


76
PRECAUTIONS AND GENERAL SUGGESTIONS PAGE
80
TABLE OF CONTENTS
DESCRIPTION OF THE HOB PAGE
77
BEFORE USING THE HOB PAGE
79
HOW TO USE THE HOB PAGE
82
COOKING HINTS PAGE
85
ENERGY SAVING HINTS PAGE
86
CLEANING AND MAINTENANCE PAGE
87
AFTER-SALES SERVICE PAGE
88
INSTALLATION PAGE
89
ELECTRICAL CONNECTION PAGE
99
To get full satisfaction from your glass ceramic hob, please read carefully your
instruction manual and keep it at hand for ready reference.

77
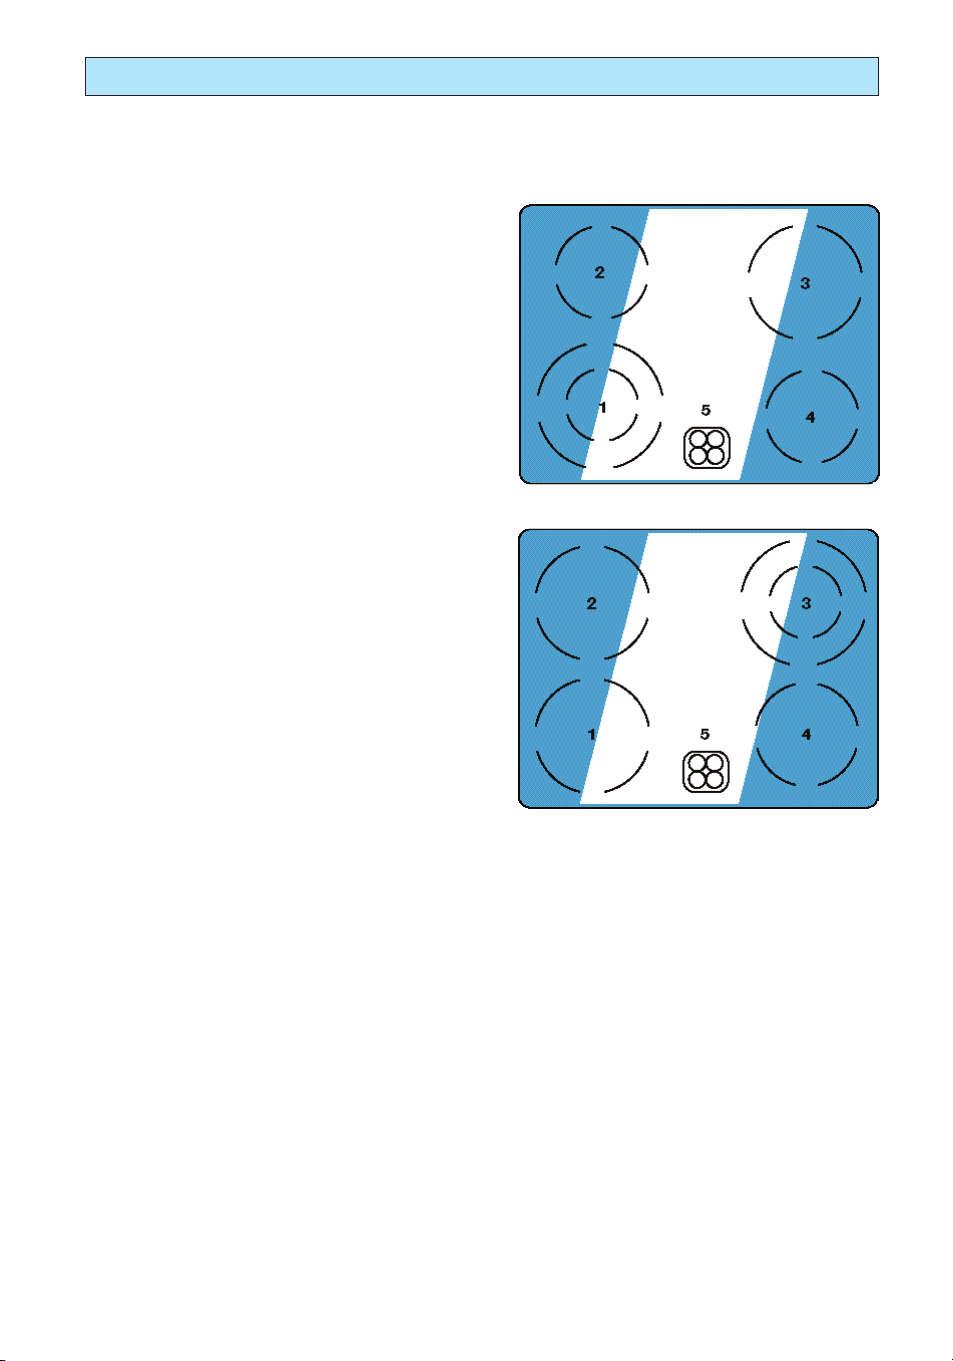
DESCRIPTION OF THE HOB
GLASS CERAMIC HOB WITH
FRAME
KU 947-1
1. Quick Star heater ø 180 mm, 1800W - 400V
2. Quick Star heater ø 180 mm, 1800W - 400V
3. Double radiant heater ø 210/120 mm,
2100/700W - 400V
4. Radiant heater ø 145 mm, 1200W - 400V
5. Pilot lamps for residual heat indication
EKA 3482-1 li
1. Double radiant heater 210/120 mm,
2100/700W - 400V
2. Double oval radiant heater ø 145/250 mm,
1800/1000W - 400V
3. Quick Star heater ø 145 mm, 1200W - 400V
4. Quick Star heater ø 180 mm, 1800W - 400V
5. Pilot lamps for residual heat indication
6. Left warming zone 120W
7. Touch control for warming zone”ON/OFF”
EKA 3482-1 re
1. Double radiant heater ø 210/120 mm,
2100/700W - 400V
2. Double oval radiant heater 145/250 mm,
1800/1000W - 400V
3. Quick Star heater ø 145 mm, 1200W - 400V
4. Quick Star heater ø 180 mm, 1800W - 400V
5. Pilot lamps for residual heat indication
6. Right warming zone 120W
7. Touch control for warming zone “ON/OFF”
78
GLASS CERAMIC HOBS WITHOUT
FRAME
EKI 3482-1 / EKB 3482/2481
1. Double radiant heater ø 210/120 mm,
2100/700W - 400V
2. Radiant heater ø 145 mm, 1200W - 400V
3. Quick Star heater ø 180 mm, 1700W - 400V
4. Quick Star heater ø 145 mm, 1200W - 400V
5. Pilot lamps for residual heat indication
KI 947-1
1. Quick Star heater ø 180 mm, 1800W - 400V
2. Quick Star heater ø 180 mm, 1800W - 400V
3. Double radiant heater ø 210/120 mm,
2100/700W - 400V
4. Radiant heater ø 145 mm, 1200W - 400V
5. Pilot lamps for residual heat indication
DESCRIPTION OF THE HOB

79
1. Packaging (plastic bags, polystyrene parts,
etc.) must be stored out of reach of children
as they are potentially dangerous.
2. The packing material is recyclable and is
marked with the recycling symbol .
3. Check that the hob is not damaged, broken
or cracked.
4. Please ensure that the installation and the
electrical connection have been carried out
by a qualified technician, following the
manufacturer’s instruction and in
compliance with local safety regulations.
5. Prior to discarding an old appliance,
disconnect it electrically and render it
inoperable.
BEFORE USING THE HOB

80
Warning: electrical shock hazard
1. Before any maintenance operation,
disconnect the electricity leading to the hob
at the main power supply. Failure to do so
could result in electrical shock or injury.
2. If the hob is cracked, do not operate it but
switch off electricity at the main supply and
then, contact the After-Sales Service.
3. The glass ceramic hob has a good
mechanical strenght and can withstand
small accidents, misuse, however, if some
objects should fall on the surface and
damage it, please do not use the hob but
disconnect it from the main supply and
contact the nearest Service Centre.
4. Do not use the glass ceramic hob as a
working surface.
5. Do not use plastic utensils or aluminium foil
container to cook food on the glass ceramic
hob.
6. Do not use pans with wet bases.
7. When the hob is in use the surface of the
cooking zone is very hot; keep children
away from it.
8. As overheated fats and oils can easily ignite,
do not leave frying food unattended.
9. Do not operate the cooking zones without
anything on them.
PRECAUTIONS AND GENERAL SUGGESTIONS

81
10. Do not let electric wires (i.e.: of small
household appliances) to come into
contact with hot parts of the hob.
11. Do not forget synthetic clothes, plastic
utensils or any other material which could
ignite on the hob.
12. Take care not to scratch the surface of the
hob with the bottom of pans.
13. For best cooking results, we recommend
the use of stainless steel pans with flat
bases.
The diameter of the base must be the same
or slightly greater than that of the cooking
zone.
14. Never sprinkle sugar or sweetened food
such as jam, jellies and juices on the hob.
Should it happen, please clean immediately
the hob thoroughly following the cleaning
instructions.
PRECAUTIONS AND GENERAL SUGGESTIONS

82
The cooking zones are circumscribed and visible on the hob surface. The cooking zones are
controlled by knobs marked 0 to 12 or 10, situated on your oven. Every number on the
knob corresponds to a specific temperature of
the cooking zone.
The four pilot lamps indicating residual heat
are located at the front of the hob between
the two front cooking zones. The location of
each pilot lamp corresponds to the zone it represents. A pilot lamp will remain lit as long as
its cooking zone is hot, turning OFF only when
the cooking zone is sufficiently cool.
You will find informations on the layout and
use of the controls in the Operating
Instructions booklet contained in the respective
oven or control panel.
HOW TO USE THE HOB

83
DUO COOKING ZONE
The second area of both duo cooking zone can
be switched ON by turning the correspondent
knob to the right, rotating it at the far end (beyond the position 12 or 10). Then you can
choose the desired position.
HOW TO USE THE HOB
 Loading...