

Whirlpool ED20TWXDW02, ED20ZKXDN01, ED20ZKXDW01, ED22PQXDN02, ED22PQXDW02 Use & Care Manual
...
PART NO. 2189606
\a45
TimeSmart’”
Tips‘ I
de!
Use&Care
A Note to You . . . . . . . . . . . . 2
Refrigerator Safety.... 3
Parts and Features . . .
4
Installing Your
Refrigerator . . . . . . . . . . . . . . . 7
Using Your
Refrigerator . . . . . . . . . . . . . 12
Caring for Your
Refrigerator . . . . . . . . . . . . . 24
Food Storage
Guide . . . . . . . . . . . . . . . . . . . . . . 27
‘-tof,;t;~~shoo[ing
C-T, 4!J I il; p
RT
. . . . . . . . . . . . . . . . . . . . . .
id
Requesting
Assistance
or Service . . . . . . . . . . . . . . . . 36
Index . . . . . . . . . . . . . . . . . . . . . . .
37
W&ranty . . . . . . . . . . . . . . . . . 40
I=
-2534301
Call our Consumer Assistance
Center anytime with
questions or comments.
ANOIETOYOU
Thank you for buying a
WHlRiPOOt ~~ applkme.
Because your life is getting busier and more complicated, WHIRLPOOL refrigerators are easy to use, save
time, and help you manage your home better. To
ensure that you enjoy years of trouble-free operation,
we developed this Use and Care Guide. It is full of
valuable information about how to operate and
maintain your appliance properly and safely. Please
read it carefully.
Also, please complete and mall the Product
Registration Card provided with your appliance.
The card helps us notify you about any new
information for your appliance.
record your model’s information
Write down the following information about your refrigerator to better help you obtain assistance or service if
you ever need it. You will need to know your complete model number and serial number. You can find this
information on the model and serial number plate.
Dealer name Model number
Address Serial number
Purchase date
Phone number
(See “Parts and Features” on pages 4-6 for model and serial number label location.)
I
Call us toll-free anytime with txmments trr questions
at our Consumer Assistance
Center:
Your safety is important to us.
This guide contains safety statements under a
warning symbol. This symbol alerts you
to such dangers as fire, electrical shock,
burns, and personal injury. Please pay
special attention to this symbol and
follow any instructions given.
IMPORTANTSAFETY INSTRUCTIONS
0 Read all instructions before using the refrigerator.
0 Never allow children to operate, play with, or crawl
0 Child entrapment and suffocation are not
inside the refrigerator.
problems of the past. Junked or abandoned
0 Never clean refrigerator parts with flammable fluids.
refrigerators are still dangerous . . . even if they The fumes can create a fire hazard or explosion.
will “just sit in the garage a few days.”
0 FOR YOUR SAFE-W 0
If you are getting rid of your old refrigerator, do
it safely. Please read the enclosed safety booklet
DO NOT STORE OR USE GASOLINE OR OTHER
from the Association of Home Appliance Manu-
FLAMMABLE VAPORS AND LIQUIDS IN THE
facturers. Help prevent accidents.
VICINITY OF THIS OR ANY OTHER APPLIANCE.
THE FUMES CAN CREATE A FIRE HAZARD OR
EXPLOSION.
- SAVE THESE INSTRUCTIONS -
Help us help you
Please:
0 Install and level the refrigerator on a floor that will
hold the weight and in an area suitable for its size
and use.
0 Do not install the refrigerator near an oven, radiator,
or other heat source.
0 Do not use the refrigerator in an area where the
temperature will fall below 55°F (13°C).
0 Keep the refrigerator out of the weather.
0 Connect the refrigerator only to the proper kind of
outlet, with the correct electrical supply and grounding. (See “Electrical Requirements” on page 7 or
refer to the Electrical Requirements and Grounding
Instructions Sheet in your Literature Package.)
0 Do not load the refrigerator with food before it has
time to get properly cool. (See “Setting the controls”
on page 12.)
0 Use the refrigerator only for the uses described in
this manual.
0 Properly maintain the refrigerator.
0 Be sure the refrigerator is not used by anyone unable
to operate it properly.
3
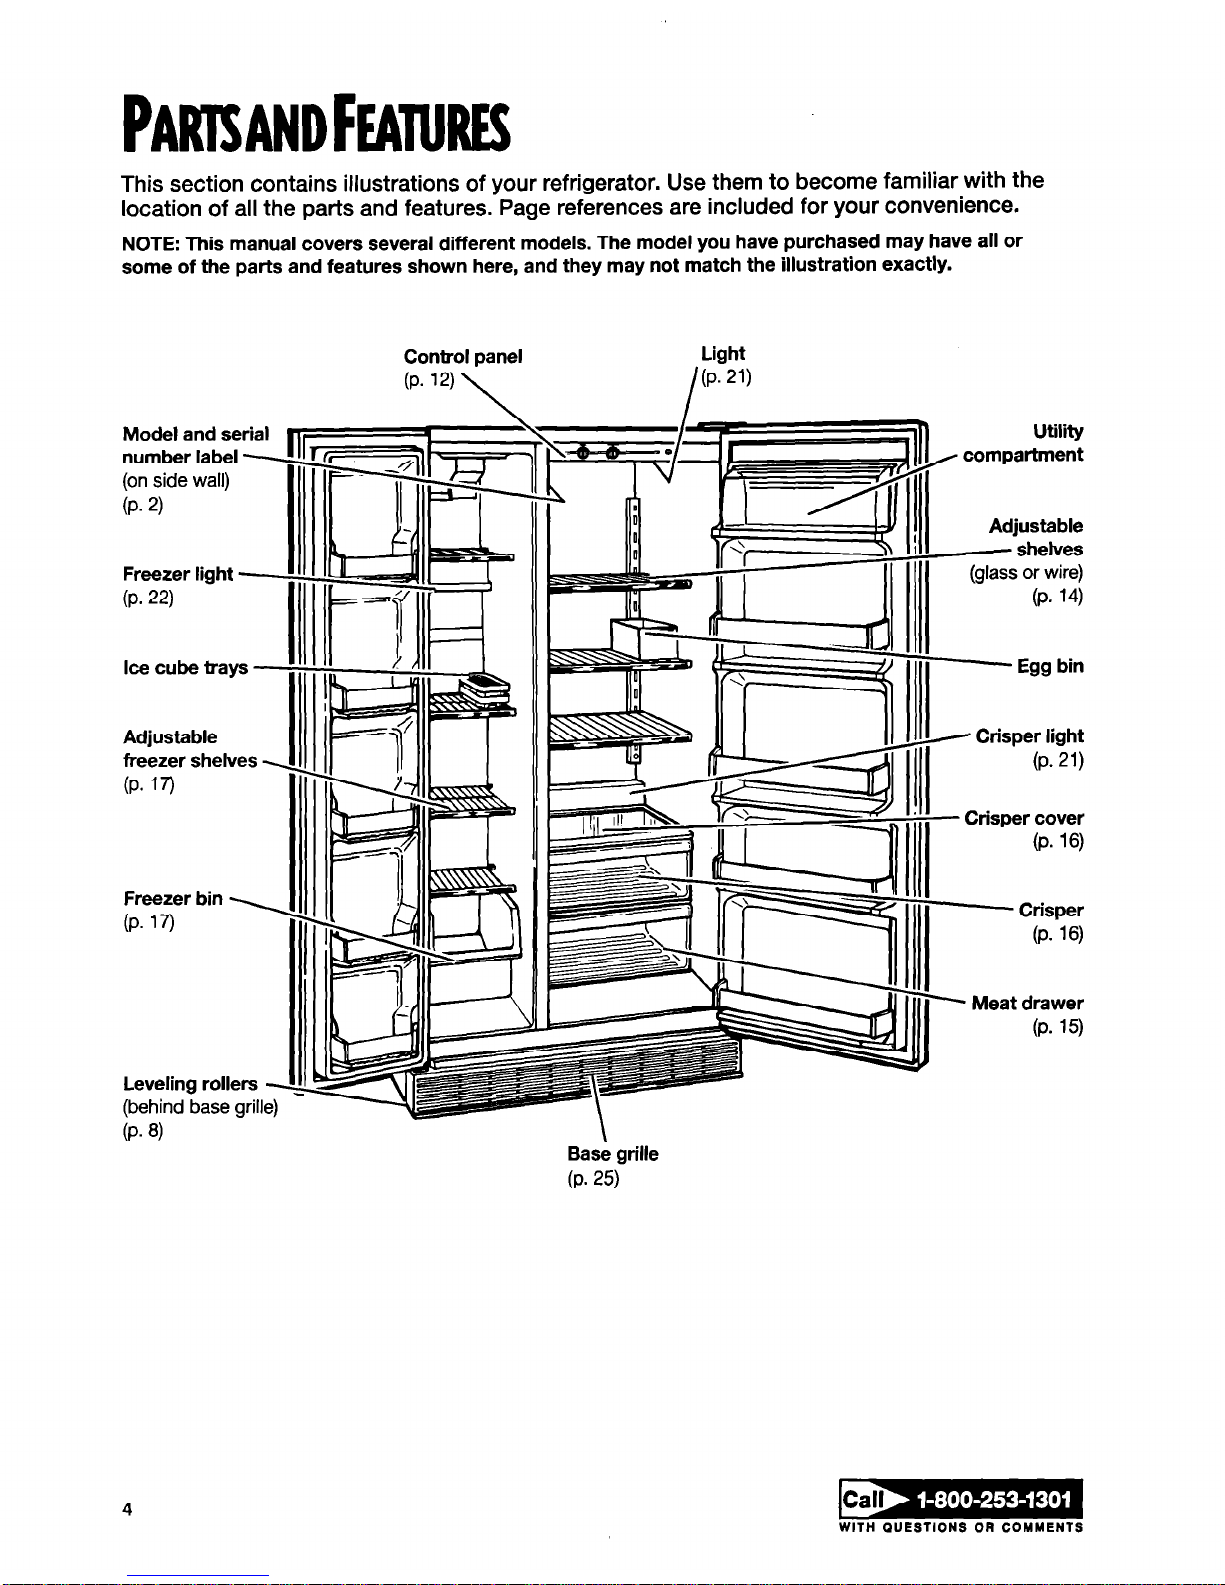
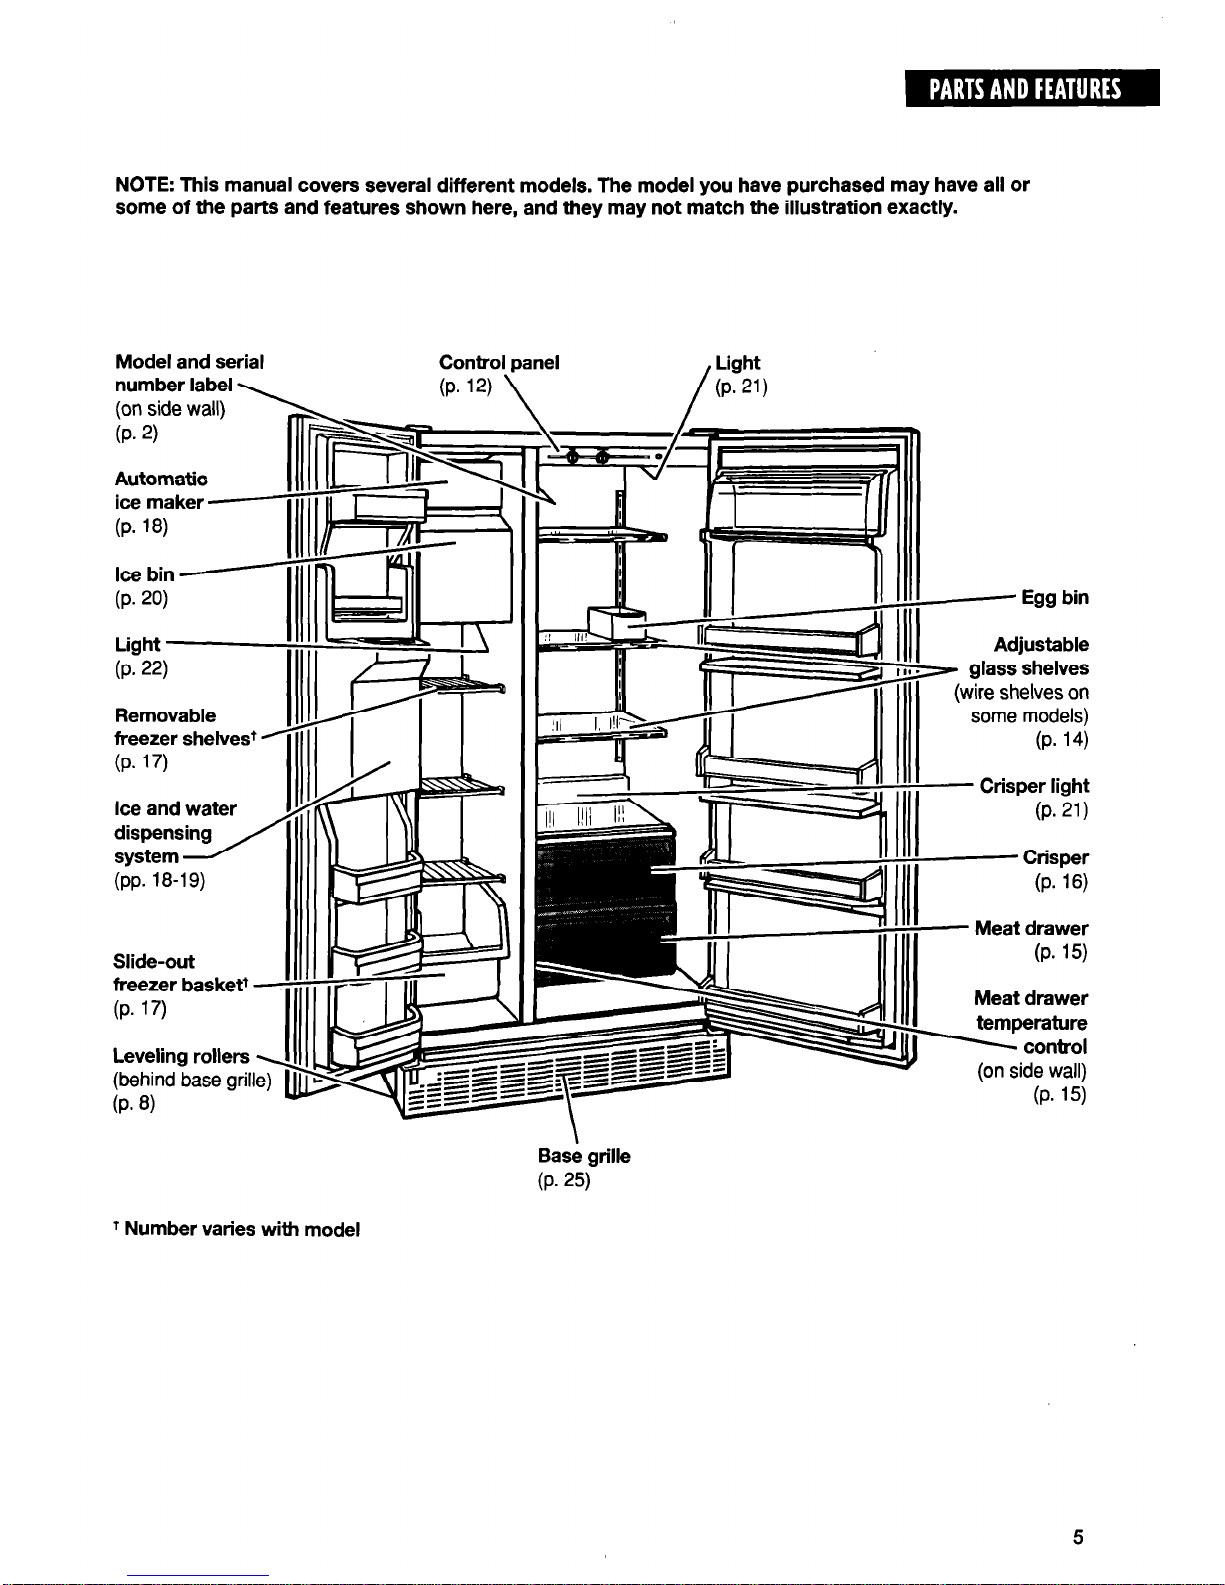
This section contains illustrations of your refrigerator. Use them to become familiar with the
location of all the parts and features. Page references are included for your convenience.
NOTE: This manual covers several different models. The model you have purchased may have all or
some of the parts and features shown here, and they may not match the illustration exactly.
Model and !
number labc
(on side wall,
(P. 2)
Freezer ligh
(P. 22)
Ice cube tra
Adjustable
freezer she1
(P. 17)
Freezer bin
(P. 17)
Leveling rol
(behind base
(P. 8)
serial
E!lJ
1
Control panel
(P- 12)
\
Light
I
(P. 21)
Yr- II
in
Utility
Base grille
(P. 25)
WITH QUESTIONS OR COMMENTS
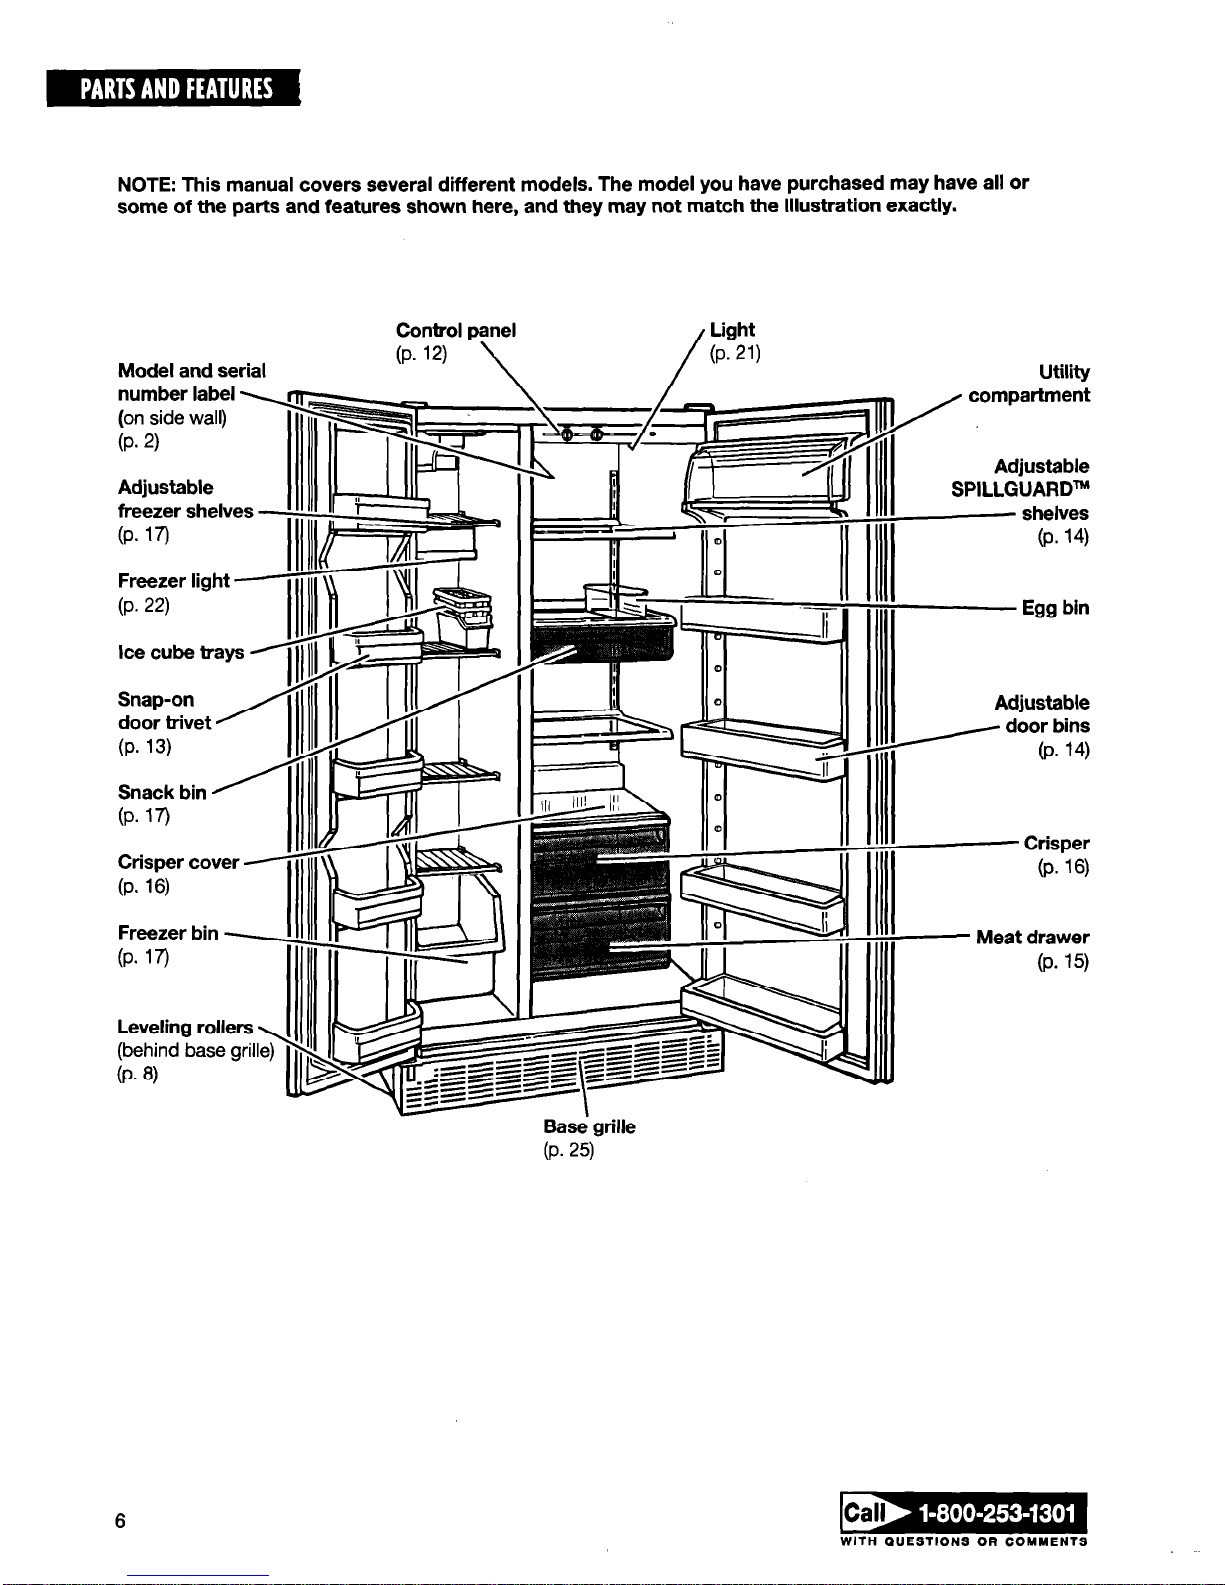
NOTE: This manual covers several different models. The model you have purchased may have all or
some of the parts and features shown here, and they may not match the illustration exactly.
Model and serial
Control panel
Removable
freezer shelves+
Ice and water
freezer basket?
. . ,
Leveling rollers
.altE
;;l$d base gnlle) b
(P- 15)
Meat drawer
Base grille
(P. 25)
t Number varies with model
5
NOTE: This manual covers several different models. The model you have purchased may have all or
some of the parts and features shown here, and they may not match the illustration exactly.
Model and serial
number label
(on side wall)
(Pa 2)
Adjustable
freezer shelw
(Pm 17)
Freezer light (P. 22)
Ice cube tray!
Snap-on
door trivet ’
(Pa 13)
Snack bin 0
(Pa 17)
Crisper cover
(P- 16)
Freezer bin (Pa 17)
Leveling roller
(behind base g
(P. 6)
Control panel
(P. 12)
\ /
Light
(P. 21)
Utility
Adjustable
Base grille
(P. 25)
6
WITH QUESTIONS OR COMMENTS
INSTALLING YOUR REFRIGERATOR
It is important to prepare your refrigerator for use. This section tells you how to clean it,
connect it to a power source, install it, and level it.
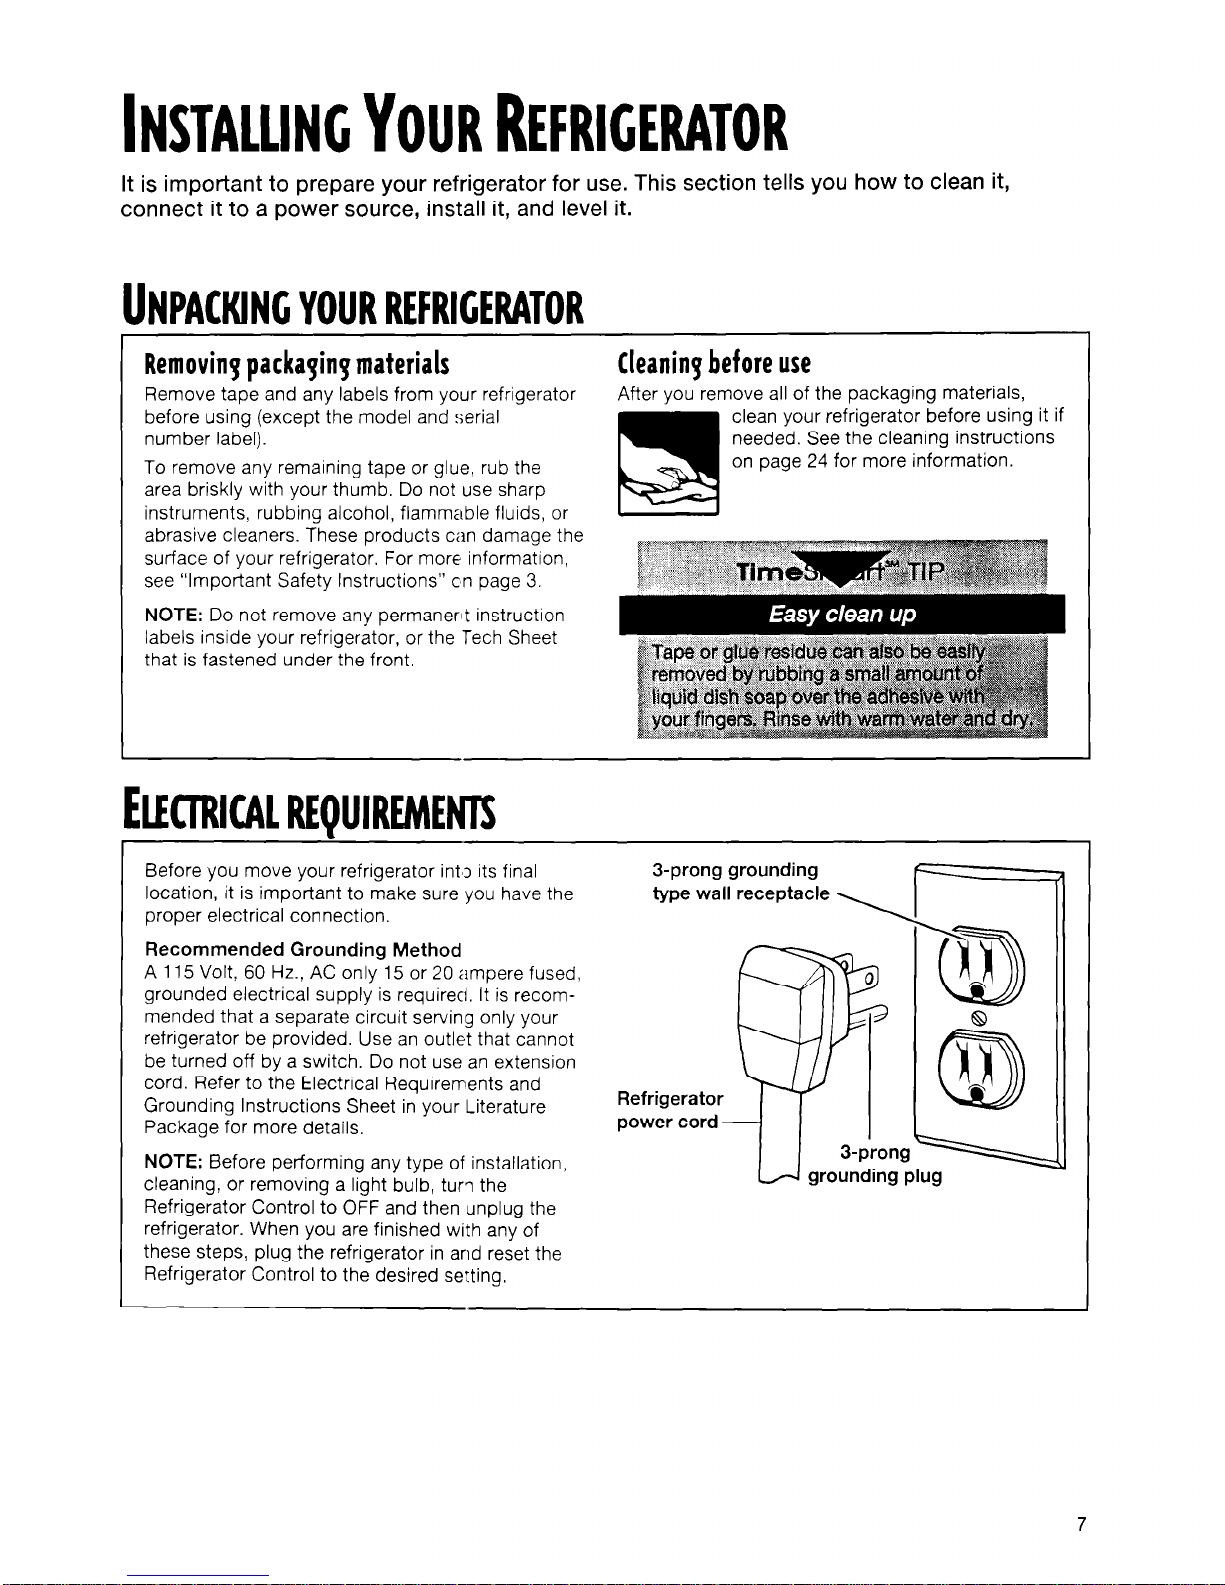
Removing packaging materials
cleaning before use
Remove tape and any labels from your refrigerator
After you remove all of the packaging materials,
before using (except the model and serial
clean your refrigerator before using it if
number label).
needed. See the cleaning instructions
To remove any remaining tape or glue, rub the
on page 24 for more information.
area briskly with your thumb. Do not use sharp
instruments, rubbinq alcohol, flammable fluids, or
UNPACKING
YOUR REFRIGERATOR
abrasive cleaners. These products can damage the
surface of your refrigerator. For more information,
see “Important Safety Instructions” cn page 3.
NOTE: Do not remove any permanerit instruction
labels inside your refrigerator, or the Tech Sheet
that is tastened under the front.
Recommended Grounding Method
A 115 Volt, 60 Hz., AC only 15 or 20 ampere fused,
grounded electrical supply is required. It is recommended that a separate circuit serving only your
refrigerator be provided. Use an outlet that cannot
be turned off by a switch. Do not use an extension
cord. Refer to the Electrical Requirements and
Grounding Instructions Sheet in your Literature
Package for more details.
NOTE: Before performing any type of installation,
cleaning, or removing a light bulb, turi the
Refrigerator Control to OFF and then unplug the
refrigerator. When you are finished with any of
these steps, plug the refrigerator in and reset the
Refrigerator Control to the desired se:ting.
Before you move your refrigerator int#I its final
location, it is important to make sure you have the
proper electrical connection.
EIHTRKA~
REQUIREMENTS
3-prong grounding
type wall receptacle
7
SPACE REQUIREMENTS
--__
_._.__ .^._ ..--_-.
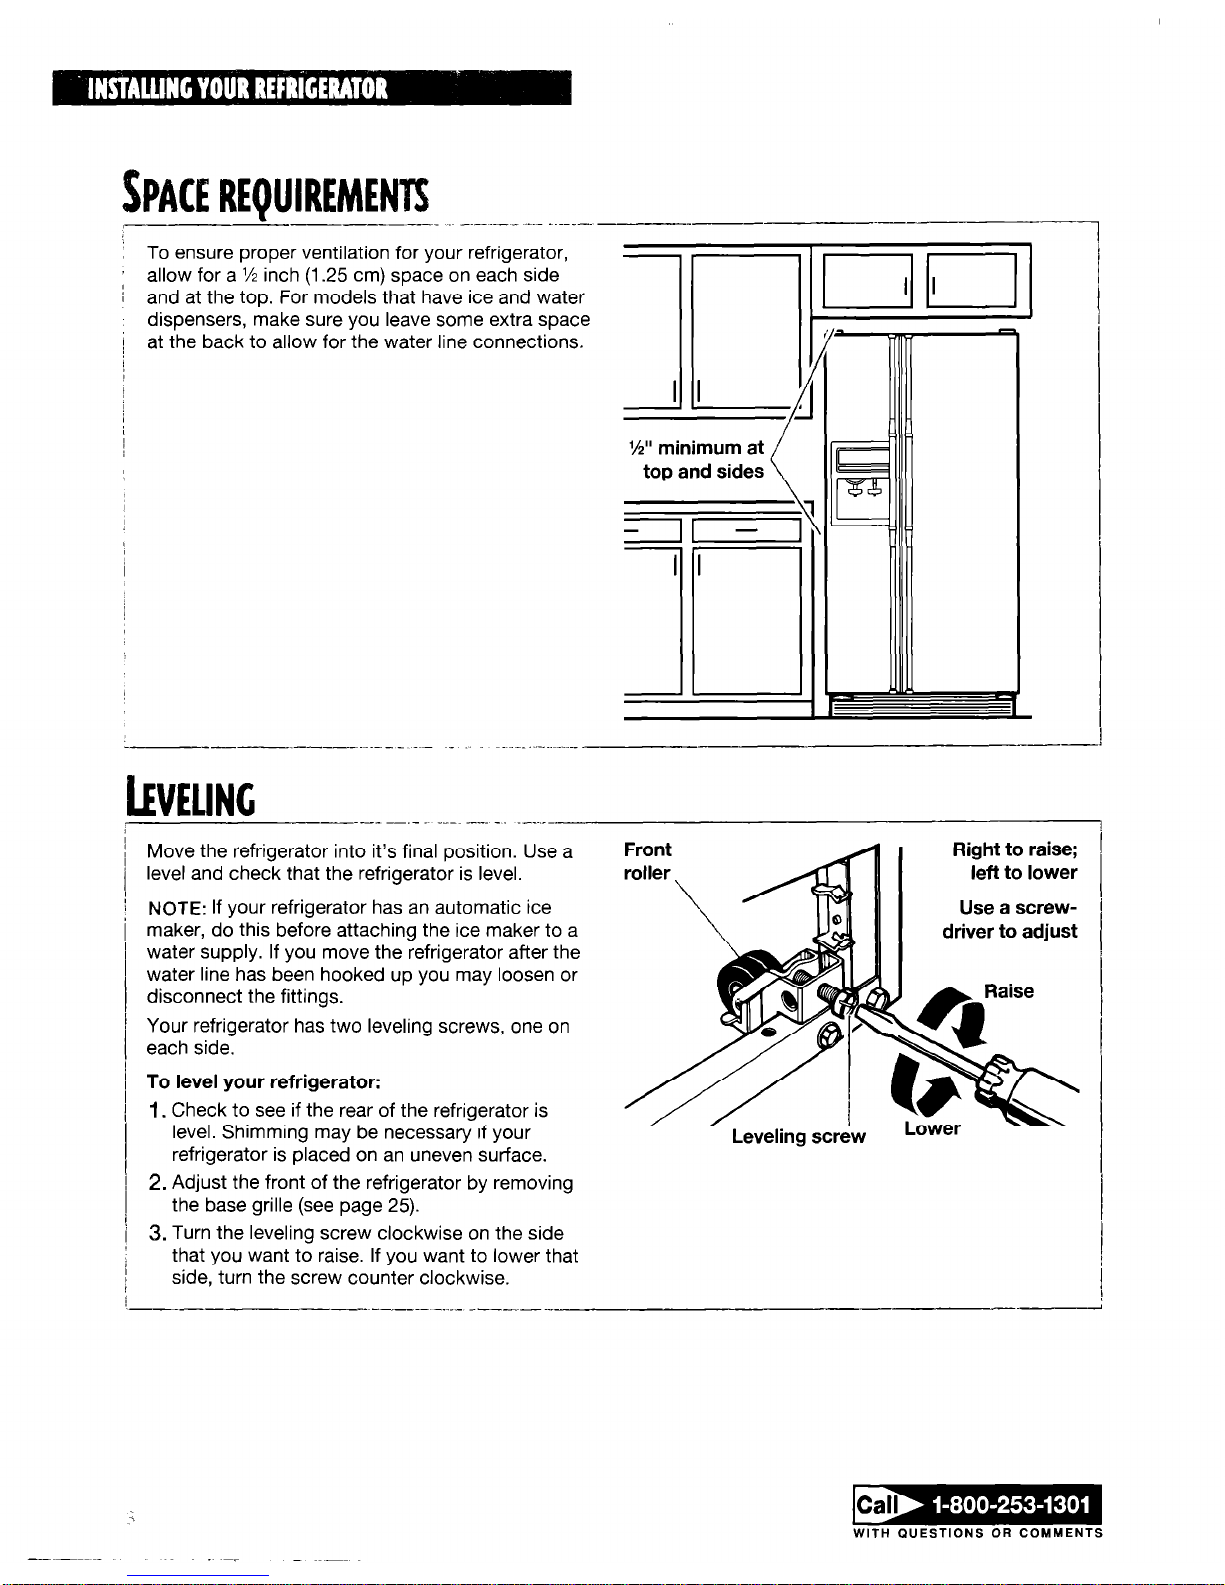
To ensure proper ventilation for your refrigerator,
’ I allow for a M inch (1.25 cm) space on each side
; and at the top. For models that have ice and water
dispensers, make sure you leave some extra space
) at the back to allow for the water line connections.
I
Y2” minimum at
1
-
/
g
I
-
-
I
_-____ I ___. -.-_ _--
_ _....... _._
_
---
LEVELING
--_.-^ -_-. _--~ _--. -. .,__.._ -.__
,
I-
I
_/
Move the refrigerator into it’s final position. Use a
level and check that the refrigerator is level.
NOTE: If your refrigerator has an automatic ice
maker, do this before attaching the ice maker to a
water supply. If you move the refrigerator after the
water line has been hooked up you may loosen or
disconnect the fittings.
left to lower
Use a screw-
driver to adjust
Your refrigerator has two leveling screws, one on
each side.
To level your refrigerator:
1.
Check to see if the rear of the refrigerator is
level. Shimming may be necessary if your
refrigerator is placed on an uneven surface.
Leveling screw
2. Adjust the front of the refrigerator by removing
the base grille (see page 25).
3.
Turn the leveling screw clockwise on the side
that you want to raise. If you want to lower that
side, turn the screw counter clockwise.
--.-
--_I ----- -_._- ----...
~-
WITH QUESTIONS OR COMMENTS
hlNC (CONT.1
4. Make sure that the doors are even. If the freezer
6. If you are not hooking up an ice maker, connect
door is lower than the fresh food door, turn the
the refrigerator to the electrical supply after
leveling screw on the freezer side clockwise. If
leveling, and then see page 12.
the fresh food door is lower, turn the leveling
screw on that side clockwise.
5. Replace the base grille.
- ---
ATTACHING
THE ICE MAKER TO A WATER
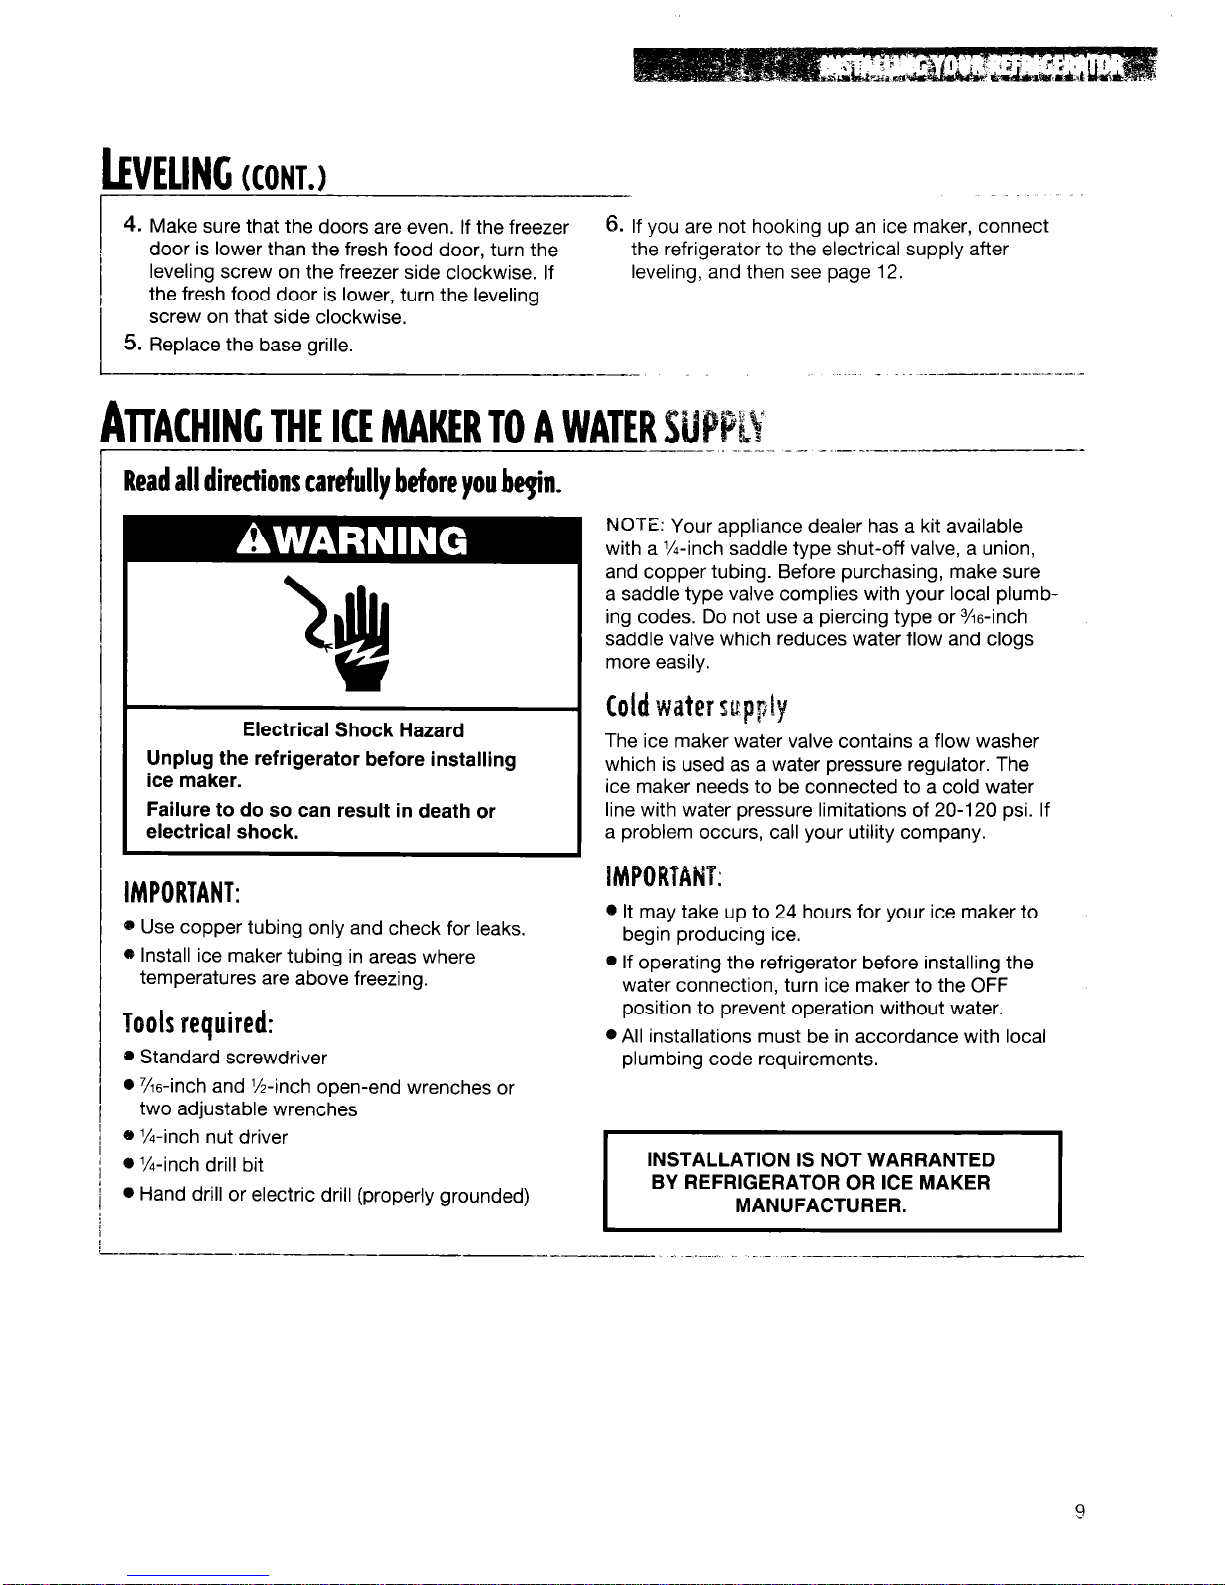
Read all directions carefully before you be@.
Electrical Shock Hazard
Unplug the refrigerator before installing
ice maker.
Failure to do so can result in death or
electrical shock.
IMPORTANT:
e Use copper tubing only and check for leaks.
@ Install ice maker tubing in areas where
temperatures are above freezing.
Tools required:
0 Standard screwdriver
0 7/16-inch and M-inch open-end wrenches or
two adjustable wrenches
8 X-inch nut driver
l
N-inch drill bit
l
Hand drill or electric drill (properly grounded)
NOTE: Your appliance dealer has a kit available
with a %-inch saddle type shut-off valve, a union,
and copper tubing. Before purchasing, make sure
a saddle type valve complies with your local plumbing codes. Do not use a piercing type or G-inch
saddle valve which reduces water flow and clogs
more easily.
Cold water supply
The ice maker water valve contains a flow washer
which is used as a water pressure regulator. The
ice maker needs to be connected to a cold water
line with water pressure limitations of 20-120 psi. If
a problem occurs, call your utility company.
1MPORTANT:
* It may take up to 24 hours for your ice maker to
begin producing ice.
@ If operating the refrigerator before installing the
water connection, turn ice maker to the OFF
position to prevent operation without water.
l
All installations must be in accordance with local
plumbing code requirements.
INSTALLATION IS NOT WARRANTED
BY REFRIGERATOR OR ICE MAKER
MANUFACTURER.
ATCACHING
ME ICE MAKERTO A WAITR SUPPLY
(CONT.)
Connecting to water line
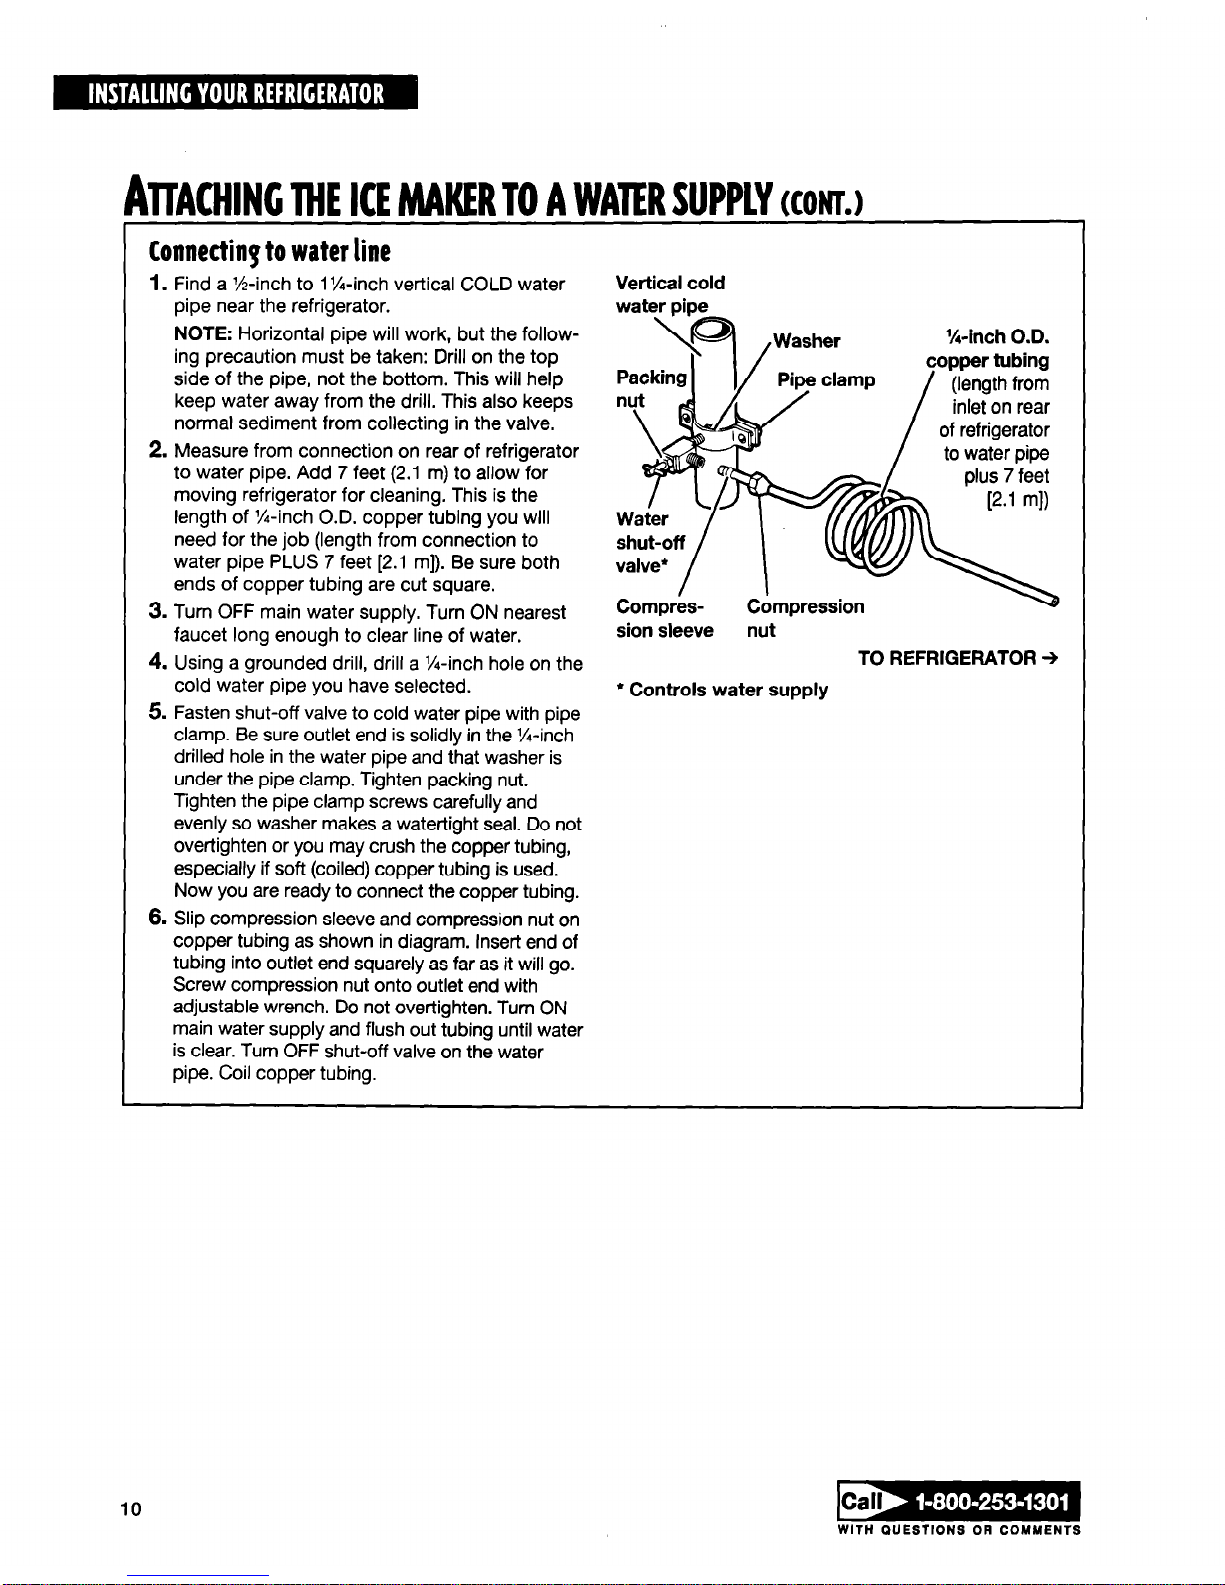
1.
Find a M-inch to 1 %-inch vertical COLD water
Vertical cold
pipe near the refrigerator.
water pipe
NOTE: Horizontal pipe will work, but the follow-
X-inch O.D.
ing precaution must be taken: Drill on the top
side of the pipe, not the bottom. This will help
keep water away from the drill. This also keeps
n
normal sediment from collecting in the valve.
2. Measure from connection on rear of refrigerator
to water pipe. Add 7 feet (2.1 m) to allow for
moving refrigerator for cleaning. This is the
length of %-inch O.D. copper tubing you will
need for the job (length from connection to
water pipe PLUS 7 feet [2.1 ml). Be sure both
ends of copper tubing are cut square.
3. Turn OFF main water supply. Turn ON nearest
faucet long enough to clear line of water.
sion sleeve nut
4. Using a grounded drill, drill a %-inch hole on the
TO REFRIGERATOR +
cold water pipe you have selected.
* Controls water supply
5. Fasten shut-off valve to cold water pipe with pipe
clamp. Be sure outlet end is solidly in the X-inch
drilled hole in the water pipe and that washer is
under the pipe clamp. Tighten packing nut.
Tighten the pipe clamp screws carefully and
evenly so washer makes a watertight seal. Do not
over-tighten or you may crush the copper tubing,
especially if soft (coiled) copper tubing is used.
Now you are ready to connect the copper tubing.
6.
Slip compression sleeve and compression nut on
copper tubing as shown in diagram. Insert end of
tubing into outlet end squarely as far as it will go.
Screw compression nut onto outlet end with
adjustable wrench. Do not overtighten. Turn ON
main water supply and flush out tubing until water
is clear. Turn OFF shut-off valve on the water
pipe. Coil copper tubing.
10
WITH OUESTIONS OR COMMENTS
ATTACHING
ME ICE MAKER TO A WATER SUPPLY
KONL)
--~~~~--~~~- B-w- WR -s------ - -
__ --- ---- - --- - -- __- -.---
Connecting to refrigerator
NOTE: The first step for connecting the water line to
your refrigerator is different depending on the type
of water valve provided with your refrigerator. See
the diagrams at right to determine the style of valve
you have. (On kit models, assemble water valve to
refrigerator per kit instructions.)
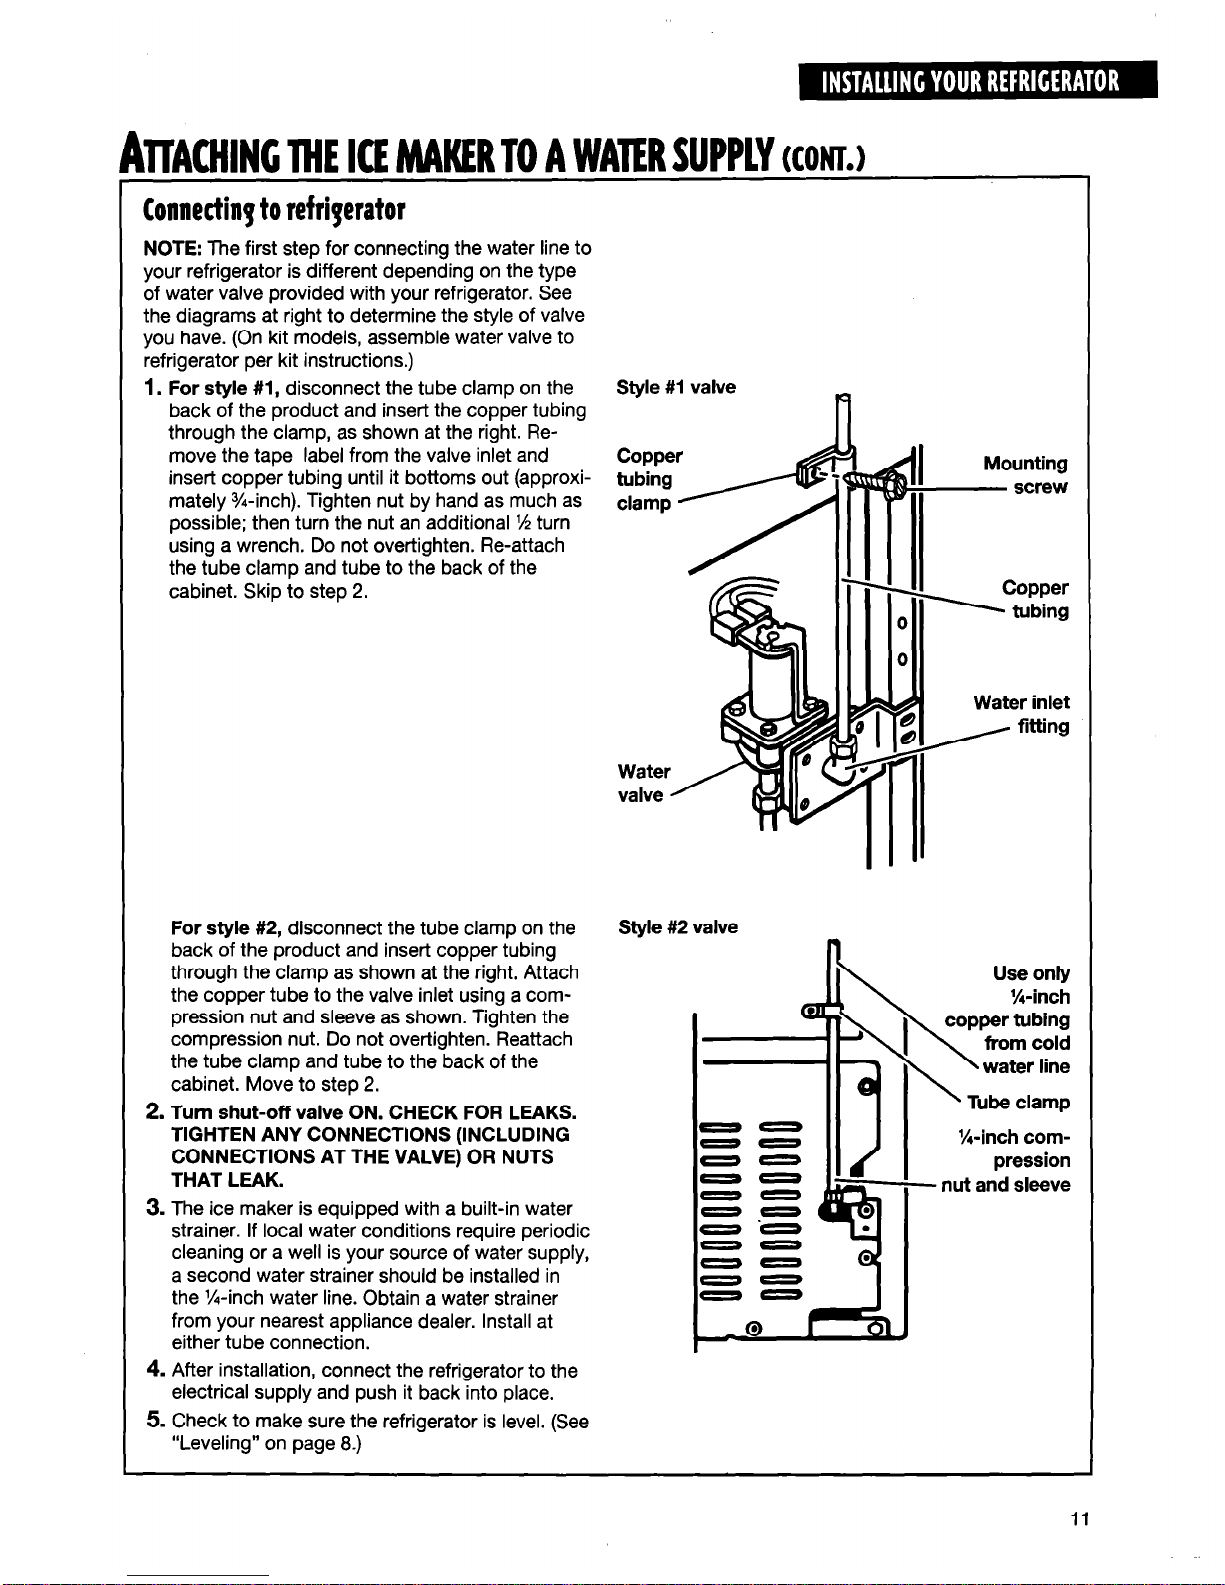
1.
For style #l, disconnect the tube clamp on the
Style #I valve
back of the product and insert the copper tubing
through the clamp, as shown at the right. Remove the tape label from the valve inlet and
insert copper tubing until it bottoms out (approximately %-inch). Tighten nut by hand as much as
possible; then turn the nut an additional l/i turn
using a wrench. Do not overtighten. Re-attach
the tube clamp and tube to the back of the
cabinet. Skip to step 2.
Water inlet
For style #2, disconnect the tube clamp on the
back of the product and insert copper tubing
through the clamp as shown at the right. Attach
the copper tube to the valve inlet using a compression nut and sleeve as shown. Tighten the
compression nut. Do not overtighten. Reattach
the tube clamp and tube to the back of the
cabinet. Move to step 2.
Style #2 valve
2. Turn shut-off valve ON. CHECK FOR LEAKS.
TIGHTEN ANY CONNECTIONS (INCLUDING
00
CONNECTIONS AT THE VALVE) OR NUTS
00
00
THAT LEAK.
00
3. The ice maker is equipped with a built-in water
00
00
strainer. If local water conditions require periodic
cleaning or a well is your source of water supply,
-0
a second water strainer should be installed in
00
00
the %-inch water line. Obtain a water strainer
00
from your nearest appliance dealer. Install at
either tube connection.
4. After installation, connect the refrigerator to the
electrical supply and push it back into place.
5. Check to make sure the refrigerator is level. (See
“Leveling” on page 8.)
Use only
X-inch
copper tubing
\
from cold
\
water line
Tube clamp
X-inch com-
pression
- nut and sleeve
USING YOUR REFRICERAT~R
To obtain the best possible results from your refrigerator, it is iImportant that you operate it
properly. This section tells you how to set the controls, remove and adjust the features in your
refrigerator, and how to save energy.
SEITING THE CONTROLS
When you first install your refrigerator, set the
IMPORTANT: If you add food before the refrigerator
Refrigerator Control at 3 and the Freezer Control
has cooled completely, your food may spoil. Turning
at B. Give your refrigerator time to cool down
the Refrigerator and Freezer controls to a higher than
completely before adding food. It is best to wait
recommended setting will not cool the compart-
24 hours before adding food.
ments any faster.
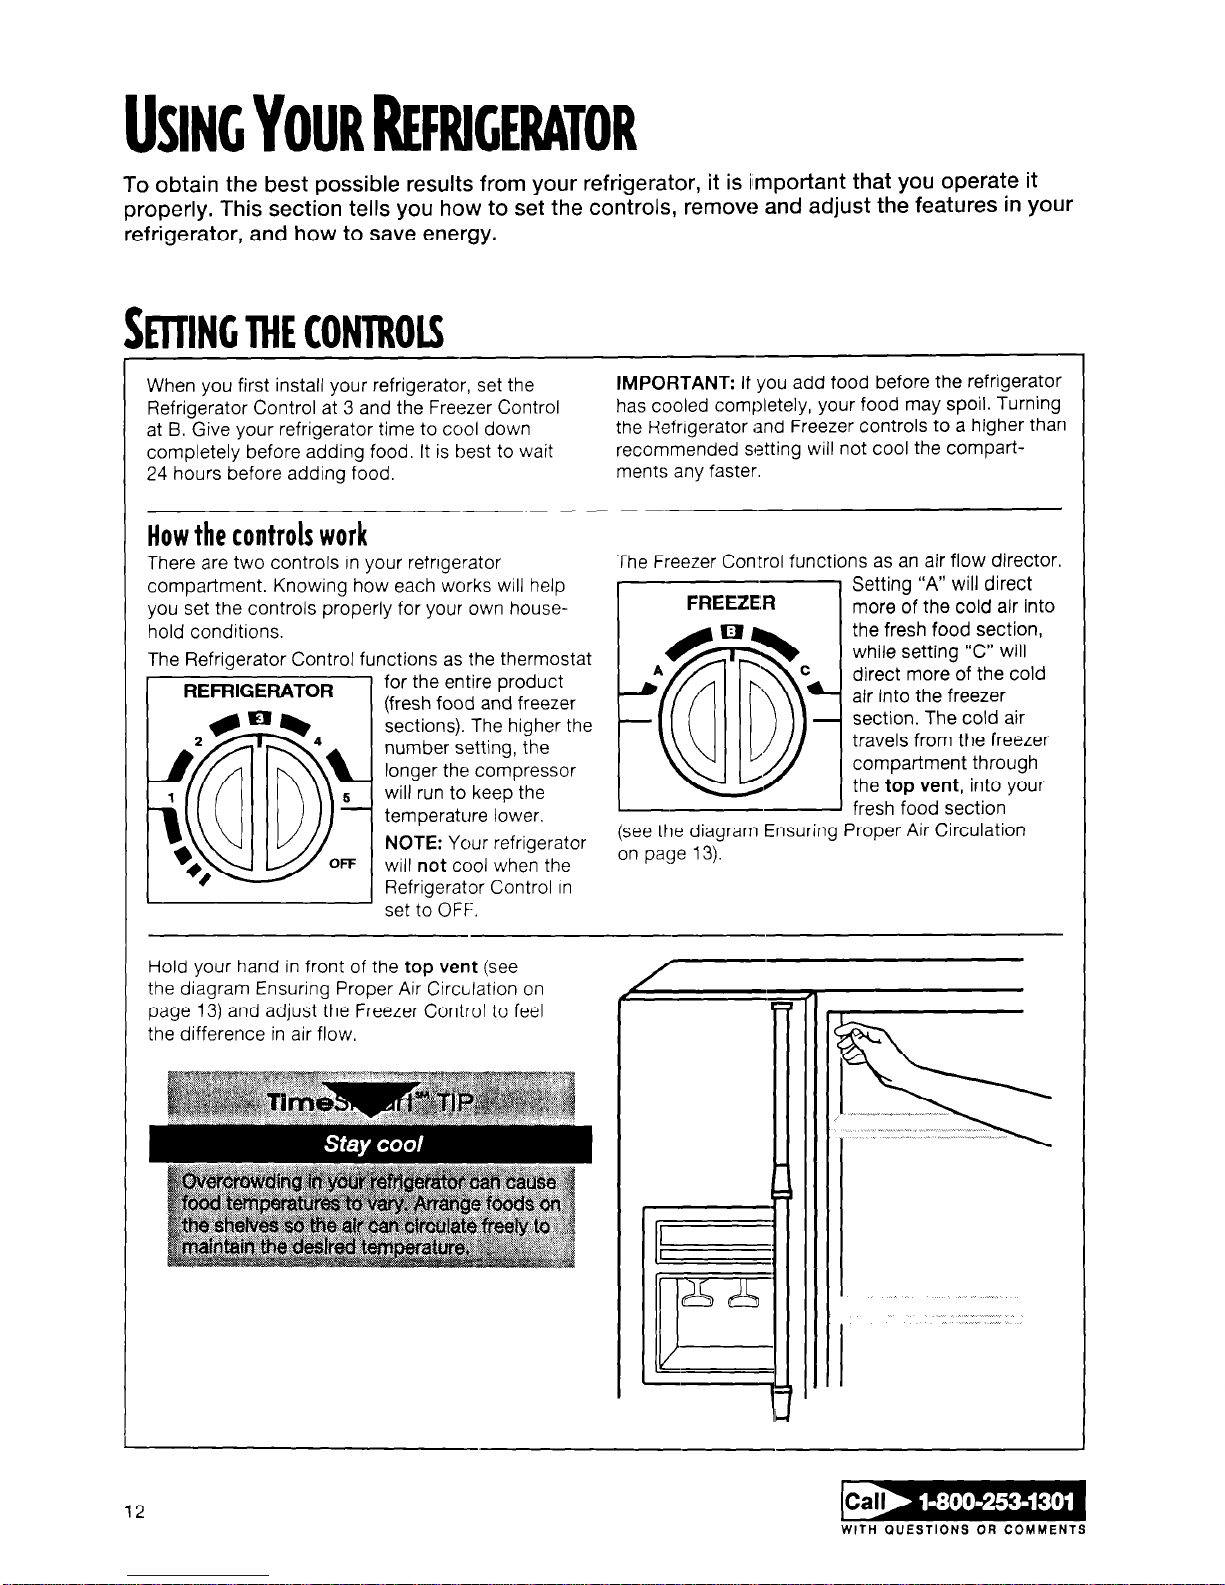
How the controls work
There are two controls in your refngerator
The Freezer Control functions as an air flow director
compartment. Knowing how each works will help
Setting “A” will direct
you set the controls properly for your own house-
more
of the cold
air into
hold conditions.
the fresh food section,
The Refrigerator Control functions as the thermostat
while setting “C” will
for the entire product
direct more of the cold
REFRIGERATOR
(fresh food and freezer
air into the freezer
sections). The higher the
section. The cold air
number setting, the
travels from the freezer
longer the compressor
compartment through
will run to keep the
the
top vent,
into your
temperature lower.
fresh food section
NOTE: Your refrigerator
(see the diagram Ensuring Proper Air Circulation
will
not
cool when the
on pacge 13).
Refrigerator Control In
set to OFF.
Hold your hand in front of the
top vent (see
the diagram Ensuring Proper Air Circulation on
page 13) and adjust the Freezer Control to feel
the difference in air flow.
a
t-
II___
r]
“”
I-4
12
WITH QUESTIONS OR COMMENTS

ENSURING
PROPER AIR CIRCULATION
In order to ensure proper temperatures, you need
to permit air flow between the two sections. As
shown in the illustration, cold air enters the bottom
of the freezer section (A) and moves up. It then
enters the fresh food section through the top vent
(B). Air returns to the freezer through the vent at (D).
Do not block any of these vents with food such
as soda, cereal, bread, etc. If the vents are
blocked, air flow will be prevented and the temperature controls will not function properly.
To adjust the air control vent C, see “Adjusting the
Meat Drawer Temperature” on page 15.
IMPORTANT: Because air circulates between both
sections, any odors formed in one section will
transfer to the other. You must thoroughly clean
both sections to eliminate odors. To prevent odor
transfer from food, wrap or cover foods tightly.
-.---
-I----”
--m-v----
--------I-----B-B
---------
---------
kMOVINC lliE SNAP-ON DOOR TRIVET
(ON SOME MODELS)
The door trivets may be removed for easier clean-
To replace the trivet, line up the ends of the trivet
ing. To remove the
trivet, first remove all
items from the shelf.
Then push in slightly
and pull out on each
side of the inside tab
and lift the trivet
straight out.
with the buttons on the
sides of the door liner.
Push the trivet straight
back until it snaps into
place.
13

REMOVING ME DOOR TRIM ABOVE DISPENSER AREA
(ON SOME MODELS)
The trim above the dispenser area may be easily
To replace the trim, line up each end of the trim
removed for convenient
above the trim pocket
cleaning. To remove
opening in the door liner
the trim piece, first
wall. Then push the trim
remove all items from
straight down on both
the shelf. Then simply
sides until it stops.
pull straight up on each
end of the trim piece.
ADJUSTING
THE DOOR BINS
(ON SOME MODELS)
The door bins iare removable for easy cleaning and
adjusting. To remove
the bin, simply lift the
bin up and pull straight
out. To replace the bin,
slide it in above the
desired support button
and oush down until
~DJUSTINC ME CANTILEVER REFRIGERATOR SHELVES
(ON SOME MODELS)
The shelves in ‘your refrigerator are adjustable to
match the way you use them. Glass shelves are
strong enough to hold bottles, milk, and other
heavy food items.
To remove a shelf, first remove all items from the
shelf. Then tilt up the front of the shelf and lift it at
the back. Pull the shelf straight out.
To replace a shelf, guide the rear shelf hooks into
the slots of the shelf supports on the back liner of
the refrigerator. Tilt the front of the shelf up until the
rear hooks drop into the slots and then lower the
front of the shelf into position.
14
WITH QUESTIONS OR COMMENTS

To remove the meat drawer:
0 Slide the meat drawer straight out to the stop.
0 Lift the front slightly and slide it out the rest of
the way.
0 Replace in the reverse order.
To remove the cover:
0 Remove the meat drawer and the crisper.
0 Lift the front of the cover off of the supports and
remove it by pulling up and out.
To replace the cover:
0 Fit the back of the cover into the notch
supports on the walls of the refrigerator and
lower it into place.
0 Replace the meat drawer and crisper.
REMOVING THE MEAT DRAWER AND COVER
ADIUSTINC
ME MEAT DRAWER IEMPERATURE
(ON SOME MODELS)
The meat drawer is cooled from cold air that flows
To adjust the temperature, slide the control from
’ in from the freezer side to side to let more or less cold air into the meat
compartment through drawer. Set the control toward Cold for a slightly
a vent in the wall of
cooler temperature, or toward Colder for a much
the refrigerator (See
cooler temperature.
“Ensuring Proper Air
Circulation” vent C on
NOTE: Putting the control on the coldest setting
page 13.) This helps to
may cause freezing or ice crystals, depending on
keep the meat drawer
the items you have in the meat drawer.
colder than the rest of
the refrigerator for
better storage of meats.
15

I
!EM~VIM THE CRISPER AND c~lsp~ft COVER
The crisper and its cover are designed for easy
removal and cleaning.
To remove the crisper, slide it straight out to the
stop and lift the front. Then slide it out the rest of
the way.
Replace the crisper in the reverse order.
.
To remove the cover, hold it firmly with both
hands, lift the front out of the supports and pull it
up and out.
To replace the cover, fit the back of the cover into
the notch supports on the walls of the refrigerator
and lower the front into place.
16

kMOVlNC THE SNACK BIN
(ON SOME MODELS)
The snack bin provides a convenient place to store
raisins, nuts, spreads, and other small items at
normal refrigerator temperatures.
To remove the snack bin, slide the snack bin
straight out to the stop, lift the front and slide the
bin out the rest of the way.
Replace the snack bin in the reverse order.
w
stop, lift the front,
and pull again
REMOVING THE FREEZER BASKET
(PLASTIC BIN ON SOME MODELS)
The freezer basket can be used to store bags of
frozen fruits and vegetables that can slide off
freezer shelves.
For easy removal of the freezer basket, slide it out
to the stop, lift the front and slide it out the rest of
the way.
To replace the basket, position it on the slides,
making sure that the
wire stops clear the
I
front of the slides, and
slide it in all the way.
The freezer shelf is removable for easy cleaning, or
To remove the shelf, lift the shelf off of the sup-
to create more open space in the freezer cornpart-
ment for storage of large or bulk items.
REM~V~NC ME mm stw
order.
17

Read the information below to learn how to operate
your ice maker. Before you turn the ice maker on,
be sure that it is attached to a water supply. Instructions for the ice maker water supply hookup are on
pages 9-10 of this manual.
0 The ON/OFF lever is a wire signal arm. Push the
arm down to start making ice automatically, and
push it up to shut off the ice maker.
0 It is normal for the ice to be attached at the
corners. It will break apart easily.
0 The ice maker will not operate until the freezer is
cold enough to make ice. This can take as long as
overnight.
0 If ice is not being made fast enough and more ice
is needed, turn the Refrigerator Control toward a
higher number in half number steps. (For example,
if the control is at 3, move it to between 3 and 4.)
Wait 24 hours and, if necessary, gradually turn
the Freezer Control toward C, waiting 24 hours in
between each increase.
REMEMBER:
0 The quality of your ice will be only as good as the
quality of the water supply that the ice maker is
hooked up to.
0 Avoid connecting the ice maker to a softened
water supply. Water softener chemicals (such as
salt) can damage the ice maker mold and lead to
poor quality ice. If a softened water supply
cannot be avoided, make sure the water softener
is operating properly and is well maintained.
USING
THE AUTOMAIIC ICE MAKER
ikING ME ICE AND WATlR DISPENSERS
(ON SOME MODELS)
------ ---- ---
----- --- --------- ------- _-__-------------_
The ice dispenser
The ice dispenses from the ice maker storage bin
located in the freezer. When you press the dis-
penser bar, a trapdoor opens in a chute between
the dispenser and the ice bin. The ice moves from
the bin and falls through the chute. When you
release the dispenser bar, a buzzing sound may be
heard for a few seconds as the trapdoor closes.
I
x
Cut Hazard
Use a sturdy glass when dispensing ice
or water.
Failure to do so can result in cuts.
18
WITH QUESTIONS OR COMMENTS

JSING THE ICE AND WATER DISPENSERS
(ON SOME MODELS) (CONT.)
To dispense ice:
0 Press a sturdy glass against the ice dispenser
bar. Be sure to hold the glass close to the
dispenser opening so ice does not fall outside
of the glass.
0 Remove the glass to stop dispensing.
0 If you need a large amount of ice, take it directly
from the ice bin in the freezer. Do not use the
dispenser. (See “The dispenser arm has been
held in too long on page 32.)
NOTES: The dispenser will not operate when the
freezer door is open. The first few batches of ice
may have an off-flavor due to the new plumbing
and parts. Throw this ice away.
The water dispenser
The water for the dispenser comes from a tank
behind the meat drawer. It holds approximately
1 l/2 quarts (1.5 L).
To start the water dispenser when the refrigerator
is first hooked up, press the water dispenser bar
with a glass or jar until you draw and discard two
or three quarts (1.9 to 2.8 L). It will take one to three
minutes for water to begin dispensing. This first
water that you draw and discard will fill the tank
and pipes. Allow several hours to cool a new
tankful.
NOTE: The small tray beneath the dispenser is
designed to evaporate small drips. Do not pour
water into the tray because there is no drain in it.
To dispense water, press a sturdy glass against
the water dispenser bar. Remove the glass to stop
dispensing.
REMEMBER: Dispense enough water every week
to maintain a fresh water supply in the tank.
b
b
I
1
I
I
f
I ‘I
I I
I I
19

There are several reasons why you may need to re-
move, empty, and clean the ice maker storage bin.
l
The ice dispenser has not, or will not, be used for
a week or more.
l
A power failure causes the ice in the bin to melt
and freeze together.
0 The ice dispenser is not used regularly.
l
Ice tastes off-flavored. (See Troubleshooting
guide on page 34.)
If any of these conditions apply to you, follow the
instructions on removing the ice bin.
To remove the ice bin:
1.
Pull the covering panel out from the bottom and
REM~~INC THE ICE MAKERSTOM~E BIN
2. Lift the signal arm so it clicks into the OFF (up)
1 position. Ice can still be
1 bispensed, but no
more can be made.
3. Lift up the front of the storage bin and pull it out.
4. Empty the ice bin. Use hot or warm water to
melt the ice if necessary. Never use anything
sharp to break up the ice in the bin. This can
cause damage to the bin and the dispenser
mechanism.
5. Wash with a mild detergent and rinse well. Do
not use harsh or abrasive cleaners or solvents.
When you replace the bin, make sure it is pushed
in all the way or the dispenser will not work. Then
push the signal arm down to the ON position to
restart ice production. Make sure the door is
closed tightly.
20
-
WITH QUESTIONS OR COMMENTS

u
*
Electrical Shock Hazard
Unplug the refrigerator before removing a
light bulb.
Failure to do so can result in death or
electrical shock.
Your refrigerator has several light bulbs. This section shows you where they are located and tells you
how to change them if they burn out. Before you
change any light bulb in your refrigerator, be sure to
turn the Refrigerator Control to OFF and unplug the
refrigerator. After you have replaced the bulb, plug
the refrigerator in and reset the Refrigerator Control
to the desired setting.
NOTE: Not all commercial appliance bulbs will fit
your refrigerator. Be sure to replace the bulb with
one of the same size and shape.
To change the refrigerator light:
1. Reach behind the Control Panel and remove
the bulb.
2. Replace the bulb with a 40-watt appliance bulb.
To change the crisper light
1.
Pull the top of the light shield forward until
it snaps free and lower until the light bulb
is visible.
2. Replace the bulb with a 40-watt appliance bulb.
3. Pull the top of the light shield up over the bulb
and snap it onto the side wall supports.
NOTE: To remove light shield for cleaning, remove
the crisper and the crisper cover. Then release the
bottom of the shield from the lower side wall
supports. Pull the light shield out from above the
crisper cover and wash it with warm water and a
liquid detergent. Dry the cover and replace it in the
reverse order.

To change the light below the ice bin:
1.
Push in the sides of the light shield and pull
down until the shield snaps free.
2. Replace the bulb with a 40-watt appliance bulb.
3. Replace the light shield.
To change the upper freezer light
(on some models):
1. Remove the light shield by grasping the top
center of the shield and pulling forward while
turning it slightly to one side.
2. Replace the bulb with a 40-watt appliance bulb.
3. To replace the light shield:
0 Grasp the top center of the shield and insert
the tabs on one end into the slotted holes in
the freezer liner.
0 Carefully bend the shield at the center to insert
the tabs on the other end.
To change the dispenser area light:
1. Reach through the dispenser area to remove
the bulb.
2. Replace the bulb with a heavy-duty lo-watt
bulb, which can be purchased from your
Whirlpool dealer.
I I
Upper freeier light
Dispenser
Light
22
WITH QUESTIONS OR COMMENTS

UNDERSTANDING ME SOUNDS YOU MAY HEAR
Your new refrigerator may make sounds that your
old one didn’t make. Because the sounds are new
to you, you might be concerned about them. Most
of the new sounds are normal. Hard surfaces, like
the floor, walls, and cabinets can make the sounds
seem louder than they actually are. Due to new
product designs, there may be sounds that you are
not familiar with. The following describes the kinds
of sounds that might be new to you, and what may
be making them.
0 Your refrigerator is designed to run more effi-
ciently to keep your food items a the desired
temperature. The high efficiency compressor may
cause your new refrigerator to run longer than
your old one, and you may hear a pulsating or
high pitched sound.
0 Water dripping on the defrost heater during a
defrost cycle may cause a sizzling sound.
0 If your product is equipped with an ice maker,
you will hear a buzzing sound when the water
valve opens to fill the ice maker for each cycle.
0 You may hear ,the evaporator fan motor circulat-
ing the air throlJgh the refrigerator and freezer
compartments.
0 As each cycle ends, you may hear a gurgling
sound due to tlie refrigerant equalizing in your
refrigerator.
0 The defrost tirner will click when the automatic
defrost cycle begins and ends.
0 The thermostat, refrigerator control, will click
when cycling on and off.
0 Rattling noises may come from the flow of
refrigerant, the waterline, or items stored on top
of the refrigerator.
l
Contraction and expansion of the inside walls
may cause popping and cracking noise.
SAVING ENERGY
There are ways that you can help your refrigerator
run more efficiently.
0 Check the door gaskets for a tight seal. Leveling
the cabinet will ensure a proper seal.
0 Clean the condenser coils regularly A coil
cleaning brush is available for purchase (part
number 4210463).
0 Open the door as few times as possible.
0 Don’t block the air vents in the freezer and
refrigerator so that cold air cannot flow freely.
(see page 13.)
0 Do not set your refrigerator and freezer at a
colder setting than is needed. Keep the
refrigerator control at the lowest nurnber setting
that keeps your ice cream firm and your drinks as
cold as you like.
0 Do not put your refrigerator next to a heat source,
such as a range, water heater, furnace, radiator, or
in direct sunlight.
23

CARING FORYOUR REFRICERLTOR
Your refrigerator is built to give you many years of dependable service. However, there are a
few things you can do to help extend its product life. This section tells you how to clean your
refrigerator and what to do when going on vacation, moving, or
during a power outage.
Both the refrigerator and freezer sections defrost
E!!
automatically. However, clean both
about once a month to help prevent
odors from building up. Wipe up spills
right away.
To clean your refrigerator, turn the
Refrigerator Control to OFF, unplug it, take out all
removable parts, and clean the refrigerator accord-
ing to the following directions.
Bum Hazard
Do not touch refrigeration tubes near
defrost pan.
Doing so can result in burns.
PART
WHAT TO USE
HOW TO CLEAN
Removable parts
Sponge or cloth with mild 0 Hand wash, rinse, and dry thoroughly.
(shelves, crisper, etc.)
detergent and warm water
Outside
Sponge, cloth, or paper
towel with mild detergent,
warm water, and a good
appliance wax (or good
auto paste wax)
0 Wash outside of cabinet. Do not use abrasive or
harsh cleaners.
0 Wipe and dry thoroughly.
0 Wax painted, metal surfaces at least twice a year.
Apply wax with a clean, soft cloth. Waxing exterior
painted, metal surfaces helps provide rust
protection. Do not get wax on plastic parts
or gaskets.
Inside walls
(allow freezer to
warm up so cloth
won’t stick)
Sponge or soft cloth
0 Wash with mixture of warm water and:
with baking soda or mild
-mild detergent, or
detergent and warm water
- baking soda (2 tbs to 1 qt [about 25 g to 1 L]
of water).
0 Wipe and dry thoroughly.
Door liners
and gaskets
Sponge or soft cloth
with mild detergent
and warm water
0 Wash, wipe, and dry thoroughly.
DO NOT USE cleaning waxes, concentrated
detergents, bleaches, or cleaners containing
oetroleum on elastic Darts or aaskets.
Plastic parts
(covers and panels)
Sponge or soft cloth
with mild detergent
and warm water
0 Wash, wipe, and dry thoroughly.
DO NOT USE paper towels, window sprays,
scouring cleansers, or flammable fluids.
These can scratch or damage plastic parts.
See “Important Safety Instructions” on page 3.
24
WITH OUESTIONS OR COMMENTS

CLEANING your REFRIGERATOR
(CONT.)
PART
Defrost pan
WHAT TO USE
HOW TO CLEAN
Sponge or cloth with mild
0 Remove base grille. (See below.)
detergent and warm water
0 Reach into small opening at left edge and remove
the defrost pan.
0 Wash, rinse, and dry thoroughly.
0 Replace defrost pan. Make sure to push it com-
pletely into the opening.
0 Replace base grille.
Condenser
coils
Vacuum cleaner with
extended narrow
attachment
0 Remove base grille.
0 Vacuum coils when dusty or dirty. Coils may need
to be cleaned as often as every other month.
0 Replace base grille.
REM~wNC ME BASE GRID
The base grille can be easily removed for access to
the defrost pan and condenser coils. You will need
to remove the base grille to clean the defrost pan or
the condenser coils (see above).
To remove the base grille:
1.
Open both doors.
2 Place hands along the ends of the grille, with
your thumbs along the top. Push in with your
thumbs and pull up on the bottom.
NOTE: Do not remove the Tech Sheet that is
fastened behind the grille.
To replace the grille:
1. Line up the grille support tabs with the metal clips.
2. Push the grille firmly to snap it into place and close
the doors.
Support tabs
25

VACATION
AND MOVING CARE
Short vacations
If you will be away for less than four weeks, there is
no need to turn off your refrigerator. Use these tips
to prepare your refrigerator before you leave.
1.
Use up any perishables and freeze other items.
2. Raise ice maker signal arm to the OFF (up)
position and shut off the water supply.
3. Empty the ice bin.
Lony vacations
If you will be gone for a month or more, follow these
steps to prepare your refrigerator.
1.
Turn off the water supply to the ice maker at
least one day ahead of time.
2. When the last load of ice drops, turn off the ice
maker and make sure all ice is dispensed out of
the ice maker mechanism.
3. Remove all food from your refrigerator.
4. Turn the Refrigerator Control to OFF.
5. Unplug the refrigerator.
6.
Remove water that may be in the defrost pan.
(See page 25.)
7. Clean it, wipe it, and dry well.
8.
To keep the doors propped open far enough for
air to get in, tape rubber or wooden blocks to the
tops of both doors. This will stop odor and mold
from building up.
Movin y
When you are moving your refrigerator to a new
home, follow these steps to prepare it for the move.
1. Turn off the water supply to the ice maker at
least one day ahead of time.
2. Disconnect the water line from the back of the
refrigerator.
3. When the last load of ice drops, lift the signal
arm to the OFF (up) position.
4. Remove all food from the refrigerator and pack
all frozen food in dry ice.
5. Turn the Refrigerator Control to OFF.
6. Unplug the refrigerator.
7. Empty water from :he defrost pan.
8. Clean, wipe, and dry the entire product well.
9. Take out all removable parts, wrap them well,
and tape them together so they don’t shift and
rattle during the move.
10. Screw in the leveling rollers.
11. Tape the doors shut and the power cord to the
refrigerator cabinet.
When you get to your new home, put everything
back and see page 7 for preparation instructions.
Also, if your refrigerator has an automatic ice maker,
remember to reconnec: the home water source to
the refrigerator.
POWER I~RRUPTIONS
If the electricity in your house goes off, call the
power company and ask how long it will be off.
1.
If the power will be out for 24 hours or less,
keep both doors closed to help foods stay
cold and frozen.
2. If the power will be out for more than 24 hours:
(a) Remove all frozen food and store it in a
frozen food locker.
OR
(b) Place 2 lb. (900 g) of dry ice in the freezer for
every cubic foot (liter) of freezer space. This
will keep the food frozen for two to four days.
While handling dry ice, wear gloves to protect
your hands from ice burns.
OR
(c) If neither a food locker or dry ice is available,
use up or can perishable food at once.
REMEMBER: A full freezer stays cold longer than
a partly filled one. A freezer full of meat stays cold
longer than a freezer full of baked goods. If food
contains ice crystals, it may be safely refrozen,
although the quality and flavor may be affected. If
the condition of the food is poor, or if you feel it is
unsafe, dispose of it.
Questions?
Call our Consumer Assistance Center telephone
number, l-800-2!53-1301, from anywhere in
the U.S.A.
26
WITH PIJESTIONS OR COMMENTS
FOOD STORAGE GUIDE
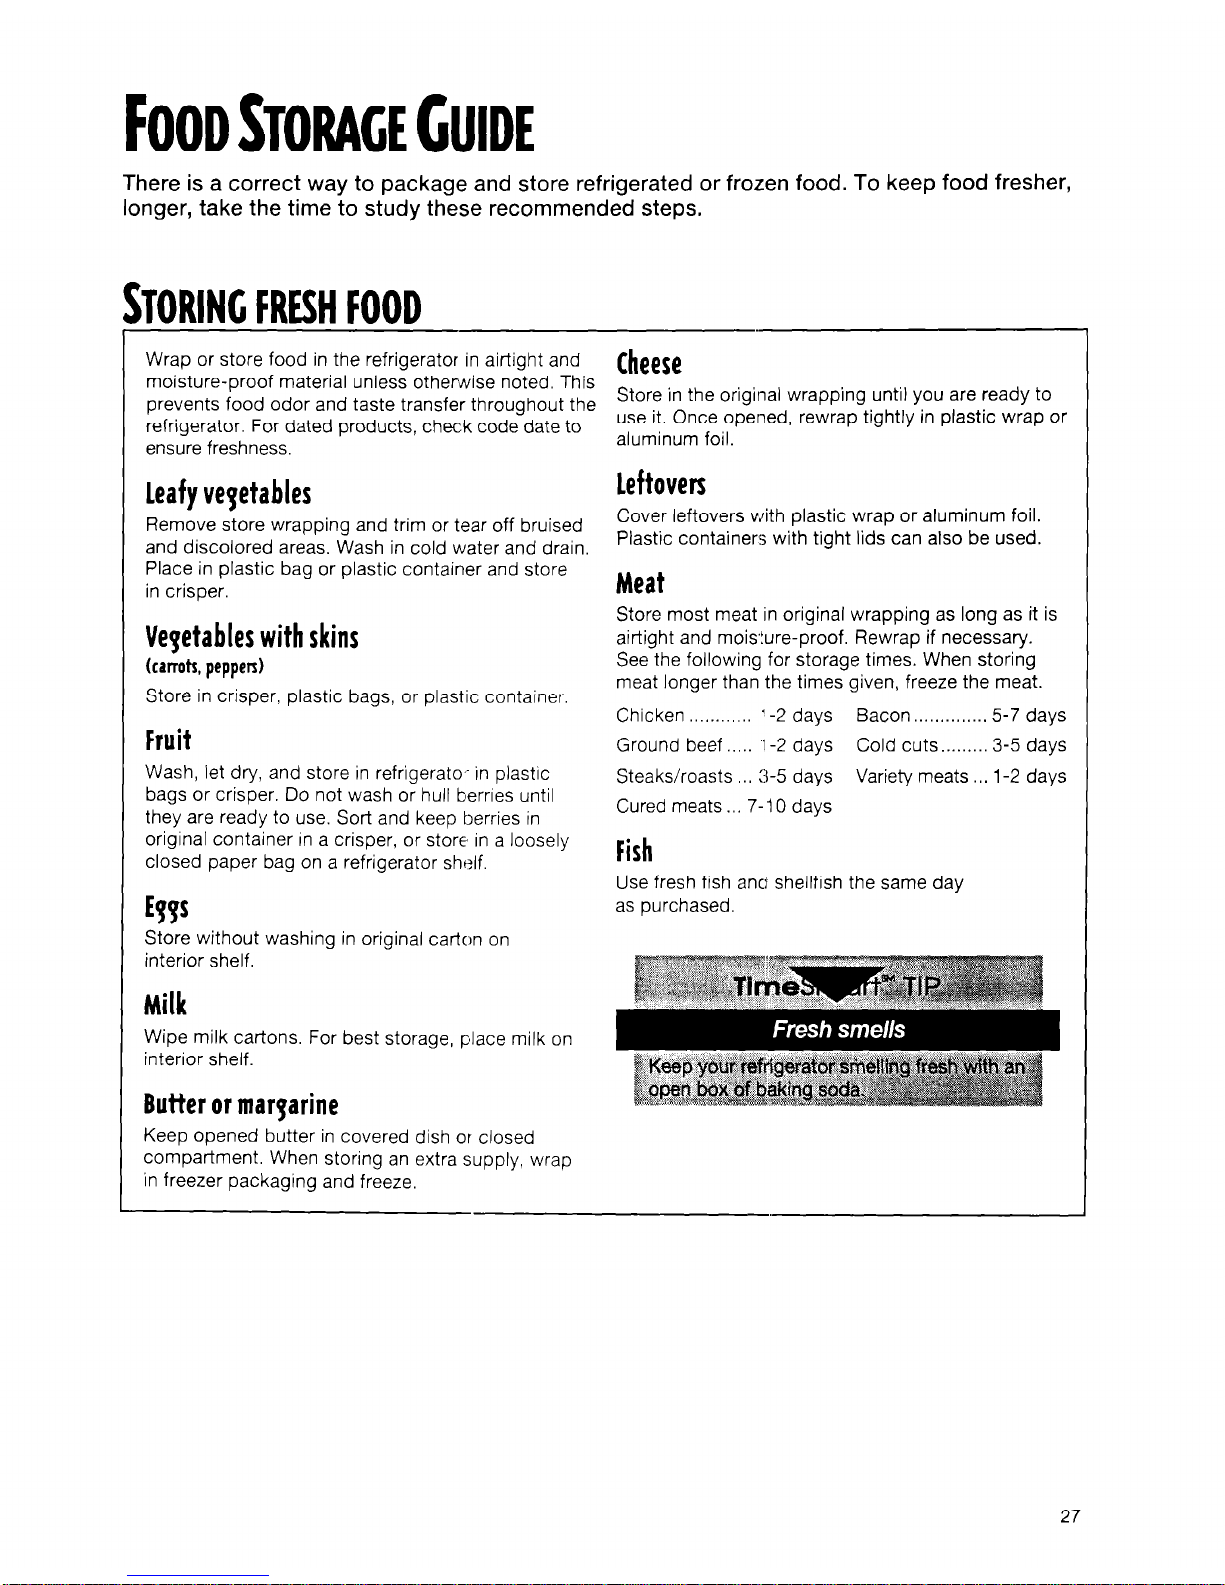
There is a correct way to package and store refrigerated or frozen food. To keep food fresher,
longer, take the time to study these recommended steps.
iTORlNC FRESH FOOD
Wrap or store food in the refrigerator in airtight and
moisture-proof material unless otherwise noted. This
prevents food odor and taste transfer throughout the
refrigerator. For dated products, check code date to
ensure freshness.
Leafy veyetables
Remove store wrapping and trim or tear off bruised
and discolored areas. Wash in cold water and drain.
Place in plastic bag or plastic container and store
in crisper.
Vegetables with skins
(carrots, pepperz)
Store in crisper, plastic bags, or plastic container.
Fruit
Wash, let dry, and store in refrigerate,- in plastic
bags or crisper. Do not wash or hull berries until
they are ready to use. Sort and keep berries in
original container In a crisper, or store in a loosely
closed paper bag on a refrigerator shelf.
EYYS
Store without washing in original carton on
interior shelf.
Milk
Wipe milk cartons. For best storage, place milk on
interior shelf.
Butter
or margarine
Keep opened butter in covered dish or closed
compartment. When storing an extra supply, wrap
in freezer packaging and freeze.
Cheese
Store in the original wrapping until you are ready to
use it. Once opened, rewrap tightly in plastic wrap or
aluminum foil.
Leftoven
Cover leftovers with plastic wrap or aluminum foil.
Plastic containers with tight lids can also be used.
Meat
Store most meat in original wrapping as long as it is
airtight and moisture-proof. Rewrap if necessary.
See the following for storage times. When storing
meat longer than the times given, freeze the meat.
Chicken .._,....,...
“-2 days Bacon . . . . . . . . . . . 5-7 days
Ground beef ..,.. 1-2 days
Cold cuts . . . . . . . . 3-5 days
Steaks/roasts . 3-5 days
Variety meats . . l-2 days
Cured meats 7-10 days
Fish
Use fresh fish ana shellfish the same day
as purchased.
27

The freezer section is designed for storage of
commercially frozen food and for freezing food
at home.
NOTE: For further information about preparing food
for freezing or food storage times, check a freezer
guide or reliable cookbook.
Packaging
The secret of successful freezing is in the packaging. The way you close and seal the package must
not allow air or moisture in or out. Packaging done
in any other way could cause food odor and taste
transfer throughout the refrigerator and drying of
frozen food.
Packaging recommended for use:
0 Rigid plastic containers with tight-fitting lids
0 Straight-sided canning/freezing jars
0 Heavy-duty aluminum foil
0 Plastic-coated paper
0 Non-permeable plastic wraps (made from
Saran film)
0 Specified Freezer self-sealing plastic bags
Follow package or container instructions for proper
freezing methods.
Do not use:
0 Bread wrappers
0 Non-polyethylene plastic containers
0 Containers without tight lids
0 Wax paper
0 Wax-coated freezer wrap
0 Thin, semi-permeable wrap
The use of these wrappings cnuld cause food odor,
taste transfer, and drying of frozen food.
Ffeezinp
Do not expect your freezer to quick-freeze any large
quantity of food. Put no more unfrozen food into the
freezer than will freeze within 24 hours (no more than
two to three Ibs of food per cubic foot [907-l ,350 g
per liter] of freezer space). Leave enough space for
air to circulate around packages. Be careful to leave
enough room at the front so the door can close tightly.
Storage times will vary according to the quality
and type of the food, the type of packaging or wrap
used, (airtight and moisture-proof), and the storage
temperature.
Ice crystals inside a sealed package are normal.
This simply means that moisture in the food and
air inside the package has condensed, creating
ice crystals.
STORING FROZEN FOOD
28
WITH QUESTIONS OR COMMENTS

TROUBLESHOOTING GUIDE
You can solve many common refrigerator problems easily, saving you the cost of a possible
service call. Try the suggestions below to see if you can solve your problem without outside
help. If the suggestions do not work, please call the Whirlpool Consumer Assistance Center
toll-free from anywhere in the U.S. at l-800-253-1 301.
YOUR REFRIGERATOR WIU NOT OPERATE
Check if...
The power supply cord is unplugged.
Then...
Firmly plug the cord into a live outlet with
proper voltage.
A household fuse has blown or circuit breaker
has tripped.
Replace the fuse or reset the circuit.
The refrigerator control is turned to the
“OFF” position.
See “Setting the controls” on page 12.
The refrigerator is defrosting.
Recheck to see if the refrigerator is operating in
30 minutes. Your refrigerator will regularly run an
automatic defrost cycle.
If it is still not running after checking the above
items, call the Consumer Assistance Center at
1-800-253-l 301.
THE
uctm DO NOT WORK
Check if...
The power supply cord is unplugged.
Then...
Firmly plug the cord into a live outlet with
proper voltage.
A household fuse has blown or circuit breaker
has tripped.
Replace the fuse or reset the circuit.
A light bulb is loose in the socket.
Turn the Refrigerator Control to OFF.
Disconnect the refrigerator from the electrical supply.
Gently remove the bulb and reinsert. Then reconnect
the refrigerator to the electrical supply and reset the
Refrigerater Control.
A light bulb has burned out. Replace with an appliance bulb of the same wattage,
size, and shape. See “Changing the light bulbs” on
pages 21 and 22.
29

THERE
IS WATER IN ME DEFROSC DRAIN PAN
Check if...
Then...
The refrigerator is defrosting.
The water will evaporate. It is normal for water to drip
into the defrost pan.
It is more humid than normal.
Expect that the water in the defrost pan will take longer
to evaporate. This is normal when it is hot or humid.
Water in the defrost pan is overflowing.
Check to make sure your refrigerator is level. (See
“Leveling it” on page 8.) If it is still overflowing there is
probably something wrong with the refrigerator. Call
the Consumer Assistance Center at 1-800-253-l 301.
THE
MOTOR SEEM TO RUN TOO MUCH
Check if...
The room temperature is hotter than normal.
Then...
Expect the motor to run longer under warm conditions.
At normal room temperatures, expect your motor to
run about 40% to 80% of the time. Under warmer
conditions, expect it to run even more of the time.
A large amount of food has just been added to
the refrigerator.
Adding a large amount of food warms the refrigerator.
It is normal for the motor to run longer in order to
cool the refrigerator back down. See food storage
on page 27.
The door is opened often.
Expect the motor to run longer when this occurs. In
order to conserve energy, try to get everything you
need out of the refrigerator at once, keep food organized so it is easy to find, and close the door as soon
as the food is removed.
The controls are not set correctly for the
surrounding conditions.
See “How the controls work” on page 12.
The doors are not closed completely.
The doors are misaligned.
Push the doors firmly shut. If they will not shut all the
way, see “The doors will not close completely,” on
page 35.
See “Leveling it” on page 8 or call the Consumer
Assistance Center at 1-800-253-l 301.
The base grille is dirty or blocked.
The condenser coils are dirty.
This prevents air circulation and makes the motor
work harder. Remove the grille and clean, See
Removing the base grille” on page 25.
This prevents air transfer and makes the motor work
harder. Clean the.condenser coils. See “Cleaning
your refrigerator” on page 25.
If the problem is not due to any of the above, remember that your new refrigerator will run longer than your
old one due to its high efficiency motor.
30
WITH QUESTIONS OR COMMENTS

THE
ICE MAKER IS NOT PRODUCING ICE
Check if...
Then...
The freezer temperature is not cold enough to
produce ice.
See “Setting the controls” on page 12.
The ice maker arm is in the “OFF” (up) position.
Lower arm to the “ON” (down) position. See “Using
the automatic ice maker” on page 18.
The water line shut-off valve to the refrigerator is
not turned on.
Turn on the water valve. See “Attaching the ice
maker to a water supply” on pages 9-l 1. If not due
to any of the above, there may be a problem with the
water line. Contact the Consumer Assistance Center
at 1-800-253-l 301.
An ice cube is jammed in the ejector arm.
Remove the ice from the ejector arm with a plastic
utensil. See page 18 for ejector arm location.
The ice maker mold has no water in it or no ice
has been produced.
Check to see if your refrigerator has been connected
to your home water supply and the supply shut-off
valve is turned on. See “Attaching the ice maker to
a water supply” on pages 9-l 1.
THE
ICE MAKER IS PRODUQNC TOO LITTLE ICE
Check if...
Then...
The ice maker has just been installed.
Wait 72 hours for full ice production to begin. Once
your refrigerator is cooled down, the ice maker
should begin producing 70-120 cubes every 24 hours.
A large amount of ice has just been removed.
Allow 24 hours for ice maker to restock.
The controls are not set correctly.
See “Setting the controls” on page 12.
The water shut-off valve is not turned completely on.
Turn valve on fully. See “Attaching the ice maker to a
water supply” on pages 9- 11.
There is a water filter installed on the refrigerator.
This filter may be clogged or installed incorrectly.
First, check the filter installation instructions to ensure
that the filter was installed correctly and is not clogged.
If installation or clogging IS not a problem, call the
Consumer Assistance Center at 1-800-253-l 301.
32
WITH QUESTIONS OR COMMENTS

THE
ICE DISPENSER WILL NOT OPERATE PROPERLY
Check if...
The freezer door is not closed completely.
Then...
Push the door firmly shut. If it will not shut all the way,
see “The doors will not close completely,” on page 35.
The ice bin is not installed correctly.
Push the ice bin in all the way. If the ice bin does not
go in all the way, it may not be put in straight. Pull it
out and try again.
The wrong ice has been added to the bin.
Use only cubes produced by the current ice maker. If
other cubes have been added, remove all cubes and
check to see that none have become stuck in the
delivery chute.
The ice has frozen in the ice bin.
Shake the ice bin to separate cubes. If cubes do
not separate, empty bin and wait 24 hours for ice
to restock.
The ice has melted around the auger (metal
spiral) in the ice bucket.
Dump the ice cubes and clean the ice bucket completely. Allow 24 hours for the ice maker to re-stock.
Do not try to remove the melted ice with a sharp
object. You could damage the ice bucket.
Ice is stuck in the delivery chute. Clear the ice from the delivery chute with a plastic
utensil. Do not use anything sharp to remove the ice.
You could cause damage.
There is no ice in the bucket.
The dispenser arm has been held in too long.
See “How the controls work,” on page 12.
Release dispenser arm. Ice will stop dispensing when
the arm is held in too long. Wait three minutes for
dispenser motor to reset before using again. (For
future use, take large amounts of Ice directly from
the ice maker so that the dispenser arm is not held in
too long.)
32
WITH QUESTIONS OR COMMENTS

Check if...
The freezer door is not closed completely.
Then...
Push the door firmly shut. If it will not shut all the way,
see “The doors will not close completely,” on page 35.
The water tank has not filled.
The water tank needs to be filled the first time it is
used. Depress the water dispenser bar with a large
container until you draw two or three quarts
(1.9 to 2.8 L) of water. Discard water. (Refer to page
19 for further instructions on filling the water tank.)
The water shut-off valve is not turned on or the
water line is not connected at the source.
Check to be sure the water shut-off valve is turned on
and the water source is connected to the refrigerator.
Refer to pages 9-l 1 for directions.
The water shut-off valve is clogged or incorrectly
installed.
There is a kink in the home water source line.
Refer to pages 9 and 10. Call the Consumer Assis-
tance Center at 1-800-253-l 301 or a plumber.
If you find or suspect a kink in the water line, call the
Consumer Assistance Center at l-800-253-1301.
There is a water filter installed on the refrigerator.
This filter may be clogged or incorrectly installed.
First, check the filter installation instructions to ensure
that the filter was installed correctly and is not clogged.
If installation or clogging is not a problem, call the
Consumer Assistance Center at 1-800-253-l 301.
WATER
OR ICE IS EAKINC FROM THE DISPENSER
I
Check if...
Then...
The glass is not being held under the ice dispenser
Hold the container under the ice chute for two to three
long enough, causing the ice to spill.
seconds after releasing the dispenser lever. A small
amount of ice may dispense after the lever is released.
The glass is not being held under the water
dispenser long enough, causing water to drip.
Hold the container under the water dispenser two to
three seconds after releasing the dispenser lever.
Water may continue to dispense during this time.
An ice cube is stuck in the chute and holding the
trap door open.
Remove the cube.
THE
DISPENSER WATER IS NOT COOL ENOUGH
Check if...
Then...
The refrigerator has been newly installed,
Allow 24 hours for the tank to cool comoletelv.
A large amount of water has been recently
dispensed.
Allow 24 hours for the tank to cool completely.
No water has been recently dispensed.
The first glass of water may not be cool. Discard the
first glass of water.
33

OFF-TAslI OR ODOR IN ME ICE
I
Check if...
Then...
I
The plumbing connections are new, causing
Discard the first few batches of ice.
discolored or off-flavored ice.
The ice cubes have been stored for too long.
Throw old ice away and make a new supply.
Food in the freezer has not been wrapped properly.
See page 28 for food storage instructions.
I
Freezer and ice bin need to be cleaned.
See page 24 for cleaning instructions.
I
Water contains minerals (such as sulfur).
A filter may need to be installed to remove the minerals.
THE
CENTER DIVIDER BETWEEN ME TWO COMPARTMENK IS WARM
Check if...
The condenser coil or base grille is dirty
or clogged.
Clean according to the directions on page 25.
If not due to any of above, the warmth is probably
due to normal operation of the automatic exterior
moisture control. If still concerned, call the Consumer
Assistance Center at l-800-253-1 301.
IEMPERATURE IS TOO WARM
Check if...
Then...
The air vents are blocked in either compartment.
This prevents the movement of cold air from the
freezer to the refrigerator.
Remove any objects from in front of the air vents.
Refer to page 13 for the location of air vents.
The door(s) are opened often.
Beware that the refrigerator will warm when this
occurs. In order to keep the refrigerator cool, try to
get everything you need out of the refrigerator at
once, keep food organized so it is easy to find, and
close the door as soon as the food is removed.
A large amount of food has just been added to
the refrigerator or freezer.
Adding a large amount of food warms the refrigerator.
It can take several hours for the refrigerator to return
to the normal temperature.
The controls are not set correctly for the surround-
See “How the controls work” on page 12.
ing conditions.
34

Check if...
The air vents are blocked in the refrigerator.
Then...
Remove any objects from in front of the air vents.
Refer to page 13 for the location of air vents.
The door is opened often.
To avoid humidity build-up, try to get everything
you need out of the refrigerator at once, keep food
organized so it is easy to find, and close the door
as soon as the food is removed. (When the door is
opened, humidity from the outside air enters the
refrigerator. The more often the door is opened, the
faster humidity builds up, especially when the room
itself is very humid.)
The room is humid. It is normal for moisture to build up inside the refrig-
erator when the outside air is humid.
The food is not packaged correctly. Check that all food is securely wrapped. If neces-
sary, repackage food according to the guidelines on
page 27, the “Food Storage Guide.” Wipe off damp
food containers before placing in the refrigerator.
The controls are not set correctly for the surround-
ing conditions.
See “How the controls the work” on page 12.
A self defrost cycle was completed.
It is normal for droplets to form on the back wall
after the refrigerator self-defrosts.
THE
DOORS WIU NOT aosE COMPLETELY
Check if...
Then...
Food packages are blocking the door open.
The ice bin is out of position.
Rearrange containers so that they fit more tightly and
take up less space.
Push the ice bin in all the way.
The pans, shelves, bins, or baskets are out
of position.
Put all pans, shelves, bins, and baskets back into
their correct position.
The gaskets are dirty.
Clean gaskets according to the directions on page 24.
I
The refrigerator is not level.
Level the refrigerator. Refer to “Leveling it” on page 8.
The doors were removed during product installation and not properly replaced.
Remove and replace the doors according to the
removal instructions that came with your refrigerator.
Or, call the Consumer Assistance Center at
1-800-253-l 301.
THE DOORS ARE DIFFICULTTO OPEN
Check if...
The gaskets are dirty or sticky.
Then...
Clean gaskets according to the directions on
page 24.
35

To avoid unnecessary service calls, please check the “Troubleshooting Guide” on pages 29-35.
It may save you the dost of a service call. If you still need help, follow the instructions below.
IF YOU NEED ASSISTANCE OR SERVICE
Call the Whirlpool Consumer Assistance Center
w
toll free at 1-800-253-l 301. Our
w
consultants are available to assist
you 24 hours a day, 7 days a week.
When calling:
Please know the purchase date, and
the complete model and serial number of your
appliance (see page 2). This information will help us
better respond to your request.
Our consultants provide assistance with:
l
Features and specifications on our full line
of appliances
0 Installation information
I
l
Use and maintenance procedures
0 Accessory and repair parts sales
l
Do-it-yourself repair help
l
Specialized customer assistance (Spanish speaking, hearing impaired, limited vision, etc.)
l
Referrals to local dealers, service companies, and
repair parts distributors
Whirlpool service technicians are trained to fulfill
the product warranty and provide after-warranty
service, anywhere in the United States.
To locate the authorized Whirlpool service company
in your area, you can also look in your telephone
directory Yellow Pages.
IF YOU NEED REPUKEMENT PARTS
If you need to order replacement parts, we recom-
mend that you only use FSP@ factory authorized
parts. FSP replacement parts will fit right and work
right, because they are made to the same exacting
specifications used to build every new
WHIRLPOOL appliance.
To locate FSP replacement parts in your area, call
our Consumer Assistance Center telephone number
or your nearest authorized service center.
FOR FURlHER ASSISLANCE
If you need further assistance, you can write to
Whirlpool with any questions or concerns at:
Whirlpool Brand Home Appliances
Consumer Assistance Center
c/o Correspondence Dept.
414 N. Peters Rd.
Knoxville, TN 37922
Please include a daytime phone number in your
correspondence.
If the dealer, authorized servicer, and Whirlpool have
failed to resolve your problem, you can contact the
Major Appliance Consumer Action Program
(MACAP). MACAP is a group of independent consumer experts that voice consumer views at the
highest levels of the major appliance industry.
MACAP will in turn inform us of your action.
Major Appliance Consumer Action Program
20 North Wacker Drive
Chicago, IL 60606
36

INDEX
This index is alphabetical. It contains all the topics included in this manual, along with the
pages on which you can find each topic.
TOPIC
PAGE
TOPIC
PAGE
AIR
CIRCULATION
.................................
. .................. 13
BASE GRILLE
Removing..
.............................................................
.25
CLEANING
How to
....................................................................
24
Moving
....................................................................
26
Vacation ..................................................................
26
CONTROLS
l-low
they work.. .....................................................
12
Setting
.................................................................... 12
FOOD STORAGE
Freezing .................................................................. 28
Fresh Food
............................................................
.27
FREEZER SECTION
Baskets
...................................................................
17
Shelves
..................................................................
.17
ICE MAKER
Attaching to a water supply
......................
. ......... 9-10
Removing
storage bin
............................................
20
Using ...................................................................... 18
LIGHT BULBS
Changing
..........................................................
21-22
PARTS AND FEATURES
..........................................
4-6
POWER
INTERRUPTIONS
........................................
26
REFRIGERATOR SECTION
Door bins
................................................................
14
Door trim
.................................................................
14
Crisper
....................................................................
16
Crisper cover
......................................................... 16
Meat drawer
..........................................................
15
Snack bin
................................................................
17
SAFETY
........................................................................
3
SERVICE
Requesting
.............................................................
36
SOUNDS
Understanding
....................................................... 23
STORAGE
Moving
.................................................................... 26
Vacation
.................................................................
.26
TEMPERATURE
Controlling
..............................................................
12
Meat drawer
..........................................................
15
TROUBLESHOOTING
..........................................
29-35
WARRANTY
...............................................................
40
37

WARRANTY
WHIRLPOOL@
REFRIGERATOR
LENGTH OF WARRANTY
FULL ONE-YEAR
WARRANTY
From Date of Purchase
FULL FIVE-YEAR
WARRANTY
From Date of Purchase
WHIRLPOOL WILL PAY FOR
FSP@ replacement parts and repair labor to correct defects in materials
or workmanship. Service must be provided by an authorized
Whirlpool
service company.
FSP replacement parts and repair labor to correct defects in materials
or workmanship in the sealed refrigeration system. These parts are:
1. Compressor
2. Evaporator
3. Condenser
4. Drier
5. Connecting tubing
Service must be provided by an authorized Whirlpool service company.
WHIRLPOOL WILL NOT PAY FOR
A. Service calls to:
1. Correct the installation of your refrigerator.
2. Instruct you how to use your refrigerator.
3. Replace house fuses or correct house wiring or plumbing.
4. Replace light bulbs.
6. Repairs when your refrigerator is used in other than normal, single-family household use.
C. Pickup and delivery. Your refrigerator is designed to be repaired in the home.
D. Damage to your refrigerator caused by accident, misuse, fire, flood, acts of God, or use of products not
approved by Whirlpool.
E. Any food loss due to product failure.
F: Repairs to parts or systems caused by unauthorized modifications made to the appliance.
w94
WHIRLPOOL CORPORATION SHALL NOT BE LIABLE FOR INCIDENTAL OR CONSEQUENTIAL DAMAGES.
Some states do not allow the exclusion or limitation of incidental or consequential damages, so this exclusion
or limitation may not apply to you. This warranty gives you specific legal rights, and you may also have other
rights which vary from state to state.
Outside the United States, a different warranty may apply, For details, please contact your authorized
Whirlpool dealer.
If you need service, first see the “Troubleshooting” section of this book. After checking “Troubleshooting,”
additional help can be found by checking the “Requesting Assistance or Service” section, or by calling our
Consumer Assistance Center telephone number, 1-800-253-1301, from anywhere in the U.S.A.
PART NO. 2189606
0 1995 Whirlpool, USA
@ Registered Trademark/TM Trademark of Whirlpool
lli95
Printed in USA
 Loading...