

Whirlpool ED20DFXEB Use And Care Manual
®
Home Appliances
Use And Care
GUIDE
Table of Contents
(complete) .................. 2
A Note to You................ 2
Refrigerator Safety ....... 3
Parts and Features ....... 4
Installing Your
Refrigerator................... 5
Using Your
Refrigerator................. 11
Caring for Your
Refrigerator................. 23
Food Storage Guide ... 26
Troubleshooting ......... 28
Requesting
Assistance
or Service .................... 29
Warranty ......................32
1-800-253-1301
Call our Consumer Assistance Center
with questions or comments.
24'' DEEP FREESTANDING/BUILT-IN SIDE BY SIDE
FREEZER REFRIGERATOR
PART NO. 4343601/12100701S

Table of Contents
Page
A Note to You ............................................................2
Refrigerator Safety....................................................3
Parts and Features....................................................4
Installing Your Refrigerator .....................................5
Cleaning your refrigerator ......................................5
Removing the wooden base ..................................6
Leveling it...............................................................6
Removing the doors and handles ..........................7
Aligning the doors..................................................7
Attaching the ice maker to a water supply .............8
Plugging it in ........................................................10
Using Your Refrigerator .........................................11
Setting the controls .............................................. 11
Changing the control settings ..............................11
Removing the snap-on door trivet........................12
Adjusting the door bins ........................................12
Adjusting the cantilever refrigerator shelves........13
Removing the temperature controlled
meat drawer and cover ........................................14
Page
Adjusting the meat drawer temperature...............14
Removing the crispers and crisper covers...........15
Adjusting the crisper humidity control ..................15
Removing the freezer basket...............................16
Removing the freezer shelf..................................16
Using the utility compartment ..............................16
Using the ice and water dispensing system.........17
Using the automatic ice maker ............................19
Removing the ice maker storage bin ...................20
Removing the base grille .....................................20
Changing the light bulbs ......................................21
Understanding the sounds you may hear............22
Saving energy......................................................22
Caring for Your Refrigerator ..................................23
Food Storage Guide................................................26
Troubleshooting......................................................28
Requesting Assistance or Service ........................29
Warranty...................................................................32
A Note to You
Thank you for buying a WHIRLPOOL® appliance.
Because your life is getting busier and more complicated, WHIRLPOOL Refrigerators are easy to use, save time,
and help you manage your home better. To ensure you enjoy years of trouble-free operation, we developed this
Use and Care Guide. It contains valuable information about how to operate and maintain your appliance properly
and safely. Please read it carefully. Also, please complete and mail the Ownership Registration Card provided
with your appliance. This card helps us notify you about any new information on your appliance.
Please record your model’s information.
Whenever you call to request service on your appliance, you need to know your complete model number
and serial number. You can find this information on the
model and serial number label (see diagram on page 4
for location of label).
Please also record the purchase date of your appliance and your dealer’s name, address, and telephone
number.
Keep this book and the sales slip together in a safe place for future reference.
Our Consumer Assistance Center number is tollfree from anywhere in the U.S.A. 24 hours a day.
Model Number ___________________________________
Serial Number ___________________________________
Purchase Date ___________________________________
Dealer Name ____________________________________
Dealer Address __________________________________
Dealer Phone ____________________________________
1-800-253-1301
2

Refrigerator Safety
Your safety is important to us.
This guide contains statements under warning symbols. Please pay special attention to these symbols
and follow any instructions given. Here is a brief
explanation of the use of the warning symbol.
This symbol alerts you to such dangers as
fire, electrical shock, burns, and personal
injury.
IMPORTANT SAFETY INSTRUCTIONS
wWARNING
wWARNING
• Read all instructions before using the refrigerator.
• Child entrapment and suffocation are not problems
of the past. Junked or abandoned refrigerators are
still dangerous … even if they will “just sit in the
garage a few days.”
If you are getting rid of your old refrigerator, do
it safely. Please read the enclosed safety booklet
from the Association of Home Appliance Manufacturers. Help prevent accidents.
To reduce the risk of fire, electrical shock, or injury when using
your refrigerator, follow these basic precautions:
– SAVE THESE INSTRUCTIONS –
Help us help you
Please:
• Install and level the refrigerator on a floor that will
hold the weight and in an area suitable for its size
and use.
• Do not install the refrigerator near an oven, radiator,
or other heat source.
• Do not use the refrigerator in an area where the
room temperature will fall below 55°F (13°C).
• Keep the refrigerator out of the weather.
• Connect the refrigerator only to the proper kind of
outlet, with the correct electrical supply and grounding. (Refer to the Electrical Requirements and
Grounding Instructions Sheet.)
• Do not load the refrigerator with food before it has
time to get properly cold.
• Use the refrigerator only for the uses described in
this manual.
• Properly maintain the refrigerator.
• Be sure the refrigerator is not used by anyone
unable to operate it properly.
• Never allow children to operate, play with, or
crawl inside the refrigerator.
• Never clean refrigerator parts with flammable
fluids. The fumes can create a fire hazard or
explosion.
• FOR YOUR SAFETY •
DO NOT STORE OR USE GASOLINE OR OTHER
FLAMMABLE VAPORS AND LIQUIDS IN THE
VICINITY OF THIS OR ANY OTHER APPLIANCE.
THE FUMES CAN CREATE A FIRE HAZARD OR
EXPLOSION.
3
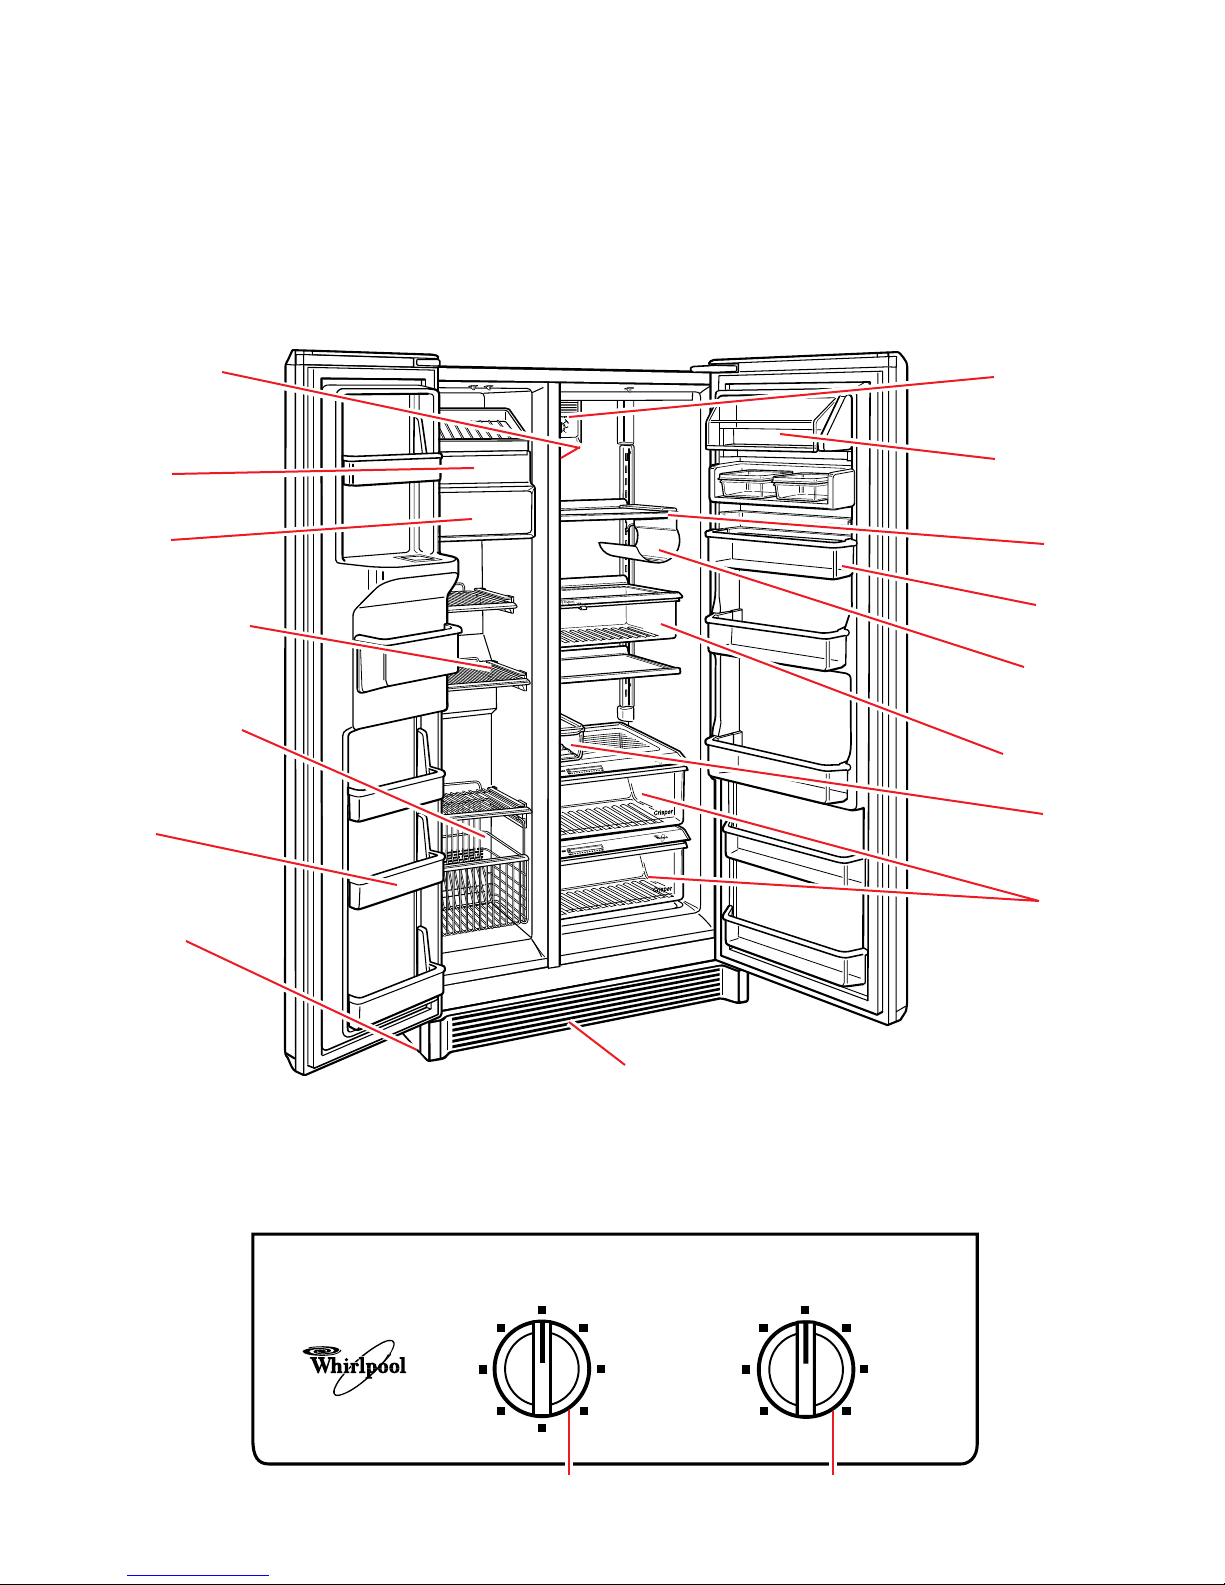
Parts and Features
This section contains captioned illustrations of your appliance. Use them to become familiar with where all parts
and features are located and what they look like. Page references are included for your convenience.
NOTE: The model you have purchased may have all or some of the parts and features shown and they
may not match the illustration exactly. This manual covers several models.
Model and serial
number label
(on side wall)
(p. 2)
Automatic ice
maker
(p. 19)
Ice bin
(p. 20)
Quick Freeze
Control panel
(p. 11)
Utility
compartment
(p. 16)
Refrigerator
shelves
(p. 13)
Freezer shelves
(p. 16)
Freezer basket
(p. 16)
Snap-on door
trivet
(p. 12)
Levelers
(p. 6)
Door bin
(p. 12)
Wine rack
Temperature
controlled
meat drawer
(p. 14)
Egg bin
Humidity
controlled
crispers
(p. 15)
Base grille
(p. 20)
Control Panel
4
3
2
1
FREEZER
4
OFF
C
O
L
D
E
5
R
6
7
REFRIGERATOR
4
3
2
1
Freezer control Refrigerator control
C
O
L
D
E
5
R
6
7

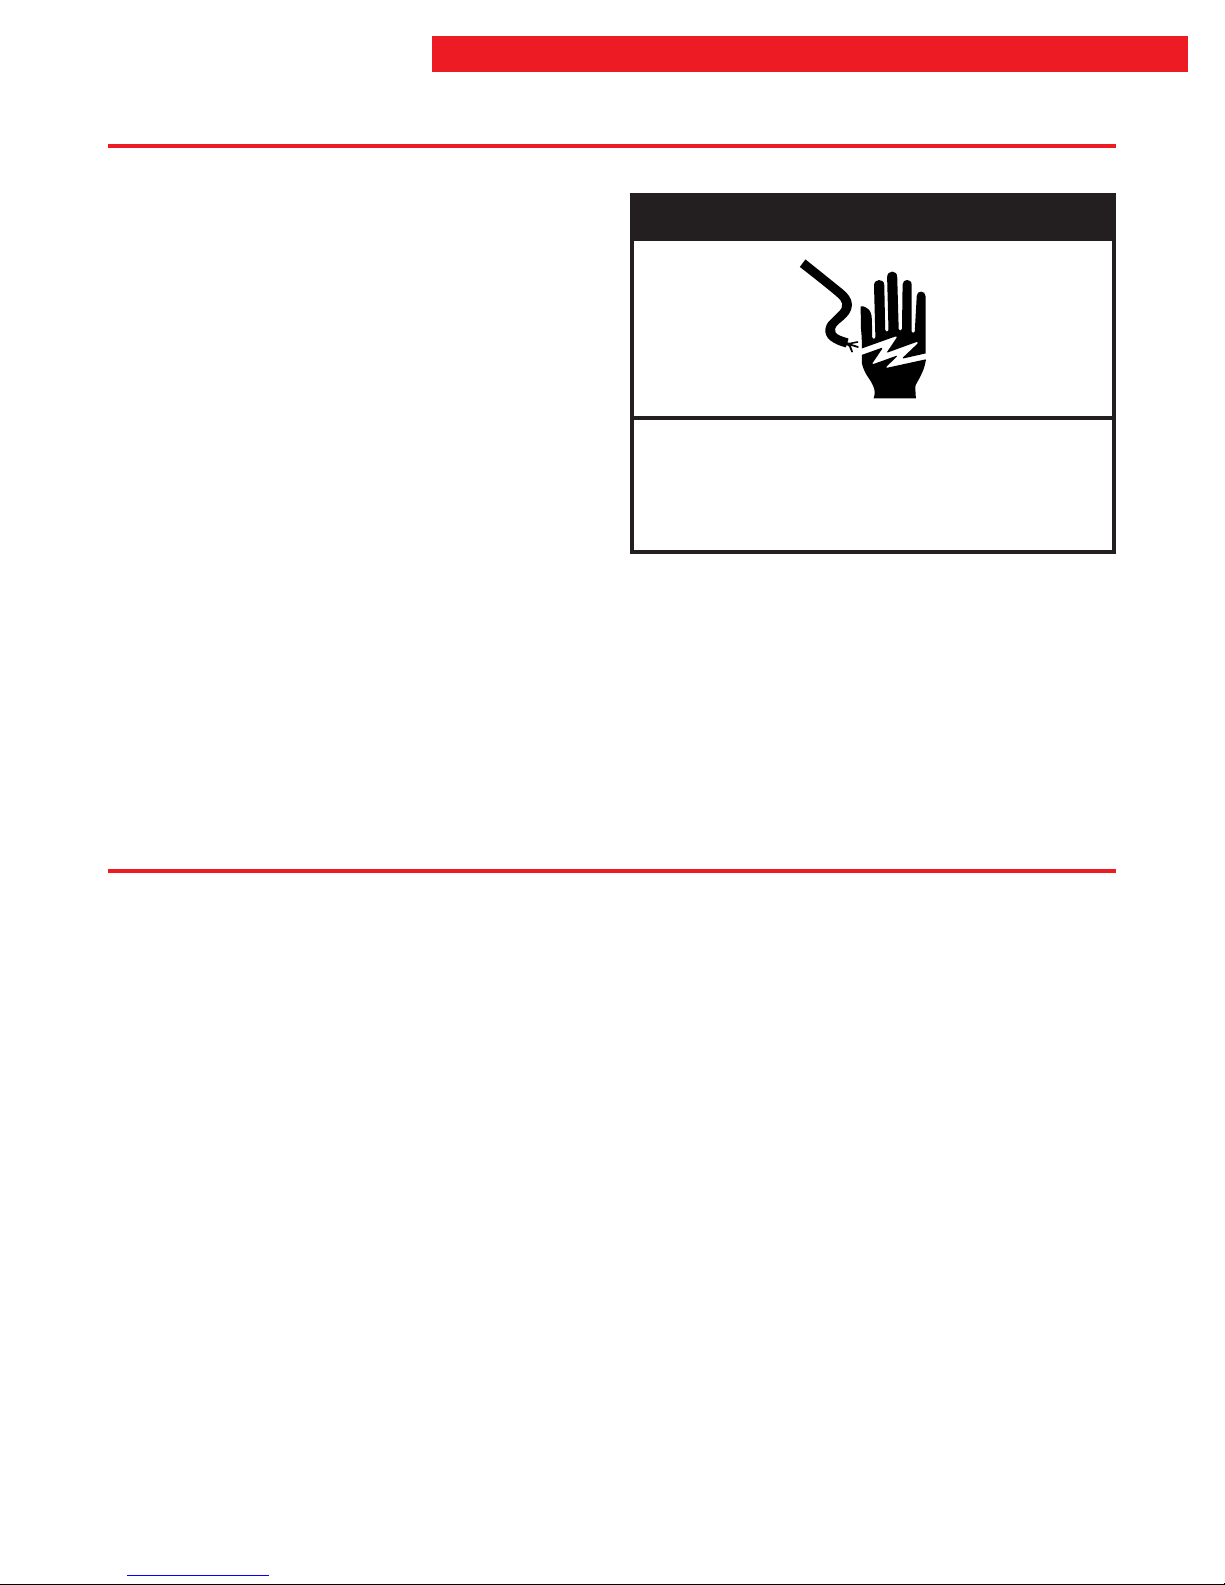
Installing Your Refrigerator
wWARNING
Electric Shock Hazard
Disconnect the power to the refrigerator before
performing any installation steps.
Failure to follow this instruction can result in
death or electrical shock.
When you are installing your refrigerator, allow 1⁄2-inch
(1.25cm) of space on each side and at the top of the
refrigerator for ease of installation. It can be flush
against the back wall. Be sure to wear gloves while
installing the refrigerator.
Cleaning your refrigerator
Removing packaging materials
Remove tape and any inside labels (except the model
and serial number label) before using the refrigerator.
To remove any remaining tape or label glue:
• Rub briskly with thumb.
OR
• Apply liquid hand-dishwashing detergent or tooth-
paste to area before removing glue as described
above. Do not use sharp instruments, rubbing alcohol, flammable fluids, or abrasive cleaners. These
can damage the material. See “Important Safety
Instructions” on page 3.
NOTE: Do not remove any permanent instruction
labels inside your refrigerator. Do not remove the
Tech Sheet fastened under the refrigerator at the
front.
5

INSTALLING YOUR REFRIGERATOR
Plugging it in
Be sure you have a 115 Volt, 60 Hz., AC only 15 or 20
ampere fused and properly grounded electrical supply.
It is recommended that a separate circuit serving only
this appliance be provided. Use a receptacle which
cannot be turned off with a switch or pull chain. Do not
use an extension cord. See Electrical Requirements
and Grounding Instructions Sheet in your Literature
Package.
Removing the wooden base
wWARNING
Excessive Weight Hazard
Use two or more people to move refrigerator.
Failure to do so can result in back or other
injury.
3-prong grounding
type wall receptacle
Refrigerator
power cord
3-prong grounding plug
1. Tape the doors shut with masking tape.
2. Slide an appliance cart under one side of the
refrigerator.
3. Wrap the refrigerator with a blanket or pad for
protection and thread the cart strap around the
refrigerator. Then place foam shipping pads from the
shipping carton under the strap and gently tighten.
4. Lower the appliance cart to the floor so the cart
handles are resting on the floor. Remove the two
bolts from the wooden base and return the appliance
cart to the upright position. Remove the appliance
strap.
Leveling it
Move the refrigerator into it’s final position. Use a level
and check that refrigerator is level. Do this before
attaching the ice maker to a water supply.
Level the refrigerator using the four leveling screws two on the right and two on the left. To adjust one or all
of these, follow the directions below.
1. Remove base grille (see page 20).
2. Turn the leveling screw clockwise to raise refrigera-
tor or counterclockwise to lower the refrigerator. The
top screw will control the rear of the refrigerator and
the bottom screw will control the front of the refrigerator. The screws on the right side will control the
refrigerator section and the screws on the left will
control the freezer section.
3. Check the refrigerator with a level after it is adjusted.
4. If it is level, replace the base grille.
5. Slide the appliance cart under the opposite side of
the refrigerator and repeat steps 3-4. When you are
finished, throw away the bolts and the wooden
base.
6. When you have removed the wooden base, position
the refrigerator close to where you want it to be.
Make sure that the floor under the refrigerator is
secure and can support 945 pounds.
NOTE: On model ED20DBXE, see the installation
instructions included with the refrigerator for directions
on installing the panels and trim on the doors. You can
purchase a separate trim kit from your local authorized
appliance dealer for model ED20DFXE.
Leveling screws
IMPORTANT: If refrigerator is not level because of
uneven flooring, use shims under the rollers to level it.
6
INSTALLING YOUR REFRIGERATOR
Removing the doors and handles
The doors and the handles of your refrigerator can be
removed if necessary.
To remove the handles:
1. Remove the crushed/cubed ice switch cover on the
dispenser by pulling forward. Release the bottom
clips on the dispenser cover by placing the taped
edge of a putty knife underneath and pulling out.
Release the top clips by holding bottom of dispenser
cover out and sliding up.
2. On model ED20DBXE, remove the top handle end
caps by removing the screws with a Phillips screwdriver. Then remove the door handle inserts by
placing a tape covered end of a screwdriver at the
top of the door handles in between the handle and
insert, and pull the inserts out along the length of the
handle.
On model ED20DFXE, remove the handles by
removing screws with a 1/4-inch (6 millimeter) hex
nut driver.
3. Replace handles in the reverse order.
To remove the doors:
1. Remove the base grille by holding the end and
pulling forward.
2. Loosen the screw from the water tube clamp on the
left side of the refrigerator cabinet behind the base
grille with a 1/4-inch (6 millimeter) hex nut driver.
Do not remove green ground wire from wire
connectors.
Doing so can result in death or electrical shock.
3. Remove the top hinge covers by removing the
screws with a Phillips screwdriver. Trace around the
top hinges with a pencil to help maintain proper
alignment when you reassemble the door.
4. Unplug the top hinge wire connectors.
5. Remove the top hinge screws with a 5/16-inch (8
millimeter) hex nut driver, then remove the hinges.
6. Lift the doors off of the bottom hinges.
7. To replace the doors, reverse steps 1-6.
wWARNING
Electrical Shock Hazard
Aligning the doors
After you have replaced the doors, you should make
sure that the doors are properly aligned.
1. Slide the refrigerator into it’s final location and
ensure that it is stable. If refrigerator is not stable,
remove the base grille and turn the roller adjustment
screws clockwise 1⁄4-inch (6 millimeter) with a hex
nut driver until the refrigerator is firmly on all rollers.
If the floor is uneven, you may need to place shims
under the rear rollers to level the refrigerator.
2. Once the refrigerator is stable, make sure that the
doors are aligned with each other. If they are not
aligned, remove the base grille if it is not already
removed, and turn the front roller adjustment screw
clockwise with a 1⁄2-inch (6 millimeter) hex nut driver
to lower the door.
3. Open and close both doors to make sure that the
tops of the doors are aligned. Repeat step 2 until the
doors are aligned.
4. Recheck to make sure that the refrigerator is stable,
and if not stable, repeat step 1.
5. Once the refrigerator is stable again, make sure that
the gap between the doors is consistent from top to
bottom. If the gap is consistent, simply replace the
base grille.
6. If the gap is not consistent, remove the top hinge
covers with a Phillips screwdriver and loosen the
screws with a 1/4-inch (6 millimeter) hex nut driver.
7. Push both doors toward the door that is lower and
align the tops of the doors with each other while
checking that the gap between them is consistent
from top to bottom.
8. Tighten the top hinge screws, replace the top hinge
covers and base grille.
7

INSTALLING YOUR REFRIGERATOR
Attaching the ice maker to a water supply
Read all directions carefully before you begin.
NOTE: Your appliance dealer has a kit available with a
1
wWARNING
Electrical Shock Hazard
Unplug the refrigerator before installing the
ice maker.
Failure to do so can result in death or
electrical shock.
IMPORTANT:
• Use copper tubing only and check for leaks.
• Install ice maker tubing in areas where temperatures
are above freezing.
Tools required:
• Tightly fitting gloves
• Water bucket
• Masking tape
• Center punch
• Hammer
• Towel
• Standard screwdriver
• Two1⁄2-inch open-end wrenches or two adjustable
wrenches
•1⁄4-inch hex nut driver
•1⁄4-inch drill bit
•3⁄8-inch drill bit
• Hand drill or electric drill (properly grounded)
⁄4-inch saddle type shut-off valve, a union, and copper
tubing. Before purchasing, make sure a saddle type
valve complies with your local plumbing codes. Do not
use piercing type or 3⁄16-inch saddle valve which
reduces water flow and clogs more easily.
Cold water supply
The ice maker water valve contains a flow washer
which is used as a water pressure regulator. The ice
maker needs to be connected to a cold water line
with water pressure limitations of 20-120 psi. If a
problem occurs, call your utility company.
IMPORTANT:
• It may take up to 24 hours for your ice maker to
begin producing ice.
• If operating the refrigerator before installing the water
connection, turn ice maker to the OFF position to
prevent operation without water.
• All installations must be in accordance with local
plumbing code requirements.
INSTALLATION IS NOT WARRANTED
BY REFRIGERATOR OR ICE MAKER
MANUFACTURER.
8
Connecting to water line
1. Find a 1⁄2-inch to 11⁄4-inch vertical COLD water pipe
near the refrigerator.
NOTE: Horizontal pipe will work, but the following
precaution must be taken: Drill on the top side of the
pipe, not the bottom. This will help keep water away
from the drill. This also keeps normal sediment from
collecting in the valve.
2. Measure from connection on rear of refrigerator to
water pipe. Add 8 feet (2.4 m) to allow for moving
refrigerator for cleaning. This is the length of 1⁄4-inch
O.D. copper tubing you will need for the job (length
from connection to water pipe PLUS 8 feet [2.4 m]).
Be sure both ends of copper tubing are cut square.
3. Turn OFF main water supply. Turn ON nearest
faucet at the lowest elevation long enough to clear
line of water.
4. Using a grounded drill, drill a 1⁄4-inch hole on one
side of the cold water pipe you have selected.
5. Fasten shut-off valve to cold water pipe with pipe
clamp. Be sure outlet end is solidly in the 1⁄4-inch
drilled hole in the water pipe and that washer is
under the pipe clamp. Tighten packing nut. Tighten
the pipe clamp screws carefully and evenly so
washer makes a watertight seal. Do not overtighten
or you may crush the copper tubing, especially if soft
(coiled) copper tubing is used. Now you are ready to
connect the copper tubing.
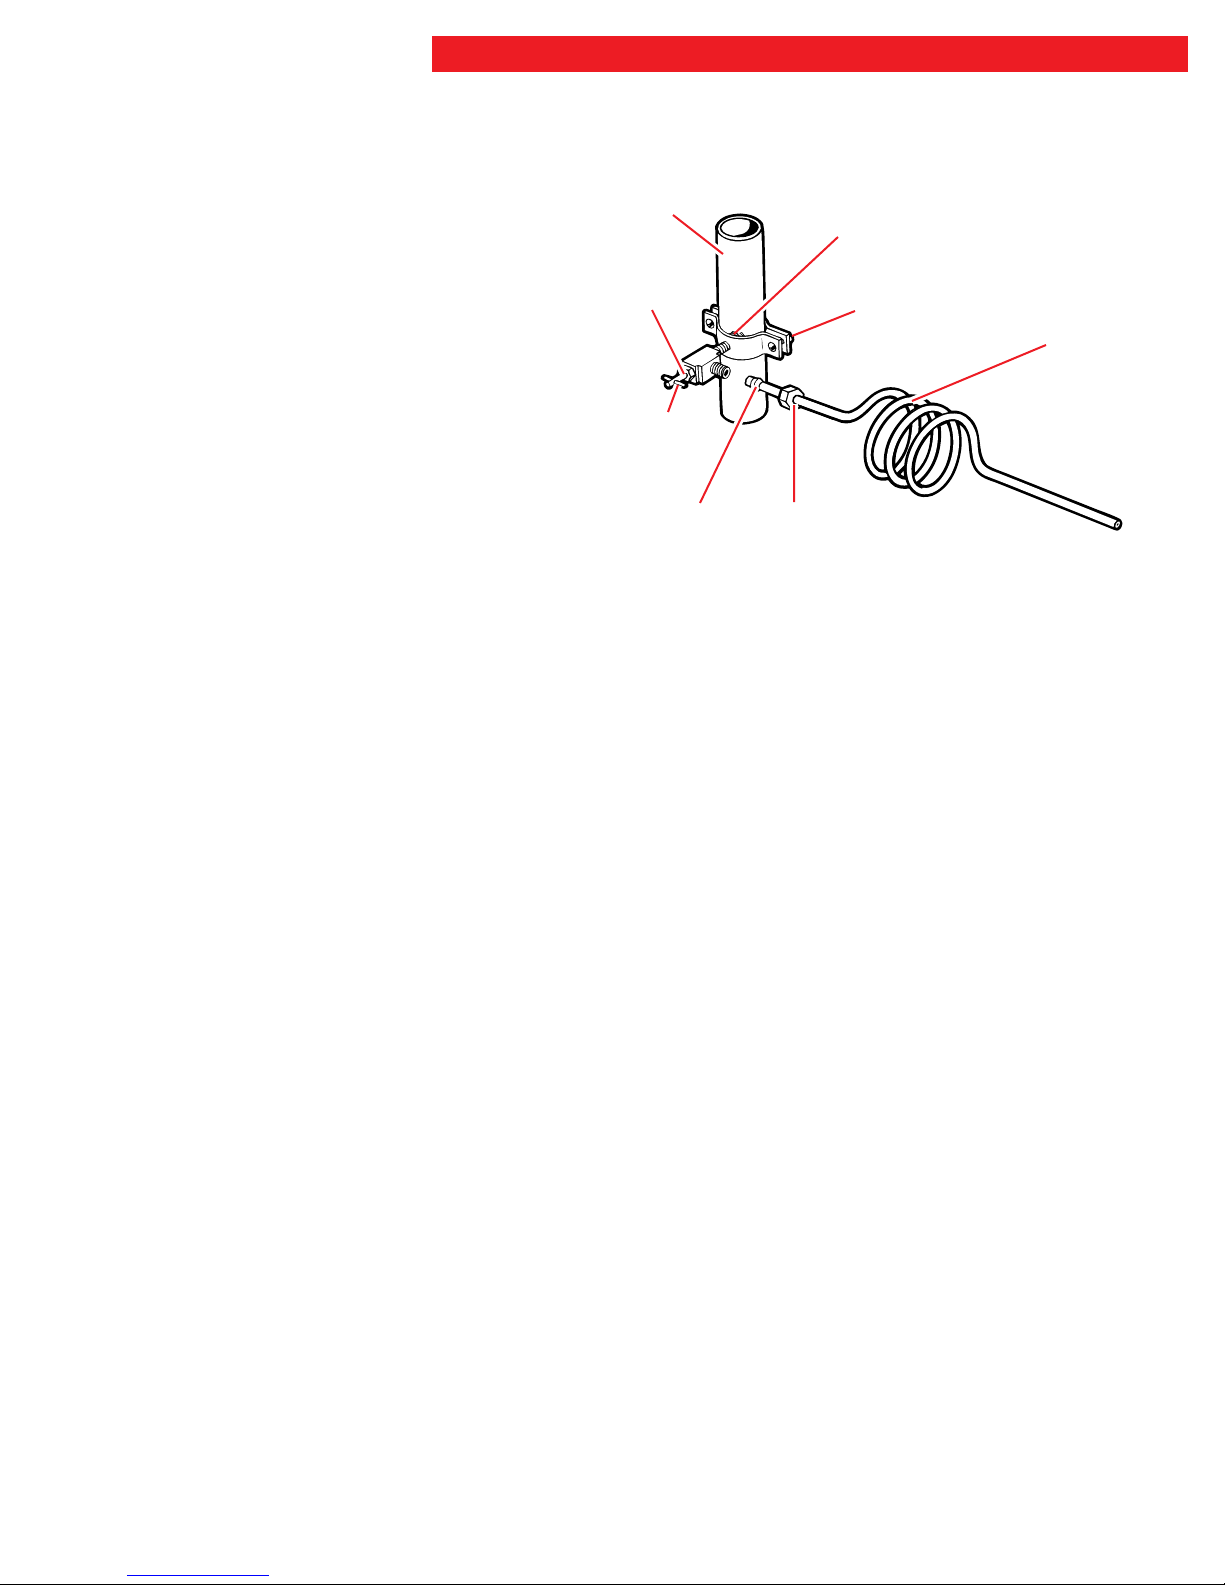
6. Slip compression nut and compression sleeve on
copper tubing as shown in diagram. Insert end of
tubing into outlet end squarely as far as it will go.
Screw compression nut onto outlet end with adjustable wrench. Do not overtighten. Turn ON main
water supply and flush out tubing until water is clear.
Turn OFF shut-off valve on the water pipe. Coil
copper tubing.
INSTALLING YOUR REFRIGERATOR
Vertical cold
water pipe
Rubber washer
Packing
nut
Water
shut-off
valve*
Compression
sleeve
Pipe clamp
Compression
* Controls water supply
nut
1
⁄4-inch O.D. copper
tubing (length from
inlet on rear of
refrigerator to water
pipe plus 8 feet
[2.4 m])
TO REFRIGERATOR ➔
9

INSTALLING YOUR REFRIGERATOR
Connecting to refrigerator
1. While your refrigerator is away from the wall, remove
and save the lower cover by removing the screws.
2. Remove the nut and sleeve from the adapter fitting
and slide the brass nut and sleeve over the end of
the copper tubing. Insert the copper tubing completely into the adapter fitting and make sure that the
hose washer is in place. Tighten the adapter fitting
by hand as much as possible, then tighten 1/2 turn
with an adjustable wrench. Make sure the copper
tubing is secure by pulling on it gently.
3. Turn shut-off valve ON. CHECK FOR LEAKS.
TIGHTEN ANY CONNECTIONS (INCLUDING
CONNECTIONS AT THE VALVE) OR NUTS
THAT LEAK.
4. Replace the lower back cover onto the refrigerator
and replace and tighten the screws. Be sure to tuck
wires inside the cover. Do not allow wires to be
pinched.
5. Create a service loop with the copper tubing to avoid
kinks and secure it to the refrigerator cabinet
using the “P” clamp.
6. Plug in the refrigerator and recheck for leaks while it
is running. Make sure that the water inlet tube in the
freezer section stays firmly in place.
7. Reposition the refrigerator against the wall.
10
 Loading...