

Whirlpool DP840SWKX, DU800SWKQ, DU810SWKQ, DU811SWKQ, DU840SWKQ Owner's Manual
...
®
Model Series/Modèles des séries
400, 800, 810, 811, 840, 850, 890
DISHWASHER
Use & Care Guide
For questions about features, operation/performance
parts, accessories or service, call:
In Canada, call for assistance
www.whirlpool.com
and service, call:
or visit our website at...
or
1-800-253-1301
1-800-461-5681
1-800-807-6777
www.whirlpool.com/canada
.
, for installation
LAVE-VAISSELLE
Guide d’utilisation
et d’entretien
Au Canada, pour assistance, composez le
installation ou service
ou visitez notre site web à
www.whirlpool.com/canada
1-800-807-6777
1-800-461-5681
, pour
3381186A
Table of Contents/Table des matières............. 2

TABLE OF CONTENTS
TABLE DES MATIÈRES
DISHWASHER SAFETY .................................................................3
PARTS AND FEATURES................................................................5
UNDERCOUNTER START-UP GUIDE..........................................7
Using Your New Dishwasher .......................................................7
Stopping Your Dishwasher ..........................................................7
PORTABLE START-UP GUIDE .....................................................8
Using Your New Dishwasher .......................................................8
Stopping Your Dishwasher ..........................................................8
CONNECTING YOUR PORTABLE DISHWASHER......................9
Connecting the Faucet Adapter...................................................9
Connecting to Water and Electrical Supply.................................9
Using the Faucet ........................................................................10
Disconnecting the Dishwasher ..................................................10
DISHWASHER LOADING............................................................10
Loading Suggestions .................................................................10
Loading Top Rack......................................................................10
Loading Bottom Rack ................................................................11
Loading Silverware Basket ........................................................11
DISHWASHER USE.....................................................................12
Detergent Dispenser ..................................................................12
Rinse Aid Dispenser...................................................................12
Dishwasher Efficiency Tips ........................................................13
Cycle Selection Charts...............................................................13
Canceling a Cycle ......................................................................14
Changing a Cycle or Setting ......................................................14
Adding Items During a Cycle .....................................................14
Option Selections.......................................................................14
Drying System............................................................................15
Overfill Protection Float..............................................................15
WASHING SPECIAL ITEMS.........................................................15
DISHWASHER CARE ...................................................................16
Cleaning......................................................................................16
Cleaning the Filter Screen..........................................................16
Drain Air Gap..............................................................................17
Storing........................................................................................17
TROUBLESHOOTING ..................................................................17
ASSISTANCE OR SERVICE.........................................................19
In the U.S.A. ...............................................................................19
In Canada ...................................................................................19
WARRANTY ..................................................................................20
LA SÉCURITÉ DU LAVE-VAISSELLE .........................................21
PIÈCES ET CARACTÉRISTIQUES ..............................................23
GUIDE DE MISE EN MARCHE
DU LAVE-VAISSELLE ENCASTRÉ..............................................25
Utilisation de votre nouveau lave-vaisselle................................25
Arrêt du lave-vaisselle................................................................25
GUIDE DE MISE EN MARCHE
DU LAVE-VAISSELLE MOBILE ..................................................26
Utilisation de votre nouveau lave-vaisselle................................26
Arrêt du lave-vaisselle................................................................26
CONNEXION DU LAVE-VAISSELLE MOBILE............................26
Connexion de l’adaptateur pour robinet....................................26
Connexion à la source d’eau et d’alimentation électrique ........27
Utilisation du robinet ..................................................................27
Déconnexion du lave-vaisselle...................................................28
CHARGEMENT DU LAVE-VAISSELLE.......................................28
Suggestions de chargement......................................................28
Chargement du panier supérieur ...............................................28
Chargement du panier inférieur .................................................29
Chargement du panier à couverts .............................................29
UTILISATION DU LAVE-VAISSELLE...........................................30
Distributeur de détergent ...........................................................30
Distributeur d’agent de rinçage..................................................31
Conseils d’efficacité pour le lave-vaisselle ................................31
Tableaux de sélection de programmes .....................................32
Annulation d’un programme ......................................................33
Changement d’un programme ou réglage ................................33
Addition de vaisselle durant un programme..............................33
Sélection d’options.....................................................................33
Système de séchage..................................................................34
Dispositif de protection contre le débordement........................34
LAVAGE D’ARTICLES SPÉCIAUX ..............................................34
ENTRETIEN DU LAVE-VAISSELLE.............................................35
Nettoyage ...................................................................................35
Nettoyage de l’écran du filtre.....................................................35
Dispositif anti-refoulement .........................................................36
Remisage....................................................................................36
DÉPANNAGE.................................................................................36
ASSISTANCE OU SERVICE.........................................................38
Aux États-Unis............................................................................38
Au Canada..................................................................................38
GARANTIE.....................................................................................39
2
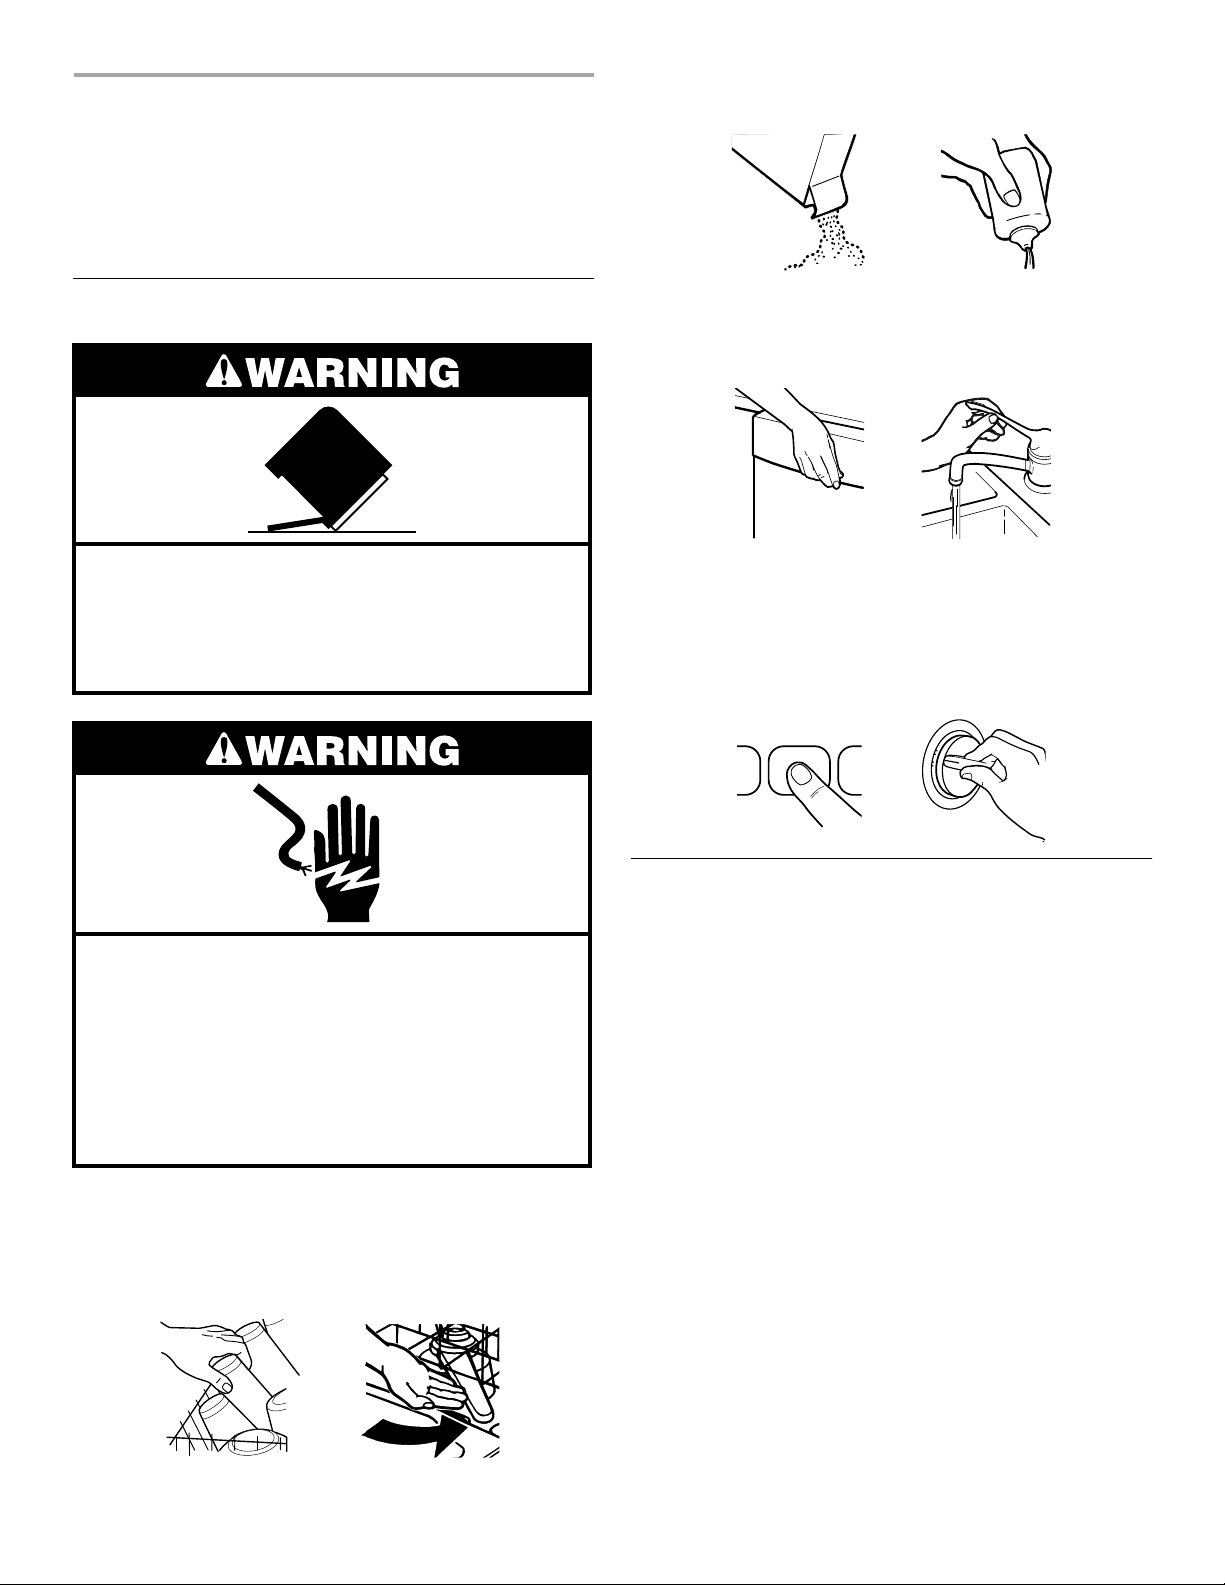
DISHWASHER SAFETY
Your safety and the safety of others are very important.
We have provided many important safety messages in this manual and on your appliance. Always read and obey all
safety messages.
This is the safety alert symbol.
This symbol alerts you to potential hazards that can kill or hurt you and others.
All safety messages will follow the safety alert symbol and either the word “DANGER” or
“WARNING.” These words mean:
You can be killed or seriously injured if you don't
immediately follow instructions.
can be killed or seriously injured if you don't
You
follow instructions.
All safety messages will tell you what the potential hazard is, tell you how to reduce the chance of injury, and tell you
what can
happen if the instructions are not followed.
3
■
Install where dishwasher is protected from the elements.
Protect against freezing to avoid possible rupture of fill valve.
Such ruptures are not covered by the warranty. See “Storing”
in the “Dishwasher Care” section for winter storage
information.
■
Install and level dishwasher on a floor that will hold the
weight, and in an area suitable for its size and use.
■
Remove all shipping plugs from hoses and connectors (such
as the cap on the drain outlet) before installing. See
Installation Instructions for complete information.
4

PARTS AND FEATURES
4
This manual covers several different models. The dishwasher you have purchased may have some or all of the parts and features listed
below.
1
2
3
4
5
6
1
7
8
9
10
11
12
13
Top r a ck
1.
Water inlet opening
2.
Bottom rack
3.
Rack bumper
4.
Heating element
5.
Vent
6.
Series 400
Spray tower and protector
7.
Model and serial number label
8.
Silverware basket
9.
Spray arm
10.
Overfill protection float
11.
Detergent dispenser
12.
Rinse aid dispenser
13.
Other features your dishwasher
OFF
may have
Third level wash
14.
5

Series 800
Series 810 and 811
Series 840
Series 850
Series 890
6
UNDERCOUNTER
START-UP GUIDE
Before using your dishwasher, remove all packaging materials.
Read this entire Use and Care Guide. You will find important
safety information and useful operating tips.
Using Your New Dishwasher
3.
Add detergent and check the rinse aid dispenser. Add rinse
aid if needed. (See “Dishwasher Use.”)
4.
Push door firmly closed. The door latches automatically. Run
hot water at the sink nearest your dishwasher until the water
is hot. (See “Dishwasher Efficiency Tips.”) Turn off water.
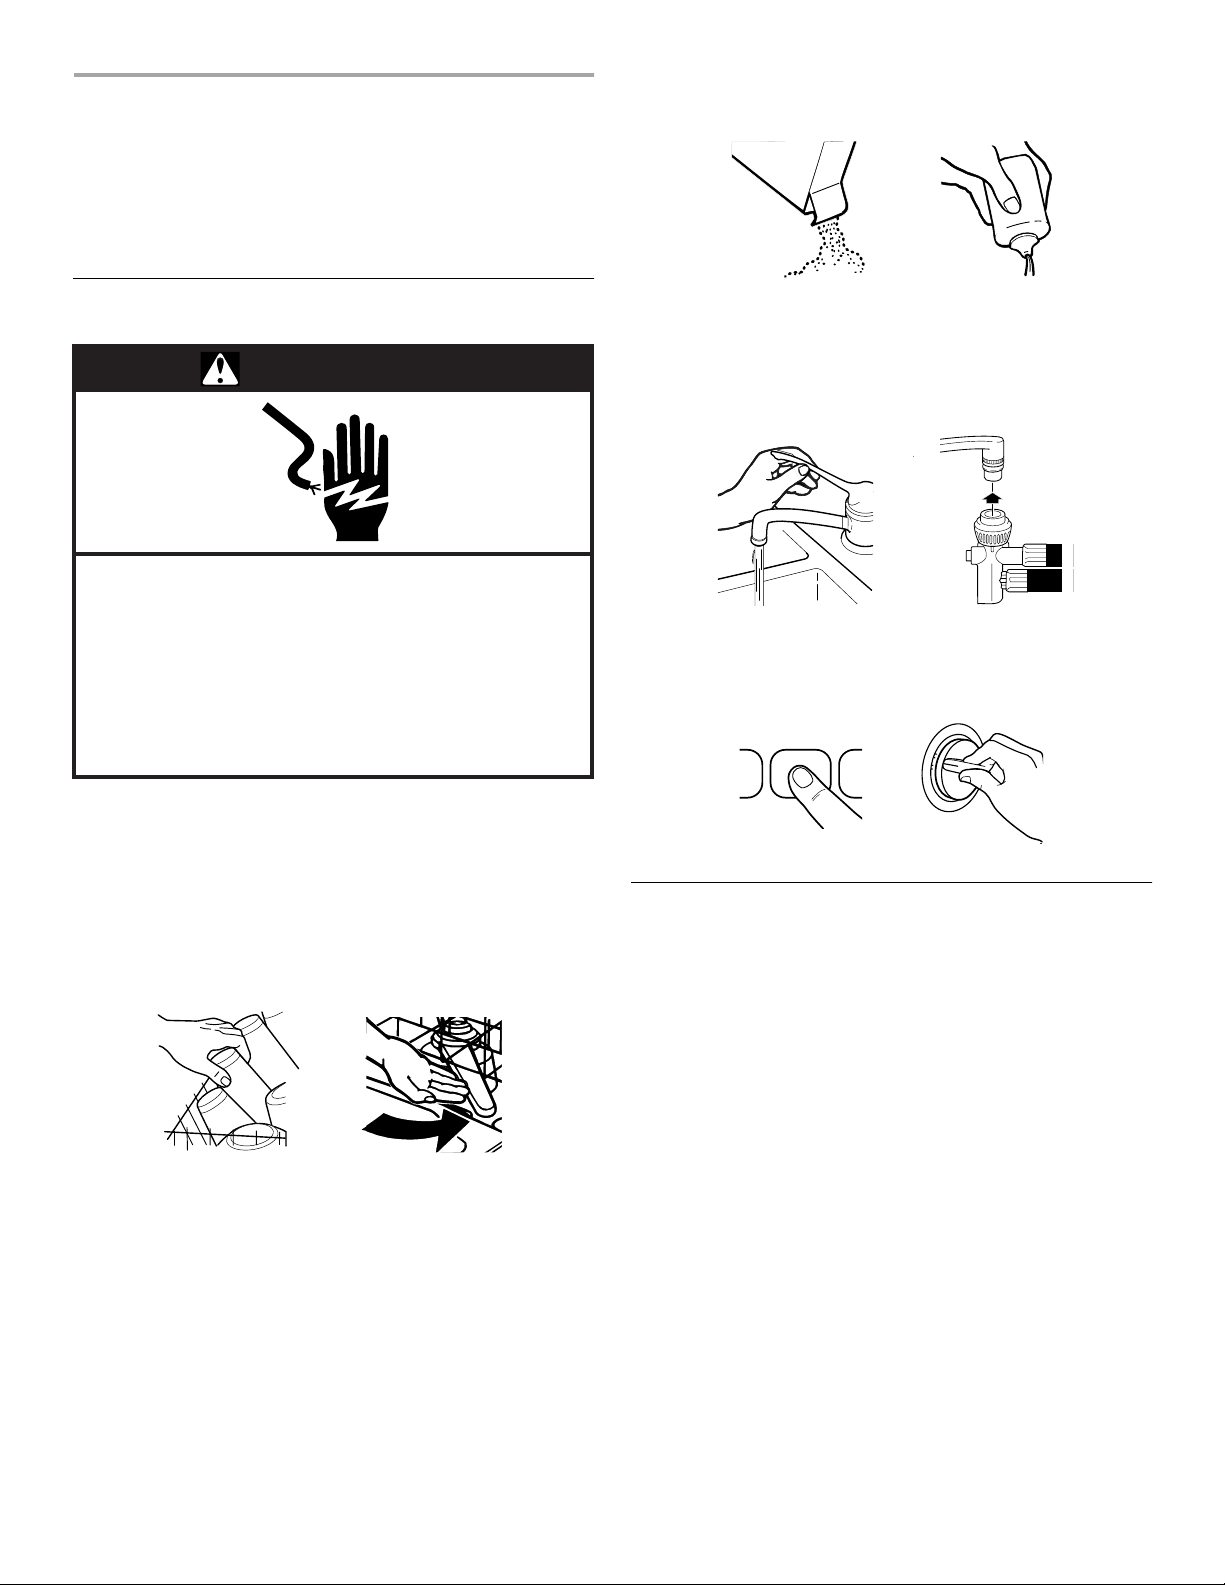
Tip Over Hazard
Do not use dishwasher until completely installed.
Do not push down on open door.
Doing so can result in serious injury or cuts.
Electrical Shock Hazard
Electrically ground dishwasher.
Connect ground wire to green ground connector
in terminal box.
Do not use an extension cord.
Failure to follow these instructions can result in
death, fire, or electrical shock.
5.
Select a drying option.
NOTE:
Use Air Dry for the Rinse Only cycle.
6. For Series 840, 850 and 890:
option selections. (See “Dishwasher Use.”) Turn the Cycle
Control knob to the desired cycle to start.
Press the desired cycle and
Stopping Your Dishwasher
You can stop your dishwasher anytime during a cycle.
1.
Open the door slightly.
2.
Wait for the spraying action to stop. Then open the door all
the way, if needed.
3.
Close the door to continue the cycle.
OR
1.
Turn the Cycle Control knob slowly clockwise until you hear
water draining. Let the dishwasher drain completely.
2.
Open the door.
3.
Turn the Cycle Control knob to OFF.
1.
Scrape large food soil and hard items (toothpicks or bones)
from dishes.
2.
Properly load the dishwasher. (See “Dishwasher Loading.”)
Make sure nothing prevents the spray arm(s) from spinning
freely.
7
PORTABLE
START-UP GUIDE
Before using your dishwasher, remove all packaging materials.
Read this entire Use and Care Guide. You will find important
safety information and useful operating tips.
4.
Add detergent and check the rinse aid dispenser. Add rinse
aid if needed. (See “Dishwasher Use.”)
Using Your New Dishwasher
WARNING
Electrical Shock Hazard
Plug into a grounded 3 prong outlet.
Do not remove ground prong.
Do not use an adapter.
Do not use an extension cord.
Failure to follow these instructions can result in
death, fire, or electrical shock.
A power supply of 120 volts, 60 Hz AC, 15 or 20 amps, is
required.
1.
Plug into a grounded 3 prong outlet.
2.
Scrape large food soil and hard items (toothpicks or bones)
from dishes.
3.
Properly load the dishwasher. (See “Dishwasher Loading.”)
Make sure nothing prevents the spray arm(s) from spinning
freely.
5.
Push door firmly closed. The door latches automatically. Run
hot water at the sink where you will connect dishwasher until
water is hot. (See “Dishwasher Efficiency Tips.”) Turn off the
water and hook the dishwasher to the faucet. (See
“Connecting Your Dishwasher.”) Turn on the hot water.
6.
Press the desired cycle and option selections. (See
“Dishwasher Use.”) Turn the Cycle Control knob to the
desired cycle to start.
Stopping Your Dishwasher
You can stop your dishwasher anytime during a cycle.
1.
Open the door slightly.
2.
Wait for the spraying action to stop. Then open the door all
the way, if needed.
3.
Close the door to continue the cycle.
OR
1.
Turn the Cycle Control knob slowly clockwise until you hear
water draining. Let the dishwasher drain completely.
2.
Open the door.
3.
Turn the Cycle Control knob to OFF.
8
CONNECTING YOUR
PORTABLE DISHWASHER
Connecting the Faucet Adapter
NOTE:
A special adapter must be installed on the faucet before
the dishwasher can be connected. Complete Installation
Instructions and the adapter are packed with your dishwasher.
(See the Installation Instructions.)
When moving your dishwasher, make sure the door is latched.
Hold the dishwasher at the top front corners.
Preparing the faucet
1.
Remove the screen holder or aerator, screen, and washer
from the end of the faucet.
2.
Use the faucet adapter kit that came with your portable
dishwasher to modify the faucet where the dishwasher will be
used.
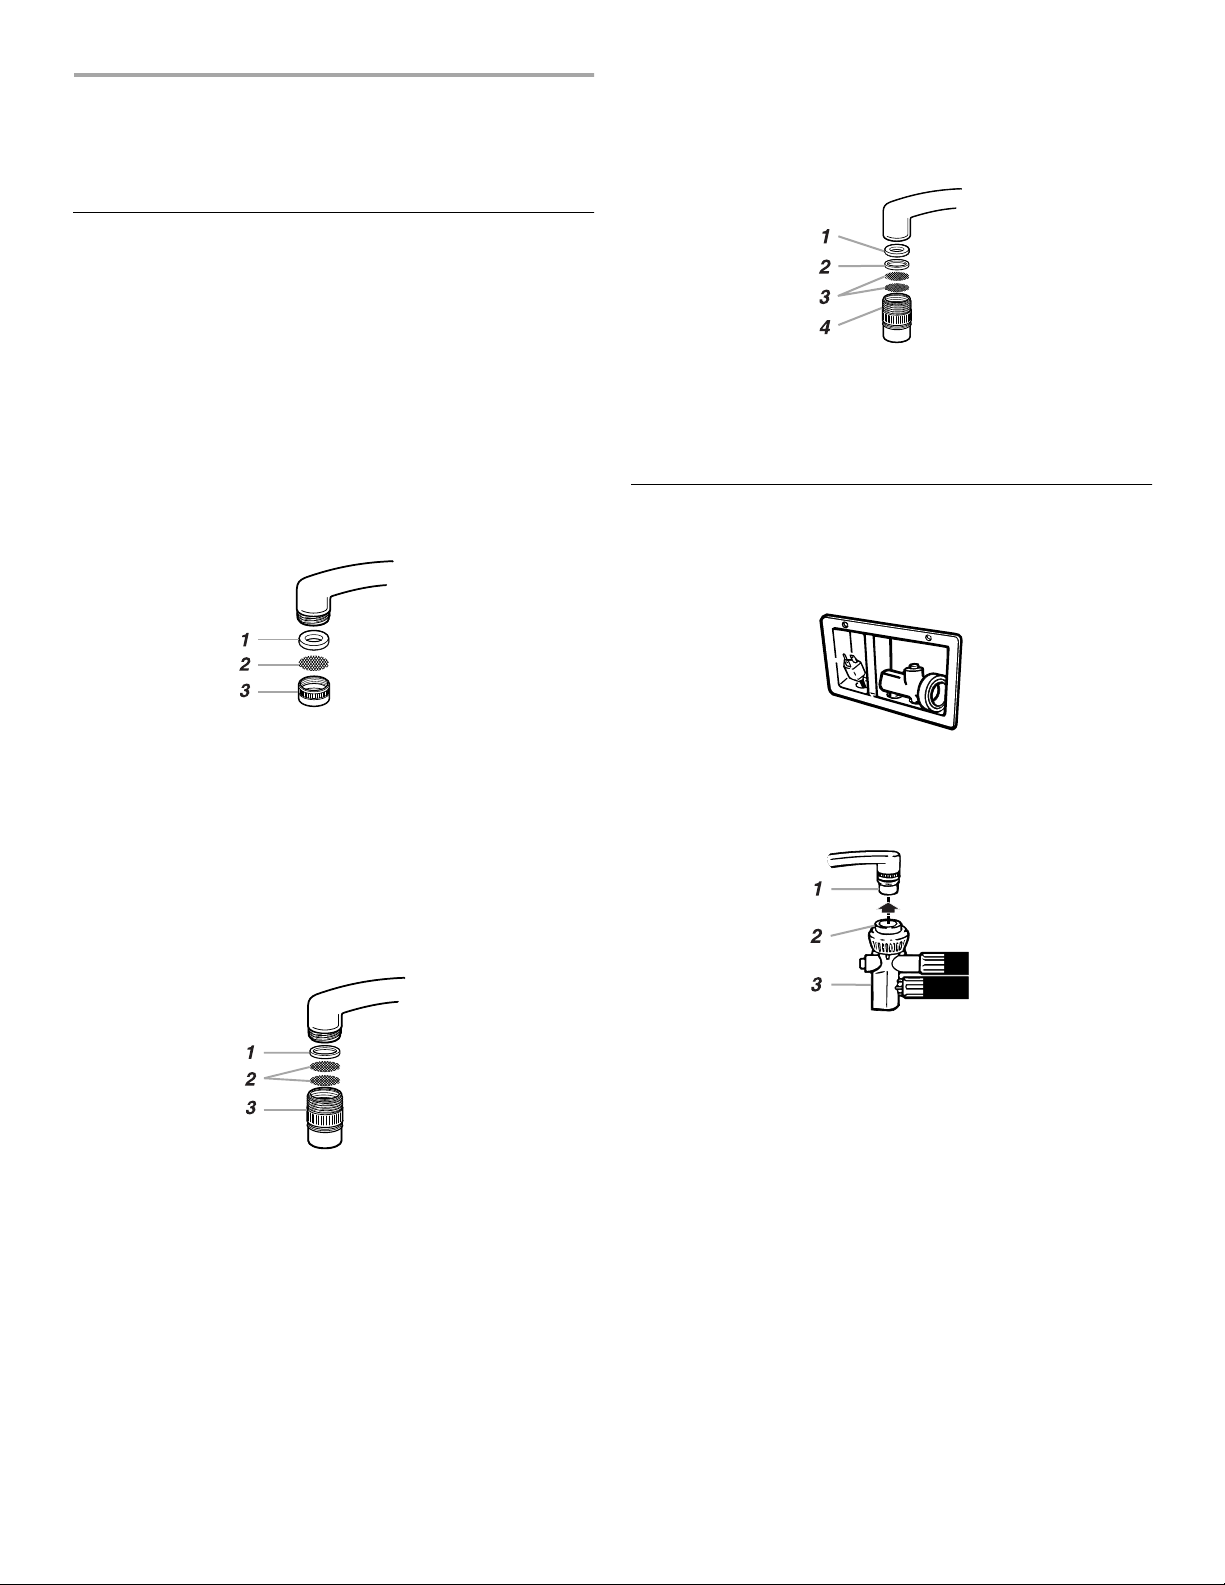
Connecting the faucet adapter to faucets with
internal threads
Insert the two screens, the thin washer, and then the thick washer
from the faucet adapter kit into the faucet adapter. Attach the
adapter onto the end of the faucet.
1. Thick washer
2. Thin washer
3. Screens
4. Faucet adapter
NOTE:
Use both washers.
Connecting to Water and Electrical Supply
1.
Run water at the faucet until it is hot. Turn the water off.
2.
Pull the hoses out of their storage compartment on the back
of the dishwasher.
1. Washer
2. Screen
3. Screen holder or aerator
NOTE:
Remove and save the washer, screen, and screen holder
or aerator for future use.
Connecting the faucet adapter to faucets with
external threads
Insert the two screens and then the thin washer from the faucet
adapter kit into the faucet adapter. Attach the adapter onto the
end of the faucet.
1. Thin washer
2. Screens
3. Faucet adapter
NOTE:
Do not use the thick washer.
NOTE:
Make sure the hoses are not kinked or twisted. Kinked
hoses reduce washing performance.
3.
Pull down on the locking collar while lifting the hose
connector onto the faucet adapter.
1. Faucet adapter
2. Locking collar
3. Hose connector
4.
When the connector snaps into place, release the locking
collar.
5.
Turn the hot water on slowly until it is all the way on.
6.
Plug into a grounded 3 prong outlet.
9
Using the Faucet
You can draw water from the faucet while the dishwasher is
connected.
NOTE:
water is being pumped out. (This helps prevent a low fill when
dishwasher is filling or mixing drain water with fresh water when
dishwasher is draining.)
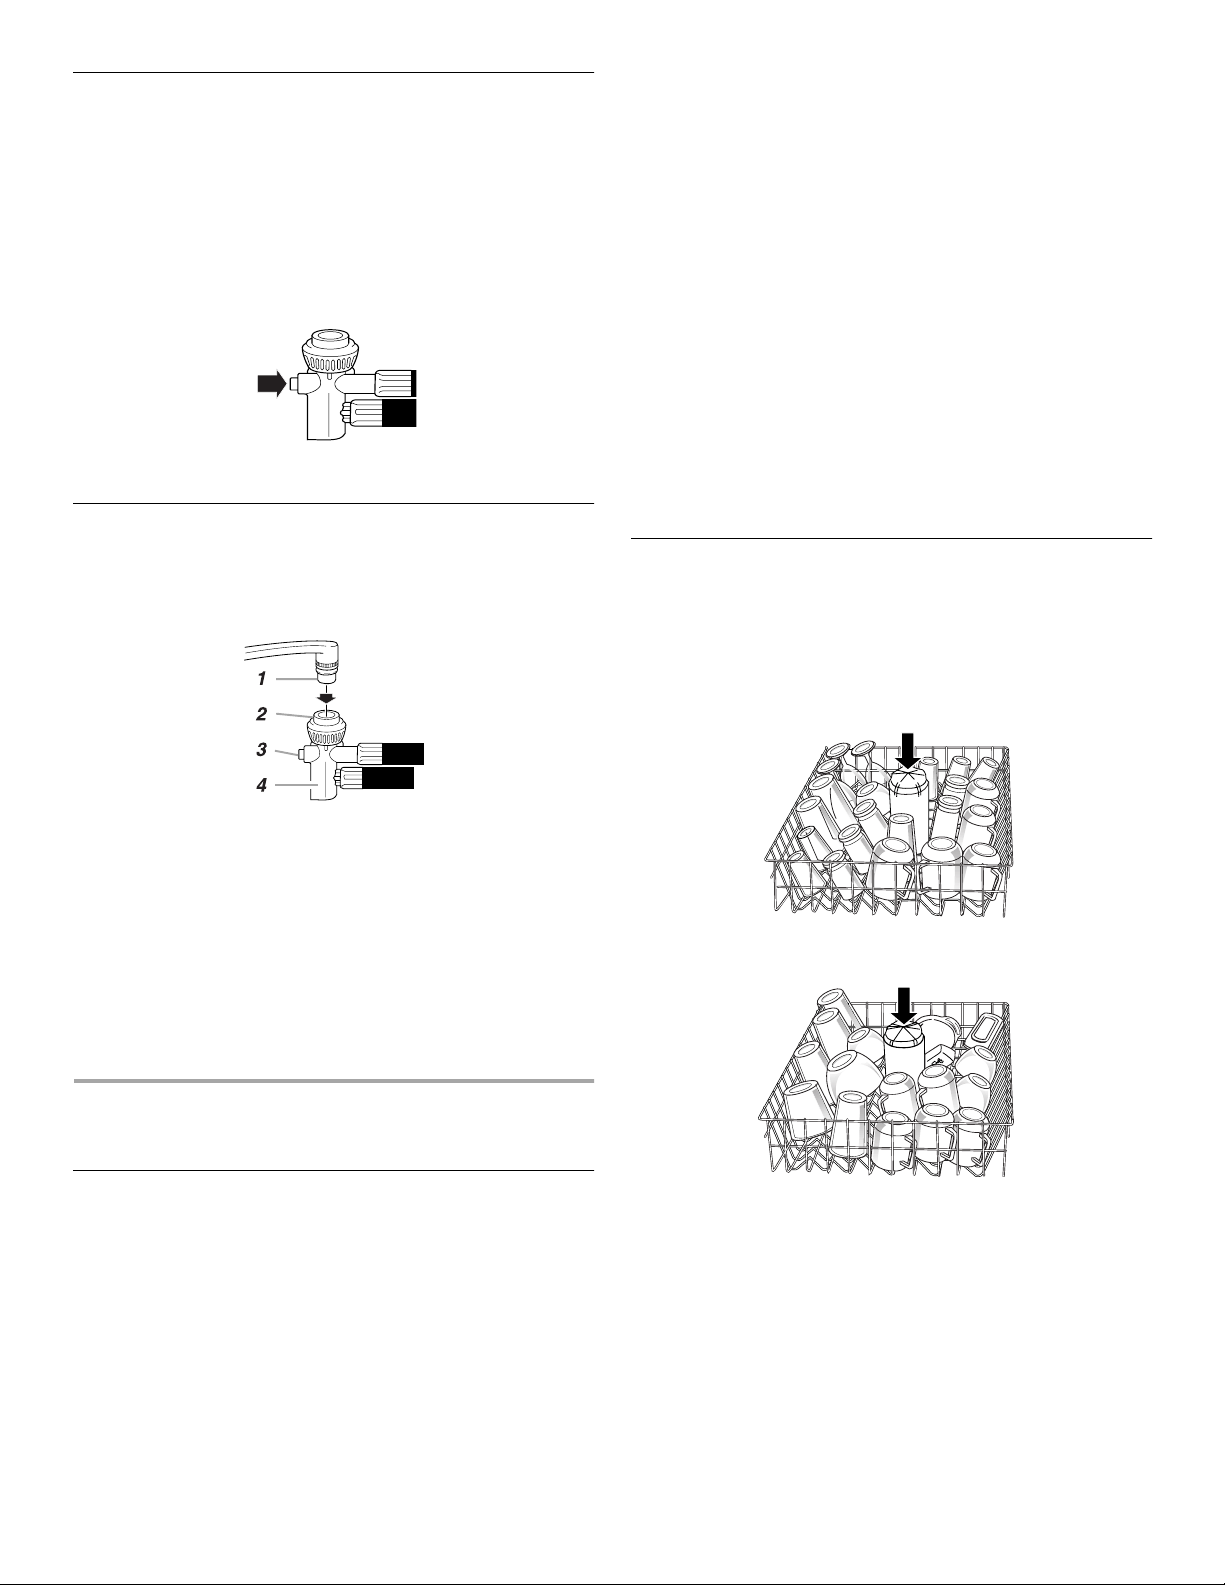
Press the red button on the hose connector to draw water from
the faucet. (The faucet is set on hot. Adjust the faucet for the
water temperature you want.)
NOTE:
faucet. Turn off the cold water.
Do not draw water while the dishwasher is filling or while
Turn the hot water back on after you draw water from the
Disconnecting the Dishwasher
1.
Turn the hot water off. (This can be done after the last rinse.)
2.
Press the red button on the connector to release the water
pressure.
■
It is important for the water spray to reach all soiled surfaces.
■
Load dishes so they are not stacked or overlapping, if
possible. For best drying, water must be able to drain from all
surfaces.
■
Make sure pot lids and handles, pizza pans, cookie sheets,
etc., do not interfere with the spray arm rotation.
■
Run a rinse cycle to keep dishes moist if you do not plan to
wash them soon. Foods such as eggs, rice, pasta, spinach,
and cooked cereals may be hard to remove if they are left to
dry over a period of time.
Quiet operating tips
To avoid thumping/clattering noises during operation:
■
Make sure lightweight load items are secured in the racks.
■
Make sure pot lids and handles, pizza pans, cookie sheets,
etc., do not touch interior walls or interfere with the rotation of
the spray arm.
■
Load dishes so they do not touch one another.
NOTE:
For built-in models, keep sink drain plugs closed during
dishwasher operation to prevent noise transfer through drains.
Loading Top Rack
The top rack is designed for cups, glasses, and smaller items.
(See recommended loading patterns shown.)
NOTE:
The features on your dishwasher rack may vary from the
drawings shown.
Do not cover third level wash (on some models). See arrow.
1. Faucet adapter
2. Locking collar
3. Red button
4. Hose connector
3.
Lift slightly on the hose connector while pulling down the
locking collar. Pull down on the connector.
4.
Empty any remaining water from the connector by turning the
connector upside-down.
5.
Unplug the power supply cord and return it to the storage
compartment.
6.
Return the hoses to the storage compartment.
DISHWASHER LOADING
Loading Suggestions
■
Remove leftover food, bones, toothpicks and other hard
items from the dishes. It is not necessary to rinse the dishes
before putting them into the dishwasher. The wash module
removes food particles from the water. The module contains a
chopping device which will reduce the size of food items.
NOTE:
If hard items such as fruit seeds, nuts, and egg shells
enter the wash module, you might hear chopping, grinding,
crunching, or buzzing sounds. These sounds are normal
when hard items enter the module. Do not let metallic items
(such as pot handle screws) get into the wash module.
Damage can occur.
Cup and glass load
Mixed load
■
Place items so open ends face down for cleaning and
draining.
■
Load glasses and cups in top rack only. The bottom rack is
not designed for glasses and cups. Damage can occur.
■
Place cups and glasses in the rows between tines. Placing
them over the tines can lead to breakage.
■
To avoid chipping, do not let stemware touch other items.
■
China, crystal, and other delicate items must not touch each
other during dishwasher operation. Damage can occur.
10
■
Wedge lightweight items against one another or overlap them
with heavier dishes.
■
Load plastic items securely in the top rack only. Wash only
plastic items marked “dishwasher safe.”
■
Small bowls, pans, and other utensils can be placed in the
top rack. Load bowls in the center section for best stability.
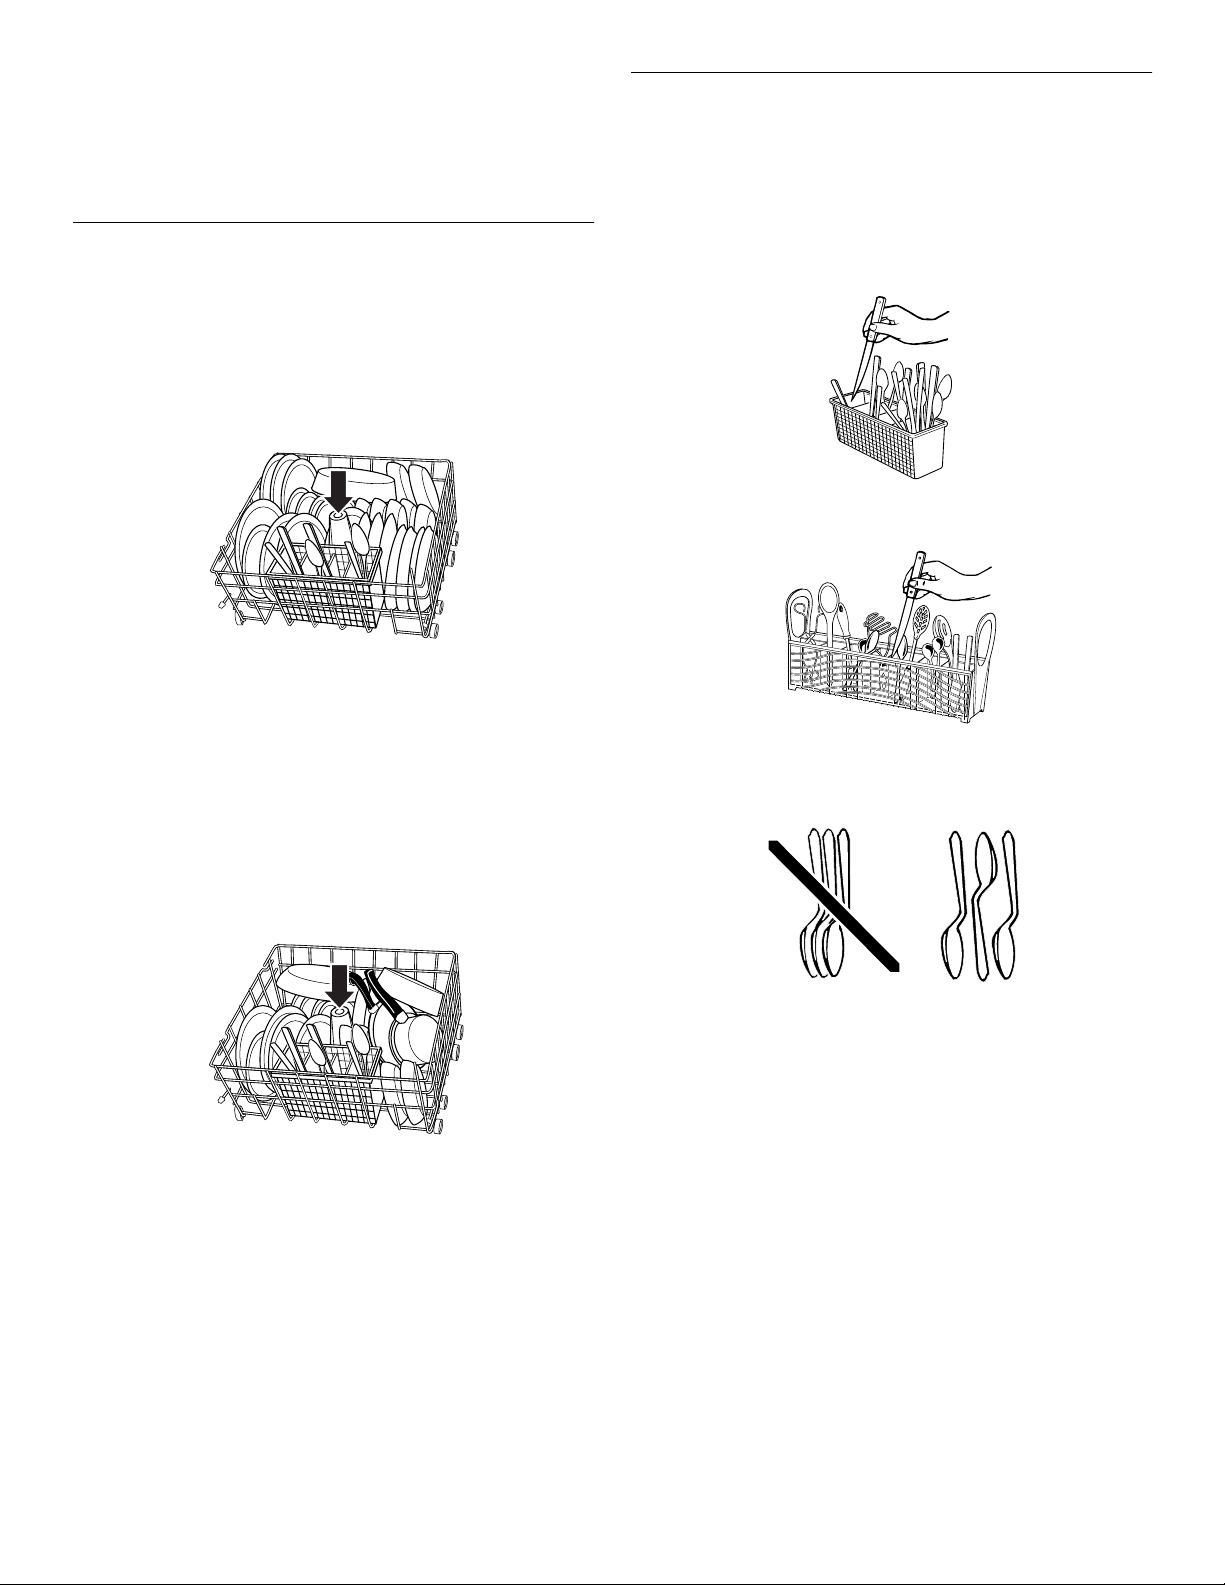
Loading Silverware Basket
Load the silverware basket while it is in the bottom rack or take
the basket out for loading on a counter or table.
NOTE:
Unload or remove the basket before unloading the racks
to avoid spilling water droplets on the silverware.
Loading Bottom Rack
The bottom rack is designed for plates, pans, casseroles, and
utensils. Items with cooked-on or dried-on food should be loaded
with soiled surfaces facing inward to the spray. (See
recommended loading patterns shown.)
NOTE:
The features on your dishwasher rack may vary from the
drawings shown.
Do not cover spray tower. See arrow.
Mixed load
■
Do not load glasses, cups, or plastic items in the bottom
rack. Load small items in the bottom rack only if they are
secured in place.
■
Load plates, soup bowls, etc., between tines and facing
inward to the spray.
■
Overlap the edges of plates for large loads.
■
Load soup, cereal, and serving bowls in the rack in a variety
of ways depending upon their size and shape. Load bowls
securely between the rows of tines. Do not nest bowls
because the spray will not reach all surfaces.
Style 1
(on some models)
Style 2
(on some models)
Mix items in each section of the basket with some pointing up
and some down to avoid nesting. Spray cannot reach nested
items.
Utensil load
■
Load cookie sheets, cake pans, and other large items at the
sides and back. Loading such items in front can keep the
water spray from reaching the detergent dispenser and
silverware basket.
■
Secure heavily soiled cookware face down in the rack.
■
Make sure pot handles and other items do not stop rotation
of the spray arm(s). The spray arm(s) must move freely.
■
Do not load items between the bottom rack and the side of
the dishwasher tub because they might block the water inlet
opening.
NOTE:
If you have removed the bottom rack for unloading or
cleaning, replace it with the bumpers in front.
IMPORTANT:
Always load sharp items (knives, skewers, etc.)
pointing down.
NOTES:
■
Do not load silver or silver-plated silverware with stainless
steel. These metals can be damaged by contact with each
other during washing.
■
Some foods (such as salt, vinegar, milk products, fruit juices,
etc.) can pit or corrode silverware. Run a rinse cycle if you do
not have a full load to wash immediately.
11
DISHWASHER USE
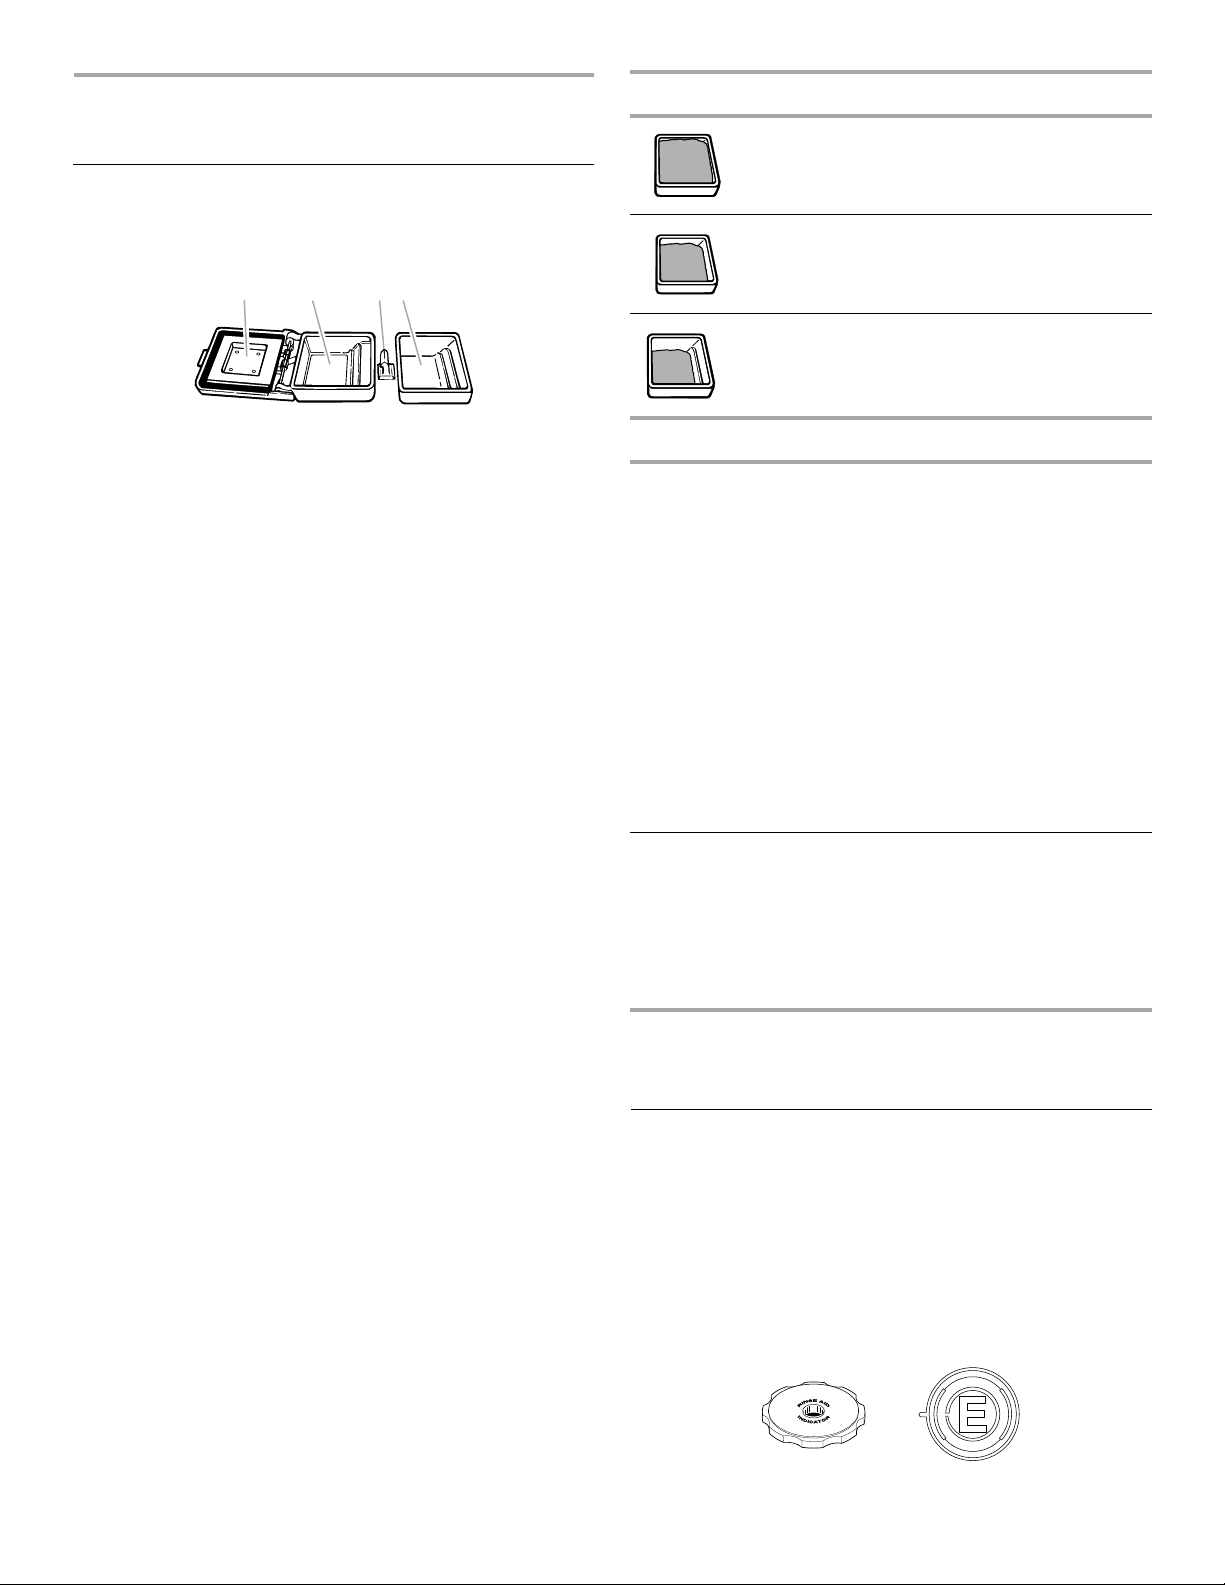
Detergent Dispenser
The detergent dispenser has 2 sections. The Pre-Wash section
empties detergent into the dishwasher when you close the door.
1.
2. 3.
4.
Where to fill
Top of 3rd step (3 tbs or 45 g)
Top of 2nd step (2 tbs or 30 g)
Top of 1st step (1 tb or 15 g)
1. Cover
2. Main Wash section
3. Cover latch
4. Pre-Wash section
The Main Wash section automatically empties detergent into the
dishwasher during the main wash. (See the “Cycle Selection
Charts.”)
■
Use automatic dishwashing detergent only. Other detergents
can produce excessive suds that can overflow out of the
dishwasher and reduce washing performance.
■
Add detergent just before starting a cycle.
■
Store tightly closed detergent in a cool, dry place. Fresh
automatic dishwasher detergent results in better cleaning.
NOTE:
Do not use detergent with a rinse cycle.
Filling the dispenser
1.
If the dispenser cover is closed, open the cover by pushing
the Cover latch.
2.
Fill the Main Wash section with detergent. See “How Much
Detergent to Use.”
3.
Close the Main Wash dispenser cover. Fill the Pre-Wash
section if needed.
It is normal for the cover to open partially when dispensing
detergent.
NOTE:
Use both sections for cycles with 2 washes. Use only the
covered section for cycles with 1 wash. See the “Cycle Selection
Charts” for more details.
How much detergent to use
■
The amount of detergent to use depends on the hardness of
your water and the type of detergent. If you use too little,
dishes won’t be clean. If you use too much in soft water,
glassware will etch.
■
Water hardness can change over a period of time. Find out
your water’s hardness by asking your local water department,
water softener company, or county extension agent.
■
Different brands of dishwasher detergent have different
amounts of phosphorus for softening water. If you have hard
water and use a detergent with a phosphorous content of
less than 8.7%, you might need to use more detergent, or use
a detergent with a phosphorous content higher than 8.7%.
Water Hardness Amount of Detergent
Soft to Medium
Hard Water
0 to 6 grains per
gallon
Medium to Hard
Water
7 to 12 grains per
gallon
NOTE:
Fill amounts shown are for standard powdered detergent.
Amounts may vary if you use liquid or concentrated powdered
detergent. Follow instructions on the package when using liquid
dishwasher detergent or concentrated powdered detergent.
For normally soiled loads
■
Fill the Main Wash section to the
top of the 2nd step (2 tbs or 30 g)
■
Fill the Pre-Wash section to the
top of the 2nd step (2 tbs or 30 g)
if needed
NOTE:
Add only 1 tb or 15 g of
detergent to both sections if dishes
are pre-rinsed or the water is very
soft (0 to 2 grains per gallon).
For heavily soiled loads
■
Fill the Main Wash section to the
top of the 3rd step (3 tbs or 45 g)
■
Fill the Pre-Wash section to the
top of the 2nd step (2 tbs or 30 g)
For normally soiled and
heavily soiled loads
■
Fill the Main Wash section to the
top of the 3rd step (3 tbs or 45 g)
■
Fill the Pre-Wash section to the
top of the 2nd step (2 tbs or 30 g)
if needed
Rinse Aid Dispenser
Rinse aids prevent water from forming droplets that can dry as
spots or streaks. They also improve drying by allowing water to
drain off of the dishes during the final rinse by releasing a small
amount of the rinse aid into the rinse water. Your dishwasher is
designed to use a liquid rinse aid. Do not use a solid or bar-type.
Checking the dispenser
Check the center of the Fill Indicator cap. Clear means it needs
filling.
12
OR
 Loading...