

Whirlpool DU7400XS4, DU1099XT2, DU1099XT3, DU1099XT0, DU1099XT1 Installation Guide

IMPORTANT
Installer: Leave Installation Instructions
with the appliance.
Save Installation Instructions for local
electrical inspector's use,
Unclercounter
Dishwasher
o!

Before you start...
_roper ir_ ciia ois is your uspor sibllity
Yak@ sure yo_J hcv_ @v@pithlr/g
_@c@ss,'J_V p()r COri@Cl ,l/5ia;iahor" li is
trie t@S!DO_%IE)II 1¥ or _ihe CL, srom@r tO
contaci e _bQlifled i¢'staher lo assure
fhct the _lum_biqg QnG elechiCQI
ir'staliatlons ,3re o_eqL, Qte, at_d meet
_lallonoi aqd IOCOi COCJ@s and
ora_FIQF_Ce5
IM PORTAN_[: Observe all governing
codes and ordinances.
PrOber elecl, CO_ csroh ant woler
s_oo y lines must be available or rqusl
De tr%lolled aS specifiec _, within
shaded area See EieQtrlool
requ torrents/ Water requirements/
ORal Drain reaulreqherlls sectIonS
Pl JFnDq IQ o_'d Wlrlri.% ShoL_ld no CROSS ff
trorff of iq_: mr Or th (: shwGs[ er
legs
IrJke cae lsoi o COS d_e
_Z}ower cold durit1{# nstallahor_
or rerqoval Ot d shwosher
_heCK aGariC r_ wr_@r_ dehwosner will Oe _ns aiie_
The ;ocalon S_OL;!O _r©v_@
• Easy access io waler eieciricity and drainage iines
• _or'v_nlent Ioadlrg
!he b÷sl posltlO '_ is i@tt or nghi of kitchen sink
• SQuare open_n(_ Ior FoF)_r G_shwasher opera!ion
arid appearance
• Cab nei front that is oerpendiculor to lOaF
• Proloc:hoi so lhat waler llJet vOv(_
a[(l ar_] FI carnot fleezfz
• :" rThr/_rnum clearance'_e wean
rqolor and floorir'g Io prevent motor over _egrln
ElecirlCol ground
s reau -ea See
lectrrooi
-eau_reqqerhls ¸
sectlor"
Wall receplacle
valve)
within 36 max
• opening
8 max i
_o floor i
DO P.Ot insla from right or
.'3ishwasher over wlfhinr8 max
C srpet _8 floonn_ ham letlat
.,e--=.i.._.24_, _,
Iwatefinlei
I side view
Electrical
requirements
r,_STZ_1_II_I
Electrical Shock Hazard
• Electrical ground is recruited on
this appliance
• Check with a qualified
electrician if you are in doubt
as Io whelher the appliance is
properly grounded
• improper eonneclion of lhe
equipment-grounding
conductor can result in tire,
electrical shock, or other
personal _njury
• Disconnect the power Supply
al the junction box.
• Do Not connecl appliance
lo electrical supply unlil
appliance is permanently
grounded
• DO NOl use an exlension cold
with this appliance
This appliance must be
connected to a grounded,
metallic, permanent wiring
syslem Or a grounding
conductor should be
connected to the grounding
terminal or wire lead on the
appliance
Do Not use a fuse in the neutral
Failure 1o follow these instructions
could resuII in a fire, electrical
shock or olher personal iniury.
PANEL A
elec_dca_ ware1
lunctlor" bo_ _mel valv_
4
Figure 2
A 120-volt, 60-Hz, AC only, 15- or 20-
ampere, fused, electrical supply s
required. Time-delay fuse or circuit
breaker is recommended It is
recommended lhat a separale cilouit
sen,qng any this appliance be
_,ovided
It is the personal responsibli W and
ODIJgotion of the customer to contact
a qualified electr clan to assure the
electrical nstallation is adequate and
in conformance with the Notional
Electrical Code ANSI/NFPA 70dafest
ed lion, and local codes and
ordinar/oes
The dishwasher must be connected
with copper w eony
Wiring methods
Pick one method to follow depending
upon your d shwasher and local codes
A, Directwiremethod
[cableconne_ling dishwasher
toa junctionbox}
Recommended grounding
method
1, Disconnecl the power supply,
24 opemng
width t-Jgure I
J
3
ele,:lncol
2O
Electrical Shock Hazard
• Electrical wiring and
components must Nor contact
any plumbing material ordrain
hose.
• Cabinet opening must
completely enclose sides, fop
and back at dishwasher to
prevent personal injury from
exposeg wiring. Failure to do so
could result in fire, electrical
shock, or other personal injury
from exposed wiring
Personal InjurylProduct Damage
Avoid opening dishwasher door
belore dishwasher is inslalled
Dishwasher may tip over when
door is opened, resulting in
personal inlury or product
damage.
Tools needed for
installation:
pipe wrench socket wrench
keyhole suw measuring tape
ele¢Iri_ _rill level
Phillips screwdriver pliers
2 a_jusfoble wrenche_ tupJng _utiel
flrJf- bla¢_ e s¢ rewd river (not Shown}
wlte-stnDpet or knife pipe-ioinl ¢OmpOUhd
2. Run flexible, armored or non-
metai/e sheathed, copper cable
[with grounding wire] from the fused
disconnect, e rcuif breaker or junction
box through the _/4"or larger egbinel
hole to the dishwasher location. The
ca ble must extend 24" from the back
wall,
The hole cut through a wood cabinet
shouid he sanded until smooth
The hole cut through a metal cabinet
must be covered with a grommet
[Poff No. 302797)
A U,L.qsfed strain re/el must be
instaled at each end of the power
supply cable [at the dishwasher and
at the junction box}, Wire sizes
[COPPER WIRE ONLY) must conform
with the rating of the dishwasher.
dl_wg_r /_
c_be _ /::_[' n o bOx€over I
_.,,_,__--'-'_
3. Remove the dishwasher terminal box
cover. Connect the white and black
wires or the power supply cable to the
white an_ black leads in the terminal
box with lwist-on wire connectors. (See
Figure 3,)
Figure 3
/
4 Conneci the green, grounding w_re
of the power supply cable 1o the
grounaing connection sc,ew Ioccteo
inside the terminal box [See Figure 3.]
5, Replace terminal box cover.
Alternate grounding melhod
fthe recommended grounding
method s impossible COnnect a
separete, green, grcund ng wire [No 16
m nimum) from grounding connection
screw located inside the terminal box
to o grounded, copper, cold water
pioe; (See Figure 5]
THIS, HOWEVER, IS NOT
RECOMMENDED
Do Not connect to eectr co supply
until dishwasher is permanently
grounaed
DO Not ground to a gas supply plpe
or hot water pipe.
"GrourlUeU, cola woJer _i_e rqusl have melG
cOnllmUlly to eleclr ¢ol ground anc hal be
interrupted by plastic ;uP, bet at o_her msula_ing
cat'nectars such O_ hoses¸ fJtlin0s w_sr_ors or
ga_koU/ir_old_dlr_ G woi@r meter or DL, mD) Any
;nsulalir_g olec_rical conneclo_ sh_k, ld _e
jumped w=th Q length of NO 4 Copper wire
securely clamped Io Dare meloi of _OF_ ends
(See Figure 5 i
B, Power supply cord method
(connecting dishwasher to
outlet}
Local codes may permit the use of a
U E -listed, flexible, three-conauctos
power supply coro terminated with a
three-prong, graunoing-_ype p!ug,
It is recommended that cord kt, Part
No. 675456, availaole from your
Whirlpoo! aealer or parts supplier, be
used. If the cord kt is not available
locally, the flexible cord used must be
a U Ldisted, three-conductor, 16 gauge
cord that meets the National Electrical
Code ANSI/NFPA 70 latest edition, and
all rocal codes and o_dinanoes The
length of the cord must not exceed six
feet it must be routed so that it does not
touch the dishwc_sher motor or the
Iowe_ per*ion of the dishwashe_ tub. A
grommet [Part No 302797) must cover
the hole cut in a metal cabinet tar the
flexible cord. The flexible cord must be
plugged into a mating, three-prong,
grounding-type wall recebtac e,
grounded in accordance with the
National Electrical Code ANSI/NFFA
70- atest edilion, and all local codes
and ordnances Foow instructions
packaged with the flexible cord
Recommended grounding
method
V__
Electrical Shock Hazard
• Electrical ground is required on
this appliance
• Improper connection Of the
equipment-grounding conductor
can result in a risk of electrical
shock
• Check with a qualified electrician
if you are in doubt as to whether
the appliance is properly
gtoumded, DO NOt modify or
remove the power supply cord
plug. If plug does not fil the outlet,
have a proper gullet installed by
a qualified electrician.
• Do Not use an extension cord
with Ibis appliance.
• Do Not have a ruse in the neutral,
Failure to follow these instructions
could result in a fire, eleclrical
shock or other personal injury.
PANEL B
Disnwashers equipped with a power
supply cord have a 3 prong,
grounding plug The power suppy cord
must De pluggea into a mating, 3
prong, g_ounding type receptacle,
grounded in accordance with the
National Electrical Code ANSI/NFPA
7O-iatesl edition, and all local codes
and ordinances. Ira mating wall
receptacle is not available, it is the
personal responsibility and obligation
of the customer to have a properly
grounded, 3-prong, wall receptacle
instaliea by a qualified electrician,
(See Figure 4.]
3.p_ong,grcur_Ing.t'/pe
wall r_peplo¢le li
,-ooog.°r o°log -j l
power _upplycord Figure 4
t. Have a 3-prong, grounding-type, wail
receptac e available or installed by a
qualified electrician on the rear wall of
one cabinet next to dlshwasner
opening [See Figure 1, Panel A,]
grounded
cold watel pipe
Figure 5
2. For added personal
safety, use clamp and
green-colored, copper
grounding wire, Connect
the grounding wire (#16 minimum) from
the external grounding connector
screw inside the terminal box to a
grounded, cold water pipe t [See
Rgure 5,]
Do Not connect to eleetrical supply until
appliance is permanently grounded,
Do Not ground to a gas supply plpe
or hot water plpe.
*Grounde_rl,cod wa er pipe retesthave metal
Oonlir_uJl'y10eJecircal ground and not be
interrupted _ D!OS!i¢rubr2_ror other electficai
ir_ulaiing conP,ectors such as hoses¸titiinos.
washer or ga_kels [includir_ w_lor m_ler ol
I:_JmD/Any eJecifioQI insulating conne_or
shOulCbe jumped, as shown_with a ler_th or NO.
4 wire securelY/clamped !o D_re me!ol at both
ends
Temporary grounding method
GroUnding aMembly attached
._1o gto_Jndod metal €14€I
Ce_e_-oIo ta
untied _
__to 2-prong
- " Grounding prong recilpiocleplug
Powersupply cord Flgure 6
It changing and properly grounding
the eleetrJcet supply is impo_ible, and
where local codes permit [consult your
electrical inspector}, a temporary
adapter may De plugged into the 2-
prong, wall receptacle to mate with
the 3 prong, power supply cord. (See
Figure 6.]
it this is done, you must connect a
separate copper grounding wire from
the external grounding connector
screw inside the terminal box to the
grounded, cold water pipe" (See
Figure 5.)
Do Not connect to eleclrical supply
until appliance is permanently
grounded.
Do Not ground to a gas supply plpe
orhot water plpe.
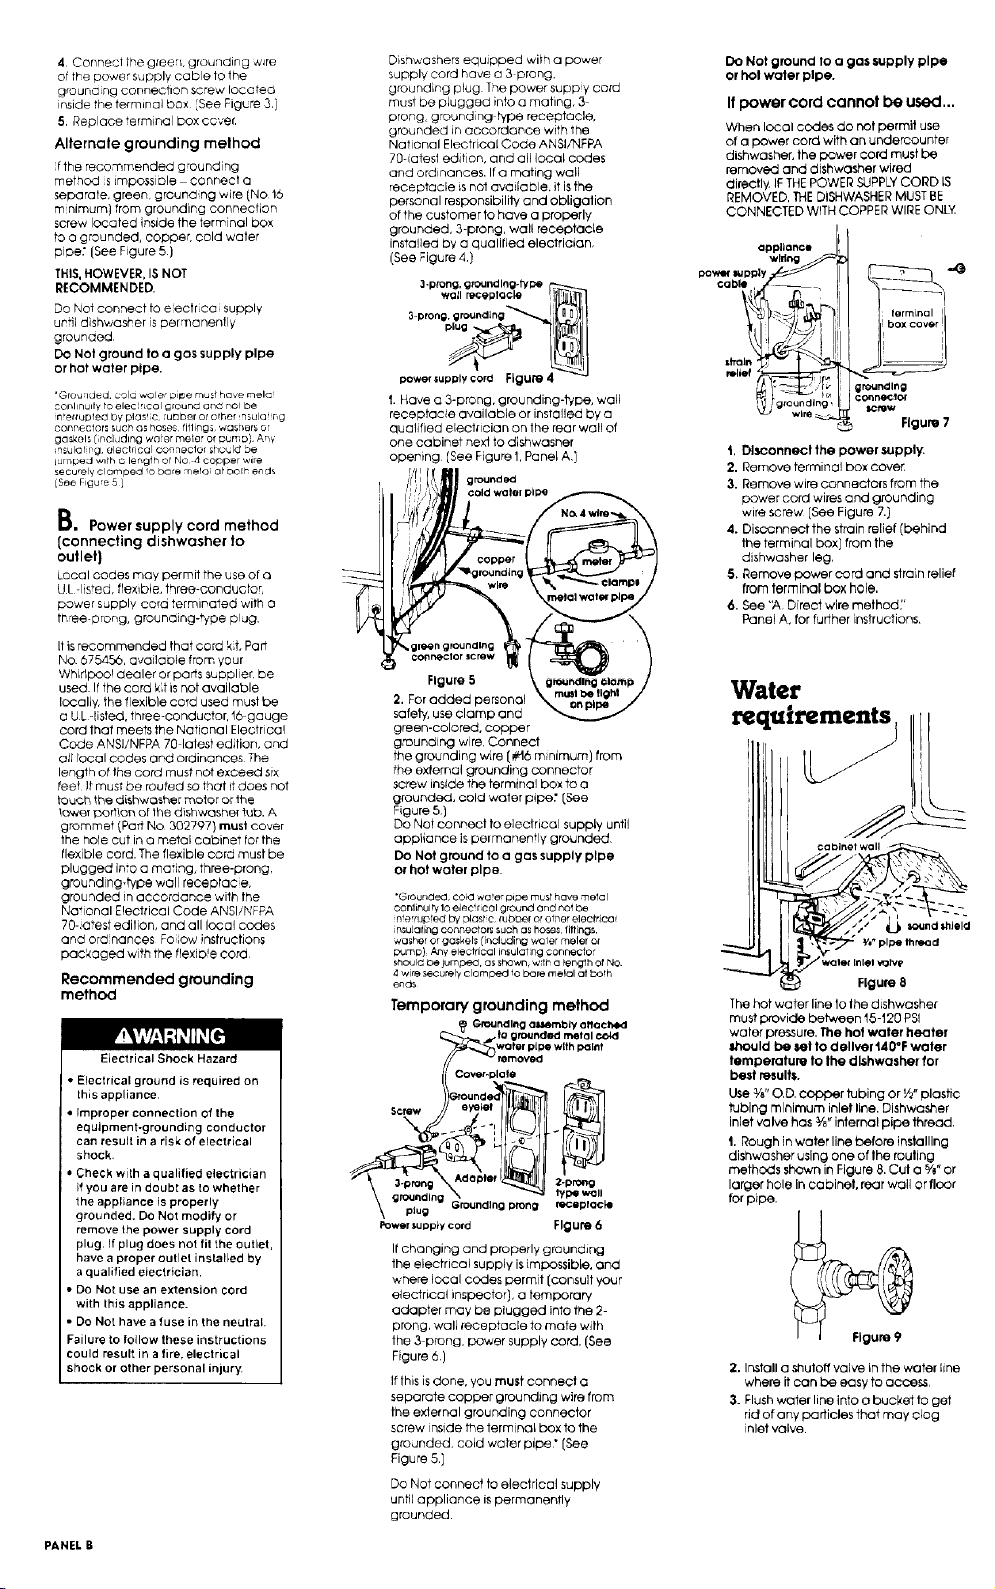
If power cord cannot be used...
When local codes do not permit use
of a bower cord with an undercounter
dishwasher, the power cord must be
removed and dishwasher wired
directly. IF THE POWER SUPPLY CORD IS
REMOVED, THE DISHWASHER MUST BE
CONNECTED WITH COPPER WIRE ONLY.
appllcmce
power luoply
wldng
cable
t, Dl_,connectthe power supply.
2. Remove terminal box cove_:
3. Remove wire connectors from the
power cord wires and grounding
wire screw (See Figure 7.]
4. Disconnect the strain relief [behind
the terminal box] from the
dishwasher leg,
5, Remove power cord and strain relief
from terminal box hole,
6. See 'A Direct wire method:'
Panel A, for further instructions,
Water
requirement
cabinet wall
¥." plpe thread
rale_ Inlelv_fv_
The hot water line 1o the dishwasher
must provide between t5-120 PSi
water pressure. The hat water heater
should be set to ciellver 140°F water
temperature to lhe dishwasher for
best results.
Use YW'O,D, copper tubing or Y_"plastic
tubing minimum inlet line. Dishwasher
Inlet valve has ¥_" internal pipe thread
t. Rough in water line before installing
dishwasher using one of the routing
methods shown in Figure 8. Cut a _Ye"or
larger hole inCa Diner, rear waft or floor
for pipe.
2. Install a shutoff valve in the water line
where it can be easy to access,
3. Flush water line into a bucket to get
rid of any particles that may clog
inlet valve.
Flguro 8
Figure 7
_K_nd _hJeld
 Loading...