

Whirlpool DU500OXW, DU4099XX User Manual
T&&l 01
Home
Appliances
4a
Use & Care Guide
Model and
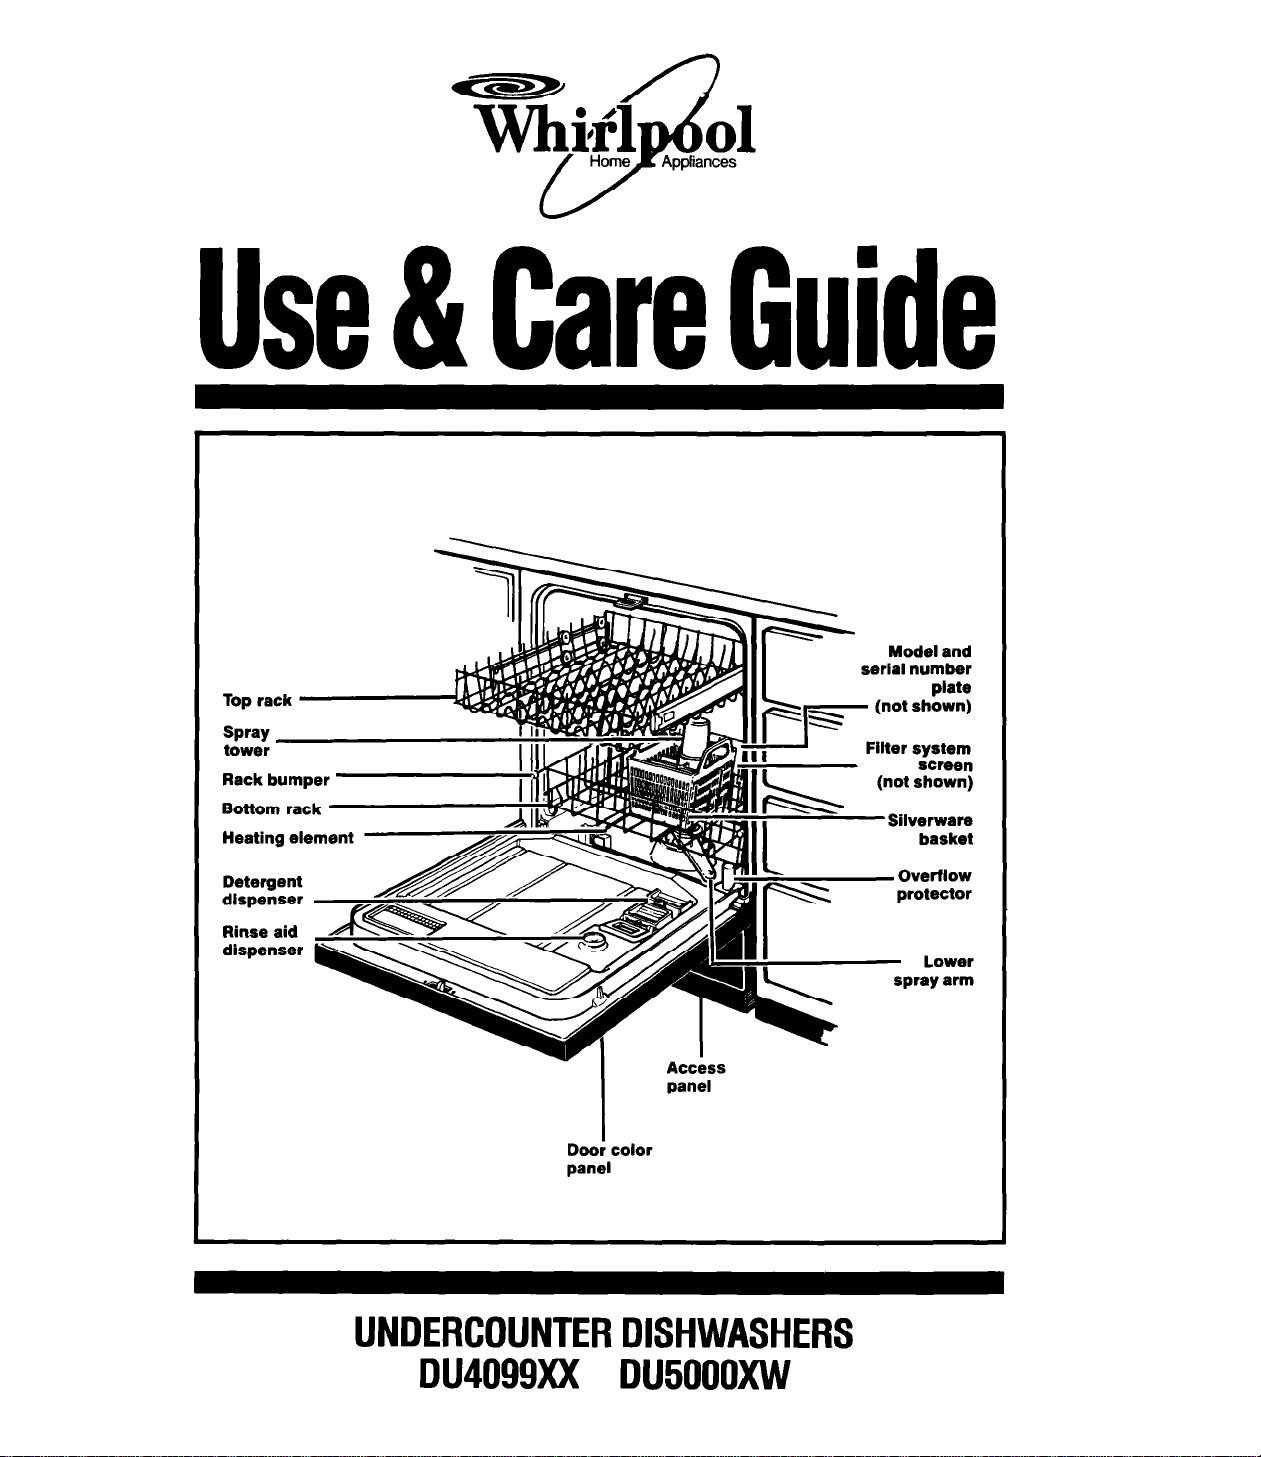
lop rack
Spray
tower
Rack bumper
Bottom rack
Heating element
Detergent
dispenser
Rinse aid
dispenser ;
II
IL.
II”
serial number
Filter system
.--
plate
(not shown)
screen
(not shown)
Silverware
basket
Overflow
protector
Lower
spray arm
Access
panel
I
Dooi color
panel
UNDERCOUNTER DISHWASHERS
DU4099XX DU500OXW

Contents
Page
Important Safety instructions.
Operating Instructions
Before starting your dishwasher
Starting your dishwasher
To add a dish after starting
Changing a cycle setting . . . . . . . .
What happens in each cycle .
What happens in each option .
Proper Loading. . . . . . . . . . .
Adding Detergent And Rinse Aid . .
For Best Results. .
Special tips
Common Dishwashing Problems
If You Need Service Or Assistance
Whirlpool Dishwasher Warranty
01969 Whirlpool Corporation
Thank you for buying a Whirlpool appliance.
Please complete and mail the Owner Registration Card provided with this product.
Then complete the form below. Have this information ready if you need service or call with a
question.
l
Copy model and serial numbers from plate
(see diagram on front cover)
and purchase date
from sales slip.
l
Keep this book and sales slip together in a
handy place.
11
11
13
15
16
3
3
3
4
4
4
5
6
7
9
it is your responsibility to be sure your
dishwasher:
l
Is installed by a qualified installer.
l
Has been installed where it is protected from
the elements.
l
Has been installed on a floor strong enough to
support its weight.
l
Has been properly connected to electricity, water
and drain.*
l
Has been properly electrically grounded.*
l
Has had all hang tags and temporary
labels removed.
l
Is not used by children or anyone unable to
operate it properly.
l
Is properly maintained.
‘See Installation Instructions for complete
information.
Model Number
Serial Number
Purchase Date
Service Company Phone Number
2

Important Safety Instructions
l
l
Read all instructions before using
the dishwasher.
l
Properly connect to electricity and water.
. DISHWASHER MUST BE ELECTRICALLY
GROUNDED. Read the Installation Instructions for details.
l
Be sure your dishwasher is installed on a
level floor that will hold the weight, and in an
area suitable for its size and use.
l
When discarding an old dishwasher, always
remove the door to prevent accidental
entrapment.
l
REMEMBER, use your dishwasher only for
the job it was designed to do.
l
Store dishwasher detergent in a cool, dry
place WHERE CHILDREN CAN’T REACH IT
l
Use ONLY detergents and rinse aids recommended for use in a dishwasher.
l
Locate sharp items and knives so that they
are not likely to damage door seal or cut the
user.
l
DO NOTlet children play in or on the
dishwasher.
l
DO NOT reach into the area below the
bottom rack until the heating element has
cooled for at least 20 minutes.
DO NOT wash plastic items unless marked
“Dishwasher Safe” or the equivalent. If not
marked, check manufacturer’s
recommendations.
l
DO NOT use your dishwasher unless all
enclosure panels are properly in place.
l
DO NOT sit on, stand on or abuse the
dishwasher door or dish racks.
l
DO NOT tamper with controls.
l
if hot water has not been used recently
(usually two weeks or longer), hydrogen gases may build up in the water
heater and the hot water pipes. HYDROGEN GAS IS EXPLOSIVE. To prevent
injury or damage, before using your
dishwasher, turn on all hot water
faucets and allow water to run for several minutes. This will allow gases to
escape. Do not smoke or use any open
flame near the faucet while it is open.
l
Disconnect electrical power to the
dishwasher before attempting to
service.
0 DO NOT store or use gasoline or other
flammable vapors and liquids in the vicinity
of this or any other appliance. The fumes
can create a fire hazard or explosion.
-SAVE THESE INSTRUCTIONS -
Operating Instructions
Before starting your dishwasher
1. Properly load the top and bottom racks, and
silverware basket. See pages 7 and 6.
2. Spin the Lower Spray Arm with lower rack in
place to make sure nothing will stop it from turning freely.
3. Add detergent.
4. Check rinse aid dispenser.
5. Push door firmly when closing and it will
automatically latch.
6. Run hot water at sink nearest dishwasher until
it is hot. Turn it off.

Operating Instructions
Continued
NOTE: If the door is latched, you will hear cycles
start and stop as the knob passes each cycle
mark. This is normal and will not hurt the dishwasher. If you prefer, you can set cycles with the
door unlatched.
To add a dish after starting
1. To be sure the added item is washed and
rinsed, make sure the Cycle Control Knob has
not passed LIGHT WASH.
2. Lift up on the door latch to unlatch door and
stop the cycle.
3. Open the door and add the dish.
4. Close the door. Do not latch it. Wait 30
seconds for air in the dishwasher to warm up.
This helps reduce the amount of moisture
that can come from the vent when restarting
the cycle.
5. Press door in to latch it. The dishwasher will
start where it stopped.
Changing a cycle setting
‘fou can change a setting anytime during
any cycle.
1. Lift up on the door latch to unlatch the door
and stop the cycle.
2. Turn the Cycle Control Knob clockwise to the
cycle you want.
3. Be sure the detergent dispensers are filled
properly for the new cycle. When changing dial
from LIGHT WASH to NORMAL WASH setting,
detergent is released. Reload covered section
of dispenser before starting Normal Wash
Cycle.
4. Close and latch the door. The dishwasher will
automatically start the new cycle.
4

What happens in each cycle
NORMAL WASH Cycle
A double wash for moderate to heavily soiled
loads. (The Energy Guide Label data is based on
this cycle.) Cycle time* is about 88 minutes.
LIGHT WASH Cycle
For light to moderately soiled loads. Cycle time* is
about 76 minutes.
Rinse
Wash
I
Rinse
Rinse
Rinse
Off
-
-
-
I
Rinse
I
Rinse
*Cycle time includes heated dry time.
I
5
 Loading...