

Page 1
簡易手冊
感謝您購買Whirlpool產品。
為獲得更完整的協助,
請上網註冊您的家電,網址:
www.whirlpool.eu/register
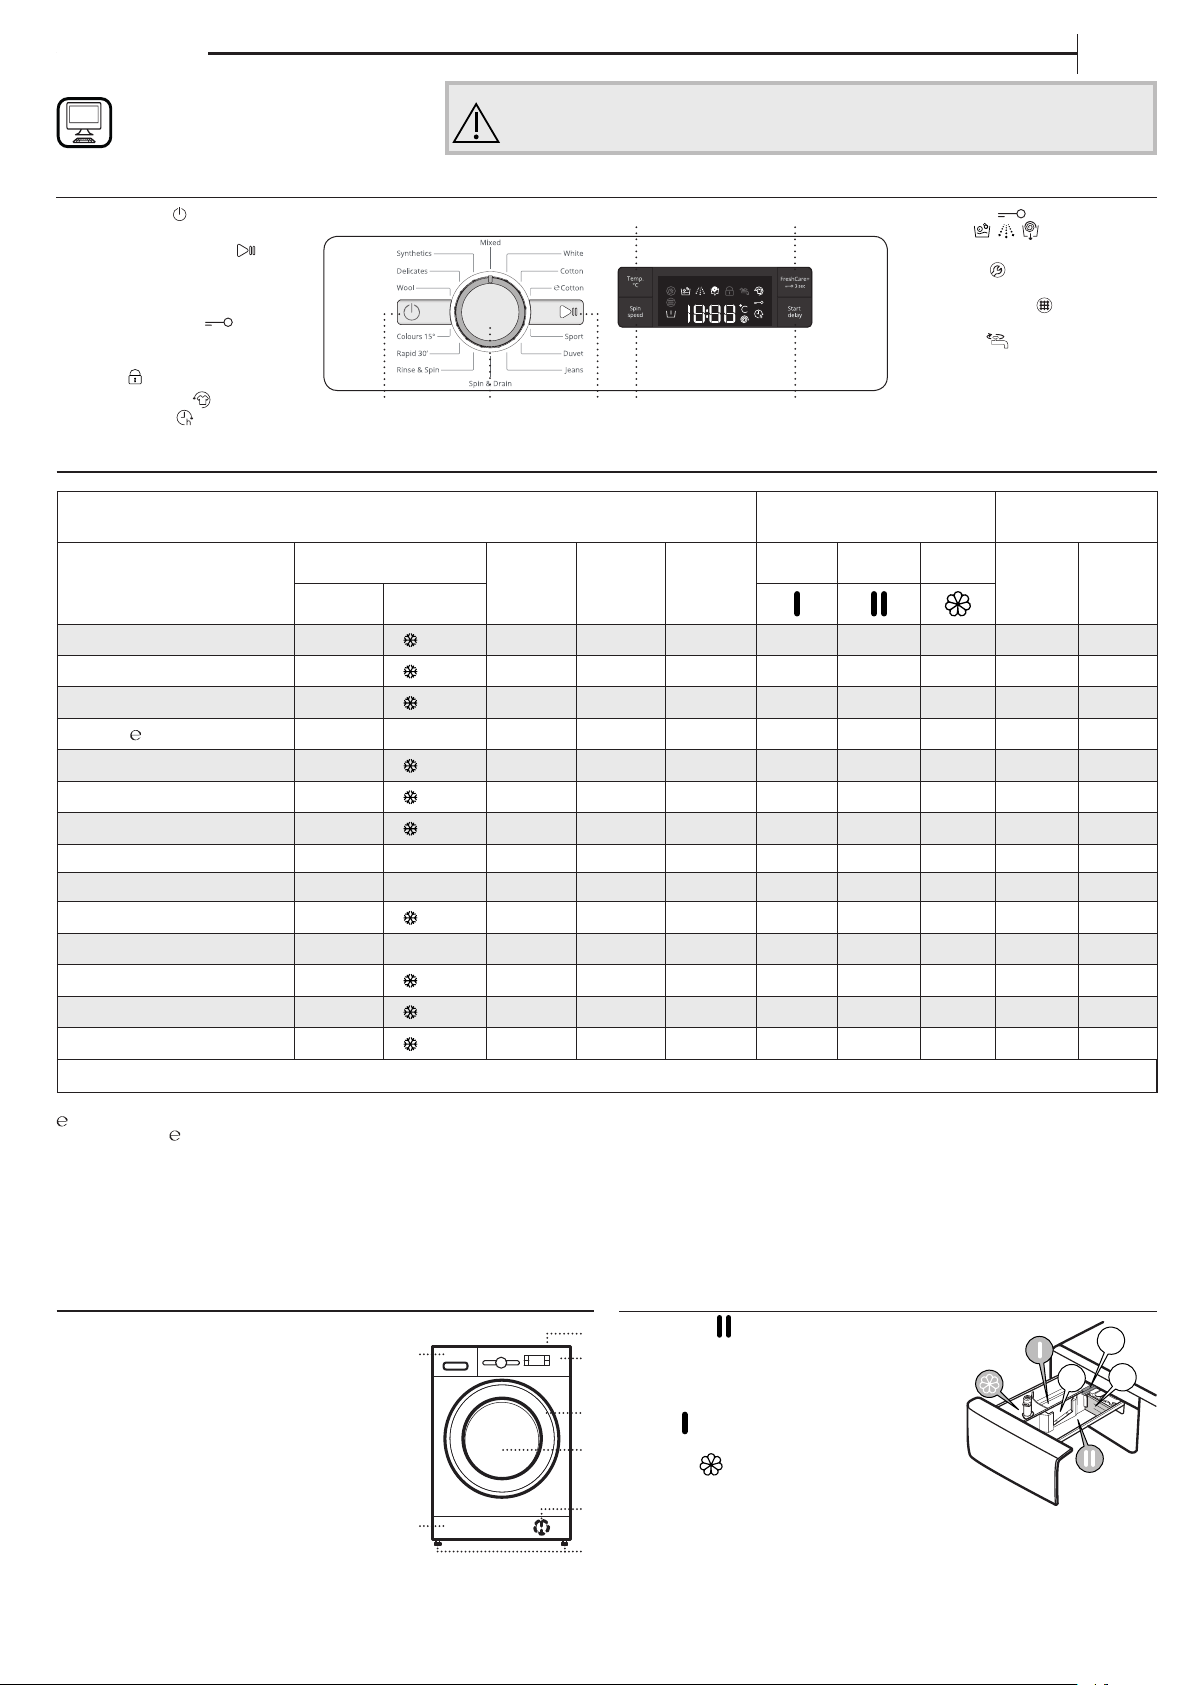
控制面板
1 開/關按鈕
2 程序旋鈕
3 「啟動/暫停」按鈕
4 「脫水」按鈕
5 「延遲啟動」按鈕
6 「FreshCare+」/
「按鍵鎖」按鈕
7 「溫度」按鈕
顯示幕指示燈
機門鎖住
FreshCare+已啟用
延遲啟動已啟用
程序表
使用本家電前,請詳閱安全說明。
使用洗衣機前,請務必將搬運螺栓拆掉。若需更多拆卸相關說明,請參閱安裝指南。
6.7.
h
2.1. 3. 4. 5.
按鍵鎖已啟用
清洗階段
顯示程序目前的清洗階段
故障:叫修
請參閱故障排除一節
故障:水濾網阻塞
無法排水;水濾網可能阻塞
故障:沒水
沒水或進水量不足。
發生故障時,請參閱「故障排除」
一節
ZT
最大衣物量7公斤
功耗量:關閉模式:0.5 W/保持啟動模式:8 W
溫度
程序
混合衣物
白色衣物
棉質衣物
棉質衣物
運動衣物
被單
牛仔布料
脫水與排水
洗清與脫水
快洗30分
Colours 15°
羊毛衣物
精緻衣物
合成纖維
需要的用量 選擇性用量
預設 範圍
40°C
60°C
40°C
60°C
40°C
30°C
40°C
- 40°C
- 90°C
- 60°C
40°C - 60°C 1000
- 40°C
- 30°C
- 40°C
—
—
30°C
15°C
40°C
30°C
40°C
- 30°C
15°C 1000
- 40°C
- 30°C
- 60°C
最大脫
水速度
(rpm)
1000
1000
1000
600
1000
800
— 1000
— 1000
800
800
–
1000
洗劑與添加劑 建議使用的洗劑
最大衣物量
(公斤)
持續時間
(分鐘)
3.5 *** —
7.0 ***
7.0 *** —
7.0 *** —
3.5 *** —
2 *** —
3.5 *** —
預洗 主要清洗 柔軟劑
洗衣粉 洗衣精
—
(90°)
—
—
—
7.0 *** — — — — —
7.0 *** — —
3 *** —
3.5 *** —
1.5 *** —
1 *** —
3.5 *** —
— —
—
—
—
—
棉質衣物 - 測試清洗程序符合 EN 60456 規範
設定洗衣程序 棉質衣物;60℃。
測試數據
此資料可能會與您住家資料不合,原因包括注水的水溫、水壓等。程序持續時間為
使用預設設定,未使用選用功能之參考值。
產品介紹
1. 工作台
2. 洗劑自動分配盒
3. 控制面板
4. 機門把手
5. 機門
6. 水濾網 - 底座後方
7. 底座(可拆卸式)
8. 可調整腳架(4)
2.
7.
*** 程序持續時間會顯示在顯示幕上。
洗衣機會依您的洗衣量調整用水、用電量及程序持續時間
洗劑自動分配盒
主要清洗盒
1.
主要清洗程序的清洗劑、去污劑或水質軟化
3.
劑。使用液態洗劑時建議使用可拆卸式塑膠
隔板A(隨機附送)進行劑量調整。若使用
粉狀洗劑,請將隔板放到插槽B中。
4.
預洗盒
預洗用清洗劑。
5.
柔軟劑盒
衣物柔軟劑。澱粉漿。
倒入柔軟劑或澱粉漿時請勿超過「MAX」標
6.
記。
釋放鈕
8.
按下可將盒子拆下清潔。
A
B
Page 2

程序
為選擇適合衣物的程序,請務必參考衣物的保養標籤之
說明。水缸符號中的值為清洗衣物時可用的最高溫度。
混合衣物
清洗輕微或一般髒污的棉質、亞麻、合成纖維及混紡纖
維。
白色衣物
清洗一般至重度髒污之彈性棉質及亞麻材質之毛巾、貼身衣物、桌巾
與床單等。僅用於水溫選擇為90°C且在主要洗程前有預洗階段的洗
程中。此時建議在預洗與主要洗劑區均添加洗劑。
棉質衣物
一般至重度髒污的硬質棉料。
棉質衣物
清洗一般髒污的棉質衣物。在40°c與60°C下,此為標準的棉質程
序,且是用水與用電最有效率的程序。
運動衣物
清洗輕微髒污的運動服(運動衣、短褲等)。為達最佳清洗效果,建
議不要超過「程序表」中的最大衣物量。建議使用液態洗劑,並添加
適合一半衣物量的劑量。
被單
設計用於清洗羽絨填充物如雙人或單人被、抱枕與大衣等。建議將這
類填充物放入滾筒時將邊緣向內折,且不要放超過滾筒¾的量。建議
使用液態洗劑以獲得最佳清洗效果。
牛仔布料
清洗前請將衣物翻面並使用液態洗劑。
脫水與排水
將衣物脫水並排水。適用彈性衣物。若不使用脫水功能,則機器僅
會排水
洗清與脫水
洗清與脫水。適用彈性衣物。
快洗30分
可快速清洗輕微髒污的衣物。此程序僅有30分鐘,既省時又省電。
Colours 15°
本程序可利用冷水(15°C)清洗達到護色效果,並在使用較低電力
加熱水溫的同時仍提供令人滿意的清洗效果。適合輕微髒污、未染
色的衣物。本程序可在15°C的水溫下提供接近40°c混合程序的清洗
效果
羊毛衣物
所有羊毛衣物均可使用「羊毛衣物」程序清洗,即便標籤有載明「限
手洗」亦可。請使用特殊洗劑且不要超過衣物建議的最大公斤數以獲
得最佳清洗效果。
精緻衣物
用於清洗精緻衣物。建議清洗前先將衣物翻面。
合成纖維
用於清洗髒污之合成纖維(例如聚酯、聚丙烯、黏膠等)或棉料/合
成纖維混紡衣物。
首次使用
若要去除製造殘留物,請選擇「棉質衣物」程序並使用水溫60°C。
將少量的洗衣粉倒入洗劑自動分配盒的主要清洗盒 中(不超過洗劑
製造商針對輕微髒污衣物建議量的1/3)。在不放入任何衣物的狀態
下啟動程序。
日常使用
請依照「提示與秘訣」一節的建議準備您的衣物。放入衣物、關上機
門、將水龍頭打開再按下「開/關」 按鈕將洗衣機啟動,「啟動/
暫停」 按鈕會開始閃爍。將程序旋鈕轉至想用的程序再依需要選
擇其他選項。按下「Temp. C°」按鈕或「Spin speed」 按鈕可變更
溫度與脫水速度。將洗劑自動分配盒拉出並添加清洗劑(以及添加
劑/柔軟劑)。請遵循洗劑包裝上的用量建議。接著關閉洗劑自動分
配盒再按下「啟動/暫停」 按鈕。「啟動/暫停」 按鈕會亮起
且機門會鎖住。
暫停執行中的程序
若要將洗衣程序暫停,請按下「啟動/暫停」 ;該顯示燈便會熄
滅且顯示幕上的剩餘時間會閃爍。再次按下本按鈕便可從中斷的洗衣
程序繼續洗衣。
開啟機門(如有需要)
啟動程序後,「機門已鎖定」 指示燈會亮起表示機門無法開啟。
在執行洗衣程序的過程中,機門均會保持鎖定。若要在程序進行中
將機門開啟,請按下「啟動/暫停」 將程序暫停。只要水位及(
或)溫度不要過高,「機門已鎖定」 指示燈便會熄滅且此時便可
開啟機門。此時可增減衣物。再次按下「啟動/暫停」 按鈕便可
繼續程序。
程序結束
「機門已鎖定」 指示燈會熄滅且顯示幕會出現「End」字樣。若要
在程序結束後將洗衣機關閉,請按下「開/關」 按鈕,燈號便會
熄滅。若未按下「開/關」 按鈕,洗衣機便會在約半小時後自動關
閉。請關上水龍頭,將機門打開並將洗衣機中的衣物取出。將機門保
持開啟讓滾筒風乾。
選項
! 若選擇的選項與設定的程序不合,則會以蜂鳴器聲(3響)表示,
且對應的指示燈會閃爍。
! 若選擇的選項與之前設定的其他選項不合,則僅會保留最近的選
項。
延遲啟動
若要設定讓選擇的程序稍後啟動,請按下本按鈕設定希望的延遲時
間。啟用此功能後顯示幕上的符號 會亮起。若要取消延遲啟動,
請再次按下按鈕直到顯示幕上的值顯示「0」為止。
FreshCare+
本選項會透過產生蒸氣的方式防止洗衣機內的主要異味來源擴散以加
強清洗效果。蒸氣階段結束後,洗衣機的滾筒會以低轉速進行輕柔翻
攪。FreshCare+ (清新護理+)選項會在程序結束後啟動,最多可持續
6小時,您可隨時按下控制面板上的按鈕或轉動旋鈕將其中斷。
(*)開啟機門且請等候約5秒。
溫度
每個程序都有預設的溫度。若您希望變更溫度,請按「Temp. C°」
按鈕。溫度值會出現在顯示幕上。
脫水
每個程序都有預設的脫水速度。若您希望變更脫水速度,請按「Spin
speed」按鈕。溫度值會出現在顯示幕上。
展示模式
本家電搭載了展示模式功能。若需更多相關資訊,請參閱使用手冊/
展示模式。
Page 3

簡易手冊
按鍵鎖
若要鎖定控制面板,請按住「按鍵鎖」 按鈕約3秒。顯示幕出現
鑰匙符號 時,控制面板會鎖住(唯「開/關」 按鈕除外)。如
此可避免不小心改變程序(尤其是當洗衣機附近有兒童時)。若要將
控制面板解鎖,請再按住「按鍵鎖」 按鈕約3秒。
漂白
若希望將衣物漂白,請將衣物放入洗衣機中,並設定「洗清與脫水」
程序。
啟動洗衣機並等候其完成第一次注水(約2分鐘)。按下「啟動/暫
停」 按鈕讓洗衣機暫停,將洗劑分配盒打開並將漂白劑(依照包
裝上的用量)倒入裝有隔板的主要清洗盒中。按下「啟動/暫停」
按鈕。
如有需要,可添加衣物柔軟劑至洗劑分配盒的對應區域中。
提示與秘訣
將衣物分類,依據:
布料類型/保養標籤(棉質、混紡布料、合成纖維、羊毛、手洗衣物
等)。顏色(將彩色衣物與白色衣物分開,將全新彩色衣物單獨清
洗)。貼身衣物(將小型衣物(例如尼龍絲襪)及有勾子的衣物(例
如內衣)放在洗衣袋中或有拉鍊的枕頭套中)。
清空所有口袋
硬幣或打火機這類小東西會傷害衣物和滾筒。
清潔與保養
進行保養與維護前,請先關閉洗衣機並拔下插頭。請勿使用易燃性液
體清潔洗衣機。
清潔洗衣機外部
使用濕布清潔洗衣機外部零件。請勿使用玻璃或一般用清潔劑、去污
粉或類似產品清潔控制面板 – 這類物質會損壞印刷表面。
檢查供水管線
定期件查進水管線是否有硬化或破損。若發現損壞,請向售後服務中
心或您的專業經銷商購買新品更換。依管線類型不同:若進水管線有
透明包覆,請定期檢查是否有變色。若有,則表示管線漏水必須更換
清潔供水管線中的濾網
將水龍頭關閉並鬆開進水管線。清潔內部的濾網再將進水管線裝回水
龍頭上。接著將洗衣機後方的進水管線鬆開。用鉗子將水濾網從洗衣
機管線中取出進行清潔。將水濾網裝回去並將進水管線鎖回去。打開
水龍頭確認管線的水密情況。
清潔水濾網/排出殘餘水份
若剛使用過高溫清洗程序,請等候水溫下降後再將水份排出。請定期
清潔水濾網,以避免濾網塞住造成洗衣後無法將水排出。若無法排
水,顯示幕上會顯示水濾網可能塞住。
用螺絲起子將底座拆掉:用手將底座一側向下推,再將螺絲起子插到
底座與前面板間的縫隙將底座撬開。在水濾網底下放一個寬大的扁平
容器以盛裝流出的水份。慢慢將濾網逆時鐘轉動直到有水流出。在不
取下濾網的狀態下讓水流出。待水盤裝滿後,將水濾網順時鐘方向轉
動關上。將水盤中的水倒掉。重複以上程序直到所有水份均排出為
止。在水濾網下方放一塊棉布,可吸收少量的殘水。接著以逆時鐘方
向轉動水濾網將其取出。清潔水濾網:將濾網中的殘留物清除並用水
沖洗。將水濾網裝上並重新安裝底座:以順時鐘方轉動水濾網將其重
新裝回去。確實將其轉到底;濾網握把必須呈垂直狀態。若想測試水
濾網的水密程度,可倒入約1公升的水到洗劑自動分配盒中。接著重
新安裝底座。
ZT
配件
若想瞭解以下配件是否適用您的洗衣機機種,請與我們的售後服務中
心聯繫。
疊放套件架
可讓您將乾衣機固定在洗衣機上方以節省空間並方便從較高的位置取
放乾衣機中的衣物。
運送與搬運
請勿以握住頂端的方式將洗衣機抬起。
請拔掉電源插頭並關閉水龍頭。確認機門與洗劑自動分配盒均有確實
關好。將進水管線從水龍頭上拔掉,並將排水管線從排水孔上拆下。
將管線中所有的殘水排出,再將其固定以免在運送過程中損壞。重新
安裝搬運螺栓。請依安裝指南中拆卸搬運螺栓的相反順序將其裝回。
Page 4

故障排除
洗衣機有時會因某些原因無法正常運作。在與售後服務中心聯繫前,建議先確認是否可用以下清單解決問題。
異常: 可能原因/解決方案:
洗衣機無法啟動。
清洗程序未啟動。
洗衣機未進水(顯示幕上出現「h2o」的訊
息)。每5秒出現一個「嗶」聲。
洗衣機不斷注水與排水。
洗衣機未排水或無法脫水。
洗衣機在脫水過程中異常振動。
• 插頭未連接到插座,或長度不夠。
• 電力異常。
• 機門未完全關閉。
• 「開/關」 按鈕未按下。
• 「啟動/暫停」 按鈕未按下。
• 水龍頭未打開。
• 已設定「延遲啟動」 。
• 進水管線未接到水龍頭。
• 管線扭曲。
• 水龍頭未打開。
• 主水源已關閉。
• 水壓不足。
• 「啟動/暫停」 按鈕未按下。
• 排水管安裝時未離地65到100公分。
• 排水管末端泡在水中。
• 牆上的排水接頭無通風口。
• 若進行這些檢查後問題仍存在,請關閉水龍頭、關閉洗衣機並與售後服務中心聯繫。若住家位於
大樓的最上層,有時會發生虹吸效應,造成洗衣機不斷注水與排水。市面上有銷售專用的抗虹吸
閥可避免此類問題發生。
• 程序不含排水功能:在某些程序中必須手動啟動。
• 排水管線扭曲。
• 排水管線阻塞。
• 安裝時,未將滾筒卡榫確實拆掉。
• 洗衣機不水平。
• 洗衣機卡在傢俱與牆壁之間。
洗衣機漏水。
機器鎖住且顯示幕閃爍、顯示故障碼(例
如F-01、F-..)。
泡沫過多。
機門鎖住、出現或未出現故障指示,且程
序未啟動。
• 進水管線未旋緊。
• 洗劑自動分配盒阻塞。
• 排水管線未確實固定。
• 關閉洗衣機、將插座上的插頭拔掉,並等候約1分鐘後再將其重新啟動。
• 若問題仍持續發生,請與售後服務中心聯繫。
• 洗劑與洗衣機不合(必須有「洗衣機適用」、「手洗與洗衣機適用」或其他類似字樣)。
• 洗劑用量過多。
• 機門在斷電時鎖住。程序會在市電恢復後自動回復。
• 洗衣機停止。待洗衣機停止原因排除後程序便會自動回復。
您可下載H&S說明、使用手冊、產品手冊以及用電資料,透過:
• 造訪我們的網站 - http://docs.whirlpool.eu
• 使用QR碼
• 或是,與我們的售後服務中心聯繫(請參閱保固手冊中的電話號碼)。聯絡售後服務中心時,請提供
產品識別銘牌上的代碼。
xxxxxxxxxxxx
Page 5

Quick guide
THANK YOU FOR BUYING A WHIRLPOOL PRODUCT.
In order to receive a more complete assistance,
please register your appliance on
www.whirlpool.eu/register
Before using the appliance carefully read the Safety Instruction.
CONTROL PANEL
1 “ON/OFF” button
2 Programme selector
3 “Start/Pause” button
4 “Spin” button
5 “Start delay” button
6 “FreshCare+” /
“Key lock“button
7 “Temperature” button
DISPLAY INDICATORS
Door locked
FreshCare+ activated
Start delay activated
2.1. 3. 4. 5.
PROGRAMME CHART
Max load 7 Kg
Power consumption in o -mode 0.5 W / in left-on mode 8 W
Temperatures
Programme
Default Range
EN
Before using the machine, it is imperative that the transport bolts are removed. For more detailed
instructions on how to remove them, see the Installation Guide.
Key lock activated
Washing phase
Indicates washing phase of the cycle
Failure: Call Service
Refer to Troubleshooting section
Failure: Water lter clogged
Water cannot be drained; water lter
might be blocked
Failure: No water
No or not sucient inlet water.
In the event of any failure, refer to the
“TROUBLESHOOTING” section
Recommended
detergent
Powder Liquid
Max. spin
speed
(rpm)
Max
load
(kg)
Duration
(Minutes)
6.7.
h
Detergents and additives
Prewash Main wash Softener
Mixed 40°C - 40°C 1000 3.5 *** –
White 60°C
Cotton 40°C
- 90°C 1000 7.0 ***
- 60°C 1000 7.0 *** –
Cotton 60°C 40°C - 60°C 1000 7.0 *** –
Sport 40°C
Duvet 30°C
Jeans 40°C
- 40°C 600 3.5 *** –
- 30°C 1000 2 *** –
- 40°C 800 3.5 *** –
Spin & Drain – – 1000 7.0 *** – – – – –
Rinse & Spin – – 1000 7.0 *** – –
Rapid 30’ 30°C
- 30°C 800 3 *** –
Colours 15° 15°C 15°C 1000 3.5 *** –
Wool 40°C
Delicates 30°C
Synthetics 40°C
Dosing required Dosing optional
Cotton - Test wash cycles in compliance with regulations EN 60456:
set wash cycle Cotton with a temperature of 60°C.
For all Test Institutes
This data may dier in your home due to changing conditions in inlet water
temperature, water pressure etc. Approximate programme duration values refer to the
default setting of the programmes, without options.
- 40°C 800 1.5 *** –
- 30°C – 1 *** –
- 60°C 1000 3.5 *** –
–
(90°)
–
–
–
– –
–
–
–
–
*** The duration of the programme is shown on the display.
The washer adapts water, energy and programme duration to your wash load
PRODUCT DESCRIPTION
1. Worktop
2. Detergent dispenser
3. Control panel
4. Door handle
5. Door
6. Water lter - behind plinth
7. Plinth (removable)
8. Adjustable feet (4)
DETERGENT DISPENSER
Main wash compartment
1.
2.
Detergent for the main wash, stain remover
3.
or water softener. For a liquid detergent it
is recommended to use removable plastic
partition A (supplied) for a proper dosage. If
4.
powder detergent is used, place the partition
into slot B.
5.
Prewash compartment
Detergent for the prewash.
Softener compartment
6.
7.
Fabric softener. Liquid starch.
Pour in softener or starch solution only up to the “max” mark.
8.
Release button
Press to remove tray for cleaning.
A
B
Page 6

PROGRAMMES
For choosing the appropriate programme for your kind of
laundry, always respect the instructions on the care labels
of the laundry. The value given in the tub symbol is the
maximum temperature possible for washing the garment.
Mixed
For washing lightly to normally soiled resilient garments in cotton, linen,
synthetic bres and mixed bres.
White
For washing normally to heavily soiled towels, underwear, table and bed
linen, etc in resilient cotton and linen. Only when the temperature is
selected at 90°C the cycle is provided with a prewash phase before main
washing phase. In this case it is recommended to add detergent both, in
the prewash and main wash section.
Cotton
Normally to heavily soiled and robust cottons .
Cotton
For washing normally soiled cotton garments. At 40°c and 60°C, this is the
standard cotton programme and the most ecient in terms of water and
energy consumption.
Sport
For washing lightly soiled sports clothing (tracksuits, shorts, etc.). For best
results, we recommend not exceeding the maximum load indicated in
the ‚‘‘PROGRAMME CHART‘‘. We recommend using liquid detergent , and
adding the amount suitable for half-load.
Duvet
Designed for washing eiderdown padded items such as double or single
duvets, cushions and anoraks. It is recommended to load such padded
items in the drum with the edges folded inwards and not to exceed ¾ of
the drum’s volume. For optimal washing, we recommend using a liquid
detergent.
Jeans
Turn garments inside-out before washing and use a liquid detergent.
Spin & Drain
Spins the load then empties the water. For resilient garments. If you
exclude the spin cycle, the machine will drain only
Rinse & Spin
Rinses and then spins. For resilient garments.
Rapid 30’
For washing lightly soiled garments quickly. This cycle lasts only 30
minutes, saving time and energy.
Colours 15°
This cycle helps protect colours by washing in cold water (15°C) and uses
less energy to heat the water while still oering satisfactory wash results.
Suitable for lightly soiled, ustained garments. This cycle oers wash
results comparable to 40°c mixed at just 15°C
Wool
All wool garments can be washed using programme ‚“Wool“ even
those carryng the “hand-wash only “ label. For best results, use special
detergents and do not exceed max kg declaration of laundry.
Delicates
For washing particularly delicate garments. Preferably turn garments
inside out before washing.
Synthetics
For washing soiled garments made from synthetic bres (such as
polyester, polyacrylic, viscose, etc.) or cotton/synthetic blends.
FIRST TIME USE
To remove any manufacturing debris select the “Cotton” programme at a
temperature of 60°C. Pour a small quantity of detergent powder into the
main wash compartment of the detergent dispenser (maximum 1/3 of
the quantity the detergent manufacturer recommends for lightly soiled
laundry). Start the programme without adding any laundry.
DAILY USE
Prepare your laundry according to the recommendations in the “HINTS
AND TIPS” section. Load the laundry, close the door, open the water tap
and press the “ON/OFF” button to switch the washing machine on, the
“Start/Pause” button ashes. Turn the programme selector to the
desired programme and select any option if needed. The temperature
and spin speed can be changed by pressing the “Temp. C°” button
or the “Spin speed” button. Pull out the detergent dispenser and
add the detergent (and additives/softener) now. Observe the dosing
recommendations on the detergent pack. Then close the detergent
dispenser and press the “Start/Pause” button. The “Start/Pause”
button will lights up and the door will be locked.
PAUSE A RUNNING PROGRAMME
To pause the wash cycle, press the “Start/Pause” ; the indicator light
will go o and the remaining time on display ash. To start the wash cycle
from the point at which it was interrupted press the button again.
OPEN THE DOOR, IF REQUIRED
After starting a programme, the “Door locked” indicator lights up to
show that the door can not be opened. As long as a wash programme is
running, the door remains locked. To open the door while a programme
is in progress, press the “Start/Pause” to pause the programme.
Provided the water level and/or temperature is/are not too high, the
“Door locked” indicator light goes o and you can open the door.
For example to add or remove laundry. Press the “Start/Pause” button
again to continue the programme.
PROGRAMME END
The “Door locked” indicator light goes o and the display shows
“End”. To switch o the washing machine after programme ends press
the “ON/OFF” button, the lights goes o. If you do not press “ON/OFF”
button, the washing machine will switch o automatically after about
a half of an hour. Close the water tap, open the door and unload the
washing machine. Leave the door ajar to allow the drum to dry.
OPTIONS
! If the selected option is incompatible with the programme set,
the incompatibility will be signalled by a buzzer (3 beeps) and the
corresponding indicator light will ash.
! If the selected option is incompatible with another previously set
option, only the most recent selection will remain active.
Start delay
To set the selected programme to start at a later time, press the button
to set the desired delay time. Symbol lights on the display when this
fuction is enabled. To cancel the delayed start, press the button again
until the value ‚‘‘0‘‘ is shown on the display.
FreshCare+
This option enhances washing performance by generating steam
to inhibit the proliferation of the main bad odour sources inside the
machine. After steam phase, the washing machine will perform gentle
tumbling through slow rotations of the drum. FreshCare+ option starts
after the cycle ends for a maximum duration of 6h and you can interrupt
at any time by pressing any button on control panel or turning the knob.
(*) Wait around 5’ before open the door.
Temperature
Every programme has a predened temperature. If you want to change
the temperature, press the “Temp. C°” button. The value appears on the
display.
Spin
Every programme has a predened spin speed. If you want to change
the spin speed, press the “Spin speed” button. The value appears on the
display.
Demo mode
This appliance is equipped with Demo mode function. For more
information see the USER MANUAL/ Demo Mode.
Page 7

Quick guide
KEY LOCK
To lock the control panel, press and hold the “Key lock” button for
approximately 3 seconds. When the display visualises a key symbol
, the control panel is locked (with the exception of the “ON/OFF”
button). This prevents unintentional changes to programmes, especially
with children near the machine. To unlock the control panel, press and
hold the “Key lock” button for approximately 3 seconds again.
BLEACHING
If you wish to bleach the laundry, load the washing machine and set the
“Rinse & Spin” programme.
Start the machine and wait for it to complete the rst water lling cycle
(roughly 2 minutes). Put the machine in pause mode by pressing the
“Start/Pause” button, open the detergent drawer and pour the bleach
(observe the recommended doses indicated on the package) into the
main wash compartment where the partition was previously mounted.
Restart the cycle by pressing the “Start/Pause” button.
If desired, it is possible to add fabric softener into the appropriate
compartment of the detergent drawer.
HINTS AND TIPS
Sort your laundry according to
Type of fabric/care label (cotton, mixed bres, synthetics, wool, handwash
items). Colour (separate coloured and white items, wash new coloured
items separately). Delicates (wash small items – like nylon stockings – and
items with hooks – like bras – in a cloth bag or pillow case with zip).
Empty all pockets
Objects like coins or lighters can damage your laundry as well as the
drum.
EN
ACCESSORIES
Contact our After-Sales Service to check if the following accessories are
available for your washing machine model.
Stacking kit shelf
By which your dryer can be xed on top of your washing machine to save
space and to facilitate loading and unloading your dryer in the higher
position.
TRANSPORT AND HANDLING
Never lift the washing machine by holding it at the worktop.
Pull out the mains plug, and close the water tap. Make sure that door
and detergent dispenser are properly closed. Disconnect the inlet hose
from the water tap, and remove the drain hose from your draining point.
Remove all rest water from the hoses, and x them so that they cannot
get damaged during transport. Ret the transport bolts. Follow the
instructions for removing the transport bolts in the INSTALLATION GUIDE
in reverse order.
CLEANING & MAINTENANCE
For any cleaning and maintenance, switch o and unplug the washing
machine. Do not use ammable uids to clean the washing machine.
Cleaning the outside of the washing machine
Use a soft damp cloth to clean the outer parts of the washing machine.
Do not use glass or general purpose cleaners, scouring powder or similar
to clean the control panel – these substances might damage the printing.
Checking the water supply hose
Check the inlet hose regularly for brittleness and cracks. If damaged,
replace it by a new hose available through our After-Sales Service or
your specialist dealer. Depending on the hose type: If the inlet hose has
a transparent coating, periodically check if the colour intensies locally. If
yes, the hose may have a leak and should be replaced
Cleaning the mesh lters in the water supply hose
Close the tap and loosen the inlet hose on the tap. Clean the internal
mesh lter and screw the water inlet hose back onto the tap. Now
unscrew the inlet hose on the rear of the washing machine. Pull o the
mesh lter from the washing machine connection with universal pliers
and clean it. Ret the mesh lter and screw the inlet hose on again. Turn
on the tap and ensure that the connections are completely water-tight.
Cleaning the water lter / draining residual water
If you used a hot wash programme, wait until the water has cooled down
before draining any water. Clean the water lter regularly, to avoid that
the water cannot drain after the wash due to obstruction of the lter. If
the water cannot drain, the display indicates that the water lter may be
clogged.
Remove the plinth by using the screwdriver: push downwards one side
of the plinth with your hand, then push the screwdriver into the gap
between plinth and front panel and pry open the plinth. Place a broad,
at container beneath the water lter, to collect the drain water. Slowly
turn the lter counterclockwise until water ows out. Let the water ow
out, without removing the lter. When the container is full, close the
water lter by turning it in clockwise. Empty the container. Repeat this
procedure until all the water has drained. Lay a cotton cloth beneath the
water lter, which can absorb a small amount of rest water. Then remove
the water lter by turning it out anti clockwise. Clean the water lter:
remove residues in the lter and clean it under running water. Insert
the water lter and reinstall the plinth: Reinsert the water lter again by
turning it in clockwise direction. Make sure to turn it in as far as it goes;
the lter handle must be in vertical position. To test water tightness of
the water lter, you can pour about 1 liter of water into the detergent
dispenser. Then reinstall the plinth.
Page 8

TROUBLESHOOTING
The washing machine may sometimes not work properly for certain reasons. Before calling the After-sales service, it is recommended to check to see if
the problem can be easily resolved using the following list.
Anomalies: Possible causes / Solution:
The washing machine does not turn on.
The wash cycle does not start.
The washing machine does not ll with
water (the message “h2o” is shown on
the display). “Beep” sound every 5
seconds.
The washing machine loads and drains
water continuously.
The washing machine does not drain or
does not spin.
• The plug is not inserted into the electrical outlet, or not enough to make contact.
• There has been a power failure.
• The door is not fully closed.
• The “ON/OFF”
• The “Start/Pause” button has not been pressed.
• The water tap is not open.
• A “Start delay” has been set.
• The water intake hose is not connected to the tap.
• The hose is bent.
• The water tap is not open.
• The mains water supply has been shut o.
• There is not enough pressure.
• The “Start/Pause”
• The drain hose has not been installed at 65 to 100 cm from the ground.
• The end of the drain hose is immersed in water.
• The drain connector on the wall does not have an air vent.
• If the problem persists after having performed these checks, close the water tap, shut o the
washing machine, and call the After-sales service. If the dwelling is located on one of the
uppermost oors of a building, a siphon eect can sometimes occur, thus causing the washing
machine to load and drain water continuously. Special anti-siphon valves are available on the
market to prevent these types of problems.
• The programme does not include the draining function: with certain programmes it must be
activated manually.
• The drain hose is bent.
• The drain line is obstructed.
button has not been pressed.
button has not been pressed.
The washing machine vibrates
excessively during the spin cycle.
The washing machine leaks water.
The machine is locked and the display
ashes, indicating an error code (e.g.
F‑01, F‑..).
Too much foam is formed.
Door is locked, with or without
failure indication, and the
programme does not run.
• At the time of installation, the drum was not properly unblocked.
• The washing machine is not level.
• The washing machine is squeezed between furniture and the wall.
• The water intake hose has not been tightened properly.
• The detergent dispenser is clogged.
• The drain hose has not been properly fastened.
• Shut o the machine, disconnect the plug from the outlet, and wait about 1 minute before
turning it back on.
• If the problem persists, call the After-sales service.
• The detergent is not compatible with the washing machine (it must bear the wording “for
washing machines”, “for hand washing and washing machines”, or something similar).
• The dosage was excessive.
• Door is locked in case of power breakdown. Programme will continue automatically as soon as
the mains is available again.
• Washing machine is in a standstill. Programme will continue automatically after the origin of
the standstill does not persist anymore.
You can download the H&S INSTRUCTIONS, USER MANUAL, PRODUCT FICHE and ENERGY DATA by:
• Visiting our website - http://docs.whirlpool.eu
• Using QR code
• Alternatively, contact our After‑sales Service (See phone number in the warranty booklet). When
contacting our After-sales Service, please state the codes provided on your product’s identication plate.
400011502660
xxxxxxxxxxxx
 Loading...