

Page 1
GB
BC155
BC219
BC118/18
BC184/18
FROSTIG
Page 2

Page 3

ENGLISH 4
Page 4

ENGLISH 4
Safety information
Before first use
This appliance is intended to be used in household.
To ensure best use of your appliance, carefully read
this User Manual which contains a description of the
product and useful advice.
Keep these instructions for future reference.
1. After unpacking the appliance, make sure it is not
damaged and that the door closes properly.
Any functional fault must be reported to IKEA After
Sales Service as soon as possible.
2. Wait at least two hours before switching the
appliance on, to ensure that the refrigerant circuit
is fully efficient.
3. The electrical installation and the electrical
connection must be carried out by a qualified
technician according to the manufacturer's
instructions and in compliance with the local safety
regulations.
4. Clean the inside of the appliance before using it.
Precautions and general recommendations
Installation and connection
• The appliance must be handled and installed by
two or more persons.
• Be careful not to damage the floors (e.g. parquet)
when moving the appliance.
• During installation, make sure the appliance does
not damage the power cable.
• Make sure the appliance is not near a heat source.
• To guarantee adequate ventilation, leave a
space on both sides and above the appliance
and follow the installation instructions.
• Keep the appliance ventilation openings free.
• Do not damage the appliance refrigerant circuit
pipes.
• Install and level the appliance on a floor strong
enough to take its weight and in a place suitable
for its size and use.
• Install the appliance in a dry and well-ventilated
place. The appliance is arranged for operation in
places where the temperature comes within the
following ranges, according to the climatic class
given on the rating plate. The appliance may not
work properly if it is left for a long time at a
temperature outside the specified range.
• Make sure the voltage specified on the rating
plate corresponds to that of your home.
• Do not use single/multi adapters or extension
cords.
• For the water connection, use the pipe supplied
with the new appliance; do not reuse that of the
previous appliance.
• Power cable modification or replacement must
only be carried out by qualified personnel or by
After-sales Service.
• It must be possible to disconnect the appliance
from the power supply by unplugging it or by
means of a mains two-pole switch installed
upstream of the socket.
Safety
• Do not store explosive substances such as aerosol
cans with a flammable propellant in this
appliance.
• Do not store or use petrol, flammable liquids or
gas in the vicinity of this or other electrical
appliances. The fumes can cause fires or
explosions.
• Do not use mechanical, electric or chemical
means other than those recommended by the
Manufacturer to speed up the defrost process.
• Do not use or place electrical devices inside the
appliance compartments if they are not of the
type expressly authorised by the Manufacturer.
• This appliance is not intended for use by persons
(including children) with reduced physical, sensory
or mental capabilities, or lack of experience and
knowledge, unless they have been given
supervision or instruction concerning use of the
appliance by a person responsible for their safety.
Contents
Safety information 4
Product description 6
First use 7
Daily use 7
Cleaning and maintenance 8
What to do if… 9
Technical data 10
Environmental concerns 10
Electrical connection for Great Britain
and Ireland only 11
IKEA GUARANTEE 12
Climatic Class Amb. T. (°C) Amb. T. (°F)
SN From 10 to 32 From 50 to 90
N From 16 to 32 From 61 to 90
ST From 16 to 38 From 61 to 100
T From 16 to 43 From 61 to 110
Page 5

ENGLISH 5
• To avoid the risk of children becoming trapped
and suffocating, do not allow them to play or
hide inside the appliance.
• Do not swallow the contents (non-toxic) of the ice
packs (in some models).
• Do not eat ice cubes or ice lollies immediately
after taking them out of the freezer since they
may cause cold burns.
Use
• Before carrying out any maintenance or cleaning
operation, unplug the appliance or disconnect it
from the power supply.
• All appliances equipped with an automatic icemaker and water dispenser must be connected to
a water supply that only delivers drinking water
(with mains water pressure of between 0.17 and
0.81 Mpa (1.7 and 8.1 bar)). Automatic icemakers and/or water dispensers not directly
connected to the water supply must be filled with
drinking water only.
• Use the refrigerator compartment only for storing
fresh food and the freezer compartment only for
storing frozen food, freezing fresh food and
making ice cubes.
• Do not store glass containers with liquids in the
freezer since they may burst.
The Manufacturer declines any liability if the above
advice and precautions are not respected.
Cleaning, sanitization and maintenance
of the ice and water dispenser (if present)
Failure to observe the sanitization instructions
provided may compromise the hygiene and safety
of water dispensed.
• When using the appliance for the first time,
discard the first 9-14 litres of water, equivalent to
6-7 minutes of dispensing (not necessarily
consecutive, but before initial consumption) and
discard the ice produced in the first 24 hours.
• Reposition the removable water dispenser (if
present), ensuring your hands are hygienically
clean.
• Periodically clean the ice bucket or drawer under
running water only.
• Every six months, sanitize the water and ice
dispenser system using a food grade disinfectant
solution (with sodium hypochlorite) which does not
taint the appliance materials. Rinse with water
before use.
• Replacement of any parts of the ice and water
dispenser must be carried out using original spare
parts provided by the Manufacturer.
• Any work on the appliance must be carried out by
a qualified technician or the After-sales Service.
Page 6
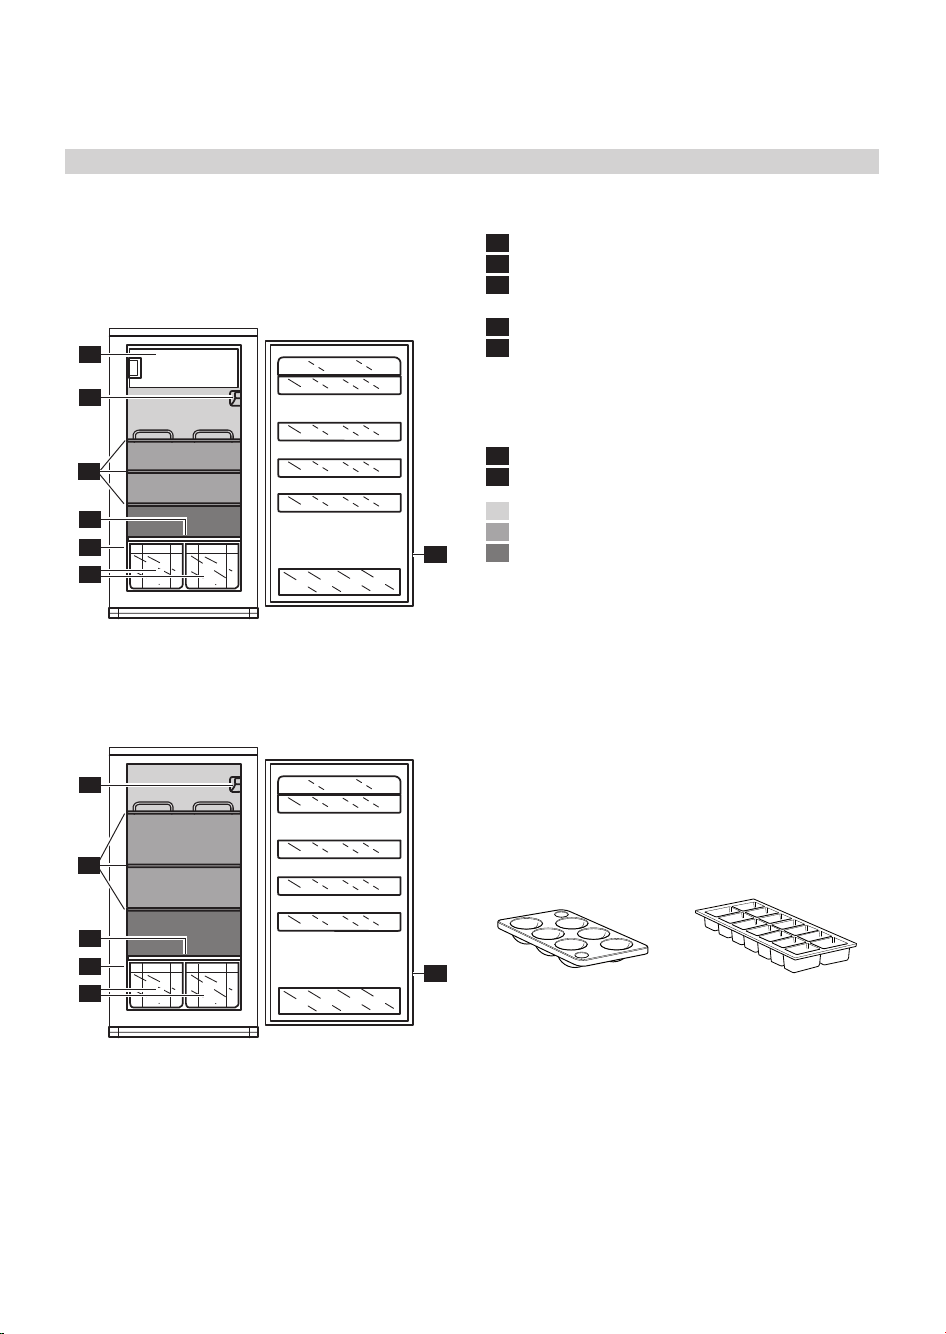
Product description
Refrigerator compartment
(for storage of fresh food and beverages)
Shelves (partly height adjustable)
Crispers
Refrigerator inner door with: (if supplied)
adjustable door trays
Pull-out defrost water drain
Rating plate (at the side of the crisper)
Freezer compartment (if supplied)
(marked with the symbol < for storing fresh
food, frozen food and making ice cubes)
Freezer section
Controls
Least cold zone
Intermediate temperature zone
Coldest zone
Features, technical information and images may
vary depending on model
6
7
2
1
3
4
5
Carefully read the operating instructions before
using the appliance.
ENGLISH 6
Accessories (if present)
Egg tray
1x
Ice tray
1x
BC184/18
BC118/18
BC219
BC155
7
5
2
6
3
1
4
7
5
2
3
1
4
Page 7
ENGLISH 7
Refrigerator compartment
Refrigerator compartment defrosting is completely
automatic. Droplets of water on the rear wall inside
the refrigerator compartment indicate that the
automatic defrost phase is in progress. The defrost
water is automatically run into a drain hole and
collected in a container, where it evaporates.
Fan (if provided)
The fan operates automatically. The fan ensures a
more consistent distribution of the temperature inside
the refrigerator compartment, with better
preservation of food and reduction of excess
humidity. Do not obstruct the suction zone with food.
The fan is only active when the motor is in operation.
Caution! The refrigerator accessories must not
be placed in a dishwasher.
Freezer compartment (if present)
This appliance is a refrigerator with a < star
rating freezer compartment. Packed frozen foods
can be stored for the period indicated on the
packing. Fresh food can also be frozen, ensuring
that any contact with already frozen food is
avoided. The quantity of fresh food that can be
frozen in a 24 hour period is given on the rating
plate. Re-freezing of partially defrosted food is not
recommended. This food should be consumed
within 24 hours. For further information on freezing
fresh food, refer to the quick guide.
Freezing fresh food
Place the fresh food to be frozen inside the freezer
compartment. Avoid direct contact with already
frozen food. To freeze the quantity of food shown
on the serial tag, remove the top drawer and place
the food directly on the rack.
Making ice cubes (if provided)
Fill the ice cube tray up to 2/3 with water and
place in the freezer compartment. Do not use sharp
or pointed objects to detach the tray.
Operation of the refrigerator and freezer
compartment (if present)
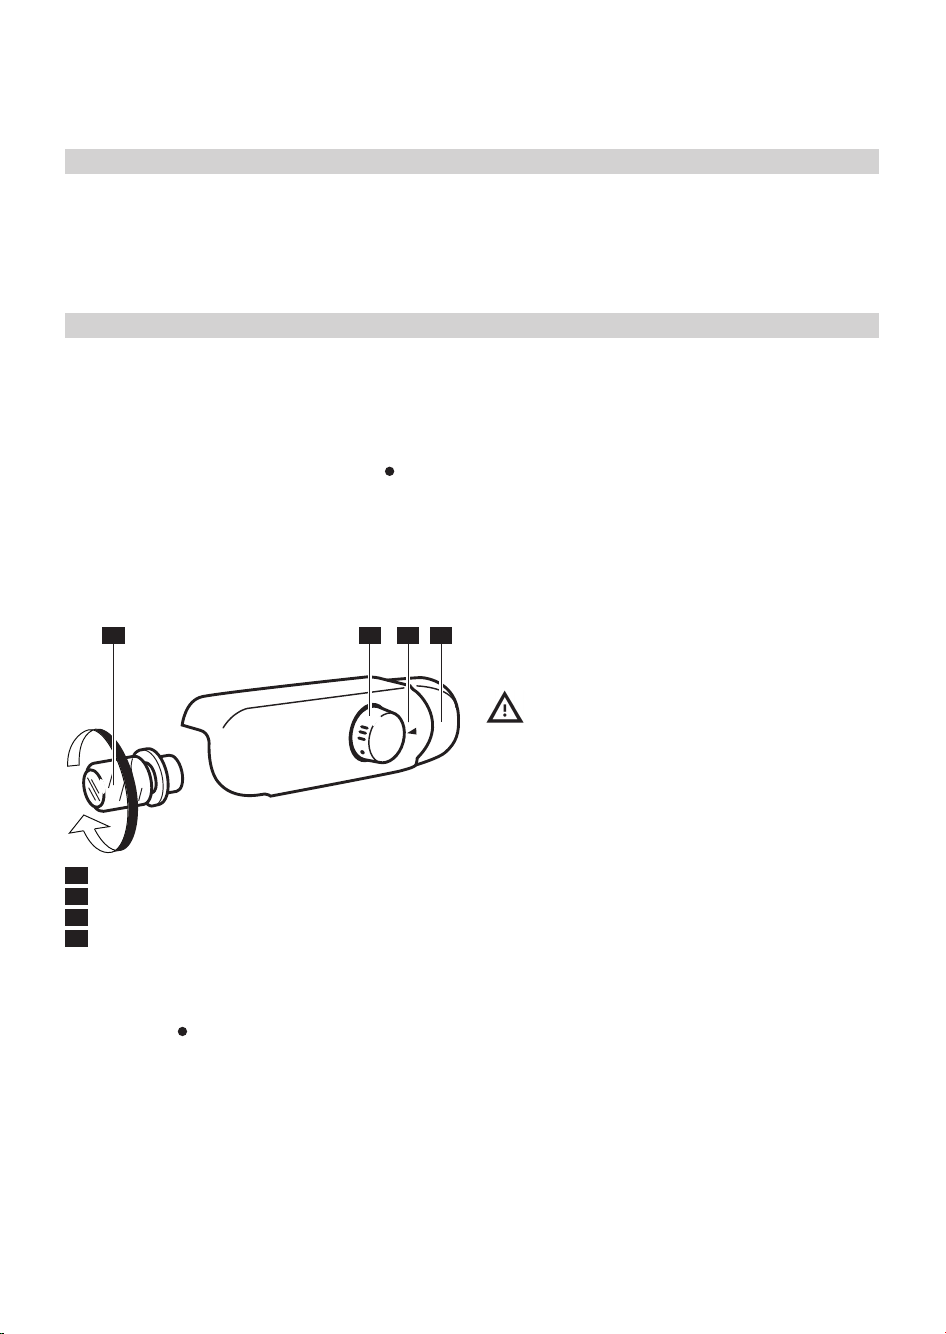
• Use the thermostat knob to adjust the
temperature of the refrigerator compartment (or
both compartments, depending on the model), as
shown in figure 1. Move the knob to the
position to switch the whole appliance off.
Note: The ambient temperature, frequency of door
opening and position of the appliance can affect
the temperatures inside the two compartments.
These factors must be taken into consideration
when setting the thermostat.
Thermostat control knob
Light button
Thermostat position setting notch
Light bulb (see instructions near the light bulb)
Thermostat on 1/MIN: Low refrigeration level
Thermostat on 3-5/MED: Medium refrigeration
Thermostat on 7/MAX: Maximum refrigeration
Thermostat on : Both refrigeration and
illumination are switched off.
To remove the light bulb turn anticlockwise as
shown in figure 1.
D
C
B
A
D A C B
fig. 1
Daily use
Connect the appliance to the mains power supply.
The ideal temperatures for preserving food have
already been set at the factory (3-5/MED).
Note: After switching the appliance on, it will be
necessary to wait for 2 to 3 hours before a
temperature suitable for a standard appliance load
is reached.
First use
Page 8
Storing food
Wrap food so that no water, moisture or condensate
can enter; this will prevent odours or aromas going
from one part to another in the refrigerator, ensuring
better preservation of frozen foods.
Never place hot food in the freezer. Cooling hot
foods before freezing saves energy and prolongs
the life of the appliance.
If the appliance is not going to be used
Disconnect the appliance from the power supply,
remove all the food, defrost and clean. Leave the
doors open enough for air to circulate inside the
compartments. This will prevent the formation of
mould and bad odours.
In case of power failures
Keep the doors of the appliance closed. In this way
the stored food will stay cold as long as possible.
Do not refreeze partially thawed food, consume it
within 24 hours.
ENGLISH 8
Regularly clean the appliance using a cloth and a
solution of warm water, with some soft detergent
suitable for cleaning the inside of the refrigerator
compartment. Do not use abrasive detergents or
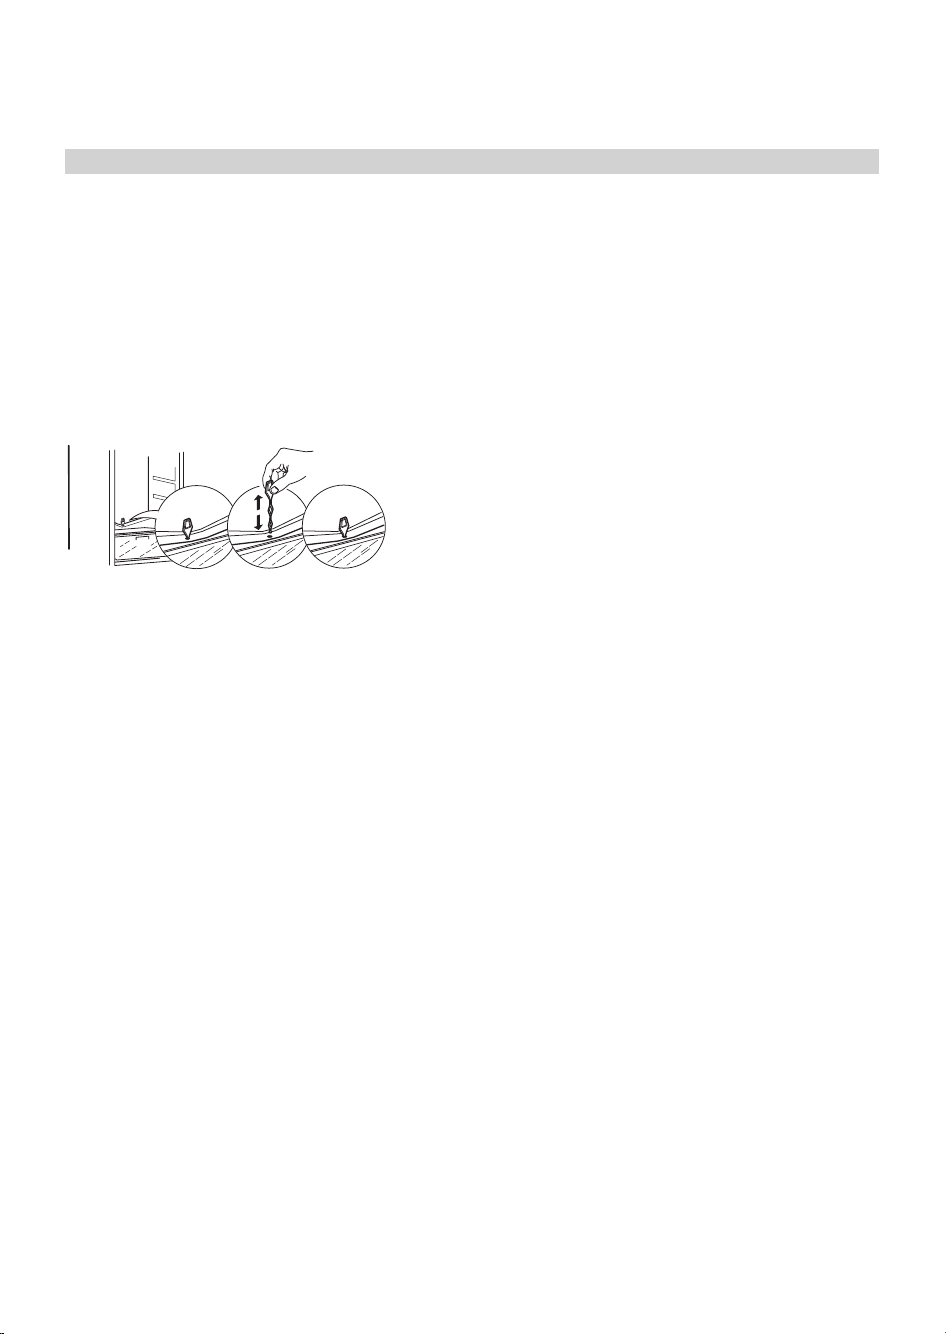
tools. To ensure continuous and correct flow of
defrost water, regularly clean the inside of the
draining hole on the back of the refrigerator near the
fruit and vegetable drawer, using the tool provided
(see fig.1).
Before carrying out any cleaning or maintenance
operation, unplug the appliance or disconnect it
from the power supply.
Defrosting the freezer compartment
The freezer should be defrosted once or twice a
year or when excessive frost is present (3 mm
thickness).
The formation of frost is normal. The amount and
rate at which frost accumulates depends on room
conditions and how often the door is open.
To defrost the unit, switch off the freezer compartment
or the whole appliance, depending on the model,
and remove all food products.
Clean the inside of the freezer. Rinse and dry
thoroughly. Switch the freezer compartment, or the
whole appliance, back on and store the food inside.
Cleaning and maintenance
fig. 1
Page 9
ENGLISH 9
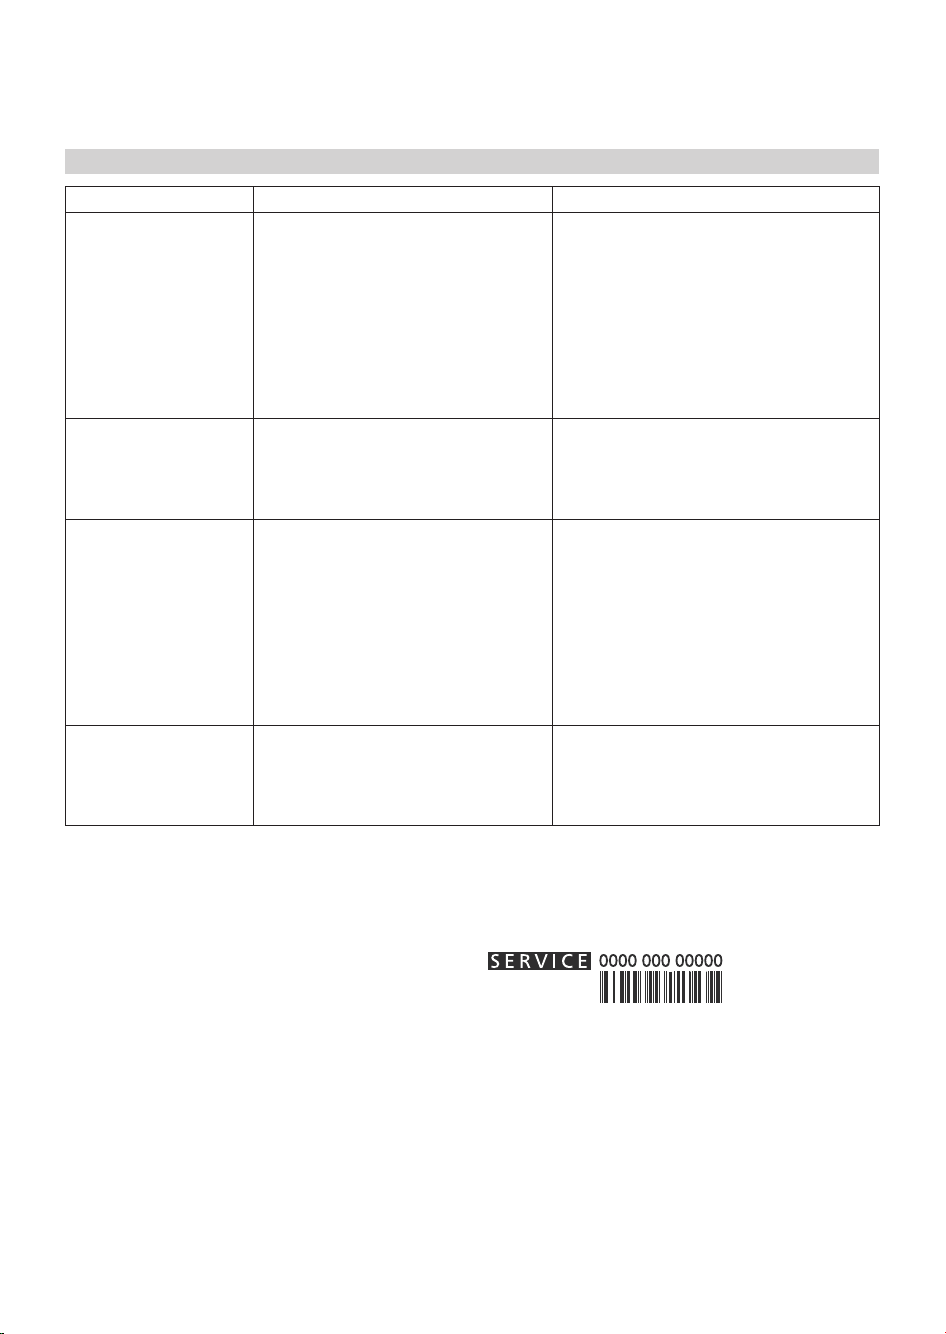
Problem Possible cause Solution
The appliance does not
operate
There might be a problem with the
electric power supply to the
appliance.
Check that:
• there isn't a power supply failure
• the power plug is correctly inserted in
the power socket and the two-pole
switch, if present, is in the correct
position (on)
• the electric circuit safety devices
installed in the house are fully functional
• the power supply cable is not broken
The inside light does
not work.
The lamp might need replacing. Disconnect the appliance from the electric
power supply, check the lamp and
replace with a new one if necessary
(see "Daily use").
The temperature inside
the compartments is
not cold enough.
There may be several causes
(see "Solutions")
Check that:
• The doors are closed correctly
• The appliance is not placed near a heat
source.
• the temperature set is appropriate.
• Air circulation through the ventilation
grills at the bottom of the appliance is
not obstructed.
There is water at the
bottom of the
refrigerator
compartment
The defrost water drain is obstructed. Clean the defrost water drain hole (see
"Cleaning and maintenance").
What to do if…
Note:
• Gurgling, hissing and humming noises from the
refrigerating system are normal.
Before contacting the After-sales service:
Switch the appliance on again to see if the problem
has disappeared. If not, switch it off again and
repeat the operation after an hour.
If your appliance still does not work properly after
carrying out the checks listed in the troubleshooting
guide and switching the appliance on again,
contact the After-sales service, clearly explaining
the problem and specifying:
• the type of fault;
• the model;
• the type and serial number of the appliance
(given on the rating plate);
• the Service number (the number after the word
SERVICE on the rating plate inside the appliance).
Note:
Reversing of appliance door opening is not
covered by the warranty.
Page 10
ENGLISH 10
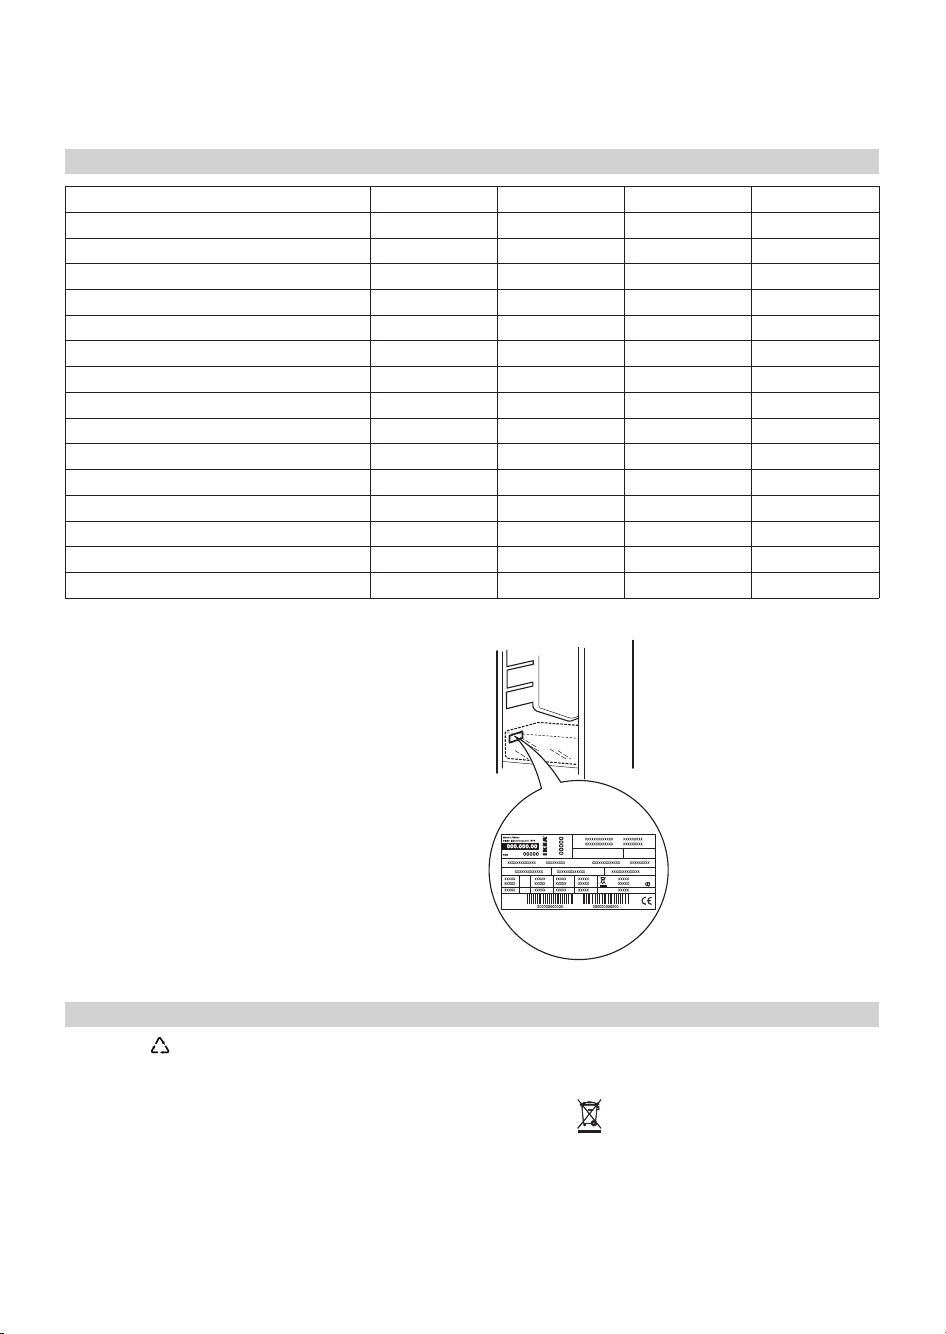
The technical information is situated in the rating
plate on the internal side of the appliance and in
the energy label
Dimensions BC219 BC184/18 BC155 BC118/18
Height 12 21 12 21 874 874
Width 540 540 540 540
Depth 550 550 550 550
Net Volume (l)
Fridge 219 18 4 15 5 118
Freezer - 18 - 18
Defrost system
Fridge Automatic Automatic Automatic Automatic
Freezer - - - -
Star Rating - 4 - 4
Rising Time (h) - 10 - 10
Freezing Capacity (kg/24h) - 2 - 2
Energy consumption (kwh/24h) 0,35 0,61 0,33 0,53
Noise level (dba) 35 36 35 36
Energy class A+ A+ A+ A+
Technical data
Enviromental concerns
1. Packing
The packing material is 100% recyclable and bears
the recycling symbol. For disposal, comply with the
local regulations. Keep the packing materials (plastic
bags, polystyrene parts, etc.) out of the reach of
children, as they are a potential source of danger.
2. Scrapping/Disposal
The appliance is manufactured using recyclable
material. This appliance is marked in compliance
with European Directive 2002/96/EC on Waste
Electrical and Electronic Equipment (WEEE). By
ensuring the correct disposal of this appliance, you
can help prevent potentially negative consequences
for the environment and the health of persons.
The symbol on the appliance, or on the
accompanying documents, indicates that this
appliance should not be treated as domestic waste
but must be taken to a special collection centre for
the recycling of electrical and electronic equipment.
When scrapping the appliance, make it unusable by
cutting off the power cable and removing the doors
and shelves so that children cannot easily climb
Page 11
ENGLISH 11
inside and become trapped.
Scrap the appliance in compliance with local
regulations on waste disposal, taking it to a special
collection centre; do not leave the appliance
unattended even for a few days, since it is a
potential source of danger for children.
For further information on the treatment, recovery
and recycling of this product, contact your competent
local office, the household waste collection service or
the shop where you purchased the appliance.
Information:
This appliance does not contain CFCs. The
refrigerant circuit contains R600a (HC) (see the rating
plate inside the appliance).
Appliances with Isobutane (R600a): isobutane is a
natural gas without environmental impact, but is
flammable. Therefore, make sure the refrigerant
circuit pipes are not damaged.
Declaration of conformity
• This appliance has been designed for preserving
food and is manufactured in compliance with
Regulation (CE) No. 1935/2004.
n
• This appliance has been designed, manufactured
and marketed in compliance with:
- safety objectives of the “Low Voltage” Directive
2006/95/CE (which replaces 73/23/CEE and
subsequent amendments);
- the protection requirements of Directive “EMC”
2004/108/EC.
Electrical safety of the appliance can only be
guaranteed if it is correctly connected to an
approved earthing system.
Warning - this appliance must be earthed
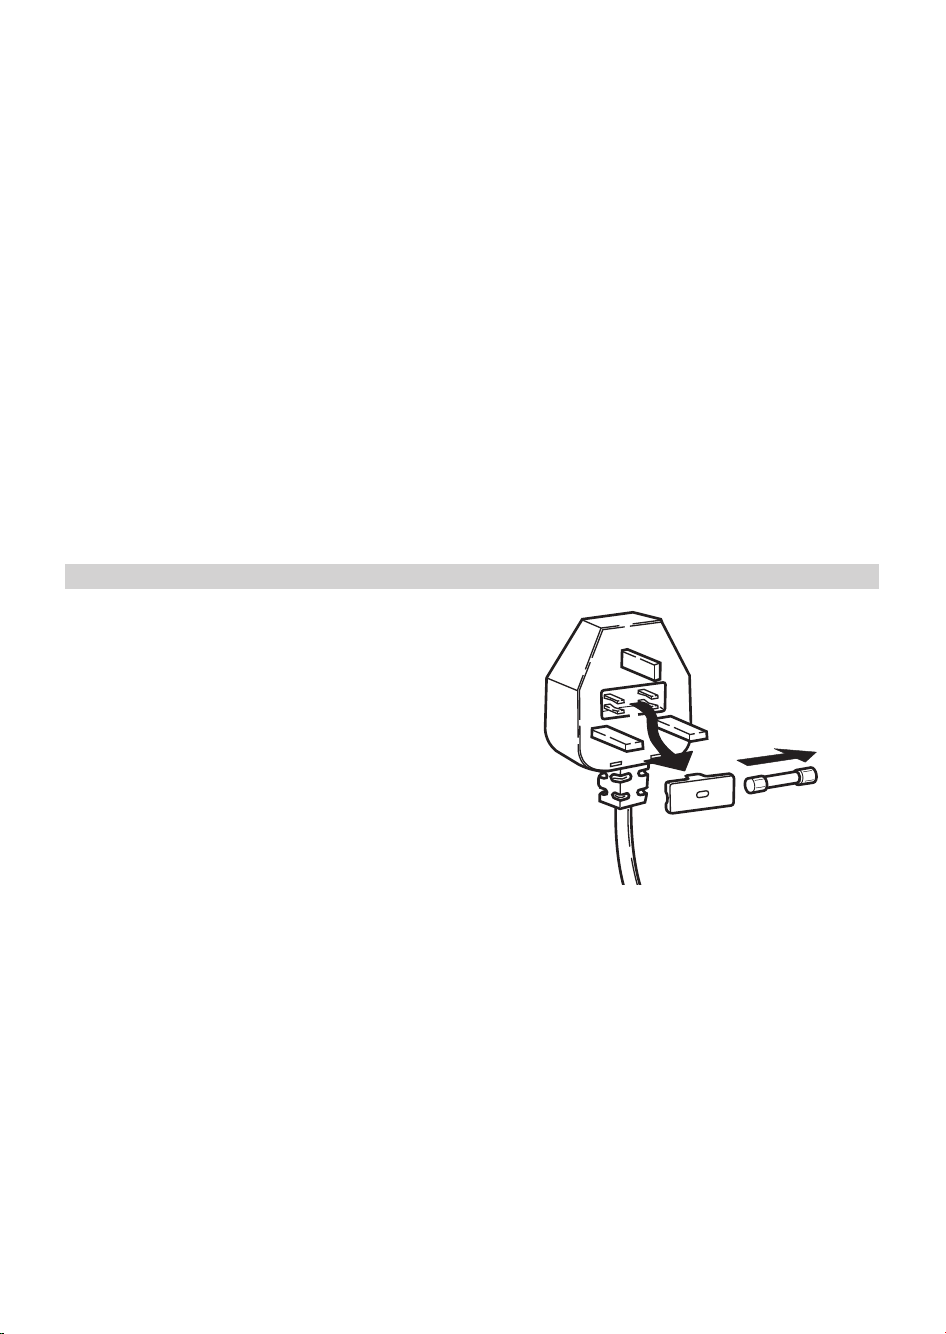
Fuse replacement
If the mains lead of this appliance is fitted with a BS
1363A 13amp fused plug, to change a fuse in this
type of plug use an A.S.T.A. approved fuse to BS
1362 type and proceed as follows:
1. Remove the fuse cover (A) and fuse (B).
2.Fit replacement 13A fuse into fuse cover.
3.Refit both into plug.
Important:
The fuse cover must be refitted when changing a
fuse and if the fuse cover is lost the plug must not
be used until a correct replacement is fitted.
Correct replacement are identified by the colour
insert or the colour embossed in words on the base
of the plug.
Replacement fuse covers are available from your
local electrical store.
For the Republic of Ireland only
The information given in respect of Great Britain will
frequently apply, but a third type of plug and
socket is also used, the 2-pin, side earth type.
Socket outlet / plug (valid for both countries)
If the fitted plug is not suitable for your socket
outlet, please contact After-sales Service for further
instruction. Please do not attempt to change plug
yourself. This procedure needs to be carried out by
a qualified technician in compliance with the
manufactures instructions and current standard
safety regulations.
Electrical connection for Great Britain and Ireland only
Page 12

ENGLISH 12
IKEA GUARANTEE
How long is the IKEA guarantee valid?
This guarantee is valid for five (5) years from the
original date of purchase of your appliance at
IKEA, unless the appliance is named LAGAN in
which case two (2) years of guarantee apply. The
original sales receipt, is required as proof of
purchase. If service work is carried out under
guarantee, this will not extend the guarantee
period for the appliance.
Which appliances are not covered by the IKEA
five (5) years guarantee?
The range of appliances named LAGAN and all
appliances purchased in IKEA before 1st of August
2007.
Who will execute the service?
IKEA service provider will provide the service
through its own service operations or authorized
service partner network.
What does this guarantee cover?
The guarantee covers faults of the appliance, which
have been caused by faulty construction or material
faults from the date of purchase from IKEA. This
guarantee applies to domestic use only. The
exceptions are specified under the headline “What
is not covered under this guarantee?” Within the
guarantee period, the costs to remedy the fault e.g.
repairs, parts, labour and travel will be covered,
provided that the appliance is accessible for repair
without special expenditure. On these conditions
the EU guidelines (Nr. 99/44/EG) and the
respective local regulations are applicable.
Replaced parts become the property of IKEA.
What will IKEA do to correct the problem?
IKEA appointed service provider will examine the
product and decide, at its sole discretion, if it is
covered under this guarantee. If considered
covered, IKEA Service Provider or its authorized
service partner through its own service operations,
will then, at its sole discretion, either repair the
defective product or replace it with the same or a
comparable product.
What is not covered under this guarantee?
• Normal wear and tear.
• Deliberate or negligent damage, damage caused
by failure to observe operating instructions,
incorrect installation or by connection to the
wrong voltage, damage caused by chemical or
electrochemical reaction, rust, corrosion or water
damage including but not limited to damage
caused by excessive lime in the water supply,
damage caused by abnormal environmental
conditions.
• Consumable parts including batteries and lamps.
• Non-functional and decorative parts which do not
affect normal use of the appliance, including any
scratches and possible color differences.
• Accidental damage caused by foreign objects or
substances and cleaning or unblocking of filters,
drainage systems or soap drawers.
• Damage to the following parts: ceramic glass,
accessories, crockery and cutlery baskets, feed
and drainage pipes, seals, lamps and lamp
covers, screens, knobs, casings and parts of
casings. Unless such damages can be proved to
have been caused by production faults.
• Cases where no fault could be found during a
technician’s visit.
• Repairs not carried out by our appointed service
providers and/or an authorized service
contractual partner or where non-original parts
have been used.
• Repairs caused by installation which is faulty or
not according to specification.
• The use of the appliance in a non-domestic
environment i.e. professional use.
• Transportation damages. If a customer transports
the product to his home or another address, IKEA
is not liable for any damage that may occur
during transport. However, if IKEA delivers the
product to the customer’s delivery address, then
damage to the product that occurs during this
delivery will be covered by IKEA.
• Cost for carrying out the initial installation of the
IKEA appliance.
However, if an IKEA appointed Service Provider
or its authorized service partner repairs or
replaces the appliance under the terms of this
guarantee, the appointed Service Provider or its
authorized service partner will reinstall the
repaired appliance or install the replacement, if
necessary. This does not apply within Ireland,
customer should contact the local IKEA dedicated
after sales line or the appointed Service Provider
for further information.
These restrictions do not apply to fault-free work
carried out by a qualified specialist using our
original parts in order to adapt the appliance to the
technical safety specifications of another EU country.
Page 13
ENGLISH 13
How country law applies
The IKEA guarantee gives you specific legal rights,
which cover or exceed all the local legal demands.
However these conditions do not limit in any way
consumer rights described in the local legislation.
Area of validity
For appliances which are purchased in one EU
country and taken to another EU country, the
services will be provided in the framework of the
guarantee conditions normal in the new country.
An obligation to carry out services in the framework
of the guarantee exists only if the appliance
complies and is installed in accordance with:
- the technical specifications of the country in which
the guarantee claim is made;
- the Assembly Instructions and User Manual
Safety Information.
The dedicated AFTER SALES for IKEA appliances
Please don’t hesitate to contact IKEA appointed
After Sales Service Provider to:
• make a service request under this guarantee;
• ask for clarifications on installation of the IKEA
appliance in the dedicated IKEA kitchen furniture;
• ask for clarification on functions of IKEA
appliances.
To ensure that we provide you with the best
assistance, please read carefully the Assembly
Instructions and/or the User Manual before
contacting us.
How to reach us if you need our service
In order to provide you a quicker service, we
recommend to use the specific phone
numbers listed on this manual. Always refer
to the numbers listed in the booklet of the
specific appliance you need an assistance for.
Please also always refer to the IKEA article
number (8 digit code) and 12 digit service
number placed on the rating plate of your
appliance.
SAVE THE SALES RECEIPT!
It is your proof of purchase and required for the
guarantee to apply. The sales receipt also
reports the IKEA name and article number
(8 digit code) for each of the appliances you
have purchased.
Do you need extra help?
For any additional questions not related to After
Sales of your appliances please contact your
nearest IKEA store call centre. We recommend you
read the appliance documentation carefully before
contacting us.
Please refer to the last page of this
manual for the full list of IKEA
appointed After Sales Service
Provider and relative national phone
numbers.
Page 14
14
BELGIË - BELGIQUE - BELGIEN
Telefoon/Numéro de téléphone/Telefon-Nummer: 026200311
Tarief/Tarif/Tarif: Lokaal tarief/Prix d’un appel local/Ortstarif
Openingstijd: Maandag - Vrijdag 8.00 - 20.00
Heures d’ouverture: Lundi - Vendredi 8.00 - 20.00
Öffnungszeiten: Montag - Freitag 8.00 - 20.00
ČESKÁ REPUBLIKA
Telefonní číslo: 225376400
Sazba: Místní sazba
Pracovní doba: Pondělí - Pátek 8.00 - 20.00
DANMARK
Telefonnummer: 70150909
Takst: Lokal takst
Åbningstid: Mandag - fredag 9.00 - 21.00
Lørdag 9.00 - 18.00
(Åbent udvalgte søndage, se IKEA.dk)
DEUTSCHLAND
Telefon-Nummer: 06929993602
Tarif: Ortstarif
Öffnungszeiten: Montag - Freitag 8.00 - 20.00
ΕΛΛΑΔΑ
Τηλεφωνικός αριθμός: 2109696497
Χρέωση: Τοπική χρέωση
Ώρες λειτουργίας: Δευτέρα - Παρασκευή 8.00 - 20.00
ESPAÑA
Teléfono: 913754126
Tarifa: Tarifa local
Horario: Lunes - Viernes 8.00 - 20.00
(España Continental)
FRANCE
Numéro de téléphone: 0170480513
Tarif: Prix d’un appel local
Heures d'ouverture: Lundi - Vendredi 9.00 - 21.00
ÍSLAND
Símanúmer: 5852409
Kostnaður við símtal: Almennt mínútuverð
Opnunartími: Mánudaga - Föstudaga 9.00 - 17.00
ITALIA
Telefono: 0238591334
Tariffa: Tariffa locale
Orari d’apertura: Lunedì - Venerdì 8.00 - 20.00
MAGYARORSZÁG
Telefon szám: (06-1)-3285308
Tarifa: Helyi tarifa
Nyitvatartási idő: Hétfőtől Péntekig 8.00 - 20.00
NEDERLAND
Telefoon: 09002354532
en/of 0900 BEL IKEA
Tarief: Lokaal tarief € 0,10 p/min
Openingstijd: Maandag t/m - Vrijdag 9.00 - 21.00
Zaterdag 9.00 - 20.00
Zondag 9.00 - 18.00
NORGE
Telefon nummer: 23500112
Takst: Lokal takst
Åpningstider: Mandag - fredag 8.00 - 20.00
ÖSTERREICH
Telefon-Nummer: 013602771461
Tarif: Ortstarif
Öffnungszeiten: Montag - Freitag 8.00 - 20.00
POLSKA
Numer telefonu: 225844203
Stawka: Koszt połączenia według taryfy
operatora
Godziny otwarcia: Poniedziałek - Piątek 8.00-20.00
PORTUGAL
Telefone: 213164011
Tarifa: Tarifa local
Horário: Segunda - Sexta 9.00 - 21.00
REPUBLIC OF IRELAND
Phone number: 016590276
Rate: Local rate
Opening hours: Monday - Friday 8.00 - 20.00
РОССИЯ
Телефонный номер: 84957059426
Стоимость звонка: Местная стоимость звонка
Время работы: Понедельник - Пятница 8.00 - 20.00
(Московское время)
SCHWEIZ - SUISSE - SVIZZERA
Telefon-Nummer/Numéro de téléphone/Telefono: 0225675345
Tarif/Tarif/Tariffa: Ortstarif/Prix d’un appel local/Tariffa locale
Öffnungszeiten: Montag - Freitag 8.00 - 20.00
Heures d’ouverture: Lundi - Vendredi 8.00 - 20.00
Orario d’apertura: Lunedì - Venerdì 8.00 - 20.00
SLOVENSKO
Telefónne číslo: (02) 50102658
Cena za hovor: Cena za miestny hovor
Pracovná doba: Pondelok až piatok 8.00 - 20.00
SUOMI
Puhelinnumero: 0981710374
Hinta: Yksikköhinta
Aukioloaika: Maanantaista perjantaihin 8.00 - 20.00
SVERIGE
Telefon nummer: 0775-700 500
Taxa: Lokal samtal
Öppet tider: Måndag - Fredag 8.30 - 20.00
Lördag - Söndag 9.30 - 18.00
UNITED KINGDOM
Phone number: 02076601517
Rate: Local rate
Opening hours: Monday - Friday 9.00 - 21.00
Page 15

Page 16

5019 608 02128
©Inter IKEA System B.V. 2011 AA-511620-1Printed in Italy 02/11
 Loading...