


CONTENTS GB
INSTALLATION
ELECTRICAL CONNECTION
BEFORE USING THE OVEN
PROTECTING THE ENVIRONMENT
PRECAUTIONS AND GENERAL RECOMMENDATIONS
OVEN ACCESSORIES
LOWER OVEN FUNCTIONS
TOP OVEN FUNCTIONS
COOLING SYSTEM
PAGE
PAGE
PAGE
PAGE
PAGE
PAGE
PAGE
PAGE
PAGE
4
5
6
6
6
7
8
9
9
CLEANING THE OVEN AND ITS ACCESSORIES
TROUBLESHOOTING GUIDE
AFTER-SALES SERVICE
DECLARATION OF CONFORMITY CE
PAGE
PAGE
PAGE
PAGE
10
11
11
11
3
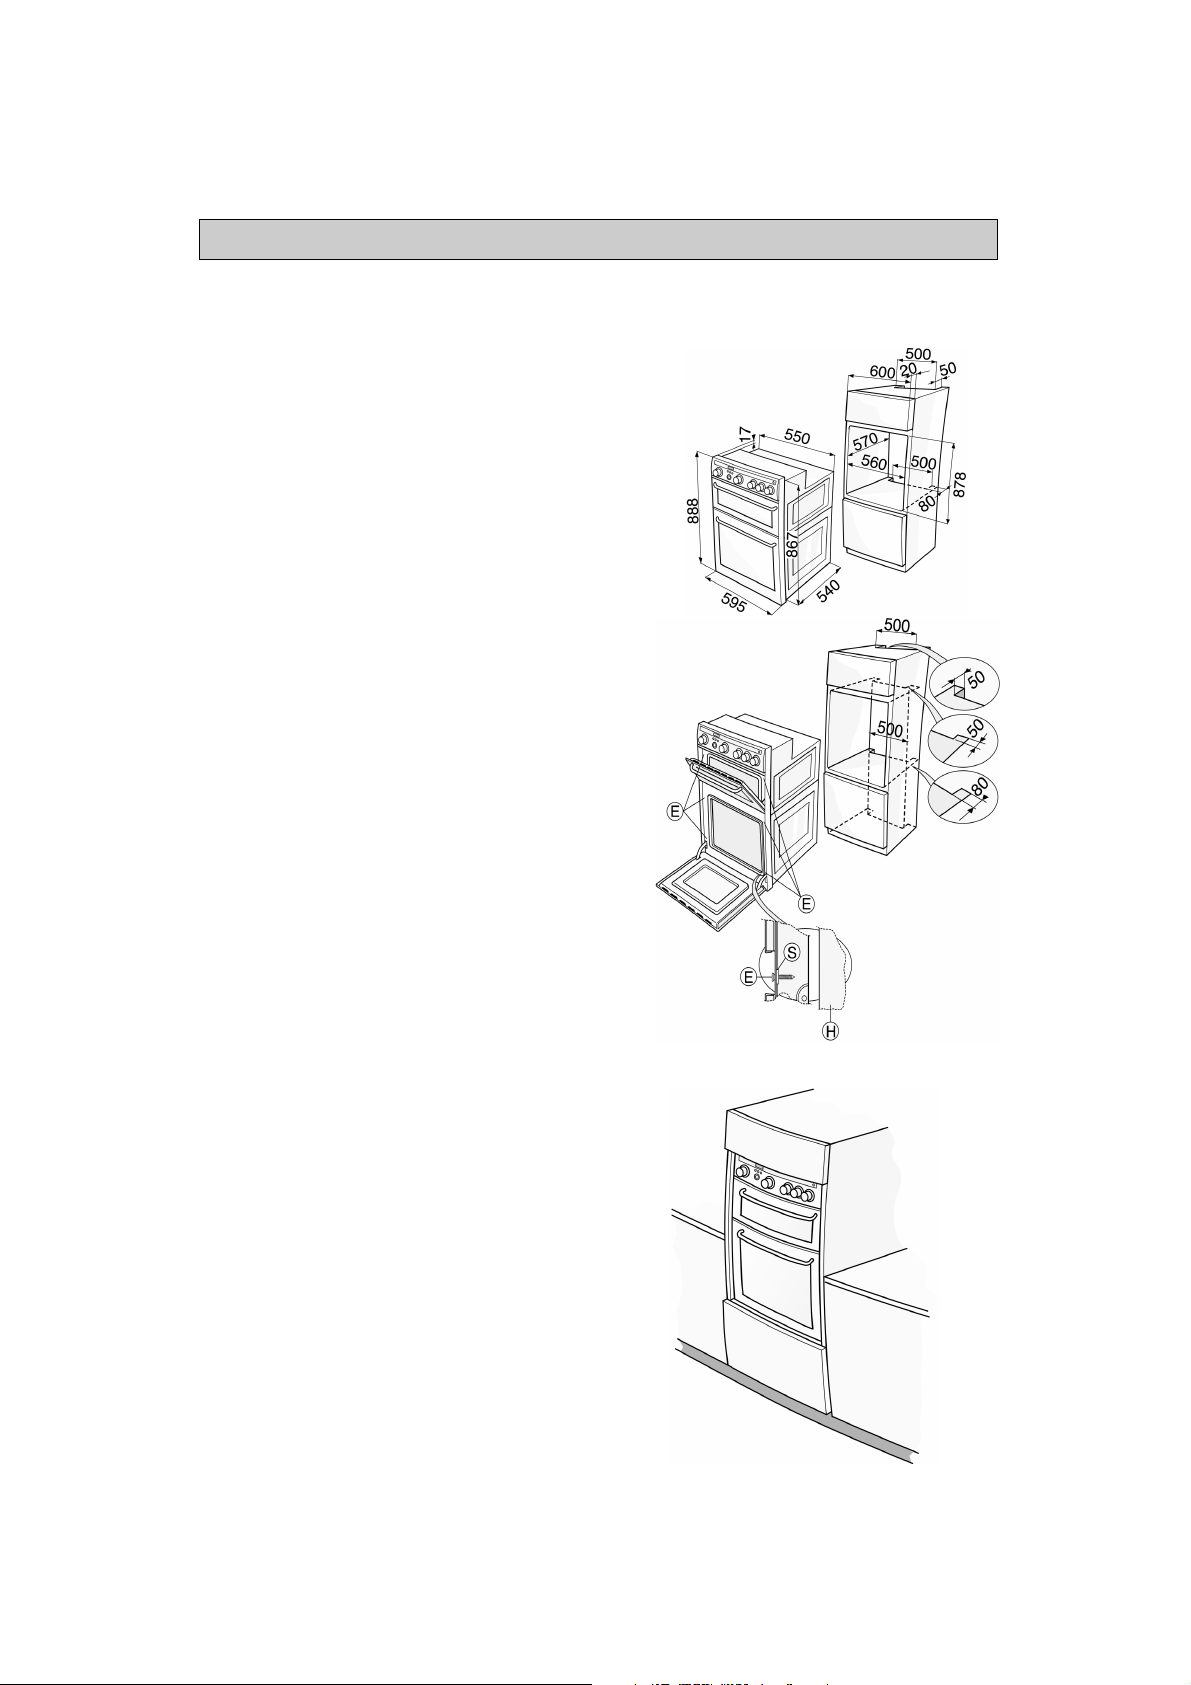
INSTALLATION
Technical information for the installer
•
After removing the oven from its packaging,
before making the connections place it on the
polystyrene foam base to protect it from
damage.
•
Do not attempt to lift the oven by the handle.
Lift at the sides as shown in the figure
(see arrow).
•
Check that the appliance has not been
damaged in transit.
•
Oven dimensions and kitchen unit dimensions
are shown in the figure opposite.
•
Kitchen units in contact with the oven must be
heat resistant (80°C min).
If plastic laminates or cement are not
sufficiently heat-resistant, warping, bubbling
or detachment of the finish may result.
•
Install the oven in the housing, lifting it at the
sides, taking care not to trap the wires of the
electrical supply cable.
•
For correct ventilation, follow the ventilation
opening directions shown in the figure
(500 min x 80 mm and 500 min x 50 mm inside
the cabinet).
•
Secure the oven to the kitchen unit (H)
tightening the screws (E) and the selfadhesive plastic spacers (S).Remove the
protection from the self-adhesive side. Before
installation, position the spacers as shown in
the opposite figure.
.
During oven installation, care must be taken to
ensure that the sides are not touching the front
edges of the housing or adjacent drawers and
doors (see picture).
4
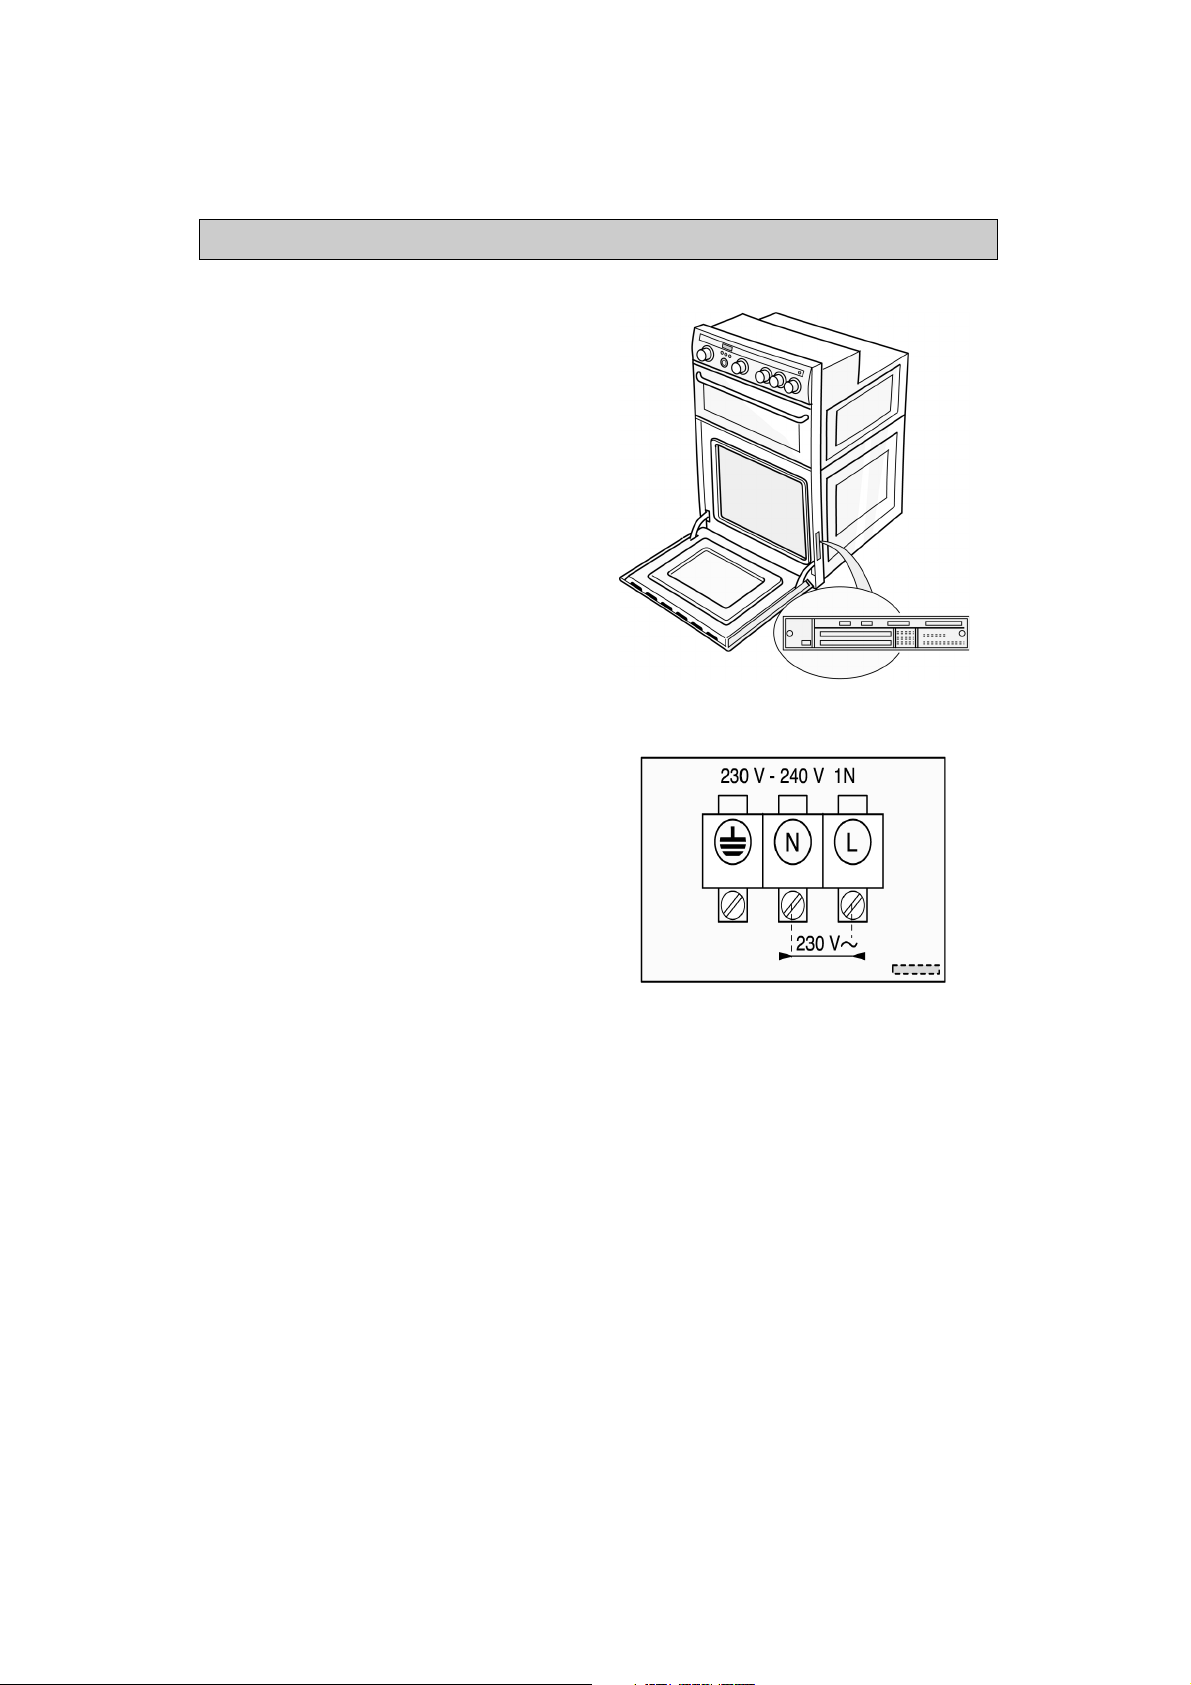
ELECTRICAL CONNECTION
• Important: do not connect to the power
supply before you have finished
connecting the oven and cooktop.
• Warning: Make sure the appliance is
installed and connected to the electricity
supply by a qualified technician in
accordance with the manufacturer’s
instructions and in compliance with local
regulations.
The installer is responsible for the correct
electrical connection of the appliances and the
observance of the relative safety
recommendations.
• The appliance must be connected to the
electricity supply by means of an all-pole
disconnect switch with minimum contact gap
of 3 mm.
The appliances must be earthed by law.
•
Do not use multiple plug adapters or extension
•
leads.
After the oven has been installed, the electrical
•
components must be concealed.
Make sure that the voltage shown on the rating
•
plate is the same as the power supply voltage
in your home. The rating plate is on the front
edge of the oven cavity (visible with oven door
open).
• Attention:
this appliance is 26 A. Connect the appliance
to the mains accordingly.
For Australia only:
The oven is delivered without supply cord.
Use a supply cord type H05 RR-F, 3 X 2,5 mm2
min.
The maximum absorbed power of
5

BEFORE USING THE OVEN
To make the most of your new oven, read the
•
users instructions carefully and keep them on
hand for consultation in the future.
Remove the cardboard protections and the
•
protective plastic film.
Remove the accessories from the oven and
•
heat it at 200°C for about an hour to eliminate
the smell of protective grease and insulating
materials. Keep the window open during this
procedure.
PROTECTING THE ENVIRONMENT
1. Packing
The packaging material can be 100%
•
recycled, as confirmed by the recycling symbol
().
2. Appliances
The appliances are built from recyclable
•
materials. If you decide to scrap the
appliances observe local waste disposal bylaws. Cut off the power cords so that the
appliances cannot be connected to the mains.
.
PRECAUTIONS AND GENERAL RECOMMENDATIONS
Before any maintenance on the oven
•
disconnect it from the mains.
Keep children away from the oven when it is in
•
use.
The oven must be repaired or adjusted only by
•
a qualified technician.
Make sure that the electrical wires of other
•
electrical appliances near the oven do not
come into contact with hot parts and do not
become entrapped in the oven door.
Use oven gloves to remove baking trays and
•
accessories when the oven is hot.
• Do not cover the bottom of the oven with
aluminium foil.
Do not place inflammable material in the oven
•
- risk of fire if the oven is inadvertently switched
on.
During the cooking process, water evaporates
•
from food. All ovens require this steam and
other fumes to be vented from the oven cavity.
For reasons of safety and aesthetics, we have
determined that an opening at the bottom of
the door is the optimum solution.
Consequently, vapour may be seen to be
coming from this area on occasions
(see picture).
This is a normal occurrence and the bottom
trim can be cleaned after removal of the door
as described on page 10.
Heavy weights must not be placed on the open
•
door as this may result in damage to the cavity
and hinges. Max weight: 7 kg (15lbs).
Never stand or sit on the oven open door.
•
Never hang any weight at the handle of the
oven door when open.
6

OVEN ACCESSORIES
• Accessories supplied depend on the model
(see the Product Description Sheet
supplied separately).
Drip tray
The drip tray is designed to collect fat and food
particles when it is positioned under the grid; it can
also be used as a griddle to cook meat, chicken
and fish, with or without vegetables. When using
the drip tray under the grid, pour in a little water to
avoid fat spatters and smoke.
1
1
2
Baking tray
For cooking biscuits, meringues and pizzas.
3
Grid
The grid can be used to grill food or as a support
for baking trays, cake tins and other cooking
receptacles. It can be placed on any of the runners
in the oven.
For AU only:
oven with the reinforce towards the oven rear wall.
Catalytic panels
These panels have a microporous coating that
absorbs fat spatters. We recommend an
automatic cleaning cycle after cooking particularly
fatty food.
To clean the oven heat it to 200°C when empty
1.
and leave it switched on for about
an hour.
At the end of the cycle and when the oven is
2.
cool; use a moist sponge to remove food
residues if necessary.
Do not use detergent or cleaners - risk of
damaging the catalytic enamel coating.
Pan Set Kit
The set comprises a grid , a drip tray and
one or two tongs .
This accessory must be set on the grid and
used with the Grill function.
2
the grid must be positioned into the
4
5
5a 5b
5c
3
3
4
5
5a
5b
5c
5b
Roof shield
To be used for meats and chicken with all
functions. Position it between the oven ceiling and
the grill element to facilitate cleaning of the ceiling .
It may be used in your dishwasher.
Meat tray
To be used on top of the fat pan.
To cook and grill meat, sausages, poultry.
The opening on the front side of the tray allows the
collection of juices, using a spoon.
6
7
6
7
7

LOWER OVEN FUNCTIONS
The functions actually available depend on the
model (see the Product Description Sheet
supplied separately).
STATIC FUNCTION
This function is used to cook food on the same
runner level.
The function allows temperature control; the
temperature can be set in the range of
. The default setting is
250°C
Preheat the oven until the required
•
temperature is reached and place the food into
the oven when all the indicators on the scale
are on.
°C__
When using this function, it is advisable to put the
•
food in the middle of the oven.
200°C
.
GRILL FUNCTION
This function is ideal to grill small pieces of meat
(steaks, sausages) and for making toast.
The function allows five settings, 1, 2, 3, 4, 5, each
corresponding to an increased heating level of the
heating element at the top.
The default setting is 3.
During cooking, the oven door may be open or
•
closed. However top performances are
obtained with the oven door open.
Preheat the oven for 3/5 minutes.
•
When cooking meat, to avoid spatters of fat
•
and smoke, pour a little water into the drip tray.
Turn the food half-way through grilling time.
•
“MLTF” FUNCTION
(Heat maintenance)
This function keeps one of two temperature levels
of temperature (either 35°C or 60°C) inside the
oven.
Setting the temperature at
•
useful to raise dough for bread and pizza.
The default setting is
•
is advisable to use the first shelf level.
Use the
•
food warm once it is cooked.
temperature setting to keep the
60°C
35°C
is particularly
35°C
. For this function it
FAN FUNCTION
This function is especially useful for
simultaneously cooking different foods at more
than one shelf level (for example: fish, vegetables,
pasta).
This function allows temperature control; the
temperature can be set in the range
.
250°C
The default setting is
If possible choose dishes that require the
•
same cooking temperature.
It is not necessary to preheat the oven.
•
If the dishes in the oven have different cooking
•
times, remove completed dishes and leave
remaining foods until cooked.
160°C
.
50°C
50°C
to
to
PASTRY FUNCTION (Static + Fan)
This function is useful when cooking at two levels
and when baking cakes. The function allows
temperature control; the temperature can be set in
the range of
The default setting is
It is not necessary to preheat the oven.
•
Switch the position of the dishes inside the
•
oven during cooking time.
If the dishes in the oven have different cooking
•
times, remove completed dishes and leave
remaining foods until cooked.
50°C
to
250°C
175°C
.
.
TURBOGRILL FUNCTION (Grill + Fan)
This function is ideal to cook large chunks of meat
(i.e. roast beef, roasts).
The function allows five settings, 1, 2, 3, 4, 5, each
corresponding to an increasing heating level of the
heating element at the top. The default setting is 3.
• Keep the oven door closed while cooking.
Lay the meat onto the grid and position the drip
•
tray on the first shelf level. To avoid spatters of
fat and smoke, pour a little water into the drip
tray.
Turn over the meat half-way through cooking
•
time.
TURBOFAN FUNCTION
This function is useful when cooking at two runner
levels; the temperature can be set in the range of
to
50°C
The default setting is
This function is ideal for:
Large fruitcakes.
•
Timbales.
•
Stuffed vegetables.
•
Poultry (weighing more than 3 kg).
•
It is not necessary to preheat the oven.
250°C
.
160°C.
PROGRAM FUNCTION
This function is useful to bake pizzas, bread and
focaccia. The function provides 3 cooking
programs (P1, P2,
model). The temperature levels in each program
are preset and can be selected by the user.
The temperature values that can be selected in
each program are limited by the programmer, in
order to obtain good cooking results.
Each program corresponds to a recipe for the
preparation of the dish you want (consult the
Bread/Pizzas cookbook).
The default setting of this function is P1.
•
is available depending on
P3
8

TOP OVEN FUNCTIONS
Off
0
Oven light
BOTTOM HEATING FUNCTION
Use:
To finish baking fruitcakes or cheesecakes.
•
To thicken sauces.
•
Use the lower heating function for the last 10 or 15
minutes of cooking time.
DUAL GRILL FUNCTION
This function has 2 positions: single and
dual grill.
Use the single grill position to grill small
•
quantities of food.
Use the dual grill position to grill large
•
quantities of food.
Place food on the meat tray. Pour some water
•
into the fat pan to reduce smoke and grease
spatters and position it into the oven.
During cooking leave the oven door open.
•
Before use, preheat the grill for 5 minutes
•
approx.
STATIC FUNCTION
Use when all the food is on the same runner level.
Preheat the oven to the required cooking
•
temperature and place the food inside as soon
as the red thermostat indicator light switches
off.
Ideally, the shelf should be on the second
•
runner level when using the static function.
GRILL FUNCTION
Use the grill function to cook small pieces of meat
(steaks, sausages) and for making toasts.
- The oven door must be closed during the cooking
cycle.
- Preheat the grill for about 5 minutes.
- Arrange the meat on the grid with the drip tray
underneath. Pour water in the drip tray to cover the
bottom to reduce smoke and fat spatters.
- Turn over the meat about half-way through
cooking time.
COOLING SYSTEM
This oven is provided with a cooling system
consisting of two fans.
Both fans operate when the lower and top
•
cavities are switched on at the same time or
when the lower cavity alone is switched on.
The top fan operates when the top cavity alone
•
is switched on.
9

CLEANING THE OVEN AND ITS ACCESSORIES
When you finish cooking; wait for the oven to
•
cool and then clean it to prevent the build-up of
baked-on residues.
If the food residues are baked on, use a
•
specific oven cleaner and follow the
manufacturer’s instructions on the pack.
Clean the exterior of the oven with a sponge
•
and warm water.
• Do not use abrasive cleaners or pan
scourers.
Use a liquid detergent to clean the oven door
•
windows.
Wash the accessories in a dishwasher or in the
•
sink, using an oven cleaner.
After the oven has been in prolonged use and
•
when cooking on different levels (especially
food with high water contents such as pizzas,
stuffed vegetables, etc.) condensation may
form on the door and on the inside of the door
seal: when the oven is cool, dry any
condensation with a cloth or sponge.
REMOVING THE OVEN DOORS
Open the oven door.
1.
Press hinge catches (A) forwards.
2.
Lift the catches until they engage and then
3.
remove the door.
4. Important:
ensure you do not disengage the hinge
retainer catches.
Refit the oven door by following the above
5.
steps in reverse order.
While you are cleaning the oven,
HOW TO REPLACE THE OVEN LAMPS
Switch off electricity at the mains.
1.
Unscrew the lamp cover.
2.
Replace the bulb.
3.
Remount the lamp cover.
4.
Switch on electricity.
5.
Note:
Use only a replacement bulb of 25 Watts 230 V,
Type E-14, T300°C, available from our After-Sales
Service.
10

TROUBLESHOOTING GUIDE
Oven not working
Switch the oven off and then on again to see if
•
the problem persists.
Check for the presence of mains electrical
•
power.
Check that the oven selector is not on position
•
.
“0”
If the electronic display shows the message
•
“STOP”,
and then set the clock (see the Programmer
Description Sheet supplied separately).
If the electronic display shows the message
•
“Fxx”
quoting the error code displayed.
press the button 2 to reset the oven
, contact the After-Sales Service,
AFTER-SALES SERVICE
Before contacting After-Sales Service:
Try to solve the problem
1.
(see “Troubleshooting Guide”).
Turn off the appliance and restart it to see if the
2.
fault is repeated.
If after the above checks the fault still occurs,
get in touch with the nearest After-Sales
Service.
Please give:
the nature of the problem,
•
the exact type and model,
•
the service number (number after the word
•
Service on the rating plate), located on the
right hand edge of the oven cavity (visible
when the oven door is open). The service
number is also indicated on the guarantee
booklet,
Your complete address (including postal code)
•
and phone number.
DECLARATION OF CONFORMITY CE
These appliances are designed to come into
•
contact with foodstuffs and they are
constructed in compliance with Directive
89/109/EEC.
The appliances are designed solely for use as
•
a domestic cooking appliances. Any other use
of the appliances (e.g. for room heating) is
considered as improper use and potentially
dangerous.
These appliances are designed, built and sold
•
in compliance with:
- the safety requirements of “Low Voltage”
Directive 73/23/EEC;
- the protection requirements of EMC
Directive 89/336/EEC;
- the requirements of Directive 93/68/EEC.
11
 Loading...