

Page 1
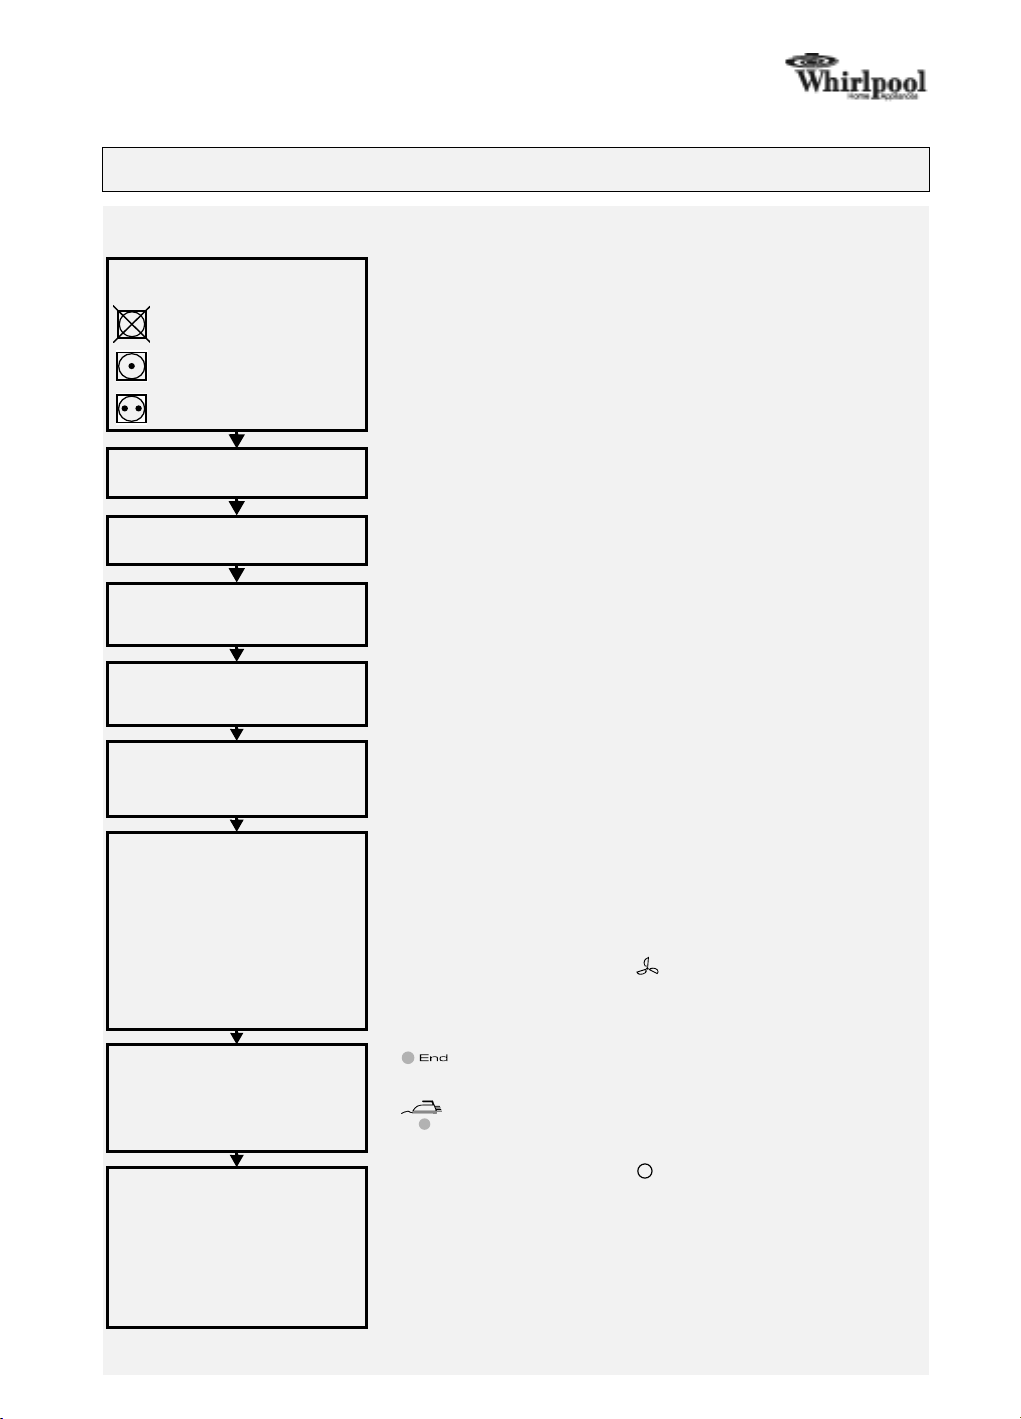
Machine operation
Additional information (including troubleshooting and service) can be found in the individual chapters of the
instructions for use.
Sort laundry according to
care symbols:
Do not tumble dry
Suitable for tumble drying -
at low drying temperature
Suitable for tumble drying
Sort by:
Material thickness:
separate laundry according to weight (e.g. dry towels and thin underwear
separately).
Type of material:
Degree of drying:
Do not tumble dry
with metallic decorations, bulky items such as sleeping bags, etc.
Whenever there is greater load than the dryer can handle,
Cotton (linen); synthetic textiles (easy care).
Cupboard dry, iron dry etc.
: Woollens, silk, nylon stockings, delicate embroidery, fabrics
Preparing laundry
Opening door
Loading dryer and
closing door
Switching on machine and
selecting programme
Selecting options
(if available)
Starting dryer
Check that all fastenings are closed and that pockets are empty. Please ensure that
there are no cigarette lighters in the wash. Turn laundry inside out.
Pull the door handle. If the child safety lock is activated, please deactivate it
(additional information can be found in the “Door Reversibility/Child Safety Lock”
chapter of the instructions for use).
Place laundry loosely in the drum to achieve equal drying throughout. Then close
the door.
Select the drying programme required by turning the programme selector knob
(for information, refer to programme table).
Select the option required by pressing the corresponding button.
The indicator lamp above the relevant button lights up to confirm your selection. A
fast blinking led indicates a wrong selection is made (incompatible options). Press
the button again to cancel the option.
The drying programme is started by pressing the
The relevant indicator lamp lights up.
Changing programme selection:
drying, the dryer stops. The
new programme, again press the
Interrupting programme:
programme selector knob to “Airing” “ ” and press the
Wait at least 5 minutes before opening the door to allow the dryer to cool down.
For your safety the drying cycle stops automatically if you open the door. To restart,
after door opening, close the door and press the
If the programme selected is changed during
“Start (Pause)”
“Start (Pause)”
To interrupt the dryer during the drying cycle, set the
“Start (Pause)”
indicator lamp flashes. To operate the
button.
“Start (Pause)”
“Start (Pause)”
button.
button.
button again.
T ake the laundry out of the dryer. The drying process is complete
End:
Programme end -
unloading dryer
Set the programme selector knob to “ ”.
Cleaning the lint filter:
it. Brush lint using a soft brush or your fingertips. Close lint filter and push firmly
Switching dryer off
Please note:
thoroughly in plenty of water before drying. Never dry rubber objects or objects stained with vegetable oils in the dryer.
Only use additives/plastic items specified as dryer safe and rinse items that have been treated with stain remover
back into place.
Emptying water container:
Replace the container when empty by pushing it completely back into place.
If required, activate child safety lock (additional information can be found in the
“Door Reversibility/Child Safety Lock” chapter of the instructions for use).
and the anti-crease phase has been reached (active).
Anti-Crease:
an automatic anti-crease cycle will operate for maximum 60 min. The
drum rotates at regular intervals to prevent the laundry from creasing.
If the laundry is not removed at the end of the drying cycle,
Open door, pull lint filter up and out of machine and open
Pull container out by the handle and empty.
1
Page 2
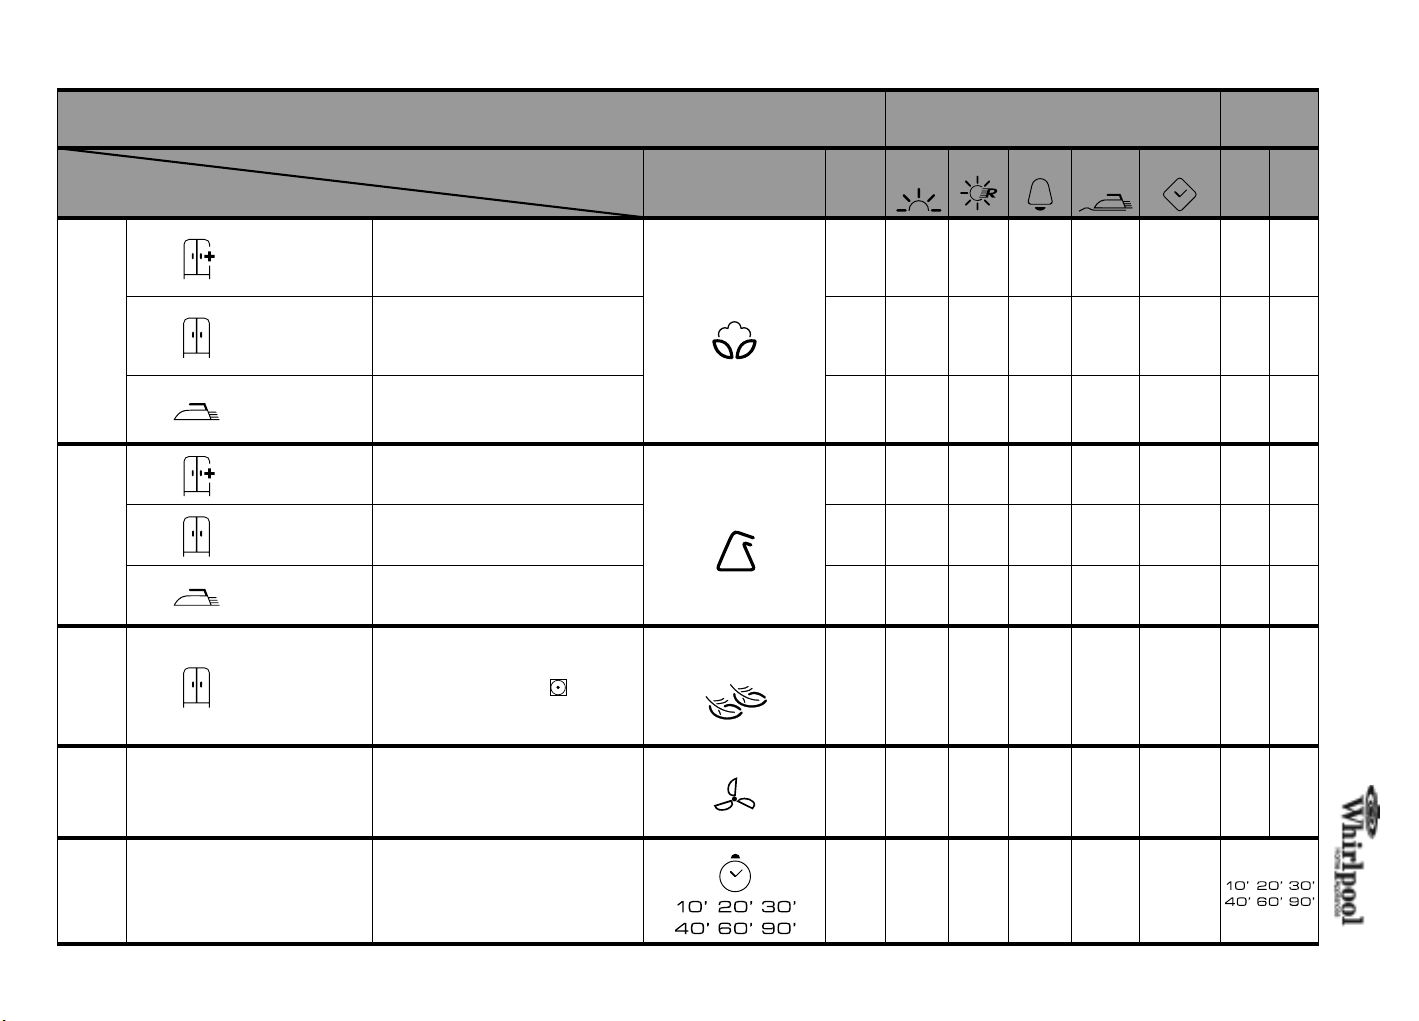
Programmes / Drying levels
Cotton
Mixed fabrics
plus
Delicate
Overview of programmes Options
Ready to wear
Cupboard dry *
Iron dry *
Ready to wear
Cupboard dry *
Iron dry
Cupboard dry
Type of textile
Multi-layered, thick laundry such as:
terry towels, dish cloths and dry
towels, bed linen, underwear, terry
towelling bath robes.
Similar types of laundry which do
not require ironing such as: dry
towels, bed linen, underwear, baby
clothes, T-shirts, cotton socks.
Laundry which requires ironing such
as: bed and table linen, dry towels,
T-shirts, polo shirts, work clothes.
Laundry with thick, multi-layered
areas such as: bed and table linen,
track suits, anoraks, blankets.
Laundry which does not require
ironing such as: shirts, blouses,
T-shirts, sportswear.
Laundry which requires ironing such
as: trousers, dresses, skirts, shirts,
blouses.
Low drying intensity for delicates
and items labelled with , such as:
trousers, dresses, shirts, blouses.
Fabrics
Cotton or linen hot wash /
coloured laundry
Max. 7 kg
Synthetic, mixed fibre or
cotton easy care (ironing not
required) laundry
Max. 3.5 kg
Laundry made from synthetic
fibres such as polyamide,
nylon, polyacrylic, etc.
Max. 2.5 kg
Volume
of load
kg
3.0
7.0
3.0
7.0
3.0
7.0
1.0
3.5
1.0
3.5
1.0
3.5
2.5
Gentle Rapid Buzzer Anti-
crease
X X X X X
X X X X X
X X X X X
X - X X X
X - X X X
X - X X X
X - X X -
Start Delay
Approximate
drying times
(in minutes)
Very
Wet
wet
load
load
95’
80’
170’
140’
85’
70’
160’
120’
70’
60’
120’
100’
50’
40’
90’
70’
40’
30’
80’
60’
30’
20’
70’
50’
100’ 85’
Laundry is aired and refreshed for 30
minutes without heating.
Airing
Completes drying or dries single items
(suitable for all fabrics).
times
Drying
* Test programme in accordance with EN 61121.
- - - - - - - -
- X - X X -
2
Page 3

How to proceed if ...
• Open the door.
• Pull the filter upwards.
Clean the filter at the end of
every cycle.
...you want to
correctly care for
and clean your
dryer:
...you want to
check the dryer
yourself first:
(If your machine is
not functioning
correctly, please
check the following
points before phoning
for the customer
service – also refer to
relevant chapter in
the instructions for
use)
AFTER-SALES SERVICE
If the fault is still present once the above checks have been undertaken or should the fault occur for a second time, s witch the
machine off. Please contact your after -sale s se rvice representative (for mo re information, refer to the warr anty manual).
Please have the following details ready when calling your after-sales service representative:
• the nature of the fault.
• the dryer type and model.
• the service code (the number after the word Service on the adhesive
rating plate) on the right-hand side when the door is open.
Empty the water container at
the end of each drying cycle.
Clean the heat exchanger at
least every month.
(For further information see
chapter “Heat Exchanger” in
the Instructions for Use).
Drying takes too long / laundry
is not dry enough
The dryer will not operate
(after a power failure, always
press the “Start (Pause)”
button).
Lint filter, water container or
heat exchanger indicator
lamps on.
Water droplets underneath
the dryer.
Replacing the drum light bulb
(if supplied).
All programme sequence
indicators blinking.
• Open the filter.
• Brush lint using a soft brush or your
fingertips.
• Close the filter.
• Push the filter back into place.
• Pull the handle to remove the water
container.
• Empty the wa ter container.
• Replace the water container when empty
by pushing it
• Remove fibres in and around the water
evacuation hole at least once per month.
• Has the correct drying programme been
selected?
• Was the inserted laundry too wet
(washing machine spin speed less than
1000 rpm)?
• Is the lint filter dirty (filter indicator light on)?
• Is the heat exchanger dirty? (for more
information, refer to the instructions for use)
• Is the room temperature too high?
• Are the “End” “ ” and “ Anticrease”
“ ” indicator lamps lighting up?
The drying cycle is complete and the
laundry can be taken out.
• Is the plug properly inserted into the
mains electricity socket?
• Is ther e a pow e r failure?
•Has the fuse blown?
• Is the door properly closed?
• Has a drying programme been selected?
•Has the
pressed?
• Is the lint fi l ter c lean?
• Is the water container empty?
• Has the water container been inserted
correctly?
• Is the heat exchanger clean?
• Has the heat exchanger been inserted
correctly?
• Has any fluff on the heat exchanger seal
been wiped away?
• Has any fluff on the door seal been
wiped away?
• Has the water container been inserted
correctly?
• If the inside lamp does not wo rk, the
bulb may be faulty.
•Unplug the dryer.
• Open the door and unscrew the glass
cover inside the drum.
• Replace the faulty bulb with a new one
and screw the glass cover back on.
• Replacement bulb: Philips 15W,
230/240V, E14.
• Servi ce call necessary.
completely
“Start (Pause)”
back in place.
button been
3
Page 4

Before using the machine, please also read the instructions for use carefully!
AWZ 8665
Programme selector knob
The drying programme is selected by turning
this knob.
“Start (Pause)” button
The drying programme is started by pressing
this button. The indicator lamp flashes during
the selection phase and lights up during
drying.
Indicator lamps
Filter
The indicator lamp lights up when the filter
and/or heat exchanger need cleaning.
Clean the filter at the end of every cycle.
Water container
The indicator lamp lights up when the water
container needs to be emptied. The drying
cycle is automatically interrupted. Empty the
container and restart the drying programme.
Empty the water container after every
drying cycle
Clean heat exchanger
The Led lights up after 30 cycles when the
heat exchanger needs to be cleaned. Clean
the heat exchanger. Then for reset the led
indication, turn the programme selector
knob to the vertical position indicated by the
symbol “ ” and press the
(Pause)”
switches off.
Time remaining display
Depending on the programme selected, once
the drying cycle has been started, a default
drying time is displayed. The time displayed is
corrected by a few minutes depending on the
volume, type and dampness of the laundry.
The drying time specified is a calculated
value which will be updated during the
drying programme.
The flashing lines indicate that the calculation is
running. The remaining time will be updated.
Overdry protection
The indicator lamp lights up when a humidity
controlled program is selected, to indicate
the working protection function. Function is
not active in time controlled programmes
10’, 20’, 30’, 40’, 60’, 90’ and “Airing” “ ”.
Quick Reference Guide
.
“Start
button during 3 seconds until led
Programme sequence
Overdry
protection
Drying
Options
Gentle
Reduces drying intensity (recommended for
delicate items).
Rapid
Shortens drying duration (recommended for
thin items of the same size).
Buzzer
Signals/sounds end of drying cycle.
Anti-crease
Prevents laundry from creasing up to 12
hours. Buzzer and Anti-crease cannot be
selected together.
Delayed Start
Delays the start of the drying cycle by 1 to 12
hours. Each time the button is pressed, the
start time is delayed by 1 hour.
Then press the
confirm the final selection and to start the dryer.
The delayed start indicator lamp flashes and
the countdown counts down in 1-hour
intervals. The countdown is indicated by the
indicator lamp above the button flashing.
During the countdown, the drum will turn
from time to time to re-distribute the
laundry. To cancel or change the previously
set time delay, set the programme selector
knob to “ ” or open the door.
+
Anti-
crease
“Start (Pause)”
GB
End
of cycle
button to
Whirlpool is a registered trademark of Whirlpool USA
5019 307 00693
(Subject to technical modifications)
4
 Loading...