

Page 1
3gb15103.fm Page 4 Friday, August 27, 2004 6:52 PM
CONTENTS
BEFORE USING THE WASHING MACHINE
FIRST WASH CYCLE
PRECAUTIONS AND GENERAL
RECOMMENDATIONS
DESCRIPTION OF THE WASHING MACHINE
CHILD LOCK
DETERGENTS AND ADDITIVES
DRAINING RESIDUAL WATER
REMOVING THE FILTER
CARE AND MAINTENANCE
TROUBLESHOOTING GUIDE
AFTER SALES SERVICE
TRANSPORT AND HANDLING
INSTALLATION
ELECTRICAL CONNECTION
Black process 45.0° 150.0 LPI
Page 2

3gb15103.fm Page 5 Friday, August 27, 2004 6:52 PM
BEFORE USING THE WASHING MACHINE
1.
Remove the packaging and check
After unpacking, make sure that the washing
•
machine is undamaged. If in doubt, do not use the
washing machine. Contact After-Sales Service or
your local dealer.
Keep the packaging materials (plastic bags,
•
polystyrene parts, etc.) out of reach of children,
since it is a possible source of danger.
2.Remove the transit bolts
The appliance is fitted with transit bolts to
•
prevent internal damage during transport.
Before using the washing machine you must
remove the transit bolts
Remove the transit bolts”).
(see “Installation/
3.Install the washing machine
Install the appliance on a solid and level floor
•
surface. In the case of a yielding sub-floor, the
appliance should be installed in the corner of a
room.
Adjust the feet to ensure that the machine is
•
stable and level on the floor (see “Installation/
Adjust the feet”).
4.Water inlet
Connect the water supply inlet hose in
•
accordance with the regulations of your local
water company (see "Installation/Connect the
water inlet hose").
•
Water supply: Cold water only
•
Tap: 3/4” threaded hose connection
Pressure: 100-1000 kPa (1-10 bar).
•
5.Drain hose
Connect the drain hose to the ventilated siphon
•
or hook it over the edge of a sink by means of the
“U” bend (see “Installation/Connect the water
drain hose”).
6.Electrical connections
Electrical connections must be carried out by a
•
qualified electrician in compliance with the
manufacturer's instructions and local safety
regulations.
Voltage information, power consumption and
•
electrical fusing data are supplied on the front
panel behind the door frame.
The appliance must be connected to the mains
•
exclusively by means of a socket with an earth
connection in accordance with established
regulations. The appliance must be earthed by
law. The manufacturer declines all liability for
possible damage to property or injury to persons
or pets deriving from failure to observe the a/m
directions.
Do not use extension leads or multi sockets.
•
Before any maintenance on the washing machine
•
disconnect the power plug or switch off the
power supply.
Access to the mains plug or to disconnection
•
from mains supply via a double-pole switch must
be ensured at all times following the installation.
Do not operate the washing machine if it has
•
been damaged during transport. Inform the
After-Sales Service.
Mains cable replacement is only to be carried out
•
by After-Sales Service.
The washing machine must only be used in the
•
household for the prescribed uses.
Black process 45.0° 150.0 LPI
5
Page 3

3gb15103.fm Page 6 Friday, August 27, 2004 6:52 PM
FIRST WASH CYCLE
We recommend that the first wash cycle be made without laundry.
This will remove any residual water used by the manufacturer in testing your washing machine.
Turn on the tap.
1.
2.
Close the appliance door.
3.
Pour a small amount of detergent (about 30 ml) into the detergent dispenser .
4.
Select a short wash programme (see programme chart).
5.
Press the
“Start/Pause”
button.
PRECAUTIONS AND GENERAL
RECOMMENDATIONS
1.Packaging
The packaging is 100% recyclable and is marked
•
with the recycling symbol . Adhere to
current local regulations when disposing of
packaging material.
2.Disposing of packaging and old
appliances
The washing machine is built from reusable
•
materials. The washing machine must be
disposed of in compliance with current local
waste disposal regulations.
Before scrapping, pull out the mains plug and cut
•
off the power cable so that the washing machine
becomes unusable.
The detergent residues should also be removed
•
from the detergent dispenser, the drum, the
water drain hose and pump before the washing
machine is scrapped. The detergent residues
might otherwise get into the groundwater during
the disposal process and contaminate it.
3.Child safety
The appliance must not be operated by children.
•
Children must not be allowed to play with the
washing machine, to climb into the drum, to
handle the pedestal drawer or its content.
5.General recommendations
Never leave the appliance switched on
•
unnecessarily. Turn off the tap.
Before any cleaning and maintenance pull out the
•
mains plug or switch off the power supply.
To clean the outside of the washing machine, use
•
a neutral detergent and a damp cloth.
Do not use abrasive detergents.
•
Never force the door open.
•
If necessary, the power cable may be replaced
•
with an identical one obtained from our AfterSales Service. The power cable must only be
replaced by a qualified technician.
6.EC Declaration of Conformity
•
This washing machine has been designed,
constructed and distributed in compliance with
EC safety requirements:
73/23/EEC Low Voltage Directive
89/336/EEC EMC Directive
93/68/EEC CE Marking Directive
4.Safety Instructions
No other appliances are to be placed on the
•
washing machine worktop (e.g. tumble dryer,
water heater etc.).
6
Black process 45.0° 150.0 LPI
Page 4
3gb15103.fm Page 7 Friday, August 27, 2004 6:52 PM
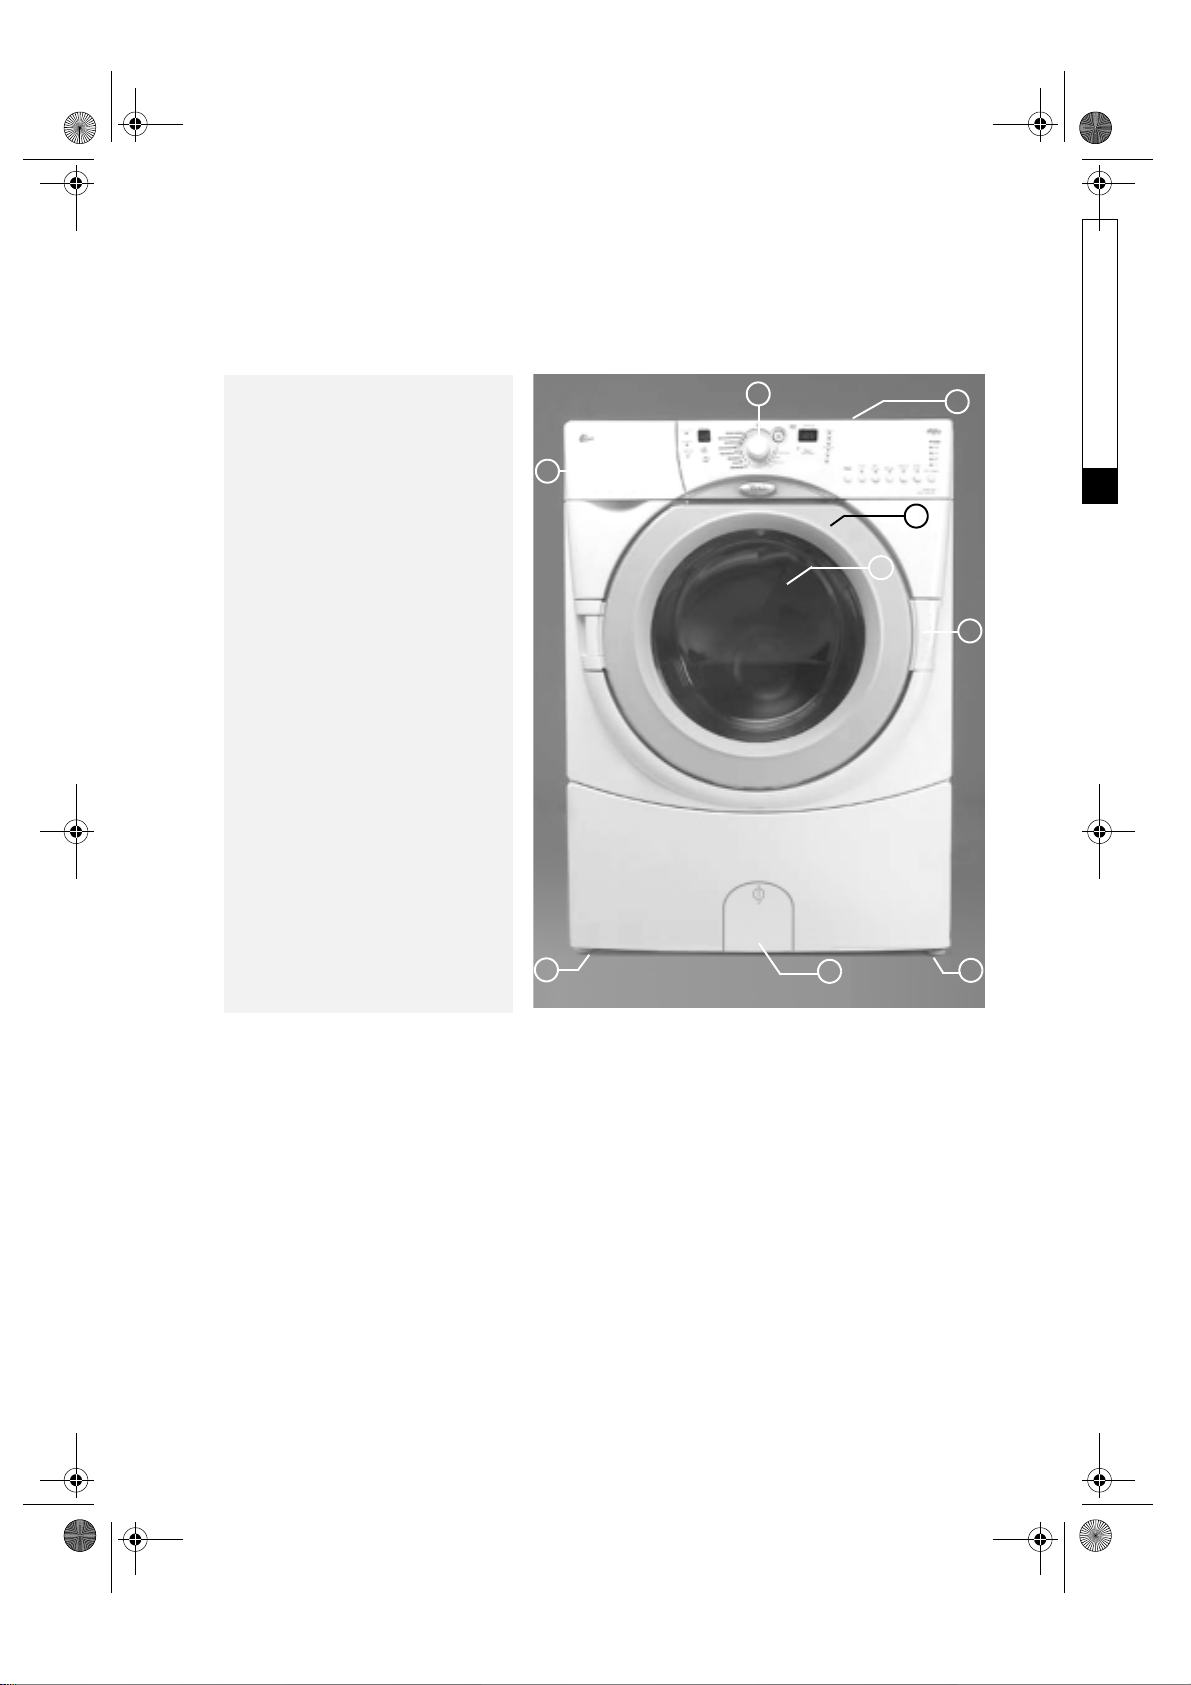
DESCRIPTION OF THE WASHING MACHINE
1.
Worktop
Control panel
2.
Detergent dispenser
3.
After-Sales Service sticker (on
4.
the front panel behind the door
frame)
Door
5.
Door handle
6.
•
To open the door pull the handle
•
Close the door by pushing it
firmly (the lock will click into
place)
Adjustable feet
7.
Filter behind the cover
8.
2
1
3
4
5
6
Black process 45.0° 150.0 LPI
7
8
7
7
Page 5

3gb15103.fm Page 8 Friday, August 27, 2004 6:52 PM
CHILD LOCK
We are pleased that you have chosen our washing machine with the extra-large capacity drum and wide
door. They may also appeal to your young children, so we have taken special measures to protect
youngsters who decide to play in or around the machine. These measures are intended to help busy
parents, but remember that children should never play with the machine, whether it is running or not.
Door Opening
The door has NO special interlock, so it can be opened from inside without much force by a small child
if the machine is not in operation. If the machine is switched on, the door is locked so that hot water or
laundry cannot be thrown out.
Door lock
After the programme has started, the door is locked and approx. 0.5 l of water is rinsed into the drum.
The door is then unlocked for a few seconds and subsequently locked until the end of the programme.
The “Door Locked” warning light goes on if the door is locked. If the door has to be opened during a
programme, press the
“Start/Pause”
shutting the door and pressing the
The door can never be opened in certain stages of the wash cycle, e.g. when the water is very hot or
could run out. In these cases the door remains locked and the “Door Locked” warning light goes on again
after the
do not pull the plug out but press the “Reset” button. This drains all the water out, and the door can then
be opened.
“Start/Pause”
“Start/Pause”
indicator flashes. The door can now be opened. The machine can be started again by
button has been pressed. If you still have an urgent need to open the machine,
button. The “Door Locked” warning light goes out and the
“Start/Pause”
button.
Child lock Button
You can prevent children turning the machine on by disabling the controls. To do this, simply PRESS and
HOLD the “Child Lock” button for 5 seconds. An indicator light will come on and all controls will be
disabled. Only the programme selector knob can be turned, so that the machine can be stopped
immediately in an emergency. To do this, turn the knob to the “ ” position. If the machine was already
running a programme when the “Child Lock” was set, the programme will continue normally to the end,
but it will be impossible to make any changes to the programme. If the machine is switched off after
pressing the “Child Lock” button, it will be impossible to start another programme. If the programme
selector knob is then turned to a programme position, the “Child Lock” indicator light flashes briefly
indicating that it is activated. To switch off the lock at any time, PRESS the “Child Lock” button AGAIN
and HOLD for 5 seconds.
Child lock screws (inside the door)
Activating the child lock
1.
Open the door.
Using the insert from the detergent dispenser, turn the plastic screw underneath the handle anti-
2.
clockwise by about 180°. The screw now protrudes somewhat and the door cannot be closed.
Deactivating the child lock
1.
Use the detergent dispenser insert to return the screw to its original position. The door can now be
shut.
8
Black process 45.0° 150.0 LPI
Page 6
3gb15103.fm Page 9 Friday, August 27, 2004 6:52 PM
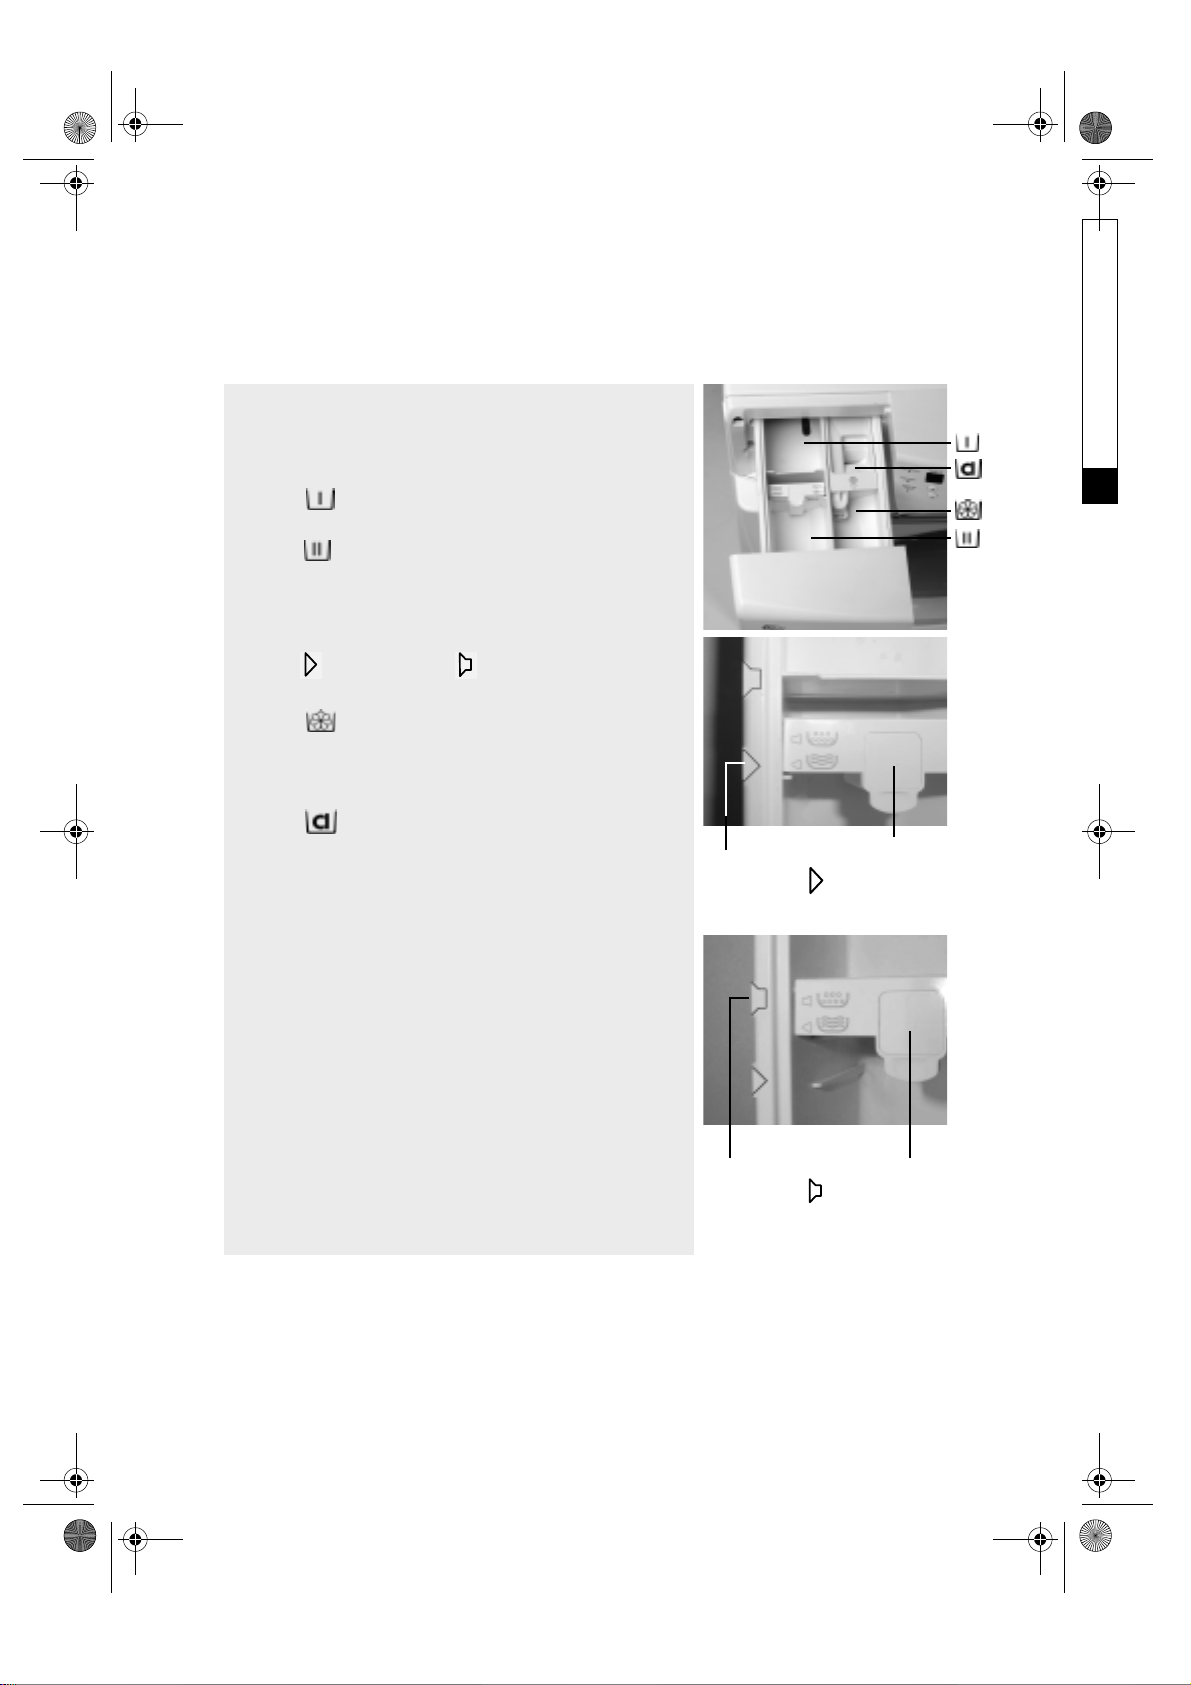
DETERGENTS AND ADDITIVES
Pouring in detergents and additives
Pull out the detergent dispenser to its full extent.
Pour in detergent:
Chamber
•
Chamber
•
•
•
When using liquid detergent, put the divider insert in the
front slot and in the rear slot when using powder
detergent. (See marking).
Chamber
•
•
Only add fabric softeners and conditioners up to the “Max” mark.
Chamber
•
Only add the liquid chlorine bleach up to the “Max” mark.
Only use this chamber if the “Bleach” column is shown on the
enclosed programme chart.
Slide the detergent dispenser in until it clicks shut.
Detergent for the pre-wash
Detergent for the main wash
Stain remover
Water softener (water hardness 4)
Fabric Softener
Liquid starch
Liquid chlorine bleach
liquid detergentuse front slot
Divider
insert
Black process 45.0° 150.0 LPI
powder detergentuse rear slot
Divider
insert
9
Page 7

3gb15103.fm Page 10 Friday, August 27, 2004 6:52 PM
Notes:
•
Keep detergents and additives in a dry place and out of reach of children.
•
If you use descaling agents, dyes or bleaches, make sure they are suitable for washing machine use.
Descaler could contain components that can attack parts of your washing machine.
•
Do not use solvents (turpentine, benzine, etc.)
Do not machine wash fabrics that have been treated with solvents or flammable liquids.
•
You can use liquid detergent in the "Prewash" phase for programmes with this option. In this case put
only powder detergents in the compartment for the main wash .
•
When using concentrated fabric softeners, dilute with water in the detergent dispenser up to "MAX"
level mark.
•
To prevent dispensing problems when using highly concentrated powder and liquid detergents, use the
special detergent ball or bag supplied with the detergent and place it directly inside the drum.
If you use gel-type detergent, please use the powder detergent insert setting.
•
For Start Delay, only use powder detergent, please. Powder detergent remains in the detergent
dispenser until the programme starts, but liquid detergents can run out of the detergent dispenser.
•
If you use powder starch, proceed as follows:
1.
Wash your laundry using the desired wash programme.
2.
Next mix the starch with water in a cup.
3.
Set the “Rinse and Spin” programme, reduce the speed to ca. 800 rpm and start the programme.
4.
Pull the detergent dispenser out until you can see about 3 cm of the chamber.
5.
While the water is running into the detergent dispenser, pour the starch solution into the
chamber.
6.
If there are starch residues in the detergent dispenser after the end of the programme, clean it if
necessary (see "Care and Maintenance").
Observe also the starch manufacturer's information.
10
Black process 45.0° 150.0 LPI
Page 8

3gb15103.fm Page 11 Friday, August 27, 2004 6:52 PM
DRAINING RESIDUAL WATER
Draining Residual Water
Residual water should be removed:
before moving a washing machine (relocation),
•
when installing in areas prone to frost and
•
before removing the filter.
•
Before emptying the residual water, switch the appliance off
1.
and unplug it from the mains socket Make sure that the water
has cooled before draining
Turn the slot through 180°, so that the dot points to the open
2.
lock. To do this, use the insert from the detergent dispenser
or a coin. The cover bends down to the floor.
Remove the hose, place a low container underneath and pull
3.
the cap from the hose.
Drain the residual water until no more flows out. Then close
4.
the residual water emptying hose.
Put the hose in the cover, fold the cover up and close the cover
5.
using the detergent dispenser insert or a coin. The dot points
to the closed lock.
Pour about 1 l of water into the detergent dispenser to
6.
reactivate the ecosystem. You must also plug the mains plug
back into the socket-outlet.
Now you can fill the washing machine and run the desired
7.
programme.
2/5
3
5
Black process 45.0° 150.0 LPI
11
Page 9

3gb15103.fm Page 12 Friday, August 27, 2004 6:52 PM
REMOVING THE FILTER
Removing the filter
The filter must be taken out if:
if the washing machine does not drain properly,
•
if small items, e. g. buttons and coins rattle in the pump and
•
2 to 3 times a year for inspection.
•
You must remove the residual water before taking out the filter.
Carry out the steps in the “Draining Residual Water” section, but
only up to point 4. Then follow the points given below.
Open the filter but do not withdraw it completely. Slowly turn
1.
the handle anticlockwise until the water drains out. Make sure
that the water has cooled before letting it drain.
Wait until all the water has drained out.
2.
Now unscrew the filter completely and extract it.
3.
Clean the filter and the filter chamber.
4.
Check that the pump impeller can still rotate.
5.
Insert the filter with the guide pin upwards and screw it in
6.
clockwise.
Lay the hose in the cover, fold the cover up and close it using
7.
the detergent dispenser insert or a coin. The dot points to the
closed lock.
Pour about 1 l of water into the detergent dispenser to
8.
reactivate the Eco System. You must also put the plug back
into the socket.
You can now load the washing machine and start the desired
9.
programme.
1
6
7
12
Black process 45.0° 150.0 LPI
7
Page 10

3gb15103.fm Page 13 Friday, August 27, 2004 6:52 PM
CARE AND MAINTENANCE
Appliance exterior and control panel
Clean using normal household cleaner (do not
•
use abrasive products or solvents).
Dry with a soft cloth.
•
Filter
Check and clean the filter regularly, at least two
•
or three times a year (see “Removing the Filter”).
Door seal
Clean occasionally with a damp cloth.
•
Check the seal folds for foreign bodies
•
periodically.
Detergent dispenser
Press the release lever in the prewash compartment down and
1.
pull out the dispenser.
Remove the inserts from the detergent dispenser.
2.
Clean all parts under running water.
3.
Replace the separate parts in the detergent dispenser and slide
4.
the dispenser back into the opening.
Periodically check and clean the mesh filters in the
water connection.
Turn off the tap.
1.
Unscrew the water inlet hose from the tap.
2.
Clean the internal filter.
3.
Screw the supply hose back onto the tap.
4.
Unscrew the supply hose from the washing machine.
5.
Clean the mesh filter in the washing machine.
6.
Screw the supply hose back on to the machine.
7.
Turn on the tap and ensure that the connections are water-
8.
tight.
Black process 45.0° 150.0 LPI
13
Page 11

3gb15103.fm Page 14 Friday, August 27, 2004 6:52 PM
TROUBLESHOOTING GUIDE
This washing machine is equipped with automatic
safety functions which detect and diagnose faults at
an early stage and react appropriately.
Often, however, the faults detected are small
enough to be solved in a matter of minutes.
For example:
The appliance will not start; no lamp
lights up.
Check whether:
the appliance is plugged in;
•
the wall socket is functioning correctly
•
(use a table lamp or similar to test);
a programme is selected correctly.
•
The appliance will not start, but the
“Start/Pause” lamp is flashing.
Check whether:
the appliance door is properly closed (child lock);
•
the programme has been changed;
•
the water tap is turned on. If not, turn the tap on
•
and press the
“Start/Pause”
button.
The appliance stops during the programme.
Check whether:
the
•
“Rinse Hold”
option by pressing the button again;
another programme has been selected.
•
Reselect the desired programme and press the
“Start/Pause”
•“Start/Pause”
•
button;
Pause”
The appliance safety system has been activated.
See fault description table.
lamp is on. Terminate this
button;
lamp goes on. Press
“Start/
Detergent and additives incorrectly
washed in.
Check whether:
the detergent dispenser inserts are incorrectly
•
located (see “Care and Maintenance”);
enough water is being supplied. The mesh filters
•
in the water connection could be blocked (see
“Care and Maintenance”).
The appliance vibrates during the spin cycle.
Check whether:
the appliance is levelled and solidly installed on all
•
four feet (see “Installation”);
the transit bolts have been removed. Before
•
using the washing machine you must remove the
transit bolts (see “Installation”).
Final spin results are poor:
The appliance has an imbalance detection and
correction system. If individual heavy articles are
loaded (bathmat, bathrobe, etc.) this system may
reduce the spin speed automatically to protect the
appliance or even interrupt the spin cycle
altogether, if the imbalance is too great even after
several spin starts.
If the laundry is still too wet at the end of the
•
cycle, add other articles of laundry and repeat the
spin cycle.
Excessive foam formation may prevent spinning.
•
Ensure correct amount of detergent is used.
Check whether the spin speed has been reduced
•
to 0.
No water or insufficient water pressure
for appliances with safety hose:
the appliance has a safety hose and the safety
•
valve has opened (red indicator in the safety valve
inspection window).
In this case replace it with a new safety hose.
The programme time given on the time
remaining display “jumps” suddenly up or
down by several minutes, or the
programme duration shown at the start
increases/decreases by some time.
This is a normal adaptation action by the washing
machine to factors that can affect the duration of
the wash programme, e.g.
excessive foaming;
•
load imbalance from individual, heavy items of
•
laundry;
longer heating time from correspondingly cold
•
water supply.
Because of such influences, the time remaining in
the programme is recalculated and updated if
necessary. In addition, the washing machine
determines the amount of the load during the filling
phase and adjusts the initially indicated programme
duration appropriately if necessary.
14
Black process 45.0° 150.0 LPI
Page 12

3gb15103.fm Page 15 Friday, August 27, 2004 6:52 PM
What should I do when the automatic safety system detects a malfunction?
The programme is interrupted and various indicators (if available) point to the source of the fault.
Fault description table
Small lamp lights up Digital display Fault description
“Water tap closed” “FH” “Water inlet fault”
- “FP” “Draining fault”
- from “F4” to “F21” “Electrical components fault”
“Water Stop” “FA” “Water Stop fault”
a.Water inlet fault (no water or insufficient
water pressure)
The “Water tap closed” indicator is on and the
digital display shows “FH” Switch off the
appliance by turning the programme selector to
the “ ” position and unplug it.
Check whether:
the water tap is open and the water supply
•
pressure is sufficient;
the water inlet hose is kinked;
•
the mesh filter between the tap and the hose is
•
clean (see “Care and Maintenance” / “Mesh filter
in water connection”);
the water supply hose is frozen up.
•
Connect the appliance to the electrical supply.
Reselect the desired programme and press the
“Start/Pause”
button again to continue with
the programme (do not add detergent for this
programme)
b.Draining fault
The digital display shows “FP”. Switch off the
appliance by turning the programme selector to
the “ ” position and unplug it.
Check whether:
the drain hose is kinked (see “Installation”);
•
IMPORTANT
: before draining, allow the wash
water to cool down.
the drain hose is frozen.
•
Connect the appliance to the electrical supply.
The pump/filter is blocked (see “Removing the
•
Filter” / “Draining Residual Water”).
IMPORTANT:
Make sure that the washing
water has cooled before draining.
Reselect the desired programme and press the
“Start/Pause”
button again to continue with
the programme (do not add detergent for this
programme). If the fault re-occurs, contact After
Sales Service (See “After Sales Service”).
c. Electrical module fault
The digital display shows “F4” to “F21”.
Set the programme selector to the “ ”
•
position, select the desired programme and
press the
“Start/Pause”
button again. The
programme will continue.
If the fault re-occurs, contact After Sales
•
Service (See “After Sales Service”).
d.Water Stop fault
An audible tone sounds. The light of the Water
Stop indicator goes on. The digital display shows
“FA” and the pump is running.
The “Water Stop fault” may have been
triggered by:
too much foam.
•
a leak in the appliance, water running into the
•
water tank.
Switch off the appliance by turning the
1.
programme selector to the “ ” position,
unplug the appliance and turn off the tap.
Inform After-Sales Service and describe the fault
2.
(see “After-Sales Service”).
If the “Start/Pause” button has not been pressed
3.
but water is still running into the machine, shut
the water intake and also inform After-Sales
Service (see “After-Sales Service”).
Black process 45.0° 150.0 LPI
15
Page 13

3gb15103.fm Page 16 Friday, August 27, 2004 6:52 PM
AFTER SALES SERVICE
Before contacting After-Sales Service:
1.
Try to remedy the problem yourself (see
“Troubleshooting Guide”).
2.
Restart the programme to check whether the
problem has solved itself.
3.
If the machine continues to function incorrectly,
call After-Sales Service.
Specify:
•
The nature of the problem.
•
Appliance and model number.
•
The service code (number after the word
SERVICE).
The After-Sales Service sticker is on the
front panel behind the door frame.
•
Your full address.
•
Your telephone number and area code. AfterSales Service phone numbers and addresses are
given on the guarantee card or consult the local
dealer.
TRANSPORT AND HANDLING
1.
Pull out the power plug.
2.
Turn off the tap.
3.
Remove the water supply and drain hose from the service connection.
4.
Empty the water supply hose and the water drain hose completely.
5.
Always fit the transit bolts (see “Installation/Remove transit bolts”).
16
Black process 45.0° 150.0 LPI
Page 14

3gb15103.fm Page 17 Friday, August 27, 2004 6:52 PM
INSTALLATION
Remove the transit bolts
Slacken the four bolts with the spanner supplied. In
1.
addition, open the plastic loop wrapped round the
power cable.
Do not cut the loop.
2.
Unscrew the bolt by hand.
3.
Grip the bolt and remove it through the large aperture.
4.
Seal the resulting holes using the plastic caps supplied.
To do this, insert the caps in the wide part of the hole in
the direction of the arrow and push them into the
narrow groove until they click into place.
5.
Keep the transit bolts for future use.
Whenever the appliance is transported, the transit bolts
•
must be refitted:
Raise the plastic covers with a screwdriver, slide them in
1.
the opposite direction of the arrow and remove.
2.
Insert the transit bolts in the reverse order.
Black process 45.0° 150.0 LPI
17
Page 15

3gb15103.fm Page 18 Friday, August 27, 2004 6:52 PM
Adjust the feet
Small unevennesses in the floor can be compensated for by
screwing the four appliance feet up or down (never use
pieces of wood, cardboard or similar material):
1.
The washing machine must be installed horizontally in
width and depth. Use a spirit level.
2.
Loosen the locknut clockwise using the wrench
provided.
3.
Adjust the height of the foot by hand.
4.
Tighten the locknut anti-clockwise to the washing
machine.
If the appliance is to be installed on a wooden floor,
distribute the weight by placing it on a 70 x 70 cm sheet of
plywood at least 3 cm in thickness.
Screw the plywood sheet to the floor.
18
Black process 45.0° 150.0 LPI
Page 16

3gb15103.fm Page 19 Friday, August 27, 2004 6:52 PM
Connect the water supply hose
1.
Carefully screw the hose connection onto the tap,
preferably by hand.
2.
Make sure there are no kinks in the hose.
3.
Check water-tightness of tap and appliance connections by
turning the tap completely on.
The appliance
non-pressurized water heater.
The appliance can be connected without a non-return valve.
Check the supply hose regularly for brittleness and cracks and
replace if necessary using a new hose of the same type
(available from After-Sales Service or specialist dealer).
If the flexible hose is damaged, unplug the appliance from the
mains immediately.
must not be
connected to the mixing tap of a
Water supply hose “A”
If the hose is too short, replace it with a suitable length of
pressure resistant hose (minimum 1000 kPa - EN 50084
approved type).
Mount the new hose professionally on the washing machine
and the tap.
A
Water supply hose “B”
If the hose is too short, replace it with a longer length of
“Water Stop” hose (available from After-Sales Service or
specialist dealer).
Mount the new hose professionally on the washing machine
and the tap.
Note: The inlet hose and the plastic enclosure at the water
connection contain electrical components.
do not cut the hose and do not immerse the plastic
enclosure in water.
For this reason,
Connect the water drain hose
Connect the drain hose to the ventilated siphon or hook it over the edge of a sink with the “U” bend.
1.
2.
Make sure there are no kinks in the hose.
3.
Secure the hose so that it cannot fall down while the appliance is running.
Small wash-hand basins are unsuitable.
If you need to add an extension, use a hose of the same type. Secure the connections with clips.
Max. drain hose length: 2.50 m
Max. drain height: 1.25 m
Min. drain height: 0.70 m
B
Black process 45.0° 150.0 LPI
19
Page 17

3gb15103.fm Page 20 Friday, August 27, 2004 6:52 PM
ELECTRICAL CONNECTION
For Great Britain only
Warning - this appliance must be earthed
Fuse replacement
If the mains lead of this appliance is fitted with a
BS 1363A 13amp fused plug, to change a fuse in this type
of plug use an A.S.T.A. approved fuse to BS 1362 type and
proceed as follows:
1.
Remove the fuse cover (A) and fuse (B).
2.
Fit replacement 13A fuse into fuse cover.
3.
Refit both into plug.
Important:
The fuse cover must be refitted when changing a fuse and
if the fuse cover is lost the plug must not be used until a
correct replacement is fitted.
Correct replacement are identified by the colour insert or
the colour embossed in words on the base of the plug.
Replacement fuse covers are available from your local
electrical store.
For the Republic of Ireland only
The information given in respect of Great Britain will
frequently apply, but a third type of plug and socket is also
used, the 2-pin, side earth type.
Socket outlet / plug (valid for both countries)
If the fitted plug is not suitable for your socket outlet,
Please contact Whirlpool Service for further instruction.
Please do not attempt to change plug yourself. This
procedure needs to be carried out by a qualified Whirlpool
technician in compliance with the manufactures
instructions and current standard safety regulations.
20
Black process 45.0° 150.0 LPI
 Loading...