

English
ENVIRONMENTAL HINTS
Packing
Do not throw the packing into the garbage: first sort out
the different materials (i.e.: steel, cardboard, polystyrene)
following local regulations.
Conformity declaration
This appliance incorporates parts intended to come into
contact with foodstuffs in compliance with EEC directive 89/09/CEE.
Information
This appliance is free of CFC’s (refrigerant circuit contains
R34a) or free of HFC’s (refrigerant circuit contains R 600a Isobutane). For more details, please refer to the rating
plate on the appliance.
For appliances with Isobutane (R600a)
The refrigerant is a natural gas of high environmental compatibility but which is inflammable. Therefore, it is essential
to ensure that the ducts of the refrigerant circuit do not
get damaged.
Ù
KNOW YOUR FROST-FREE APPLIANCE
The main advantage of your refrigerator/freezer with fan circulation is the total absence of frost and ice forming on the
compartments walls, thanks to the process described below.
The cold air is produced by an evaporator and is circulated by
means of a fan into the compartments.
The air, having been circulated, is again passed to the evaporator. This keeps the humidity low. In this way, there will be no
frost formation on the compartment walls, as in a traditional
appliance. The moisture in the air is retainedbytheevaporator,
transformed into frost and then into water, this automatically
flows into a tray where it evaporates. The “ventilated cold” system ensures a better storage of foods by maintaining their original condition for a longer period of time.
Besides these characteristics, which are typical of the FROST
FREE system, the 0
tional advantage for the storage of delicate and perishable
foods in the low temperature compartment.
o
C special compartment offers the addi-
DESCRIPTION OF THE APPLIANCE (Fig. )
Light control button
!
Refrigerator compartment control button
"
Refrigerator compartment
a
Adjustable grid plates
b
Glass plate
c
Crisper drawers
d
Low temperature compartment to store meats, fish or
e
particularly delicate or deteriorable foods
Low temperature compartment control button (sit-
§
uated inside the compartment, on the rear wall)
Inner door liner with adjustable compartments
f
Fast freeze switch (yellow light)
$
Mains switch (green light) - operation
%
Freezer compartment control knob (adjustable by
&
means of a coin)
Freezer compartment
g
Frozen foods storage baskets
h
Freezing-in basket
i
Acoustic alarm of freezer door open (if provided)
l
Plinth.
m
INSTALLATION (Fig. 2)
Please check your appliance and ensure that it is undamaged:
any transport damage must be reported to your dealer within
24 hours of receipt. The appliance should not be installed close
to heat sources such as cookers, central heating boilers, direct
sunlight, etc. It must however be located in a well ventilated
dry space, and in a housing following the separate instructions
supplied. The housing has to be provided with a front and rear
ventilation gap. The rear ventilation gap has to remain free: do
not cover it with any object or sheet of paper
door support (if provided)
only. After installation of the appliance into the housing, fit the
plinth
(Fig. )
in a solution of lukewarm water and vinegar.
We suggest you reheat slightly the door gaskets
reestablish their original elasticity.
Attention
Please ensure that the supply socket is accessible after installation, in case the appliance requires a prompt disconnection. If not possible, connect the appliance to a doublepole switching device with contact separation of at least 3
mm placed in a accessible position even after installation.
and clean the interior with a sponge dampened
(Fig. 4)
is for transport purpose
(Fig. 3)
(Fig. 5) to
.The
ELECTRICAL CONNECTION AND
OPERATION
This appliance has beendesigned,builtand marketed in
compliance with.
- the safety targets of the “Low Voltage” EEC Directive
73/23;
- the protection requirements of the “EMC” EEC Directive 89/336 amended by EEC Directive 93/68.
Please check that the voltage indicated on the rating plate
situated inside the compartment (Fig. 8) corresponds to
the voltage in your home (Fig. 9).
The earthing of this appliance is compulsory by law.
The manufacturer will accept no liability for injury to
persons or damage to objects arising from the non- observance of this requirement.
ELECTRICAL INFORMATION
For Great Britain only
“WARNING - THIS APPLIANCE MUST BE EARTHED”
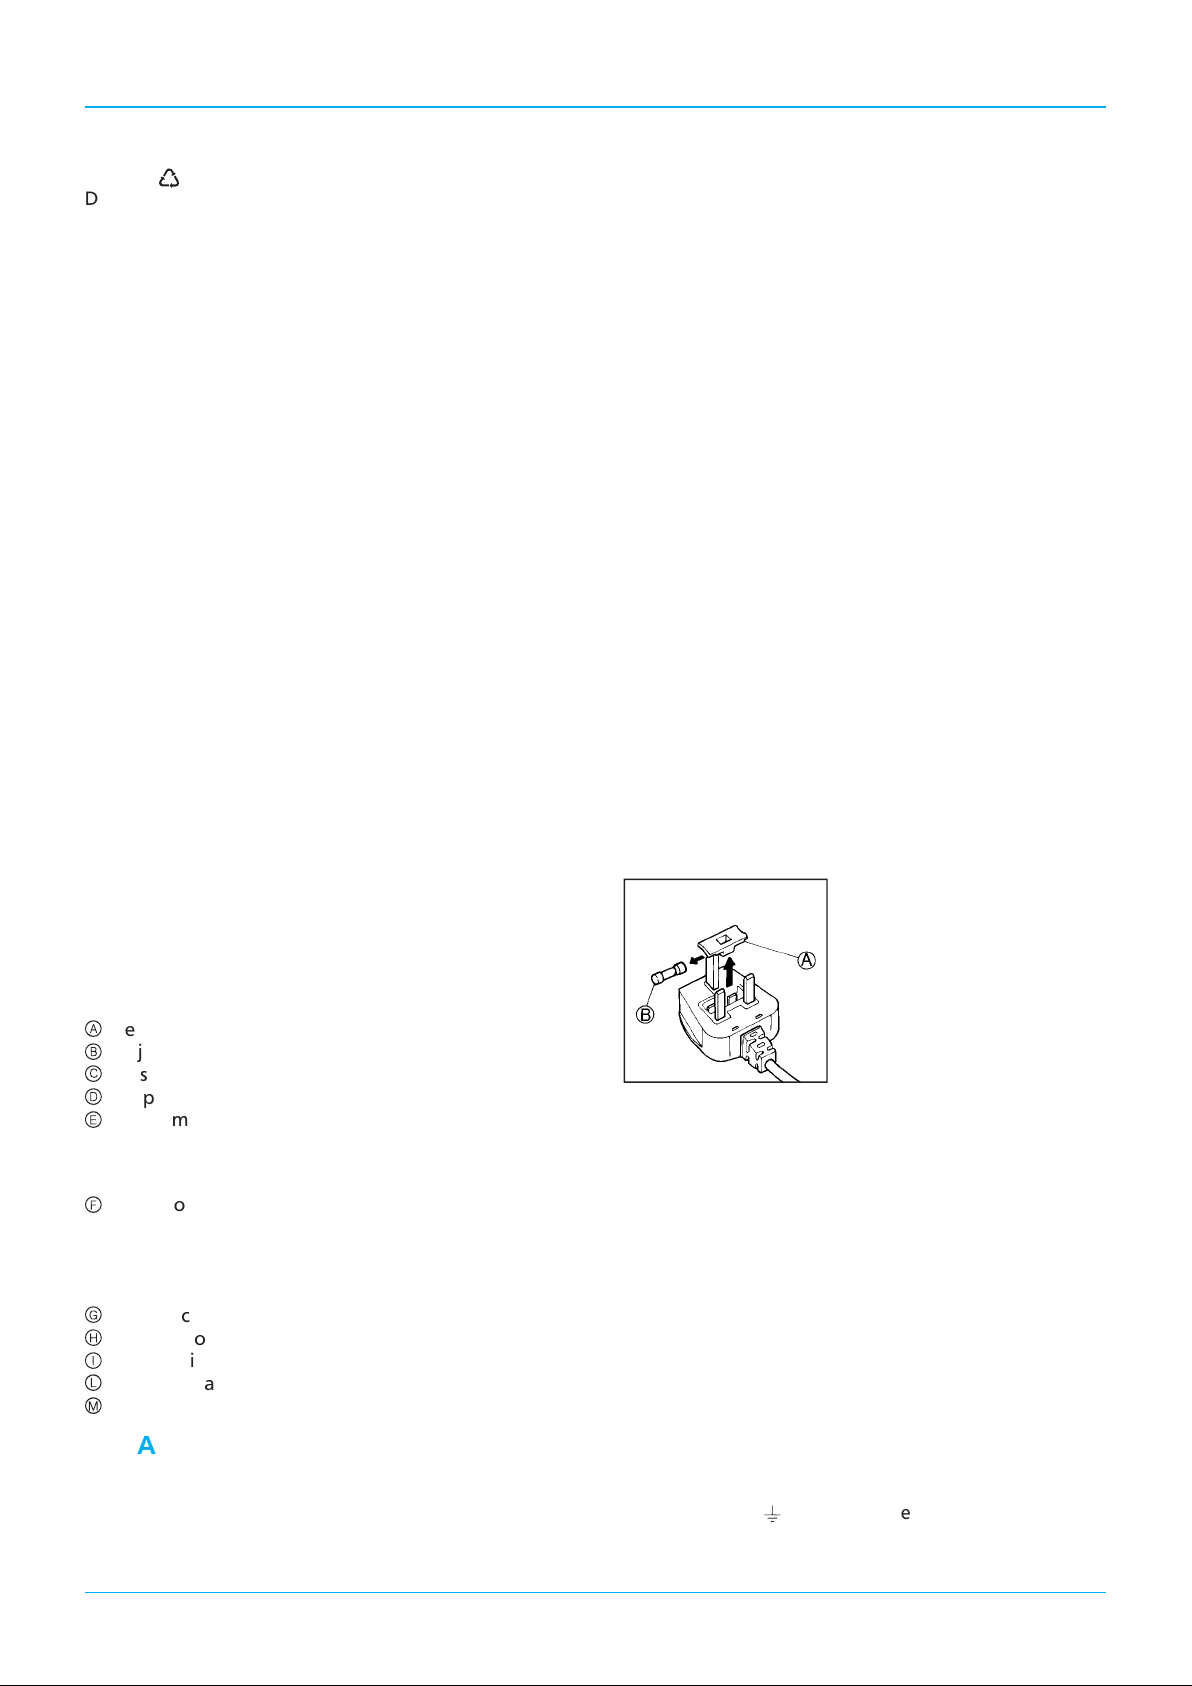
IMPORTANT:
ing a fuse and if the fuse cover is lost the plug must not be
used until a correct replacement is fitted. Correct replacements are identified by the colour insert or the colour embossed in words on the base of the plug. Replacement fuse covers are available from your local electrical store.
The fuse cover must be refitted when chang-
Fuse replacement.
If the mainsleadof this appliance is
fitted with a BS 1363A 13 amp
fused plug, to change a fuse in this
type of plug use an A.S.T.A. approved fuse to BS 1362 type and proceed as follows:
1. Removethefusecover(A)and
fuse (B).
2. Fit replacement 13A fuse into
fuse cover.
3. Refit both into plug.
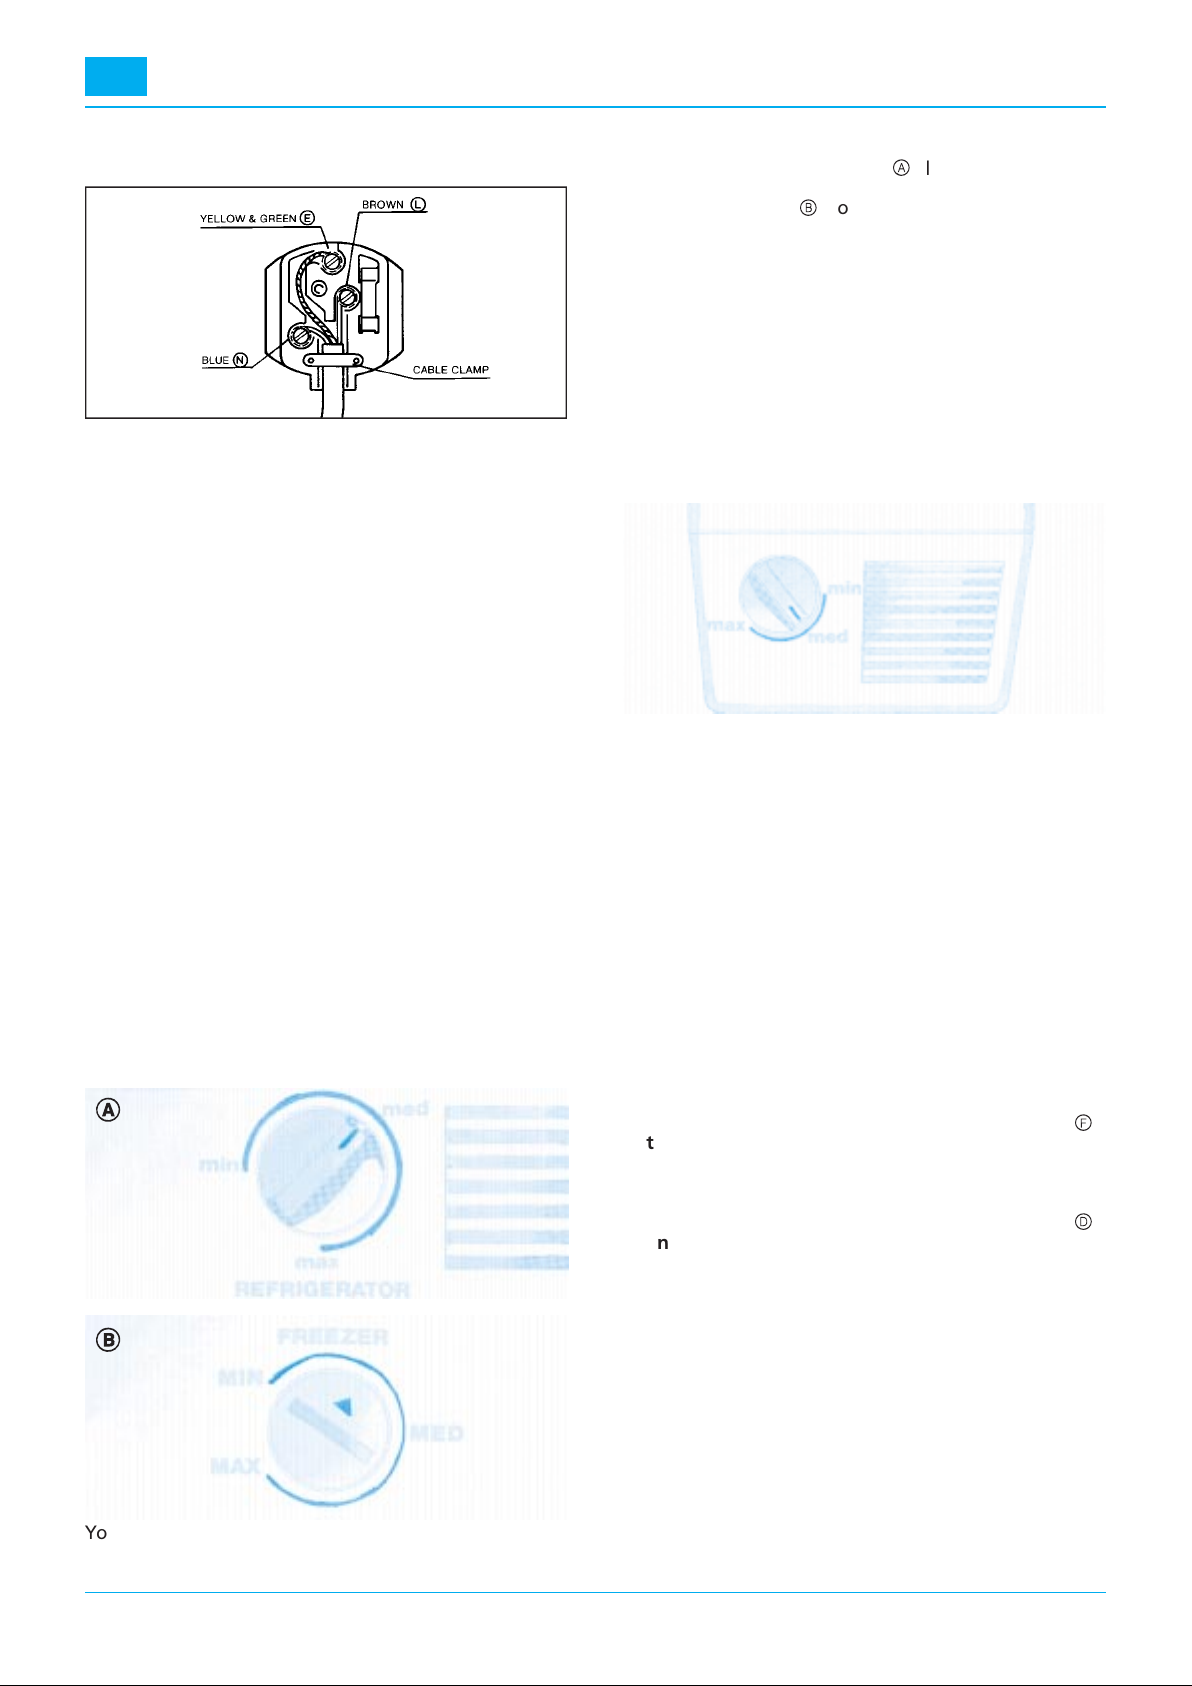
CONNECTION TO A REWIREABLE PLUG
If the fitted plug is not suitable for your socket outlet, then
it should be cut off and disposed of in order to avoid a
possible shock hazard should it be inserted into a 13A socket elsewhere. A suitable alternative plug should then be
fitted to the cable. Thewiresin this mains lead are coloured
in accordance with the following code:
BLUE - “NEUTRAL” (“N”)
BROWN - “LIVE” (“L”)
GREEN AND YELLOW - “EARTH” (“E”)
1.
The GREEN AND YELLOW wire must be connected to the
terminal in the plug which is marked with the letter “E” or by
the Earth symbol
2. The BLUE wire must be connected to the terminal
which is marked with the letter “N” or coloured black.
or coloured green or green and yellow.
4
5
GB
3. The BROWN wire must be connected to the terminal
which is marked with the letter “L” or coloured red.
Connection to a
typical 13 amp plug
For the Republic of Ireland only
The information given in respect of Great Britain will frequently
apply, but a third type of plug and socket is also used, the 2-pin,
side earth type. In this case, the wire which is coloured GREEN
AND YELLOW must be connected to the EARTH contact, and
the other two wires to the two pins, irrespective of colour. The
supply to the socket must be fitted with a 16 amp fuse.
Please check that the voltage on the rating plate
uated at the right hand side of the low temperature compartment, corresponds to the voltage in your home
earthing of this appliance is compulsory by law.
manufacturer will accept no liability for damage to persons or
objects arising from the non-observance of this requirement. If
the plug and the wall socket do not comply, have the socket replaced by a qualified electrician. He should also check that the
section of the socket wires can withstand the power absorbed
by the appliance. The use of adapters, multipole sockets and extension cords is not advisable. If absolutely necessary, use simple
or multiple adapters and extension cords in compliance with
local safety regulations, paying attention not to exceed the maximum amperage, which is marked on the simple adaptors and
on extension cords and that of the total power marked on the
multiple adapters.
After connection of the appliance to the mains supply, wait at
least one hour prior to pressingtheswitch
nating the operation of the appliance and of the interior light
when the refrigerator door is opened.
Important:
quired before the compartments attain the temperature suitable for the storage of foods.
After connection of the appliance, 3 hours are re-
(%-Fig.)
(Fig. 6)
(Fig. 7).The
,sit-
The
determi-
ADJUSTMENT OF THE TEMPERATURES
A
B
Your appliance has separate temperature adjustments.
To obtain the correct operation, we suggest you turn the ther-
mostat control knobs to an intermediate position.
The control knob illustrated in
the temperature of the refrigerator compartment; the control
knob illustrated in
rature of the freezer compartment.
If you wish to lower the temperature in the sections, turn the
knobs to the MAX positions, to rise the temperature, turn the
knobs to the MIN positions. To obtain particularly cold temperatures in the refrigerator, we suggestyouturn the refrigerator
control knob to the “MAX” position and the freezer control
knob towards “MAX” position.
We remind you that internal temperatures are affected by the
location of the appliance, the temperature of the surrounding
air and the frequency of door opening.
The setting of the temperature regulator may have to be varied to allow for these factors.
Adjustment of the temperature of the low temperature
compartment
This section has an independent temperature adjustment.
ideal temperature of 0
the control knob to the MED position (see figure). To obtain
warmer or colder temperatures than 0
knob to the MIN or to the MAX positions respectively.
Fig.ballows the adjustment of the tempe-
Fig.aallows the adjustment of
o
C approx.,
is obtained by setting
o
C, turn th e control
The
USE OF THE REFRIGERATOR
COMPARTMENT
We recommend that you wrap all items stored in the refrigerator compartment in plastic or aluminium foil or keep them in a
covered container. This prevents foodsfromloosing their freshness and stops strong smells and flavours being transferred
from one food to another. Some fruits with particularly thick
skin or rind, can be stored without wrapping. As the temperature is homogeneous thanks to the fan assisted air circulation,
foods can be stored on any of the shelves dependent on your
needs. We suggest however you store some types of foods in
the “dedicated” compartments, as indicated hereafter:
Eggs, cheese, dairy products:
ments in the inner door liner (to remove them, see
Butter:
In some models it is possible to adjust the temperature of this
compartment by means of the slots provided, so that the butter will spread easily (position
Fruits and vegetables:
Canned foods:
sed food into a non-metallic container.
Important
− Store all foods so as to permit free circulation of air. Do not
cover the shelves with paper or plastic.
− Allow cooked food to cool before storing in the refrigerator compartment.
Use of the low temperature compartment (Fig. 9-0-)
This compartment has been designed to store delicate and
perishable foods at a0
sequently longer and foods do not need freezing-in to preserve nutritional values and original freshness.
Listed below are foods which are best stored in this compartment: meat, fish, cooked foods.
You can store vacuum foods in this compartment, as a 0
temperature is recommended. The correct storage of these
store it in the compartment of the inner door liner.
once the can has been opened, transfer unu-
(Fig. 8)
use the appropriate compart-
x).
store in the crisper drawers
o
C temperature. The storage timeiscon-
Fig. f).
(Fig. d).
o
C
6

GB
foods depends however on their original freshness and on the
packing. To open the compartment, see
USE OF THE FREEZER COMPARTMENT
Your
ç
fresh and cooked foods and for the long storage of deep frozen foods. It also allows the production of ice cubes.
Some models are equipped with an acoustic alarm of freezer
door open: if the door is not correctly closed or remains open
for a long time,thedevice activates an intermittent acoustic signal, after one minute.
It can be stopped by closing the door properly or pressing the
button
freezer compartment is for the freezing-in of
l
(Fig. )
situated in the plinth of the appliance.
Fig. 9
.
(Fig. 8)
FREEZING-IN
The maximum quantity of food, in Kg,thatcanbe frozen in a 24
hours period at an ambient temperature of +25
the rating plate
of food, we suggest you press switch (4)
to freezing-in and you switch it off 24 hours after introduction
of fresh foods to be frozen.
The freezing-in basket is situated at the bottom
Do not store warm foods in the freezer. Never re-freeze partially or totally thawed foods. Wrap foods in plastic or aluminium foils or store them in the suitable containers.
Label each packet indicating type of food and the freezing-in
date. Further detailed suggestions are given in the enclosed
freezing guide. The freezer compartment maintains the storage temperature for 6/8 hours approx., even in case of power
failure. During this time, we suggest leaving the door of the
compartment closed. In normal operating conditions, that
means
without setting the fast freeze,
freeze half of the maximum quantity stated on the rating plate.
(Fig. 6)
. If you need to freeze large quantities
o
C, is stated on
(Fig. )
, 24 hours prior
(Fig. i)
the appliance can
PRODUCTION OF ICE CUBES
To produce ice cubes, first 3/4 fill the ice cube tray with water.
Close the trays and store them on the upper basket of the freezer compartment.
Attention:
their removal from the freezer as they may give rise to “cold
burns”. Do not store liquids in glass containers into the freezer.
Do not eat ice cubes or ice lollies immediately after
STORAGE OF DEEP FROZEN FOODS
When buying deep frozen foods, make sure that wrapper or
packet is intact. If it bulges, sags, or has spots of moisture on it, it
may not have been kept cold enough and the contents may
have lost their original quality. When home, store deep frozen
foods in the freezer compartment with the least possible delay,
as any appreciable rise in temperature may cause them to start
to thaw. Store deep frozen foods no longer than the packet instructions recommend.
THAWING
Here are some basic suggestions:
Raw vegetables:
and cook as usual.
Meat (large cuts):
thout unwrapping them. Beforecooking, leave at room temperature for some hours, or defrost in a microwave oven following the manufacturer’s recommendations.
(small cuts):
Fish:
thaw in the refrigerator compartment without unwrap-
ping or cook directly before being completely thawed.
Previously cooked foods:
moving from its aluminium container.
Fruit:
thaw in the refrigerator compartment.
do not thaw, put straight into boiling water
thaw in the refrigerator compartment wi-
thaw at room temperature or cook directly.
re-heat in the oven without re-
MAINTENANCE AND CLEANING
A periodic and proper maintenance will ensure a longer life to
your appliance. When carrying out cleaning operations, always
disconnect the appliance from the mains supply. Periodically
clean the refrigerator and freezer compartments with a
sponge dampened in a solution of lukewarm water and vinegar. Rinse and dry carefully. Never use detergents or abrasives.
HINTS FOR HOLIDAYS
If you plan to be away for a long time: disconnect the appliance
from the mains supply, empty and clean the inside of the two
compartments. Leave the doors open to prevent the appliance
from smelling musty. If you plan to be away for a short time: let
the appliance operate normally.
Note:
To disconnect the appliance temporarily, press the mains
switch
-Fig.
%
.
SERVICE (Fig. 2-3-4-5)
The incorrect operation of the appliance is not always due to a
fault but it may also result from poor installation or usage. To
prevent unnecessary service calls for which you will be charged,
we suggest you consult this trouble shooting guide.
1. The temperature in the compartment is not enough.
Check that:
.
− the doors are properly shut
− the thermostats are in the correct positions (see chapter
“Adjustment of the temperature”)
− the appliance is not too close to a heat source
− the air flow is not restricted.
2. The temperature in the refrigerator compartment is
too cold. Check that:
− the thermostat is in the correct position.
3. Vibrations: Check that:
− the appliance is level and correctly installed in the housing.
4. The appliance does not work at all, the interior light
and the switch lamps are off. Check that:
−themainsswitch(%-Fig.)
− the supply plug is making good contact with the supply socket
− there is not a power failure
− check the plug fuse by connecting another appliance to the
supply socket.
For Great Britain only
Check the plug fuse (if fitted).
A 3 A fuse must be fitted. Try new fuse - check removable
plugs for loose connections and tighten if necessary.
− Loose connections can cause overheating oftheplug:where
this has occurred, replace the plug.
5. The interior light does not work:
See point 4. Unplug the appliance and remove the lamp cover.
Check that the bulb is not loose - tighten if necessary. To
change the faulty bulb, proceed as above and fit a replacement
bulb of not more than 5 W rating
6. The door gasket is warm (Fig. 3):
This is not a fault but prevents the door sticking due to condensation.
Note:
When replacing a damaged supply cord, be sure the new cable
has the appropriate section and is correctly clamped.
is in the correct position
(Fig. 2)
.
NORMAL OPERATION
It is absolutely normal that frost-free appliances produce particular noises during operation: these noises, which do not alter
normal operation, are caused by the forced air system (fan-air)
and by the automatic defrost system (occasional creaking due
to the production/detachment of the ice inside the refrigerating circuit).
If you have followed the above checks and your appliance still
does not work properly, get in touch with the Service Division.
Addresses and telephone numbers can be found on the Service
Registration Card or Booklet.
State clearly what is wrong and the type and serial number of
your appliance.
7
 Loading...