

Page 1
63602089GB.fm Page 17 Wednesday, September 23, 2009 11:13 AM
INSTRUCTIONS FOR USE
BEFORE USING THE APPLIANCE
SAFEGUARDING THE ENVIRONMENT
PRECAUTIONS AND GENERAL
RECOMMENDATIONS
HOW TO OPERATE THE REFRIGERATOR
COMPARTMENT
HOW TO OPERATE THE FREEZER
COMPARTMENT
HOW TO DEFROST AND CLEAN THE
FREEZER
HOW TO CLEAN THE REFRIGERATOR
COMPARTMENT
CARE AND MAINTENANCE
TROUBLESHOOTING GUIDE
AFTER-SALES SERVICE
INSTALLATION
ELECTRICAL CONNECTION
17
Page 2
63602089GB.fm Page 18 Wednesday, September 23, 2009 11:13 AM
BEFORE USING THE APPLIANCE
• Your new appliance is designed to be used in
the household and similar applications such as:
- kitchen areas in shops, offices and other
working environments
- farm houses
- by clients in hotels, motels, residences, bed
& breakfasts.
To ensure best use of your appliance,
carefully read the operating instructions
which contain a description of the product
and useful advice.
Keep these instructions for future
reference.
1. After unpacking the appliance, make sure it is
not damaged and that the door closes properly.
Any damage must be reported to the dealer
within 24 hours of delivery of the appliance.
2. Wait at least two hours before switching the
appliance on in order to ensure that the
refrigerant circuit is fully efficient.
3. Installation and electrical connection must be
carried out by a qualified technician according
to the manufacturer’s instructions and in
compliance with local safety regulations.
4. Clean the inside of the appliance before using it.
SAFEGUARDING THE ENVIRONMENT
1. Packaging
The packing material is 100% recyclable and
bears the recycling symbol. For disposal, comply
with local regulations. Keep the packing
materials (plastic bags, polystyrene parts, etc.)
out of the reach of children, as they are a
potential source of danger.
2. Scrapping/Disposal
The appliance is manufactured using recyclable
material.
This appliance is marked in compliance with
European Directive 2002/96/EC on Waste
Electrical and Electronic Equipment (WEEE).
By ensuring the correct disposal of this
appliance, you can help prevent potentially
negative consequences for the environment and
health.
The symbol on the appliance, or on the
accompanying documents, indicates that this
appliance should not be treated as domestic
waste but must be taken to a special collection
centre for the recycling of electrical and
electronic equipment.
When scrapping the appliance, make it unusable
by cutting off the power cable and removing the
doors and shelves so that children cannot easily
climb inside and become trapped.
Scrap the appliance in compliance with local
regulations on waste disposal, taking it to a
special collection centre; do not leave the
appliance unattended even for a few days, since
it is a potential source of danger for children.
For further information on the treatment,
recovery and recycling of this product, contact
your competent local office, the household
waste collection service or the shop where you
purchased the appliance.
Information:
This appliance does not contain CFCs.
The refrigerant circuit contains R134a (HFC) or
R600a (HC) (see the rating plate inside the
appliance).
Appliances with Isobutane (R600a): isobutane is
a natural gas with low environmental. Caution is
required, however, since isobutane is
flammable. Therefore, it is essential to ensure
that refrigerant pipelines are not damaged.
This product may contain Fluorinated
Greenhouse Gases covered by the Kyoto
Protocol; the refrigerant gas is inside a
hermetically sealed system.
Refrigerant gas: R134a has a Global Warming
Potential of (GWP) 1300.
Declaration of conformity
This appliance has been designed for preserving
food and is manufactured in compliance with
Regulation (CE) No. 1935/2004.
This appliance has been designed, manufactured
and marketed in compliance with:
• safety objectives of the “Low Voltage”
Directive 2006/95/CE (which replaces
73/23/CEE and subsequent amendments);
• the protection requirements of Directive
“EMC” 2004/108/CE.
Electrical safety of the appliance can only be
guaranteed if it is correctly connected to an
approved earthing system.
18
Page 3
63602089GB.fm Page 19 Wednesday, September 23, 2009 11:13 AM
PRECAUTIONS AND GENERAL
RECOMMENDATIONS
INSTALLATION
• The appliance must be handled and installed
by two or more persons.
• Be careful not to damage the floors (e.g.
parquet) when moving the appliance.
• During installation, make sure the appliance
does not damage the power cable.
• Make sure the appliance is not installed near a
heat source.
• To guarantee adequate ventilation, leave a
space on both sides and above the appliance
and follow the installation instructions.
• Keep the appliance ventilation openings free.
• Do not damage the appliance refrigerant
circuit pipes.
• Install and level the appliance on a floor strong
enough to take its weight and in a place
suitable for its size and use.
• Install the appliance in a dry, well ventilated
place. The appliance is designed to operate in
areas where the temperature comes within
the following ranges, according to the climatic
class given on the rating plate.
The appliance may not work properly if it is
left for a long time at a temperature outside
the specified range.
Climatic Class Amb. temp.
(°C)
SN From 10 to 32 From 50 to 90
N From 16 to 32 From 61 to 90
ST From 16 to 38 From 61 to 100
T From 16 to 43 From 61 to 110
• Make sure the voltage specified on the rating
plate corresponds to that of your home.
• Do not use single/multi adapters or extension
cords.
• For the water connection, use the pipe
supplied with the new appliance; do not reuse
that of the previous appliance.
• Power cable modification or replacement
must only be carried out by qualified
personnel or After-sales Service.
• It must be possible to disconnect the
appliance from the power supply by
unplugging it or by means of a mains two-pole
switch installed upline of the socket.
Amb. temp.
(°F)
SAFETY
• Do not use the appliance to store aerosol cans
or receptacles containing propellants or
flammable substances.
• Do not store or use petrol, flammable liquids
or gas in the vicinity of this or other electrical
appliances. The fumes can cause fires or
explosions.
• Do not use mechanical, electric or chemical
means other than those recommended by the
Manufacturer to speed up the defrost process.
• Do not use or place electrical devices inside
the appliance compartments if they are not of
the type expressly authorised by the
Manufacturer.
• This appliance is not intended for use by
persons (including children) with reduced
physical, sensory or mental capabilities or lack
of experience and knowledge, unless they
have been given supervision or instruction
concerning use of the appliance by a person
responsible for their safety.
• To avoid the risk of children becoming
trapped and suffocating, do not allow them to
play or hide inside the appliance.
• Do not swallow the contents (non-toxic) of
the ice packs (in some models).
• Do not eat ice cubes or ice lollies immediately
after taking them out of the freezer since they
may cause cold burns.
USE
• Before carrying out any maintenance or
cleaning operation, unplug the appliance or
disconnect it from the power supply.
• All appliances equipped with an automatic
icemaker and water dispenser must be
connected to a water supply that only delivers
drinking water (with mains water pressure of
between 0.17 and 0.81 Mpa (1.7 and 8.1 bar)).
Automatic ice-makers and/or water dispensers
not directly connected to the water supply must
be filled with drinking water only.
• Use the refrigerator compartment only for
storing fresh food and the freezer
compartment only for storing frozen food,
freezing fresh food and making ice cubes.
• Do not store glass containers with liquids in
the freezer since they may burst.
The Manufacturer declines any liability if
the above advice and precautions are not
respected.
19
Page 4
63602089GB.fm Page 20 Wednesday, September 23, 2009 11:13 AM
HOW TO OPERATE THE REFRIGERATOR
COMPARTMENT
This appliance is a refrigerator with a star freezer
compartment.
Defrosting of the refrigerator compartment is completely
automatic.
Optimal performance is obtained at temperatures between
+16°C and +32°C.
Switching on the refrigerator for the first time
Insert the plug into the mains socket.
The thermostat is used to adjust the temperature of both
compartments: refrigerator and freezer.
How to adjust the temperature of the compartments:
1. For correct operation and optimum storage of food, it is
advisable to set the thermostat to 2-3/MED.
2. To adjust the temperature in the refrigerator compartment,
turn the thermostat control knob:
•lowest/MIN numbers for the LEAST COLD internal
temperatures;
•highest/MAX numbers for the COLDEST internal
temperatures.
thermostat set to 0: no operation, no light.
Note:
In order to ensure proper operation with an ambient temperature
below 16°C, press the button next to the thermostat (if available).
Press the button again to turn it off when the temperature is high
(above 16°C).
The ambient air temperature, frequency of door opening and the
position of the appliance can affect internal temperatures. These
factors must be taken into account when setting the thermostat.
How to use the refrigerator compartment
Position the food as illustrated in the figure.
A. Cooked food
B. Fish, meat
C. Fruit and vegetables
D. Bottles
E. Eggs
F. Butter, cheese and dairy products
Notes:
• The space between the shelves and the rear wall of the
refrigerator compartment must be unobstructed to allow
circulation of air.
• Do not place food in direct contact with the rear wall of the
refrigerator compartment.
• Do not place hot food in the refrigerator or freezer.
• Store liquids in closed containers.
• Storing vegetables with a high water content can result in
condensation in the crisper drawer: this will not affect the
correct operation of the appliance.
20
Page 5
63602089GB.fm Page 21 Wednesday, September 23, 2009 11:13 AM
HOW TO OPERATE THE FREEZER
COMPARTMENT
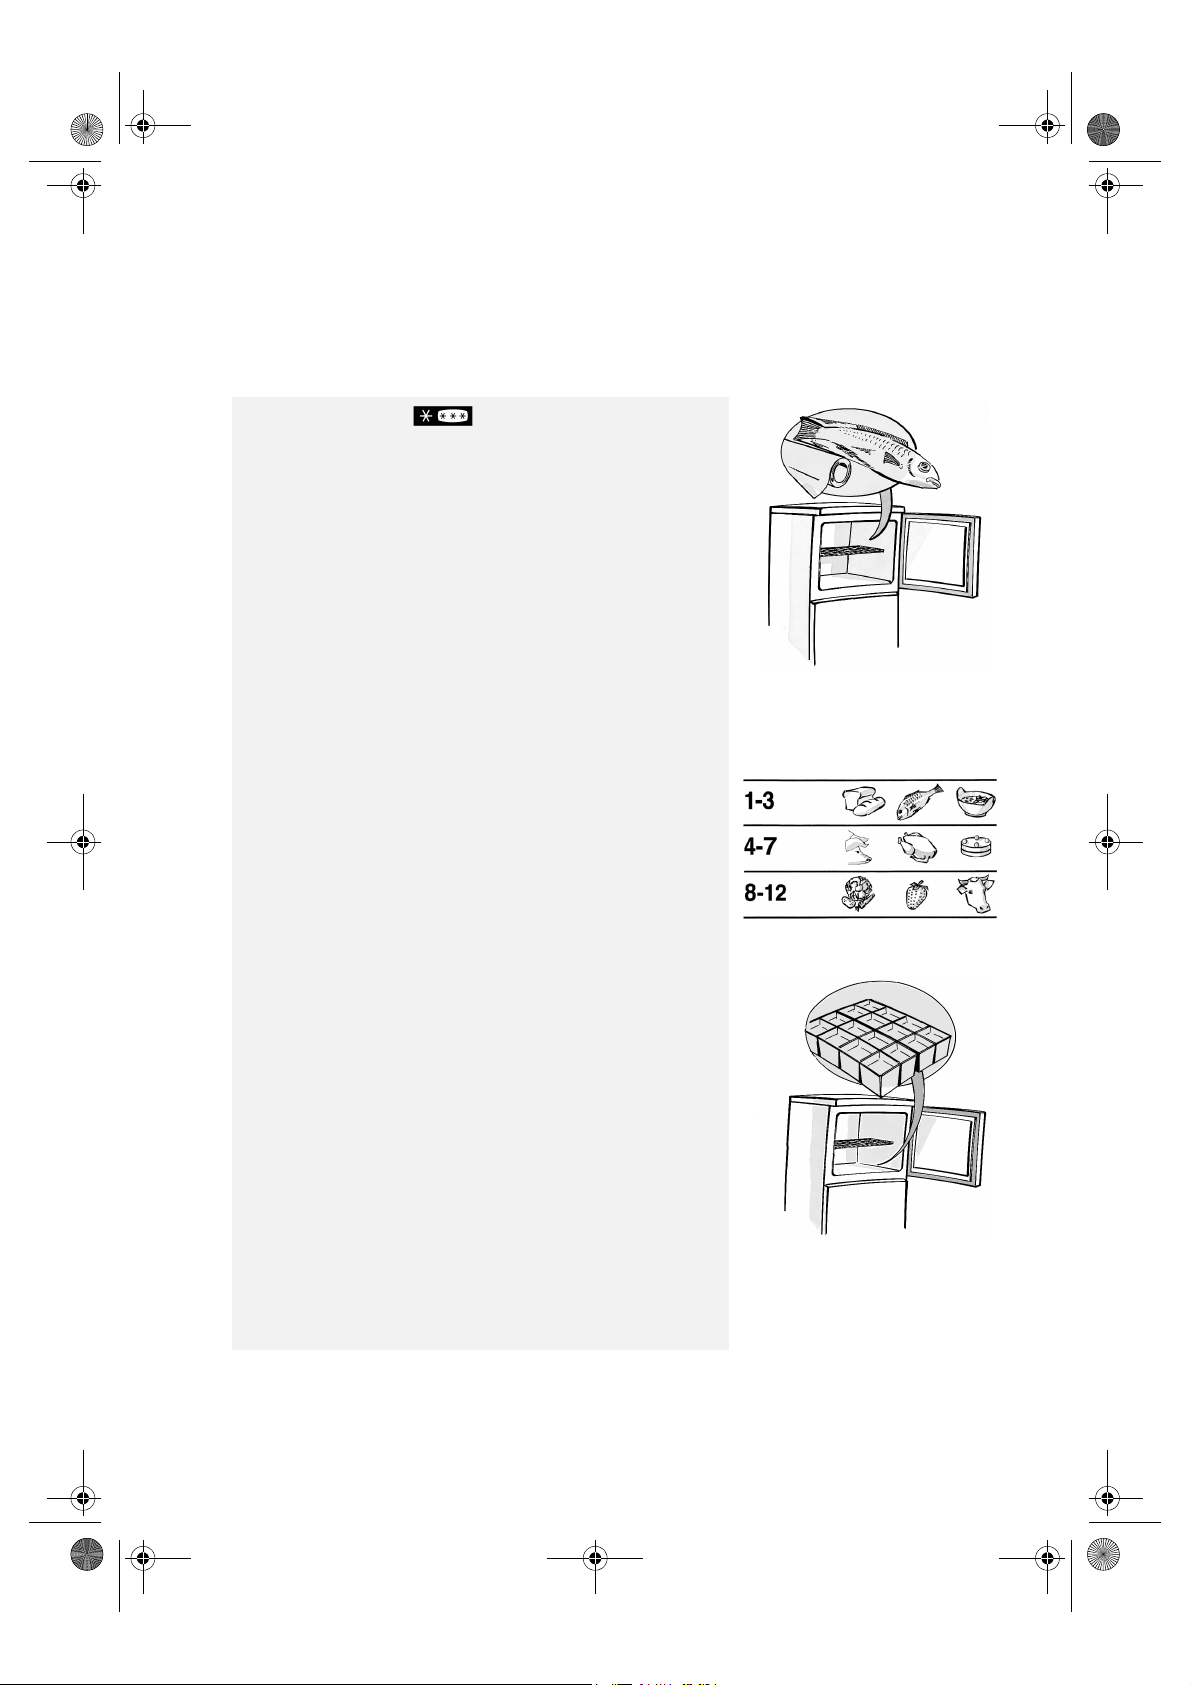
The freezer is a star compartment.
This compartment can be used to store frozen foods for the
period of time indicated on packaging. The freezer can also
be used to freeze fresh food by positioning it on the rack;
place frozen food in the lower part of the compartment so
that there is no contact with fresh food that has yet to be
frozen.
The quantity of fresh food that can be frozen in 24 hours is
shown on the rating plate.
Note:
Pressing the freeze button next to the thermostat (if available)
increases freezing power.
The food will be completely frozen in 24 hours. Deactivate the
freeze button.
Important:
Before freezing, wrap and seal fresh food in:
• aluminium foil, cling film, air and water-tight plastic bags,
polythene containers with lids or freezer containers suitable
for freezing fresh food.
• In the event of a power cut, the freezer compartment will
maintain a sufficiently low temperature for food storage.
However, it is advisable to avoid opening the compartment
door during such periods.
Important:
The table alongside shows the recommended maximum
storage time for frozen fresh foods.
When purchasing frozen food products:
• Ensure that the packaging is not damaged (frozen food in
damaged packaging may have deteriorated). If the package is
swollen or has damp patches, it may not have been stored
under optimal conditions and defrosting may have already
begun.
• When shopping, leave frozen food purchases until last and
transport the products in a thermally insulated cool bag.
• Place the items in the freezer compartment as soon as you get
home.
• If food has defrosted even partially, do not re-freeze it.
Consume within 24 hours.
• Avoid, or reduce temperature variations to the minimum.
Respect the best-before date on the package.
• Always observe the storage information on the package.
Making ice cubes
• Fill the ice cube tray 3/4 with water and place it at the bottom
of the freezer compartment.
Do not use sharp or pointed instruments to detach the tray if
it is stuck to the compartment bottom.
MONTHS
FOOD
21
Page 6
63602089GB.fm Page 22 Wednesday, September 23, 2009 11:13 AM
HOW TO DEFROST AND CLEAN THE
FREEZER
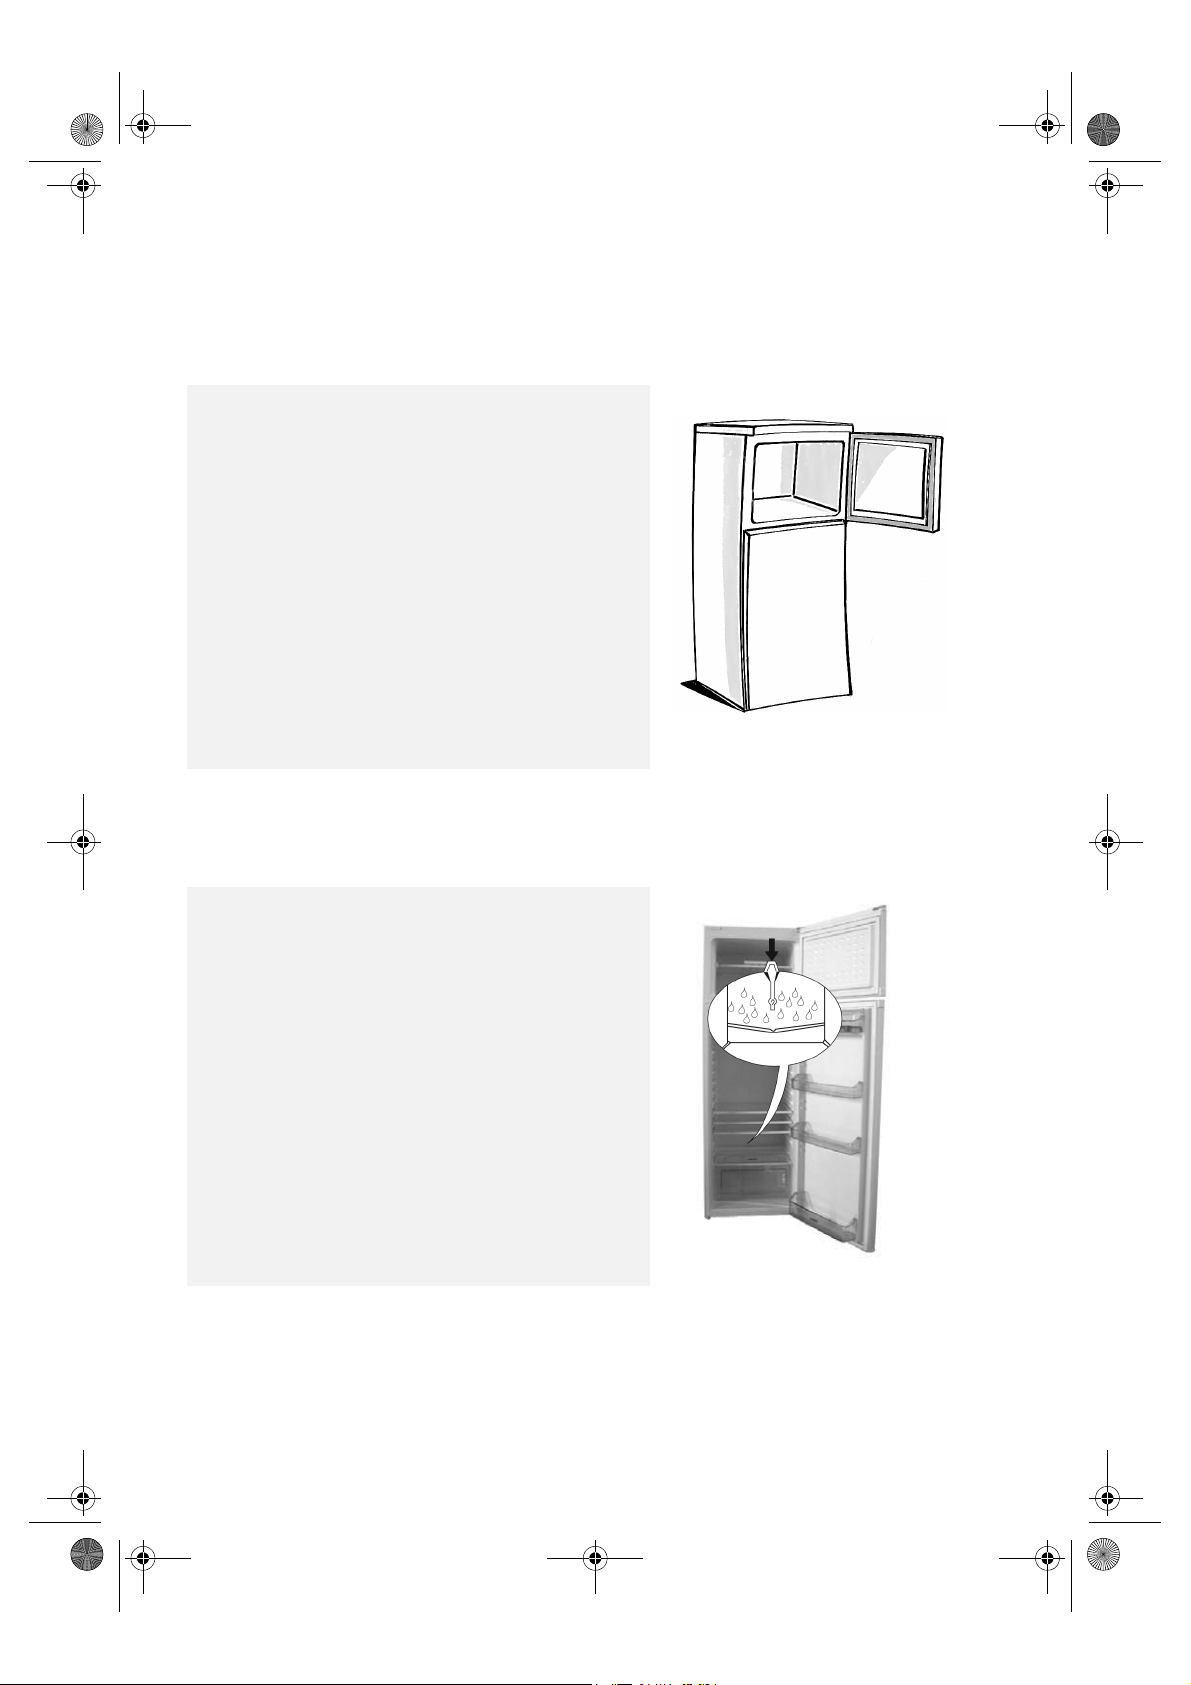
Defrost the freezer compartment once or twice a year,
or when the ice on the walls reaches a thickness of
about 3 mm. If possible, defrost the freezer when it is
nearly empty.
1. Remove the food from the freezer, wrap in newspaper
and group together in a cool place or in a portable cooler.
2. Disconnect the appliance from the mains power
supply.
3. Leave the door open to allow the frost to melt.
4. Remove the defrost water from the compartment
bottom.
5. Clean the interior using a sponge dampened in a solution
of warm water and neutral detergent.
Do not use abrasive products.
6. Rinse the interior and dry thoroughly.
Note: Do not use sharp or pointed metal instruments
to scrape off ice; do not heat the freezer compartment
artificially.
HOW TO CLEAN THE REFRIGERATOR
COMPARTMENT
Periodically clean the inside of the refrigerator
compartment.
Defrosting of the refrigerator compartment is
completely automatic.
Droplets of water on the rear wall of the refrigerator
compartment indicate that the periodic automatic defrost
cycle is in progress.
The defrost water is automatically routed to a drain outlet
and into a container from which it evaporates.
Clean the defrost water drain outlet regularly using the tool
supplied with the appliance in order to ensure defrost water
is removed correctly.
Before carrying out any cleaning operations, disconnect the
appliance from the power supply.
• Use a sponge dampened in lukewarm water and/or
neutral detergent.
• Rinse the interior and dry with a soft cloth.
Do not use abrasive products.
22
Page 7
63602089GB.fm Page 23 Wednesday, September 23, 2009 11:13 AM
CARE AND MAINTENANCE
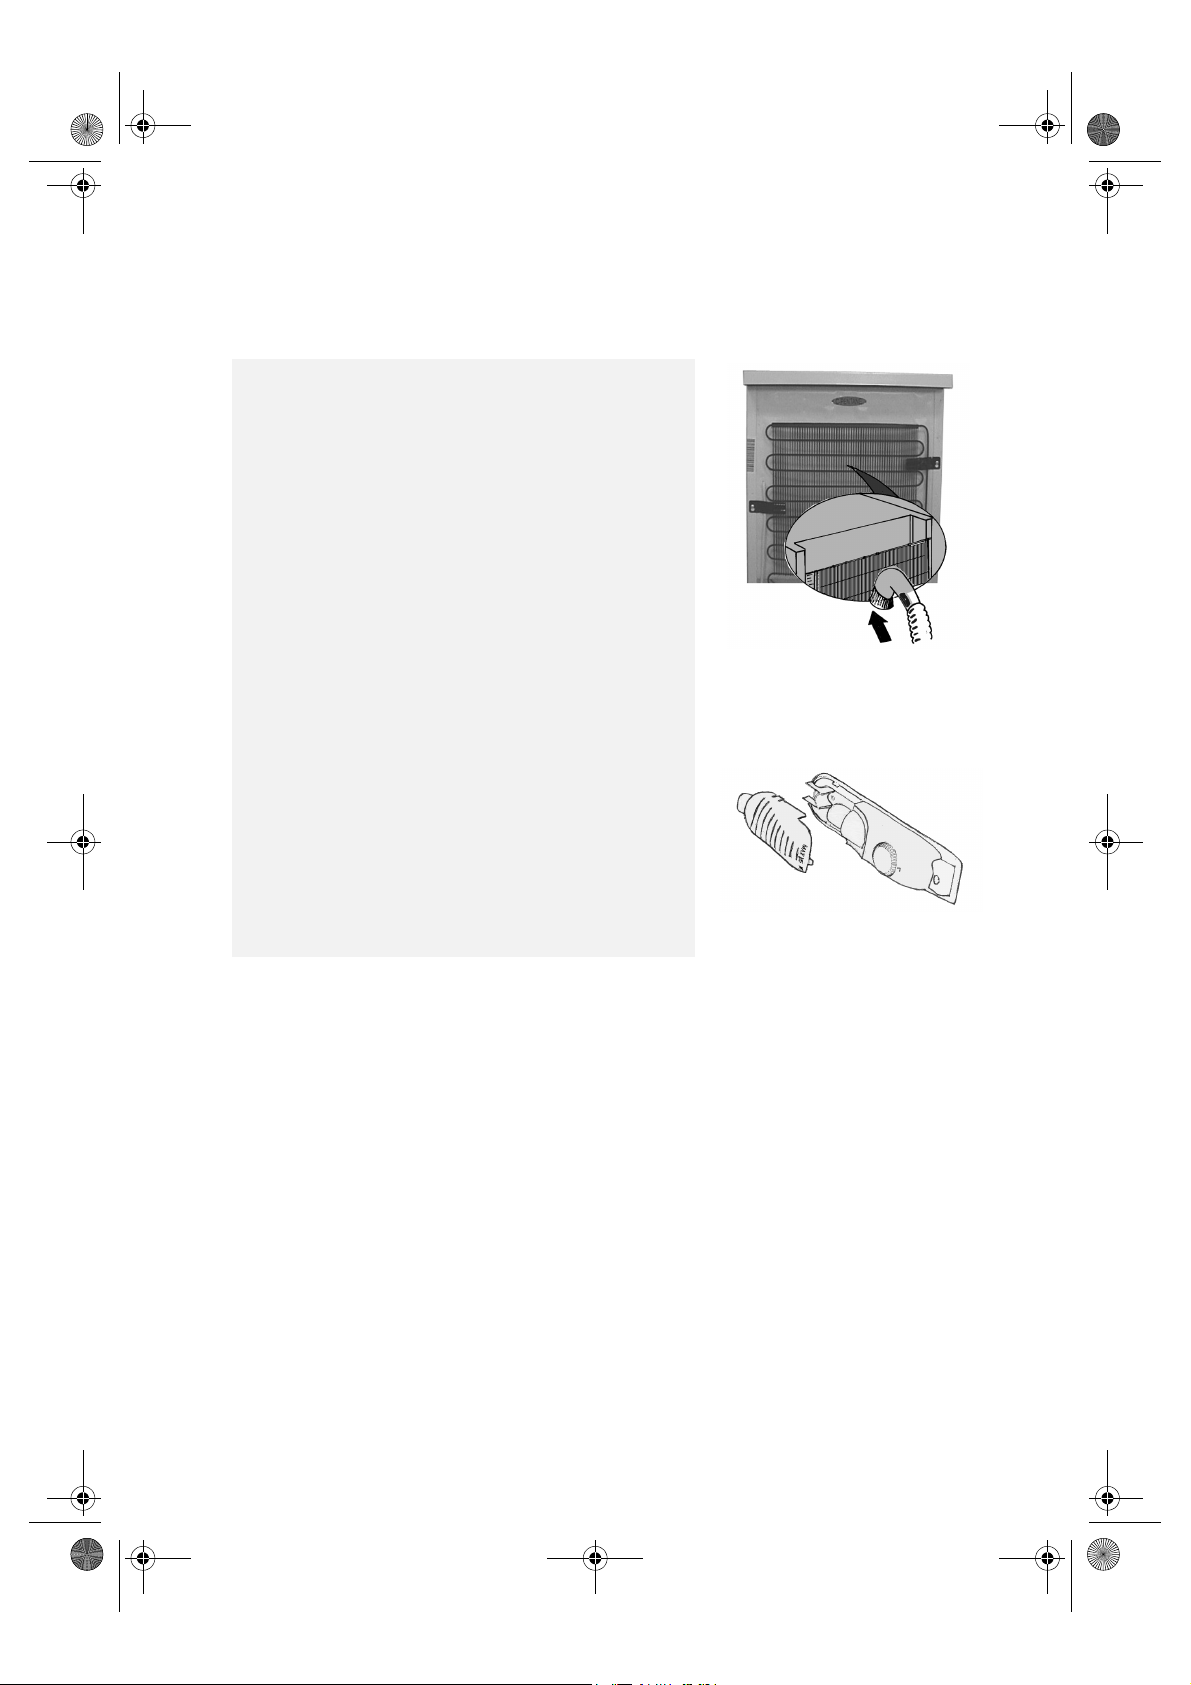
• Periodically clean air vents and the condenser at the rear
of the appliance with a vacuum cleaner or a brush.
• Clean the outside using a soft cloth.
Prolonged disuse
1. Empty the refrigerator.
2. Disconnect the appliance from the power supply.
3. Defrost and clean the interior.
4. In the event of prolonged disuse, leave the door open to
prevent the formation of mould, odours and oxidation.
5. Clean the appliance.
• Clean the inside of the low temperature compartment
(where fitted) when defrosting.
• Periodically clean the inside of the refrigerator
compartment with a sponge dampened in warm water
and/or neutral detergent. Rinse and dry with a soft cloth.
Do not use abrasive products.
• Clean the outside with a soft damp cloth.
Do not use abrasive products, scourers, stain-removers
(e.g. acetone, trichloroethylene) or vinegar.
Replacing bulbs:
When replacing the bulb, proceed as follows:
• Unplug the appliance from the mains
• Squeeze the tabs on the sides of the lamp cover and
remove it.
• Replace the bulb with a new one, maximum 15 W.
• Put the lamp cover back on and wait 5 minutes before
plugging the appliance back into the mains.
23
Page 8
63602089GB.fm Page 24 Wednesday, September 23, 2009 11:13 AM
TROUBLESHOOTING GUIDE
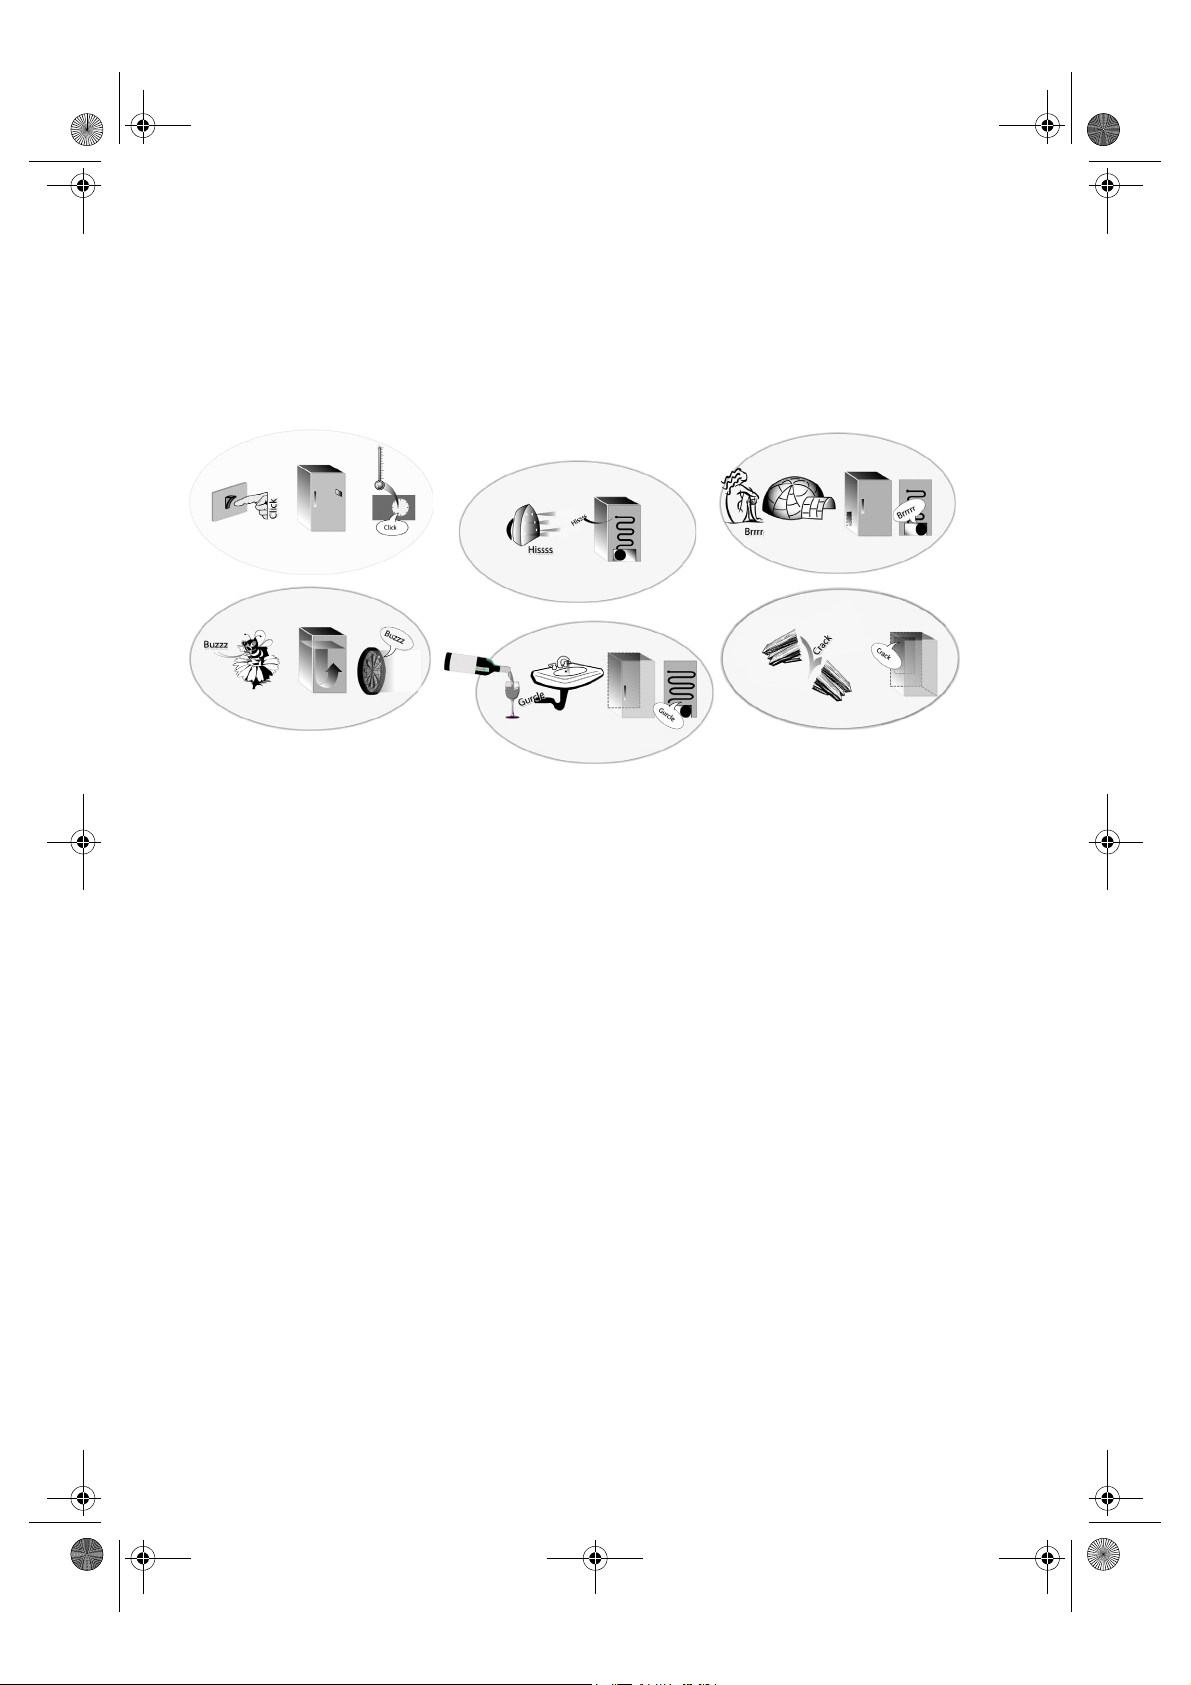
When you hear these noises
1. The appliance is not working.
• Is there a power failure?
• Is the plug properly inserted in the socket?
• Is the double-pole switch on?
• Has the fuse blown?
• Is the power cord damaged?
• Is the thermostat set to 0 (Stop)?
2. Temperature inside the compartments is
not low enough.
• Is the door shut properly?
• Is the appliance installed near a heat source?
• Is the thermostat setting correct?
• Are the air circulation grilles blocked?
3. Temperature inside the refrigerator
compartment is too low.
• Is the thermostat setting correct?
4. Water collects at the bottom of the
refrigerator compartment.
• Is the defrost water drain blocked?
..your appliance is alive!!!
5. The inside light is not working.
Perform the checks for problem 1, then:
• Disconnect the appliance from the mains
power supply.
To inspect the bulb, refer to the instructions
and illustration on the attached table.
• Check the bulb and if necessary replace it.
Replace using maximum 15W bulb.
6. Excessive frost build-up in the freezer
compartment
• Is the door shut properly?
• Is food obstructing proper door closure?
Notes:
• The front edge of the appliance may be
hot. This prevents the formation of
condensation and is not a defect.
• Gurgling and hissing noises due to
expansion in the refrigerant circuit are
normal.
24
Page 9
63602089GB.fm Page 25 Wednesday, September 23, 2009 11:13 AM
AFTER-SALES SERVICE
Before contacting After-Sales Service:
1. See if you can solve the problem yourself with
the help of the “Troubleshooting guide”.
2. Switch the appliance on again to see if the
problem persists.
If it does, switch off and wait for about an hour
before switching on.
3. If the problem persists after this course of
action, contact After-sales Service.
Specify:
• the nature of the problem,
• the model,
• the Service number (the number after the word
SERVICE on the rating plate on the inside of the
appliance),
INSTALLATION
• Install the appliance away from heat sources.
• Install the appliance in a dry, well-ventilated
place.
• Do not obstruct the top and bottom vent
zones.
• Clean the inside (see chapter “How to clean the
refrigerator compartment”).
• Fit the accessories supplied.
• Overall dimensions with door open 110 cm
• Maximum width with door open 105 cm
Electrical connection
• Electrical connections must be made in
accordance with local regulations.
• Voltage and power consumption are indicated
on the rating plate (at the side of the crispers).
• your full address,
• your telephone number and area code.
Note: The direction of door opening can be
changed. If this operation is performed by
After-sales Service it is not covered by the
warranty.
• Regulations require that the appliance is
earthed. The Manufacturer declines all
liabilities for injury to persons or animals
or damage to property resulting from
failure to observe these regulations.
• If the plug and socket are not of the same type,
have the socket replaced by a qualified
electrician.
• Do not use extension leads or adapters.
Disconnecting the appliance
• It must be possible to disconnect the appliance
by unplugging it or by means of a two-pole
switch fitted upline of the socket.
Freestanding appliances (not built-in)
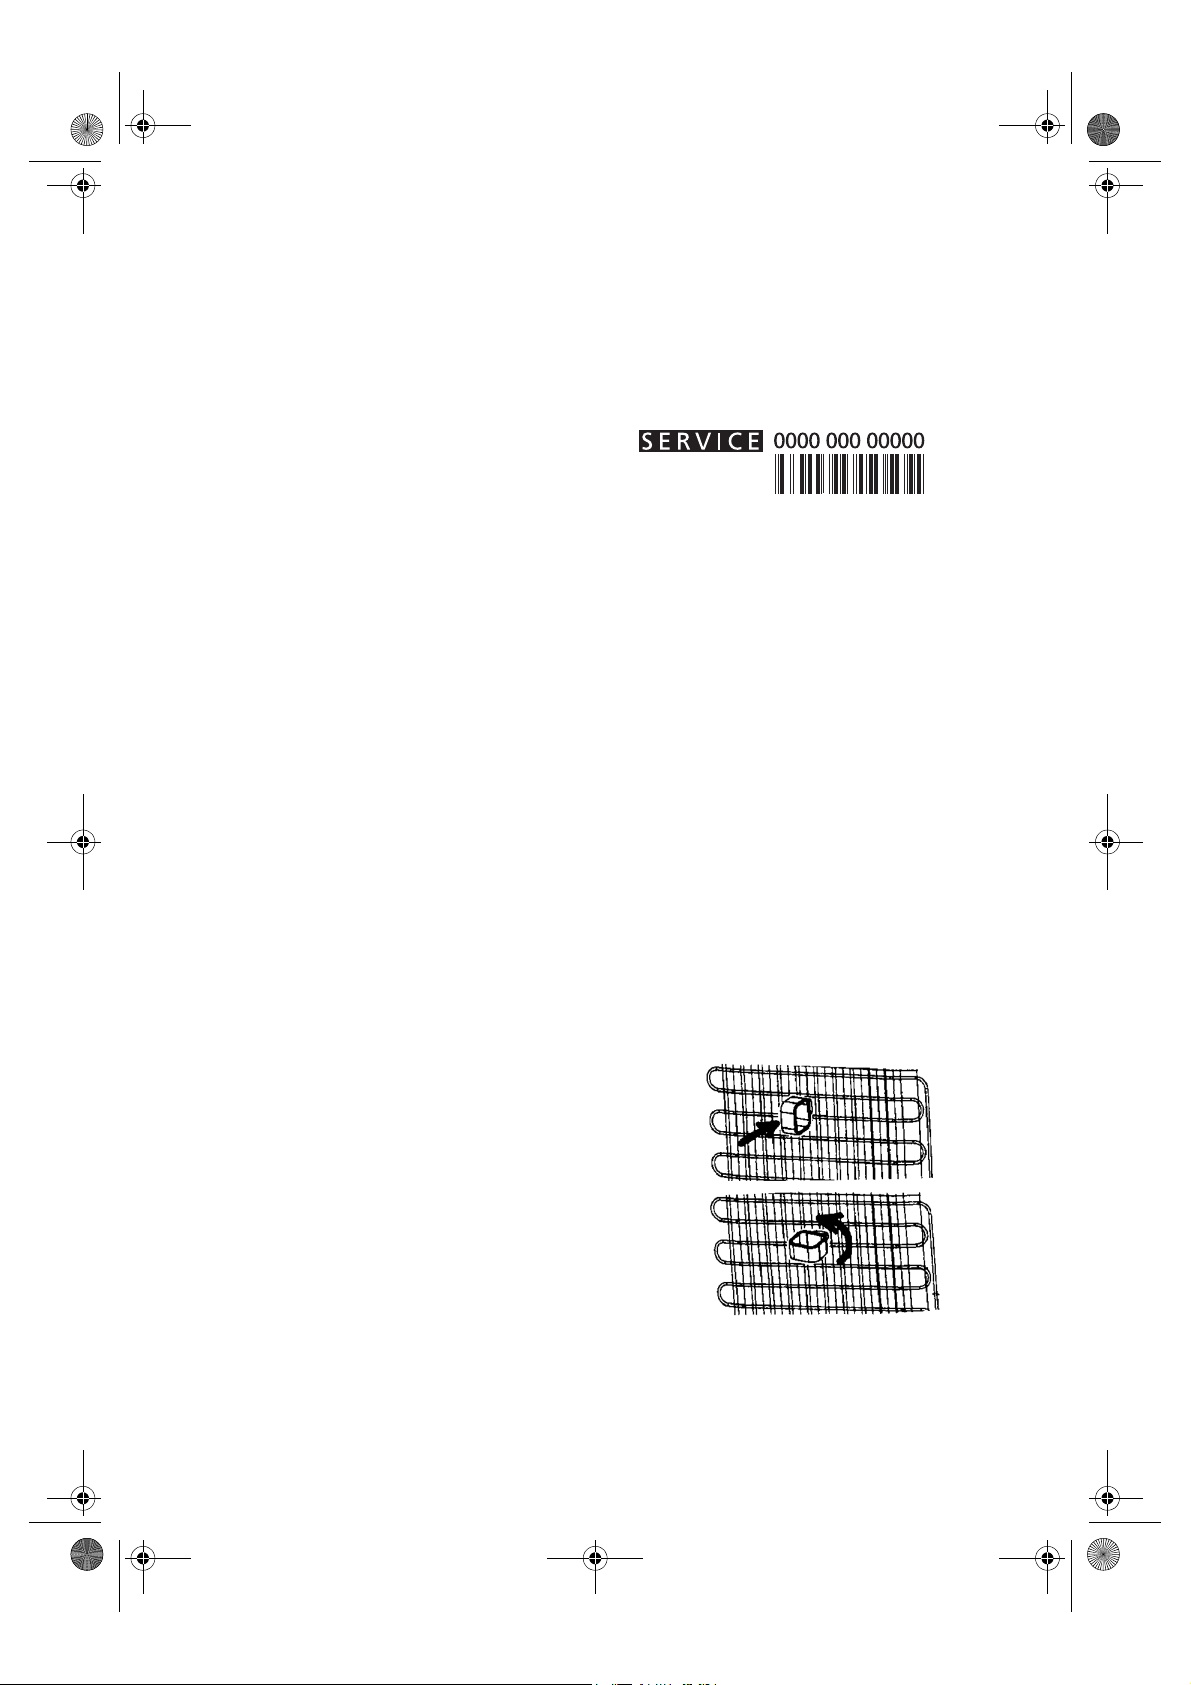
• Fit the spacers (if supplied) on the rear of the
condenser positioned at the back of the
appliance (see figure).
• To optimize appliance efficiency, leave a 5 cm
gap above the appliance and make sure that
adjacent kitchen units are sufficiently distanced
to allow air circulation.
• Ensure that the appliance is level, using the
front adjustment feet if necessary.
25
Page 10
63602089GB.fm Page 26 Wednesday, September 23, 2009 11:13 AM
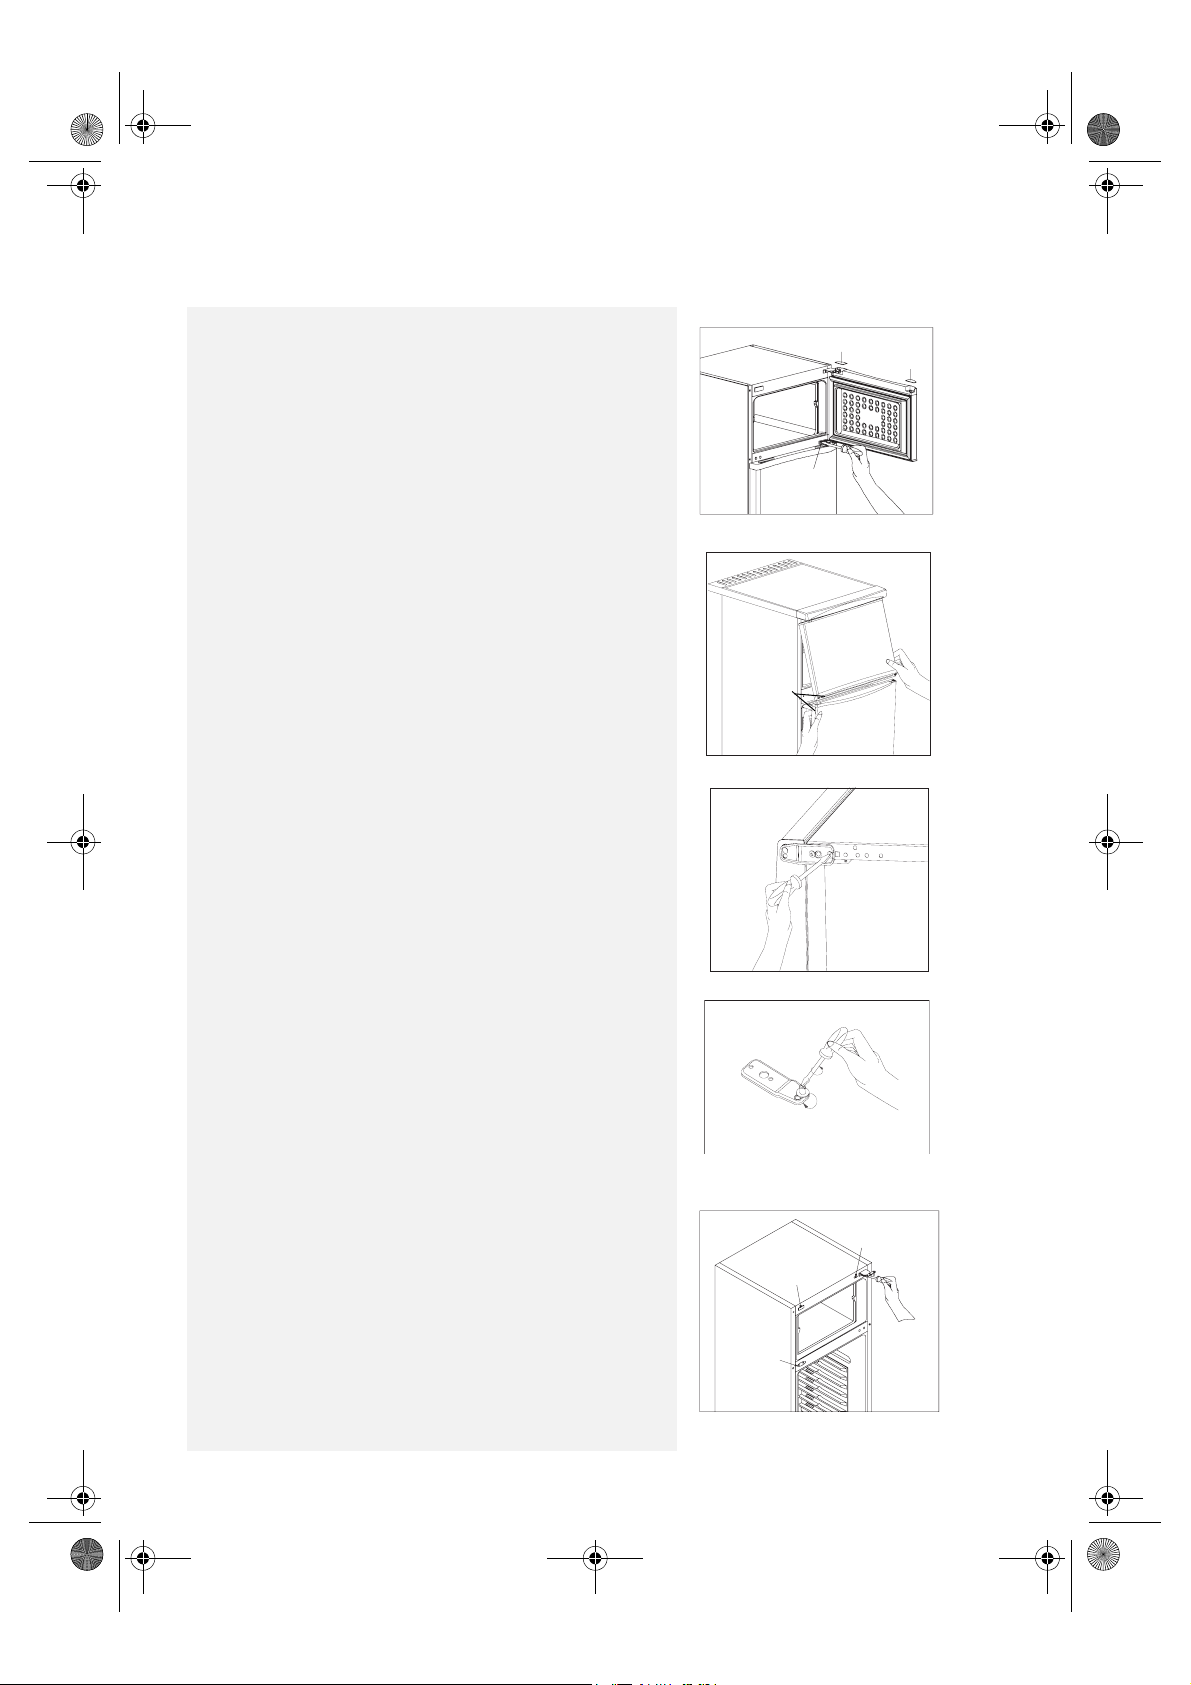
Model A
Changing The Door Swing Direction to Right Hand
1. Remove the 2 caps from the top of the freezer door. Remove
the 2 screws holding the middle hinge (Fig. 1).
2. Carefully remove the refrigerator and freezer doors together
with the middle hinge by sliding them from the top and
bottom hinge pins and gently towards you (Fig. 2)
3. Lay the appliance on its left side. Remove both levelling feet.
Remove the screws holding the bottom hinge and remove it
(Fig. 3). Unscrew the bottom hinge pin and screw it into the
left hole (Fig. 4). Then screw the bottom hinge on the left
hand side of the refrigerator. Screw the levelling feet back
into place.
Freezer door left cap
Unscrew the two
middle hinge
screws
Pull the doors
towards to
you with
middle hinge
Freezer door
right cap
Fig. 1
Fig. 2
4. Remove the two plugs from the middle left hand hinge
position.
Remove the two screws holding the top hinge and remove it.
Remove the plug from the top left hand hinge position.
Remove the plug from the middle right hand hinge position
(Fig. 5).
26
Remove the
two middle
hinge screw
caps (big)
Remove top
hinge screw
left cap
Fig. 3
Fig. 4
Remove the
middle hinge
screw cap (big)
Unscrew the
top hinge
Fig. 5
Page 11
63602089GB.fm Page 27 Wednesday, September 23, 2009 11:13 AM
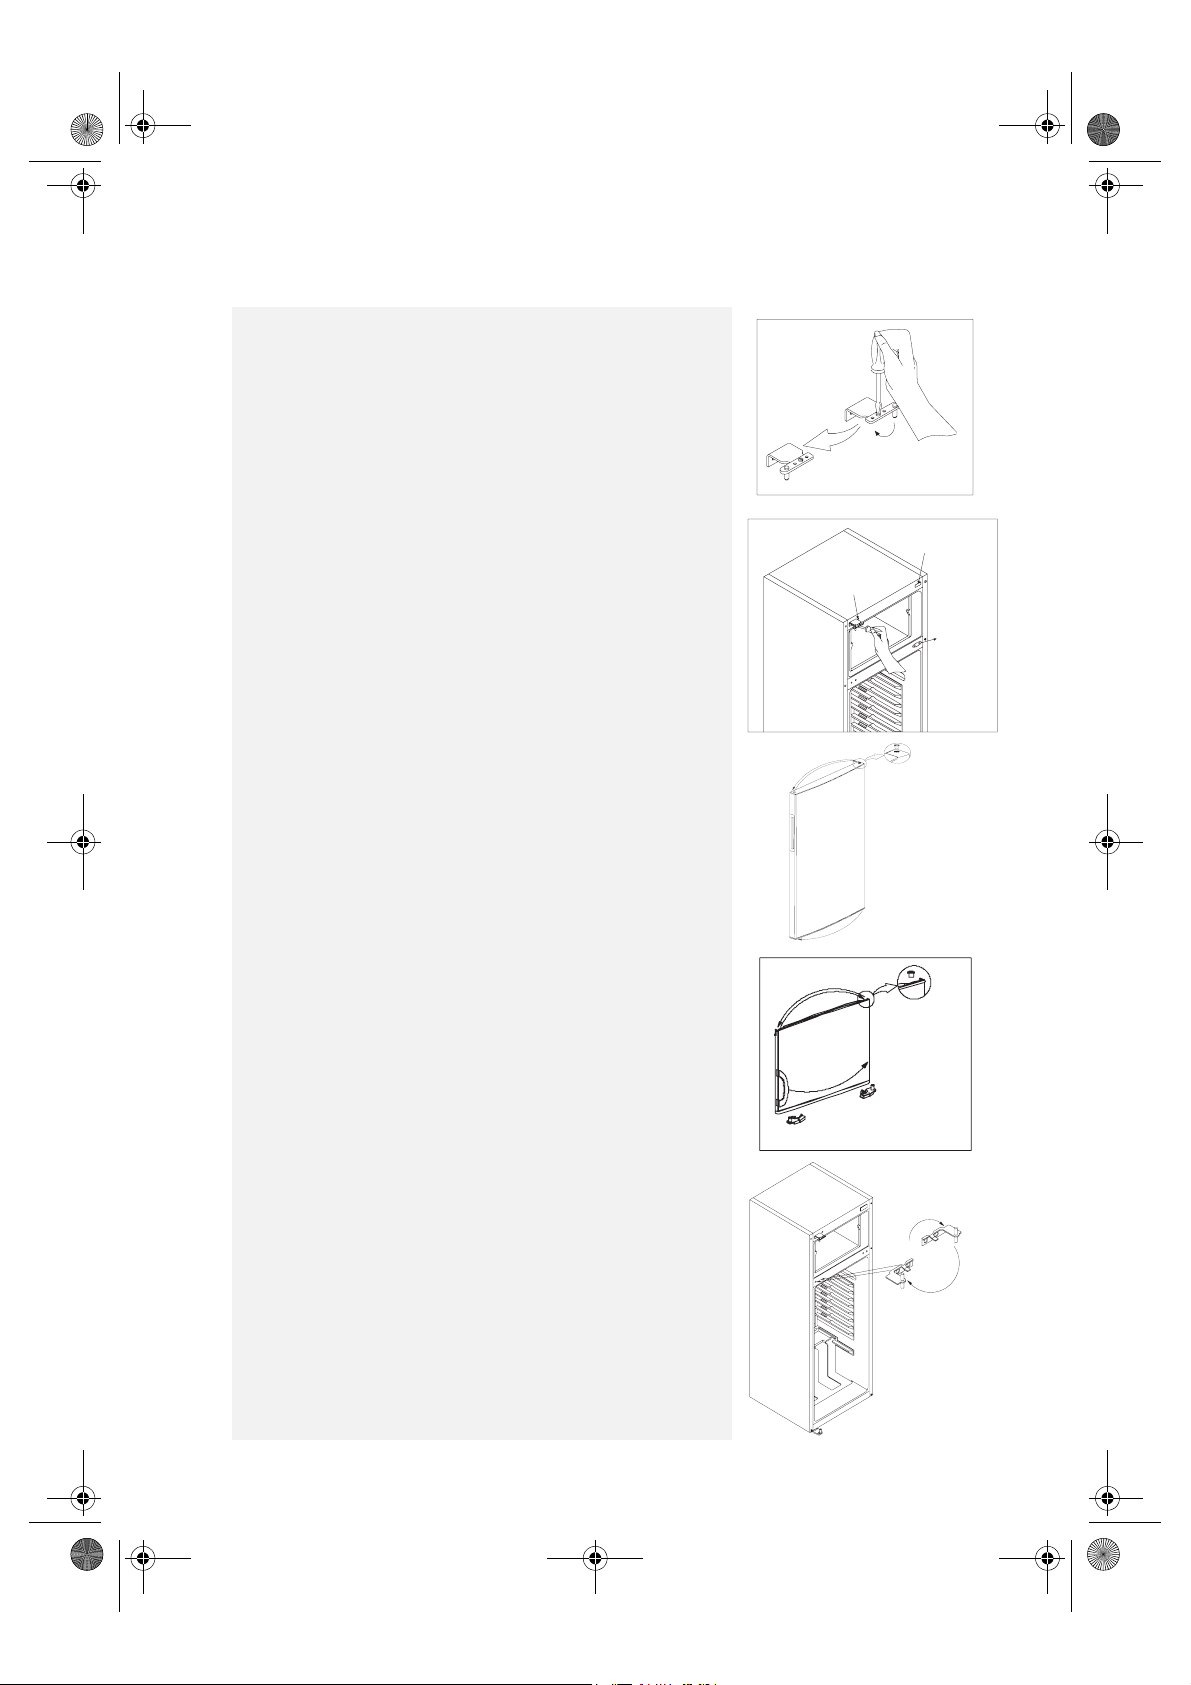
5. Loosen the screw holding the top hinge pin. Rotate the pin
180° and retighten the screw(Fig. 6).
6. Reassemble the top hinge on the left hand side (Fig. 7).
Plug the top and middle right hand holes. Transfer the middle
hinge plug to the left side. (You can use the plugs supplied in
the user's manual bag).
Rotate the top hinge pin by 180°
Insert the middlehinge
screw cap (big)
Fig. 6
Insert the top hinge
screw right cap
Insert the
two middle
hinge screw
caps (big)
here
7. Replace the top bushing and top bushing cap (Fig. 8) (You can
use the new bushing cap supplied in the user's manual bag).
Remove the bottom bushing and transfer it to the left (Fig. 8).
8. Remove the top bushing and transfer it to the left hole (Fig. 9).
Remove the screw holding the right freezer door stopper and
remove it. Assemble the left stopper on the left side (Fig. 9).
(You can use the freezer door stopper (left) in the user's
manual bag).
9. Rotate the middle hinge 180º. Reassemble the refrigerator and
freezer doors together with middle hinge (reverse step 2). Fix
the middle hinge in place by tightening the screws (Fig. 10).
Finally, replace the freezer door top caps.
Fig. 7
Fig. 8
Fig. 9
Turn the middle
hinge 180°
Fig. 10
27
Page 12
63602089GB.fm Page 28 Wednesday, September 23, 2009 11:13 AM
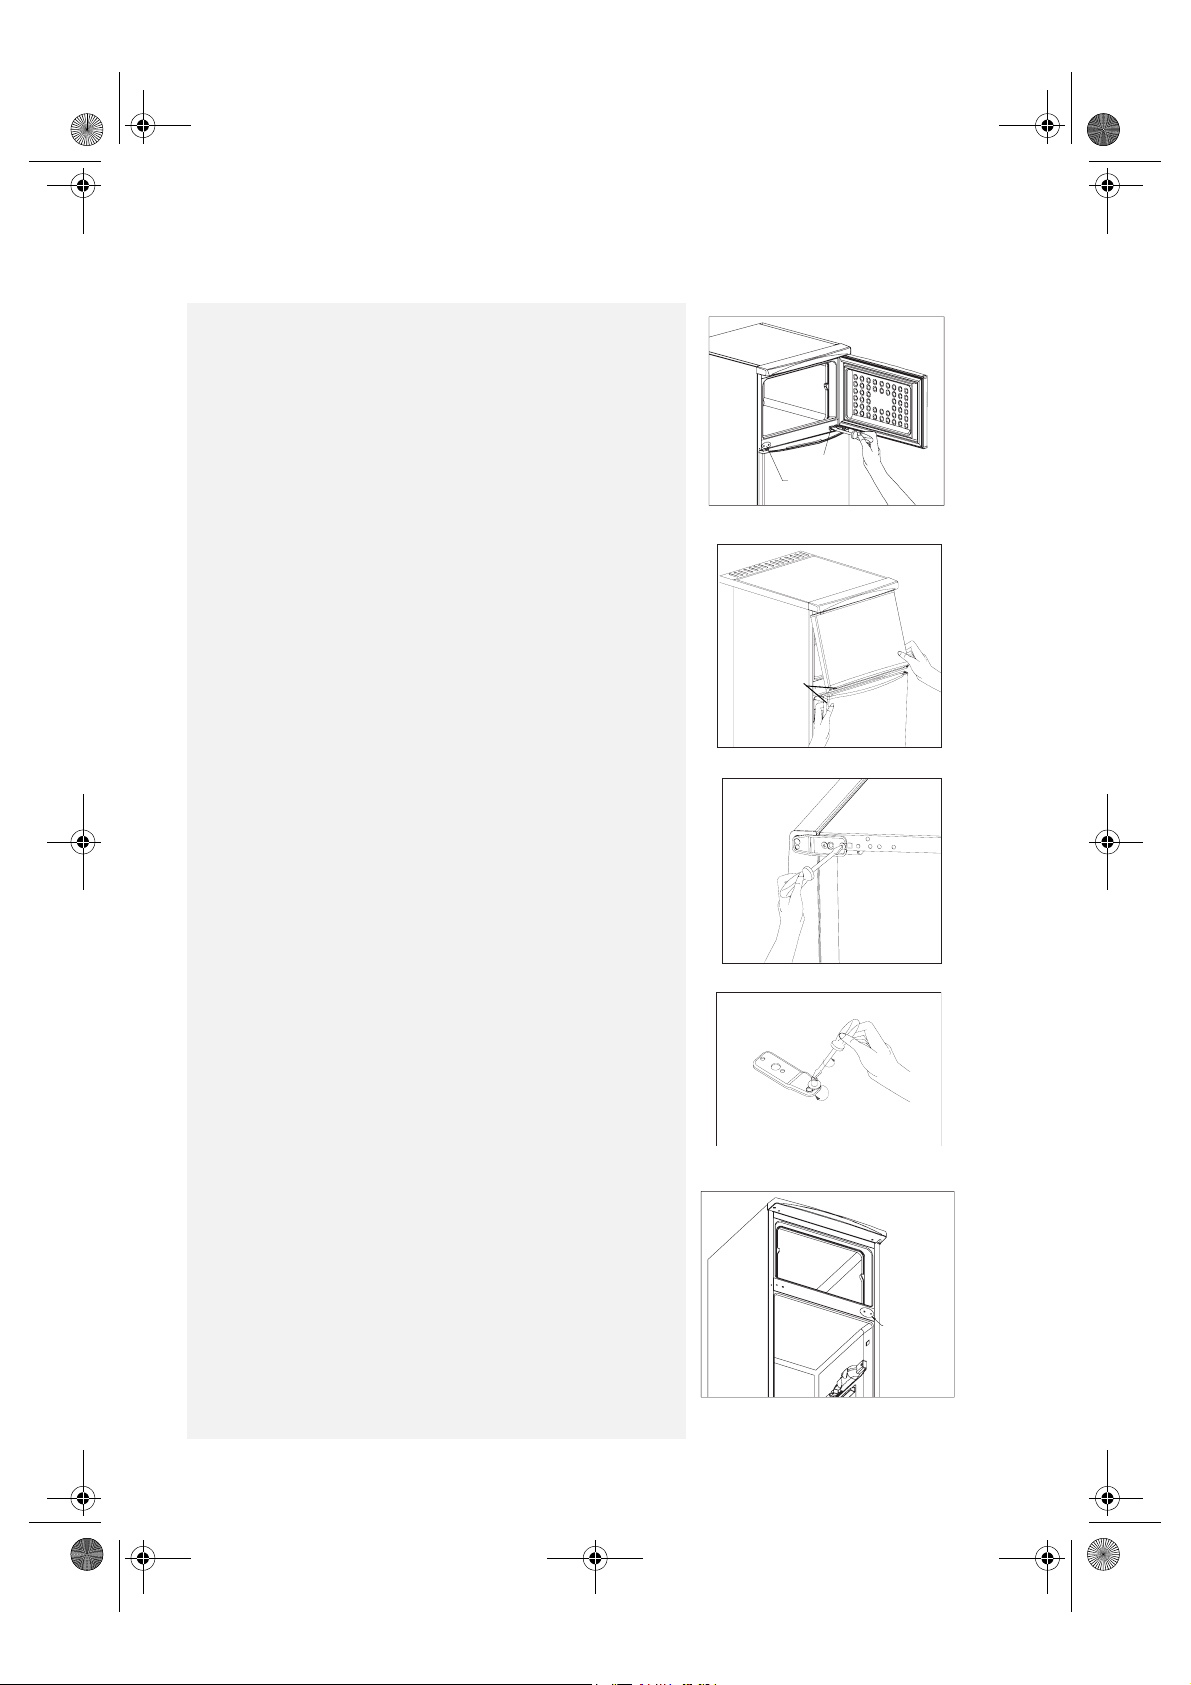
Model B
Changing The Door Swing Direction to Right Hand
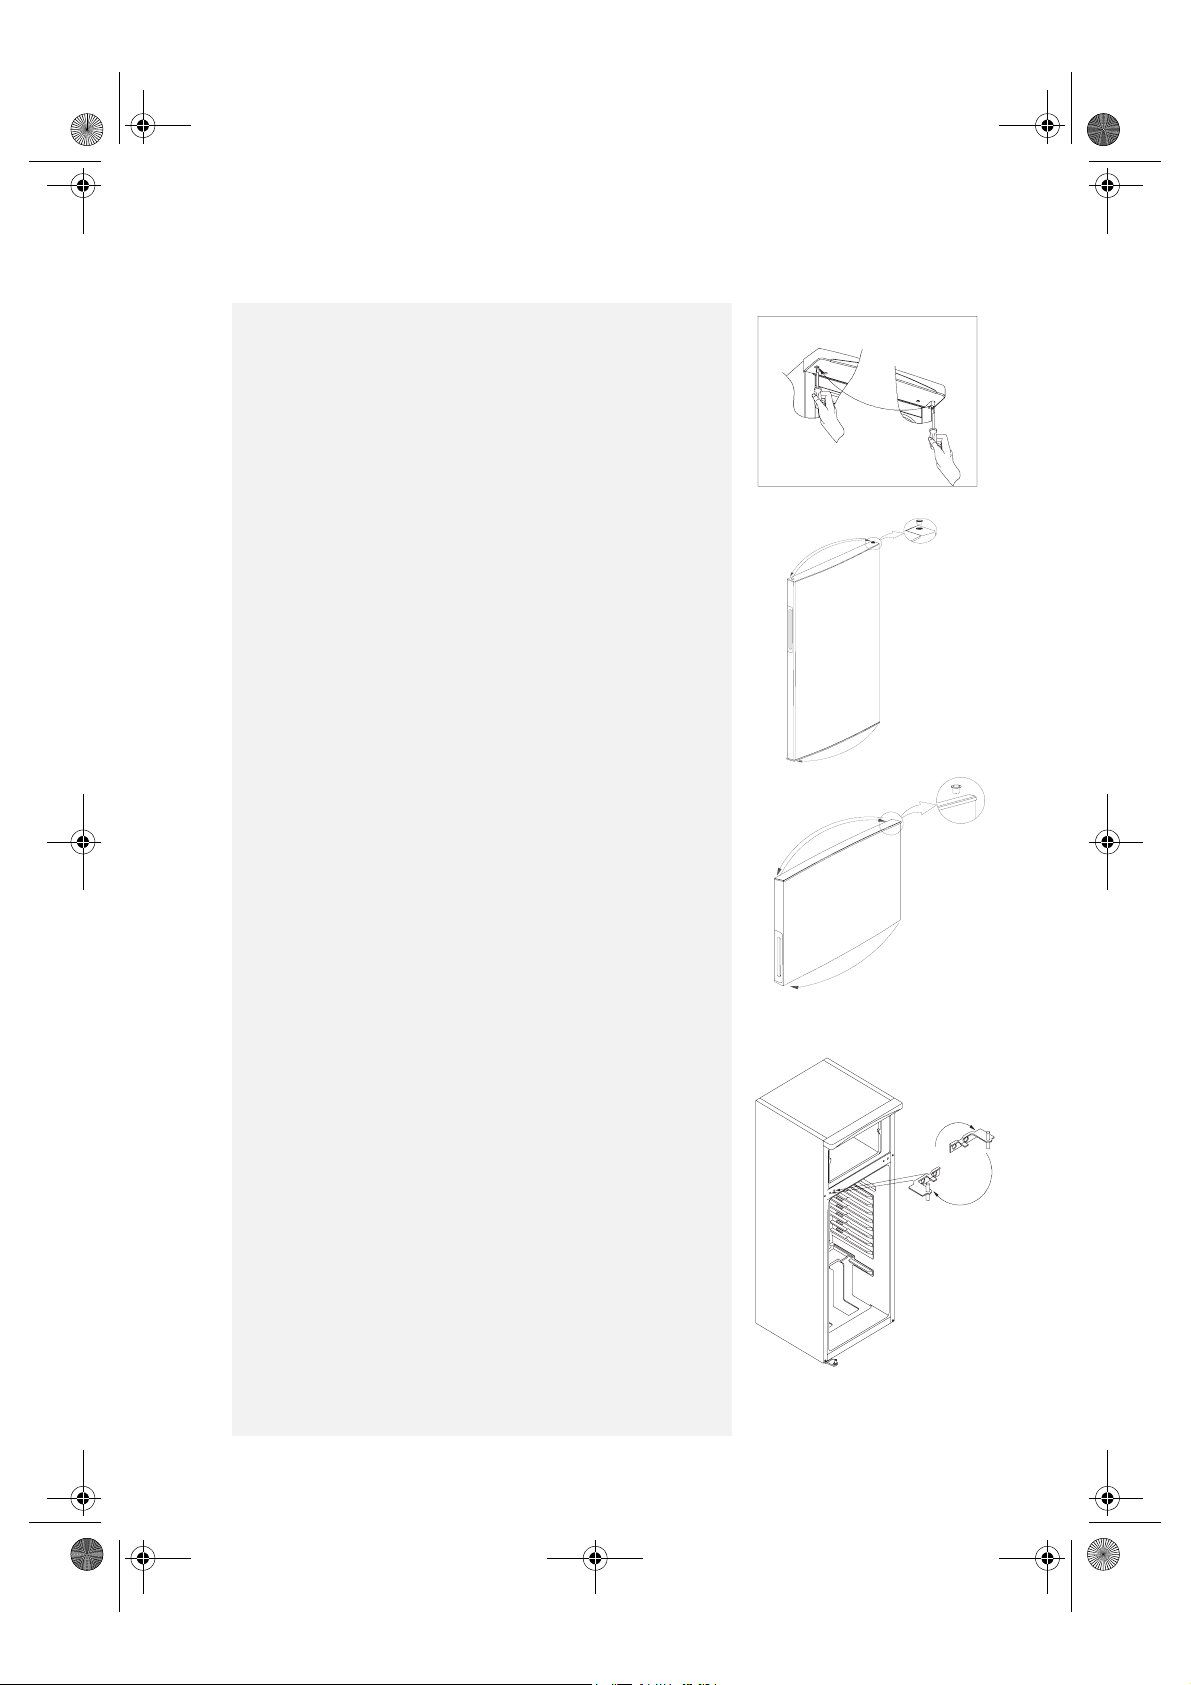
1. Remove the 2 screws holding the middle hinge. Remove the 2
plugs from the middle left hand hinge position (Fig. 1)
2. Carefully remove the refrigerator and freezer doors together
with the middle hinge by pulling them towards you (Fig. 2)
Remove the two
middle hinge screws
Remove the two
middle hinge plugs
Insert the two
middle hinge
screw caps
(big) here
Fig. 1
Fig. 2
3. Lay the appliance on its left side. Remove both levelling feet.
Remove the screws holding the bottom hinge and remove it
(Fig. 3). Unscrew the bottom hinge pin and screw it into the
left hole (Fig. 4). Then screw the bottom hinge on the left hand
side of the refrigerator. Screw the levelling feet back into place.
Fig. 3
Fig. 4
Insert the
two middle
hingescrew
caps(big)
here.
28
Fig. 5
Page 13
63602089GB.fm Page 29 Wednesday, September 23, 2009 11:13 AM
4. Unscrew the pin located on the right (Fig. 6/Detail-A) and
screw it to the left (Fig. 6/Detail-B)
5. Replace the top bushing and top bushing cap (Fig. 7) (You can
use the new bushing cap supplied in the user's manual bag).
Remove the bottom bushing and transfer it to the left (Fig. 7)
6. Replace the top bushing and top bushing cap (Fig. 8).
Remove the bottom bushing and transfer it to the left (Fig. 8).
DETAIL-B
DETAIL-B
Fig. 6
Fig. 7
7. Turn the middle hinge 180º. Reassemble the refrigerator and
freezer doors together with the middle hinge (reverse step 2).
Fix the middle hinge in place by tightening the screws (Fig. 9).
FREEZER
DOOR
Turn the middle
hinge 180°
Fig. 8
Fig. 9
29
Page 14
63602089GB.fm Page 30 Wednesday, September 23, 2009 11:13 AM
ELECTRICAL CONNECTION
1) For Great Britain only
Warning - this appliance must be earthed
Fuse replacement
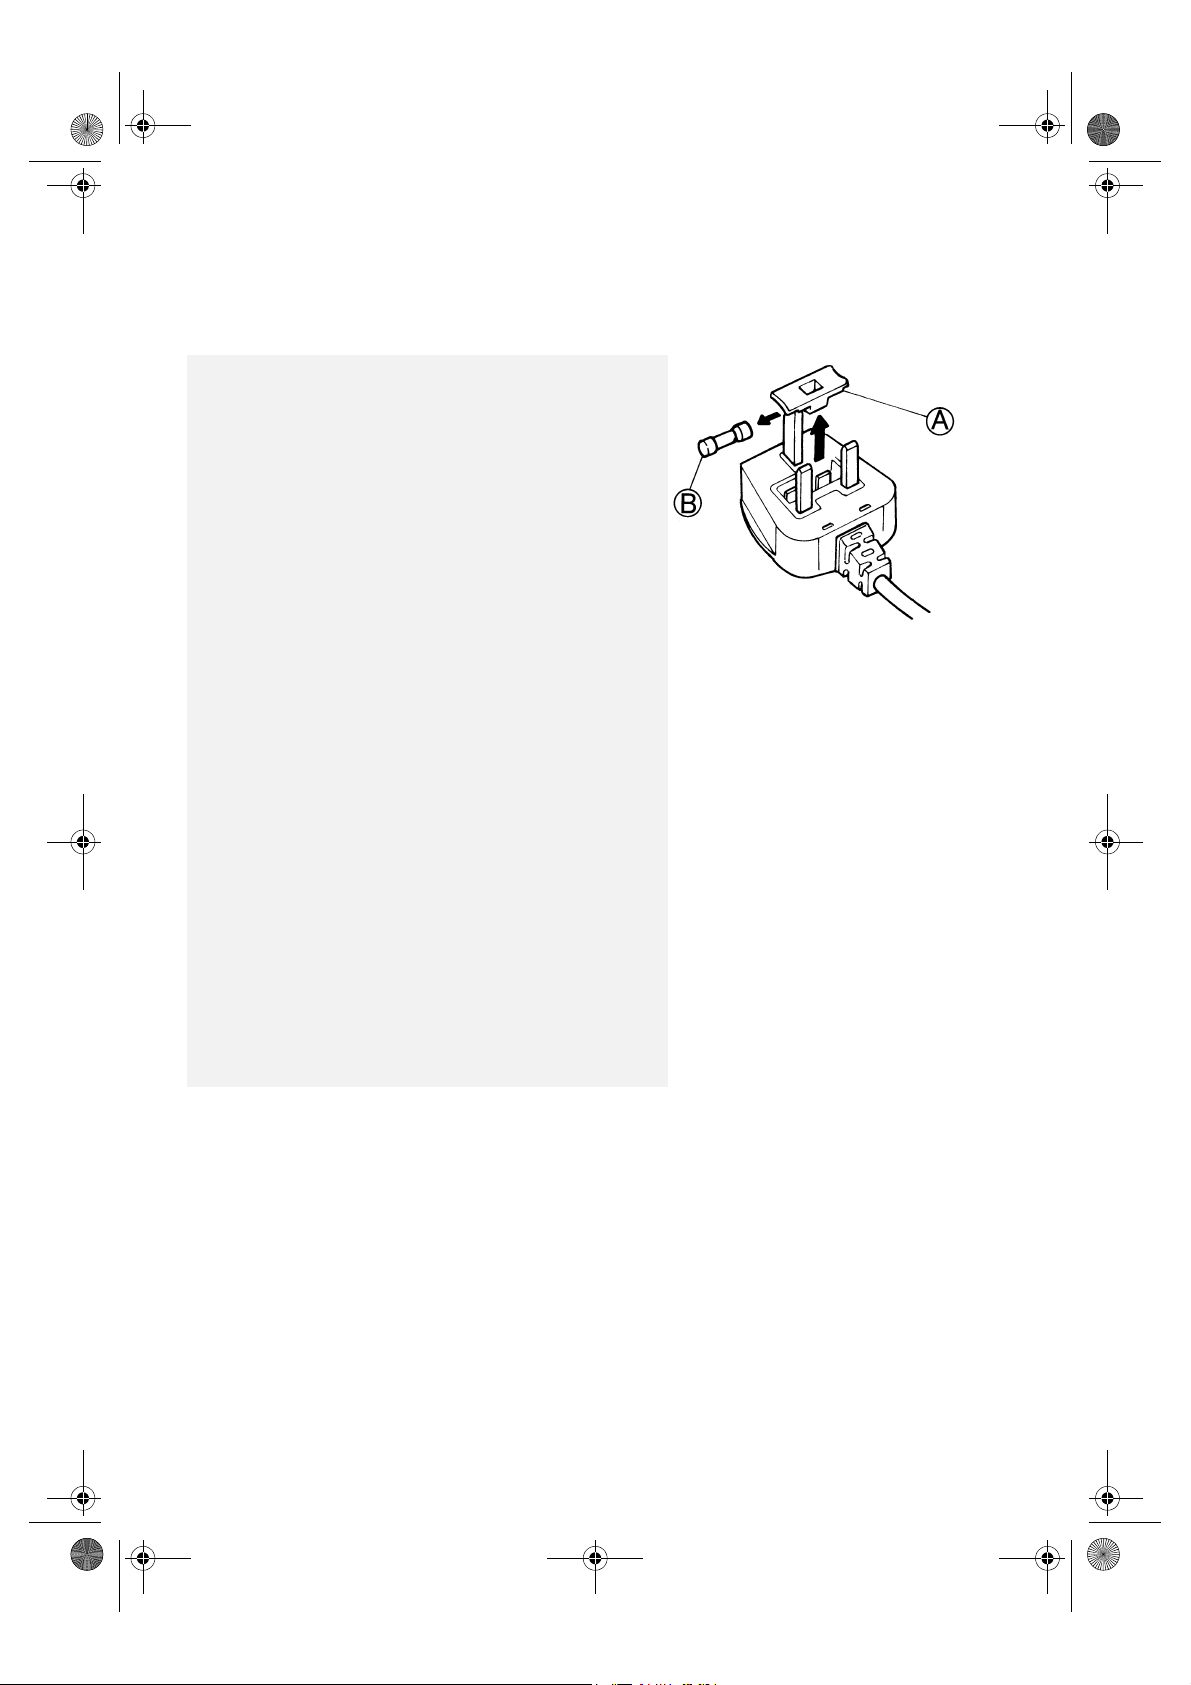
If the mains lead of this appliance is fitted with a BS 1363A
13amp fused plug, to change a fuse in this type of plug use an
A.S.T.A. approved fuse to BS 1362 type and proceed as follows:
1. Remove the fuse cover (A) and fuse (B).
2. Fit replacement 13A fuse into fuse cover.
3. Refit both into plug.
Important:
The fuse cover must be refitted when changing a fuse and if the
fuse cover is lost the plug must not be used until a correct
replacement is fitted.
Correct replacement are identified by the colour insert or the
colour embossed in words on the base of the plug.
Replacement fuse covers are available from your local electrical
store.
2) For the Republic of Ireland only
The information given in respect of Great Britain will frequently
apply, but a third type of plug and socket is also used, the
2-pin, side earth type.
3) Socket outlet / plug (valid for both countries)
If the fitted plug is not suitable for your socket outlet, please
contact Whirlpool Service for further instruction. Please do not
attempt to change plug yourself. This procedure needs to be
carried out by a qualified Whirlpool technician in compliance
with the manufactures instructions and current standard safety
regulations.
30
 Loading...