

Page 1

4
PRECAUTIONS FOR USE
Warning:
• Never operate the air conditioner with wet
hands.
• The rated voltage of this air conditioner is 220240V with a tolerance of ±22V for fluctuation.
The compressor will vibrate if the voltage is too
low, causing damage to the cooling system.
• If you notice anything unusual (e.g. burnt smell),
switch off the power supply immediately and
contact the Whirlpool Authorized Service
Centre nearest you.
If the abnormal condition continues, the air
conditioner could be damaged and could also
cause electrocution or fire.
• Grounding: The unit must be reliably grounded.
The grounding cable must be connected to the
special grounding system in the building.
If the building does not have a grounding
system, ask an expert electrician to install one.
Never connect the grounding cable to a gas
pipe, water pipe, sewage pipe or other unless
the professional considers it reliable.
• Set the room temperature appropriately. The
difference between indoor and outdoor
temperature should be 5°C.
Appropriate adjustment of the temperature
setting serves to reduce consumption.
• When the air conditioner is running, do not
leave doors and windows open in the room.
This will prevent loss of effectiveness of the air
conditioner.
• Never block the air inlet or outlet of indoor and
outdoor unit, as this will decrease the effect of
the air conditioner or cause it to shut down or
even catch fire.
• Spray cans, chemicals and gas tanks must be
placed at least 1m away from the indoor and
outdoor unit; they could cause fire or explosion
• Make sure to mount the outdoor unit on a
sturdy base. If the base is damaged and
unsteady, the unit could fall and cause injury.
• Do not stand or place anything on the outdoor
unit. Persons or objects falling from the unit
could cause injuries.
• Do not repair the air conditioner yourself.
Incorrect repairs could cause electrocution or
fire. Contact the Whirlpool Authorized Service
Centre nearest you for repairs.
• Never reach with your finger or a stick into the
indoor or outdoor unit.
• Never blow the air directly at pets or plants, as
this may harm them.
• Never spray water onto the unit or wash the air
conditioner with water.
• Never let the air conditioner blow on a heat
source. This could put the flame out and cause
carbon monoxide poisoning.
• To avoid any harm to your health, do not blow
the cold air on your body too long or lower the
room temperature too much.
• This air conditioner cannot be used for drying
clothes or chilling foods.
• Do not spray any paint or pesticide on the unit,
or it may cause fire.
Warning:
• Persistent abnormality indicates that the air
conditioner may be damaged with the
consequent risk of electric shock or fire. This
may cause an electric shock.
• To prevent fire always use a special power
supply circuit.
• Disconnect the air conditioner from the power
supply if it is to be left unused for a long period.
• For 18-23K, 230V, with a tolerable fluctuation of
±23V. The compressor is subject to strong
vibrations under very low voltages which can
damage the refrigerating system. Electrical
elements are easily damaged by high voltage.
• Ensure that the power supply is suitably
protected by a special circuit with air breaker.
The air conditioner automatically starts or stops
according to requirements. Do not switch the
air conditioner on and off too often as this can
damage the appliance. This may cause an
electric shock or injury.
• Do not cut or damage the external cable. Any
damaged external cable must be replaced by
qualified electricians.
Page 2

5
DESCRIPTION OF AIR CONDITIONER
INDOOR UNIT
OUTDOOR UNIT
Drain Pipe
To drain water
produced while
the unit is
functioning
Refrigerant Tube
Air Inlet
Air Outlet
Indicator light state
1. POWER indicator light: on/off with system running / stop
and flash when system in protection state.
2. COOL indicator light: on/off with the operation of cool
ON/OFF.
3. HEAT indicator light: on/off with the operation of heat
ON/OFF.
CAUTION:
Wrong wiring connection will cause electrical malfunction.
Do not pull the wire when fixing it wire clamp.
Do not let the wire too loose in the outdoor unit.
Wiring terminal
Power connection cord
Power supply cord
Sign connection cord
Working temperature range
NOTE
1. If the supply cord is damaged, it must be replaced by the manufacturer or its service agent or a similarly
qualified person in order to avoid hazard.
2. The appliance shall be installed in accordance with national wiring regulations.
3. An all-pole disconnection switch having a contact separation of at least 3mm in all poles should be connected in fixed wiring.
Indoor side DB/WB (°C) Outdoor side DB/WB (°C)
Maximum cooling 32/23 48/30
Minimum cooling 21/15 18/-
Maximum heating 27/- 24/18
Minimum heating 20/- -7/-8
Page 3
6
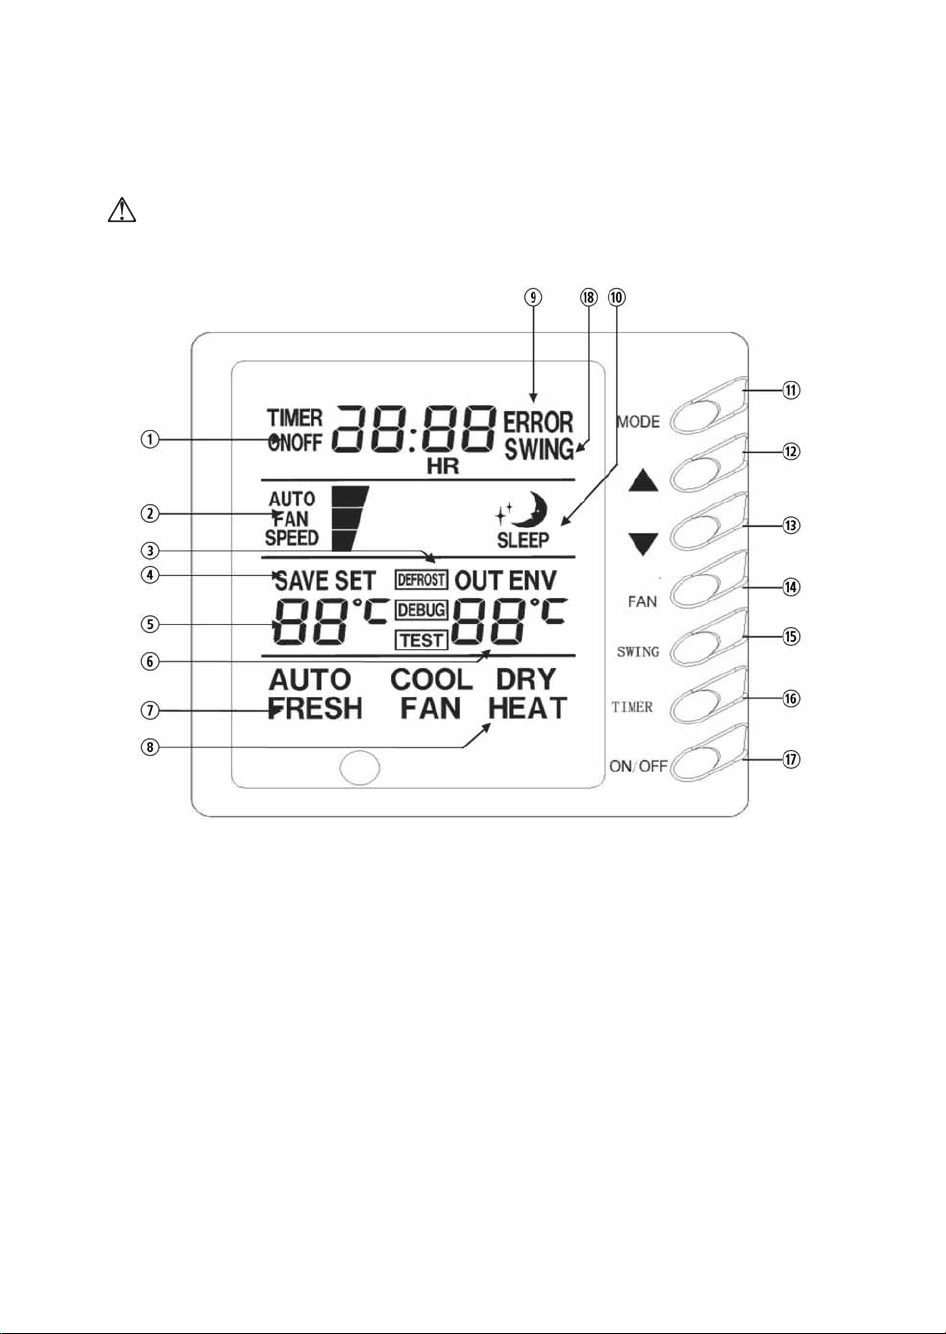
WIRE CONTROLLER (standard fitting)
WARNING!
Never install the wire controller in a place where there is water leakage.
Avoid bumping, throwing, tossing or frequently opening the wire controller.
Each part of the manual controller
1. Timer display
2. Fan speed display (Auto, High, Middle, Low)
3. Defrosting display
4. Saving state display
5. Set temp. display
6. Ambient temp. display
7. Fresh air display
8. Mode (COOL, DRY, FAN, HEAT, AUTO)
9. Malfunction display
10. Sleep display
11. MODE button
12. Button for temperature increase
13. Button for temperature decrease
14. FAN button
15. SWING button
16. TIME button
17. ON/OFF button
18. Display of Swing state
Fig. 1
Page 4
7
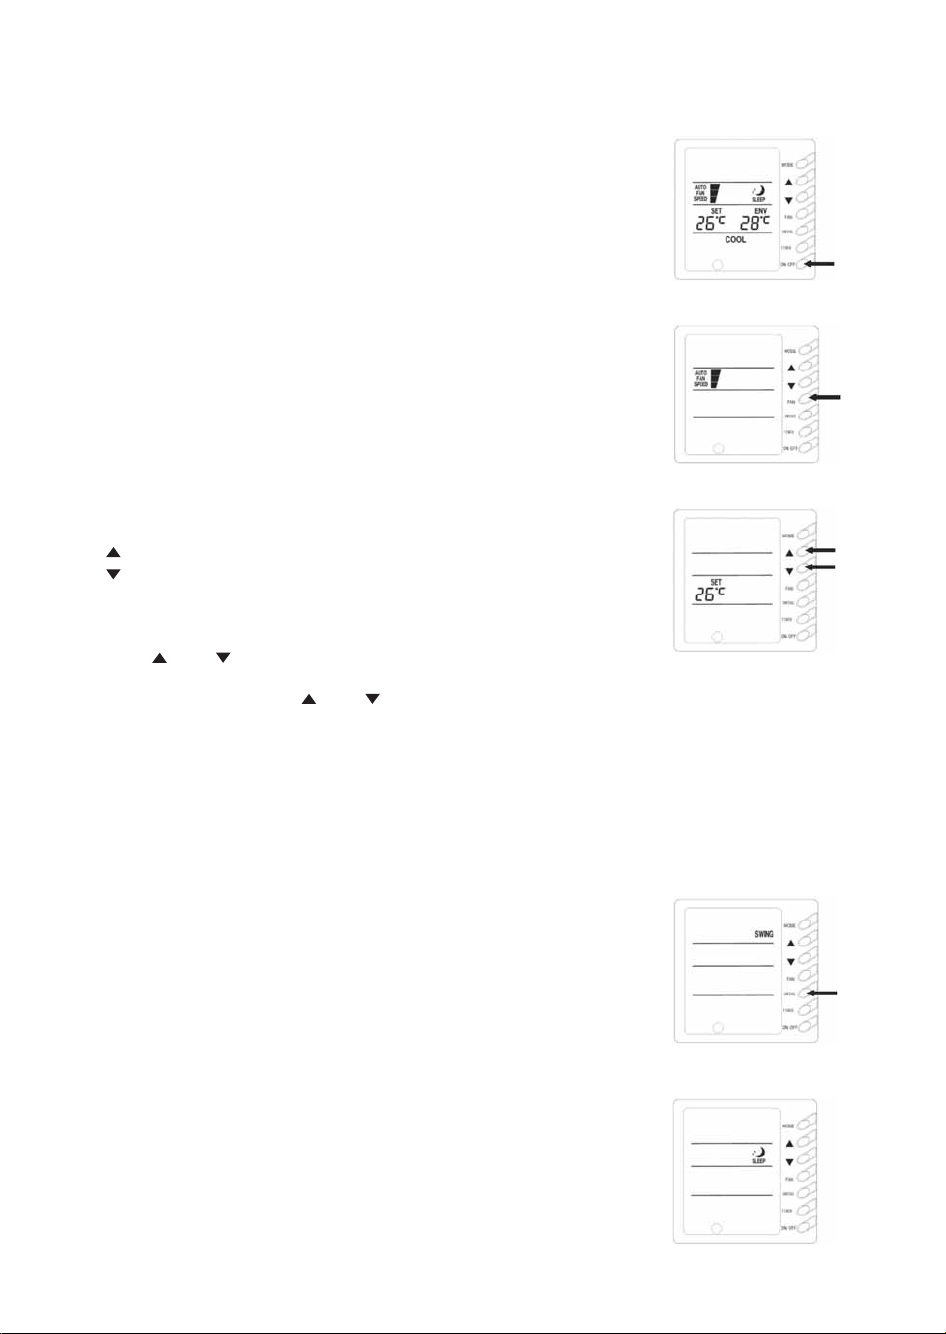
1) ON/OFF (Fig.2)
• Press this button the unit will start.
• When repress the button, the unit will stop running.
2) Fan control (Fig. 3) (The relevant contents are shown in the figure.)
• Press this button to change the fan speed of:
• At the DRY mode: the fan speed will be set for low fan speed automatically.
3) Temperature adjustment (Fig.4)
• Press the temperature adjustment button
: For temperature increase;
: For temperature decrease.
(Press this button once, the temperature will be increased or decreased by 1°C)
NOTE: Lock function:
Press " " and " " at the same time for 5 seconds, the set temperature
indicating area shall display "EE" and all keys' response shall be shut off, all buttons
will sound; and repress the " " and " " simultaneously for 5 seconds, the lock function will be released.
When the displayer of long-distance monitoring or central controller has been shielded, the buttons and
remote control signal will be shielded too, the setting temperature will display "CC".
• The set temperature range under each mode:
HEAT 16°C ~ 30°C
COOL 16°C ~ 30°C
DRY 16°C ~ 30°C
FAN The temp. cannot be set up
AUTO The temp. cannot be set up
4) Swing mode set up (Fig.5)
• when pressing "SWING" button, the type style "SWING" will be displayed on
LCD, the unit will run in Swing mode
• when repressing the "SWING" button, that the type style "SWING" will be
disappeared, and the unit will stop running in Swing mode.
Note: The SLEEP function could be set up by wireless remote control.
5) Sleep mode set up (Fig. 6)
When under the cooling or dehumidifying mode, after receiving the SLEEP order
for 1 hour, the previous set temperature Tset will be risen for 1°C, and another
1°C will be risen after 2 hours that means that the temperature been risen 2°C
within 2 hours. Then the unit will run according to this set temperature.
When under the heating mode, after receiving the SLEEP order for 1 hour, the
previous set temperature Tset will be lower for 1°C, and another 1°C will be
lower after 2 hours that means that the temperature been lowered 2°C within 2
Fig. 2
Fig. 3
Fig. 4
Fig. 5
Fig. 6
Page 5
8
hours. Then the unit will run according to this set temperature
There is no SLEEP mode under fan mode.
Note: the wired remote control has no SLEEP mode button; if SLEEP mode is needed to be set,
complete the procedure by wireless remote control.
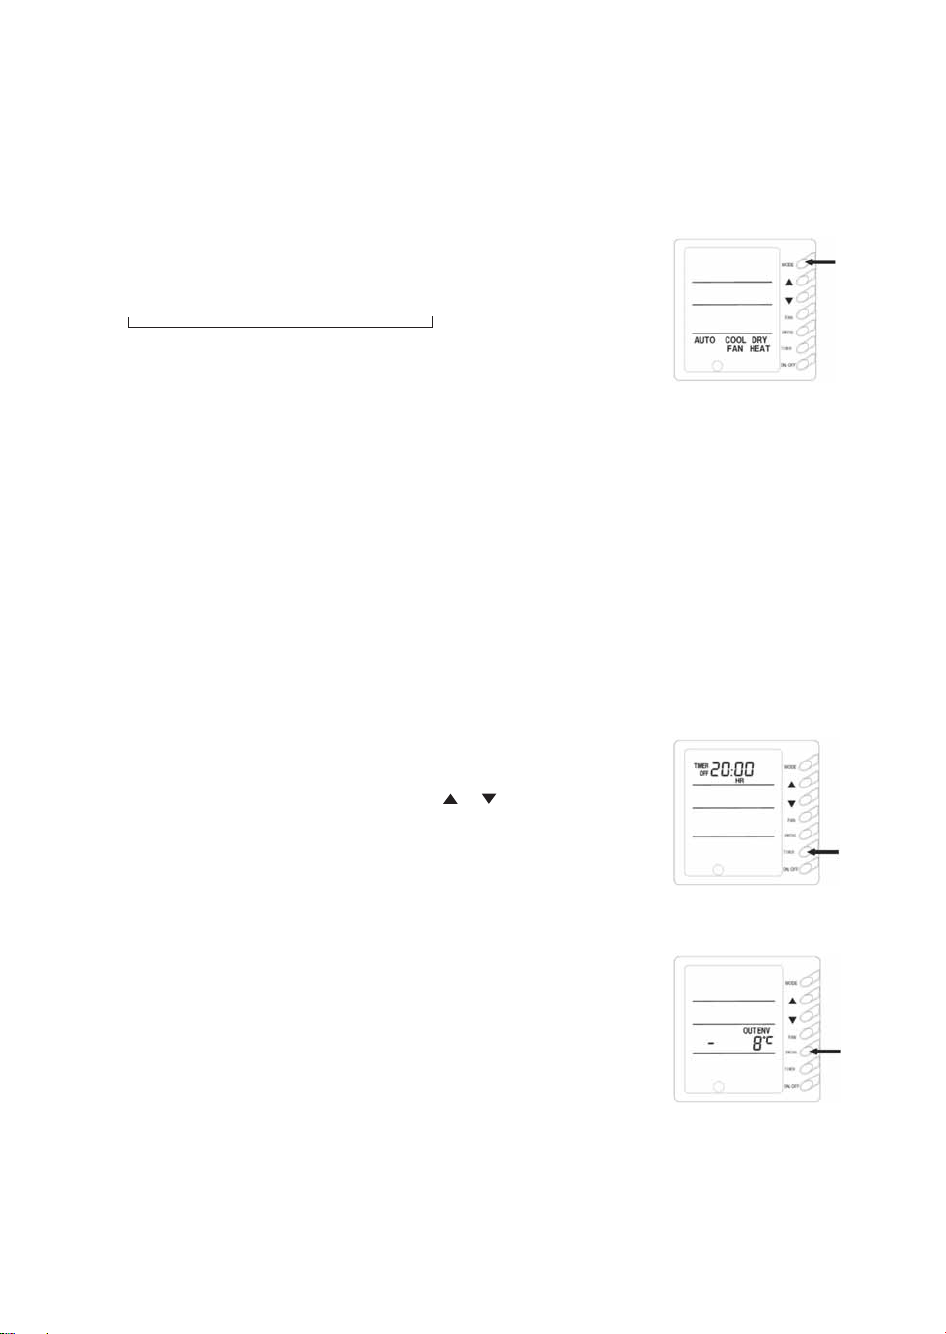
6) Running mode setup (Fig. 7)
• When pressing this button once, the operation mode will be changed as
follow:
→ COOL → DRY → FAN → HEAT → AUTO
• At "COOL" mode, the "COOL" icon will light on, the current temperature
should be set up lower than the ambient temperature. If the setting
temperature is higher than the ambient temperature, the COOL mode will not
start, only the fan is active.
• In "DRY" mode, the "DRY" icon will light up. The inner fan will run at low fan speed in a certain range.
This DRY efficiency in this mode is more obvious than the one in COOL mode, and the power saving
efficiency is better.
• In "HEAT" mode, the "HEAT" icon will light up. The setting temperature should be set up higher than
the present temperature; if it is lower than the present ambient temperature, the HEAT mode is
unavailable.
• In "FAN" mode, the "FAN" icon will light up.
• In "AUTO" mode, the " AUTO" icon will light up, according to the ambient temperature, the unit will
automatically adjust the running mode.
• In "HEAT" mode, when the outdoor temperature is low and there is high humidity, and there is frost on
the outdoor unit, the heating efficiency will be reduced. In this case, the product will start defrosting
automatically, and displays the "DEFROST" icon.
NOTE: There is no HEAT mode in the cooling only unit, after the power saving set up, the auto mode
will be shielded.
7) TIMER setup (Fig. 8)
At unit turned off, the timer on could be set up, at unit turned on, the timer off
could be set up. After pressed the "TIMER" button, the unit could be set up, and
the TIMER icon flashes, by pressing the buttons " ", " " could increase or
decrease the time of timer, when repress the "TIMER" button, the Timer is valid,
the units will start calculate the time. When the unit is in the TIMER, press the
"TIMER" button could cancel the time.
NOTE: When the protection or malfunction happens after the timer on
was set up, the time place will display the protection or the error codes,
the timer button cannot be setup, but the time you have setup before is still available.
8) Outer ambient temperature display (Fig. 9)
Under normal condition, "ENV" will display the room ambient temperature, at
unit turned on, or unit turned off status, press "SWING" button last for 5 seconds,
the LCD will display "OUT ENV".
A) If tested the outdoor temperature is the positive value, that the setting
temperature will not be displayed, the original environment temperature
displayer displays the Fig 8 system internal tested outdoor environment
temperature.
B) If tested the outdoor temperature is the negative value, the original
environment temperature displays the system inner tested the absolute value of the out environment.
After displayed the outdoor environment temperature 10 seconds later, the system will back to the
room ambient temperature displaying surface.
NOTE: If the unit has been unconnected with the outdoor ambient sensor, this function will be
unavailable.
Fig.7
Fig. 8
Fig. 9
Page 6
9
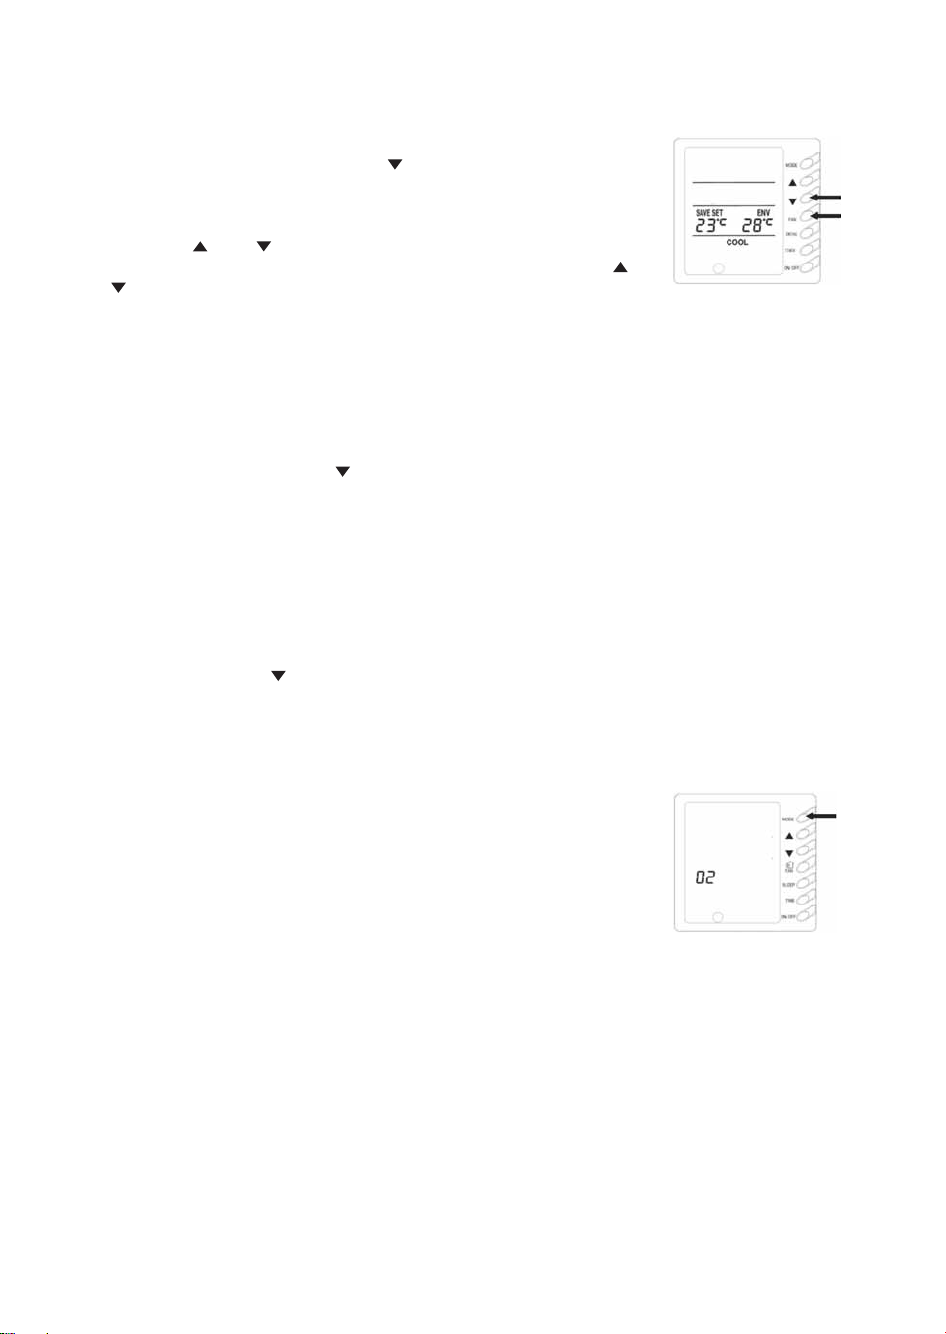
9) SAVE set up (Fig. 10)
At unit turned off, to press the "FAN" +" " buttons continuously for 5 seconds,
adjust the Saver set menu, at this time displays "SAVE" "COOL" icons, (if it is the
first setup, that will display the initial value:26 °C), at the temperature setting
district, it displays the lower limit temperature,and the set temperature flashes,
by pressing " " and " " buttons to set the cooling temperature lower limit (the
setting range is 16~30), press "ON/OFF" button to confirm; by pressing " " and
" " buttons to set cooling temperature upper limit, it will flash and display at
ambient temperature, (the setting range is 16-30), and press "ON/OFF" button to
confirm.
NOTE: The upper limit temperature should not be lower than the setting lower limit temperature. If
upper limit temperature is lower than the lower limit temperature, the system will default. The higher is
the upper limit temperature, the lower is the lower limit temperature. Press "MODE" button, to complete
the save setting in COOL, DRY mode, and transfer to the save setting in HEAT mode (There is no the
function in cooling only unit), at this time, it displays the "SAVE", "HEAT" icons, after setup has been
completed, then press "FAN" + " " button last for 5 seconds, and quit the SAVE setting operation. If the
SAVE interface has been opened, the system will respond to the last button input after 20 seconds, there
is no any operation, the system will quit the menu, and displays the normal unit off interface.
The above setting has been completed, the system will display "SAVE" icon, no matter by buttons on
displayer or the wireless remote control, the setting temperature should not exceed the former SAVE
setup temperature range, for example as show in Fig. 9, we set up the cooling lower limit is 23 °C in SAVE
setting, the upper limit is 27 °C , the user can set the cooling temperature between 23 °C to 27 °C by the
wireless remote control and buttons on displayer.
If the set up upper limit temperature is the same with the lower limit temperature that the system only
can run at the corresponding modes at the set temperature. After the SAVE mode set up, at unit turned
off, press the "FAN" + " " buttons for 5 seconds, will quit the SAVE setting function, but the former
setting data will not clear, and the next time SAVE setting will be the initial setting temperature.
After powered off, the SAVE setup function will be memorized, the next time power on, the SAVE setting
is still active.
Set up the SAVE mode, the SLEEP, AUTO modes will shield.
10) MEMORY function setup (Fig. 11)
At unit turned off, press "MODE" button for 10 seconds, could switch whether
turn on or off the unit state after powered off, at setting temperature district
displays 01, denote that the unit is turned off after powered off, 02 denote that
do not memorize the unit turn on or turn off, press "ON/OFF" button quit
setting. If the memory turn on and off interface is displayed, the system will quit
the menu, the system will respond to the last button input after 10 seconds, there
is not any operation, the system will quit the menu, and displays the normal unit
off interface, the memory function setting still have been stored.
Fig. 10
Fig. 11
Page 7
10
11) Malfunction display (Fig.12)
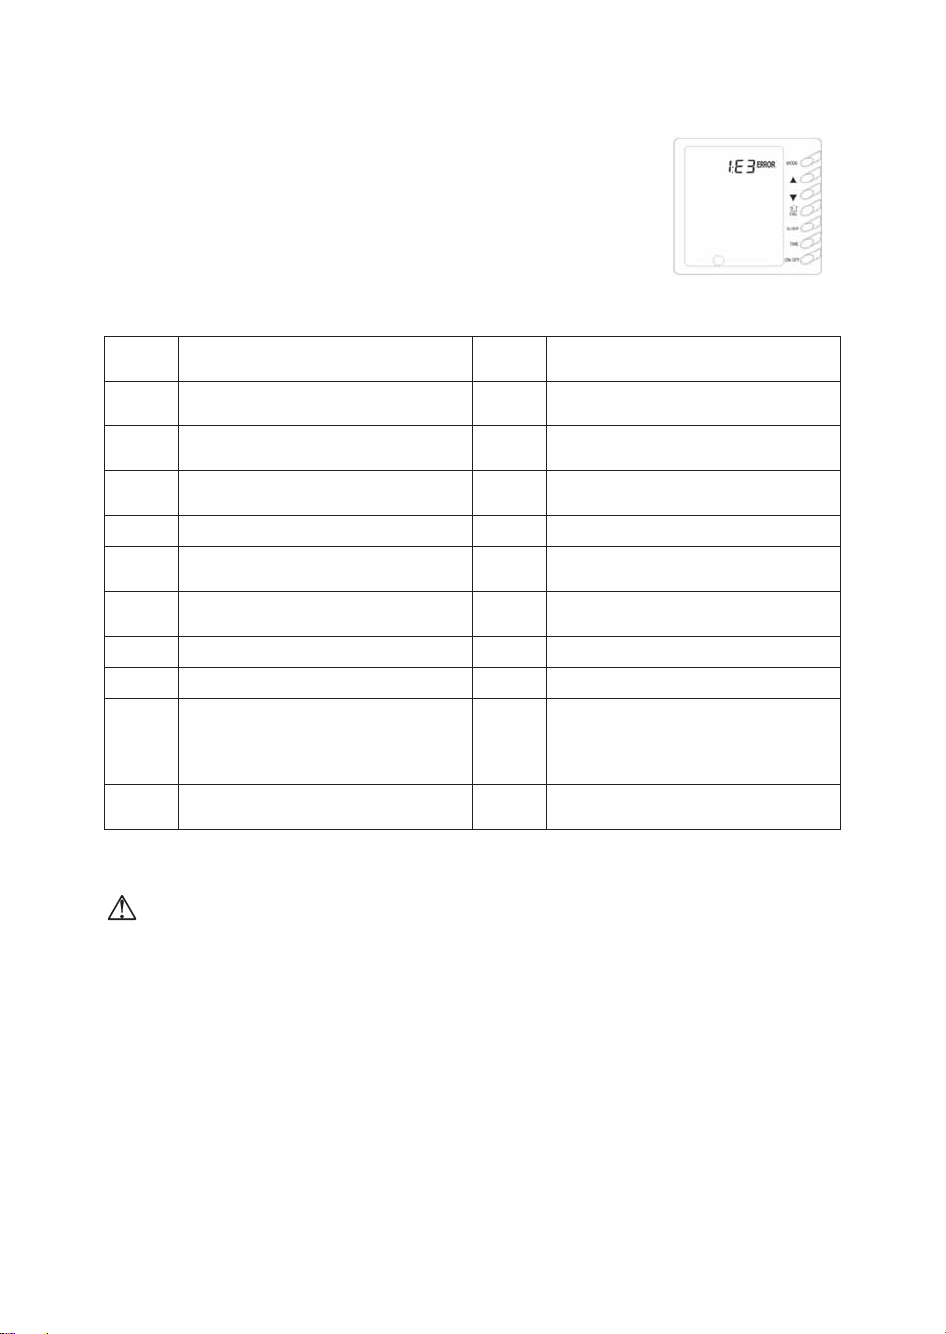
When the malfunction happened during operation, the displayer will display
"ERROR" icon and flash, and meanwhile will display the error code, when there
are multi-malfunction happened, the displayer will display the error codes
circularly. The first number denotes the system number, if there is only one
system in the display, it will not display the system number, the following two are
error codes. For example as show in right figure, that denotes the system 1, lowpressure protection of compressor.
The meaning of error codes as show in below:
E5 Material Malfunction will be showed by the indicator light on the Mother Board of Outside Unit.
NOTE When the "EH" malfunction happened, please cut off the power supply of unit
immediately, and please ask for the professional to repair!
Fig. 12
Fault
code
Fault
Fault
code
Fault
E0 Water pump malfunction F0
Failure of Indoor Room Sensor at Air
Intake
E1 High pressure protection of compressor F1
Failure of Evaporator Temperature
Sensor
E2 Indoor anti-frozen protection F2
Failure of Condenser Temperature
Sensor
E3 Low pressure protection of compressor F3 Failure of Outdoor Ambient Sensor
E4
Air discharge high-temperature
protection of compressor
F4 Failure of Exhaust Temperature Sensor
E5 Overload protection of compressor F5
Failure of Indoor Room Sensor at Wire
Controller
E6 Transmit malfunction
E8 Indoor fan protection EE Keys are locked (not failure)
E9 Water flow protection CC
The unit is remotely monitored or
controlled by centralized controller and
the wire controller's
functions are invalidated (not failure)
FF
Connected control communications
Failure
Page 8
• Week Timing Controller (With Centralized Control Function)
Centralized Control and Week Timer Functions: The centralized controller and the weekly timer are
integrated in the same wire controller. The system has both the centralized control and the week timing
functions. Up to 16 sets of units can be controlled simultaneously by the centralized controller (weekly
timer). The weekly timer has the function of invalidating the lower unit. The weekly timing function is able
to realized four timing ON/OFF periods for any unit every day, so as to achieve fully automatic operation.
No timing control can be set for holidays.
This WEEKLY TIMER adopts 485 mode to communicate with manual control of every duct type unit, and
it can control up to 16 units. Adopting 2-core twisted-pair wire, the longest communication distance of
this TIMER is 1200m. After connected to power, the WEEKLY TIMER can display all connected units
(sequence of unit is determined by code switch of manual control of every duct type unit). On and off of
every duct type unit can be done through the Timer On / Off of this WEEKLY TIMER, and the button
shield operation of manual control can be done through shield setting on WEEKLY TIMER. Mode selection
and temperature adjustment and other operations are done through the manual control at every unit.
Note:
1. For upper unit checks 16 lower units consecutively, there will be no more than 16 seconds
delay when setting works till unit responds.
2. Please let us know your requirement before your placing the order, for this WEEKLY TIMER
will only be prepared when customer orders (communication joint with WEEKLY TIMER on
manual control had been prepared).
11
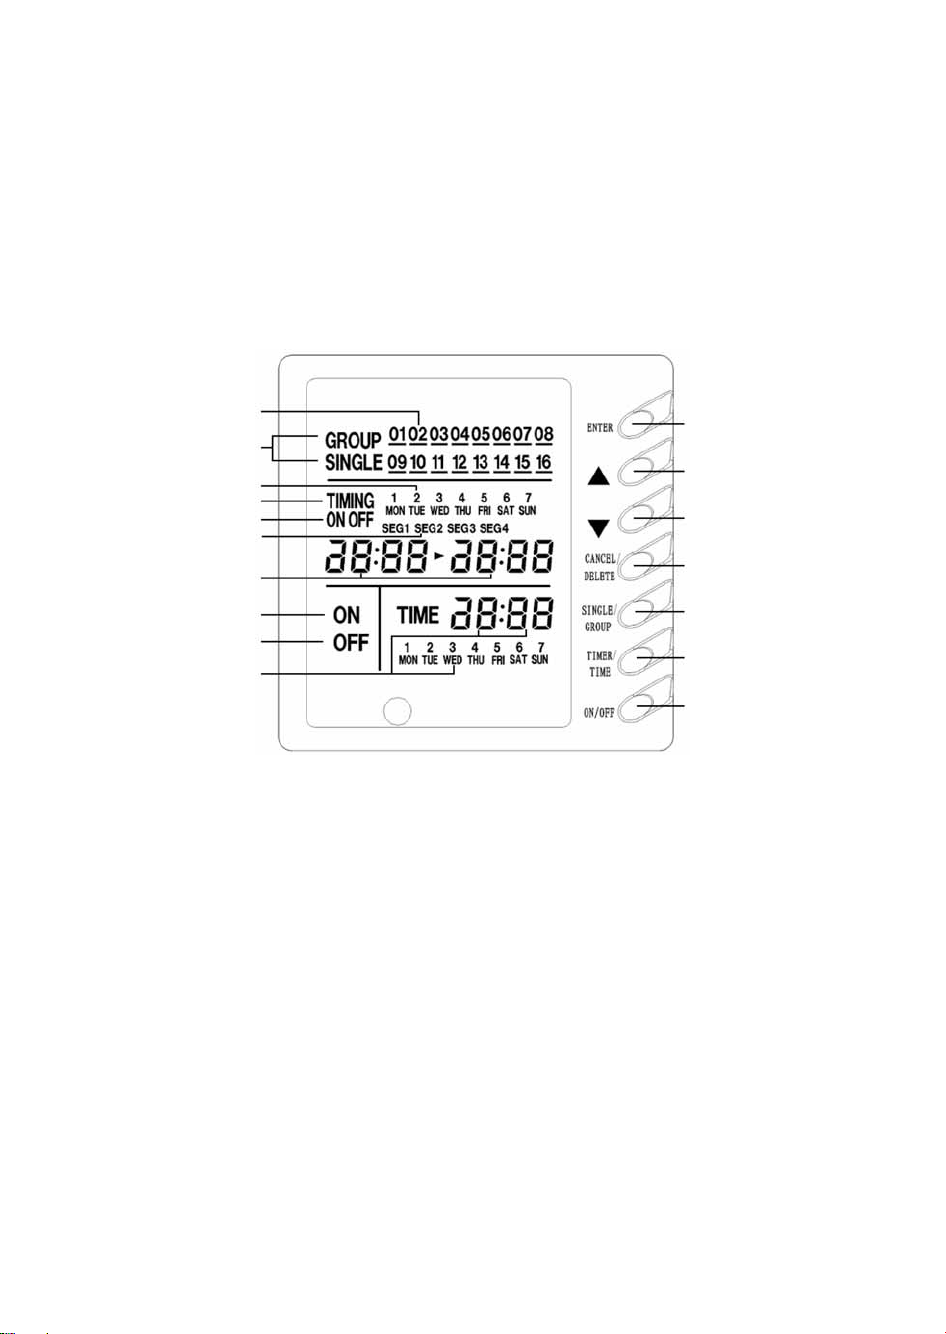
WEEKLY TIMER (optional fitting)
Unit display
Single / Group display
Timer week display
Timer display
Timer state display
Timer time period display
Timer on/off time display
Unit on display
Unit off display
Clock display
Confirm button
Decrease button
Increase button
Cancel/delete button
Single/Group button
Timer/Time button
On/Off button
Fig. 1
Page 9
12
1. Press or to select the unit that needed to be control. It is available to control several units by
Group Control (1~16), or control single unit by Single Control.
2. When selected a certain or several units by Single Control or Group Control, Timer setting and On/off
setting can be set. Timer setting can set 4 on/off times in a day in one week; and on/off setting can be
done by pressing on/off button.
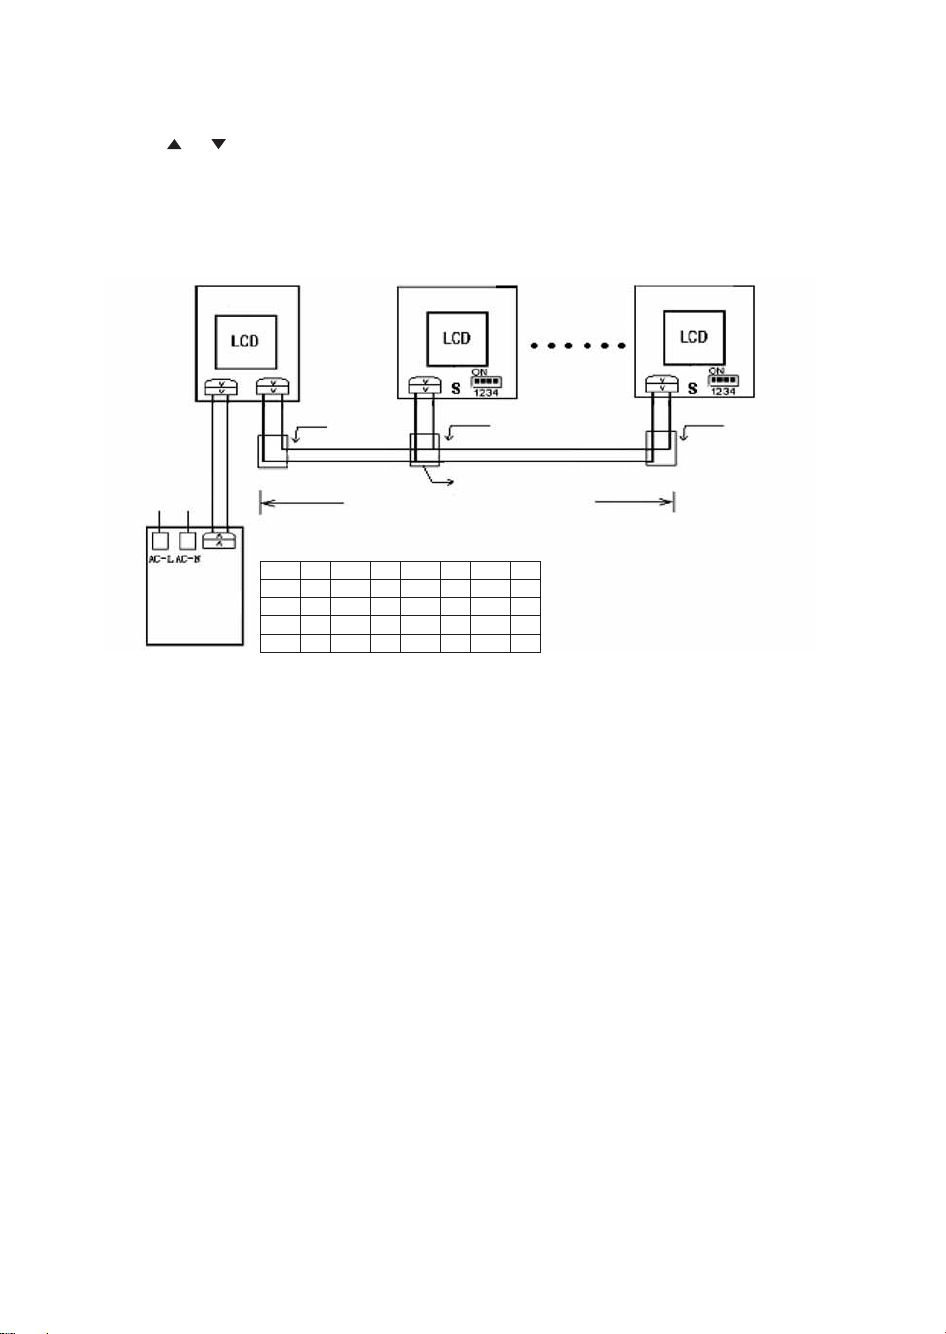
3. Connection between WEEKLY TIMER and manual control is shown as following:
Week Timer
Manual control Manual control
16 units in max
Telephone
wire box
Telephone
wire box
Telephone
wire box
Twisted-wire with crystal joint
Longest distance 1200 m
Corresponding relation between code switch and sequence of unit
(Note: Putting code switch to ON means 0)
P = Position
S = Sequence
Power Supply
~ 220V
On/Off power
P S P S P S P S
0000 1 0010 5 0001 9 0011 13
1000 2 1010 6 1001 10 1011 14
0100 3 0110 7 0101 11 0111 15
1100 4 1110 8 1101 12 1111 16
Page 10
13
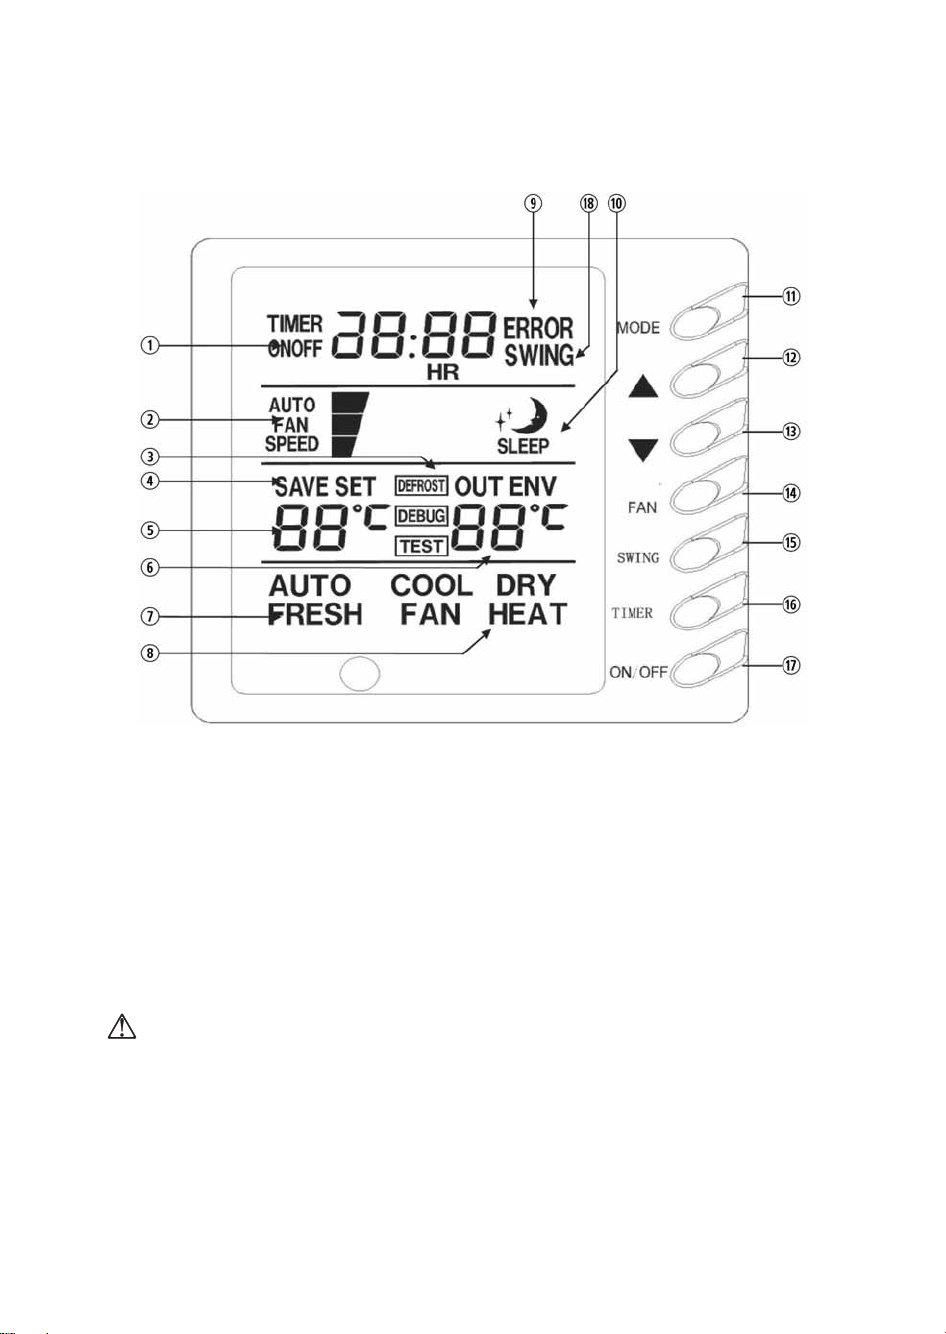
WIRE CONTROLLER
(with week timer functions)
1. Failure status displayTiming display
2. Fan speed display (Auto, High speed, Medium
speed, Low speed)
3. Defrosting status display
4. Energy saving status display
5. Set temperature display
6. Ambient temperature display
7. Fresh air status display (not supplied)
8. Mode (cooling, dehumidifying, fan, heating,
auto)
9. Failure status display
10. Sleep status display
11. Mode key
12. Set temperature increase key
13. Set temperature decrease key
14. Fan speed key (fresh air setting)
15. Sleep key (outdoor environment temperature
check)
16. Timing key
17. ON/OFF key
18. Timer day display
19. Timer segment display
Fig. 1
• Never install the wire controller in a place where is water leakage.
• Avoid bumping, throwing, tossing or frequently opening the wire controller.
Page 11
14
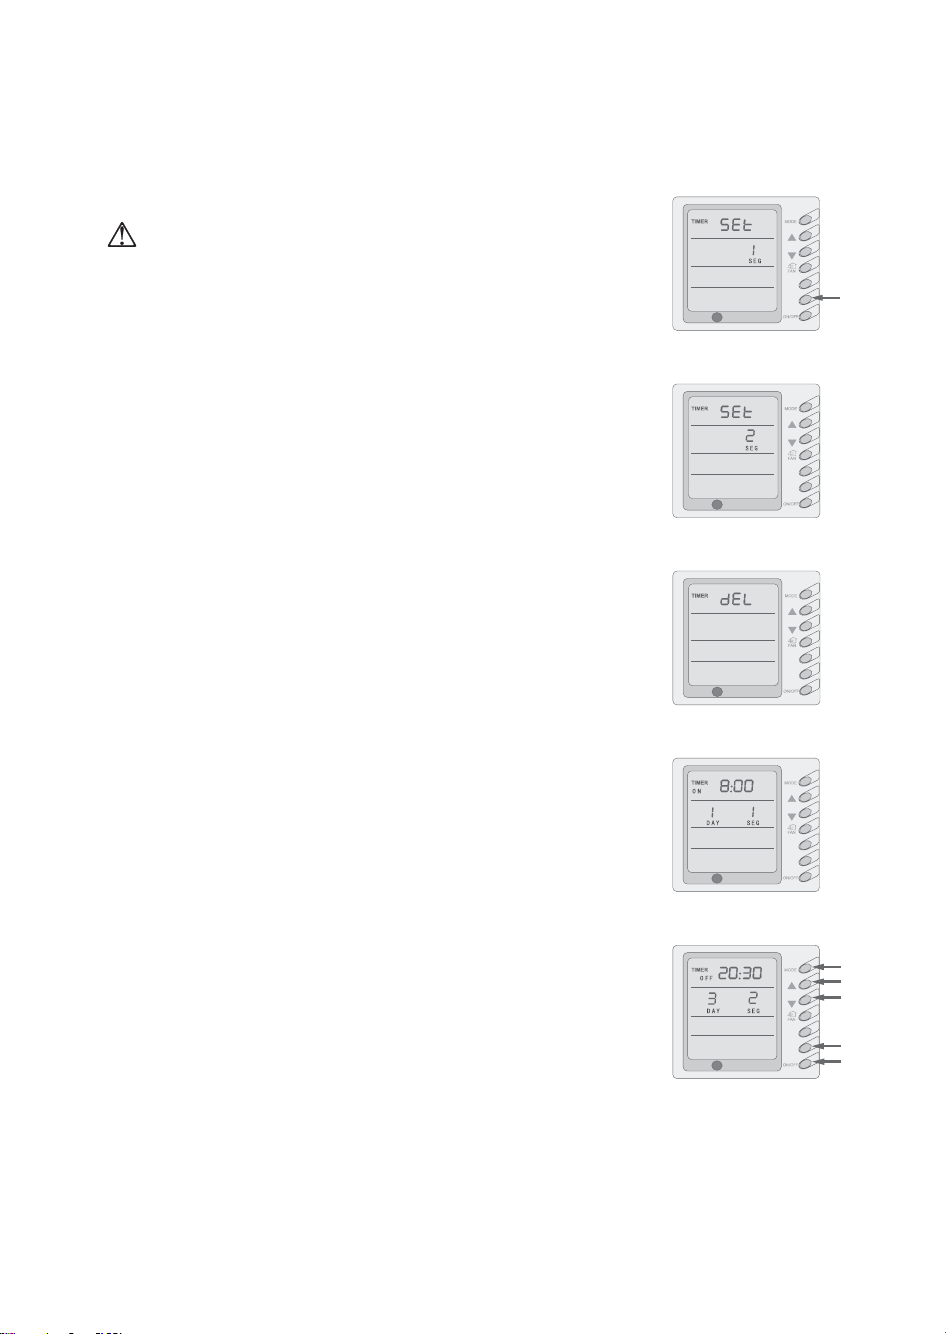
• Wire controller with week timer function, No.1-No17 is the same as front instructions of No18,
No.19:
Timer setting (Fig. 15, 16, 17)
The timer function of this display board is invalid when connect with the
timer of the last week, the display board will be controlled by the week timer.
No matter the unit is turned on or turned off, press "TIMER" button enter into
Timer setting, then use the "▲" or "▼"buttons to select the time (As shown In
Fig.15), the setting time (Fig.16) or cancel setting (Fig.17).
Then press "Timer" Button to enter into each item setting.
• If enter into timer setting, by pressing "Mode" button to select the setting item:
Day (Monday to Sunday), Segment (1-4), Timer (timer on or timer off), the
Minutes and Hours of the time; By pressing "▲" or "▼" buttons to adjust the
setting, then press the Timer button to confirm, and press the Timer button
once more to cancel the setting; After the setting confirmed, the character on
displayer will not blink, it can not be setup; When cancel the confirmation,
there are figure blink, it can be set up, finally press the "ON/OFF" button
complete the setting and quit, the timer data will be save. (Fig.18, 19).
Fig. 15
Fig. 16
Fig. 17
Fig. 18
Fig. 19
SWING
TIMER
SWING
TIMER
SWING
TIMER
SWING
TIMER
SWING
TIMER
Page 12
15
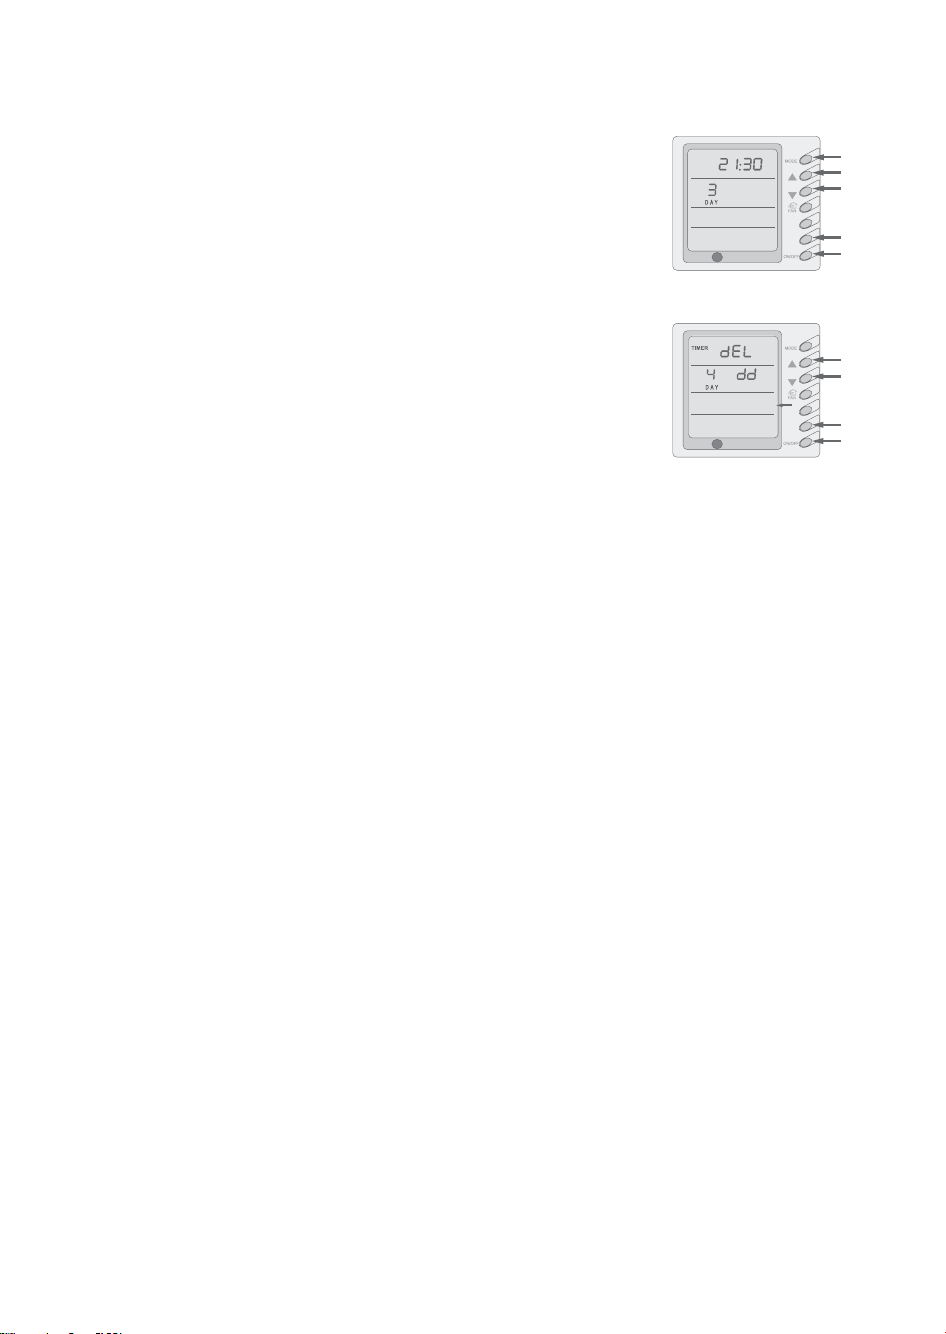
• If entered into "Timer setting" by pressing the "Mode" button to select the
setting item: Day (Monday to Sunday), Hours (0~23) or Minutes (0~59); By
pressing "▲" or "▼" buttons to adjust the setting items, then press "Timer"
button to confirm, or press the "Timer" button once more to cancel the
setting; After the setting confirmed, the character on displayer will not blink, it
can not be setup; When cancel the confirmation, there are figure blink, it can
be set up, finally press the "ON/OFF" button complete the setting and quit, the
timer data will be save. (Fig. 20).
• If enter into "Cancel Timer", by pressing "▲" or "▼" buttons to select Week,
then press the "Timer" button to confirm, at this time, "dd" will display; or
press "Timer" button to cancel the selected day, at this time "dd" will not
display. At last press "ON/OFF" button complete setting and quit. (Fig.21).
Fig. 20
Fig. 21
SWING
TIMER
SWING
TIMER
Page 13
16
HOW TO USE THE REMOTE CONTROL
Operating Guideline - General Procedures
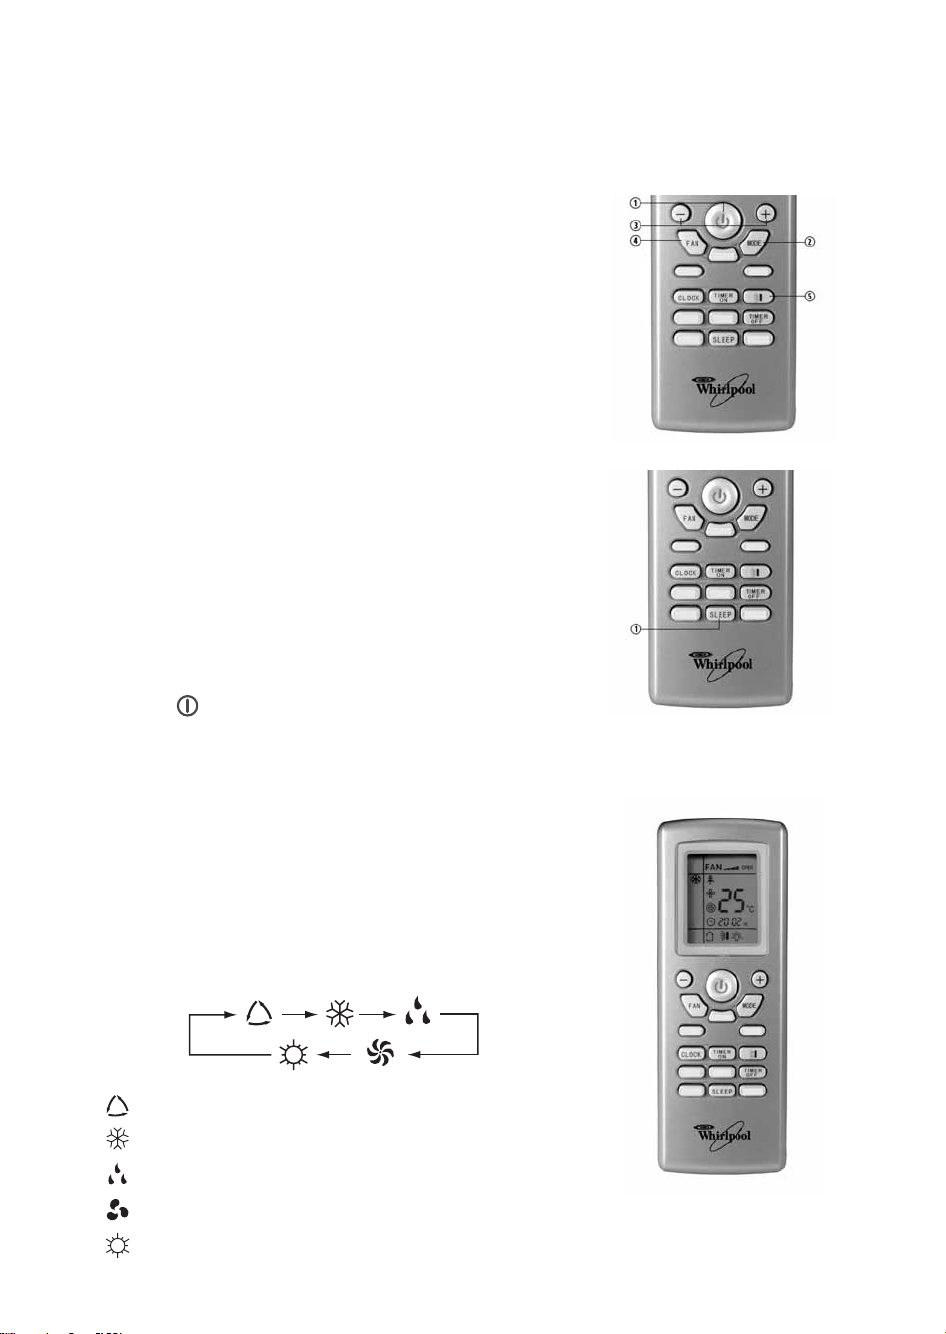
1. After the main unit is connected to power, press the ON/OFF key
on the remote control to start the air conditioner.
(Note: The guide louver on main unit will be closed automatically
when the air conditioner is switched off).
2. Press MODE button, select desired running mode, or press COOL
or HEAT mode to enter into the corresponding operation directly.
3. Press the UP or DOWN key to set the desired temperature.
4. Press the FAN SPEED key to set the fan speed. AUTO, LOW,
MEDIUM or HIGH.
5. Press the SWING key to select the swing mode.
Operating Guideline - Optional Procedures
1. Press the SLEEP key to set the sleep mode.
Description and Function of Remote Control Keys
Note: Be sure to point the remote control towards the signal receiver.
Check that there is no obstacle between the remote control and signal
receiver. Do not drop or throw the remote control. Do not drop any
liquid onto the remote control, or expose it to direct sunlight or
extremely hot temperatures.
This remote control is for general use and is applicable to multiple
types (functions) of air conditioner. Please note that if a key is not
applicable to this air conditioner it will not be described here.
ON/OFF
ON/OFF Key
Press this key once to start the unit, press twice to stop it.
Only the clock TIMER icon (if activated) is displayed when the unit is
not running.
MODE
MODE Key
Press this button, Auto, Cool, Dry, Fan, Heat mode can be selected
circularly.
Auto mode is default while power on.
Under Auto mode,the temperature will not be displayed; Under Heat
mode, the initial value is 28 °C (82 °F); Under other modes, the initial
value is 25 °C (77 °F).
AUTO mode
COOL mode
DRY mode
FAN mode
HEAT mode (Only for cooling and heating unit.)
Signal Emission Head
Remote Control
Page 14
17
About AUTO mode
When AUTO mode is selected, the setting temperature will not be
displayed on the LCD, the unit will be in accordance with the room
temperature automatically to select the suitable running method and to
make ambient comfortable.
+ key
This key is used for increasing preset temperature. When pressing this
button temperature can be increased. When pressing and holding this
button down for more than 2 seconds the content will change rapidly.
When desired temperature is displayed simply release the button. C° is
always shown on the display. Temperature setting range: 16-30 C°.
In Auto mode the temperature cannot be set, but when pushing this
button the signal is sent to the indoor unit.
- key
This key is used for lowering preset temperature. When pressing this
button temperature can be decreased. When pressing and holding this
button down for more than 2 seconds the content will change rapidly.
When desired temperature is displayed simply release the button. C° is
always shown on the display. Temperature setting range: 16-30 C°.
In Auto mode the temperature cannot be set, but when pushing this button the signal is sent to the indoor
unit.
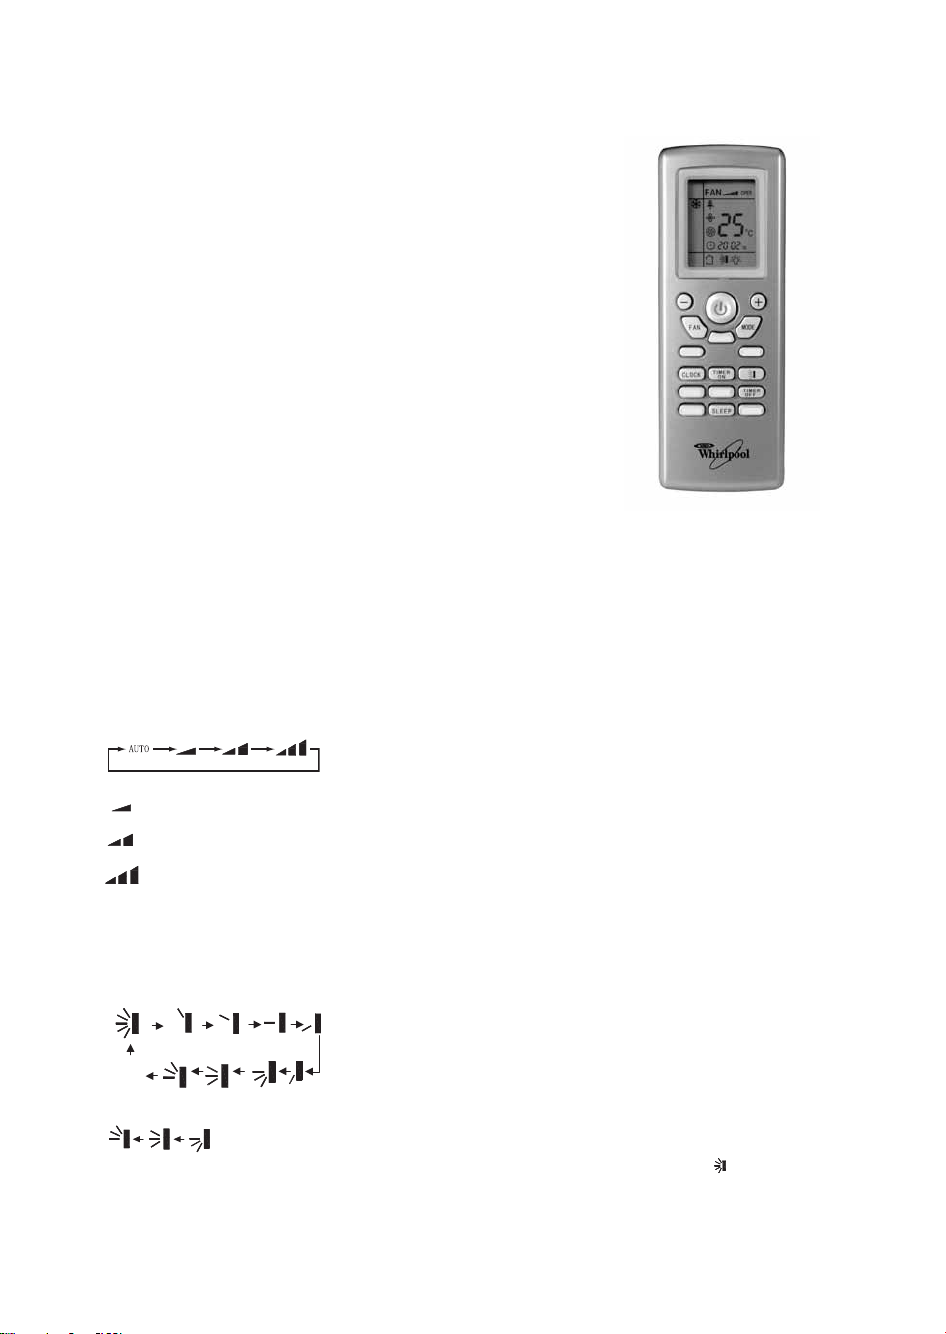
FAN
FAN key
Press this button, Auto, Low, Middle, High speed can be circularly selected. After powered on, Auto fan
speed is default.
Under Dehumidify mode, Low fan speed only can be set up.
Low fan
Middle fan
High fan
SWING
SWING UP and DOWN key
When the unit is running, press this key to activate the swing function, indicated by the swing icon. Press
again to stop the swing function.
If guide louver is stopped when it is swinging up and down, it will remain its present position.
Indicates guide louver swings back and forth in all the five places, as shown in the figure .
Remote Control
OFF
Page 15
18
TIMER-ON
TIMER key
To operate the time on, press this button. Set the ON TIME within the range on 0-24 hours and the unit
will start automatically at the pre-set time.
TIMER-OFF
TIMER-OFF key
To operate the timer off, press this button. Set the OFF TIME within the range on 0-24 hours and the unit
will stop automatically at the pre-set time.
CLOCK
When you press this key, the icon will start to blink and enter the clock adjustment mode. In this mode
pressing the + button will increase the clock by 1 minute each time. If the + key is held down for 2
seconds or longer, the clock will increase by 10 minutes every half second.
Pressing the - key will decrease the clock by 1 minute each time. If the - key is held down for 2 seconds or
longer, the clock will decrease by 10 minutes every half second. After adjustment, press CLOCK again to
confirm. The icon will be constantly displayed.
After powered on, 12:00 is displayed as default and the icon is on.
If no key is pressed for 5 seconds after TIMER ON, TIMER OFF or CLOCK setup, the unit will exit setup
mode.
SLEEP
SLEEP key
Press this button, Sleep On and Sleep Off can be selected. After powered on, Sleep Off is defaulted. After
the unit is turned off, the Sleep function is cancelled.
After Sleep function set up, the signal of Sleep will display. In this mode, the time of timer can be adjusted.
Under Fan and Auto modes, this function is not available.
About lock
Press + and - buttons simultaneously to lock or unlock the keyboard. If the remote controller is locked,
the icon will be displayed on it, in which case, press any button, the mark will flicker for three times. If
the keyboard is unlocked, the mark will disappear.
About swing up and down
1. Press swing up and down button continuously more than 2s,the main unit will swing back and forth
from up to down, and then loosen the button, the unit will stop swinging and present position of guide
louver will be kept immediately.
2. Under swing up and down mode, when the status is switched from off to , if press this button again
2s later, status will switch to off status directly; if press this button again within 2s, the change of
swing status will also depend on the circulation sequence stated above.
Page 16
19
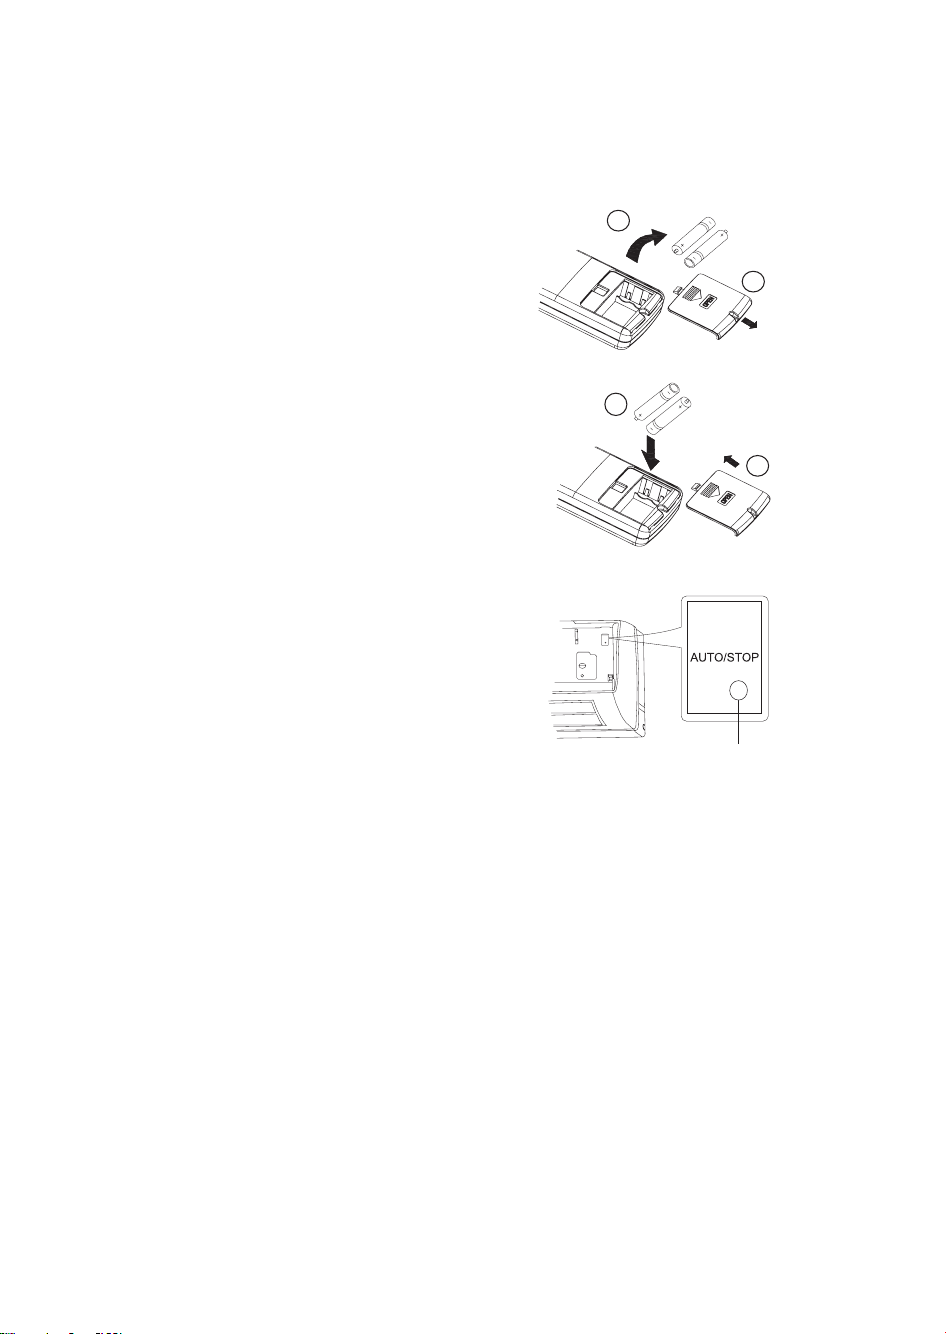
STORAGE AND TIPS FOR USING THE RC
How to insert the batteries
1. Unscrew the screw on the battery cover.
2. Gently press down on the battery cover and push in
the direction of the arrow to remove, as shown.
3. Remove the old batteries.
4. Replace with two 7# dry cell batteries (AAA 1.5V).
Ensure that "+" and "-" polarity is correctly positioned.
5. Close the battery cover on the remote control.
6. Put back the screw on the remote control.
How to remove the batteries
Unscrew the screw and remove the battery cover in the
direction of the arrow.
Press the positive pole of the battery softly with your
fingers, then draw the batteries out of the compartment.
All this should be done by adults, children are forbidden
to remove the batteries from the remote control in
order to avoid danger of swallow.
Disposal of the batteries
Please discard the batteries as sorted municipal waste at
the accessible collection point.
To operate the air conditioner, point the remote control
at the signal receptor.
The remote control will operate the air conditioner at a
distance of up to 7m.
Precautions
• When replacing the batteries, do not use new
batteries with old batteries, or different types of batteries as this may cause the remote control to
malfunction.
• If you do not expect to use the remote control for some time, take the batteries out to prevent leakage
of battery acid in the remote control.
• Operate the remote control within effective range.
• Keep the remote control at least 1 meter from any TV set or hi-fi equipment.
• If the remote control does not work normally, take the batteries out and reinstall after 30 seconds. If it
still does not work install new batteries.
• To operate the main unit by remote control, point the remote control at the receiving device on the
main unit, to ensure receiving sensibility.
• To send a message from remote control, the symbol will flash for 1 second. On receipt of the
message, the main unit will emit a beep.
key switch
2
1
3
4
Page 17

20
CLEANING AND MAINTENANCE
Before inspection and maintenance of the unit, Please turn off the unit and set the power switch to "OFF"
to cut off the power supply
Just professional people could clean or replace the filter.
Before open grill to clean filter, the power must be cut off and wait for the fan motor stop.
CLEANING THE AIR FILTER
Remove the air filter; clean it by a vacuum cleaner or if it is very dirty, wash it with soap water then wipe
off until it is completely dry before reinstallation.
SUGGESTION:
• If the air filter is dirty, it will cause the reduction of airflow. The unit is overloaded and consumes 6%
more of electricity.
• Clean the air filter every week for higher efficiency.
CLEANING THE UNIT
Clean the air conditioner and the remote control with dry cloth or a vacuum cleaner. If damp cloth is
used, remove moisture by using dry cloth afterward.
CAUTION
• Do not use benzine gasoline, thinners or polishing products for cleaning.
• Do not wash with hot water (above 40°C). Some parts of the unit may be deformed.
AT THE START OF THE SEASON
• Check that nothing blocks the air inlet and outlet of the indoor and outdoor units.
• Running the unit without air filters can cause malfunctions due to dirt or dust. Always install air filters at
all times.
• Check that drainage hose is not bent or clogged.
• Check that the units are properly installed.
DURING THE OFF SEASON
• Cut off the power supply main switch.
• Clean the air filters and other parts
• Leave the fan running for 2-3 hours to dry out the inside of the unit.
Page 18
Warning:
Do not attempt to repair the air conditioner yourself. Incorrect repairs may cause electrocution or
fire, so please contact the Whirlpool Authorized Service Centre nearest you for professional repairs.
The following checks may save your time and costs.
21
TROUBLESHOOTING
Malfunction Cause
Air conditioner does not
start immediately after a
stop.
• To protect the air conditioner when started after a stop, the
microcomputer control delays for 3 minutes before allowing the air
conditioner to start.
An unpleasant odour is
perceived at start-up.
• The air conditioner itself is odourless. Any odour is accumulated from
the environment. The solution is to clean the air filter (see Cleaning and
Maintenance).
• If there is still any problem, the air conditioner should be cleaned (Please
contact the Whirlpool Authorized Service Centre).
You may hear a "gurgling"
noise when the air
conditioner is on.
• When the air conditioner is started, or the compressor starts or stops
while running, or the air conditioner is stopped, you may hear a gurgling
noise that is the refrigerant flowing back and is not a malfunction.
A thin fog may flow from
the outlet when the air
conditioner is running in
cooling mode.
• This may occur when the indoor temperature and humidity are high.
This is because the indoor air is cooled quickly.
• After a short time, the fog will disappear as the indoor temperature and
humidity decrease.
You may hear a slight crack
when the air conditioner is
started or stopped.
• This is the sound of friction caused by expansion of the front panel or
other parts due to the change of temperature
Air conditioner does not
run.
• Is there a power failure?
• Is the power plug loose in the socket?
• Has the circuit protection device been tripped?
• Is the voltage too high or too low? (have it tested by a professional).
• Has the timer function been used correctly?
The air conditioner is not
cooling (or heating)
properly.
• Is the temperature setting correctly?
• Is the air intake or outlet of the outdoor unit blocked?
• Is the air filter clogged by dust (see Cleaning and Maintenance)?
• Are all the doors and windows closed
• Is the air flow set to "LOW FAN"?
• Is there another heat source in the room?
Remote control cannot
execute control.
• The remote control sometimes cannot execute control if the air
conditioner is subject to abnormal interference or frequent switch of
functions. To resume normal operation, switch off and on again properly.
• Is the remote control in range and not blocked by any obstacles?
• Check the battery in the remote control. If low, replace the battery.
• Check the remote control for damage.
Water leaks from indoor
unit.
• High air humidity.
• Condensation overflow.
• Joint of indoor unit drain pipe is loose.
Water leaks from outdoor
unit.
• In cooling mode, water may condense on pipe or pipe joint due to
cooling.
• Defrost water flows out in heating or defrost (auto defrost) mode.
• In cooling mode, water from heat exchanger may leak.
Page 19
22
Malfunction Cause
Indoor unit makes noise. • The sound comes from the fan or compressor relay switching over
(close/open).
• Air conditioner may make noise in defrost mode or when stopped due
to inverse flow of refrigerant in the unit.
Moisture on outlet grill • If the air conditioner is left running in high humidity, moisture may
condense on the grill and accumulate there.
In case of the following events, please contact the Whirlpool Authorized Service Centre
nearest you.
Stop the air conditioner and
pull out the power plug.
• The air conditioner makes a shrill noise when running.
• Air conditioner gives out an unpleasant odor when running.
• Water leaks from the indoor unit.
• Air break switch or leakage protection switch drips frequently.
• Foreign matter or water enter the machine or remote control.
• Abnormal overheating of power cord and plug.
INSTALLATION SERVICE - PRECAUTIONS
ON INSTALLATION
Important Precaution
1. The air-conditioning unit must be installed
according to national wiring rules and according
to this manual by professionals;
2. Contact the local Whirlpool Service Centre or
qualified technician before installation;
3. Any change of installation position must be
handled by professionals;
4. If the supply cord is damaged, it must be
replaced by the manufacturer, its Service or
similar qualified entity in order to avoid any
hazardous situation.
Basic Requirements for Installation
Installation in the following places may cause failure
of the air-conditioning unit. Please contact
Whirlpool installation and service agency if the
installation in such places cannot be avoided.
• Environments with heat, steam, flammable or
explosive gases or volatile solvents in the air;
• Near high-frequency facilities, e.g. welding
machines, medical equipment;
• Region with high saline-sodium soil near the sea;
• Places where the air contains oil (mechanical
oil);
• Locations containing sulphide gases (such as
sulphur springs);
• Other special conditions.
Indoor unit: Selection of Installation Position
1. The air inlet and air outlet must be far away
from obstacles to ensure that the airflow can
reach every corner of the room;
2. Choose a position where condensation water
can be easily discharged and the outdoor unit
can be easily connected;
3. Install out of the reach of children;
4. Choose a place capable of bearing the weight of
the indoor unit without increasing noise and
vibrations;
5. Ensure sufficient clearance and space for service
and maintenance; ensure the indoor unit is at
least 2.3m from the floor;
6. Choose a position at least 1 meter from any TV,
sound system or other household electric
appliances;
7. Choose a place where that the air filter can be
easily accessed;
8. Ensure the installation of indoor unit is in
conformity with the requirements of the
installation dimension drawing.
Outdoor unit: Selection of Installation
Position
1. Choose a place where the noise and air flow
from the fan will not affect neighbors, animals
or plants;
Page 20

23
2. Ensure good ventilation of outdoor unit;
3. There should be no obstacles near the outdoor
unit obstructing the air intake and air exhaust of
the unit;
4. The installation position shall be able to
withstand the weight and vibration of the
outdoor unit and ensure safe installation;
5. Select a dry place but not exposed to direct
sunshine or strong wind;
6. Ensure that the outdoor unit is installed in
compliance with installation dimensions for easy
repair and maintenance;
7. Height difference of fitting pipes shall be within
5 meters and the length of fitting pipe shall be
within 10 meters;
8. Install the unit out of the reach of children;
9. Choose a place that does not interfere with
public passage or view.
ELECTRICAL SAFETY REQUIREMENTS
1. The power supply must be of rated voltage with
special circuitry for air-conditioning. The
diameter of the power cord must comply with
requirements.
2. Applicable voltage range: the normal operating
range of voltage is 90%~110% of rated
voltage.
3. Never pull the power cord.
4. Ensure safe grounding and a grounding wire
connected with the special grounding system of
the building, installed by professionals. The
mains must be fitted with electrical leakage
protection switch and an air switch with
sufficient capacity (Refer to the following chart).
The air switch must also have a magnetic and a
thermal tripping function to ensure protection
in case of short-circuit and overload.
5. The minimum clearance between air
conditioner and any flammable surface is 1.5m.
Grounding Requirement
1. As the air-conditioning unit is a Class 1 electrical
appliance, reliable grounding measures must be
taken;
2. The yellow and green cable inside the air
conditioner is for grounding and must not be
used for other purposes or cut. Do not tighten
with tapping screws; this could cause
electrocution;
3. The user power supply shall have a reliable
grounding terminal. It is prohibited to connect
the grounding wire to the following items:
1) Water Supply Pipe 2) Gas Pipe 3) Sewage
Pipe 4) Other positions that are considered
unsafe professionals.
Other:
1. The connection between the air conditioner
and power cables and the connection between
separate elements shall be in accordance with
the wiring diagram attached on the machine;
2. The model and rating of fuse shall be in
accordance with the stencil on the control or
fuse tube;
3. External static pressure of air conditioner at test
position is 0Mpa;
4. All the electrical work must be done by
qualified personnel according to relative wiring
regulation and this manual;
5. The power supply is type Y connection. If the
supply cord is damaged, it must be replaced by
the manufacturer or its service agent or a
similarly qualified person in order to avoid a
hazard;
6. The rated voltage and the exclusive circuit must
be used.
Page 21
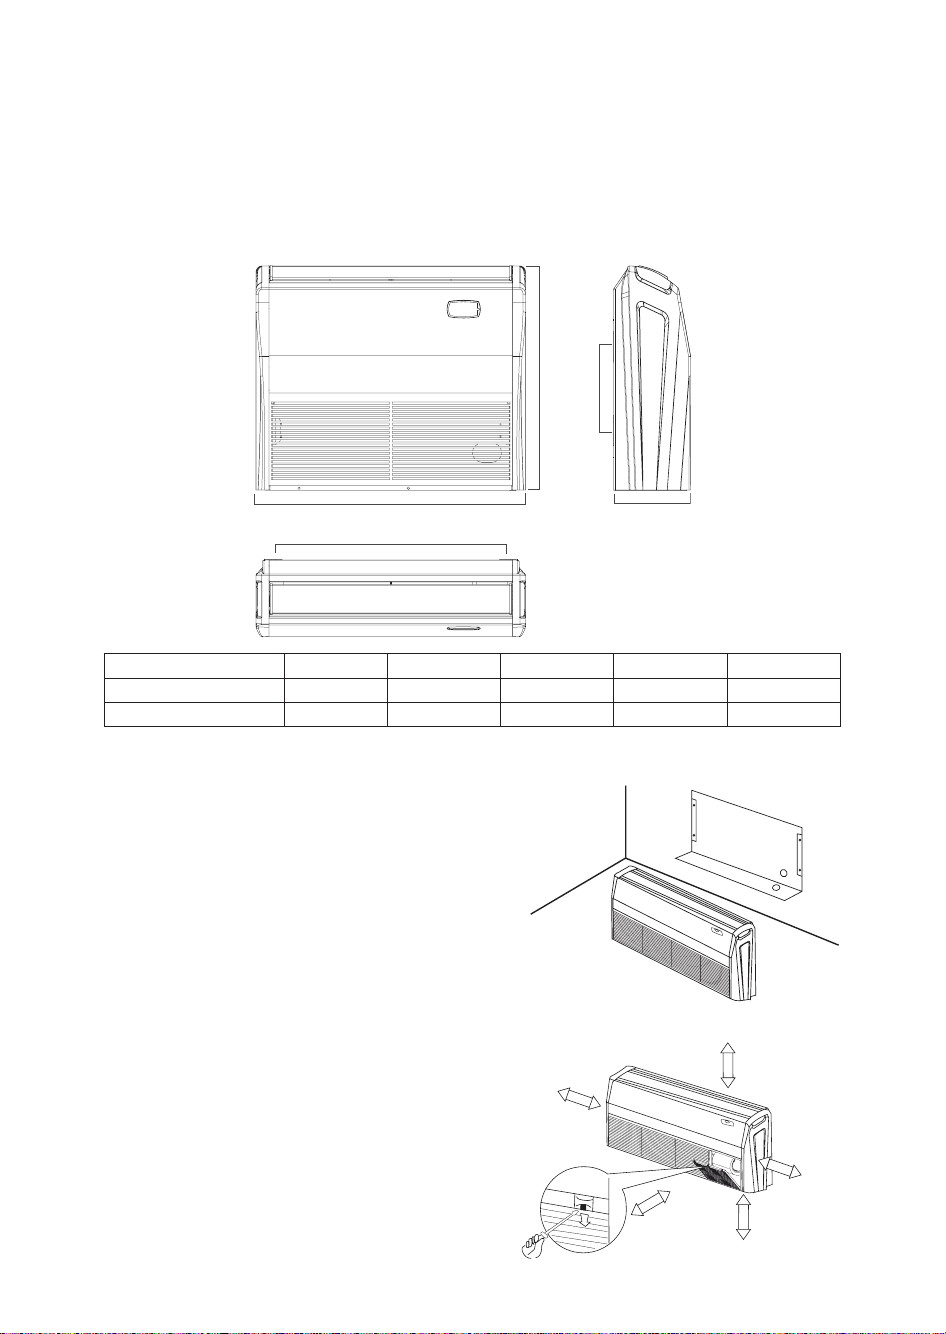
24
INSTALLING THE INDOOR UNIT
INSTALLATION DIMENSIONS OF THE INDOOR UNIT
When installing the indoor unit, you can refer the paper pattern for installation, and make sure that the
drainage side must be 10mm lower than the other side in order to drain the condensation water fluently.
SELECTION OF INSTALLATION LOCATION
• Such a place where cool air can be distributed
throughout the room.
• Such a place where is condensation water is easily
drained out.
• Such a place that can handle the weight of indoor unit.
• Such a place which has easy access for maintenance.
• Such a place where is permitting easy connection with
the outdoor unit.
• Such a place where is 1m or more away from other
electric appliances such as television, audio device, etc.
• Avoid a location where there is heat source, high
humidity or inflammable gas.
• Do not use the unit in the immediate surroundings of a
laundry, a bath, a shower or a swimming pool.
• Be sure that the installation conforms to the
installation dimension diagram.
• The space around the unit is adequate for ventilation
(Refer to Fig.23).
CAUTION FOR INSTALLATION WHERE AIR
CONDITIONER TROUBLE IS LIKELY TO OCCUR
• Where there is too much of oil.
• Where it is acid base area.
• Where there is irregular electrical supply.
Model A B C D E
AMD 382 1300 188 1202 600 260
AMD 383 - AMD 384 1590 238 1491 695 260
Installation
paper plank
Fig. 22
Fig. 23
150 cm
or more
60 cm
or more
60 cm
or more
30 cm
or more
100 cm
or more
Unit: mm
D
E
A
C
B
Page 22
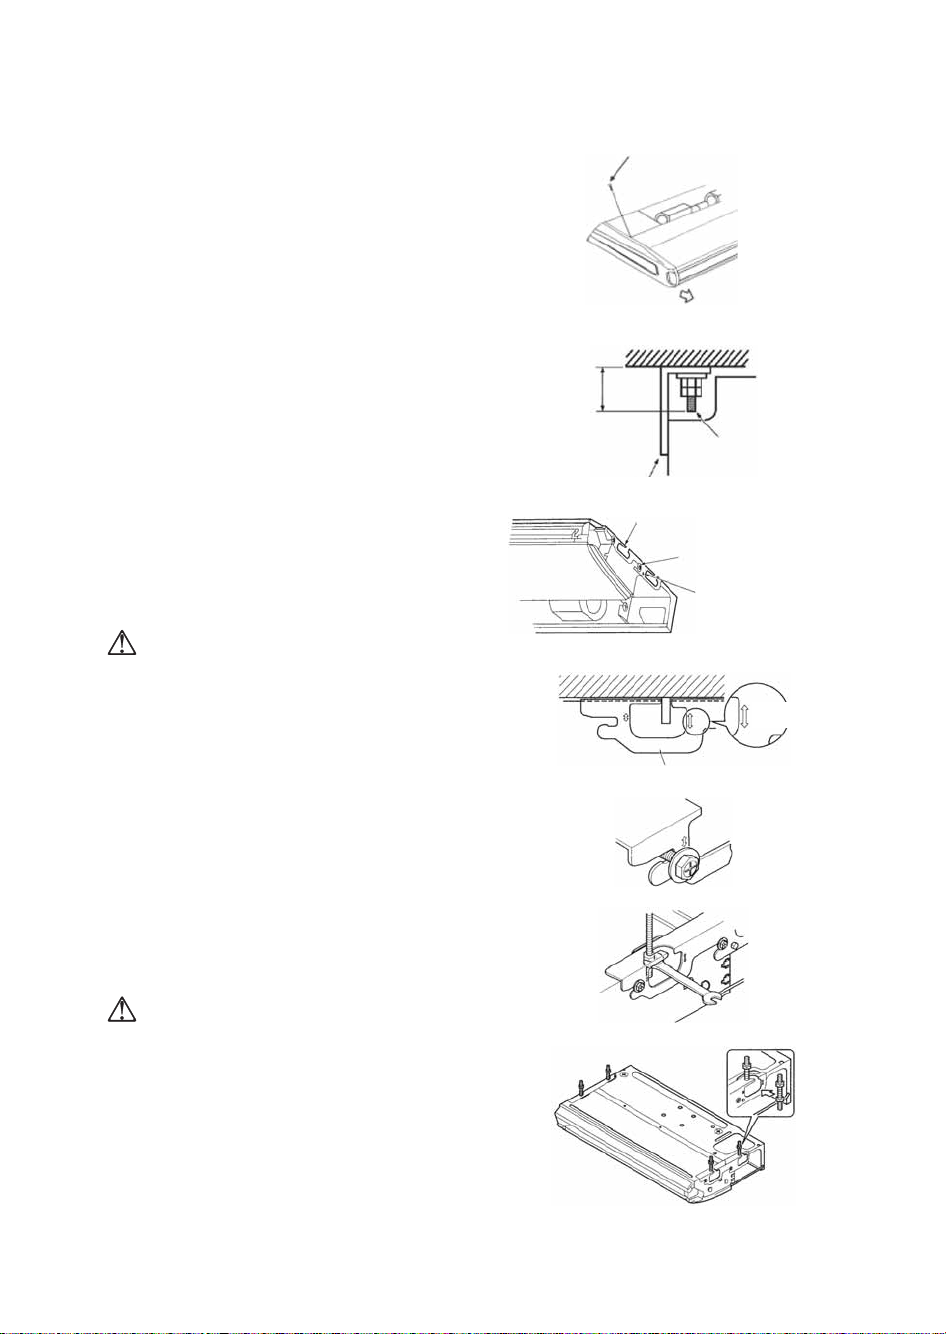
25
THERE ARE 2 STYLES OF INSTALLATION
• CEILING TYPE
• FLOOR TYPE
Each type is similar to the other as follows; determine the
mounting position on ceiling or wall by using paper
pattern to indicate indoor frame. Mark the pattern and
pull out the paper pattern. Remove the return grill, the
side panel and the hanger bracket from the indoor unit as
per procedure below.
• Press the fixing knob of the return grilles, the grilles
will be opened wider and then pull it out from the
indoor.
• Remove the side panel fixing screw and pull to the
front direction (arrow direction) to remove (Refer to
Fig.24).
• Loosen two hanger bracket setting bolts (M8) on each
side for less than 10mm. Remove two hanger bracket
fixing bolts (M6) on the rear side. Detach the hanger
bracket by pulling it backward (Refer to Fig.26).
Set the suspension bolt.(Use W3/8 or M10 size
suspension bolts).
• Adjust the distance from the unit to the ceiling slab
beforehand (Refer to Fig.25). Fix the hanger bracket to
the suspension bolt.
WARNING
• Make sure that extended suspension bolt from the
ceiling stays inside the arrowed position. Readjust the
hanger bracket when it is outside the arrowed position
(Refer to fig. 27).
• Suspension bolt stays inside the cap of indoor unit.
Never remove the cap.
Lift the unit and slide forward unit the dent. (Refer to
fig. 28).
Screw tightly both hanger bracket settings bolts (M8)
(refer to fig. 26).
Screw tightly both hanger bracket fixing bolts (M6) to
prevent the movement of the indoor unit. (refer to
fig. 26).
Adjust the unit height so that rear side of the drain pipe
slightly inclines to improve drainage.
CAUTION
• Adjust the height by turning the nut with a spanner.
Insert the spanner from the hanger bracket opening
(refer to fig. 29).
In case of hanging
It is possible to install using inward facing hanger brackets
by not removing the brackets from indoor unit (refer to
fig. 30). Be sure to use only the specified accessories and
parts for installation work.
Side panel fixing screws (M4)
Fig. 24
Fig. 25
Ceiling
40 mm
or less
Suspension bolt
Hanger bracket
Fig. 26
Hanger bracket
Hanger bracket setting
bolt (M8)
Hanger bracket fixing
bolt (M6)
Ceiling slab
Bolt position
inward
Hanger bracket
Fig. 27
Fig. 28
Fig. 29
Fig. 30
Page 23
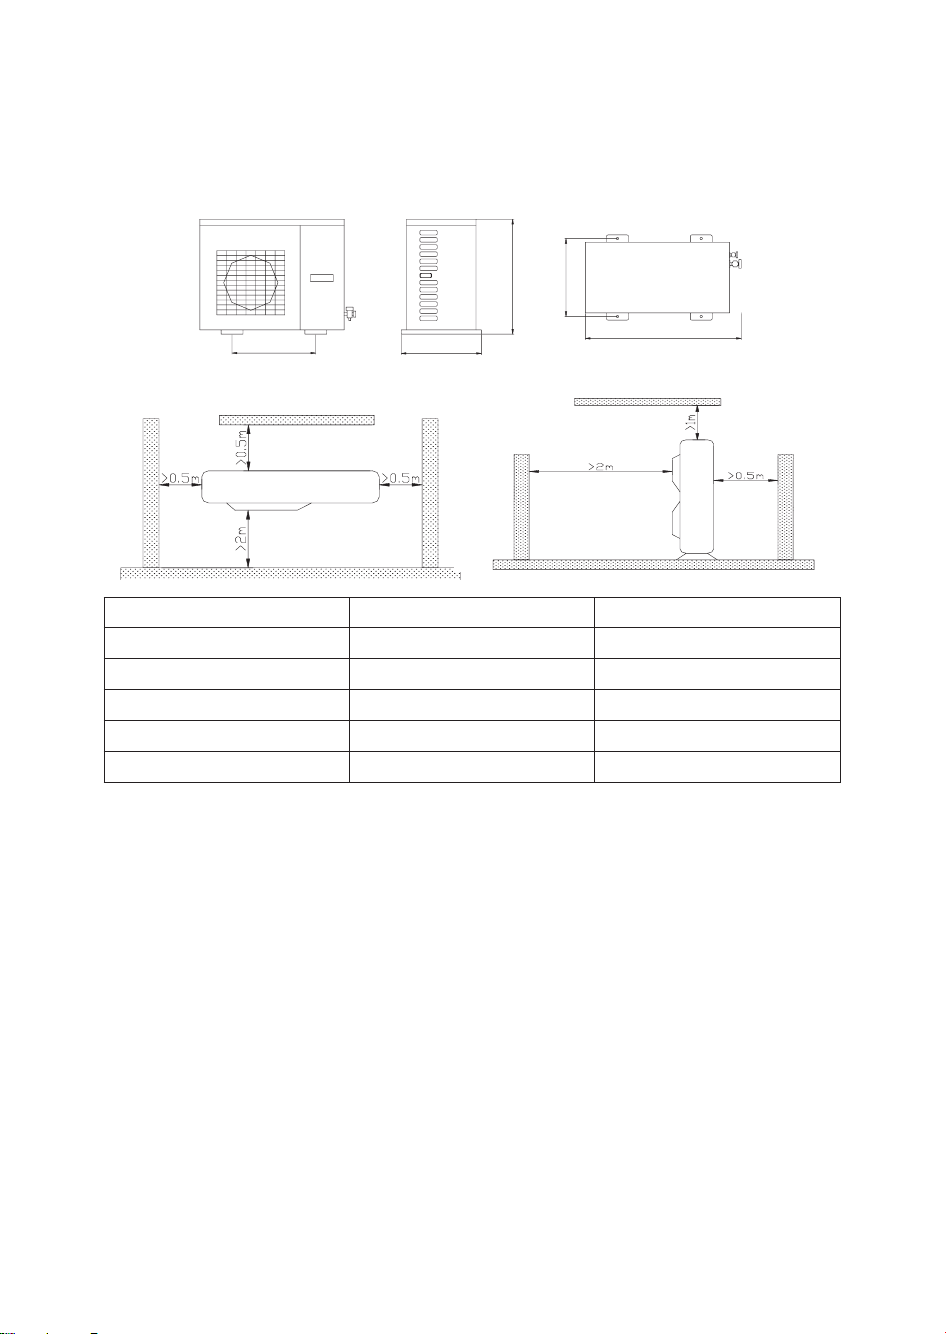
26
INSTALLING THE OUTDOOR UNIT
1. Profile Dimensions of Outdoor Unit
Unit Installation Instructions
Precautions on Installation of Outdoor Unit
To ensure the unit in proper function, selection of installation location must be in accordance with
following principles:
1. Outdoor unit shall be installed so that the air discharged by outdoor unit will not return and that
sufficient space for repair shall be provided around the machine.
2. The installation site must have good ventilation, so that the outdoor unit can take in and exhaust
enough air. Ensure that there is no obstacle for the air intake and exhaust of the outdoor unit. If there is
any obstacle blocking the air intake or exhaust, remove it.
3. Place of installation shall be strong enough to support the weight of outdoor unit, and it shall be able to
insulate noise and prevent vibration. Ensure that the wind and noise from the unit will not affect your
neighbours.
4. Avoid direct sunshine over the unit. It is better to set up a sun shield as the protection.
5. Place of installation must be able to drain the rainwater and defrosting water.
6. Place of installation must ensure the machine will not be buried under snow or subject to the influence
of rubbish or oil fog.
7. The installation site must be at a place where the air exhaust outlet does not face strong wind.
Model / Item AMD 382 AMD 383 - AMD 384
A 913 1032
B 378 412
C 680 1250
D 548 572
E 340 378
C
E
D
B
A
Page 24
27
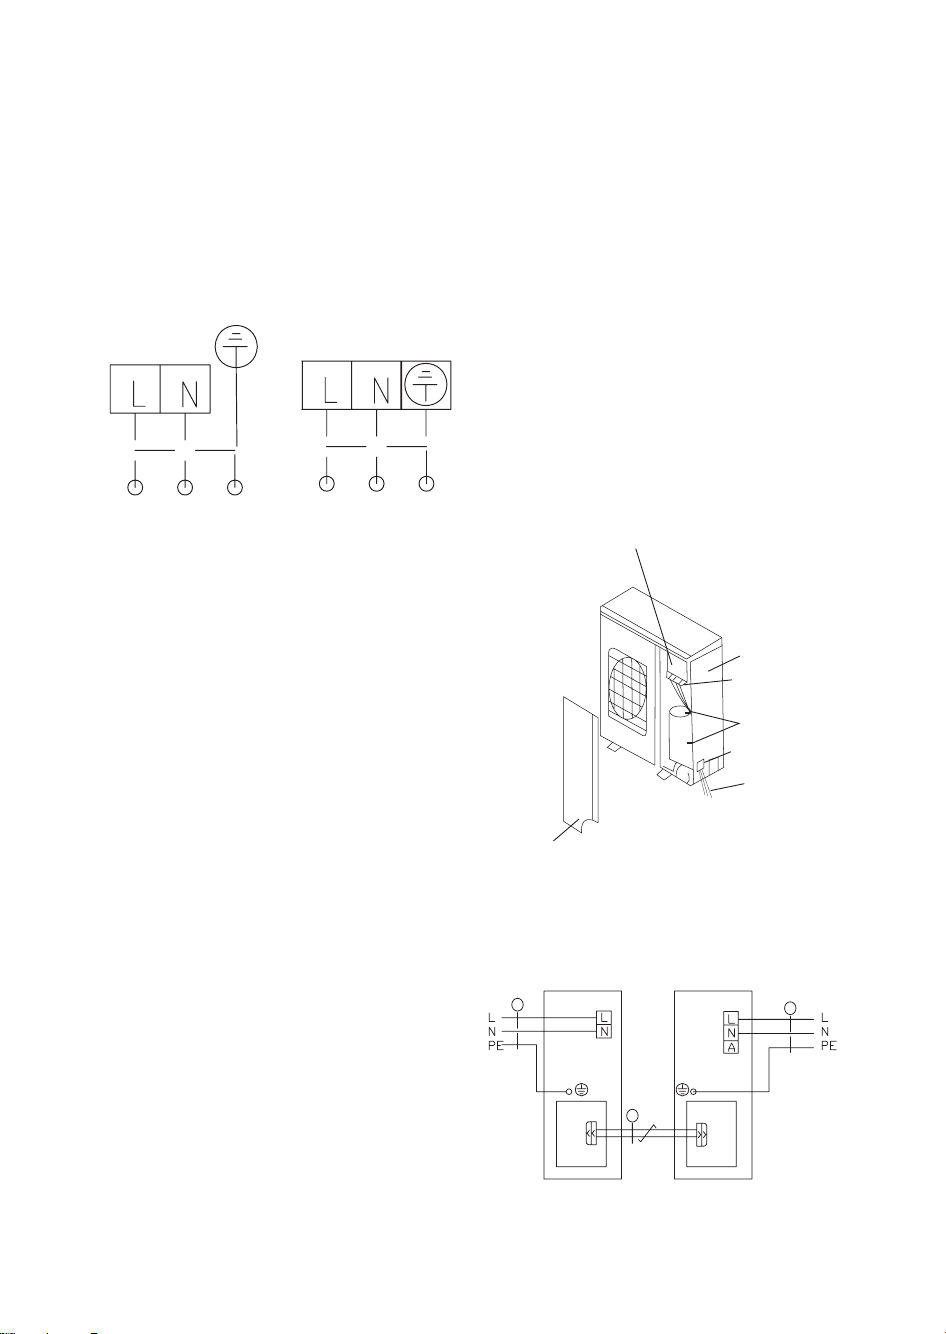
Electric wiring connection
1. Remove the front side plate (fig. 33).
2. Break through the hole for wires and put on rubber bush.
3. Pull all wires through the rubber bush.
4. Connect the outdoor unit according to the "WIRING DIAGRAM" of outdoor unit. Make sure to wire
firmly.
5. Tighten the wires with clamp and clasp.
CAUTION
• Wrong wiring may cause fire of electric shock.
• Do not pull the wire when fixing it with wire clamp
and clasp.
• Do not let the wire too loose.
• All the electrical work must be done by qualified
personnel according to the local rules and this
instruction.
• The rated voltage and the exclusive circuit must be
used.
• Leakage circuit-breaker must be installed.
• Please use specified fuse.
• If the power supply cord of the unit is damaged, it
must be replaced by the manufacturer or its service
agent or a similarly qualified person in order to
avoid a hazard.
• An all-pole disconnection air switch which have a
contact separation of at least 3 mm in all pole is needed.
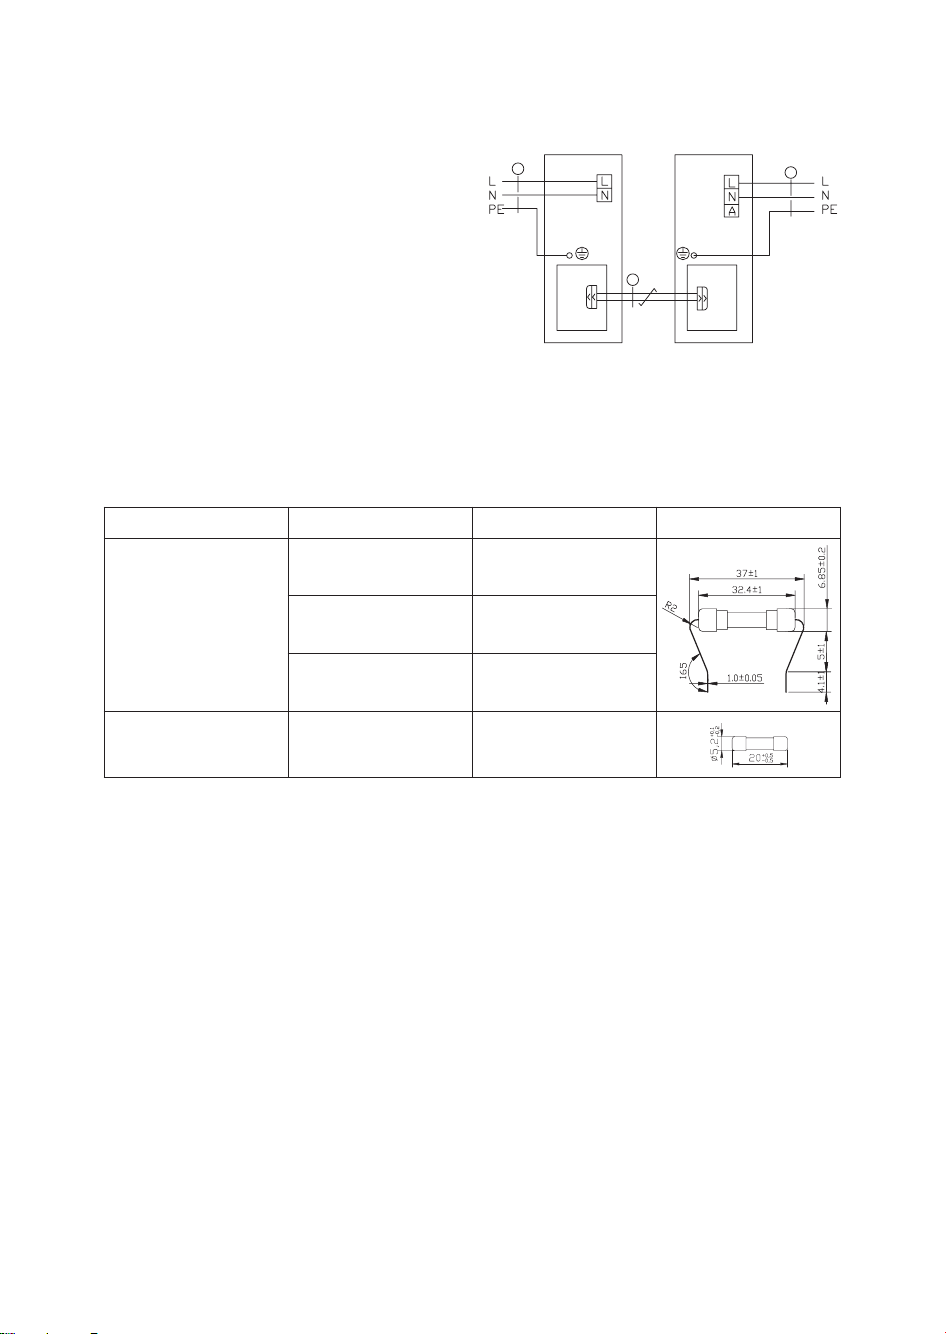
Schematic diagram of unit line connection
Electric wiring connection
AMD 382
1. Power cord 3×3.5mm
2
(H07RN-F)
2. Power cord 3×1.5mm
2
(H05RW-F)
3. Twisted-pair
AMD 382 - AMD 383 - AMD 384
or
Power supply terminal board
Front side plate
Rear side plate
Clamp
Clasp
Hole of wires and
rubber bush
Cords
POWER:
220-240V~
50Hz
Outdoor Unit
Indoor Unit
main board
main board
POWER:
220-240V~
50Hz
1
3
2
Page 25
28
AMD 383 - AMD 384
1. Power cord 3×6 mm2(H07RN-F)
2. Power cord 3×1.5mm2(H05RW-F)
3. Twisted-pair
Rated parameter and side for fuse
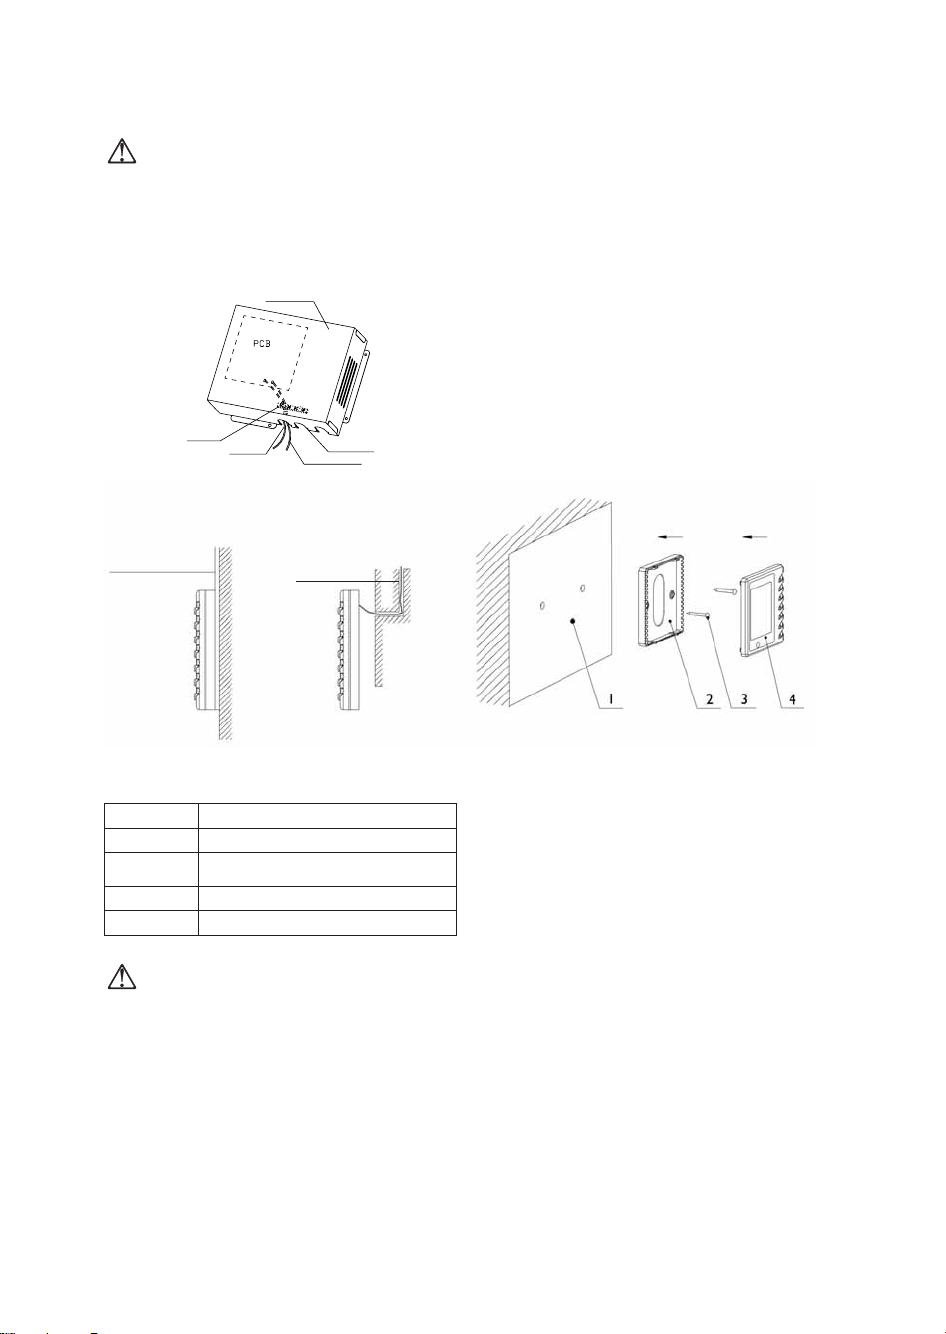
Position and Method of Installing Wire Controller
1. One end of the control wire of the manual controller is connected with main board of electric box of
indoor unit inside, it should be tightened by wire clamp, the other end should be connected with the
manual controller (installation sketch map as shown in below). The control wire be used for the indoor
unit and manual controller, which is the special communication wire, the length is 8 meters, the
material be adopted for the control wire should be metallic substance. The manual controller could not
be disassembled and the communication wire be used for the manual controller should not be changed
by users optionally, the installation and maintenance should be carried out by the professional
personnel.
2. First select an installation position. According to the size of the communication line of the wire
controller, leave a recess or an embedded wire hole to bury the communication line.
3. If the communication line between the wire controller (85 ×85 ×16) and the indoor unit is surfacemounted, use 1# PVC pipe and make matching recess in the wall (refer to Figure 6); If concealed
installation is adopted, 1# PVC pipe can be used (Refer to Figure 7).
4. No matter if surface mounting or concealed mounting is selected, it is required to drill 2 holes (in the
same level) which distance shall be the same as the distance (60mm) of installation holes in the bottom
plate of the wire controller. Then insert a wood plug into each hole. Fix the bottom plate of the wire
controller to the wall by using the two holes. Plug the communication line onto the control panel. Lastly
install the panel of the wire controller.
POWER:
220-240V~
50Hz
Outdoor Unit
Indoor Unit
main board
main board
POWER:
220-240V~
50Hz
Unit Code Rated parameter Side
AMD 382
AMD 383
AMD 384
46010403 250 V, 25 A
46010023 250 V, 30 A
46010014 250 V, 3. 15 A
All the indoor
units
46010013 250 V, 5 A
1
2
3
Page 26
29
Caution:
1. During the installation of the bottom plate of the wire controller, pay attention to the direction of the
bottom plate. The plate's side with two notches must be at the lower position, and otherwise the panel of
the wire controller cannot be correctly installed.
Sketch map for indoor unit communication wire
Caution
1. The standard communication distance between the main board and the wire controller is 8 m.
2. The wire controller shall not be installed in a place where there is water drop or large amount of water
vapor.
Metallic Pipe
Fig 43 Surface Mounting of cable Fig 44 Concealed mounting of cable Fig 45 Schematic diagram of installation
Electric box cover
Cable-cross loop
Communication wire
Control wire
Wire clamp
Metallic Pipe
N° Name
1 Wall surface
2 Bottom Plate of wire controller
3 Screw M4x10
4 Panel of wire controller
Page 27
30
Caution: Before installing the electrical equipment, please pay attention to the following
matters which have been specially pointed out by our designers:
1. Check that if the power supply used conforms to the rated power supply specified on the nameplate.
2. The capacity of the power supply must be large enough. The section area of fitting line in the room
shall be larger than 2.5 mm
2
.
3. The lines must be installed by professional personnel.
An electricity leakage protection switch and an air switch with gap between electrode heads
larger than 3 mm shall be installed in the fixed line.
1. Connection of single wire
(1) Use wire stripper to strip the insulation layer (25mm long) from the end of the single wire.
(2) Remove the screw at the terminal board of the air-conditioning unit.
(3) User pliers to bend the end of the single wire so that a loop matching the screw size is formed.
(4) Put the screw through the loop of the single wire and fix the loop at the terminal board.
2. Connection of multiple twisted wires
(1) Use wire stripper to strip the insulation layer (10mm long) from the end of the multiple twisted
wires.
(2) Remove the screw at the terminal board of the air-conditioning unit.
(3) Use crimping pliers to connect a terminal (matching the size of the screw) at the end of the multiple
twisted wires.
(4) Put the screw through the terminal of the multiple twisted wires and fix the terminal at the terminal
board.
Warning:
If the power supply flexible line or the signal line of the equipment is damaged, only use special flexible line
to replace it.
1. Before connecting lines, read the voltages of the relevant parts on the nameplate. Then carry out line
connection according to the schematic diagram.
2. The air-conditioning unit shall have special power supply line which shall be equipped with electricity
leakage switch and air switch, so as to deal with overload conditions.
3. The air-conditioning unit must have grounding to avoid hazard owing to insulation failure.
4. All fitting lines must use crimp terminals or single wire. If multiple twisted wires are connected to
terminal board, arc may arise.
5. All line connections must conform to the schematic diagram of lines. Wrong connection may cause
abnormal operation or damage of the air-conditioning unit.
6. Do not let any cable contact the refrigerant pipe, the compressor and moving parts such as fan.
7. Do not change the internal line connections inside the air-conditioning unit. The manufacturer shall not
be liable for any loss or abnormal operation arising from wrong line connections.
Connection of Signal Line of Wire Controller
1. Open the cover of the electric box of the indoor unit.
2. Pull the signal cable of the wire controller through the rubber ring.
3. Plug the signal line of the wire controller onto the 4-bit pin socket at the circuit board of the indoor
unit.
4. Use cable fastener to bundle and fix the signal cable of the wire controller.
Page 28
31
Connecting pipe preparation
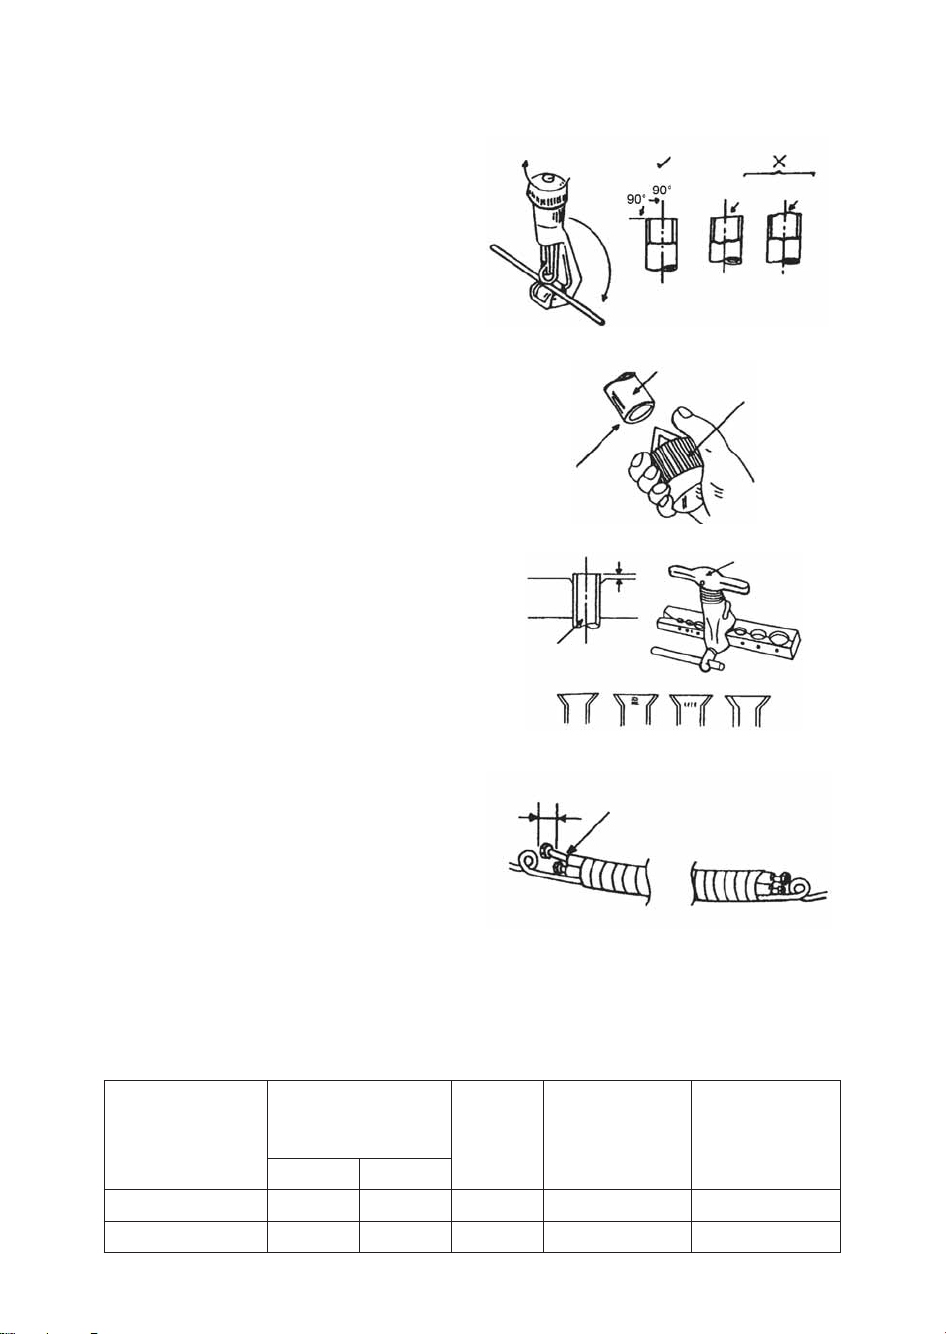
PIPE & ELECTRICAL WIRE CUTTING
• Use cutting tools easily found in the market.
• Measure precisely both outer & inner pipe.
• Provide a little bit longer pipe than the
measurement.
• Wire must be 1.5 m longer than the refrigerant
tube.
REAMING
• Clean inside the inner refrigerant tube.
• While reaming, the tube and must be on the top of
the reamer to prevent any dust going into the tube.
FLARING THE PIPE END
• Flare the both ends of the pipe with flaring kit by
fitting the flare nut on the pipe before flaring. Set
the die on the pipe so that pipe end is 0.5 mm
above top of the die. Check if the pipe end is even
and perfectly round.
WIRE CONNECTION AND TAPE COVERING
(See the picture on the right hand side)
The refrigerant is R410A, GWP= 2020, ODP=0
Select copper pipes for gas and liquid as informed in specific table (see the pipe table below). For dust and
moisture protection, before assembly of the pipe and its insulation, both ends of the pipe must be
covered. Avoid pipe bending as much as possible, if it is necessary, the bending radius must be more than
3 cm or 4 cm.
Cutting tool
Right Wrong
Sloped cut
Rough cut
Refrigerant tube
Up side down
position
Reamer
0.5 mm
Refrigerant tube
Flare-kit
Uneven
slope
Poor
skin
Cracked Uneven
thickness
30-40 mm
Low pressure refrigerant tube
Connecting
wire
High pressure refrigerant tube
To indoor unit To outdoor unit
Item / Model
Size of fitting Pipe
(mm)
Max. pipe
length (m)
Max. height
difference between
indoor unit and
outdoor unit (m)
Amount of
additional
refrigerant to be
filled (for extra
length of pipe)
Gas pipe Liquid pipe
AMD 382 5/8" 3/8" 30 15 60g/m
AMD 383 - AMD 384 3/4" 1/2" 50 30 120g/m
Page 29
32
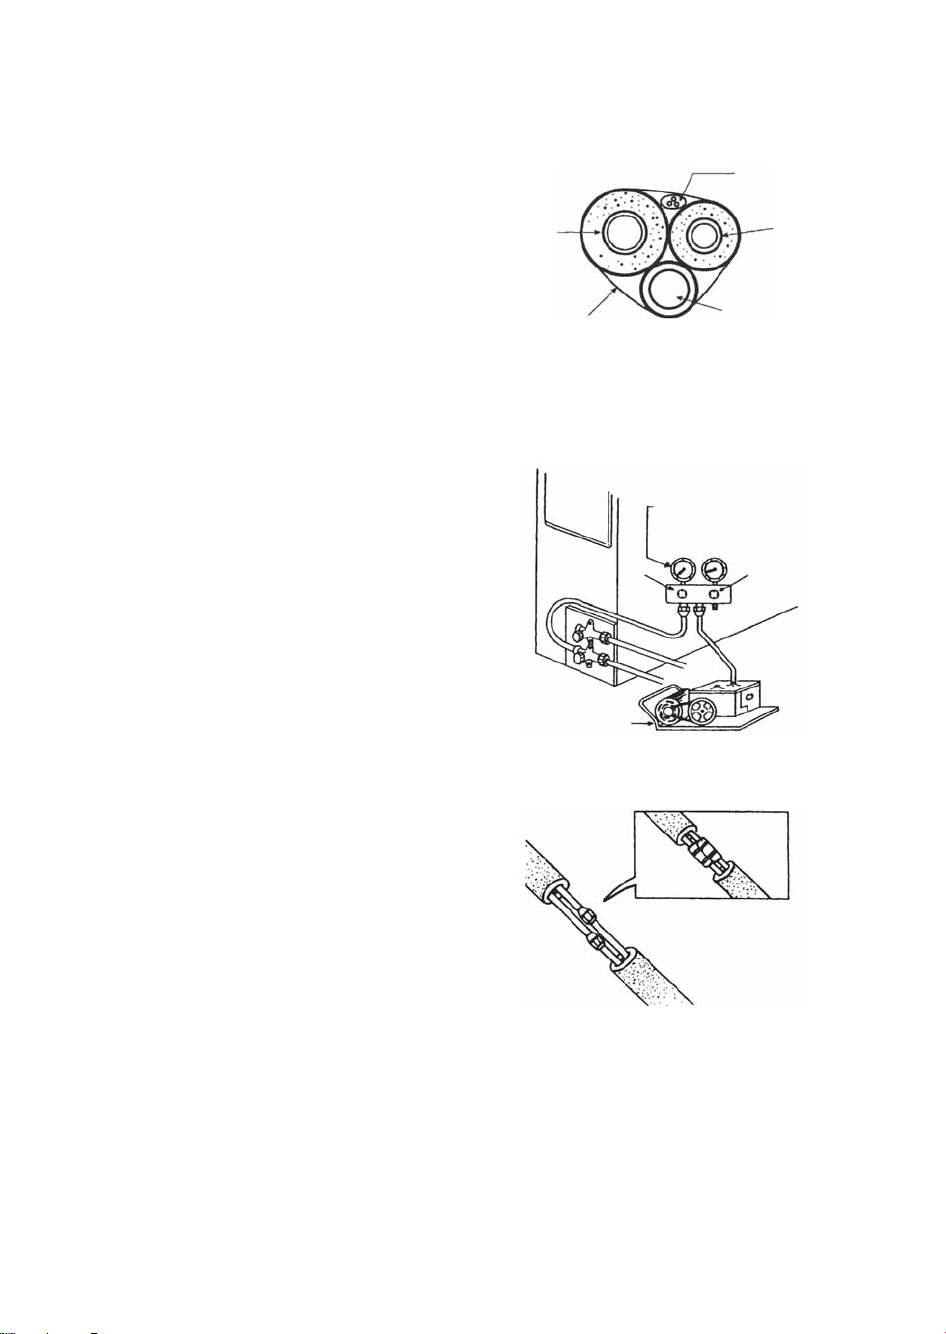
The connection between an indoor unit and an
outdoor unit.
• Unscrew the flare nut for releasing pressure gas
in the indoor unit. If there is no high pressure gas
blowing out, it is the signal of a leaking indoor
unit.
• Fit the flare nut to the liquid pipe. Flare the pipes
and with flare tool.
• Tighten both flare nuts into gas pipe and liquid
pipe at the indoor unit with two holding spanners.
AIR PURGING
The purpose of air purging is to get rid of moisture and air in the system, otherwise moisture and air may
cause ineffectiveness of the compressor which directly affects the cooling capacity.
PURGING BY USING VACUUM
After tightening the flare nuts between the indoor and
the outdoor units.
• Remove a blank cap of a three-way valve by using a
torque wrench. Check if both high pressure and
low pressure valve are in closed condition.
• Remove the nut of the service port.
• Connect a gauge into the service port and vacuum
port and vacuum pump.
• Vacuum until the gauge indicates at 30 inches
mercury pressure.
• Remove gauge. Tighten up the nut of the service
port.
• Use a hexagonal wrench to open both high
pressure and low pressure valves to the end (counter clockwise).
• Tighten the blank cap of the three-way valve.
GAS LEAKING CHECK
• Check leakage by apply soapsuds to every
connection and inspect carefully. After checking,
wipe them off completely.
• Cover indoor unit joint with pipe insulation and 4
plastic bands to prevent condensation at joints.
Connecting wire
Liquid pipe
Diameter Drain Pipe ½
Piping tape
Gas tape
Point at 30 inches
mercury pressure
Open
Close
Vacuum pump
OUTDOOR UNIT
Gauge
Page 30
33
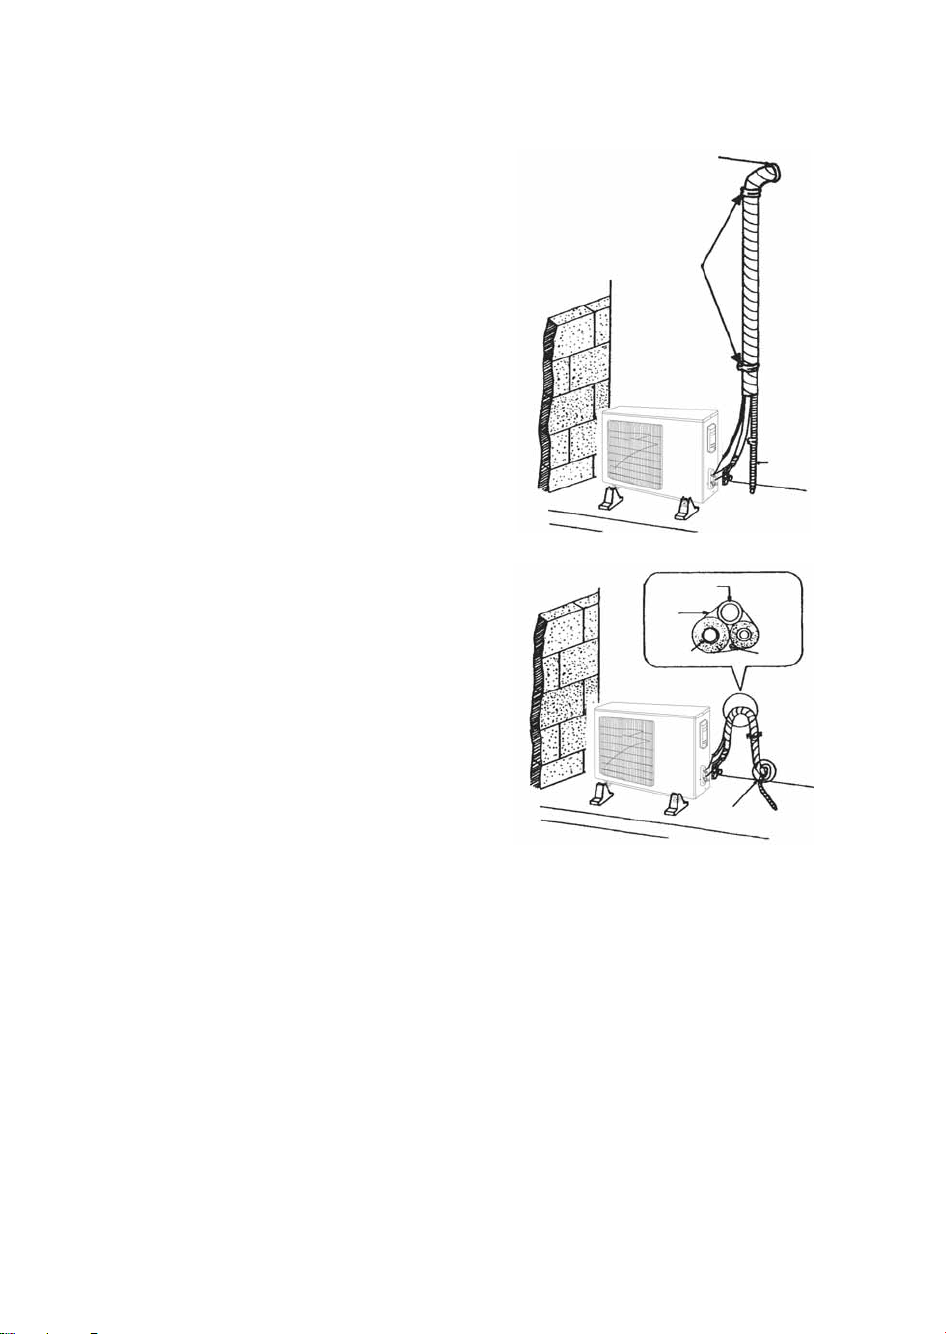
IF THE OUTDOOR UNIT IS INSTALLED
LOWER THAN THE INDOOR UNIT (picture 1)
1. A drain pipe should be above ground and the end of
the pipe does not dip into water. All pipes must be
restrained to the wall by saddles.
2. Taping of the pipe must be done from bottom to
top.
3. All pipes are bound together by tape and restrained
to the wall by saddles.
IF THE OUTDOOR UNIT IS INSTALLED
HIGHER THAN THE INDOOR UNIT (picture 2)
1. Taping should be done from lower to upper part.
2. All pipes are bound and taped together and trapped
the pipes to prevent water returning to the room
(see picture).
3. Restrain all pipes to the wall with saddles.
Sealed
Saddle
Drain pipe
Picture 1
Drain pipe
Refrigerant
pipe
Tape
Wire
Trap
Picture 2
Page 31
34
DRAIN PIPING WORK
Make sure the drain flows out
CAUTION
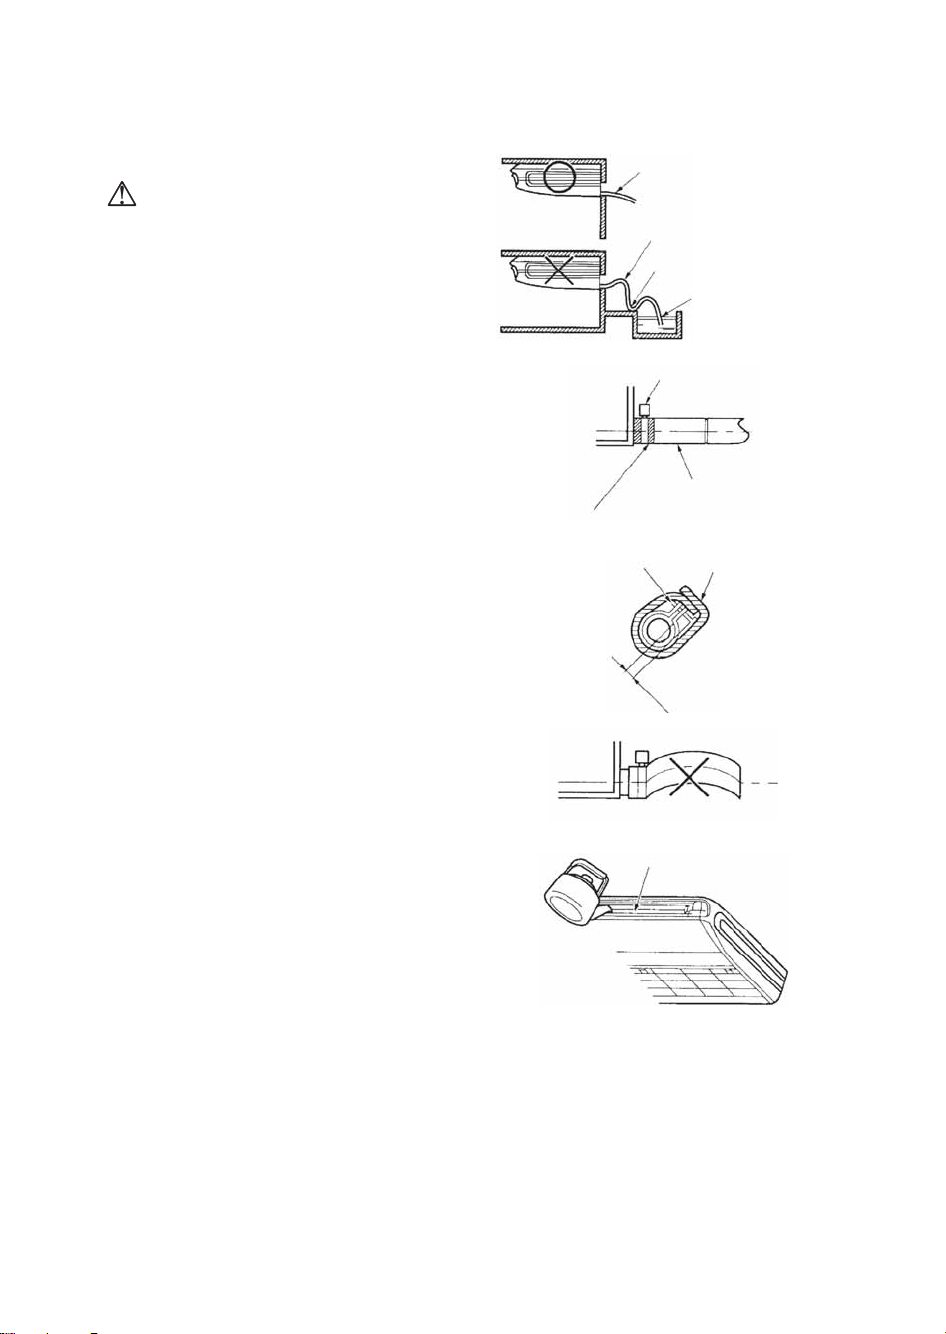
1. Drain piping
• The drain pipe outlet direction can be chosen from
either the right rear or right.
• The diameter of the drain pipe should be equal to
or greater than the diameter of the connecting pipe
(vinyl tube; pipe size: 20 mm; outer dimension: 26
mm).
• Keep the drain pipe short and incline downwards at
the gradient of at least 1/100 to prevent air pockets
(refer to fig. 1).
• Use the attached drain hose (4) and clamp (5).
Insert the drain hose completely into the drain
socket . Tighten the clamp within the range of gray
tape until the screw head is less than 4 mm from
the hose (refer to fig. 2, 3).
• Wrap the attached sealing pad (11) over the clamp
and drain hose to insulate. (Refer to fig. 3).
• No folding of drain hose inside the indoor unit
(refer to fig. 4).
(2) Confirm that smooth drainage is achieved after the
piping work.
• Pour 600 cc of water into the drain pan from the air
outlet for confirming drainage (refer to fig.5).
(When drain hose is connected)
Incline the drain hose
Not to be lifted
No foldings
Not to be soaking in water
Fig. 1
Clamp (5)
Fig. 2
Taping area (Gray)
Drain hose (4)
Fig. 3
Clamp (5)
(accessory)
Large sealing pad (11)
(accessory)
4 mm or less
Fig. 4
Fig. 5
Air outlet
Watering can
Page 32
35
CHECKS AND TEST RUN AFTER
INSTALLATION
Check Items After Installation
Tes t Ru n
1. Preparation of Test Run
• Do not switch on the power before all installation work is completed.
• Confirm that the control line is correctly installed and all electrical lines are securely connected.
• Open the shutoff valves of the large and small pipes.
• Clear the unit of any foreign bodies, especially metal scraps, line ends and tools.
2. Test Run
• Plug in, press the "ON/OFF" key on the remote control, and the air-conditioning unit should start.
• Press the Mode key, select the operating modes such as cooling and fan, and check for normal
operation.
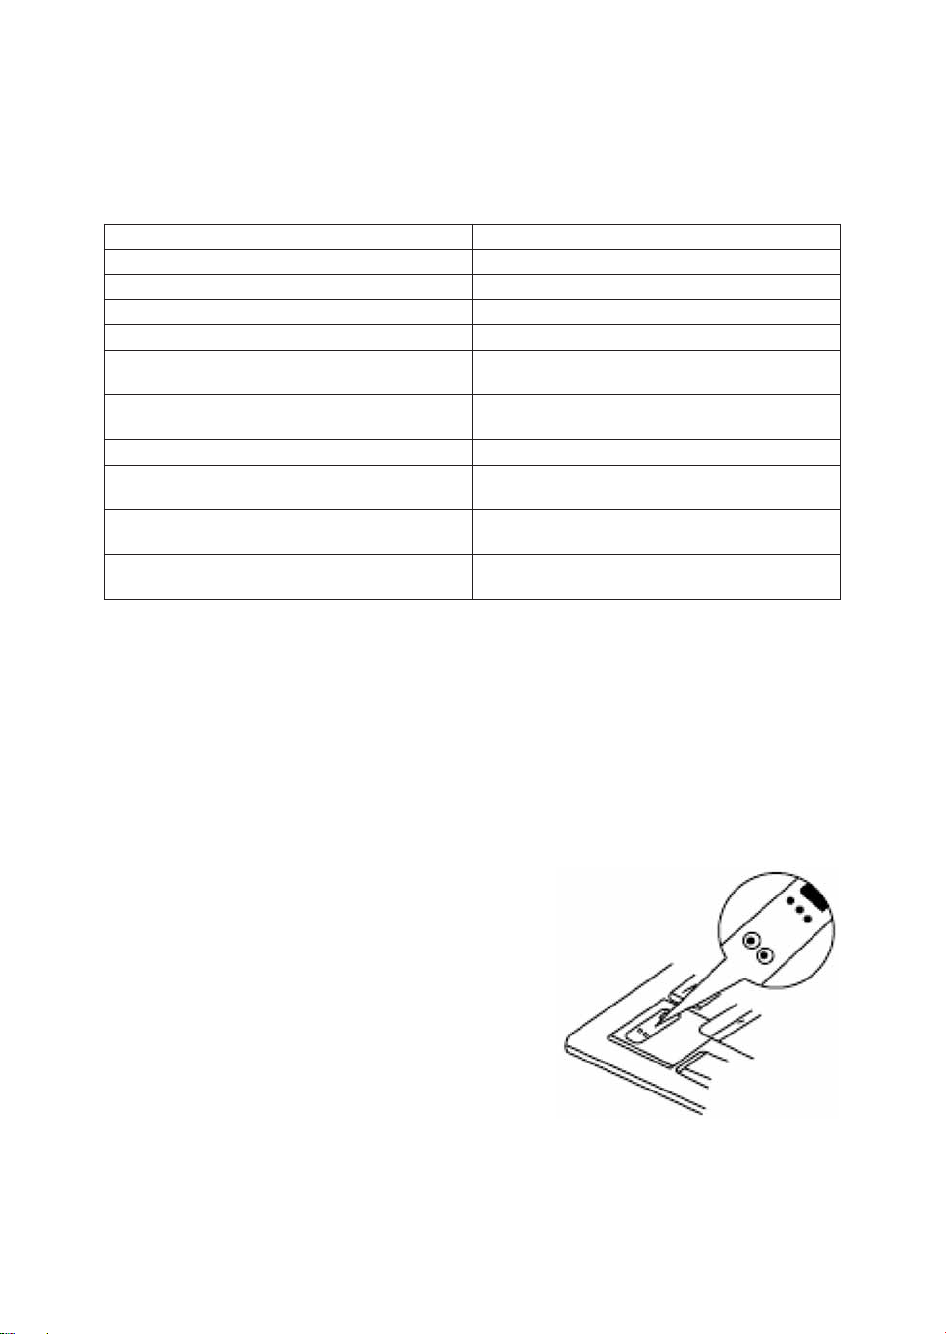
3. Emergency operation.
When the batteries fail or when the remote controller is missing,
operate as shown below.
• On stopping you can press the AUTO button on cover
NO.Ⅱ, until it is in AUTO mode.
The cover NO.Ⅱ is the part of the panel. As the below picture .
Check items Problems caused to improper installation
Is the installation secure? The unit may fall, vibrate or make noise
Has gas leakage been checked? May cause unsatisfactory cooling (heating) effect
Is the thermal insulation of the unit sufficient? May cause unsatisfactory cooling (heating) effect
Is drainage smooth? May cause condensation and dripping
Is the main supply voltage the same as the rated
voltage specified on the nameplate?
The unit may break down or components may burn
out
Are the lines and pipelines correctly installed? The unit may break down or components may burn
out
Has the unit been safely grounded? Risk of electrical leakage
Are the models of lines in conformity with
requirements?
The unit may break down or components may burn
out
Are there any obstacles near the air inlet and outlet
of the indoor and outdoor units?
May cause unsatisfactory cooling (heating) effect
Have the length of refrigerating pipe and refrigerant
charge amount been recorded?
It is difficult to know how much refrigerant to use
 Loading...