

Page 1
61002001.book Page 13 Tuesday, March 25, 2008 4:46 PM
OPERATING INSTRUCTIONS
INSTALLATION INSTRUCTIONS
SAFEGUARDING THE ENVIRONMENT
IMPORTANT NOTES
BEFORE USING THE OVEN
OVEN ACCESSORIES
MAINTENANCE AND CLEANING
TROUBLESHOOTING GUIDE
AFTER-SALES SERVICE
To make the most of your new oven, carefully read the instructions and keep them for future
reference.
13
Page 2
61002001.book Page 14 Tuesday, March 25, 2008 4:46 PM
INSTALLATION INSTRUCTIONS
Recommendations
IMPORTANT: Unplug the oven before any cleaning and maintenance operations.
Installation must be carried out by a qualified technician according to the manufacturer's instructions
•
and in compliance with the current local regulations
After unpacking the oven, make sure it has not been damaged during transport and that the door closes
•
properly.
Preparation of cabinet for fitting
Cabinets in contact with the oven must be heat resistant (min. 90 °C).
•
Carry out all cabinet cutting work before fitting the oven. Carefully remove any chips or sawdust that
•
could compromise oven operation.
• The bottom of the oven must not be accessible after installation.
During installation make sure the sides of the oven do not touch the adjacent units.
•
• For correct appliance operation, the minimum opening required between the worktop and
the top of the oven must not be obstructed.
Electrical connection
Regulations require the appliance to be earthed.
Electrical connection must be carried out by a qualified technician according to the manufacturer's
•
instructions and in compliance with the current local regulations.
The installer is responsible for correct electrical connection and compliance with the safety regulations.
•
The power cable must be long enough to make the electrical connection of the oven fitted in the
•
cabinet.
The safety directives require a multi-pole switch with contact gap of at least 3 mm to be used during
•
installation.
After installation, the electrical components must be inaccessible.
•
In case of any doubts, contact the dealer or the nearest After-Sales Service.
Connecting the oven to the power supply
Make sure the voltage indicated on the dataplate is the same as the mains voltage.
•
The dataplate is on the front edge of the oven (visible when the door is open).
If the oven is without a power cable, proceed as follows:
•
1. Remove the two fixing screws of the terminal block cover located in the bottom part of the oven's
back closing panel.
2. Remove the cover to access to the terminal block and insert the power cable (see table) through
the opening located on the bottom of the oven.
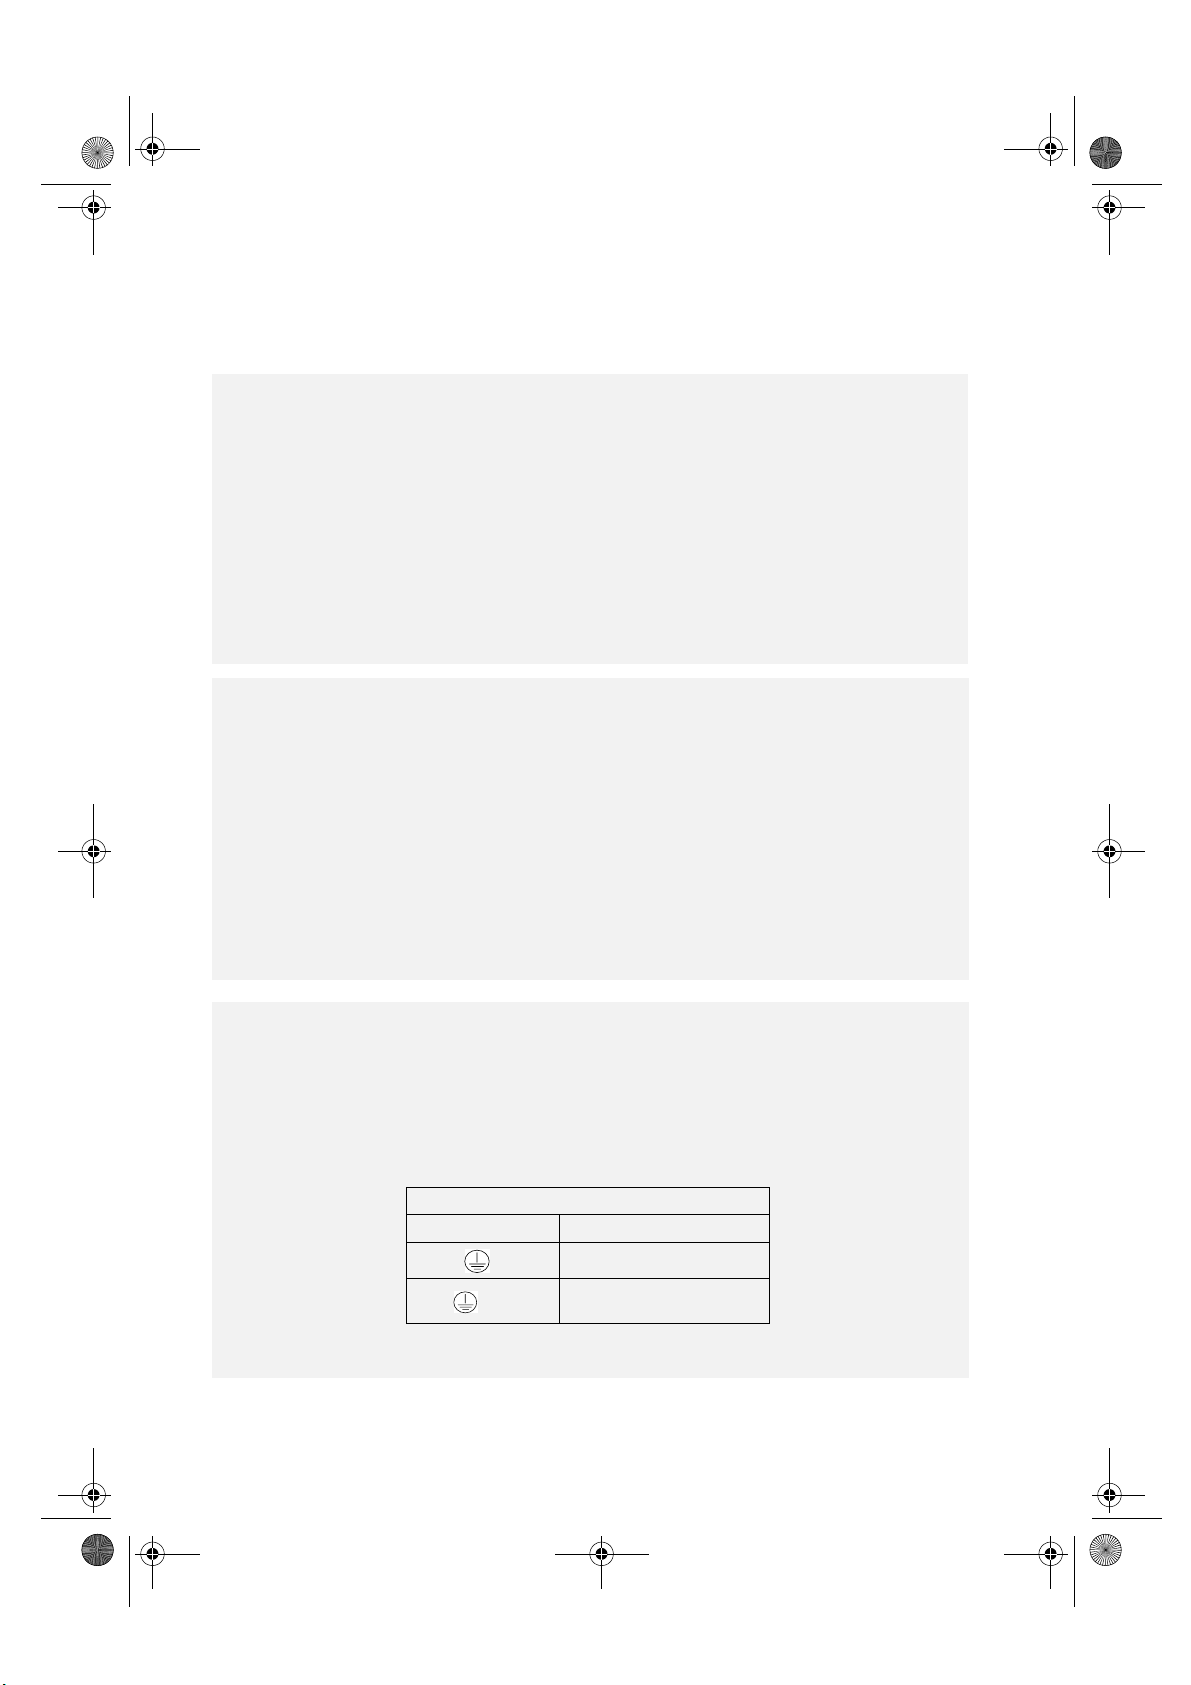
Power cable table
No. of wires Type of cable
1N+
2+
3. Connect the cable to the terminal block, tighten the screws and secure it to the cable fastener.
4. Refit the cover, inserting the two tabs in the special slots, and fix it with the two screws.
14
~
~
H05 RR-F 3 X 1.5 mm²
H05 RR-F 3 X 1.5 mm²
(for Switzerland only)
Page 3

61002001.book Page 15 Tuesday, March 25, 2008 4:46 PM
SAFEGUARDING THE ENVIRONMENT
Disposal of packing
The packing material is 100% recyclable and is
•
marked with the recycle symbol .
The various parts of the packing must be disposed
•
of in compliance with local regulations; do not
disperse in the environment.
Disposal of old electrical appliances
This appliance is marked in compliance with
•
European Directive 2002/96/EC, Waste
Electrical and Electronic Equipment (WEEE).
By ensuring that this appliance is correctly
scrapped, the user can help prevent potentially
harmful consequences for the environment and
the health of people.
IMPORTANT NOTES
Important:
Do not allow children or infirm persons to
•
operate the oven without supervision.
Make sure children do not play with the appliance.
•
•The appliance must not be used by children
or people (including children) with limited
physical, sensory or mental abilities or
without experience and knowledge of it,
unless instructed in its use by those
responsible for their safety.
The accessible parts of the oven may become
•
very hot during use. Keep children away from the
appliance.
Do not use abrasive materials or substances to
•
clean the GLASS, as they could damage it.
The appliance becomes very hot during use.
•
Do not touch the heating elements in the oven.
The symbol on the product or on the
accompanying documentation indicates that it
should not be treated as domestic waste but
must be taken to an appropriate collection
centre for the recycling of electrical and
electronic equipment.
Scrap the appliance in accordance with the local
regulations on waste disposal.
For further information regarding the treatment,
recovery and recycling of this appliance, contact
the competent local office, the domestic waste
collection service or the shop where you
purchased the product.
Energy saving
Preheat the oven only if specified in the Product
•
Sheet cooking table or in your recipe.
Use dark, black painted or enamelled baking
•
moulds as they absorb heat very well.
This oven is designed solely for use as a household
•
appliance for cooking food. Other uses are not
allowed. The Manufacturer declines any liability
for improper use or incorrect setting of the
controls.
Any repairs or operations must only be carried
•
out by a qualified technician.
Do not expose the oven to atmospheric agents.
•
Do not place heavy objects on the door, as they
•
could damage the oven compartment and hinges.
Do not cling to the door.
Do not hang anything heavy on the oven door
•
handle.
• Do not cover the bottom of the oven with
aluminium foil or other objects.
The oven door must close properly. Keep the
•
door seals clean.
Never pour water directly inside the oven when
•
hot. The enamel could become damaged.
15
Page 4
61002001.book Page 16 Tuesday, March 25, 2008 4:46 PM
The juices of fruit dripping from the pan may
•
leave permanent stains. It is advisable to clean the
oven before reusing it.
To avoid scratching the coating, do not drag pots
•
and pans across the bottom of the oven.
Residual condensation after cooking could
•
eventually damage the oven and surrounding
kitchen units. It is advisable to:
- set the lowest temperature;
- cover food;
- remove food from the oven;
- dry the wet parts when the oven is cool.
The panel and handle of the oven door become
•
hot when the appliance is switched on for a long
time at high temperatures.
Do not touch the oven with wet parts of the
•
body or use it when barefoot.
Do not pull the appliance or the power cable
•
to unplug it.
• Do not allow children to touch:
- the oven and its controls, especially when it is
on and immediately afterwards, to avoid
injury;
- packing materials (bags, polystyrene, metal
parts, etc.);
- the oven to be scrapped.
Make sure the electrical cables of other appliances
•
used near the oven do not touch hot parts and are
not caught in the oven door.
Some oven models have an air cooling system to
•
prevent the front of the oven and cabinet recess
from becoming too hot.
Caution:
located between the control panel and the oven
door. Therefore do not obstruct the ventilation
openings.
•
•
•
•
•
•
•
Hot air comes out through an opening
Do not place flammable materials in the oven or
near it: they could catch fire if the appliance is
inadvertently switched on.
Use oven gloves to remove pans and accessories
when the oven is hot.
If alcoholic beverages (e.g. rum, cognac, wine,
etc.) are added when roasting or baking cakes,
remember that alcohol evaporates at high
temperatures. Alcohol vapours can catch fire
when coming into contact with the electrical
heating element.
Do not heat or cook food in closed containers
in the oven. The pressure created inside could
cause them to burst, damaging the oven.
For cooking do not use containers made of
synthetic material (unless specific for oven use;
see the Manufacturer's instructions). They could
melt at high temperatures.
Pay attention when cooking with oil and fat.
In fact, the oil and fat could overheat and cause
afire!
Do not pull out fully loaded accessories. Be very
careful.
BEFORE USING THE OVEN
Remove the accessories from the oven and heat
•
it at 200 °C for about an hour to eliminate the
odours and fumes of the insulating material and
protective greases. It is advisable to keep the
window open during this operation.
16
Before using the appliance, remove:
•
- stickers on the front and oven door, except
for the dataplate;
- cardboard protection and protective plastic
film from the control panel and other parts
of the oven;
- any adhesive labels from the accessories
(e.g. under the drip-tray).
Page 5
61002001.book Page 17 Tuesday, March 25, 2008 4:46 PM
OVEN ACCESSORIES
The accessories supplied depend on the model.
The accessories provided with the oven are listed in
the separate Product Sheet (under Accessories).
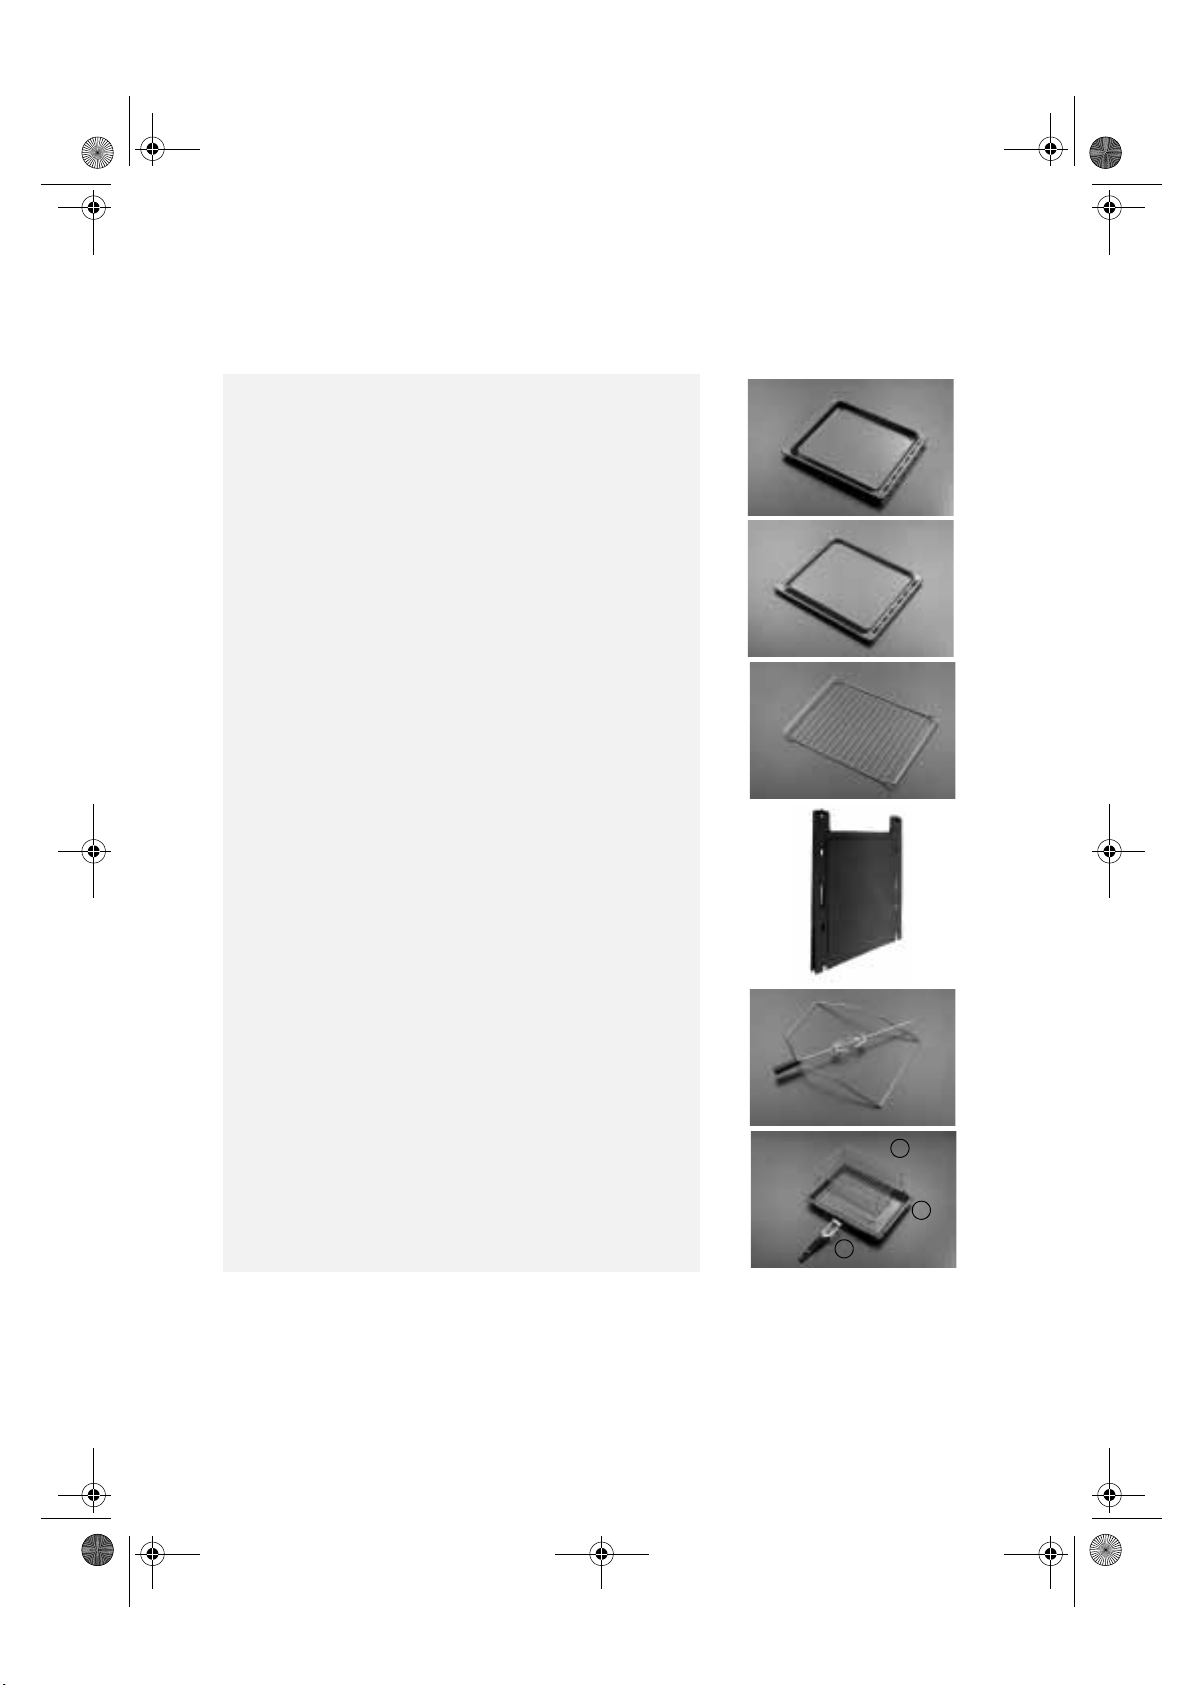
Drip-tray (1)
For collecting fat and bits of food when placed under the wire
shelf, or as a plate for cooking meat, chicken and fish, etc., with
or without vegetables. Pour a little water into the drip-tray to
prevent spatters of fat and smoke.
Baking tray (2)
For baking biscuits, cakes and pizzas.
Wire shelf (3)
For grilling food or as a support for pots, cake tins and other
cooking receptacle. It can be placed on any available level.
The wire shelf can be inserted with its curvature facing up
or down.
1
2
3
Catalytic side panels (4)
These panels have a special microporous enamel coating that
absorbs fat spatters. It is advisable to do an automatic cleaning
cycle after cooking particularly fatty food (see Maintenance and
cleaning).
Rotisserie (5)
Use the rotisserie as indicated in the relevant section in separate
Product Sheet.
Grill Pan Set (6)
The set comprises a wire shelf (6a), an enamelled recipient (6b)
and one or two handles (6c).
This set must be placed on the wire shelf (3) and used with the
Grill function.
4
5
6a
6b
6c
6
17
Page 6
61002001.book Page 18 Tuesday, March 25, 2008 4:46 PM
OVEN ACCESSORIES
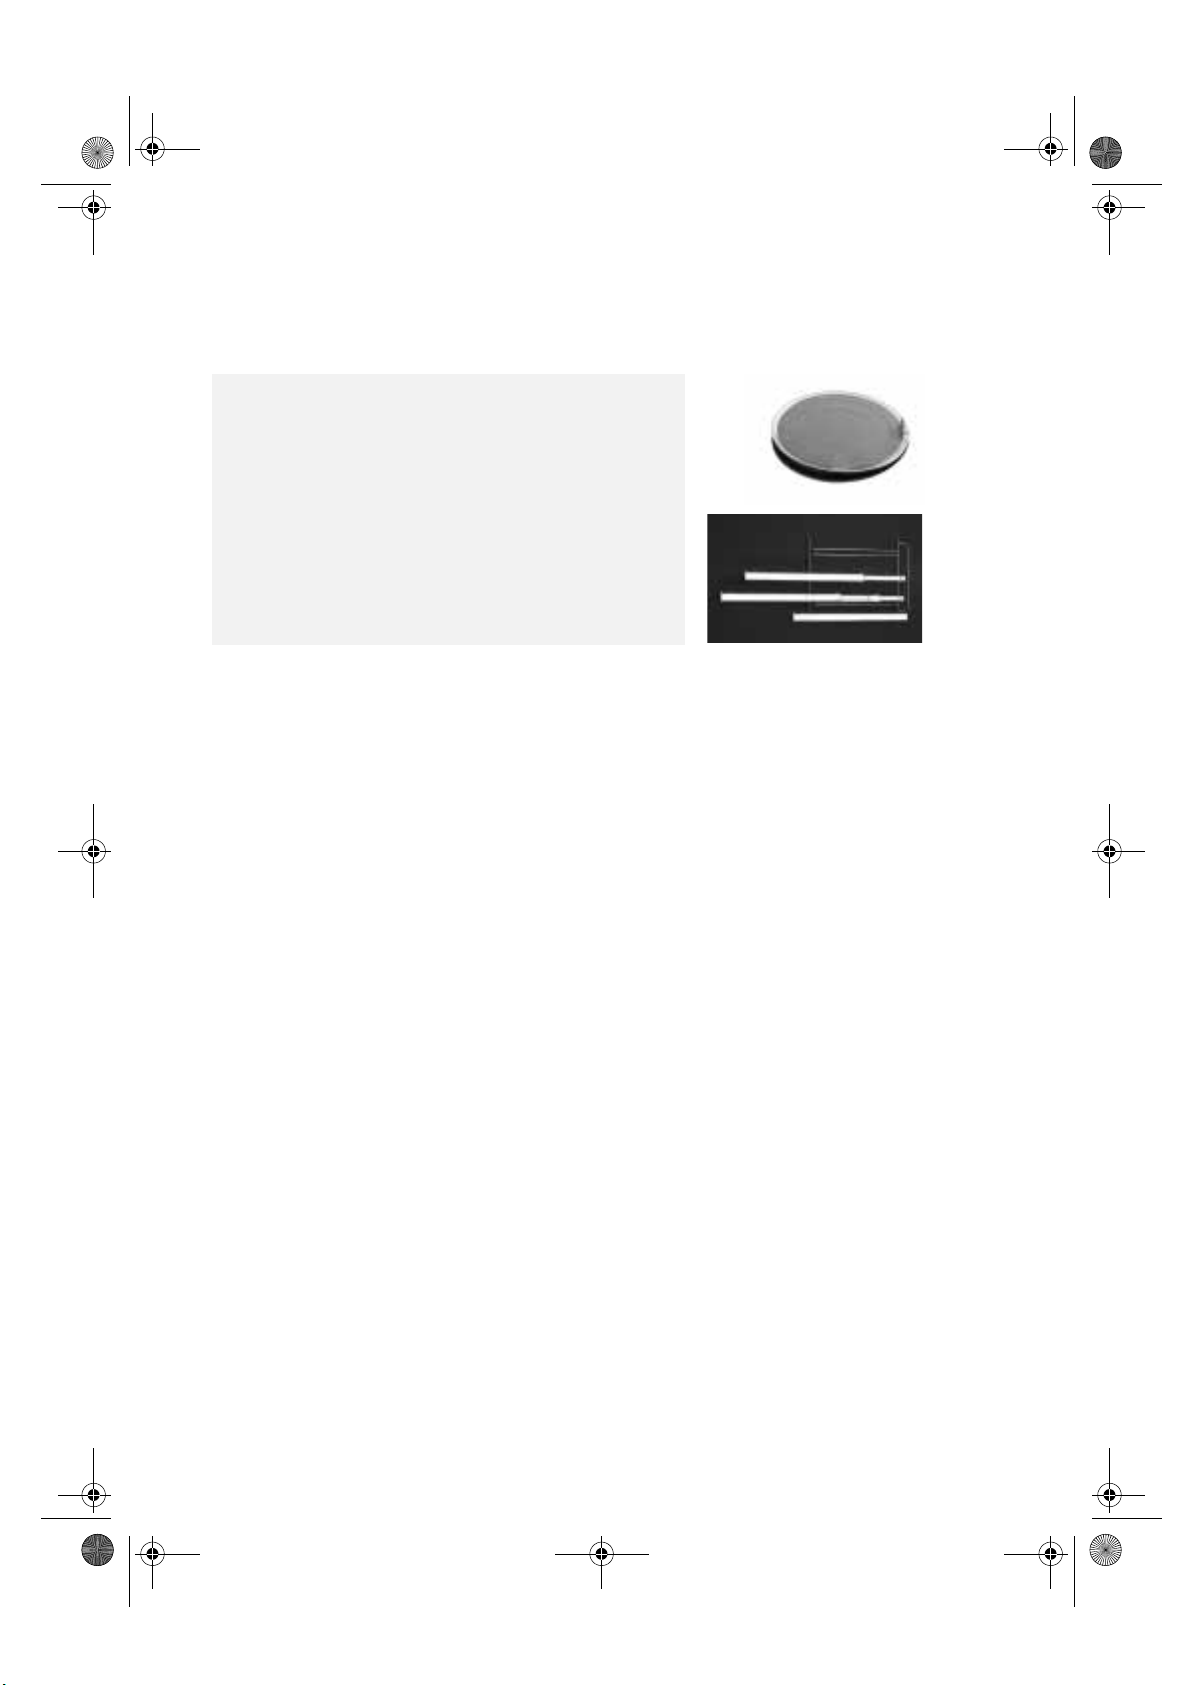
Grease filter (7)
Use
wall of the oven compartment, opposite the fan.
It can be cleaned in a dishwasher and used with the fan-assisted
function.
for particularly greasy cooking. Hook it on the rear
only
Sliding shelves (8)
They allow the wire shelves and drip-trays to be pulled half out
during cooking.
Suitable for all the accessories, they can be cleaned in a
dishwasher.
MAINTENANCE AND CLEANING
7
8
Important:
steam cleaning equipment.
Never use high pressure water or
Oven exterior
Clean with a damp cloth. If very dirty, add a few
•
drops of dish washing detergent to the water.
Dry with a dry cloth.
Do not use corrosive or abrasive detergents,
•
as they can create dull areas.
If one of these products accidentally comes into
contact with the oven, immediately clean it with
a damp cloth.
Slight colour differences on the front of the
•
appliance are due to the use of different
materials, such as glass, plastic and metal.
Ovens with aluminium front panel
Use a mild detergent and a soft window-cleaning
•
cloth or a microfibre cloth that does not leave
hairs. Wipe crosswise, without pressing.
Do not use corrosive products, hard sponges or
•
coarse cloths for cleaning. Clean the aluminium
surfaces with a dry cloth.
Accessories
Soak the accessories in water with washing up
•
detergent immediately after use. Food residuals
can be easily removed with a suitable brush or
sponge.
Oven compartment
Do not use abrasive sponges or metal scouring
•
pads. Use oven detergents, following the
Producer's instructions.
After every use, allow the oven to cool then clean
•
it to prevent deposits caused by food residuals.
Condensation may form inside the door and on
•
the seal during prolonged cooking or simultaneous
cooking on several levels, especially in case of food
containing much water (pizzas, stuffed vegetables,
etc.). When the oven is cold, dry the inside of
the door with a cloth or sponge.
Clean the door glass with a suitable liquid
•
detergent.
The oven door can be removed to facilitate
•
cleaning. The top heating element of the grill can
be lowered in order to clean the top of the oven
(only for some models).
Catalytic side panels and rear wall
(if provided) - Cleaning cycle
Operate the oven empty at 200 °C for about one
•
hour.
At the end of the cycle and with the oven cold,
•
if necessary use a damp sponge to remove any
food residuals.
• Do not clean the catalytic panels and rear
wall with abrasive products, coarse brushes,
pot sponges or oven sprays which could
damage the catalytic surface and make
them lose their self-cleaning properties.
18
Page 7
61002001.book Page 19 Tuesday, March 25, 2008 4:46 PM
Important: When carrying out the following operations
make sure to wear protective gloves. Carefully follow
these instructions in order to prevent possible injury and
to avoid damaging the oven door and hinges.
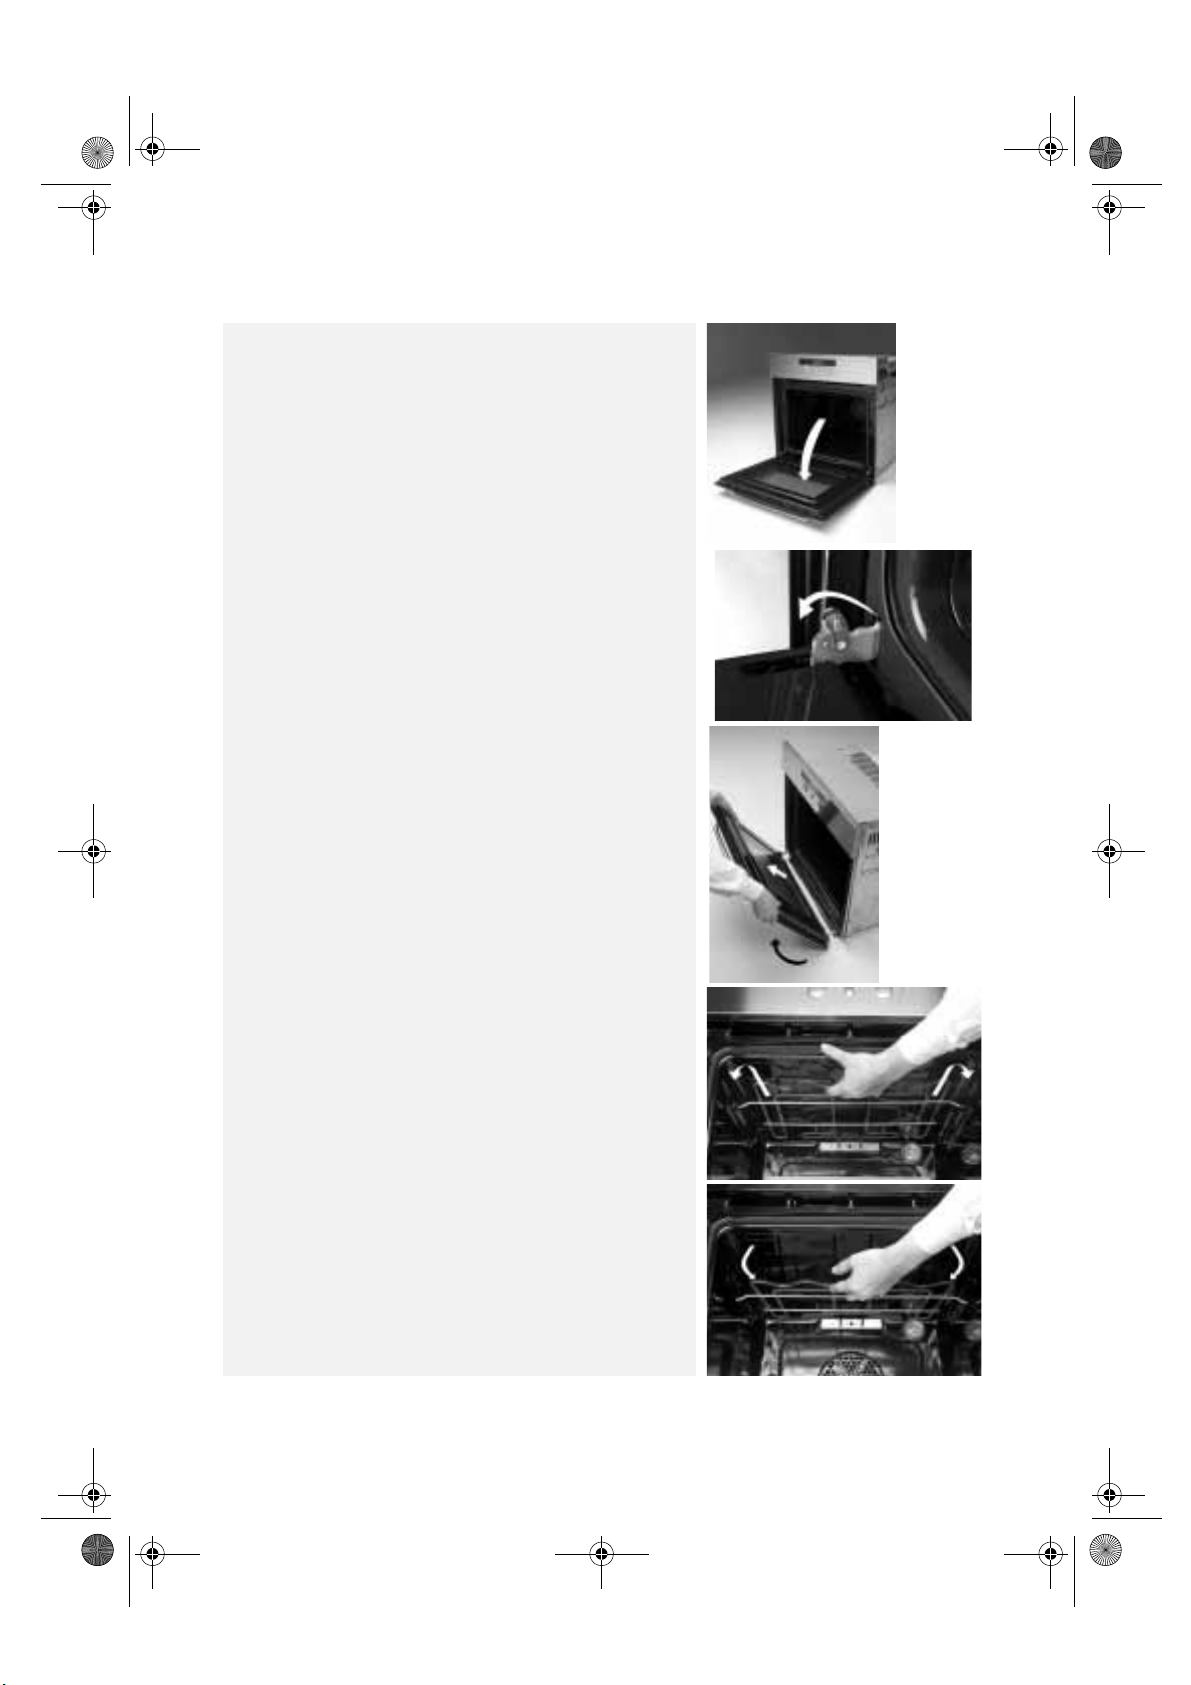
To remove the oven door:
Open the oven door completely (see fig. 1).
1.
Lift the two catches and push them forward as far as the stop
2.
(see fig. 2).
Close the door enough to remove it by pulling upwards
3.
(see fig. 3).
To refit the door:
Fit the hinges in their grooves and lower the door
1.
completely.
Lower the two catches.
2.
Close the oven door completely.
3.
Important:
order to prevent injury and to avoid damaging the oven door and
hinges.
Carefully follow the instructions given above in
1
2
To lower the top heating element (only for some models)
Clean only when the oven is cold.
Remove the side accessory holder grilles.
•
Pull the
•
heating element out a little and lower it
(4)
(5)
.
3
4
5
19
Page 8
61002001.book Page 20 Tuesday, March 25, 2008 4:46 PM
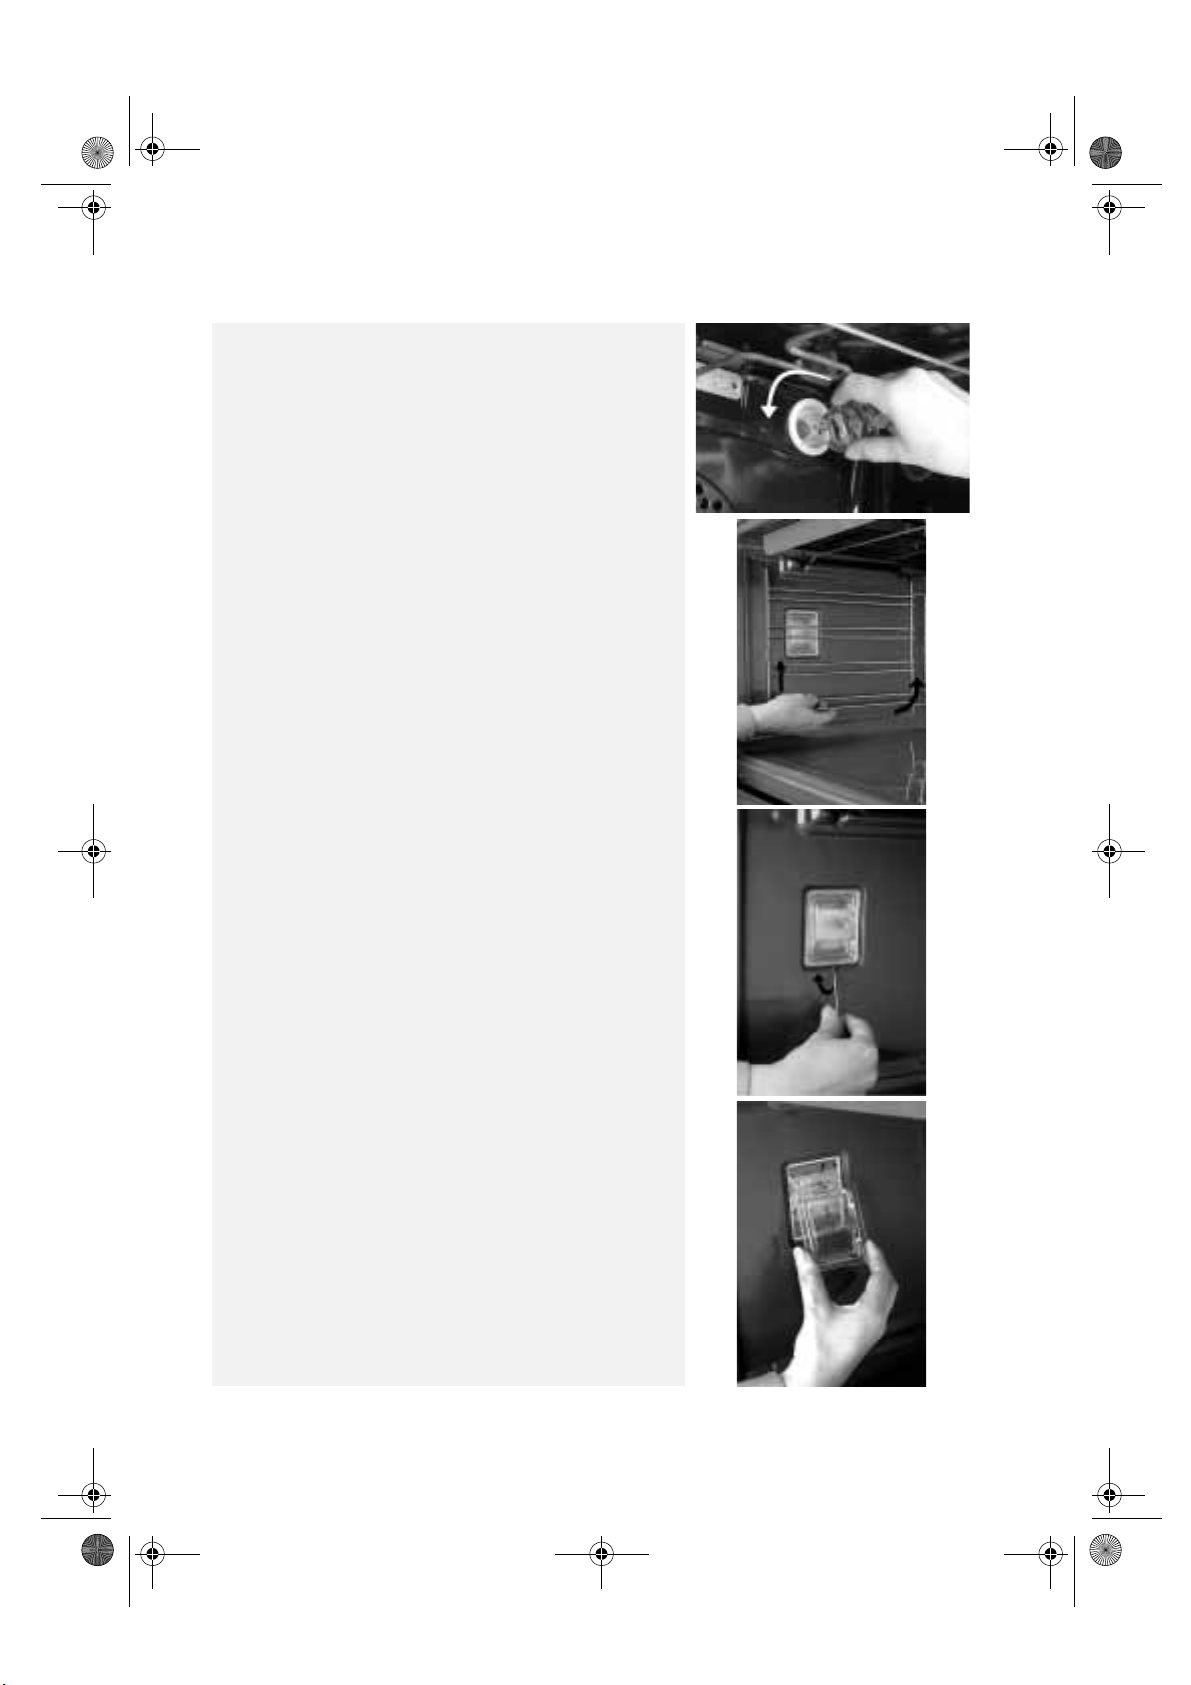
Changing the rear oven lamp (if provided):
Disconnect the oven from the power supply.
1.
Allow the oven cool before turning the lamp cover left to
2.
unscrew it (see fig. 1).
Replace the lamp (see note).
3.
Screw the lamp cover back on.
4.
Reconnect the oven to the power supply.
5.
Note: Only use 25 W/230 V, E-14 type T300°C lamps
available from the After-Sales Service.
Important: Do not use the oven before refitting the lamp
cover.
Replacing the side lamp (if provided):
Disconnect the oven from the power supply.
1.
Remove the left side accessory holder grille after allowing
2.
the oven cool (see fig. 2). Using a screwdriver, prise
outwards to remove the lamp cover (see fig. 3 - 4).
Replace the lamp (see note).
3.
Refit the lamp cover, pressing it against the oven wall to
4.
correctly hook it.
Refit the side accessory holder grille.
5.
Reconnect the oven to the power supply.
6.
Note: Only use 25 W/230 V, E-14 type T300°C lamps
available from After-Sales Service.
Important: Do not use the oven before refitting the lamp
cover.
1
2
Replacing the side halogen lamp (if provided):
Disconnect the oven from the power supply.
1.
Remove the left side accessory holder grille after allowing
2.
the oven cool (see fig. 2). Using a screwdriver, prise
outwards to remove the lamp cover (see fig. 3 - 4).
Do not replace the lamp with bare hands. Carefully remove
3.
the halogen lamp from the lamp holder and replace it with a
new one (see note).
Refit the lamp cover, press it against the oven wall to
4.
correctly hook it.
Refit the side accessory holder grille.
5.
Reconnect the oven to the power supply.
6.
Note: Only use 20 W/12 V, G4 type T300°C lamps
available from our After-Sales Service.
Important: Do not use the oven before refitting the lamp
cover.
20
3
4
Page 9
61002001.book Page 21 Tuesday, March 25, 2008 4:46 PM
TROUBLESHOOTING GUIDE
The oven does not work:
Check the mains power and that the oven is
•
electrically connected.
Turn the oven off and then on again to see if the
•
fault has been eliminated.
AFTER-SALES SERVICE
Before calling the After-Sales Service:
Try to eliminate the problem on your own,
1.
according to the points described in
“Troubleshooting Guide”.
Switch the appliance off and then on again
2.
to see if the problem has been eliminated.
If the fault persists after the above checks,
contact the nearest After-Sales Service.
Always specify:
a brief description of the fault;
•
the exact oven model and type;
•
the After-Sales Service number (number after
•
the word Service on the dataplate), located on
the right inside edge of the oven compartment
(visible when the door is open). The AfterSales Service number is also given in the
warranty booklet;
your full address;
•
your telephone number.
•
IMPORTANT:
Make sure the oven selector is not set to “0”
•
or on the “lamp” symbol .
- If the electronic programmer (if provided)
indicates “ ”, consult the separate
product sheet and/or the electronic
programmer description.
- If the electronic programmer (if provided)
indicates “F XX”, contact the nearest AfterSales Service. In this case specify the number
after the letter “F”.
- Make sure the mechanical programmer
(if provided) is set to “manual”.
If any repairs are required, contact an
Technical Service Centre
use of original spare parts and correct repair).
Failure to comply with these instructions
can compromise the safety and quality of
the product.
DECLARATION OF CONFORMITY
• This oven is intended to come into contact
with food products and complies with
European Regulation no. 1935/2004.
• It is designed to be used only as a cooking
appliance.
Any other use (e.g. for room heating)
is considered improper and therefore
potentially dangerous.
• This appliance has been designed,
manufactured and put on the market
in compliance with:
- the safety requirements of “Low Voltage”
Directive 2006/95/EC (replacing 73/23
EEC amended)
- the protection requirements of EMC
Directive 89/336/EEC
- the requirements of Directive 93/68/EEC.
(to guarantee the
authorised
21
 Loading...