

Page 1

AKZ 434 PRODUCT DESCRIPTION SHEET
GB FR
To p
shelf
Bottom
shelf
1)
The fan will come on when the oven reaches a certain
temperature and may continue for a few minutes after the oven has
been switched off.
During the pyro-clean cycle the oven fan runs faster than during
normal cooking functions in order to ensure more efficient cooling.
2)
Prevents food from coming into direct contact with the grill.
Nevertheless, you are advised not to touch the safety guard whilst
the oven is on.
ACCESSORIES
Wire shelf:
CONTROL PANEL
1. Control panel
2. Cooling fan
3. Grill safety guard
4. Door lock
1)
(hidden)
3)
2)
5. Catalyser
6. Upper heating element safety guard
7. Upper heating element
8. Rear oven lamp
9. Seat for turnspit
10. Oven fan
11. Lower heating element (hidden)
12. Oven door
3)
An automatic "door lock" mechanism activates during pyrocleaning and the indicator lamp lights up on the display
“”.
Drip tray:
Oven function chart
Function
Temperatures
not preset
Te m p e r a t u r e
range
Description of function
- Oven OFF - - -
LAMP
DUAL 35°/60° 35°C - 60°C -
CONVENTIONAL 50C 50°C - 250°C
FAN 50C 50°C - 250°C
GRILL 1 -
TURBO GRILL 1 -
PYRO-CLEAN
PYRO-CLEAN
EXPRESS
Important notes:
During the self-clean cycle you are advised not to remove any of the accessories provided with the oven to prevent any
further increase in the outside temperature of the door and to assure more thorough cleaning of the lower part of the oven.
- - • To switch on the oven light.
• To maintain constant temperature inside the oven.
• 35°C: to raise pasta, bread and pizza.
• 60°C: to keep cooked food warm.
• Ideally the first shelf level should be used.
• To cook meat, fish and chicken on the same level.
• Preheat the oven to the required cooking temperature and
place food in the oven as soon as the indicator light "C" switches
off.
• Ideally, the second or third shelf level should be used.
• To cook on up to two different shelf levels.
• If necessary, switch the positions of the dishes to cook food
more evenly.
• To grill steak, kebabs and sausages, to cook vegetables au gratin
and to toast bread.
• This function can be set to different power levels (min. 1 - max. 5).
• Preheat the oven for 3 - 5 min.
• The oven door must be kept closed during the cooking cycle.
• When cooking meat, pour a little water into the drip tray (on the
bottom level) to reduce smoke and fat spatters.
• Ideally the meat should be turned during cooking.
• To grill large joints of meat (roast beef and other roast meats).
• This function can be set to different power levels (min. 1 - max. 5).
• Preheat the oven for 3 - 5 min.
• The oven door must be kept closed during the cooking cycle.
• When cooking meat, pour a little water into the drip tray (on the
bottom level) to reduce smoke and fat spatters.
• Ideally the meat should be turned during cooking.
Further details can be found in the
instruction manual.
Further details can be found in the
instruction manual.
• Self-cleaning time can be set from a minimum of 2 minutes to a
maximum 3 hours.
• For a preset self-cleaning time of 1 hour 15 minutes.
1
2
1. On/Off - function selector knob
2. Button to select and confirm programmes
3. Knob to change preprogrammed values (temperature, time, levels)
5019 310 56741
3
Page 2

COOKING TABLES
FOOD Function Preheating
Lamb, mutton
Roast
(veal, pork, beef)
M
E
A
T
F
I
S
H
V
Tomatoes, stuffed peppers
E
G
E
T
A
B
L
E
S
B
P
R
I
E
Z
A
Z
D
A
C
A
K
E
S
C
O
N
F
E
C
T
I
O
N
A
R
Y
E
T
C
(1 kg)
Chicken, Rabbit, Duck
Tu r k e y
(3-4 kg)
Goose (2
Kg)
(Whole) (1-1.5 kg)
Gilt-head, Bass, Salmon
(Steaks) (1 kg)
Salmon, Swordfish
Roast potatoes
Pizza - Bread
Leavened cakes
Filled pies
(with cheese)
Ta rt s
Apple strudel
Biscuits
Choux buns
Shelf
(from the bottom)
X 2 2
X 2 -
X 2 2
X 2 -
X 2 2
X 2 -
X 1 3
X 1 -
X 2 3
X 2 - 200
X 2 1
X 2 -
X 2 - 200 50 - 60
X 2 - 180 50 - 60
X 2 - 200 60 - 70
X 2 - 180 60 - 70
X 2 3
X 2 -
X 2 -
X 2 -
X 2 -
X 2 -
X 2 -
X 2 -
X 2 - 180 50 - 60
X 2 - 180 50 - 60
X 2 -
X 2 -
X 2 -
X 2 -
X 2 -
X 2 -
Browning level
Temperature
(°C)
200 90 - 110
200 90 - 110
200 100 - 110
200 100 - 110
200 80 - 90
200 80 - 90
200 160 - 180
200 160 - 180
200 100 - 130
200 50 - 60
180 50 - 60
200
200
250 15 - 20
220 20 - 30
170 40 - 50
170 40 - 50
190 70 - 90
170 70 - 90
200
180
160
150 30 - 40
190 40 - 50
180 40 - 50
Cooking time
min.
100 - 130
50 - 60
50 - 60
50 - 60
50 - 60
30 - 40
COOKING TABLES
FOOD Function Preheating
C
A
K
E
S
C
O
N
F
E
C
T
I
O
N
A
R
Y
E
T
C
Savoury pies
Filled fruit pies,
e.g. pineapple, peach
Meringues
Vol -au- ven ts
Soufflés
Lasagna
X 2 -
X 2 -
X 2 -
X 2 -
X 2 -
X 2 - 4 -
X 2 -
X 2 - 190
X 2 -
X 2 -
X 2 1
X 2 -
COOKING TABLE FOR GRILL FUNCTION
FOOD Function Preheating
Steak
Cutlets
Sausages
Chops
Chicken legs
Kebabs
M
E
A
T
F
I
S
H
N.B: GRILL, turn meats halfway through cooking time.
Spare ribs
1/2 chicken
1/2 chicken
Whole chicken
Roast
(pork, beef)
Duck
Leg of lamb
Roast beef
Fish (gilthead, trout)
Fish (steaks)
Roast potatoes
Shelf
(from the bottom)
Level (from the
bottom)
X 3 - 4 4 - 5 40 - 50
X 3 - 4 4 - 5 30 - 40
X 3 - 4 4 - 5 30 - 40
X 3 - 4 4 - 5 30 - 40
X 3 - 4 4 - 5 40 - 50
X 3 - 4 4 - 5 40 - 50
X 3 - 4 4 - 5 40 - 50
X 3 4 - 5 50 - 60
X 2 3 - 4 50 - 60
X 2 2 - 3 60 - 70
X 2 3 70 - 80
X 2 3 80 - 90
X 2 3 70 - 80
X 2 3 50 - 60
X 2 2 - 3 50 - 60
X 3 - 4 4 - 5 30 - 40
X 3 3 - 4 50 - 60
Browning
level
Temperature
(°C)
200 50 - 60
190 50 - 60
180 50 - 60
180 50 - 60
120 150 - 180
120 150 - 180
200 30 - 40
200 50 - 60
190 50 - 60
200 50 - 60
190 50 - 60
Power le vel Cooking time (min.)
Cooking time
min.
30 - 40
Page 3
GB
IE
PROGRAMMER DESCRIPTION SHEET
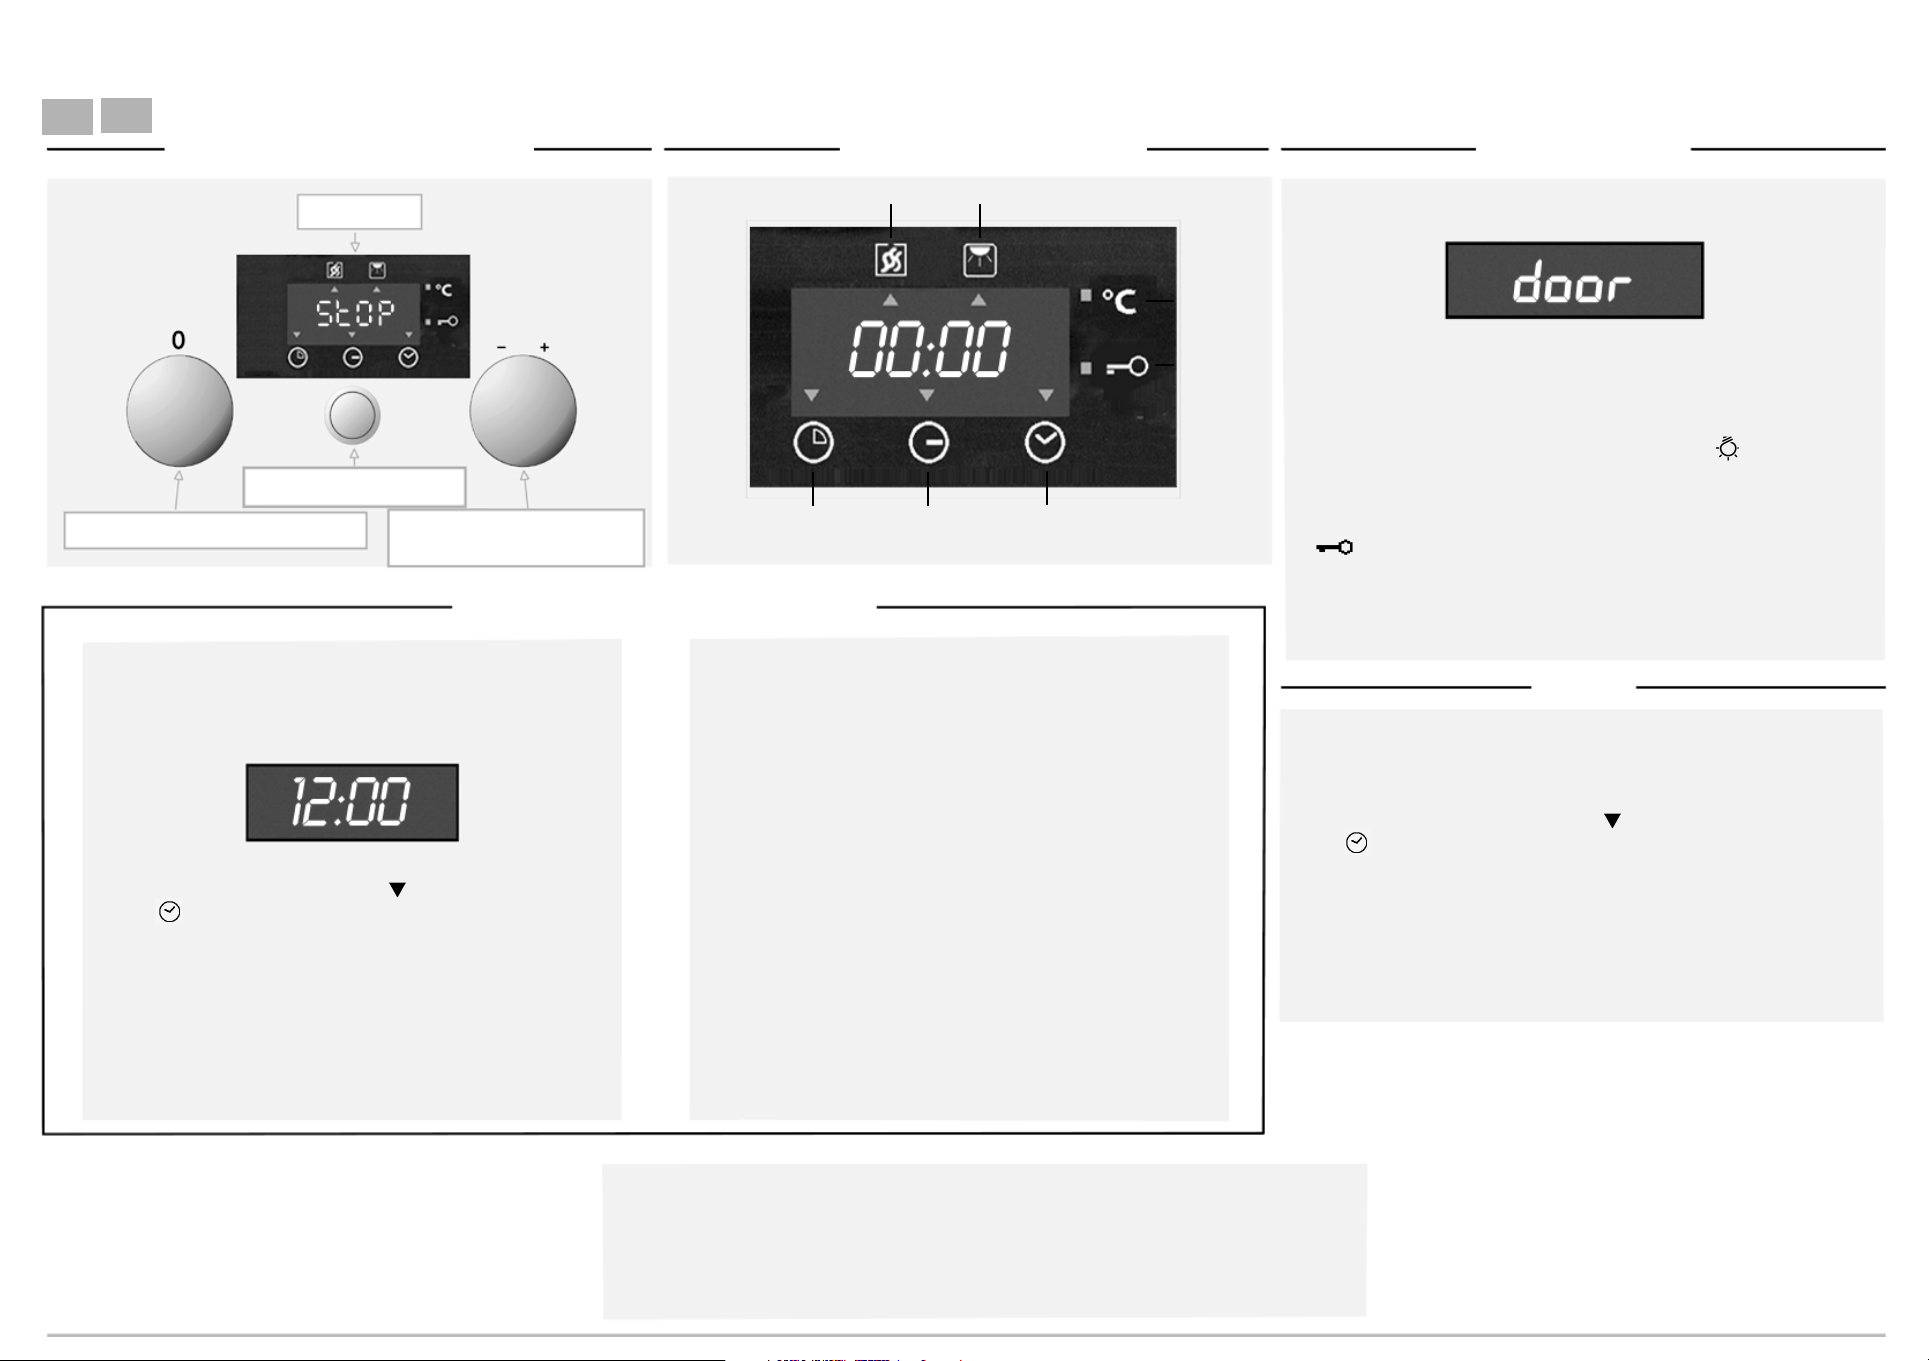
Description of control panel Description of display Safety features
and confirm settings.
Function Selector Knob 1
Display
Button to select
Change pre-set values
(Temperature, Time, Levels)
knob 2
Cooking time End of cooking time Watch
Using the oven for the first time
Keep warm
Extra browning
Temperature
indicator
light
Door Lock
• When the oven door is open the display will show:
Close the door to proceed
Automatic switch-off device
• For safety reasons, the oven switches off automatically (except for the
oven light ) after 4 hours of continuous operation .
PYRO-CLEAN (self-cleaning)
• During self-cleaning, an automatic “door lock” activates and the
“ ” indicator lamp lights up on the display.
When the oven is connected to the power supply for the first
time, or reconnected after a power failure.
St0P is shown on the display and the door is blocked for a few
seconds.
Setting the clock
Turn knob 1 to “O”.
Press the button until the indicator blinks above the
symbol .
Turn knob 2 (within 10 seconds) to set the time of day; the time
will blink on the display.
Press the confirm button or wait 10 seconds to have the setting
accepted automatically.
Select cooking function
Turn knob 1 to the chosen function (see product sheet): the
temperature or the pre-set grill level will blink on the display.
If the displayed value is correct, press the confirm button or wait
10 seconds to have the value accepted automatically.
Turn knob 2 to modify the value shown: the temperature or grill
level (where selected) will blink on the display.
Press the confirm button or wait 10 seconds to have the setting
accepted automatically.
The oven will turn on after 10 seconds:
the temperature lamp will light up on the display until the oven
reaches the pre-set temperature.
N.B. Values set can also be changed during cooking by turning
knob 2.
At the end of the cooking time, turn knob 1 to “O” to turn the
oven off. The time will reappear on the display.
To cancel any selection: turn knob 1 to “O”.
To disable button tones press the button for 5 seconds.
Repeat to restore button tones.
Timer
The timer can only be set when the oven is not in use and for a maximum
setting of 3 hours and 59 minutes.
To set the timer:
1. Leave knob 1 at “0”.
2. Press the button until the indicator on the display blinks next to
the symbol.
3. Turn knob 2 to set the required time.
4. Press the confirm button or wait 20 seconds for the setting to be
accepted automatically; once the set time has elapsed, a buzzer will
sound and “End” appears on the display. Press the button to stop the
buzzer and the time will return to the display.
Page 4
Selecting the cooking time Selecting self-cleaning functions
GB
IE
1. Set the function and temperature or grill level (see paragraph titled “Selecting cooking function”).
2. Press the button until the indicator blinks next to the symbol .
3. Turn knob 2 to select cooking time. The display will show the selected time with the “-” sign before it.
4. The oven will switch on 20 seconds later and the display will show the time remaining to end of cooking.
At the end of the cooking time, the oven switches off automatically, a buzzer sounds and “End” is shown
on the display. The oven light stays on for 25 minutes. Press the button to switch the buzzer off. Turn
knob 1 back to “0”, the oven light switches off and the time returns to the display.
Selecting the end of cooking time with delayed start
1. Set the function and temperature or grill level (see section titled “Selecting cooking functions”).
2. Press the button until the indicator blinks next to the symbol .
3. Turn knob 2 to select cooking time. The display will show the selected time with a “-” sign before it.
4. Press the confirm button, the indicator lamp will blink next to the symbol and the display will show
the time of day and cooking time.
5. Turn knob 2 to select the time you'd like the oven to switch off at (the oven can't be programmed more
than 23 hours and 59 minutes in advance).
6. Press the button until the time of the day reappears or wait 20 seconds for the setting to be accepted
automatically.
The oven automatically calculates the start cooking time on the basis of the total cooking time and
selected end of cooking time.
N.B. Turn knob 2 by one click to check the chosen temperature or grill level.
Press the button to check or modify both the cooking time and the switch-off time.
Self-cleaning functions (depending on model):
“Pyro-clean” : this function has a pre-set duration of 3 hours and can be altered up to a minimum of 2
hours. The display shows “Cln”.
“Express” : this function has a pre-set duration of 1 hour 15 minutes. The display shows “ECln”.
“6th Sense” : this function calculates the duration in accordance with the level of grime. The display shows
“SenS”. This function can only be selected when the oven is cold; if the oven is still hot, “Hot” will appear on
the display. The display will only show “Sens” once the oven has cooled sufficiently.
Turn knob 1 to the desired self-cleaning function (Pyro-clean, Express or 6th Sense) and press the confirm
button. At the end of self-cleaning, the display will show “End”.
Selecting the duration of the pyro-clean function
1. Turn knob 1 to the “Pyro-clean” function.
2. Press the button until the indicator blinks beside the
3. Turn knob 2 to select the required duration (the display will show the maximum pre-set duration of
“03.00”; this can be altered up to a minimum of 2h.).
Press the button to confirm.
Selecting the end of pyro-clean time with delayed start
1. Turn knob 1 to the required function (Pyro-clean, Express, 6th Sense). When selecting the “Pyro-clean”
function, the duration must be set first (see section titled “Selecting the duration of the pyro-clean
function).
2. Press the button until the indicator blinks beside symbol
3. Turn knob 2 to set the time you want the pyro-clean to finish.
4. Press the button to confirm.
.
Selecting special functions
The special“Keep Warm” and “Extra-browning” functions are available only when programming cooking time or switch-off time.
Keep warm
This function keeps the temperature in the oven at 60°C at the end of the cooking cycle when the oven is on
automatic function.
The “Keep Warm” function can only be selected in combination with functions.
1. Set the cooking and end of cooking times. See sections titled “Selecting the cooking time” and “Selecting
the end of cooking time”.
2. Press button 1 until the red indicator blinks on the display next to the symbol and “-C ” appears.
3. Turn knob 3 to “60C”.
4. Press button 3 or wait 20 seconds for the setting to be accepted automatically.
Extra-browning
Use this function to brown food (eg. a roast) while cooking. Choose either level 1, 2 or 3.
1. Set the cooking and end of cooking times. See the sections titled “Selecting the cooking time” and
“Selecting the end of cooking time”.
2. Press the key until the red indicator on the display blinks next to the symbol , and “0” appears.
3. Turn knob 2 to select the food browning level: (1, 2 or 3).
4. Press the button twice or wait 20 seconds for the setting to be confirmed automatically.
 Loading...