

Whirlpool AKZ 162/WH, AKZ 162/IX, AKZ 162 INSTALLATION
GB
S
S
t
p
2
4
T
“
T
T
a
A
W
s
l
2
T
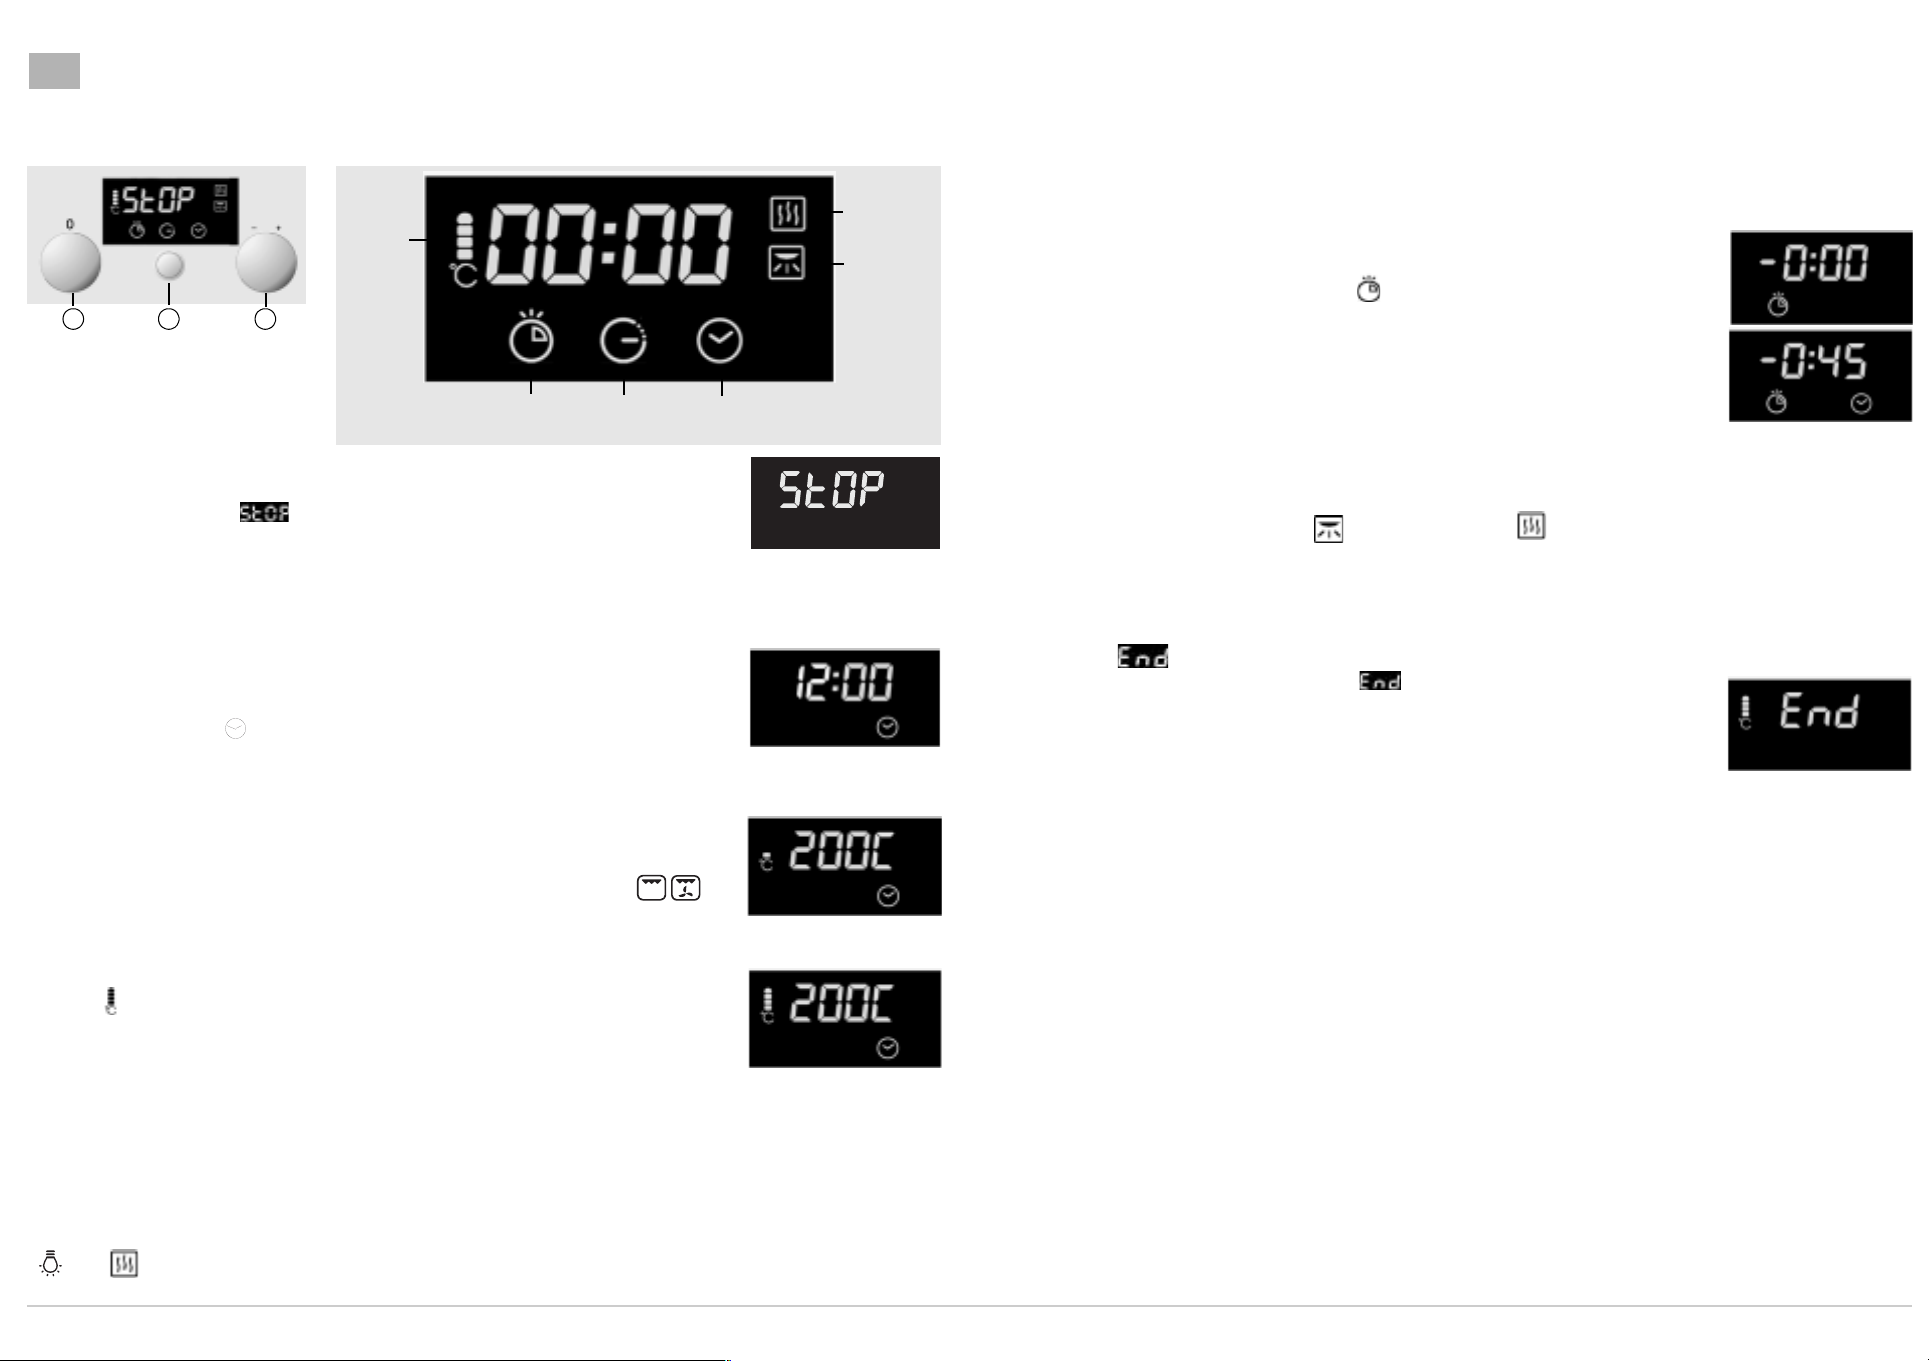
GUIDE TO USING THE ELECTRONIC PROGRAMMER
Electronic
Display
programmer
Temperature
increase
indicators
!
ON/OFF - Function Selector Knob
1
Button to select and confirm
2
programmes
Knob to change preprogrammed values
3
(temperature, time, levels)
Cooking time ClockEnd of
cooking time
Fast starting the oven
When the oven is connected to the power supply for the first time, or reconnected after a power
failure, the display indicates “ ”.
To switch on the oven:
1. Turn knob
2. press the
Selecting and changing the clock time:
1. Press the button
2. Turn the knob
3. Press the button
To modify the time of the day:
Press the button
Select cooking function:
1. Turn knob
display.
2. If this value is right, press the button
accepted automatically.
To change the pre-set temperature or grill level:
1. Turn knob
blinks on the display.
2. Press button
automatically.
The oven begins operation about 5 seconds after confirmation: the temperature increase
indicators on the display turn on sequentially, indicating the temperature increase on the
graduated scale
Notes:
The set values can be changed even during cooking.
At the end of cooking:
Switch off the oven by turning knob
Important notes:
To cancel any selection made, turn knob
Keeping button
Press button
“ ” and functions) after 4.5 hours of continuous operation.
to
1
2<<
1
3
2
°C
2
again for 5 seconds to reactivate. For safety reasons, the oven switches off automatically (except for the
2
.
“0”
button. The display shows
three times.
2
within 15 seconds to set the time of day. The time of day flashes on the display.
2
or wait 15 seconds to get automatic confirmation of the setting.
2
twice blinks on the display. Repeat the steps described above.
2
to the chosen function: the preset temperature or grill level will flash on the
to confirm or wait 10 seconds to have the setting
2
: the temperature (or grill level when knob 1 is on the selection )
to confirm or else wait about 10 seconds to have the setting accepted
.
back to
1
to
1
down for 5 seconds deactivates the audio signal associated with the manipulation of knobs and buttons.
“--:--”.
. The time of day appears again on the display.
“0”
.
“0”
Heat
Maintenance
Extra
browning
Operating the oven using the electronic programmer
electing the cooking time:
elect the cooking time (available with any function) to turn the oven on for a specified period of
ime. At the end of the specified time the oven will switch off automatically. The maximum
rogrammed cooking time is 3 hours and 59 minutes.
1. Set the function and temperature or grill level (see chapter: “Fast starting the oven” and
“Selecting the cooking function”).
. Repeatedly press the button 2, the indicator blinks on the display and
3. Turn knob
indicates that the chosen time decreases until
”
. The oven automatically starts cooking 20 seconds after the setting and the time remaining until
the end of cooking appears on the display.
Note:
to the display of the remaining time, wait 20 seconds or press the button
o use the special functions Extra browning and Heat Maintenance , consult the chapter
Special functions”.
o change the pre-set temperature or grill level:
urn the knob 3 and confirm by pressing the button 2 or wait about 10 seconds for automatic
cceptance of the setting.
ppearance of on the display:
hen the pre-set time (end of cooking) runs out, appears on the display and an acoustic
ignal sounds for 15 minutes in intervals. The oven switches off automatically and the oven's interior
amp stay on for 25 min.
1. Press button
. Turn knob 1 back to
he time of day appears again on the display.
clockwise: the selected time blinks on the display. The appearance of the dash
3
is reached.
“0”
To vie w or cha nge t he p rev iou sly set temperature, turn the knob
by one click. To return
3
2
to stop the acoustic signal.
2
. The lamp turns off.
“0”
“-0:00”
.
appears.
”-
5019 610 56189
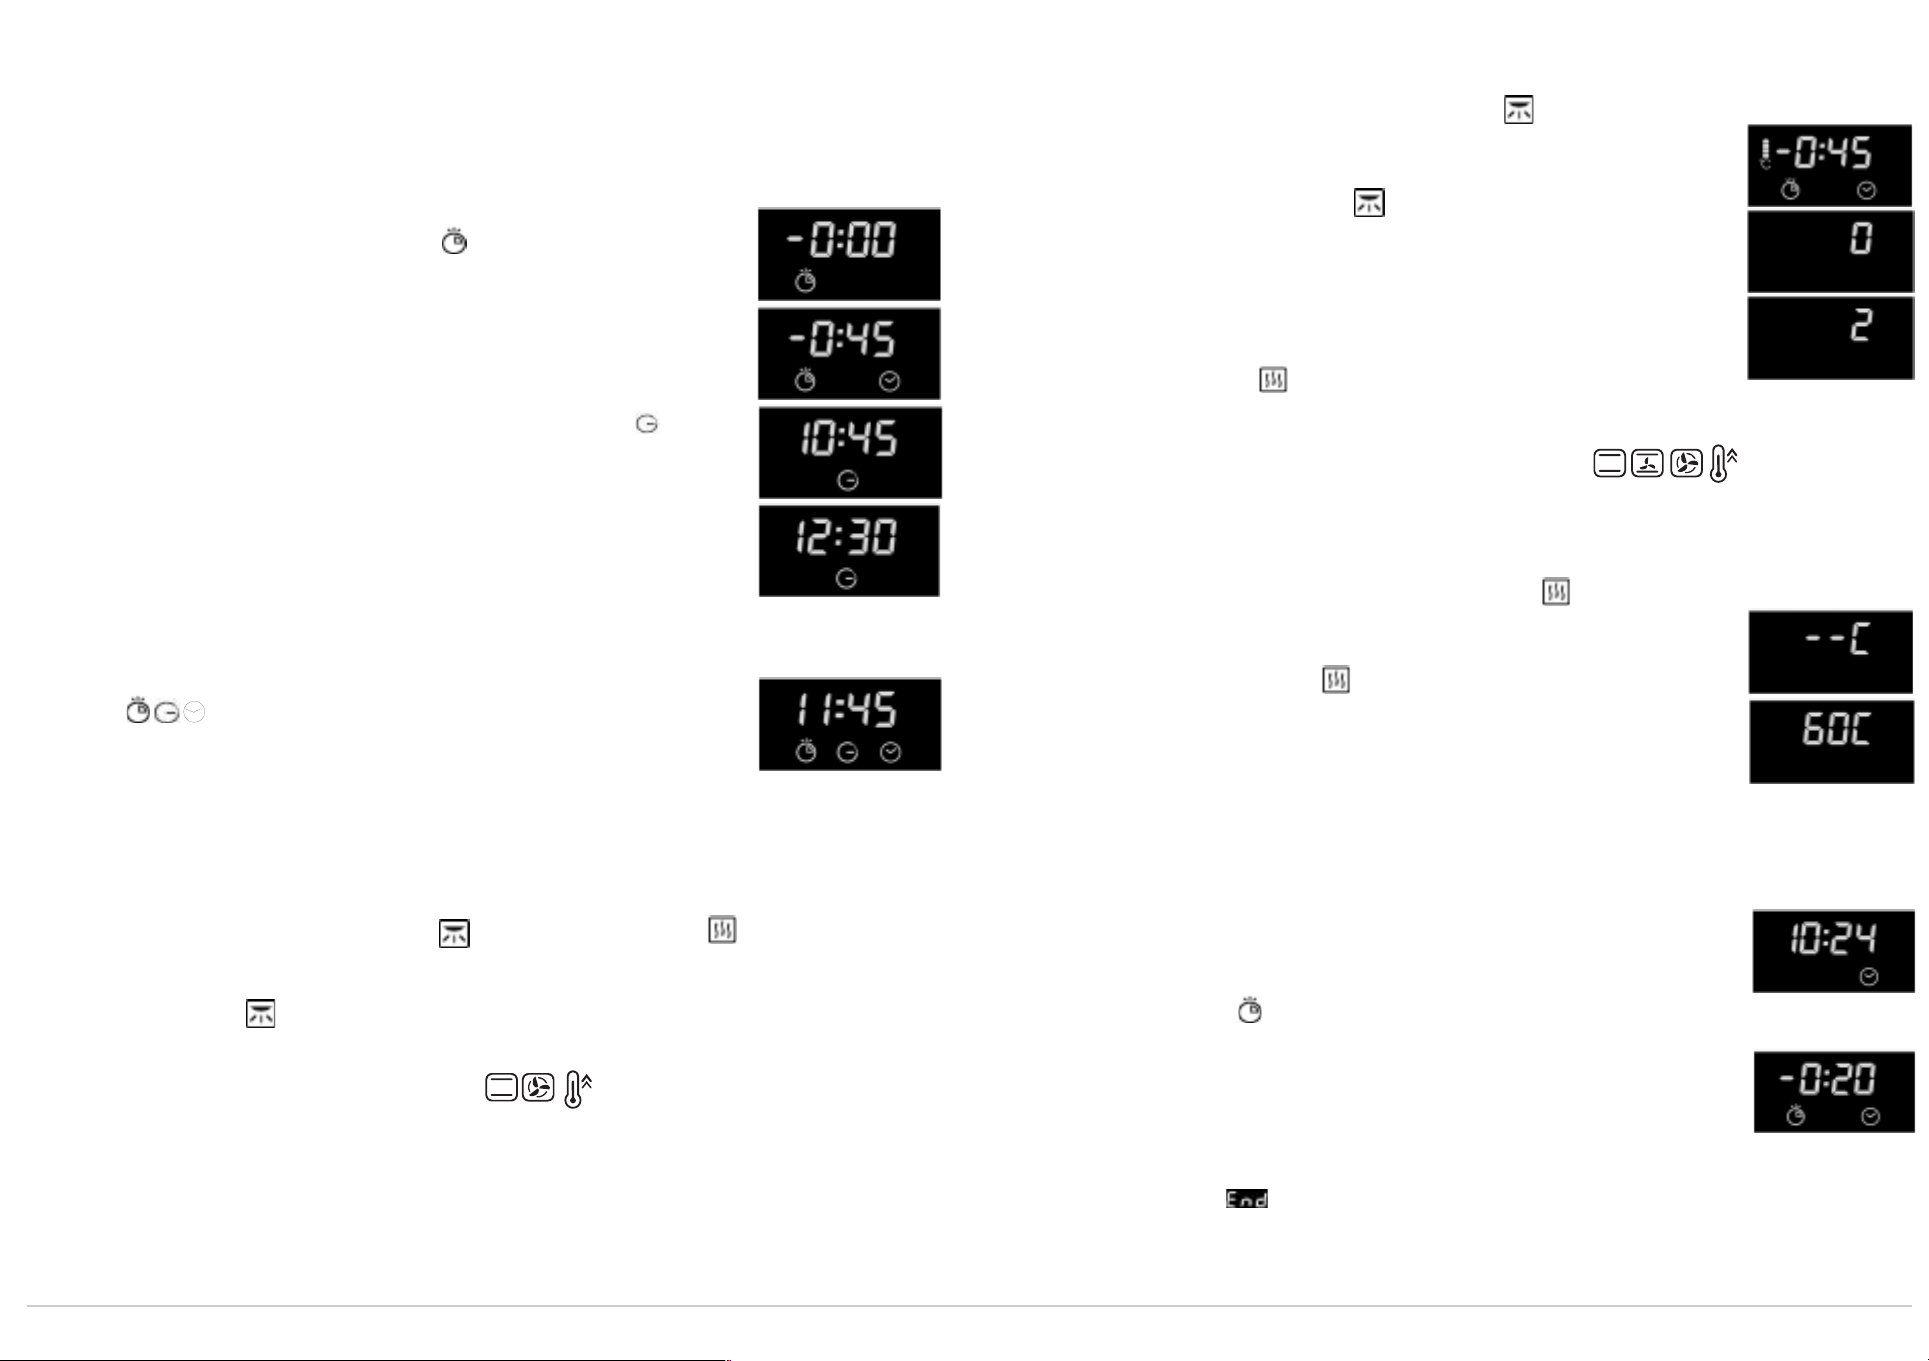
Setting end of cooking time
1.Set th
By using this function it is possible to preset the end of cooking time. The maximum programmed
cooking time is 23 hours and 59 minutes.
1. Set the function and temperature or grill level. See chapter: “Fast starting the oven”, paragraph:
“Select cooking function”.
Selecting the special Extra Browning function:
e cooking time or end of cooking time. See “Fast starting the oven” and “Selecting the
cooking function”.
2. Repeatedly press button
2
until the symbol blinks on the display and
“0”
appears.
2. Example: it is 10 a.m.: press button
appears.
3. Set the cooking time (e.g. 45 minutes) by turning the knob
display.
2
4. Press the button
the display indicates the time of day plus the cooking time (e.g.: time 10:00 + 45 minutes = ore
10:45).
5. Select the time when you want cooking to end by turning the knob
(e.g.: 12:30).
6. Repeatedly press the button
for the setting to be automatically accepted.
The oven will turn on automatically at the end of cooking time minus cooking time
(e.g. 11:45): on the display turn on.
To verify the chosen temperature or grill level, turn knob
To verify or change both the cooking time (e.g. 45 min.) and the end of cooking time (e.g. 12:39),
press the <<button
to confirm setting selection (e.g. 45 minutes): the indicator blinks and
2
.
2
, the indicator blinks on the display and
3
: the set time appears on the
3
2
until the time of day (10:00) appears, or wait about 20 seconds
3
by one click.
“- 0:00”
3. Turn the knob
4. Press button
3
to select the food's level of browning:
2
twice or wait 20 seconds to get automatic confirmation of the setting.
1, 2 or 3
.
Heat Maintenance
This function is used to maintain an oven temperature of 60°C at the end of cooking with automatic oven
operation.
The “Heat Maintenance” function can be selected only together with the functions .
Selecting the special Heat Maintenance function:
1. Set the cooking time or end of cooking time. See chapter: “Fast starting the oven” and “Selecting
the cooking function”
2. Repeatedly press button
display.
“60C”
3
3. Turn the knob
4. Press button
to
2
or wait 20 seconds to get automatic confirmation of the setting.
2
, the symbol blinks on the display and
.
“-- C”
appears on the
Special functions:
These functions are only available with the selection of cooking time or end of cooking time.
It is possible to select the two special functions simultaneously or separately.
(Extra browning and Heat Maintenance )
Extra browning
This function is used for browning food (e.g. roast) during cooking. It is possible to choose between levels
number 1 represents minimum browning and the number 3 maximum browning.
This function can be selected only together with the functions .
1-2-3
, where the
Minute minder
The minute minder can only be used when the oven is not in use, and allows a maximum setting of 3 hours
and 59 minutes.
To set the minute minder:
“0”
1
on
1. Leave knob
2. Press button
3. Turn knob
indicates that the chosen time decreases until
4. Press button
Once the set time has elapsed:
An acoustic signal is heard and appears on the display.
Press the <<button
2
3
clockwise. The set time blinks on the display. The appearance of the dash
2
. The display shows the time of the day.
, the symbol blinks on the display.
“0”
is reached.
or wait about 20 seconds to get automatic confirmation of the setting.
2
: The acoustic signal stops. The time of day appears again on the display.
“-”
 Loading...