

Whirlpool AKT325IX User Manual
AKT 325 BARBECUE OPERATION
GB
ESFR
ITPT
NOSE
FIDK
HUSK
BGRU
RO
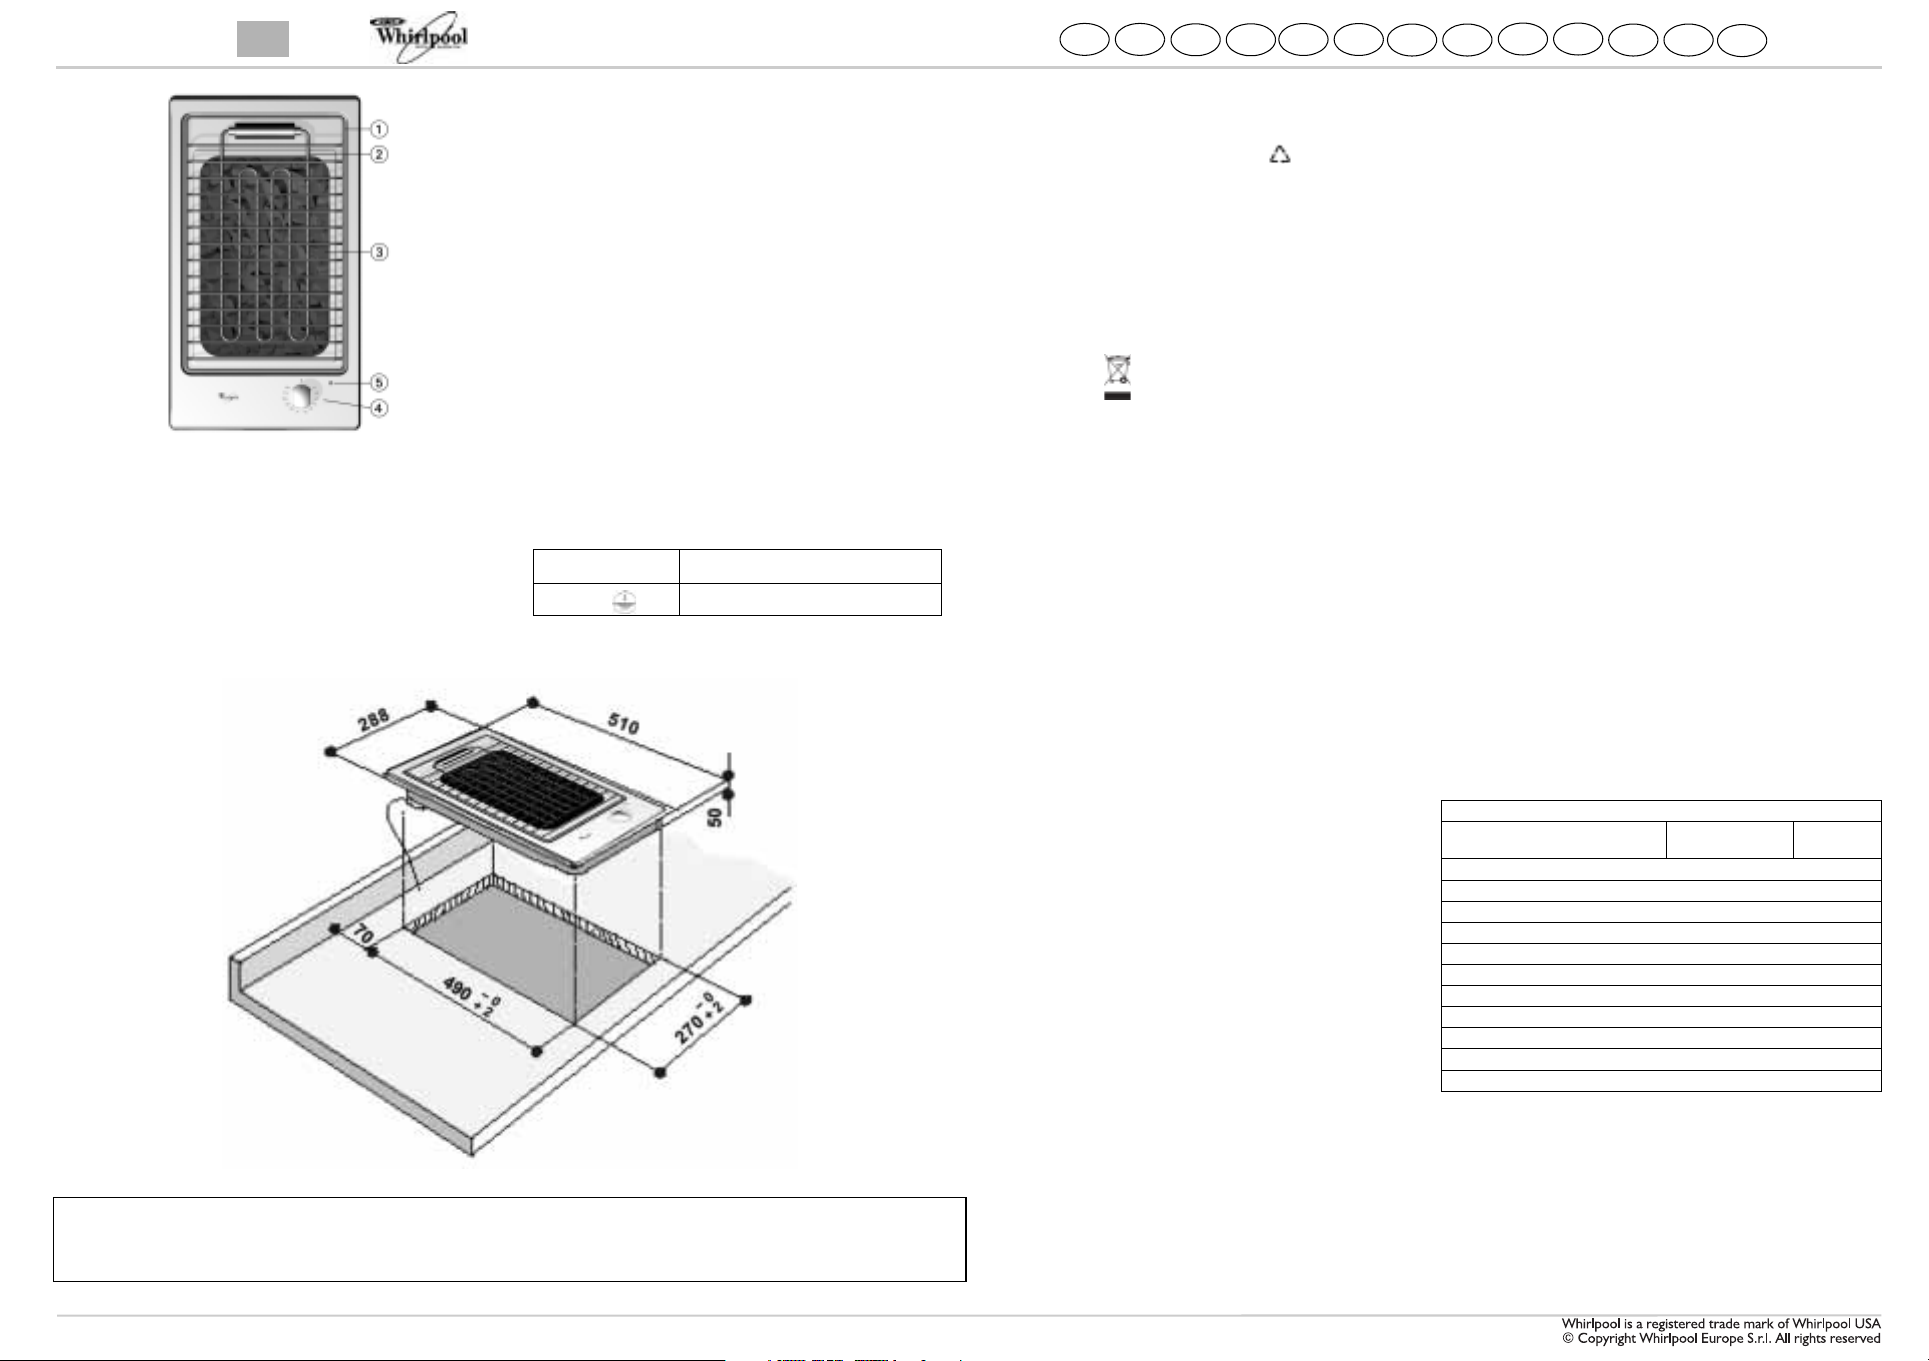
Grill
1.
Tiltable electric heating element
2.
Tr a y w i t h l a v a s t o n e
3.
Heating element control knob
4.
Heating element On indicator light
5.
• To use the barbecue turn the knob clockwise and
position at the required power setting.
• To switch off the hob return the knob(s) to position
• The hob is provided with 1 indicator light showing when
.
“0”
the barbecue is switched ON.
Make sure that the voltage indicated on the rating
plate corresponds to the mains voltage. The technical
data stated on the rating plate underneath the hob are
also provided below:
ELECTRICAL CONNECTION
Supply voltage Conductors: number and size
230 ~ +
H05 RR-F 3 x 1.5 mm
2
DIMENSIONS OF BARBECUE HOB AND WORKTOP (mm)
Type PLBTD 230 V ~ 50Hz 2.4 kW
PROTECTING THE ENVIRONMENT
Disposal of packaging
• The packaging material is entirely recyclable, and is
marked with the recycling symbol .
• Do not dispose of the various packaging materials
carelessly, but do so responsibly and in full compliance
with local authority regulations governing waste
disposal.
Disposal of old household appliances
• This appliance is marked according to the European
directive 2002/96/EC on Waste Electrical and Electronic
Equipment (WEEE). By ensuring this product is disposed
of correctly, you will help prevent potential negative
consequences for the environment and human health.
The symbol on the product, or on the documents
accompanying the product, indicates that this appliance may
not be treated as household waste. Instead it shall be
handed over to the applicable collection point for the
recycling of electrical and electronic equipment. Dispose of
in accordance with local standards governing waste disposal.
For further information on the treatment, recovery and
recycling of this product, contact the relevant local
authority, household waste collection service, or the outlet
at which the product was purchased.
BARBECUE
• This appliance grills meat and fish without fat or oil.
• Under the heating element there is a tray with lava
• All the parts, grill, tray and stones, can be easily
USING THE BARBECUE FOR THE FIRST TIME
• Remove the adhesive film which protects some parts.
• Carefully remove all the glue residues without using
• Wash and dry the grill carefully (better if in the
• Raise the heating element (A) until touching the stop
• Lower the heating element and put the grill on top.
• Switch the barbecue on by turning the energy regulator
USING THE BARBECUE
• Before cooking, check that the removable parts are in their
• Switch on the barbecue by turning the knob to position 12.
• The indicator light shows that the barbecue is On.
• Preheat for about 5 minutes until the lava stone
• Turn the knob to the desired position. The numbers
• Place the food on the grill and check the cooking
• To switch the barbecue Off, turn the knob to “0”.
FEATURES
stone, which guarantees a constant temperature of
about 250°C and absorbs the fat drops.
removed for cleaning.
abrasive substances, to avoid scratching the surfaces.
dishwasher).
(B) Fig. 4. Insert the tray and correctly position it, then
evenly distribute the lava rock.Lower the heating
element and put the grill on top.
knob to the maximum position (11-12) for about 15
minutes to remove the fatty residues.
correct position (tray with well distributed lava stone,
heating element completely lowered, grill in position).
becomes hot.
from 1 to 12 indicate the operating positions.
Temperature increases with the number.
process.
Warnings
• This barbecue is designed solely for use as a domestic
appliance for cooking food. No other type of use is
allowed. The Manufacturer declines all responsibility for
inappropriate use.
• Avoid exposing the appliance to atmospheric agents.
• Any repairs or maintenance work on the appliance
must be carried out exclusively by a qualified technician.
• Never touch the appliance with any wet part of the
body and do not operate it with bare feet.
• During use, accessible parts may become very hot. To avoid
the risk of burns, keep children away from the appliance.
• This appliance is not intended for use by persons
(including children) with reduced physical, sensory or
mental capabilities or lack of experience and knowledge
unless they have been given initial supervision or
instruction concerning use of the appliance by a person
responsible for their safety.
• Do not allow children or infirm persons to operate the
barbecue without supervision.
• Make sure children do not play with the appliance.
• Make sure that the electrical wires of other electrical
appliances near the barbecue do not touch hot parts.
• Always keep an eye on food while it is cooking. Oil and
fat can overheat and catch fire!
• Do not place plastic, aluminium foil, cloths, paper or
other flammable materials on the cooking surface while
it is still hot.
TIPS FOR GRILLING
• Preheat for 5 minutes until the lava stone becomes hot.
• The hotter the lava stone, the quicker and more
uniform is cooking.
• Do not pour water onto the hot or working barbecue.
• After grilling is finished, leave the barbecue switched on
for a few minutes to allow fat to be absorbed and burnt
by the lava stone.
TABLE FOR GRILLING
Times given are indicative and refer to the barbecue preheated to
maximum.
TABLE OF COOKING TIMES
Foods
Beef fillet 12 8
Steaks 12 12
Hamburgers 12 14
Sausages 12 13
Liver 12 5
Lamb chop 12 8
Chicken steak 12 9
Chicken thigh 11 - 10 17
Salmon steak 11 - 10 10
Trout 11 - 10 12
Trout baked in greaseproof paper 11 30
Note. As you get experienced with the use of the barbecue, you will
be able to determine the best cooking time for each food.
CARE AND MAINTENANCE
• Before cleaning the BARBECUE disconnect it from the
mains power supply and wait until it has cooled down
• Clean the outside with a cloth dampened with liquid
detergent. To make cleaning operations easier, remove
the grill and lava stone tray.
• Stainless steel surfaces can be cleaned with special
Energy regulator
position
Time
(min.)
5019 319 01349
To get full satisfaction from the hob, please read these instructions carefully and keep them for future consultation.
• The lava stone tray and the grill can be washed in the
sink but they are better washed in the dishwasher.
• After each cooking empty the residual fats from the lava
stone and wash it carefully. This is to prevent unpleasant
smells during cooking.
• Every 2 to 3 cookings wash the lava stone with running
water.
• Replace the lava stones about twice a year, depending
on frequency of use.
• Remove and dispose of all used lava stones and clean all
surrounding areas and accessories of the appliance.
• Replace uniformly all the new lava stones.
• Clean the heating element very carefully using a dry
cloth or a cloth dampened with water.
• Be careful: do not let water penetrate into the
appliance.
• Do not use steam jet cleaners because the humidity
could infiltrate into the appliance making it dangerous.
TROUBLESHOOTING GUIDE
The heating element does not work:
Check whether :
- The ON indicator light is off.
- Mains electrical power is on.
- The heating element is faulty. In this case disconnect
immediately the power cable and call the After-Sales
Service.
INSTALLATION
Recommendations
Important: Before any installation or maintenance
operation, disconnect the barbecue from the mains
power supply.
• Electrical connections must be made before connecting
the appliance to the electricity supply.
• Installation must be performed by a qualified technician
according to the manufacturer's instructions and current
local regulations.
• After unpacking the barbecue, check that there has
been no damage during transport.
the nearest dealer or Authorised After Sales
Service.
Preparation of fitted cabinet
• Perform all required cuts on the work top before
inserting the appliance. Carefully remove all chips or
residue which could impair efficient operation of the
appliance.
• The barbecue must be recessed in a work top with a
thickness of min. 30 and max. 50 mm.
• Insert a separator panel at a minimum distance of
20 mm from the bottom of the barbecue, so that it is
not accessible to the user.
• If the barbecue is to be installed next to a column unit, leave
a distance of at least 300 mm from the barbecue edge.
• Make an opening in the worktop, observing the
dimensions specified.
Fit the seal supplied onto the hob (if not already present),
after carefully cleaning the application surface.
ASSEMBLY
After having cleaned the perimeter surface, apply the
supplied gasket to the hob as shown in the figure.
If in doubt, contact
There are unpleasant smells:
- Check whether there are residues of cooking fat on
the lava stone tray.
AFTER-SALES SERVICE
Before contacting After-Sales Service:
• See if you can solve the problem yourself with the help
of the suggestions given in chapter “Troubleshooting
Guide”.
If after the above checks the fault persists, contact the
nearest After-sales Service.
Please give:
• a brief description of the fault;
• the type and exact model of the hob;
• the service number (i.e., the number that follows the
word SERVICE on the rating plate, located under the
hob). The service number is also indicated on the
warranty booklet;
• your full address;
• your telephone number and area code.
If any repairs are required, please contact an
After-sales Service
will be used and repairs carried out correctly).
Failure to comply with these instructions may
compromise the safety and quality of the product.
Important:
plastic protection film applied.
Ensure that the opening made in the worktop to house the
barbecue corresponds to the dimensional drawing
specifications, within the relative tolerances.
Never force the barbecue into the worktop.
•
1.
NOTE:
permit its upward extraction.
2.
3.
before installing the barbecue, remove any
For installation
supplied.
Position the hob in the work top opening made respecting
the dimension indicated on first page.
The power supply cable must be long enough to
To secure the hob, use the brackets
Fit the brackets into the relevant bores shown by the
arrow and fasten them by means of their screws in
accordance with the tickness of the work top (see fig. 1).
(to guarantee that original spare parts
, use the relative brackets and screws
authorised
(A)
provided with it.
Electrical connection
• Regulations require that the appliance is earthed.
• The electrical connection must be made by a qualified
technician according to the manufacturer's instructions
and current local regulations.
• The installer is responsible for the correct electrical
connection of the appliance and the observance of the
relative safety standards.
• To comply with directives governing safety, during
installation use a single-pole switch with a minimum gap
between contacts of 3 mm.
• Do not use multiple plug adapters or extension leads.
• After installation, electrical parts must not be accessible.
Connection to the electrical mains
Note:
the yellow/green earthing wire
the screw. If the power cable is not yet connected:
• strip approx. 70 mm of sheath from the power supply
cable
• strip approx. 10 mm of sheath from the wires
• open the terminal board
by means of a suitable tool.
• insert the power cable
the wires to the terminal board.
• close the terminal board cover.
• after the electrical connection, insert the hob from the
above and secure on the fixing brackets as shown in figure 1.
(B)
must be connected to
(C)
by pressing the side tabs
(D)
in clamp
(E)
and connect
Fig. 2
Declaration of conformity
• This cooktop is suitable for contact with foodstuffs and
complies with EEC (CE) Regulation n. 1935/2004.
• This cooking hob has been designed to be used only for
cooking Any other use (such as heating a room) is
improper and dangerous
• This cooking hob has been designed, constructed and
marketed in compliance with:
- safety objectives of the “Low Voltage” Directive 2006/
95/CE (which replaces 73/23/CEE and subsequent
amendments).
- protection requirements of EEC Directive “EMC”
89/336;
- requirements of EEC Directive 93/68.
Fig. 1
Fig. 3
 Loading...