

Whirlpool AKT 110 User Manual
AKT 110
DE GB FR NL ES PT GR SE NO DK FI PL CZ SKHURUBGRO LV LT ET
HOB INSTRUCTIONS
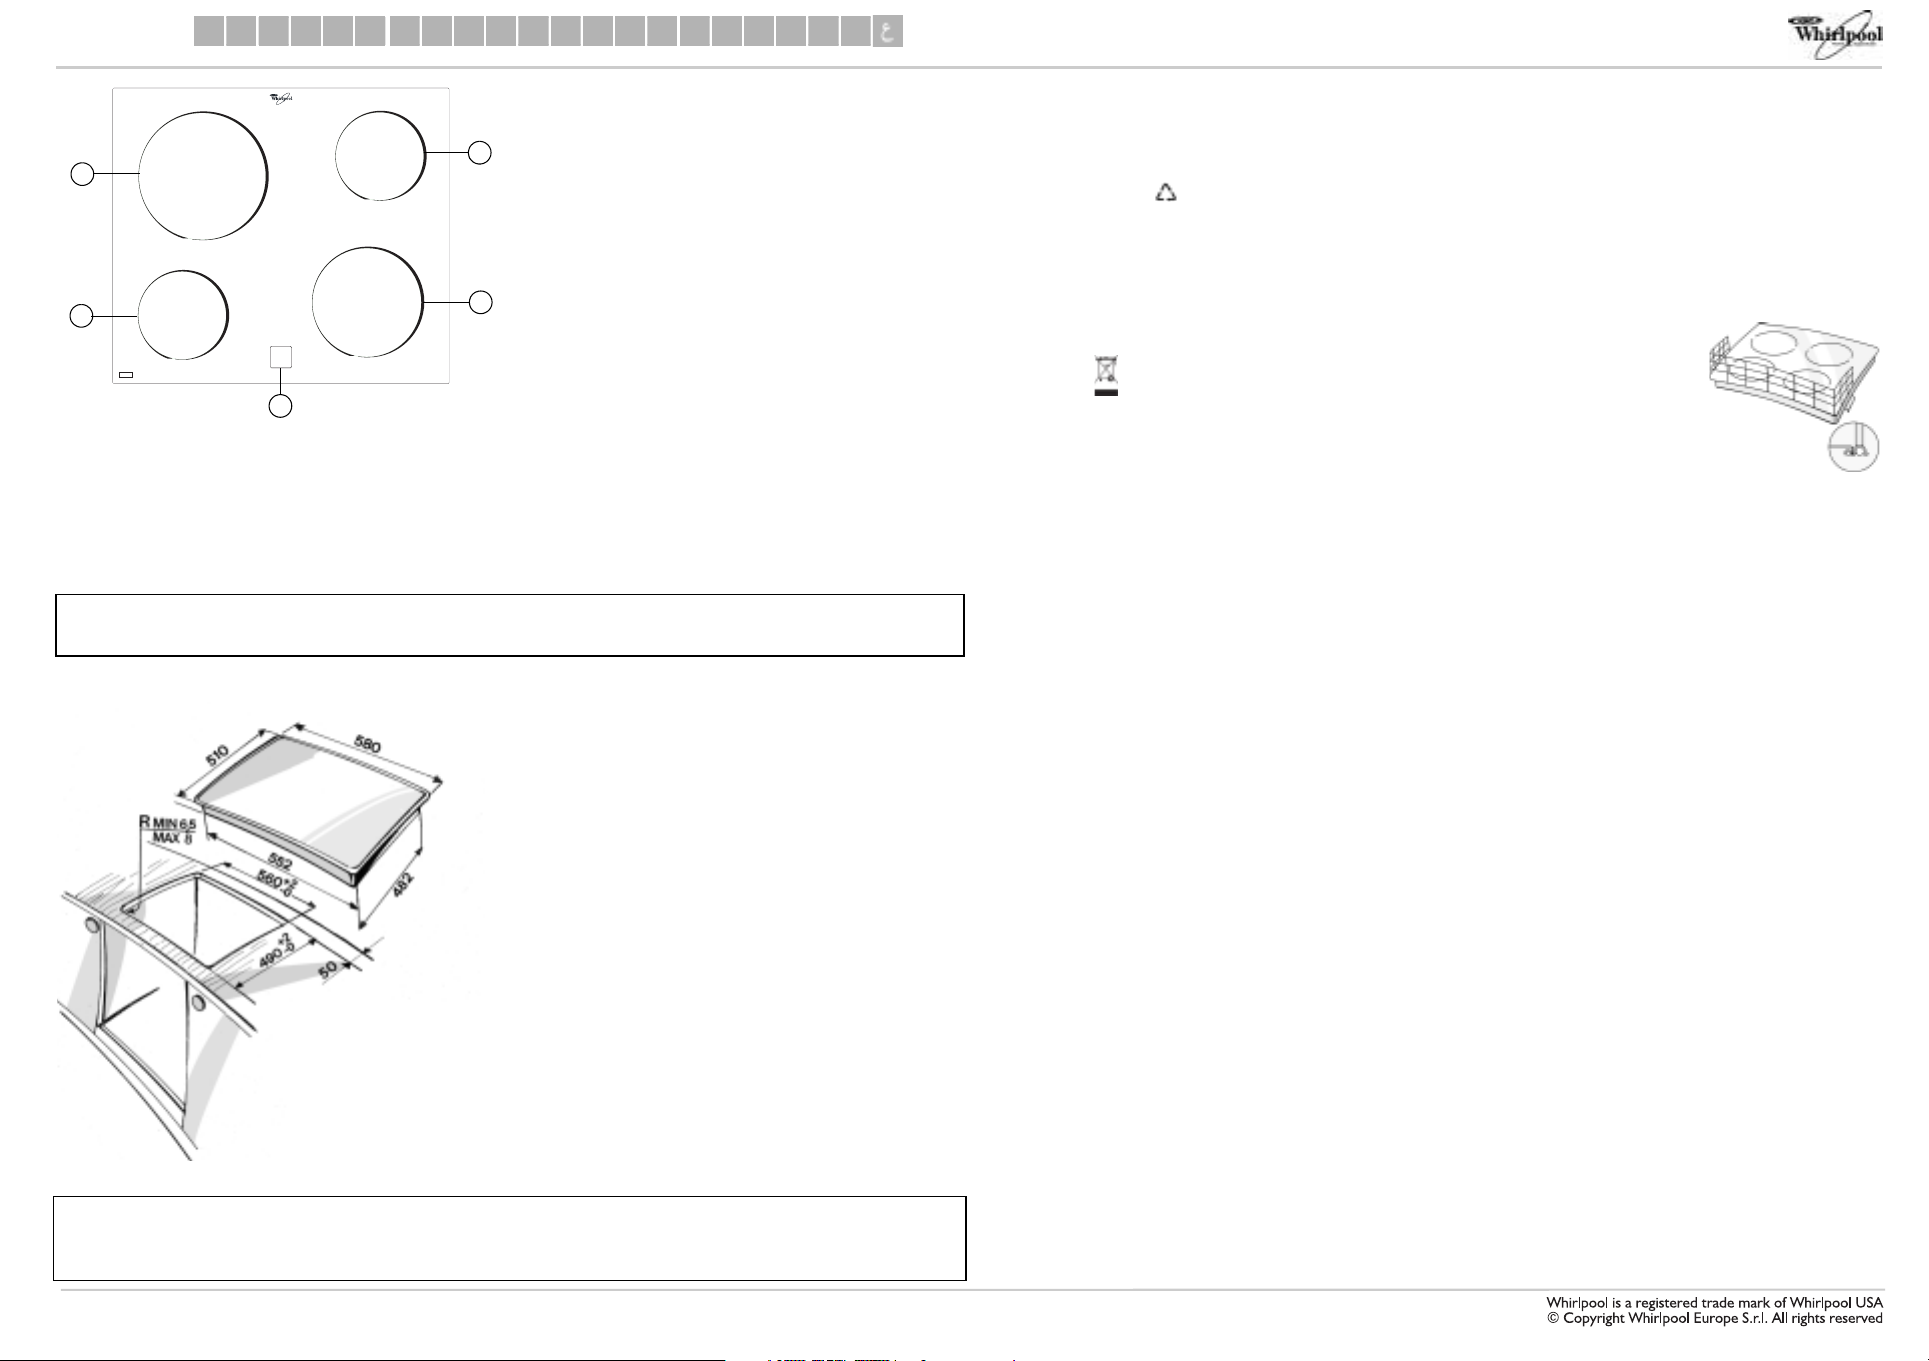
1.
Radiant cooking zone Ø 145
2.
Radiant cooking zone Ø 210
3
3.
2
1
4
Radiant cooking zone Ø 145
4.
Radiant cooking zone Ø 180
5.
Residual heat indicator lamps
5
Operation of cooking zones
The cooktop control knobs are on the control panel on
the oven.
• Set the knob to one of position 1-6, which correspond
to different temperatures.
• To switch off the cooking zones, set the knob to
position “0”.
Important:
To avoid permanently damaging the glass-ceramic top,
do not use:
- Pots with bottoms that are not perfectly flat
- Metal pots with enamelled bottom.
Any aesthetic defects (scratches, marks etc.) must be
reported at the time of installation.
Clean the cooktop frame with warm water and neutral solution only.
Do not use corrosive and/or abrasive substances which could damage the enamelled surface.
DIMENSIONS OF COOKTOP AND WORKTOP (mm)
Make sure that the voltage indicated on the rating plate is
the same as the mains voltage. Technical data is given on the
rating plate on the edge of the hob and also below:
Type PFEVS 230 V - 50 Hz 6,2 kW
To get full satisfaction from the hob, please read these
instructions carefully and keep them for future consultation.
PROTECTING THE ENVIRONMENT
Disposal of packaging materials
• The packing material can all be fully recycled, as confirmed by
the recycling symbol .
• The various parts of the packing must not be sent for waste,
but recycled in conformity with the regulations imposed by
local authorities.
Disposal of used household appliances
• This appliance is marked according to the European directive
2002/96/EC on Waste Electrical and Electronic Equipment
(WEEE). By ensuring this product is disposed of correctly, you will
help prevent potential negative consequences for the
environment and human health.
The symbol on the product, or on the documents
accompanying the product, indicates that this appliance may not
be treated as household waste. Instead it shall be handed over to
the applicable collection point for the recycling of electrical and
electronic equipment. Dispose of in accordance with local
standards governing waste disposal.
For further information on the treatment, recovery and recycling
of this product, contact the relevant local authority, household
waste collection service, or the outlet at which the product was
purchased.
Energy saving
• Use pots and pans whose bottom diameter is equal to that of
the cooker plates, or slightly larger.
• Only use flat-bottomed pots and pans.
• If possible, keep the pot covered when cooking.
• Cook vegetables, potatoes, etc. with little water in order to
cut down cooking time.
• A pressure cooker allows you to save even more energy and
time.
CAUTION
• Should the hob become cracked or broken, do not use it and
call the After Sales Service immediately.
• If the hob incorporates halogen cooking elements, do not stare
at them.
• The hob is designed for use as a domestic food cooker only.
No other type of use is allowed. The Manufacturer declines all
responsibility for inappropriate use or incorrect setting of the
controls.
• Do not expose the hob to atmospheric agents.
• Any repairs or adjustments must be carried out exclusively by
an authorised technician.
• Avoid touching the hob with wet hands or using it when
barefoot.
• This appliance is not intended for use by persons (including
children) with reduced physical, sensory or mental capabilities
or lack of experience and knowledge unless they have been
given initial supervision or instruction concerning use of the
appliance by a person responsible for their safety.
Do not allow children to touch
•
- the hob in general, to avoid burns.
During and immediately after use the hob reaches extremely
high temperatures;
- packing materials (bags, polystyrene, metal parts, etc.);
- the hob to be scrapped.
• Make sure that the electrical wires of other electrical
appliances near the hob do not come into contact with hot
parts of the hob itself.
• Always keep a watch on pans when cooking with oil and
grease. The oil and grease might overheat and catch fire!
• Do not use the hob as a support or worktop.
:
• Do not leave the hot plates/cookers turned on when they are
empty.
• Do not rest plastic, aluminium foil, cloths, paper etc. on the hot
plates/cookers.
• The hob is fitted with hot plates/cookers of different sizes.
Use pans whose bottom diameter is equal to that of the hot
plates/cookers, or slightly larger.
BEFORE USING THE COOKING HOB
Before use, remove:
- adhesives stuck on the hob;
- cardboard guards and protective plastic film;
- check whether the hob has been damaged during transport.
If in doubt, contact the After Sales Service.
ACCESSORY
Child guard AMH 122
This accessory can be obtained from
the After Sales Service under code
number 4819 310 18436 or from your
dealer under reference number
017124.
Care and maintenance
Important:
with high pressure water or steam cleaning equipment.
• Clean the hob, when it is cool, after each use. This will prevent
• Use a clean cloth, absorbent kitchen wipes and washing up
• Remove baked-on dirt with the special scraper tool
• Any food spills should be cleaned off before they dry.
• Do not use abrasive products, chlorine-based cleaners, oven-
• The hob should be treated periodically with specific products
never clean the appliance
the build-up of dirt and make cleaning easier.
liquid or a specific glass ceramic cleaner.
(if provided) and specific cleaning products.
cleaner spray or pan scourers.
available from the shops, following the manufacturer's
instructions.
TROUBLESHOOTING GUIDE
The hob does not work:
- Make sure that the power supply is on.
- Turn the hob off and on again, to make sure that the problem
has been solved.
- Make sure that the knob is not turned to
Turn the multi-pole switch to
then turn it back to
“On”
“Off”
.
“0”
for a few minutes and
.
AFTER SALES SERVICE
Before you call the After Sales Service
• Make sure that you cannot solve the problem yourself following
the points described in chapter “Troubleshooting Guide”.
If after the above checks the fault still occurs, get in touch
with the nearest After Sales Service.
Please give:
• a short description of the fault;
• the exact type and model of hob;
• service number (i.e., the number that follows the word
SERVICE on the rating plate under the hob itself). The service
number is also indicated on the guarantee booklet;
• your full address;
• your telephone number.
If any repairs are required, please contact an authorised
Service
(to guarantee that original spare parts will be used and
repairs carried out correctly).
Failure to comply with these instructions may compromise
the safety and quality of the product.
After Sales
5019 319 01132
To get full satisfaction from the hob, please read these instructions carefully and keep them for future consultation.

INSTALLATION
Recommendations
Important: Disconnect the hob from the mains before carrying
out any installation work or servicing.
• All electrical connections must be made before connecting the
appliance to the power supply.
• Installation must be carried out by a qualified technician in
accordance with the manufacturer's instructions and in
compliance with local regulations.
• Unpack the hob and make sure that the appliance has not been
damaged during transport.
dealer or the nearest service centre.
If you are not sure contact the
Preparing the housing unit
• Cut the worktop to fit before installing the appliance. Carefully
remove any shavings or sawdust that could prevent the
appliance from running properly.
Attention:
(plastic, ceramic, marble, stone, etc.) remember to ask After Sales
Service for the fixing plates (fig. 6).
• The hob must be fitted in a worktop with a minimum thickness
• There must be nothing between the hob and the oven
• An adjacent column unit must be installed at least 100 mm
• Cut an opening in the worktop of the given dimensions.
• We recommend you seal the internal edges of the worktop
• If not already in place, apply the supplied seal to the hob,
to install the cooktop on other surfaces than wood
of 20 mm and a maximum of 50 mm.
(e.g. cables, insulating material, etc.).
from the edge of the hob.
with wood glue or silicone.
after cleaning the adhesive surface thoroughly.
Glass-ceramic hob
Important: remove any protective film before installing the
hob.
Make sure that that the opening in the worktop for the hob is cut
according to the dimensions given in the drawing, paying attention to
the tolerance range.
The hob should not be forced into the worktop. Forcing the glassceramic top may cause it to crack (even at a later date)!
•
If the worktop is made of wood
brackets, spring clips and screws provided.
• Position the 4 clips (A), if not alreay fitted, around the cooktop
frame, in the slots provided, see Fig. 1.
• Measure the centre of the vertical sides of the cut out a shown
in Fig. 2.
• Position the centre of the brackets (C) on the centre of the
side previously identified.
• The upper edge of the brackets must be flush with the
worktop surface.
• Secure using the 4 screws (B) provided that should screwed
into the pre-prepared holes.
• Insert the cook hob into the pre-prepared hole ensuring that
the clips (A) lodge into the bracket slots provided
(CFig. 4 and 5).
, use the appropriate
Electrical connection
• Regulations require that the appliance be earthed.
• Connection to the mains must be carried out by a qualified
technician in accordance with the manufacturer's instructions
and in compliance with local regulations.
• The installer is responsible for connecting appliances correctly
to the mains and for observing the safety regulations.
• After the oven has been installed, the electrical components
must be inaccessible.
• Important: do not connect the oven to the power supply
before you have finished connecting the oven and cooktop.
• Before connecting the oven (or box) to the power supply,
make sure that the hob is among the ones listed in the hob/
oven pairing product sheet provided.
• Connect the connectors of the hob
the oven
guides visible on the top of the connectors.
• Then make the connection by pushing the connectors all the
way in, making sure that the tongue clicks into place.
• Unscrew the nut of the ground screw
on the top covering of the oven and insert the yellow/green
ground cable, leaving the washer in place. Screw the nut back
onto the screw and tighten it as far as it will go.
Important:
do not comply with the data given on the hob/oven pairing product
sheet located on the top of the oven, please request the adapter kit
code
AMC 873
matching the colours and alignment of the housing
(F)
if the connection and colour coding of the hob terminals
, available from After Sales Service.
to the connectors of
(G)
(fig. 8)
(H)
Declaration of conformity
• This cooktop is suitable for contact with foodstuffs and
complies with EEC (CE) Regulation n. 1935/2004.
• This hob (Class Y) has been designed to be used only for
cooking. Any other use (such as heating a room) is improper
and dangerous.
• This hob has been designed, constructed and marketed in
compliance with:
- safety objectives of the “Low Voltage” Directive 2006/95/CE
(which replaces 73/23/CEE and subsequent amendments);
- protection requirements of EEC Directive “EMC” 89/336;
- requirements of EEC Directive 93/68.
The Manufacturer reserves the right to change product specifications
without prior notice.
Fig. 1
Fig. 6
Fig. 2
Fig. 3
Fig. 4
Fig. 5
Fig. 7
Fig. 8
 Loading...