

Whirlpool AKR 916 IX, AKR 671 WNB INSTALLATION SHEET

EXTRACTOR OR FILTERING HOOD INSTALLATION
The minimum distance between the pan supports on the cooking appliance and the lowest part of the cooker
hood must not be less than 50 cm for electric cookers or 65 cm for gas or combination cookers. If the installation
instructions for the gas cooker specify a greater distance, this must be taken into account. Contact a qualified
technician for installation.
Do not connect the hood to the electrical power supply until installation is completed.
Warning! Check whether the exhaust duct and clamps are provided. If not, they must be purchased separately.
Extremely heavy product; hood handling and installation must be carried out by two or more persons.
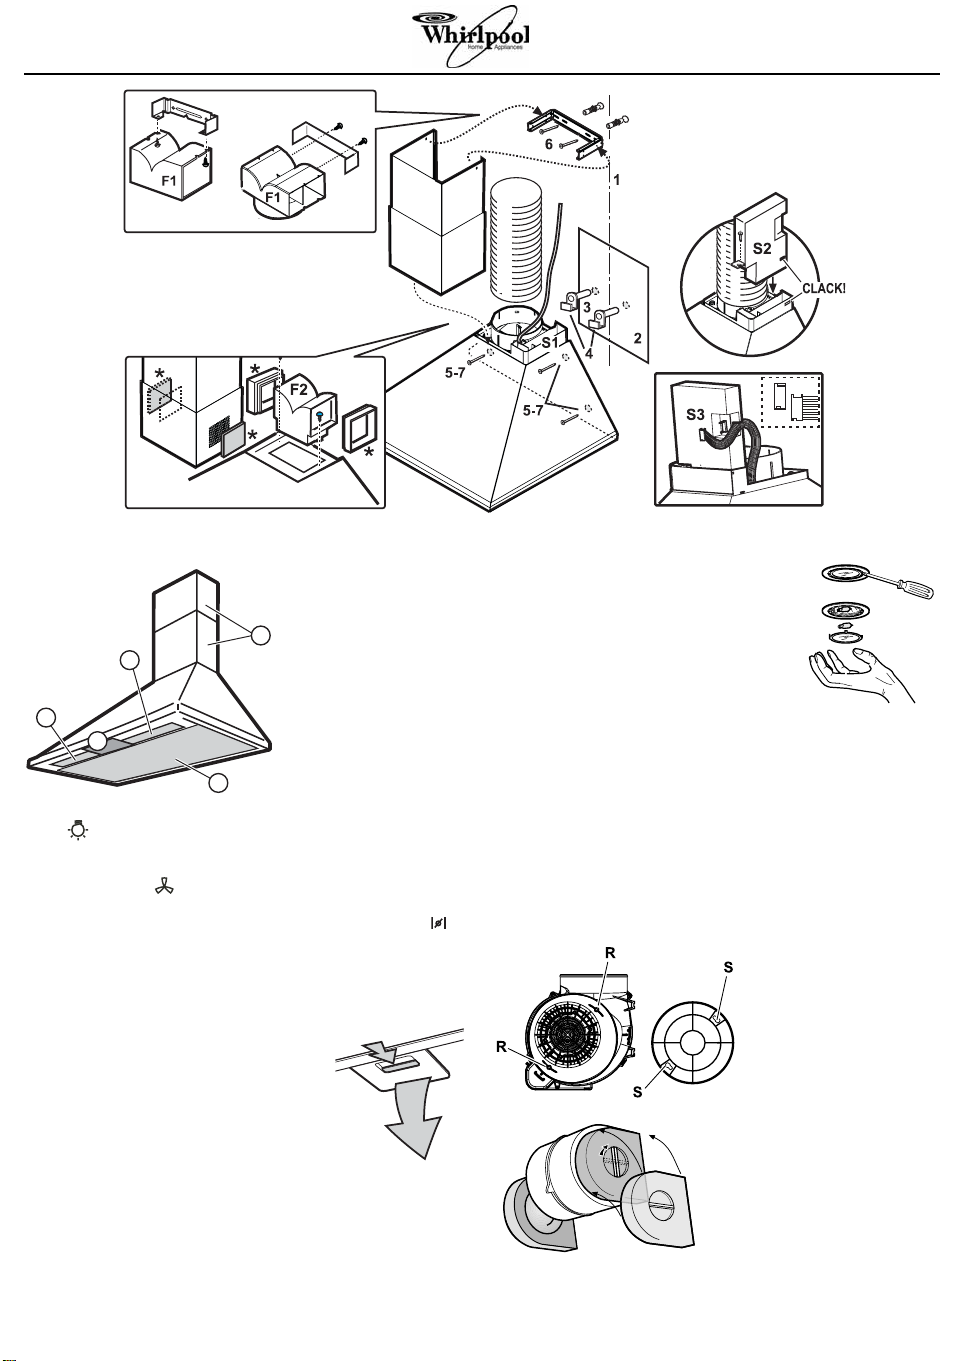
1. Mark a line on the wall, from the cooktop right up to the ceiling, corresponding to the centre-line of the hood.
2. Bearing in mind the minimum heights over the cooktop specified above, mark the height of the hood on the wall with a
pencil. Apply the drilling template to the wall over this mark.
3. Using the template supplied, mark the holes, drill them and insert the rawlplugs, then fit the 2 hooks (if provided) or partly
screw in 2 screws in the top holes.
4. Hang the hood and adjust the position using the adjustment screws on the hooks (if provided).
Note: The hood MUST be secured with a further 2 screws, to be inserted in the top holes and (if provided) with 2 screws
in the bottom holes.
5. Only for some models: mark the bottom holes (and top), remove the hood, drill, insert the rawlplugs (partly screw 2
screws into the top holes).
6. Fix the flue support to the wall as close as possible to the ceiling. For filter hoods, at this stage, also secure the deflector F1
with 2 screws if the flue is provided with top grilles (for flues with bottom grilles, see installation step “7”).
7. Hang the hood on the wall again and fix in place with the screws. For filter versions (flues with bottom grilles), the deflector
F2 must be fixed in place of the connector collar (model with fixture with 2 screws) or on the connector collar (model with
2 rear couplings and 1 front fixing screw).
Extractor Version: fumes are extracted and expelled to the outside through an exhaust duct fixed to the collar at the top of
the hood.
Caution! If the hood is equipped with a carbon filter, this must be removed.
Exhaust air must not be conveyed through a flue used for removal of fumes produced by gas combustion appliances or other
combustible materials, but must have an independent outlet. All national regulations governing extraction of fumes must be
observed.
Filter Hood: Air is filtered through a carbon filter and recycled into the surrounding environment.
Caution! If the hood is not equipped with a carbon filter, one must be ordered and fitted prior to use.
Installing the electronic control box
• If your hood has an electronic control box, S2 snap-fit it into its housing S1 and fix it in place with one screw.
• On models with electronic control panels, fit the card S3 in the socket alongside the control box S2.
Telescopic flue installation
• Connect the hood to the mains supply and fix the telescopic flue to the flue bracket with two screws. Slide the bottom
section down into its seat on the top of the hood. Fit the side grilles if provided.
5019 318 33221
GB
* Only present on some models
4
3
3
1
2
1. Control panel.
Light :
move the switch to the right or press the button to switch
on.
Extraction speed :
move the switch to the right or press the next button to
increase extraction speed (or open the electric shutter) .
2. Grease filters.
3. Lamp covers
(or halogen lamps, depending on the model).
4. Telescopic flue.
Grease filters:
Metal grease filters have an unlimited
life and should be washed once a month
either by hand or in a dishwasher at a
low temperature and with a short cycle.
Washing in a dishwasher can cause
grease filters to turn white, but this in
no way affects efficiency.
a. Press the handle to release the filter
b. Remove the filter.
Wash the filter and leave it to dry, proceeding in reverse
order to refit it.
a
Bulb/s:
Remove the filters and remove the
burnt-out bulb.
Refit the filters.
Halogen lamps:
Use a small screwdriver or other suitable
tool to prise off the cover. Snap-fit the
cover back on.
Use only max 40 W - E14 bulbs or
max 20 W halogen bulbs (depending on the model),
taking care not to touch them with your hands.
Fitting or replacing the carbon filter (filter hoods only).
Change the carbon filter every six months.
1. Remove the grease filters.
2. Fit the filter/s over the motor
according to the model:
•Align the pins R on the cowl with the slots S, then
turn the filter clockwise until it locks in place or
• turn the central handle clockwise.
3. Reverse the above procedure to remove the carbon
filter.
4. Refit the grease filters.
Or
b
5019 318 33221
 Loading...