


AKP 644
IT
First
Last
1
Functions selector knob
2.
Mechanical Analog clock
3.
Thermostat control knob
4.
Temperature red lamp
Important
: An optional kit consisting of an oven door
glass and of relevant mounting components, is available
by th e Af ter -Sa les Servic e. T he u se of the kit reduces the
temperature of the outer oven surface and is strongly
recommended if there are kids in the house.
Code N°: 4819 310 39186.
PRODUCT DESCRIPTION SHEET
Accessories:
Grid
Drip tray
OVEN
First...Last
1.
Control panel
2.
Cooling fan (not visible)
3.
Upper heating element
4.
Grill element
5.
Oven light
6.
Fan
7.
Lower heating element (not visible)
8.
Oven door hinges
9.
Oven door
CONTROL PANEL
: Runner positions
OVEN FUNCTIONS
0
Off
Oven light
STATIC FUNCTION
Use when all the food is on the same runner level.
-
Pre-heat the oven to the required cooking temperature and place the food inside as soon as the red thermostat indicator
light switches off.
-
Ideally, the shelf should be on the second runner level when using the static function.
STATIC FUNCTION + FAN
Use this function when cooking on two different levels.
-
Oven preheating is not necessary (except for pizzas and focaccia).
-
Switch the position of the dishes in the oven 10 minutes before the end of cooking time.
-
Remove the cooked dish and, if necessary, continue cooking the other one for as long as required.
GRILL FUNCTION
Use the grill function to cook small pieces of meat (steaks, sausages) and for making toasts.
-
The oven door must be closed during the cooking cycle.
-
Preheat the grill for about 5 minutes.
-
Arrange the meat on the grid with the drip tray underneath. Pour water in the drip tray to cover the bottom to reduce
smoke and fat spatters.
-
Turn over the meat about half-way through cooking time.
GRILL + FAN FUNCTION
Ideal for large joints, pork, chicken and roast beef.
-
The oven door must be closed during the cooking cycle.
-
Place the meat on the grid with the drip tray underneath. Pour water in the drip tray to cover the bottom to reduce
smoke and fat spatters.
-
Turn over the meat about half-way through cooking time.
5019 310 54252
DEFROST FUNCTION
Ideal for thawing frozen food to room temperature.
-
The food should be inserted in the oven in its wrapping to prevent it from drying out.
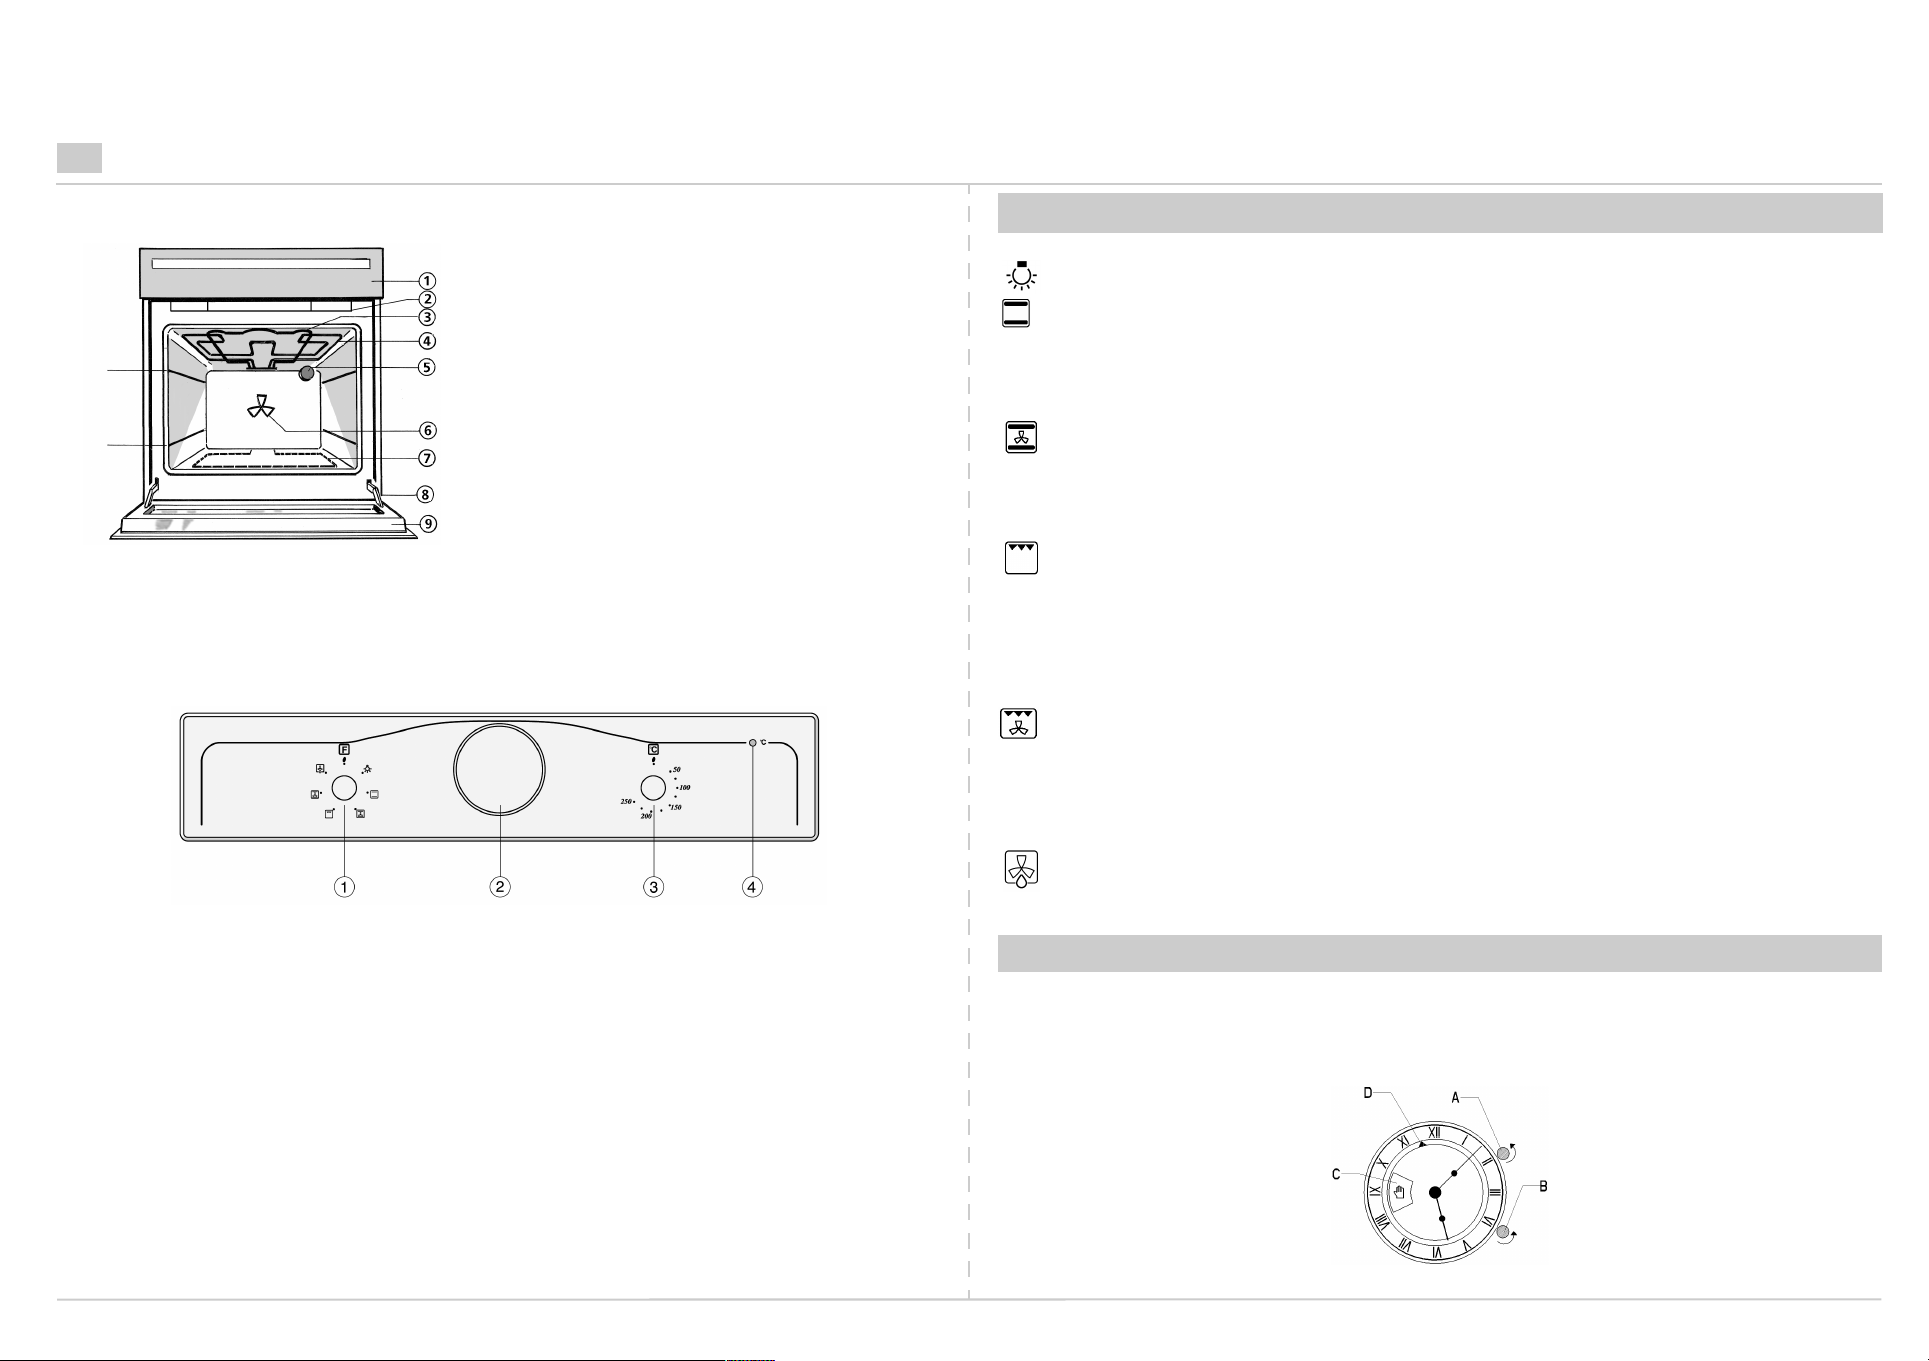
MECHANICAL ANALOG TIMER
Use this electromechanical timer to:
1) View the time of day. To adjust the time, press button
2) Set the cooking start time, which can be delayed by a maximum of 12 hours (e.g. at 7.00 a.m. its not possible to
delay start of cooking until 8.00 p.m. since cooking would actually start at 8.00 a.m.).
3) Set the cooking duration from a minimum of 5 minutes to a maximum of 180 minutes.
(B)
and turn it anti-clockwise.

SWITCHING ON THE OVEN
MANUAL COOKING (without cooking start time or cooking duration)
1) Turn button
2) Press button
(hour hand).
3) Turn the selector knob to the required symbol. The oven light switches on.
4) Turn the thermostat knob clockwise to the required temperature. The red thermostat indicator light switches on.
5) At the end of cooking,
off, turn the thermostat knob and the selector knob to OFF (0 - ).
MANUAL COOKING (with cooking start time but without cooking duration)
1) Proceed as per point (1) of the previous paragraph.
2) Press button
start (e.g. in the figure: 11.30).
3) Proceed as per points (3), (4) and (5) of the previous paragraph.
COOKING WITH THE TIMER (with cooking start time and cooking duration)
1) Turn button
window
2) Press button
start (e.g. in the figure: 11.30).
3) Turn the selector knob to the required symbol. The oven light switches on.
4) Turn the thermostat knob clockwise to the required temperature. The red thermostat indicator light switches on.
5) At the end of the set cooking time an acoustic signal will sound and the
exclude the acoustic signal, turn button
displayed in the window.
6) At the end of the set cooking time, cooking may be prolonged by following the instructions given above,
or by using the manual cooking procedure.
COOKING WITH THE TIMER (with cooking duration but without cooking start time)
1) Proceed as per point (1) of the previous paragraph.
2) Press button
(hour hand).
3) Proceed as per points (3), (4), (5) and (6) of the previous paragraph.
anti-clockwise (without pressing), until the symbol is displayed in the window
(B)
and turn it
(A)
The button clicks when turned to the proper position.
and turn it
(A)
(B) anti-clockwise
(5 - 180 min.).
(C)
and turn it
(A)
and turn it
(A)
The button clicks when turned to the proper position.
anti-clockwise
since it is in manual mode, the oven WILL NOT switch off automatically;
anti-clockwise
(without pressing) until the required cooking duration is displayed in the
anti-clockwise
anti-clockwise
until the triangle
until the triangle
until the triangle
(B) anti-clockwise
until the triangle
points to the time shown on the clock
(D)
points to the time at which cooking is to
(D)
points to the time at which cooking is to
(D)
oven will switch off automatically.
(without pressing) until the symbol is
points to the time shown on the clock
(D)
.
(C)
to switch
To
5019 310 54252