

Page 1
ADVANTECH™ Commercial Laundry
Products Software User’s Manual
CL-8
SOFTWARE MANUAL
PART 8524743A
Page 2

Copyrights and Liability Limitations
All product names and services identified throughout this book
are trademarks or registered trademarks of their respective
companies.
® Registered trademark/
© 2004 Whirlpool Corporation Part No. 8524743A
®
Whirlpool
ADVANTECH™ Management Software Version 1.13
™
Trademark of Whirlpool, U.S.A.
Page 3
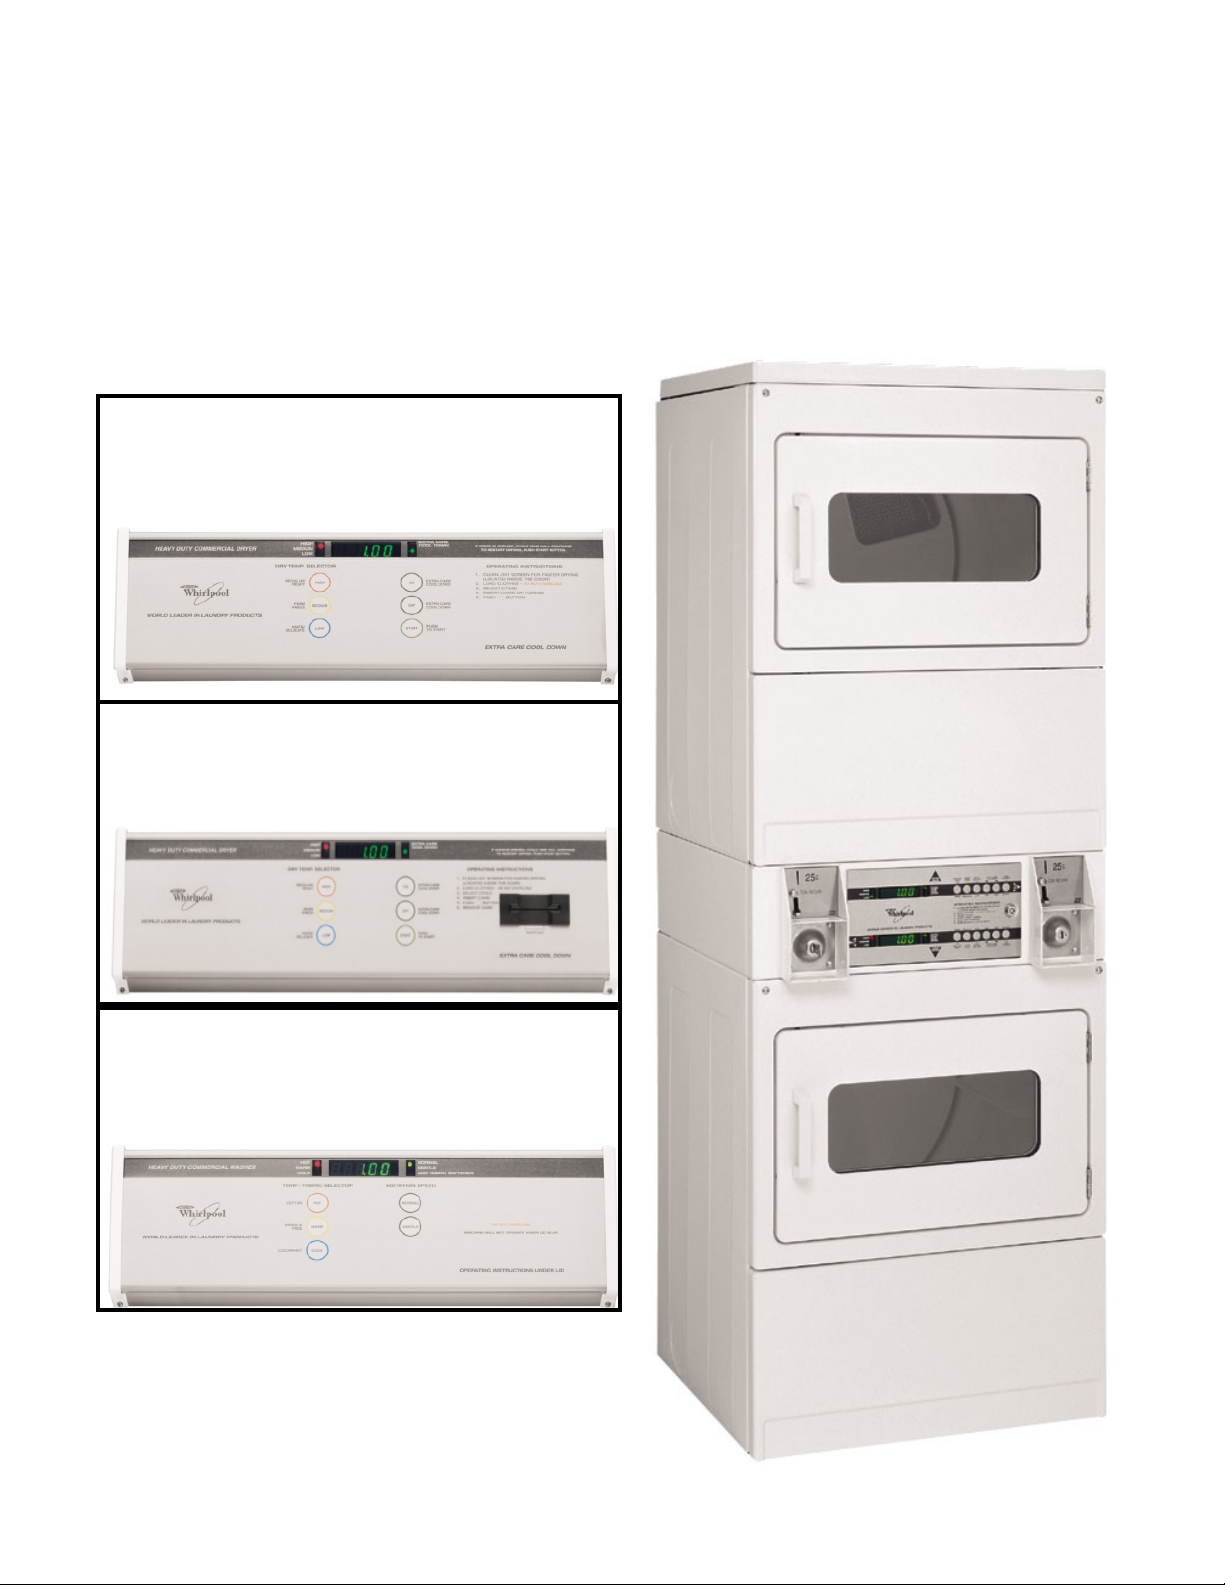
THE ADVANTECH™ PRODUCT LINE
CEE2760KQ
CGE2761KQ
CSP2770/2771KQ
CEE2790KQ
CGE2791KQ
CAE2762KQ
Page 4
Literature Cross Reference
Archway
(Form)
Number
CWXL043B 8524744B
N/A 8178077
CWLL086A 8524743A
CWLL082B N/A Sales literature
Whirlpool Corporation publications are available to support ADVANTECH™ Commercial Laundry
For on-line access to all pertinent Whirlpool commercial laundry service information, go to:
Government models begin with a “G”
Whirlpool
Part
Description Contains Ordering And Viewing
Information
Number
All information necessary to
CD for
PC User's
CL7 Service
Manual/Job Aid
CL8 Software
User’s Manual
operate and manage
ADVANTECH™
Commercial Laundry
Included on this
Software Install CD
Complete diagnostic and
technical reference manual
Complete Software and
Palm® application Manual
Product specifications,
Money Acceptor
Cross-reference
Available at www.coinop.com
1-800-643-3444
Also through Whirlpool Corporation
Literature department and for
selected Trade Partners at:
www.whirlpoolwebworld.com
products and more, commercial
laundry link, or call:
1-800-851-4605
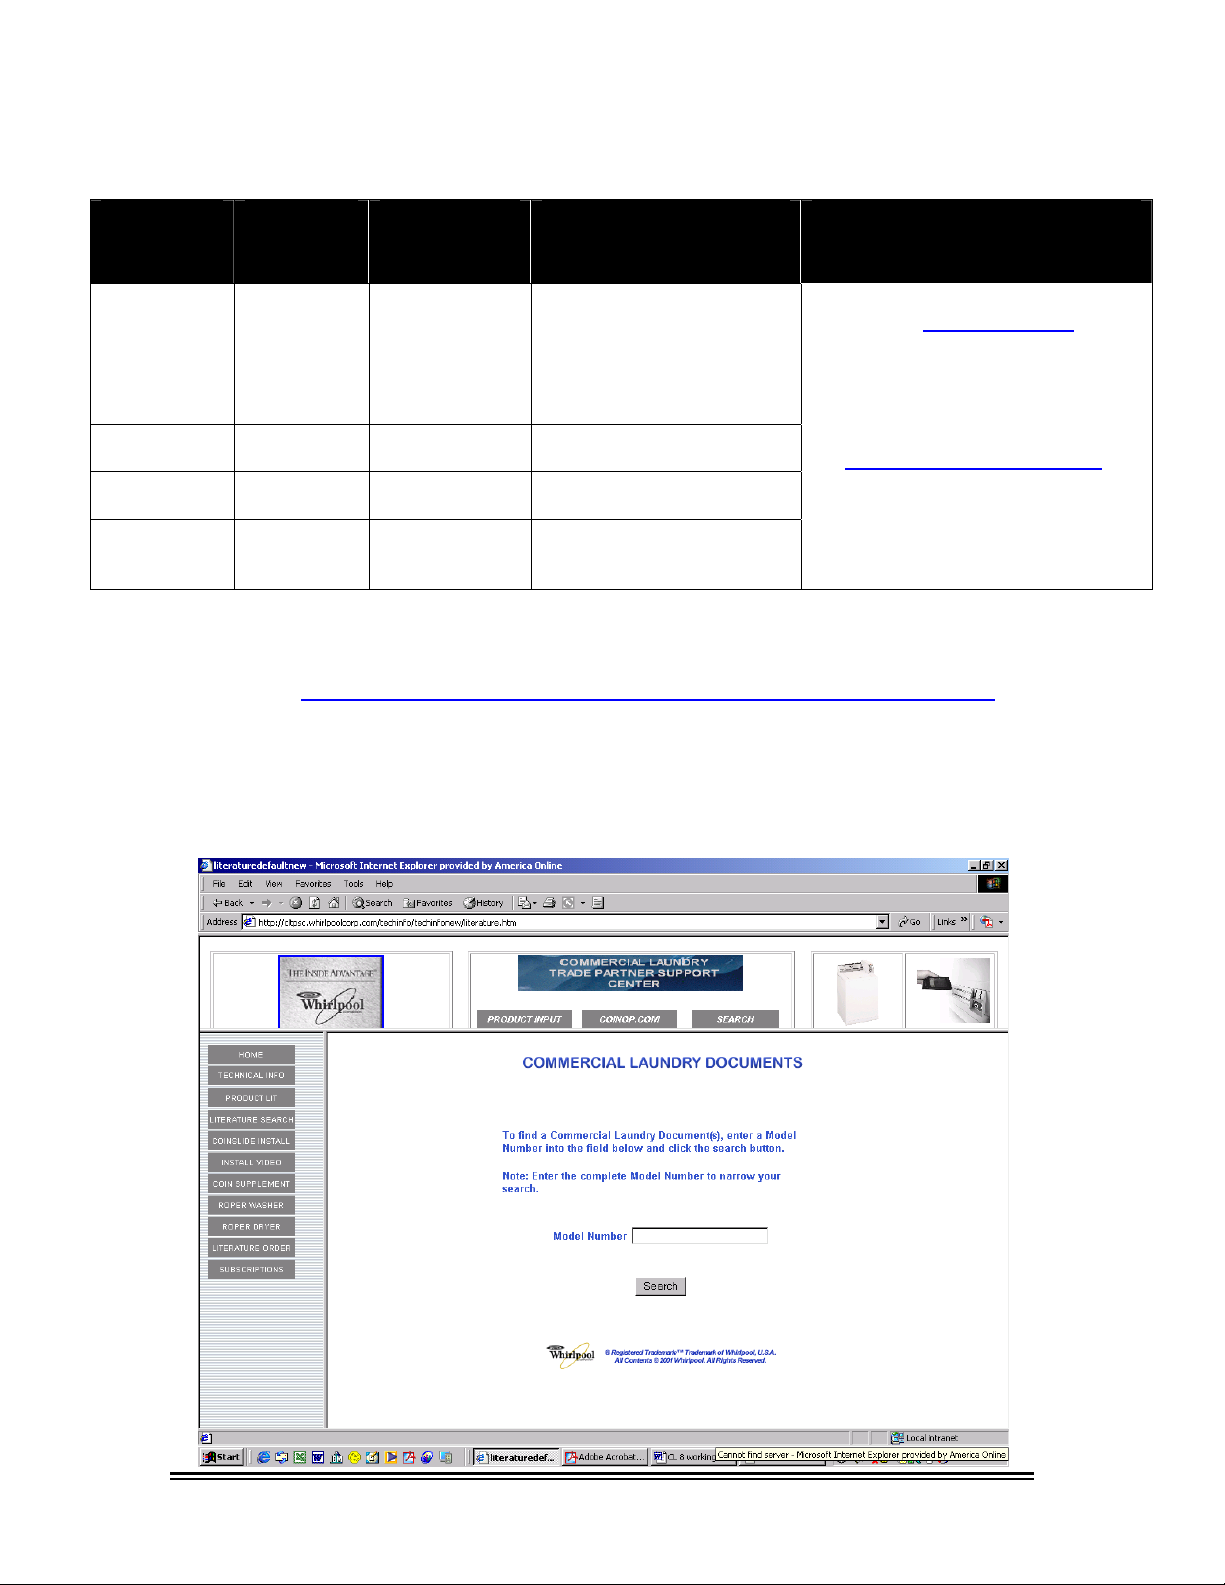
http://cltpsc.whirlpoolcorp.com/techinfo/techinfonew/literature.htm
Enter as complete a model number as possible and then click search
Note: Canadian model numbers begin with a “Y”
, or call
,
Page 5

Table of Contents
Page 6

Table of Contents
ADVANTECH™ OVERVIEW 1
ADVANTECH™ Commercial Laundry Product....................................................... 2
ADVANTECH™ PC System and Handheld Requirements ..................................... 5
Minimum PC System Requirements ...................................................................... 6
Minimum Handheld Requirements......................................................................... 6
ADVANTECH™ MANAGEMENT SOFTWARE INSTALLATION 5
Installing ADVANTECH™ Management Software .................................................. 8
Installing DCOM95 for Windows "95" Users ........................................................ 10
™
ADVANTECH
Installing ADVANTECH
ADVANTECH™ MANAGEMENT SOFTWARE SETUP 19
Management Software Overview......................................................................... 20
Locations ............................................................................................................. 22
Creating a New Location .............................................................................. 22
Editing Location Information ......................................................................... 23
Deleting a Location ....................................................................................... 23
Passwords ........................................................................................................... 24
Setting the Management Password .............................................................. 24
Setting the Access Control Password........................................................... 25
Setting Service Person IDs and Passwords ................................................. 26
Setting the Software Update Password ........................................................ 27
Machine Templates.............................................................................................. 28
Creating a New Machine Template............................................................... 28
Editing an Existing Template ........................................................................ 31
Deleting a Machine Template ....................................................................... 31
Special Prices Overview ............................................................................... 32
Setting Special Prices................................................................................... 32
HOTSYNC
PALM
™
HANDHELD 35
Download Machine Setup Data to Palm
HANDHELD SOFTWARE INSTALLATION 13
™
Handheld Software...................................................... 14
®
PROCESS BETWEEN THE MANAGEMENT SOFTWARE AND THE
™
Handheld via a HotSync® Process…....36
I
Page 7

DATA EXCHANGE BETWEEN THE PALM™ HANDHELD AND ADVANTECH™
COMMERCIAL LAUNDRY PRODUCTS 37
Overview.............................................................................................................. 38
Starting the Handheld Software and Logging In .................................................. 38
Initializing Machines............................................................................................. 40
Using the Send Setup Command......................................................................... 43
Using the Get Audit Command ............................................................................ 44
Using the Utilities Command................................................................................ 45
Using the One Touch Command.......................................................................... 46
AUDITS 47
Overview.............................................................................................................. 48
Uploading Audits.................................................................................................. 48
Viewing Audits ..................................................................................................... 48
Viewing Histograms .................................................................. ……………..51
Creating a Manual Audit ............................................................................... 52
Audit Problems ............................................................................................. 53
Deleting an Audit .......................................................................................... 53
Existing Machines......................................................................................... 53
Viewing an Existing Machine ........................................................................ 54
Deleting an Existing Machine........................................................................ 54
EXCEPTIONS 55
Overview.............................................................................................................. 56
Viewing Exceptions.............................................................................................. 56
Creating a Manual Exception............................................................................... 57
Deleting an Exception .......................................................................................... 58
SERVICE DATA 59
Overview.............................................................................................................. 60
Viewing Service Data........................................................................................... 60
Entering Service Data Manually........................................................................... 61
Deleting Service Data .......................................................................................... 62
REPORTS 63
Overview.............................................................................................................. 64
Viewing Reports................................................................................................... 64
Exporting Reports ................................................................................................ 66
Printing Reports ................................................................................................... 67
UPDATING CONTROL BOARD FIRMWARE 69
Downloading Firmware to PDA............................................................................ 70
Installing Downloaded Firmware to A Machine .................................................... 71
II
Page 8

APPENDIX 75
Passwords and IDs .............................................................................................. 76
Backing Up the Management Software................................................................ 77
Reinstall Procedures............................................................................................ 78
Audit Discrepencies ............................................................................................. 79
Possible Exceptions............................................................................................. 80
Report Types ....................................................................................................... 81
Exporting Reports ................................................................................................ 84
TROUBLESHOOTING INFORMATION 87
GLOSSARY 89
INDEX 93
ADVANTECH™ SOFTWARE QUICK REFERENCE SHEET 95
SUPPORT AND CONTACT INFORMATION 98
III
Page 9

Page 10

ADVANTECH™ Overview
1
Page 11

Overview
ADVANTECH™ Commercial Laundry Products
Whirlpool
products allows the use of a Palm™ handheld device,
also referred to as a Personal Digital Assistant (PDA),
for washer and dryer installation, setup, setting
special vend prices, washer and dryer software
upgrades, and transferring data to and from a
personal computer (PC). This information is setup on
the PC using ADVANTECH™ Management Software,
which is then used to download ADVANTECH
Handheld Software to the Palm
Palm
communicate information contained in the
Management Software to the washer and dryer. See
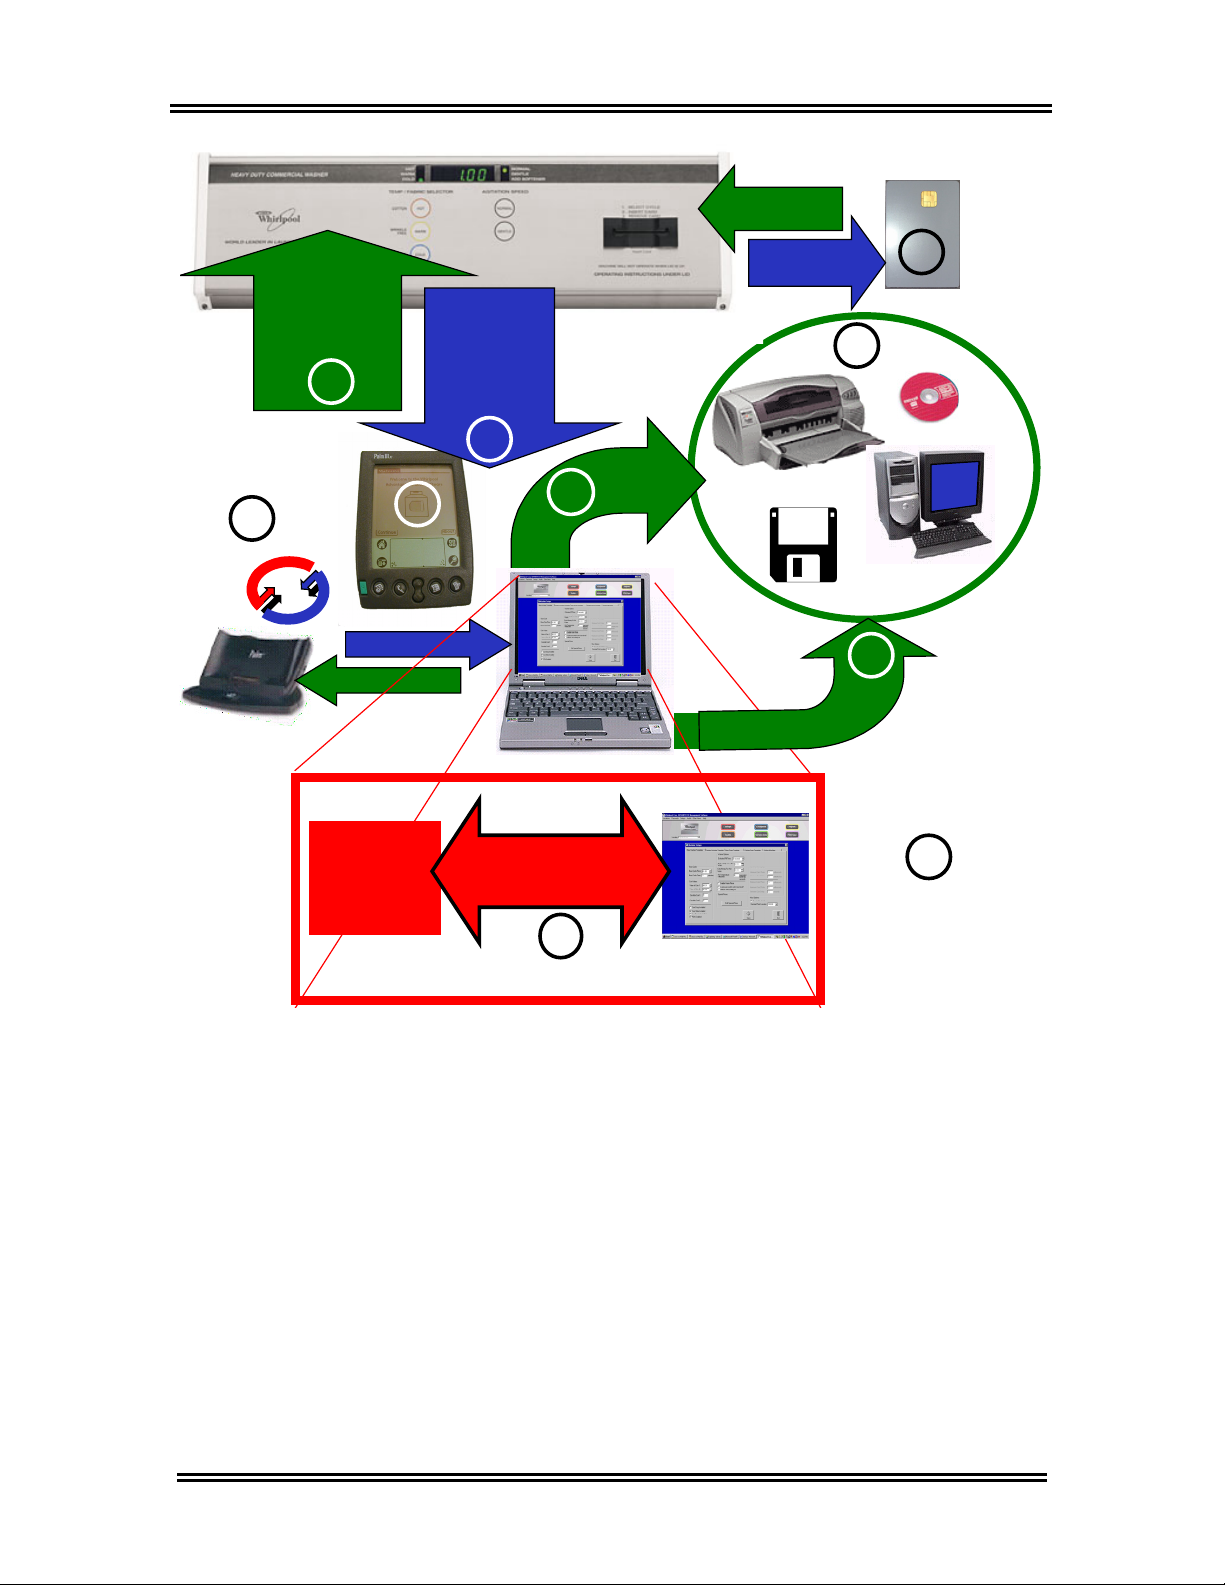
Information Flowchart on page 3.
Before downloading the Handheld Software to a PDA
device running the Palm
ADVANTECH™ Management Software must be
installed and running on your PC. Passwords,
machine setup, and Handheld Software are available
within the Management Software package. This
software instruction manual details the initial setup of
the ADVANTECH™ Management and Handheld
Software and its use with the PC, the Palm
handheld (or other PDA), and the ADVANTECH™
commercial laundry products.
It is assumed that you are familiar with the basic
operation and use of the Palm
and that you have followed all installation instructions
that came with the Palm™ handheld for the setup of
the Palm™ software, including the HotSync® Manager,
and its cradle. See the Palm owner’s manual for more
information. Setup of the Palm™ software and a
successful HotSync
should be accomplished prior to the installation of the
ADVANTECH™ Management Software onto the PC.
®
ADVANTECH™ commercial laundry
™
handheld. The
™
handheld uses an infrared light beam to
™
operating system,
™
handheld and the PC,
®
between the PDA & the PC
™
™
2
Page 12

Overview
Commands for the Management Software, installed
on the PC, can be entered by using either the
keyboard or the mouse. Commands for the Handheld
Software will be entered using the stylus (provided
with the Palm
™
handheld) to “tap” on the Palm
™
handheld screen. Occasionally you may be asked to
enter text into the Palm
™
handheld using the Graffiti®
text characters or the Palm™ keyboard. Additional
information regarding the use of Graffiti ® text and the
Palm™ keyboard can be found in your Palm owner’s
manual.
Important:
The electronic controls within the laundry machines
are factory preset to accept commands from a Palm™
handheld equipped with the ADVANTECH™ Handheld
Software. If the Palm™ handheld is not to be used,
this functionality needs to be disabled. Failure to
disable the handheld device can result in
unauthorized machine access. To manually disable
handheld functionality, see the Important Set Up
Information on the Service Tech Sheet. To disable
Handheld functionality using the Palm
Machine Templates section of this manual.
™
handheld, see
3
Page 13
Overview
SMART
Set Up
Instructions
(Templates)
2
HotSync®
5
Software
Brand x
Audit and
Service
data
3
4
User built
interface required
9
Software
Data
Export
Brand x
CARDS
Reports
1
10
8
8
ADVANTECH™
Software
7
6
1. Smart Cards see page 29
2.
Set Up Instructions (templates) see page 28
3. Audit Data see page 47, Service Data see page 59
Handheld Software Installation see page 14
4.
5. HotSync
®
procedures see page 35
6. Data Analysis in third party software see page 75
7.
Management Software Overview see page 21
8. Reports see page 63
9. Exporting Reports see page 66
10. Printing Reports see page 67
4
Page 14

ADVANTECH™ PC System and
Handheld Requirements
5
Page 15

System Requirements
Minimum PC System
Requirements
• Pentium® 233 MHz MMX
processor
• CD-ROM drive
• 32 MB of RAM
• Dedicated minimum of 2.5 GB
of hard drive space to store
report information
• One of the following operating
systems:
♦ Windows
4.10.2222A (Second Edition)
preferred
♦ Windows
4.10.1998 (First Edition)
♦ Windows® 95 SR2, SR2.51
♦ Windows NT® SP3, SP4, SP6
♦ Windows ME®
♦ Windows® 2000 Professional,
SP1
• Monitor resolution: 1024x768
pixels or higher
®
98 Version
®
98 Version
®
Minimum Handheld
Requirements
• PDA handheld computer
(running on a Palm
system required)
• Palm OS® 3.5.0 to 4.0.0
• 4MB of RAM
®
operating
1
In order for the Management Software to
run on the Windows
Windows
before installing the Management Software.
See page 11 for DCOM95 install
instructions.
®
95 users must install DCOM95
®
95 operating system,
6
Page 16

ADVANTECH™ Management
Software Installation
7
Page 17

ADVANTECH™ Management Software Installation
Installing ADVANTECH™ Management Software
The Management Software is used to interpret audit
data collected from your ADVANTECH™ commercial
laundry products. It must be installed before the
Handheld Software can be downloaded to the Palm
handheld. The Management Software and the
HotSync® Manager must be loaded and operating
prior to attempting a PDA data transfer.
1. Power on the PC, if not done so already.
2. Place the ADVANTECH™ Management Software
CD into the CD drive.
3. The InstallShield Self-extracting EXE window
appears.
Important:
Windows® 95 users MUST click on NO, and then
install DCOM95 before proceeding with installation of
the ADVANTECH™ Management Software.
See page 11 for the DCOM95 install instructions.
If you are using an operating system other than
Windows® 95, such as Windows® 98, Windows
NT®, Windows ME™, Windows® 2000, Windows
2000 Professional, or if you are using Windows®
95 and have already installed DCOM95, click on
Yes to continue with the installation.
4. The
5. Click on
6. Read the Software License Agreement then in
7. Click on Next again.
8. The
InstallShield Self-extracting EXE and
Setup windows will appear briefly. When the
Welcome window appears, click on Next to
proceed.
Next again.
order to precede you must accept the terms by
clicking on
Select Program Folder window appears. To
accept the default folder location (Advantech)
click on Next.
Yes.
™
®
8
Page 18
ADVANTECH™ Management Software Installation
9. Click on Next again to begin the software installation.
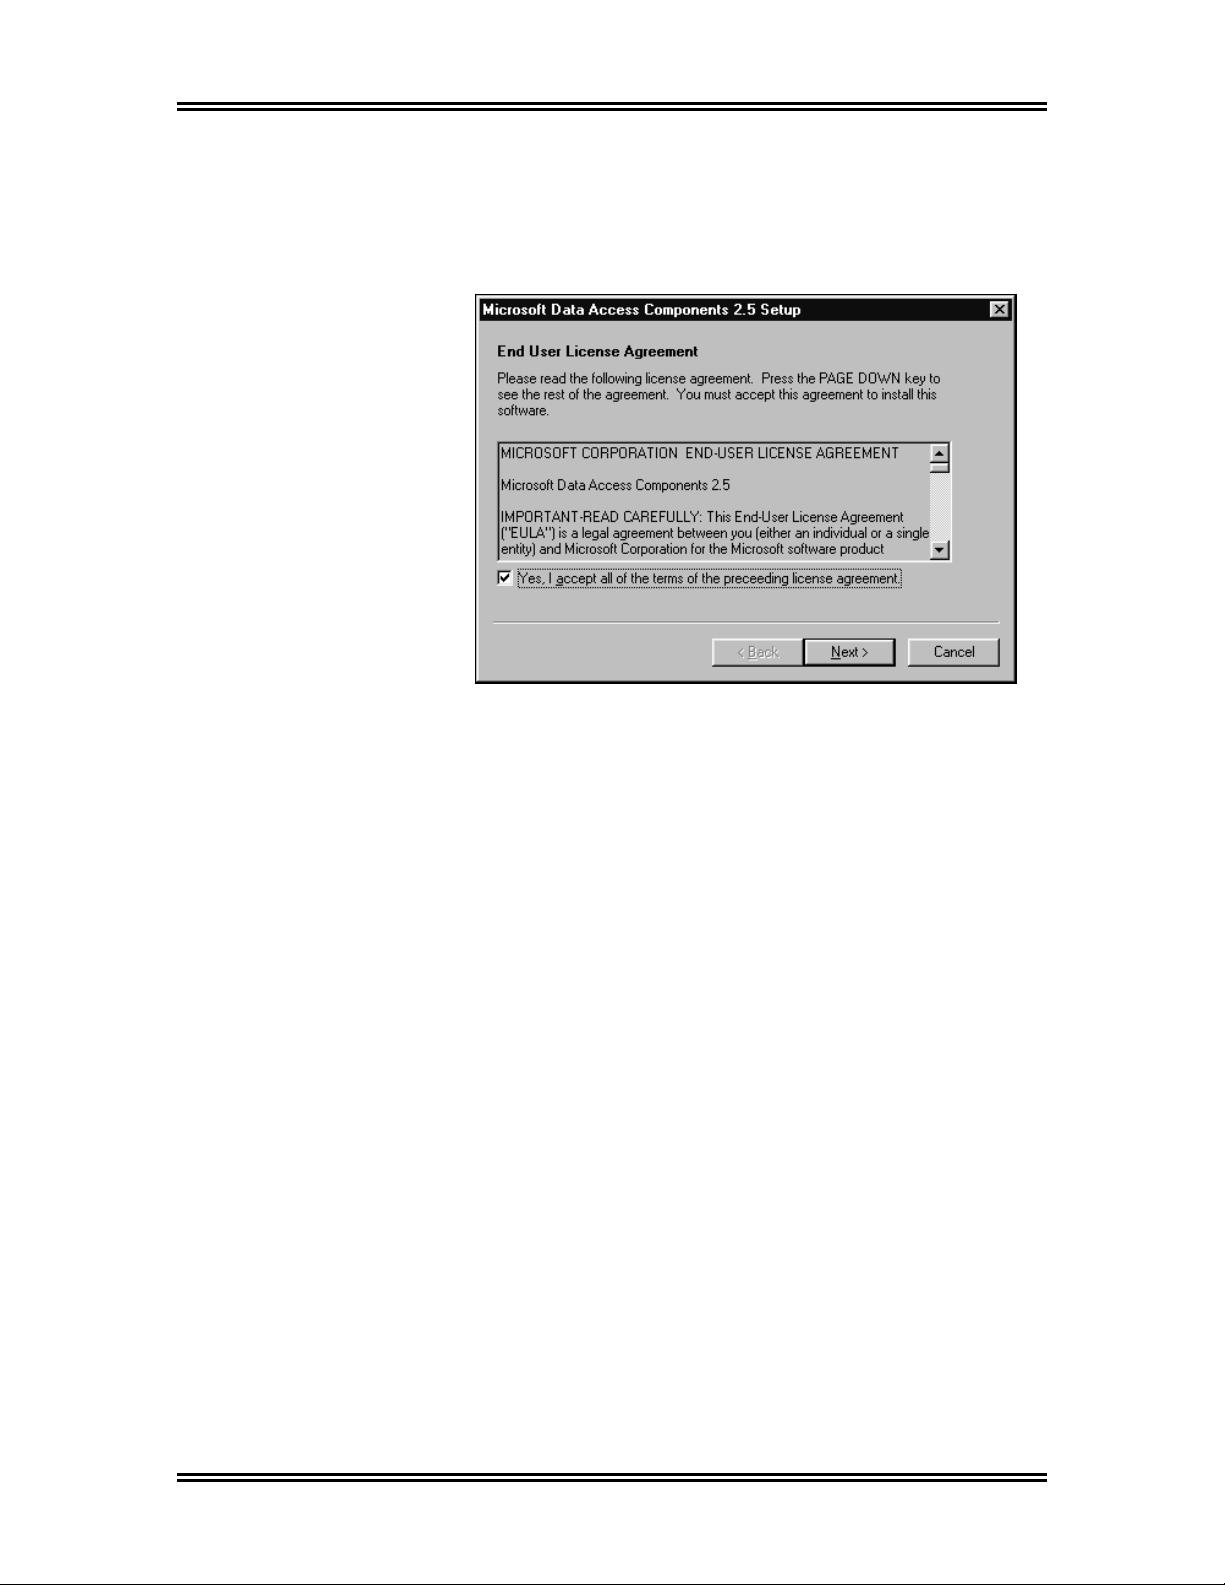
Several windows will flash on the screen. No user input
is necessary until you see the End User License
Agreement
screen, pictured below.
10. Select the
Yes checkbox, then click on Next.
11. Click on Next again.
12. Several windows will flash. Click on Finish.
13. You should have already installed your Palm™ software
and the HotSync® Manager, so you may see the Exit
HotSync Manager
window. Click on No to proceed.
OR
If you have not yet installed your Palm™ software and
the HotSync® Manager, you may be warned that the
HotSync® Manager cannot be found. Click on OK to
proceed (it is recommended that the Palm
®
and the HotSync
ADVANTECH
Manager be installed prior to the
™
Management Software).
™
software
14. The Setup Complete window appears. Verify that Yes
is selected, then click on
Finish. This will restart your
PC.
15. Eject the Management Software CD from the CD drive.
Note:
If the installation does not start automatically, select the
Start button and choose Run. Type D:\setup and click
OK. (If your CD drive is not D, select the appropriate
on
drive.)
9
Page 19

ADVANTECH™ Management Software Installation
Installing ADVANTECH
™
Management Software (continued)
Important:
Before proceeding to install the Handheld Software,
the Palm
HotSync® cradle must already be setup. See the Palm
owner’s manual for more information.
Installing DCOM95
DCOM95 is a file that allows ADVANTECH™
Management Software to run on the Windows
operating system.
DCOM95
Software
(Windows® 98, Windows NT®, Windows ME™, and
Windows® 2000 & Windows® 2000 Professional) may
disregard DCOM95 installation.
1. Power on the PC.
2. After the PC has booted up, place the
3. The InstallShield Self-extracting EXE window
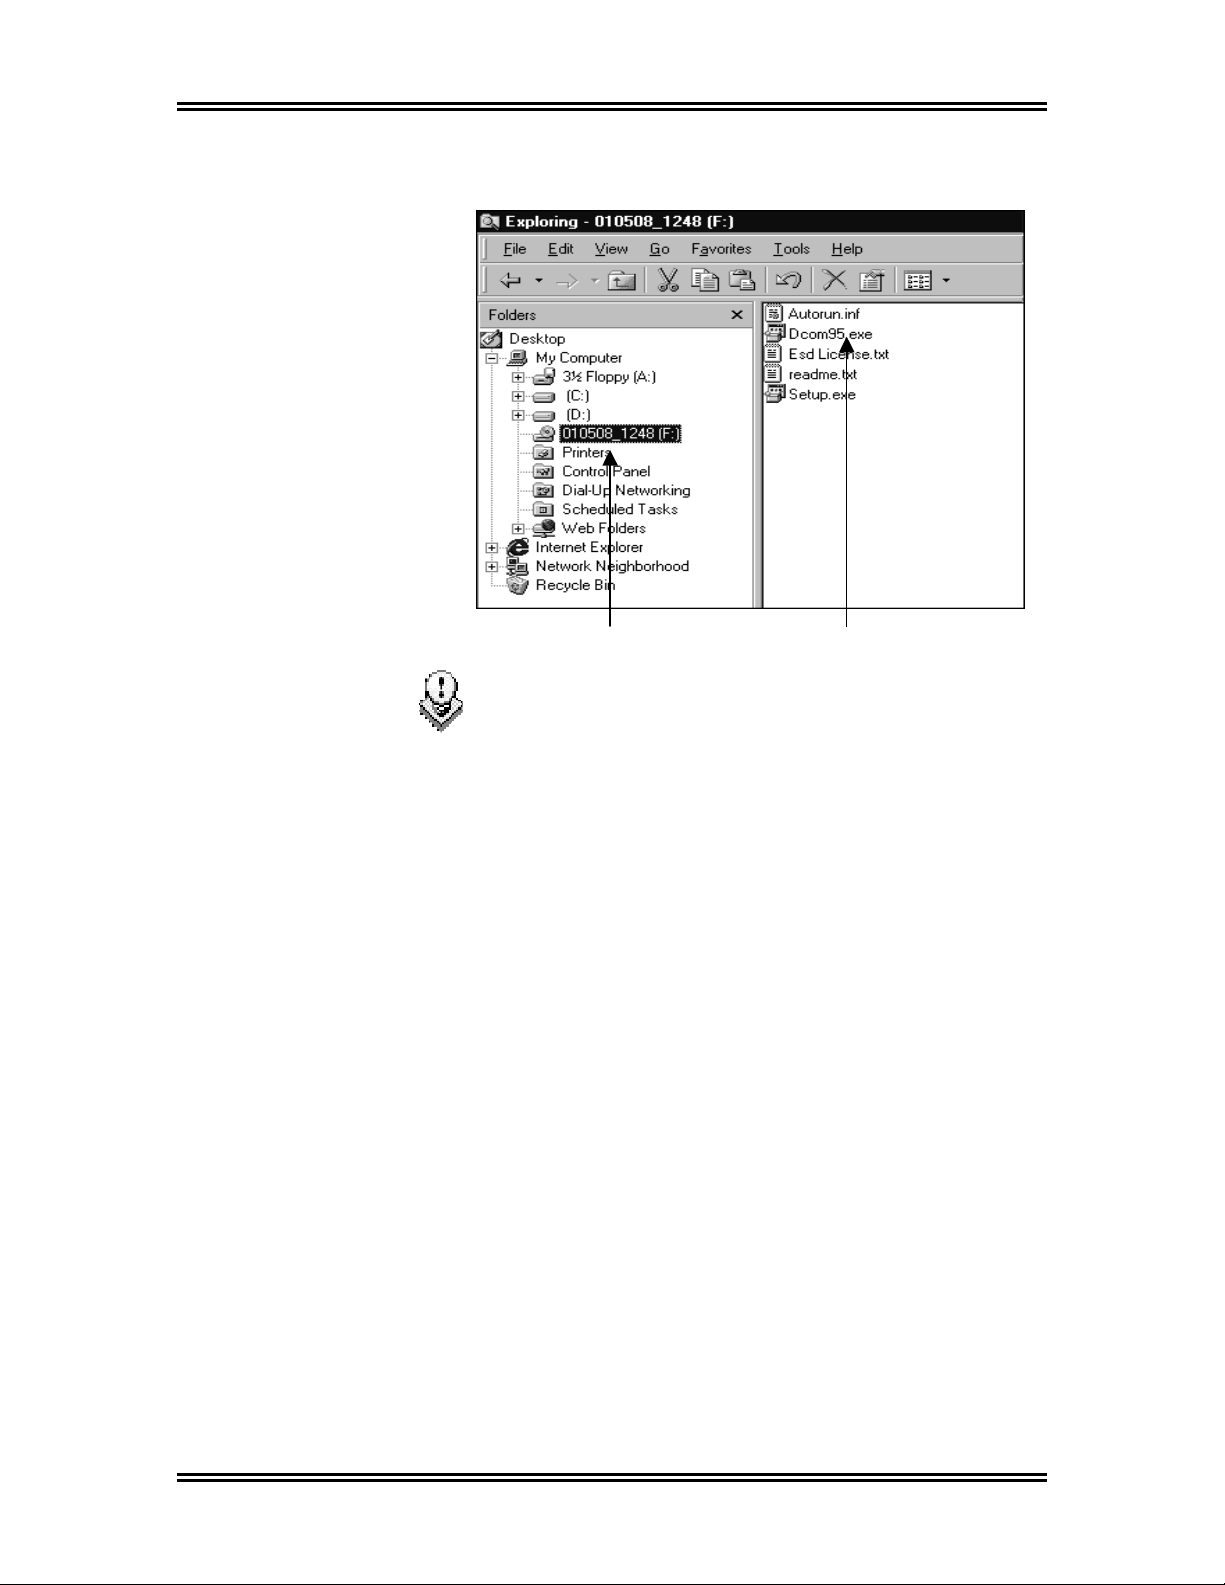
4. Select Start, Programs, Windows Explorer.
5. Single-click on the
6. Double-click on the file DCOM95.exe, located on
™
software, the HotSync® Manager, and the
®
95
Windows® 95 users must install
before installing the Management
. Users of all other operating systems
ADVANTECH™ Management Software CD into
the CD drive.
appears. Click on No to exit the install process.
drive letter representing the
CD drive (usually the D:\ drive), located on the
left side of the Explorer window.Installing
DCOM95 (continued)
the right side of the Explorer window.
10
Page 20
ADVANTECH™ Management Software Installation
CD Drive DCOM95.exe
File
Hints:
Depending on your PC setup:
• The Explorer window may look slightly different.
• The DCOM95.exe filename may appear as
DCOM95.
• The letter that represents the CD drive may be
different.
7. Click on
8. Read the
Yes again, to accept.
9. Several windows will flash. When the DCOM95
for Windows
to restart the PC.
10. After the PC has restarted, eject the CD.
Yes.
End User Agreement then click on
®
95 window appears, click on Yes
11
Page 21

ADVANTECH™ Management Software Installation
NOTES:
12
Page 22

ADVANTECH™ Handheld Software
Installation
13
Page 23

ADVANTECH™ Handheld Software Installation
Installing ADVANTECH™ Handheld Software
ADVANTECH™ Handheld Software is downloaded
™
from the PC to the Palm
process.
Important:
ADVANTECH™ Management Software and the
Palm™ software must already be installed on your PC.
The HotSync® Manager must also be running. See
the Palm owner’s manual for more information
1. Launch the Management Software by clicking on
Start, Programs, ADVANTECH,
ADVANTECH™
clicking on the shortcut icon from the Windows
Desktop.
2. First, you will be prompted to fill in the New
Location Information
address, and phone number for one of your
laundry locations. Fill in the appropriate
information, and click on Submit. See Note on
page 16.
3. Next, you will be prompted to enter a New
Owner Password. Enter a password and click
on Enter.
handheld via the HotSync®
Management Software or by
dialog box with a name,
®
Important:
The New Owner Password prevents unauthorized
access to your machines by any PDA that has not
been synced with your copy of the Management
Software.
therefore you should write it down and store it in a
safe place. If you forget your Owner ID then all of your
machines will have to be factory reset and reinitialized
and the Owner ID file will have to be deleted before
the Management Software can be reinstalled. See
Appendix for reinstall procedures or contact the
Whirlpool Technical Assistance Team at: 1-800-NO
Belts (1-800-662-3587) > Option 5
A lost Owner ID cannot be restored;
14
Page 24
ADVANTECH™ Handheld Software Installation
Note: If you’re not ready to enter the location
information at this time, click on the
Additional locations can be created later.
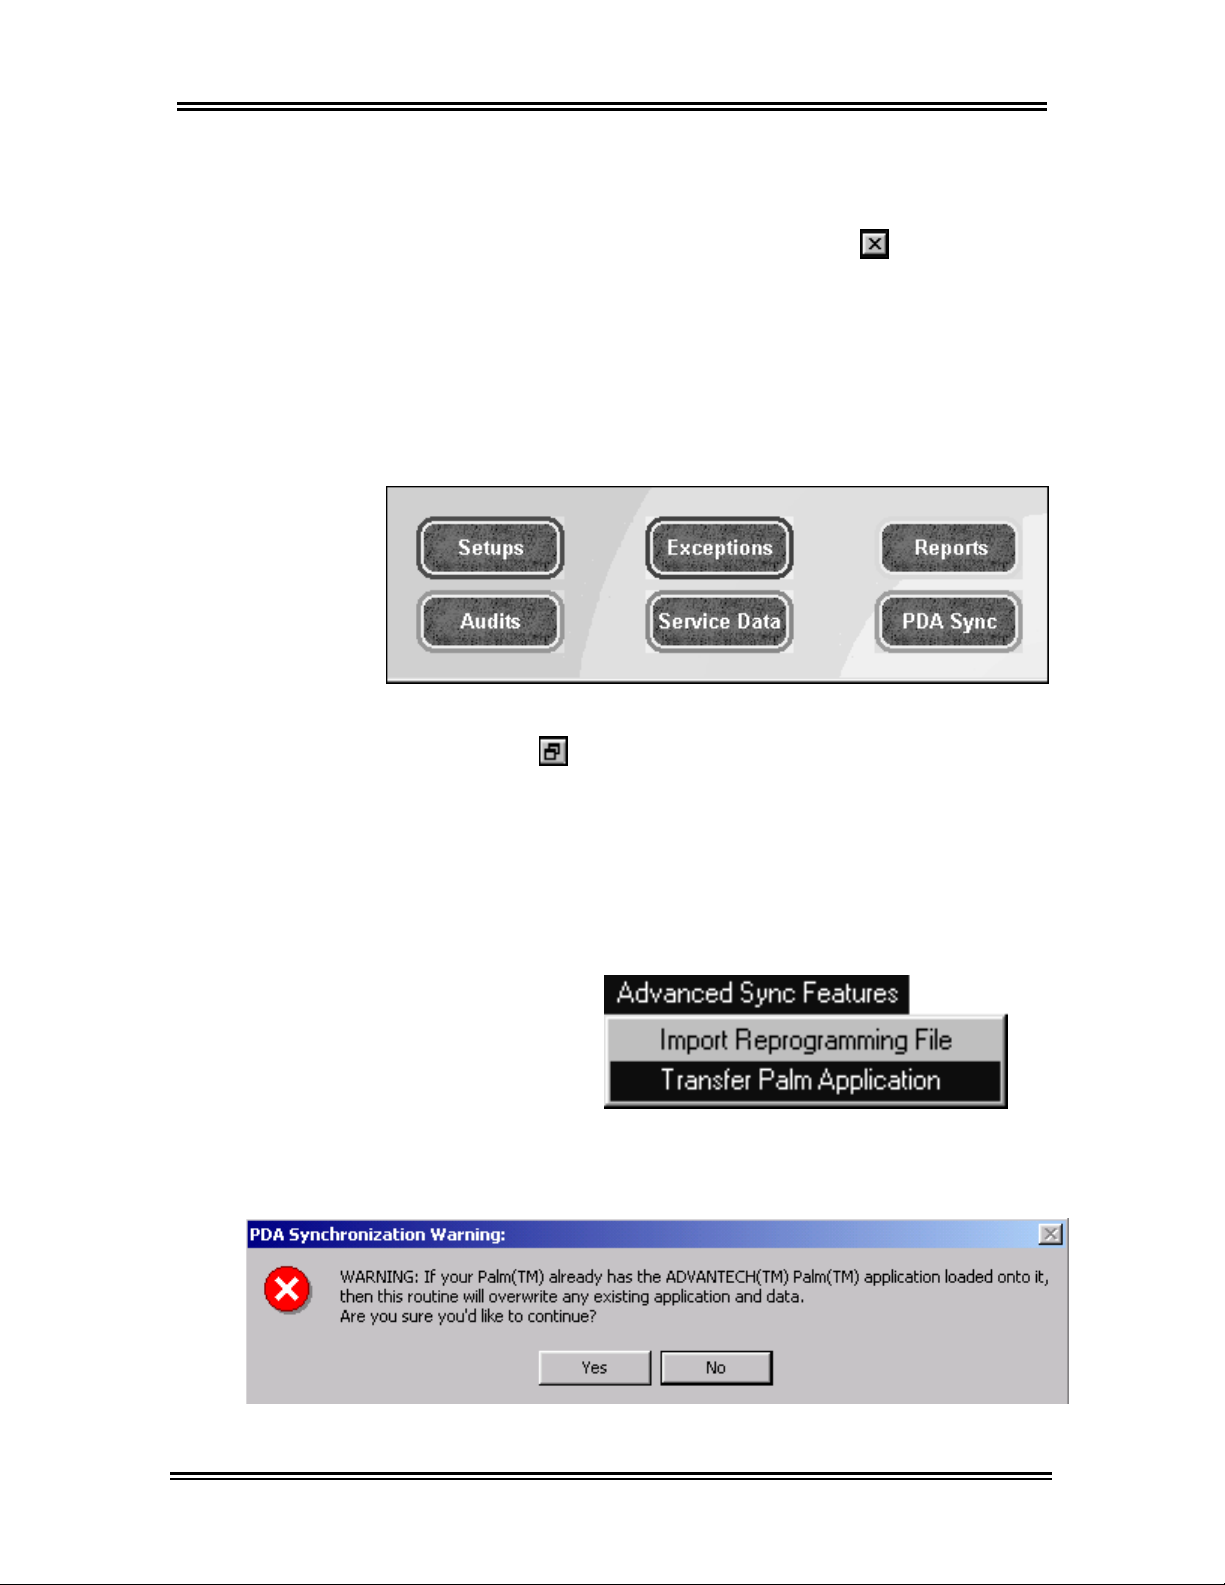
4. If you are using the preferred monitor resolution
(1024x768 pixels or higher,) you should be able
to view all 6-command buttons in the upper right
corner of your screen.
If you cannot view all six command buttons,
Close button.
• Click on the Restore button, located in the
extreme upper right of the screen.
5. Place the Palm™ handheld in its cradle.
6. In the Management Software on the PC, click on
the PDA Sync button.
7. Select the Advanced Sync Features menu from
the upper left corner of the screen and choose
Transfer Palm Application.
15
8. A
Warning window will appear, click on Yes.
Page 25
ADVANTECH™ Handheld Software Installation
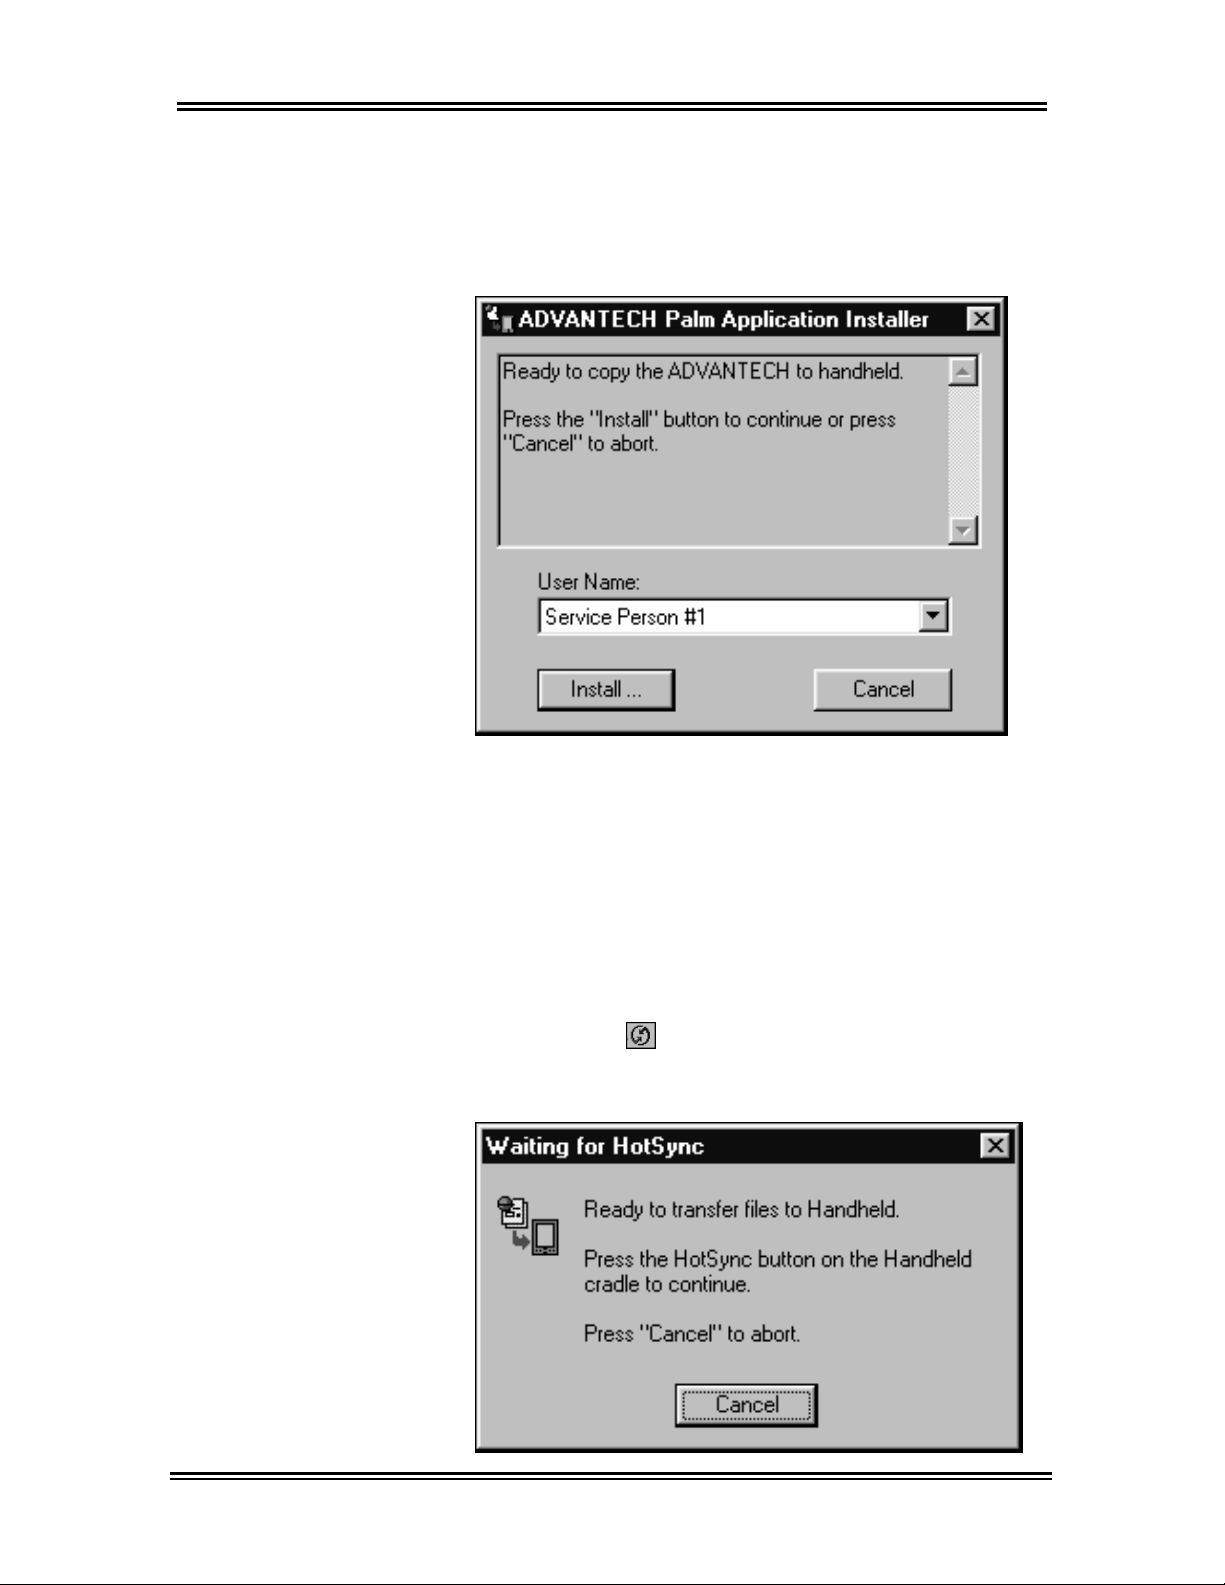
9. The ADVANTECH
dialog box appears. Verify the
correct then click on Install….
™
Palm Application Installer
User Name is
Note:
The User Name, shown here as Service Person #1,
was defined during the Palm™ handheld setup. To
change the User Name, see the Palm owner’s
manual.
10. The
Waiting for HotSync window appears.
Press the HotSync® button on the Palm
handheld’s cradle to begin the HotSync®
process.
™
16
Page 26

ADVANTECH™ Handheld Software Installation
11. If the Users dialog box appears, prompting you
to select a user, then select the appropriate user
name. This will be the name of the person using
the PDA. Click on
OK.
12. Once the HotSync® process is complete, the PC
screen may display the HotSync
®
Problem
window. Click on OK.
13. Tap the Reset button, located on the Palm™
handheld screen.
14. The HotSync® process is complete. Close any
remaining open windows on the PC, including
the PDA Synchronization window. Do this by
clicking on the
15. On the Palm
Exit button.
™
handheld, tap on the Home icon to
return to the main screen.
17
Page 27

ADVANTECH™ Handheld Software Installation
NOTES:
18
Page 28

ADVANTECH™ Management Software
Setup
19
Page 29

ADVANTECH™ Management Software Setup
Management Software Overview
Once you have completed the installation of the
Management and Handheld Software, you are ready
to begin setup of the Management Software. The
Management Software stores databases on your PC
to help you manage your laundry locations, machine
setups, audits, exceptions, and service data. With the
Management Software you can also generate reports
to track machine usage for a specified time period.
The preferred monitor resolution for the Management
Software is 1024x768 pixels or higher. If that is not
possible on your monitor, the Management Software
window will need to be Restored every time the
program is launched. See page 16, step 4 for more
information.
To restore the Management Software window:
1. Click on the Restore button, located in the
extreme upper right of the screen.
Note: All instructions included in this manual
assume that the Management Software is launched
and the screen display is set so that all six command
buttons can be viewed. See illustration on next page.
20
Page 30
ADVANTECH™ Management Software Setup
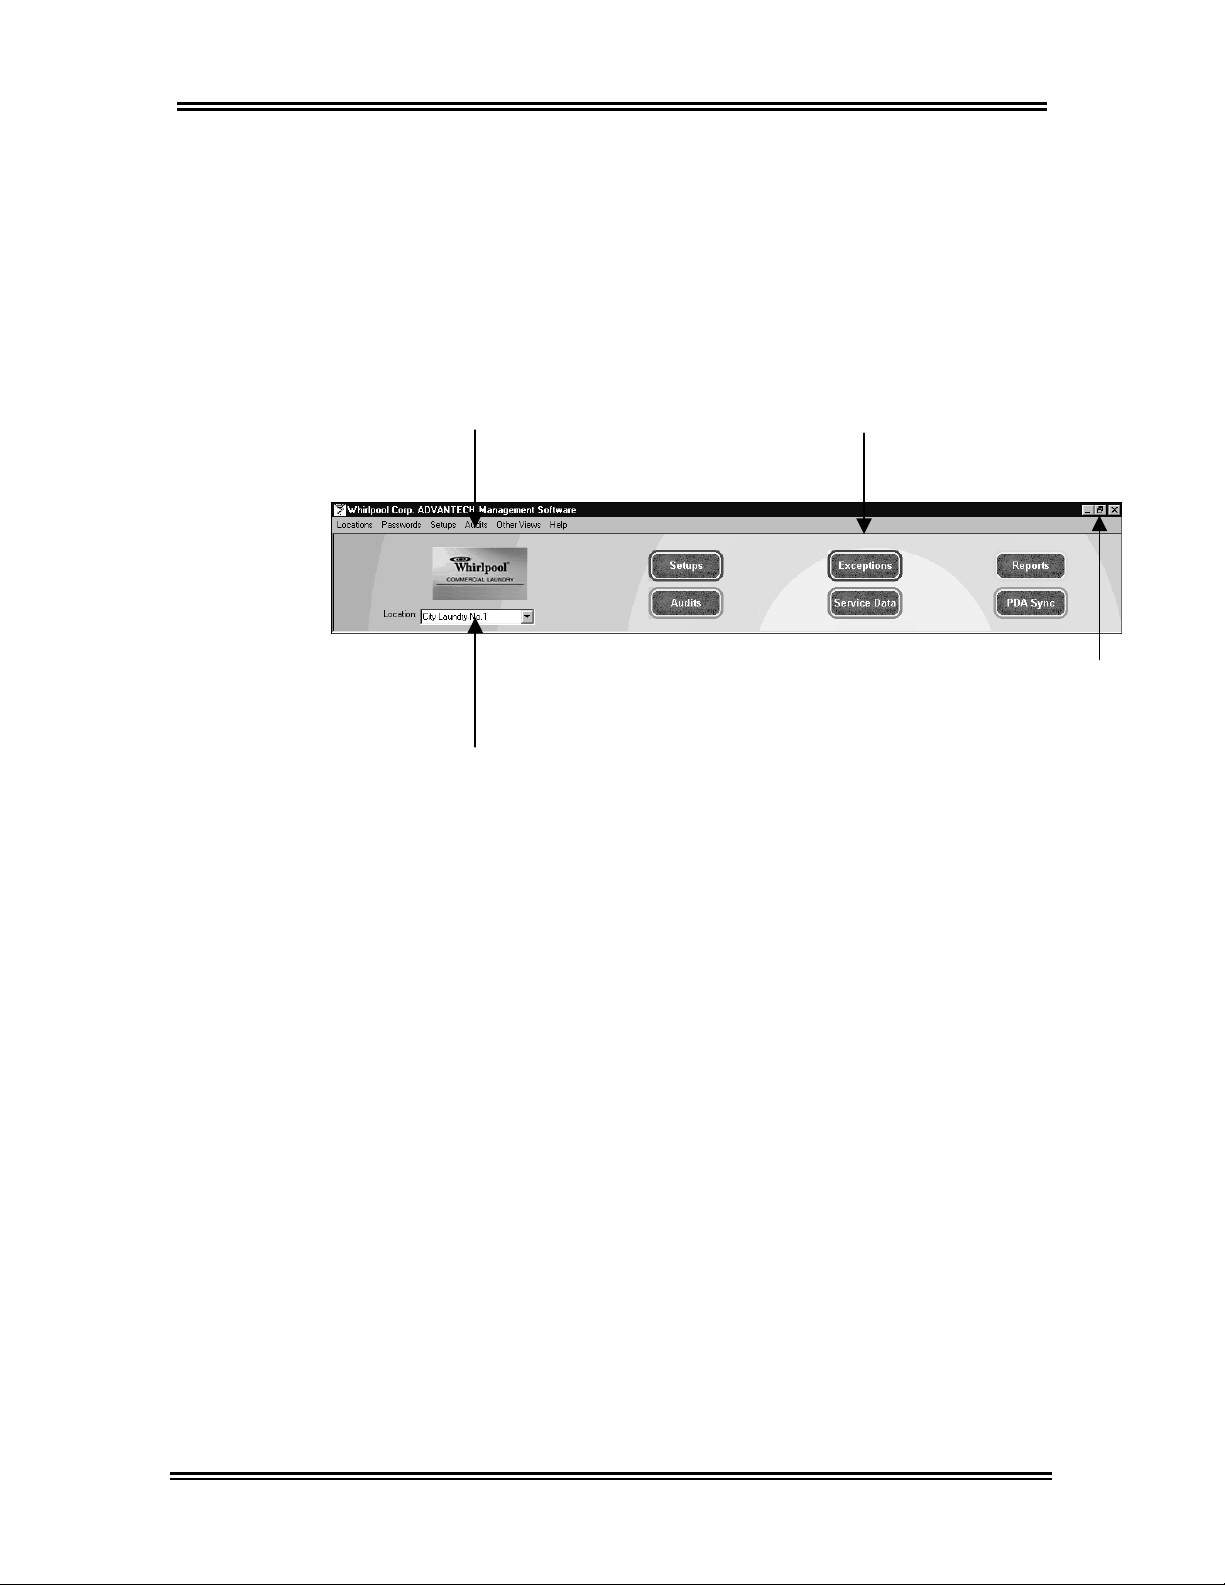
The Management Software screen allows you to
execute commands by using either the menus,
located in the upper left, or the command buttons,
located in the upper right. Also located on the left side
of the screen is the Location: drop-down list. This list
is used to specify which laundry location you wish to
work with in the Management Software.
Menus
Command
Buttons
Restore
Button
Location:
Drop-down
List
This section describes how to setup the Management
Software and prepare it for downloading to the Palm
™
handheld. The following items must be setup before
the first HotSync® operation.
• Machine Locations
• Passwords and IDs
1. Management Password
2. Access Control Password
3. Service Person IDs and Passwords
• Machine Templates (Special Pricing optional)
21
Page 31
ADVANTECH™ Management Software Setup
Locations
Locations store address information for your
machines. Setup, audit, exception, and service data
are all stored and reported by location.
Creating a New Location
In addition to creating the Owner ID the first time you
launch the Management Software, you are also
prompted to enter New Location Info. If you chose
not to enter New Location Info at that time, or would
like to create additional locations, follow the steps
below. At least one location must be created before a
HotSync® operation can be done.
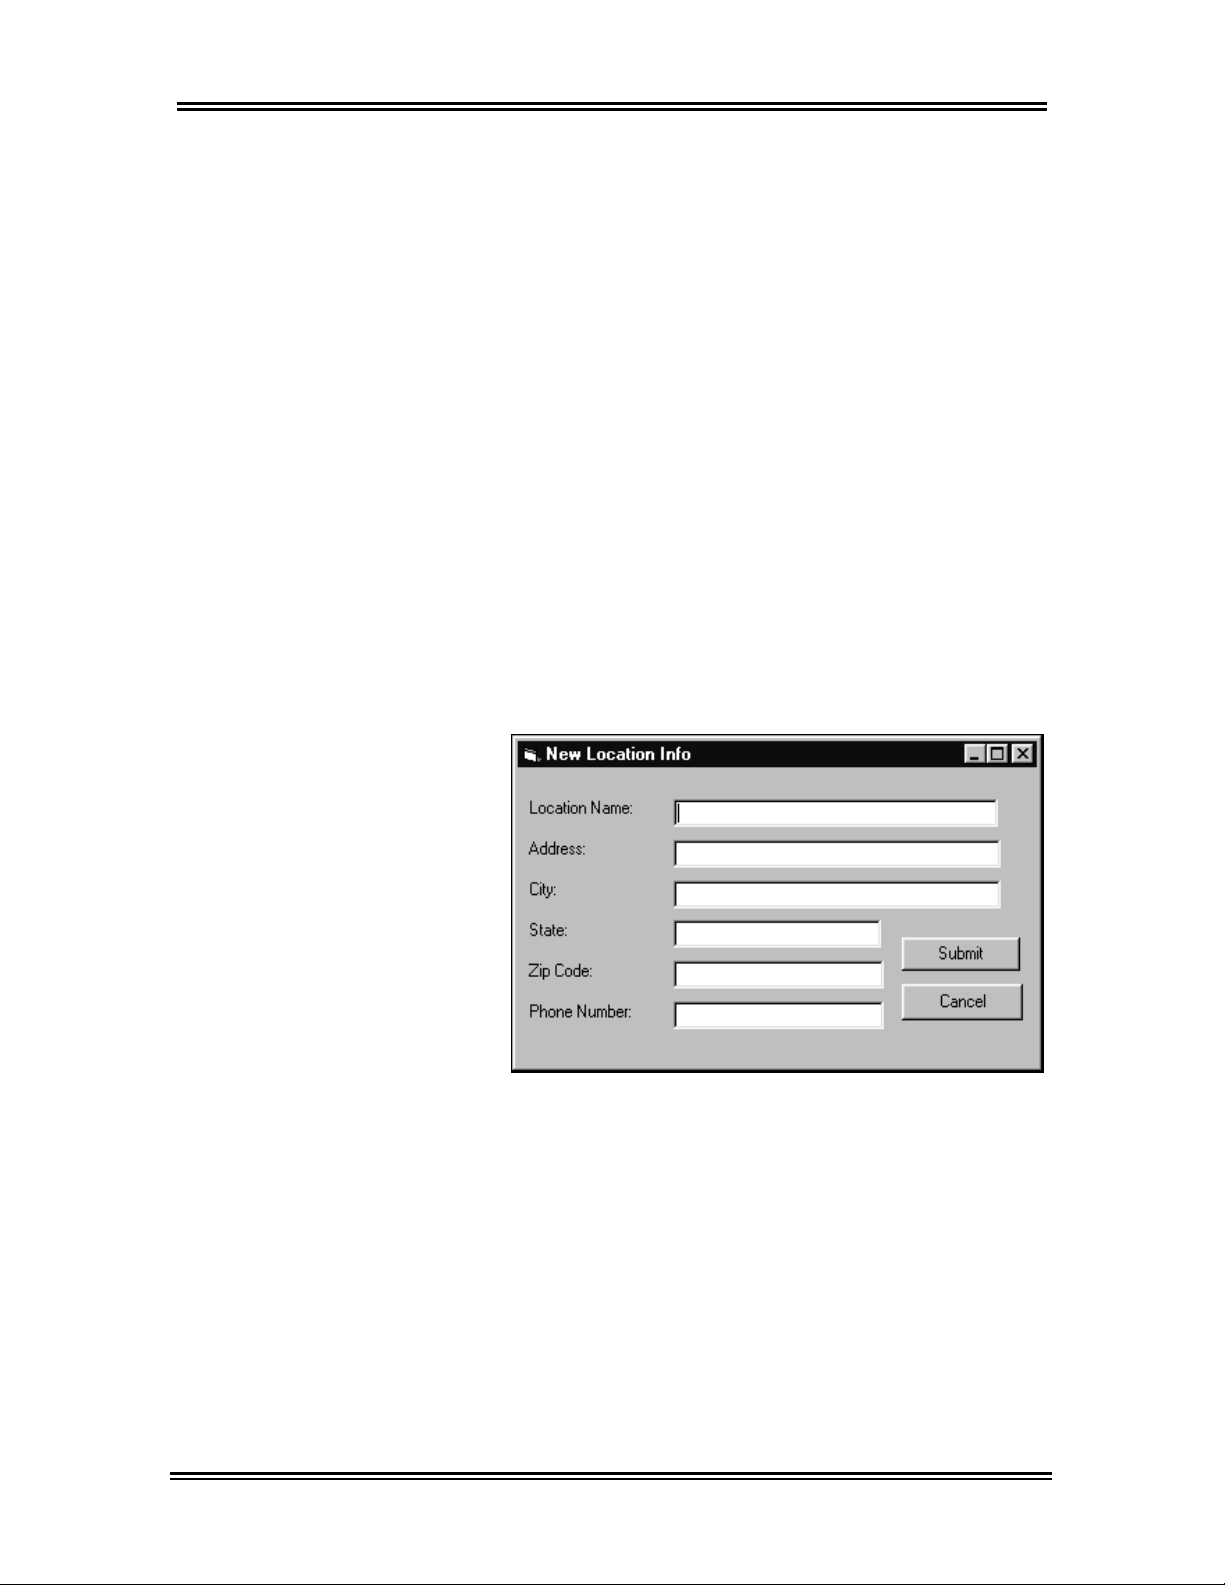
1. Select Locations, Create New Location from
the menu.
2. Enter the appropriate information into the New
Location Info
3. Click on
4. Repeat steps 1-3 to create additional locations.
dialog box.
Submit.
22
Page 32
ADVANTECH™ Management Software Setup
Editing Location Information
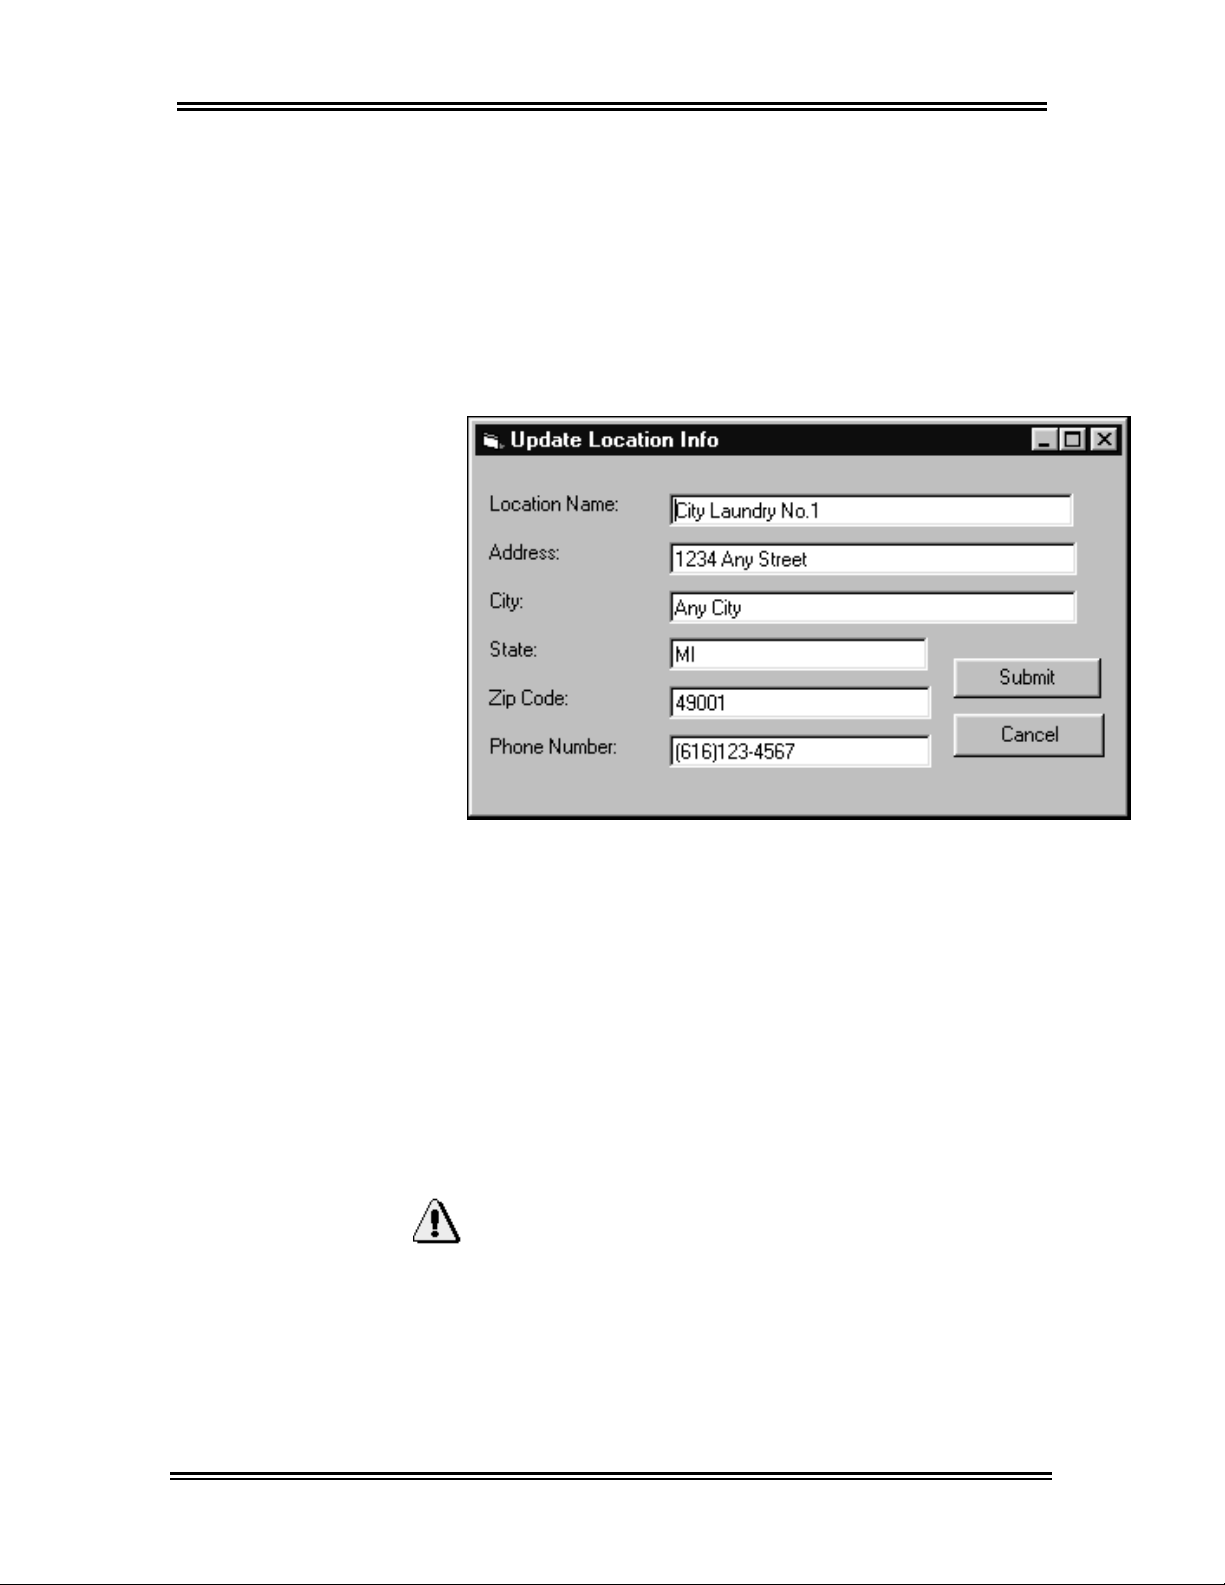
1. Verify that the correct location appears in the
Location: drop-down list located in the upper left
of the screen.
2. Select Locations, Update Current Location
from the menu.
3. Make the appropriate changes in the Update
Location Info
dialog box.
4. Click on Submit.
Deleting a Location
1. Verify that the correct location appears in the
Location: drop-down list located in the upper left
of the screen.
2. Select Locations, Delete Current Location
from the menu.
3. Click on Yes to accept the Location Deletion
Warning
.
Important:
Deleting a location also deletes template setup and
audit data associated with the location.
23
Page 33
ADVANTECH™ Management Software Setup
Passwords
Passwords protect your data from unauthorized user
access. The first time you launch the Management
Software you are prompted to enter an Owner ID.
There are several other types of passwords that, in
conjunction with the Owner ID, produce multiple
layers of security for the Management and Handheld
Software. See Appendix for more information on
passwords.
Setting the Management Password
The Management Password is used to access the
Management Software. You will be prompted to enter
this password each time you launch the Management
Software.
Important:
Write down your management password and store it
in a safe place. If you forget this password you will not
be able to use your Management Software, even if
you reinstall it!
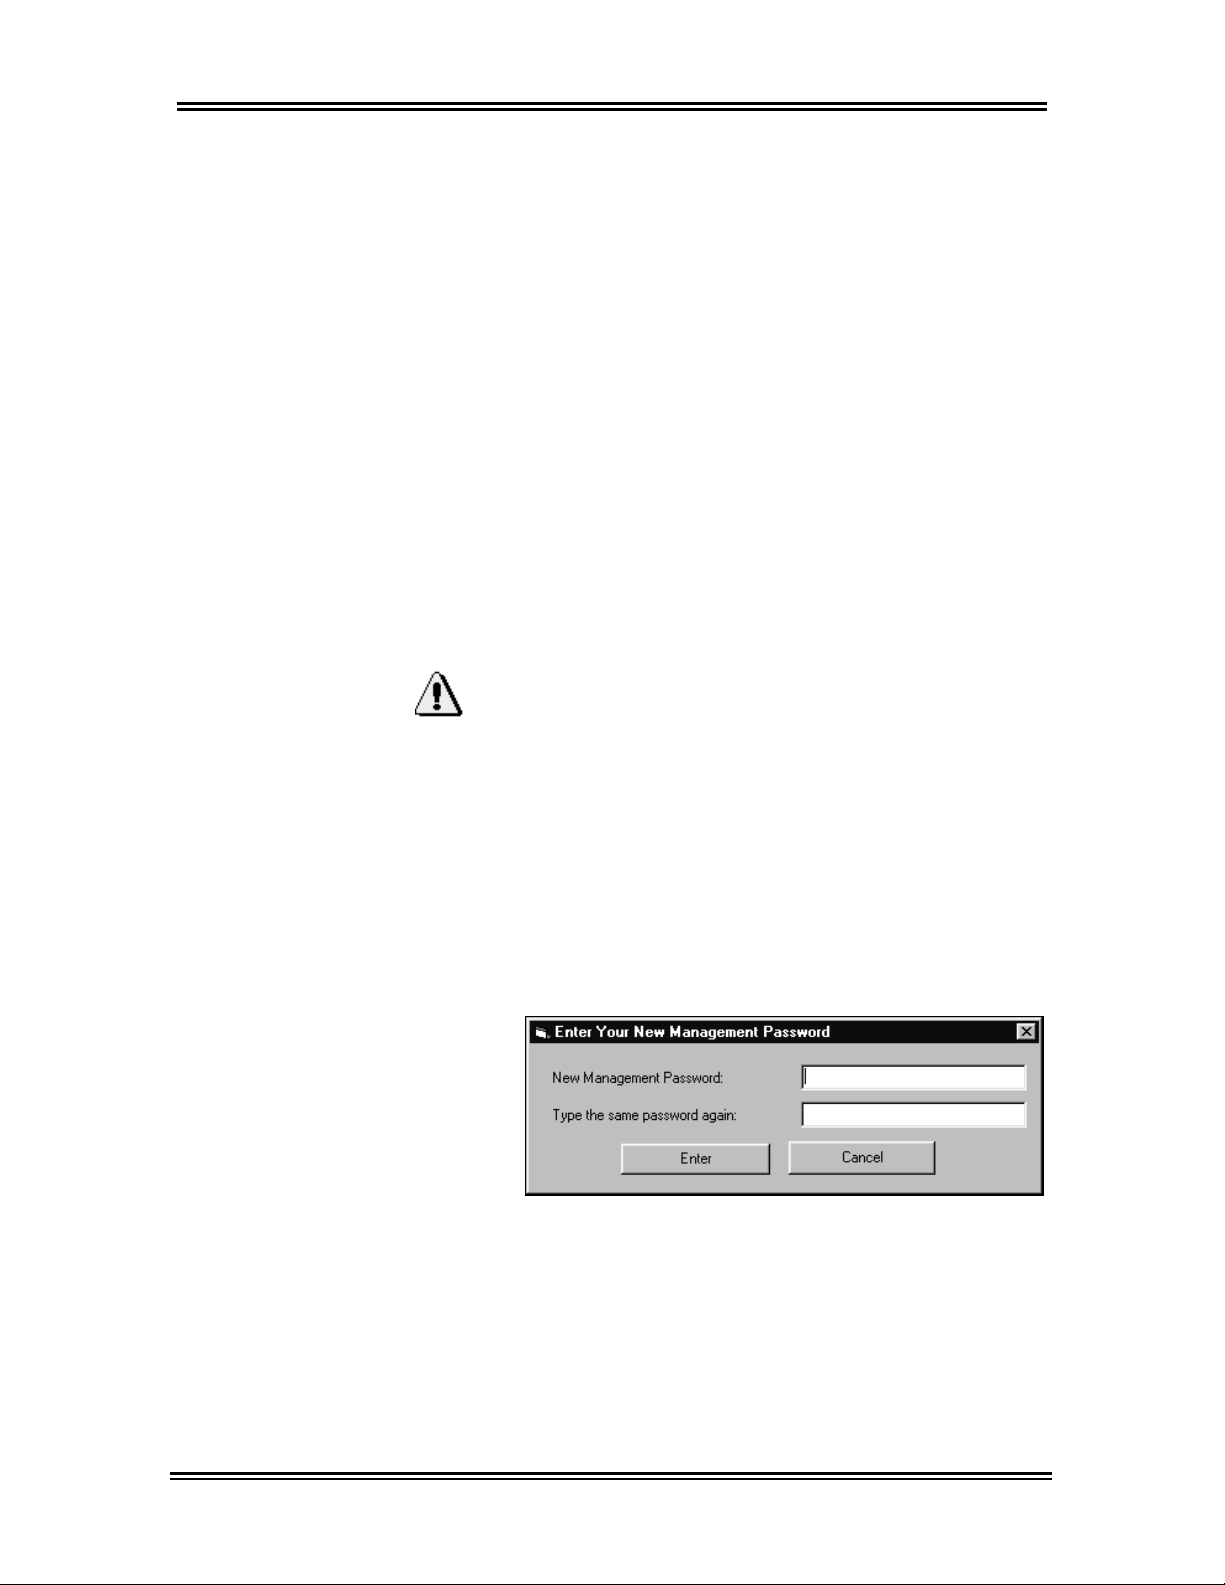
1. Select Passwords, Set Management Password
from the menu.
2. Enter the New Management Password in the
dialog box and press
3. Enter the
confirm, then click on Enter.
4. Click on
Management Password again to
OK.
[Tab].
Note: The Management Password is case
sensitive, i.e., distinguishes between upper and lowercase letters.
24
Page 34
ADVANTECH™ Management Software Setup
Setting the Access Control Password
The Access Control Password is used in
conjunction with the Owner ID to protect your
machines from unauthorized user access. Unlike the
Owner ID, the Access Control Password can be
changed.
Important:
If a service person loses a PDA, it is recommended
that you change your Access Control Password
immediately, re-sync all of your PDAs, and re-initialize
all of your machines to install the new password.
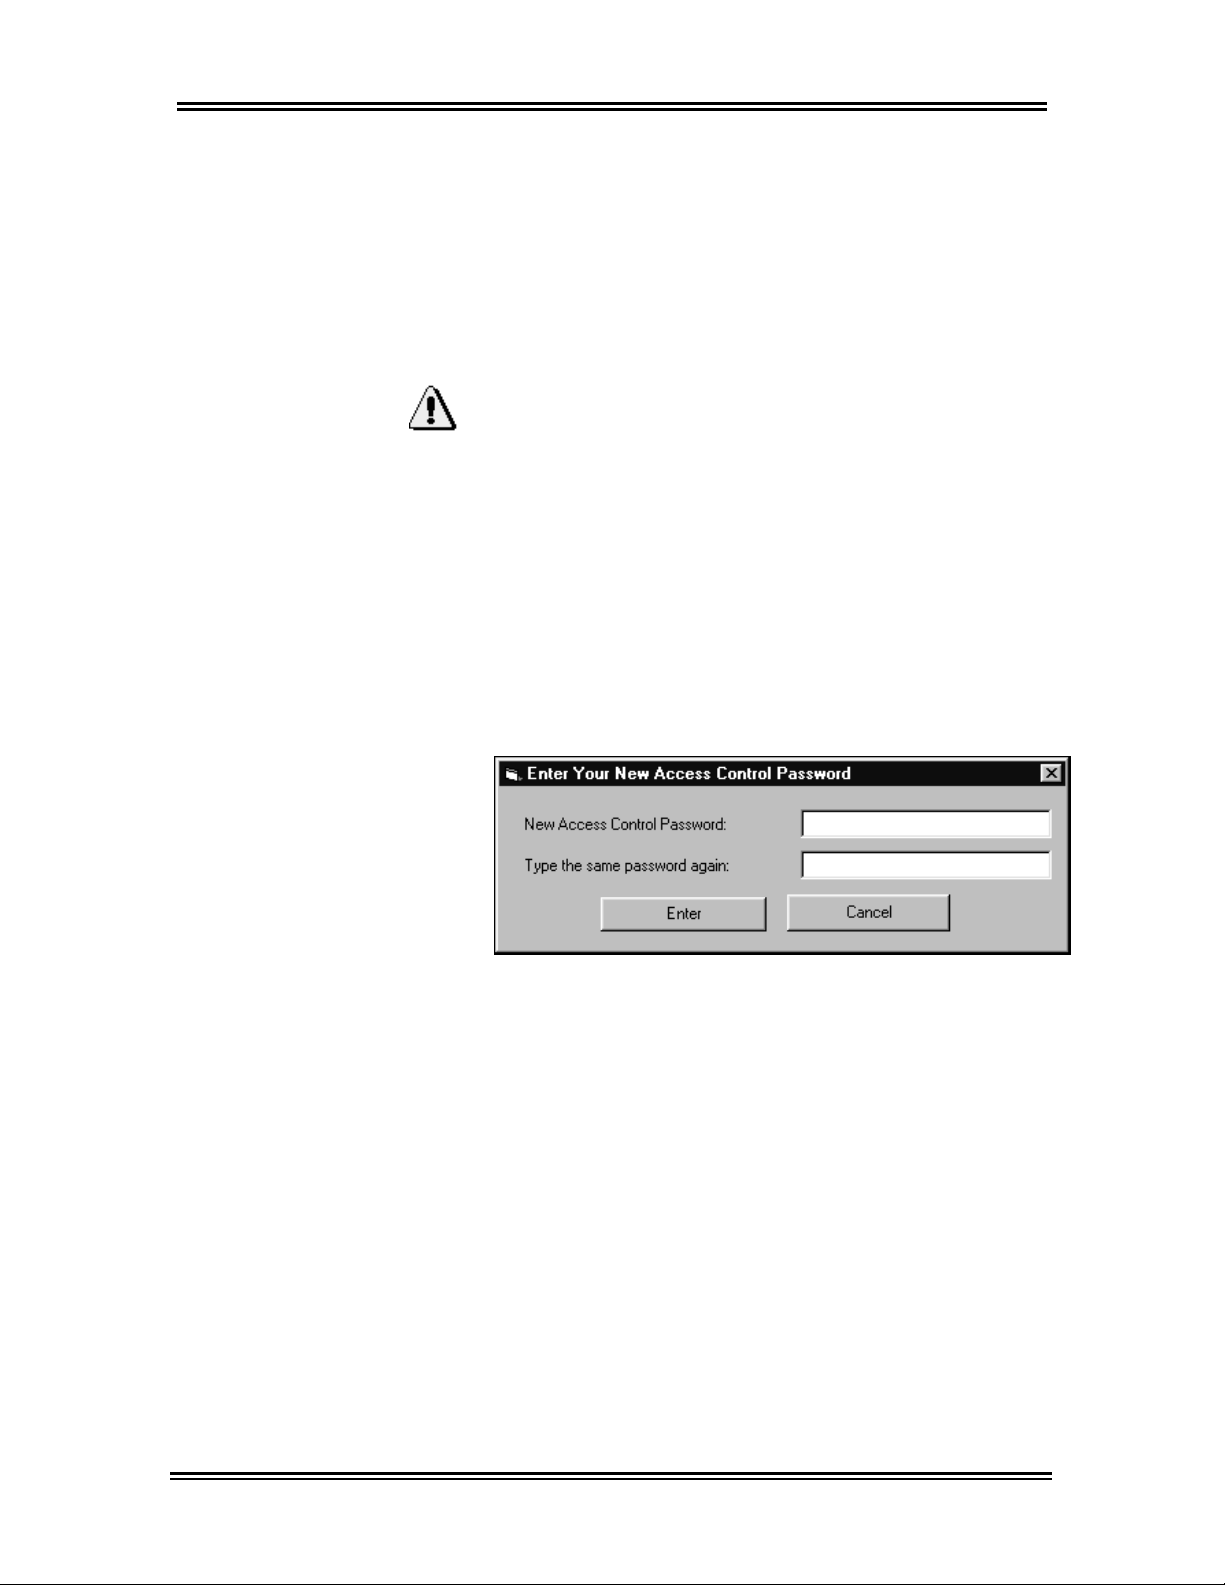
1. Select Passwords, Set Access Control
Password
2. Enter the New Access Control Password in the
dialog box and press [Tab].
from the menu.
25
3. Enter the
confirm, then click on Enter.
4. Click on
Access Control Password again to
OK.
Note: The Access Control Password is case
sensitive.
Page 35
ADVANTECH™ Management Software Setup
Setting Service Person IDs and Passwords
Service Person IDs control access to the Handheld
Software, located on the PDA. These IDs give the
owner/operator the ability to track service person
activity. An ID should be created for each service
person using a PDA.
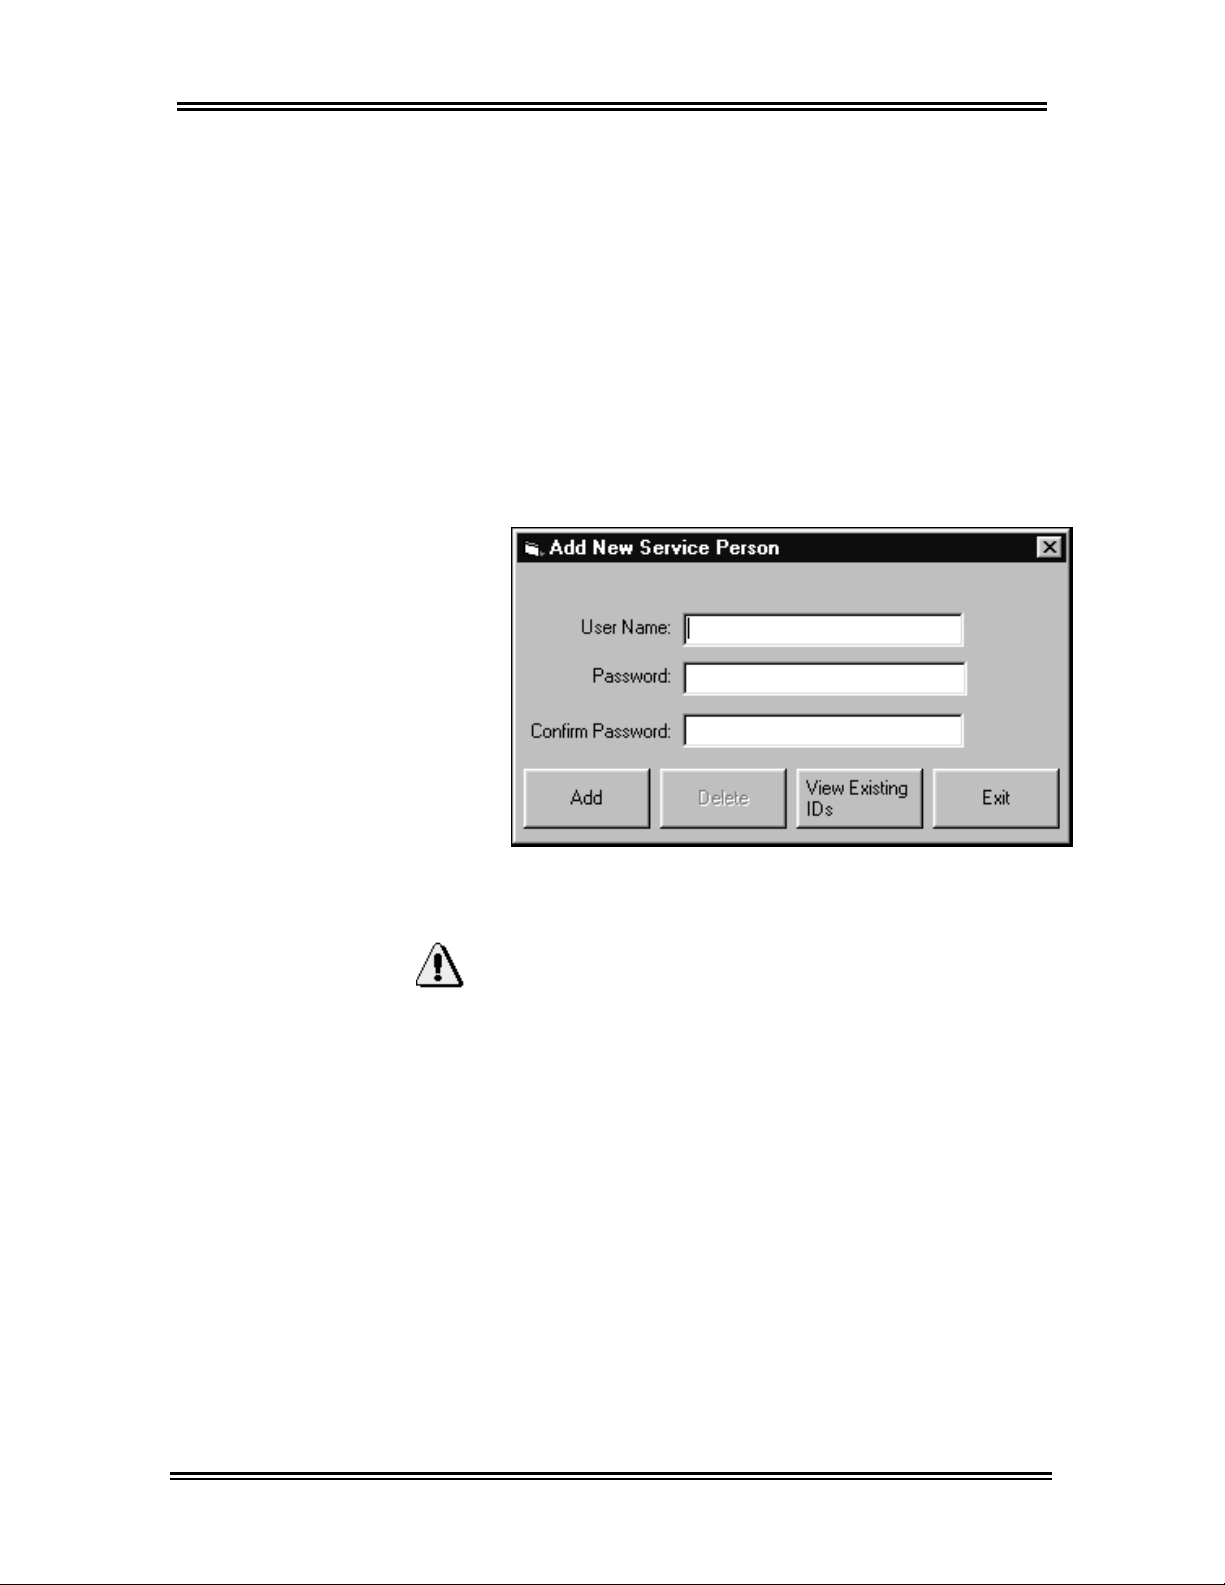
1. Select Passwords, Add/View Service Person
IDs
from the menu.
2. Enter your Management Password, then click
on Submit. The Add New Service Person
window appears.
3. Enter the User Name and press [Tab].
Important:
• The
• The Password is case sensitive.
4. Enter the
5. Enter the
on Add.
User Name and Password cannot be
longer than 12 characters (alpha and/or numeric)
including spaces.
Password and press [Tab].
Password again to confirm, then click
26
Page 36

ADVANTECH™ Management Software Setup
Setting Service Person IDs (continued)
6. Repeat steps 1-5 to create additional Service
Person IDs.
7. Click on
Service Person IDs.
Exit when you are finished adding
Hints:
• Longer passwords are more secure; however
choosing a password that is too long can be
cumbersome to enter into the PDA.
• Click on the View Existing IDs button to see IDs
you have already setup.
Note: If you delete a Service Person ID, that
information is deleted from the active list only. This
information still resides in the database so you can
still view who is responsible for past audits.
Setting the Software Update Password
The Software Update Password is used to secure
the upgrade process when needing to change the
Whirlpool imbedded software of the machine’s control
board. The process will copy new software from the
PDA to the control board of the machine by n infrared
beam. This will only be required if Whirlpool issues
new machine control board software also called
firmware. The Software Update Password is not
mandatory and should only be used for additional
security.
1. Select Passwords, then Set Software Update
Password
2. Enter the
press [Tab].
3. Enter the
confirm, then click on Enter.
4. Click on OK.
New Software Update Password and
Software Update Password again to
from the menu.
27
Page 37
ADVANTECH™ Management Software Setup
Machine Templates
Machine Templates are created and managed within
the Management Software. Template information
includes machine settings such as base cycle price
and base cycle time for machines at a certain
location. A single location can have multiple templates
created to assist in resource balancing and usage
management. This information is then downloaded to
the PDA, via the HotSync® process, to distribute
machine setup information to the washers and dryers.
Machine templates are location specific. A new
template must be created for each location even if
template data is the same at all locations.
Creating a New Machine Template
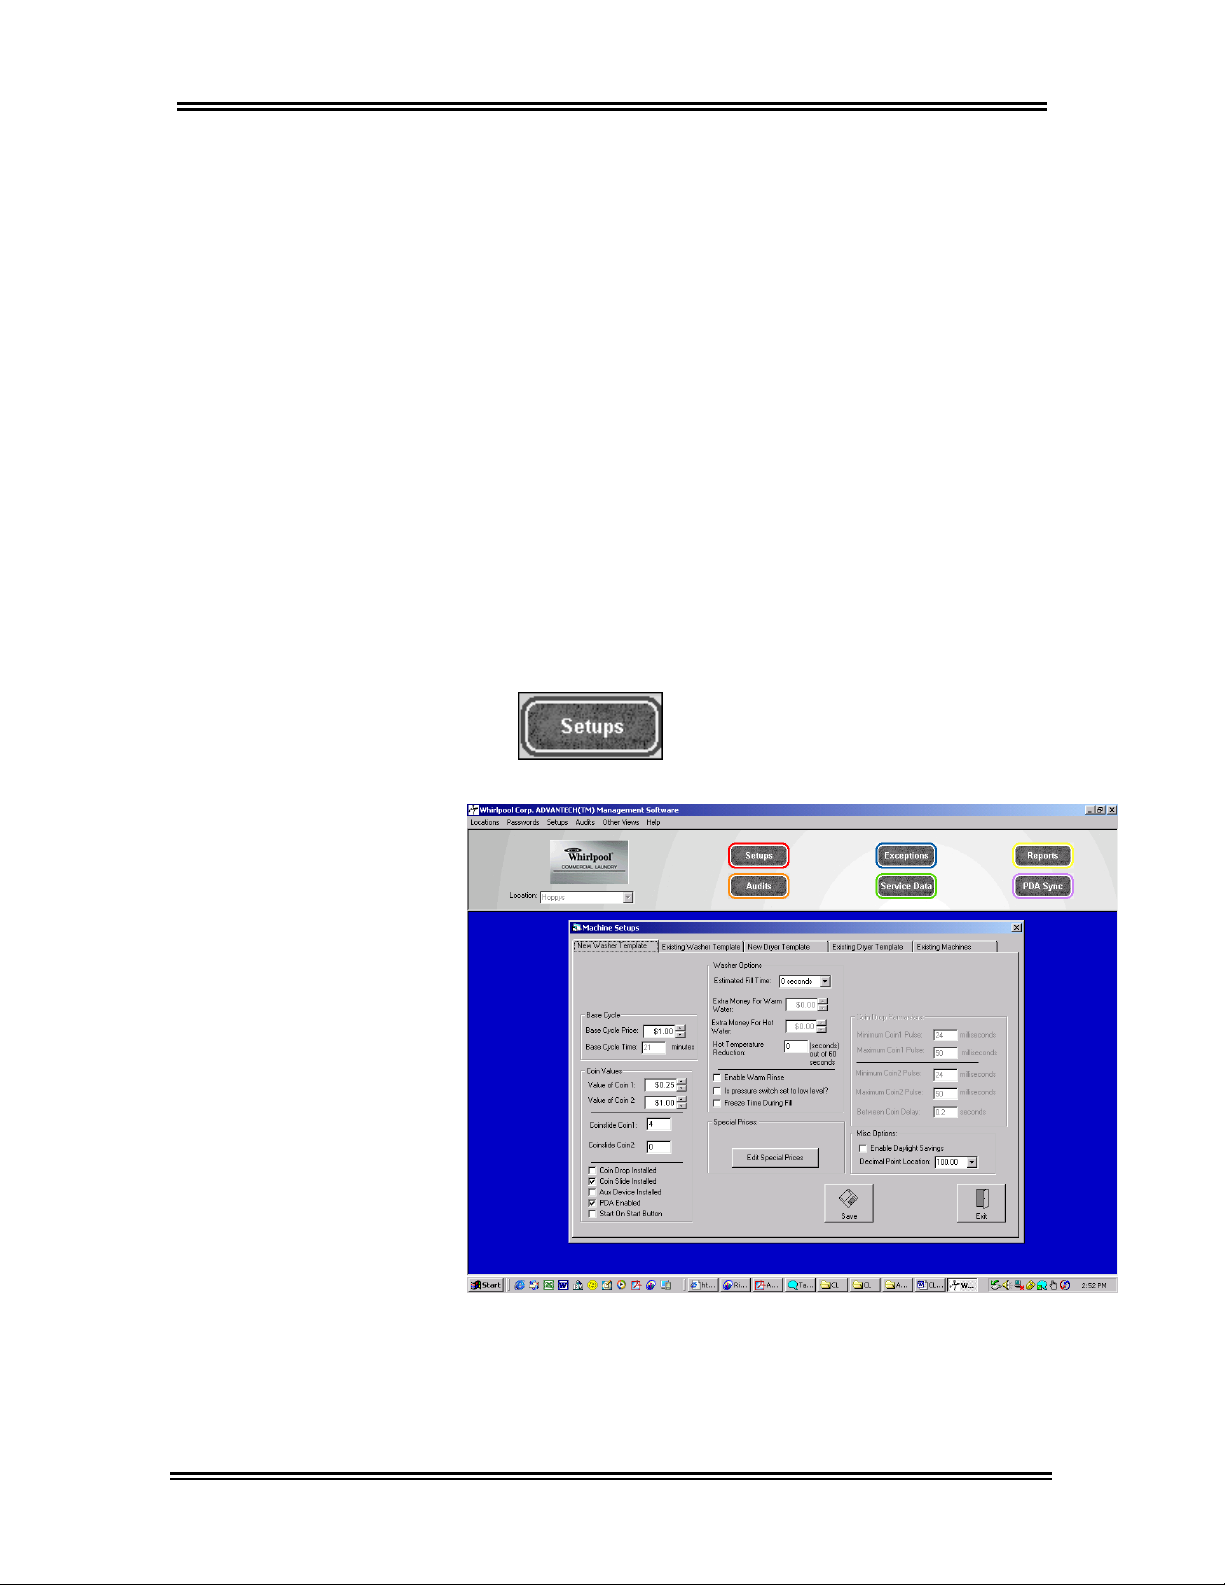
1. Select the correct location from the Location:
drop-down list.
2. Click on Setups.
3. The Machine Setups dialog box appears.
4. Click on the tab to display either a
Template
selections for the new template. See tables on
the following pages for more information on
template options.
or a New Dryer Template. Make
New Washer
28
Page 38
ADVANTECH™ Management Software Setup
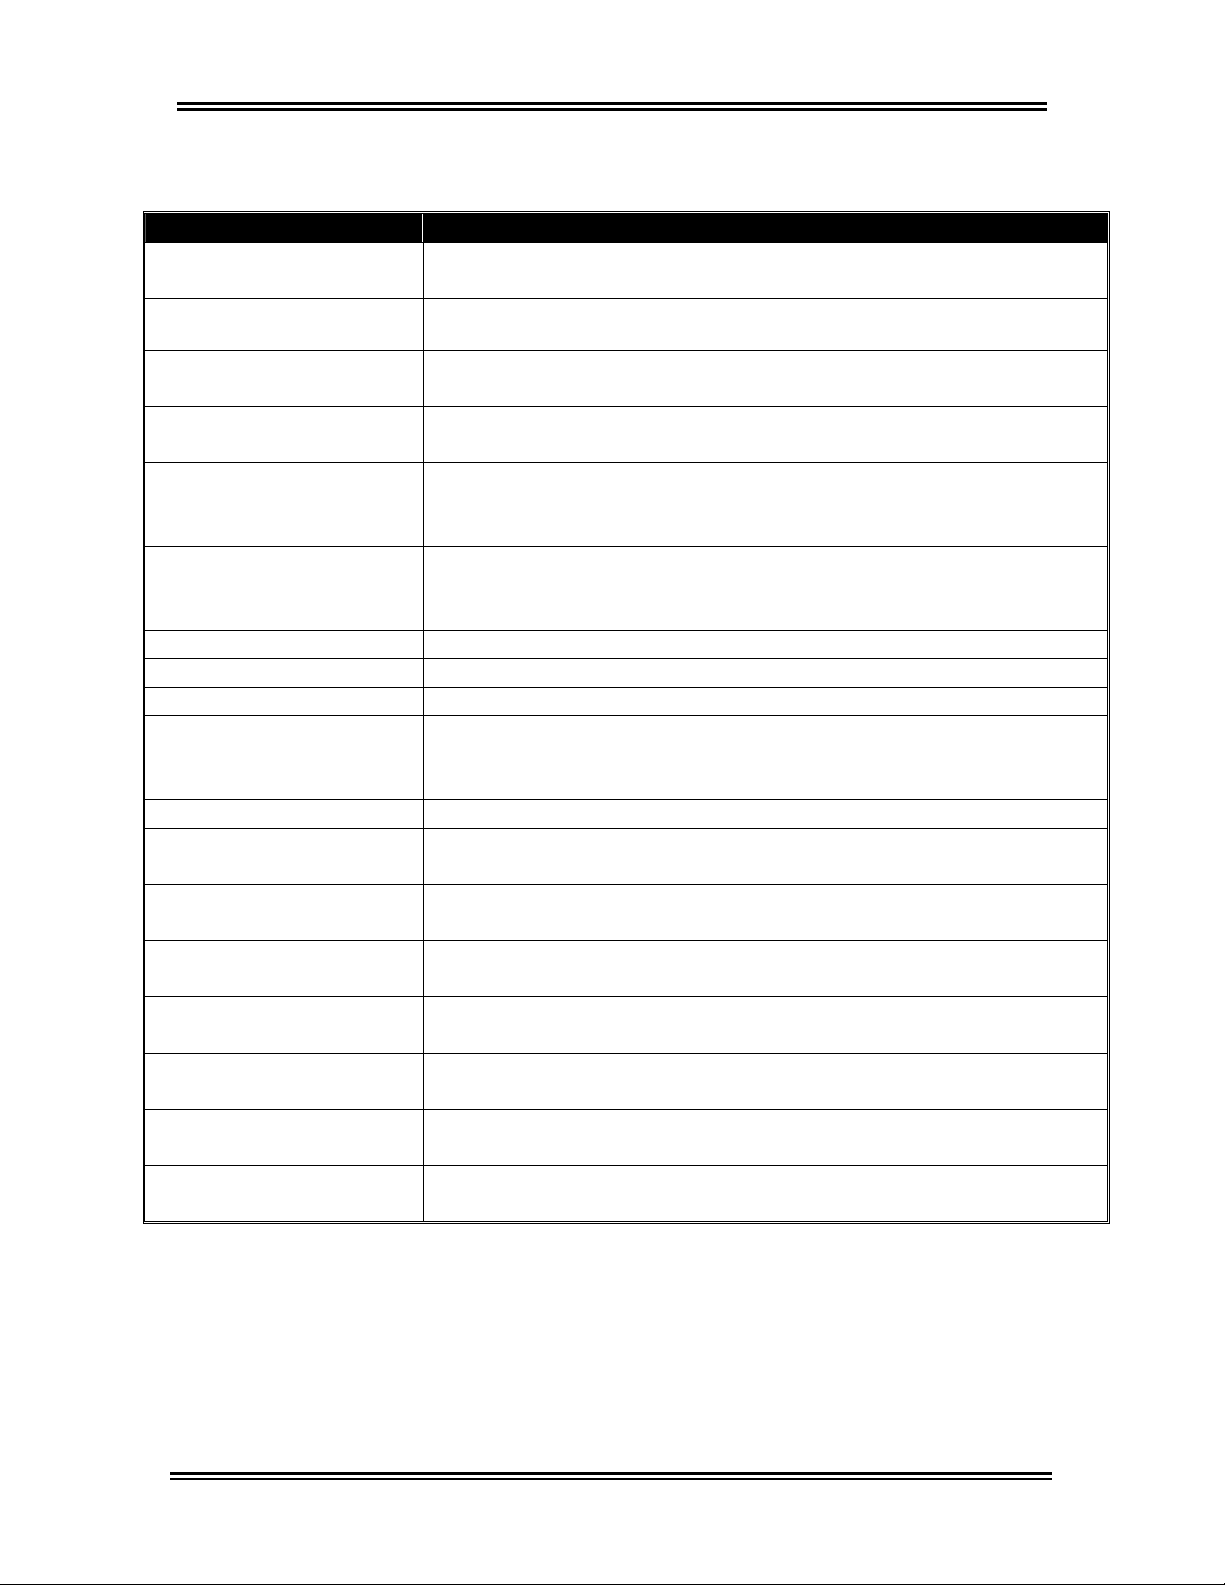
The following options can be set for either a New Washer or New Dryer
Template
(defaults are listed below the option):
Option Description
Base Cycle Price*
($1.00)
Base Cycle Time (cannot
be changed on washer)
Value of Coin 1 ($0.25)
Value of Coin 2 ($1.00)
Coinslide Coin1
(4)
Coinslide Coin2
(0)
Sets the
Sets the
Base Cycle Price for a wash or a dry cycle.
Base Cycle Time for a wash or a dry cycle.
Sets the value of coins inserted into the first coin drop or slide.
This field must be filled in.
Sets the value of coins inserted into the second coin drop or
slide (if necessary).
Indicates the number of coins that must be inserted into the
first slide to equal the value of the
Base Cycle Price. This
field must be filled in.
Indicates the number of coins that must be inserted into the
second slide to equal the value of the
Base Cycle Price (if
necessary).
Coin Drop Installed** Indicates whether or not a Coin Drop device is installed.
Coin Slide Installed** Indicates whether or not a Coin Slide device is installed.
Aux Device Installed** Indicates whether or not a Smart Card reader is installed.
Indicates whether service persons can access the machines
PDA Enabled
with PDAs. If this options is not enabled (no checkmark), then
PDAs cannot be used.
Start on Start Button**** When enabled allows for Push-to-Start or OPL cycles. ($0.00)
Minimum Coin1 Pulse
(24 milliseconds)***
Maximum Coin1 Pulse
(50 milliseconds)***
Minimum Coin2 Pulse
(24 milliseconds)***
Maximum Coin2 Pulse
(50 milliseconds)***
Between Coin Delay
(default 0.2 seconds)***
Enable Daylight
Savings (Disabled)
Decimal Point Location
* For coin drops and slides, Base Cycle Price must match the mechanical settings of the selected coin acceptor.
** A minimum of one-money accepting mechanism must be selected: Coin Drop, Coin Slide, Aux Device, or OPL
*** For coin-operated machines, use manufacturer’s recommended time settings for individual installation, if an OFF error
code appears on the display during use, the time pulse or delay should be dropped to 0.0
**** For Start On Start Option
appear in the display of the machine.
a minimum of .01 must be input for the cycle price in order for the 0.00 vend price to
Sets the minimum number of milliseconds for coins to pass
through the Coin1 drop.
Sets the maximum number of milliseconds for coins to pass
through the Coin1 drop.
Sets the minimum number of milliseconds for coins to pass
through the Coin2 drop.
Sets the maximum number of milliseconds for coins to pass
through the Coin2 drop.
For machines with coin drops installed, the minimum number
of seconds between the drop of Coin1 and the drop of Coin2.
Indicates whether the machine is set to observe Daylight
Savings Time.
Indicates the location of the decimal point when the price is
displayed on the machine.
29
Page 39
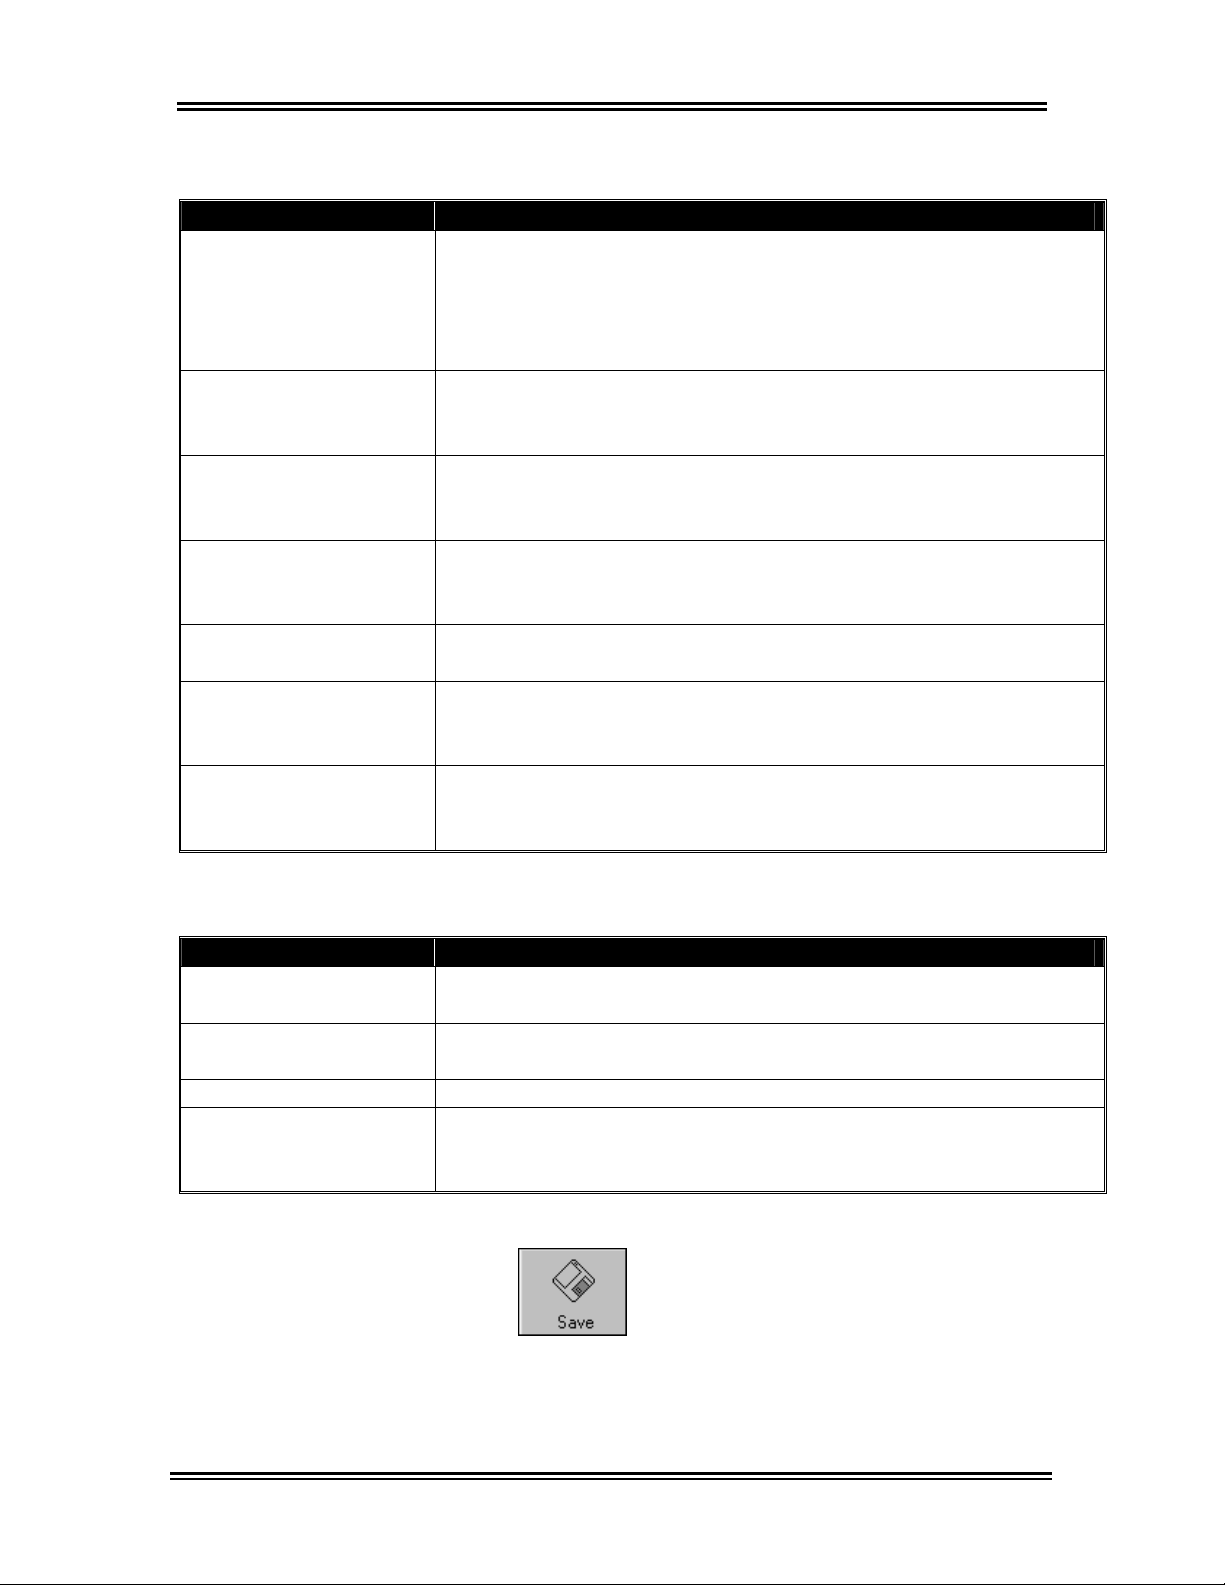
ADVANTECH™ Management Software Setup
New Washer Template options, defaults are listed below the option:
Option Description
Estimates the time it takes to fill a machine during wash or
Estimated Fill Time
(0 seconds)
Extra Money for
Warm Water
($0.00)
Extra Money for Hot
Water
($0.00)
Hot Temperature
Reduction
(0)
Enable Warm Rinse
(No)
Is Pressure Switch
Set to Low Level (No)
Freeze Time During
Fill (No)
rinse cycles. This time is added to the Base Cycle Time. An
estimated fill time can be obtained from the audit results by
location. Display time will be increased by double the amount
selected as it adds the time to both fill cycles.
Indicates how much money to be added to the
Price
when warm water is selected.
Indicates how much money to be added to the
Price
when hot water is selected.
Indicates how many seconds of cold water should be added
to the hot water for each minute of fill time. Max of 30
seconds.
Selects warm water only for the Rinse Cycle. The default is
No (no check mark).
Indicates whether washer’s pressure switch is set to low.
The default is No (no check mark). See Service Tech
Manual for more information.
Indicates whether machine’s Base Cycle Time should begin
counting down during machine fill. The default is No (no
check mark).
New Dryer Template
options:
Option Description
Topoff Price
($0.00)
Topoff Time
(0)
Disable Topoffs Does not allow Topoffs.
Extended Cooldown
(5 minutes)
Indicates that Base Cycle Time can be extended after the
initial
Sets the amount of time, in minutes, that is added for each
additional coin.
Indicates the number of minutes of
the Base Cycle Time. This is part of the Base Cycle Time,
not an addition to.
Base Cycle Price has been met.
Cooldown before end of
Base Cycle
Base Cycle
5.
template options.
6. A number will automatically be assigned to the
template. Click on OK to confirm the action.
Click on Save to save machine
30
Page 40
ADVANTECH™ Management Software Setup
Editing an Existing Template
1. Click the appropriate Existing Washer Template
or Existing Dryer Template tab.
2. Select the washer or dryer template to be edited
from the Select a Template: drop-down list.
3. Make the appropriate changes to the template.
4. Click on Save.
5. Click on OK to confirm update.
Deleting a Machine Template
1. Click the appropriate Existing Washer Template
or Existing Dryer Template tab.
2. Select the washer or dryer template to be deleted
from the Select a Template: drop-down list.
3. Click on Delete, located in the lower
right of the dialog box.
4. Click on Yes to confirm the action.
5. Click on OK.
31
Page 41
ADVANTECH™ Management Software Setup
Special Prices Overview
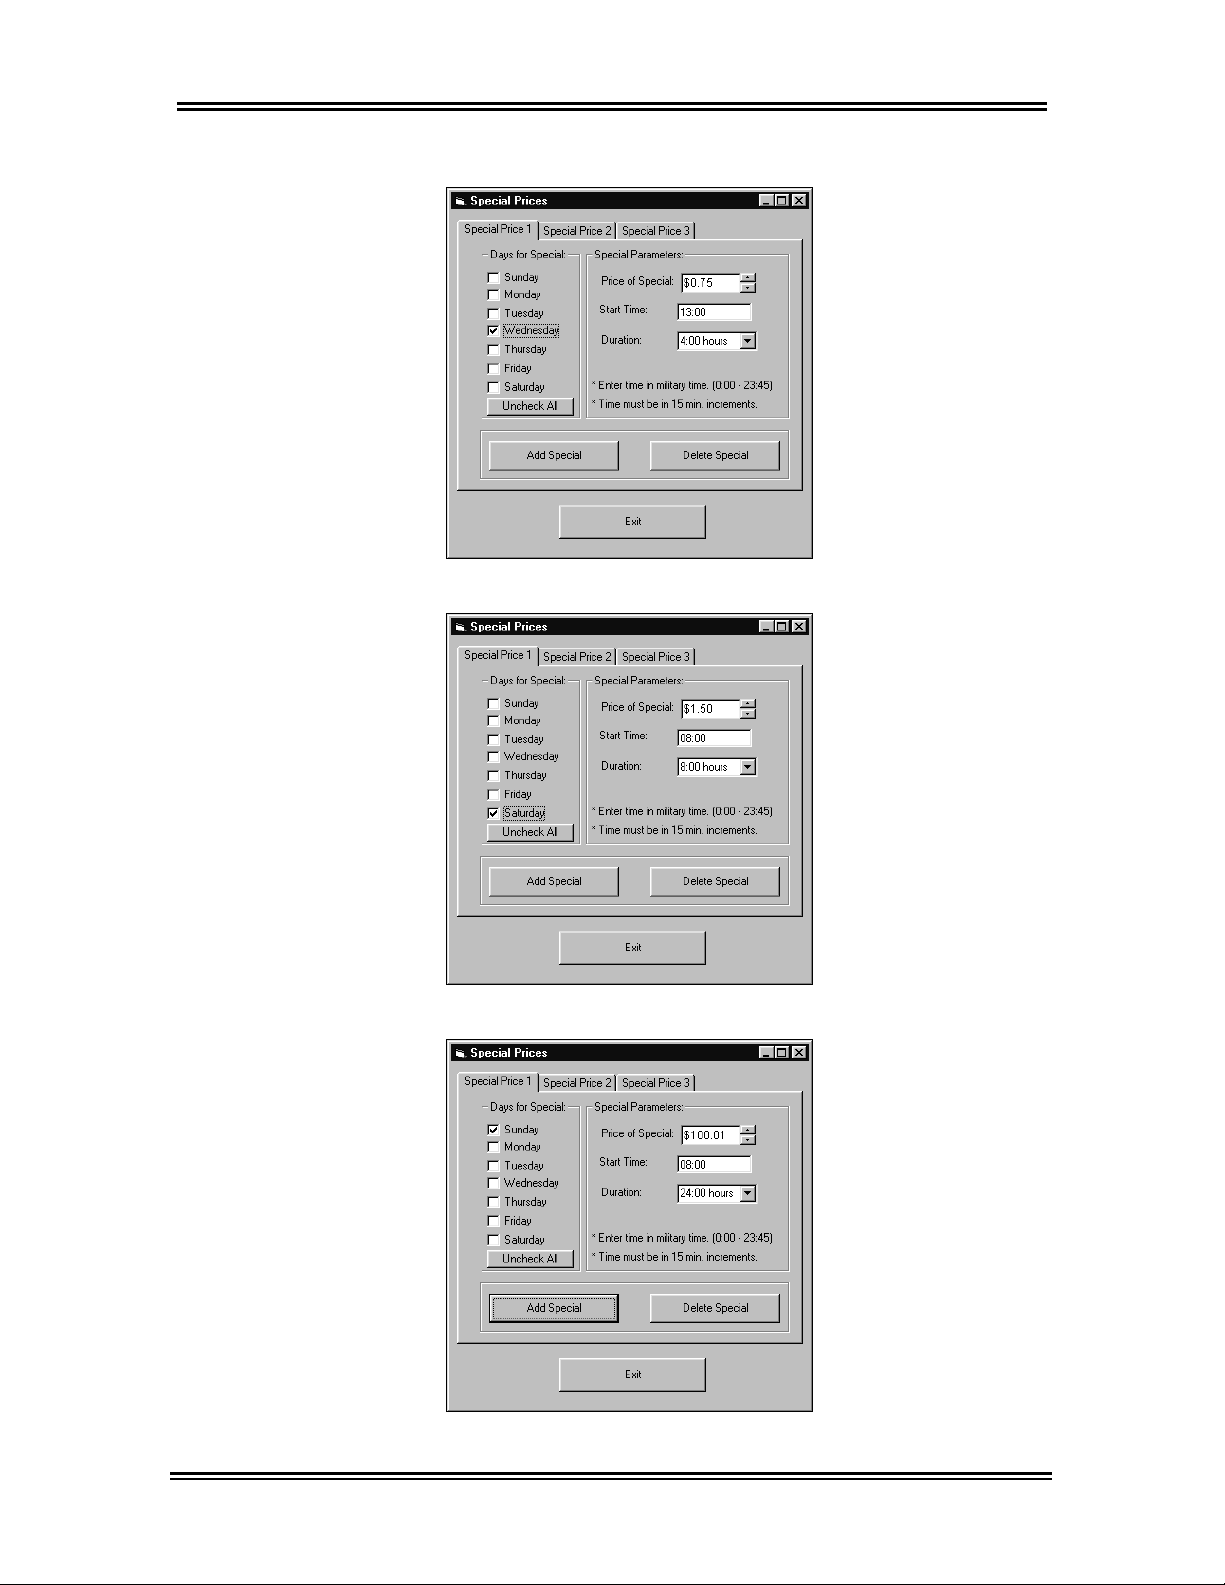
The New Washer and New Dryer Templates enable
you to create up to three special vend prices for
your machines. For example, you could adjust prices
for specific time periods when the machines are under
or over-utilized, or set the machine to turn itself off for
a specified time period. See page 35 for Special Price
examples.
Setting Special Prices
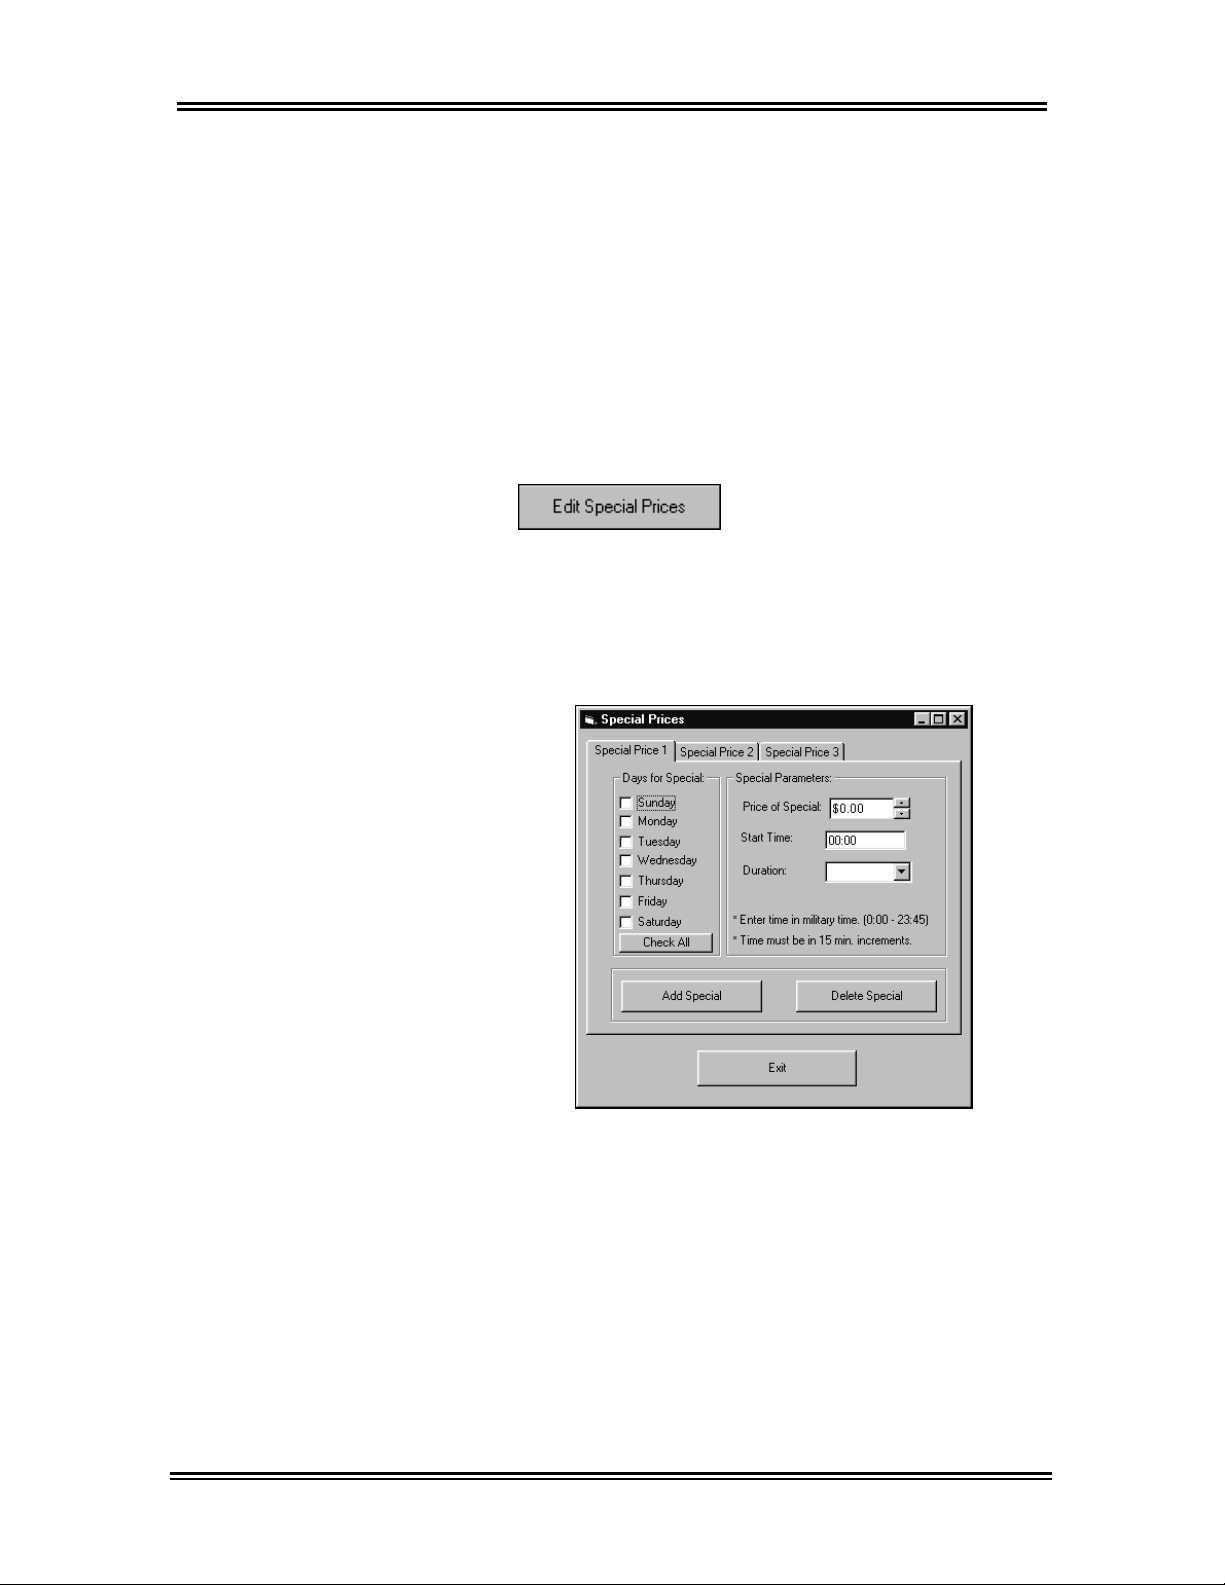
1. Click on Edit Special Prices,
located in the center of the New Washer or New
Dryer Template
2. The Special Prices dialog box appears. Select
the appropriate days for the Days for Special:
and set the Special Parameters:. You cannot
set a Special Price of $0.00.
tab.
3. Click on the
Add Special button.
Note: To set the machine to turn itself off for a
specified time period, select the days and times for
the machine to turn off under Days for Special: and
Special Parameters:, then set the Price of Special
$100.01”. This will cause the machine to display
to “
“OFF” on its control panel during the specified time
period.
32
Page 42
ADVANTECH™ Management Software Setup
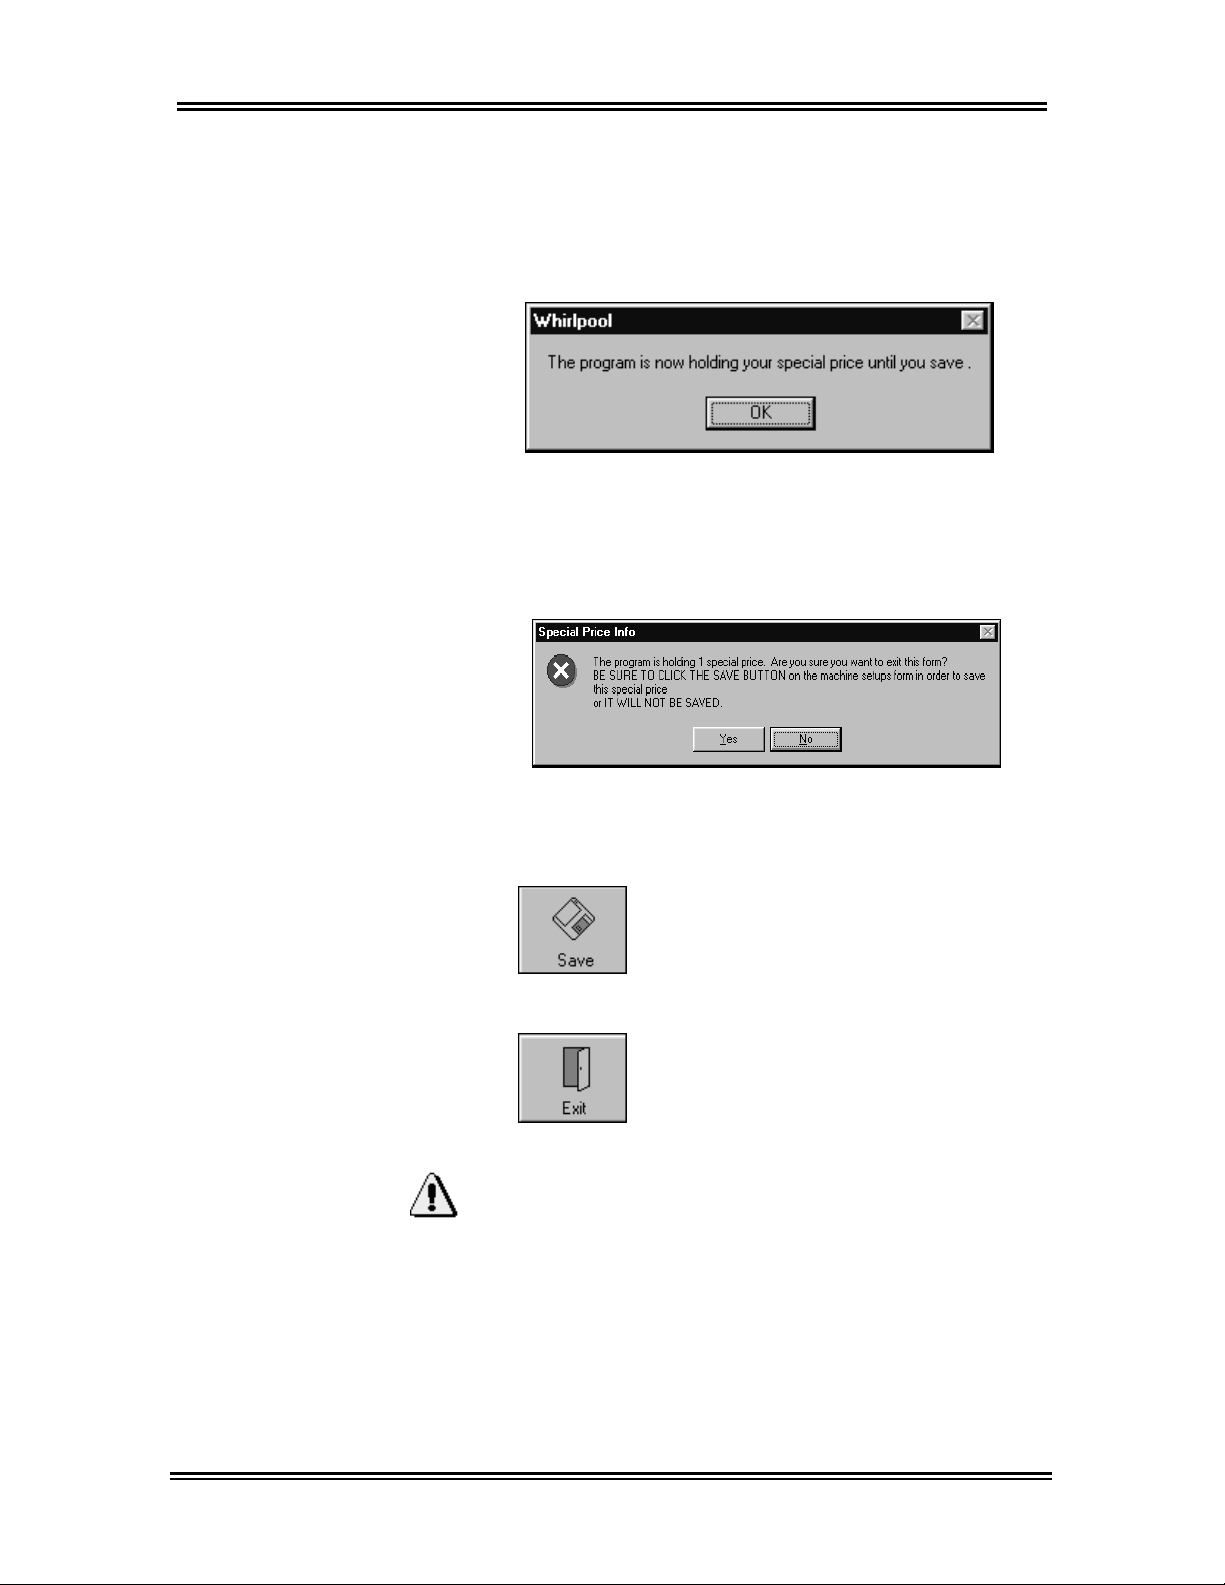
4. The following window appears. The special price
will remain in the software’s memory until the
template is saved. Click on
5. Click on the
Prices
6. The Special Prices Info window appears. Click
on Yes.
Exit button to exit the Special
dialog box.
OK.
Note: The Special Prices will not be saved until
you save the template.
7. Click on Save to save the New
Washer
8. Click on
9.
Setups
or New Dryer Template.
OK to confirm.
Click on Exit to exit the Machine
dialog box.
Important:
You will not be prompted to save the template before
exiting the
that you remember to click on
all of your template information will be lost!
Machine Setups window. It is important
Save before exiting, or
33
Page 43
ADVANTECH™ Management Software Setup
Special Price Examples
Special Price set
to reflect an
under-utilized
machine (default
price is $1.00)
Special Price set
to reflect an
over-utilized
machine (default
price is $1.00)
Special Price set
to turn a
machine off for a
specified time
period
34
Page 44

HotSync® Process Between the
Management Software and the Palm
Handheld
™
35
Page 45
ADVANTECH™ Management Software HotSync
Downloading Machine Setup Data to the Palm
™
Once you have setup your passwords, locations, and
templates you can download the information from the
PC to the PDA via the HotSync
be in
Open-Access Mode until the first HotSync
operation is performed. In Open-Access mode your
machines are vulnerable to any PDA with the Handheld
Software loaded on them, however, only a limited
number of utilities are available in this mode: Get/Set
Time, Get Setup, Start/End Cycles, Audit Count,
Service Mode, and Run Diagnostics. It is recommended
that you sync your PDAs with the Management
Software and initialize your machines as soon as
possible after installation. After the first HotSync
operation has been performed the PDAs will then be in
Synced Mode, where all features will become
available.
Handheld via a HotSync®
®
process. The PDA will
®
®
Before performing a HotSync® operation, make sure the
Management Software has been launched on the PC
and that the Palm™ handheld is in its cradle. Refer to
page 15 of this manual for instructions on installing the
Handheld Software.
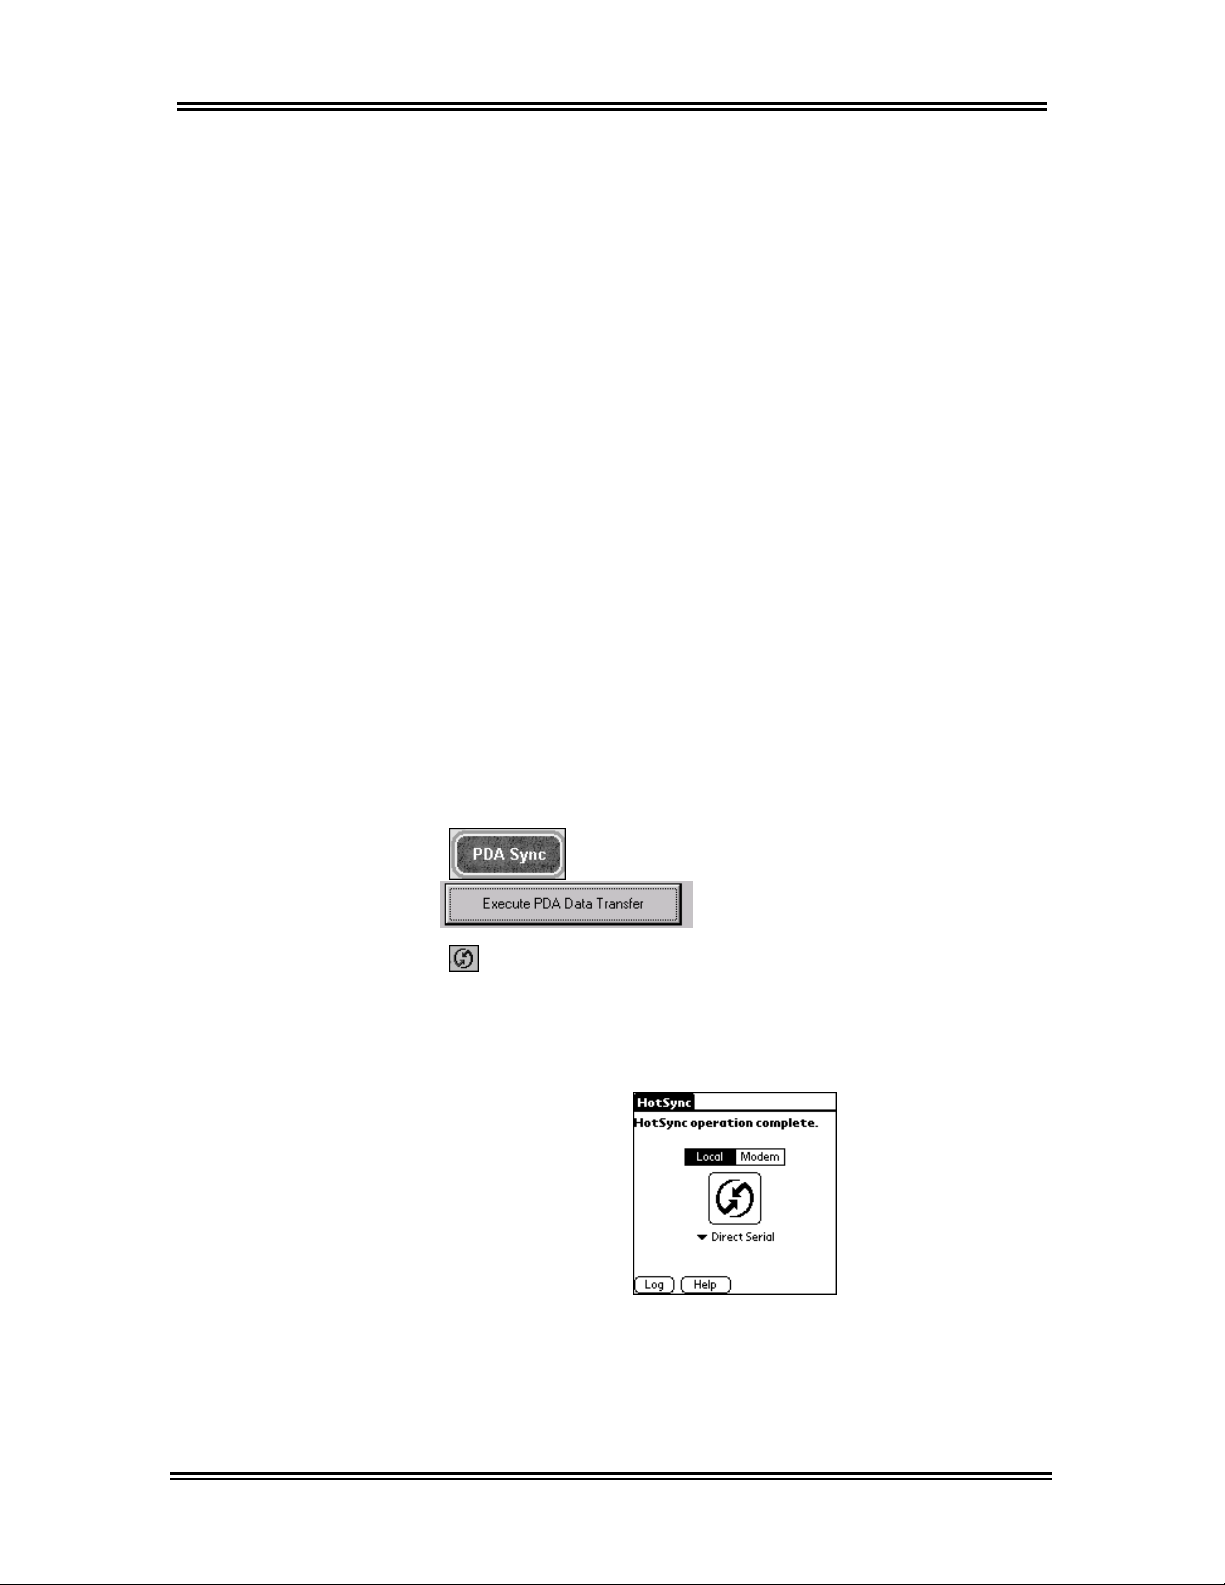
1. Click on PDA Sync.
2. Click on Execute
PDA Data Transfer.
3. Press the HotSync® button on the HotSync® cradle
or cable.
4. When the HotSync® operation is complete, click OK on
the PC, then click on
Exit. The Palm
™
handheld screen
will look like this:
5. On the Palm
™
handheld, use the stylus to tap the Home
icon, located to the left of the Graffiti
will display the main menu screen on the PDA.
®
writing area. This
36
Page 46

Data Exchange Between the Palm™
Handheld and ADVANTECH™
Commercial Laundry Products
37
Page 47
Data exchange between PDA & Machine
Overview
Once you have completed the initial setup of the
Management and Handheld Software, and have
downloaded the data to the Palm
ready to upload the information to the ADVANTECH™
commercial laundry products. Part of this process
requires the initialization of each machine so data can
be exchanged between the Palm™ handheld and the
ADVANTECH™ equipment. When initialization is
complete, templates may then be uploaded to the
machines.
Starting the Handheld Software and Logging In
1. Remove the Palm™ handheld from its cradle and
turn it on, if necessary.
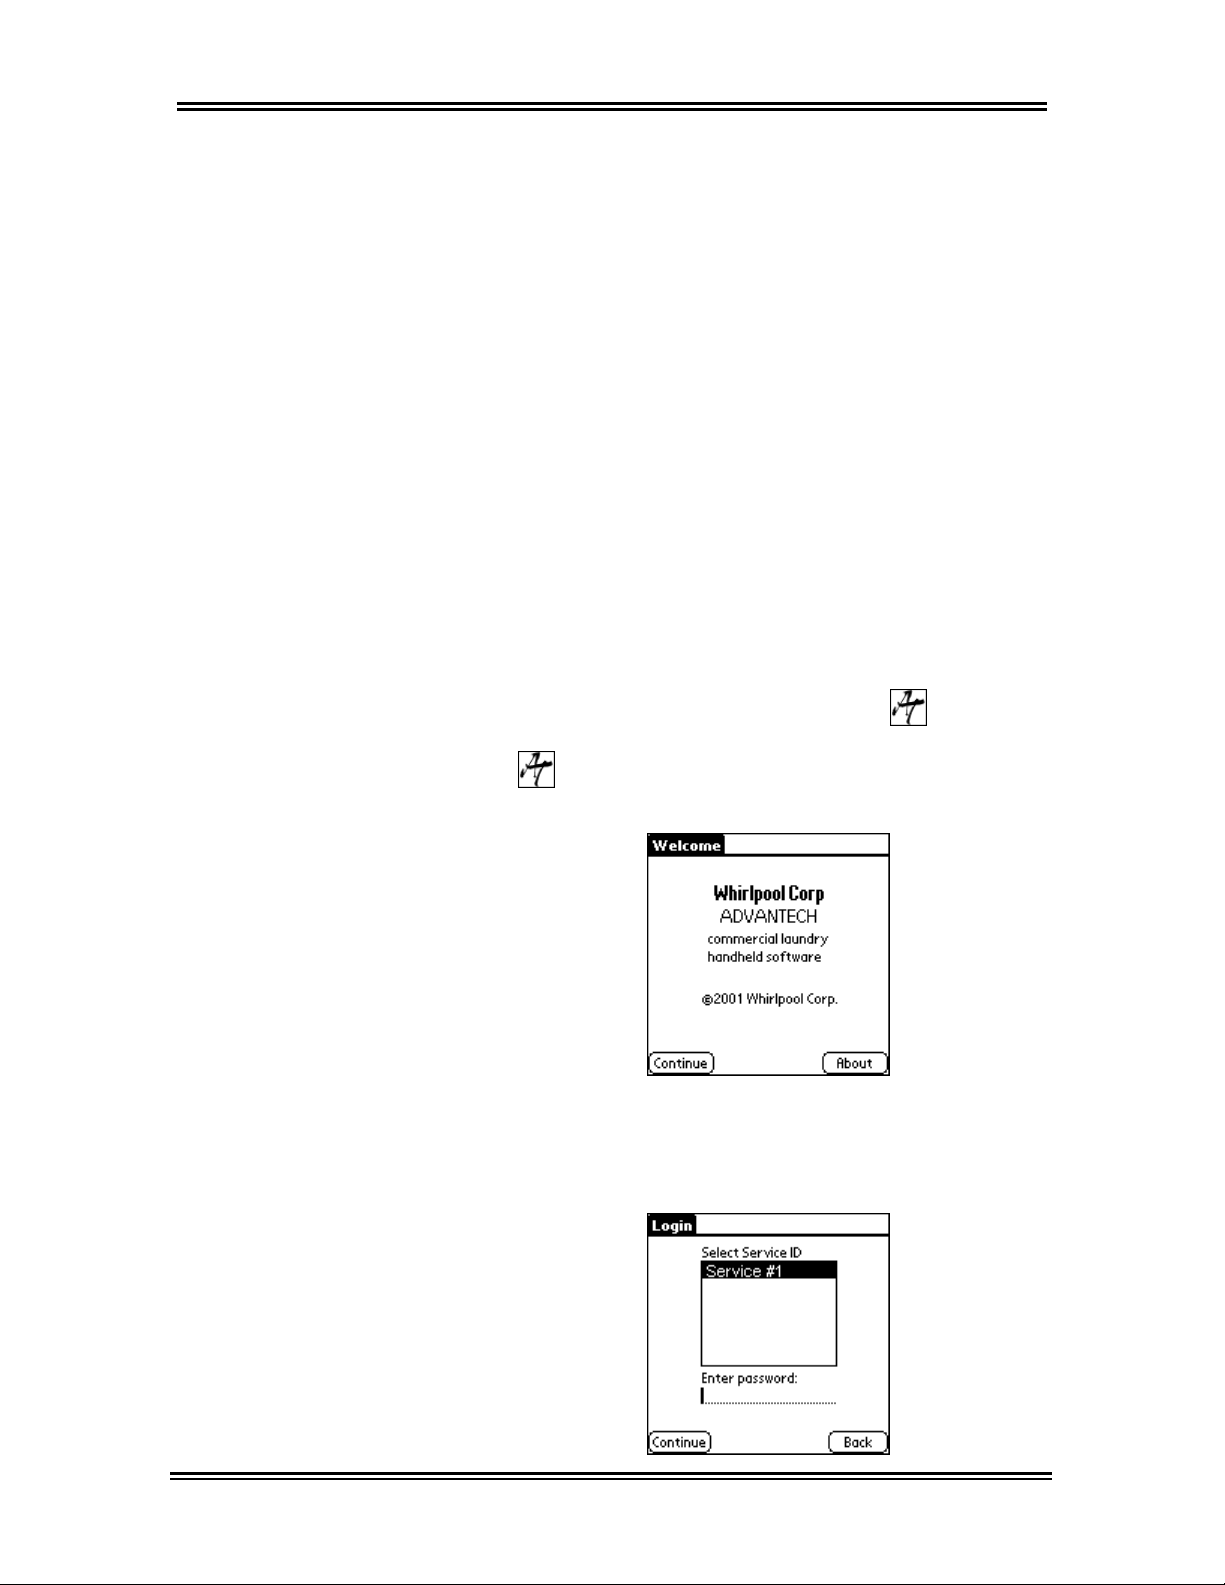
2. Using the stylus, tap the Palm™ handheld screen
™
handheld, you are
to scroll to the ADVANTECH icon.
3. Tap on the ADVANTECH icon.
4. The Welcome screen appears.
5. Tap on Continue.
6. The
Login screen appears. Select the correct
Service ID and enter the corresponding
password using the Graffiti
®
writing method.
38
Page 48
Data exchange between PDA & Machine
7. Tap on Continue.
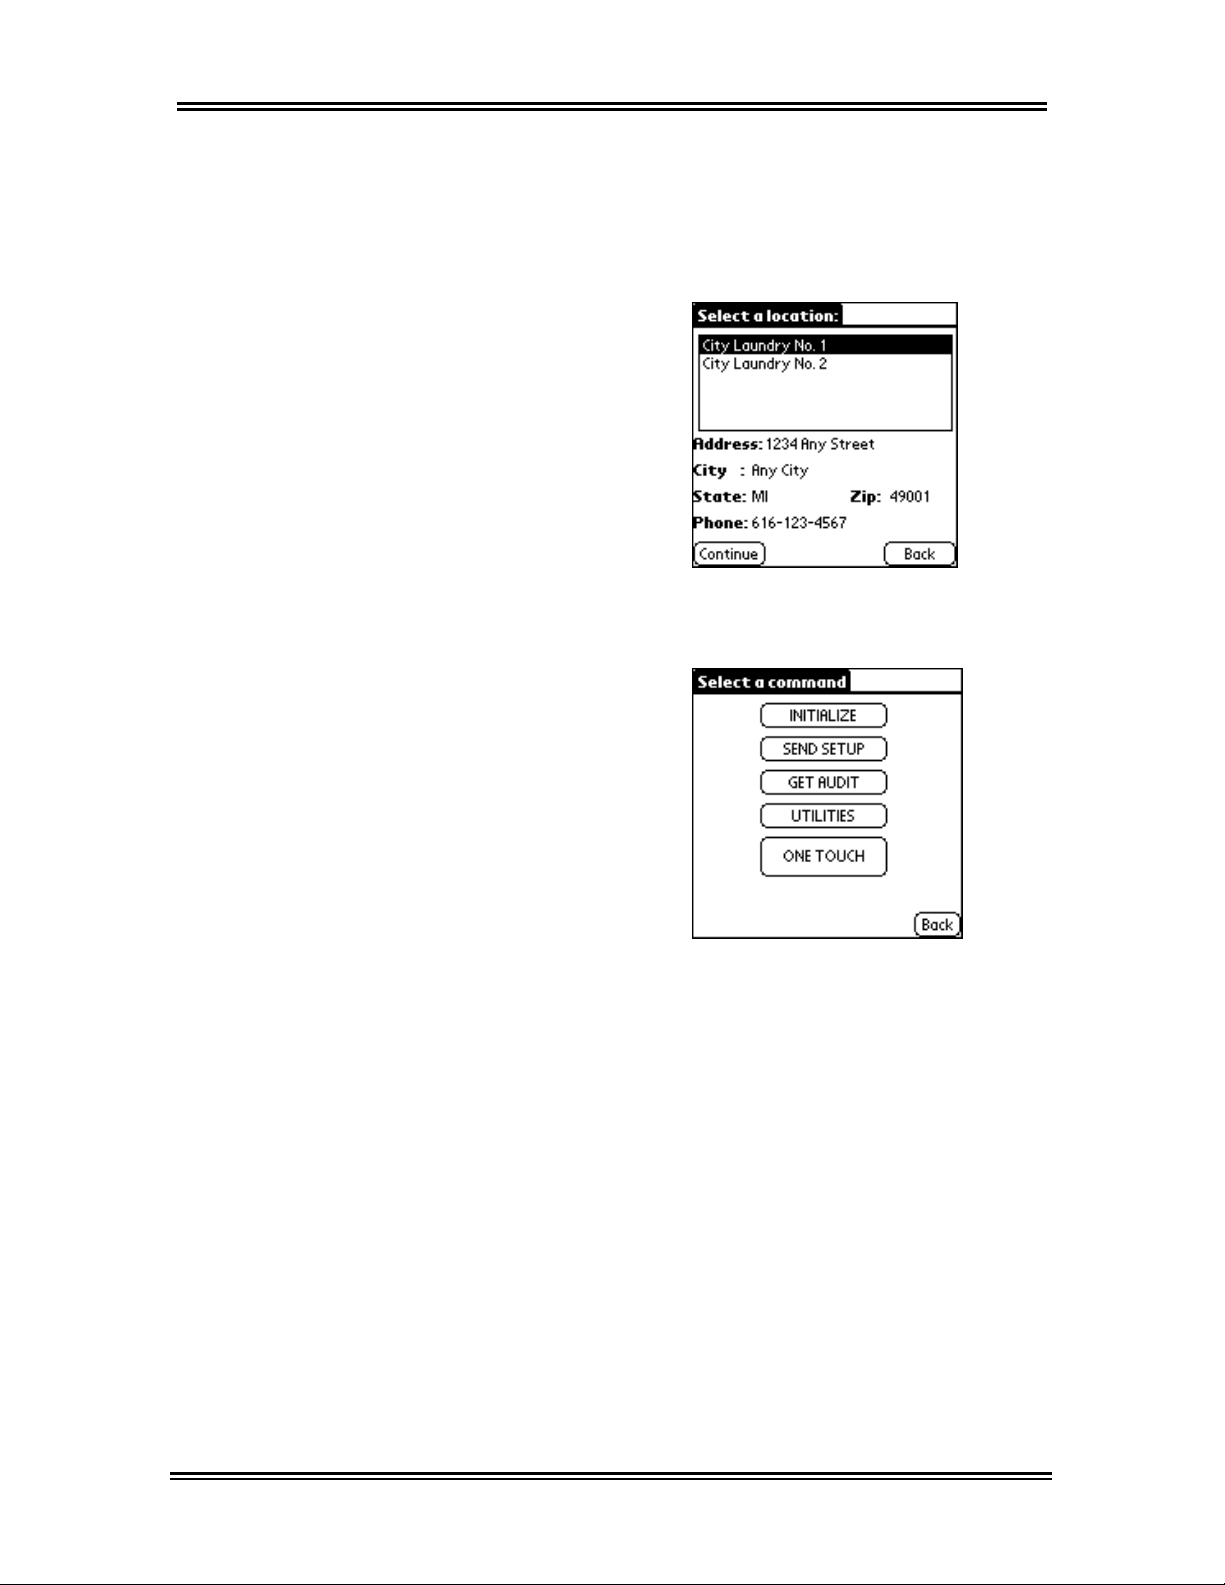
8. The Select a location: window appears. Select
the appropriate
9. After logging in and selecting the appropriate
location, the following screen appears.
location, then tap on Continue.
39
The Select a command screen is where you can
choose to
information,
use the One Touch command. Each of these
features is explained in more detail throughout this
section.
Initialize a machine, Send Setup template
Get Audit data, use Utilities features, or
Page 49
Data exchange between PDA & Machine
Initializing Machines
Initialization
Management Software. Before a machine is
initialized, it is in Open-Access Mode. This means
any PDA with the Handheld Software installed can
access your machines. So it is very important to
initialize your machines as soon as possible. When a
machine is initialized, information such as the Owner
ID, Access Password, and Location ID are uploaded
to the machine. These passwords and IDs protect
your machines from unauthorized user access. A
machine name (number) will be assigned and audit
information can be obtained.
Important:
Communication between the Palm™ handheld and the
ADVANTECH™ equipment is done through an
infrared light beam. Therefore, the position of the PDA
in relation to the machine is critical for successful
completion of the data transfer.
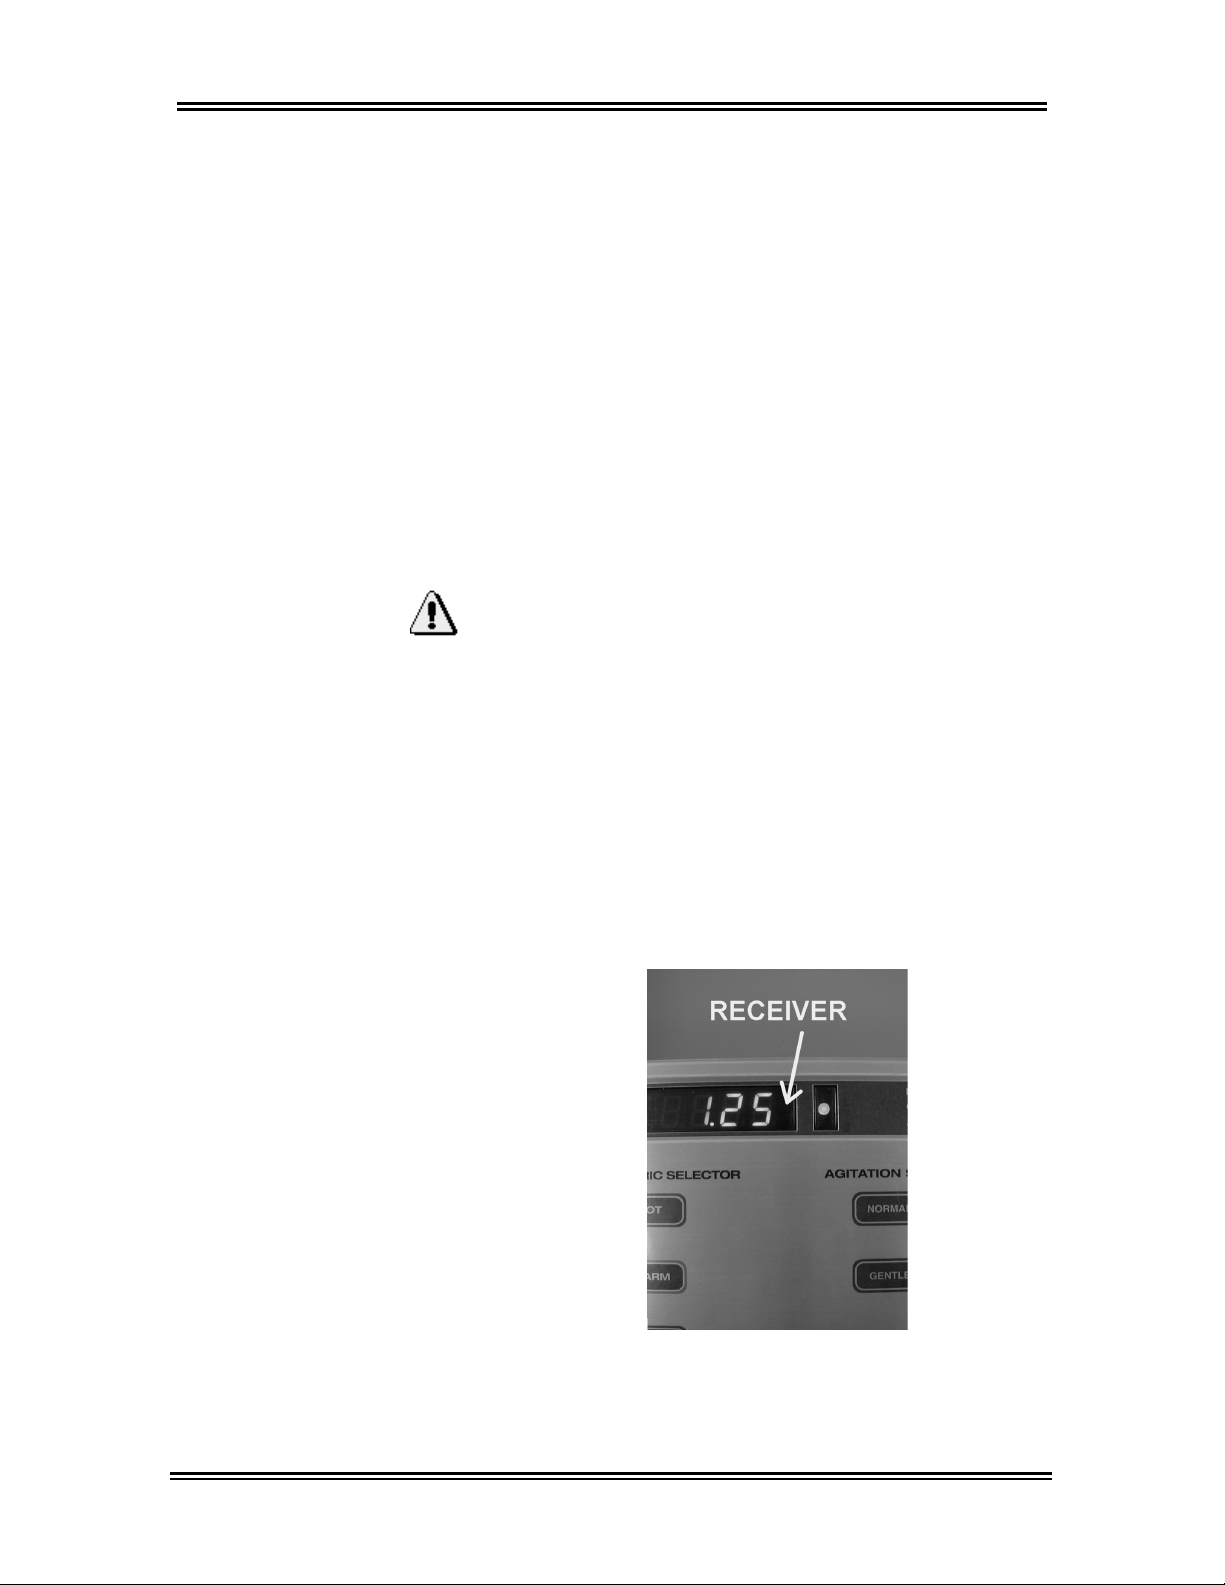
The infrared communication port on the PDA is
usually located at the top of the device. The receiver
on the machine is located to the right of the last digit
on the display panel. See picture below.
prepares a machine for use with the
40
Page 50
Data exchange between PDA & Machine
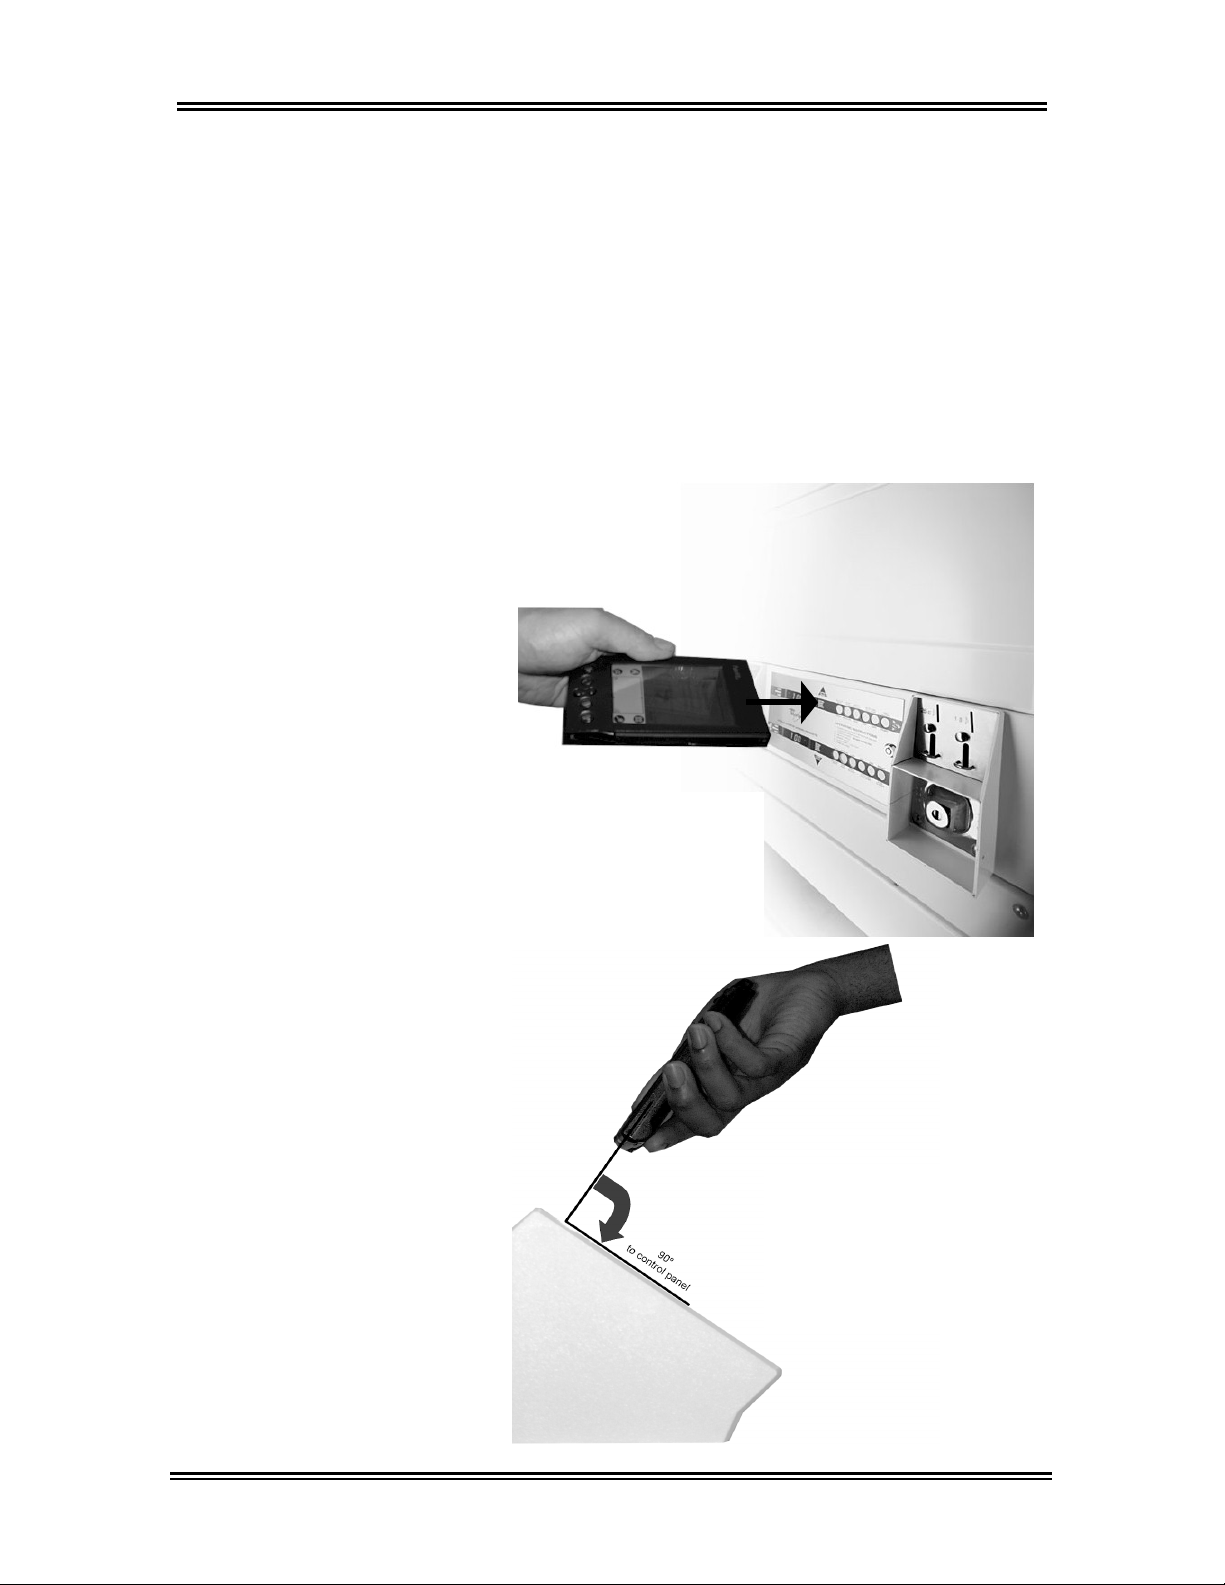
Aim the handheld much like you would aim a TV
remote control. Be sure to locate the infrared port on
the device that you are using and understand the
direction of its beam to ensure a successful data
transmission. Ensure that the distance between the
PDA and the infrared receiver on the machine is less
than 5-inches. Strong light sources not excluding
sunlight, or close proximity of other infrared devices
such as alarm systems may inhibit the transmission of
data. To remedy this situation, simply use your hand
to shield the receiver & or the PDA port.
Proper positioning
of this type PDA
device for an upper
stack dryer data
transfer.
41
Proper positioning
of the same type
PDA device for a
washer or single
dryer data transfer.
Page 51
Data exchange between PDA & Machine
To initialize a machine:
1. Aim the PDA at the machine’s infrared receiver.
2. Tap on
command
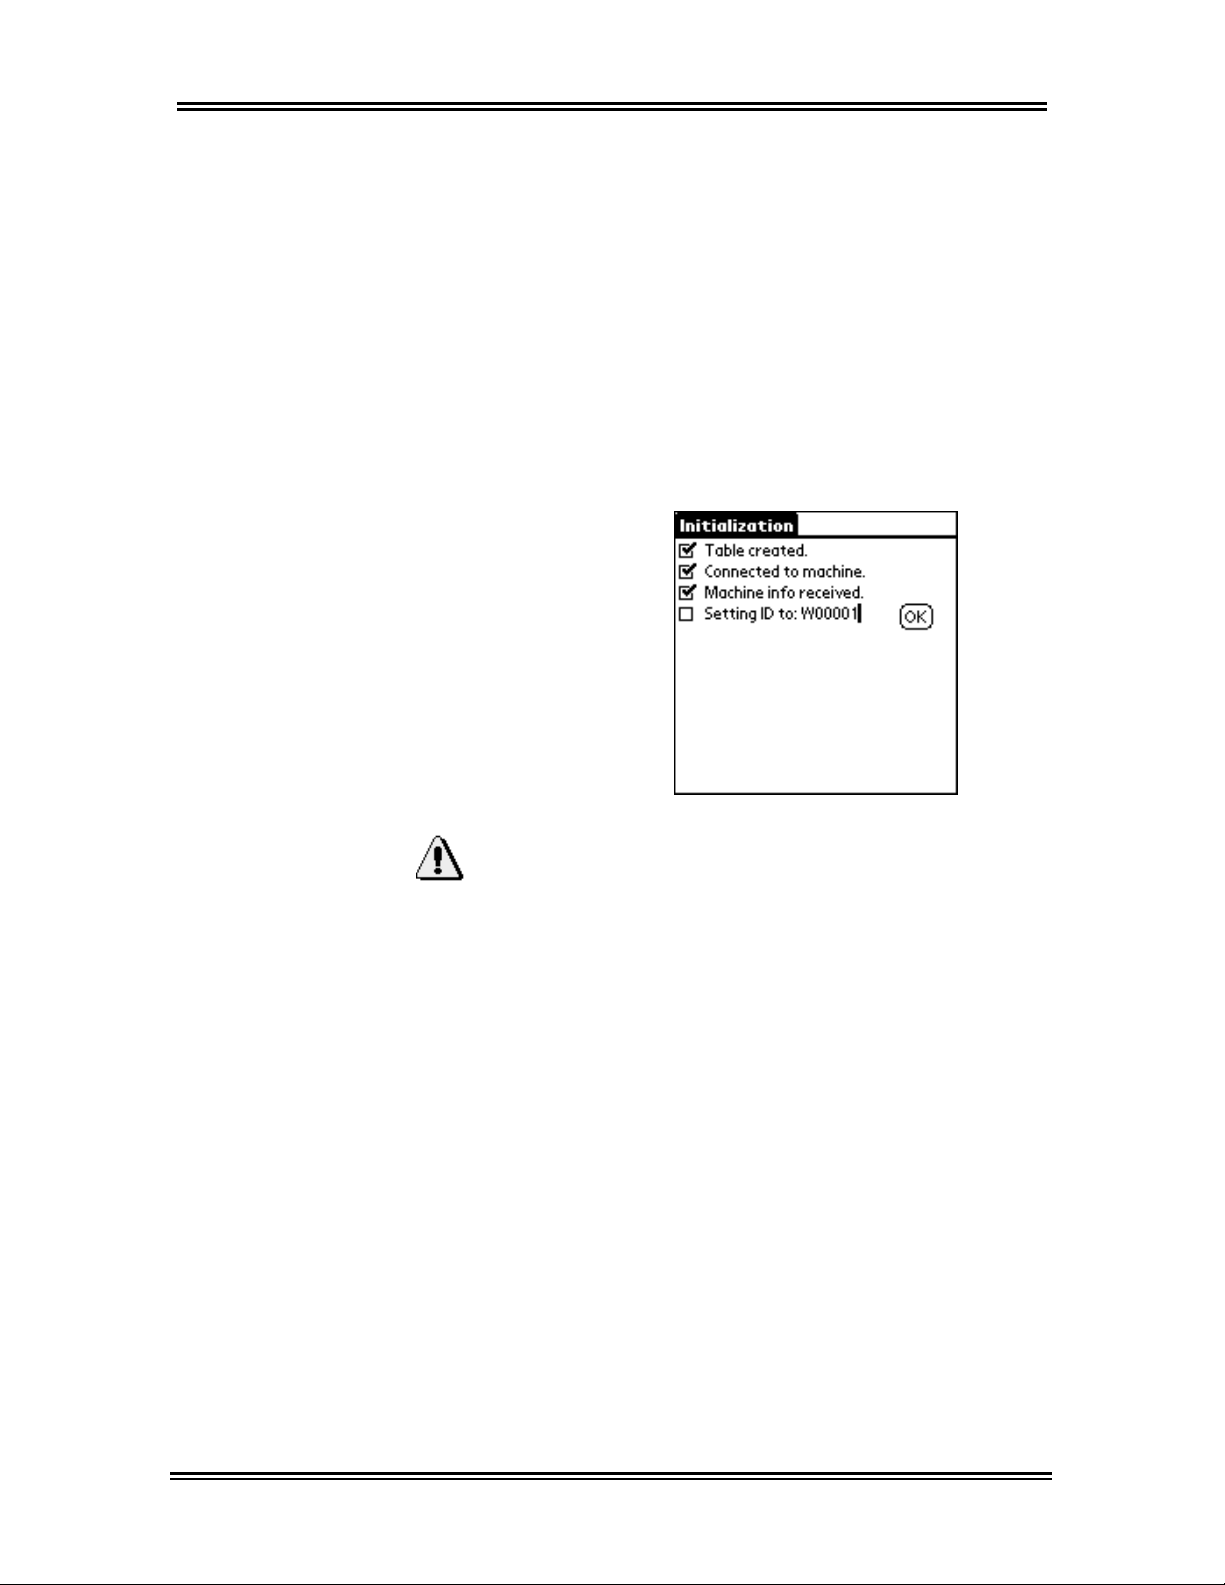
3. The Initialization screen appears. To create a
different ID, use the Graffiti® writing area on the
PDA to delete and re-enter a new ID number.
Verify that you are aiming at the machine’s
infrared receiver then tap on OK when the ID is
correct.
Initialize, located on the Select a
screen on the PDA.
Important:
Machine IDs must begin with a “W” for washers or a
“D” for dryers, followed by an additional five digits.
The Handheld Software suggests a logical numbering
order. Or, if you prefer, you could use the product
serial number as well as another system of your
choice. Machine IDs must also be unique within a
location.
42
Page 52
Data exchange between PDA & Machine
Hint:
An easy way to keep track of machine names is to
begin with the first machine to your left as you enter a
location and work clockwise around the room, or
physically mark the machine with a property tag or
magic marker.
4. When initialization is complete the screen will
display Operation completed. Tap on Back to
return to the
Select a command screen.
Using the Send Setup Command
The Send Setup command transfers a washer or
dryer template, created in the Management Software,
to a machine.
1. Aim the infrared port on the PDA at a 90 degree
angle to the machine’s receiver.
2. Tap on
command
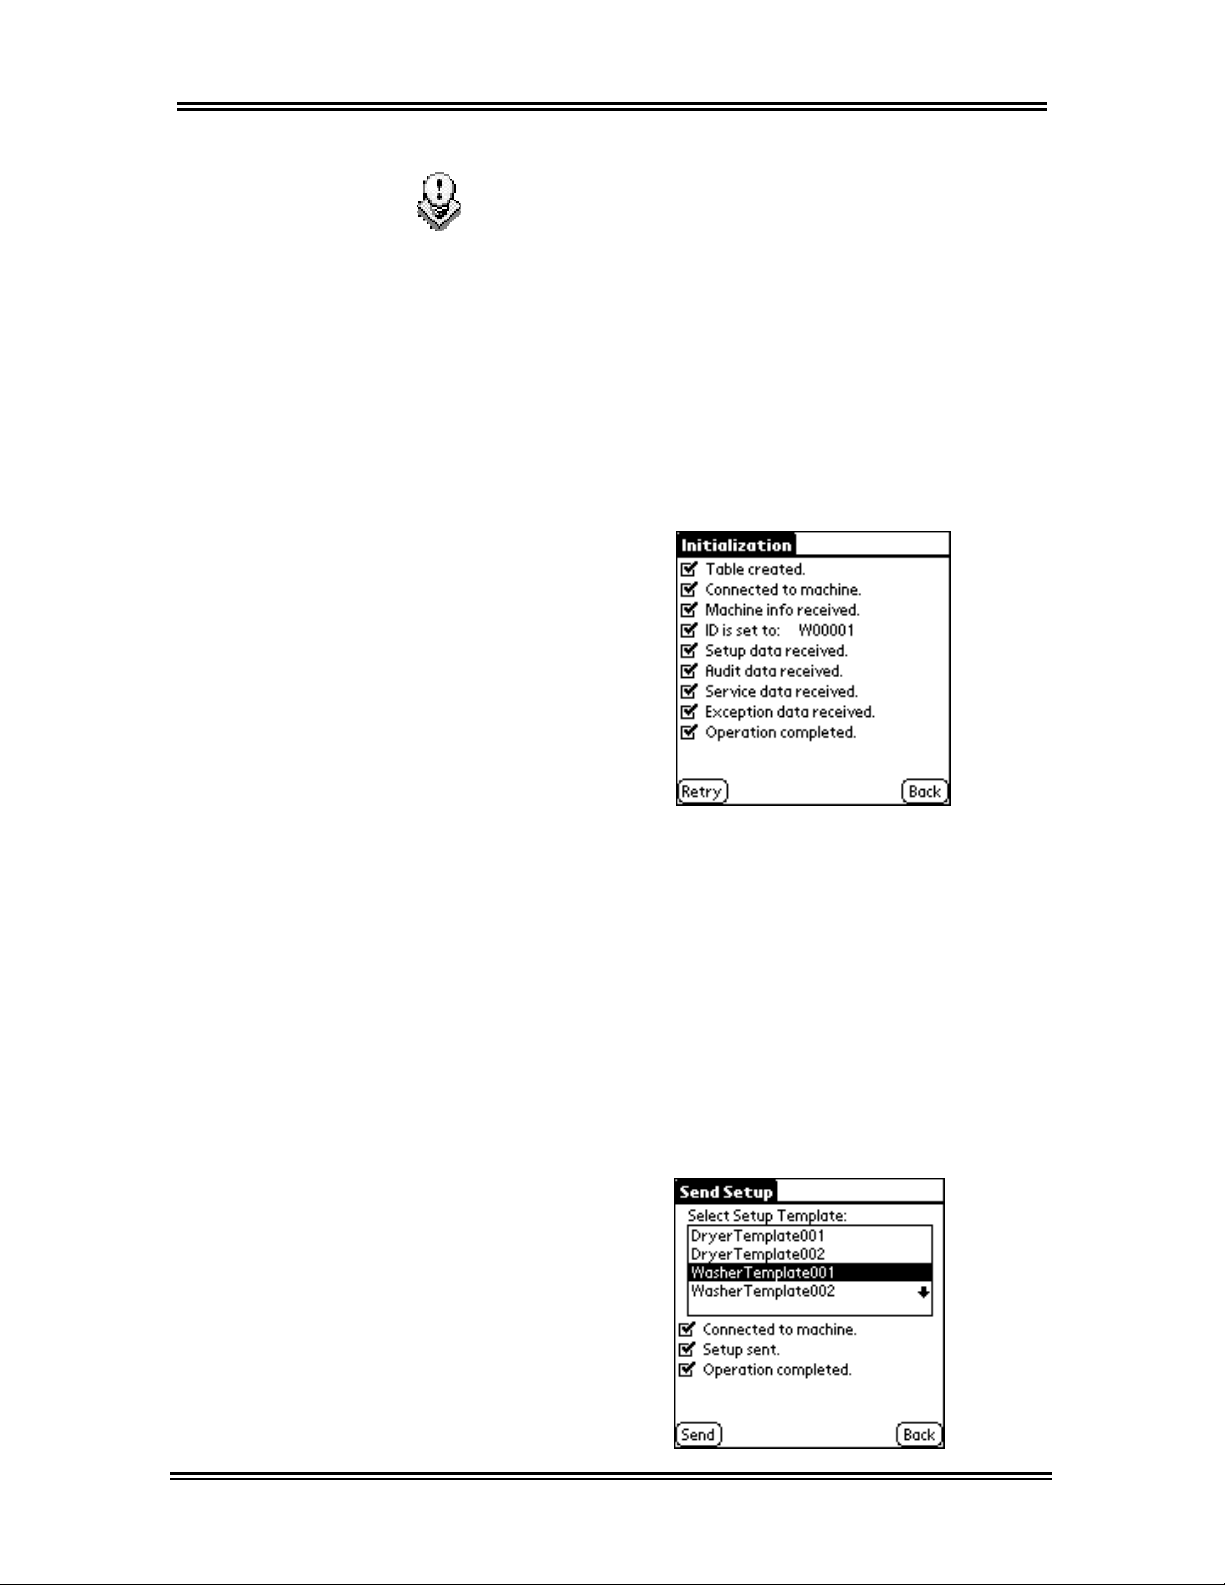
3. Select the appropriate Setup Template, then tap
on
Send Setup, from the Select a
screen on the PDA.
Send.
43
Page 53
Data exchange between PDA & Machine
Using the Send Setup Command (continued)
4. When the operation is complete, tap on Back to
return to the Select a command menu.
Note: The Management Software will not recognize
the setup data you assigned to the machine until you
have taken an audit and performed a HotSync®
operation, to download it back to your PC.
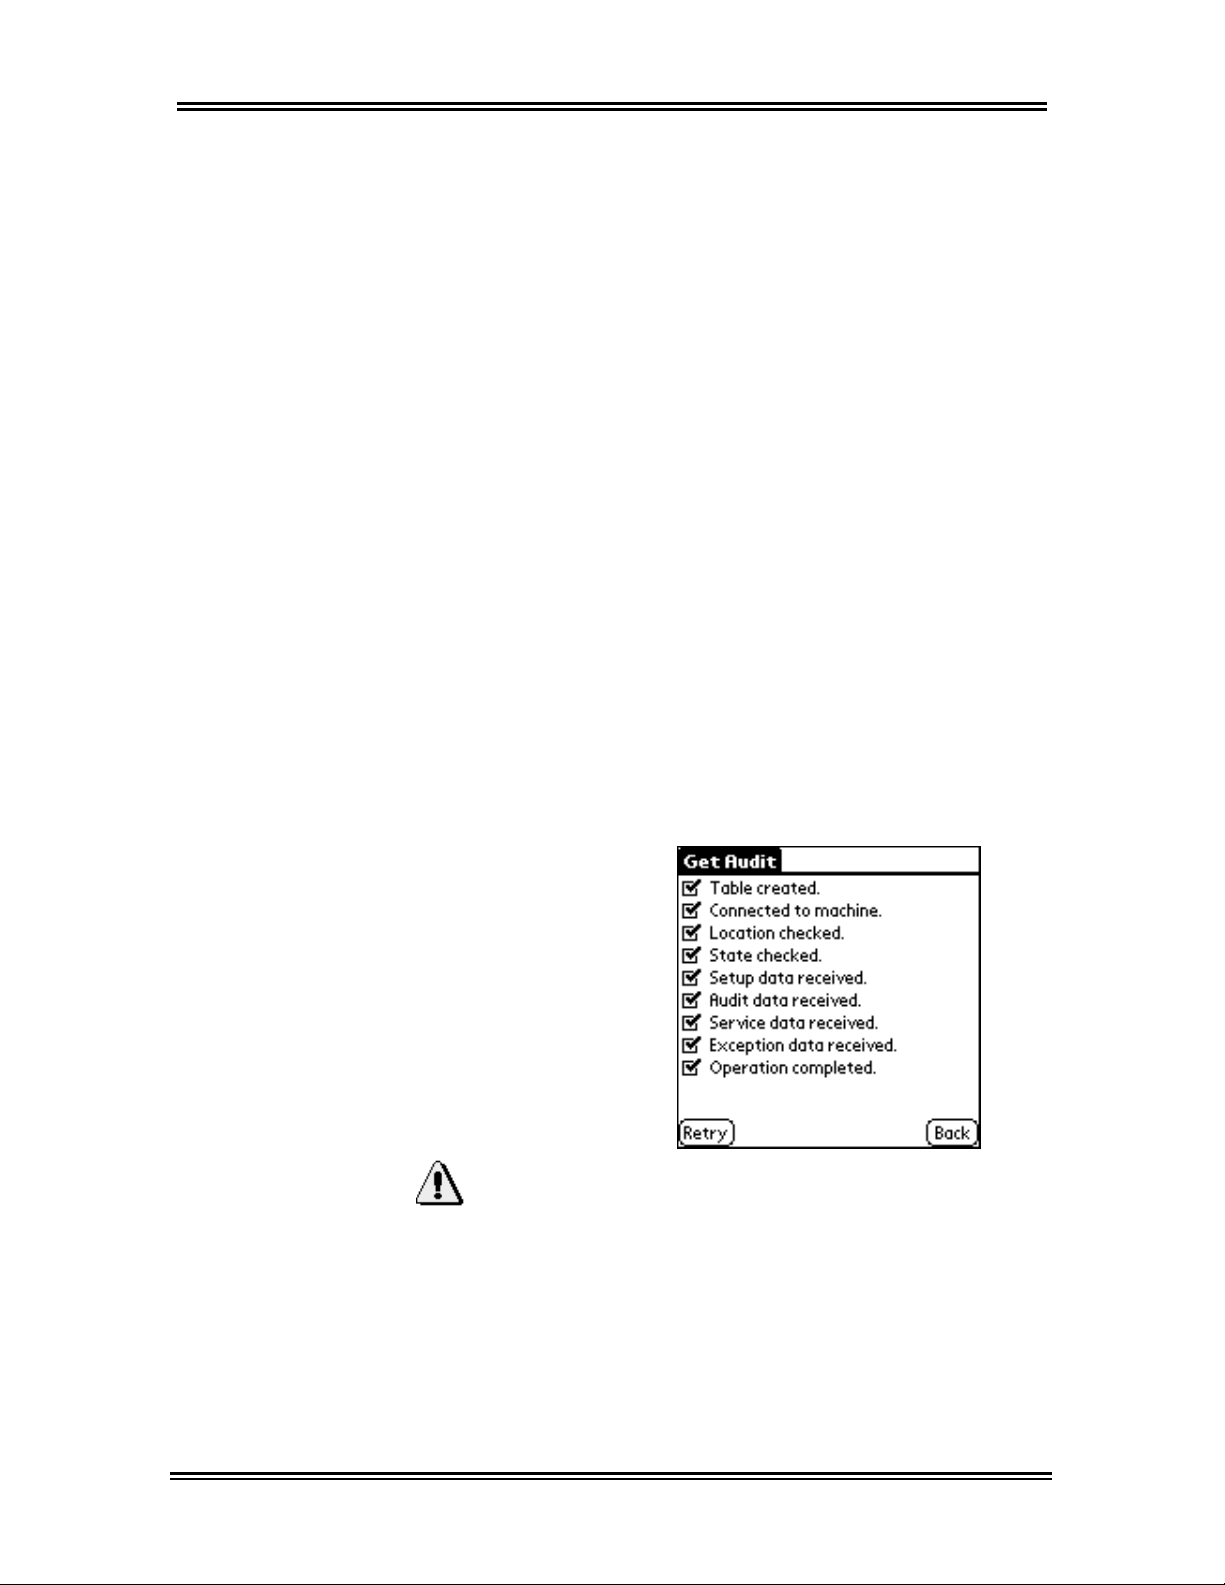
Using the Get Audit Command
The Get Audit command allows you to track vend
cycles for each machine. Audit data is then uploaded
from the PDA to the PC, containing the Management
Software, for analysis.
1. Aim the handheld at the machine’s receiver.
2. Tap on Get Audit, located on the Select a
command
3. When the Audit is complete, the following screen
appears. Tap on Back to return to the Select a
command
screen on the PDA.
screen.
Important:
If all items on the
the operation was a success. If some items are not
checked, then the communication has failed. In the
event of a failed audit, tap the Back button, check
your aim of the PDA in relation to the control panel,
and perform steps 1-3 again.
Get Audit screen are checked, then
44
Page 54
Data exchange between PDA & Machine
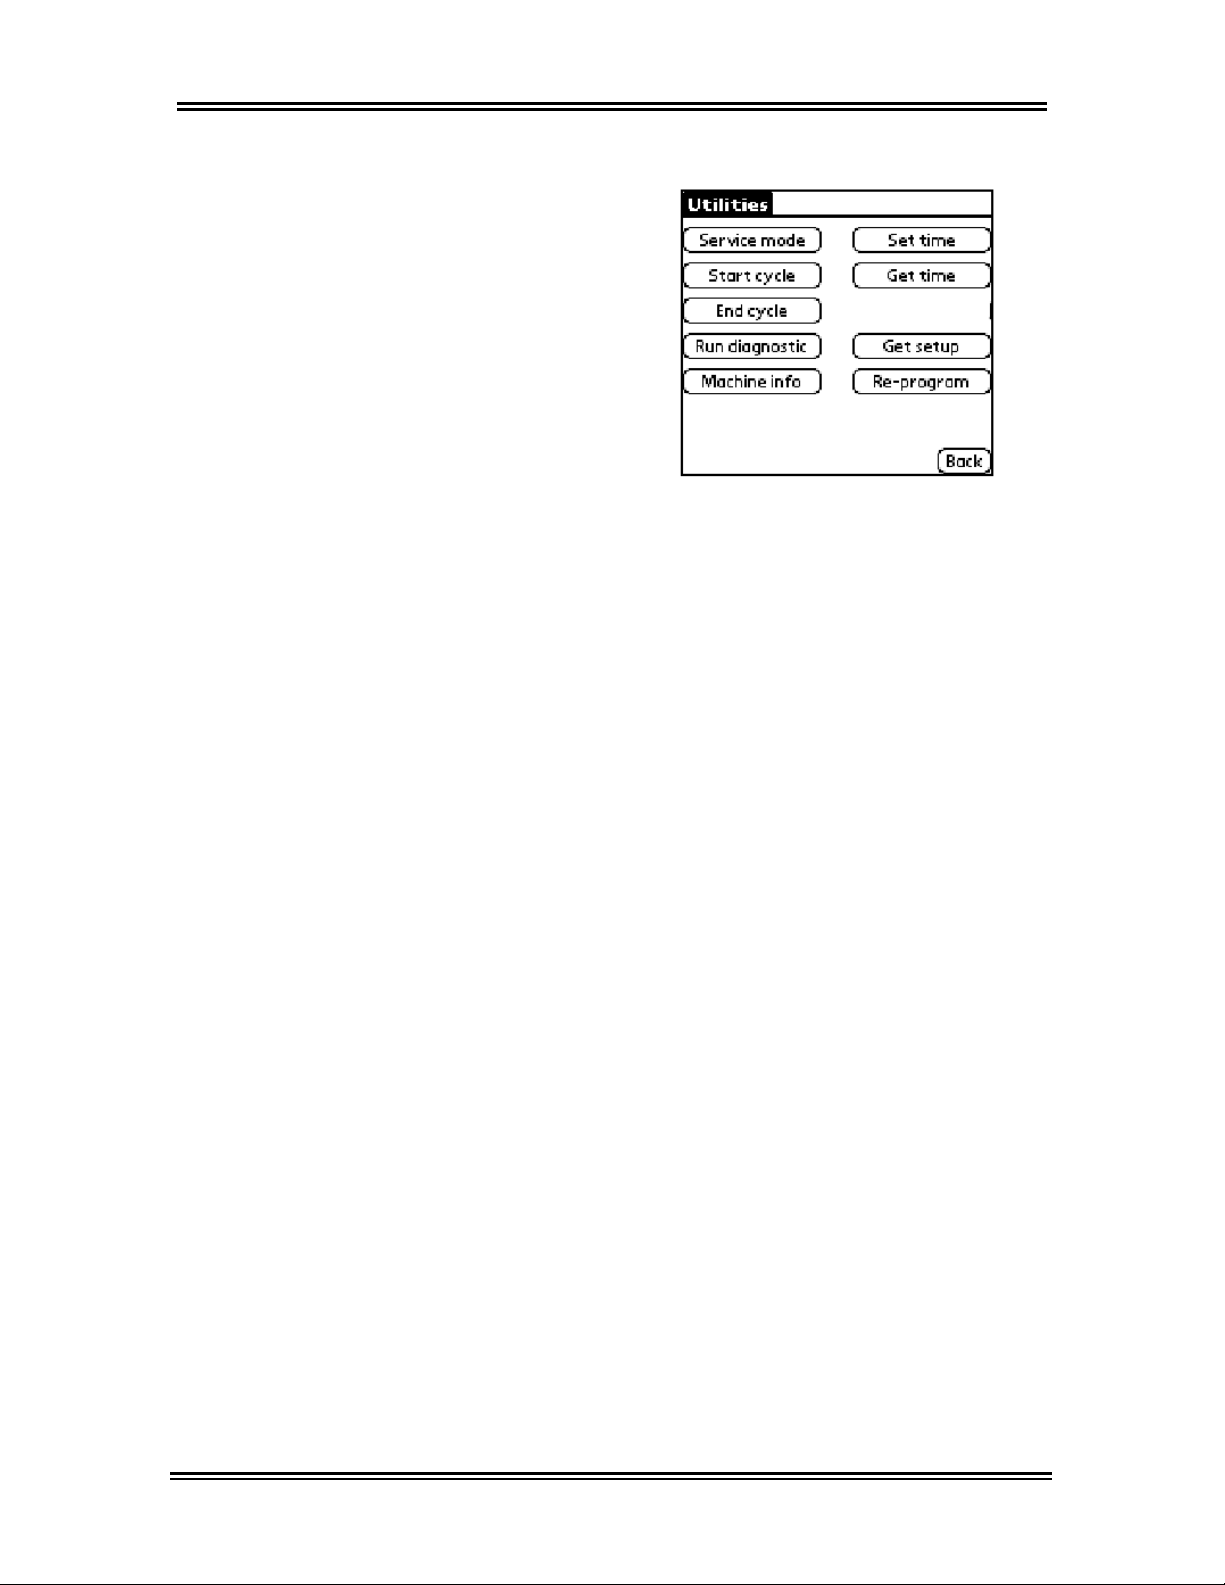
Using the Utilities Command
The Utilities command, located on the Select a
command
your machines. Many of these options can also be
accessed directly from the control board on the
machine.
• Service mode - Places the machine into Service
Mode. This option can be used in place of
pressing the service switch on the machine. See
the Service Tech Sheet or Service Manual for
more information on placing the machine in
Service Mode.
• Start cycle - Allows the service person to start a
cycle without depositing any coins.
• End cycle - Ends the current cycle that is
running.
• Run diagnostic - Checks machine’s internal
data to ensure integrity.
• Machine info - Displays the processor’s serial
number, machine ID, location ID, and software
version number.
• Set time - Sets the machine’s internal clock
based on the time and date that is on the Palm™
handheld. The time is set automatically during
initial setup of the machine, however use Set
time if manual set up is required.
• Get time – Displays the machine’s current time
and date settings.
screen, displays options for managing
45
Page 55

Data exchange between PDA & Machine
• Get setup - Allows the service person to “clone”
a machine. For example, if a control board
needed to be replaced on a machine, the service
person could clone the setup data from an
existing machine in order to copy the current
template to the new control board.
Important:
All machine usage history will be lost at time of control
board replacement. See Service Tech Manual/Job Aid
for details.
• Re-program - Used only when a machine
software (firmware) upgrade is required.
Instructions for re-programming will be provided
when new machine software (firmware) is
available.
Using the One Touch Command
The final option on the Select a command screen is
One Touch. This command performs two common
commands with a single tap of the stylus:
• Audit data is uploaded to the Palm™ handheld
from the machine.
• The correct time and date are set on the
machine, according to the time and date on the
PDA.
46
Page 56

Audits
47
Page 57
Audits
Overview
After audit data has been uploaded from the
machines to the Palm
downloaded back to the PC and analyzed using the
Management Software. Up to 500 machine audits can
be stored on the Palm™ handheld before a HotSync®
operation is required.
Uploading Audits
Before performing a HotSync® operation to upload the
Audits from the Palm™ handheld to the PC, make
sure the Management Software has been launched
and that the Palm
™
handheld, it can be
™
handheld is in its cradle.
Viewing Audits
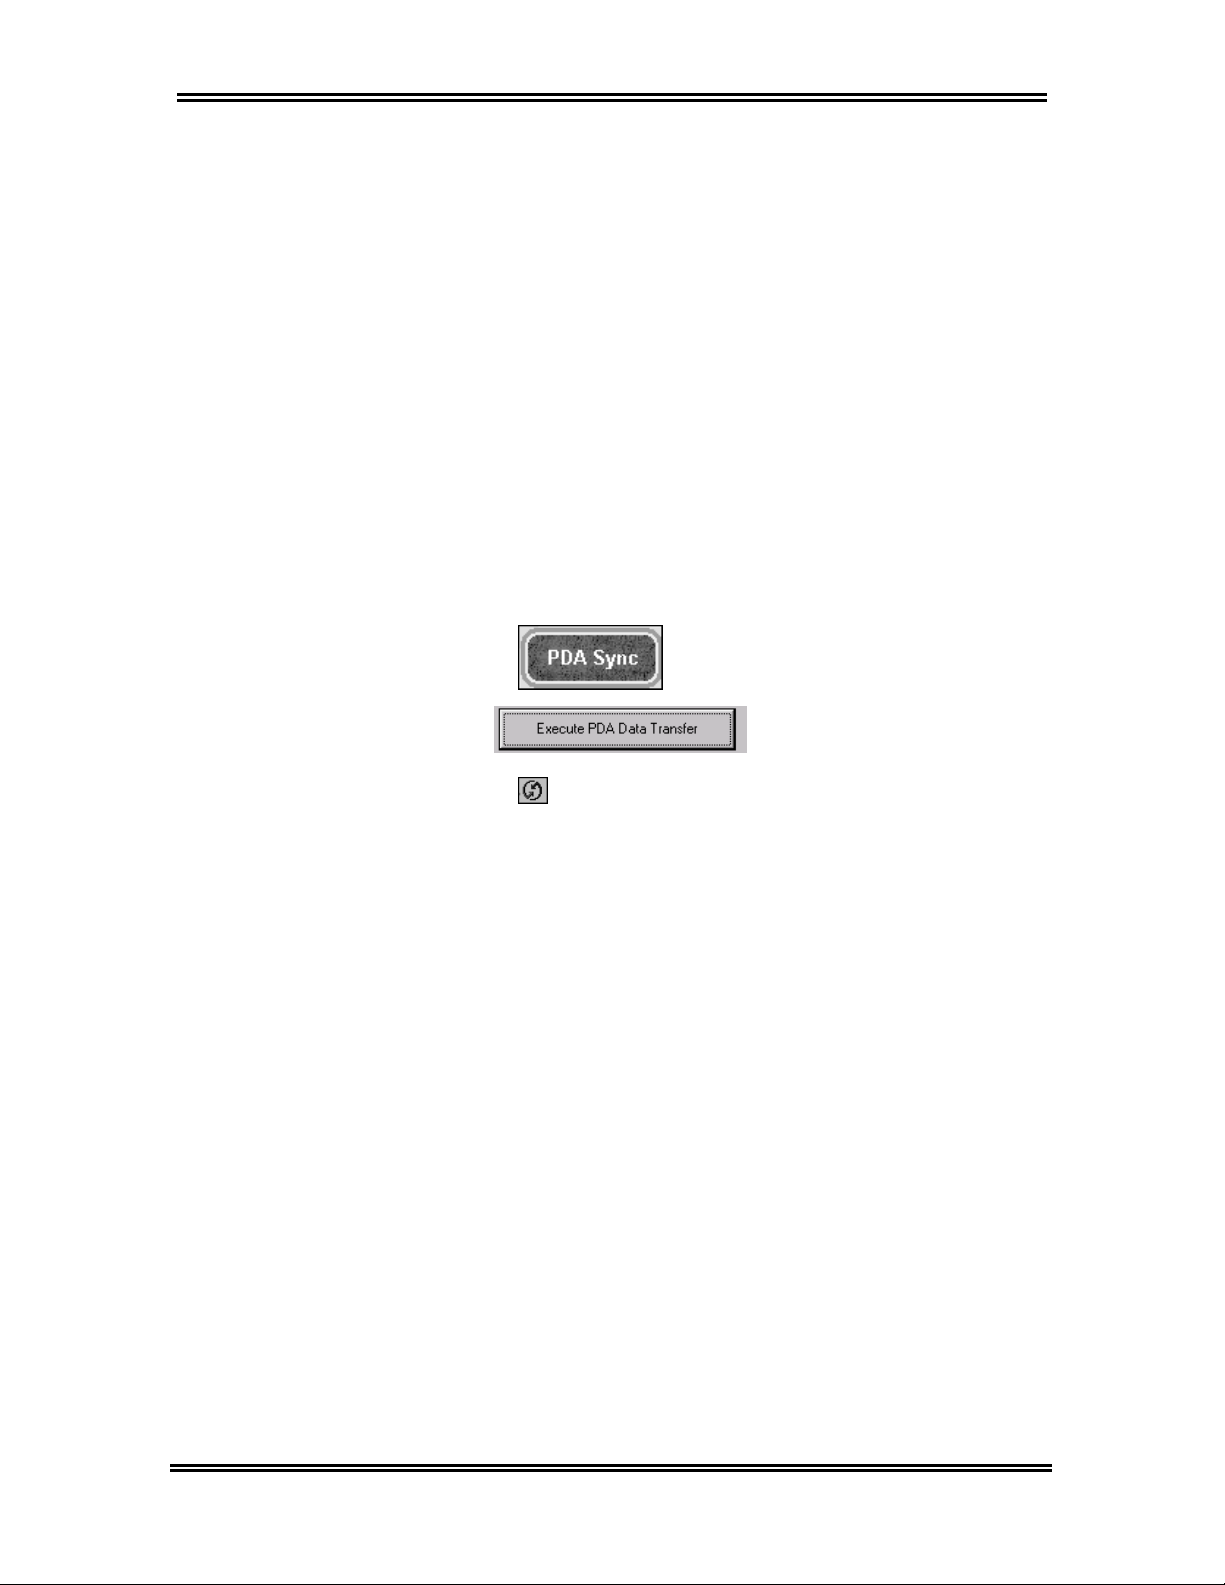
1. Click on PDA Sync.
2. Click on Execute PDA
Data Transfer
3. Press the HotSync® button on the HotSync®
cradle.
4. When the HotSync® operation is complete, click
on OK on the PC, then click on Exit.
Audits track information such as number of cycles
vended, number of coins inserted, and the total
amount of revenue received. Audit data can later be
used to generate reports.
Two types of audits are recorded for each machine:
Interval – Interval audits track cycle and vend
history from the time of the last audit. This information
is cleared from the machine every time audit data is
collected.
Cumulative – Cumulative audits track cycle and
vend history over the life of the machine. This data is
never cleared from the machine unless a reinitialization is done or a control board is replaced.
.
48
Page 58
Audits Audits
Important:
For coin-operated machines it is imperative that coins
are collected every time an audit is taken. Audits
record how many coins should be collected and
documents that information with a Collection
Timestamp
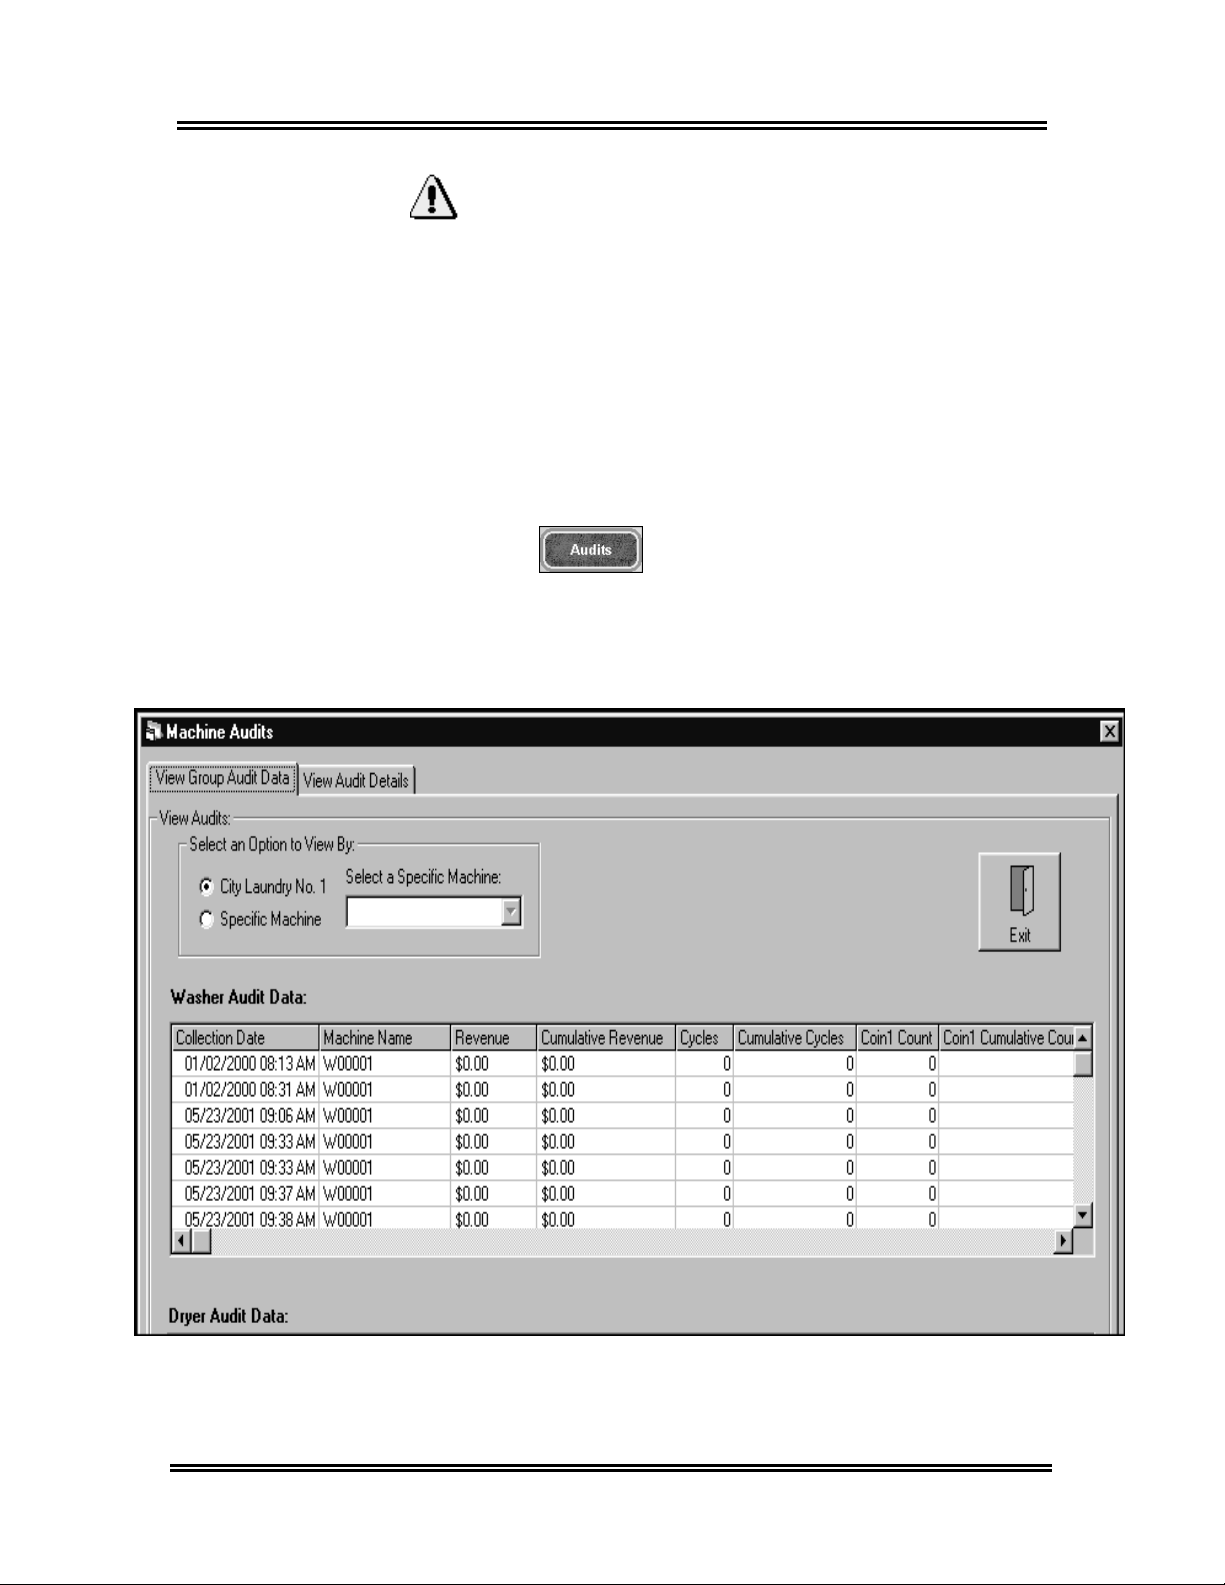
Before viewing an Audit, verify the correct location is
selected from the
1. Click on Audits. The Machine
in the Service Data.
Location: drop-down list.
Audits
Group Audit Data
dialog box appears with the View
tab displayed.
49
2. Verify that the correct location is selected, or
select a specific machine from the Specific
Machine
drop-down list.
Page 59
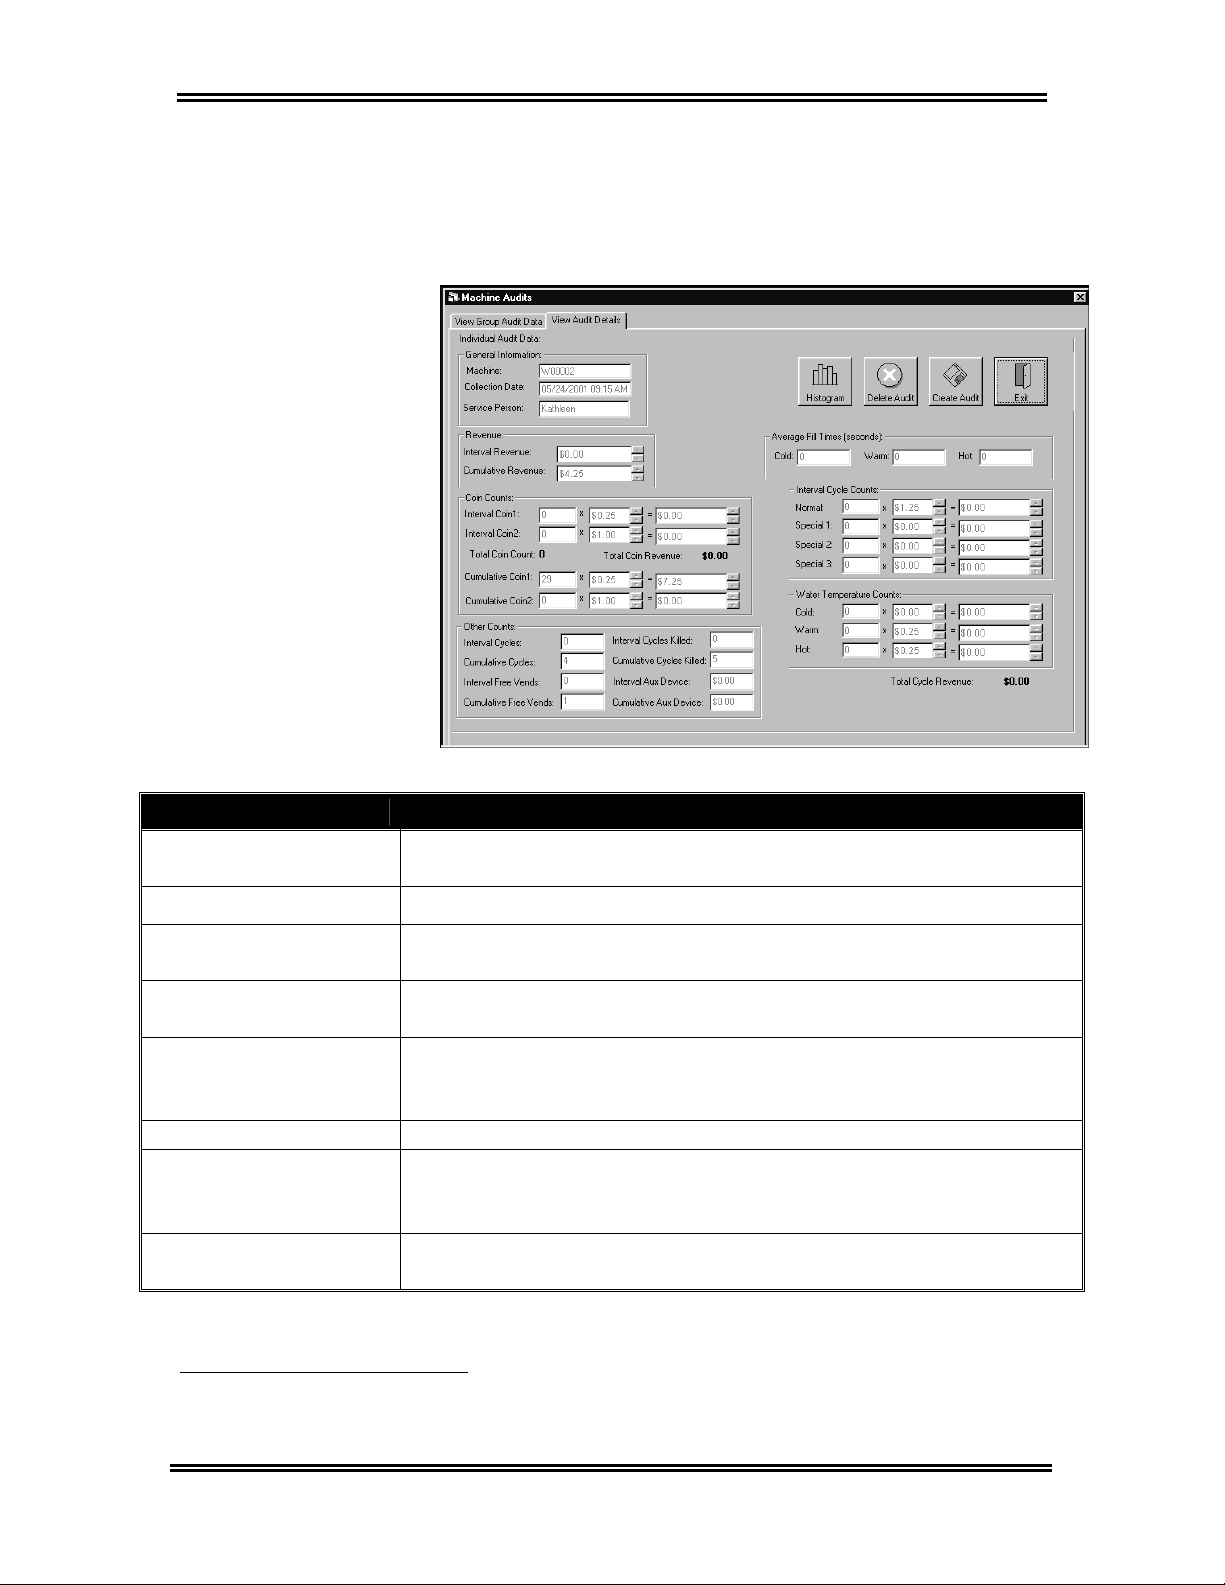
Audits
3. Double-clicn the audit grid to view details about a
particular audit. The View Audit Details tab
appears.
The View Audit Details tab displays the following information:
Option Description
General Information
Displays information about Machine ID number, Collection
Date
, and Service Person.
Revenue2 Displays both Interval and Cumulative revenue information.
Coin Counts
Other Counts
Displays the Interval and Cumulative number of coins
collected.
Displays Interval and Cumulative Cycle, Free Vend, and
Aux Device information.
Average Fill Times
(seconds)
Displays Average Fill Time for each water temperature.
Washer Audits only
Interval Cycle Counts Displays Special Cycles information.
Water Temperature
Counts
Washer Audits only
Topoff Counts
Dryer Audits only
Displays a Count of Water Temperature usage as selected
by customers.
Displays Interval and Cumulative Cycle Revenue for
topoffs.
2
This is the actual and accurate revenue collected by the machine. Other revenue values are
based on the number of coins or the number of cycles and the machine’s current setup. These
numbers can be inaccurate if machine setup has been changed, or if extra coins have been
inserted into the coin operated machines.
50
Page 60
Audits Audits
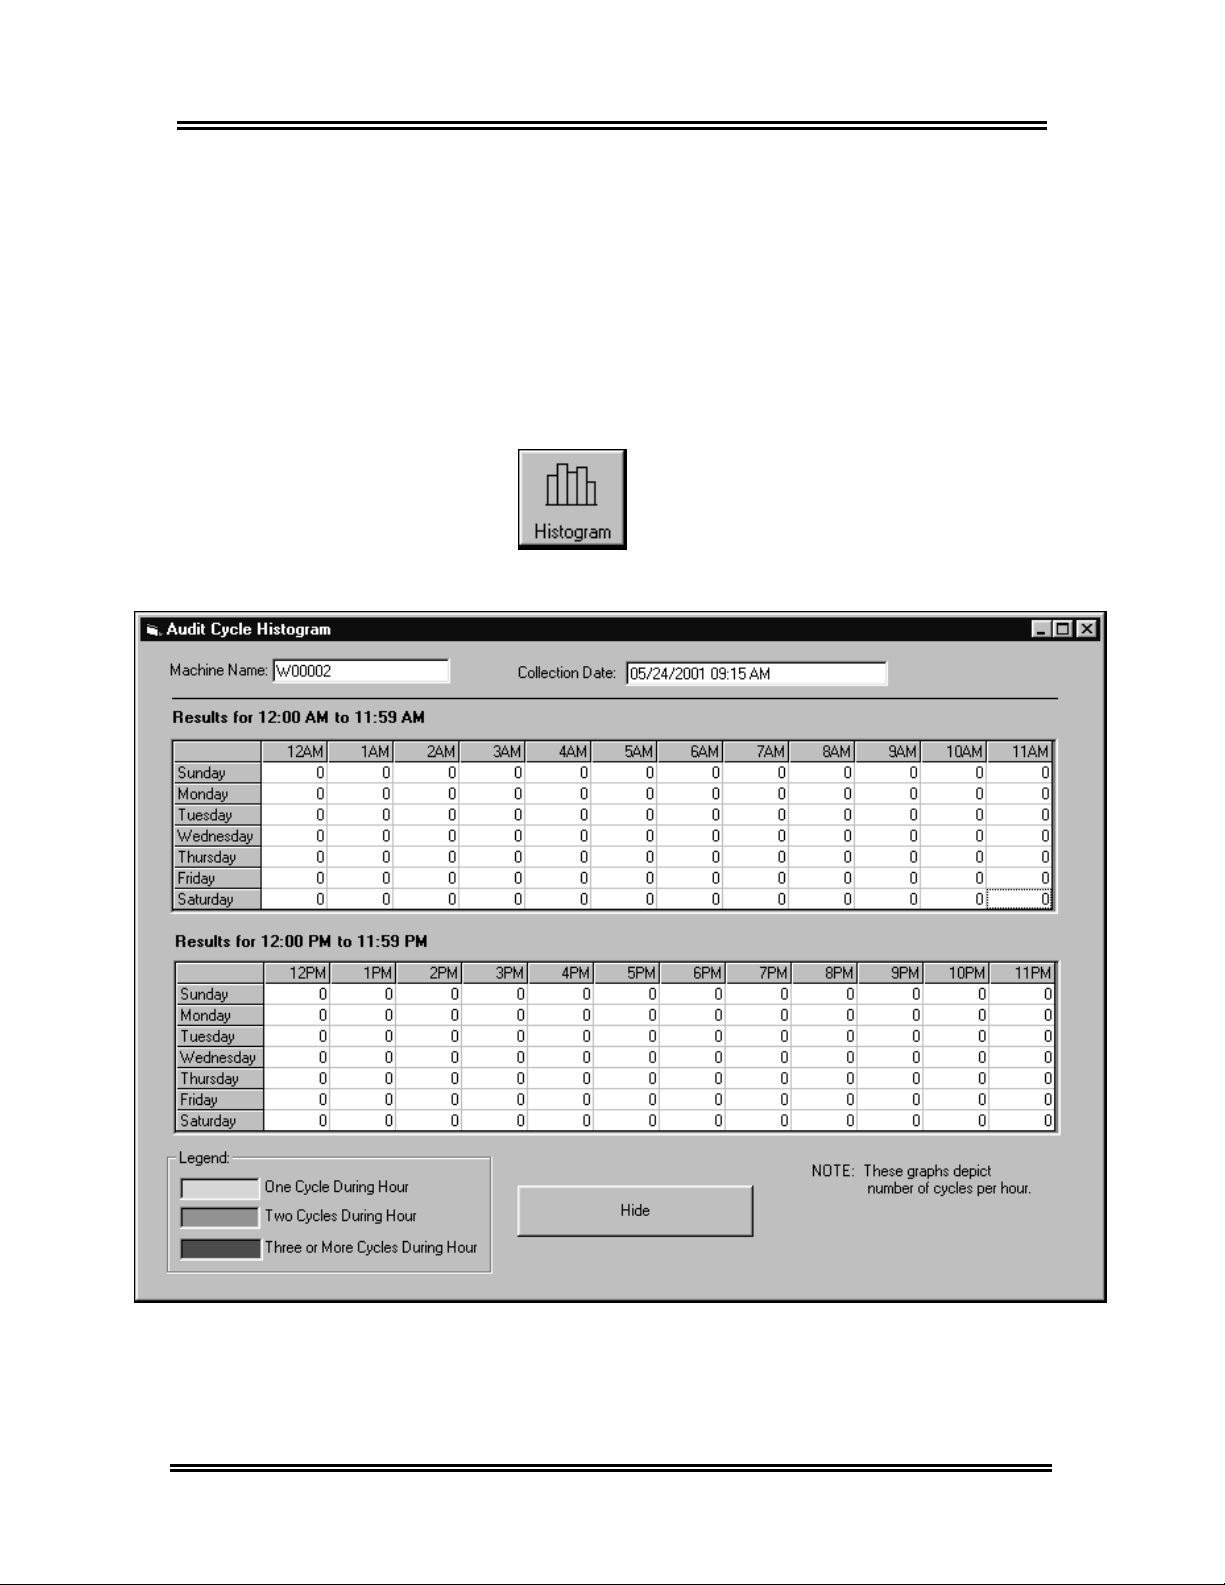
Viewing Histograms
Histograms show hourly cycle counts for a selected
machine, which may be helpful in determining peak
usage. This option is only available for synced audit
data, not manual audit data. On the View Audit
Details
1. Click on Histogram. The Audit Cycle
tab:
Histogram
window appears.
51
2. Click on the Hide button to close the window.
Note:
Histogram data is reset after every audit.
Page 61
Audits
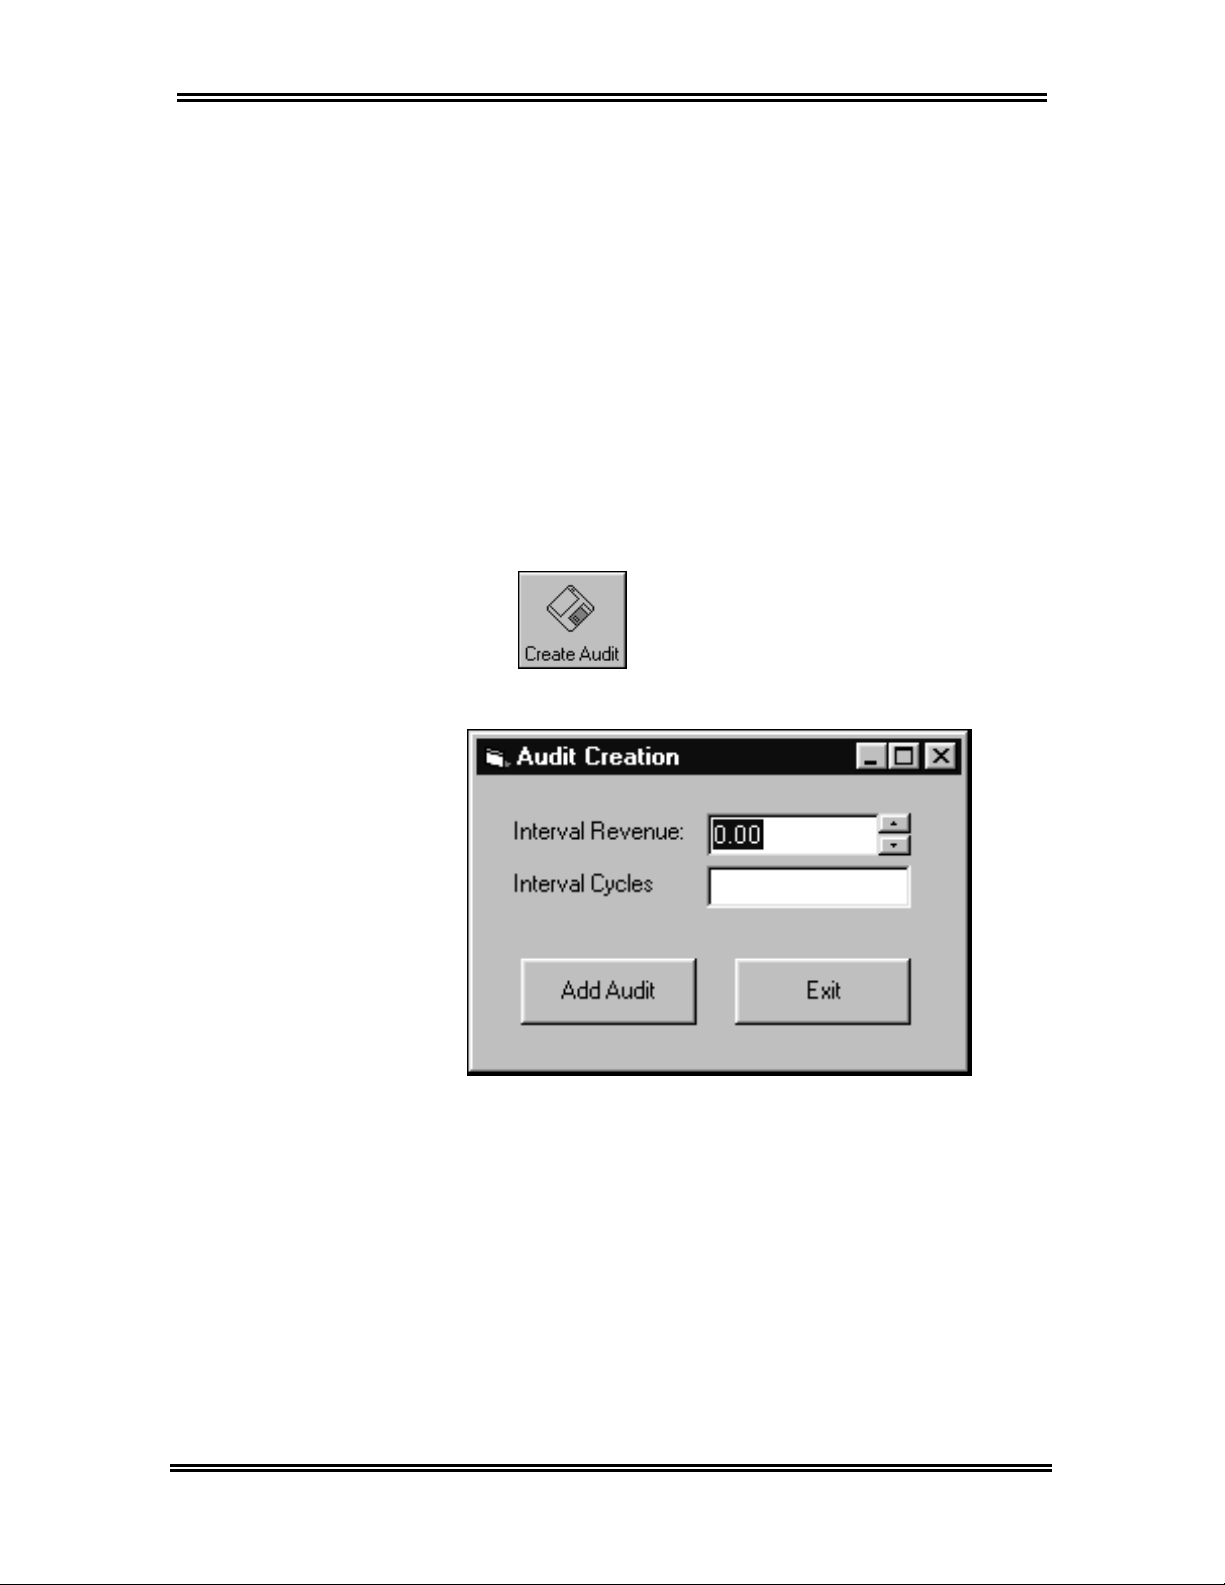
Creating a Manual Audit
Occasionally you may need to add audit information
manually in the Management Software. For example,
if your PDA stops working and you need to record that
a coin collection was taken.
From the View Audit Details tab:
1. Click on Create Audit. The Audit
Creation
2. Enter in the appropriate Interval Revenue: and
Interval Cycles information, then click on Add
Audit
3. Click on
into the database.
dialog box appears.
.
OK to confirm the new audit data entry
52
Page 62
Audits Audits
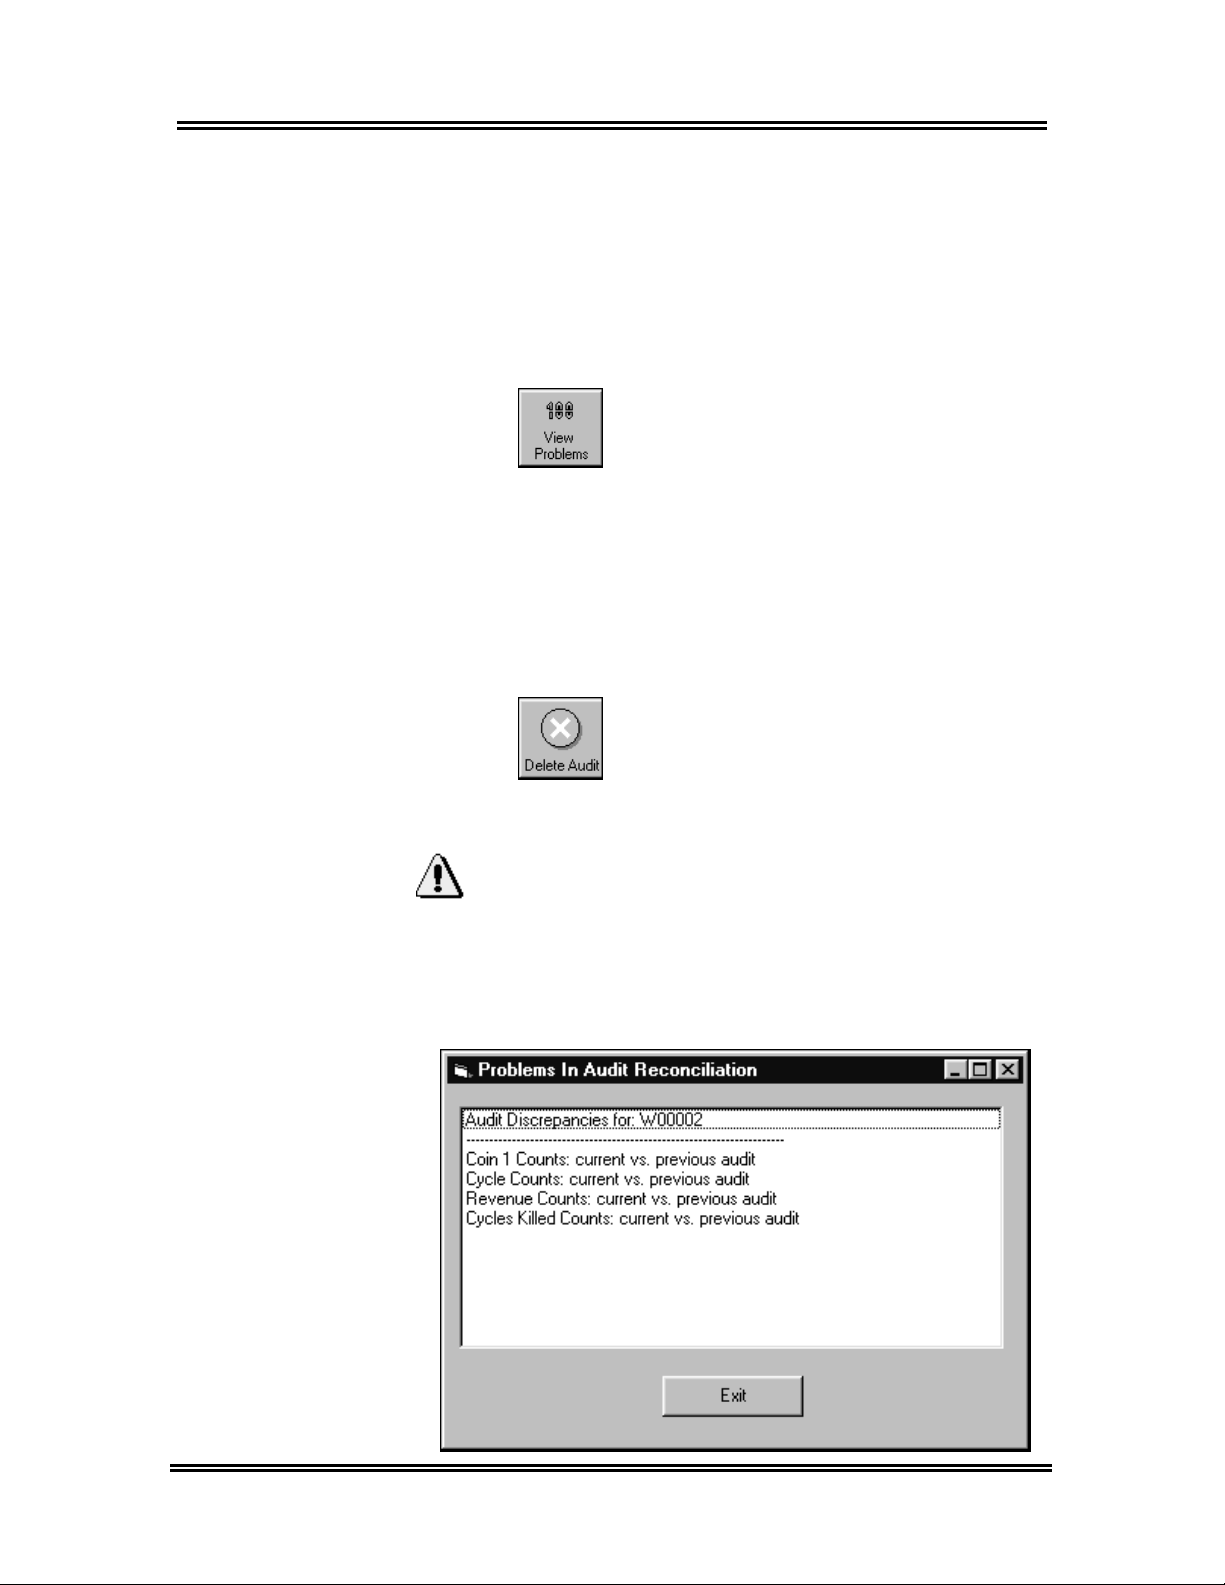
Audit Problems
If audit problems are present on the View Audit
Details
View Problems button will be displayed. See
Appendix section for a complete list of audit
discrepancies.
tab, they will appear highlighted in red and a
1.
2. Click on
Deleting an Audit
Only audits that are created manually can be deleted.
1. Click on Delete Audit, located on the
2. Click Yes to confirm the delete command.
Important:
Deleting audit data can have a serious impact on the
overall reconciliation of machine data.
Existing Machines
Click on View Problems to view details.
Problems… window appears.
The
Exit to close the window.
View Audit Details tab.
53
Page 63
Audits
Once a machine template has been created, the
information has been downloaded to the PDA via the
HotSync® process, and audits have been taken,
information about specific machine templates can be
viewed in the Management Software. This information
resides on the Existing Machines tab of the
Machine Setups dialog box.
This view is helpful to see which template each
machine is using or service information for diagnosing
service issues. The machine ID number and whether
or not any manual setups have been set on the
machine can also be viewed.
Viewing an Existing Machine
1. Select the correct location from the Location:
drop-down list.
2. Click on Setups.
3. The Machine Setups dialog box appears.
4. Click in the Existing Machine tab.
5. Choose the machine you would like to view from
the Select a machine: drop-down list.
Deleting an Existing Machine
If a certain machine is taken out of service or moved
to a new location, you could delete it.
1. Within the Machine Setups dialog box, click on
Existing Machine tab.
the
2. From the Select a Machine: drop-down list,
choose the machine to be deleted.
3. Click on Delete, located in the lower
right corner.
4. Click on
Yes.
Important:
Deleting an existing machine will delete all audit,
machine, exception, and service data associated with
the machine.
5. Click on OK.
54
Page 64

Exceptions
55
Page 65
Exceptions
Overview
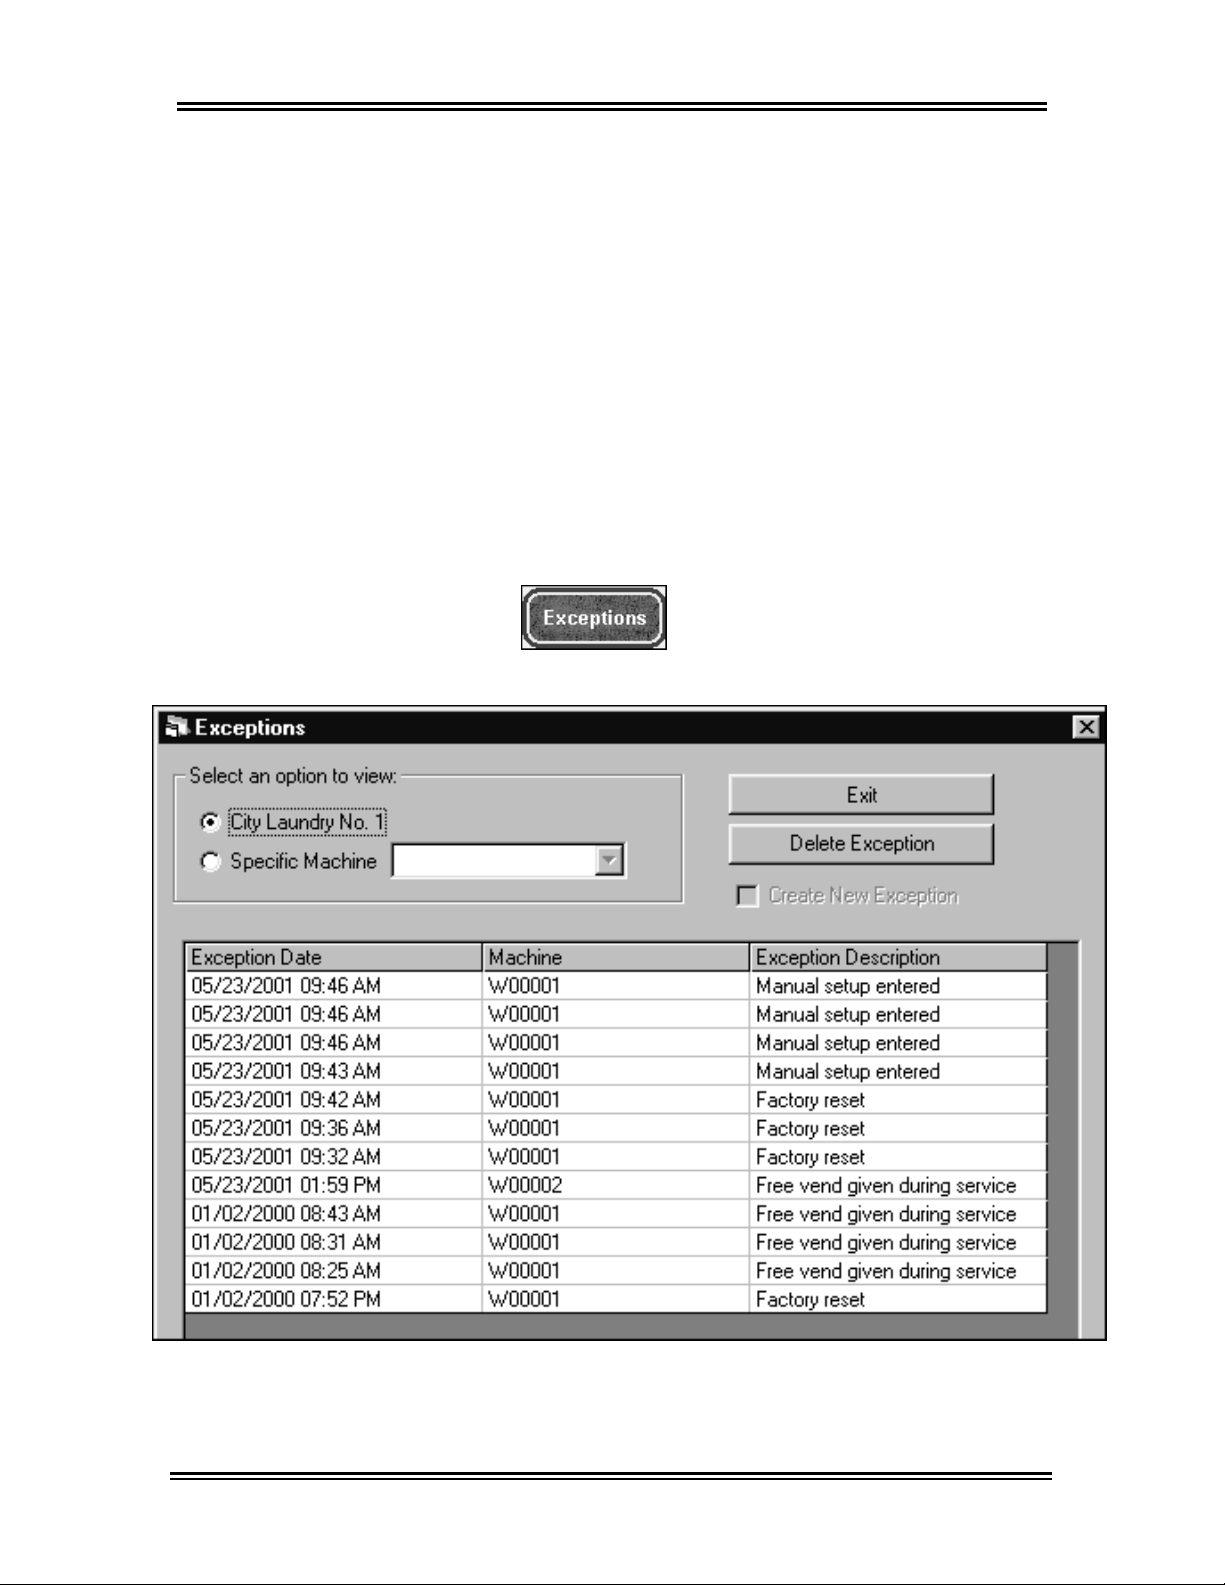
Exceptions keep track of audit information such as
when a free vend was given, or when the A/C power
was lost. This data can be viewed for an entire
location or for individual machines. Each machine
keeps track of the 100 most recent exceptions. This
data is automatically collected during a machine audit.
See Appendix for table of possible exceptions.
Viewing Exceptions
Before viewing Exceptions, verify the correct location
is selected from the Location: drop-down list.
1. Click on Exceptions. The
Exceptions window appears.
56
Page 66
Exceptions
Creating a Manual Exception
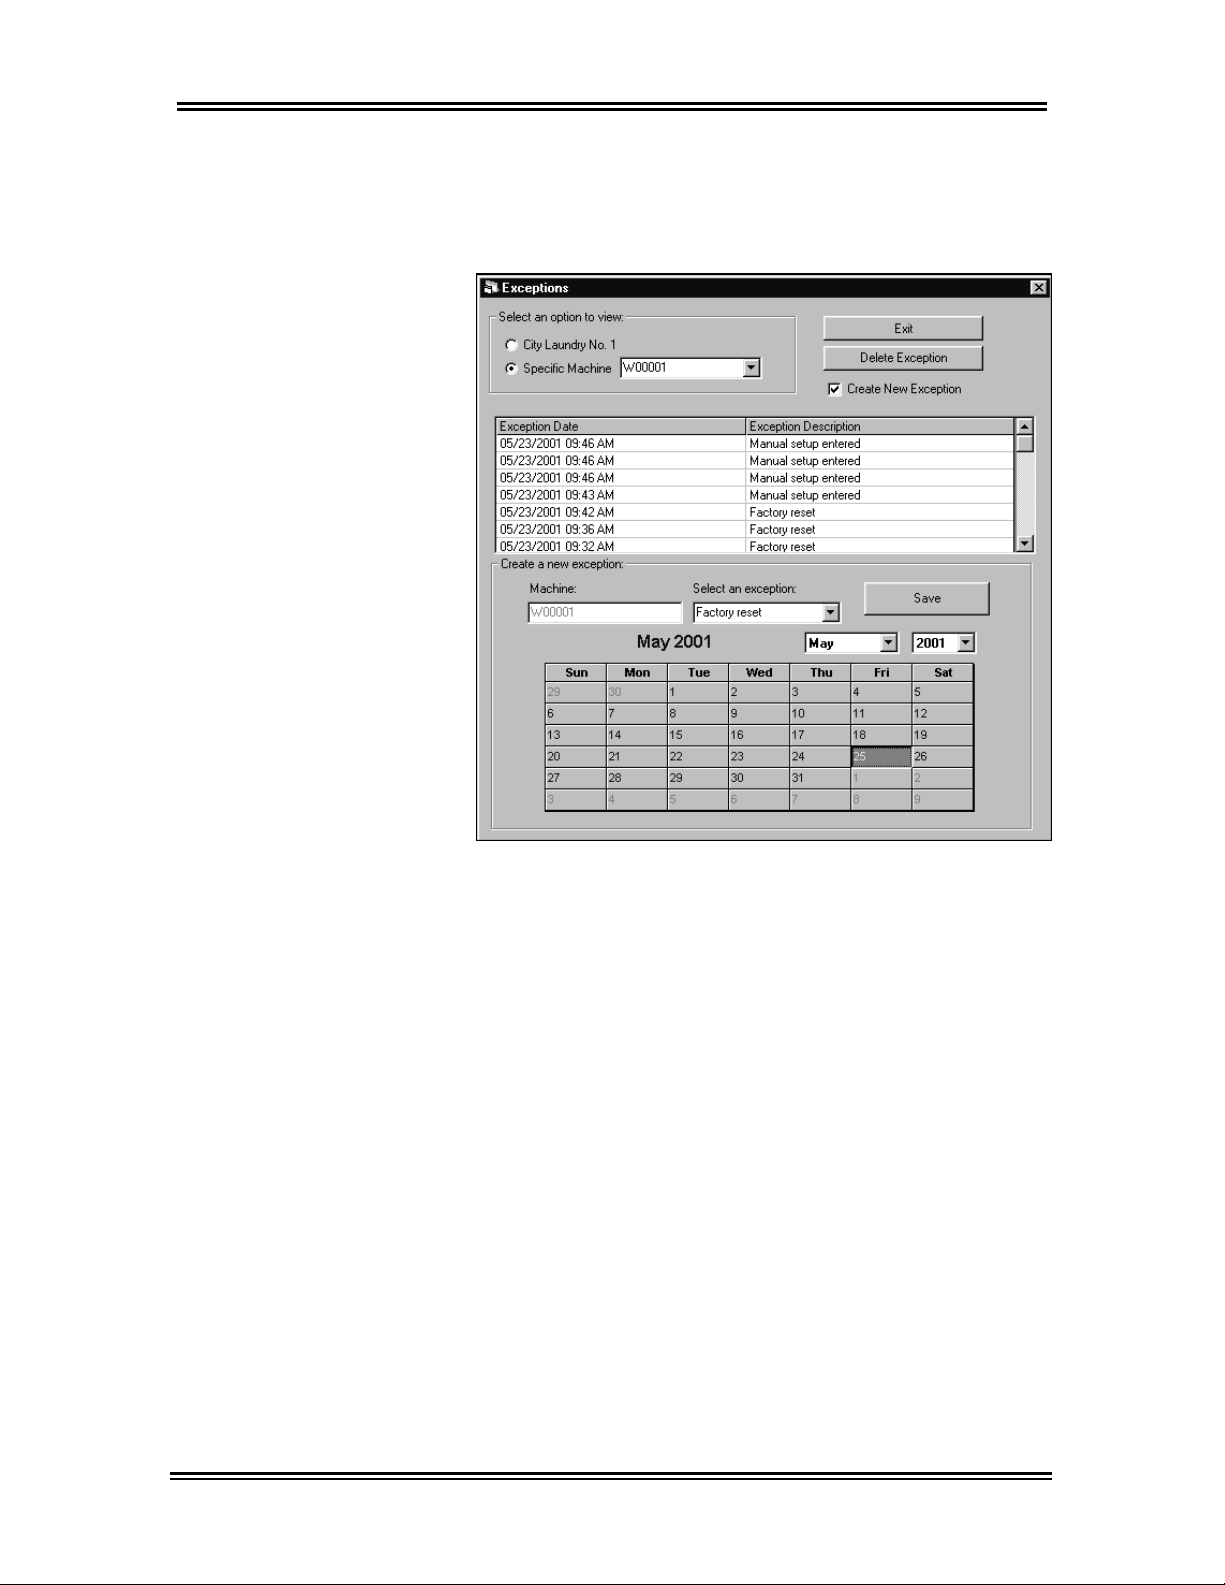
1. Select the Specific Machine option, and choose
a machine name from the drop-down list.
2. Check the Create New Exception checkbox.
The bottom half of the window displays the
Create a new exception: options.
3. Select an exception: from the drop-down list,
and select a
4. Click on
5. A confirmation window appears. Click on
6. Click on Exit to close the Exceptions window.
Date on the calendar.
Save.
OK.
57
Page 67
Exceptions
Deleting an Exception
1. Select an exception by single-clicking on the
appropriate exception on the grid.
2. Click on Delete Exception
from within the Exceptions dialog box.
Important:
You will not be given a warning to complete this
action.
58
Page 68

Service Data
59
Page 69
Service Data
Overview
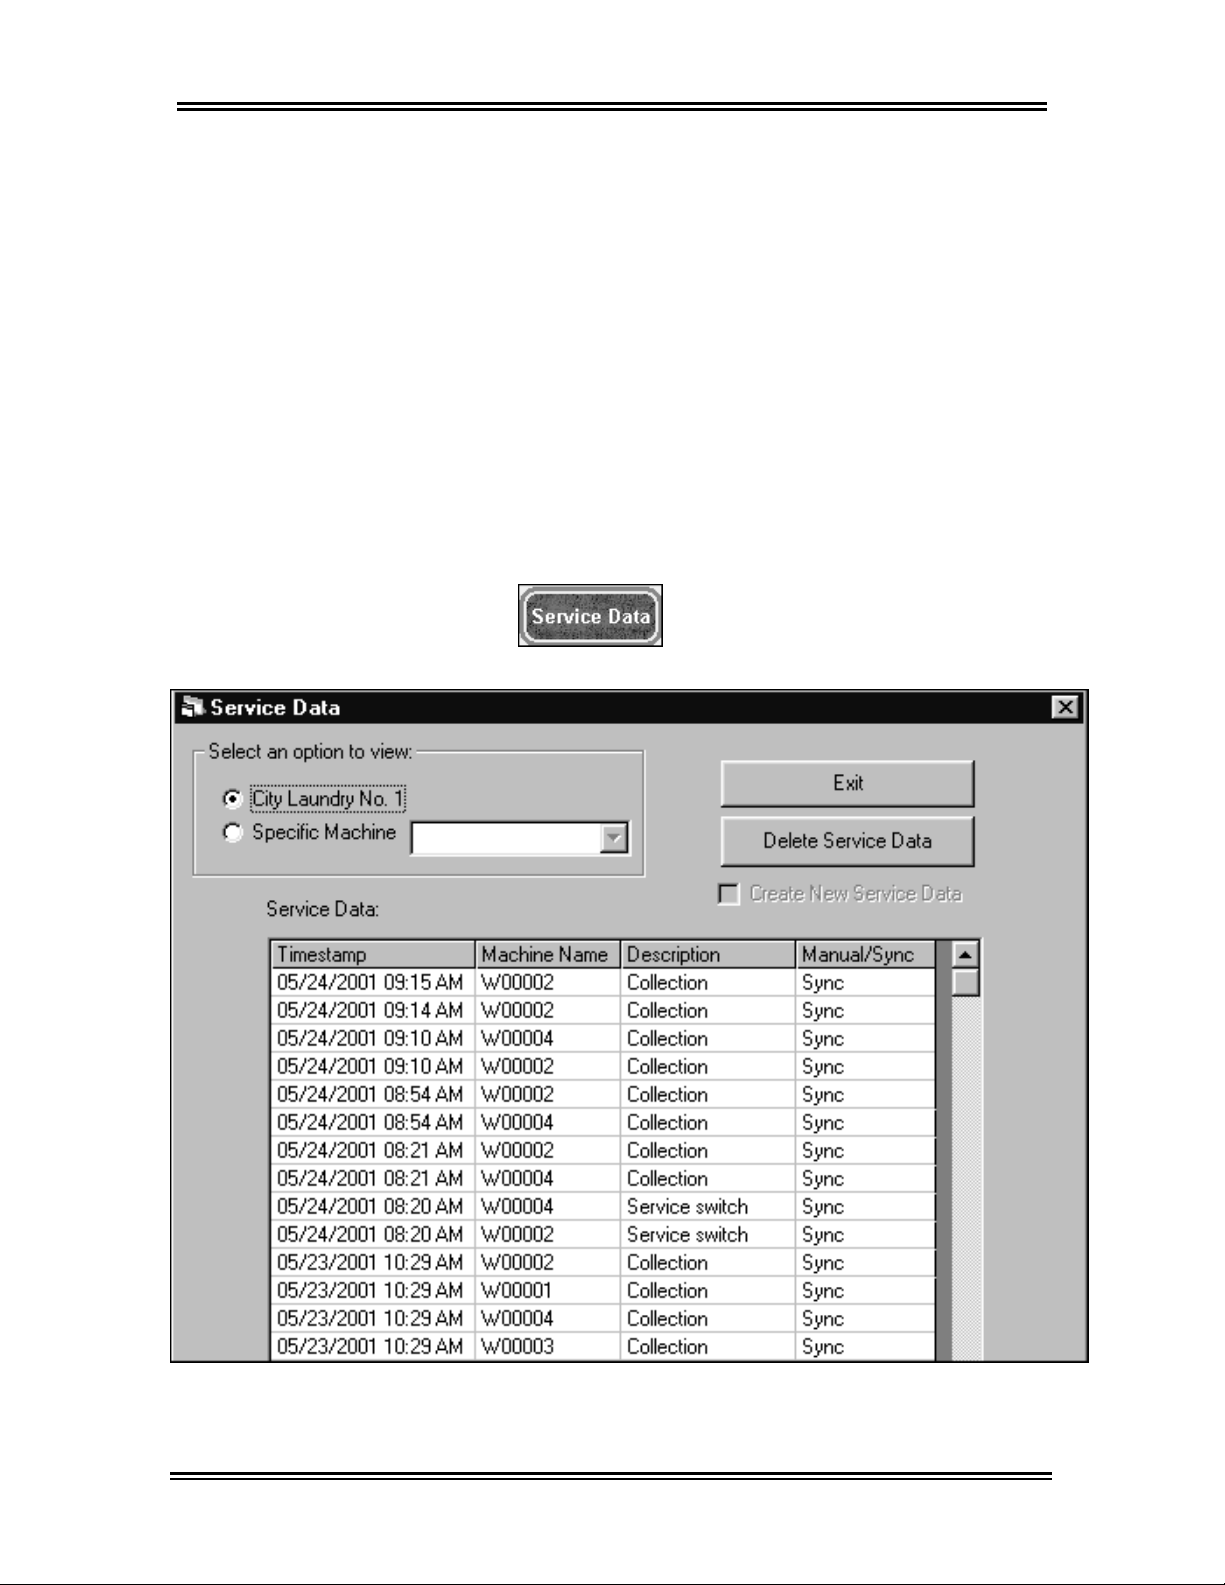
Service Data is a record of when services, such as
coin collections, were performed. Like Exceptions,
Service Data is collected during a machine audit and
can be viewed for an entire location or for a specific
machine. Each machine can record up to ten
timestamps for the service switch, and five
timestamps for other types of service.
Viewing Service Data
Before viewing Service Data, verify the correct
location is selected from the Location: drop-down list.
1. Click on Service Data. The
Service Data window appears.
60
Page 70
Entering Service Data Manually
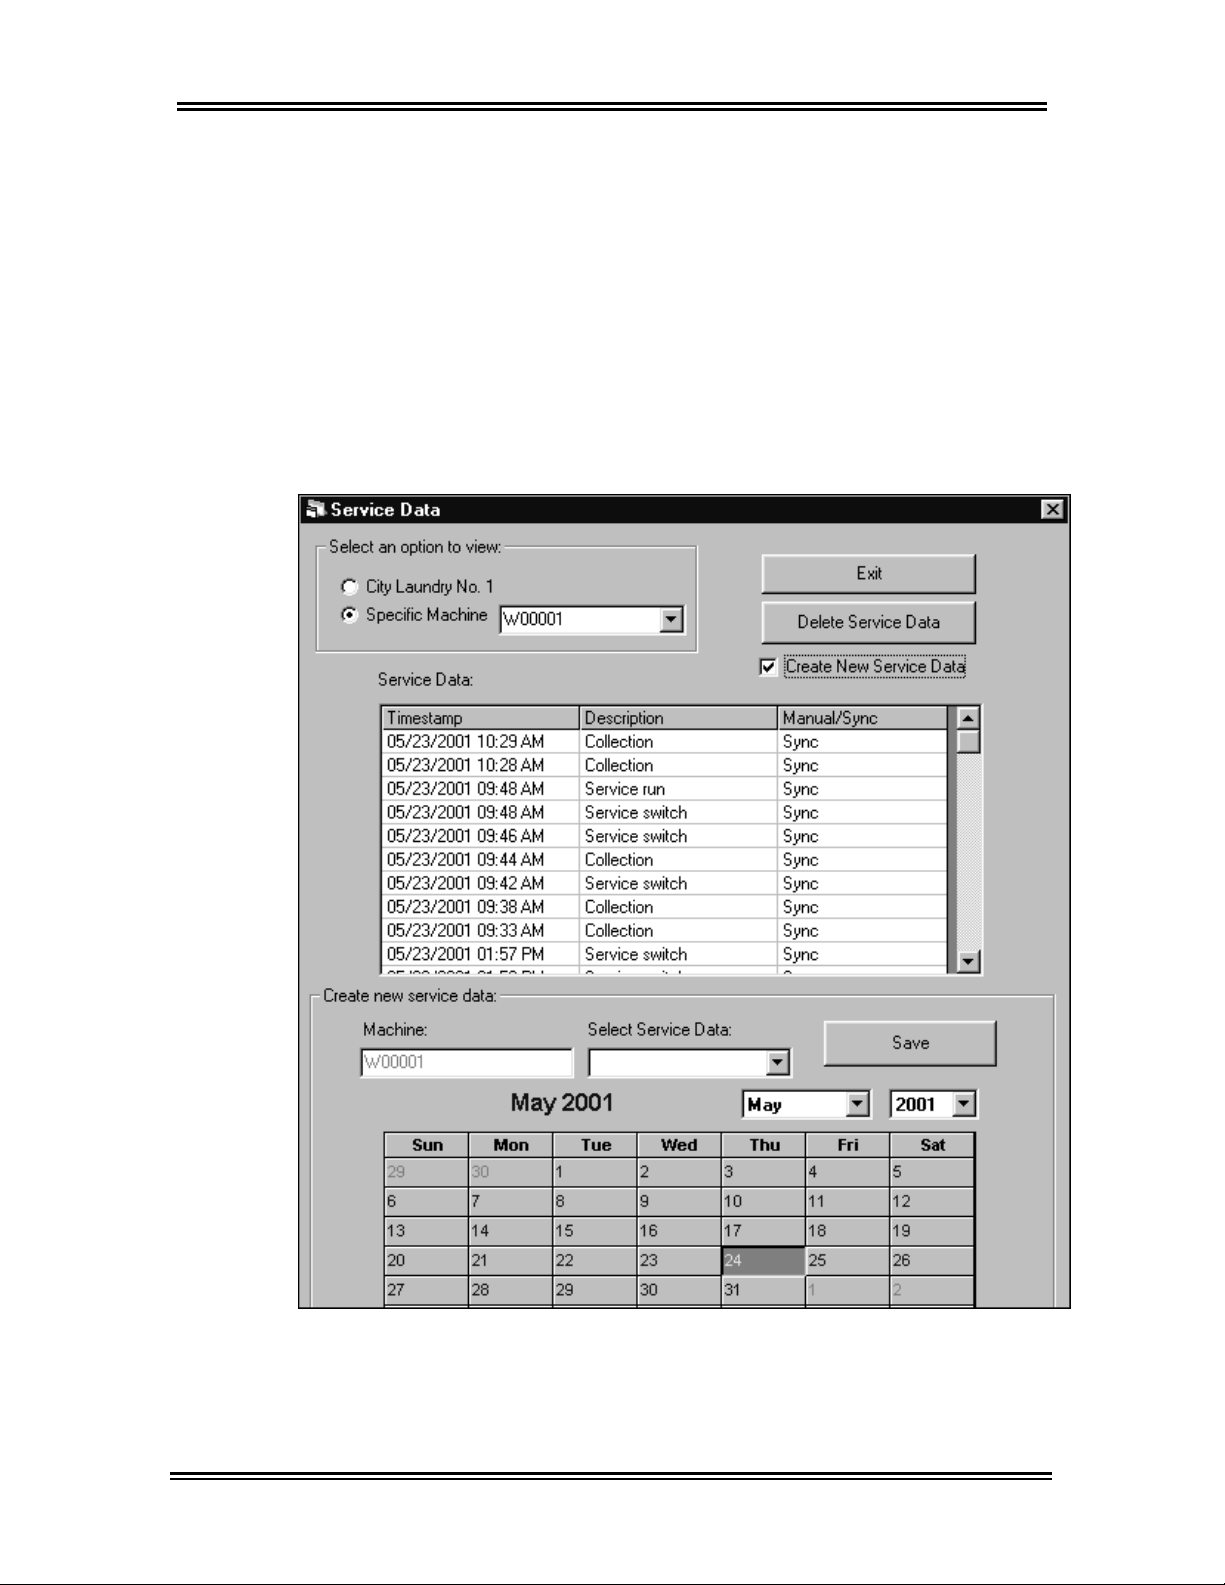
Occasionally you may need to add service data
information manually in the Management Software.
For example, if your PDA stops working and you need
to record that a coin collection was taken.
1. Select the Specific Machine option, and choose
a machine name from the drop-down list.
2. Check the Create New Service Data checkbox.
The bottom half of the window displays the
Create new service data: options.
Service Data
61
3. Select Service Data: from the drop-down list,
and select a
4. Click on
5. A confirmation window appears. Click on
6. Click on
Date on the calendar.
Save.
OK.
Exit to close the Service Data window.
Page 71
Service Data
Deleting Service Data
1. Select service data to be deleted by single-
clicking on the appropriate service data on the
grid.
2. Click on Delete Service
Data
3. Click on
Important:
You will not be given a warning to complete this
action, however you will receive a confirmation that
the action has been successfully completed.
.
OK to close the confirmation window.
62
Page 72

Reports
63
Page 73
Reports
Overview
Viewing Reports
The Management Software provides an extensive
selection of reporting options to help you track your
machine setup and service data, audits, and
exceptions. Reports can be previewed on the screen,
printed, or exported to a separate file for use within a
third-party program. It is assumed that if you are using
a third-party software to analyze the Management
Software reports that you will build/supply the
interfaces necessary for the information to be
displayed in a meaningful way.
Before viewing a Report, verify the correct location is
selected from the
Location: drop-down list.
1.
ADVANTECH
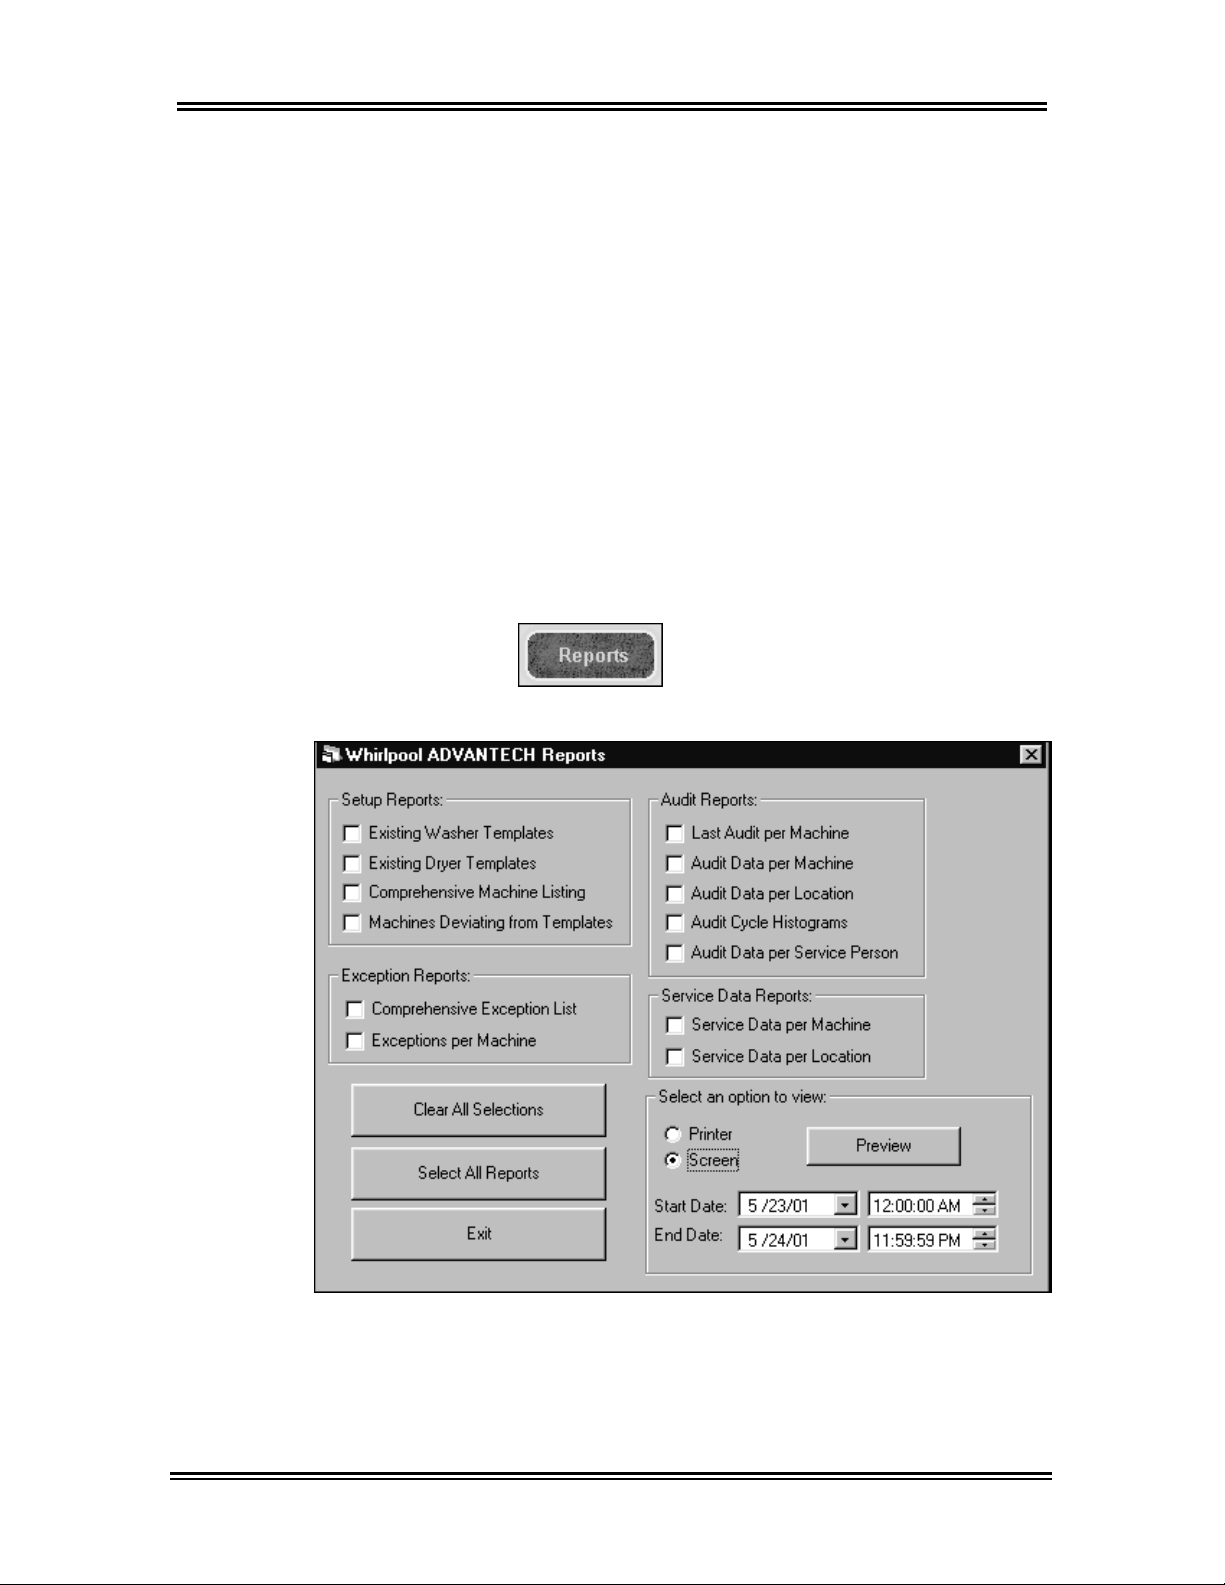
Click on Reports. The Whirlpool
™
Reports dialog box appears.
2. Click on the check boxes to select which type of
report, or reports, you wish to create. If no report
data is available for a selected report, a warning
window will be displayed at the time of
previewing or printing.
64
Page 74
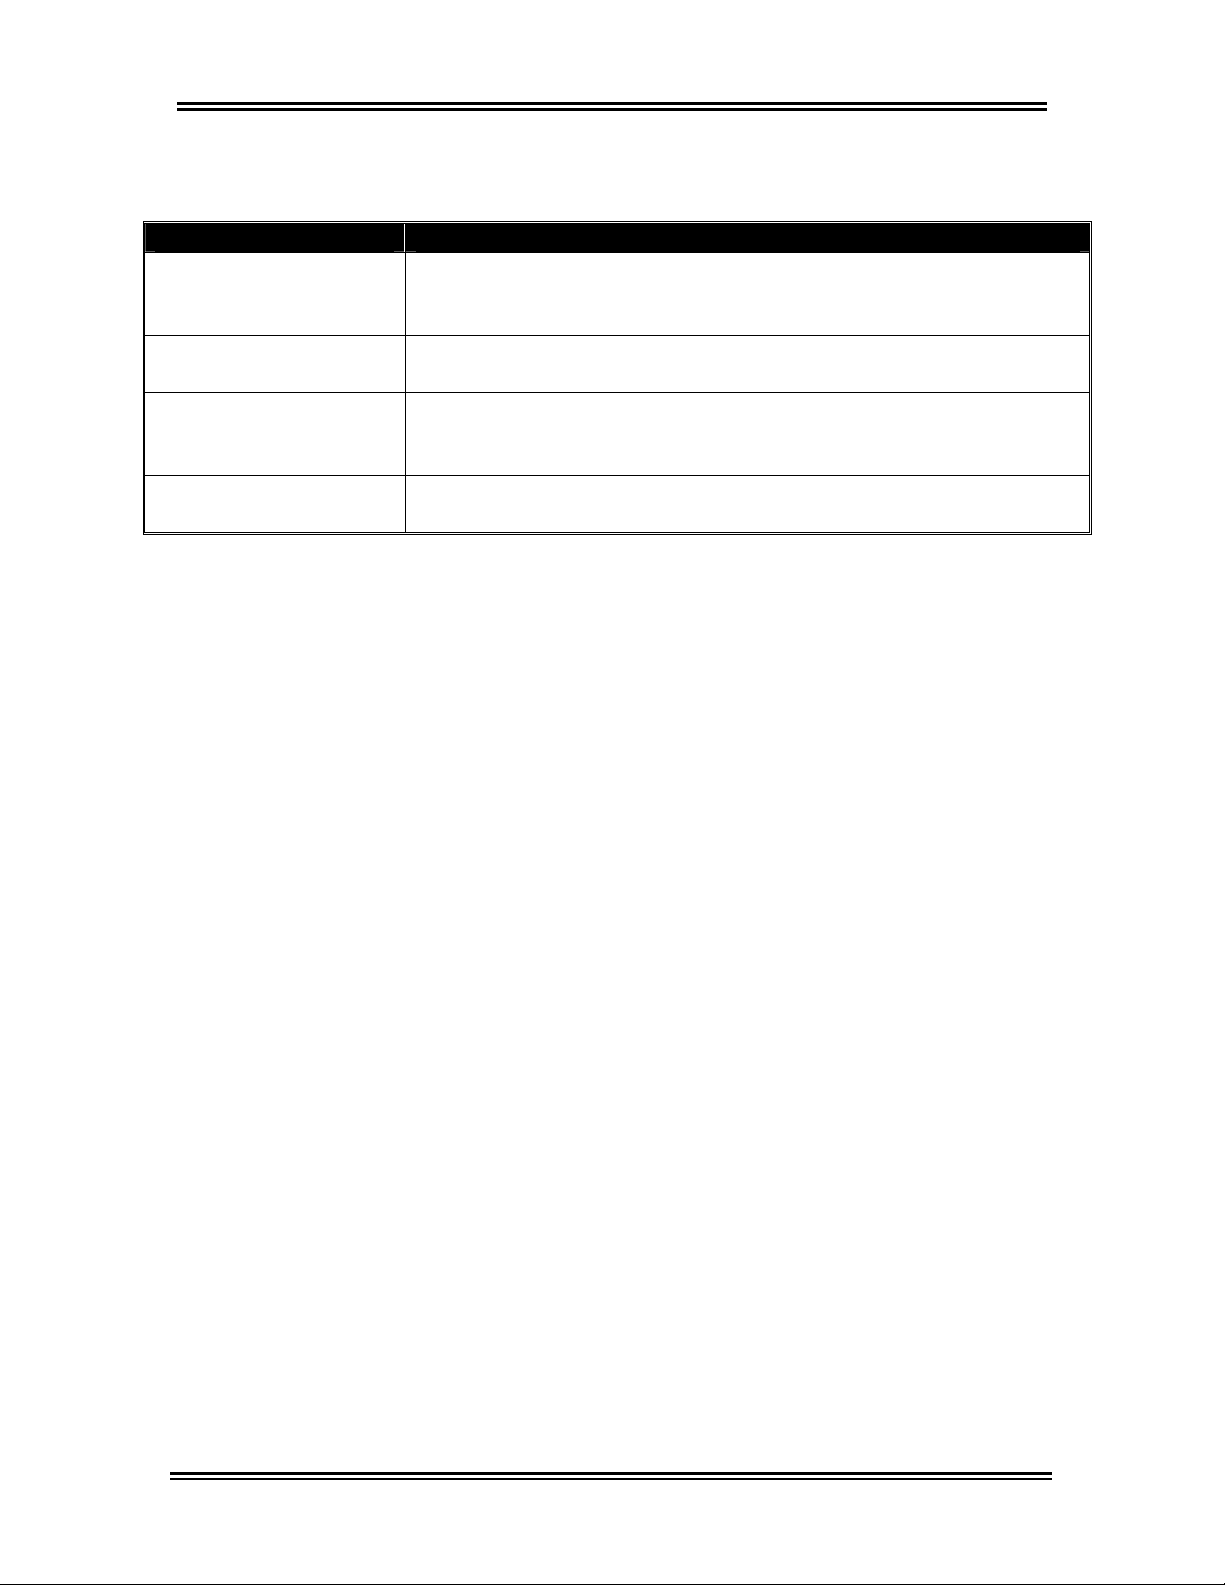
The following table describes the types of reports that can be created. See
Appendix for a complete listing of report types.
Option Description
Creates a report based on an Existing Washer or Dryer
Setup Reports
Exception Reports
Audit Reports
Service Data Reports
Template
Deviating from Templates
Creates a report detailing all Machine Exceptions or
Exceptions per Machine.
Creates reports based on Audit data such as: Last Audit per
Machine
Histograms
Creates reports based on Service Data per Machine or
Location.
, Comprehensive Machine Listing, or Machines
.
, Audit Data per Machine, or Location, Audit Cycle
, or Audit Data per Service Person.
3. To view the report, under Select an option to
view:
select Screen, then click on Preview.
Reports
Note: A specific range of dates can be selected
before viewing the reports.
65
Page 75
Reports
Exporting Reports
Previewed reports can be exported to a separate file
for use within a third-party software program. It is
assumed that if you are using third-party software to
analyze the Management Software reports that you
will build/supply the interfaces necessary for the
information to be displayed in a meaningful way.
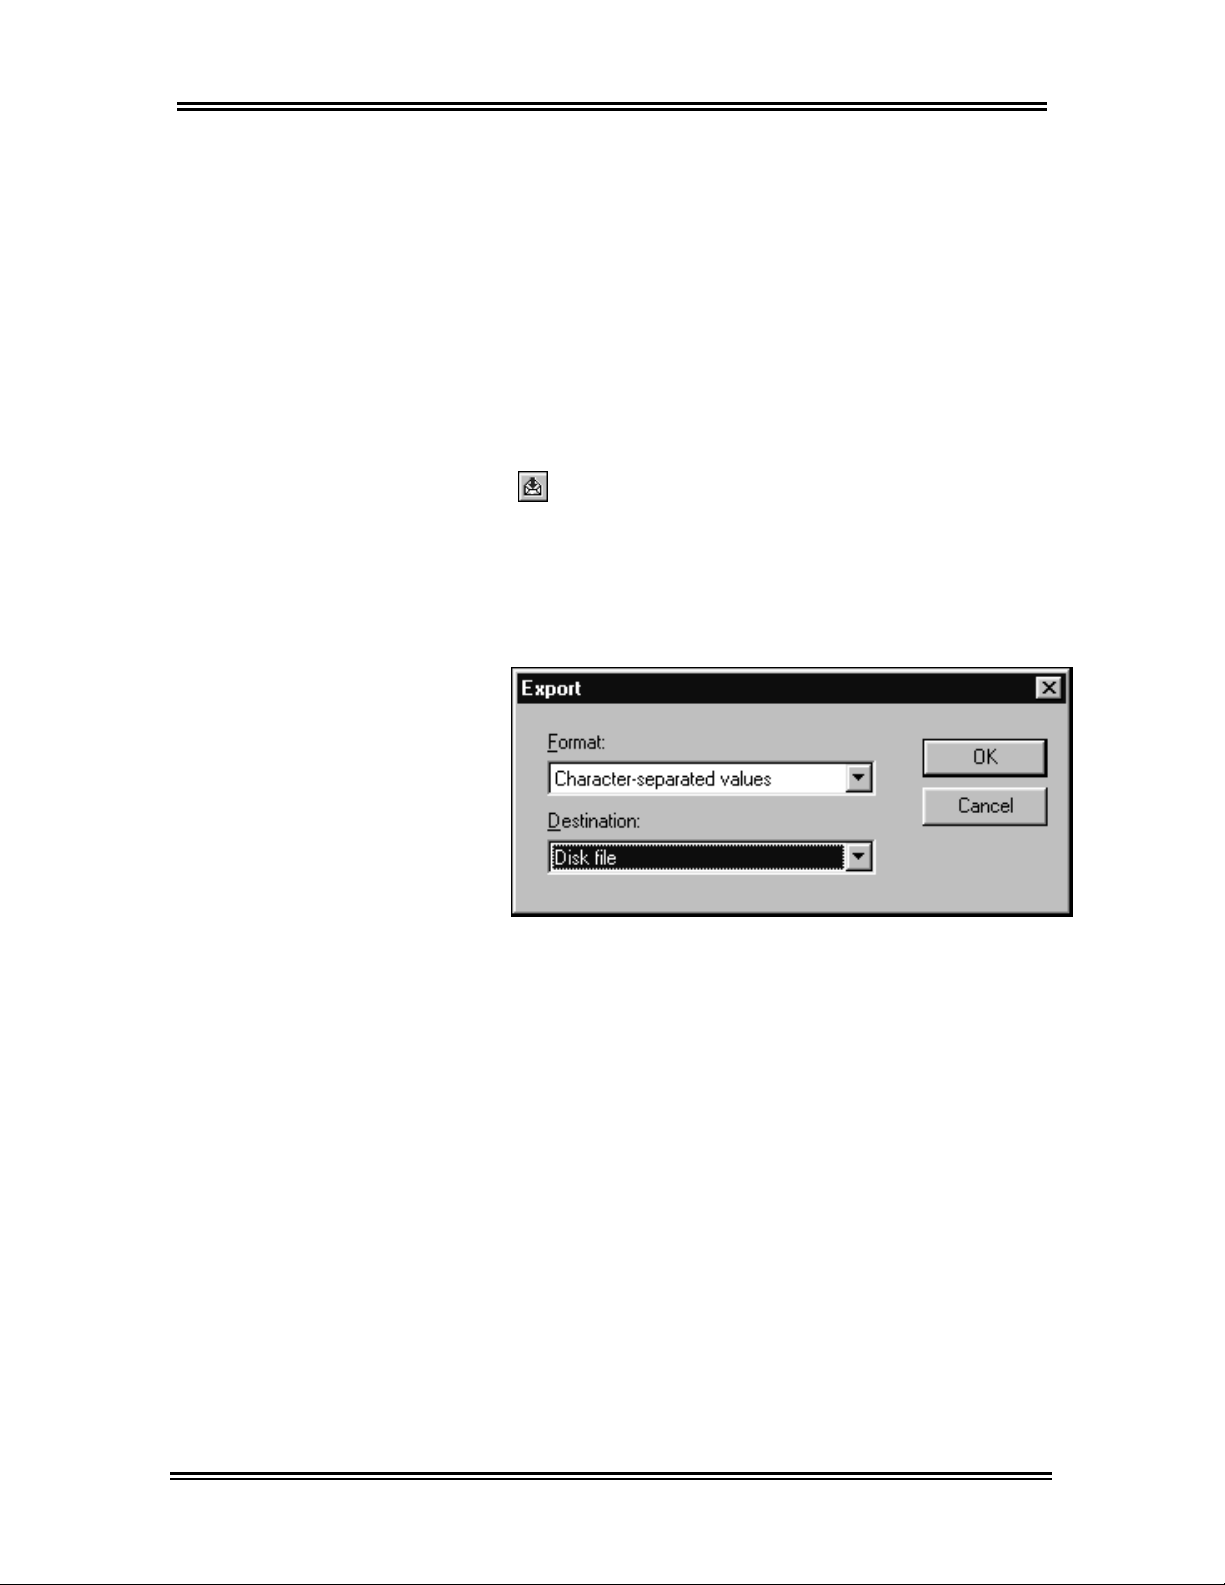
1. Select the type of report to be created and
2. Click on the Export button.
3. In the Export dialog box, select which type of
choose to Preview it on the Screen. The report
will open inside a separate window.
Format: in which to export the report, and which
Destination: for the report. See Exporting
Reports in the Appendix for a complete list of
different format types.
4. Click on
OK.
Note: Depending on the format you have selected,
you may be allowed to make other choices as to the
setup of the exported report. Once you have saved
the report to the destination of your choice, you can
re-open the report inside of the program you have
specified.
66
Page 76
Printing Reports
Reports
Before printing a Report, verify the correct location is
selected from the Location: drop-down list.
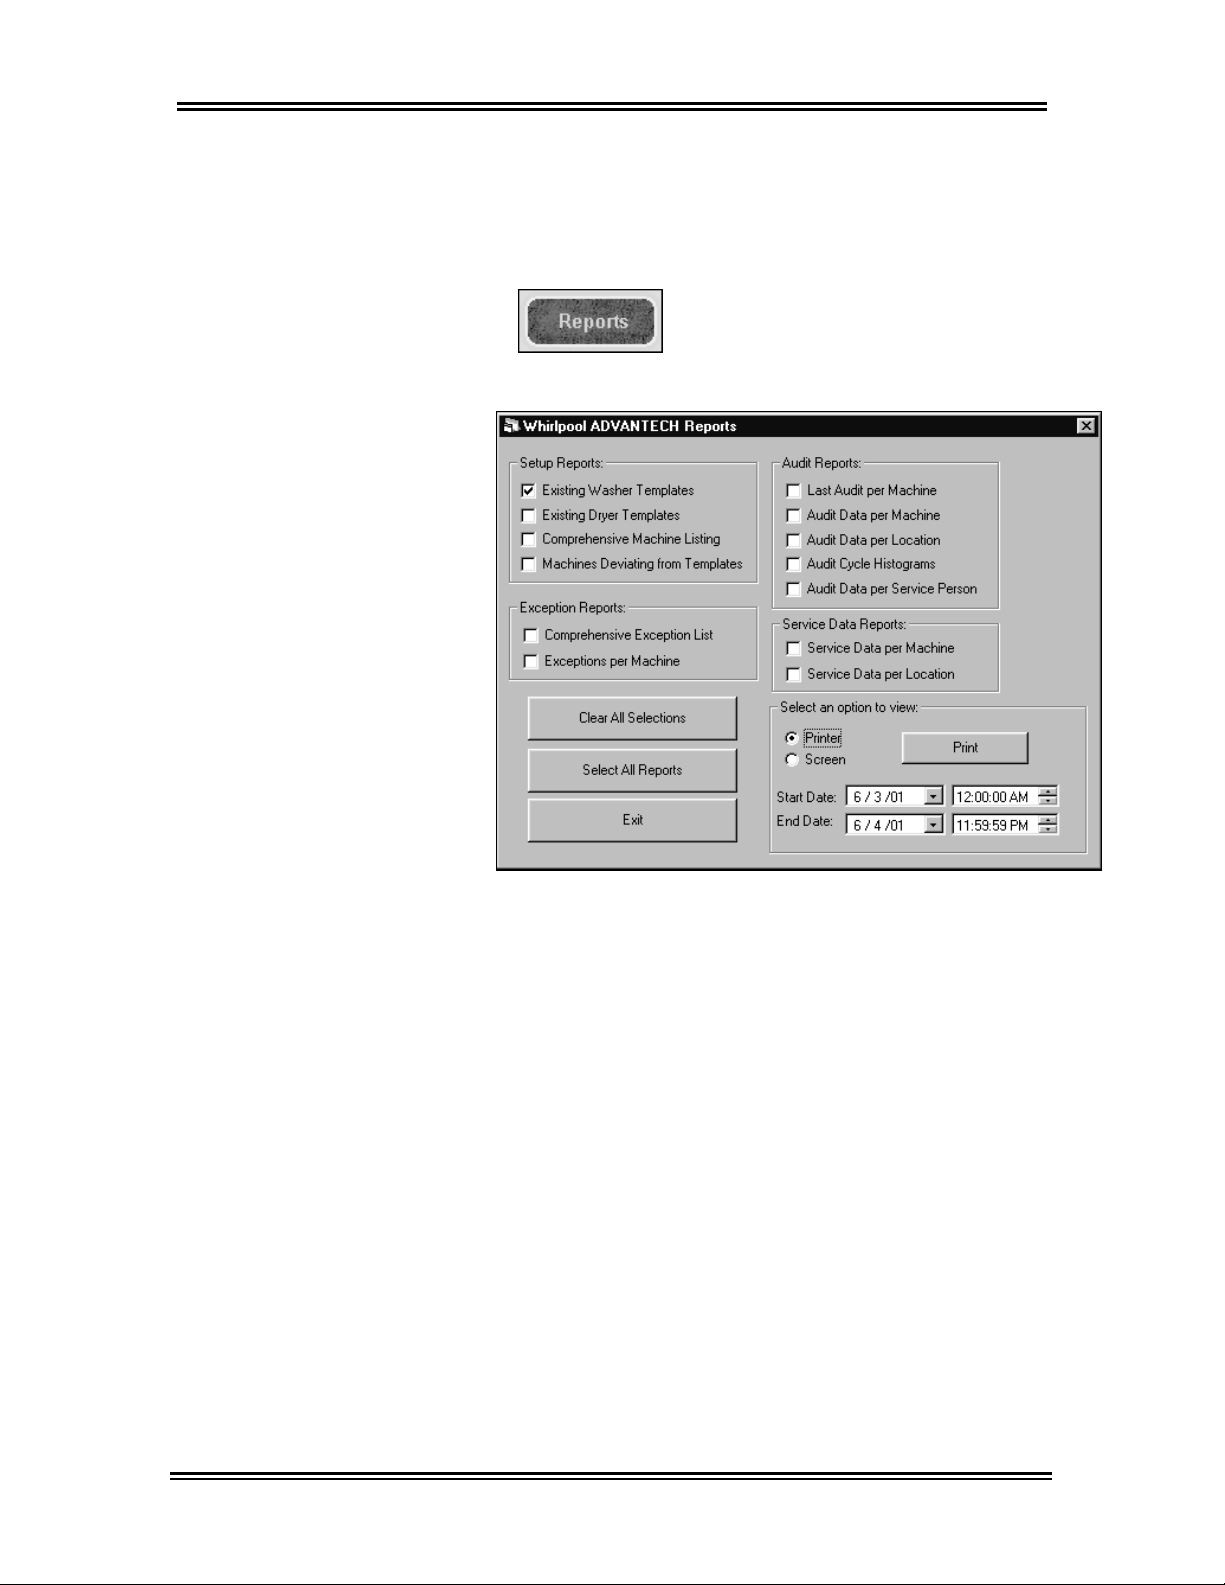
1. Click on Reports. The Whirlpool
ADVANTECH Reports
dialog box appears.
2. Click on the check boxes to select which type of
report, or reports, you wish to create. If no report
data is available for a selected report, a warning
window will be displayed at the time of
previewing or printing.
3. To print the report, under Select an option to
view:
select Printer, then click on Print.
Note: A specific range of dates can be selected
before printing the reports.
67
Page 77

Reports
NOTES:
68
Page 78

Updating Control Board Firmware
69
Page 79
Firmware Update
Firmware Update
Downloading Firmware to PDA
1. Whirlpool Corp makes critical updates to
embedded control programming available to users
of the product.
2. Updates can be performed on previously installed
units using properly programmed PDAs & the
ADVANTECH™ Back Office Software installed on
a PC: (Whirlpool Pt# 8524744B)
®
3. PDA devices need to operate on a Palm
3.5.0 to 4.0.0
4. Firmware must be downloaded from the Internet at:
www.cltpsc.whirlpoolcorp.com/techinfo/tech_support/firmware/firmwaredefault.htm
5. Place the downloaded file onto the computer
Desktop where it can be unzipped easily.
6. Unzip the file and place it in the computer
ADVANTECH/Add-on folder.
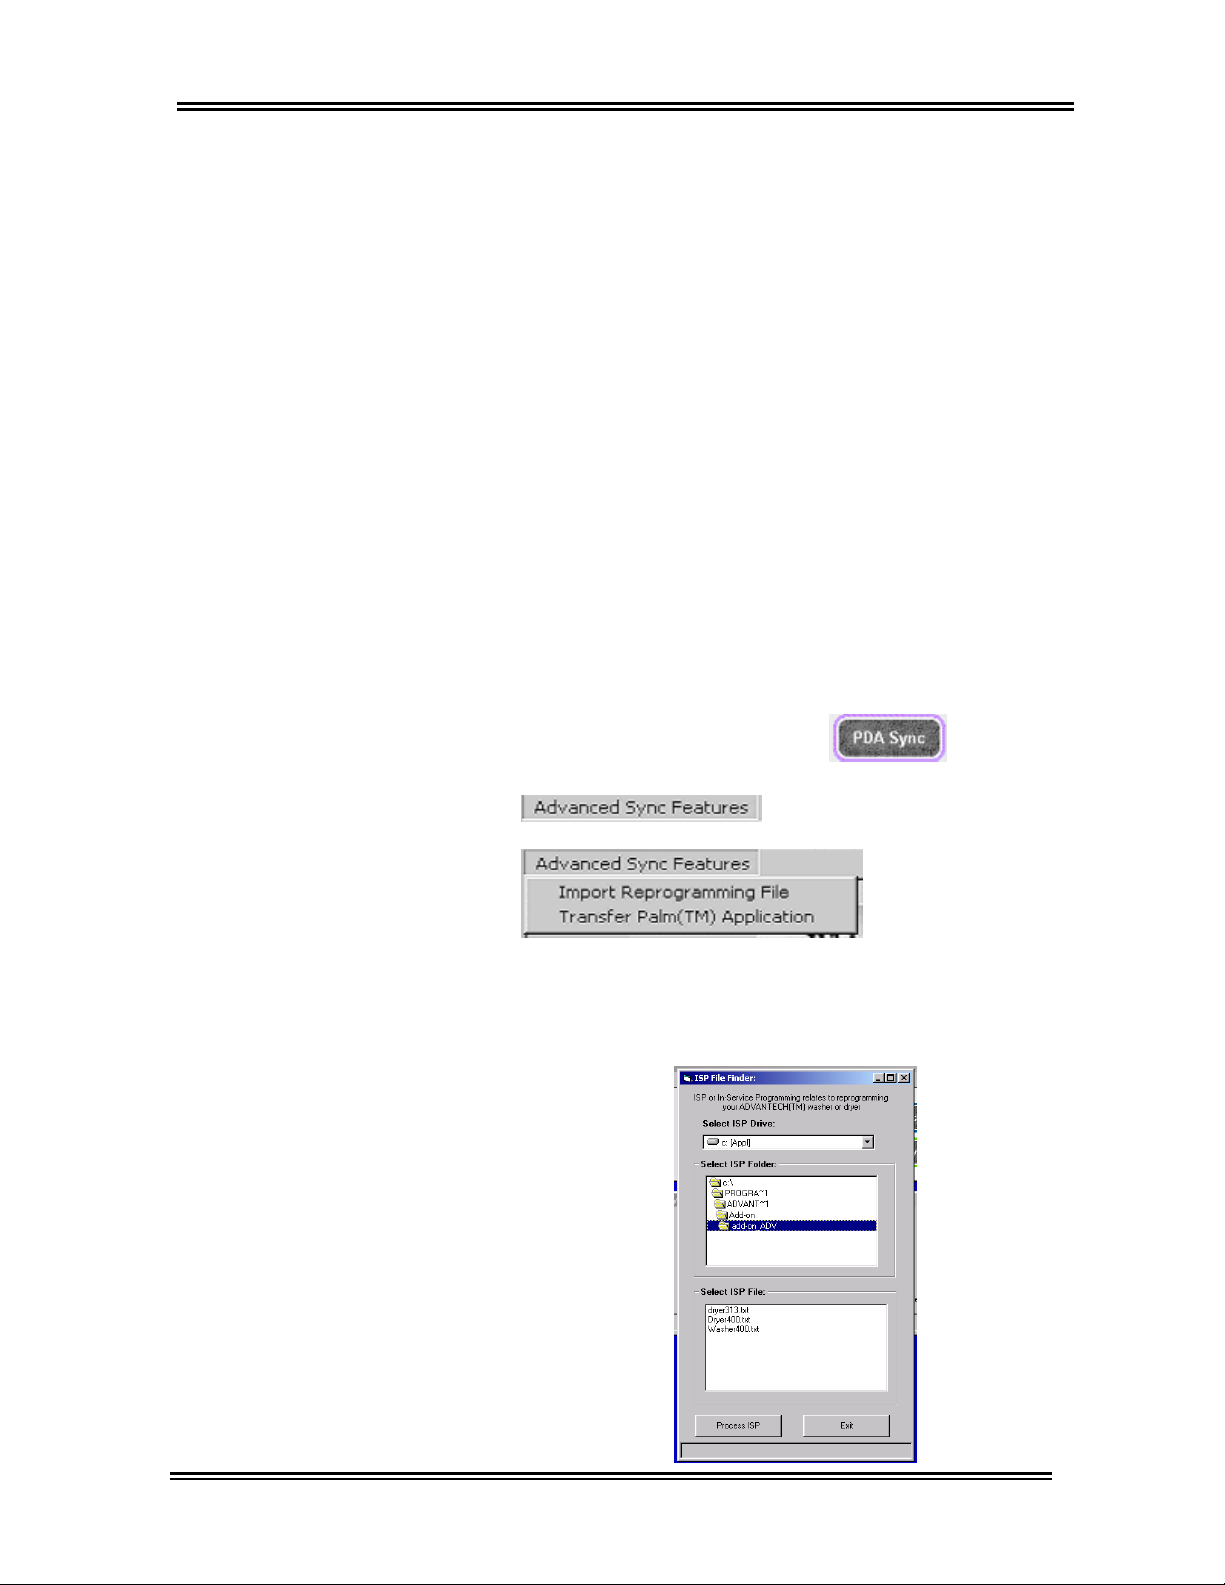
7. Boot-up the ADVANTECH™ software application
OS of
8. Select the PDA Sync button
9. Select Advanced Sync Features
10. Select Import Reprogramming File
11. Locate the Firmware file on your computer where it
was placed: C://Programs/ADVANTECH/Add-on
Then select the appropriate firmware file.
70
Page 80
Firmware Update
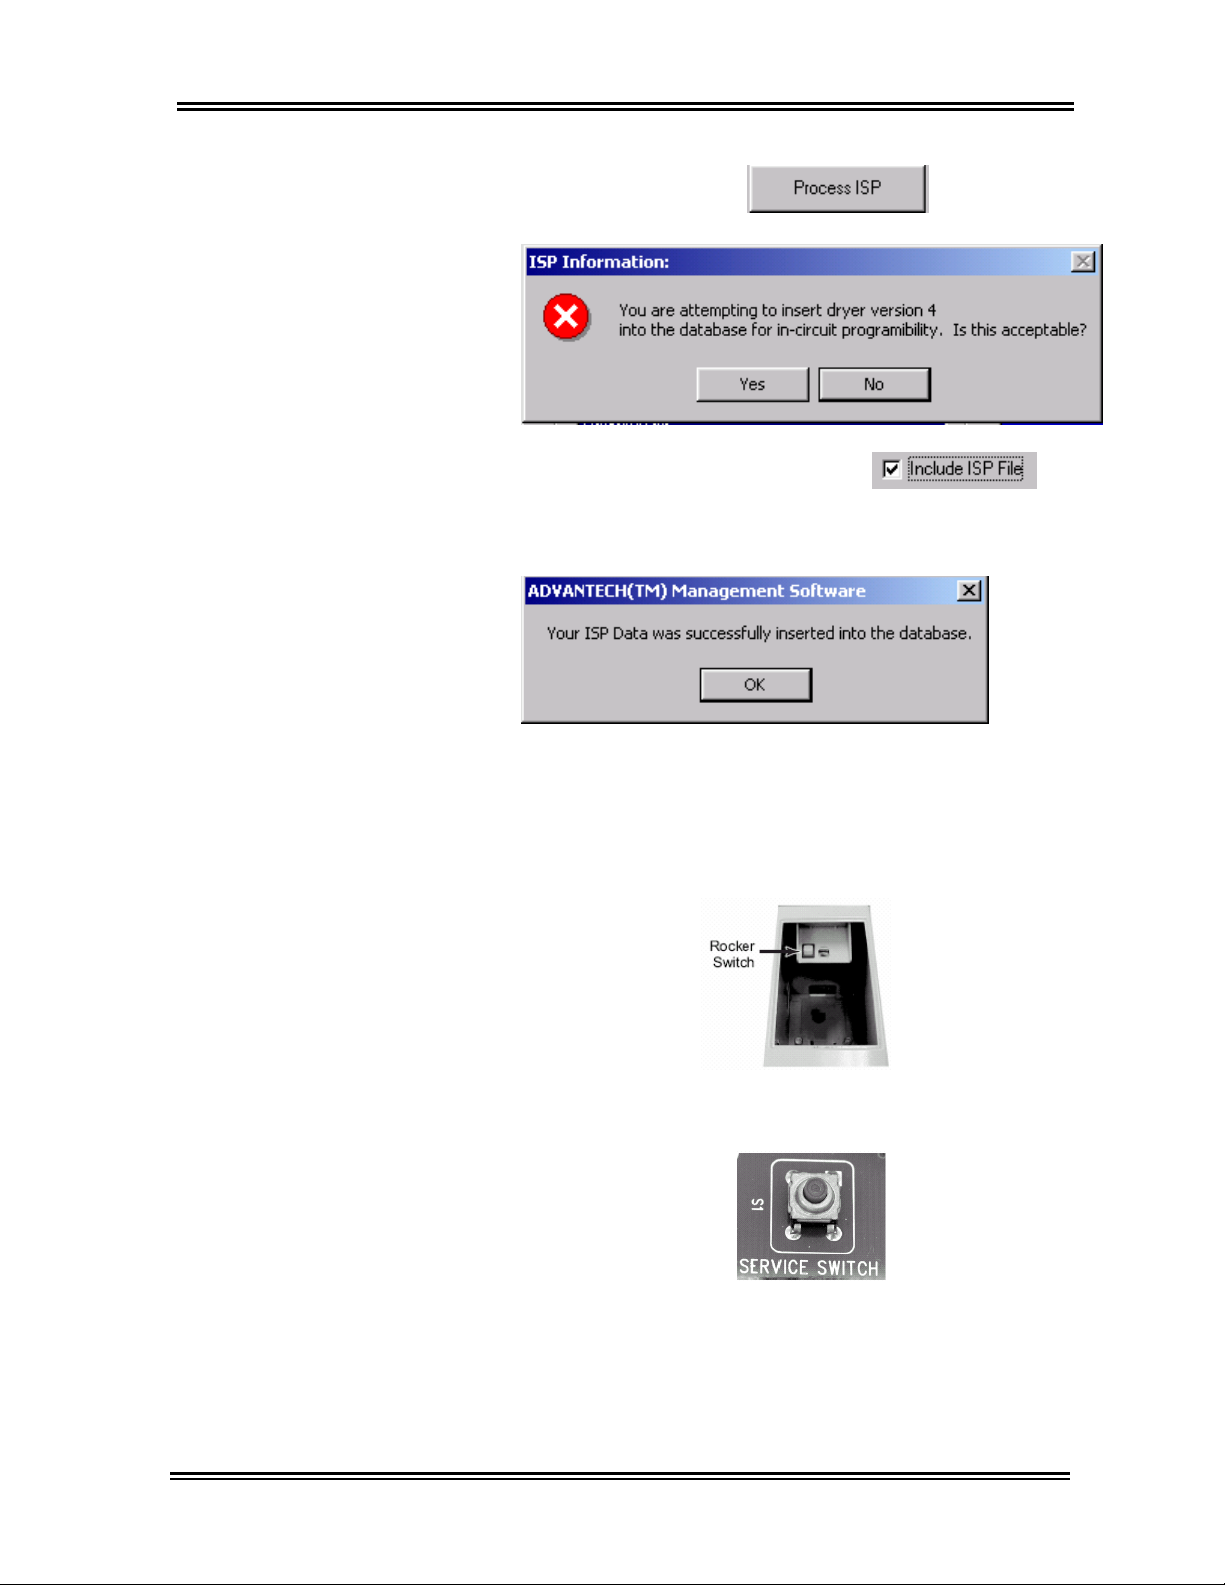
12. Select Process ISP.
13. Then select Yes.
14. Check the box: Include ISP File
15. Press the Hot Sync button on the cradle or the
cable to sync the computer with the PDA.
16. Click on OK after the ISP File is downloaded
Installing Firmware On a Machine
1. Unlock, open and remove the metercase access
door. Push and hold the service switch until the
process is complete.
2. On a full console machine or on a stack dryer the
service switch is located on the control board near
the P11 Aux connection.
3. Either service switch circuit must remain closed
throughout the update process. Reprogramming
can take up to 4-min. per machine and is only
complete when the word “done” appears in the
machine’s display.
71
Page 81
Firmware Update
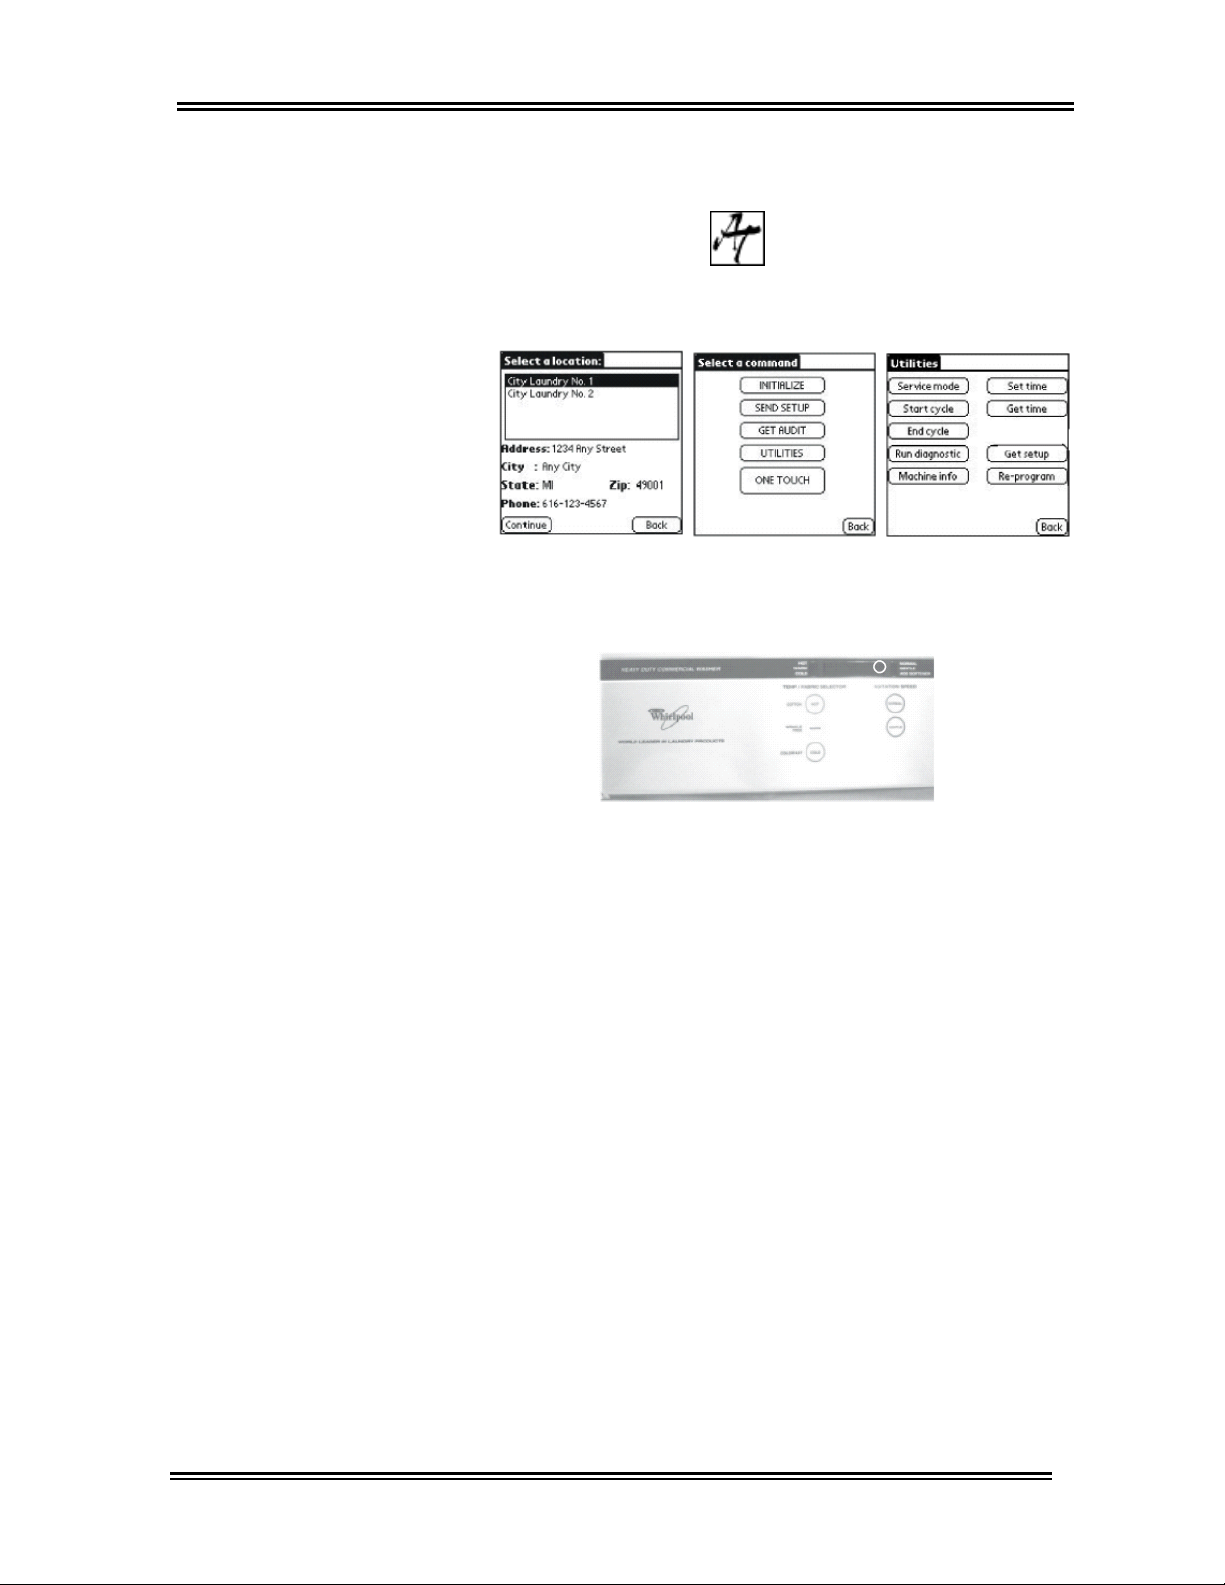
4. On the PDA, open the ADVANTECH™ application
by tapping on the icon shown.
5. Choose Select Location, and then pick the
appropriate location from the list.
6. Choose UTILITIES, and then select Re-program.
7. Aim the PDA’s IR beam into the IR receiver on the
machine, located just to the right of the cents
position in the display (circled in the display below).
8. Handheld should be held no more than 4-inches
from the display and the beam should be shielded
from intense light sources that can distort the beam.
9. To verify that the new firmware was uploaded:
a. Exit the previous operation by releasing the
service switch and then pressing the S6
pad twice. The Vend Price should be
displayed.
b. Press and release the service switch and
then press and release S4 twice. First the
Vend Price will display, and then the
Firmware Version.
72
Page 82

Firmware Update
NOTES:
73
Page 83

Firmware Update
NOTES:
74
Page 84

Appendix
75
Page 85

Appendix
Passwords and IDs
The following table outlines the Passwords and IDs required when using the
Management and Handheld Software.
Password/I
D
Owner ID
Manageme
nt
Password
Access
Control
Password
Service
Person ID
Service
Person
Password
Software
Update
Password
Description Entered When? Protects
Used to prevent unauthorized
access to your ADVANTECH
commercial laundry products by
any PDA that has not been
synced with your copy of the
Management Software.
Used to prevent unauthorized
access to the Management
Software on the PC.
Used in conjunction with the
Owner ID to protect your
ADVANTECH
laundry products.
Used to control access to the
Handheld Software.
Used to control access to the
Handheld Software.
Used to update the
ADVANTECH™ commercial
laundry product’s control board.
™
commercial
™
Created upon initial
entry to the
Management
Software. Entered
only after a
reinstall.
Entered every time
the Management
Software is
accessed.
Entered whenever
a PDA is re-synced
with the
Management
Software.
Selected from the
Login Menu on the
PDA.
Entered every time
the Handheld
Software is
accessed.
Entered whenever
a new software
version is
distributed.
(Optional)
ADVANTECH
commercial
™
laundry
products
Management
Software
ADVANTECH
commercial
™
laundry
products
PDA No
PDA No
Control Board
Software
Case
Sensitive
?
No
Yes
Yes
No
76
Page 86

Backing Up the Management Software
Periodically you should backup your Management
Software to protect your data from accidental loss in
the event of a PC failure.
Before beginning a backup, ensure that you have
enough diskettes, or other media, to accommodate
your backup data. Due to the large size of the
database files that are backed up, it is recommended
that backups be to a CD or tape drive.
All files that should be backed up have a .mbd
extension, and are located in the installation directory.
The default installation directory is listed below:
C:\Program Files\Advantech\Whirlpool
Advantech\DB-Report.
1. Select Start, Programs, Windows Explorer.
2. Navigate to the default installation directory for
the Management Software, unless you specified
a different location at the time of install.
3. On the right side of the screen select all files with
an .mbd extension.
Appendix
77
Hint:
To select multiple files, press the
selecting the .mbd files.
4. Select Edit, Copy from the menu.
5. Single-click on the drive letter to which you wish
to backup your data. For example, if you are
backing up to a floppy disk, single-click on the
3 ½ Floppy (A:) drive.
6. Select Edit, Paste from the menu.
[Ctrl] key while
Page 87
Appendix
Reinstall Procedures
If the Management Software ever becomes corrupted,
or if the Owner or Management Password is lost, the
Management Software must be reinstalled.
Important:
Reinstalling the Management Software will cause you
to lose all of your audit data – unless you have
recently backed up that information.
Before you reinstall the Management Software, you
need to uninstall the current version and delete an
additional file from your hard drive.
To uninstall:
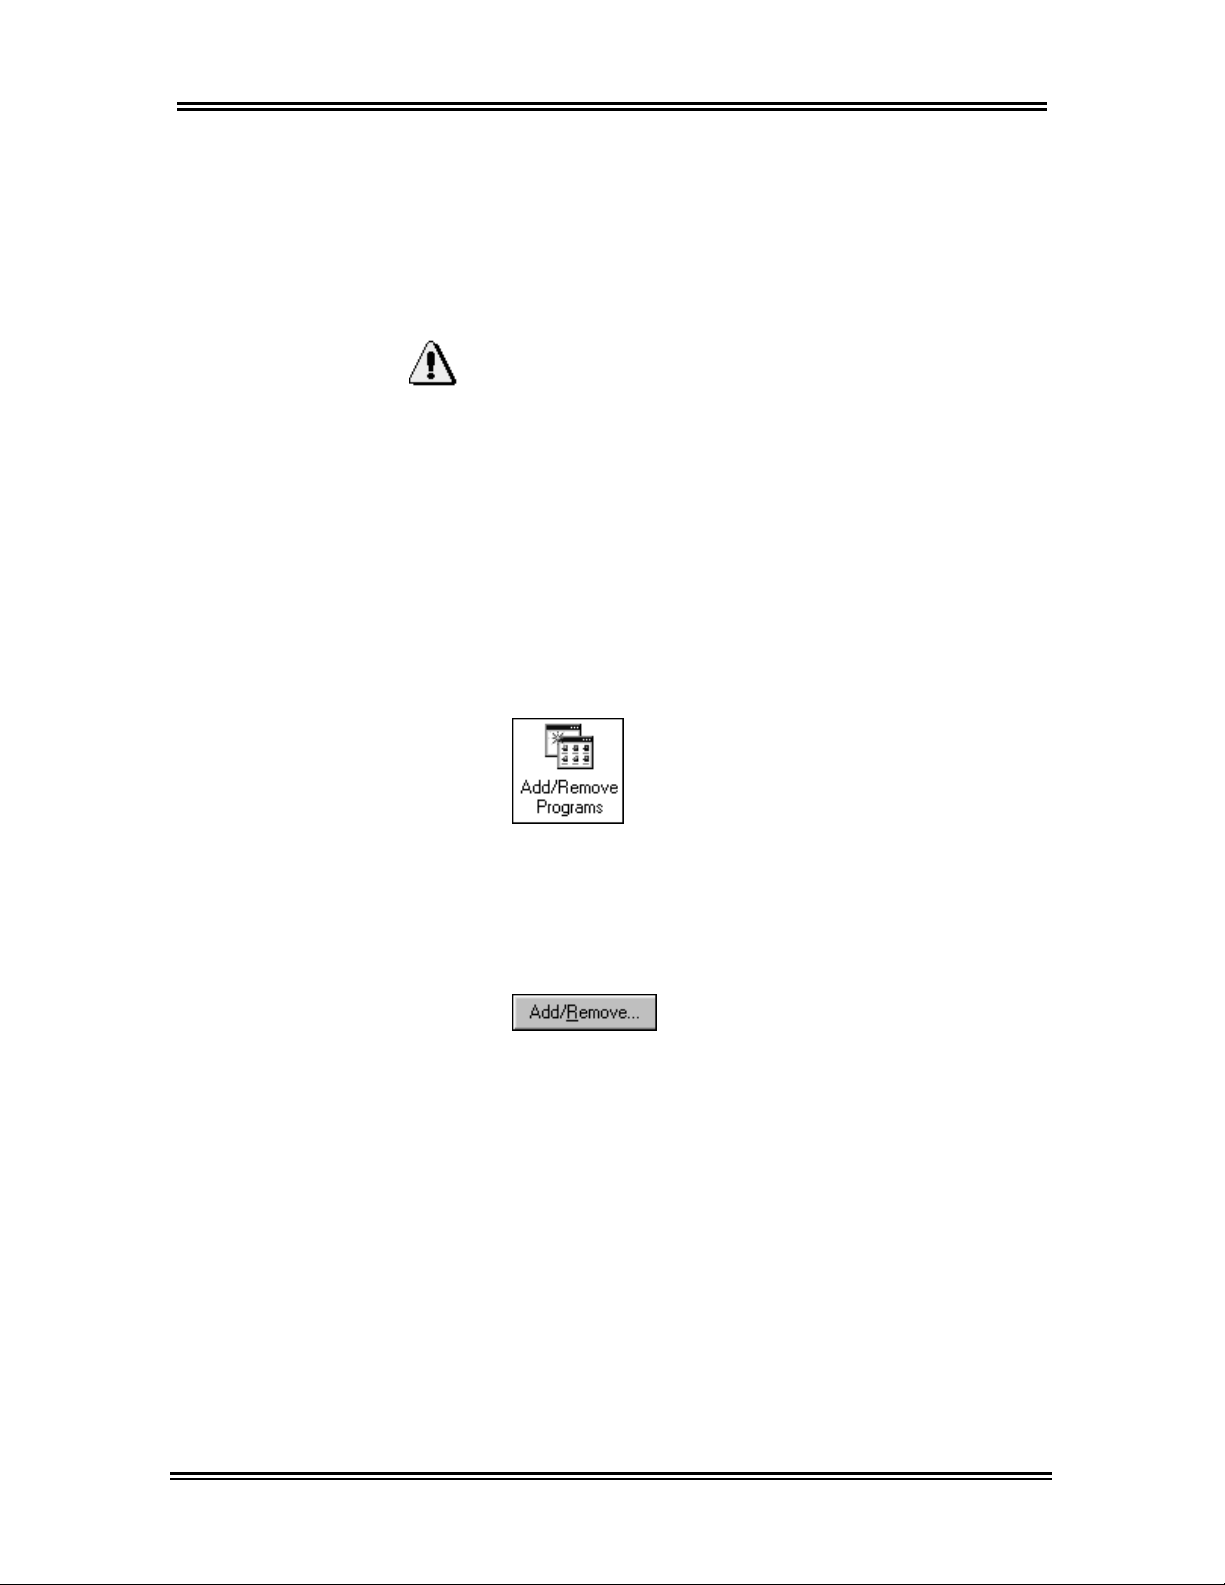
1. Select
Start, Settings, Control Panel.
2. Double-click on Add/Remove
Programs
3. Scroll through the list of programs, located at the
bottom of the window, until you find Whirlpool
ADVANTECH
Program Properties
4. Single-click to select Whirlpool ADVANTECH.
5.
6. When the uninstall process is complete, close all
open windows.
Now that you have uninstalled the Management
Software, you are ready to delete the rest of the
associated Management Software files from your hard
drive.
1. Select
2. Navigate to
3. Select the
4. Press
5. Click on
.
, located in the Add/Remove
dialog box.
Click on Add/Remove.
Start, Programs, Windows Explorer.
C:\Windows.
Advantech.ini file.
[Delete] on the keyboard.
Yes to confirm the deletion.
78
Page 88

Appendix
Now you can reinstall the Management software. Do
this by following the installation instructions on page 9
of this manual.
Note: This will not delete DCOM95. Windows
users DO NOT need to reinstall the DCOM95 file
before reinstallation!
Audit Discrepencies
Message Appearing in Audit Reconciliation Problems Window
Coin 1 Counts: current vs. previous audit
Coin 2 Counts: current vs. previous audit
Topoff Counts: current vs. previous audit
Cycle Counts: current vs. previous audit
Special Counts & Normal Cycle Counts vs. Cycle Interval Counts
Revenue Counts: current vs. previous audit
Free Vend Counts: current vs. previous audit
Aux Device Counts: current vs. previous audit
Cycles Killed Counts: current vs. previous audit
For each category, the cumulative counters are compared with the interval
counters as follows:
Previous Cumulative Count + Current Interval Count = Current Cumulative
If this is not true, then a discrepancy appears in the Audit Reconciliation
Problems
window.
®
95
79
Page 89
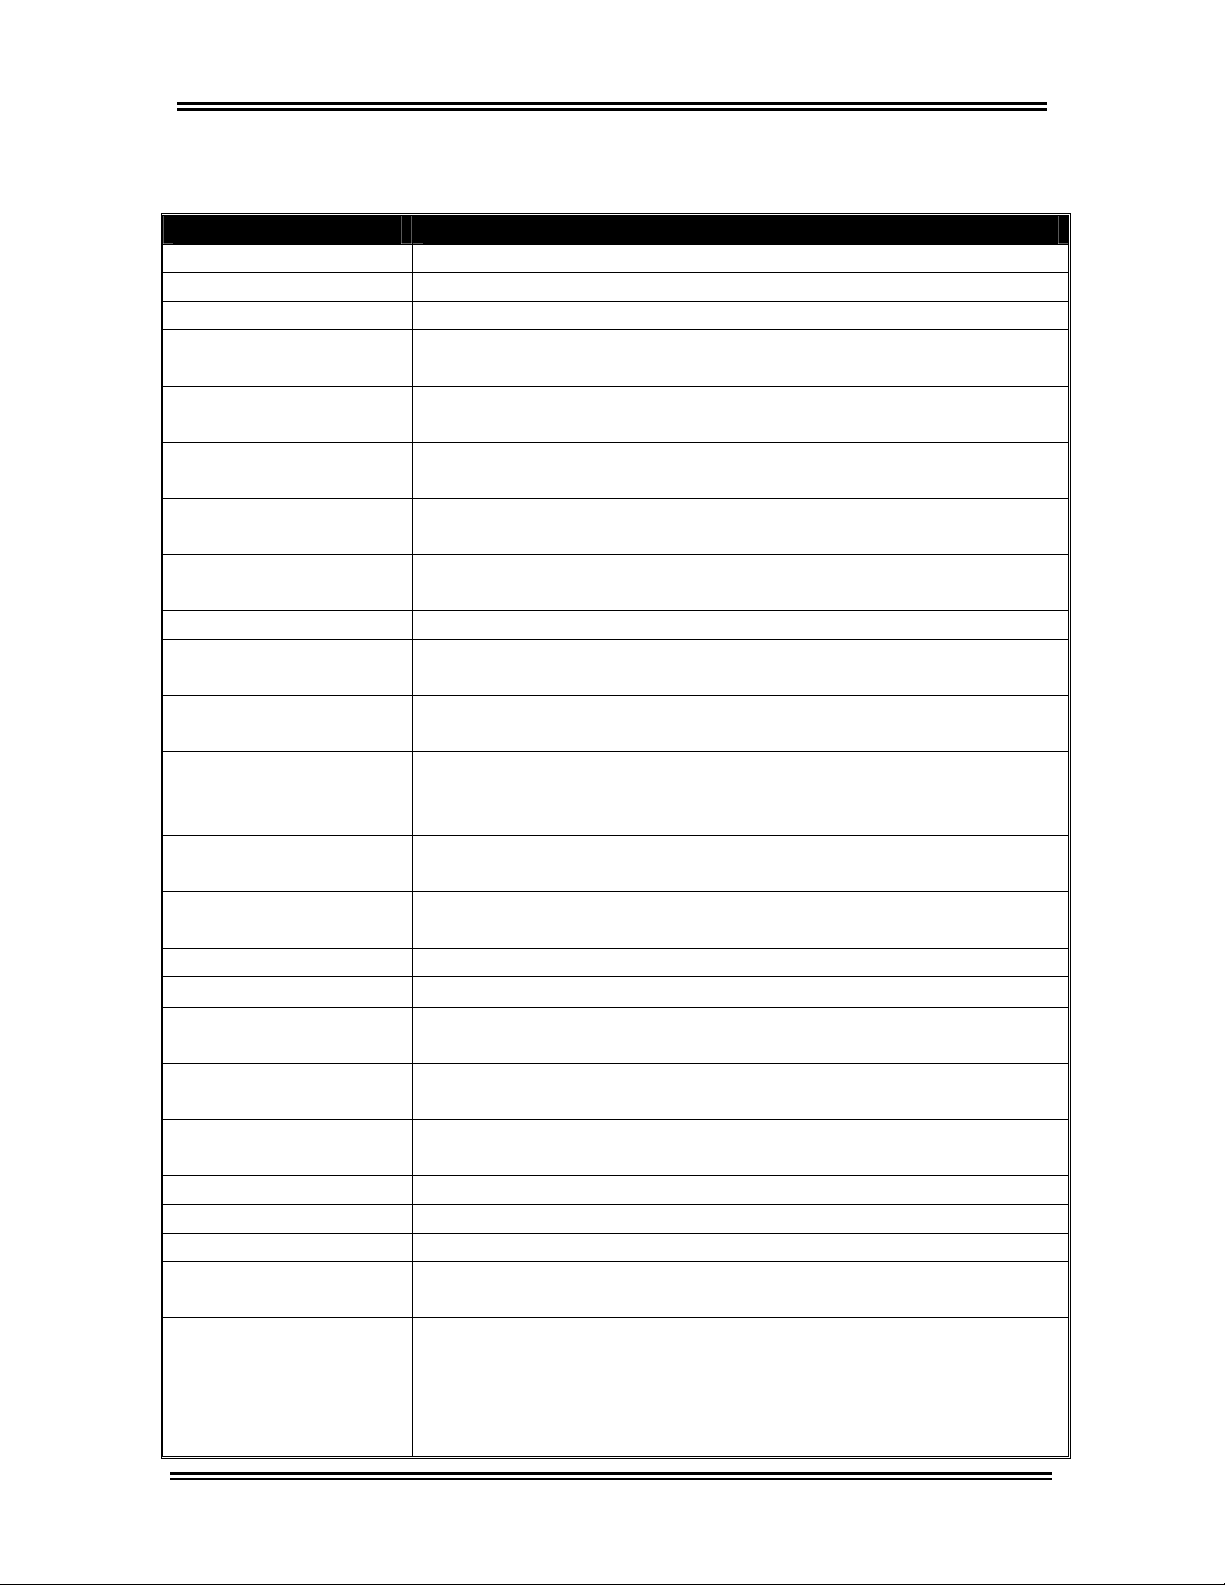
Appendix
Possible Exceptions
Exception Cause
AC power off Unplugged or AC failed
AC power on Plugged in or AC turned on
Audit table lost N/A
Coin drop 1 pulse too
short
Coin drop1 pulse too
long
Coin drop2 pulse too
long
Coin drop2 pulse too
short
Drain time too long
Factory reset N/A
Fill time too long
Fill time too short
Free vend given
during service
routine
Internal backup table
bad
Internal main table
bad
Internal table lost Controller lost one of its setup tables
Invalid owner ID
Manual back in
service
Manual out of service
Reserved internal
exception
Service table lost N/A
Setup table lost N/A
Time: Fall back Return to Standard Time
Time: Spring
Forward
Washer lid did not
open
Bad coin, fishing of drop, or incorrect coin acceptor set up.
Bad coin, fishing of drop or incorrect coin acceptor set up.
Bad coin, fishing of drop or incorrect coin acceptor set up.
Bad coin, fishing of drop or incorrect coin acceptor set up.
Drain time is greater than 15 minutes. This is only logged,
no action is taken.
Fill time is greater than 30 minutes. This is only logged, no
action is taken.
Fill time is less than 2 minutes. This is only logged, no
action is taken.
N/A
N/A
N/A
Bad ID from Palm™ handheld
N/A
Service person entered a manual command on control
board to indicate “OFF” on display.
N/A
Daylight Savings
Washer lid switch must be detected as open before it is
allowed to run another wash cycle. The washer displays
=OFF= on the display until the service routine is run. See
product Tech Sheet or Service Manual/Job Aid for Service
Routine Procedure. Possible defective lid switch.
80
Page 90
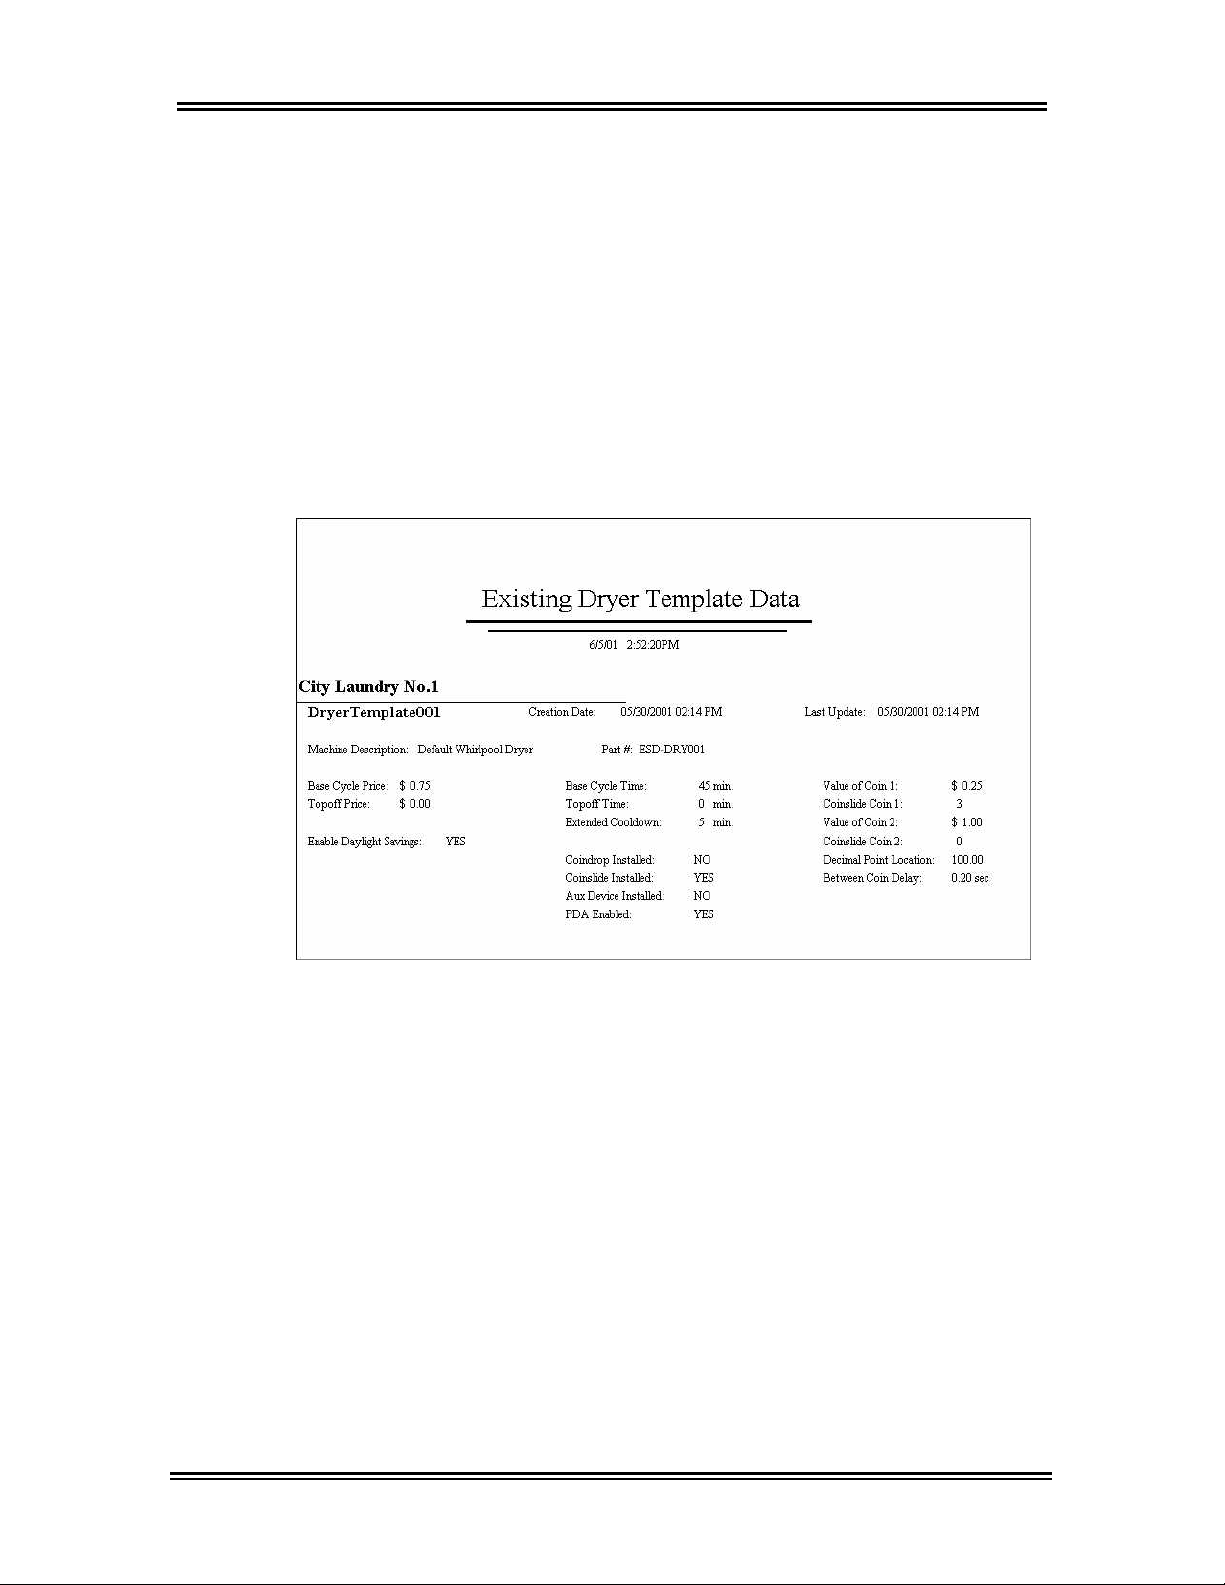
Report Types
Appendix
Below are examples of reports that can be generated
from each of the four categories of reports in the
Management Software.
Category: Setup Reports
• Existing Washer Templates
• Existing Dryer Templates
• Comprehensive Machine Listing
• Machines Deviating from Templates
81
Page 91
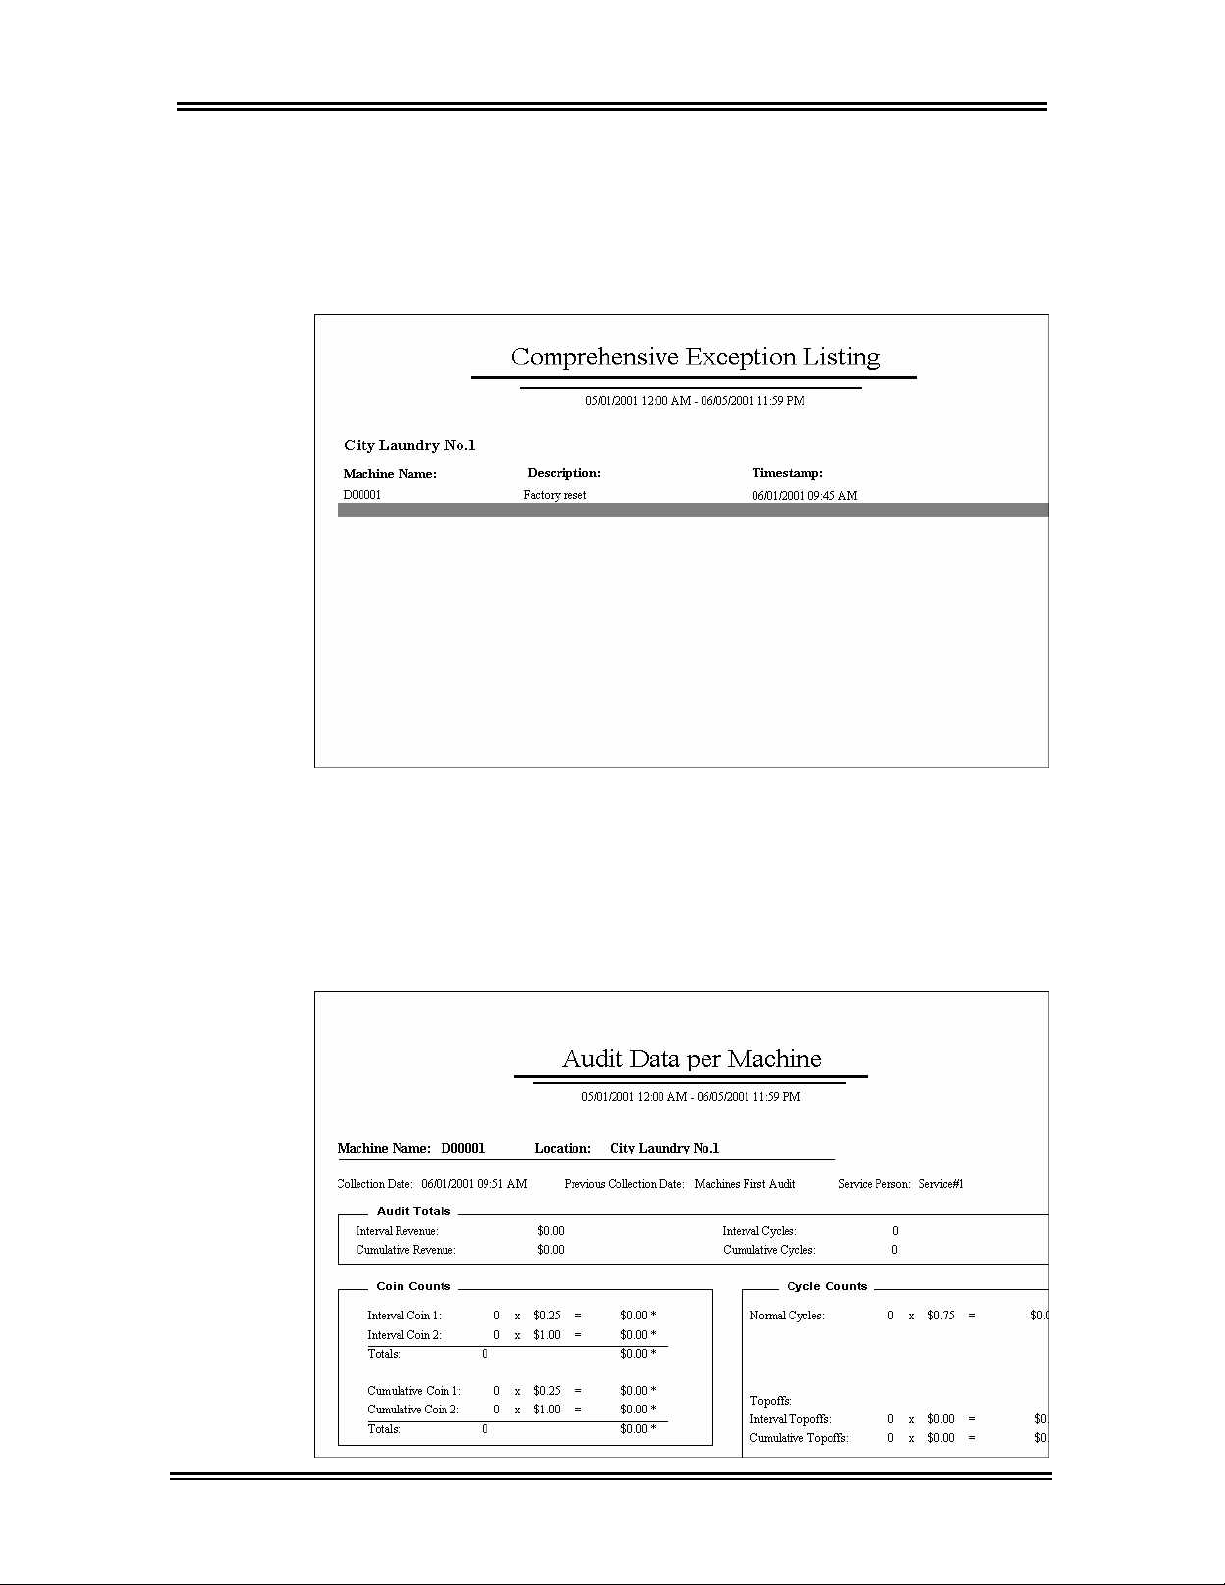
Appendix
Category: Exception Reports
• Comprehensive Exception List
• Exceptions per Machine
Category: Audit Reports
• Last Audit per Machine
• Audit Data per Machine
• Audit Data per Location
• Audit Cycle Histograms
• Audit Data per Service Person
82
Page 92
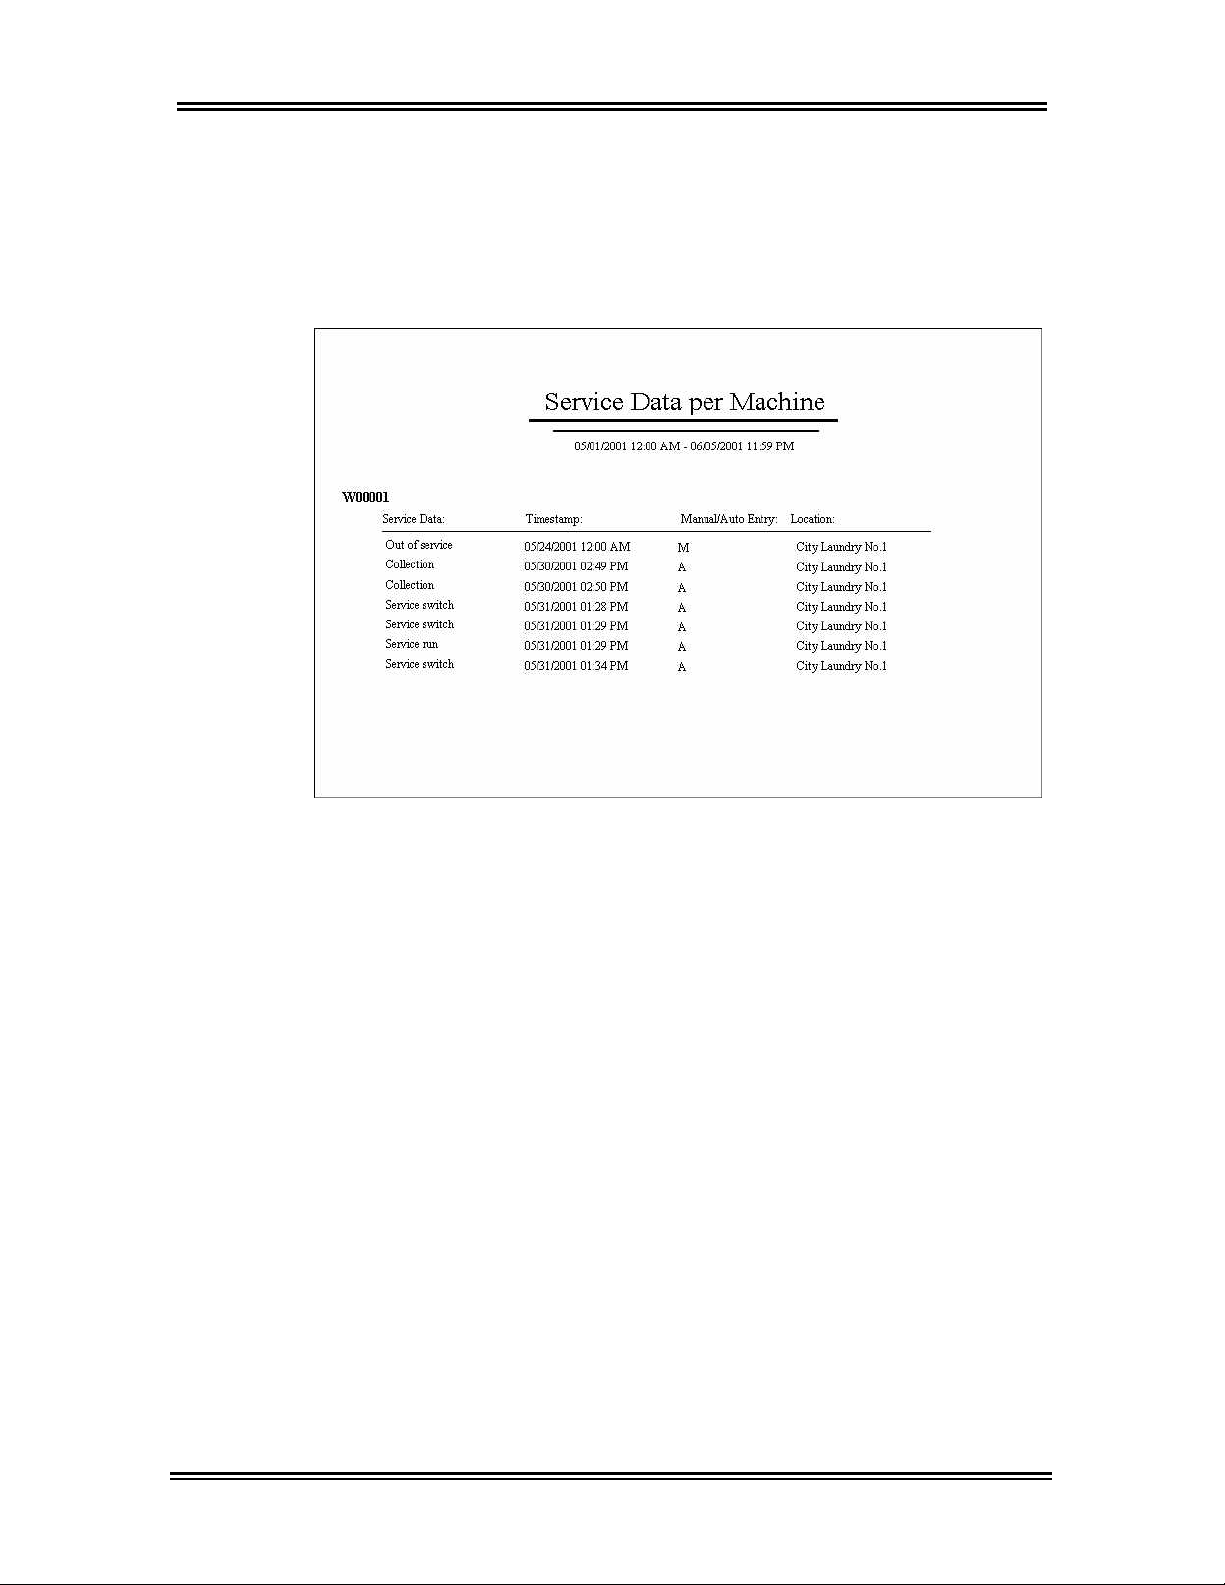
Appendix
Category: Service Data Reports
• Service Data per Machine
• Service Data per Location
83
Page 93

Appendix
Exporting Reports
Reports can be exported to the following file formats:
• Character-separated values
• Comma-separated values (CSV)
• Crystal Reports (RPT)
• Data Interchange Format (DIF)
• Excel 2.1 (XLS)
• Excel 3.0 (XLS)
• Excel 4.0 (XLS)
• Excel 5.0 (XLS)
• Excel 5.0 (XLS) (Extended)
• Excel 7.0 (XLS)
• Excel 7.0 (XLS) (Extended)
• Excel 8.0 (XLS)
• Excel 8.0 (XLS) (Extended)
• HTML 3.0 (Draft Standard)
• HTML 3.2 (Extended)
• HTML 3.2 (Standard)
• Lotus 1-2-3 (WK1)
• Lotus 1-2-3 (WK3)
• Lotus 1-2-3 (WKS)
• Paginated Text
• Record Style (columns of values)
• Rich Text Format
• Tab-separated text
• Tab-separated values
• Text
• Word for Windows document
84
Page 94

Appendix
NOTES
85
Page 95

Appendix
NOTES
86
Page 96

Troubleshooting Information
87
Page 97

Troubleshooting
If you experience problems with the software, consult this list for troubleshooting
tips.
Problem Solution
• Connection between PDA and laundry
machine fails.
• PDA appears to be locked up.
• PDA Sync with Management Software fails. • Check connection between PDA and cradle.
• Audit Problems button displays in Audit View. • The Audit Problem button displays when
• Check position (angle should be 90
degrees)and distance of PDA in relation to
infrared sensor on laundry machine.
• Make sure there isn’t any bright light
interfering with the infrared connection. Use
your hand to shade the sensor.
• Try returning to the “Home” menu and relaunch the Handheld Software.
• Press the Reset button on the back of the
PDA. Caution: Audit data may be lost when
a reset is done on the PDA.
• Check battery level, charge, or replace
battery if necessary.
there are inconsistencies in audit data. They
are generally caused by:
iAn audit that was collected from the
machine but never performed a HotSync
operation to the Management Software.
iA deleted audit.
iA damaged audit table due to a washer or
dryer malfunction.
®
• When trying to initialize a machine, Wrong
Access Password error displays.
• Receive Fatal Alert error while trying to
connect to machine.
• Errors occur during Management Software
installation.
• Palm™ handheld battery wears down quickly. • Palm™ handheld models III or IIIx should not
• Program Error messages occur during
software installation.
• Error displayed on machine. • Do not use $0.00 vend price for coin slides
• Off displayed on machine. • See Tech Sheet or Service Manual/Job Aid
• Handheld Software does not install on Palm™
handheld.
• Machine needs to be factory reset. See
Service Manual/Job Aid.
• May not have been close enough to the
machine. Reset the PDA and try again.
•
• Uninstall the software and then reinstall.
®
be left in cradle unless a HotSync
is being performed.
• Follow reinstall procedures in the Appendix
on pages 81 and 82.
or coin drops.
for Off code details.
• De-install the Management Software and
install software on PC in the following order:
1. Palm
2. Management Software
™
Software
operation
88
Page 98

Glossary
89
Page 99

Glossary
Access Control Password
to protect laundry machines from unauthorized
– Password used in conjunction with the Owner ID
PDA access.
Aux Device – SMART Card, network device, or other.
Coindrop – Coindrops have slots into which coins are deposited one at a time.
Coinslide – Coinslides hold coins on a sliding device that is pushed in to deposit
money into the machine.
Cradle – Device used to connect PC with PDA.
Cumulative Audit – Cycle and vend history tracked over the life of a machine.
DCOM95 – File that enables the Management Software to run on the Windows
®
95 operating system. DCOM95 must be installed on Windows
95 machines
®
before the Management Software is installed.
Download – Transfer of data from PC to PDA, or from PDA to laundry machine.
Exception – Any vend or cycle information that deviates from the norm, i.e., the
A/C power was turned off.
Graffiti
®
– Style of writing used to enter data into a PDA.
Handheld – Palm
™
device, or similar machine. Also referred to as a PDA, or a
Personal Digital Assistant.
Histogram – Chart that depicts number of cycles vended for a given time period.
HotSync
®
– Method of downloading or uploading data from the PC to the
PDA, or vice versa.
HotSync® Button – Button, located on the PDA’s cradle, that is pressed to
initiate a HotSync® procedure.
HotSync® Manager – Enables communication between PC and PDA. The
HotSync
®
Manager icon displays in the Windows® System Tray to verify that it is
running.
Infrared – Type of light beam used to transfer data between the PDA and
laundry machine.
Initialize – Method of setting up laundry machine so that it can be recognized by
the PDA.
90
Page 100

Glossary
Installation Directory
The default
installation directory is C:\Program Files\Advantech\Whirlpool
– Location on PC where Management Software resides.
Advantech.
Interval Audit – Cycle and vend history that is tracked from the time of the last
machine audit.
Management Password – Password used to access the Management Software.
Open-Access Mode
– Initial mode of the Handheld Software on the PDA. Offers
a limited number of utilities to be performed.
Owner ID – ID that is setup upon first entry into the Management Software. This
ID prevents unauthorized access to laundry machines by PDAs that are not
given access.
Palm™ Software – Software needed to be installed on the PC in order for
communication to take place between the PC and the PDA.
PC – Personal computer.
PDA – Personal Digital Assistant or handheld. Used in reference to a Palm
™
device or similar machine.
Reinitialization – Returns the machine to its original factory specifications.
Service Person ID – ID used to control access to Handheld Software.
Service Switch – See Service Tech Sheet or Service Manual/Job Aid for more
details.
Software Update Password – Password provided by Whirlpool Corporation to
be used when installing new control software on a laundry machine.
Stylus – Pen-like device, provided with Palm
information into the Palm
™
handheld.
™
handheld, to be used to enter
Synced Mode – Mode of the Handheld Software after it is initially downloaded
via the HotSync® process to the Management Software. All utilities are available
in this mode.
Upload – Transfer of data from laundry machine to Palm
™
handheld or Palm™
handheld to PC.
91
 Loading...