

Page 1
ADP 450
Page 2
Dear Cus tom er ,
Pleasecarefully readthismanualbeforeusingthe
dishwasher, it will help you to use and maintainthe
dishw ash er proper ly.
Keepit to referto it at a laterdate.
Passit onto anysubsequentowner of the applianc e.
This ma nua l c on tain s section s on safety Instruction s ,
Operating Instructions, Installation Instructions and
Troubles hooting Tip s, etc.
ControlPanel...................................................3
Dishw as h er Fe at u re s............ ... . ... .. .. . ... . ... .. . .. . ..3
A WaterSo ftener...... ...... ....... .. ....... ...... ..... ..4、 ..
B Loadi n g th e S al t intot he S oftener...... . ... .. . .. .. 5、
C Fill the Rinse Aid Dispenser..... ...... .. .. .. 5、 ..... ...
D Fun ctionof Detergent .........................6
、
........
Howto use the 3 in 1function............................8
Attentio n befor e or after loading the Dish wash er
Baskets. .........................................................9
Loadingthe upper ...............................9Basket
Loading the Lower ...............................10Basket
CutleryBasket........................................... ...11
To review the section on tro ubleshooting Tips
will helpyoutosolvesome common problems
byyourself .
Ifyo u can not solve the problems by you rself ,
please ask f or the help of profe ssional tec hnician s.
The m anufactu rer,follo wing a policy of constant
development and updati ng of the product, may
make modifications witho ut giving prior notice .
WashCycleTable.................................. ......... 12
Turning on theAppliance................................13
Changethe Programme.............. ................13....
At the End of the Wash Cycle...........................13
FilteringSystem................ ......... ....................14
Caring forthe Dishwasher..................... .........15.
Positioning the Appliance................... ..........16..
About P o wer C onne c ti on..... ..... . .. ... .... .... . ..... . 16.
Water Connection.......... ...................... .. .......17.
Startof dishwasher................................ ... ...18..
Beforecallingfor service. ....... ................... .....19.
Technicalinformation....... ....................... .....21..
Page 3
When usin g your dishw as he r, follow the precaut i ons listed b el ow:
This appliance must be grounded. In the event of a
malfunction or breakdown, grounding will reduce
the risk of anelectric shock by providing a path of
least resistance of electric current. This appliance
is equipped with a cord having an equipmentgrounding conductor and a grounding plug.
The plug must be plugged into an appropriate outlet
that is installed and grounded in accordance with
all local codes and ordinances.
Do not abuse, sit on, or stand on the door or dish
rack of the dishwasher.
Do not operate your dishwasher unless all
enclosure panels are properly in place. Open
the door very carefully if the dishwasher is
operating, there is a risk of water squirting out.
Do not place any heavy objects the
door when it is open. The appliance could tip
forward.
When lo ad ing i tem s to b e wa sh e d:
1) L ocate sharp items so that theyare notlikely
todamage the doorseal;
2 Warning: Knives and other ute nsils with
)
sh a rp poin ts mu st be loade d i n the basket
with their poi nts d own or placed in a
horizontal position.
When using your dishwasher, you should
prevent plastic items fro m coming into contac t
with the heating element .(This instru ction is only
applicable to machines with a visual h eating
element.)
Check thatthedetergentcomparment is empty
after completio no f the wash cycle.
Do not wash plastic items unless they are marked
dishwasher safe or the equivalent. For plastic items
n
ot so marked, check the manufacturer's
recommendations.
Use o nly deterge nt and rins e additives
designed for an automatic dishwash er.
Never use soap, laun dry de tergent, or hand
washing detergent inyour dishwash er.Keep
these products out ofth e reach of children.
on or stand on
Improper connection of the equipment-grounding
conductor can result in the risk of an electric shock.
Check with a qualified electrician or service
representative if you are in doubt whether the
appliance is properly grounded. Do not modify the
plug provided with the appliance; If it does not fit
the outlet. Have a proper outlet installed by a
qualified electrician.
Keep children away from detergent and rinse aid, keep
child awayfromthe open door of the dishwasher,
ren
there could still be some detergent left inside.
This appliance is not intended for use by persons
(including children with reduced physical, sensory or
mental capabilities, or lack of experience and
knowledge ,unless they have been given supervision
or instruction concerning use of the appliance by a
person responsible for their safety.
Children should besupervised to ensure that they do
not play with the appliance.
Dishwasher detergents are strongly alkaline,they
can be ext re me ly dangerous i f swa llow e d.Avoi d
contact with skin and eyes and keep children away
from the dishw asher when t he door is open.
The door sh ould not be left o pen,
since th is could increase the risk oftrippi ng.
If the s upply cord is dam aged, it must be replaced
by the m anufact urer or its service agent ora
similar ly qual ifi e d person i n orde r to av oid a
hazard.
Remove the door to the washingcompartmentwhen
removing an old dishwasher from service or discarding it.
Please dispose of packing m aterials properl y.
Use the dishwasher only for its intended function.
During installation, thepower supplymust not
beexcessivelyordangerouslybentor flattened.
Do not tamper with controls.
The app liance is to be connected to the water
mainsu sing newhose setsandthatoldhose-sets
sho ul d not be reused.
Themaximum number of place s ettingsto be
washed is 9 .
Themaximum permissibleinlet waterpressureis
1Mp a .
Theminimum permissible inletwaterpressureis
0.04Mpa.
)
1
Page 4
Dispose of the dishwas her packaging mater ial correctly.
All packaging mate rials can be recy cled.
Plastic parts ar em arked with th e s tandard int ernational a bbreviations:
PE for polyethylen e, e .g. sheet wrappingm aterial
PS forpolystyrene,e.g.padding m aterial
POM po lyoxymethyle ne, e.g. plastic clips
PP polypropylene , e.g. Salt filler
ABS Acrylonitri le Butadiene Sty rene, e.g . Control Panel .
WARNING!
Packagingmaterialcould be dangerousforchildren!
For disposing of pa ckage and th e a ppliance please go to arecyc ling centre. Therefor e cut
offthepower s upply cableandmakethedoor closing deviceunusable.
Cardboardpackagingismanufactured fromrecycledpaper and should be disposedin the
waste paper collec tion for recyc ling.
By ensuring this produ ct is disposed of corr ectly,you will hel p prevent potent ialn egati ve
consequences f or the environment a nd human health, which cou ld o therw ise be caused
byinappropriate wastehandlingofthisproduct.
For more detail ed informatio n a bout rec ycling of this prod uct, please con tact your loca l
city office and your househo ld w aste dispos al service.
DISPOSAL: Do not dispose th is product as unsorte d m unicipal waste . Collection of such
waste separately for spec ial treatment is n ecessary.
2
Page 5
To get the bestperformance fromy ourdi shwasher,r ead all operatinginstructions
beforeusing it for the firsttime.
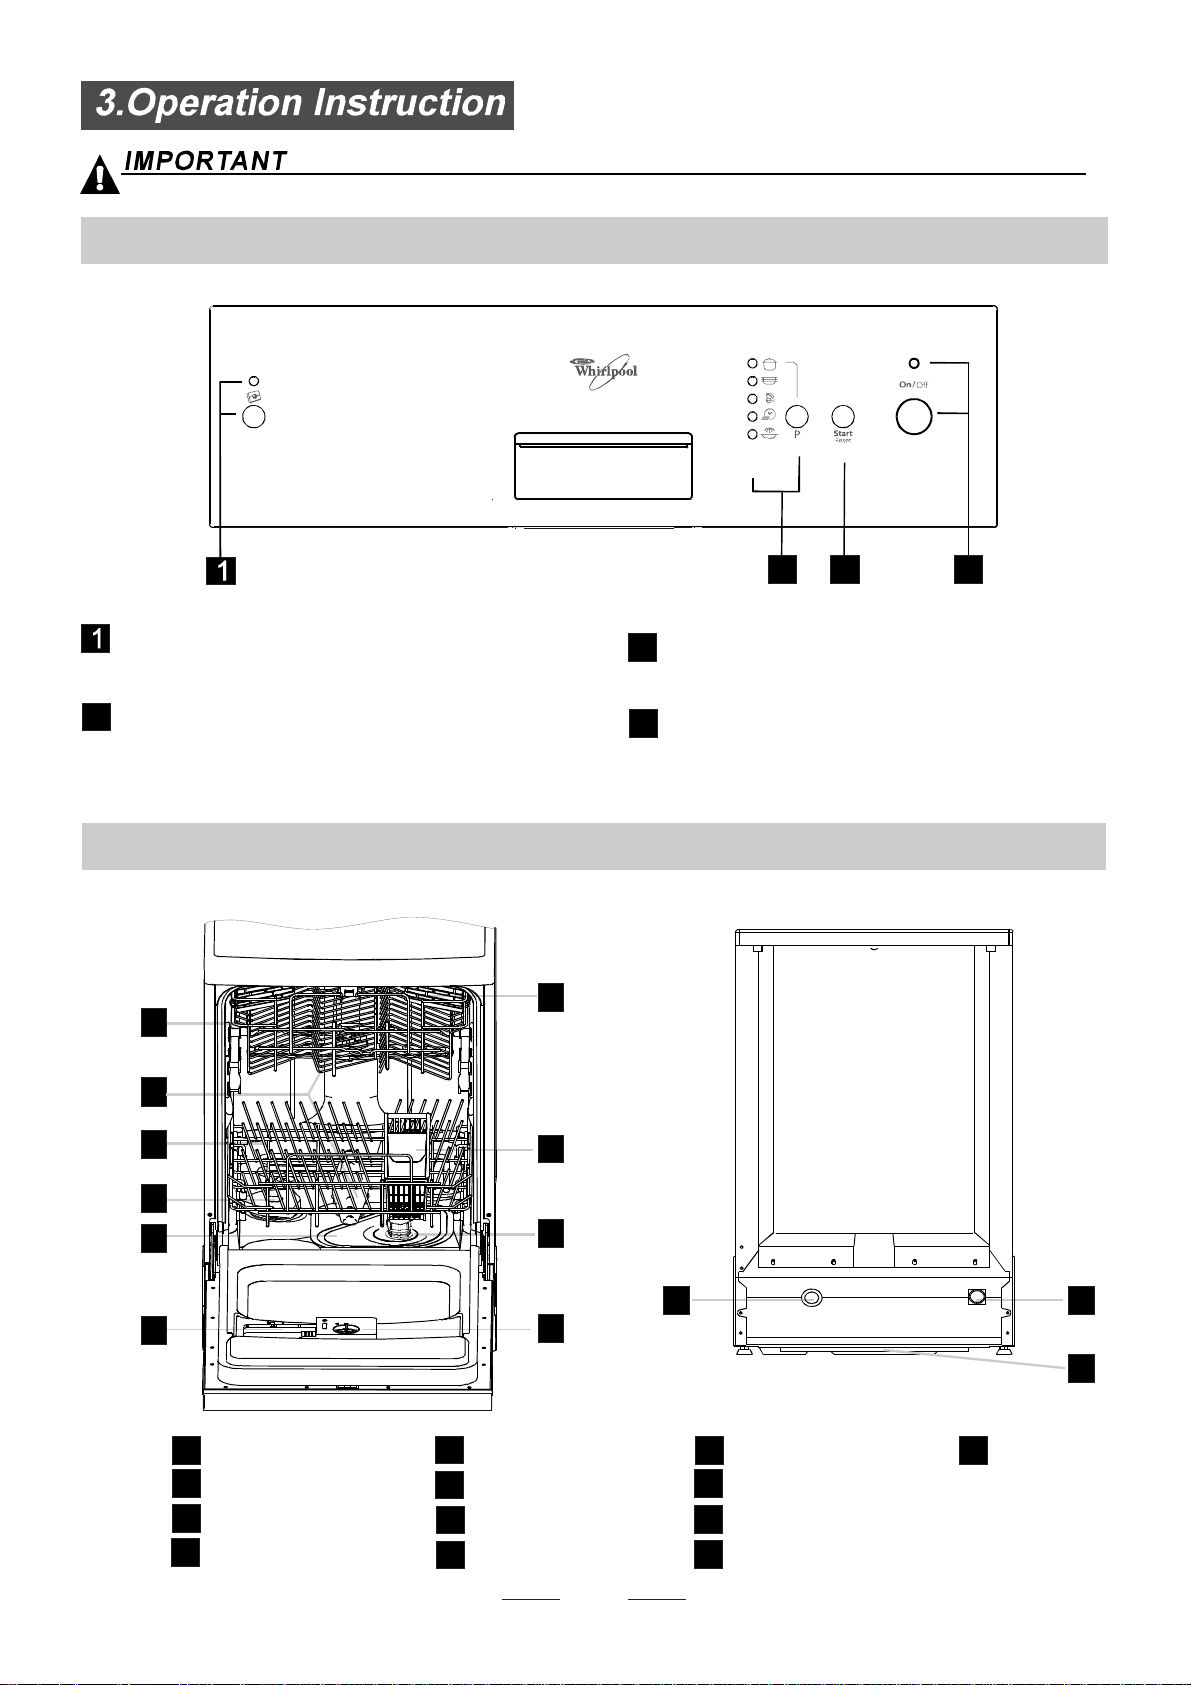
Control Panel
3in1 indicator light / 3in1
function button: Toselect an d sh ow 3in1 .
Program indica tor lights and button: Tos elect
2
one of the seven a nd s how the washing progr am.
Dishwasher Feat ures
Front view
1
2
3
2
Start and r eset b u tton: Tostart the selected washing
3
program or r e set t he w ashing program when th e
machine is worki n g.
Power indicator lightand switch:To turn on/off
4
and show the power supply.
3
Back View
4
7
8
4
5
9
11 12
6
10
13
on
Off
Upper B ask e t
1
Spray Arms
2
Lower Bask et
3
Salt C ontainer
4
MainFilter
5
Detergent Dispense r
6
CupShelf
7
CutleryBasket
8
Coarse Filter
9
Rins e Aid Dispens e r
10
Drainpipe connector
11
Inlet pipe connector
12
3
13
Tray ass
Page 6
Before u sing your dishwashe r for the first time:
A. Set the wate r softener
B. Pour 1 2 litre o f water inside the sal t co ntainer and then fil l with dishwash er salt
/
C. Fil l the rins e aid dispen ser
D. Fill indetergent
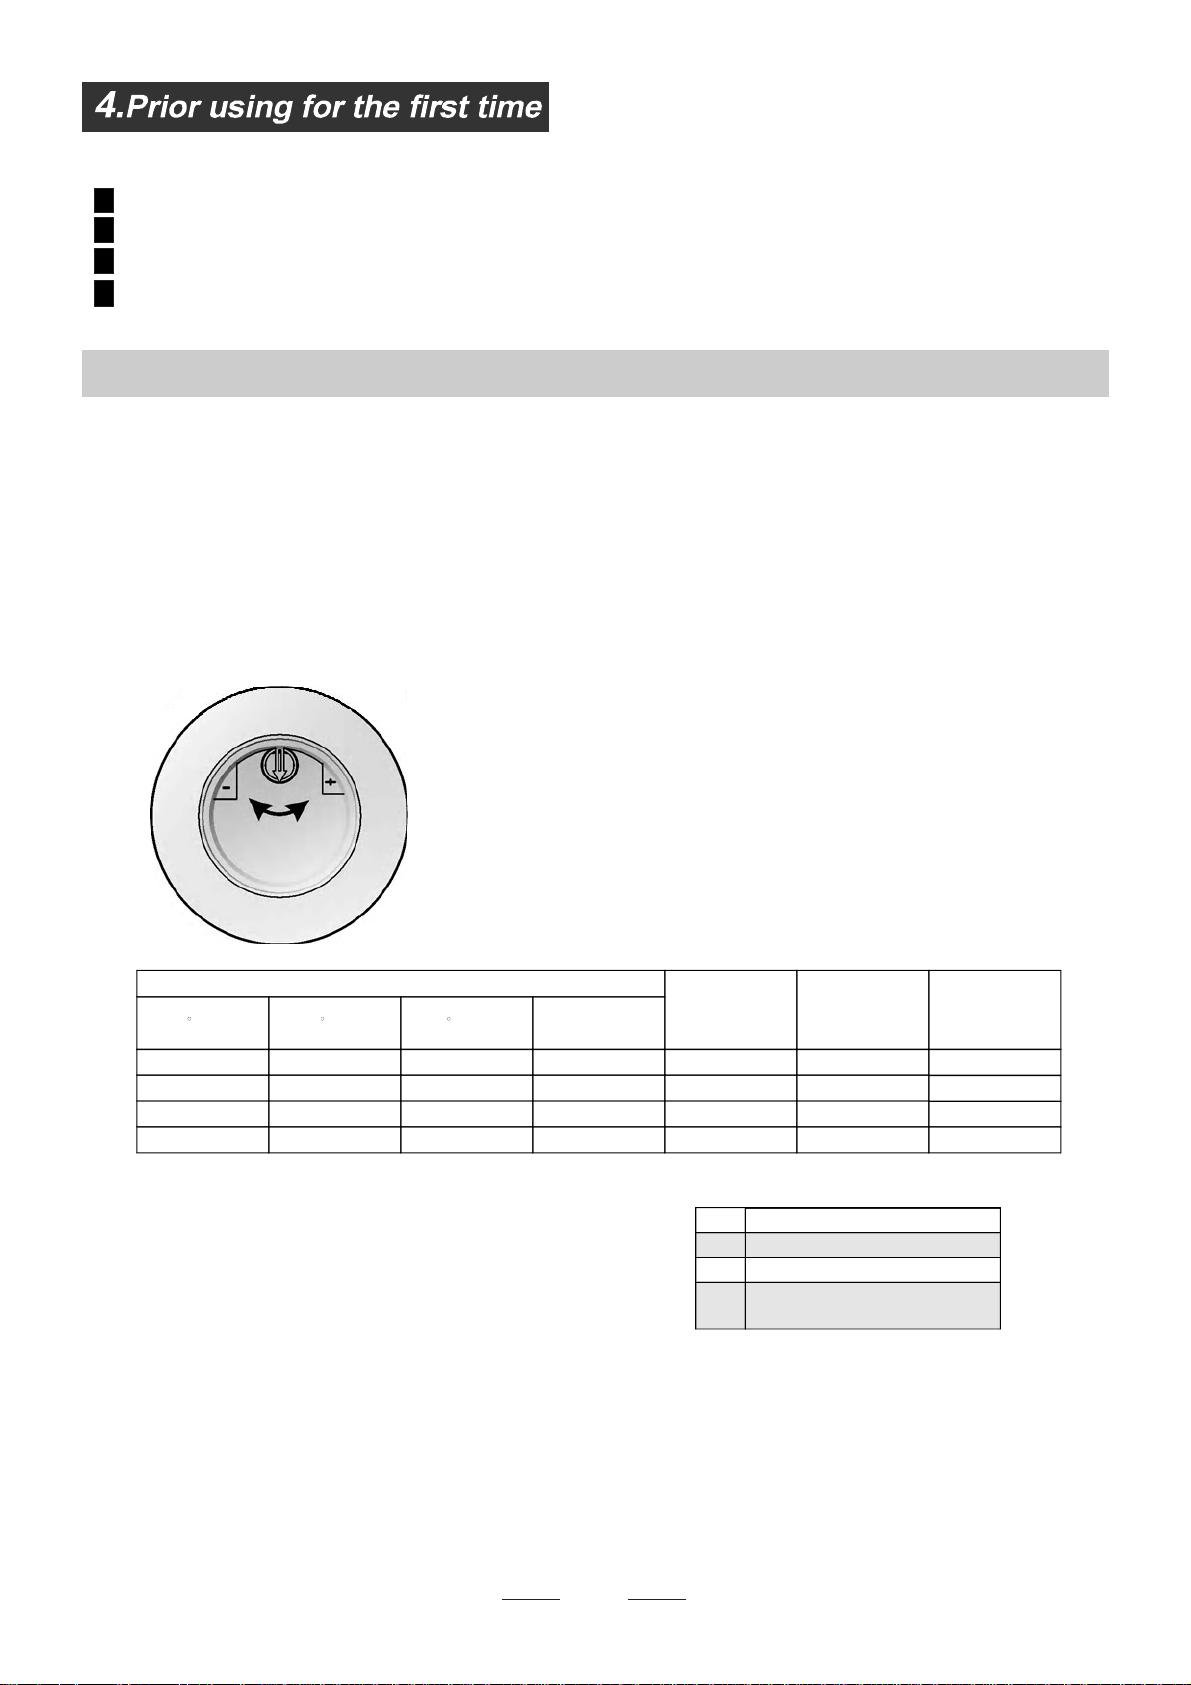
A. Water Softener
The water so ftener must beset manu ally, usin g the w ater hard ness dial.
The wat er softener is design ed to remove mineral s and salts from the water, w hich would have
a de trimental or adverse effect on the ope ration of the app liance. The h igher the
content of th ese minerals an d sa lts, the harde r your water is. The softener shou ld be
adjusted acco rding t o the ha rdness o f t he water in you r ar ea. Yourlocal WaterA uthority
can advise youonthe hardness o fthewater in your area.
Adjust ing Sa lt Cons umption
The dishwasher is designed to all ow for adjustment i n the amount of sa lt consumed bas ed on t he ha rdness of
the waterused. Thisisintended to optimise andcustomisethelevelo f saltconsumption.
Pleas e fol low thest eps below for a djus tmen t in salt consum ption .
1. Unscrew thecapfrom the salt container.
2. There is a r ing on the con tainer with an arrow o n it (see figure
onthe side),ifnecessary, rotate theringinthe anticlockwise
direction from the "-" Settingtoward the "+" s ign, based on the
hardness o f the water be ing used.
It is recommended t hat a djustme nts should be made in
accord ance wit h the f ollowin g sc hem e:
WATER HARDNESS
dH
45~60 80~107 56~75 8~11
Note:1
°
dH=1.25 Clarke=1.78 fH=0.178mmol/l
DH: German degree
°
fH: Frenchdegree
°
Clark: Britishdegree
°
fH
0~140~8 0~1.4
14~398~22 1.4~3.9 - 20 50
39~8022~45 3.9~8 Mid 40 25
°°
Clarke
0~10
10~28
28~56
mmol/l
Selector Position
/
+
Note:2
""/
"-"
"+"
"Mid"
Salt consumption
(gram/cycle)
No sa lt need added
Settingtowardthe"-"sign
Settingtowardthe"+"sign
Settingtowardbetween
the "-" sign and "+" sign
Contact your local water bo ard for information on the har dness of your water suppl y.
Auto nomy
(cycles/1kgs)
0
60 16
/
4
Page 7
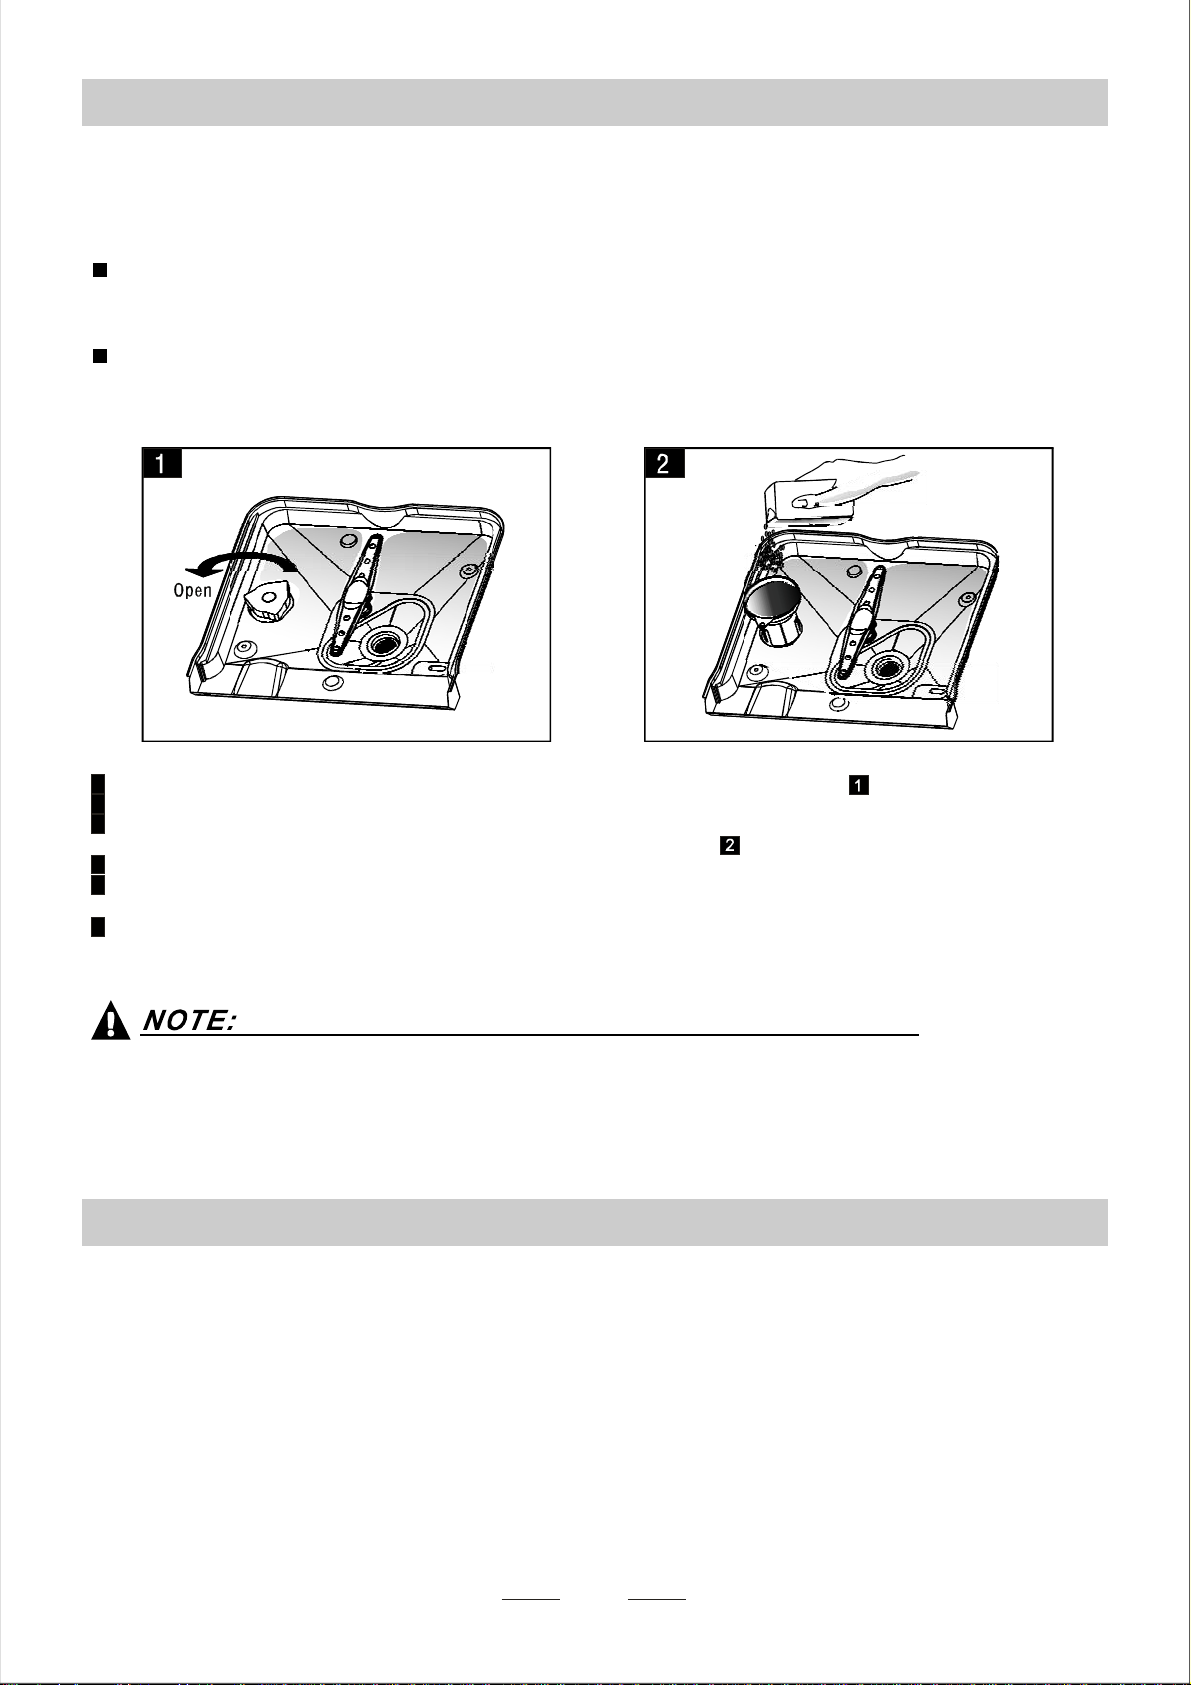
B. Loadi ng the Sal t I nto the Sof tener
Always use the salt intende d for use with dishw asher.
The salt c ont ainer is locat ed beneath the l ower basket and sh ould be filled as e xplained in the
follow ing:
Attention!
Only use salt spe cifi cally designed for the use i ndi shwashers! Every othertype of
salt n ot specif ically designed fo r the u se in a dishwas her, espe cially table salt,will
damage the water softener. I n case of da mages caused b y the use of unsuitable
salt t he manufact urer does not give any wa rranty nor is li able for any damage s caused.
Only fill wi th salt just b efore starting one o f theco mplete wa shing p ro grams.
This will prevent any grai ns of s a lt or sa lty wate r,whi ch may have been spill ed,
remaining on the bottom of the machine for anype riod of time, which may cau se
corrosi on.
A Removethe lower basket andthenunscrew andremovethecapfromthe saltcontainer.
B Before thefirstwash, fill1lt.of water in the salt container of your machine.
C Place the e nd of the fun nel (supp lied) into the ho le and introd uce abou t 1kg of salt .
normal fo r a smal l am o unt of water to com e ou t of the sal t co n taine r.Itis
D Af ter filli ng the cont ainer , screw the c ap tigh tly back clo ckwise.
E Usually,the salt warni ng light wi ll stop being illuminat ed with in 2-6 days af ter the salt co ntain er has been filled wit h
salt.
F Immediately after f illing t he salt into th e salt cont ainer, a w ashing pr ogram should be started (We suggest touse t he
soak orrapidprogram). Otherwise the filter system, pumpor otherimportantpartsof themachine may bedamaged
bysalty water.This is outof warranty.
1.The salt con tainer must only be refilled w hen the salt wa rning light in the contr ol panel comes on.
Depending on how well the salt dissolves, the salt warnin g light may still be on even tho ugh the
salt container is filled.
If there is n o salt warning light in the con trol panel (fo r so me Mode ls),you can estimate when to f ill
the s alt into the softene r by the cycles that the di shwasher has run.
2. If there are spills of the salt, a soak or a rapid program shoul d be run to remove the excessive sa lt.
C. Fill the Rins eAid Dispens er
RinseAid Dispenser
The r i nse aid i s releas ed d uring the final rinse to prevent water f rom f orming droplets o n y o ur dish es, whic h can l eave
spots and s treaks. It also improve sd rying by allowing water to rolloff the dishes. Your di shwasher is designed to
usel iquid rinse aids. The rinse aid dispenser is located inside the do or next to t he detergent di spenser.To fill the
dispenser, openthecapand pour the rinse aidintothe dispenser untilthelevelindicator turnscompletelyblack.
Thevol ume of the rins eaid container is about110ml.
Function of R inseAid
Rinse ai d is aut omat ically added d uring the last ri nse, ensuring thorough rinsing, and spo t an d st reak free dryi ng.
Attention!
Only usebranded rinse aidfordishwasher. Neverfill the rinse aiddispenserwithanyother substances
(e.g. Dishwasher cleaning agent, liquid deterge nt). This would damag e the app liance.
5
Page 8

Whento Refill the R inse A idDispenser
Ifth ere is no rinse-aid warning ligh t in the c ont rol panel, you can est imate the amount from the colo ur
ofth e optical level indi cator C located next to the cap. When the rins e-aid contai ner is fu ll, the wh ole
indicator will be dark .As the rinse -aid diminishes, th es ize of the dark dot decreases. Youshould neve r let
the rins e aid level fall 1 / 4 full.
Asth e rinse aid dimin ishes, the size o f the black dot
onthe rinse aidlevel indicatorchanges, as illustrated below.
Full
3/4full
1/2full
1/ 4 full- Shouldrefill to eliminatespotting
Empty
""
C (R ins e- Ai d i n d ic ato r)
6
To op en the di spen ser, t urn the cap to the "o pen" ( left ) arrow an d l ift it o ut.
1
Pour the ri nse ai d int o the dis pen ser, being car eful not to overfi ll .
2
Replace the cap by inserting i t a ligned with " open" arrow and turning it to the closed (righ t) arrow.
3
Cl ean u p any rins e aid spi lled while dur in g fi ll i ng w ith a n abs o r bent cl oth t o avoi d excessive foaming
during the next wash. Don 't forget to re place t he cap be fore you close dis hwasher door.
Adjusti ng RinseA id Disp enser
Adjust lever
(Rinse)
Increasethedose if there aredropsofwater or lime spotson thedishes after washing.
Reduce it ifthereare stickywhitis h stainson yourdishes o ra bluishfilmon glasswareo r
knifeblades.
The rinse aid dispe nser has six or four s ettings. Always start wi th the dispens er
set o n "4". If spots andpoor drying are a p roblem, incre ase the amoun t of r i nse
aid d ispensed by removing the d ispe nser lid and rotat ing the dial to "5" . If the
dishes still are not dryi ng prope rly o r are show sp ots, adjust the di al to the next
higher lever until your dishes a re spot-fr ee. The recommend ed setting is "4".
(Factoryvalue is "4".)
NOTE:
D. Funct ion of D etergent
Detergents wi th its chemic al ingredie nts ar e necessary to rem ove dirt, c rush dirt an d transport it ou t of the di shwasher.
Mosto f the commerci alqualityd eterge ntsare suitable fo rthisp urpose.
Detergents
The re are 3 sort s of det e rgents
1.Withphosphate andwithchlorine
2.Withphosphate and without c hlorine
3.Withoutphosphate and with out chlorine
6
Page 9

Normally ne w pulver ised detergent is without phos phate. Thus the water soften er function of
phosphate is not gi ve n. In th is c a se we recommen d to f i l l sal t in th e salt co nta i n er even whe n
the h ardness of water is only 6 dH. If dete rgents witho ut phosphate are used in the case of hard wat er
often white s pots app ear on d ishe s a nd glasses. In this cas e please add more d etergent to reach
better results. D ete r gents with o ut chlorin e do only bleach a lit tle. Str o ng a nd colou red spots will not
bere moved complete ly.In this case p lease choose a program with a hi gher temperature .
°
Concentr ated Det ergent
Based on their chemicalcomposition, detergents canbe splitintwobasictypes:
conventional, alkalinedetergents withcaustic components
lo w a lk al i ne conc entra t ed det erge nt s wit h natura l enzy mes
The use of normal washingprograms incombination withconcentrated detergents
reduces pollution and is g ood for your dishes; these was h program s ar e specific ally matche d
toth e di rt-di ssol ving propert ies o f the enz yme s of the concent rated de terg ent. For this reas on
“”
normal wash programs in which concentrated detergentsareusedcanachievethe same
resultsthat c ano therwiseonly be achieved using intensive programs.
“”
“”
DetergentTablets
Detergent tablets of different brandsdissolve atdifferent speeds. Forthisreason some
detergent tablets cannot dissolve and dev elop their full cleaning power dur ing short
programs. T here fore please use long program s when usin g d eterg ent t ablet s, t o
ens ure the complete rem oval of d e tergent residu al s.
Detergent Dispenser
The disp enser must be refille d before the start of each wash cy cle f ollowing the i nstructions
provided i n the w ash cycle t able . You r dishwa sher uses less detergent and rins e aid than
Conventional dishwasher. Generally, onlyone tablespoon of detergent isneeded for
anormal washload. Moreheavilysoiled itemsneedmore detergent. Always addthe
detergen t jus t be fore star ting the dish was her, otherwis e it could g e t damp and w ill n ot
dissol v e proper ly.
AmountofDetergentto Use
If the l id is closed: press rele ase button. T he lid wi ll spring open.
Always a dd the detergent just b efore starting each wash cycle.
Only usebranded detergentaid for dishwasher.
WARNING!
Proper U se of Deterg ent
Use o nly deterge nt s pecif ically made for the us e i n dishwas hers. Keep your det ergent fresh and dry.
Don't putpowdered d etergentintothe dispenseruntil you're readytowashdishes.
Dishwasher detergent i s corrosive! Take care to keep it out ofreach of childr en.
7
Page 10

Fill in Detergent
Fillt he detergent disp enser with deter gent.
The mar k ing indi c ates the do s ing l eve ls , as
illus t ra ted on t he right:
The p lace of main wash cycle detergent placed ,
A
MIN means approxim ately 20g of detergen t.
“”
The p lace of pre-wash cycle det ergent placed ,
B
approximately 5g of detergen t
Pleaseo bserve the manufa cturers dosing and storage
Recommendations as stated onthedetergentpackaging.
Closethe lid and press untilit locks in place.
If th e dishes are he avil y soi l ed , pla c e an a d dit i o nal
detergent dose i n the pre- wash detergent chamber.This detergen t will take effect during the pre-wa sh phase.
Youf ind informatio n about the amo unt o f deterg ent for the single program me on the last p age.
Please aware, tha t according to the lev el so iling and the specific hardness of wat er d ifference s a re possibl e.
Please observe themanufacturer'srecommendationsonthedetergentpackaging.
How To Use The 3IN1 Function
Your dishwas her has a 3in1 functio nw hich needs no sal t a nd rinse aid bu t a 3In1 t ablet.
This dishwasher comes w ith a 3in1 tablet cont ainer as an a ccessory.
Only the 3in1 fun ction(f or the program: in t ensi ve/Norm al/ Eco.) Can be used wit h 3in 1 ta blets.
If you use 3in1 tablets in other pro grams, the appliance wil l not achieve a go od p erformance.
1.Thefigure below showshow to hangthe 3in1tablet containeron the upperbasket.
2. Rotate the up per s pray er an d change the location o f the conta iner to ensure the uppersp rayer is not
obstructed by the3in 1 tablet container. R efer tothe figure below forreference.
3.Put the3in1 tabletintothecontainer ,then startthe 3in1program.
When using 3in1 combination / co mpact Detergent s ,please pay atten tion to make sure that
the size of the combination deterg ents fits to the dispe nser so that combinati on
detergents can be easily p ut into the dispenser, and the d ispenser wou ld not be broken.
,
869
Page 11

For b est pe rforma nce of t h e dishwashe r,fo llow these lo ading gu ideline s. Features an d
appearance of baskets and cutlery basket s may va ry from your mod el.
Attention before or after Loadingthe Dishwash erBaskets
Scrape off any large am ounts of le ftover foo d. Soften r emnants of bur nt food in p ans.
It is n ot necess ary to rins e the dishes un der running wa ter.
Place objects in the di shwasher in f ollowing wa y:
1.Itemssu ch as cups, glass es, pots/ pans, etc. a re faced downw ards.
2.Curved i tems, or ones with r ecesses, sho uld be loaded as lant so that water can r un off.
3.Allutensils arestacked securely andcannottipover.
4.Alluten sils are plac ed in the wa y that the spray ar ms can rota te freely d uring wash ing.
Verysmall ite ms should no t be washed in the di shwasher a s they could easi ly fall out of th e b aske ts.
Loading the Upper Rack
The upp e r r ack is des i g n ed to hold more delicate and li ghte r dishware such as glas ses , coffee
and tea c up and saucers, as well as pl ates, small bowls and sha llow pans (as long as they are
not t oo dirty).
Position the dishes and cookware so that they do not g et m oved by the spray of wate r.
Bowl M Bowl L() ()
Glasses
Front
Dessert plate
(Egg)
Cups
Gravy ladle
Saucers
Adjustingthe UpperBasket
The hei ght of the upper basket can be adjuste d in order to creat e more space for lar ge utensi ls
both for theupper/lowerbasket. The height of the upperbasket can be adjusted byplacing the
wheels on different heigh t of the rail s. Long items , serving cu tlery, salad se rver s a nd knives
should be placed on the shel f so t hat t hey do not o bstruct the rota tion of the spr ay arms.
The s helf can be fold ed back or be remove d when not requ ired for use.
Upper wheels
Lower wheels
Page 12

Loadingthe Lower Basket
Werecommendthat you p lace large itemswhich are mostdifficultto clean intothelowerbasket:
pots, pans, lids,serving dishes andbowls, asshown in thefigure to the right.
It is preferabl e to place serving dis hes and lids onthe side o f the racks in order to avoid b locking
therotationofthetopsprayarm.
Pots, serving bowls, etc.mustalways beplacedtop down.
Deep pots should be slante d t o allow water to fl ow o ut.
The b ottom b asket feature fold down tin e ro ws so that larger ormore pot s andpa ns can be loaded .
1. Cutlery basket
2. Dessert plates
3. Soup plates
4. Dinner plates
5. Oval platter
6. Saucer
10
Page 13

Cutlery Basket
Cutlery should be place d in the cutler y b asket with th e handles at t he bottom. If the rack ha s side baske ts, the
spoons should be loade d separat ely into the ap propri ate slots , especiall y long utensi ls should be pl aced in t he
horizontal posi tion at the fron t of the uppe r basket as s hown in the pict ure.
3553
1551
3553
3553
1561
3213
3244
1244
2244
2214
1214
7274
For washi ng in th e d ishw ashe r the following cut ler y/dishes
1 2 3456 7
1. Tea spoons
2. Dessert spoons
3. Soup spoons
4. Forks
5. Knives
6. Serving forks
7. Serving spoons
Do not leave any item ex tend through bot tom .
Knivesand otherutensilswithsharp points
mustbe loaded in th e basket with the ir points
down or plac ed i n an hor izon tal po sit ion.
Always load sh arp utensils w ith the shar p
point down!
Arenot suitable
Cutlery with wood en, horn chi na or
mother-of-pe arl handl es
Are of limitedsuitability
Somety pes of g lasses can become
dull after a largenumberof washes
Plastic items that a re not heat re sistan t
Older cutlery w ith glued p arts that are not
temperature resistant
Sil ver and alu mi nu m parts have a
tendency to discolou r during was hing
Bonded cutlery itemsor dishes
Pewter or cooper i tems
Crystalglass
Glaze d patt ern s m a y f ad e i f machin e
washe d fr equen t ly
Steel items subject to r usting
Woodenplatters
Itemsmade from synthetic fibres
NOTE:
Do n ot put in items that are d irty of c igaret te ash, candle w ax, l acq uer or paint .
If you buy new dishes pl ease make sur e that they are su itable for dis hwashers .
NOTE:
Pl eas e do not ove r lo ad you r di s hwa she r. T h er e is only spac e for 9 st an dar d dishes. Do n o t
use dish that isnot sui table for dis hwashers . T his is im portant for go od result s and for
reasonable e nerg yconsu me.
Loadingcutlery and dishes
Before lo ading the dis hes, you sho uld:
Remove largeleft-over
Soften re mnants of bu rnt food in pa ns
Whenloading the dishes and cutlery, pleasenote:
Dishesand cutlery mustnotimpedethe rotationofthe spray arms
Load holl ow items suc h as cups, glass es, pans etc . with the ope ning downw ards so that
water cannot collectin the container or a deep b ase
Itisdangerousto open thedoorwhenwashing,because the hot w ater maybe scaldedtoyou.Thedoor shouldnot be
leftintheopenpositionsincethiscouldpresentatrippinghazard.
11
Page 14

Wash Cy cle Table
()
Meaning: needto fill rinse into theRinse-Aid Dispenser.
*En50242: Thisprogram isthe test c ycle,the rinse-aid dispenser
setti ng i s re comm e nded to b e set to posi t io n 6 .
Int en siv e
Daily
EN 50242
Eco.
Express
Pre -wash
Forthe heaviest soiledloads,
such as pots, pans, cas serole
dishes and dishes that h ave
been sitting withdriedfood
on them fora while.
For normally soil ed loads ,
such as , plates,glasses
and lightly soiled pans.
Standard dai ly cycl e.
Forlightlysoiledloads,such
as plates, glasses,bowls and
lightly so iled pan s.
Asho rter wash f or lightl y
soiled l oads that do not
need drying.
pots
To rinse dishesthatyou
plan to wa sh la ter th at d ay.
Pre -wash 50
Pre
Wash (60 )
Rinse
Rinse
Rinse(70 )
Drying
Pre-wash
Wash (50 )
Rinse (60 )
Drying
Pre-was h
Wash (45 )
Rinse(60 )
Drying
Wash (4 0 )
Rinse(45 )
()
-wash
℃
℃
℃
℃
℃
℃
℃
℃
Pre-w ash
℃
5/22g
5/22g
22g
15g15g
173
171
111
28
11
1.4
0.81
0.7
0.35
0.01
18.4
13.0
11.0
7.0
6.0
+
Int en s i ve
+
3in1
+
Daily
+
3in1
+
Eco.
+
3in1
For the h e avie st soiled l oads ,
such aspots, pans, casserole
dishes anddishesthathave
beensitting with driedfood
onthem f ora while.
Fornormallysoiledl oads,
suchas ,p lates, glasses
andlightlysoiled pans.
standarddaily cycle.
For lightlysoiledloads,such
as plates,g lasses,b owls and
lightly soiled pans.
pots
Pre-wa sh 60
Wash(70 )
Rinse
Rinse
Rinse(70 )
Drying
Pre-wa sh
Wash(50 )
Rinse(70 )
Drying
Pre-wash
Wash (45 )
Rinse(70 )
Drying
(
℃
℃
℃
℃
℃
℃
℃)
12
3in1
3in1
3in1
161
148
128
1.5
1.0
0.8
15.1
12.7
12.7
Page 15

Turning On theAppliance
Starting a cycle wash
1 D raw out the lowe r an d upper b asket, load the dishes and pu sh them back.
It iscommendedtoloadthelowerbasketfirst,thentheupperone(seethe sectionentitled
Loadin g the Di s hwashe r ).
“”
2 P ou r in the dete r gent (see th e secti on entit l e d Sal t, D ete r gen t and RinseAid ) .
3 I nsert the plu g into the socket. The pow er s uppl y i s 220- 240 VAC/50 HZ, the spec ification of th e
socket is 10A 25 0VAC. M ake sure that the water supply is turne d on to fu ll pressure.
4 Close the d oo r, pres s the ON/ OFF button , and the ON/ OFF light w ill tur n on. Press t h e progr a m
button to select a desired wash cycle, A fter 3 seconds, the machine will work.
“”
Change t he Progr am...
Premise:
1 Acycl e that is underwa y can only be modified ifit ha s only been running for a short
time. Otherwis e, the deterg ent may have alread y been relea sed, and th e a pplian ce may
have alread y drained the wash wate r. If this is th e case, the detergen t dispenser must
be refilled (se e the sect ion entit led " Loading th eD etergent " ).
2 When you press the star t/reset butto n more than 3 sec onds, you can cance l the running
programmeand select otherprogrammes(see the section entitled "Starting a w ash cycle.. . ").
3 When you select Int ensive/Normal/E co.Progr ammes, you can select the 3in1 fu nction.
If you open the door , the machine will pause. When you cl ose the door , the machineduring a w ash cycle
will workingafter10 seconds.continue
Forgot toAdd a Dish?
Aforgotten dish can be added at any time before the detergent cup opens.
Open the door a little to stop the washing.
1
After the spray arms stop working,you can open the door
2
completely.
Load the forgottendishes.
3
Close the door, the dishwasher will start running again
4
after 10 seconds.
AttheEndoftheWashCycle
When th e worki ng cycle has f ini s hed, the buz zer of the di s hwa she r wil l sound f or 8 s econ d s, then stop. Turn o ff
the appliance usi ng the ON/OFF butto n, sh ut off the water supp ly and open the door of the di shwashe r.
Wait for a few mi nutes bef ore unloading the dishwash er to avoid handlin g t he dishes and ute nsils while th ey
are still hot and more suscept ible to break age. They w ill also dry better.
SwitchOff the Dishwasher
The p rogram has en ded, only if there appears a0 in the digi tal display (rem aining progra m time).
1.Switchoff the dishwa sher by pressin g the ON/OFF butto n.
2.Turn offthewater tap!
Openthedoor carefully.
Hot dishes are sensitive to knocks. The dishes shou ld therefore be allow ed to cool down around 15 minutes
beforeremovingfromthe appliance.
Open t he dishwas her's door, l eave it ajar and wai t a few minutes before remov ing the dishes. In this way t hey
will be cooler and the drying will be improved.
Unloading thedishwasher
Itis nor mal that the dishwashe r is wet inside.
Empty the lower basket first and the n the upper one. This will avoid water dripping from the upper Basket onto
the dishes in the lower one.
WARNING!
It is d ange ro u s to open the door w hen washi ng , bec a us e the hot water may scald you .
13
Page 16

Filtering System
The filter prev ents l ar ger remnants of food or ot her objects from get ting inside th ep um.
Theresiduesmay blockthe filter, inthiscase they mustbe removed.
The fi lter system consists of a coarse filter,a flat (Main filter)
An d a mi c rofilter(Fine filter).
1
2
3
2
1
3
Main filter
Foodandsoilparticles trappedinthisfilter arepulverized by a
special jet on the lower spr ay arm and w ashe d d own to drain.
Coarse filter
Larger item s, suc h as piec es of bones or gl ass, tha t could blo ck
thedrainare trappedin thecoarsefilter. To removetheitems
caught by the fil ter,gently sque eze the tap on the top of this
filter and l ift out.
Fine filter
This filterholds soilandfood residues in thesump a rea and
preventsitfrombeing r edepositonthedishes during wash cycle.
Filterassembly
Thefilter efficiently
For best perfo rmance and results, the f ilter must be cleane d regular ly. t his reason, it i s a goodide a to
remove the larger foodpar ticles trapp ed in the filter after e ach wash cycle by rinsing thes emicircular f ilter and
cup under runnin g w ater. Toremove the filter de vice, pull the cup handle in t he u pward direct ion.
WARNING!
removes f ood part icles from the wash wate r,allowin g it to be recycled during the cycl e.
For
Th e dish was her mus t never be used witho ut th e f il ters .
Improper replace ment of the filter may red uce the performanc e level of the applian ce
andd amage dishes andutensils.
Step 1 Turnthe filt er in anti-clo ckwise direction,
:
then li f t it up.
Step 2 lift the Main fil te r up:
Step3 lifttheFinefilterup:
When following this procedure from step1 to step 3, the filter system will be removed;
when following i t from Step 3 to Step 1, the filter systemwill be installed.
14
Page 17

Remarks:
- Inspec t the filters for blo cking after ever y time t he dis hwasher has been used .
- By uns crewing the coar se filter, you can r emove the filter system. Remove a ny foo dre mna nts and
clean the filters under running water.
Theentirefilterassemblyshouldbe cleanedonce a week.
Cleaning the Filter
To c lean the coa rse f ilter and the fine filter , use a clean ing brush. Reas sembl e the f ilter part s as shown in the fi gures
on t he la st pa ge and r eins ert t he enti re ass emb ly in the dishwa sher, positio ning i t in i ts seat and pressing downwar ds.
WARNING!
Whencleaning thefilters, don'tknockon them. Otherwise,the filtersc ouldbe
contortedand theperformanceofthedishwashercould bedecreased.
Caring f or the Di shwasher
The control panel can be cleaned by u sing a l ightly dam pened cloth.
After cle aning, m ake sure t o dry it thoroug hly.
For the exte ri or, use ag ood appliance polis h wax .
Neveruse shar p objects, sco uring pads or harsh clean ers on a ny part of the dis hwasher.
Cleaning The Door
To clean the edge around t he door,you shoul d use only a soft warm, damp clot h.
To avoid penetrati on o f water into t he d oor lock and electr ical components , d o not
usea spray cle aner of any kind.
Never u se a spray cleaner t o cl ean the door panelas it may dam age the door lock
WARNING!
and electricalcomponents.
Abrasive ag ents or some paper towelss hould not be used because of the risk of
scra tching or leavin g s pots on the s t ainless ste el surfa ce.
Protec tA gain st Freezi ng
please take frost prot ection measur es ont he dishwasher inwinter. Every fter washing cycles,
please operat e as follows
1.Cut offthe electricalpower to thedishwasher.
2.Turnoff the water supply and disco nnect the water inl et pipe from the water valve.
3.Drainthewater fromtheinlet pipeandwater valve. (Useapanto catchthewater)
4.Reconnect the water inlet pipe to the wate r valve.
5.Remove the f ilter at the bottom of the tub and use a spong e to soak up water in the sump.
:
If your dis hwasher cannot wor k becaus e of the ice, ple a se contact profession al ser v i ce per so ns.
timea
Cleani ng the SprayAr ms
It is necessary to clean the spray arms regul arly in order to
remove the accumulation of scale fr om the hard water
and thus prevent blocki ng of spray arm jets and bear ings.
We Suggest to poke the blocked spray arm jets wit h a needle
to e nsure good washing effect.
15
Unscrew
Page 18

AfterEvery Wash
After every wash, turn offthe water supp ly to the
appliance and leave th e door slightl y op en so that
moisture an d odours are not trapped in side.
Removethe Plug
Before cleaning or per forming mainten ance, always
remove the p lug from the socket.
No Solvents orAbrasive Cleaning
To clean the exterior and rubberpartsof the dishwasher,
donot usesolventsor abrasivecleaning products.
Only use a clo th w ith w arm soapy water.
Tor em ove sp ots o r sta ins from the surf ace oft he
interior, u sea clothda mpened with wa teran a little
vinegar,o r a c leaning pro duct made s peci fically for
dishwashers.
Whennot inUse for aLongTime
It isrecommend that you runa wash cycle with the
dishwasher empty and then remove the plu g fr om the
socket, turn offth e water supp ly and leave the door of
the applia n ce sl ig ht ly ope n. Thi s wil l hel p the doo r
seals to last l onger and prevent odours fromforming
withinth e appliance.
Moving t heAppli anc e
If the appliance must be move d, t ry to keep it in the
verticalposition. If absolutely necessary,itcanbe
positioned on its back.
Seals
Oneofthefactorsthatcauseodourstoforminthe
dishwasher is food that remains tr apped i n the seals .
Periodic cleaning with a damp sponge wi ll preve nt t his
fro m occ urring.
Position ing th eApplia nce
Position theappliance in t he desired lo cation. T he back sho uld rest against t he wall behind it, and the sides,
along the adjacent ca binets or wall s.T he dishwasher is equippedwi th water supply and drain hos es that can
be positioned eith er to the right or the left s ides to facilitate pro per installati on.
Once the appliance is positione d for levellin g, the height of the dishwashe r
may be altered vi a adjustment of the screwing leve l of the feet. In any case,
the appliance should not be inclin ed more t han 2 .
About Powe r Connect ion
for personal safety:
WARNING!
Please look at th e rating label to knowthe rat ing voltage a nd connect the dishwash er to the app ropriate power suppl y.
Use the required fuse 10 amp , time delay fuse or c ircuit breake r recommended and provide sepa rate circuit s erving
only this applianc e.
DO NOT USEAN EXTENSION CORD OR AN ADAPTER PLUG WITH THIS APPLIANCE.
DONOT, UNDERANY CIRCUMSTANCES, CUT OR REMOVETHE EARTHING
CONNECTION FROM THE POWER CORD.
Ensure the voltage and frequenc y o f the power being corresponds t o
those on the rating plate. Only in sert the plug into an electrica l so cket which is earthed
properly.If the electri cal socket to which the appl iance must be connected is not
appropriate fortheplug , replace thesocket, rather thanusingaadaptors orthelike as
theycould cause overheating andburns.
This appliance must be earthed. In the event of a malfunction or breakdown, earthing will reduce the risk of
electric shock by providing a path of least resistance for the electric current. This appliance is equipped with a
cord having an equipment-earthing conductor and an earthing plug. The plug mustbe plugged into an
appropriate outlet that is installed and earthed in accordance with all local standards and requirements.
16
Page 19

WARNING!
Improper connection of the equipment earthing conductor can result in the risk of an electric shock.
Check with a qualified electrician or service representative if you are in doubt whether the
appliance is properly earthed.
Do not modify the plug provided with the appliance. If the plug does not fit properly to the outlet,
please have a qualified electrician to install a proper outlet.
for personal safety:
DO NOT USE AN EXTENSION CORD OR AN ADAPTER PLUG WITH THIS APPLIANCE.
DO NOT, UNDER ANY CIRCUMSTANCES, CUT OR REMOVE THE
CONNECTION
Water Connect ion
Connect the cold w ater supply hose to a thread ed 3/4(inch ) connector and make su re
that it is fastened tig htly in place.
If the water pipe s are n ew or have no t been used for an extended pe riod of time, let the
water run to make sure that the water i s clear.This precaut ion is needed to avoid the
risk of the water inlet to be bl ocked and damage th e a pplian ce.
The w ater supp ly to the applianc e ca n also be connected tothe house hold hot water
line (such as, central sy stem, heatin g system),as lon g as it does not exce ed a
temperatur e of 60 C . In this case, the wash cycle timewill beshort ened by about 15
minutesandthewashefficiencyslightlyreduced.
The co nnection must be ma de to the hot water lin e fo llowi ng the s ame procedu res as
described i nthe section for theconnectiontothe coldwaterline.
FROM THE POWER CORD.
EARTHING
WARNING!
Insert the drain hose into a drain pi pe with a minimum diamet er o f 4 cm, or let it run into the sink , making sure to
avoid bending or crimping.Use the special plasticsupport thatcomeswith the appliance. Thefreeendofthehose
must bea t a h eigh t between 40 and 100 cm and must not be immersed inwate r.
In order to avoidthat thereis more water staying in the inlethose, pleaseclose
theh ydrant after using.(Not app licable to appliances w ithout aqua-stop.)
Wat er Ou t l et
Connect the wate r drain hose. The drain hose mu st be correctly fitted to avoid water leaks.
Ensure that the w ater inlet ho se is not kinked or squas hed.
17
Page 20

Extension Hose
Ifyo u need a dr ain hose ext ension, make sure to use a sim ilar drain hose.
Itmust b e no longer than 4 metres; otherwise the cleani ng effect of the dishwas her could be reduced.
Syph on Connec tion
The waste connec tion must be at a height of between 50 cm (min imum) and 100 cm (max imum)
from the bottom of the dish. T he water dra in ho se shoul db e fixed by a hose clip.
StartofDishwasher
Thefollowingthingsshouldbe checked beforestarting the dishwasher.
1
Thedishwasheris leveland fixedproperly
2
The inle t val ve is ope n
3
Thereis a leakageat the connections ofthe conducts
The wires are tightly connected
4
5
The power is switchedon
The inle t and drai n hoses are k notte d
6
7
Allpackingmaterialsand printings shouldbe taken out fromthe dishwasher
Afterinstallation, pl ease make sure to keep t his manual.
The content of this m anual is very helpful to the users.
18
Page 21

BeforeCallingfor Service
Technical
problem s
Fuse blown, or the
circuit breakeracted
Power supply is not
turned on
Error code:E1;
Water pressure is low
Door of dishwasher
not properly closed.
Kink in drain hose
Filter clogged
Kitchen sink clogged
Improper detergent
Replace fuse or reset circuit breaker. Remove any other
appliance s sharing the same circuit with the dishwasher
Make sure the dishwasher is turned on and the door is
closed securely.
Make sure the power cord is properly plugged into the
wall socket.
Check that the water supply is connected properly and
the water is turned on.
Make sure to close the door properly and latch it.
Check drain hose.
Check coarse the filter
(see section titled )" Cleaning The Filter "
Check the kitchen sink to make sure it is draining well.
If the problem is the kitchen sink not draining ,you may
need a plumber rather than a serviceman for dishwashers.
Use only the special dishwasherdetergent to avoid
suds. If this occurs, open the dishwasher and let suds
evaporate.Add 1 gallonof cold water to the tub. Close
and latch the dishwasher, then Start the "soak"wash
cycle to drain out the water . Repeat if necessary.
General
problem s
Noise
Spilled rinse-aid
Detergent with
colourant was used
Hard water minerals
The affected items are
notcorrosionresistant.
A programme was not
run after dishwasher
salt was added.
Traces of salt have
gotten into the wash cycle.
The lid of the softer
is loose
r
Aspayarmis
knocking against
an item in a basket
Items of crockery
are loose in the
wash cabinet
Always wipe up rinse-aid spills immediately.
Make sure that the detergent is the one without
colourant.
To clean the interior, use a damp sponge with
dishwasher detergent and wear rubber gloves .
Never use any other cleaner than dishwasher
detergent for the risk of foaming or suds.
Always run the quick wash programme .
without any crockery in the dishwasher and
without selecting the Turbo function (if present),
after adding dishwasher salt.
Check the lip .Ensure the fix is fine.
Interrupt the programme, and rearrange the items
which are obstructing the sp ay arm.r
Interrupt the programme,
and rearrange the items of crockery.
This may be caused
by on-site installation
or the cross-section of
the piping.
19
This has no influence on the dishwasher function.
if in doubt, contact a suitably qualified plumber.
Page 22

The dishes were not
loaded correctly.
See notes in " Loading the Dishwasher Baskets ".
Unsa ti s
-factory
washin g
resu lt
Theprogramme was
notpowerful enough.
Not enough detergent
wasdispensed.
Items are blocking
the path of spray arms.
The filter combination
inthebaseofwash
cabinet is not clean or
is not correctly fitted.
This may cause
the sp ay arm jets
r
to get blocked.
Combination of soft
water and too much
detergent.
Aluminum utensils
have rubbed against
dishes.
Dishes block
detergent cups.
Improper loading
Too little rinse-aid
Select a more intensive programme.
See" Wash Cycle Table ."
Use more detergent, or change your detergent.
Rearrange the items so that the sp ay can rotate freely.r
Clean and/or fit the filter combinationcorrectly.
Clean the sp ay arm jets. See "Cleaning the Spray
Arms".
Use less detergent if you have soft water and select
a shortest cycle to wash the glassware and to get
them clean.
Use a mild abrasive cleaner to eliminate those marks.
Re-loadin g the dishes properly.
Load the dishwasher as suggested in the directions.
Increase the amount of rinse-aid/refill the rinse-aid
dispenser.
r
Unsa ti s
-factory
dryi ng
resu lt
Dishes are removed
too soon
Wrong program
has been selected
Use of cutlery with
a low-quality coating
Do not empty your dishwasher immedia tely after
washing. Open the door slightly so that the steam can
escape. Begin unloadingthe dishwasher only once t
he dishes are barely warm to the touch. Empty the low
basket first. This prevents water form dropping off
dishes in the upper basket.
In short program the washing temperature is lower.
This also lowers cleaning performance. Choose
a program with a long washing time.
Water drainage is more difficult with these items.
Cutlery or dishes of this type are not suitable for
washing in the dishwasher.
20
Page 23

Technical Information
Height : 850mm
Width : 445mm
Dept h : 580mm
Waterpressure: 0.04-1.0MPa
Hot water connection : max 60 ℃
Power supply: see rating label
Capacity: 9pla ce settings
21
 Loading...