

Page 1
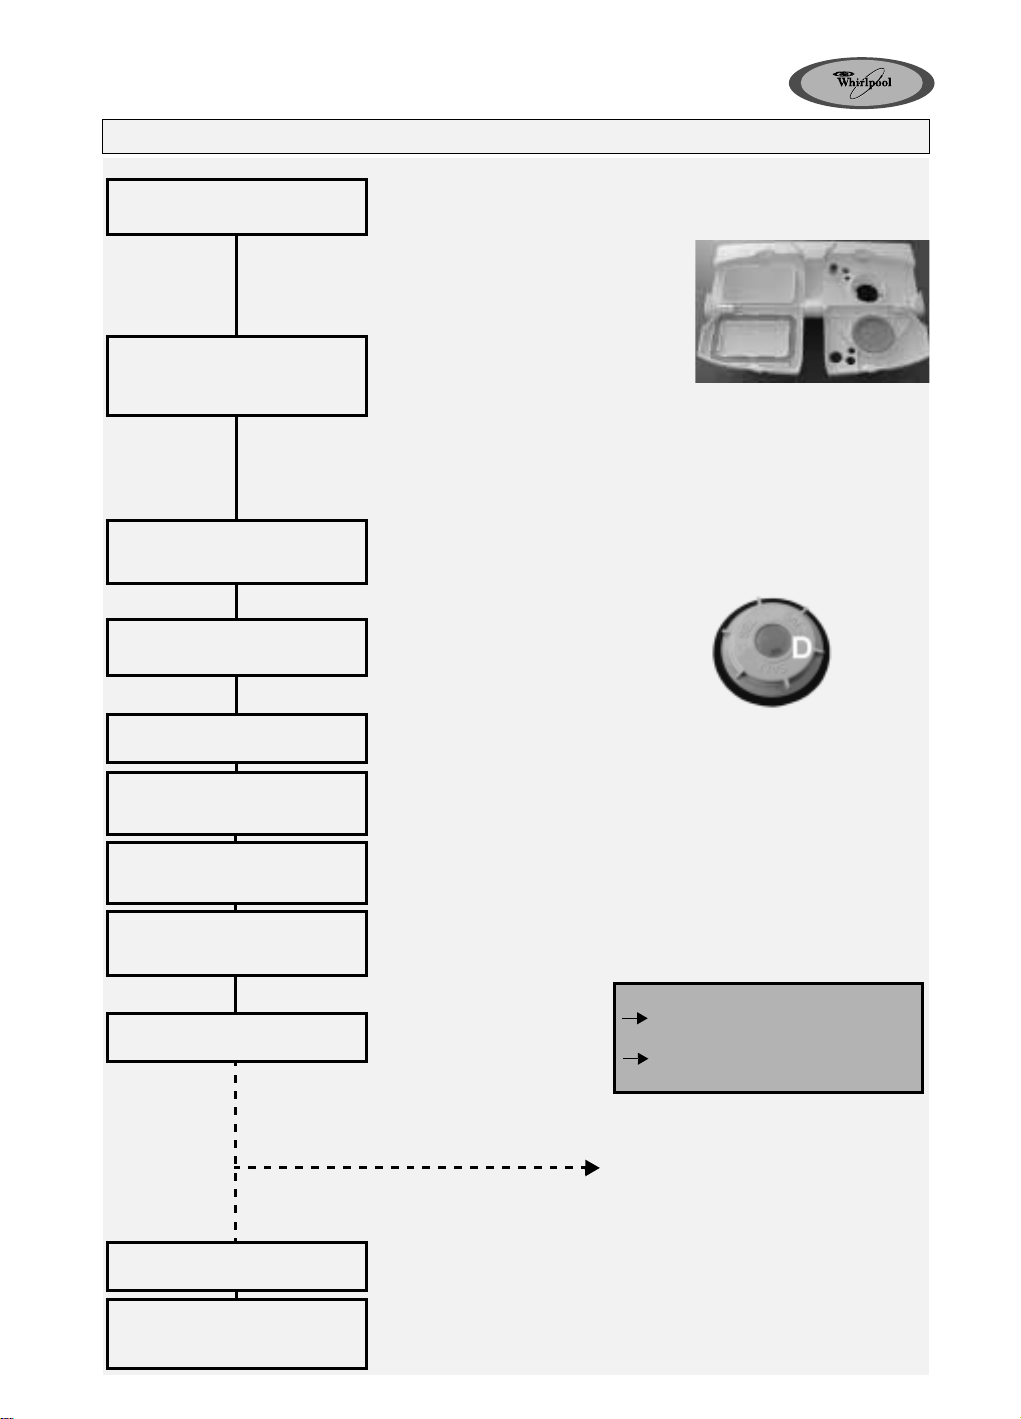
How to use the appliance
ABC
Further indications are given in the single chapters and in the user instructions.
Switch on the appliance
Select, save, and
supply the detergent
Check the rinse aid level
Check the
regeneration salt level
Load the racks
Press the ON / OFF button.
(The first time you use the appliance
and when using a different type of
detergent)
1. Select the third programme from the
top in the relative table.
2. Press the Start button for about 7
seconds until the display changes.
3. Select the required detergent with
the Start button (OFF = powder
detergent, 2 in 1, 3 in 1, 4 in 1) (shown on the display).
4. Switch the appliance off and then switch it on again. The selected
detergent type will be shown on the display for approximately 3
seconds after switching on.
For dosage of powder detergent in compartment A and B refer to the
programmes table.
Mechanical indicator C.
Electric indicator on control panel (if provided).
On models with water softener
system only.
Mechanical indicator D. Electric
indicator on control panel (if provided).
Refer to the dishwasher loading instructions.
Close the dishwasher door,
turn on the water tap
Select a programme
Select additional options
Press the Start button
Wash cycle
Switch off the appliance
Turn off the water tap,
unload the racks
The last programme selected will light up.
Select the desired programme (using the specific button or knob).
The corresponding indicator lamp lights up.
If necessary (and if provided).
The corresponding indicator lamp lights up.
The selected programme is
then memorised (even in the
event of power failure).
Only after the START button has switched off: Press the ON /
All the indicator lamps switch off.
Warning: When the door is opened steam comes out!
Unload the appliance, starting from the lower rack.
“Change programme in progress”
Press the START button for 2 sec. until the
Start indicator lamp switches off.
Select another programme and press the
START button again.
- Only open the dishwasher if necessary
(Warning: beware of hot steam).
- If the appliance is switched off during a
wash cycle, when switched on again it
will resume the cycle from where it was
interrupted.
OFF
button.
Page 2
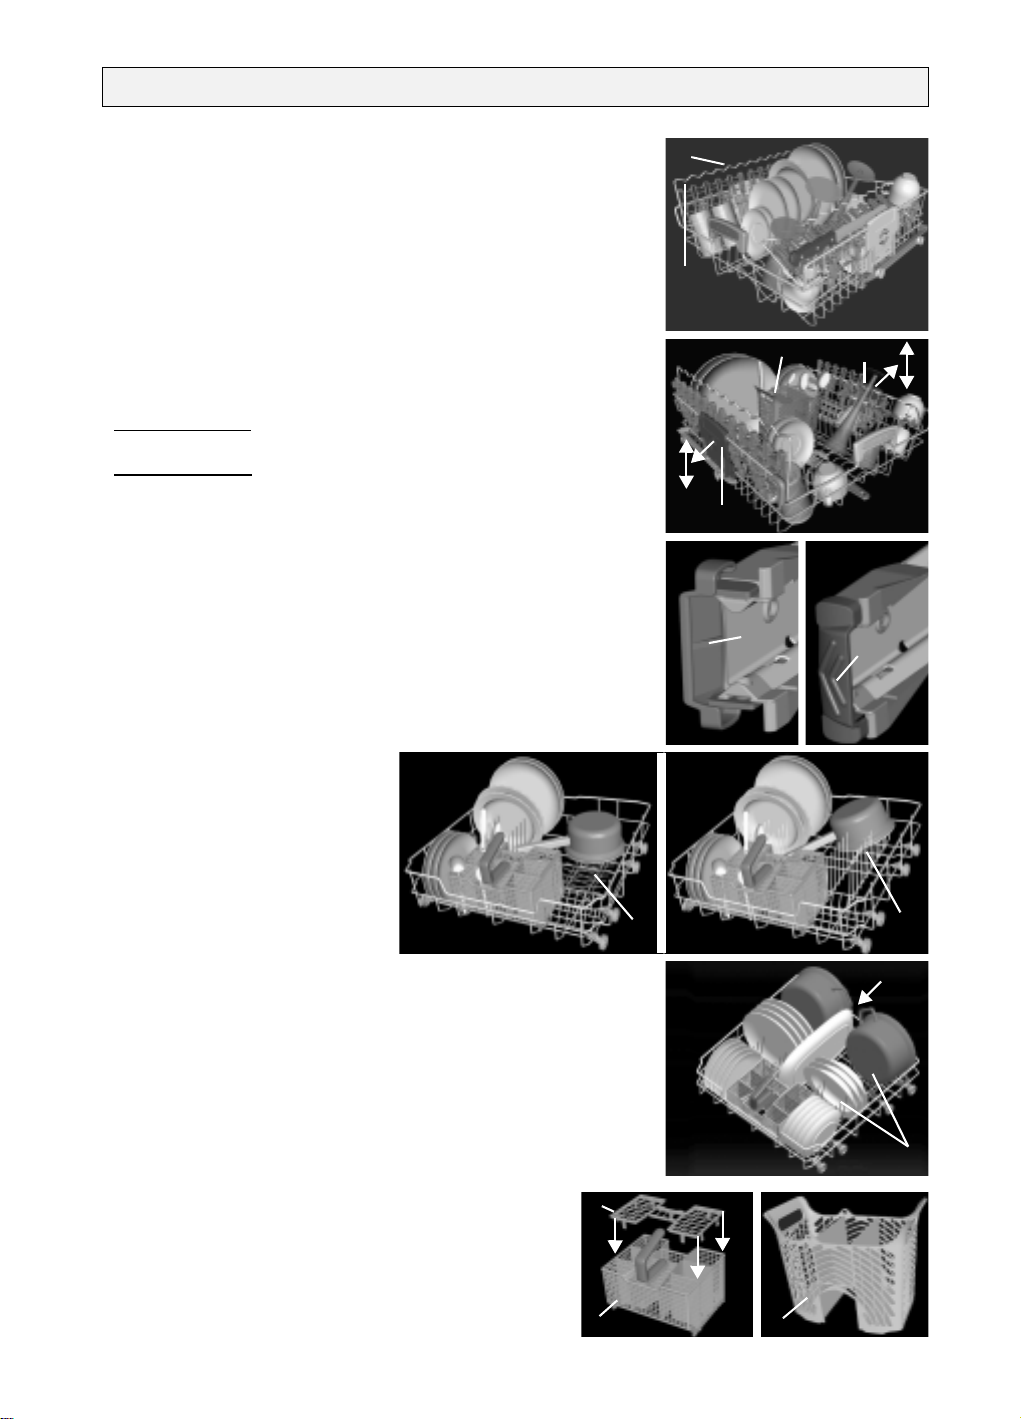
Dishwasher loading instructions and racks provided
depending on the model
Upper rack:
Crockery holder (A):
Depending on the position, for long-handles utensils, cups and
plates.
Glass holder (B):
Long-stemmed glasses.
Long-handled utensils (e.g. carving forks, knives) must
be arranged with the sharp end facing in towards the
appliance.
Half Load:
Load the upper rack (see description of Options). Place the
cutlery basket (C), if provided, in the upper rack.
Rack height adjustment (also when loaded):
Lower adjustment:
Upper adjustment:
The rack must be level on both sides.
Removing the top rack to provide clearance for large
items of crockery in the bottom rack:
Open the rack guide retainers (E) on the right and left and
remove the top rack.
When the upper rack is in place the retainers must always be
closed.
Pull the
outwards and lower the rack.
Pull the
upwards until the rack clicks
into place (factory setting).
rack handles (D)
two
rack handles (D)
two
B
A
C
D
D
Retainer
open
E
Retainer
closed
E
Lower rack:
Depending on the model with
fixed, tilting (F) or tilting split
plate holders (G).
Half Load:
Load the lower rack (see
description of Options).
Greater washing power,
particularly for plates and
saucepans.
F
F
H
Power Clean load
Increased wash power in the dedicated area (H) and high
flexibility for lower rack loading.
G
Cutlery basket (I):
Grid (J) to keep items separate.
Sharp knives and forks that might cause injury must be
placed in the cutlery basket with the sharp end facing
downwards.
Only use dishwasher-proof crockery and dishes. Do not use the appliance for items not suitable for washing in a
dishwasher, for example wooden items, aluminium, tin, hand-decorated crockery (unglazed), silver cutlery.
J
I
C
Page 3
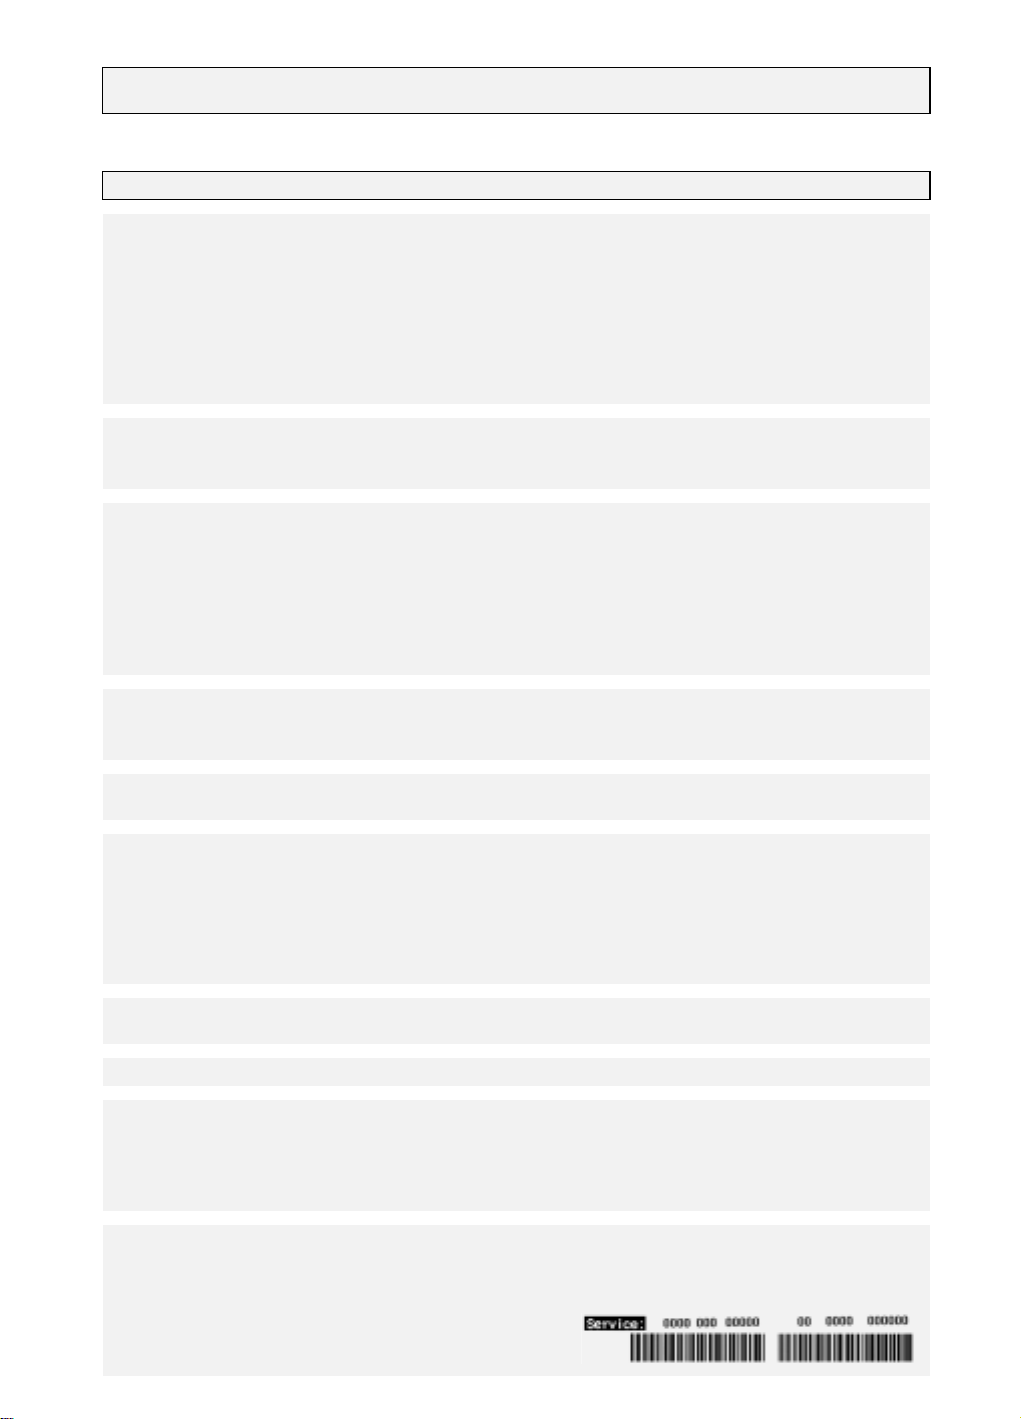
What to do if...
If a fault occurs, before contacting our After-Sales Service, make the following checks to try and remedy the problem (* see
also the corresponding chapter in the user instructions).
Problem Cause Remedy
The appliance is not
working
If crockery is not
perfectly dry
If crockery is not
perfectly clean
Sandy or grainy
residues
Colour of plastic parts
faded
• No water supply. • Open the tap.
• The appliance does not load sufficient
water.
• There is a power failure. • Insert the plug into the mains socket.
• Starting the selected programme. • The programme can be set to “0” to start.
• Insufficient rinse aid. •Increase dosage *.
• Residual water in cavities. • Load crockery at an angle.
• The water jet does not reach the
crockery.
• Insufficient detergent. • Follow recommended detergent dosage.
• Unsuitable programme. • Select a more intense wash cycle.
• Spray arms blocked. • The spray arms must be able to turn freely.
• Spray arm nozzles clogged. • Remove any impurities obstructing the water flow *.
• Incorrect detergent/detergent too old. • Use a good quality detergent.
• Clogged filters. • Check filters regularly/if necessary clean *.
• Filters incorrectly assembled. • Insert the filter correctly *.
• Tomato/carrot juice, ... • Depending on the material, if necessary use a
• Clean the water supply tap filter.
• Ensure there are no kinks in the water hose.
• Press the Start button.
• Close the door.
• Check the safety circuit breaker.
• Arrange crockery so that items do not touch each
other. Load crockery upside down.
detergent with a greater whitening power.
Deposits on crockery
•Removable • Streaks on the crockery/glasses. • Increase the rinse aid dosage *.
• Streaks on glasses. • Reduce the rinse aid dosage *.
• Layer of salt on crockery/glasses. • Close the salt container lid properly *.
• Not removable • Insufficient water softening, calcium
Opaque glasses/ glasses
deposits.
• Cannot be washed in the dishwasher. • Use suitable glasses.
• Change water hardness setting, if necessary add salt *.
not sparkling
Rust on cutlery
Identifying appliance
faults
If after carrying out the above checks the malfunction persists or appears again, turn the appliance off and turn off the water
supply tap, then call our After-Sales Service (see guarantee).
Before contacting our After-Sales Service, take note of the following:
• The nature of the fault
• The appliance type and model
• The service code (the number indicated on the adhesive rating plate)
inside the door on the right-hand side.
• Not made of stainless steel. •Use suitable cutlery.
• The START indicator lamp flashes.
• Indicator F... (if provided).
• Ensure the filter assembly is not clogged and that
there is no interruption to the water supply
(if necessary, clean the filters *). Start the programme
again. Press the ST ART button for 2 seconds, until the
START indicator lamp switches off . Select a new
programme and press the Start button again.
Page 4
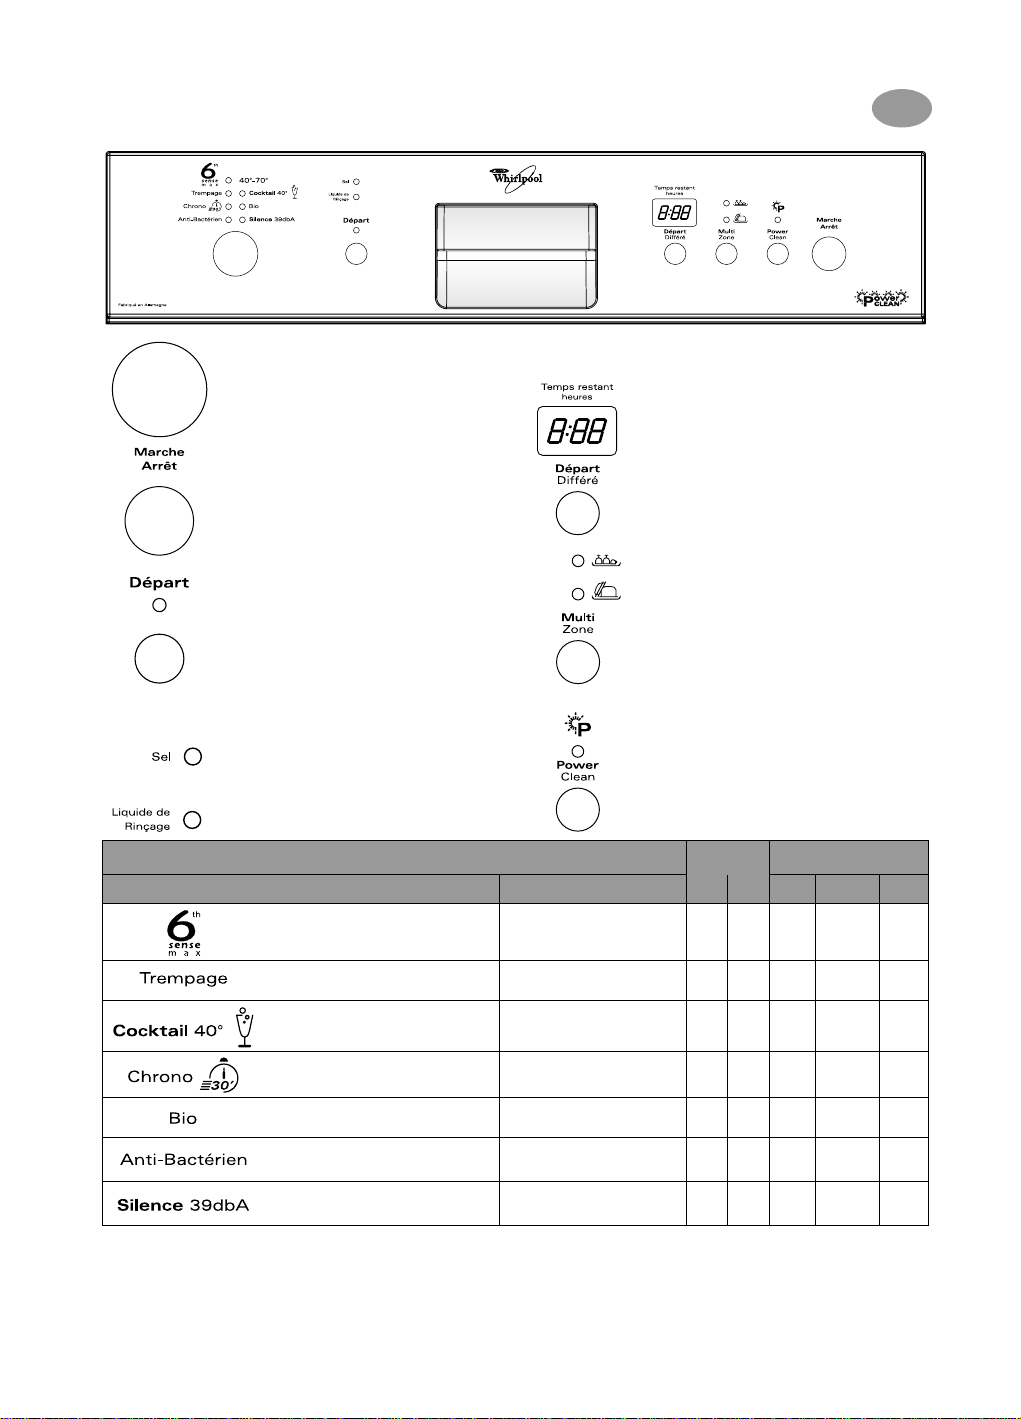
Before using the dishwasher, read the user instructions!
ADG 986
Indicators
Quick Reference Guide
Options
Programme selection button
On / Off button
Start button
Switches “on” when the dishwasher is
operating. Flashes when a fault occurs.
Switches off at the end of the programme.
Add regeneration salt
Only add regeneration salt immediately
before starting a wash programme.
Add rinse aid
Programme chart
Programmes Loading instructions A B
3)
Time and failure display
Indicates in hours the time remaining until the start
of the wash cycle. Switches off when the
programme starts and indicates the time remaining
in hours and minutes.
“F....” Identification of faults for service technician
“Delayed start” button
The wash cycle can be programmed to start after
1 - 24 hours. With each successive touch of the
button, the delayed start indicator increases by 1
hour , and after 24 returns to 00. Then press the Start
button. The dishwasher will start at the set time.
“Half load - Multizone” button
Load the upper or lower rack
This function can be used with any programme.
Press once = upper rack
(the indication lamp/symbol comes on)
Press twice = lower rack
(the indication lamp/symbol comes on)
Press 3 times = Off (half load function deactivated).
When washing without the top rack, press the “Half
Load” button twice, or “Lower rack wash” (the
corresponding LED/symbol comes on).
Power Clean
An increased pressure combined with additional
spray level offers better cleaning result and more
flexibility of dish loading in the lower rack.
Detergent
.
only
6)
2)
Consumption
Litres kWh Minutes
GB
3)
Sensor max
6)
40-70°C
Pre-Rinse cold
Party G lass 40°C
Rapid 30 min 40°C
1) 6) 7)
Bio
Antibacterial
4) 5) 6)
Overnight 55°C
1) Reference programme for energy label EN 50242;
2) Refer to “User instructions”;
3) The data relevant to programmes are values obtained in the laboratory
in conformity with Standard EN 50242. In practice there may be time
variations or leaps depending on different loads, function options, sensor
calibration (only for sensor-controlled programmes) water
temperatures or hardness and different power supply voltages.
Important information for Test Labor atories:
For detailed information on the EN comparison test and other tests, contact the following address: “[email protected] m”.
Whirlpool is a registered trademark of Whirlpool USA
Lightly, normally or heavily soiled
crockery, including pots and pans.
Crockery to be washed later.
Light soiling, for example glasses
and cups.
Lightly soiled crockery with no
dried-on food.
Normally soiled crockery.
50°C
Normally or heavily soiled
crockery, with additional
antibacterial action.
Normally soiled crockery, gentle
and quiet programme thanks to
the low spray pressure (39dbA).
4) The bacteria removal efficiency has been tested by the Institut
5) Programme interruption (e.g. the door being opened) may
6) These programmes can be used with the “Power Clean” option.
7) En ergy saving programme with prolonged drying cycle.
X X 7-17 0.99-1.58 65-170
- - 4.0 0.03 14
X - 10.0 0.85 100
X - 10.0 0.65 30
X X 13.0 1.05 195
X X 13.0 1.50 115
X X 13.0 1.20 290
Pasteur de Lille (France), based on the NF EN 13697 standard of
November 2001;
compromise the result of the antibacterial rinse;
(We reserve the right to make technical modifications)
5019 396 01017
 Loading...