

Whirlpool ADG 555 User Manual
ADG 555
Dear Cus tom er ,
Pleasecarefully rea dthismanual beforeusingthe
dishwasher, it will help you to use and maintainthe
dishw ash er proper ly.
Keepit toreferto it ata laterdate.
Passit onto anysubsequentowner of the applianc e.
This ma nua l c on tain s section s on safety Instruction s ,
Operating Instructions, Installation Instructions and
Troubles hooting Tip s, etc.
ControlPanel...................................................3
Dishw as h er Fe at u re s............ ... . ... .. .. . ... . ... .. . .. . ..3
A WaterSo ftener...... ...... ....... .. ....... ...... ..... ..4、 ..
B Loadi n g th e S al t intot he S oftener...... . ... .. . .. .. 5、
C Fill the Rinse Aid Dispenser..... ...... .. .. .. 5、 ..... ...
D Fun ctionof Detergent .........................6
、
........
Howto use the 3 in 1function............................8
Attentio n befor e or after loading the Dish wash er
Baskets. .........................................................9
Loadingthe upper ...............................9Basket
Loading the Lower ...............................10Basket
CutleryBasket........................................... ...11
To review the section on tro ubleshooting Tips
will helpyoutosolvesome common problems
byyourself .
Ifyo u can not solve the problems by you rself ,
please ask f or the help of profe ssional tec hnician s.
The m anufactu rer,follo wing a policy of constant
development and updati ng of the product, may
make modifications witho ut giving prior notice .
WashCycleTable.................................. ......... 12
Turning on theAppliance................................13
Changethe Programme.............. ................13....
At the End of the Wash Cycle...........................13
FilteringSystem................ ......... ....................14
Caring forthe Dishwasher..................... .........15.
Please carefully rea d the installation inst ruction
.....................................................................
16
....17Aesthetic panel's dim ensions and inst allation
Tension adjus tment of the door spring .19..... . .. ... . ..
Connectionofdrain hoses.......................................19
Dishwasherinstallation steps..........................20
WaterConnection...........................................22
Beforecallingforservice. ...................... ..........23
Technicalinformation...... ............. ..................25
When usin g your dishwasher, follow t he precautions listed below:
This appliance must be grounded. In the event of a
malfunction or breakdown, grounding will reduce
the risk of anelectric shock by providing a path of
least resistance of electric current. This appliance
is equipped with a cord having an equipmentgrounding conductor and a grounding plug.
The plug must be plugged into an appropriate outlet
that is installed and grounded in accordance with
all local codes and ordinances.
Do not abuse, sit on, or stand on the door or dish
rack of the dishwasher.
Do not operate your dishwasher unless all
enclosure panels are properly in place. Open
the door very carefully if the dishwasher is
operating, there is a risk of water squirting out.
Do not place any heavy objects the
door when it is open. The appliance could tip
forward.
When lo ad ing i tem s to b e wa sh e d:
1) L ocate sharp items so that theyare notlikely
todamage the doorseal;
2 Warning: Kni ves and other utensils wi th
)
sh a rp poin ts mu st be loade d i n the basket
with their poi nts d own or placed in a
horizontal position.
When using your dishwasher, you should
prevent plastic items fro m coming into contac t
with the heating element .(This instru ction i s only
applicable to machines with a visual h eating
element.)
Check thatthedetergentcomparment is empty
after completio no f the wash cycle.
Do not wash plastic items unless they are marked
dishwasher safe or the equivalent. For plastic items
n
ot so marked, check the manufacturer's
recommendations.
Use o nly deterge nt and rins e additives
designed for an automatic dishwash er.
Never use soap, laun dry de tergent, or hand
washing detergent inyour dishwash er.Keep
these products out ofth e reach of children.
on or stand on
Improper connection of the equipment-grounding
conductor can result in the risk of an electric shock.
Check with a qualified electrician or service
representative if you are in doubt whether the
appliance is properly grounded. Do not modify the
plug provided with the appliance; If it does not fit
the outlet. Have a proper outlet installed by a
qualified electrician.
Keep children away from detergent and rinse aid, keep
child awayfromthe open door of the dishwasher,
ren
there could still be some detergent left inside.
This appliance is not intended for use by persons
(including children with reduced physical, sensory or
mental capabilities, or lack of experience and
knowledge ,unless they have been given supervision
or instruction concerning use of the appliance by a
person responsible for their safety.
Children should besupervised to ensure that they do
not play with the appliance.
Dishwasher detergents are strongly alkaline,they
can be ext re me ly dangerous i f swa llow e d.Avoid
contact with skin and eyes and keep children away
from the dishwasher when t he door is open.
The door sh ould not be left o pen,
since th is could increase the risk oftrippi ng.
If the s upply cord is dam aged, it must be replaced
by the m anufact urer or its service agent ora
similar ly qual ifi e d person i n orde r to av oid a
hazard.
Remove the door to the washingcompartmentwhen
removing an old dishwasher from service or discarding it.
Please dispose of packing m aterials properl y.
Use the dishwasher only for its intended function.
During installation, thepower supplymust not
beexcessivelyordangerouslybentor flattened.
Do not tamper with controls.
The app liance is to be connected to the water
mainsu sing newhose setsandthatoldhose-sets
sho ul d not be reused.
Themaximum number of placesettingsto be
washed is 9 .
Themaximum permissibleinlet waterpressureis
1Mp a .
Theminimum permissible inletwaterpressureis
0.04Mpa.
)
1
Dispose of the dishwas her packaging mater ial correctly.
All packaging mate rials can be recy cled.
Plastic parts ar em arked with th e s tandard int ernational a bbreviations:
PE for polyethylen e, e .g. sheet wrappingm aterial
PS forpolystyrene,e.g.padding m aterial
POM po lyoxymethyle ne, e.g. plastic clips
PP polypropylene , e.g. Salt filler
ABS Acrylonitri le Butadiene Sty rene, e.g . Control Panel .
WARNING!
Packagingmaterialcould be dangerousforchildren!
For disposing of pa ckage and thea ppliance please goto a re cycling centre. There fore cut
offthepower s upply cableandmakethedoor closing deviceunusable.
Cardboardpackagingismanufactured fromrecycledpaper and should be disposedin the
waste paper collec tion for recyc ling.
By ensuring this produ ct is disposed of corr ectly,you will hel p prevent potent ialn egati ve
consequences f or the environment a nd human health, which cou ld otherwise be caus ed
byinappropriate wastehandlingofthisproduct.
For more detail ed informatio n a bout rec ycling of this prod uct, please con tact your loca l
city office and your househo ld w aste dispos al service.
DISPOSAL: Do not dispose this pr oduct as unsorted m unicipal waste . Collection of such
waste separately for spe cial treatment is neces sary.
2
To get the bestperformance fromy ourdi shwasher,r ead all operatinginstructions
beforeusing it for the firsttime.
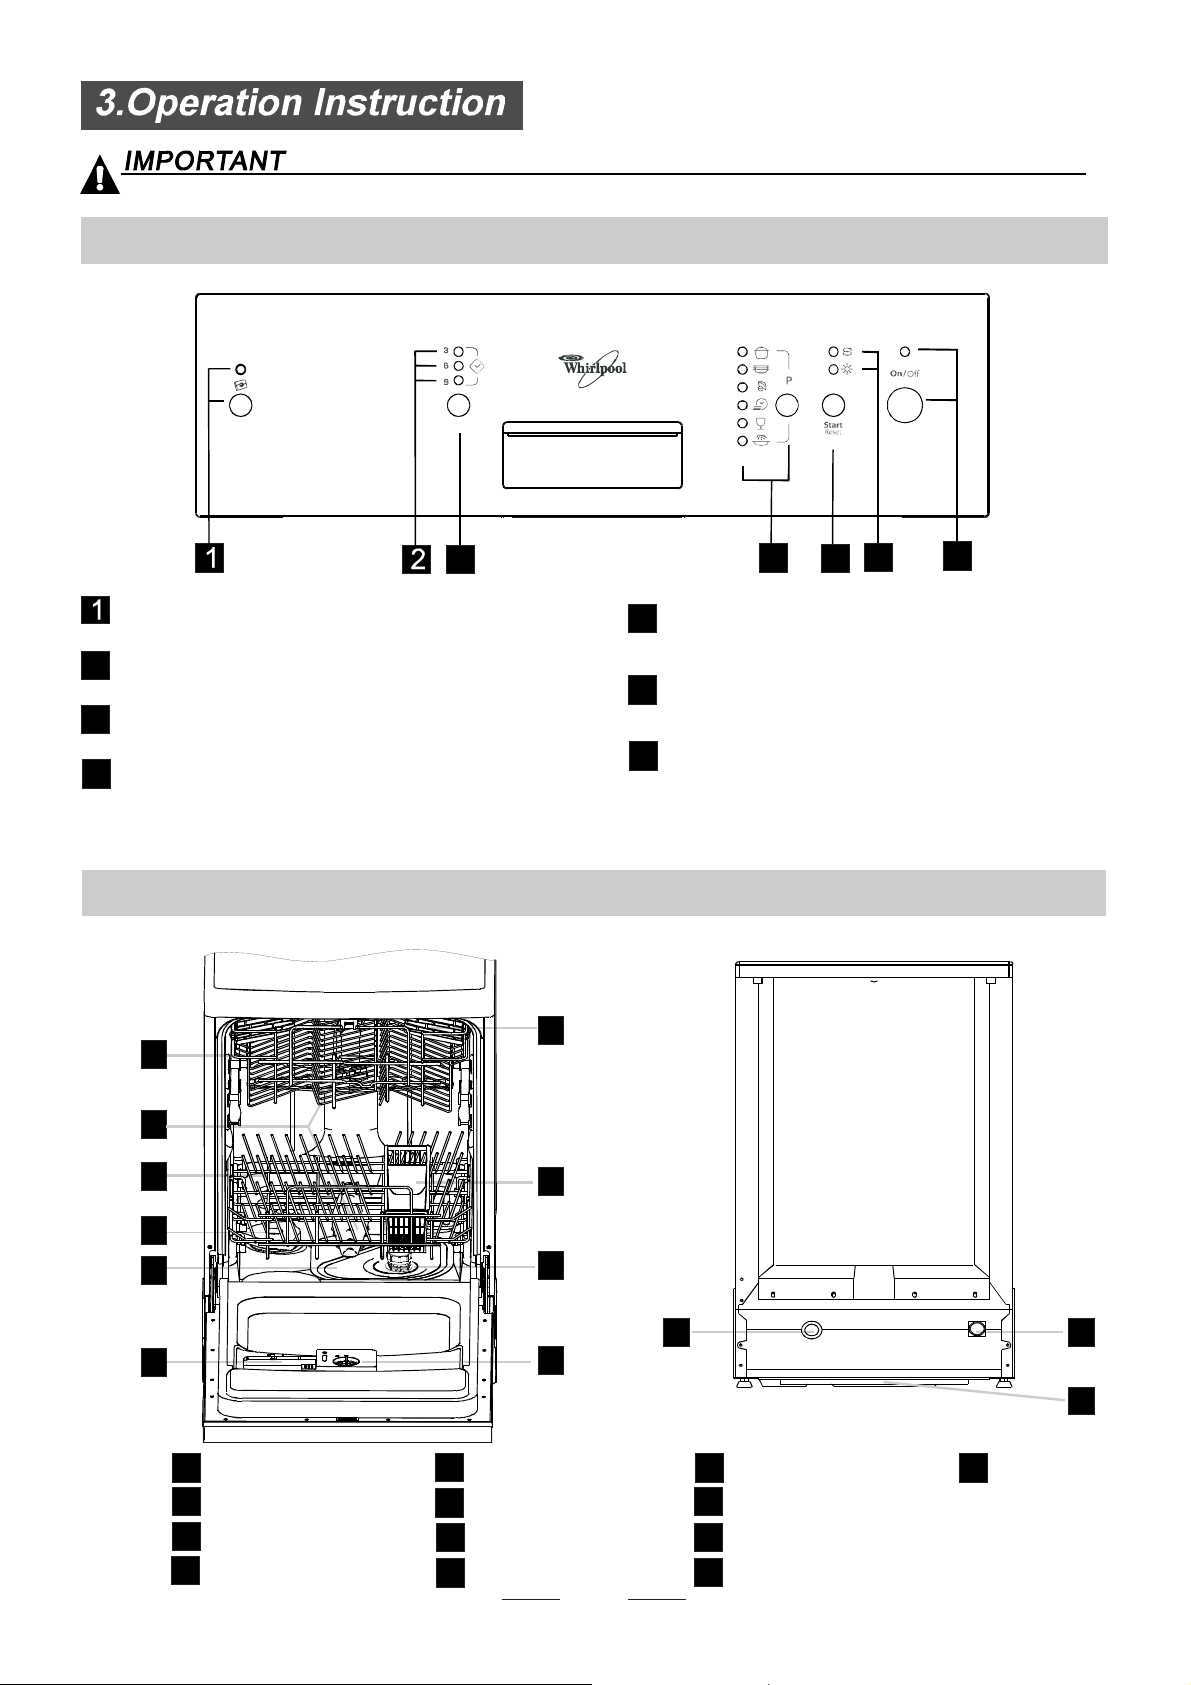
Control Panel
3
3in1 indicator light / 3in1
function button: Toselect an d sh ow 3in1.
Delay indicator lights: To show delay washing time 3 hours,
2
or 6 hou rs, or 9 hours.
Delay start button:ToPress this buttonto set thedelayed
3
hours for w ash ing up t o 3 h ours , or 6 hours, or 9 hours.
Program indica tor lights and button: Tos elect
4
one of the sev en a nd s how the washing pr ogram.
Dishwasher Fe atures
Front view
1
2
4 5
Start and r eset b u tton: Tostart the selected washing
5
program or r e set t he w ashing program when th e
machine is worki n g.
Salt and r inse a id warning light s: To show
6
when the salt container or dispenser need to be
refilled.
Power indicator lightand s witch: Toturnon/off
7
and show the power supply.
6
Back View
7
7
3
8
4
5
9
11 12
6
10
13
on
Off
Upper B ask e t
1
Spray Arms
2
Lower Bask et
3
Salt C ontainer
4
MainFilter
5
Detergent Dispense r
6
CupShelf
7
CutleryBasket
8
Coarse Filter
9
Rins e Aid Dispens er
10
Drainpipe connector
11
Inlet pipe connector
12
3
13
Tray ass
Before u sing your dishwashe r for the first time:
A. Set the wate r softener
B. Pour 1 2 litre of water i nside the salt container and then fil l with dishwash er salt
/
C. Fil l the rins e aid dispen ser
D. Fill indetergent
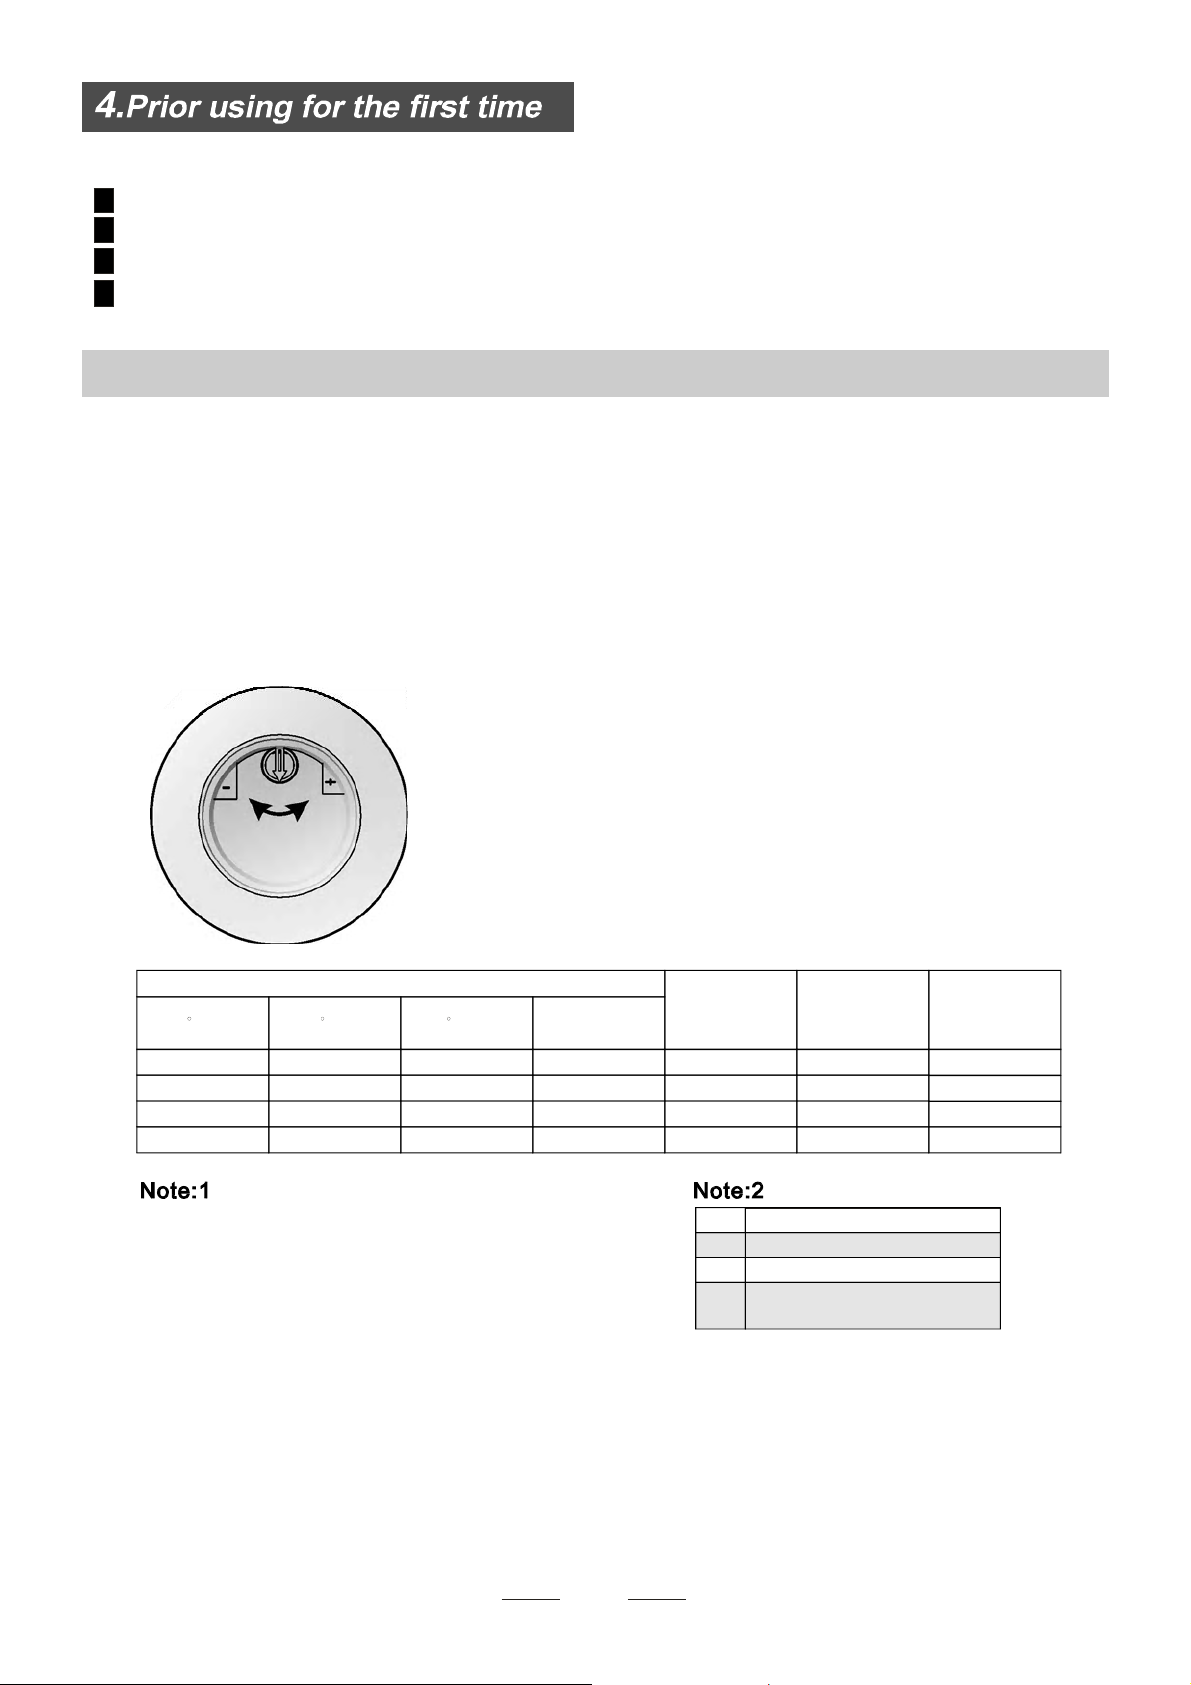
A. WaterSoftener
The water so ftener must beset manu ally, usin g the w ater hard ness dial.
The wat er softener is design ed to remove mineral s and salts from the water, w hich would have
a de trimental or adverse effect on the ope ration of the app liance. The h igher the
content of t hese minerals an d sa lts, the harde r your water is. The softener shou ld be
adjusted acco rding t o the ha rdness o f t he water in you r ar ea. Yourlocal WaterA uthority
can advise youonthe hardness o fthewater in your area.
Adjusting SaltConsumption
The dishwasher is designed to all ow for adjustment i n the amount of sa lt consumed bas ed on t he ha rdness of
the waterused. Thisisintended to optimise andcustomisethelevelo f saltconsumption.
Pleas e fol low thest eps below for a djus tmen t in salt consum ption .
1. Unscrewthecapfrom the saltcontainer.
2. There is a r i ng on the container wit h an a rrow on it (see fig ure
onthe side),ifnecessary,rotatethe ring in theanticlockwise
direction from the "-" Settingtoward the"+" sign,based o n the
hardness o f the water be ing used.
It is recommended t hat a djustme nts should be made in
accord ance wit h the f ollowin g sc hem e:
WATER HARDNESS
dH
45~60 80~107 56~75 8~11
°
dH=1.25 Clarke=1.78 fH=0.178mmol/l
DH: German degree
°
fH: Frenchdegree
°
Clark: Britishdegree
°
fH
0~140~8 0~1.4
14~398~22 1.4~3.9 - 20 50
39~8022~45 3.9~8 Mid 40 25
°°
Clarke
0~10
10~28
28~56
mmol/l
Selector Position
/
+
""/
"-"
"+"
"Mid"
Salt consumption
(gram/cycle)
No sa lt need added
Settingtowardthe"-"sign
Settingtowardthe"+"sign
Settingtowardbetween
the "-" sign and "+" sign
Contact your local water bo ard for information on the har dness of your water suppl y.
Auto nomy
(cycles/1kgs)
0
60 16
/
4
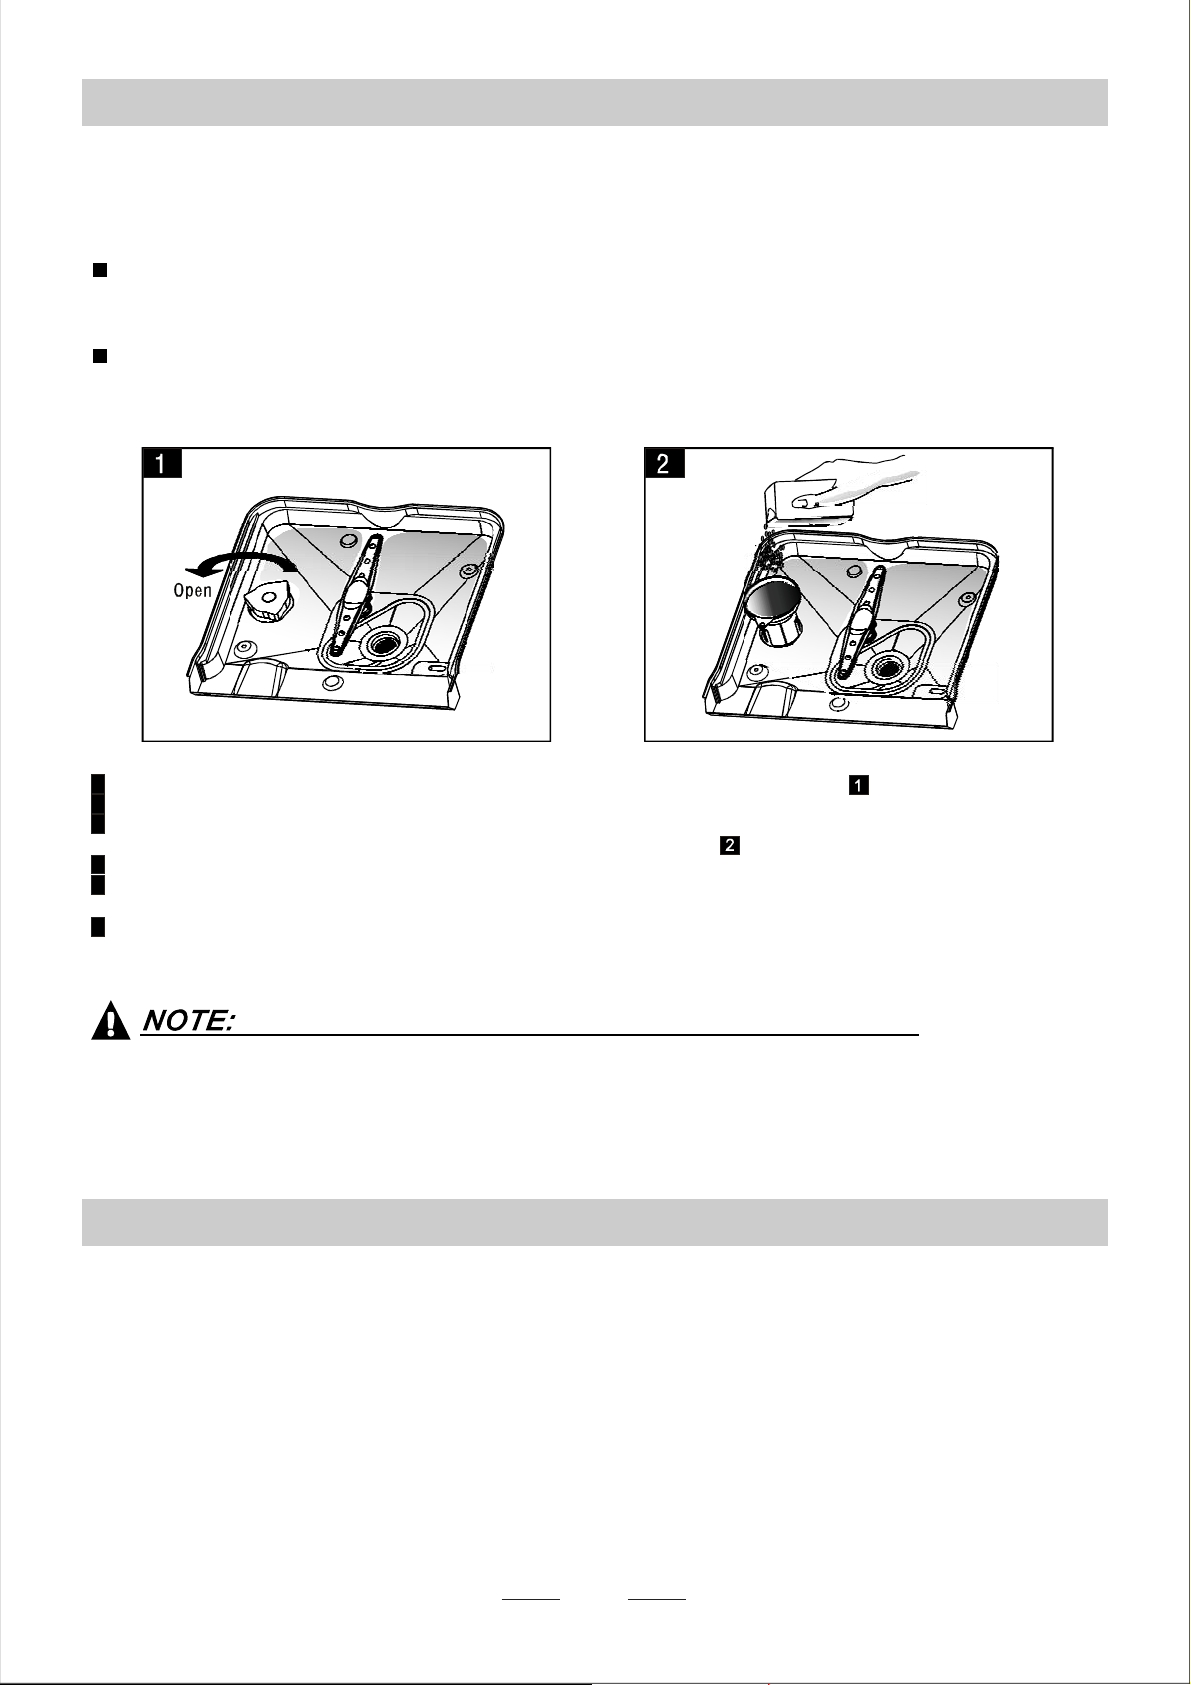
B. Loading the Salt Into the Soft ener
Always use the salt intende d for use with dishw asher.
The salt c ont ainer is locat ed beneath the l ower basket and sh ould be filled as e xplained in th e
follow ing:
Attention!
Only use salt spe cifi cally designed for the use i ndi shwashers! Every othertype of
salt n ot specif ically designed fo r the u se in a dishwas her, espe cially table salt,will
damage the water softener. In case of damages caused b y the use of unsuitab le
salt t he manufact urer does not give any wa rranty nor is li able for any damage s caused.
Only fill wi th salt just b efore starting one o f the co mplete wa shing p ro grams.
This will prevent any grai ns of s a lt or salty water,wh ich may have b een spilled,
remaining on the bottom of the machine for anype riod of time, which may cau se
corrosi on.
A Removethe lower basket andthenunscrew andremovethecapfromthe saltcontainer.
B Before thefirstwash, fill1lt.of water inthe saltcontainer of your machine.
C Place the e nd of the fun nel (supp lied) into the ho le and introd uce abou t 1kg of salt .
normal fo r a smal l amoun t of w ater to com e ou t of the sal t co n taine r.Itis
D Af ter filli ng the cont ainer , screw the c ap tigh tly back clo ckwise.
E Usually,the salt warni ng light wi ll stop being illumi nat ed within 2-6 days after the salt co ntainer ha s be en filled wi th
salt.
F Immediately after f illing t he salt into th e salt cont ainer, a w ashing pr ogram should be started (We suggest touse t he
soak orrapidprogram). Otherwise the filter system, pumpor otherimportantpartsofthemachine m aybedamaged
bysalty water. This isoutofwarranty.
1.The salt con tainer must only be refilled when the sal t warning light in the cont rol panel comes on.
Depending on how well the salt dissolves, the salt warnin g light may still be on even tho ugh the
salt container is filled.
If there is n o salt warning light in the con trol panel (fo r so me Mode ls),you can estimate when to f ill
the s alt into the softene r by the cycles that the di shwasher has run.
2. If there are spills of the salt , a soa k or a rapid program should be run to remove the excessivesa lt.
C. Fill the Ri nseAid Dispenser
RinseAid Dispenser
The r i nse aid i s releas ed d uring the final rinse to prevent water f rom f orming droplets o n y o ur dish es, whic h can l eave
spots and s treaks. It also improve sd rying by allowing water to rolloff the dishes. Your di shwasher is designed to
usel iquid rinse aids. The rinse aid dispenser is located inside the do or next to t he detergent di spenser.To fill the
dispenser, openthecapand pour the rinse aidintothe dispenseruntilthelevel indicatorturns completely black.
Thevo lume of the rins eaid container is about110ml.
Function of Rinse Ai d
Rinse aid is automa tically added d uring t he last rinse, ensuring thorough rinsing, and spo t and streak free drying.
Attention!
Only usebranded rinse aidfordishwasher. Neverfill the rinse aiddispenserwithanyothersubstances
(e.g. Dishwasher cleaning agent, liquid deterge nt). This would damag e the app liance.
5

Whento Refill theRinseAidDispenser
Ifth ere is no rinse-aid warning ligh t in the c ont rol panel, you can est imate the amount from the colo ur
ofth e optical level indi cator C loca ted next to the cap. When the rinse-a id c onta iner is full, the whole
indicator will be dark .As the rinse -aid diminishes, th es ize of the dark dot decreases. Youshould neve r let
the rins e aid level fall 1 / 4 full.
Asth e rinse aid dimin ishes, the siz eo f the black dot
onthe rinse aidlevel indicatorchanges, as illustrated below.
Full
3/4full
1/2full
1/ 4 full- Shouldrefill toeliminatespotting
Empty
""
C (R ins e- Ai d i n d ic ato r)
6
To op en the di spen ser, t urn the cap to the " ope n" (le ft) arr ow and l ift it o ut.
1
Pour the ri nse ai d int o the dis pen ser, being car eful not to overfi ll .
2
Replace the cap by inserti ng it aligned with " open" arrow and turning it to the closed (righ t) arrow.
3
Cl ean u p any rins e aid spi lled while dur in g fi ll i ng wi th a n abs o r bent cl oth t o avoid exce ssi v e foamin g
during the next wash. Don 't forget to re place t he cap be fore you close dis hwasher door.
Adjusti ng RinseA id Dispense r
Adjust lever
(Rinse)
Increasethedose if there aredropsofwater or lime spotson thedishes after washing.
Reduce it ifthereare stickywhitis h stainson yourdishes o ra bluishfilmon glasswareo r
knifeblades.
The rinse aid dispe nser has six or four s ettings. Always start wi th the dispens er
set o n "4". If spots andpoor drying are a problem, increa se the amoun t o f rinse
aid d ispensed by removing the d ispe nser lid and rotat ing the dial to "5" . If the
dishes still are not dryi ng prope rly o r are show sp ots, adjust the di al to the next
higher lever until your dishes a re spot-fr ee. The recommend ed setting is "4".
(Factoryvalue is "4".)
D. Function of Detergen t
Detergents wi th its chemic al ingredie nts ar e necessary to rem ove dirt, c rush dirt an d transport it ou t of the di shwasher.
Mosto f the commerci alqualityd eterge ntsare suitable fo rthisp urpose.
Deterg ents
The re are 3 sort s of det e rgents
1.Withphosphate andwithchlorine
2.Withphosphate and without c hlorine
3.Withoutphosphate and with out chlorine
6
Normally ne w pulver ised detergent is without phos phate. Thus the water soften er function of
phosphate is not gi ve n. In th is c a se w e rec omme nd to fill sa lt in t h e sal t contai n er even when
the h ardness of water is only 6 d H. If detergents w ithout phosphate are used in the case of hard wat er
often white s pots app ear on d ishe s a nd glasses. In this cas e please add more d etergent to reach
better r esu l ts. De te rgen ts w ith o ut ch lorine do on ly blea c h a little. Stro ng a nd colou red spots will no t
bere moved complete ly.In this case p lease choose a program with a hi gher temperature .
°
Concentr ated Deterge nt
Based on their chemicalcomposition, detergents canbe splitintwobasictypes:
conventional, alkalinedetergents withcaustic components
lo w a lk al i ne conc entrated deterge nt s wit h natura l enzy mes
The use of normal washingprograms incombination withconcentrateddetergents
reduces pollution and is g ood for your dishes; these was h progr ams ar e specific ally matche d
toth e di rt-di ssol ving propert ies o f the enz yme s of the concent rated de terg ent. For this reas on
“”
normal wash programs in which concentrated detergentsareusedcanachievethe same
resultsthat c ano therwiseonly be achieved using intensive programs.
“”
“”
DetergentTablets
Detergent tablets of different brandsdissolve atdifferent speeds. Forthisreason some
detergent tablets cannot dissolve and dev elop their full cleaning power dur ing short
programs. T here fore please use long program s when usin g d eterg ent t ablet s, to
ens ure the complete re moval of dete r g ent res i duals.
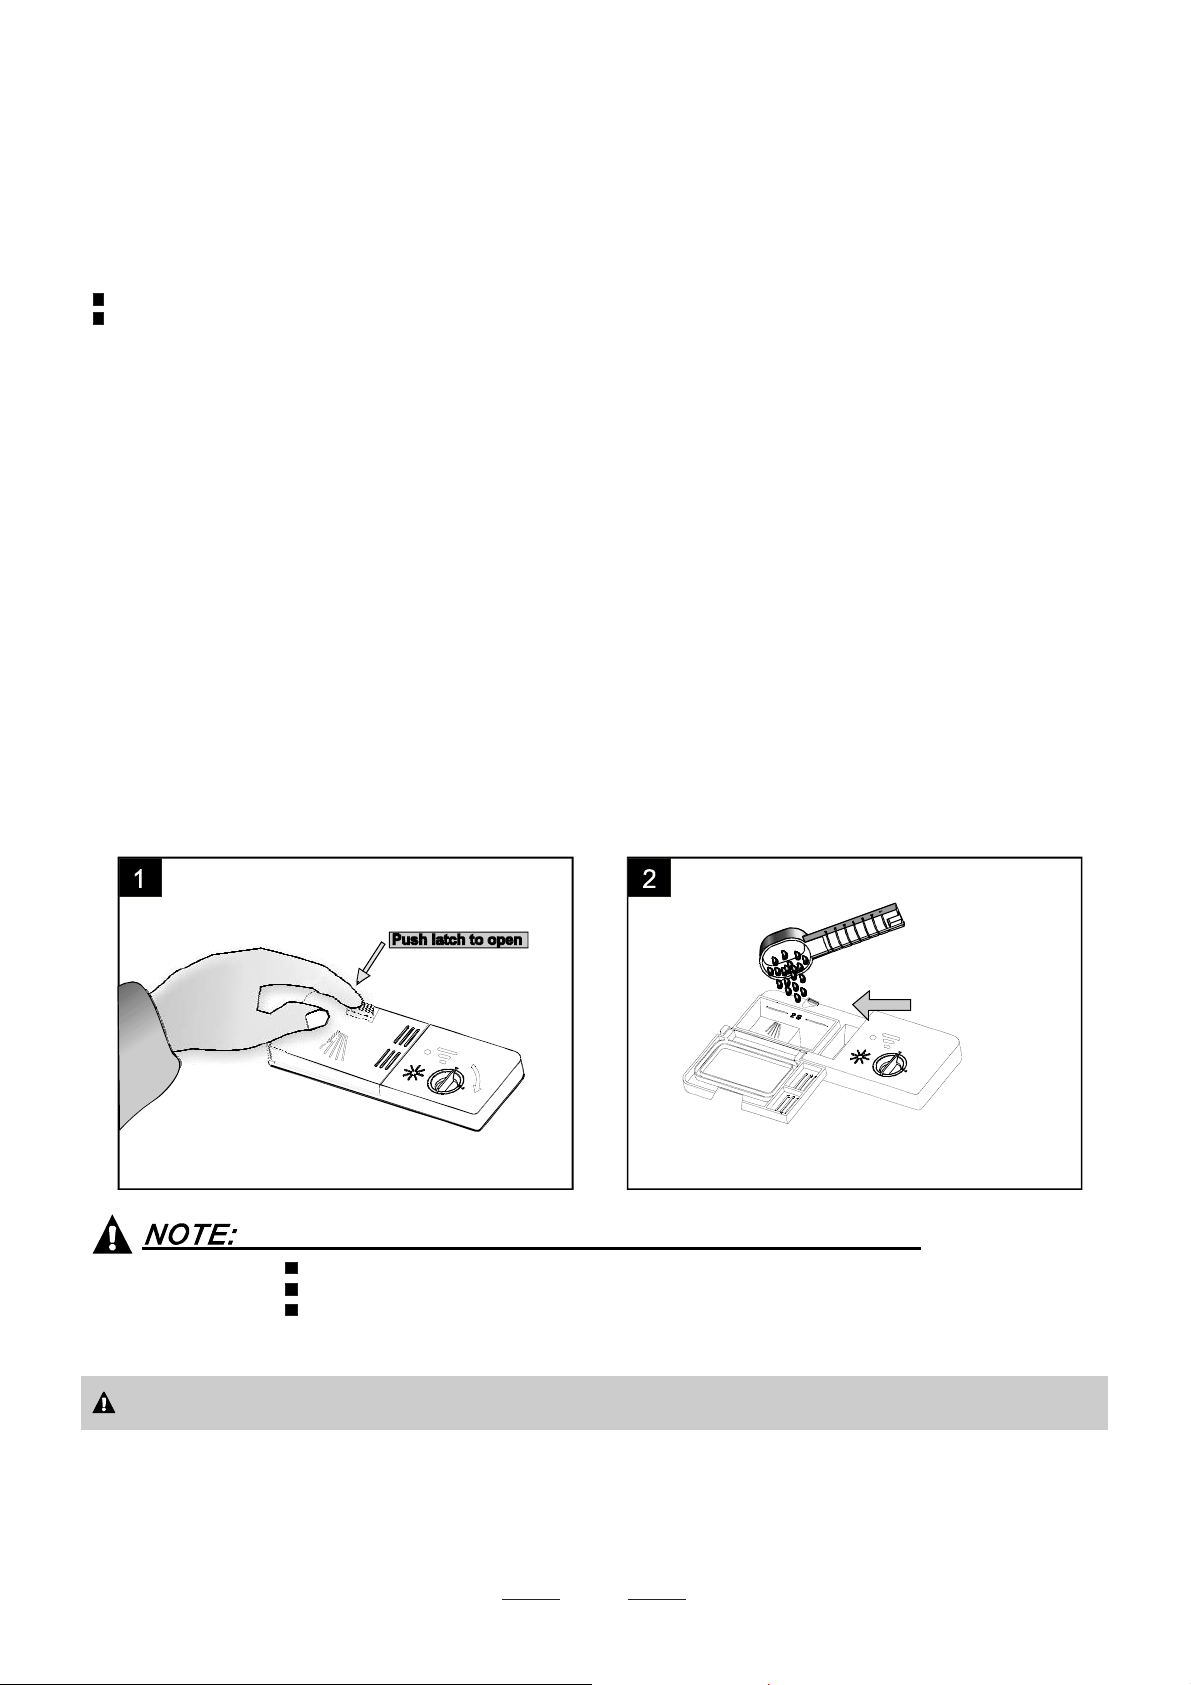
Detergent Dispenser
The disp enser must be refille d before the start of each wash cy cle f ollowing the i nstructions
provided i n the w ash cycle t able . You r dishwa sher uses less detergent and rins e aid than
Conventional dishwasher. Generally, onlyone tablespoon of detergent isneeded for
anormal washload.Moreheavily soiled itemsneedmore detergent.Alwaysadd the
detergen t jus t be fore star ting the dish was her, otherwis e it could g e t damp and w ill n ot
dissol v e proper ly.
AmountofDetergentto Use
If the l id is closed: press rele ase button. T he lid wi ll spring open.
Always a dd the detergent just b efore starting each wash cycle.
Only usebranded detergentaid f ordishwasher.
WARNING!
Proper U se of Deterg ent
Use o nly deterge nt s pecif ically made for the us e i n dishwas hers. Keep your det ergent fresh and dry.
Don't putpowdered d etergentintothe dispenseruntil you're readytowashdishes.
Dishwasher detergent i s corrosive! Take care to keep it out ofreach of childr en.
7
 Loading...