

Page 1

AIR CONDITIONER
Use & Care Guide
For questions about features, operation/performance, parts,
accessories or service, call: 1-800-253-1301 in the U.S.A.
ACONDICIONADOR
DE AIRE
Manual de uso y cuidado
Si tiene preguntas respecto a las características, funcionamiento,
rendimiento, piezas, accesorios o servicio técnico,
llame al: 1-800-253-1301 en los EE. UU.
Table of Contents/Índice ..................................... 2
66121560A
Page 2
TABLE OF CONTENTS
AIR CONDITIONER SAFETY .........................................................2
INSTALLATION REQUIREMENTS................................................3
Tools and Parts ............................................................................3
Location Requirements................................................................3
Electrical Requirements ............................................................... 4
INSTALLATION INSTRUCTIONS..................................................5
Unpack the Air Conditioner.......................................................... 5
Window Installation (on some models)........................................6
Through-the-Wall Cabinet Installation......................................... 9
Complete Installation .................................................................10
AIR CONDITIONER USE..............................................................11
Starting Your Air Conditioner—Digital Control ..........................12
Using the Remote Control .........................................................13
ÍNDICE
SEGURIDAD DEL ACONDICIONADOR DE AIRE......................19
REQUISITOS DE INSTALACIÓN.................................................20
Herramientas y piezas................................................................20
Requisitos de ubicación.............................................................20
Requisitos eléctricos..................................................................21
INSTRUCCIONES DE INSTALACIÓN.........................................22
Desempaque el acondicionador de aire....................................22
Instalación en una ventana (en algunos modelos) ....................23
Instalación a través de la pared.................................................26
Complete la instalación..............................................................27
CÓMO USAR SU ACONDICIONADOR DE AIRE.......................28
Cómo poner en marcha su acondicionador de aire—
Control digital .............................................................................29
Cómo usar el control remoto .....................................................30
Starting Your Air Conditioner—Rotary Control—
Cool Only Models.......................................................................14
Starting Your Air Conditioner—Rotary Control—
Heat/Cool Models ......................................................................15
Changing Air Direction ...............................................................16
Normal Sounds...........................................................................16
AIR CONDITIONER CARE ...........................................................16
Cleaning the Air Filter .................................................................16
Cleaning the Front Panel............................................................16
Repairing Paint Damage ............................................................16
Annual Maintenance...................................................................16
TROUBLESHOOTING ..................................................................17
ASSISTANCE OR SERVICE.........................................................18
Accessories ................................................................................19
Cómo poner en marcha su acondicionador de aire—
Control rotativo—Modelos con sólo aire frío.............................31
Cómo poner en marcha su acondicionador de aire—
Control rotativo—Modelos con aire caliente/frío.......................32
Cómo cambiar la dirección del aire ...........................................33
Sonidos normales.......................................................................33
CUIDADO DE SU ACONDICIONADOR DE AIRE......................34
Limpieza del filtro de aire ...........................................................34
Limpieza del panel delantero .....................................................34
Reparación de la pintura dañada...............................................34
Mantenimiento anual..................................................................34
SOLUCIÓN DE PROBLEMAS......................................................34
AYUDA O SERVICIO TÉCNICO...................................................36
Accesorios..................................................................................36
AIR CONDITIONER SAFETY
Your safety and the safety of others are very important.
We have provided many important safety messages in this manual and on your appliance. Always read and obey all safety
messages.
This is the safety alert symbol.
This symbol alerts you to potential hazards that can kill or hurt you and others.
All safety messages will follow the safety alert symbol and either the word “DANGER” or “WARNING.”
These words mean:
You can be killed or seriously injured if you don't immediately
DANGER
WARNING
All safety messages will tell you what the potential hazard is, tell you how to reduce the chance of injury, and tell you what can
happen if the instructions are not followed.
follow instructions.
can be killed or seriously injured if you don't
You
instructions.
follow
2
Page 3
WARNING:
To reduce the risk of fire, electrical shock or injury when using your air conditioner, follow these basic precautions:
Plug into a grounded 3 prong outlet.
IMPORTANT SAFETY INSTRUCTIONS
Do not use an extension cord.
Do not remove ground prong.
Do not use an adapter.
SAVE THESE INSTRUCTIONS
INSTALLATION REQUIREMENTS
Tools and Parts
Gather the required tools and parts before starting installation.
Read and follow the instructions provided with any tools listed
here.
Tools Needed
■ Flat-blade and Phillips
screwdrivers
■ Level
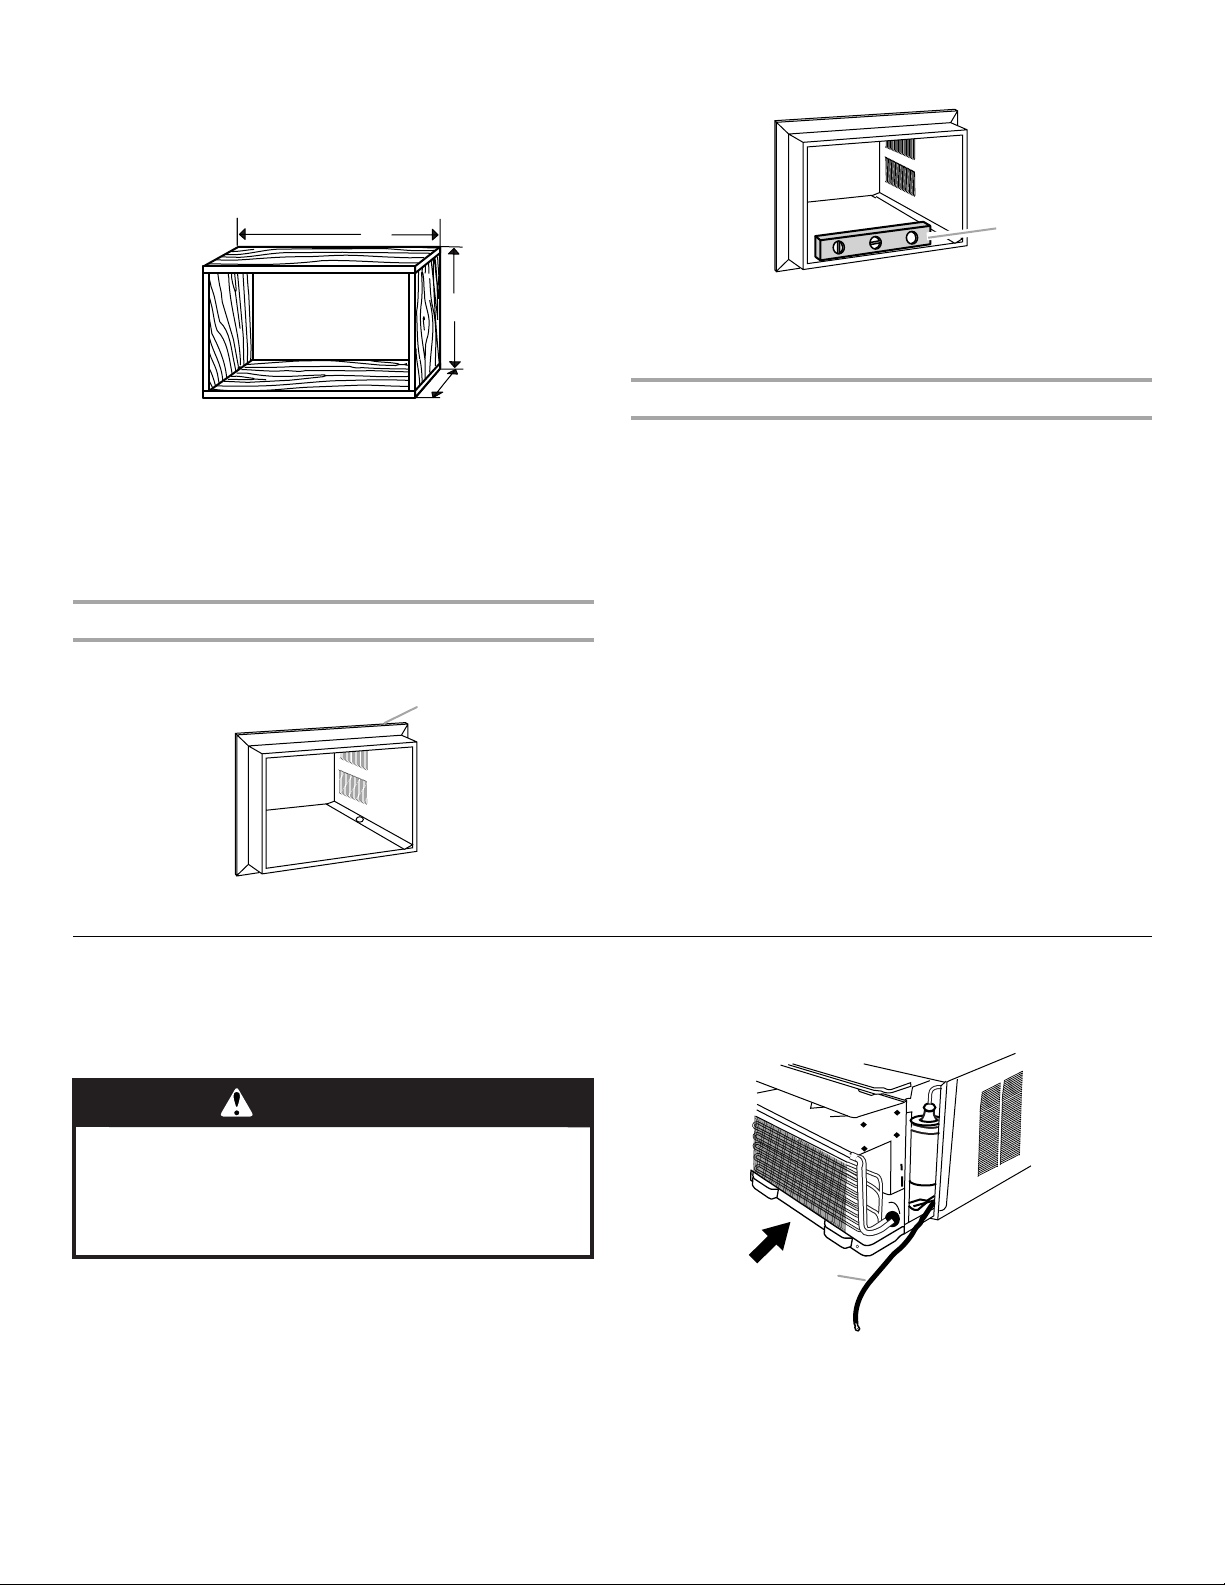
Through-the-Wall Installation:
In addition to the tools listed above, the following tools are
needed for through-the-wall installation.
■ Saw
■ Wood preservative
■ Caulk
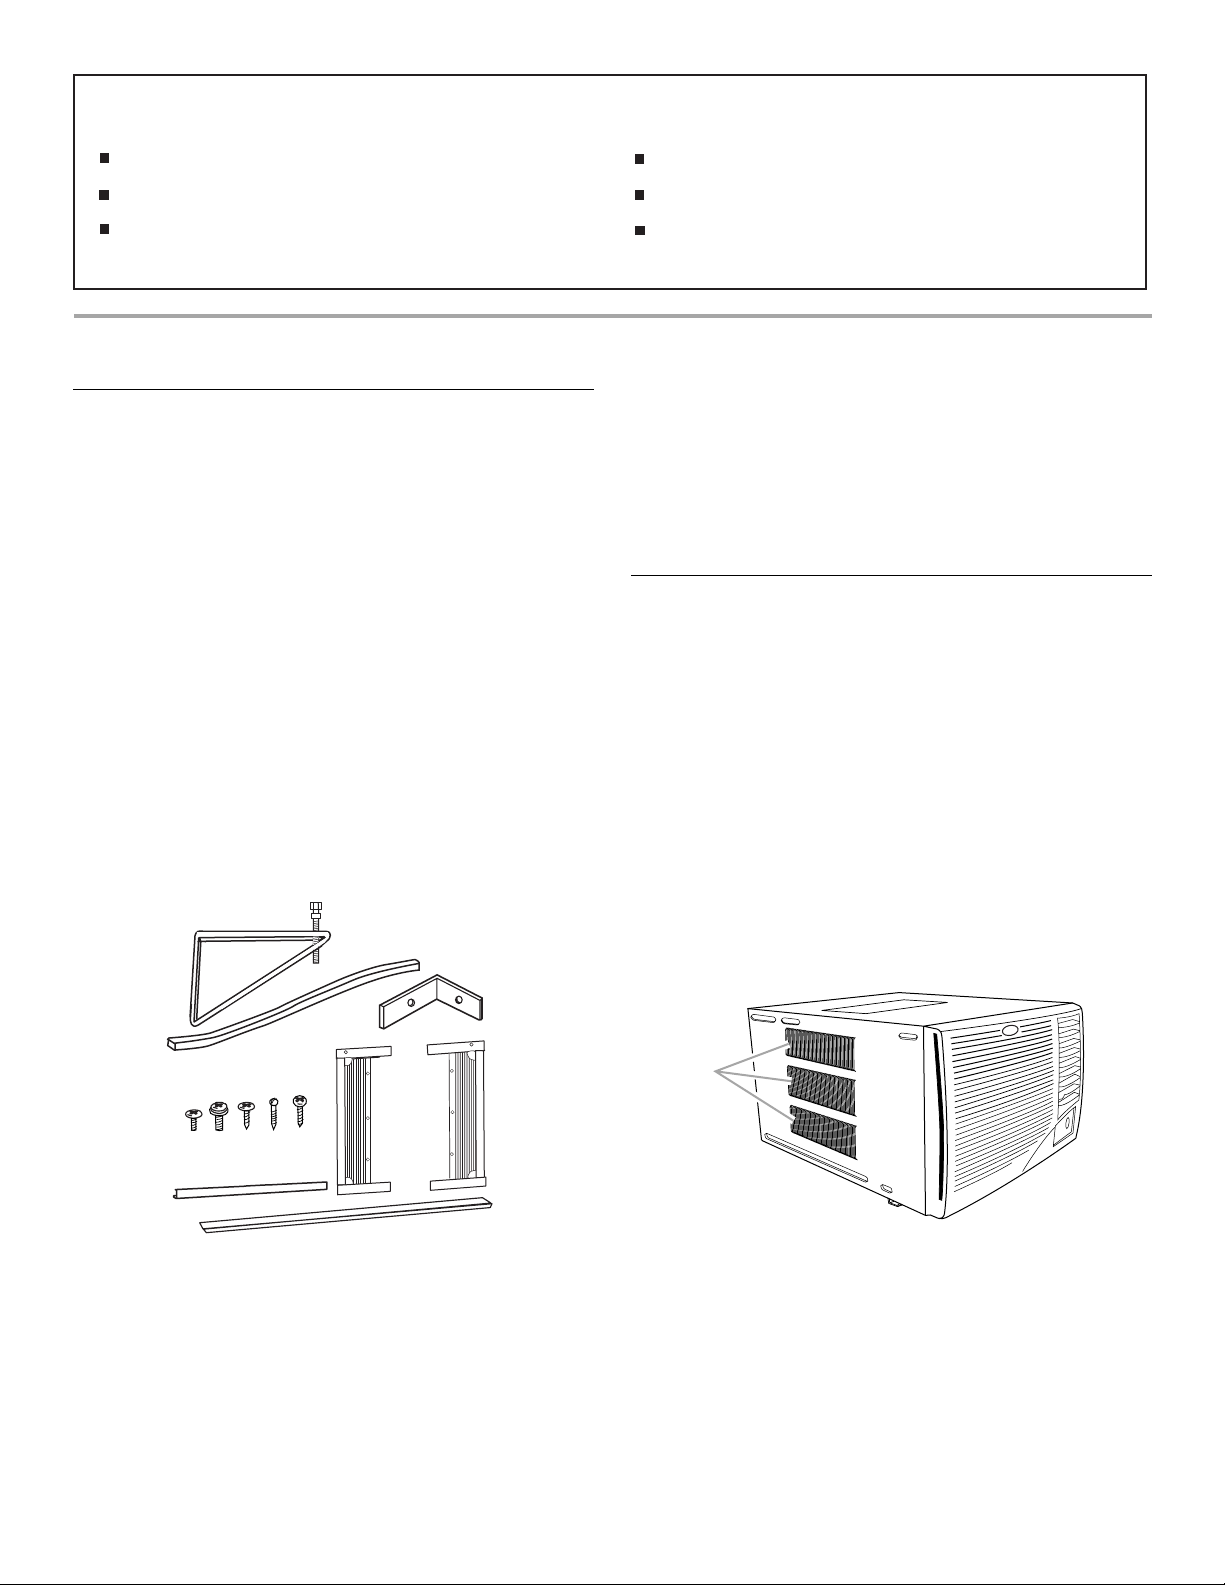
Parts Supplied (on some models)
Check that all parts are included in parts package.
A
■ Tape measure
■ Drill and ³⁄₃₂" or smaller bit
■ 1" (2.5 cm) or thicker
lumber
■ #10 x 1" wood screws (7)
Unplug air conditioner before servicing.
Use two or more people to move and install air conditioner.
NOTES:
■ On some models, the front panel is not attached to the air
conditioner. On these models, the 2 - #10 x ³⁄₄" painted
round-head Phillips screws (H) used to attach the front panel
will be included in the parts bag.
■ Installation parts are supplied for double-hung windows up to
40" (101.6 cm) wide. A special Wide Window Kit is available
from your dealer or service center. See “Accessories.”
Location Requirements
IMPORTANT: Observe all governing codes and ordinances.
Check the location where air conditioner will be installed. Proper
installation is your responsibility. Make sure you have everything
necessary for correct installation.
The location should provide:
■ Grounded electrical outlet within 4 ft (122 cm) of where the
power cord exits the air conditioner.
NOTE: Do not use an extension cord.
■ Free movement of air in room to be cooled.
■ A large enough opening for the air conditioner.
■ Adequate wall support for weight of air conditioner. Air
conditioner weighs between 145 and 200 lbs (65 to 96 kg).
NOTE: Cabinet louvers must not be obstructed. Air must be able
to pass freely through the cabinet louvers.
B
F
D
E
I
A. Support brackets with
adjustment bolts (2)
B. Foam window sash seal
C. Window lock bracket (2)
¹⁄₄
D. #10 x
E. #10 x
" pan-head Phillips
screws (6)
³⁄₈
" washer-head
Phillips thread-cutting
screws (4)
H
G
K
F. #10 x
G. #10 x
H. #10 x
screw (2) (on some models)
I. Top channel
J. Side curtains (2)
K. Foam adhesive seal
C
J
¹⁄₂
" pan-head Phillips screws (8)
³⁄₄
" round-head screws (6)
³⁄₈
" painted round-head Phillips
A
A. Cabinet louvers
3
Page 4
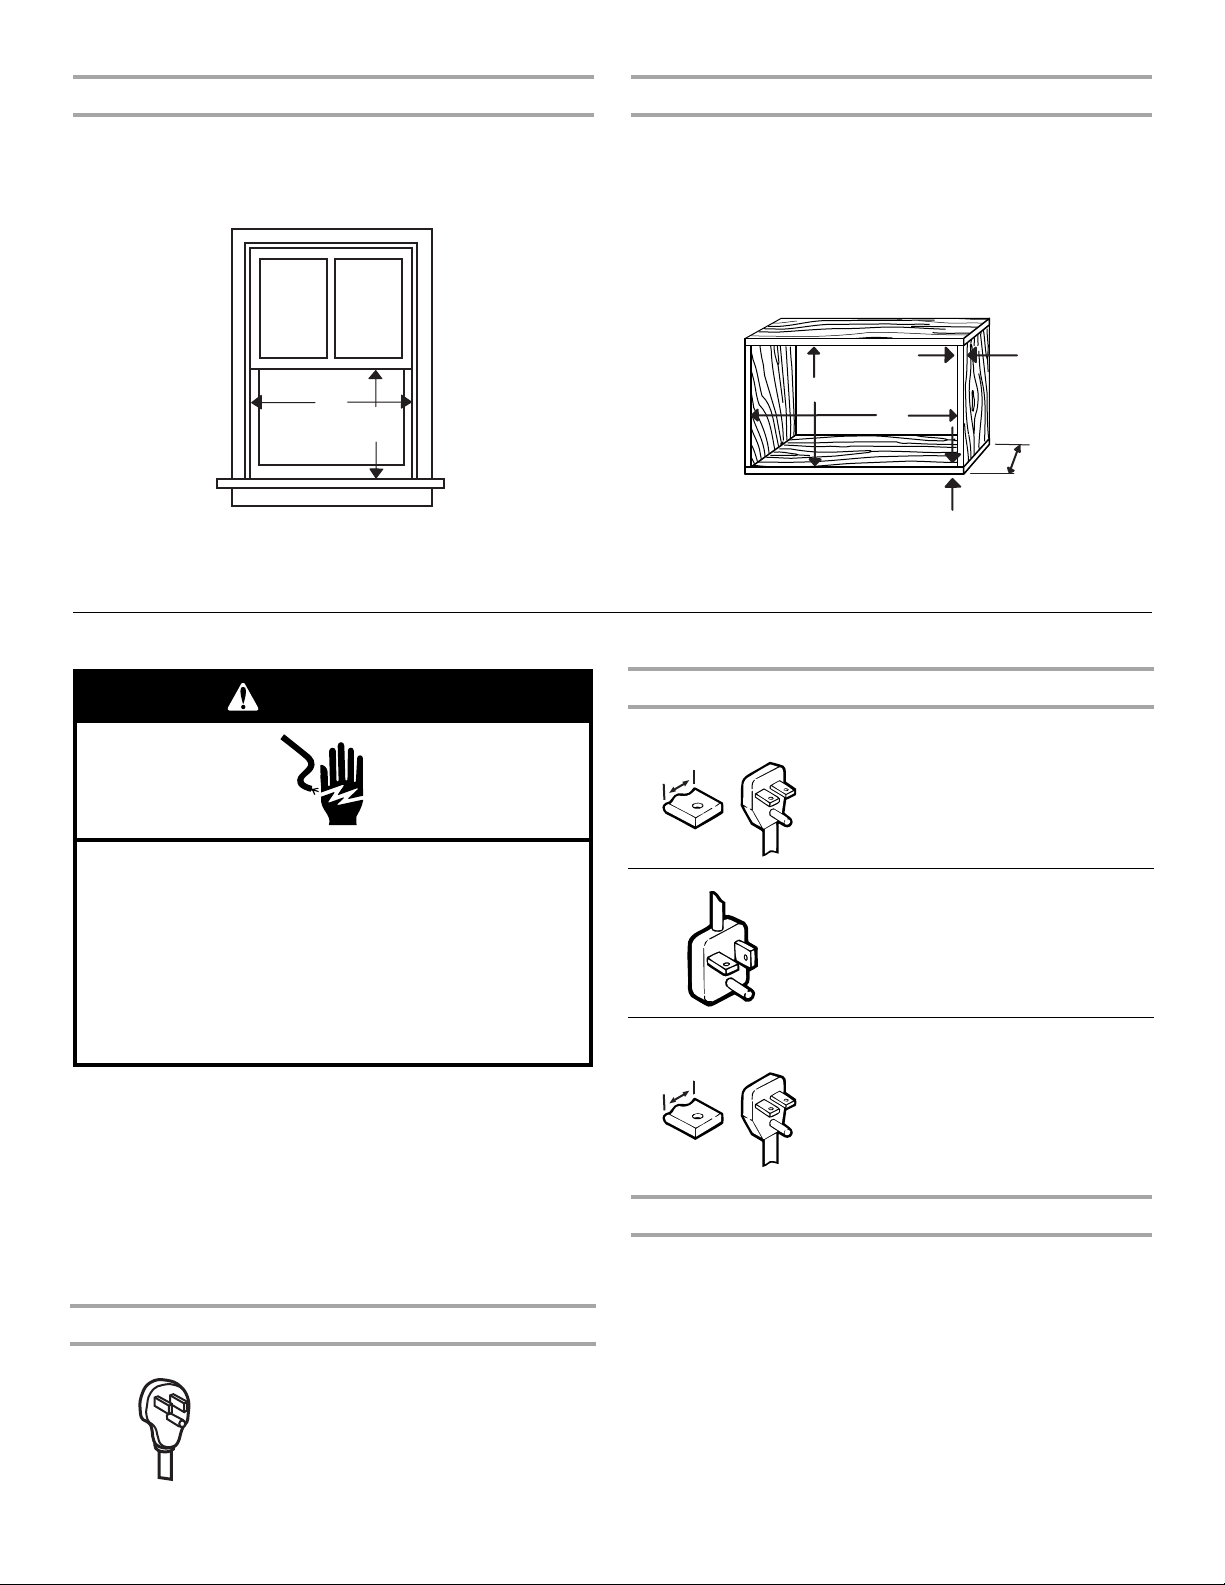
Window Installation
C
D
Through-the-Wall Installation
Window opening measurements:
■ 30" to 40" (76.2 cm to 101.6 cm) opening width.
■ 20" (50.8 cm) minimum opening height.
A
B
A. 30" (76.2 cm) minimum
B. 20" (50.8 cm) minimum
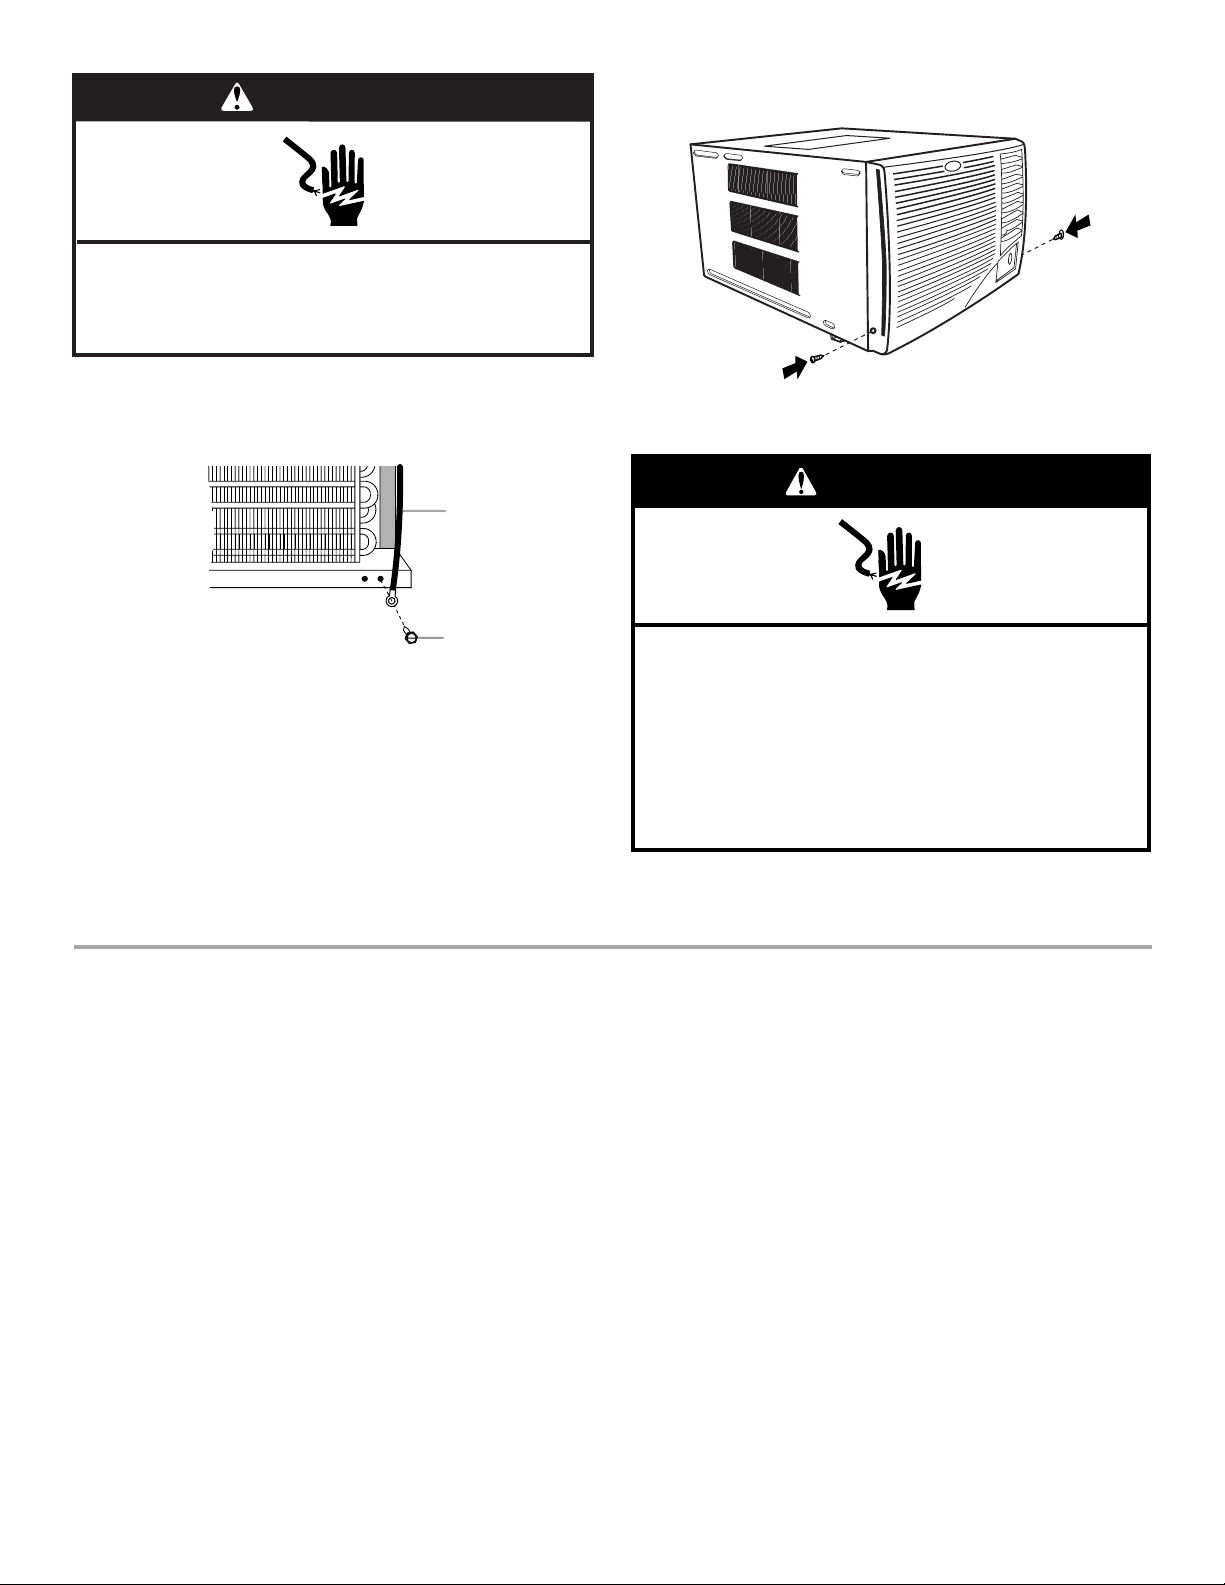
Electrical Requirements
WARNING
Electrical Shock Hazard
Plug into a grounded 3 prong outlet.
Do not remove ground prong.
Do not use an adapter.
Do not use an extension cord.
Failure to follow these instructions can result in death,
fire, or electrical shock.
Ground wire must be connected to the ground screw located in
the lower right corner of the air conditioner when the air
conditioner is in the cabinet.
The electrical ratings for your air conditioner are listed on the
model and serial number label. The model and serial number
label is located behind the front panel on the flange below the
control panel area.
Specific electrical requirements are listed in the chart below.
Follow the requirements for the type of plug on the power supply
cord.
Power Supply Cord Wiring Requirements
■ 115-volt (103.5 min. to 126.5 max.)
■ 0 to 12 amps
■ 15-amp time-delay fuse or
circuit breaker
■ Use on single outlet circuit only.
The wall opening measurements should be:
■ Width: 26¹⁄₂" (66.1 cm) plus twice thickness of wood used to
build frame.
■ Height: 19³⁄₄" (50.2 cm) plus twice thickness of wood used to
build frame.
■ Depth: Dimension for depth depends on the wall thickness
and the type of molding.
A
B
C
A. 19
B. 26
³⁄₄
" (50.2 cm)
¹⁄₂
" (66.1 cm)
C. Wood thickness
D. Depth
Power Supply Cord Wiring Requirements
¹⁄₄"
(0.6 cm)
■ 230-volt (207 min. to 253 max.)
■ 0 to 12 amps
■ 15-amp time-delay fuse or
circuit breaker
■ Use on single outlet circuit only.
■ 230-volt (207 min. to 253 max.)
■ 0 to 16 amps
■ 20-amp time-delay fuse or
circuit breaker
■ Use on single outlet circuit only.
¹⁄₂"
(1.3 cm)
■ 230-volt (207 min. to 253 max.)
■ 0 to 24 amps
■ 30-amp time-delay fuse or
circuit breaker
■ Use on single outlet circuit only.
Recommended Grounding Method
This air conditioner must be grounded. This air conditioner is
equipped with a power supply cord having a grounded 3 prong
plug. To minimize possible shock hazard, the cord must be
plugged into a mating, grounded 3 prong outlet, grounded in
accordance with all local codes and ordinances. If a mating outlet
is not available, it is the customer's responsibility to have a
properly grounded 3 prong outlet installed by a qualified electrical
installer.
4
Page 5
It is the customer's responsibility:
■ To contact a qualified electrical installer.
■ To assure that the electrical installation is adequate and in
conformance with National Electrical Code, ANSI/NFPA 70 latest edition, and all local codes and ordinances.
Copies of the standards listed may be obtained from:
National Fire Protection Association
One Batterymarch Park
Quincy, MA 02269
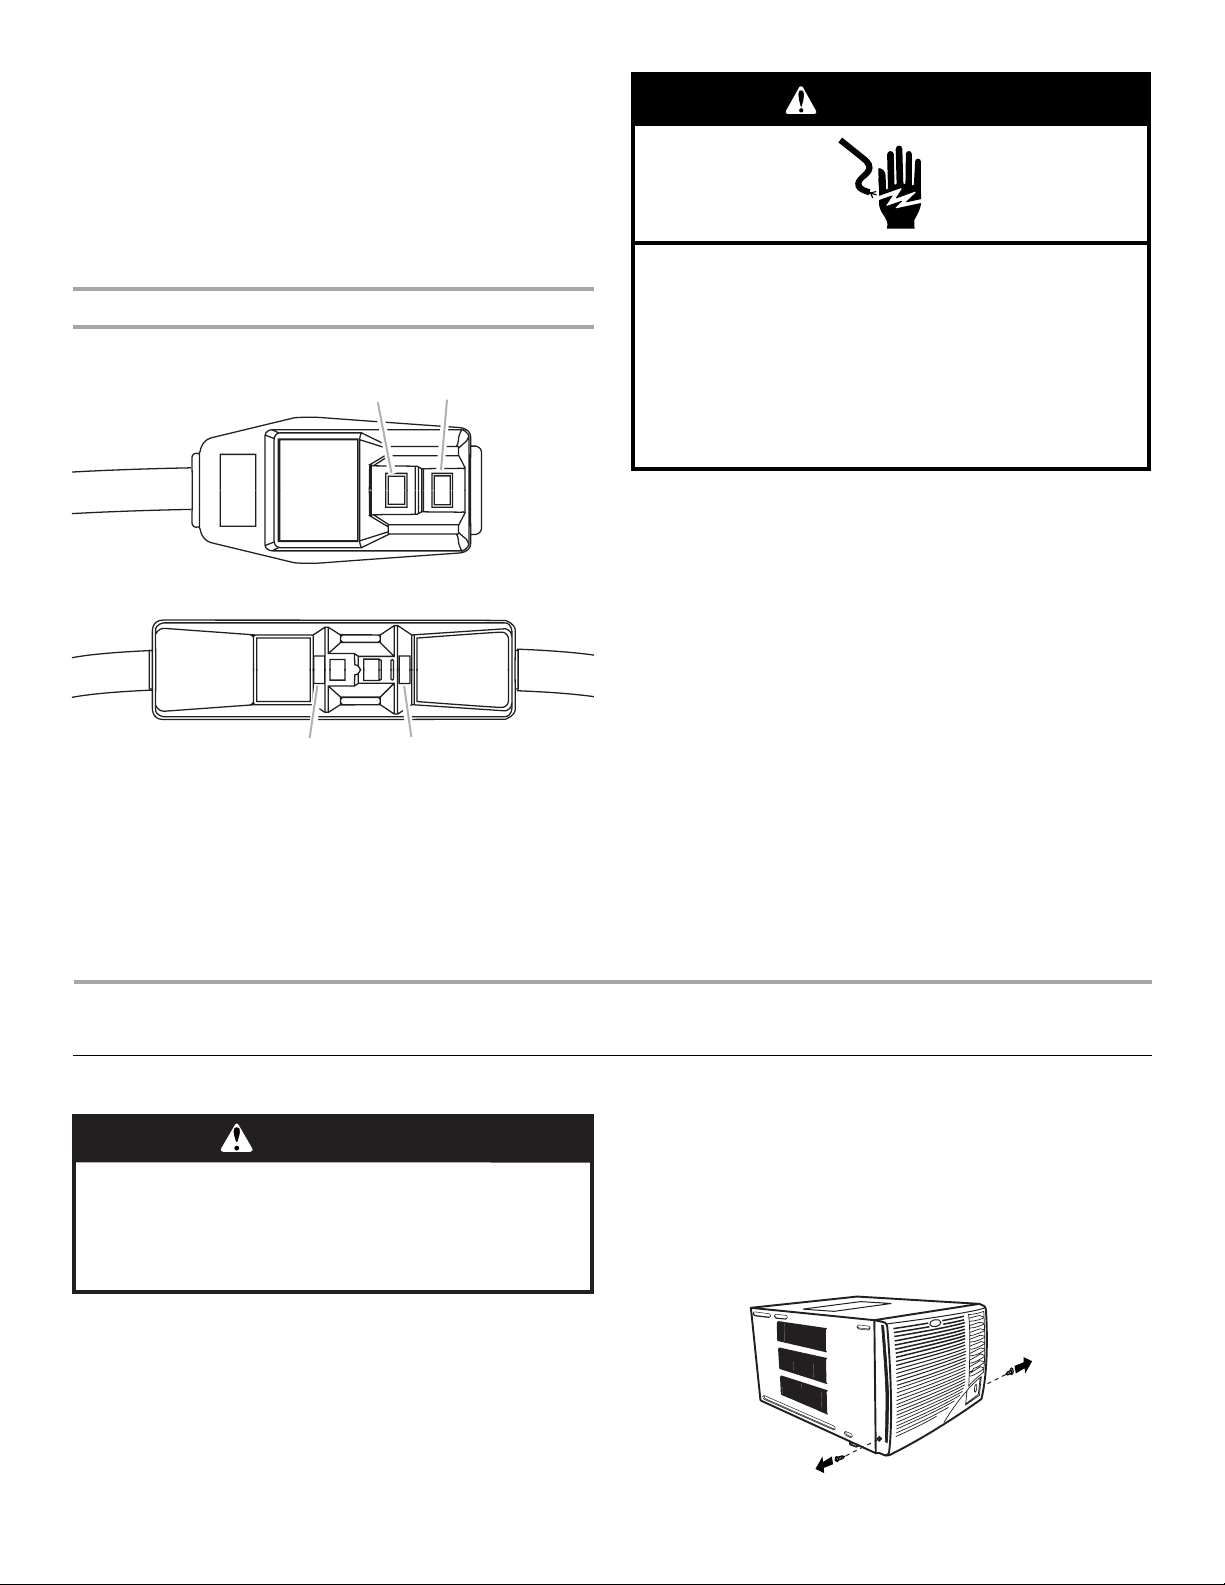
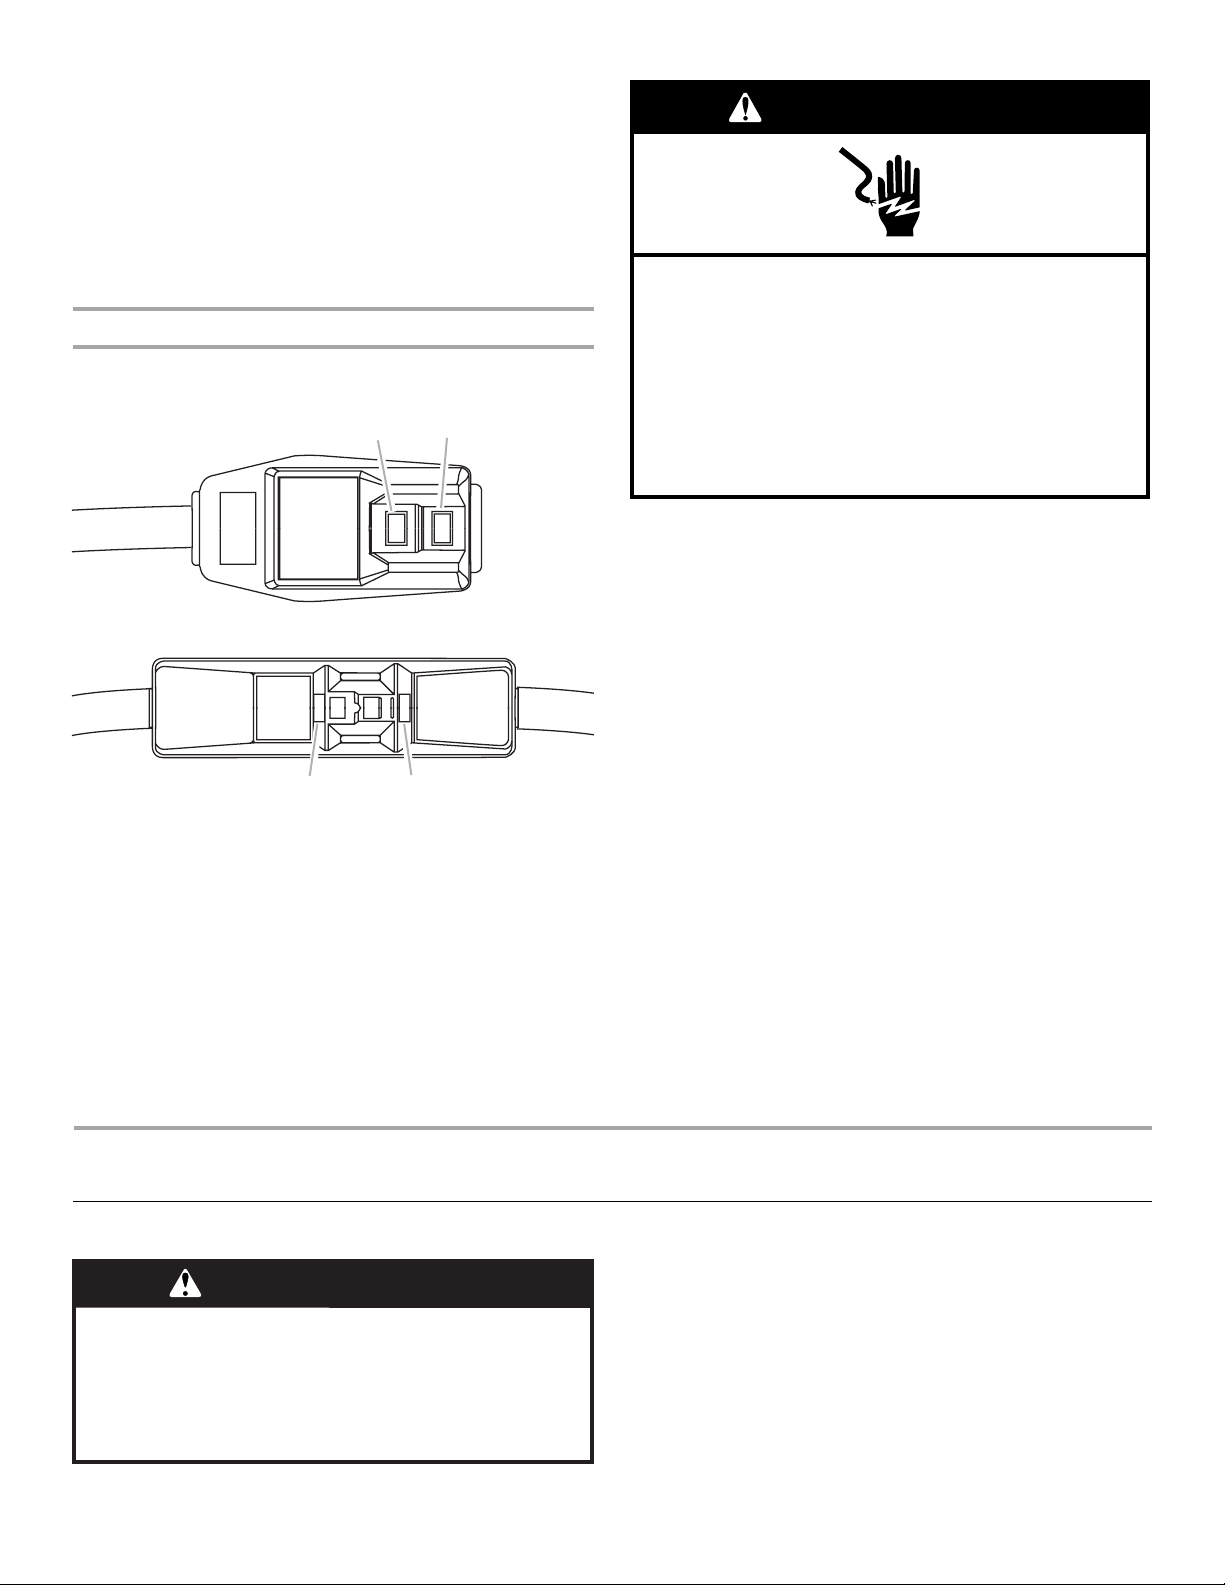
Power Supply Cord
NOTE: Yo ur un it’s device may differ from the ones shown.
A
TEST
TEST
A
A. Test button
B. Reset button
This room air conditioner is equipped with a power supply cord
required by UL. This power supply cord contains state-of-the-art
electronics that sense leakage current. If the cord is crushed, the
electronics detect leakage current and power will be
disconnected in a fraction of a second.
B
RESET
RESET
B
WARNING
Electrical Shock Hazard
Plug into a grounded 3 prong outlet.
Do not remove ground prong.
Do not use an adapter.
Do not use an extension cord.
Failure to follow these instructions can result in death,
fire, or electrical shock.
To test your power supply cord:
1. Plug the power supply cord into a grounded 3 prong outlet.
2. Press RESET.
3. Press TEST (listen for click; Reset button will trip and pop
out).
4. Press and release RESET (listen for click; Reset button will
latch and remain in). The power supply cord
operation.
NOTES:
■ The Reset button must be pushed in for proper operation.
■ The power supply cord must be replaced if it fails to trip when
the test button is pressed or fails to reset.
■ Do not use the power supply cord as an off/on switch. The
power supply cord is designed as a protective device.
■ A damaged power supply cord must be replaced with a new
power supply cord obtained from the product manufacturer
and must not be repaired.
■ The power supply cord contains no user serviceable parts.
Opening the tamper-resistant case voids all warranty and
performance claims.
is ready for
INSTALLATION INSTRUCTIONS
Unpack the Air Conditioner
WARNING
Excessive Weight Hazard
Use two or more people to move and install
air conditioner.
Failure to do so can result in back or other injury.
Remove packaging materials
■ Remove and dispose of/recycle packaging materials.
Remove tape and glue residue from surfaces before turning
on the air conditioner. Rub a small amount of liquid dish soap
over the adhesive with your fingers. Wipe with warm water
and dry.
■ Do not use sharp instruments, rubbing alcohol, flammable
fluids, or abrasive cleaners to remove tape or glue. These
products can damage the surface of your air conditioner.
■ Handle the air conditioner gently.
1. Remove the air conditioner from the carton and place it on
cardboard.
2. On some models, remove the screws from the front panel.
5
Page 6
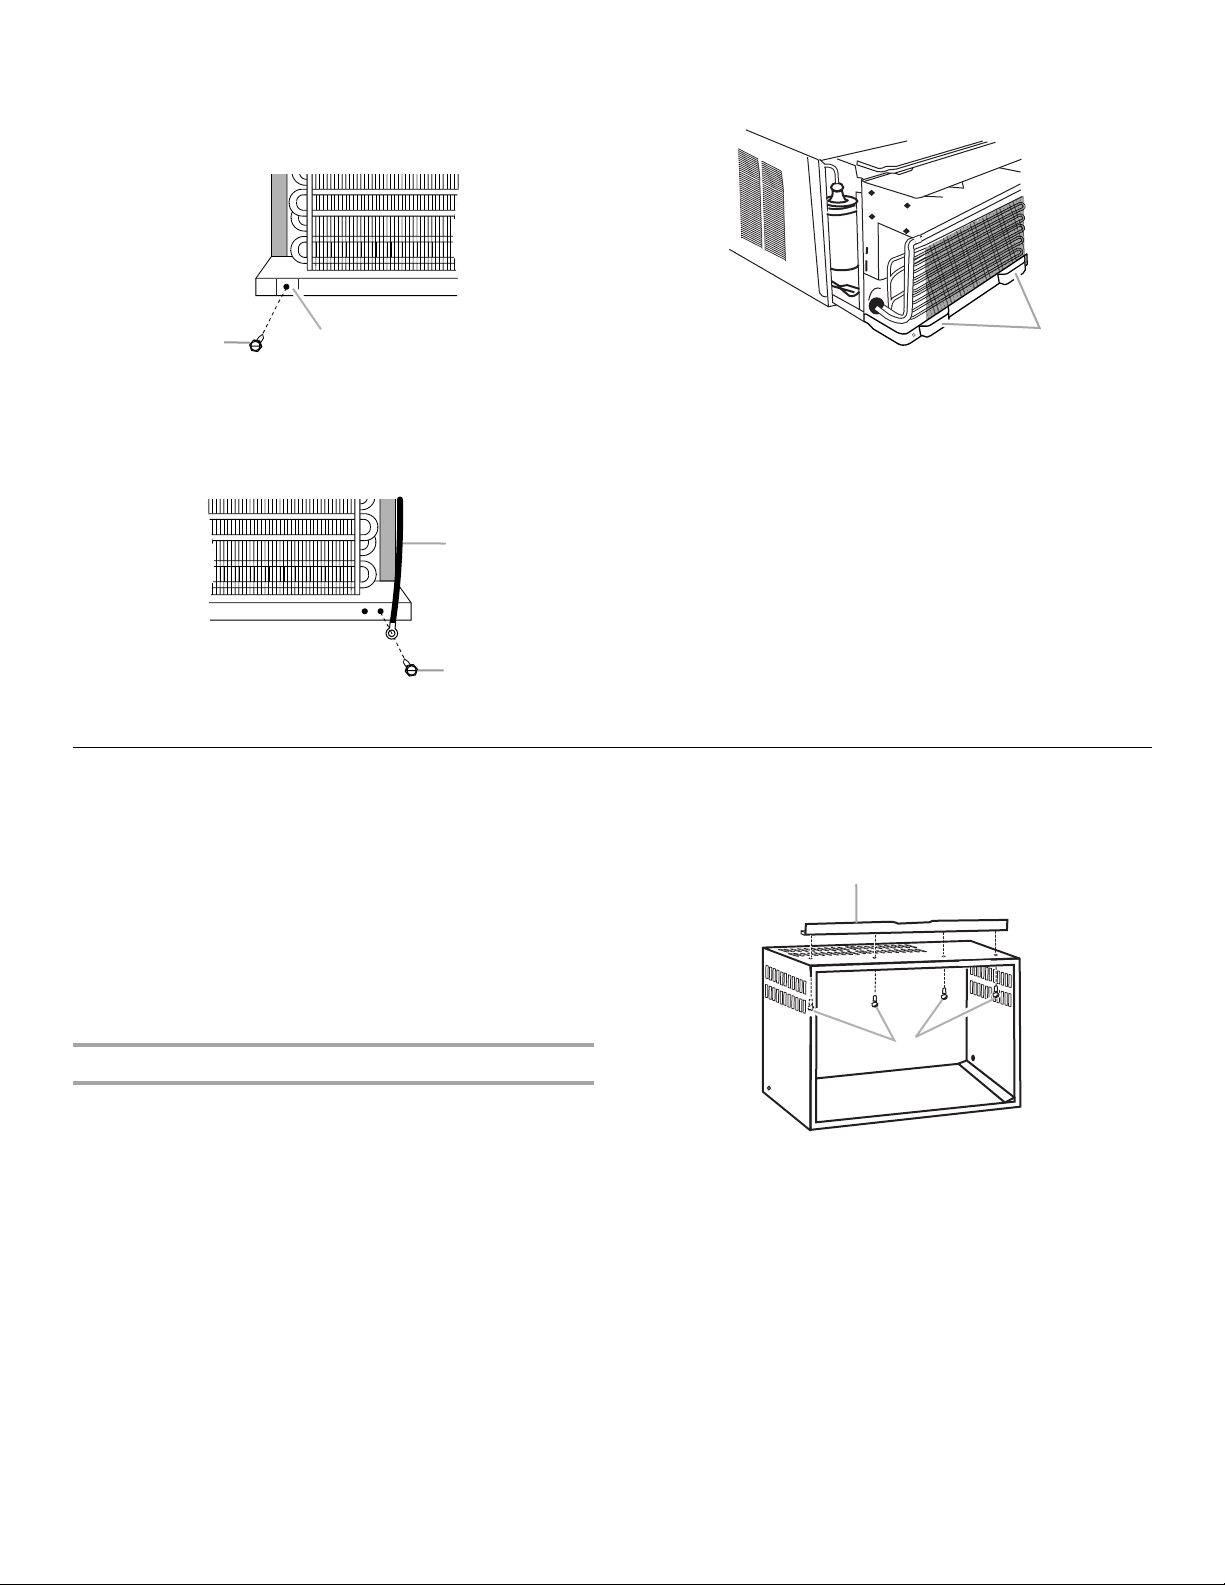
3. Remove the front panel from the air conditioner and set
aside.
4. Remove the shipping lock bracket and screw from the air
conditioner and set aside.
6. Pull on the handles to slide the air conditioner out of the
cabinet. Place the air conditioner on cardboard.
A B
A. Shipping lock bracket screw
B. Shipping lock bracket
5. Remove the ground screw and ground wire from the front of
the air conditioner. Save the ground screw.
A
B
A. Green ground wire
B. Ground screw
Window Installation (on some models)
NOTES:
■ Handle the air conditioner gently.
■ Be sure your air conditioner cabinet does not fall out of the
opening during installation or removal.
■ The location where the power cord exits the air conditioner
should be no more than 4 ft (122 cm) from a grounded
3prong outlet.
■ Do not block the louvers on the front panel.
■ Do not block the louvers on the outside of the air conditioner.
Attach Top Channel
A
A. Handles
NOTE: Do not lift, push, pull or remove any expanded
polystyrene (foam) from inside the air conditioner. It is not
packing material.
3. Using 4 - #10 x ³⁄₈" washer-head Phillips thread-cutting
screws, attach the top channel to the air conditioner cabinet.
A
B
NOTE: Attach the top channel and the side curtains to the air
conditioner cabinet before placing the cabinet in the window.
1. Locate the bag of screws provided.
2. Place the top channel on top of the air conditioner cabinet,
lining up the 4 holes in the top channel with the 4 holes on top
of the air conditioner cabinet.
6
A. Top channel
B. #10 x
³⁄₈
" washer-head Phillips thread-cutting screws
Page 7
Attach Side Curtains
1. Locate the bag of screws provided.
2. Insert the top and then the bottom of the right-hand curtain
housing in the top and bottom curtain guides on the air
conditioner.
Top vi ew
A
B
4. While the right-hand curtain is still extended, insert #10 x ¹⁄₄"
pan-head Phillips screws into the top and bottom slots of
curtain. Screw the curtain to the top and bottom holes in the
air conditioner cabinet.
NOTE: Some curtains may have 2 slots at each end. You will
be able to see a mounting hole through the correct slot.
5. Slide the curtain housing into the curtain guides as far as it
will go.
6. Repeat the above steps for the left-hand curtain.
Attach foam adhesive seal
Attach the foam adhesive seal along the bottom of the bottom
curtain guide.
A. Curtain housing
B. Curtain guides
Bottom view
A
B
A. Curtain housing
B. Curtain guides
3. Extend the right-hand curtain outward so you may insert the
first screw through the middle hole of the curtain. Using
#10 x ¹⁄₄" pan-head Phillips screw, screw the curtain to the
middle hole in the air conditioner cabinet.
NOTE: This screw is required to correctly attach the curtain
(top to bottom) to the air conditioner cabinet.
A
B
A. Curtain housing
B. Foam adhesive seal
Install Cabinet into Window
NOTES:
■ Handle the air conditioner gently.
■ Be sure your air conditioner cabinet does not fall out of the
opening during installation or removal.
■ The location where the power cord exits the air conditioner
should be no more than 4 ft (122 cm) from a grounded
3prong outlet.
■ Do not block the louvers on the front panel.
■ Do not block the louvers on the outside of the air conditioner.
1. Center the empty cabinet in the window. Check that the lower
rail of the air conditioner cabinet is behind and against the
back side of the windowsill. Maintain a firm hold on the air
conditioner cabinet. Lower the window sash to hold the
cabinet in place.
2. Measure the distance between the right-hand side of the
cabinet and the inside of the window channel.
7
Page 8
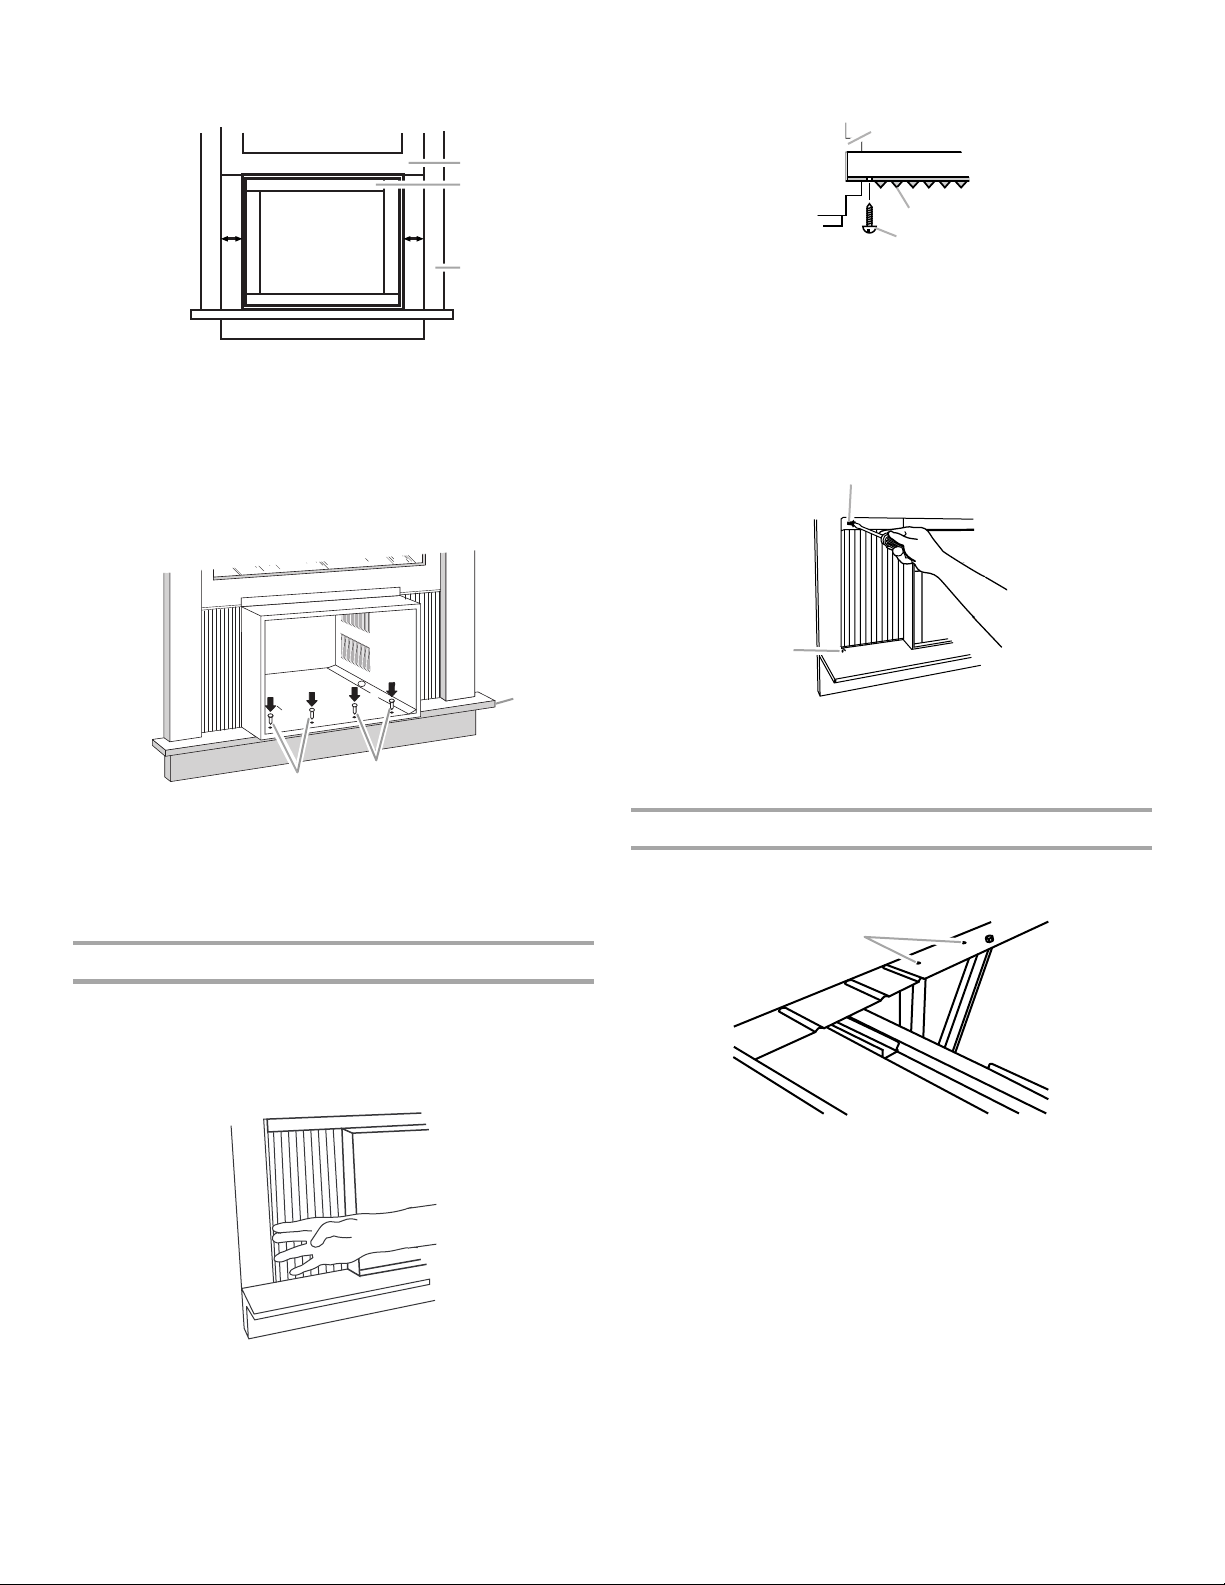
3. Repeat for the left side. Adjust the cabinet until the distance
B
A
C
B
on each side is the same.
Top Vi ew
A
B
C
A. Window channel
B. Left-hand curtain
C. #10 x
³⁄₄
" round-head screw
A. Window sash
B. Empty cabinet
C. Window channel
4. Use a ³⁄₃₂" drill bit to drill 4 starter holes ³⁄₈" deep through the
4 holes in the cabinet and into the windowsill.
5. Attach cabinet to windowsill with 4 - #10 x ¹⁄₂" pan-head
Phillips screws.
A
¹⁄₂
A. #10 x
B. Windowsill
" pan-head Phillips screws
A
6. Check that air conditioner cabinet is tilted to the outside so
that water will run to the outside.
Attach Side Curtains to Window Frame
2. Insert one of the #10 x ³⁄₄" round-head screws through the
hole in the top of the curtain.
3. Insert one of the #10 x ³⁄₄" round-head screws through the
slotted hole in the bottom of the curtain.
A
B
³⁄₄
A. #10 x
B. Slotted hole in the bottom of the curtain
" round-head screw
4. Repeat for the right-hand curtain.
Attach Support Brackets
1. Attach the support bracket to the cabinet by aligning the
holes in the bracket with the holes in the cabinet.
A
1. Pull the left-hand curtain out until it fits into the window
channel. Use a ³⁄₃₂" drill bit to drill a starter hole through the
hole in the curtain housing and into the lower window sash.
Front View
8
A. Holes in cabinet and support bracket
Page 9
2. Using #10 x ¹⁄₂" pan-head Phillips screws, attach the bracket
C
C
D
D
to the cabinet. Repeat for the other bracket.
3. Turn the adjustment bolt for each bracket until the bolt
touches the wall.
4. Turn the locking nut on the adjustment bolt to lock in position.
A
B
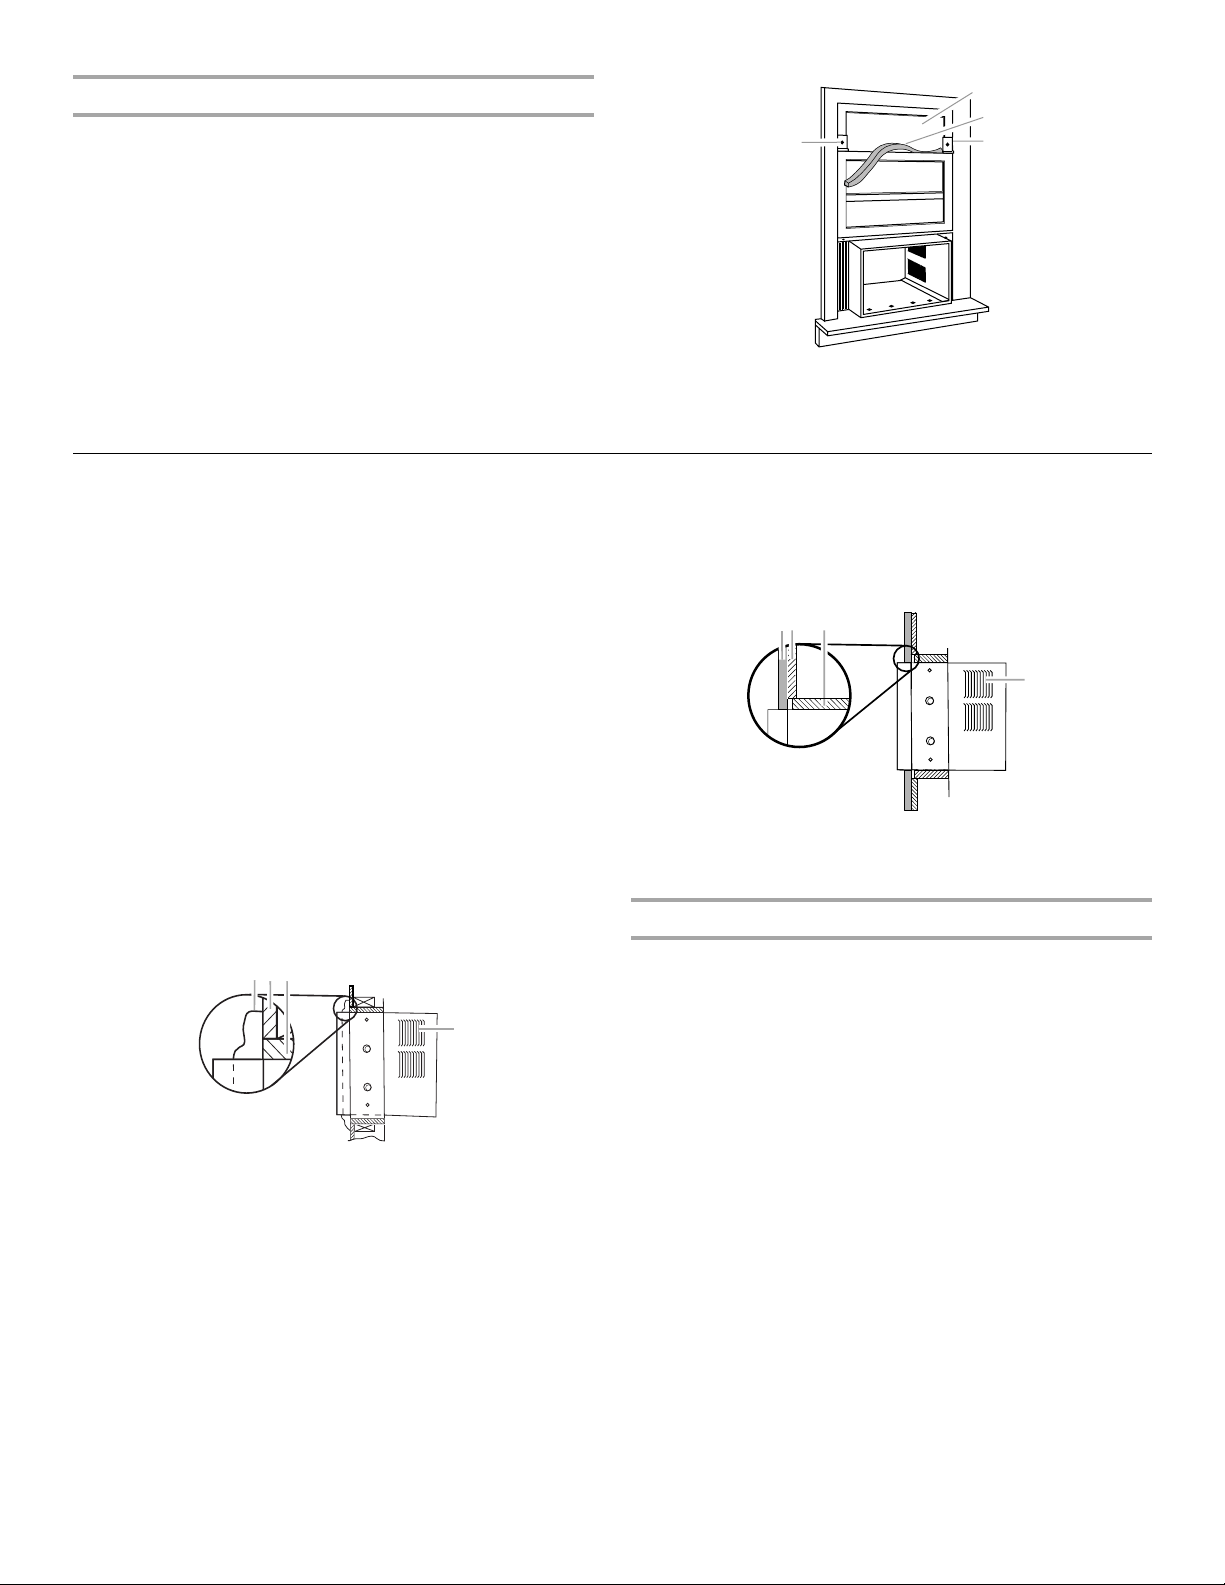
Complete Window Installation
1. Insert the foam window sash seal behind the top of the lower
window sash and against the glass of the upper window.
2. Place one window-lock bracket on top of the lower window
and against the upper window sash on each side of the
window.
3. Use a ³⁄₃₂" drill bit to drill a starter holes through the holes in
each bracket into the window sash.
4. Attach both the window-lock brackets to the window sash
with #10 x ³⁄₄" round-head screws to secure the window in
place.
B
A. Support bracket
B. Locking nut
C. Adjustment bolt
Through-the-Wall Cabinet Installation
NOTES:
■ Handle the air conditioner gently.
■ Be sure your air conditioner cabinet does not fall out of the
opening during installation or removal.
■ The location where the power cord exits the air conditioner
should be no more than 4 ft (122 cm) from a grounded
3prong outlet.
■ Do not block the louvers on the front panel.
■ Do not block the louvers on the outside of the air conditioner.
■ It is the customer's responsibility and obligation to have this
product installed by a qualified technician familiar with
through-the-wall room air conditioner installations.
A
A. Window lock brackets
B. Upper window glass
C. Foam window sash seal
A
Option 2—Plastered wall with no molding
If the plastered wall is to be flush with the cabinet and no molding
is used, the wood frame must be set ¹⁄₂" (13 mm) into the inside
wall.
B
C
A
Option 1—Wood, metal or plastic molding
When using a wood, metal or plastic molding, the wood frame
should line up with the inside wall as shown.
B
C
A
A. Molding
B. Inside wall
C. Wood frame
D. Louvers
A. Plastered wall
B. Inside wall
C. Wood frame
D. Louvers
Install Wood Frame
1. Construct the wood frame. See “Location Requirements” for
dimensions.
2. Measure the outside width and height of the frame to
determine the wall opening dimensions.
3. Cut the opening through the wall. Remove and save the
insulation.
9
Page 10
NOTES:
C
A
■ Dimension for depth depends on the wall thickness and
the type of molding.
■ Do not block louvers in the air conditioner cabinet.
■ Use 1" (2.5 cm) or thicker lumber for the wood frame.
A
2. Use a level to check that the cabinet is level side to side.
B
A. Outside width
B. Outside height
C. Depth
4. Apply the wood preservative to the outside exposed surface.
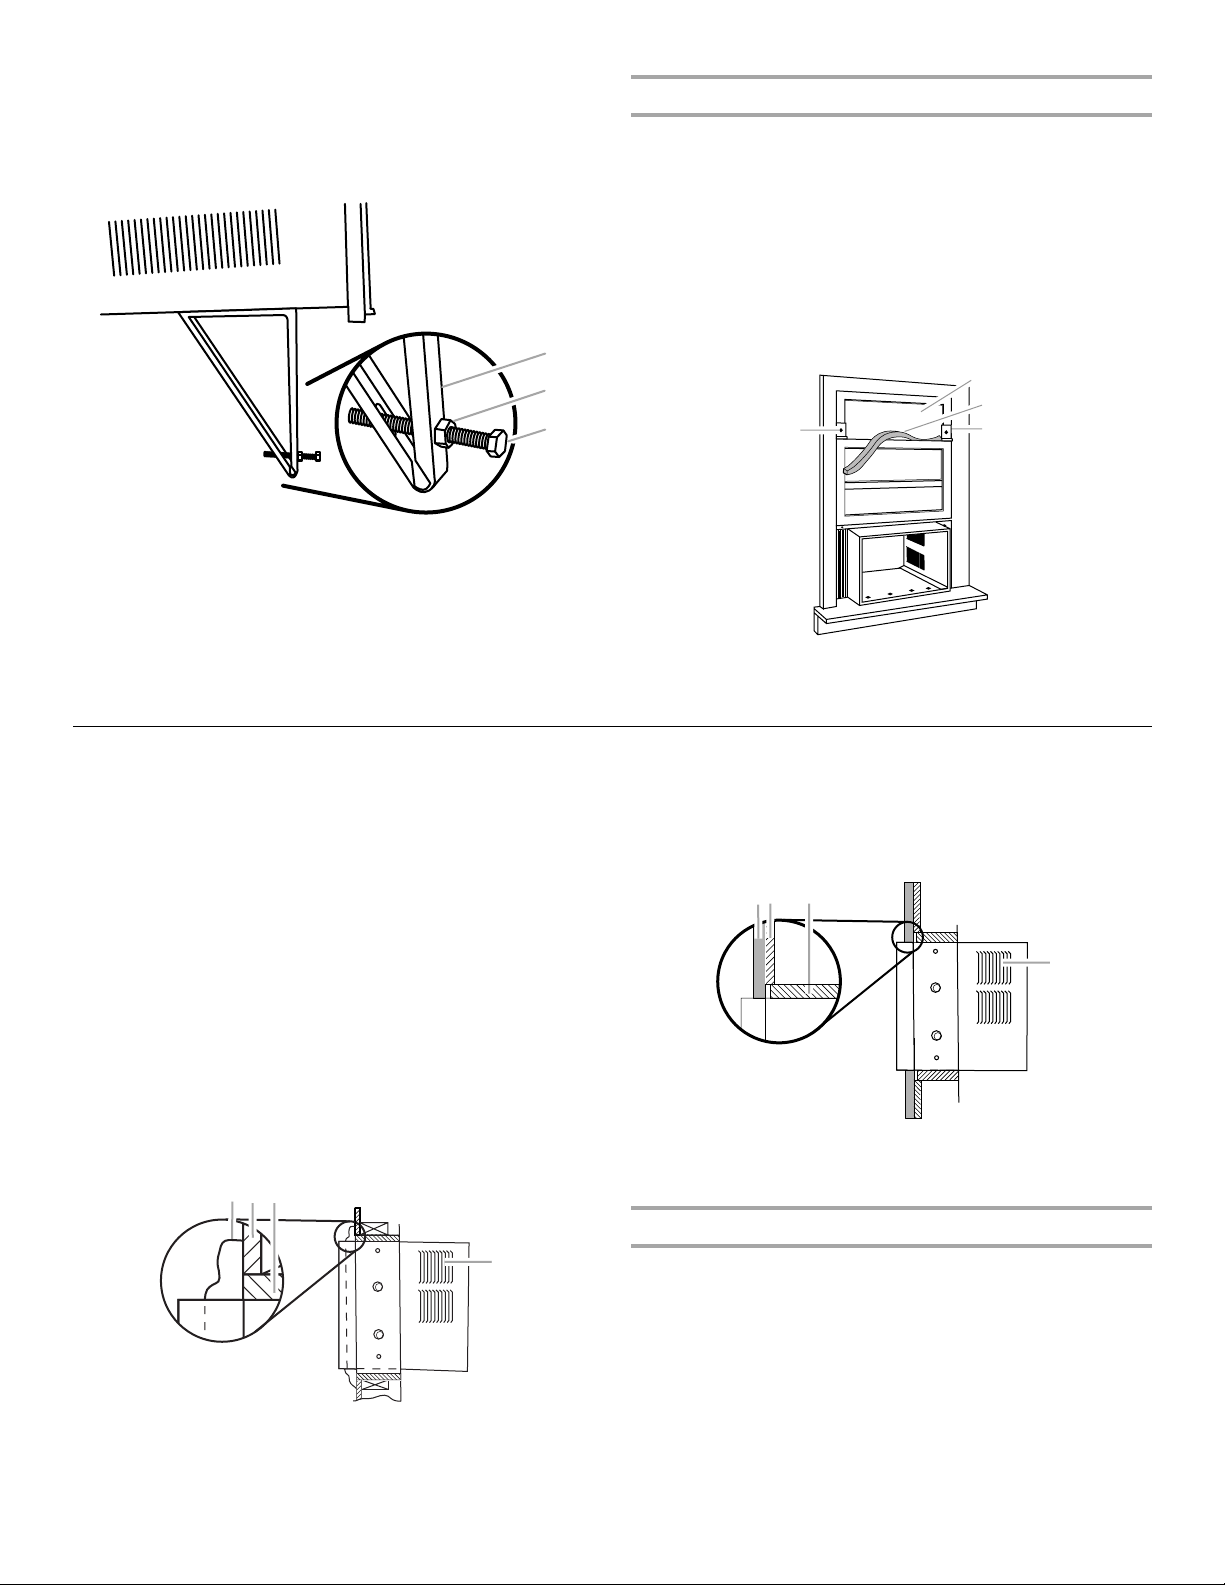
5. Insert the frame in the wall opening. Square and level the
frame.
6. Attach the frame securely to the wall.
Install Cabinet into Wood Frame
1. Insert the cabinet into the framed wall opening.
A
A. Level
3. Check that the air conditioner cabinet is tilted to the outside
so that water will run to the outside.
Complete Through-the-Wall Installation
1. Reuse the insulation to seal opening between the cabinet and
the frame.
2. Use the existing holes and 6 - #10 x 1" wood screws (not
provided) to attach the cabinet to the frame.
NOTE: Do not overtighten the screws or the cabinet will
distort and provide a poor air seal between the cabinet and
the air conditioner.
3. Caulk all outside wall openings around the cabinet.
A. Trim
Complete Installation
NOTE: Handle the air conditioner gently.
1. Make sure the free end of the ground wire is outside of the
cabinet.
WARNING
Excessive Weight Hazard
Use two or more people to move and install
air conditioner.
Failure to do so can result in back or other injury.
2. Insert the air conditioner into cabinet.
NOTE: Make sure the free end of the ground wire is outside
of the cabinet.
A
A. Ground wire outside of the cabinet
10
Page 11
WARNING
Electrical Shock Hazard
Connect green ground wire to ground screw.
Failure to do so can result in death or electrical shock.
5. Using 2 - #10 x ³⁄₈" painted round-head screws, attach the
bottom front of the panel.
3. Connect the green ground wire to the ground screw.
Position the ground wire pointing straight up. Put the excess
ground wire between the coil and the air conditioner cabinet.
A
B
A. Green ground wire
B. Ground screw
4. Push front panel straight on and then lower it slightly to lock it
into place.
NOTE: For through-the-wall installations, if needed, install the
molding around the room side of cabinet.
WARNING
Electrical Shock Hazard
Plug into a grounded 3 prong outlet.
Do not remove ground prong.
Do not use an adapter.
Do not use an extension cord.
Failure to follow these instructions can result in death,
fire, or electrical shock.
6. Plug into a grounded 3 prong outlet.
7. Press RESET on the power supply cord. See “Electrical
Requirements.”
AIR CONDITIONER USE
Operating your air conditioner properly helps you to obtain the
best possible results.
This section explains proper air conditioner operation.
IMPORTANT:
■ If you turn off the air conditioner, wait at least 3 minutes
before turning it back on. This prevents the air conditioner
from blowing a fuse or tripping a circuit breaker.
■ Do not try to operate your air conditioner in the cooling mode
when outside temperature is below 65°F (18°C). The inside
evaporator coil will freeze up, and the air conditioner will not
operate properly.
NOTE: In the event of a power failure, your air conditioner will
operate at the previous settings when the power is restored.
11
Page 12

Starting Your Air Conditioner—Digital Control
NOTES:
■ When the air conditioner is off, the display shows the current
room temperature.
■ If the room temperature is below 55ºF (13ºC), the display will
show 55ºF (13ºC). If the room temperature is above 99ºF
(37ºC), the display will show 99ºF (37ºC).
1. Remove clear protective film from control panel and front
panel badge (on some models).
2. Press POWER to turn on the air conditioner.
NOTE: When air conditioner is turned on for the first time
after it is plugged in, it will display the default settings: Cool
mode, Turbo fan speed, 72°F (22°C) for 3 seconds. When it is
turned on at all other times, it will display the previous
settings for 3 seconds, and then display the room
temperature.
3. Choose mode. See “Mode.”
4. Choose fan speed. See “Fan Speed.”
5. Choose temperature. See “Temperature.”
P
R
O
E
W
Fan Speed
NOTE: The Fan Speed button will operate only when the Cool or
Power Saver mode has been selected.
1. Press and hold FAN SPEED until you see the indicator light
for the desired setting.
2. Choose Turbo, High, Low or Auto.
Filter Monitor
1. When filter indicator light is lit or flashing, remove, clean and
replace air filter. See “Cleaning the Air Filter.”
2. Press and hold FILTER for 3 seconds after cleaning and
replacing the air filter. This resets the filter monitor.
NOTE: After 360 hours of fan operating time, the filter indicator
light will turn on. It will remain on for 180 hours or until you press
FILTER. After 180 hours, it will flash. It will continue flashing until
you press FILTER.
Temperature
■ Press the plus button to raise the temperature. Each time you
press or hold the plus button, the temperature will go up 1º to
a maximum temperature of 86°F (30°C).
NOTE: After 3 seconds, display will show the current room
temperature.
Mode
1. Press and hold MODE until you see the indicator light for the
desired setting.
2. Choose Cool, Fan or Power Saver.
■ Cool—Cools room. Press FAN SPEED to choose fan
speed. Press the up or down arrow buttons to adjust the
temperature.
■ Fan—Operates the fan at Turbo speed, without cooling.
The display shows “FO” (fan only).
■ Power Saver—Fan runs only when cooling is needed. You
can select the fan speed by pressing Fan Speed.
Because the fan does not circulate the room air
continuously, less energy is used, but the room air is not
circulated as often. Use Power Saver when you are
asleep or away from home.
12
■ Press the minus button to lower the temperature. Each time
you press or hold the minus button, the temperature will go
down 1º to a minimum temperature of 64°F (18°C).
NOTE: After 3 seconds, display will show the current room
temperature.
Page 13

Timer Delay
To set the Timer to turn off the air conditioner (the air
conditioner must be On):
1. Press TIMER. Timer indicator light will flash. Display will show
remaining hours before the air conditioner will turn off.
2. Press the plus or minus button to change the delay time from
1 to 24 hours.
3. Press TIMER again or wait 10 seconds. Timer indicator light
will remain on. Display will show the current room
temperature.
To set the Timer to turn on the air conditioner, keeping
previous settings:
1. Turn off the air conditioner.
2. Press TIMER. Timer indicator light will flash. Display will show
remaining hours before the air conditioner will turn on.
3. Press the plus or minus button to change the delay time from
1 to 24 hours.
4. Press TIMER again or wait 10 seconds. Timer indicator light
will remain on. Display will show current room temperature.
To set the Timer to turn on the air conditioner, changing
previous settings:
1. Turn on the air conditioner.
2. Adjust the mode to Cool, Fan Only, or Power Saver.
3. Adjust the fan speed to Turbo, High, Low or Auto.
4. Adjust temperature between 64°F and 86°F (18ºC and 30ºC).
5. Turn off the air conditioner.
6. Press TIMER. Timer indicator light will flash. Display will show
remaining hours before the air conditioner will turn on.
7. Press the plus or minus button to change delay time (1 to
24 hours).
8. Press TIMER again or wait 10 seconds. Timer indicator light
will remain on. Display will show current room temperature.
To clear Timer delay program:
NOTE: Air conditioner can be either on or off.
Press and hold TIMER for 3 seconds. Timer indicator light will
turn off.
To see or change the time remaining (in hours):
1. Press TIMER once after it has been programmed. Display will
show remaining time.
2. While the display is showing the remaining time, you can
press the plus or minus button to increase or decrease the
time.
3. After 10 seconds, display will show the current room
temperature.
NOTE: Remote control may vary in appearance.
FAN
SPEED
TIMER
POWER
FAN
Power saver
COOL
SWING
Using the Remote Control
To Select the Mode
Press COOL, FAN, or POWER SAVER.
To Select the Fan Speed
Press FAN SPEED for Turbo, High or Low or Auto.
NOTE: Auto fan speed cannot be selected in Fan Only mode.
To Set the Temperature
To raise the temperature:
Press the plus button to raise the temperature. Each time you
press or hold the plus button, the temperature will go up 1º to a
maximum temperature of 86°F (30°C).
FAN
FAN
SPEED
COOL
Power saver
AUTO
NOTE: Two AAA batteries (included) power the remote control.
Replace batteries after 6 months of use, or when the remote
control starts to lose power.
To Turn the Air Conditioner On or Off
Press POWER.
POWER
To lower the temperature:
Press the minus button to lower the temperature. Each time you
press or hold the minus button, the temperature will go down 1º
to a minimum temperature of 64°F (18°C).
13
Page 14
To Set the Timer Delay
To set Timer to turn off the air conditioner (air conditioner
must be on):
1. Press TIMER. Timer indicator light on the air conditioner
control panel will flash.
TIMER
2. Press the plus or minus button to change the delay time from
1 to 24 hours.
3. Press TIMER again or wait 10 seconds. Timer indicator light
on the air conditioner control panel will remain on.
To set Timer to turn on the air conditioner, keeping
previous settings:
1. Turn off the air conditioner.
2. Press TIMER. Timer indicator light on the air conditioner
control panel will flash.
Starting Your Air Conditioner—Rotary Control—Cool Only Models
3. Press the plus or minus button to change delay time from 1 to
24 hours.
4. Press TIMER again or wait 10 seconds. Timer indicator light
on the air conditioner control panel will remain on.
To set Timer to turn on the air conditioner, changing the
previous settings:
1. Turn on the air conditioner.
2. Adjust the mode to Cool, Fan, or Power Saver.
3. Adjust the fan speed to Turbo, High, Low, or Auto.
4. Adjust temperature between 64°F and 86°F (18ºC and 30ºC).
5. Turn off the air conditioner.
6. Press TIMER. Timer indicator light on the air conditioner
control panel will flash.
7. Press the plus or minus button to change delay time from 1 to
24 hours.
8. Press TIMER again or wait 10 seconds. Timer indicator light
on the air conditioner control panel will remain on.
Fan Speed
Wait three minutes before restarting
4
3
2
1
WARMER
TEMPERATURE FAN SPEED
COOLER
5
7
6
AIR SWING
OFF
FAN
ONLY
LOW
COOL
HIGH
COOL
TURBO
COOL
1. Set vent control. See “Vent Control (on some models).”
2. Select the fan speed. See “Fan Speed.”
3. Set temperature. See “Temperature.”
Vent Control (on some models)
Set the Vent control to CLOSE for maximum continuous cooling.
The Vent control set to OPEN allows you to draw stale or smoky
air from the room.
■ Open—to exhaust room air to the outside.
■ Close—to circulate room air.
Set Fan Speed to the desired setting. When the air conditioner is
operating at Turbo Cool, High Cool, or Low Cool, the fan
circulates air continuously.
■ Turbo Cool—for maximum cooling
■ High Cool—for normal to maximum cooling (depending on
model)
■ Low Cool—for sleeping comfort
■ Fan Only—to move air continuously without cooling
LOW
COOL
OFF
FAN
ONLY
HIGH
COOL
TURBO
COOL
Temperature
Turn the TEMPERATURE control to a mid-setting. Adjust the air
conditioner's performance by turning the Temperature control
clockwise for maximum cooling. For less cooling, turn the
TEMPERATURE control counterclockwise. Experiment to find the
setting that suits you best.
4
3
5
NOTE: The Vent control will function only when the Fan Speed is
operating.
14
2
1
WARMER
6
7
COOLER
Page 15

Starting Your Air Conditioner—Rotary Control—Heat/Cool Models
Wait three minutes before restarting
OFF
LOW
77
6
5
4
3
2
1
WARMER COOLER
6
5
4
2
1
TEMPERATURE
3
AIR SWING
HEAT
TURBO
HEAT
TURBO
COOL
FAN SPEED
1. Set vent control. See “Vent Control (on some models).”
2. Select the fan speed. See “Fan Speed.”
3. Set temperature. See “Temperature.”
Vent Control (on some models)
HIGH
COOL
FAN
ONLY
LOW
COOL
POWER
SAVER
■ Low Cool—for sleeping comfort
■ Fan Only—to move air continuously without cooling or
heating
NOTE: Fan runs on Turbo speed only.
■ Power Saver—fan runs only when cooling or heating is
needed.
Since the fan does not circulate the room air continuously,
less energy is used, but the room air is not circulated as
often. Use Power Saver when you are asleep or away from
home.
NOTE: Fan runs on Low speed only.
OFF
TURBO
HEAT
LOW
HEAT
TURBO
COOL
COOL
HIGH
FAN
ONLY
LOW
COOL
POWER
SAVER
Set the Vent control to CLOSE for maximum continuous cooling.
The Vent control set to OPEN allows you to draw stale or smoky
air from the room.
■ Open—to exhaust room air to the outside.
■ Close—to circulate room air.
NOTE: The Vent control will function only when the Fan Speed is
operating.
Fan Speed
Set Fan Speed to the desired setting. When the air conditioner is
operating at Low Heat or Turbo Heat, Turbo Cool, High Cool or
Low Cool, the fan circulates air continuously.
■ Low Heat—for reduced heating
■ Turbo Heat—for maximum heating
■ Turbo Cool—for maximum cooling
■ High Cool—for normal to maximum cooling
Temperature
Cooling
Turn the TEMPERATURE control to a setting on the right-hand
side of the knob. Adjust the air conditioner's performance by
setting the Temperature control to “1” for maximum cooling. For
less cooling, turn the TEMPERATURE control counterclockwise
to a larger number on the right-hand side of the knob.
Heating
The electric strip heater is activated when the Fan Speed control
is set to a heat setting. Turn the TEMPERATURE control to a
setting on the left-hand side of the knob. For more heating, turn
the TEMPERATURE control to “1” for maximum heating. For less
heating, turn the TEMPERATURE control clockwise to a larger
number on the left-hand side of the knob.
Experiment to find the setting that suits you best.
NOTE: Your air conditioner is not designed to be used as a
primary heat source. It is intended for supplemental heating only.
77
5
4
3
2
1
WARMER
6
6
5
1
COOLER
4
3
2
15
Page 16

Changing Air Direction
Use the Air Swing button on the air conditioner control panel or
the Swing button on the remote control to direct air left or right.
SWING
AIR SWING
Use the tab to direct air up, down or straight ahead.
A
A. Tab
AIR CONDITIONER CARE
Your new air conditioner is designed to give you many years of
dependable service. This section tells you how to clean and care
for your air conditioner properly. Call your local authorized dealer
for an annual checkup. Remember… the cost of this service call
is your responsibility.
Cleaning the Air Filter
The air filter is removable for easy cleaning. A clean filter helps
remove dust, lint, and other particles from the air and is important
for best cooling and operating efficiency. Check the filter every
2 weeks to see whether it needs cleaning.
NOTE: Do not operate the air conditioner without the filter in
place.
1. Turn off the air conditioner.
2. Remove the air filter by sliding out from either side of the front
panel.
Normal Sounds
When your air conditioner is operating normally, you may hear
sounds such as:
■ Droplets of water hitting the condenser, causing a pinging or
clicking sound. The water droplets help cool the condenser.
■ Air movement from the fan.
■ Clicks from the thermostat cycle.
■ Vibrations or noise due to poor wall or window construction.
■ A high-pitched hum or pulsating noise caused by the modern
high-efficiency compressor cycling on and off.
3. Use a vacuum cleaner to clean air filter. If the air filter is very
dirty, wash it in warm water with a mild detergent. Do not
wash the air filter in the dishwasher or use any chemical
cleaners. Air dry the filter completely before replacing to
ensure maximum efficiency.
4. Replace the air filter by sliding the filter back into either side
of the air conditioner.
Cleaning the Front Panel
1. Turn off the air conditioner.
2. Remove the air filter and clean it separately. See “Cleaning
the Air Filter.”
3. Wipe the front panel with a soft, damp cloth.
4. Air dry the front panel completely.
Repairing Paint Damage
Check once or twice a year for paint damage. This is very
important, especially in areas near oceans or where rust is a
problem. If needed, touch up with a good grade enamel paint.
NOTE: To reduce paint damage during the winter, install a heavyduty cover over the air conditioner cabinet. For information on
ordering a heavy-duty cover, see “Accessories.”
16
Annual Maintenance
Your air conditioner needs annual maintenance to help ensure
steady, top performance throughout the year. Call your local
authorized dealer to schedule an annual checkup. The expense
A
A. Air filter
of an annual inspection is your responsibility.
Page 17

TROUBLESHOOTING
Before calling for service, try the suggestions below to see whether you can solve your problem without outside help.
Air conditioner will not operate
WARNING
Electrical Shock Hazard
Plug into a grounded 3 prong outlet.
Do not remove ground prong.
Do not use an adapter.
Do not use an extension cord.
Failure to follow these instructions can result in death,
fire, or electrical shock.
■ The power supply cord is unplugged. Plug into a grounded
3 prong outlet. See “Electrical Requirements.”
■ The power supply cord has tripped (Reset button has
popped out). Press and release RESET (listen for click; Reset
button will latch and remain in) to resume operation.
■ A household fuse has blown, or a circuit breaker has
tripped. Replace the fuse or reset the circuit breaker. If the
problem continues, call an electrician. See “Electrical
Requirements.”
■ The Fan Speed control is turned to the off position. Turn
the Fan Speed control to an active setting.
■ The local power has failed. Wait for power to be restored.
Air conditioner power supply cord trips (Reset button
pops out)
■ Disturbances in your electrical current can trip (Reset
button will pop out) the power supply cord. Press and
release RESET (listen for click; Reset button will latch and
remain in) to resume operation.
■ Electrical overloading, overheating, cord pinching or
aging can trip (Reset button will pop out) the power
supply cord. After correcting the problem, press and release
RESET (listen for click; Reset button will latch and remain in)
to resume operation.
NOTE: A damaged power supply cord must be replaced with a
new power supply cord obtained from the product manufacturer
and must not be repaired.
Air conditioner seems to run too much
■ The current air conditioner replaced an older model. The
use of more efficient components may cause the air
conditioner to run longer than an older model, but the total
energy consumption will be less. Newer air conditioners do
not emit the “blast” of cold air you may be accustomed to
from older units, but this is not an indication of lesser cooling
capacity or efficiency. Refer to the efficiency rating (EER) and
capacity rating (in Btu/h) marked on the air conditioner.
■ The air conditioner is in a heavily occupied room, or heat-
producing appliances are in use in the room. Use exhaust
vent fans while cooking or bathing and try not to use heatproducing appliances during the hottest part of the day. A
higher capacity air conditioner may be required, depending
on the size of the room being cooled.
Air conditioner cycles on and off too much, or does not
cool/heat room in cooling/heating mode
Air conditioner blows fuses or trips circuit breakers
■ Too many appliances are being used on the same circuit.
Unplug or relocate appliances that share the same circuit.
■ Time-delay fuse or circuit breaker of the wrong capacity
is being used. Replace with a time-delay fuse or circuit
breaker of the correct capacity. See “Electrical
Requirements.”
■ An extension cord is being used. Do not use an extension
cord with this or any other appliance.
■ You are trying to restart the air conditioner too soon after
turning the Fan control off. Wait at least 3 minutes after
turning the Fan control off before trying to restart the air
conditioner.
■ The Fan Speed control is set to Power Saver (on some
models). Use Power Saver only when you are asleep or away
from home, since the fan does not circulate the room air
continuously. Use Low Cool, High Cool, Turbo Cool, Turbo
Heat or Low Heat for your best comfort.
■ The air conditioner is not properly sized for your room.
Check the cooling capabilities of your room air conditioner.
Room air conditioners are not designed to cool multiple
rooms.
■ The filter is dirty or obstructed by debris. Clean the filter.
■ The inside evaporator and outside condenser coils are
dirty or obstructed by debris. See “Annual Maintenance.”
17
Page 18

■ There is excessive heat or moisture (open container
cooking, showers, etc.) in the room. Use a fan to exhaust
heat or moisture from the room. Try not to use heatproducing appliances during the hottest part of the day.
■ The louvers are blocked. Install the air conditioner in a
location where the louvers are free from curtains, blinds,
furniture, etc.
■ The outside temperature is below 65°F (18°C). Do not try to
operate your air conditioner in the cooling mode when the
outside temperature is below 65°F (18°C).
■ The temperature of the room you are trying to cool is
extremely hot. Allow extra time for the air conditioner to cool
off a very hot room.
■ Windows or doors to the outside are open. Close all
windows and doors.
■ The Vent control is set to OPEN (on some models). Set the
Vent control to CLOSED for maximum cooling and/or heating.
ASSISTANCE OR SERVICE
To avoid unnecessary service calls, please check the
“Troubleshooting” section. It may save you the cost of a service
call. If you still need help, follow the instructions below.
If you need assistance or service
Call the Customer eXperience Center telephone number. Dial tollfree 1-800-253-1301 in the U.S.A. Our consultants are available
to assist you.
When calling: Please know the purchase date, and the complete
model and serial number of your appliance.
This information will help us better respond to your request.
Our consultants provide assistance with:
■ Features and specifications on our full line of appliances
■ Installation information
■ Use and maintenance procedures
■ Accessory and repair parts sales
■ Specialized customer assistance (Spanish speaking, hearing
impaired, limited vision, etc.)
■ Referrals to local dealers, service companies, and repair parts
distributors
Our service technicians are trained to fulfill the product warranty
and provide after-warranty service, anywhere in the United
States.
To locate the authorized service company in your area, you can
also look in your telephone directory Yellow Pages.
■ The Temperature is not set at a cool enough setting.
Adjust the Temperature control to a cooler setting by turning
the knob clockwise. Turn the Fan Speed control to Turbo
Cool.
■ The air conditioner in the heating mode has insufficient
Btu/h for the heating requirements of the room. Do not
use the air conditioner as a primary source of heat.
Water drips from cabinet into your house
■ The air conditioner is not properly leveled. The air
conditioner should slope slightly downward toward the
outside. Level the air conditioner to provide a downward
slope toward the outside to ensure proper drainage. See the
Installation Instructions.
NOTE: Do not drill a hole into the bottom of the metal base
and condensate pan.
If you need replacement parts
If you need to order replacement parts, we recommend that you
only use factory-authorized parts. These parts will fit right and
work right, because they are made to the same exacting
specifications used to build every new appliance.
To locate factory-authorized parts in your area, call our Customer
eXperience Center telephone number, your nearest authorized
service center, or Factory Service at 1-800-442-1111 in the
U.S.A.
For further assistance
If you need further assistance, you can write to ask any questions
or tell us about your concerns to:
Customer eXperience Center
553 Benson Road
Benton Harbor, MI 49022-2692
Please include a daytime phone number in your correspondence.
Please record your model's information.
Whenever you call to request service on your appliance, you
need to know your complete model number and serial number.
You can find this information on the model and serial number
label. See “Electrical Requirements” for model and serial number
location.
Please record the model and serial number information below.
Also, record the purchase date of your appliance and the store's
name, address, and telephone number.
Model Number__________________________________________________
18
Serial Number __________________________________________________
Purchase Date __________________________________________________
Store Name ____________________________________________________
Store Address __________________________________________________
Store Phone ____________________________________________________
Keep this book and the sales slip together for future reference.
Page 19

Accessories
You can order the following accessories for your air conditioner
from your local authorized dealer or by calling 1-800-253-1301
from anywhere in the U.S.A. You will hear a recording. Follow the
instructions to place an order.
Replacement Air Filters
A good, clean air filter is important for best cooling with least
energy consumption. Your air filter should be cleaned regularly.
See “Cleaning the Air Filter” for cleaning instructions. We suggest
you replace your air filter once a year.
For a new electrostatic air filter, order Part Number 111211551.
Airborne particles are attracted to an electrostatic air filter and
remain attached to it until they are rinsed away. For a new
antimicrobial air filter, order Part Number 11121216. In addition to
providing all the benefits of an electrostatic air filter, an
antimicrobial air filter also inhibits the growth of odor-causing
bacteria, fungi, mold and mildew on the filter. Both of these air
filters are sized to fit your air conditioner.
Heavy-duty cover
If you decide to leave your air conditioner installed during the
winter, a heavy-duty cover will help protect your air conditioner
and reduce drafts. The outdoor cover protects against cold drafts
through the unit's air passages and protects the cabinet from
snow, rain, sleet, rust, and dust.
For a heavy-duty outdoor cover sized to fit your air conditioner,
order Part Number 484069.
For a heavy-duty indoor cover sized to fit your air conditioner,
order Part Number 4392941.
Wide Window Kit
A special Wide Window Kit is available for windows 40"
(101.6 cm) to 54" (137.2 cm) wide. Use Kit Number 1162147.
SEGURIDAD DEL ACONDICIONADOR DE AIRE
Su seguridad y la seguridad de los demás es muy importante.
Hemos incluido muchos mensajes importantes de seguridad en este manual y en su electrodoméstico. Lea y obedezca siempre
todos los mensajes de seguridad.
Este es el símbolo de advertencia de seguridad.
Este símbolo le llama la atención sobre peligros potenciales que pueden ocasionar la muerte o una lesión a
usted y a los demás.
Todos los mensajes de seguridad irán a continuación del símbolo de advertencia de seguridad y de la palabra
“PELIGRO” o “ADVERTENCIA”. Estas palabras significan:
PELIGRO
ADVERTENCIA
Todos los mensajes de seguridad le dirán el peligro potencial, le dirán cómo reducir las posibilidades de sufrir una lesión y lo que
puede suceder si no se siguen las instrucciones.
INSTRUCCIONES IMPORTANTES DE SEGURIDAD
ADVERTENCIA:
siga estas precauciones básicas:
Conecte a un contacto de pared de conexión a tierra de
3 terminales.
No quite el terminal de conexión a tierra.
No use un adaptador.
Para reducir el riesgo de incendio, choque eléctrico o lesiones personales al usar su acondicionador de aire,
CONSERVE ESTAS INSTRUCCIONES
Si no sigue las instrucciones de inmediato, usted puede
morir o sufrir una lesión grave.
Si no sigue las instrucciones, usted puede morir o sufrir
una lesión grave.
No use un cable eléctrico de extensión.
Desconecte el acondicionador de aire antes de
darle servicio.
Use dos o más personas para mover e instalar el
acondicionador de aire.
19
Page 20

REQUISITOS DE INSTALACIÓN
Herramientas y piezas
Reúna las herramientas y piezas necesarias antes de comenzar
la instalación. Lea y siga las instrucciones provistas con
cualquiera de las herramientas enlistadas aquí.
Herramientas necesarias
■ Destornilladores Phillips y
de hoja plana
■ Nivel
Instalación a través de la pared:
Además de las herramientas enlistadas arriba, se necesitan las
siguientes herramientas para la instalación a través de la pared.
■ Sierra
■ Preservativo para madera
■ Masilla
Piezas suministradas (en algunos modelos)
Verifique que estén todas las piezas en el paquete de piezas.
A
■ Cinta para medir
■ Taladro y una broca de
³⁄₃₂" o más pequeña
■ Madera de 1" (2,5 cm) o
más gruesa
■ Tornillos para madera
#10 x 1" (7)
Requisitos de ubicación
IMPORTANTE: Observe todos los códigos y reglamentos
aplicables.
Verifique el lugar donde se instalará el acondicionador de aire. La
instalación correcta es su responsabilidad. Asegúrese de que
usted tenga todo lo necesario para una instalación correcta.
El lugar debe tener:
■ Tomacorriente puesto a tierra a no más de 4 pies (122 cm) de
donde el cable eléctrico sale del acondicionador de aire.
NOTA: No use un cable eléctrico de extensión.
■ Libertad de movimiento del aire en la habitación que desea
enfriar.
■ Una abertura con la amplitud suficiente para el
acondicionador de aire.
■ Un soporte adecuado en la pared para el peso del
acondicionador de aire. El acondicionador de aire pesa entre
145 y 200 lbs (65 a 96 kg).
NOTA: No deben obstruirse las rejillas del gabinete. El aire debe
circular libremente a través de las rejillas del gabinete.
A
C
B
J
H
G
F
D
E
I
K
A. Soportes de apoyo con pernos
de ajuste (2)
B. Obturador de espuma del marco
de la ventana
C. Soportes de seguridad para la
ventana (2)
D. Tornillos de cabeza de cono
achatado Phillips #10 x
E. Tornillos de cabeza de arandela
Phillips de roscar #10 x
¹⁄₄
³⁄₈
" (6)
" (4)
F. Tornillos de cabeza de cono
achatado Phillips #10 x
G. Tornillos de cabeza redonda
H. Tornillos Phillips #10 x
K. Obturador de espuma adhesivo
³⁄₄
" (6)
#10 x
cabeza redonda pintada (2)
(en algunos modelos)
I. Canal superior
J. Cortinas laterales (2)
¹⁄₂
³⁄₈
"(8)
"de
NOTAS:
■ En algunos modelos, el panel frontal no está fijado al
acondicionador de aire. En estos modelos, los 2 tornillos
Phillips de cabeza redonda pintada #10 x ³⁄₄" (H) que se
utilizan para ajustar el panel frontal estarán incluidos en la
bolsa de piezas.
■ Se incluyen piezas de instalación para ventanas de guillotina
de hasta 40" (101,6 cm) de ancho. Un Juego para ventana
ancha especial está disponible en su distribuidor o centro de
servicio. Vea “Accesorios”.
A. Rejillas del gabinete
Instalación en la ventana
Medidas de la abertura de la ventana:
■ Ancho: 30" a 40" (76,2 cm a 101,6 cm)
■ Altura: 20" (50,8 cm) mínimo
A
B
A. 30" (76,2 cm) mínimo
B. 20" (50,8 cm) mínimo
20
Page 21

Instalación a través de la pared
C
D
Las medidas de la abertura en la pared deben ser:
■ Ancho: 26¹⁄₂" (66,1 cm) más el doble del espesor de la
madera usada para construir el marco.
■ Altura: 19³⁄₄" (50,2 cm) más el doble del espesor de la madera
usada para construir el marco.
■ Profundidad: Las dimensiones de la profundidad dependen
del espesor de la pared y del tipo de moldura.
Requisitos eléctricos
A. 19
B. 26
³⁄₄
" (50,2 cm)
¹⁄₂
" (66,1 cm)
A
B
C
C. Espesor de la madera
D. Profundidad
ADVERTENCIA
Peligro de Choque Eléctrico
Conecte a un contacto de pared de conexión a tierra de
3 terminales.
No quite la terminal de conexión a tierra.
No use un adaptador.
No use un cable eléctrico de extensión.
No seguir estas instrucciones puede ocasionar
la muerte, incendio o choque eléctrico.
El alambre de puesta a tierra debe ser conectado a un tornillo de
tierra ubicado en la esquina inferior derecha del acondicionador
de aire cuando el acondicionador de aire esté en el gabinete.
Las clasificaciones eléctricas para su acondicionador de aire
están enumeradas en la etiqueta de número del modelo y de
serie. La etiqueta de modelo y serie se encuentra detrás del
panel delantero en la pestaña, debajo del panel de control.
Los requisitos eléctricos específicos se indican en la tabla a
continuación. Siga los requisitos para el tipo de enchufe en el
cable de alimentación eléctrica.
Cable eléctrico Requisitos de cableado
■ 115 volts (103,5 mín. a 126,5 máx.)
■ 0 a 12 amperes
■ Fusible de retardo de 15 amperes
o disyuntor
■ Úselo solamente en un circuito con
tomacorriente único.
Cable eléctrico Requisitos de cableado
¹⁄₄"
(0,6 cm)
■ 230 volts (207 mín. a 253 máx.)
■ 0 a 12 amperes
■ Fusible de retardo de 15 amperes
o disyuntor
■ Úselo solamente en un circuito con
tomacorriente único.
■ 230 volts (207 mín. a 253 máx.)
■ 0 a 16 amperes
■ Fusible de retardo de 20 amperes
o disyuntor
■ Úselo solamente en un circuito con
tomacorriente único.
¹⁄₂"
(1,3 cm)
■ 230 volts (207 mín. a 253 máx.)
■ 0 a 24 amperes
■ Fusible de retardo de 30 amperes
o disyuntor
■ Úselo solamente en un circuito con
tomacorriente único.
Método recomendado para la puesta a tierra
Este acondicionador de aire debe ser puesto a tierra. Este
acondicionador de aire está equipado con un cable de suministro
de energía provisto de un enchufe con tres terminales conectado
a tierra. Para reducir a un mínimo el peligro de posibles choques
eléctricos, el cable debe ser enchufado en un contacto
apropiado de pared de tres terminales conectado a tierra de
acuerdo con todos los códigos y reglamentos locales. Si no se
dispone de un tomacorriente apropiado, es responsabilidad del
cliente hacer instalar un contacto con tres terminales
debidamente puesto a tierra por un instalador eléctrico
calificado.
21
Page 22
Es responsabilidad del cliente:
■ Llamar a un instalador eléctrico calificado.
■ Asegurarse de que la instalación eléctrica sea adecuada y
esté hecha de acuerdo con el Código Nacional Eléctrico,
ANSI/NFPA 70, última edición, y todos los códigos y
reglamentos locales.
Pueden obtenerse copias de las normas señaladas en:
National Fire Protection Association
One Batterymarch Park
Quincy, MA 02269
Cable de suministro de energía
NOTA: El dispositivo de su unidad puede ser diferente de los que
se ilustran.
A
TEST
TEST
A
A. Botón de prueba
B. Botón de reposición
Este acondicionador de aire para habitación está equipado con
un cable de suministro de energía según lo exige UL. Este cable
de suministro de energía incluye circuitos electrónicos de última
generación que detectan la corriente de fuga. Si se aplasta el
cable, el elemento electrónico detecta la corriente de fuga y la
energía se desconecta en una fracción de segundo.
B
RESET
RESET
B
ADVERTENCIA
Peligro de Choque Eléctrico
Conecte a un contacto de pared de conexión a tierra de
3 terminales.
No quite la terminal de conexión a tierra.
No use un adaptador.
No use un cable eléctrico de extensión.
No seguir estas instrucciones puede ocasionar
la muerte, incendio o choque eléctrico.
Para poner a prueba el cable de suministro de energía:
1. Enchufe el cable de suministro de energía en un
tomacorriente de 3 terminales con conexión a tierra.
2. Presione RESET (Reposición).
3. Presione TEST (Prueba) (escuche el chasquido, el botón de
reposición se atrapa y salta).
4. Presione y suelte RESET (escuche el chasquido, el botón de
reposición queda asegurado y se mantiene asegurado). El
cable de suministro de energía está listo para su
funcionamiento.
NOTAS:
■ El botón de reposición debe presionarse para el
funcionamiento adecuado.
■ El cable de suministro de energía debe ser reemplazado si no
se dispara cuando se presione el botón de prueba o cuando
falle la reposición.
■ No use el cable de suministro de energía como un interruptor
de encendido y apagado. El cable de suministro de energía
ha sido diseñado como un dispositivo protector.
■ Un cable de suministro de energía dañado debe ser
reemplazado por un nuevo cable de suministro de energía
obtenido del fabricante del producto y no debe ser reparado.
■ El cable de suministro de energía
pueda arreglar el usuario. Todos los reclamos de desempeño
y la garantía quedarán anulados si se abre el estuche
resistente a alteraciones.
no contiene piezas que
INSTRUCCIONES DE INSTALACIÓN
Desempaque el acondicionador de aire
ADVERTENCIA
Peligro de Peso Excesivo
Use dos o más personas para mover e instalar
el acondicionador de aire.
No seguir esta instrucción puede ocasionar una lesión
en la espalda u otro tipo de lesiones.
22
Quite los materiales de empaque
■ Quite y deshágase de todos los materiales de embalaje o
recíclelos. Quite las cintas y los residuos de goma de la
superficie antes de encender el acondicionador de aire. Frote
un poco de detergente líquido para vajillas sobre el adhesivo
con los dedos. Limpie con agua tibia y seque.
■ No use instrumentos filosos, alcohol para fricciones, líquidos
inflamables o productos de limpieza abrasivos para eliminar
los restos de cinta o goma. Estos productos pueden dañar la
superficie de su acondicionador de aire.
■ Trate el acondicionador de aire con cuidado.
Page 23

1. Saque el acondicionador de aire de la caja y colóquelo sobre
el cartón.
2. En algunos modelos, quite los tornillos y el panel frontal y
apártelos.
5. Quite el tornillo de puesta a tierra y el alambre de conexión a
tierra del frente del acondicionador de aire. Guarde el tornillo
de puesta a tierra.
A
B
3. Saque el panel frontal del acondicionador de aire y déjelo a
un lado.
4. Quite el soporte de seguridad de transporte y el tornillo del
acondicionador de aire y póngalos a un lado.
A B
A. Tornillo del soporte de seguridad de transporte
B. Soporte de seguridad de transporte
Instalación en una ventana (en algunos modelos)
NOTAS:
■ Trate el acondicionador de aire con cuidado.
■ Asegúrese de que el gabinete del acondicionador de aire no
se caiga de la abertura durante la instalación o al quitarlo.
■ La parte de donde sale el cable eléctrico del acondicionador
de aire debe colocarse a no más de 4 pies (122 cm) de un
tomacorriente de conexión a tierra de 3 terminales.
■ No bloquee las rejillas que están en el panel delantero.
■ No bloquee las rejillas que están en el exterior del
acondicionador de aire.
Fije el canal superior
A. Alambre verde de conexión a tierra
B. Tornillo de puesta a tierra
6. Tire de las manijas para deslizar el acondicionador de aire
fuera del gabinete. Coloque el acondicionador de aire sobre
el cartón.
A
A. Manijas
NOTA: No levante, empuje, jale ni remueva ningún poliestireno
expandido (espuma) del interior del acondicionador de aire. No
es un material de empaque.
3. Con 4 tornillos de cabeza de arandela Phillips de roscar
#10 x ³⁄₈", ajuste el canal superior al gabinete del
acondicionador de aire.
A
B
NOTA: Sujete el canal superior y las cortinas laterales al gabinete
del acondicionador de aire antes de colocar el gabinete en la
ventana.
1. Ubique la bolsa provista con tornillos.
2. Coloque el canal superior en la parte superior del
acondicionador de aire, alineando los 4 orificios en el canal
superior con los 4 orificios en la parte superior del gabinete
del acondicionador de aire.
A. Canal superior
B. Tornillos de cabeza de arandela Phillips de roscar #10 x
³⁄₈
"
23
Page 24

Fije las cortinas laterales
A
C
1. Ubique la bolsa provista con tornillos.
2. Inserte la parte superior y luego la parte inferior del
alojamiento de la cortina derecha en las guías superior e
inferior para cortinas en el acondicionador de aire.
Vista superior
5. Deslice el alojamiento de la cortina en las guías lo más lejos
posible.
6. Repita los pasos anteriores para la cortina izquierda.
Fije el obturador de espuma adhesivo
Fije el obturador de espuma adhesivo a lo largo de la parte
inferior de la ranura inferior de la cortina.
A
A. Alojamiento de la cortina
B. Guías para las cortinas
B
Vista inferior
A
B
A. Alojamiento de la cortina
B. Guías para las cortinas
3. Extienda la cortina derecha hacia fuera de manera que pueda
insertar el primer tornillo a través del orificio del medio de la
cortina. Con un tornillo de cabeza de cono achatado Phillips
#10 x ¹⁄₄", atornille la cortina al orificio del medio en el
gabinete del acondicionador de aire.
NOTA: Se requiere este tornillo para ajustar correctamente la
cortina (de arriba hacia abajo) al gabinete del acondicionador
de aire.
A
B
A. Alojamiento de la cortina
B. Obturador de espuma adhesivo
Instalación del gabinete en la ventana
NOTAS:
■ Trate el acondicionador de aire con cuidado.
■ Asegúrese de que el gabinete del acondicionador de aire no
se caiga de la abertura durante la instalación o al quitarlo.
■ La parte de donde sale el cable eléctrico del acondicionador
de aire debe colocarse a no más de 4 pies (122 cm) de un
tomacorriente de conexión a tierra de 3 terminales.
■ No bloquee las rejillas que están en el panel delantero.
■ No bloquee las rejillas que están en el exterior del
acondicionador de aire.
1. Centre el gabinete vacío en la ventana. Controle que el riel
inferior del gabinete del acondicionador de aire esté detrás y
contra la parte posterior de la repisa de la ventana. Sostenga
firmemente el gabinete del acondicionador de aire. Baje el
marco de la ventana para mantener el gabinete en su lugar.
2. Mida la distancia del lado derecho del gabinete a la parte
interior del canal de la ventana.
3. Repita el procedimiento para el lado izquierdo. Ajuste el
gabinete hasta que la distancia a cada lado sea igual.
4. Mientras la cortina derecha está extendida, inserte tornillos
de cono achatado Phillips #10 x ¹⁄₄" en las ranuras superior e
inferior de la cortina. Atornille la cortina a los orificios superior
e inferior en el gabinete del acondicionador de aire.
NOTA: Algunas cortinas pueden tener 2 ranuras en cada
extremo. Usted podrá ver un orificio de montaje a través de la
ranura correcta.
24
B
A. Marco de la ventana
B. Gabinete vacío
C. Canal de la ventana
Page 25

4. Use una broca de barrena de ³⁄₃₂" para taladrar 4 orificios
B
C
para comenzar de ³⁄₈" de profundidad a través de los
4 orificios en el gabinete y dentro del marco de la ventana.
5. Sujete el gabinete al marco de la ventana con 4 tornillos
Phillips de cabeza de cono achatado #10 x ¹⁄₂".
2. Inserte uno de los tornillos de cabeza redonda #10 x ³⁄₄", a
través del orificio, en la parte superior de la cortina.
3. Inserte uno de los tornillos de cabeza redonda #10 x ³⁄₄", a
través del orificio, en la parte inferior de la cortina.
A
B
A
A. Tornillos Phillips de cabeza de cono achatado #10 x
B. Marco de la ventana
A
¹⁄₂
"
6. Verifique que el gabinete del acondicionador de aire esté
inclinado hacia afuera para que el agua corra hacia el
exterior.
Encaje las cortinas laterales en el marco de la ventana
1. Tire de la cortina izquierda hacia afuera hasta que encaje en
el canal de la ventana. Utilice una broca de barrena de ³⁄₃₂"
para taladrar un primer orificio en el orificio del alojamiento de
la cortina y dentro del marco inferior de la ventana.
Vista frontal
Vista superior
A. Tornillo de cabeza redonda #10 x
B. Orificio en la parte inferior de la cortina
³⁄₄
"
4. Repita el procedimiento para la cortina derecha.
Fije los soportes de apoyo
1. Fije el soporte de apoyo al gabinete alineando los orificios en
el soporte con los orificios en el gabinete.
A
A. Orificios en el gabinete y el soporte de apoyo
2. Con tornillos de cono achatado Philips #10 x ¹⁄₂" fije el
soporte al gabinete. Repita el procedimiento para el otro
soporte.
3. Gire el perno de ajuste para cada soporte hasta que el perno
toque la pared.
4. Gire la contratuerca en el perno de ajuste para fijarla en su
lugar.
A
B
C
A. Canal de la ventana
B. Cortina izquierda
C. Tornillo de cabeza redonda #10 x
A
B
³⁄₄
"
A. Soporte de apoyo
B. Contratuerca
C. Perno de ajuste
25
Page 26
Complete la instalación en la ventana
C
D
D
B
1. Inserte el obturador de espuma del marco de la ventana
detrás de la parte superior del marco de la ventana inferior y
contra el cristal de la ventana superior.
2. Coloque el soporte de seguridad de la ventana en la parte
superior de la ventana inferior y contra el marco de la ventana
superior a cada lado de la ventana.
3. Utilice una broca de barrena de ³⁄₃₂" para perforar orificios
para comenzar a través de los orificios en el soporte y en el
marco de la ventana.
4. Fije los soportes de seguridad de la ventana al marco de la
ventana con los tornillos de cabeza redonda #10 x ³⁄₄" para
asegurar la ventana en su lugar.
Instalación a través de la pared
NOTAS:
■ Trate el acondicionador de aire con cuidado.
■ Asegúrese de que el gabinete del acondicionador de aire no
se caiga de la abertura durante la instalación o al quitarlo.
■ La parte de donde sale el cable eléctrico del acondicionador
de aire debe colocarse a no más de 4 pies (122 cm) de un
tomacorriente de conexión a tierra de 3 terminales.
■ No bloquee las rejillas que están en el panel delantero.
■ No bloquee las rejillas que están en el exterior del
acondicionador de aire.
■ Es responsabilidad y obligación del cliente hacer que este
producto sea instalado por un técnico calificado familiarizado
con instalaciones a través de la pared de acondicionadores
de aire de habitaciones.
Opción 1—Moldura de madera, metal o plástico
Cuando utilice una moldura de madera, metal o plástico, el
marco de madera debe estar alineado con la pared interior como
se muestra.
B
C
A
A. Moldura
B. Pared interior
C. Marco de madera
D. Rejillas
A
A. Soportes de seguridad para la ventana
B. Cristal de la ventana superior
C. Obturador de espuma del marco de la ventana
A
Opción 2—Pared enyesada sin moldura
Si la pared enyesada va a nivelarse con el gabinete y no se utiliza
ninguna moldura, el marco de madera debe colocarse ¹⁄₂"
(13 mm) dentro de la pared interior.
B
C
A
A. Pared enyesada
B. Pared interior
C. Marco de madera
D. Rejillas
Instalación del marco de madera
1. Arme el marco de madera. Vea “Requisitos de ubicación”
para las dimensiones.
2. Mida el ancho y la altura exteriores del marco para
determinar las dimensiones de la abertura de la pared.
3. Haga una abertura en la pared. Quite y guarde el aislamiento.
NOTAS:
■ Las dimensiones de la profundidad dependen del
espesor de la pared y del tipo de moldura.
■ No bloquee las rejillas que están en el gabinete del
acondicionador de aire.
26
Page 27

■ Utilice madera de 1" (2,5 cm) o más ancha para el marco
C
A
de madera.
A
B
A. Ancho exterior
B. Altura exterior
C. Profundidad
2. Use un nivel para verificar que el gabinete esté nivelado de
lado a lado.
A. Nivel
3. Verifique que el gabinete del acondicionador de aire esté
inclinado hacia afuera para que el agua corra hacia afuera.
4. Aplique el preservativo para madera a la superficie exterior
expuesta.
5. Inserte el marco en la abertura en la pared. Cuadre y nivele el
marco.
6. Sujete con firmeza el marco a la pared.
Instalación del gabinete dentro del marco de madera
1. Inserte el gabinete en la abertura de la pared con el marco.
A
A. Marco
Complete la instalación
RECUERDE: Trate el acondicionador de aire con cuidado.
1. Asegúrese de que el extremo libre del alambre a tierra esté
fuera del gabinete.
Complete la instalación a través de la pared
1. Vuelva a utilizar el aislamiento para sellar la abertura entre el
gabinete y el marco.
2. Utilice los orificios existentes y 6 tornillos para madera
#10 x 1" (no provistos) para fijar el gabinete al marco.
NOTA: No apriete demasiado los tornillos para que el
gabinete no se deforme perjudicando el sellado del aire entre
el gabinete y el acondicionador de aire.
3. Pásele masilla a todas las aberturas exteriores de la pared
alrededor del gabinete.
NOTA: Asegúrese de que el extremo libre del alambre a tierra
esté fuera del gabinete.
ADVERTENCIA
Peligro de Peso Excesivo
Use dos o más personas para mover e instalar
el acondicionador de aire.
No seguir esta instrucción puede ocasionar una lesión
en la espalda u otro tipo de lesiones.
2. Inserte el acondicionador de aire en el gabinete.
A
A. Alambre a tierra fuera del gabinete
27
Page 28

ADVERTENCIA
Peligro de Choque Eléctrico
Conecte el alambre verde de conexión a tierra
al tornillo de conexión a tierra.
No seguir esta instrucción puede ocasionar la muerte
o choque eléctrico.
5. Ajuste la parte inferior delantera del panel usando 2 tornillos
#10 x ³⁄₈" de cabeza redonda pintada.
3. Conecte el alambre verde de conexión a tierra al tornillo de
conexión a tierra.
Coloque el alambre de puesta a tierra derecho hacia arriba.
Ponga lo que sobre del alambre de puesta a tierra entre el
serpentín y el gabinete del acondicionador de aire.
A
B
A. Alambre verde de conexión a tierra
B. Tornillo de puesta a tierra
4. Empuje en forma recta el panel delantero y luego bájelo
ligeramente para trabarlo en su lugar.
NOTA: Para las instalaciones a través de la pared, instale la
moldura alrededor del lado del gabinete que da a la habitación si
es necesario.
ADVERTENCIA
Peligro de Choque Eléctrico
Conecte a un contacto de pared de conexión a tierra de
3 terminales.
No quite la terminal de conexión a tierra.
No use un adaptador.
No use un cable eléctrico de extensión.
No seguir estas instrucciones puede ocasionar
la muerte, incendio o choque eléctrico.
6. Conecte a un contacto de pared de conexión a tierra de
3 terminales.
7. Presione RESET (Reposición) en el cable de suministro de
energía. Vea “Requisitos eléctricos”.
CÓMO USAR SU ACONDICIONADOR DE AIRE
Operar debidamente su acondicionador de aire le permite
obtener los mejores resultados posibles.
Esta sección le explica cómo operar su acondicionador de
aire debidamente.
IMPORTANTE:
■ Si usted apaga el acondicionador de aire, espere por lo
menos 3 minutos antes de volver a ponerlo en marcha. Esto
evitará que se queme un fusible del hogar o se dispare un
disyuntor de circuito a causa del acondicionador de aire.
28
■ No trate de operar su acondicionador de aire en el modo de
enfriamiento cuando la temperatura exterior sea menor de
65°F (18°C). El serpentín interior del evaporador se congelará
y el acondicionador de aire no funcionará debidamente.
NOTA: En caso de corte de electricidad, el acondicionador de
aire funcionará con los ajustes previos cuando se reanude la
electricidad.
Page 29

Cómo poner en marcha su acondicionador de aire—Control digital
NOTAS:
■ Cuando esté apagado el acondicionador de aire, la pantalla
muestra la temperatura actual de la habitación.
■ Si la temperatura de la habitación es menor de 55°F (13°C), la
pantalla mostrará 55°F (13°C). Si la temperatura de la
habitación es mayor de 99°F (37°C), la pantalla mostrará
99°F(37°C).
1. Quite la película protectora transparente del panel de control
y de la placa del panel delantero (en algunos modelos).
2. Oprima el botón de POWER (Encendido) para encender el
acondicionador de aire.
NOTA: Cuando se enciende el acondicionador de aire por
primera vez después de haberlo enchufado, mostrará en la
pantalla los ajustes programados: Modo Cool (Enfriamiento),
velocidad de ventilación Turbo, 72°F (22°C) por 3 segundos.
Cuando se encienda todas las otras veces, mostrará los
ajustes previos por 3 segundos y luego la temperatura de la
habitación.
3. Elija el modo. Vea “Mode (Modo)”.
4. Elija la velocidad de ventilación. Vea “Fan Speed (Velocidad
de ventilación)”.
5. Elija la temperatura. Vea “Temperatura”.
Mode (Modo)
1. Oprima y sostenga MODE (Modo) hasta que se encienda la
luz indicadora para la posición que usted desea.
2. Seleccione Cool (Enfriamiento), Fan (Ventilación), o Power
Saver (Ahorro de energía).
■ Cool (Enfriamiento)—Enfría el ambiente. Oprima FAN
SPEED para seleccionar la velocidad de ventilación.
Oprima los botones con las flechas hacia arriba o hacia
abajo para ajustar la temperatura.
■ Fan (Ventilación)—Hace funcionar el ventilador en la
velocidad Turbo sin enfriar. La pantalla muestra “FO”
(sólo ventilación).
■ Power Saver (Ahorro de energía)—El ventilador funciona
únicamente cuando se necesita enfriamiento. Usted
puede seleccionar la velocidad de ventilación oprimiendo
Fan Speed (Velocidad de ventilación).
P
R
O
E
W
Ya que el ventilador no hace circular continuamente el
aire de la habitación, se consume menos energía, pero el
aire de la habitación circula con menos frecuencia. Utilice
el modo de Power Saver cuando esté fuera del hogar o
durmiendo.
Fan Speed (Velocidad de ventilación)
NOTA: El botón de velocidad de ventilación funcionará
solamente cuando se hayan seleccionado los modos de Cool
(Enfriamiento), o Power Saver (Ahorro de energía).
1. Oprima y sostenga FAN SPEED (velocidad de ventilación)
hasta ver la luz indicadora para el ajuste deseado.
2. Seleccione Turbo, High (Alta), Low (Baja) o Auto (Automático).
Monitor del filtro
1. Cuando la luz indicadora Filter (Filtro) se encienda o destelle,
saque, limpie y vuelva a colocar el filtro de aire. Vea
“Limpieza del filtro de aire”.
2. Oprima y sostenga FILTER (Filtro) por 3 segundos después
de limpiar y volver a colocar el filtro de aire. Esto vuelve a fijar
el monitor del filtro.
NOTA: Después de que el ventilador funcione por 360 horas, la
luz indicadora del filtro se encenderá. Permanecerá encendida
por 180 horas o hasta que usted presione FILTER (Filtro).
Después de 180 horas, destellará. Continuará destellando hasta
que usted presione FILTER (Filtro).
Temperatura
■ Presione el botón de más para aumentar la temperatura.
Cada vez que usted presione o sostenga el botón de más, la
temperatura aumentará de a 1° hasta llegar a un máximo de
86°F (30°C).
NOTA: Después de 3 segundos, la pantalla mostrará la
temperatura actual de la habitación.
■ Presione el botón de menos para bajar la temperatura. Cada
vez que usted presione o sostenga el botón de menos, la
temperatura disminuirá de a 1° hasta llegar a un mínimo de
64°F (18°C).
NOTA: Después de 3 segundos, la pantalla mostrará la
temperatura actual de la habitación.
29
Page 30
Retardo del temporizador
Para programar el Temporizador de manera que el
acondicionador de aire se apague (el acondicionador de
aire tiene que estar Encendido):
1. Oprima TIMER (Temporizador). La luz indicadora
Temporizador destellará. La pantalla mostrará las horas
restantes antes de que se apague el acondicionador de aire.
2. Oprima el botón de más o menos para cambiar el tiempo de
retardo de 1 a 24 horas.
3. Oprima TIMER nuevamente o espere 10 segundos. La luz
indicadora Temporizador permanecerá encendida. La
pantalla mostrará la temperatura actual de la habitación.
Para programar el temporizador de manera que el
acondicionador de aire se encienda manteniendo los
ajustes previos:
1. Apague el acondicionador de aire.
2. Oprima TIMER. La luz indicadora Temporizador destellará. La
pantalla mostrará las horas restantes antes de que se
encienda el acondicionador de aire.
3. Oprima el botón de más o menos para cambiar el tiempo de
retardo de 1 a 24 horas.
4. Oprima TIMER nuevamente o espere 10 segundos. La luz
indicadora Temporizador permanecerá encendida. La
pantalla mostrará la temperatura actual de la habitación.
Para programar el temporizador de manera que el
acondicionador de aire se encienda cambiando los
ajustes previos:
1. Encienda el acondicionador de aire.
2. Ajuste el modo a Cool (Enfriamiento), Fan Only (Sólo
ventilación) o Power Saver (Ahorro de energía).
3. Ajuste la velocidad de ventilación a Turbo, High (Alta), Low
(Baja) o Auto (Automática).
4. Ajuste la temperatura entre 64°F y 86°F (18°C y 30°C).
5. Apague el acondicionador de aire.
6. Oprima TIMER. La luz indicadora Temporizador destellará. La
pantalla mostrará las horas restantes antes de que se
encienda el acondicionador de aire.
7. Oprima el botón de más o menos para cambiar el tiempo de
retardo de 1 a 24 horas.
8. Oprima TIMER nuevamente o espere 10 segundos. La luz
indicadora Temporizador permanecerá encendida. La
pantalla mostrará la temperatura actual de la habitación.
Para borrar la programación del tiempo de retardo del
Te m p or i z a do r :
NOTA: El acondicionador de aire puede estar encendido o
apagado.
Oprima y sostenga TIMER por 3 segundos. La luz del indicador
Temporizador se apagará.
Para ver el tiempo restante (en horas):
1. Oprima TIMER una vez después de que haya sido
programado. La pantalla mostrará el tiempo restante.
2. Mientras la pantalla muestra el tiempo restante, usted puede
oprimir el botón de más o menos para aumentar o disminuir
el tiempo.
3. Después de 10 segundos, la pantalla mostrará la temperatura
actual de la habitación.
Cómo usar el control remoto
NOTA: La apariencia del control remoto puede variar.
FAN
SPEED
TIMER
POWER
FAN
Power saver
COOL
SWING
Para encender o apagar el acondicionador de aire
Presione POWER (Encendido).
POWER
Para seleccionar el modo
Oprima COOL (Enfriamiento), FAN (Ventilación) o POWER SAVER
(Ahorro de energía).
COOL
Power saver
FAN
Para seleccionar la velocidad de ventilación
Oprima FAN SPEED (Velocidad de ventilación) para Turbo, High
(Alta), Low (Baja) o Auto (Automática).
NOTA: La velocidad de ventilación Auto (Automática) no puede
seleccionarse en el modo de Fan (Ventilación).
AUTO
FAN
SPEED
NOTA: El control remoto se alimenta con dos pilas AAA
(incluidas). Cambie las pilas después de 6 meses de uso o
cuando el control remoto comienza a perder fuerza.
30
Page 31

Para fijar la temperatura
Para subir la temperatura:
Presione el botón de más para aumentar la temperatura. Cada
vez que usted presione o sostenga el botón de más, la
temperatura aumentará de a 1° hasta llegar a un máximo de 86°F
(30°C).
Para bajar la temperatura:
Presione el botón de menos para disminuir la temperatura. Cada
vez que presione o sostenga el botón de menos, la temperatura
disminuirá de a 1° hasta llegar a un mínimo de 64°F (18°C).
Para fijar el retraso del temporizador
Para programar el temporizador de manera que el
acondicionador de aire se apague (el acondicionador de
aire tiene que estar Encendidio):
1. Presione TIMER (Temporizador). La luz del indicador en el
panel de control del acondicionador de aire se encenderá
intermitentemente.
TIMER
2. Oprima el botón de más o de menos para cambiar el tiempo
de retardo de 1 a 24 horas.
3. Oprima TIMER nuevamente o espere 10 segundos. La luz del
indicador en el panel de control del acondicionador de aire
permanecerá encendida.
Para programar el temporizador de manera que el
acondicionador de aire se encienda manteniendo los
ajustes previos:
1. Apague el acondicionador de aire.
2. Oprima TIMER (Temporizador). La luz del indicador se
encenderá intermitentemente en el panel de control del
acondicionador de aire.
3. Oprima el botón de más o menos para cambiar el tiempo de
retardo de 1 a 24 horas.
4. Oprima TIMER nuevamente o espere 10 segundos. La luz del
indicador en el panel de control del acondicionador de aire
permanecerá encendida.
Para programar el temporizador de manera que el
acondicionador de aire se encienda cambiando los
ajustes previos:
1. Encienda el acondicionador de aire.
2. Ajuste el modo a Cool (Enfriamiento), Fan (Ventilación) o
Power Saver (Ahorro de energía).
3. Ajuste la velocidad de ventilación a Turbo, High (Alta), Low
(Baja), o Auto (Automática).
4. Ajuste la temperatura entre 64°F y 86°F (18°C y 30°C).
5. Apague el acondicionador de aire.
6. Oprima TIMER. La luz del indicador se encenderá
intermitentemente en el panel de control del acondicionador
de aire.
7. Oprima el botón de más o menos para cambiar el tiempo de
retardo de 1 a 24 horas.
8. Oprima TIMER nuevamente o espere 10 segundos. La luz del
indicador en el panel de control del acondicionador de aire
permanecerá encendida.
Cómo poner en marcha su acondicionador de aire—Control rotativo—Modelos con sólo
aire frío
Control del respiradero (en algunos modelos)
Wait three minutes before restarting
4
3
2
1
WARMER
TEMPERATURE FAN SPEED
COOLER
5
7
6
AIR SWING
OFF
FAN
ONLY
LOW
COOL
HIGH
COOL
TURBO
COOL
1. Fije el control de respiradero. Vea “Control del respiradero (en
algunos modelos)”.
2. Elija la velocidad de ventilación. Vea “Fan Speed (Velocidad
de ventilación)”.
3. Fije la temperatura. Vea “Tem p er at ur a”.
Coloque el control de respiradero en la posición CLOSE
(Cerrada) para un enfriamiento máximo continuo. El control de
respiradero en la posición OPEN (Abierto) hace escapar el aire
viciado/humoso de la sala.
■ Open—para hacer salir el aire de la sala al exterior
■ Close—para que circule el aire en la sala
NOTA: El control de respiradero funciona únicamente cuando la
Velocidad de ventilación está funcionando.
31
Page 32

Fan Speed (Velocidad de ventilación)
Temperatura
Fije Fan Speed (Velocidad de ventilación) en la posición que
desee. Cuando el acondicionador de aire está funcionando a
temperaturas
Turbo Cool (Máximo nivel de frío) , High Cool (Muy
fría) or Low Cool (Poco fría), el ventilador hace circular el
aire continuamente.
■ Turbo Cool (Máximo nivel de frío)—para enfriamiento máximo
Coloque el Control de TEMPERATURE (Temperatura) en una
posición intermedia. Ajuste el funcionamiento del acondicionador
de aire girando el control de Temperatura en la dirección de las
manecillas del reloj para obtener el máximo nivel de enfriamiento.
Para un nivel de enfriamiento menor, gire el Control de
TEMPERATURE en dirección contraria a las manecillas del reloj.
Experimente y busque el ajuste que más le convenga.
■ High Cool (Muy fría)—para enfriamiento normal a máximo
(dependiendo del modelo)
■ Low Cool (Poco fría)—para dormir cómodo
■ Fan Only (Ventilación solamente)—para que el aire circule
continuamente sin enfriarse
LOW
COOL
OFF
FAN
ONLY
HIGH
COOL
TURBO
COOL
2
WARMER
4
3
1
5
6
7
COOLER
Cómo poner en marcha su acondicionador de aire—Control rotativo—Modelos con aire
caliente/frío
Control del respiradero (en algunos modelos)
Coloque el control de respiradero en la posición CLOSE
(Cerrada) para un enfriamiento máximo continuo. El control de
respiradero en la posición OPEN (Abierto) hace escapar el aire
viciado/humoso de la sala.
■ Open—para hacer salir el aire de la sala al exterior
■ Close—para que circule el aire en la sala
77
6
5
4
3
2
1
WARMER COOLER
6
5
4
2
1
TEMPERATURE
Wait three minutes before restarting
OFF
LOW
HEAT
TURBO
AIR SWING
HEAT
TURBO
COOL
FAN SPEED
3
HIGH
COOL
FAN
ONLY
LOW
COOL
POWER
SAVER
1. Fije el control de respiradero. Vea “Control del respiradero (en
algunos modelos)”.
2. Elija la velocidad de ventilación. Vea “Fan Speed (Velocidad
de ventilación)”.
3. Fije la temperatura. Vea “Tem p er at ur a”.
32
NOTA: El control de respiradero funciona únicamente cuando la
Velocidad de ventilación está funcionando.
Page 33

Fan Speed (Velocidad de ventilación)
Ponga la velocidad de ventilación en la posición que desee.
Cuando el acondicionador de aire está funcionando a
temperaturas Low Heat (Calor bajo), Turbo Heat (Calor turbo),
Turbo Cool (Máximo nivel de frío), High Cool (Muy fría) o Low
Cool (Poco fría), el ventilador hace circular el aire continuamente.
■ Low Heat (Calor bajo)—para reducir el nivel de calefacción
■ Turbo Heat (Calor turbo)—para máximo nivel de calefacción
■ Turbo Cool (Máximo nivel de frío)—para enfriamiento máximo
■ High Cool (Muy fría)—para enfriamiento de normal a máximo
■ Low Cool (Poco fría)—para dormir cómodo
■ Fan Only (Ventilación solamente)—para hacer circular el aire
sin calentar ni enfriar
NOTA: El ventilador funciona en velocidad Turbo solamente.
■ Power Saver (Ahorro de energía)—el ventilador funciona
solamente cuando sea necesario enfriar o calentar.
Ya que el ventilador no hace circular continuamente el aire de
la habitación, se consume menos energía, pero el aire de la
habitación circula con menos frecuencia. Utilice el modo de
Power Saver cuando esté fuera del hogar o durmiendo.
NOTA: El ventilador funciona en velocidad Low (Baja)
solamente.
NOTA: Su acondicionador de aire no está diseñado para ser
usado como fuente primaria de calor. Está diseñado para ser una
fuente suplementaria de calor solamente.
77
5
4
3
2
WARMER
6
1
6
5
1
COOLER
4
3
2
Cómo cambiar la dirección del aire
Use el botón de Air Swing (Dirección de aire) en el panel de
control del acondicionador de aire o Swing (Dirección) en el
control remoto para dirigir el aire a la derecha o a la izquierda.
SWING
AIR SWING
Use la lengüeta para dirigir el aire hacia arriba, hacia abajo o
directamente hacia adelante.
A
OFF
TURBO
HEAT
LOW
HEAT
TURBO
COOL
HIGH
COOL
FAN
ONLY
LOW
COOL
POWER
SAVER
Temperatura
Enfriamiento
Gire el control de TEMPERATURE (Temperatura) hacia un ajuste
que esté hacia el lado derecho de la perilla. Ajuste el
funcionamiento del acondicionador de aire fijando el control de
temperatura hacia “1” para un enfriamiento máximo. Para
obtener menos frío, gire el control de TEMPERATURE
(Temperatura) hacia la izquierda, a un número mayor, hacia el
lado derecho de la perilla.
Calentamiento
El calentador de tira eléctrica se activa cuando el control de Fan
Speed (Velocidad de ventilación) se coloca en una posición de
calor. Gire el control de TEMPERATURE (Temperatura) hacia un
ajuste que esté hacia el lado izquierdo de la perilla. Para mayor
calentamiento, gire el control de TEMPERATURE (Temperatura)
hacia “1”, para obtener un calentamiento máximo. Para un
menor calentamiento, gire el control de TEMPERATURE
(Temperatura) hacia la derecha a un número mayor, hacia el lado
izquierdo de la perilla.
Experimente y busque el ajuste que más le convenga.
A. Lengüeta
Sonidos normales
Cuando el acondicionador de aire está funcionando
normalmente, usted podrá escuchar sonidos como:
■ Gotas de agua que caen sobre el condensador, produciendo
tintineos o chasquidos. Las gotas de agua ayudan a enfriar el
condensador.
■ El movimiento del aire que sale del ventilador.
■ Chasquidos del ciclo del termostato.
■ Vibraciones o ruidos debidos a deficiencias en la
construcción de la pared o ventana.
■ Un zumbido agudo o un ruido pulsante producido por la
alternación de los ciclos del moderno compresor de alta
eficiencia.
33
Page 34
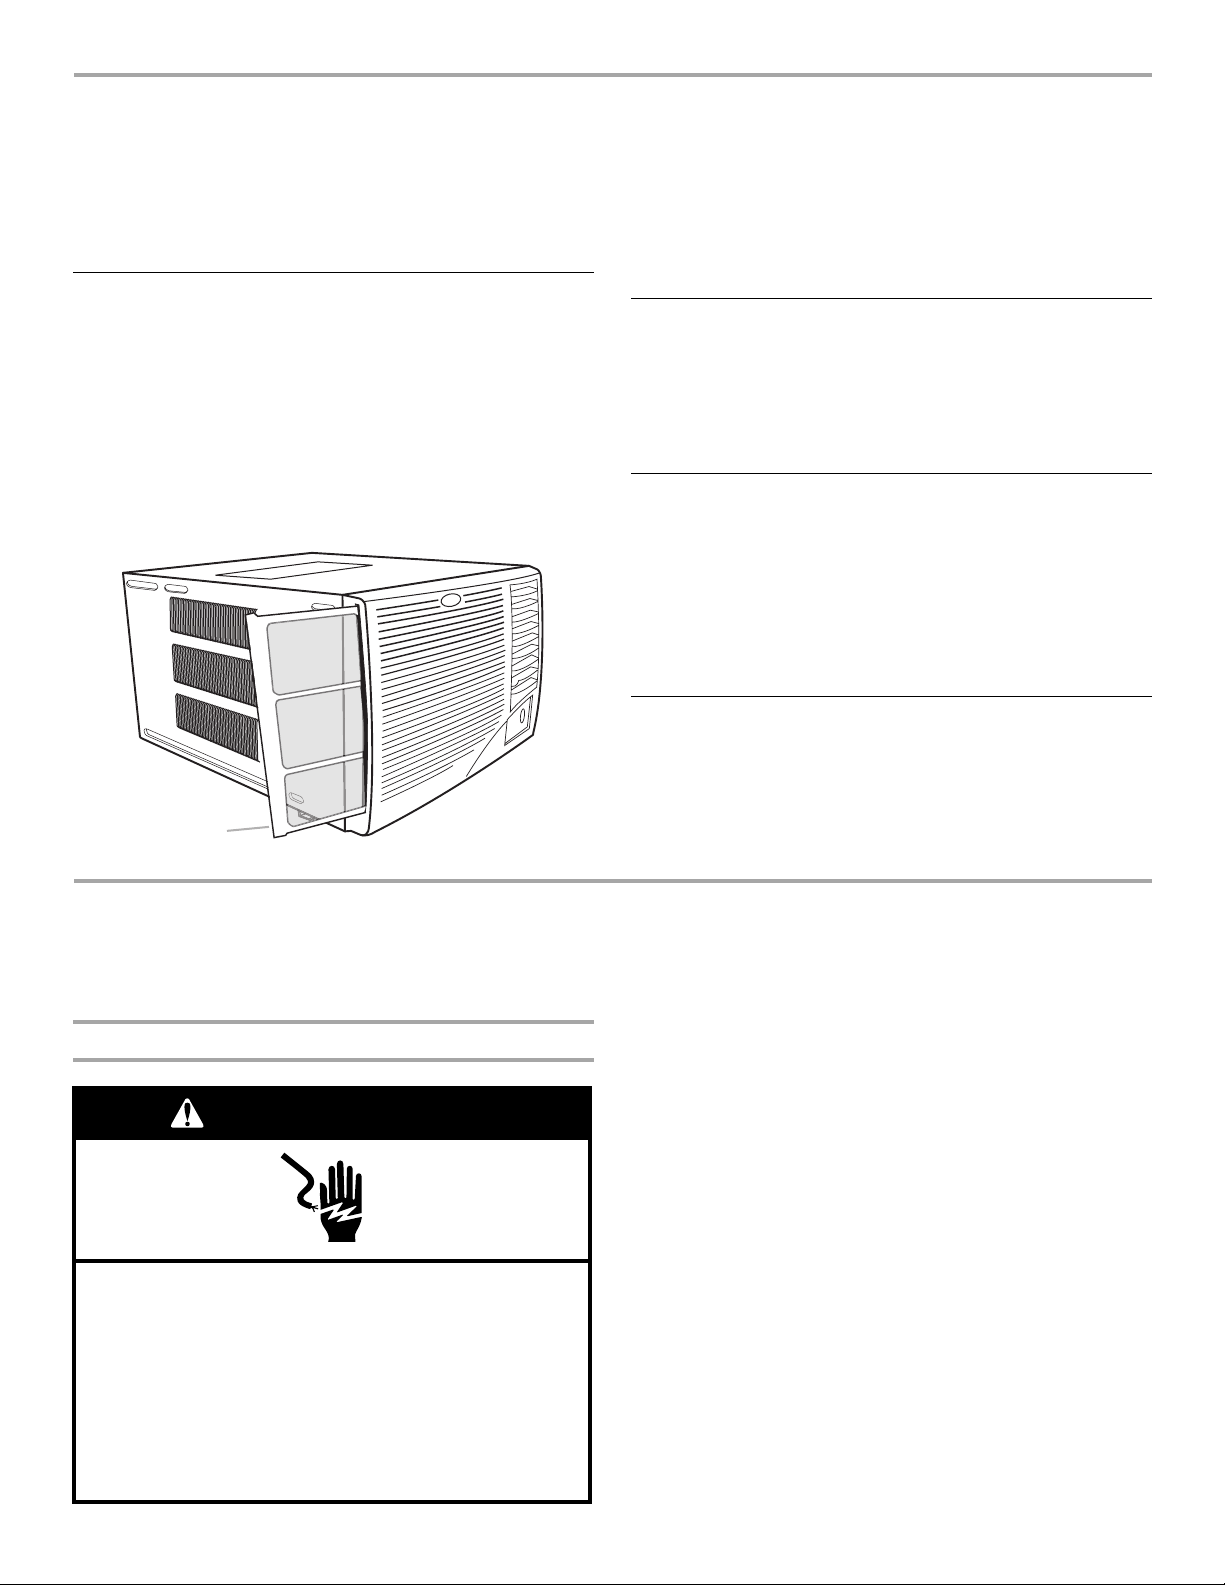
CUIDADO DE SU ACONDICIONADOR DE AIRE
Su nuevo acondicionador de aire está diseñado para darle
muchos años de servicio confiable. Esta sección le ofrece la
información acerca de la limpieza adecuada y el cuidado de su
acondicionador de aire. Llame al vendedor autorizado de su
localidad para un chequeo anual. Acuérdese…el precio de este
servicio es su responsabilidad.
Limpieza del filtro de aire
El filtro de aire se puede desmontar para facilitar su limpieza. Un
filtro limpio ayuda a quitar el polvo, las pelusas y otras partículas
del aire, y es importante para que el aparato funcione y enfríe
más eficientemente. Revise el filtro cada dos semanas para ver si
necesita limpieza.
NOTA: No haga funcionar el acondicionador de aire si el filtro no
está colocado en su lugar.
1. Apague el acondicionador de aire.
2. Saque el filtro de aire deslizándolo desde cualquiera de los
lados del panel frontal.
3. Limpie el filtro usando una aspiradora. Si está muy sucio, lave
el filtro con agua tibia y un detergente suave. No lave el filtro
de aire en la lavavajillas ni use limpiadores químicos. Seque
bien el filtro al aire antes de colocarlo nuevamente para
asegurarse la máxima eficiencia.
4. Vuelva a colocar el filtro de aire deslizándolo nuevamente en
cualquiera de los lados del acondicionador de aire.
Limpieza del panel delantero
1. Apague el acondicionador de aire.
2. Quite el filtro de aire y límpielo por separado. Vea “Limpieza
del filtro de aire”.
3. Limpie el panel delantero con un paño suave y húmedo.
4. Seque el panel delantero al aire completamente.
Reparación de la pintura dañada
Revise una o dos veces al año si hay daños en la pintura. Esto es
muy importante, especialmente en lugares que están cerca de
los océanos o donde la herrumbre es un problema. Si es
necesario, retoque con un esmalte de buena calidad.
NOTA: Para reducir el daño a la pintura durante el invierno,
instale una cubierta resistente sobre el gabinete del
acondicionador de aire. Para obtener información sobre cómo
pedir una cubierta resistente, vea la sección “Accesorios”.
Mantenimiento anual
Su acondicionador de aire necesita mantenimiento anual para
ayudar a asegurar un rendimiento constante de la mejor calidad
durante todo el año. Llame al distribuidor autorizado de su
A
A. Filtro de aire
localidad para hacer una cita para el chequeo anual. El precio del
chequeo anual es su responsabilidad.
SOLUCIÓN DE PROBLEMAS
Antes de solicitar servicio, pruebe las sugerencias que se incluyen a continuación para ver si puede resolver el
Su acondicionador de aire no funciona
ADVERTENCIA
Peligro de Choque Eléctrico
Conecte a un contacto de pared de conexión a tierra de
3 terminales.
No quite la terminal de conexión a tierra.
No use un adaptador.
No use un cable eléctrico de extensión.
No seguir estas instrucciones puede ocasionar
la muerte, incendio o choque eléctrico.
problema sin ayuda.
■ El cable de alimentación eléctrica está desconectado.
Conecte a un contacto de pared de conexión a tierra de
3 terminales. Vea “Requisitos eléctricos”.
■ El cable de suministro de energía se trabó (el botón de
reposición saltó). Presione y suelte RESET (Reposición)
(escuche el chasquido, el botón de reposición queda
asegurado y se mantiene asegurado) para reanudar el
funcionamiento.
■ Se ha fundido un fusible de la casa o disparado un
cortacircuitos. Reemplace el fusible o reposicione el
cortacircuitos. Si el problema continúa, llame a un
electricista. Vea “Requisitos eléctricos”.
■ El control de Fan Speed (Velocidad de ventilación) se ha
fijado en la posición de apagado. Fije el control de Fan
Speed en una posición activa.
■ Se ha interrumpido la energía eléctrica en su localidad.
Espere que se restablezca la energía eléctrica.
34
Page 35

El acondicionador de aire funde los fusibles o dispara
los cortacircuitos
■ Se están usando muchos aparatos en el mismo circuito.
Desconecte o ponga en otro lugar los aparatos que se estén
usando el mismo circuito.
■ Se está usando un fusible de retardo o un cortacircuitos
con la capacidad incorrecta. Reemplácelo con un fusible
de retardo o un cortacircuitos con la capacidad correcta. Vea
“Requisitos eléctricos”.
■ Se está usando un cable eléctrico de extensión. No use un
cable eléctrico de extensión con este o cualquier otro
aparato.
■ Usted está tratando de volver a poner en marcha el
acondicionador de aire muy poco tiempo después de
apagar el control de Fan (Ventilación). Espere por lo menos
3 minutos antes de poner en marcha el acondicionador de
aire después de apagar el control de Fan.
El cable de suministro de energía del acondicionador de
aire se traba (el botón de reposición salta)
■ Las interrupciones en la corriente eléctrica de su casa
pueden hacer trabar (el botón de reposición saltará) el
cable de suministro de energía. Presione y libere RESET
(Reposición) (escuche el chasquido, el botón de reposición
queda asegurado y se mantiene asegurado) para reanudar el
funcionamiento.
■ Una sobrecarga eléctrica, el recalentamiento, los
pellizcos y el envejecimiento pueden hacer que se trabe
(el botón de reposición saltará) el cable de suministro de
energía. Luego de corregir el problema, presione y libere
RESET (Reposición) (escuche el chasquido, el botón de
reposición queda asegurado y se mantiene asegurado) para
reanudar el funcionamiento.
NOTA: Un cable de suministro de energía dañado debe ser
reemplazado por un nuevo cable de suministro de energía
obtenido del fabricante del producto y que no haya sido
reparado.
Parece que el acondicionador de aire funciona
excesivamente
■ Su actual acondicionador de aire reemplazó un modelo
viejo. El uso de componentes más eficientes puede hacer
que el acondicionador de aire funcione por más tiempo que
su antiguo modelo, pero el consumo total de energía será
menor. Los acondicionadores de aire más nuevos no emiten
las “ráfagas” de aire frío a las que usted estaba
acostumbrado con sus unidades anteriores, pero esto no es
indicio de menor capacidad o eficiencia en el enfriamiento.
Verifique el régimen de eficiencia (EER) y el régimen de
capacidad (en Btu/h) que se indican en el acondicionador de
aire.
■ La unidad se encuentra en una habitación muy conges-
tionada o se están usando en la misma habitación
aparatos que generan calor. Use ventiladores aspiradores
cuando esté cocinando o bañándose y trate de no usar
aparatos que generan calor durante las horas más calurosas
del día. Podría necesitar un acondicionador de aire con más
capacidad, dependiendo del tamaño de la habitación que se
desea enfriar.
El acondicionador de aire se enciende y se apaga
demasiado, o no enfría/calienta la habitación en el modo
de enfriamiento/calefacción
■ El control de Fan Speed (Velocidad de ventilación) está
puesto en Power Saver (Ahorro de energía) (en algunos
modelos). Utilice el modo de ahorro de energía únicamente
cuando esté fuera de su hogar o durmiendo, debido a que el
ventilador no hace circular el aire de la sala continuamente.
Para mayor comodidad use Low Cool (Poco fría), High Cool
(Muy fría), Turbo Cool (Máximo nivel de frío), Turbo Heat
(Calor turbo) o Low Heat (Calor bajo).
■ El acondicionador de aire no tiene el tamaño adecuado
para su habitación. Verifique la capacidad de enfriamiento
de su acondicionador de aire para habitación. Los
acondicionadores de aire para habitaciones no están
diseñados para enfriar varias habitaciones.
■ El filtro está sucio u obstruido por desechos. Limpie el
filtro.
■ El evaporador interno y los serpentines del condensador
externo están sucios u obstruidos por desechos. Vea
“Mantenimiento anual”.
■ Hay demasiado calor o humedad (se está cocinando en
recipientes abiertos, duchas, etc.) en la habitación. Use
un ventilador para eliminar el calor o la humedad de la
habitación. Trate de no usar aparatos que generan calor
durante las horas más calurosas del día.
■ Las rejillas están boqueadas. Instale el acondicionador de
aire en un lugar donde las rejillas no estén bloqueadas por
cortinas, persianas, muebles, etc.
■ La temperatura exterior es inferior a los 65°F (18°C). No
trate de poner en marcha el acondicionador de aire en el
modo de enfriamiento cuando la temperatura exterior sea
inferior a los 65°F (18°C).
■ La temperatura de la habitación que está tratando de
enfriar está demasiado caliente. Deje pasar más tiempo
para que el acondicionador de aire enfríe una habitación muy
caliente.
■ Están abiertas ventanas o puertas que dan al exterior.
Cierre todas las puertas y ventanas.
■ El control de respiradero está en OPEN (Abierto) (en
algunos modelos). Fije el control de respiradero en la
posición CLOSED (Cerrado) para un enfriamiento y/o
calefacción máximo.
■ La temperatura no está en una posición lo
suficientemente fría. Ajuste el control de Temperature
(Temperatura) a una posición más fría girando la perilla en la
dirección de las manecillas del reloj. Ponga el control de Fan
Speed (Velocidad de ventilación) en Turbo Cool (Máximo nivel
de frío).
■ El acondicionador de aire en el modo de calefacción no
tiene la capacidad suficiente de Btu/h para los
requerimientos de calefacción de la habitación. No use el
acondicionador de aire como fuente principal de calor.
Se filtra agua del gabinete a su casa
■ El acondicionador de aire no está debidamente nivelado.
El acondicionador de aire debe inclinarse ligeramente hacia
abajo, hacia el exterior. Nivele el acondicionador de aire de
manera que tenga una inclinación hacia abajo, hacia el
exterior para asegurar el debido desagüe. Vea las
instrucciones de instalación.
NOTA: No perfore orificios en la parte inferior de la base de
metal o del colector de condensado.
35
Page 36

AYUDA O SERVICIO TÉCNICO
Para evitar llamadas solicitando servicio innecesarias, revise la
sección de “Solución de problemas”. Podría ahorrarle el costo de
una llamada solicitando servicio. Si aún necesita ayuda, siga las
instrucciones a continuación.
Si necesita ayuda o servicio técnico
Llame al número telefónico del Centro para la eXperiencia del
cliente. Llame gratis al 1-800-253-1301 en los EE. UU. Nuestros
consultores están disponibles para ayudarlo.
Cuando llame, tenga a mano la fecha de compra y el número de
modelo y de serie completos de su aparato.
Esta información nos ayudará a atenderle mejor.
Nuestros consultores le proporcionan ayuda para:
■ Características y especificaciones para nuestra línea
completa de aparatos electrodomésticos
■ Información sobre instalación
■ Procedimientos de uso y mantenimiento
■ Ventas de accesorios y refacciones
■ Asistencia especializada al cliente (asistencia en español,
para personas con problemas auditivos, visión limitada, etc.)
■ Direcciones de vendedores, compañías de servicio y
distribuidores de refacciones en su localidad.
Nuestros técnicos en servicio están capacitados para satisfacer
la garantía del producto y proporcionar servicios posteriores a la
garantía, en cualquier parte de los EE. UU.
Para localizar a una compañía de servicios autorizada en su área,
puede buscar en las páginas amarillas de su guía telefónica.
Si necesita refacciones
Si necesita pedir refacciones, le recomendamos que utilice
únicamente piezas autorizadas por la fábrica. Estas piezas se
adaptarán y funcionarán correctamente porque han sido hechas
siguiendo las mismas rigurosas especificaciones utilizadas para
construir todos los nuevos aparatos electrodomésticos.
Para localizar piezas autorizadas por la fábrica en su localidad,
llame a nuestro Centro para la eXperiencia del cliente, a su centro
de servicio autorizado más cercano o al Servicio de fábrica al
1-800-442-1111 en los EE. UU.
Para asistencia adicional
Si necesita asistencia adicional puede escribir para hacernos
cualquier pregunta o comunicarnos sus problemas a:
Customer eXperience Center
553 Benson Road
Benton Harbor, MI 49022-2692
Por favor incluya en su correspondencia un número de teléfono
en el que se le pueda localizar durante el día.
Por favor anote la información sobre su modelo.
Siempre que llame para solicitar servicio del aparato, necesitará
saber el número del modelo y el número de serie completos. Esta
información la encuentra en la placa de número del modelo y
número de serie. Vea la ubicación del número del modelo y del
número de serie en “Requisitos eléctricos”.
Por favor anote la información sobre el número del modelo y el
número de serie en el espacio a continuación. Anote también la
fecha de compra del aparato, así como el nombre, la dirección y
el teléfono de la tienda.
Número de modelo _____________________________________________
Número de serie ________________________________________________
Fecha de compra _______________________________________________
Nombre de la tienda ____________________________________________
Dirección de la tienda ___________________________________________
Teléfono de la tienda ____________________________________________
Guarde este manual y la nota de compra juntos para referencia
futura.
Accesorios
Usted puede ordenar los siguientes accesorios para su acondicionador de aire en el distribuidor autorizado de su localidad o llamando
al 1-800-253-1301 desde cualquier lugar en los EE. UU. Escuchará una grabación. Siga las instrucciones para hacer su pedido.
Filtros de aire de reemplazo
Un filtro de aire limpio y de buena calidad es importante para
obtener el mejor enfriamiento con el menor consumo de energía.
Limpie regularmente el filtro de aire. Vea las instrucciones de
limpieza en la sección “Limpieza del filtro de aire”. Le
recomendamos cambiar su filtro de aire una vez al año.
Para obtener un nuevo filtro electroestático de aire, pida la pieza
#111211551. Las partículas transportadas por el aire son
atraídas hacia un filtro electroestático y permanecen sujetas al
mismo hasta que se enjuaguen. Para obtener un nuevo filtro de
aire antimicrobiano, pida la pieza #11121216. Además de
proporcionar todos los beneficios de un filtro de aire
electroestático, un filtro de aire antimicrobiano también inhibe el
crecimiento de las bacterias, hongos y moho que causan olores
en el filtro. Ambos filtros de aire tienen el tamaño adecuado para
encajar en su acondicionador de aire.
66121560A
© 2006.
All rights reserved.
Todos los derechos reservados.
Cubierta resistente
Si usted decide dejar instalado su acondicionador de aire
durante el invierno, una cubierta resistente ayudará a proteger su
aparato y reducir las corrientes de aire. La cubierta para
exteriores protege contra las corrientes de aire frío a través de los
orificios de paso de aire de la unidad y protege el gabinete contra
la nieve, la lluvia, el agua nieve, la oxidación y el polvo.
Para obtener una cubierta para exteriores resistente del tamaño
adecuado para su acondicionador de aire, ordene la pieza
#484069.
Para obtener una cubierta para interiores resistente del tamaño
adecuado para su acondicionador de aire, ordene la pieza
#4392941.
Juego para ventana ancha
Un Juego para ventana ancha especial está disponible para
ventanas de 40" (101,6 cm) a 54" (137,2 cm) de ancho. Use el
juego #1162147.
Printed in U.S.A.
Impreso en EE. UU.
9/06
 Loading...