

Page 1
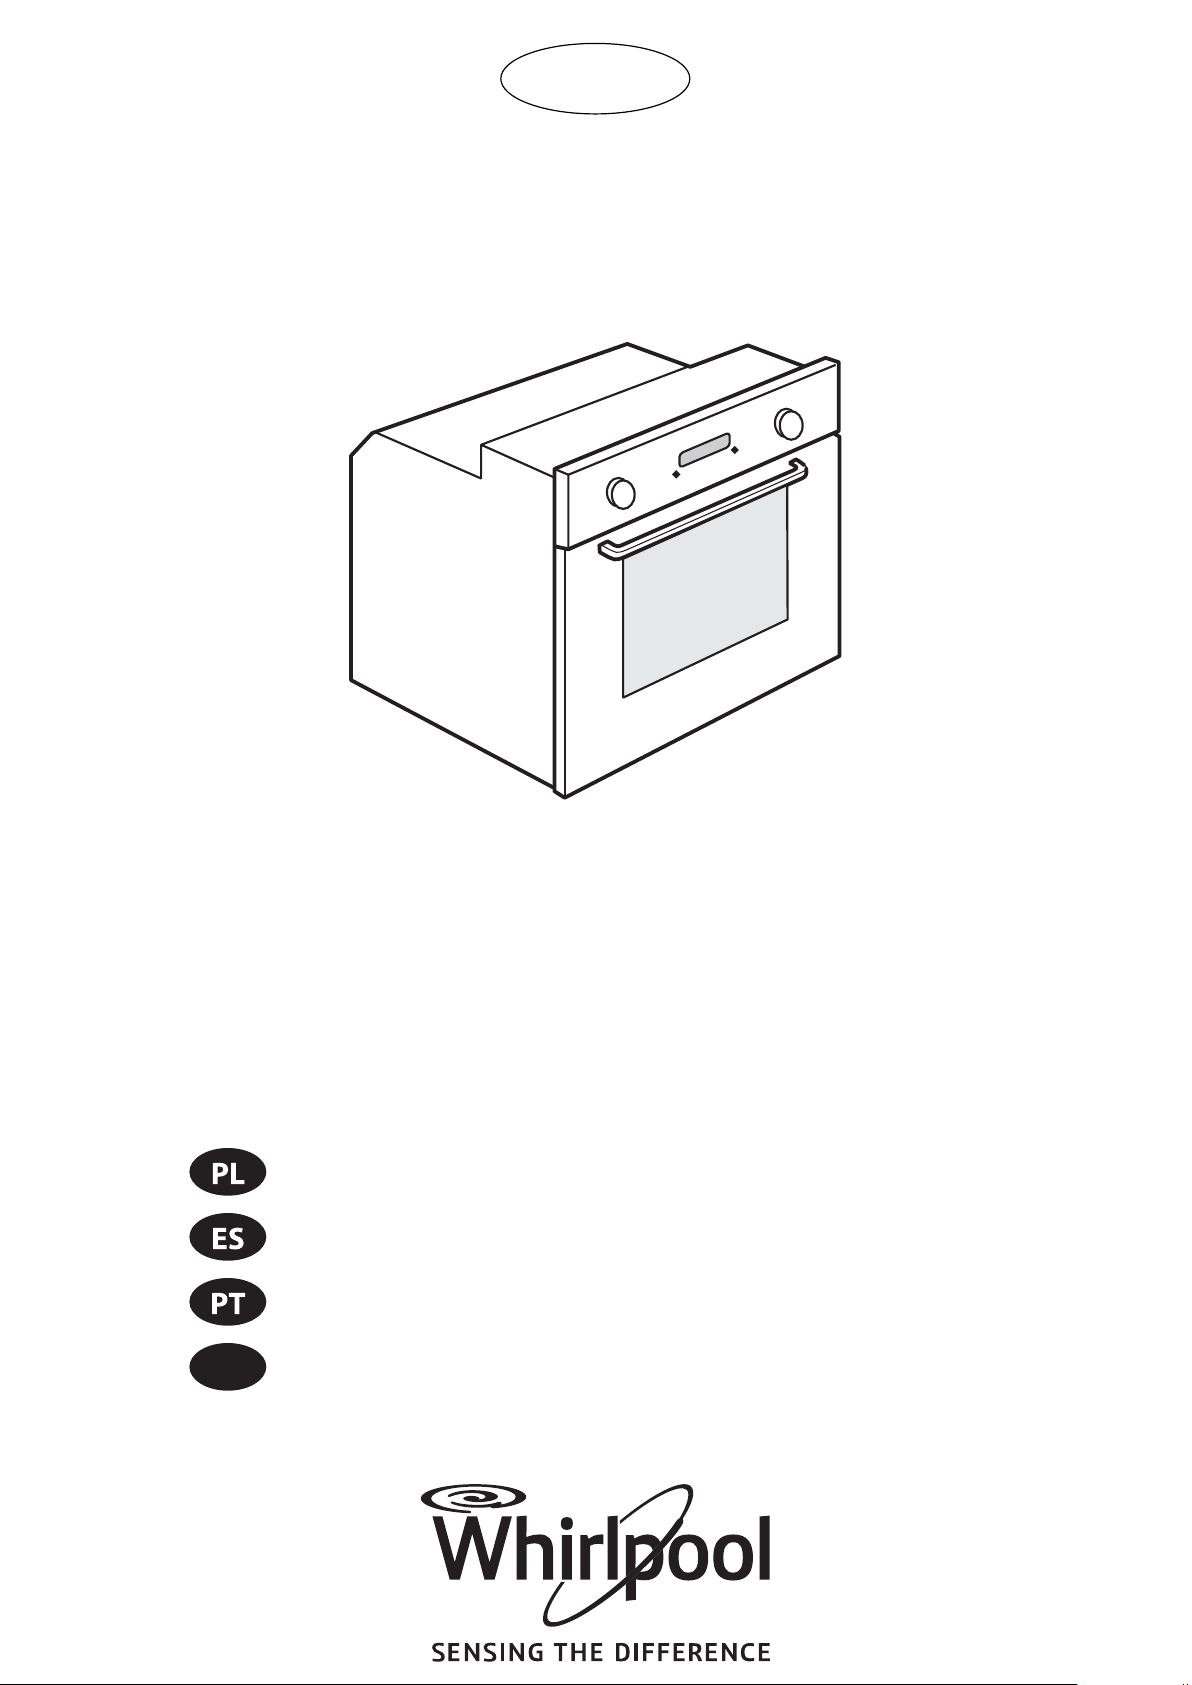
AKZM 663
RO
Instrukcja obsługi i konserwacji
Manual del usuario y de mantenimiento
Manual do utilizador e manutenção
Manual de utilizare şi întreţinere
Page 2

Page 3

IMPORTANT SAFETY INSTRUCTIONS
YOUR SAFETY AND THAT OF OTHERS IS PARAMOUNT
This manual and the appliance itself provide important safety warnings, to be read and observed at all times.
This is the danger symbol, pertaining to safety, which alerts users to potential risks to themselves and others.
All safety warnings are preceded by the danger symbol and the following terms:
DANGER
WARNING
Indicates a hazardous situation which, if not avoided, will cause serious injury.
Indicates a hazardous situation which, if not avoided, could cause serious injury.
All safety warnings give specific details of the potential risk present and
indicate how to reduce risk of injury, damage and electric shock
resulting from improper use of the appliance. Carefully observe the
following instructions:
- The appliance must be disconnected from the power supply before
carr
ying out any installation work.
- Installation and maintenance must be carried out by a qualified
t
echnician, in compliance with the manufacturer’s instructions and
local safety regulations. Do not repair or replace any part of the
appliance unless specifically stated in the user manual.
- Power cable replacement must be carried out by a qualified
elec
trician. Contact an authorized service centre.
- Regulations require that the appliance is earthed.
- The power cable must be long enough for connecting the
applianc
e, once fitted in its housing, to the main power supply.
- For installation to comply with current safety regulations, an allpole disc
be utiliz
onnect switch with minimum contact gap of 3 mm must
ed.
- Do not use multiple plug adaptors if the oven is fitted with a plug.
- Do not use extension leads.
- Do not pull the power supply cable.
- The electrical components must not be accessible to the user after
installa
tion.
- If the surface of the induction plate is cracked, do not use it and
swit
ch off the appliance to avoid the possibility of electric shock
(only for models with induction function).
EN1
Page 4

- Do not touch the appliance with any wet part of the body and do
not operate it when barefoot.
- This appliance is designed solely for use as a domestic appliance for
cooking food. No other type of use is permitted (e.g.: heating
rooms). The Manufacturer declines all responsibility for
inappropriate use or incorrect setting of the controls.
- This appliance can be used by children from 8 years and above and
persons with reduced physical, sensory or mental capabilities or
lack of experience and knowledge if they have been given
supervision or instruction concerning use of the appliance in a safe
way and understand hazards involved. Children shall not play with
the appliance. Cleaning and user maintenance shall not be made
by children without supervision.
- The accessible parts of the appliance may become very hot during
use. Young children should be kept away from the appliance and
supervised to ensure that they do not play with it.
- The appliance and its accessible parts become hot during use. Care
should be taken to avoid touching heating elements. Children less
than 8 years old shall be kept away, unless continuously supervised.
- During and after use, do not touch the heating elements or interior
surfaces of the appliance - risk of burns. Do not allow the appliance
to come into contact with cloths or other flammable materials until
all the components have cooled sufficiently.
- At the end of cooking, exercise caution when opening the
appliance door, letting the hot air or steam exit gradually before
accessing the oven. When the appliance door is shut, hot air is
vented from the aperture above the control panel. Do not obstruct
the vent apertures.
- Use oven gloves to remove pans and accessories, taking care not to
touch the heating elements.
- Do not place flammable materials in or near the appliance: a fire
may break out if the appliance is inadvertently switched on.
- Do not heat or cook sealed jars or containers in the appliance. The
pressure that builds up inside might cause the jar to explode,
damaging the appliance.
- Do not use containers made of synthetic materials.
EN2
Page 5

- Overheated oils and fats catch fire easily. Always remain vigilant
when cooking foods rich in fat and oil.
- Never leave the appliance unattended during food drying.
- If alcoholic beverages are used when cooking foods (e.g. rum,
c
ognac, wine), remember that alcohol evaporates at high
temperatures. As a result, there is a risk that vapours released by the
alcohol may catch fire upon coming into contact with the electrical
heating element.
- Never use steam cleaning equipment.
- Do not touch the oven during the pyrolysis cycle. Keep children
a
way from the oven during the pyrolysis cycle (only for ovens with
Pyrolysis function).
- Only use the temperature probe recommended for this oven.
- Do not use harsh abrasive cleaners or sharp metal scrapers to clean
the o
ven door glass since they can scratch the surface, which may
result in shattering of the glass.
- Ensure that the appliance is switched off before replacing the lamp
t
o avoid the possibility of electric shock.
- Do not use aluminium foil to cover food in the cooking vessel (only
f
or ovens with cooking vessel supplied).
- Use protective gloves to perform all unpacking and installation
oper
Scrapping of household appliances
- This appliance is manufactured with recyclable or reusable materials. Dispose of it in accordance with local waste disposal
regulations. Before scrapping, cut off the power supply cable.
- For further information on the treatment, recovery and recycling of household electrical appliances, contact your
competent local authority, the collection service for household waste or the store where you purchased the appliance.
INSTALLATION
After unpacking the oven, make sure that it has not been damaged during transport and that the oven door closes properly. In
the event of problems, contact the dealer or your nearest After-sales Service. To prevent any damage, only remove the oven
from its polystyrene foam base at the time of installation.
ations.
PREPARING THE HOUSING UNIT
• Kitchen units in contact with the oven must be heat resistant (min 90°C).
• Carry out all cabinet cutting work before fitting the oven in the housing and carefully remove all wood chips and sawdust.
• After installation, the bottom of the oven must no longer be accessible.
• For correct appliance operation, do not obstruct the minimum gap between the worktop and the upper edge of the oven.
ELECTRICAL CONNECTION
Make sure the power voltage specified on the appliance dataplate is the same as the mains voltage. The dataplate is on the front
edge of the oven (visible when the door is open).
• Power cable replacement (type H05 RR-F 3 x 1.5 mm2) must be carried out by a qualified electrician. Contact an
authorized service centre.
EN3
Page 6
GENERAL RECOMMENDATIONS
Before use:
- Remove cardboard protection pieces, protective film and adhesive labels from accessories.
- Remove the accessories from the oven and heat it at 200° for about an hour to eliminate the smell and fumes from the
insulating materials and protective grease.
During use:
- Do not place heavy objects on the door as they could damage it.
- Do not cling to the door or hang anything from the handle.
- Do not cover the inside of the oven with aluminium foil.
- Never pour water into the inside of a hot oven; this could damage the enamel coating.
- Never drag pots or pans across the bottom of the oven as this could damage the enamel coating.
- Make sure that the electrical cables of other appliances do not touch hot parts of the oven or become trapped in the door.
- Do not expose the oven to atmospheric agents.
SAFEGUARDING THE ENVIRONMENT
Disposal of packing material
The packing material is 100% recyclable and is marked with the recycle symbol ( ). The various parts of the packing must
therefore be disposed of responsibly and in full compliance with local authority regulations governing waste disposal.
Scrapping the product
- This appliance is marked in compliance with European Directive 2002/96/EC, Waste Electrical and Electronic Equipment
(WEEE).
- By ensuring this product is disposed of correctly, you will help prevent potential negative consequences for the
environment and human health, which could otherwise be caused by inappropriate waste handling of this product.
- The symbol on the product or on the accompanying documentation indicates that it should not be treated as
domestic waste but must be taken to an appropriate collection centre for the recycling of electrical and electronic
equipment.
Energy saving
- Only pre-heat the oven if specified in the cooking table or your recipe.
- Use dark lacquered or enamelled baking moulds as they absorb heat far better.
- Switch the oven off 10/15 minutes before the set cooking time. Food requiring prolonged cooking will continue to cook even
once the oven is switched off.
DECLARATION OF CONFORMITY
- This oven, which is intended to come into contact with foodstuffs, complies with European Regulation ( ) n.1935/2004
and has been designed, manufactured and sold in conformity with the safety requirements of the “Low Voltage” directive
2006/95/CE (which replaces 73/23/CEE and subsequent amendments), the protection requirements of “EMC” 2004/108/CE.
TROUBLESHOOTING GUIDE
The oven does not work:
• Check for the presence of mains electrical power and if the oven is connected to the electrical supply.
• Turn off the oven and restart it to see if the fault persists.
The door will not open:
• Turn off the oven and restart it to see if the fault persists.
• Important: during self-cleaning, the oven door will not open. Wait until it unlocks automatically (see paragraph “Cleaning
cycle of ovens with pyrolysis function”).
The electronic programmer does not work:
• If the display shows the letter “ ” followed by a number, contact your nearest After-sales Service. Specify in this case the
number that follows the letter “ ”.
EN4
Page 7
AFTER-SALES SERVICE
Before calling the After-Sales Service:
1. See if you can solve the problem yourself with the help of the suggestions given in the “Troubleshooting guide“.
2. Switch the appliance off and back on again it to see if the fault persists.
If after the above checks the fault still occurs, get in touch with the nearest After-sales Service.
Always specify:
• a brief description of the fault;
• the type and exact model of the oven;
• the service number (number after the word Service on the rating plate), located on the right hand edge of the oven cavity
(visible when the o
• your full address;
• your telephone number.
If any repairs are required, please contact an authorised After-sales Service (to guarantee that original spare parts will be used
and repairs carried out correctly).
ven door is open). The service number is also indicated on the guarantee booklet;
CLEANING
WARNING
- Never use steam cleaning equipment.
- Only clean the oven when it is cool to the touch.
- Disconnect the appliance from the power supply.
Oven exterior
IMPORTANT: do not use corrosive or abrasive detergents. If any of these products accidentally comes into contact with
the appliance, clean immediately with a damp cloth.
• Clean the surfaces with a damp cloth. If it is very dirty, add a few drops of washing up detergent to the water. Finish off
with a dry cloth.
Oven interior
IMPORTANT: do not use abrasive sponges or metallic scrapers or scourers. Over time, these can ruin enamelled surfaces
and the oven door glass.
• After every use, allow the oven to cool then clean it preferably while it is still warm in order to remove built-up dirt and
stains caused by food residues (e.g. food with a high sugar content).
• Use proprietary oven detergents and follow the manufacturer’s instructions to the letter.
• Clean the door glass with a suitable liquid detergent. The oven door can be removed to facilitate cleaning (see
MAINTENANCE).
• The top heating element of the grill (see MAINTENANCE) can be lowered (some models only) to clean the roof of the oven.
N.B.: during prolonged cooking of foods with a high water content (e.g. pizza, vegetables, etc.) condensation may form
on the inside of the door and around the seal. When the oven is cold, dry the inside of the door with a cloth or sponge.
Accessories:
• Soak the accessories in water with washing up detergent immediately after use, handling them with oven gloves if still hot.
• Food residues can be easily removed using a brush or sponge.
Cleaning the rear wall and catalytic side panels of the oven (if present):
IMPORTANT: do not use corrosive or abrasive detergents, coarse brushes, pot scourers or oven sprays which could
damage the catalytic surface and ruin its self-cleaning properties.
• Operate the oven empty with the fan-assisted function at 200°C for about one hour
• Next, leave the appliance to cool down before removing any food residue with a sponge.
Cleaning cycle of ovens with pyrolysis function (if present):
WARNING
This function burns off spatters produced inside the oven during cooking at a temperature of approx. 500°C. At this high
temperature, the deposits turn into a light ash which can be easily wiped away with a damp cloth, when the oven is cool. Do not
select the pyrolysis function after every use, only when the oven is very dirty or produces smoke or fumes while preheating or
cooking.
• If the oven is installed below a hob, make sure that all burners or electric hotplates are switched off during the selfcleaning (pyrolysis) function.
- Do not touch the oven during the pyrolysis cycle.
- Keep children away from the oven during the pyrolysis cycle.
EN5
Page 8
• Remove all accessories before running the pyrolysis function.
• For optimum cleaning of the oven door, remove the worst soiling with a damp sponge before using the pyrolytic function.
The appliance is equipped with 2 pyrolysis functions:
1. Energy-saving cycle (PYRO EXPRESS/ECO): which consumes approximately 25% less energy than the standard cycle.
Select it at regular intervals (after cooking meat on 2 or 3 consecutive occasions).
2. Standard cycle (PYRO): which is suitable for cleaning a very dirty oven.
• In any case, after a certain number of uses and depending on how dirty the oven is, a message on the oven display advises
you to run a self-cleaning cycle.
N.B.: during the pyrolysis function, the oven door will not open; it will remain locked until the temperature inside the
oven has returned to an acceptably safe level.
MAINTENANCE
WARNING
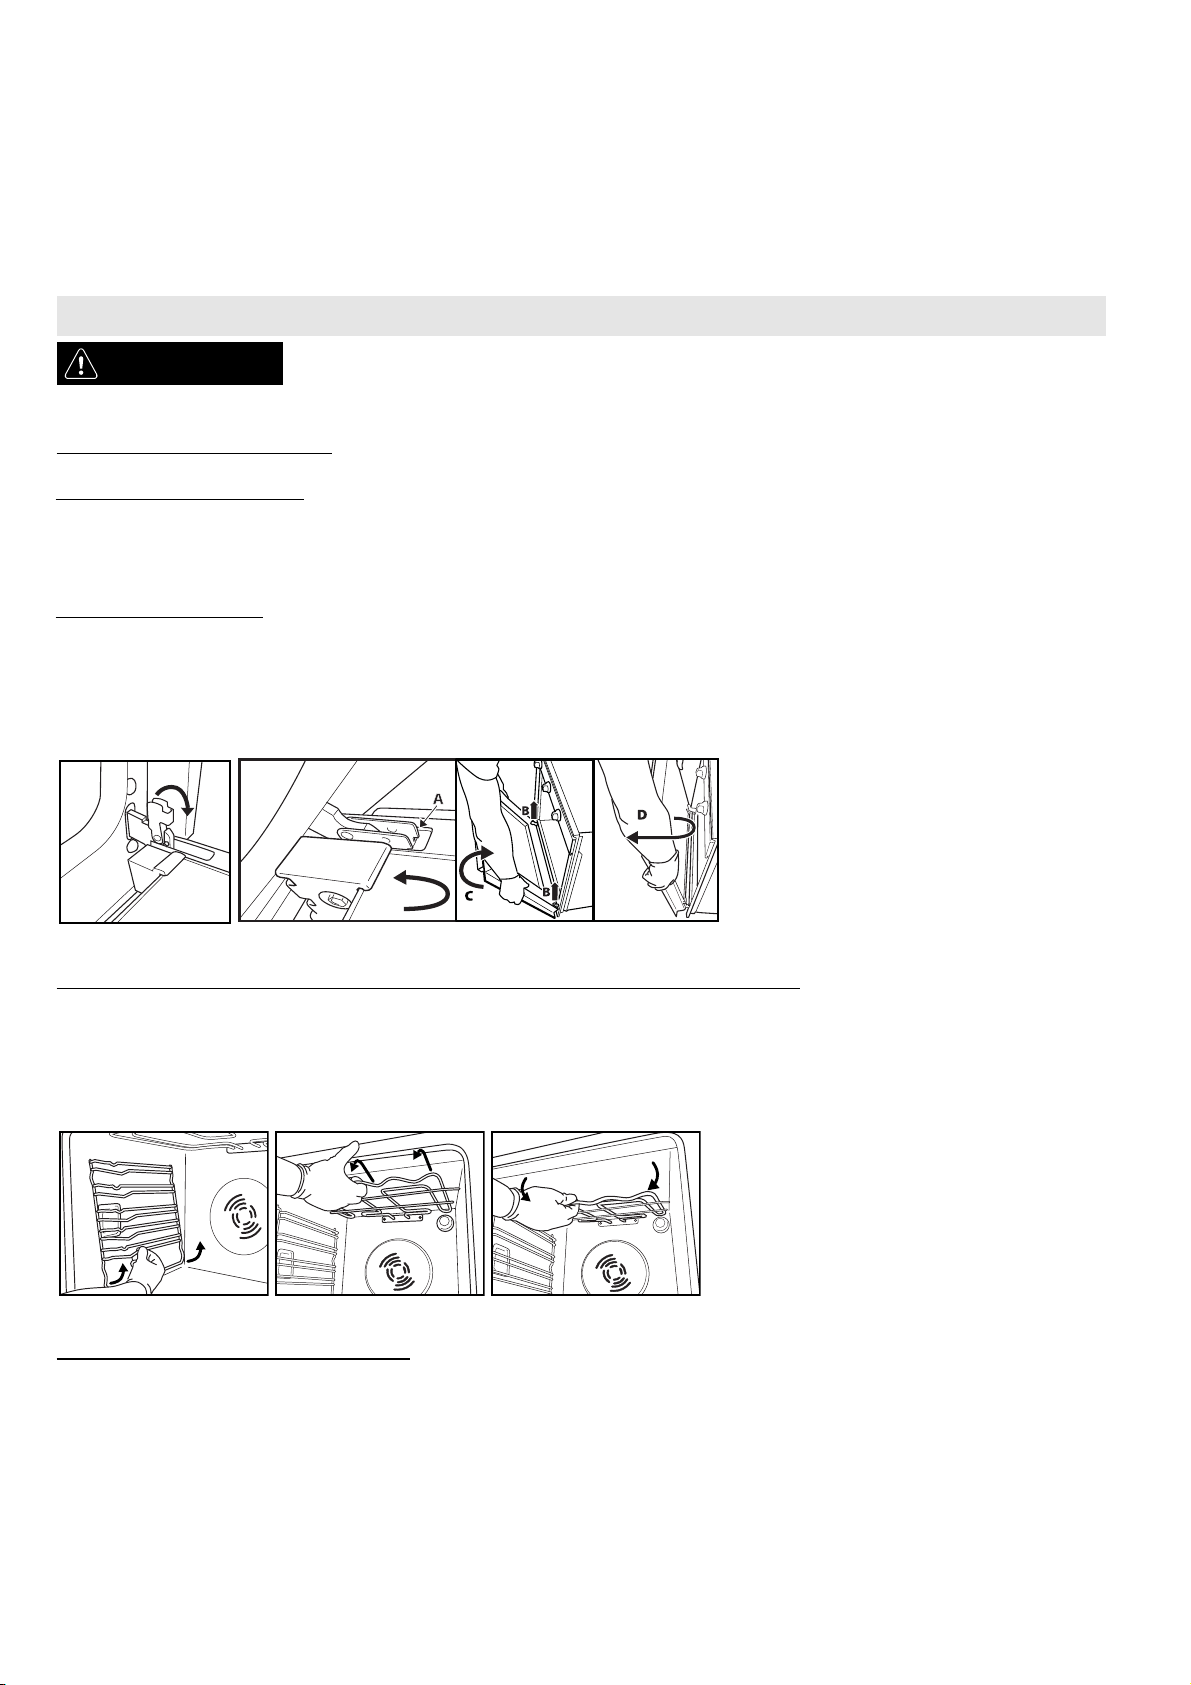
REMOVING THE DOOR
To remove the door:
1. Open the door fully.
2. Lift the catches and push them forwards as far as they will go (fig. 1).
3. Close the door as far as it will go (A), lift it up (B) and turn it (C) until it is released (D) (fig. 2).
To refit the door:
1. Insert the hinges in their seats.
2. Open the door fully.
3. Lower the two catches.
4. Close the door.
- Use safety gloves.
- Ensure the oven is cold before carrying out the following operations.
- Disconnect the oven from the power supply.
Fig. 1 Fig. 2
MOVING THE TOP HEATING ELEMENT (SOME MODELS ONLY)
1. Remove the side accessory holder grilles (Fig. 3).
2. Pull the heating element out a little (Fig. 4) and lower it (Fig. 5).
3. To reposition the heating element, lift it up, pulling it slightly towards you, making sure it comes to rest on the lateral
supports.
Fig. 3 Fig. 4 Fig. 5
REPLACING THE OVEN LAMP
To replace the rear lamp (if present):
1. Disconnect the oven from the power supply.
2. Unscrew the lamp cover (Fig. 6), replace the lamp (see note for lamp type) and screw the lamp cover back on.
3. Reconnect the oven to the power supply.
To replace the side lamp (if present):
1. Disconnect the oven from the power supply.
2. Remove the side accessory holder grilles, if present (Fig. 3).
3. Use a screwdriver to prise off the lamp cover (Fig. 7).
4. Replace the lamp (see note for lamp type) (Fig. 8).
5. Reposition the lamp cover, pushing it on firmly until it snaps into place (Fig. 9).
EN6
Page 9
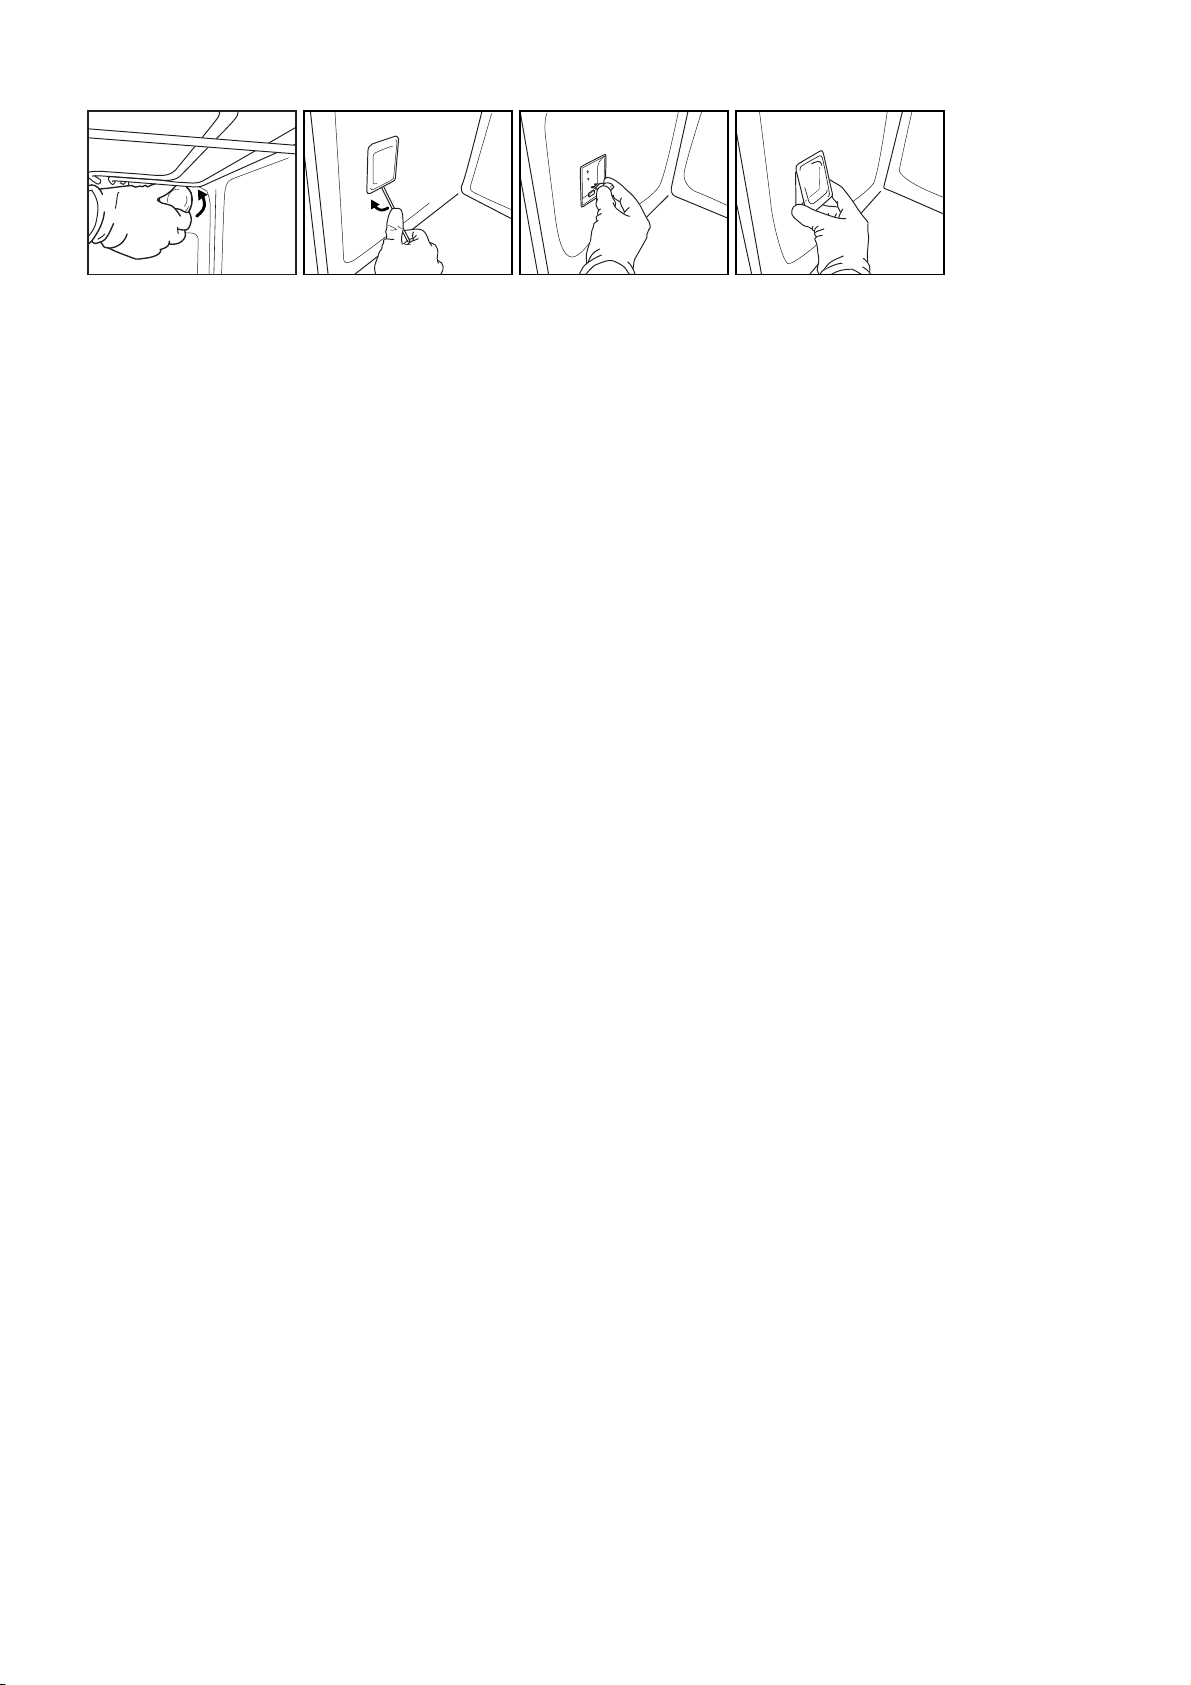
6. Refit the side accessory holder grilles.
7. Reconnect the oven to the power supply.
Fig. 6 Fig. 7 Fig. 8 Fig. 9
N.B.:
- Only use 25-40W/230V type E-14, T300°C incandescent lamps, or 20-40W/230 V type G9, T300°C halogen lamps.
- The lamp used in the appliance is specifically designed for electrical appliances and is not suitable for household room
illumination (Commission Regulation (EC) No 244/2009).
- Lamps are available from our After-sales Service.
IMPORTANT:
- If using halogen lamps, do not handle with bare hands since fingerprints can damage them.
- Do not use the oven until the lamp cover has been repositioned.
EN7
Page 10
INSTRUCTIONS FOR OVEN USE
FOR ELECTRICAL CONNECTION, SEE THE PARAGRAPH ON INSTALLATION
3
6
7
11
10
1
2
5
12
4
8
5
9
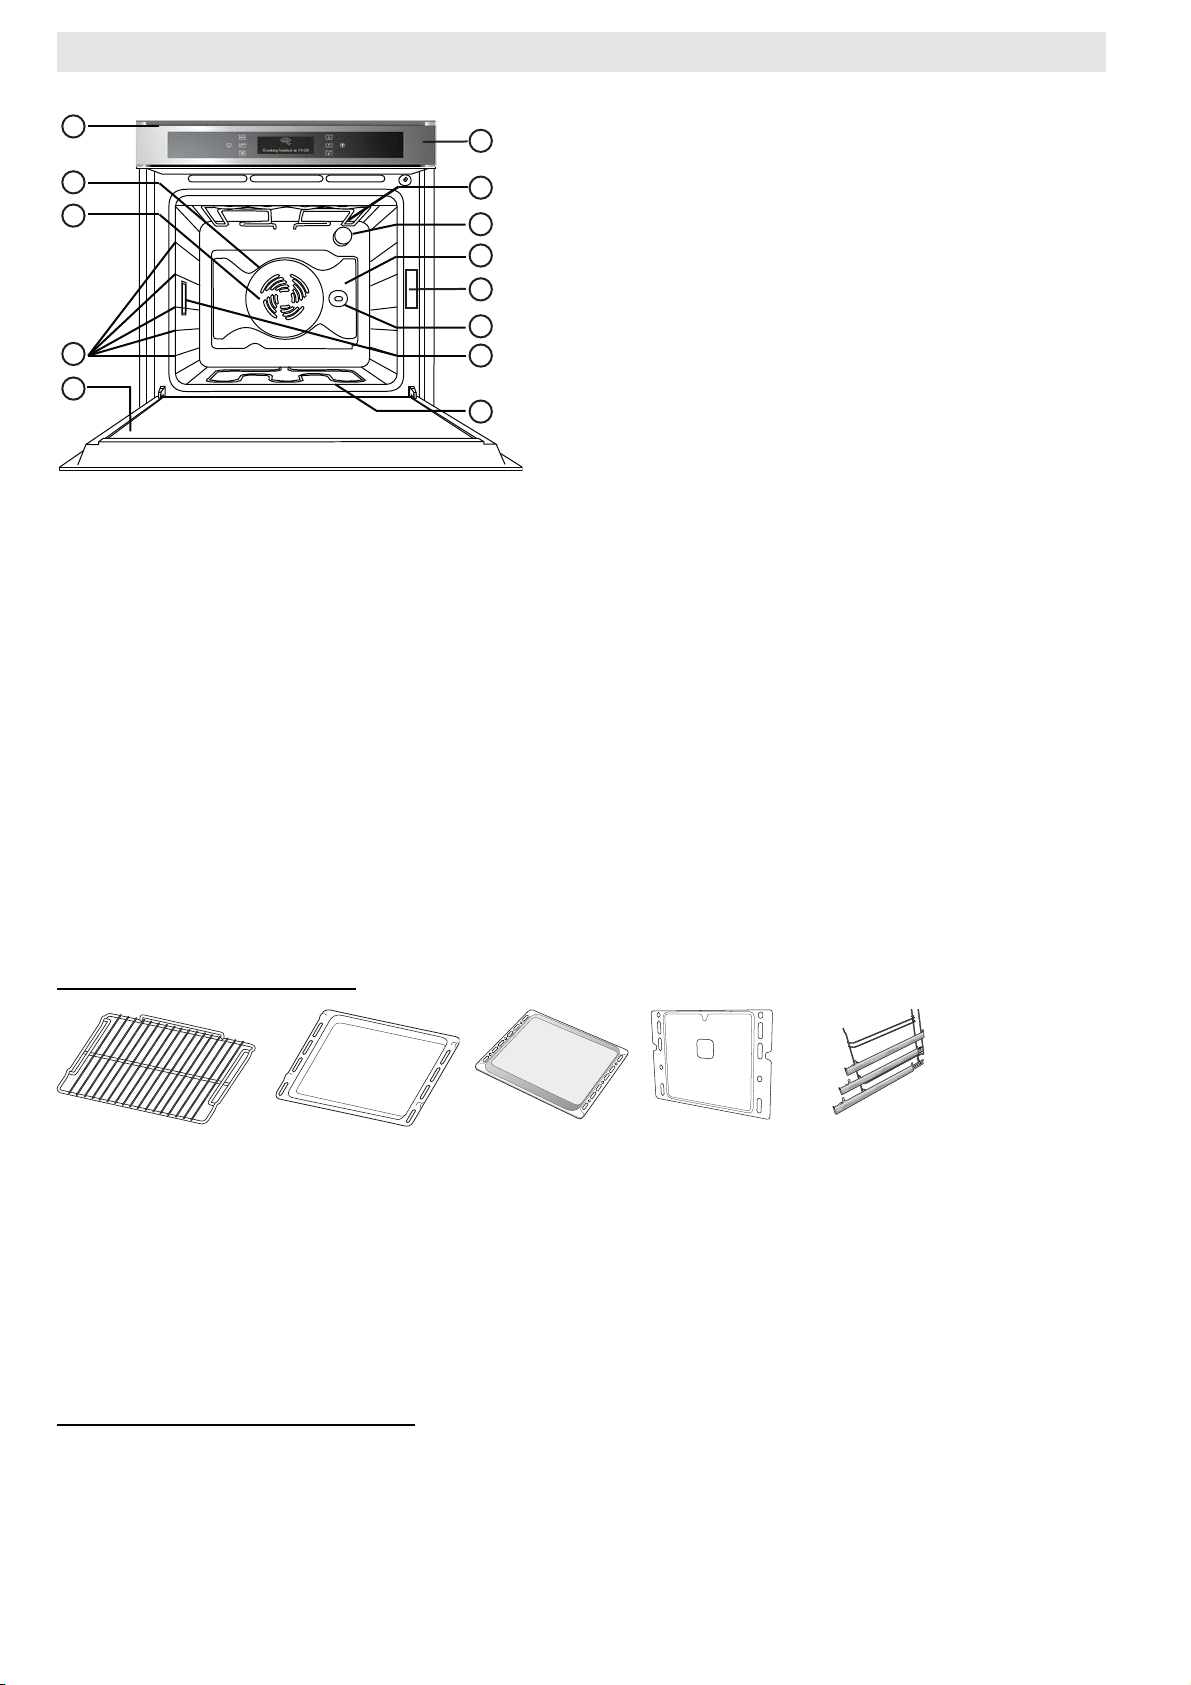
1. Control panel
2. Upper heating element/grill
3. Cooling fan (not visible)
4. Dataplate (not to be removed)
5. Lamps
6. Circular heating element (not visible)
7. Fan
8. Turnspit (if present)
9. Lower heating element (not visible)
10. Door
11. Position of shelves (the number of shelves is indicated on the front of the oven)
12. Rear wall
N.B.:
- During cooking, the cooling fan may switch on at intervals in order to minimise energy consumption.
- At the end of cooking, after the oven has been switched off, the cooling fan may continue to run for a
.
while
- When the oven door is opened during cooking, the heating elements switch off.
ACCESSORIES SUPPLIED
Fig. A Fig. B Fig. C Fig. D Fig. E
A. WIRE SHELF: the wir
e shelf can be used to grill food or as a support for pans, cake tins and other
ovenproof cooking receptacles.
B. DRIP TRAY: the drip tr
ay is designed to be positioned under the wire shelf in order to collect fat or
as an oven tray for cooking meat, fish, vegetables, focaccia, etc.
C. BAKING TRAY: f
D. CATALYTIC PANELS: f
E. SLIDING RUNNERS: t
or cooking all bread and pastry products, but also roasts, fish en papillotte, etc.
or easier and more thorough cleaning of the oven walls.
o facilitate insertion and removal of accessories.
The number of accessories may vary according to which model is purchased.
ACCESSORIES NOT SUPPLIED
Other accessories can be purchased separately from the After-sales Service.
EN8
Page 11
INSERTING WIRE SHELVES AND OTHER ACCESSORIES IN THE OVEN
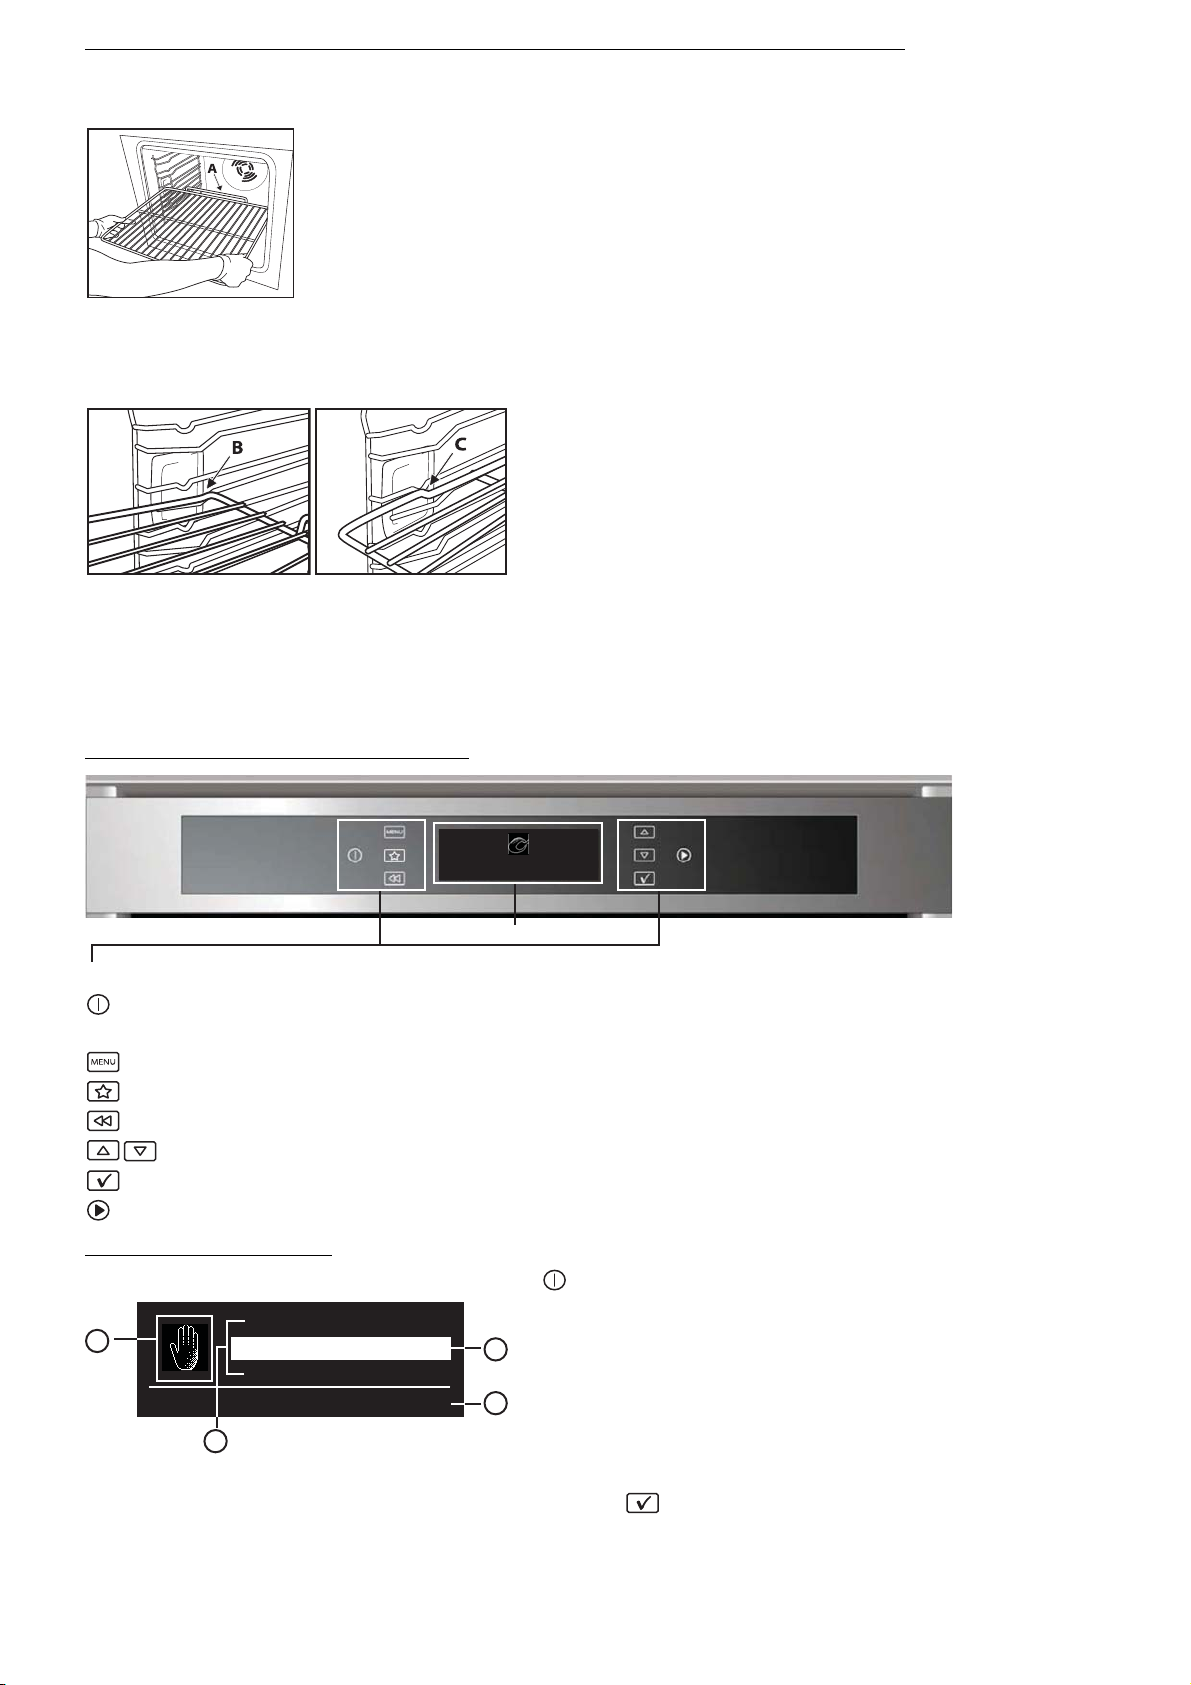
The wire shelf and other accessories are provided with a locking mechanism to prevent their accidental
removal.
Fig. 1
1. Insert the wire shelf horizontally, with the raised part “A” upwards (Fig. 1).
2. Angle the wire shelf when it reaches the locking position “B” (Fig. 2).
Fig. 2 Fig. 3
3. Return the wire shelf to the horizontal position and push it in fully to “C” (Fig. 3).
4. To remove the wire shelf proceed in reverse order.
The other accessories, like the drip tray and baking tray, are inserted in exactly the same way.
The protrusion on the flat surface enables the accessories to lock in place.
CONTROL PANEL DESCRIPTION
Cooking nished at 19:10
DISPLAY
TOUCH KEYS: to use, simply touch the corresponding symbol (a light touch is all that is required).
On/Off (when you press on / off button to turn off the oven an acoustic signal will sound, this sound can
not be disabled)
to access the main MENU or return to the start screen
to access the 10 most used functions
to return to the previous screen
to browse the functions/options and change pre-set values
to select and confirm settings
to start cooking
LIST OF FUNCTIONS
After switching on the oven, press the symbol and the display will show the following indications.
A
Traditional manual cooking functions
D
A. Symbol for highlighted function
B. H
ighlighted function can be selected by pressing
C. Description of highlighted function
urther available, selectable information
D. F
Recipes
Traditional
Specials
B
C
EN9
Page 12
DETAILS OF FUNCTION
After selecting the desired function, press button and the display will show further options and related
details.
Cursor
Zone 1 Zone 3
Zone 2
Medium
GRILL POWER
No
PREHEAT
Grill
--:--
COOK TIME
--:--
END TIME
Zone 4
To move between different areas, use buttons and : the cursor moves to the adjustable values,
following the order described above. Press
pressing button
.
to select the value, adjust it using and confirm by
USING THE APPLIANCE FOR THE FIRST TIME - LANGUAGE SELECTION AND SETTING
THE TIME
For correct use of the oven, when it is switched on for the first time you will have to select the desired
language and set the correct time.
Proceed as follows:
1. Press
2. Press buttons
3. When the desired language is highlighted, press
: the display will show the list of the first three available languages.
and to scroll down the list.
to select it.
After language selection, the display will flash 12:00.
4. Set the time using buttons and . To scroll through the numbers more quickly, keep the button
pressed.
5. Confirm your setting by pressing : the display will show the list of functions.
SELECTING COOKING FUNCTIONS
Recipes
Traditional
Traditional manual cooking functions
Specials
1. If the oven off press button ; the display will show the cooking functions.
2. To browse the various possibilities, press buttons : the selectable function is highlighted in
white in the centre of the screen.
N.B.:for the list and description of functions, see the specific table at page15 and at page16.
3. Select the function by pressing button
pre-set values are those desired, press the start button
: the cooking settings are displayed on the screen. If the
, otherwise proceed as indicated above to
change them.
SETTING THE TEMPERATURE/OUTPUT OF THE GRILL
200°C
TEMPERATURE
No
PREHEAT
Forced Air
--:--
COOK TIME
--:--
END TIME
180°C
TEMPERATURE
No
PREHEAT
Forced Air
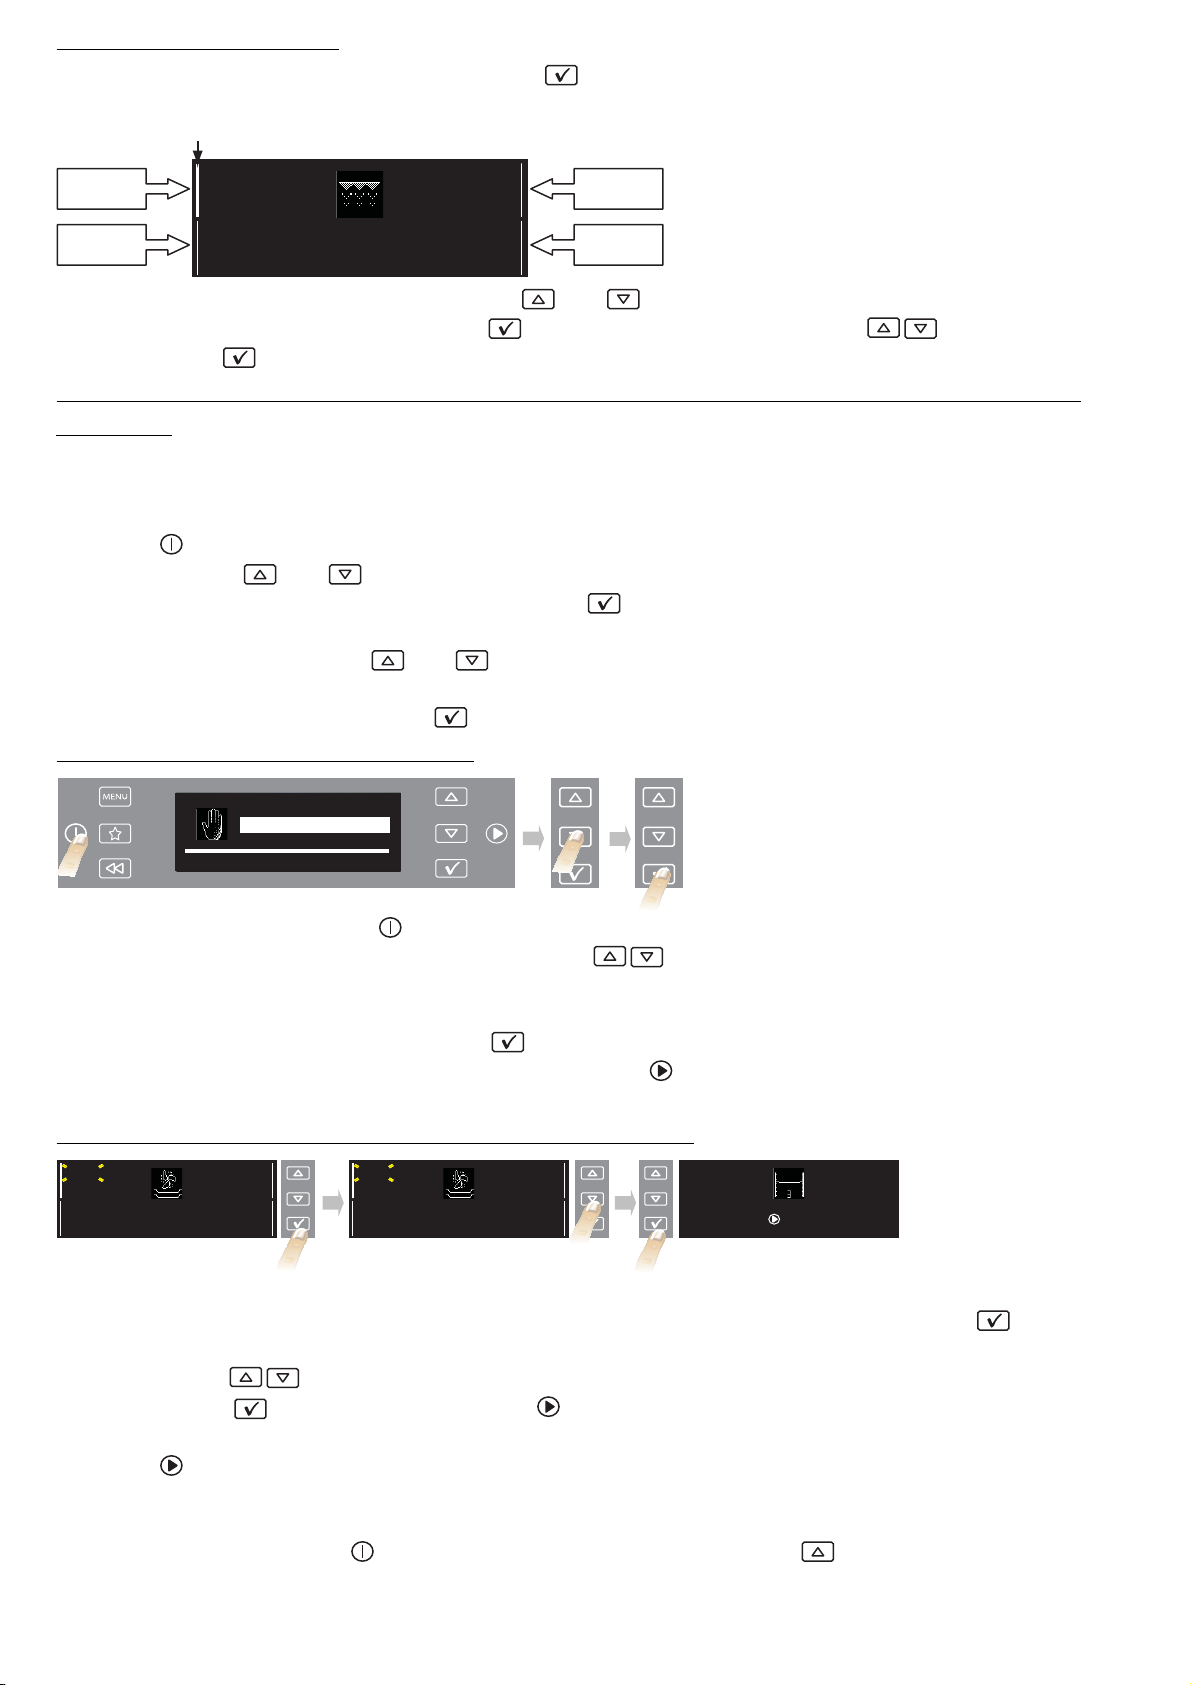
To change the temperature or output of the grill, proceed as follows:
1. Check that the cursor is positioned next to the temperature value (zone 1); press button
the parameter to be changed: the temperature values flash.
2. Use buttons
3. Press button
to change to the desired value.
to confirm and then press . The display indicates which shelf food should be
placed on.
4. Press
to start cooking.
The set temperature can also be changed during cooking by following the same procedure.
5. At the end of cooking, the end of cooking message is displayed. At this point the oven can be
ched off by pressing
swit
, or cooking can be prolonged by pressing . When switched off,
the display shows the cooling bar which indicates the temperature inside the oven.
--:--
COOK TIME
--:--
END TIME
Insert food on level 3
Press when done
to select
EN10
Page 13
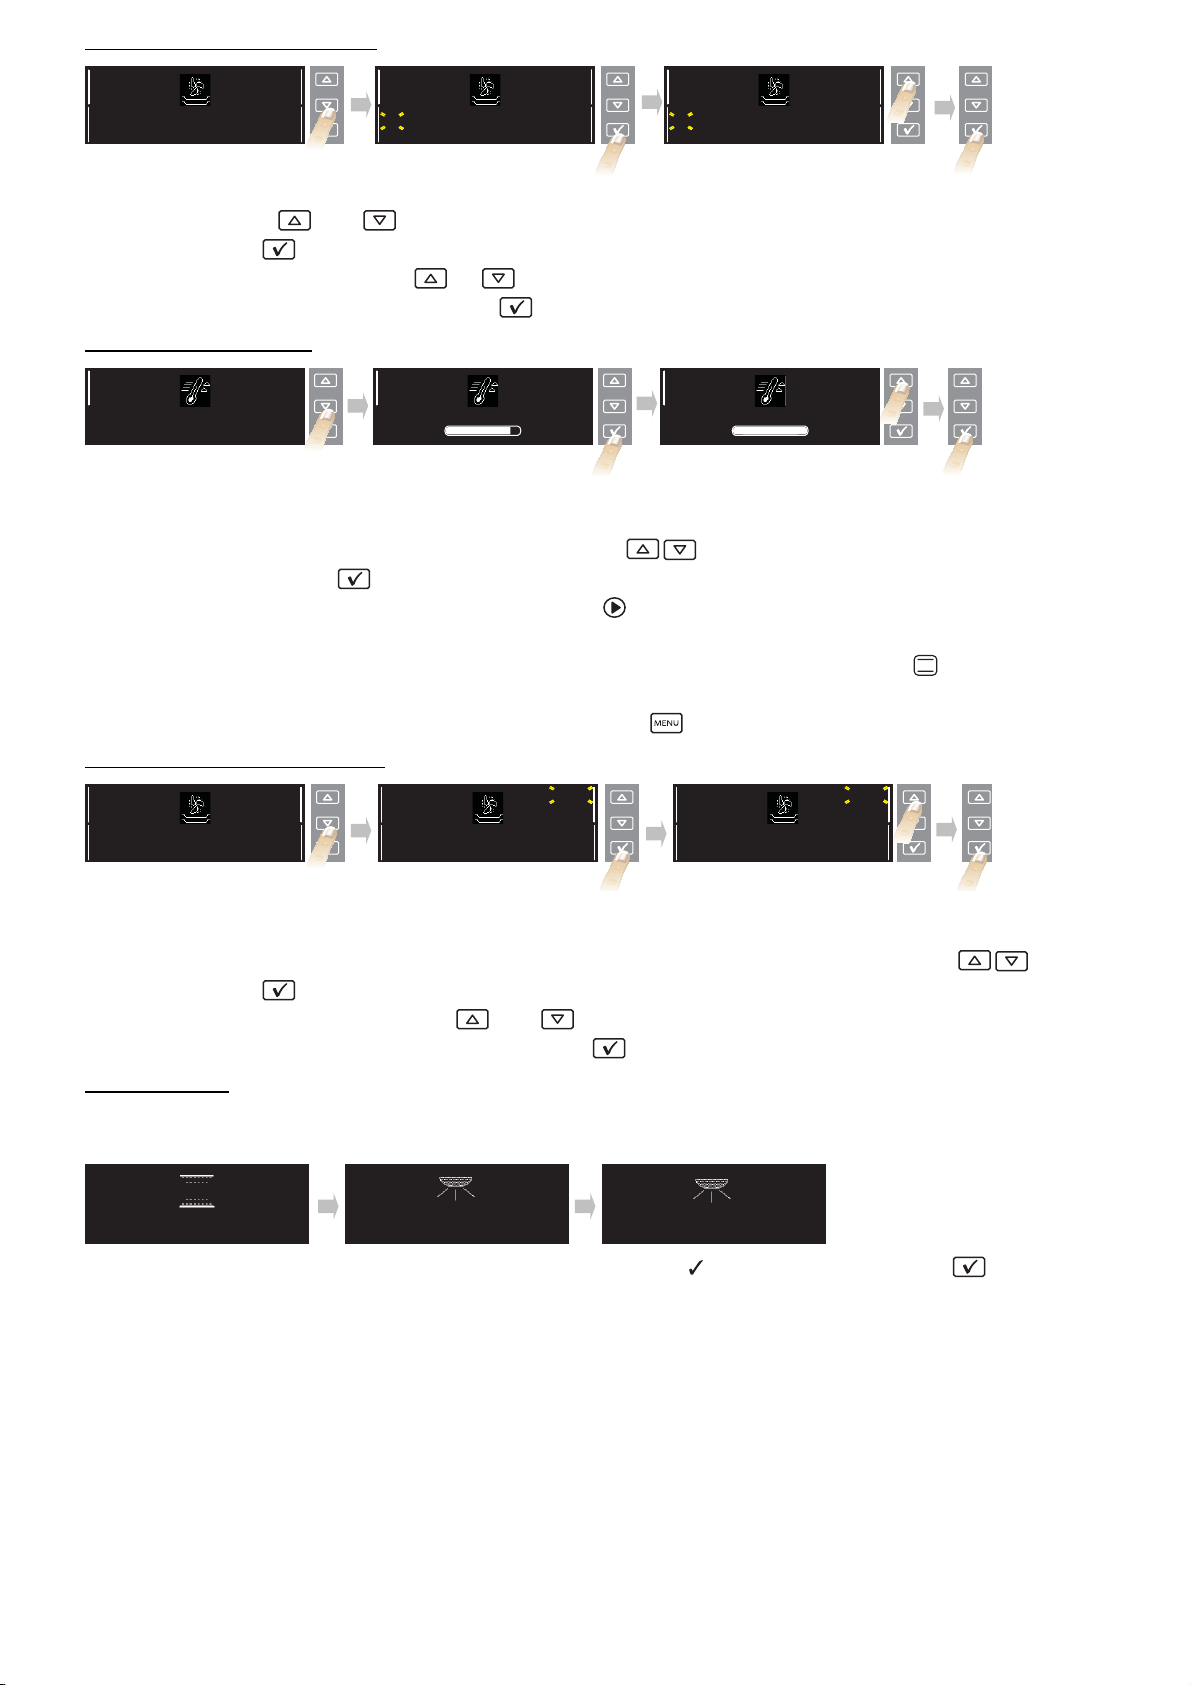
PREHEATING THE OVEN
180°C
TEMPERATURE
No
PREHEAT
Forced Air
--:--
COOK TIME
--:--
END TIME
180°C
TEMPERATURE
No
PREHEAT
Forced Air
--:--
COOK TIME
--:--
END TIME
180°C
TEMPERATURE
Yes
PREHEAT
Forced Air
--:--
COOK TIME
--:--
END TIME
If you wish to preheat the oven before inserting food, change the oven’s default selection as follows:
1. Using buttons
2. Press button
3. To change the setting, press
4. To confirm your choice, press button
and , move the cursor to preheating.
to select the setting: “No” flashes on the display.
or : the display shows “Yes”.
.
FAST PREHEATING
180°C
TEMPERATURE
Fast Preheating
If you wish to preheat the oven quickly before inserting food, change the oven’s default selection as
follows:
1. Select the fast preheating function using buttons .
2. Confirm by pressing
3. If the proposed temperature is that desired, press
paragraphs to change it. An acoustic signal will sound when the oven has reached the set temperature.
At the end of preheating, the oven automatically selects the conventional function
At this point food can be placed in the oven for cooking.
4. If you wish to set a different cooking function, press
- 00:02
INSERT IN
180°C
TEMPERATURE
Preheating
- 00:02
INSERT IN
180°C
TEMPERATURE
Oven is Hot!
: the settings are displayed on the screen.
, otherwise proceed as described in previous
and select the desired function.
- 00:02
INSERT IN
.
SETTING COOKING TIME
180°C
TEMPERATURE
No
PREHEAT
Forced Air
--:--
COOK TIME
--:--
END TIME
180°C
TEMPERATURE
No
PREHEAT
Forced Air
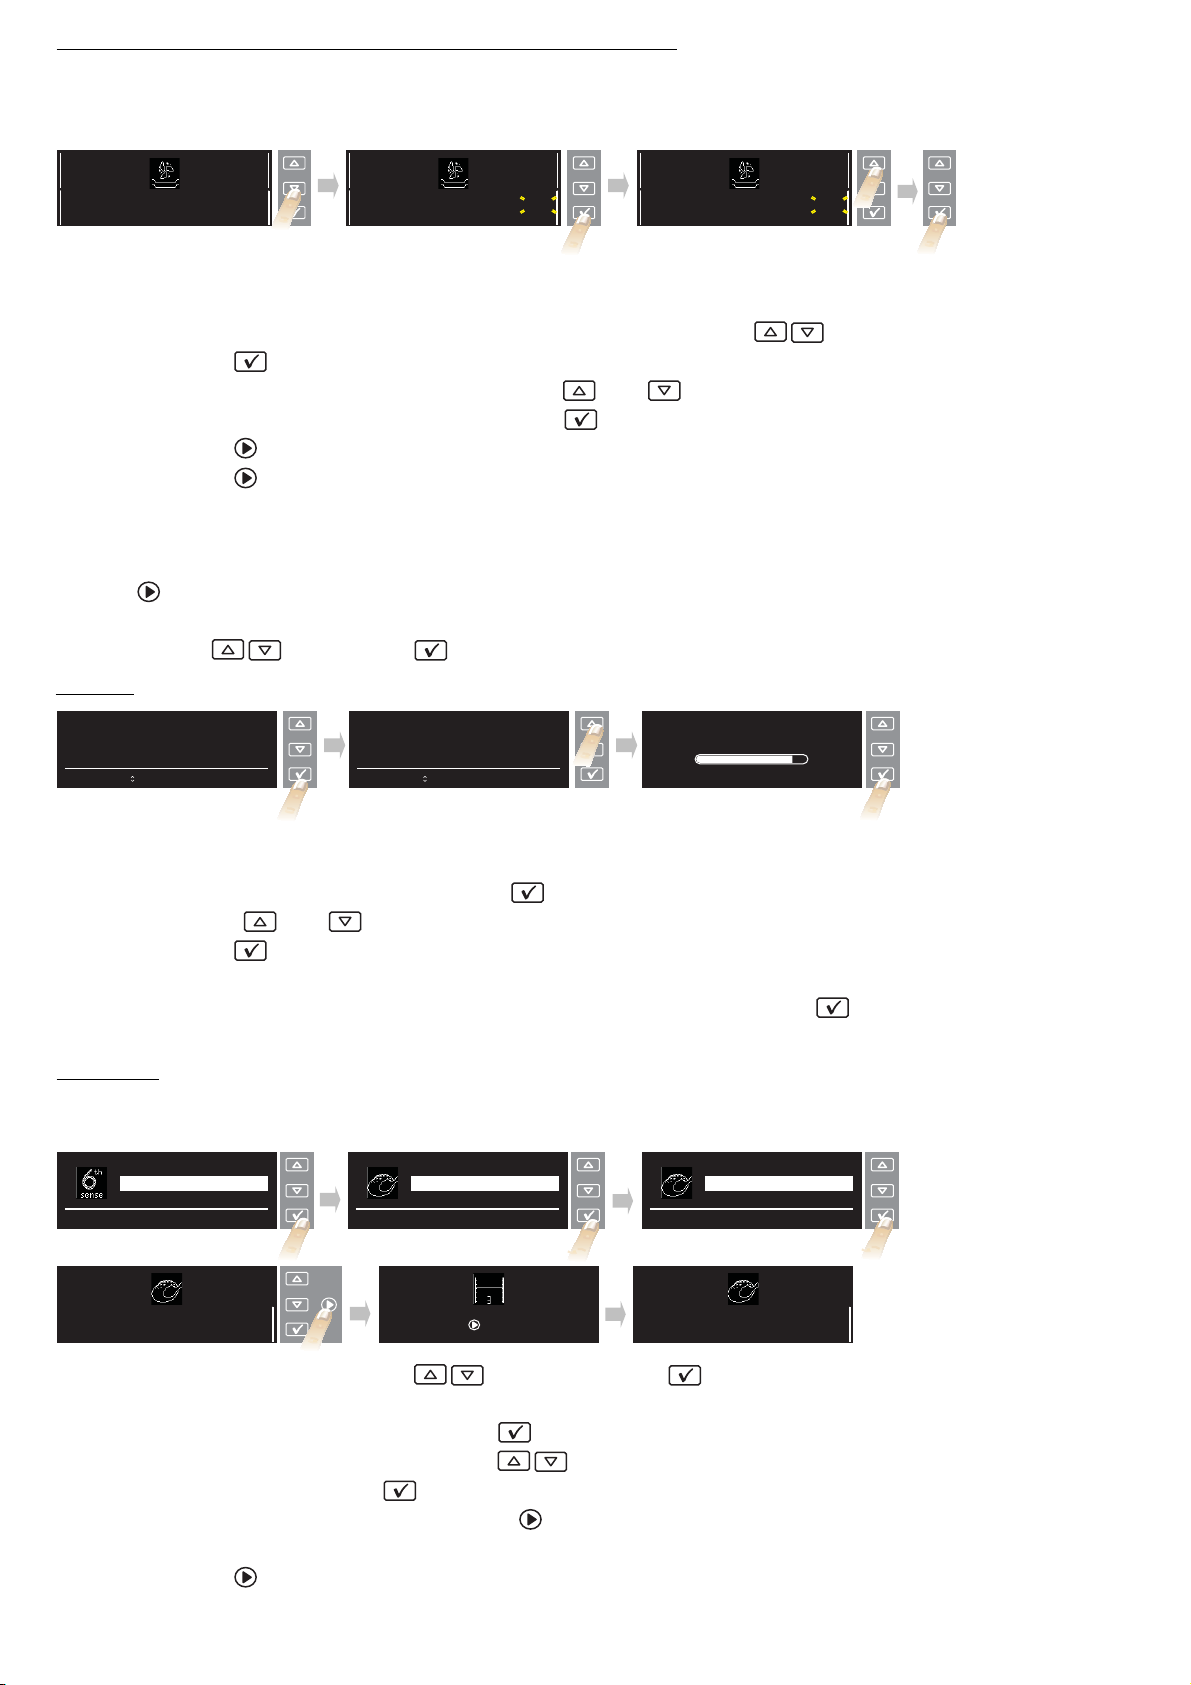
This function can be used to cook food for a set length of time, from a minimum of 1 minute to the
maximum time allowed by the selected function, after which the oven switches off automatically.
1. To select the function, position the cursor next to “cooking duration” using buttons .
2. Press button
3. Change the value using buttons
to select the setting; “00:00” flashes on the display.
and to display the desired cooking time.
4. Confirm the selected value by pressing button
- 00:00
HH:MM
--:--
END TIME
180°C
TEMPERATURE
No
PREHEAT
Forced Air
- 00:20
HH:MM
19:20
END TIME
.
BROWNING
At the end of cooking, with certain functions, the display indicates the possibility of browning the surface
of your dish. This function can only be used when cooking time has been set.
- 00:05
COOK TIME
Cooking nished at 20:00
^ to prolong,
✓ to brown
Browning
At the end of cooking time, the display shows “^ to prolong, to brown”. Press button , and the oven
starts a 5 minute browning cycle. This function can only be used once after cooking.
20:05
END TIME
Browning nished at 20:05
EN11
Page 14
SETTING END OF COOKING TIME / DELAYED START
The end of cooking time can be set, delaying the start of cooking by up to a maximum of 23 hours and
59 minutes. This can only be done once cooking time has been set. This setting is only possible when
pre-heating is not required for the selected function.
180°C
TEMPERATURE
No
PREHEAT
Forced Air
- 00:20
HH:MM
19:20
END TIME
180°C
TEMPERATURE
No
PREHEAT
Forced Air
After setting cooking time, the display shows the end of cooking time (for example 19:20). To delay the
end of cooking time, and thus also the cooking start time, proceed as follows:
1. Position the cursor next to the end of cooking time using buttons .
2. Press button
to select the setting: the end of cooking time flashes.
3. To delay the end of cooking time, use buttons
4. Confirm the selected value by pressing button
5. Press button
6. Press button
. The display indicates which shelf food should be placed on.
to activate the function. The oven will start cooking after a period of time calculated
so as to finish cooking at the set time (for example, in the case of a dish which requires a cooking time
of 20 minut
es, if the end of cooking time is set to 20:10, the oven will begin cooking at 19:50).
N.B.:during the interval before cooking starts, the oven can in any case be switched on by pressing
button
.
At any time during cooking, set values (temperature, grill setting, cooking time) can be changed
using buttons and button as described in previous paragraphs.
- 00:20
HH:MM
19:20
END TIME
180°C
TEMPERATURE
No
PREHEAT
Forced Air
- 00:20
HH:MM
20:10
END TIME
and to set the desired value.
.
TIMER
00 : 00 : 00
(HH) (MM) (SS)
Press to set Timer, ✓ to Start
This function can be used only with the oven switched off and is useful, for example, for monitoring the
cooking time of pasta. The maximum time which can be set is 1 hour 30 minutes.
1. With the oven switched off, press button
2. Press buttons
3. Press button
and to select the desired time.
to start the countdown. When the set time has elapsed, the display will show
“00:00:00” and an acoustic signal will sound. At this point the time can be prolonged, proceeding
as described above, or the timer can be deactivated by pressing button (the time of day will be
shown on the display).
01 : 10 : 00
(HH) (MM) (SS)
Press to set Timer, ✓ to Start
01 : 09 : 00
Timer
: the display will show “00:00:00”.
RECIPES
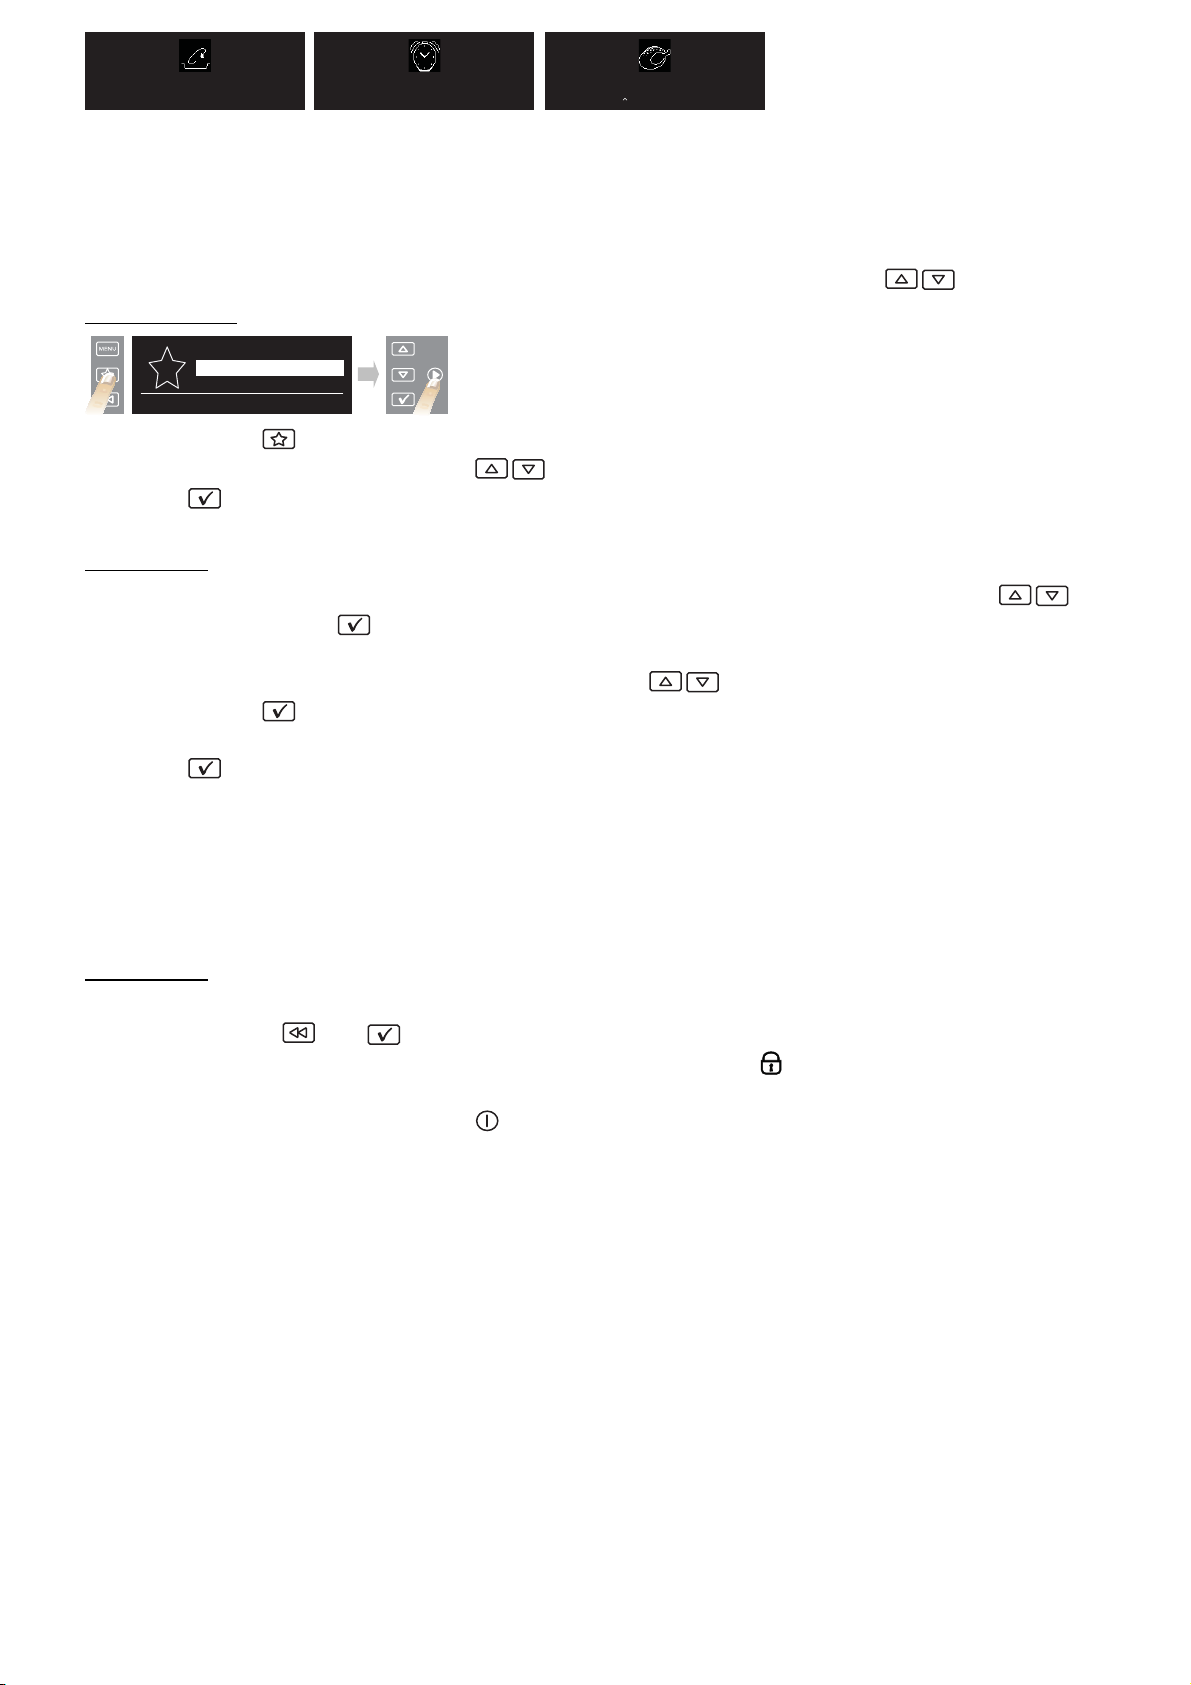
Thanks to “Sixth sense” technology, the oven offers 30 pre-set recipes with ideal cooking temperatures.
Simply follow the recipe as regards ingredients and the method of preparation. Then, proceed as follows:
Settings
Recipes
Traditional
Fully automatic 6th Sense recipes
6th Sense: Press ✓ to view recipes
Fish
Poultry
Vegetables
Chicken Breasts
Roast Chicken
6th Sense: See cookbook for description
Automatic
CONTROL
Roast Chicken
- 00:45
COOK TIME
19:45
END TIME
Insert food on level 3
Press when done
Automatic
CONTROL
1. Select “RECIPES” using buttons and confirm with .
2. Select the dish to be cooked from the proposed list.
3. Confirm the selected dish using button .
4. Select the desired recipe using buttons
5. Confirm by pressing button
: the display shows the approximate cooking time.
6. Put the food in the oven and press button
.
. The display indicates which shelf food should be placed
on.
7. Press button
to start cooking. To delay the start of cooking, see the relevant paragraph.
EN12
Cooking
- 00:44
COOK TIME
19:45
END TIME
Page 15
Please turn food
Cooking nearly nished
Please check on food
Cooking Finished at 19:45
Press to Prolong Cooking
N.B.:some dishes must be turned or stirred half way through cooking: the oven will emit an acoustic
signal and the display will indicate what action is required.
The initial cooking time displayed is merely for guidance: it can be prolonged automatically during
cooking.
Shortly before cooking time finishes, the oven prompts you to check that the food is cooked to your
satisfaction. If it is not, extra time can then be added manually using the buttons
.
SHORTCUTS
Lasagna
Pizza
Chicken Breasts
Your most used cooking functions
1. Press button : the display shows the 10 most used functions.
2. To scroll down the list, use buttons
3. Press
to select the desired function.
.
4. To change the settings of the selected function, proceed as shown in the previous paragraphs.
SETTINGS
1. To change some display settings, select “SETTINGS” from the main menu using buttons .
2. Confirm by pressing
acoustic signal, display brightness, time, energy saving function).
3. Select the setting you wish to change using buttons
4. Press button
to confirm.
5. Follow the instructions of the display to change the settings.
6. Press ; a message appears on the display confirming your selection.
N.B.:When the oven is switched off, if the ECOMODE (Energy saving) function is selected (ON), the display
switches off after a few seconds, showing the clock. To view information on the display and switch the light
on again, just press any of the buttons or turn one of the knobs. During a cooking function if the ECOMODE
is activated the cavity lamp will be switched off after 1 minute of cooking and reactivated for each user
interaction. If, on the other hand, the function is not selected (OFF), after a few minutes the display is merely
dimmed.
: the display shows which settings can be changed (language, volume of
.
KEY-LOCK
This function can be used to lock the control panel buttons.
To activate it, press and at the same time for at least 3 seconds. If activated, the functions of the
buttons are locked and the display shows a message and the symbol
during cooking. To deactivate it, repeat the above procedure. When the key-lock function is activated, the
oven can be switched off using button
.
. This function can also be activated
EN13
Page 16
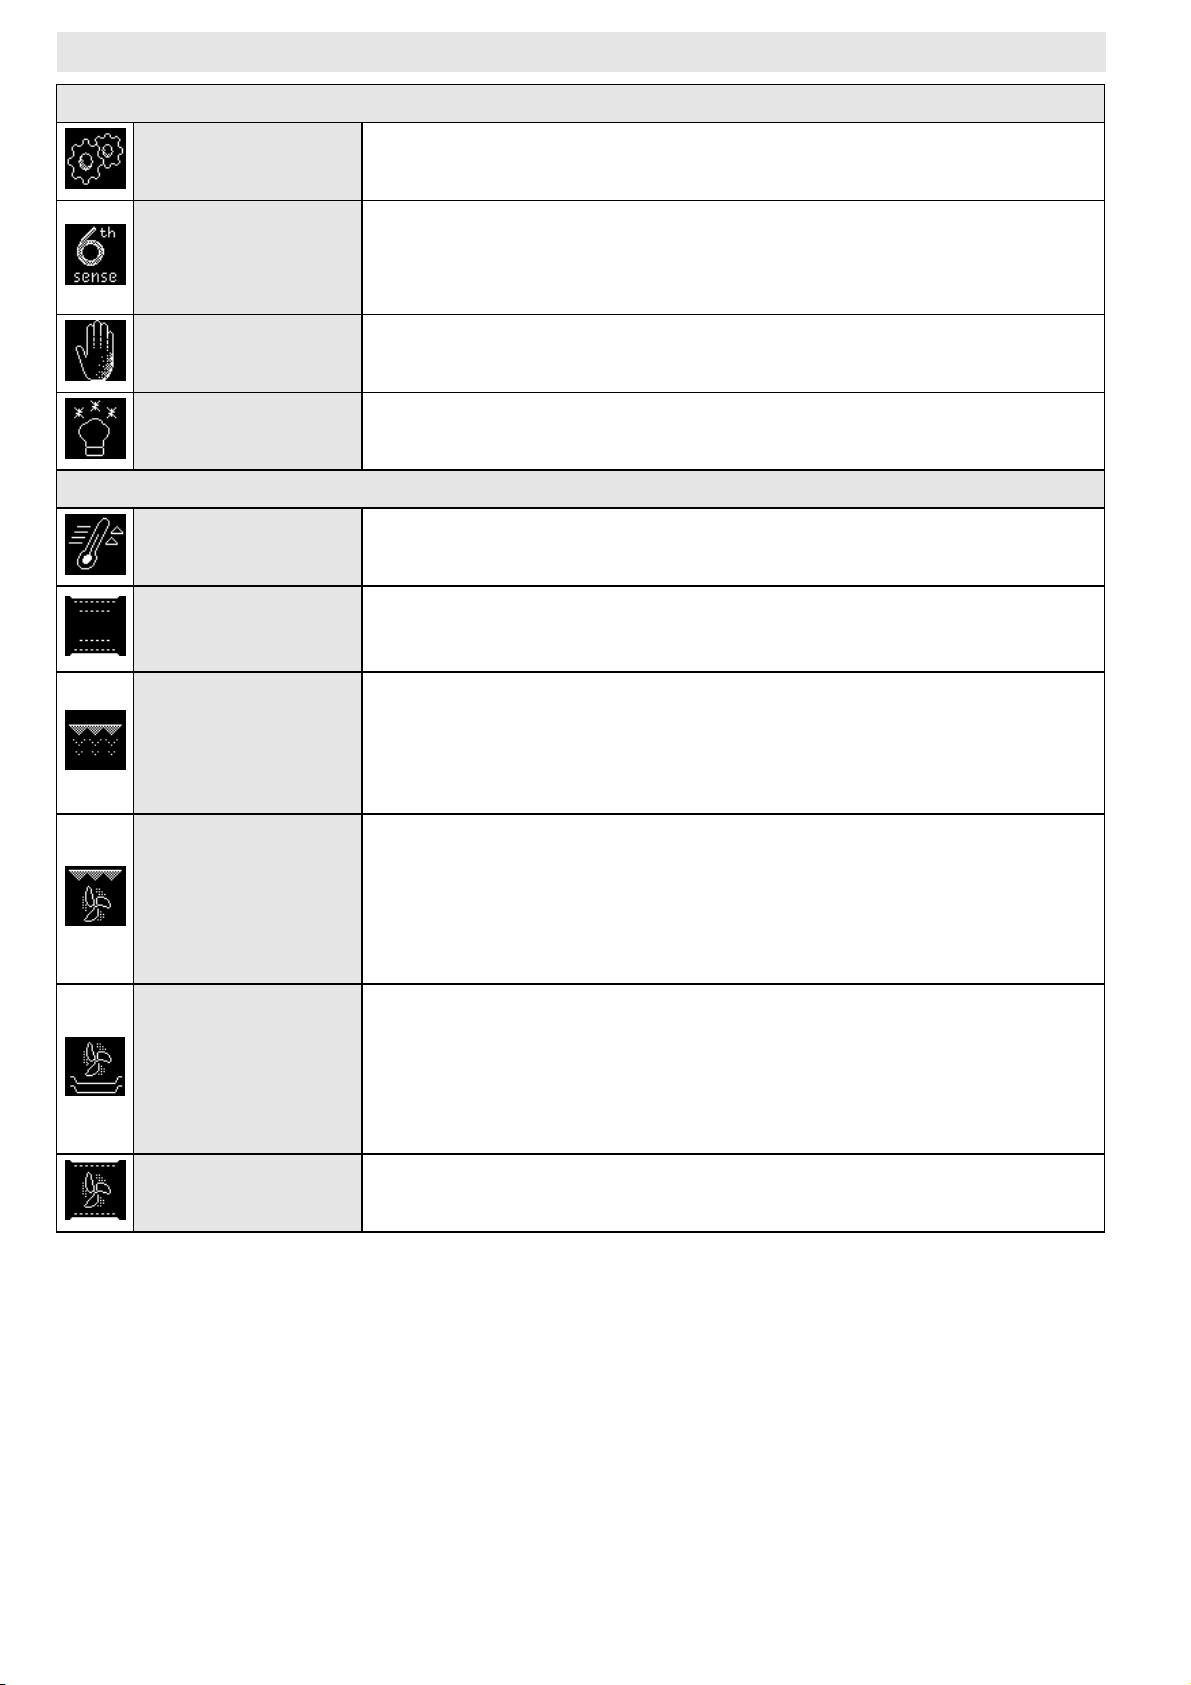
FUNCTION DESCRIPTION TABLE
MAIN MENU
SETTINGS
RECIPES
TRADITIONAL See TRADITIONAL FUNCTIONS.
SPECIALS See SPECIAL FUNCTIONS.
FAST PREHEATING To preheat the oven rapidly.
CONVENTIONAL
GRILL
TURBO GRILL
FORCED AIR
Setting the display (language, time, brightness, volume of acoustic signal,
gy saving function).
ener
Selecting 30 different pre-set recipes (see enclosed recipe booklet).
The oven automatically sets the optimum cooking temperature, function
and time
regarding preparation, accessories and which oven shelf to use.
To cook any kind of dish on one shelf only. Use the 3rd shelf. To cook pizza,
sa
voury pies and sweets with liquid fillings, use the 1st or 2nd shelf.
The oven does not have to be preheated.
To grill steak, kebabs and sausages; to cook vegetables au gratin and toast
ead. Place food on the 4th or 5th shelf. When grilling meat, use the drip
br
tray to collect the cooking juices. Position it on the 3rd/4th shelf, adding
approx. half a litre of water. The oven does not have to be preheated.
During cooking the oven door must remain closed.
To roast large joints of meat (legs, roast beef, chickens). Position the food
on the middle shelv
Position it on the 1st/2nd shelf, adding approx. half a litre of water.
The oven does not have to be preheated. During cooking the oven door
must r
provided.
To cook a variety of food requiring the same cooking temperature on
sev
cakes). This function can be used to cook different foods without odours
being transferred from one food to another. Use the 3rd shelf to cook on
one shelf only, the 1st and 4th to cook on two shelves, and the 1st, 3rd and
5th to cook on three shelves. The oven does not have to be preheated.
. It is important to follow the instructions given in the recipe book
TRADITIONAL FUNCTIONS
es. Use the drip tray to collect the cooking juices.
emain closed. With this function you can also use the turnspit, if
eral shelves (maximum three) at the same time (e.g.: fish, vegetables,
CONVECTION BAKE
To cook meat and pies with liquid filling (savoury or sweet) on single shelf.
se 3rd shelf. The oven does not have to be preheated.
U
EN14
Page 17
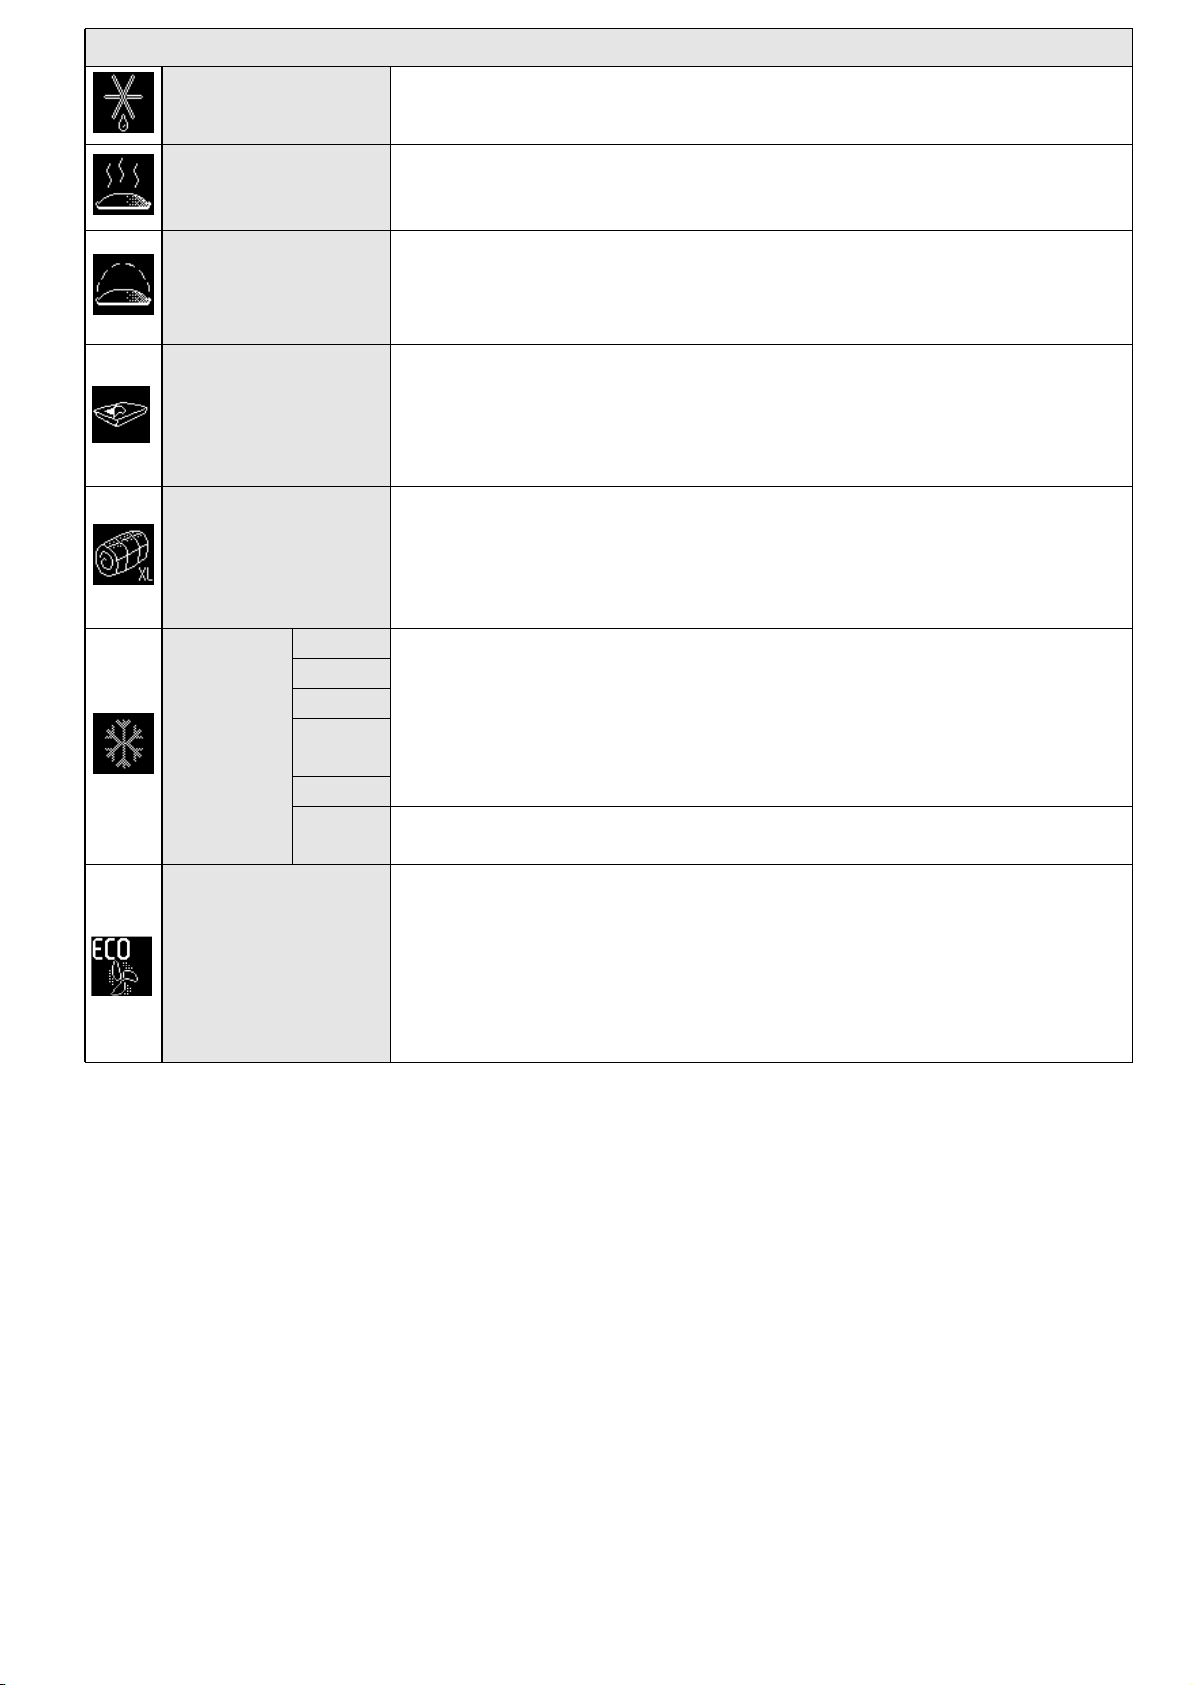
SPECIAL
DEFROST
KEEP WARM
RISING
CONVENIENCE
MAXI COOKING
Lasagne
Pizza
Strudel
FROZEN
FOOD
ECO FORCED AIR
French
Fries
Bread
Custom
To speed up defrosting of food. Place food on the middle shelf. Leave food
in its pack
For keeping just-cooked food hot and crisp (e.g: meat, fried food or flans).
P
lace food on the middle shelf. The function will not activate if the
temperature in the oven is above 65°C.
For optimal rising of sweet or savoury dough. To safeguard the quality of
proving, the function will not activate if the temperature in the oven is
above 40°C. Place the dough on the 2nd shelf. The oven does not have
to be preheated.
Cooking ready meals kept at room temperature or from refrigerated
cabinets (biscuits
products). This function gently cooks all food quickly; it can also be used
to reheat cooked food. Follow the instructions on the food packaging.
The oven does not have to be preheated.
To cook large joints of meat (above 2.5 kg). Use the 1st or 2nd shelves,
depending on the siz
preheated. It is advisable to turn the meat over during cooking, to obtain
even browning on both sides. It is preferable to baste the meat every now
and again so that it does not become too dry.
The function automatically selects the ideal cooking temperature and
mode for 5 different types of ready frozen food. Use the 2nd or 3rd shelf.
The oven does not have to be preheated.
The temperature can be set from 50 to 250°C to cook other types of
oduct.
pr
To cook stuffed roasts and meat in pieces on one shelf. This function uses
discontinuous, delicate fan assistance, which prevents excessive drying of
foods. In this ECO function the light remains off during cooking and can
be temporarily switched on again by pressing the confirm button. In order
to maximize energy efficiency, it is advisable not to open the door during
cooking. It is advisable to use 3rd level. The oven does not have to be
preheated.
aging in order to prevent it from drying out on the outside.
, liquid cake mixtures, muffins, first courses and bakery
e of the joint. The oven does not have to be
EN15
Page 18
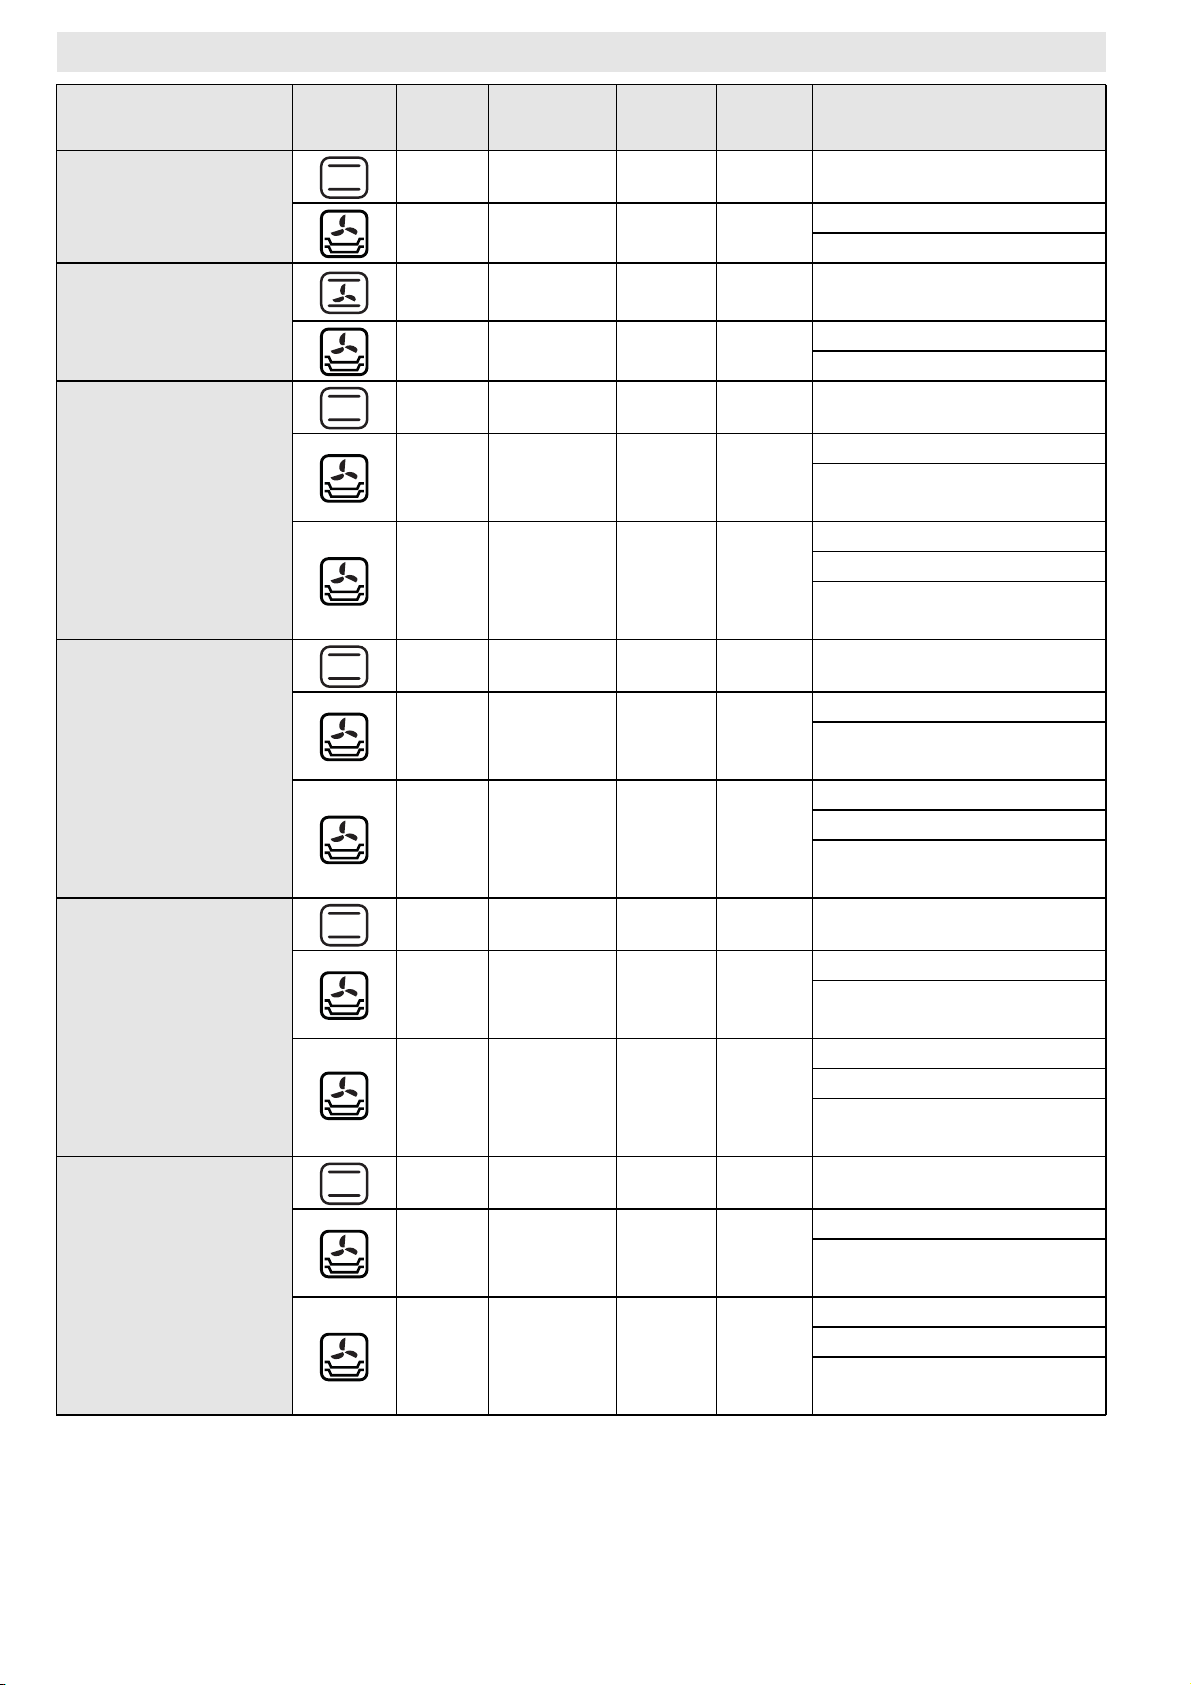
COOKING TABLES
Recipe Function Pre-
heating
- 2/3 160-180 30-90 Cake tin on rack
Leavened cakes
- 1-4 160-180 30-90
Filled pies
(cheesecake, strudel,
apple pie)
Biscuits/Tartlets
- 3 160-200 35-90
- 1-4 160-200 40-90
- 3 170-180 20-45 Drip-tray or baking tray
- 1-4 160-170 20-45
- 1-3-5 160-170 20-45*
- 3 180-200 30-40 Drip-tray or baking tray
Shelf (from
bottom)
Te mp .
(°C)
Time
(min)
Accessories and notes
Level 4: cake tin on rack
Level 1: cake tin on rack
Drip-tray / baking tray or
cake tin on rack
Level 4: cake tin on rack
Level 1: cake tin on rack
Level 4: rack
Level 1: drip-tray or baking
tray
Level 5: pan on rack
Level 3: pan on rack
Level 1: drip-tray or baking
tray
Choux buns
Meringues
Bread / Pizza /
Focaccia
Level 4: pan on rack
- 1-4 180-190 35-45
- 1-3-5 180-190 35-45*
- 3 90 110-150 Drip-tray or baking tray
- 1-4 90 140-160
- 1-3-5 90
- 1/2 190-250 15-50 Drip-tray or baking tray
- 1-4 190-250 20-50
- 1-3-5 190-250 25-50*
140160*
Level 1: drip-tray or baking
tray
Level 5: pan on rack
Level 3: pan on rack
Level 1: drip-tray or baking
tray
Level 4: pan on rack
Level 1: drip-tray or baking
tray
Level 5: pan on rack
Level 3: pan on rack
Level 1: drip-tray or baking
tray
Level 4: pan on rack
Level 1: drip-tray or baking
tray
Level 5: pan on rack
Level 3: pan on rack
Level 1: drip-tray or baking
tray
EN16
Page 19
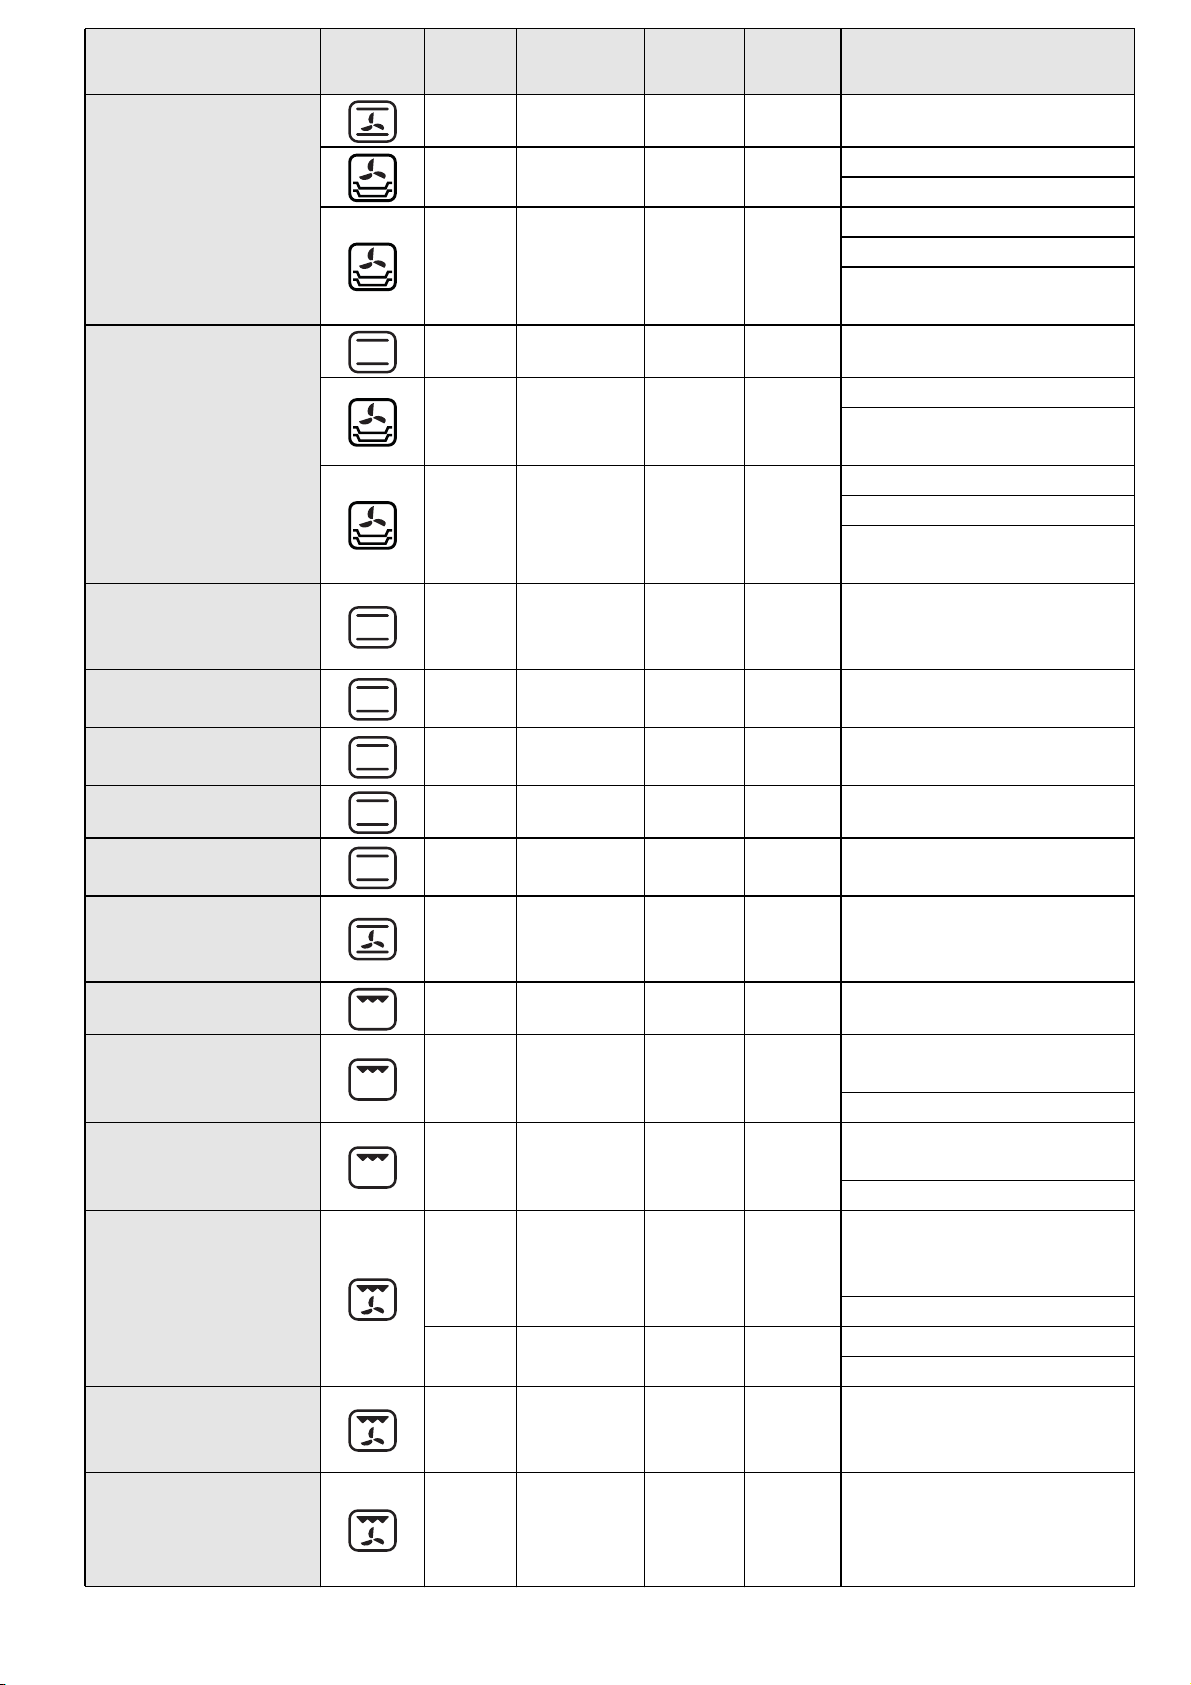
Recipe Function Pre-
heating
- 3 180-190 40-55 Cake tin on rack
Shelf (from
bottom)
Temp.
(°C)
Time
(min)
Accessories and notes
Savoury pies
(vegetable pie,
quiche lorr
Vols-au-vent / Puff
pastry savouries
Lasagna / Baked
pasta / Cannelloni /
Flans
Lamb / Veal / Beef /
Pork 1 Kg
Chicken / Rabbit /
Duck 1 Kg
aine)
- 1-4 180-190 45-70
- 1-3-5 180-190 45-70*
- 3 190-200 20-30 Drip-tray or baking tray
- 1-4 180-190 20-40
- 1-3-5 180-190 20-40*
- 3 190-200 45-55 Pan on rack
- 3 190-200 80-110 Drip-tray or pan on rack
- 3 200-230 50-100 Drip-tray or pan on rack
Level 4: cake tin on rack
Level 1: cake tin on rack
Level 5: cake tin on rack
Level 3: cake tin on rack
Level 1: drip-tray or baking
tray + cake tin
Level 4: pan on rack
Level 1: drip-tray or baking
tray
Level 5: pan on rack
Level 3: pan on rack
Level 1: drip-tray or baking
tray
Turkey / Goose 3 Kg - 2 190-200 80-130 Drip-tray or pan on rack
Baked fish / en papillote (fillet, whole)
Stuffed vegetables
(tomatoes, courgettes, aubergines)
Toast - 5 High 3-6 Rack
Fish fillets / steaks - 4 Medium 20-30
Sausages / Kebabs /
Spare ribs /
Hamburgers
Roast chicken
1-1.3 Kg
Roast beef rare 1 Kg - 3 Medium 35-45
Leg of lamb / Shanks - 3 Medium 60-90
- 3 180-200 40-60 Drip-tray or pan on rack
- 2 180-200 50-60 Pan on rack
Level 4: rack (turn food
halfway through cooking)
Level 3: drip-tray with water
- 5
- 2 Medium 55-70
- 2 High 60-80
Medium-
High
15-30
Level 5: rack (turn food
halfway through cooking)
Level 4: drip-tray with water
Level 2: rack (turn food two
thirds of the way through
cooking)
Level 1: drip-tray with water
Level 2: turnspit (if present)
Level 1: drip-tray with water
Pan on rack (turn food two
thirds of the way through
cooking if necessary)
Drip-tray or pan on rack
(turn food two thirds of the
way through cooking if
necessary)
EN17
Page 20
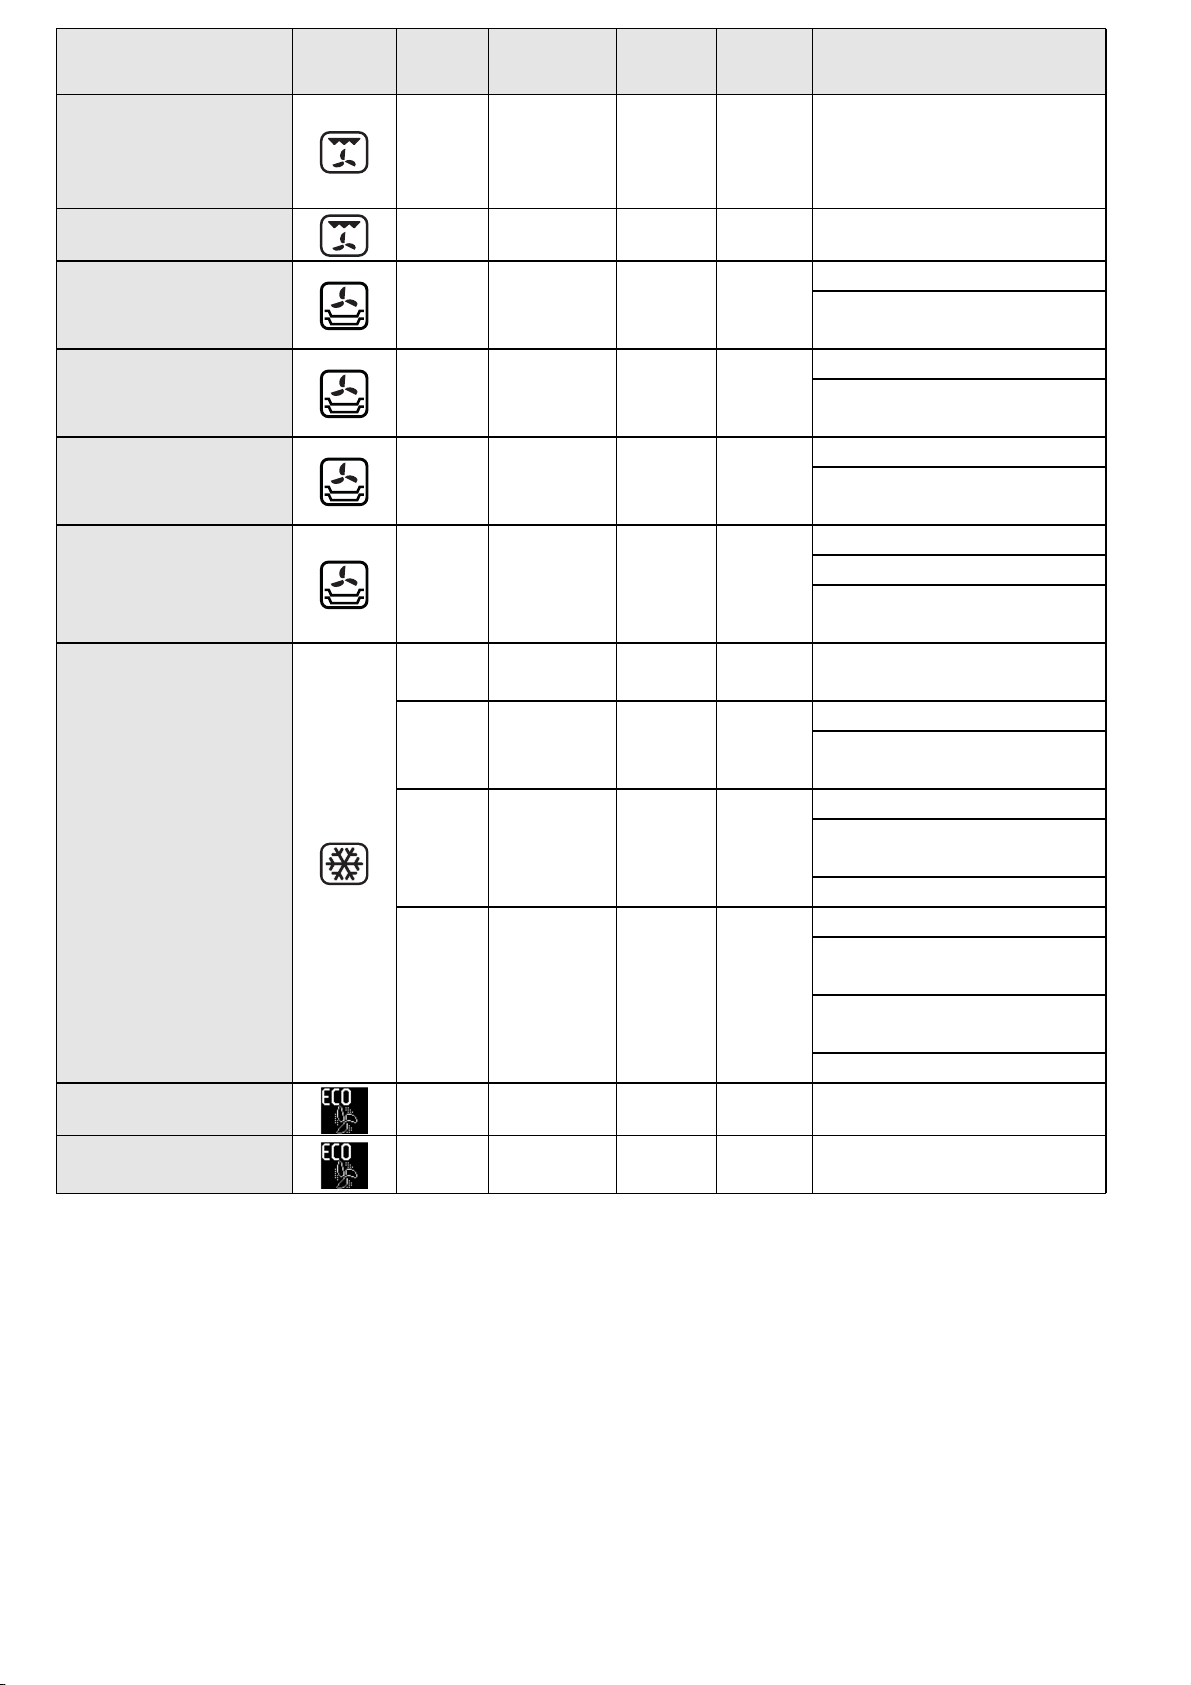
Recipe Function Pre-
heating
Baked potatoes - 3 Medium 45-55
Vegetables au gratin - 3 High 10-15 Pan on rack
Lasagna & Meat - 1-4 200 50-100*
Meat & Potatoes - 1-4 200 45-100*
Fish & Vegetables - 1-4 180 30-50*
Complete meal:
Tart (Level 5) /
Lasagna (Level 3) /
t (Level 1)
Mea
Frozen pizza
Shelf (from
bottom)
- 1-3-5 190 40-120*
- 3 Auto 10-15
- 1-4 Auto 15-20
- 1-3-5 Auto 20-30
- 1-3-4-5 Auto 20-30
Te mp .
(°C)
Time
(min)
Accessories and notes
Drip-tray or baking tray (turn
food two thirds of the way
through cooking if
necessary)
Level 4: pan on rack
Level 1: drip-tray or pan on
rack
Level 4: pan on rack
Level 1: drip-tray or pan on
rack
Level 4: pan on rack
Level 1: drip-tray or pan on
rack
Level 5: pan on rack
Level 3: pan on rack
Level 1: drip-tray or pan on
rack
Drip-tray / baking tray or
rack
Level 4: pan on rack
Level 1: drip-tray or baking
tray
Level 5: pan on rack
Level 3: drip-tray or baking
tray
Level 1: pan on rack
Level 5: pan on rack
Level 4: drip-tray or baking
tray
Level 3: drip-tray or baking
tray
Level 1: pan on rack
Filled roast meats - 3 200 80-120* Drip-tray or pan on rack
Meat cuts (rabbit,
chicken, lamb)
* Cooking time is approximate. Food can be removed from the oven at different times depending on
personal preference.
- 3 200 50-100* Drip-tray or pan on rack
EN18
Page 21
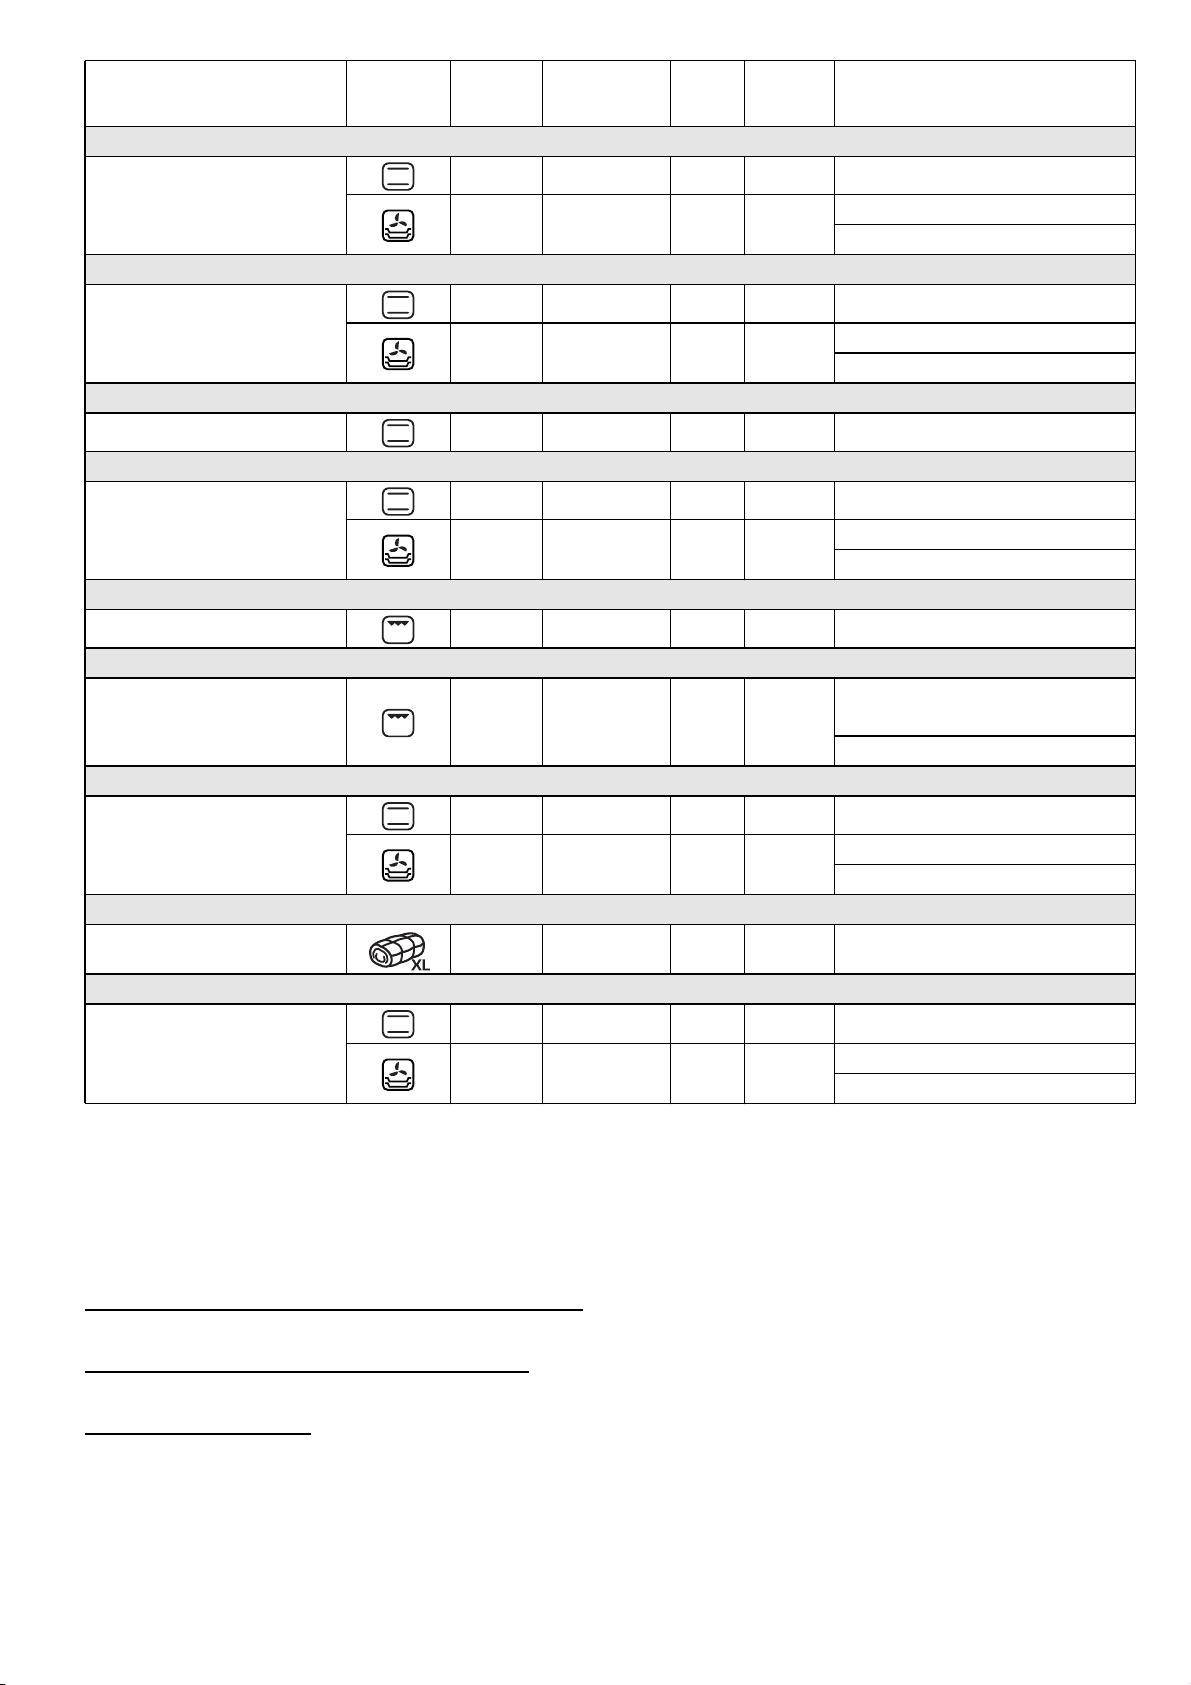
TESTED RECIPES in compliance with IEC 50304 / 60350:2009-03 and DIN 3360-12:07:07
Recipe Function Pre-
ting
hea
IEC 60350:2009-03 § 8.4.1
- 3 170 15-30 Drip-tray / baking tray
Shortbread
IEC 60350:2009-03 § 8.4.2
Small cakes
IEC 60350:2009-03 § 8.5.1
Fatless sponge cake
IEC 60350:2009-03 § 8.5.2
Two apple pies
IEC 60350:2009-03 § 9.1.1
Toast**
- 1-4 160 20-35
- 3 170 25-35 Drip-tray / baking tray
- 1-4 160 30-40
- 2 170 30-40 Cake tin on rack
- 2 / 3 185 70-90 Cake tin on rack
- 1-4 175 75-95
- 5 High 3-6 Rack
Shelf (from
bottom)
Te mp .
(°C)
Time
(min)
Accessories and notes
Level 4: baking tray
Level 1: drip-tray
Level 4: baking tray
Level 1: drip-tray
Level 4: cake tin on rack
Level 1: cake tin on rack
IEC 60350:2009-03 § 9.2.1
Level 5: rack (turn food
ay through cooking)
Burgers**
DIN 3360-12:07 § 6.5.2.3
Apple cake, yeast tray
cake
DIN 3360-12:07 § 6.6
Roast pork
DIN 3360-12:07 annex C
Flat cake
The cooking table advises the ideal function and temperature to ensure the best results with all recipes.
If you wish to cook on one shelf only using the fan-assisted function, place food on the third shelf and select
the temperature recommended for the “FORCED AIR” function on more than one shelf.
The indications in the table are without use of the runners. Do the tests without the runners.
- 5 High 18-30
- 3 180 35-45 Drip-tray / baking tray
- 1-4 160 55-65
- 2 170 110-150 Level 2: drip-tray
- 3 170 40-50 Drip-tray / baking tray
- 1-4 160 45-55
halfw
Level 4: drip-tray with water
Level 4: baking tray
Level 1: drip-tray
Level 4: baking tray
Level 1: drip-tray
** When grilling food, it is advisable leave a space of 3-4 cm from the front edge of the grill to facilitate removal
Energy efficiency class (according to EN 50304)
To do the test, use the dedicated table.
Energy consumption and preheating time
Select the function and do the test only with the "Preheating" option activated (“Preheating yes”).
Control Accuracy test
Select the function and do the test only with the "Preheating" option deactivated (when preheating is
activated, the oven control intentionally creates an oscillation of the temperature profile).
EN19
Page 22

RECOMMENDED USE AND TIPS
How to read the cooking table
The table indicates the best function to use for any given food, to be cooked on one or more shelves at the
same time. Cooking times start from the moment food is placed in the oven, excluding pre-heating (where
required). Cooking temperatures and times are purely for guidance and will depend on the amount of food
and type of accessory used. Use the lowest recommended values to begin with and, if the food is not
cooked enough, then move on to higher values. Use the accessories supplied and preferably dark coloured
metal cake tins and oven trays. You can also use pans and accessories in pyrex or stoneware, but bear in
mind that cooking times will be slightly longer. To obtain best results, carefully follow the advice given
in the cooking table for the choice of accessories (supplied) to be placed on the various shelves.
Cooking different foods at the same time
Using the “FORCED AIR” function, you can cook different foods which require the same cooking
temperature at the same time (for example: fish and vegetables), using different shelves. Remove the food
which requires less cooking time and leave food which requires longer cooking time in the oven.
Desserts
- Cook delicate desserts with the conventional function on one shelf only. Use dark coloured metal
cake tins and always position them on the wire shelf supplied. To cook on more than one shelf, select
the forced air function and stagger the position of the cake tins on the shelves, aiding optimum
circulation of the hot air.
- To check whether a raising cake is cooked, insert a wooden toothpick into the centre of the cake.
If the toothpick comes out clean, the cake is ready.
- If using non-stick cake tins, do not butter the edges as the cake may not rise evenly around the edges.
- If the cake “sinks” during cooking, set a lower temperature the next time, perhaps reducing the
amount of liquid in the mix
- For sweets with moist fillings (cheesecake or fruit pies) use the “CONVECTION BAKE” function. If the
base of the cake is soggy
biscuit crumbs before adding the filling.
ture and mixing more gently.
, lower the shelf and sprinkle the bottom of the cake with breadcrumbs or
Meat
- Use any kind of oven tray or pyrex dish suited to the size of the piece of meat being cooked. For roast
joints, it is best to add some stock to the bottom of the pan, basting the meat during cooking for
added flavour. When the roast is ready, let it rest in the oven for another 10-15 minutes, or wrap it
in aluminium foil.
- When you want to grill meat, choose cuts with an even thickness all over in order to achieve uniform
ooking results. Very thick pieces of meat require longer cooking times. To prevent the meat from
c
burning on the outside, lower the position of the wire shelf, keeping the food farther away from the
grill. Turn the meat two thirds of the way through cooking.
To collect the cooking juices it is advisable to place a drip-tray with half a litre of water directly under the
grill on which the meat is placed. Top-up when necessary.
Turnspit (only in some models)
Use this accessory to evenly roast large pieces of meat and poultry. Place the meat on the spit rod, tying
it with string if chicken, and check that it is secure before inserting the rod in the seat located on the front
wall of the oven and resting it on the respective support. To prevent smoke and to collect cooking juices,
it is advisable to place a drip-tray with half a litre of water on the first level. The rod has a plastic handle
which must be removed before starting to cook, and used at the end of cooking to avoid burns when
taking the food out of the oven.
Pizza
Lightly grease the trays to ensure the pizza has a crispy base. Scatter the mozzarella over the pizza two
thirds of the way through cooking.
Dough proving function (only in some models)
It is always best to cover the dough with a damp cloth before placing it in the oven. Dough proving time
with this function is reduced by approximately one third compared to proving at room temperature
(20-25°C). Proving time for a 1 Kg batch of pizza dough is around one hour.
EN20
Page 23

Page 24

Printed in Italy
03/2012
5019 300 01020
PTESPL RO
Whirlpool is a registered trademark of Whirlpool, USA
 Loading...