

®
INSTALLATION
INSTRUCTIONS
Cabinet Depth
Side by Side Refrigerator
IMPORTANT: READ AND SAVE THESE
INSTALLATION REQUIRES 2 OR MORE PEOPLE.
INSTRUCTIONS.
INSTRUCTIONS
D’INSTALLATION
Réfrigérateur côte à côte
à profondeur d’armoire
IMPORTANT : LIRE ET CONSERVER CES
L’INSTALLATION NÉCESSITE L’INTERVENTION DE 2
Table of Contents/Table des matières .............2
INSTRUCTIONS.
PERSONNES OU PLUS.
2221515
TABLE OF CONTENTS
TABLE DES MATIÈRES
REFRIGERATOR SAFETY .............................................................2
INSTALLATION REQUIREMENTS ................................................3
Tools and Parts ............................................................................3
Product Dimensions.....................................................................3
Door and Side Panels ..................................................................4
Location Requirements ................................................................5
Electrical Requirements ...............................................................5
Water Supply Requirements ........................................................6
INSTALLATION INSTRUCTIONS ..................................................6
Unpack Refrigerator .....................................................................6
Install New Water Line .................................................................6
Connect Water Line to Refrigerator .............................................7
Plug in Refrigerator ......................................................................7
Level Refrigerator .........................................................................7
Replace Base Grille......................................................................8
Complete Installation ...................................................................8
ASSISTANCE OR SERVICE...........................................................8
SÉCURITÉ DU RÉFRIGÉRATEUR ................................................9
EXIGENCES D’INSTALLATION .....................................................9
Outillage et pièces nécessaires ...................................................9
Dimensions du produit .................................................................9
Panneaux latéraux et de porte ...................................................11
Emplacement d’installation........................................................12
Spécifications électriques ..........................................................12
Spécifications de l’alimentation en eau .....................................13
INSTRUCTIONS D’INSTALLATION.............................................13
Déballage du réfrigérateur..........................................................13
Installation d’une nouvelle canalisation d’eau ...........................13
Raccordement de la canalisation d’eau au réfrigérateur...........14
Brancher le réfrigérateur.............................................................14
Nivellement du réfrigérateur .......................................................14
Réinstallation de la grille de la base...........................................15
Achever l’installation ..................................................................15
REFRIGERATOR SAFETY
Your safety and the safety of others are very important.
We have provided many important safety messages in this manual and on your appliance. Always read and obey all
safety messages.
This is the safety alert symbol.
This symbol alerts you to potential hazards that can kill or hurt you and others.
All safety messages will follow the safety alert symbol and either the word “DANGER” or
“WARNING.” These words mean:
You can be killed or seriously injured if you don't
immediately follow instructions.
can be killed or seriously injured if you don't
You
follow instructions.
All safety messages will tell you what the potential hazard is, tell you how to reduce the chance of injury, and tell you
what can
happen if the instructions are not followed.
2
INSTALLATION
Side View
REQUIREMENTS
Tools and Parts
IMPORTANT:
■ Observe all governing codes and ordinances.
Installer: Leave Installation Instructions with homeowner.
■
■ Homeowner: Keep Installation Instructions for future
reference and for the local electrical inspector’s use.
■ Keep cardboard shipping piece or plywood under
refrigerator until it is installed in the operating position.
Comply with installation specifications and dimensions.
■
■ Remove any moldings or decorative panels that prevent
the refrigerator from being serviced.
■ Contact a qualified electrical installer.
Tools needed:
Make sure that you have the tools necessary for proper
installation:
■ Hand drill or electric drill
(properly grounded)
■ ¹⁄₄ in. nut driver and
drill bit
Standard screwdriver
■
Parts needed:
Your refrigerator dealer has a kit available with a ¹⁄₄ in.
■
(6.35 mm) saddle-type shut-off valve, a union, and copper
tubing.
■ Or you can purchase a ¹⁄₄ in. (6.35 mm) copper tubing with
shutoff valve and a ¹⁄₄ in. (6.35 mm) compression fitting
(coupling).
Depending on water line connections, you may also need
■
a ¹⁄₄ in. (6.35 mm) nut and ¹⁄₄ in. (6.35 mm) ferrule.
■ ⁷⁄₁₆ in. and ¹⁄₂ in. open-end
wrenches
■ Two adjustable wrenches
Socket wrench
■
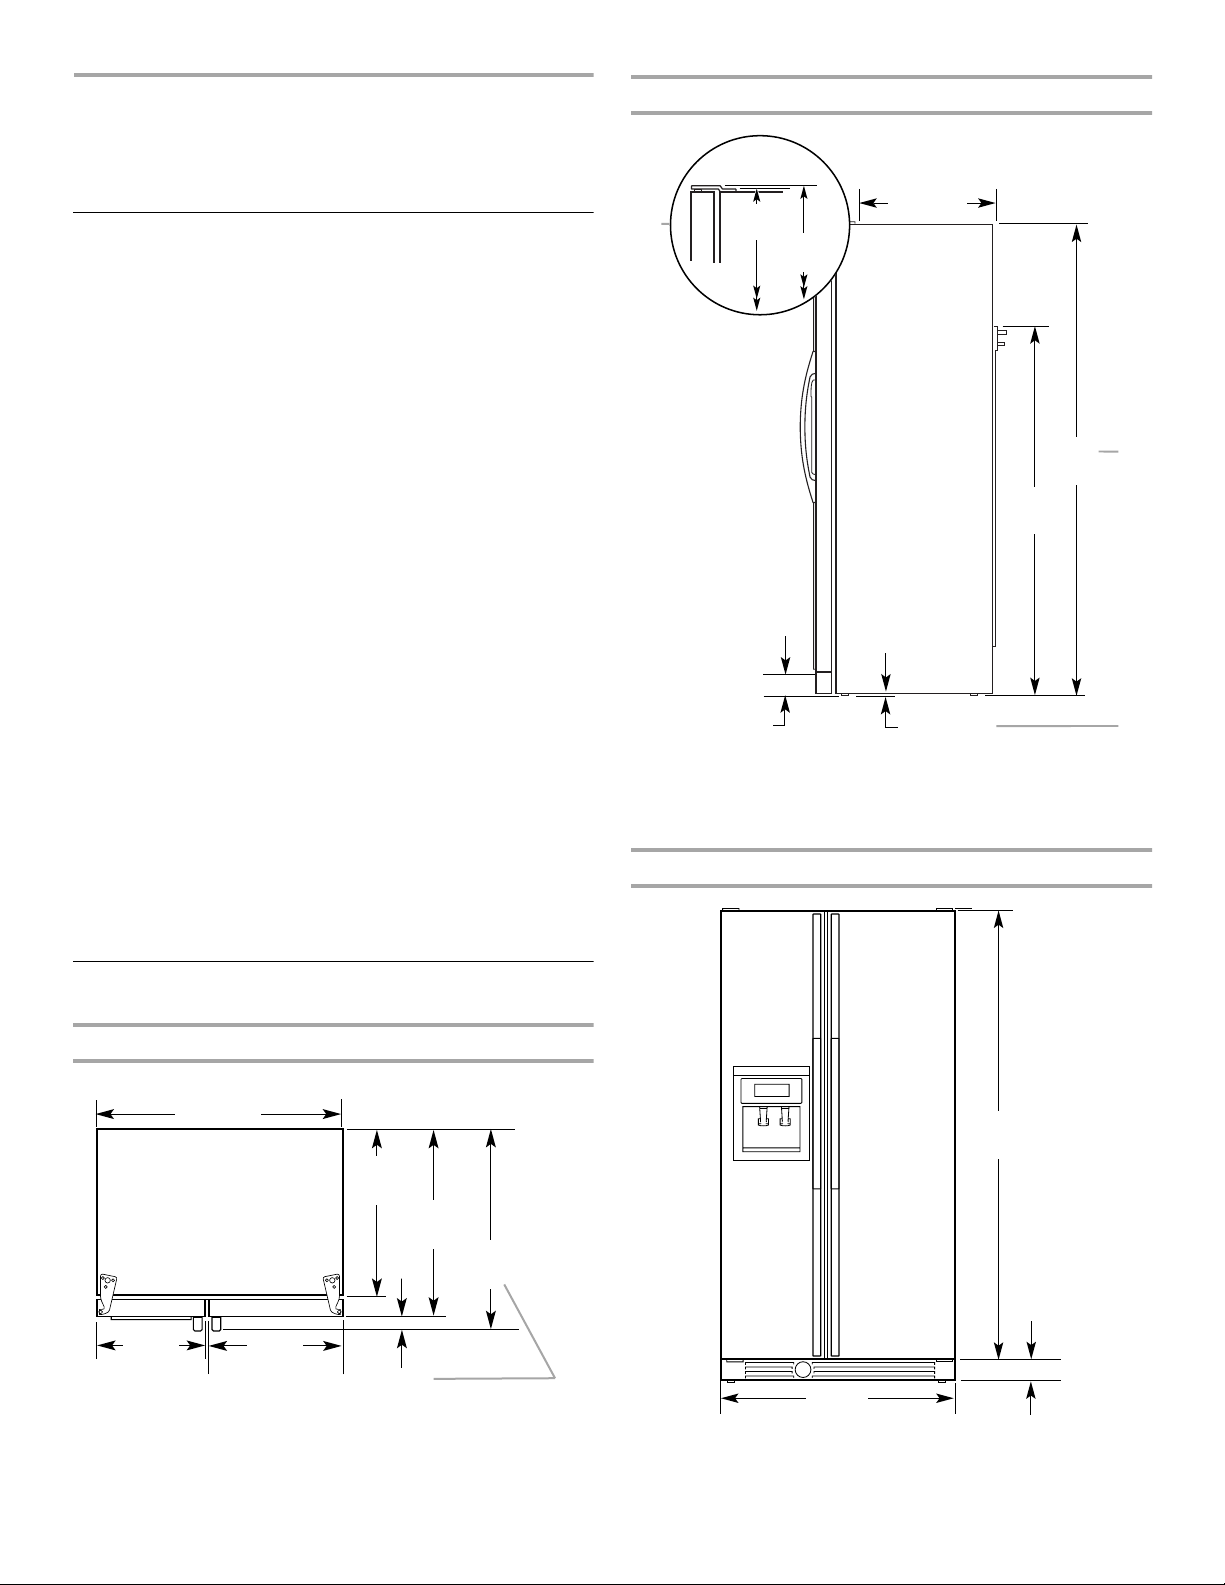
1
1. Dimensions shown from floor with rollers set
2. Overall cabinet height with rollers at
3. Minimum height
Front View
713/4"
(182.2 cm)
717/8"
(182.5 cm)
at minimum height
maximum height
211/8"
(53.7 cm)
1
/4" (6.4 mm)35/8" (9.2 cm)
(181.6 cm)
561/8"
(142.6 cm)
711/2"
2
3
Product Dimensions
Top View
351/
2"
(90.2 cm)
151/
2"
(39.4 cm)
1. Dimensions may vary based on model
191/
2"
(49.5 cm)
235/
8"
(60.0 cm)
(69.2 cm)
3
/
2
(6.0 cm)
8"
271/
4"
293/
(74.6 cm)
677/8"
(172.5 cm)
8"
1
3511/16"
(90.6 cm)
5
/8"
3
(9.2 cm)
3
Opening Dimensions
NOTE: The water hookup and electrical outlet must be placed
near the bottom of the refrigerator. The recommended grounded
electrical outlet and water connection should be installed in the
shaded area as shown. For specifications, see the “Electrical
Requirements” or “Water Supply Requirements” section. If the
recommended water line location is used, no additional plumbing
needs to be purchased.
1 1
1
13
/
4"
(34 cm)
2
72"
36"
(91.5 cm)
1
/
2"
16
(42 cm)
(182.9 cm)
2"(5 cm)
1
/
2"
12
(32 cm)
1
20
/
4"
(51.5 cm)
2"
(5 cm)
3
1
9
/
4"
(23.5 cm)
in. (183.2 cm)
¹⁄₈
(6.5 cm)
1. Minimum fixed wall position
2. For full-overlay cabinet doors and a trim kit, the
height of the opening must be 72
3. Recommended locations for electrical and water
connections
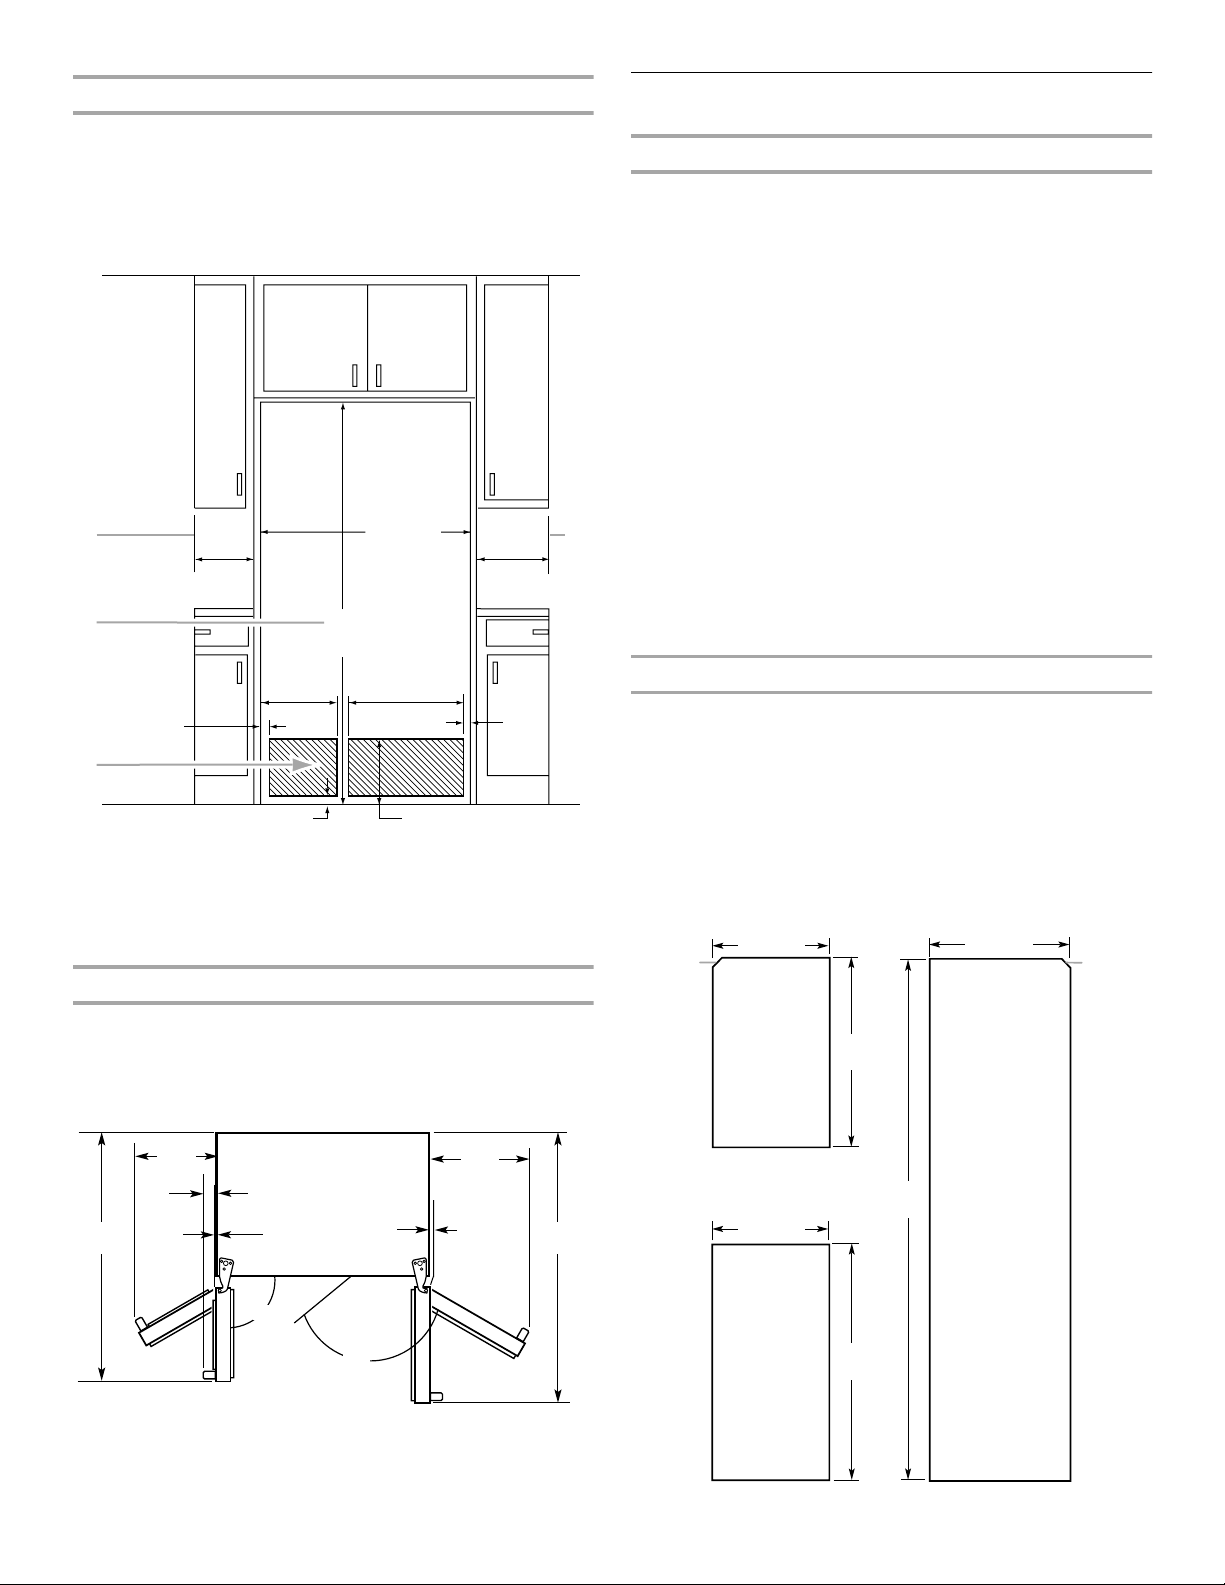
Door Swing Dimensions
21/
2"
Door and Side Panels
Factory Door Panels and Side Trim Kits
All factory parts are available through your Whirlpool dealer or by
calling Whirlpool Parts and Accessories at 1-800-442-9991. In
Canada, call 1-800-807-6777.
Decorator Door Panel Kits
Decorator door panels kits are available. Follow the kit
instructions for installing the panels.
Order Kit Number:
White - #4378123
Black - #4378124
Biscuit - #4378125
NOTE: Door panel kits are not required for factory-installed
stainless steel models.
Cabinet Side Trim Kits
Cabinet side trim kits are available to customize refrigerator to
cabinet face. Follow the kit instructions for installing the side panel.
Order Kit Number:
White - #2208187W
Black - #2208187B
Biscuit - #2208187T
Stainless Steel - #2208187S
Custom Door Panels
If you plan to install custom wood panels, you will need to create
the panels yourself or consult a qualified cabinet maker or
carpenter. See dimensional drawings for panel specifications.
IMPORTANT: Panels weighing more than the recommended
weight may cause damage to your refrigerator. Refrigerator door
panel should not exceed 28 lbs. (12.7 kg). Freezer door panels
should not exceed 21 lbs. (9.5 kg).
You can create panels by screwing or gluing wood panels to ¹⁄₄ in.
(6.35 mm) plywood backing or by using ³⁄₄ in. (19.05 mm) stock
with routed edges.
153/8"
(39.1 cm)
1
193/32"
(48.5 cm)
1
Location must permit doors to open to a minimum of 150°. Allow
13¹⁄₄ in. (33.7 cm) minimum space between the side wall and the
freezer side of the refrigerator. Allow 16¹⁄₂ in. (41.9 cm) minimum
space between the side wall and the refrigerator side.
NOTE: Dimensions may vary based on model.
3
/4"
41
(106 cm)
131/4"
(33.7 cm)
1
2
/8"
(5.4 cm)
1
/2"
(12.7 mm)
90˚
150˚
161/2"
(41.9 cm)
1
/4"
(6.4 mm)
433/8"
(110.2 cm)
4
1.
(39.1 cm)
in. x
¹⁄₈
233/4"
(60.3 cm)
6715/16"
153/8"
in. (3.2 x 3.2 mm) chamfer
¹⁄₈
(172.5 cm)
2913/16"
(75.7 cm)
Location Requirements
Electrical Requirements
WARNING
Explosion Hazard
Keep flammable materials and vapors, such as
gasoline, away from refrigerator.
Failure to do so can result in death, explosion,
or fire.
NOTES:
■ The cabinet depth refrigerator can be installed into a
recessed opening, at the end of cabinets or as a freestanding
refrigerator.
■ If you are installing the refrigerator to fit flush with the front of
the base cabinets, all shoe molding and baseboards must be
removed from the rear of the refrigerator opening.
A trim kit is available for those installations in which the
■
refrigerator will not fit flush. See the “Assistance or Service”
section in the Use and Care Guide for ordering information.
■ For full-overlay cabinet doors, the height of the opening must
be 72¹⁄₈ in. (183.2 cm).
Location should permit doors to open fully. See the “Door
■
Swing Dimensions” section.
Do not install the refrigerator near an oven, radiator, or other
■
heat source, nor in a location where the temperature will fall
below 55°F (13°C).
Floor must support refrigerator weight (more than 600 lbs.
■
[272 kg], door panels and contents).
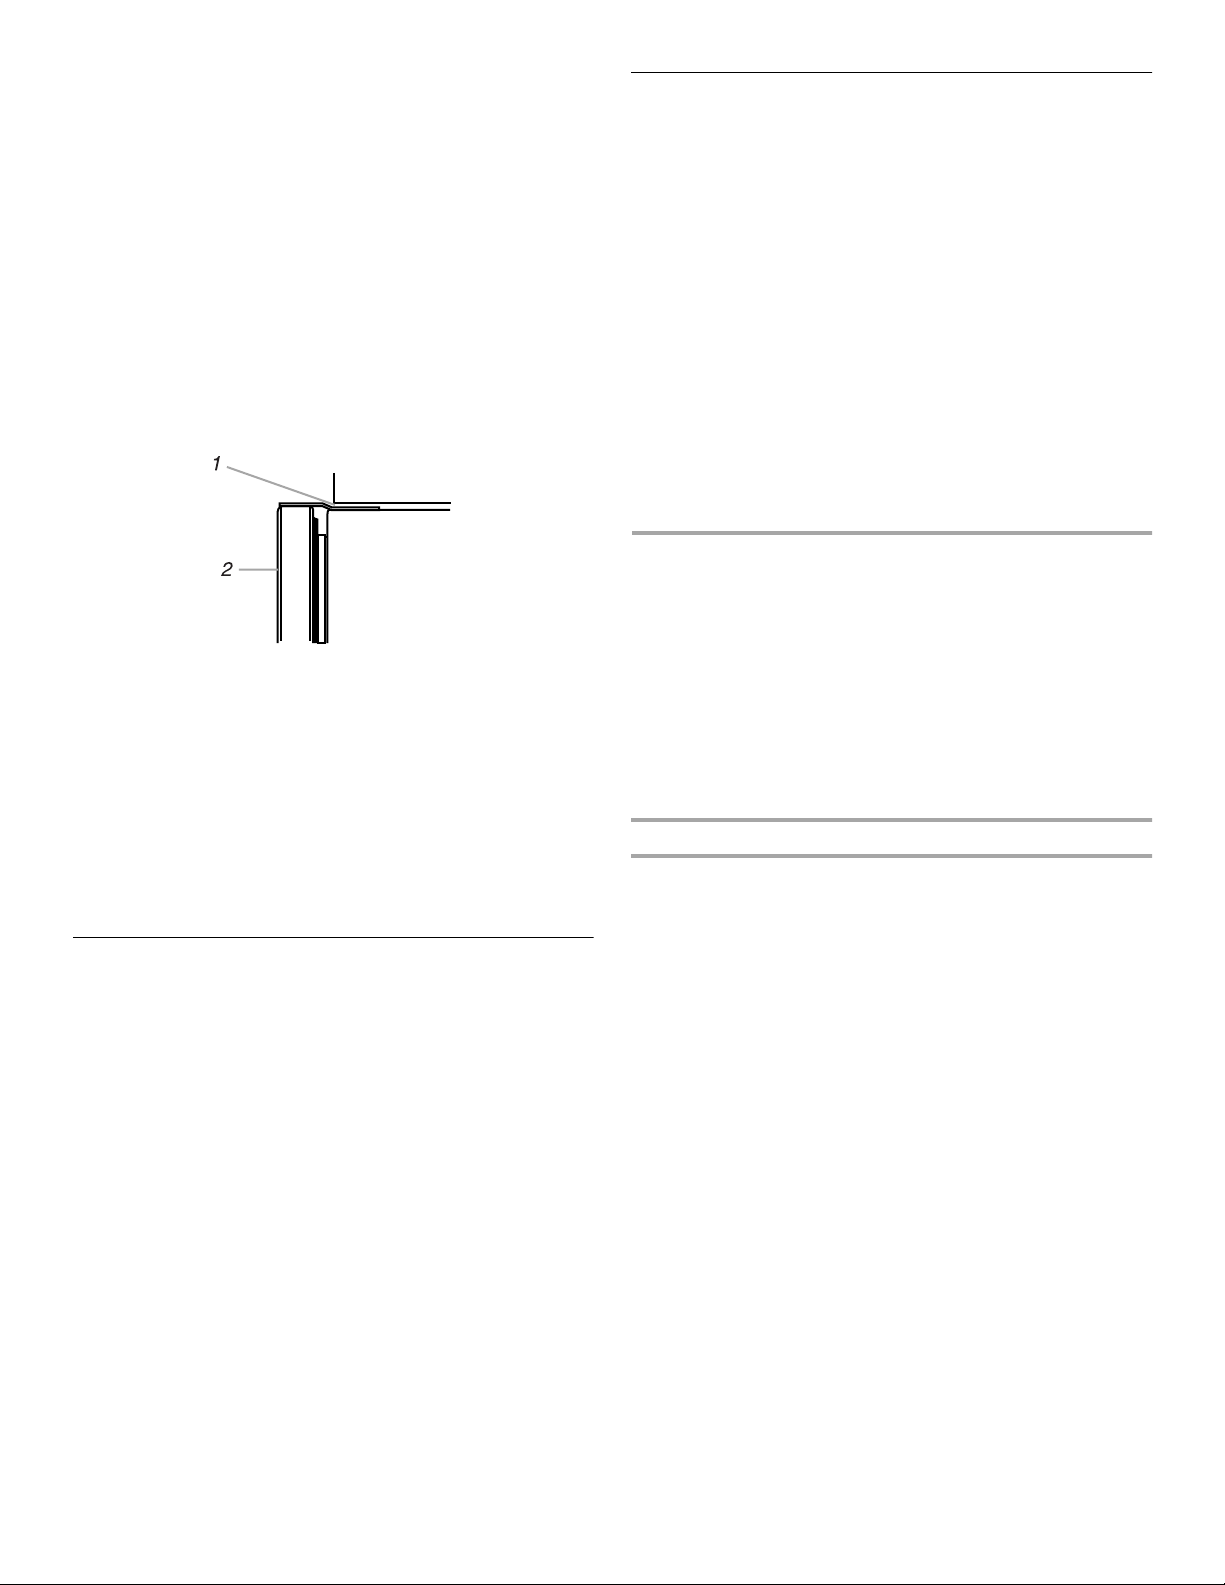
WARNING
Electrical Shock Hazard
Plug into a grounded 3 prong outlet.
Do not remove ground prong.
Do not use an adapter.
Do not use an extension cord.
Failure to follow these instructions can result in
death, fire, or electrical shock.
Before you move your refrigerator into its final location, it is
important to make sure you have the proper electrical
connection:
Recommended grounding method
A 115 Volt, 60 Hz., AC only 15 or 20 ampere fused, grounded
electrical supply is required. It is recommended that a separate
circuit serving only your refrigerator be provided. Use an outlet
that cannot be turned off by a switch. Do not use an
extension cord.
IMPORTANT:
GFCI (Ground Fault Circuit Interrupter) protected outlet, nuisance
tripping of the power supply may occur, resulting in loss of
cooling. Food quality and flavor may be affected. If nuisance
tripping has occurred, and if the condition of the food appears
poor, dispose of it.
NOTE:
removing a light bulb, turn the control (Thermostat, Refrigerator
or Freezer Control depending on the model) to OFF and then
disconnect the refrigerator from the electrical source. When you
are finished, reconnect the refrigerator to the electrical source
and reset the control (Thermostat, Refrigerator or Freezer Control
depending on the model) to the desired setting.
If this product is connected to a
Before performing any type of installation, cleaning, or
5

Water Supply Requirements
IMPORTANT:
■ If you turn the refrigerator on before the water line is
connected, turn the ice maker OFF.
■ All installations must meet local plumbing code requirements.
Use copper tubing and check for leaks. Install copper tubing
■
only in areas where temperatures will remain above freezing.
Your refrigerator dealer has a kit available with a
NOTE:
(6.35 mm) saddle-type shut-off valve, a union, and copper tubing.
Before purchasing, make sure a saddle-type valve complies with
your local plumbing codes. Do not use a piercing-type or
(4.76 mm) saddle valve which reduces water flow and clogs more
easily.
¹⁄₄
in.
³⁄₁₆
in.
Cold Water Supply
Connect the ice maker to a cold water line with water pressure
between 30 and 120 psi. If you have questions about your water
pressure, call your utility company.
INSTALLATION
INSTRUCTIONS
Unpack Refrigerator
Install New Water Line
(if required)
⁷⁄₁₆
Tools required:
wrenches or two adjustable wrenches,
electric drill (properly grounded).
Turn OFF main water supply. Turn ON nearest faucet long
1.
enough to clear line of water.
Find a
2.
water pipe near the refrigerator.
NOTE:
must be followed: Drill on the top side of the pipe, not the
bottom. This will help keep water away from the drill. This
also keeps normal sediment from collecting in the valve.
Determine the length of copper tubing you need. Measure
3.
from the connection on the lower left rear of refrigerator to the
water pipe. Add 7 ft. (2.1 m) to allow for cleaning. Use
(6.35 mm) O.D. (outside diameter) copper tubing. Be sure
both ends of copper tubing are cut square.
Using a grounded drill, drill a
4.
water pipe you have selected.
Standard screwdriver,
¹⁄₂
in. (12.70 mm) to 1
Horizontal pipe will work, but the following procedure
¹⁄₄
¹⁄₄
in. and
¹⁄₄
in. drill bit, hand drill or
in. (3.18 cm) vertical COLD
in. (6.35 mm) hole in the cold
¹⁄₂
in. open-end
in.
¹⁄₄
WARNING
Excessive Weight Hazard
Use two or more people to move and install
refrigerator.
Failure to do so can result in back or other injury.
IMPORTANT:
All four leveling legs must contact the floor to support and
■
stabilize the full weight of the refrigerator.
Keep cardboard shipping piece or plywood under refrigerator
■
until it is installed in the operating position.
Remove and save literature package. Use
1.
wrench to remove skids.
Remove tape and glue residue from surfaces before turning
2.
on the refrigerator. Rub a small amount of liquid dish soap
over the adhesive with your fingers. Wipe with warm water
and dry.
NOTES:
Do not use sharp instruments, rubbing alcohol,
■
flammable fluids, or abrasive cleaners to remove tape or
glue. These products can damage the surface of your
refrigerator. For more information, see the “Refrigerator
Safety” section.
Do not remove the tech sheet that is fastened behind the
■
base grille.
Clean before use: After you remove all of the packing
■
materials, clean the inside of the refrigerator before use.
See the cleaning instructions in the “Refrigerator Care”
section of the Use and Care Guide.
Place pieces of shipping carton or plywood on the floor when
3.
rolling the dolly and refrigerator into the house. Move
refrigerator close to refrigerator opening.
in. socket
³⁄₈
1. Cold Water Pipe
2. Pipe Clamp
3. Copper Tubing
4. Compression Nut
Fasten shut-off valve to cold water pipe with pipe clamp. Be
5.
sure outlet end is solidly in the
the water pipe and that washer is under the pipe clamp.
Tighten packing nut. Tighten the pipe clamp screws carefully
and evenly so washer makes a watertight seal. Do not
overtighten or you may crush the copper tubing, especially if
soft (coiled) copper tubing is used. Now you are ready to
connect the copper tubing.
Slip compression sleeve and compression nut on copper
6.
tubing as shown in the diagram. Insert the end of the tubing
into the outlet end of the shutoff valve as far as it will go.
Screw the compression nut onto the outlet end with an
adjustable wrench. Do not overtighten.
Place the free end of the tubing into a container or sink, turn
7.
ON main water supply and flush out tubing until water is clear.
Turn OFF the shut-off valve on the water pipe.
5. Compression Sleeve
6. Shut-Off Valve
7. Packing Nut
¹⁄₄
in. (6.35 mm) drilled hole in
6

Connect Water Line to Refrigerator
1. Remove the shipping tape from gray, coiled water tubing on
the rear of the refrigerator.
2. Before attaching copper tubing to refrigerator, flush at least
two quarts (1.9 L) of water through the copper tubing and into
a bucket to get rid of any particles in the water line.
3. Check for leaks around the saddle valve. Do not overtighten
clamp or sleeve. This will crush copper tubing.
4. Make connection to refrigerator.
Style 1: Slide the purchased nut then the purchased ferrule
onto the tubing. Push the tubing into the purchased coupling
as far as it will go. Slide the nut and ferrule forward. Tighten
the nut by hand. Then tighten it with a wrench two more
turns. Do not overtighten.
1 2 3 4 5 6
1. Line to Refrigerator
2. Nut (provided)
3. Bulb
Style 2: Push the bulb end of the tubing into the water valve
as far as it will go. Slide the nut forward and finger tighten.
Tighten the nut by hand. Then tighten it with a wrench two
more turns. Do not overtighten.
1. Bulb
2. Nut (provided)
5. Turn shut-off valve ON.
6. Check for leaks. Tighten any nuts or connections (including
connections at the valve) that leak.
4. Coupling (purchased)
5. Ferrule (purchased)
6. Nut (purchased)
1
2
Plug in Refrigerator
WARNING
Electrical Shock Hazard
Plug into a grounded 3 prong outlet.
Do not remove ground prong.
Do not use an adapter.
Do not use an extension cord.
Failure to follow these instructions can result in
death, fire, or electrical shock.
1. Plug into grounded 3 prong outlet.
2. Move refrigerator into final position.
Level Refrigerator
IMPORTANT: All four leveling legs must contact the floor to
support and stabilize the full weight of the refrigerator.
Base Grille Removal
3. Open the refrigerator doors to 90°.
NOTE: Do NOT remove the Tech Sheets fastened behind the
grille.
4. Remove base grille if it is installed.
Style 1 - Screw-on Base Grille:
■ Find pockets located about 4 in. (10 cm) in from each end
of grille. Use screwdriver to remove the screw found in
each pocket.
Style 2 - Snap-on Base Grille:
Grasp the grille with both hands. Lift up and tilt the top of
■
the grille toward you.
Leveling Refrigerator
The roller adjusting bolts are located behind the base grille. The
refrigerator has four adjustable rollers (two front and two rear).
There are two sets of roller adjusting bolts found at the base of
the refrigerator on each side.
1. Rear Leveling Bolt (yellow)
2. Front Leveling Bolt (silver)
NOTE: The yellow bolt will adjust the rear of the refrigerator,
and the silver bolt will adjust the front of the refrigerator.
7
1. Use a ¹⁄₂ in. (12.70 mm) socket wrench to adjust the leveling
bolts. Turn the leveling bolt to the right to raise that side of the
refrigerator or turn the leveling bolt to the left to lower that
side. It may take several turns of the leveling bolts to adjust
the tilt of the refrigerator.
NOTE: Be careful not to unscrew the leveling bolts too much
when lowering the refrigerator. The bolt head will start to
come away from the refrigerator when in the lowest position.
If the screw does come out of the rear roller bracket, the
compartment access cover on the back of the refrigerator will
have to be removed to reinstall the bolt.
2. Adjust the front leveling bolt to bring the refrigerator top
parallel with the cabinet above the refrigerator. For standard
cabinets, leave approximately ¹⁄₈ in. (3.18 mm) gap between
the top hinges and the cabinet. For full-overlay cabinets,
leave ¹⁄₄ in. (6.35 mm) gap for leveling. If you do not have a
cabinet above the refrigerator, simply adjust the refrigerator to
make it level.
Complete Installation
1. Turn water supply line valve to “Open” position.
2. Turn refrigerator switch to ON position. Wait a few minutes.
Check water line connections for leaks.
3. Set refrigerator and freezer compartment controls to the
midpoint setting. Check that the compressor is operating
properly and that all lights are working.
4. Flush water system before using. See the “Water System
Prep” section in the Use and Care Guide.
NOTE: If construction will continue after refrigerator has been
installed, set controls to OFF.
If refrigerator does not operate:
Check that the circuit breaker is not tripped or house fuse
■
blown.
■ Check that the power supply cord is plugged into the outlet.
■ See the “Troubleshooting” section located in the Use and
Care Guide.
ASSISTANCE OR
SERVICE
1. For standard cabinets, leave
minimum clearance for leveling the refrigerator. For
full-overlay cabinets, leave
minimum clearance for leveling and door
clearance.
2. Front of the refrigerator.
3. Adjust the rear leveling bolt to bring the refrigerator level with
the side cabinets or cabinet end panels.
4. If you want, you may now use the four leveling bolts to raise
the refrigerator to close the gap between the refrigerator top
hinge and the cabinet opening. Check that all four rollers still
touch the floor and that the cabinet doors above the
refrigerator open all the way.
in. (3.18 mm)
¹⁄₈
in. (6.35 mm)
¹⁄₄
Replace Base Grille
1. Open the refrigerator doors to 90°.
2. Replace the base grille.
Style 1 - Screw-on Base Grille:
Place the grille in front of the base grille area.
■
Use a screwdriver and guide the screws through the grille
■
holes and into the screw clips located in the corner plates
on each side of the opening. Tighten screws securely.
Style 2 - Snap-on Base Grille:
Place the grille lower clips into the holes in the refrigerator
■
panel. Roll the grille up toward the refrigerator until it
snaps into place.
If you have questions about operating, cleaning or maintaining
your refrigerator:
Refer to Use and Care Guide.
■
Call the Customer Interaction Center. Check your Use and
■
Care Guide for the number to call or phone the dealer from
whom you purchased the appliance.
If you need service
Maintain the quality built into your refrigerator by calling an
authorized service company.
To obtain the name and number of the authorized service
company, do one of the following:
Contact the dealer from whom you purchased your
■
refrigerator.
Look in the Yellow Pages of your telephone directory.
■
Call the Customer Interaction Center. The number is listed in
■
your Use and Care Guide.
When you call, you will need the refrigerator model number and
serial number. Both numbers are listed on the model/serial rating
plate located inside the refrigerator.
8

SÉCURITÉ DU RÉFRIGÉRATEUR
Votre sécurité et celle des autres est très importante.
Nous donnons de nombreux messages de sécurité importants dans ce manuel et sur votre appareil ménager.
Assurez-vous de toujours lire tous les messages de sécurité et de vous y conformer.
Voici le symbole d’alerte de sécurité.
Ce symbole d’alerte de sécurité vous signale les dangers potentiels de décès et de blessures graves
à vous et à d’autres.
Tous les messages de sécurité suivront le symbole d’alerte de sécurité et le mot “DANGER” ou
“AVERTISSEMENT”. Ces mots signifient :
Risque possible de décès ou de blessure grave si
DANGER
vous ne suivez pas immédiatement les instructions.
AVERTISSEMENT
Risque
si vous ne suivez pas les instructions.
possible de décès ou de blessure grave
Tous les messages de sécurité vous diront quel est le danger potentiel et vous disent comment réduire le risque de
blessure et ce
Outillage et pièces nécessaires
IMPORTANT :
■ Respecter toutes les prescriptions des codes et
règlements en vigueur.
Installateur : Remettre les instructions d’installation au
■
propriétaire.
Propriétaire : Conserver les instructions d’installation pour
■
consultation ultérieure et pour utilisation par l’inspecteur
local des installations électriques.
Garder la pièce de carton ou de contreplaqué
■
d’expédition sous le réfrigérateur jusqu’à son installation
à l’emplacement de service.
Observer les spécifications et dimensions d’installation.
■
Enlever toute moulure ou tout panneau décoratif qui
■
empêche l’entretien du réfrigérateur.
Communiquer avec un électricien qualifié.
■
Outillage requis :
S’assurer d’avoir tous les outils nécessaires pour une bonne
installation :
Perceuse manuelle ou
■
électrique
(convenablement reliée à
la terre)
To ur n e- écrou de ¹⁄₄ po
■
et foret
Tournevis standard
■
qui peut se produire en cas de non-respect des instructions.
EXIGENCES
D’INSTALLATION
Clés plates de ⁷⁄₁₆ po et
■
¹⁄₂ po
Deux clés à molette
■
Clé à douille
■
Pièces nécessaires :
■ Votre marchand de réfrigérateurs présente une trousse
avec un robinet d’arrêt à étrier de ¹⁄₄ po (6,35 mm), un
raccord et un tube en cuivre.
■ Ou vous pouvez acheter un tube en cuivre de ¹⁄₄ po
(6,35 mm) avec un robinet d’arrêt et un raccord de
compression de ¹⁄₄ po (6,35 mm).
Selon les raccordements de la canalisation d’eau, il vous
■
faudra peut-être aussi un écrou de ¹⁄₄ po (6,35 mm) et une
bague de ¹⁄₄ po (6,35 mm).
Dimensions du produit
Vue de dessus
351/
2"
(90,2 cm)
235/
8"
(60,0 cm)
271/
4"
(69,2 cm)
293/
(74,6 cm)
151/
2"
(39,4 cm)
1. Les dimensions peuvent varier en fonction du
modèle
191/
2"
(49,5 cm)
3
/
8"
2
(6,0 cm)
8"
1
9

Vue latérale
1
713/4"
(182,2 cm)
717/8"
(182,5 cm)
211/
8"
(53,7 cm)
(181,6 cm)
561/
8"
(142,6 cm)
711/
Dimensions de l’ouverture
REMARQUE : La prise d’eau et la prise électrique doivent être
placées près du bas du réfrigérateur. La prise d’eau et la prise
électrique reliée à la terre recommandées devraient être installées
dans la zone ombrée, tel qu’indiqué. Pour les spécifications, voir
la section “Spécifications électriques” ou “Spécifications de
l’alimentation en eau”. Si l’emplacement de la canalisation d’eau
recommandé est utilisé, il n’est pas nécessaire d’acheter de
tuyauterie supplémentaire.
2"
2
5
/
8" (9,2 cm)
1
/
4" (6,4 mm)3
1. Dimensions indiquées à partir du plancher –
roulettes réglées à la hauteur minimale.
2. Hauteur totale de la caisse – roulettes à la
hauteur maximale
3. Hauteur minimale
Vue de face
677/
8"
(172,5 cm)
1 1
1
13
/
4"
(34 cm)
2
72"
36"
(91,5 cm)
1
/
2"
16
(42 cm)
(182,9 cm)
3
2"(5 cm)
1
/
2"
12
(32 cm)
1
20
/
4"
(51,5 cm)
2"
(5 cm)
3
21/
2"
(6,5 cm)
1. Espace minimal par rapport au mur.
2. Pour les portes de caisse complètement recouvertes
et un ensemble de garniture, la hauteur de l’ouverture
doit être de 72
3. Emplacements recommandés pour les connexions
électriques et d’eau.
po (183,2 cm).
¹⁄₈
1
9
/
4"
(23,5 cm)
10
3511/
16"
(90,6 cm)
5
3
/
8"
(9,2 cm)

Dimensions d’ouverture des portes
Panneaux de porte personnalisés
L’emplacement doit permettre d’ouvrir les portes à un angle
minimal de 150°. Prévoir un dégagement minimal de 13¹⁄₄ po
(33,7 cm) entre le mur latéral et le côté du compartiment de
congélation. Prévoir un dégagement minimal de 16¹⁄₄ po (41,9
cm) entre le mur latéral et le côté du compartiment de
réfrigération.
REMARQUE : Les dimensions peuvent varier en fonction du
modèle.
3
/4"
41
(106 cm)
131/4"
(33,7 cm)
1
2
/8"
(5,4 cm)
1
/2"
(12,7 mm)
90˚
150˚
161/2"
(41,9 cm)
1
/4"
(6,4 mm)
433/8"
(110,2 cm)
Panneaux latéraux et de porte
Trousses de panneaux de porte et de garnitures latérales
d’origine
To u t es l es p i èces d’origine sont disponibles par l’entremise de
votre marchand Whirlpool ou en téléphonant à Pièces et
accessoires Whirlpool au 1-800-442-9991. Au Canada,
composer le 1-800-807-6777.
Trousses de panneaux de porte décoratifs
Des trousses de panneaux de porte décoratifs sont disponibles.
Suivre les instructions de la trousse pour l’installation des
panneaux.
Commander le numéro de trousse :
Blanc – no 4378123
Noir – no 4378124
Biscuit – no 4378125
REMARQUE : Les trousses de panneaux de porte ne sont pas
requises pour les modèles à panneaux en acier inoxydable
d’origine.
Trousses de garnitures latérales
Des trousses de garnitures latérales sont disponibles pour
assortir le réfrigérateur à la façade des armoires. Suivre les
instructions de la trousse pour l’installation du panneau latéral.
Commander le numéro de trousse :
Blanc - no 2208187W
Noir – no 2208187B
Biscuit – no 2208187T
Acier inoxydable – no 2208187S
Si vous prévoyez installer des panneaux personnalisés en bois,
vous devrez les créer vous-même ou consulter un ébéniste ou
menuisier qualifié. Voir les dessins dimensionnels pour les
spécifications des panneaux.
IMPORTANT : Les panneaux de poids supérieur au poids
recommandé risquent d’endommager le réfrigérateur. Le
panneau de la porte du réfrigérateur ne devrait pas excéder 28 lb.
(12,7 kg). Le panneau de la porte du congélateur ne devrait pas
excéder 21 lb. (9,5 kg).
Vous pouvez créer des panneaux en vissant ou en collant des
panneaux de bois à un appui en contreplaqué de ¹⁄₄ po (6,35 mm)
ou en utilisant un panneau de ³⁄₄ po (19.05 mm) à bords usinés.
153/
(39,1 cm)
1
153/
(39,1 cm)
1. Chanfrein de
8"
233/4"
(60,3 cm)
6715/
16"
2913/
(75,7 cm)
" x
¹⁄₈
(172,5 cm)
¹⁄₈
16"
" (3,2 x 3,2 mm)
8"
193/
32"
(48,5 cm)
1
11

Emplacement d’installation
Spécifications électriques
AVERTISSEMENT
Risque d'explosion
Garder les matériaux et les vapeurs inflammables,
telle que l'essence, loin du réfrigérateur.
Le non-respect de cette instruction peut causer
un décès, une explosion ou un incendie.
REMARQUES :
Le réfrigérateur à profondeur d’armoire peut être installé dans
■
un encastrement, à l’extrémité des armoires ou en position
autonome.
■ Si vous installez le réfrigérateur pour qu’il soit en affleurement
avec le devant des armoires inférieures, il faut enlever toutes
les moulures et plinthes de l’arrière de l’ouverture
d’encastrement.
■ Un nécessaire de garnitures est disponible pour les
installations où le réfrigérateur ne sera pas en affleurement.
Voir la section “Assistance ou service” dans le Guide
d’utilisation et d’entretien pour des renseignements de
commande.
Pour les portes d’armoire à recouvrement complet, la hauteur
■
de l’ouverture doit être de 72¹⁄₈ po (183,2 cm).
■ L’emplacement devrait permettre l’ouverture complète des
portes. Voir la section “Dimensions de l’ouverture des
portes”.
Ne pas installer le réfrigérateur près d’un four, d’un radiateur
■
ou d’une autre source de chaleur, ni dans un endroit où la
température baissera au-dessous de 55°F (13°C).
Le plancher doit supporter le poids du réfrigérateur (plus de
■
600 lb [272 kg], des panneaux de porte et du contenu).
AVERTISSEMENT
Risque de choc électrique
Brancher sur une prise à 3 alvéoles reliée
à la terre.
Ne pas enlever la broche de liaison à la terre.
Ne pas utiliser un adaptateur.
Ne pas utiliser un câble de rallonge.
Le non-respect de ces instructions peut causer
un décès, un incendie ou un choc électrique.
Avant de placer le réfrigérateur à son emplacement final, il est
important de vous assurer d’avoir la connexion électrique
appropriée :
Méthode recommandée de mise à la terre
Une source d’alimentation de 115 volts, 60 Hz, type 15 ou
20 ampères CA seulement, protégée par fusibles et
adéquatement mise à la terre est nécessaire. Il est recommandé
d’utiliser un circuit distinct pour alimenter uniquement votre
réfrigérateur. Utiliser une prise murale qui ne peut pas être mise
hors circuit à l’aide d’un commutateur. Ne pas employer de
rallonge.
IMPORTANT :
par un disjoncteur de fuite à la terre, un déclenchement
intempestif peut se produire et causer une perte de
refroidissement. La qualité et la saveur des aliments risquent
d’être affectées. Si un déclenchement intempestif se produit et si
les aliments semblent de piètre qualité, jeter le tout.
REMARQUE :
nettoyage ou remplacement d’une ampoule d’éclairage, tourner
la commande (du thermostat, du réfrigérateur ou du congélateur
selon le modèle) à OFF (arrêt) et débrancher ensuite le
réfrigérateur de la source d’alimentation électrique. Lorsque vous
avez terminé, reconnecter le réfrigérateur à la source
d’alimentation électrique et mettre de nouveau la commande du
thermostat, du réfrigérateur ou du congélateur selon le modèle)
au réglage désiré.
Si ce produit est connecté à une prise protégée
Avant d’exécuter tout type d’installation,
12

Spécifications de l’alimentation en eau
IMPORTANT :
■ Si on doit utiliser le réfrigérateur avant qu’il soit raccordé à la
canalisation d’eau, placer la commande de la machine à
glaçons à la position d’arrêt (OFF).
■ Toutes les installations doivent être conformes aux exigences
des codes locaux de plomberie.
■ Utiliser un tube en cuivre et vérifier s’il y a des fuites. Installer
les tubes en cuivre seulement à des endroits où la
température se maintient au-dessus du point de congélation.
REMARQUE :
avec un robinet d’arrêt à étrier de
un tube en cuivre. Avant l’achat, s’assurer que le robinet d’arrêt à
étrier est conforme aux codes locaux de plomberie. Ne pas
employer de robinet d’arrêt à étrier de
type à percer, qui réduit le débit d’eau et cause une obstruction
plus facilement.
Votre marchand de réfrigérateurs offre une trousse
¹⁄₄
in. (6,35 mm), un raccord et
³⁄₁₆
po (4,76 mm) ou de
Arrivée d’eau froide
Connecter la machine à glaçons à une canalisation d’eau froide
avec limitations de pression d’eau de 30 à 120 lb-po2. Si vous
avez des questions au sujet de la pression d’eau, contacter la
compagnie de distribution d’eau.
INSTRUCTIONS
D’INSTALLATION
Déballage du réfrigérateur
AVERTISSEMENT
Risque du poids excessif
Utiliser deux ou plus de personnes pour déplacer
et installer le réfrigérateur.
Le non-respect de cette instruction peut causer
une blessure au dos ou d'autre blessure.
IMPORTANT :
Les quatre pieds de nivellement doivent toucher le plancher
■
pour supporter et stabiliser le poids total du réfrigérateur.
Garder la pièce de carton ou de contreplaqué d’expédition
■
sous le réfrigérateur jusqu’à son installation à l’emplacement
de service.
Enlever et conserver la pochette de documentation. Utiliser
1.
une clé à douille de
Enlever tout résidu de ruban adhésif et de colle des surfaces
2.
du réfrigérateur avant de le mettre en marche. Frotter une
petite quantité de savon liquide à vaisselle sur l’adhésif avec
les doigts. Rincer à l’eau tiède et essuyer.
po pour enlever la plate-forme.
³⁄₈
REMARQUES :
Ne pas utiliser d’instruments coupants, d’alcool à friction,
■
de liquides inflammables ou de nettoyants abrasifs pour
enlever le ruban adhésif ou la colle. Ces produits peuvent
endommager la surface de votre réfrigérateur. Pour plus
de renseignements, voir la section “Sécurité du
réfrigérateur”.
■ Ne pas enlever la fiche technique fixée derrière la grille de
la base.
Nettoyer avant l’usage : Après avoir enlevé tous les
■
matériaux d’emballage, nettoyer l’intérieur du
réfrigérateur avant l’usage. Voir les instructions de
nettoyage à la section “Entretien du réfrigérateur” du
Guide d’utilisation et d’entretien.
Placer des pièces de carton ou de contreplaqué d’expédition
3.
sur le plancher lorsqu’on utilise un chariot pour faire entrer le
réfrigérateur dans le domicile. Déplacer le réfrigérateur près
de l’ouverture d’encastrement.
Installation d’une nouvelle canalisation d’eau
(si requise)
Outils requis :
po ou deux clés à molette, un foret de
manuelle ou électrique (convenablement reliée à la terre).
FERMER le robinet principal d’arrivée d’eau. OUVRIR le
1.
robinet de puisage le plus proche pendant une période
suffisante pour que la canalisation d’eau se vide.
Trouver une canalisation d’eau FROIDE verticale de
2.
(12,70 mm) à 1
REMARQUE :
procédé suivant doit être suivi : Percer par le dessus de la
canalisation et non pas par le dessous. Ainsi, l’eau ne
risquera pas d’arroser la perceuse. Ceci empêche également
les sédiments qu’on trouve normalement dans l’eau de
s’accumuler dans le robinet d’arrêt.
Déterminer la longueur du tube de cuivre nécessaire. Mesurer
3.
la distance entre le point de connexion inférieur gauche à
l’arrière du réfrigérateur et le tuyau d’arrivée d’eau. Ajouter 7
pi (2,1 m) pour permettre le déplacement du réfrigérateur
pour le nettoyage. Utiliser un tube en cuivre de
mm) de diamètre extérieur. Veiller à ce que le tube soit coupé
d’équerre aux deux extrémités.
À l’aide d’une perceuse électrique reliée à la terre, percer un
4.
trou de
choisie.
1. Canalisation d’eau froide
2. Bride de tuyau
3. Tube en cuivre
4. Écrou de compression
Tournevis standard,
¹⁄₄
po (3,18 cm) près du réfrigérateur.
Un conduit horizontal fonctionnera, mais le
¹⁄₄
po (6,35 mm) dans la canalisation d’eau froide
⁷⁄₁₆
po et des clés plates de
¹⁄₄
po, une perceuse
po (6,35
¹⁄₄
5. Bague de compression
6. Robinet d’arrêt
7. Écrou de serrage
¹⁄₂
¹⁄₂
po
13

5. Fixer le robinet d’arrêt sur la canalisation d’eau froide avec la
bride de tuyau. Vérifier que le raccord du robinet est bien
engagé dans le trou de
canalisation et que la rondelle d’étanchéité est placée sous la
bride du tuyau. Serrer l’écrou de serrage. Serrer
soigneusement et uniformément les vis fixant la bride de
tuyau sur la tuyauterie afin que la rondelle forme une jonction
étanche. Ne pas serrer excessivement car ceci pourrait
provoquer l’écrasement du tube en cuivre, particulièrement
s’il s’agit d’un tube en cuivre malléable (enroulé). On est
maintenant prêt à connecter le tube en cuivre.
6. Enfiler l’écrou et la bague de compression du raccord sur le
tube en cuivre comme on le voit sur l’illustration. Insérer
l’extrémité du tube aussi loin que possible dans l’ouverture
de sortie du robinet d’arrêt. Visser l’écrou de compression sur
le raccord de sortie avec une clé à molette. Ne pas serrer
excessivement.
7. Placer le bout libre du tube dans un contenant ou évier et
OUVRIR le robinet principal d’arrivée d’eau et laisser l’eau
s’écouler par le tube jusqu’à ce que l’eau soit limpide.
FERMER le robinet principal d’arrivée d’eau.
¹⁄₄
po (6,35 mm) percé dans la
Style 2 : Pousser l’extrémité à ampoule du tube dans le
robinet de débit d’eau aussi loin que possible. Glisser l’écrou
vers l’avant et le serrer avec les doigts. Serrer l’écrou
manuellement. Puis le serrer avec une clé deux tours de plus.
Ne pas serrer excessivement.
1
2
1. Ampoule
2. Écrou (fourni)
Raccordement de la canalisation d’eau au
réfrigérateur
1. Enlever le ruban d’expédition du tube enroulé gris à l’arrière
du réfrigérateur.
2. Avant de raccorder le tube en cuivre au réfrigérateur, purger le
tube en cuivre en laissant couler au moins deux pintes
(1,9 L) d’eau dans un seau pour éliminer toute particule de la
canalisation.
3. Vérifier s’il y a des fuites autour du robinet d’arrêt à étrier. Ne
pas serrer excessivement la bride ou la bague. Ceci
provoquera l’écrasement du tube en cuivre.
4. Effectuer le raccordement au réfrigérateur.
Style 1 : Enfiler l’écrou acheté, puis la bague achetée sur le
tube. Pousser le tube dans le raccord acheté aussi loin que
possible. Glisser l’écrou et la bague vers l’avant. Serrer
l’écrou manuellement. Puis le serrer avec une clé deux tours
de plus. Ne pas serrer excessivement.
1 2 3 4 5 6
1. Canalisation au réfrigérateur
2. Écrou (fourni)
3. Ampoule
4. Raccord (acheté)
5. Bague (achetée)
6. Écrou (acheté)
5. OUVRIR le robinet d’arrêt.
6. Vérifier s'il y a des fuites. Serrer tous les écrous ou raccords
(y compris les raccordements de la valve d’entrée d’eau) qui
coulent.
Brancher le réfrigérateur
AVERTISSEMENT
Risque de choc électrique
Brancher sur une prise à 3 alvéoles reliée
à la terre.
Ne pas enlever la broche de liaison à la terre.
Ne pas utiliser un adaptateur.
Ne pas utiliser un câble de rallonge.
Le non-respect de ces instructions peut causer
un décès, un incendie ou un choc électrique.
14
1. Brancher sur une prise à 3 alvéoles reliée à la terre.
2. Déplacer le réfrigérateur à l’emplacement final.
Nivellement du réfrigérateur
IMPORTANT : Les quatre pieds de nivellement doivent toucher le
plancher pour supporter et stabiliser le poids total du
réfrigérateur.
Enlèvement de la grille de la base
1. Ôter la grille de la base si elle est installée. Ouvrir les portes
du réfrigérateur à 90°.
REMARQUE : Ne pas enlever les fiches techniques fixées
derrière la grille.
2. Ôter la grille de la façon suivante :

Style 1 – Grille de la base vissable :
Repérer les alvéoles situées à environ 4 po (10 cm) de
■
chaque extrémité de la grille. Avec un tournevis, dévisser
la vis dans chaque alvéole.
Style 2 – Grille de la base emboîtable :
Saisir la grille des deux mains. Soulever la grille et incliner
■
le dessus vers soi.
Nivellement du réfrigérateur
Les boulons de nivellement des roulettes se trouvent derrière la
grille de la base. Le réfrigérateur comporte quatre roulettes
réglables (deux à l’avant et deux à l’arrière). Deux ensembles de
boulons de nivellement des roulettes se trouvent de chaque côté
de la base du réfrigérateur.
3. Ajuster le boulon de nivellement arrière pour que le
réfrigérateur soit à niveau avec les panneaux des armoires
latérales ou de l’extrémité des armoires.
4. Si vous le désirez, vous pouvez désormais utiliser les quatre
boulons de nivellement pour soulever le réfrigérateur et
fermer l’écart entre la charnière supérieure du réfrigérateur et
l’ouverture de l’armoire. Vérifier que les quatre roulettes
touchent encore le plancher et que les portes de l’armoire audessus du réfrigérateur s’ouvrent complètement.
Réinstallation de la grille de la base
1. Ouvrir les portes du réfrigérateur à 90°.
2. Réinstaller la grille de la base.
Style 1 – Grille de la base vissable :
■ Placer la grille devant son emplacement.
Au moyen d’un tournevis, guider les vis à travers les trous
■
de la grille et dans les attaches situées dans les cornières
de chaque côté de l’ouverture. Bien serrer les vis.
Style 2 – Grille de la base emboîtable :
Placer les attaches inférieures de la grille dans les trous
■
du panneau du réfrigérateur. Relever la grille vers le
réfrigérateur jusqu’à ce qu’elle s’emboîte en place.
1. Boulon de nivellement arrière (jaune)
2. Boulon de nivellement avant (argent)
REMARQUE : Le boulon jaune ajuste l’arrière du
réfrigérateur et le boulon argent ajuste l’avant du réfrigérateur.
1. Utiliser une clé à douille de ¹⁄₂ po (12,70 mm) pour ajuster les
boulons de nivellement. Tourner le boulon de nivellement vers
la droite pour soulever ce côté du réfrigérateur ou vers la
gauche pour abaisser ce côté. Il peut être nécessaire de
tourner les boulons plusieurs tours pour ajuster l’inclinaison
du réfrigérateur.
REMARQUE : S’assurer de ne pas trop dévisser les boulons
de nivellement lorsqu’on abaisse le réfrigérateur. La tête du
boulon commencera à se dégager du réfrigérateur lorsqu’il
est à la position la plus basse. Si la vis sort de la bride de la
roulette arrière, le couvercle d’accès au compartiment à
l’arrière du réfrigérateur devra être enlevé pour réinstaller le
boulon.
2. Ajuster le boulon de nivellement avant pour que le sommet
du réfrigérateur soit parallèle à l’armoire au-dessus du
réfrigérateur. Pour les armoires standard, laisser un écart
d’environ ¹⁄₈ po (3,18 mm) entre les charnières supérieures et
l’armoire. Pour les armoires complètement recouvertes,
laisser un écart de ¹⁄₄ po (6,35 mm) pour le nivellement. Si
vous n’avez pas une armoire au-dessus de réfrigérateur,
ajuster simplement le réfrigérateur pour qu’il soit d’aplomb.
Achever l’installation
1. Tourner le robinet de la canalisation d’eau à la position
“Open” (ouvert).
2. Tourner le commutateur du réfrigérateur à la position ON
(marche). Attendre quelques minutes. Vérifier les raccords de
la canalisation d’eau pour des fuites.
3. Régler les commandes des compartiments de réfrigération et
de congélation au réglage moyen. S’assurer que le
compresseur fonctionne bien et que toutes les lumières
s’allument.
4. Purger le système d’eau avant l’utilisation. Voir la section
“Préparation du système d’eau” dans le Guide d’utilisation et
d’entretien.
REMARQUE : Si la construction continue après l’installation du
réfrigérateur, régler les commandes à OFF (arrêt).
Si le réfrigérateur ne fonctionne pas :
Vérifier que le disjoncteur ne s’est pas déclenché ou qu’un
■
fusible du domicile n’est pas grillé.
Vérifier que le cordon d’alimentation est branché sur la prise.
■
Voir la section “Dépannage” dans le Guide d’utilisation et
■
d’entretien.
1. Pour les armoires standard, laisser un dégagement
minimal de
réfrigérateur. Pour les armoires complètement
recouvertes, laisser un dégagement minimal de
po (6,35 mm) pour le nivellement et le dégagement
¹⁄₄
de porte.
2. Avant du réfrigérateur.
po (3,18 mm) pour le nivellement du
¹⁄₈
15

2221515
© 2001 Whirlpool Corporation.
All rights reserved.
Tous droits réservés.
® Registered Trademark/TM Trademark of Whirlpool, U.S.A., Whirlpool Canada Licensee in Canada
® Marque déposée/TM Marque de commerce de Whirlpool, U.S.A., Emploi licencié par Whirlpool Canada au Canada
Printed in U.S.A.
Imprimé aux É.-U.
8/01
 Loading...