

Page 1
Facebow Registration
Instructions
Whip Mix Corporation • 361 Farmington Ave. • P.O. Box 17183 • Louisville, KY 40217-0183 USA
502-637-1451 • 800-626-5651 • Fax 502-634-4512 • www.whipmix.com
Page 2
Instructions for Attaching Facebow Transfer Assembly
Facebow Registration
Items needed for a facebow
registration
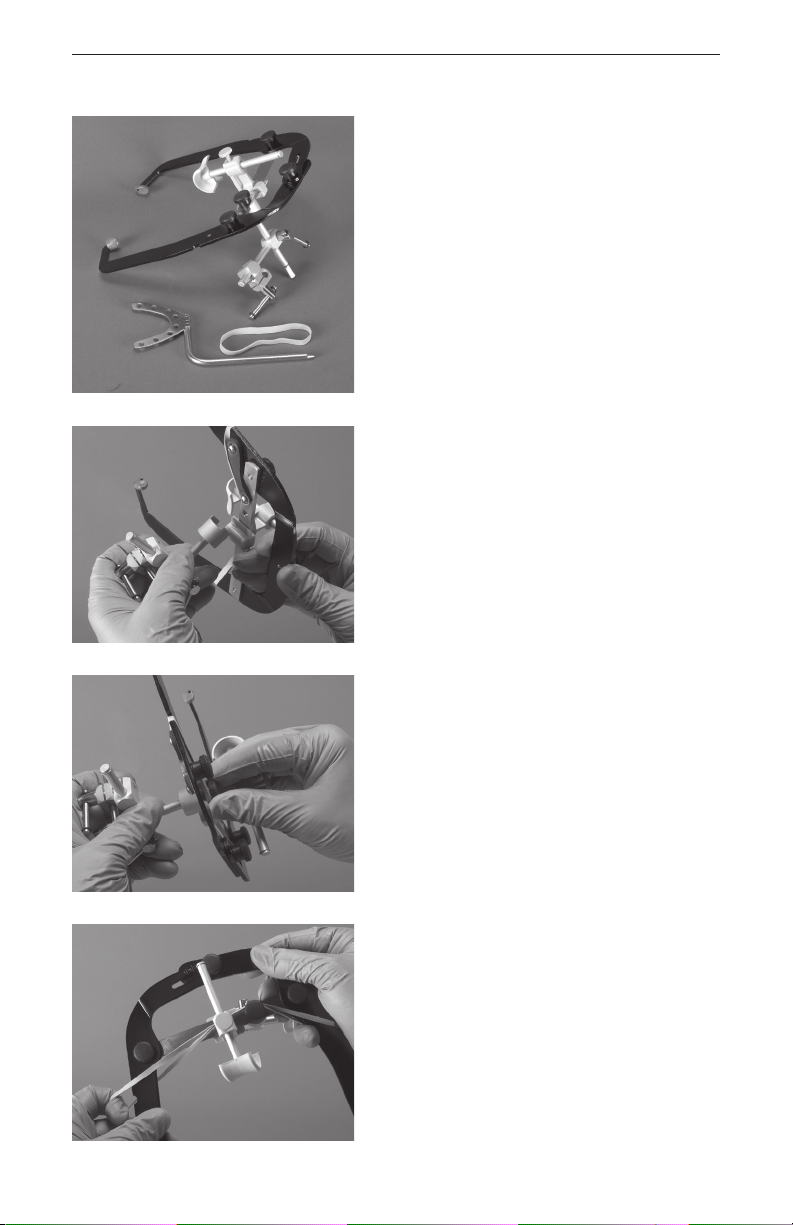
1. Facebow with nasion relator assembly,
2. Wax or bite registration material
3. Rubber band (optional)
Preparing Facebows
1. Clean and properly disinfect the plastic
Figure 1
2. Attach the transfer jig to the facebow
(Figure 1)
transfer jig, and bitefork
ear pieces before each use. If replacing
them, make sure the hole on the flat
side of each is above the side arm, and
the plastic is seated until it touches the
shoulder of the arm.
and tighten thumb screw on top.
(Figure 2 and 3)
Figure 2
Figure 3
Figure 4
3. A rubber band may be easily positioned
on the facebow to aid in its manipulation.
(Figure 4)
Note: The nasion relator assembly
moves left and right along the crossbar,
and the facebow caliper design allows
the arms to move equal distances during
the opening and closing motions.
2
Page 3
Instructions for Attaching Facebow Transfer Assembly
4. Center the nasion relator assembly on
5. Loosen the thumbscrew on top of
6. Loosen both thumbscrews on the
Preparing the Facebow Bitefork
1. Make sure the bitefork has been properly
2. Place wax or bite registration material
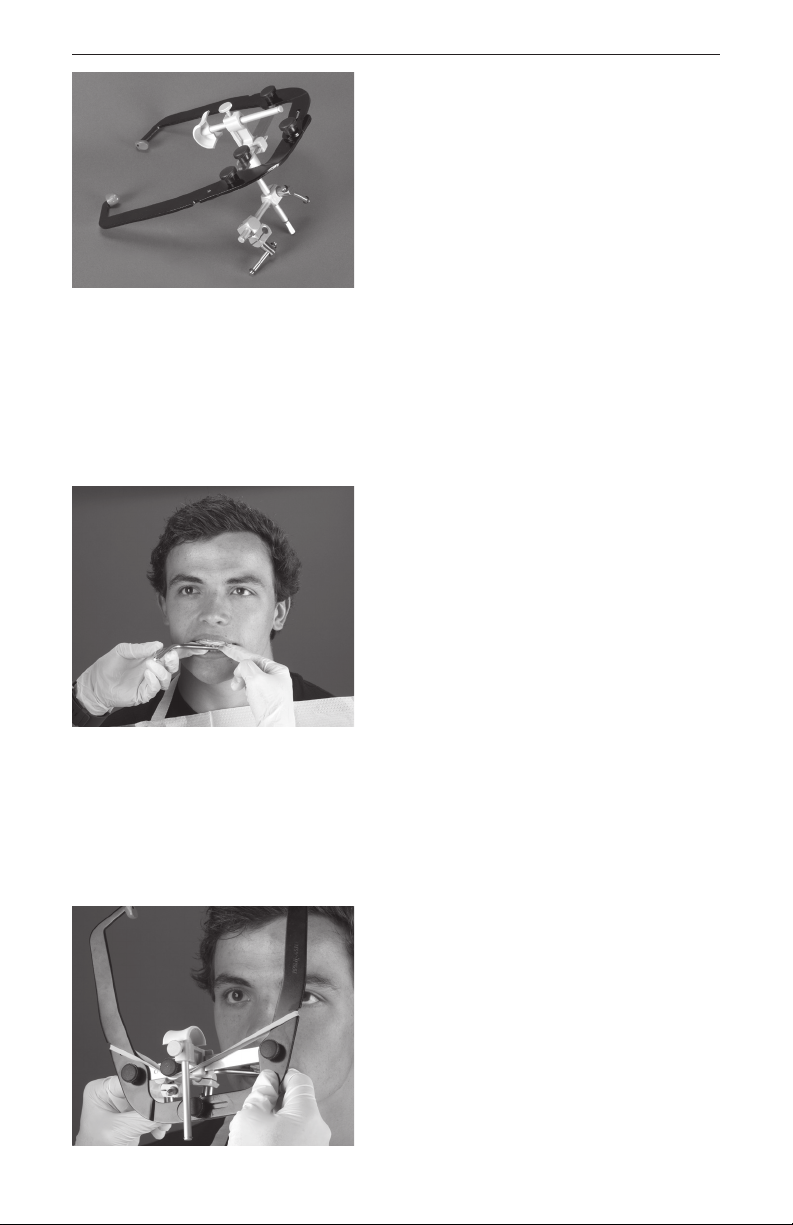
3. Position the bitefork so that the midline
The record should make a shallow
4. Inspect the registration for any soft
Figure 5
the crossbar of facebow.
the facebow that allows both arms
to slide apart. If using the Whip Mix
metal facebow, you will need to loosen
the three thumbscrews on top of the
facebow.
transfer jig.
sterilized.
uniformly over the top surface of the
bitefork.
of the bitefork aligns with the facial
midline and support the fork until the
material is set. (Figure 5)
registration of the maxillary cusp tips,
and not perforate through to the bitefork.
tissue or deep occlusal registrations. It
is only necessary to record the maxillary
cusp tips, all else should be trimmed
away using a sharp Bard-Parker blade.
Figure 6
Positioning the Facebow on
the Patient
1. Before attempting to place the facebow
onto the bitefork, it is suggested
the operator rehearse the following
procedure with the patient. Caution the
patient that the plastic ear pieces in the
auditory canal will greatly amplify noises
during the procedure.
2. A finger cot placed over each ear piece
will help facilitate proper disinfection of
the facebow.
3. With the bitefork positioned in the
patient’s mouth, slowly slide the transfer
jig on to the bitefork shaft. (Figure 6)
3
Page 4
Instructions for Attaching Facebow Transfer Assembly
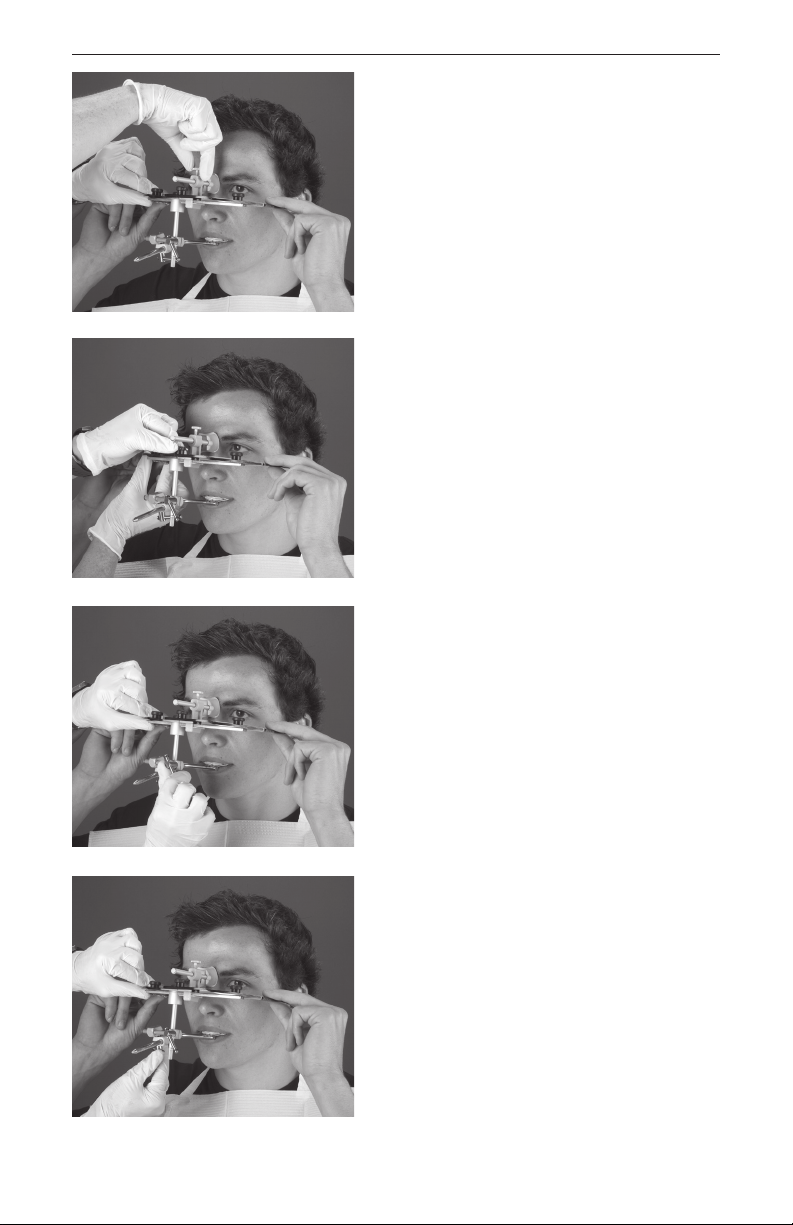
4. Have the patient grasp both arms of the
5. Center the plastic nose piece on the
Figure 7
6. Tighten the thumbscrew on top of the
Figure 8
7. Support the horizontal bar with one
facebow and bring them backwards to
a position just forward of the patient’s
ears. Then have the patient place each
earpiece in the external auditory meatus
and hold in place with a firm forward
pressure.
patient’s nasion and exert firm pressure
on the nose piece shaft while tightening
the thumbscrew of the nasion relator
assembly. This pressure will help to
firmly seat the ear pieces into the
external auditory meatus.(Figure 7)
facebow.( Figure 8)
hand and tighten the thumbscrew on the
vertical rod. (Figure 9)
Figure 7
Figure 10
8. Support the horizontal bar with one
hand and tighten the thumbscrew on the
horizontal rod. (Figure 10)
9. Verify the facebow is level and all
thumbscrews are tight.
10. Remove the facebow from the patient
in a similar manner. Loosen the
thumbscrew and slide the nasion relator
away from the patient’s nose.
4
Page 5
Instructions for Attaching Facebow Transfer Assembly
11. With the patient’s help, loosen the center
12. Together, remove the facebow and
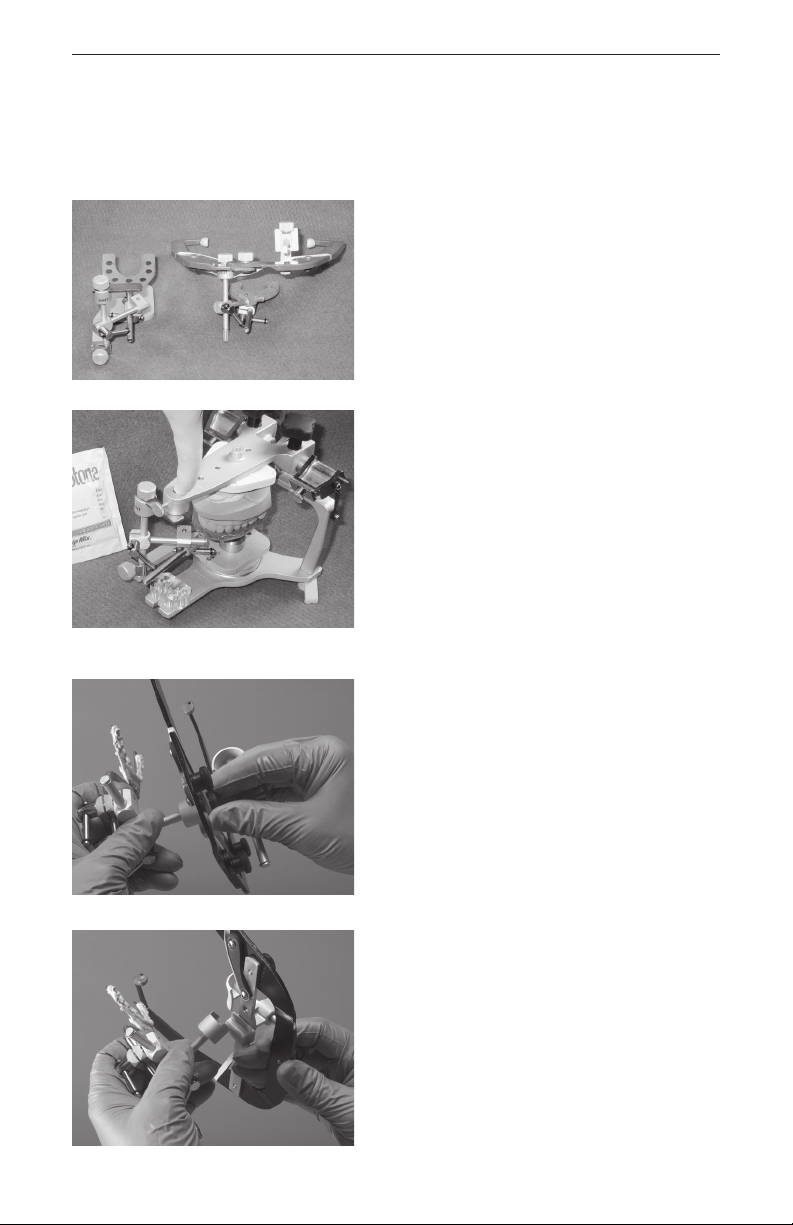
Note: The transfer jig and biteforks for all
Figure 11
For these earlier systems, and when
thumbscrew and remove the facebow
from the patient’s ears.
bitefork from patient.
Whip Mix facebows (except those with
quick lock toggle) have been updated
as of January, 2017. If your system was
purchased before that date, the bitefork
will have a straight, center shaft and the
transfer jig horizontal bar will extend to
the right. (Figure 11)
using indirect mounting of the maxillary
model, the incisal guide pin will need
to be removed and a support bar will
be needed at the top of the transfer jig.
(Figure 12)
Figure 12
Figure 13
Figure 14
Indirect Mounting of the
Maxillary Model
1. Separate the transfer jig from the
facebow by unscrewing the thumbscrew
on the crossbar. Remove thumbscrew
first, then separate. (Figure 13 and 14)
5
Page 6
Instructions for Attaching Facebow Transfer Assembly
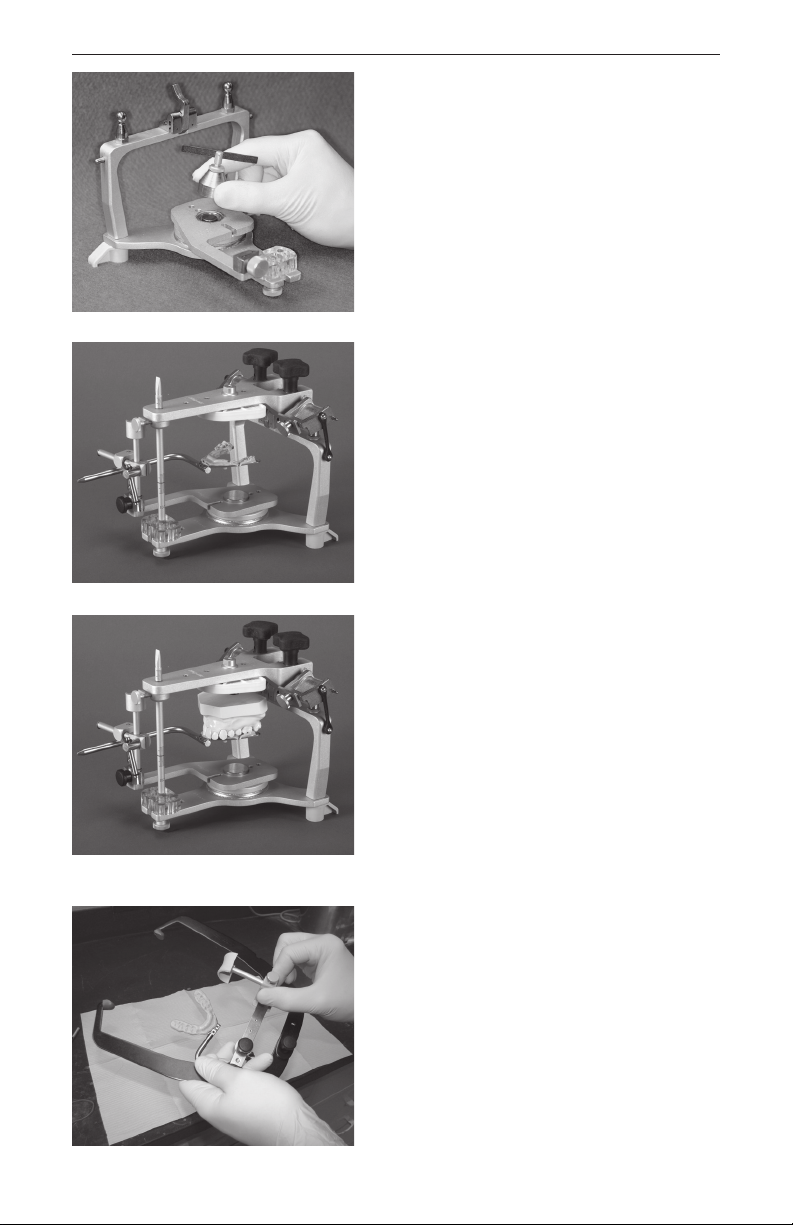
2. Place the transfer base assembly on
Note: Please refer to instructions in
Figure 15
3. Insert the vertical rod of the transfer
Figure 16
4. Position the upper model into the bite
Note: Please refer to instructions
the lower member of the articulator and
secure it. (Figure 15)
articulator manual for adjustment
settings.
assembly into the transfer base. Tighten
the clamp screw so that the vertical rod
fits securely in the transfer base.
(Figure 16)
registration and mount the maxillary
model. (Figure 17)
in articulator manual for mounting
mandibular models.
Figure 17
Figure 18
Direct Mounting of the
Maxillary Model
1. Slide the nasion relator assembly to the
patient’s left, away from the center of the
horizontal crossbar. Loosen the center
thumbscrew on the top of the facebow.
Continue to use the rubber band on
the facebow as it aids in manipulation.
(Figure 18)
6
Page 7
Instructions for Attaching Facebow Transfer Assembly
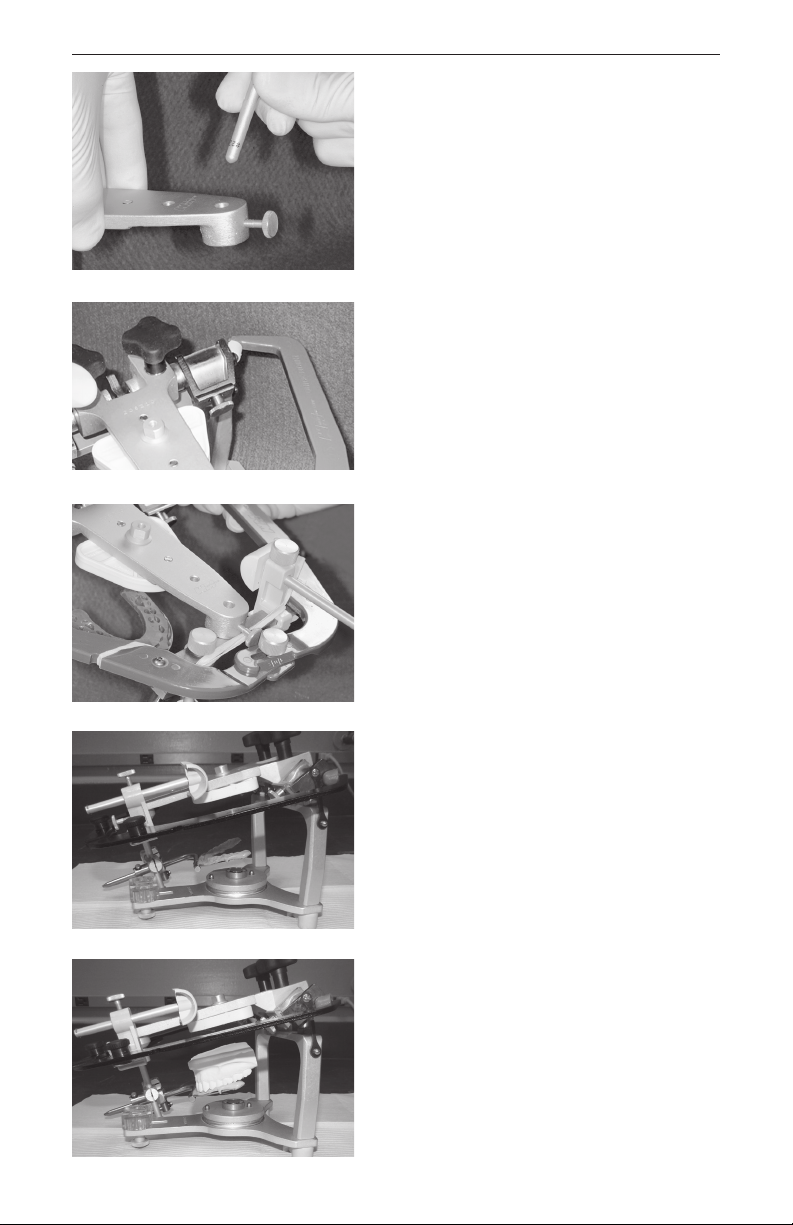
2. Loosen and remove the incisal guide pin.
Note: Please refer to instructions in
3. Guide the facebow beneath the upper
Figure 19
4. Position the brass mounting pin located
Figure 20
5. Allow the anterior end of the upper frame
6. Securely tighten the thumbscrew on top
(Figure 19)
articulator manual for adjustment
settings.
frame of the articulator. The ear pieces
should be even with the brass mounting
pin.
on the outer edge of the upright on the
lower frame into the hole on the medial
side of each earpiece of the facebow.
(Figure 20)
of the articulator to rest on the horizontal
crossbar of the facebow. (Figure 21)
of the facebow.
Figure 21
Figure 22
Figure 23
7. Because the guidance of this instrument
is part of the upper frame and the
facebow is, in effect, one piece with this
fram, the facebow bitefork is in fixed
relation to the upper frame. (Figure 22)
8. Position the upper model into the bite
registration and mount the maxillary
model. (Figure 23)
Note: Please refer to instructions
in articulator manual for mounting
mandibular models.
7
Page 8

Whip Mix Corporation
361 Farmington Avenue
Louisville, KY USA 40209
Toll-Free: 800-626-5651
Phone: 502-637-1451
Fax: 502-634-4512
www.whipmix.com
MPL30101 Rev A (01/2017)
 Loading...