

WheelHeels Hama Freestyle Cruiser, Hama Cross Cruiser, Hama Slalom Cruiser, Hama Urban Scooter Operating Instructions [en, fr, it, de, cs +1]
Page 1
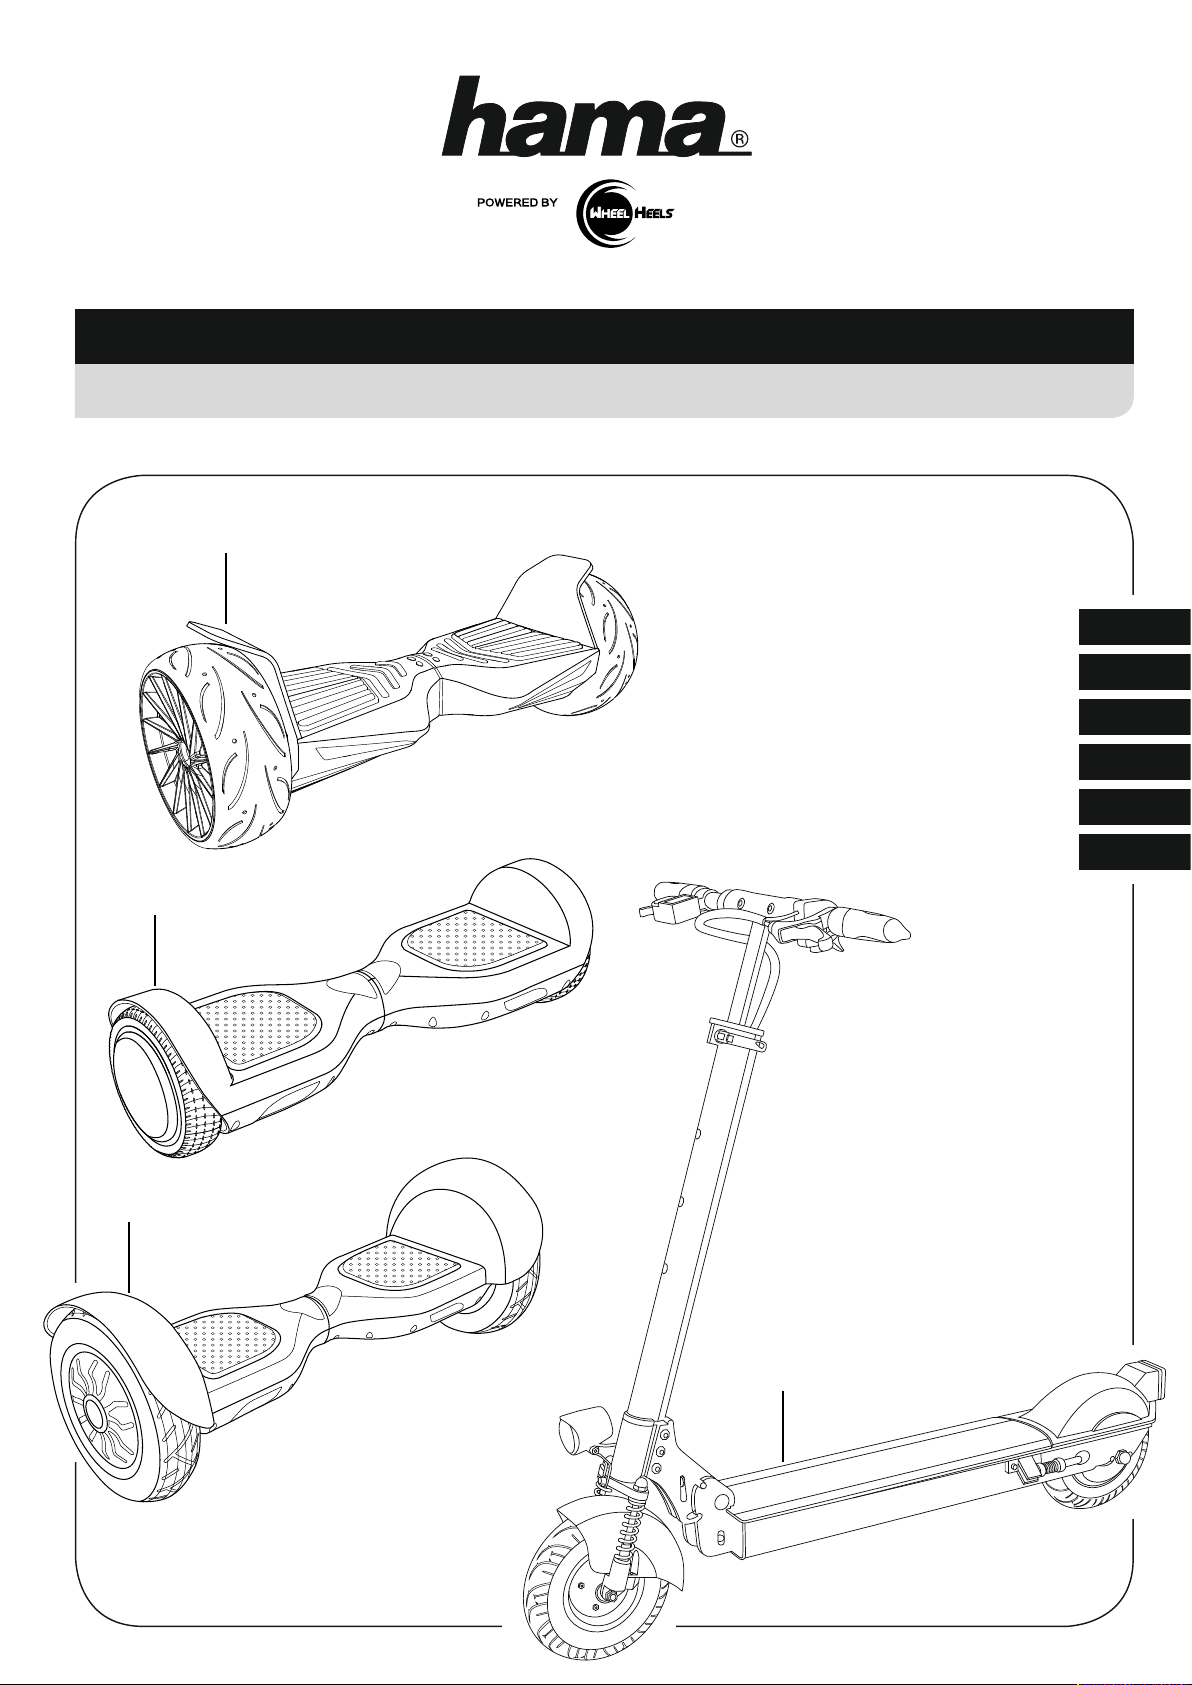
Freestyle Cruiser /Cross Cruiser /Slalom Cruiser /Urban Scooter
00109864
Freestyle Cruiser
00
109864
109865
109866
109870
00109866
Slalom Cruiser
Operating Instructions
Bedienungsanleitung
Mode d‘emploi
Istruzioni per l‘uso
Návod k použití
Bruksanvisning
GB
D
F
I
CZ
S
00109865
Cross Cruiser
00109870
Urban Scooter
Page 2
G Operating instruction
Content
1. Explanation of Warning Symbols and Notes ........2
Package Contents .............................2
2.
Unpacking ...........................................2
2.1
2.2
Recording the serial numbers ............................2
2.3
Accessories ..........................................3
Safety Notes .................................3
3.
Areas of application and performance limits .......3
4.
Areas of application....................................3
4.1
4.2
Performance limits.....................................3
Descriptions of the different models ..............4
5.
5.1
S-/X-Cruiser..........................................4
5.2
F-Cruiser/U-Scooter....................................5
App.........................................6
6.
Directions for use .............................6
7.
Controls and displays...................................6
7.1
7.1.1 X-
/S-Cruiser ....................................6
7.1.2 F-Cruiser
7.1.3 U-Scooter
7.2
Product operation .....................................8
7.2.1 F-
7.2.2 U-Scooter
7.3
Assembling and starting the device for the first time..........10
7.3.1 F-
7.3.2 U-Scooter
7.4
Battery charge level displays ............................12
7.4.1 S-
7.4.2 F-Cruiser
7.4.3 U-Scooter
Battery .....................................12
8.
8.1
Safety when handling the battery ........................12
8.2
Technical Specifications (Table 3) ........................13
8.3
Charging the devices ..................................13
8.4
Effect of the temperature on performance..................13
8.5
Replacing the battery..................................13
8.6
Shipping lithium ion batteries ...........................13
Maintenance ................................14
9.
Checking the tyres/wheel components.....................14
9.1
9.2
Checking the tyre pressure (X-Cruiser / U-Scooter)............14
9.3
Cleaning the product..................................14
9.4
Storing the product ...................................14
10. Fault tracing and troubleshooting (F- / S-/X-Cruiser)
Replacing components and spare parts...................14
10.1
10.2
Troubleshooting.....................................14
Charger ...................................15
11.
11.1
Safety instructions ...................................15
11.2
Technical specifications ...............................15
Cleaning ..........................................15
11.3
Appendix ..................................15
12.
Contact person and legal information ....................15
12.1
Warranty Disclaimer .................................15
12.2
Service and Support..................................15
12.3
Recycling Information ................................15
12.4
Declaration of Conformity .............................16
12.5
.......................................7
......................................7
/S-/X-Cruiser..................................8
7.2.1.1 Energy recovery (recuperation)
7.2.1.2 Lighting systems (F Cruiser)
7.2.1.3 USB charging socket (F Cruiser)
.......................................9
/S-/X-Cruisers ................................10
......................................10
/X-Cruiser....................................12
.......................................12
......................................12
................9
...................9
...............9
14
Thank you for choosing a Hama product.
Take your time and read the following instructions and information
completely. Please keep these instructions in a safe place for future
reference. If you sell the device, please pass these operating instructions
on to the new owner.
1. Explanation of Warning Symbols and Notes
Warning
Warns against actions that may cause injury.
Caution
Warns against actions that may affect operation or cause damage to
the device.
Note
Identies important points, helpful tips, special circumstances or
alternative methods.
2. Package Contents
F-Cruiser
• Hama Cruiser
• Charger
• 2x mudguard, incl. installation kit
• These operating instructions
• Declaration of Conformity
S-/X-Cruiser
• Hama Cruiser
• Charger
• These operating instructions
• Declaration of Conformity
U-Scooter
• Hama Scooter
• Charger
• These operating instructions
• Declaration of Conformity
2.1 Unpacking
• Before unpacking your product, check the packaging and make note of
any damage.
• If you notice any damage, please contact your supplier.
• If there is no damage, make sure that the package contents are not
missing anything.
• If the package contents are missing something, please contact your
supplier.
• Do not lift the S or X Cruiser out of the packaging by the wheel covers
2.2 Recording the serial numbers
Note
The serial number is unique. It is important for a potential warranty
claim and is needed to report in case of loss or theft.
• The serial number is found on the type plate attached to the product.
The serial number is arranged as follows:
F-Cruiser: 91XXXXXX
X-Cruiser: 92XXXXXX
S-Cruiser: 93XXXXXX
U-Scooter: 94XXXXXX
• Write down the serial number. Keep this information separate from the
product in a secure location.
2
Page 3
2.3 Accessories
4. Areas of application and performance limits
Note
The Hama accessory 109888 Hovercart can be used with all of the
devices described in these operating instructions.
3. Safety Notes
To learn how to operate your product safely, you must read all
instructions and warnings in the operating instructions and become
familiar with using the device.
You must strictly adhere to every warning and precautionary measure
described in the product user documentation.
Warning
• This electric device is not a vehicle authorised for operation on
public roads or streets.
• Loss of control, collision and falling can pose a risk of death
must read and follow all instructions and warnings in the user
documentation.
• Always wear high-quality protective clothing while using the
gloves and sturdy shoes.
• Keep an adequate distance from other people and animals,
especially if you are not familiar with the device.
• Do not overestimate yourself. Accelerate slowly and maintain a
foresighted driving style to prevent falling.
• NEVER drive while under the inuence of drugs or alcohol.
Note
Opening the device or removing the attached seals voids the warranty
• The product is intended for private, non-commercial use only.
• Use the product for its intended purpose only.
• Protect the product from dirt, moisture and overheating, and only use it
in a dry environment.
• Do not drop the product and do not expose it to any major shocks.
• This product is not intended for use by persons, including children, with
limited physical, sensory or mental abilities or lacking in experience or
knowledge, unless they are supervised by a person responsible for their
safety or have been instructed on how to use the product.
• Children are not permitted to play with the device. Children may not
clean the device.
• Connect the product only to a socket that has been approved for the
device. The electrical socket must always be easily accessible.
• Since the battery is integrated and cannot be removed, you will need to
dispose of the product as a whole. Do this in compliance with the legal
requirements.
• Do not attempt to service or repair the product yourself. Leave any
service work, with the exception of such cases described in 9, to
qualied technicians.
• Opening the device or removing the attached seals voids the warranty
•Do not open the product. Do not continue to operate the product if it
is damaged, which may be indicated by smoke, odour or loud noises.
Immediately contact your dealer or our service department (See 12.3
Service and Support).
– RISK OF INJURY AND DEATH
or serious injury during use. To minimise the risk of injury, you
product, such as a safety helmet, knee and elbow pads,
4.1 Areas of application
Note
• This product is not permitted for use on public streets. It may only
be used on private property. Observe all applicable national legal
rules and regulations!
• Use the device only on enclosed, private property as long as no
other regulation prohibits using it there.
• The minimum age for use is 14 years old.
• This device is intended for use by one driver only.
• The maximum driver weight is 120 kg.
• Do not operate the product outside the power limits given in the
specications.
• Do not use the product in areas where the use of electronic devices is
not permitted.
• Only use this product in dry locations. Although the product is
protected against splashes of water, it does not provide sucient
protection against continuous water contact and can become damaged
as a result.
4.2 Performance limits
You must familiarise yourself with the performance limits of the product.
They have been calculated to maximise the driver’s safety and to
minimise the risk of damage to the device.
• Do not exceed the maximum weight for the driver and carried loads
(maximum load capacity) or fail to meet the minimum driver weight
provided in the Technical Specications (See 5.1/5.2 Technical
Specications, table 1/2) under any circumstance.
• Non-compliance of the performance limits can lead to unsafe driving
conditions. Factors requiring greater performance include:
- larger load capacities
(driver weight and all carried loads)
- steeper incline/slope
- rough terrain
- speeds greater than 15 km/h (only for F, S and X Cruisers)
- abrupt manoeuvres
Warning
There is a greater risk of personal injury and damage to property if you
do not adhere to these weight limits, especially together with other
factors that require greater performance.
3
Page 4

5. Descriptions of the different models
5.1 S-/X-Cruiser
Model Description
Figure 1
S-Cruiser
Figure 2
X-Cruiser
Technical Specications (Table 1)
Weight limit for driver
and carried loads
Maximum load capacity
Minimum driver weight
Minimum driver age
Performance Slalom Cruiser Cross Cruiser
Maximum speed 6 km/h (Beginner Mode)
Range approx. 15 km
Power supply for charging
(use only the included power supply unit or
original accessories)
Lithium-ion (Li-ion) energy rechargeable battery
Motor performance
Tyre pressure
Volume
15 km/h (advanced mode)
30 km/h (cart mode)
(depends on the driver, speed and surface)
less than 70 dB(A) while driving less than 70 dB(A) while driving
The Slalom Cruiser (see Figure 1) provides the most fun while driving
inside as well as outside in different areas. This model may only be used
on a solid and even surface. This model is not designed for rough terrain,
such as cobblestone.
The Cross Cruiser (see Figure 2) is perfect for use outdoors. The Cross
Cruiser has a larger wheel diameter, more ground clearance and wider
tyres with lug tread so it can be driven on a more diverse and more
uneven terrain than other models. Low pressure tyres give the Cross
Cruiser more stability and traction on uneven terrain.
Slalom Cruiser Cross Cruiser
120 kg 120 kg
25 kg 25 kg
14 years 14 years
6 km/h (Beginner Mode)
15 km/h (advanced mode)
30 km/h (cart mode)
approx. 18 km
(depends on the driver, speed and surface)
42V, ≤ 5 A42V, ≤ 5 A
36V, 2.5 Ah 36V, 2.5Ah
700 Watt 700 Watt
-35 psi (2.4 bar)
Dimensions & weight Slalom Cruiser Cross Cruiser
Unit weight without battery
Battery weight
Length and width
Height
Tyre diameter
Tyre type
Temperature ranges Slalom Cruiser Cross Cruiser
Operation
Charging, storage and transport
9.1 kg 11.5 kg
0.97 kg 0.97 kg
58 cm x 18.5 cm 67 cm x 26 cm
17.5 cm 26 cm
6.5 inches / 16.5 cm 10 inches / 25.4 cm
Solid rubber Tube tyres
-10° C to 40° C-10° C to 40° C
10° C to 25° C10° C to 25° C
4
Page 5

5.2 F-Cruiser/U-Scooter
Model Description
Figure 3
F-Cruiser
Figure 4
U-Scooter
Technical Specications (Table 2)
Weight limit for driver
and carried loads
Maximum load capacity 120 kg 120 kg
Minimum driver weight 25 kg -
Minimum driver age
Performance Freestyle Cruiser Urban Scooter
Maximum speed 6 km/h (Beginner Mode)
Range approx. 15 km
(depends on the driver, speed and surface)
Power supply for charging
(use only the included power supply unit or
original accessories)
Lithium-ion (Li-ion) energy rechargeable battery
USB output for external devices 5V DC, 2A -
Motor performance 800 Watt 250 Watt
Tyre pressure-2.5 bar in front, none in rear
Volume less than 70 dB(A) while driving less than 70 dB(A) while driving
Freestyle Cruiser Urban Scooter
15 km/h (advanced mode)
30 km/h (cart mode)
The Freestyle Cruiser (see gure 3) is delivered with an app, USB charger
and Kensington security slot included, and it is fun to drive in a variety
of indoor and outdoor environments. This model should be used on solid
and even surfaces. Its extra-wide rubber tires ensure excellent traction
even at high speeds.
The Urban Scooter (see gure 4) can be folded together and unfolded
again by hand in just a few seconds. Equipped with a speedometer,
light, drum brake and low-pressure, air-lled tires that provide more
stability and traction, it is ideally suited for outdoor use. This scooter can
be driven over a variety of surfaces, including uneven terrain. Made of
powder-coated, die-cast aluminium, it is rugged and corrosion-resistant.
14 years 14 years
6 km/h (Beginner Mode)
15 km/h (advanced mode)
25 km/h (pro mode)
approx. 15 km
(depends on the driver, speed and surface)
42V, ≤ 5 A42V, ≤ 5 A
36V, 2.5 Ah 36V, 5.8Ah
Dimensions & weight Freestyle Cruiser Urban Scooter
Unit weight without battery 14 kg 14 kg
Battery weight 0.50 kg 0.97 kg
Length and width 66.9 cm x 24.3cm 115 cm x 15 cm
Height 22 cm 118 cm
Tyre diameter 8 inches / 20.4 cm 8 inches / 20.4 cm
Tyre type Solid rubber Solid rubber & tubed tyres
Temperature ranges Freestyle Cruiser Urban Scooter
Operation
Charging, storage and transport
-10° C to 40° C-10° C to 40° C
10° C to 25° C10° C to 25° C
5
Page 6

6. App
Detailed instructions on using the “Wheelheels” app for iOS and Android is available at the following link:
www.wheelheels.com/#app
7. Directions for use
Warning
• You accept sole responsiblity while using this product.
• Check the functionality of your product before each drive.
• Keep your ngers and other appendages away from possible points of danger or moving parts, especially from the wheels while in use.
• Avoid driving with hanging objects, such as free-hanging headphones, their connection cables or clothing with loose material. Parts of these objects
may reach into the moving wheels.
• Avoiding using in inclement weather (rain, snow, icy conditions, frost or snowfall, or on greasy paths). Do not drive over curbs and avoid running
over obstacles.
• This product is not permitted for use on public streets. It may only be used on private property. The manufacturer explicitly dissociates itself from any
and all damage resulting from improper use of this product.
•
Always wear high-quality protective clothing while using the product, such as a safety helmet, knee and elbow pads, gloves and sturdy shoes.
7.1 Controls and displays
7.1.1 X-/S-Cruiser
Figure 5
1
2
5 6
1. Wheel covers
2. Treads with pressure sensor system
3. Status indicators
4. Battery charge indicator LED
5. On/off switch, switch for operating mode
6. Charging socket
3 4
6
Page 7
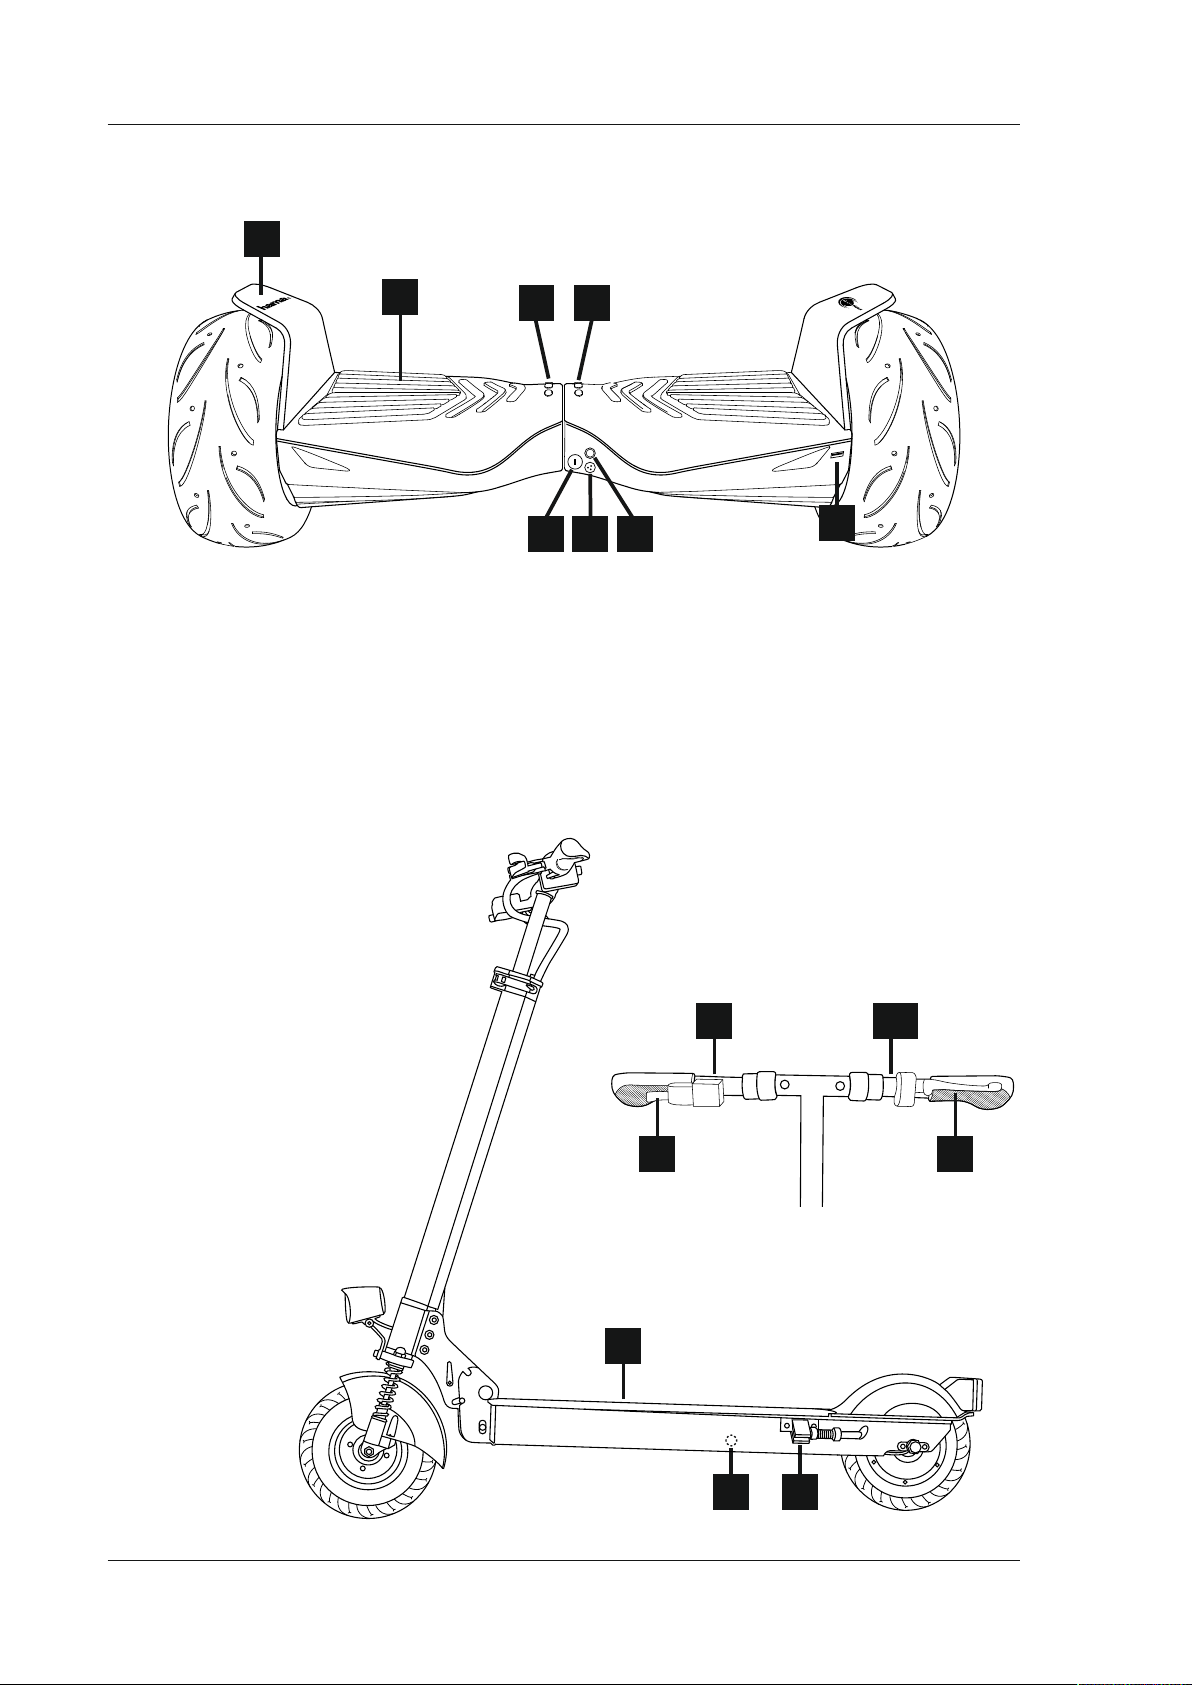
7.1.2 F-Cruiser
Figure 6
1
1. Mudguards
2. Treads with pressure sensor system
3. Battery charge indicator LED
4. Status indicators
5. On/off switch, switch for operating mode
6. Charging socket
7. Kensington security slot
8. USB output
7.1.3 U-Scooter
Figure 7
1. Display
2. Accelerator
3. Horn
4. Light switch
5. Brake
6. Footrest
7. Stand
8. Charging socket
2
3
4
6 5
7
1
8
3,4
2 5
6
78
7
Page 8
7.2 Product operation
7.2.1 F-/S-/X-Cruiser
Note
When switching on, make sure that the product is on a at, even
surface.
Caution
• Always use appropriate lifting and charging technology.
• Choose sturdy, stationary lifting points, for example, in the middle of
the lower section.
• Always lift from a squatting position and not from the back.
Warning
• Pay attention to your ngers. Do not lift the product onto tyres,
protective plates or wheels.
• You could catch your hands or ngers between the tyres and the
protective plate, resulting in injury.
The device has four operating modes:
• Beginner Mode: This mode limits the speed to 6 km/h. The device
reacts more subtly to turning movements.
To choose the mode, place the device on the oor while switched off.
By briey pushing the 5 button once, the device will automatically
adjust to the neutral position. The device is now in Beginner Mode.
Caution
The device prevents acceleration beyond 6 km/h. It is normal for the
Cruiser to rock when it reaches the speed limit.
• Advanced mode: This mode limits the speed to 15 km/h. To choose
the mode, place the device on the oor while switched off. Push the 5
button twice briey to make the device automatically adjust to the
neutral 0° position. The device is now in advanced mode.
Caution
Warning
• Please note that in this mode, the possibility of overloading the
device, resulting in the brief failure of the electronics, cannot be
ruled out.
• Failure of the electronics may cause it to tip over. At high speeds,
this could cause serious injury to the driver.
• The performance limit depends on, amongst other things, the
battery charge level, the weight of the driver, and the surface and
slope of the road. If, for example, you drive from a at surface onto
an incline, the transition may result in the performance limit being
exceeded.
• Always use quality protective equipment when driving in cart mode.
• Hama GmbH & Co KG assumes no liability for any damage to
property or injury to persons resulting from overloading of the device
in cart mode.
• Safety mode: In the case that the motor, battery or controller
is too hot, or the battery is not charged enough, the product will
automatically switch into safety mode.
Warning
Dismount immediately and switch the product off, if the following
alarm signals indicate that the product is in safety mode:
• Flashing front LEDs (or front and rear LED for F Cruiser)
• Red status LEDs (or green status LEDs for F Cruiser)
• Product brakes automatically
• Alarm sound
Contact the Support team (See 12.3 Service and Support) if the device
unusually switches into the alarm mode after charging.
The device is set into motion as follows:
Transferring weight onto the balls of your feet or heels activates the
movement buttons under the treads, thereby moving the wheels in the
direction of where your feet are pressing and you move forwards or
backwards. When you lean forwards or backwards, your centre of gravity
shifts and the contact surface of the wheels (the point where the wheels
touch the ground) shifts accordingly, and the device leans forwards or
backwards, as well.
However, you have to keep balance by yourself. Otherwise, you may tip
over.
The device prevents acceleration beyond 15 km/h. It is normal for the
Cruiser to rock when it reaches the speed limit.
• Cart mode: This mode allows speeds of up to 30 km/h. To choose
the mode, place the device on the oor while switched off. Push the 5
button three times briey to make the device automatically adjust to
the neutral 0° position. The device is now in cart mode.
Note – Cart mode
• Cart mode is intended to be used only with the cart attachment
(item no. 109888).
• Use of cart mode is entirely at the driver’s own risk.
8
Page 9

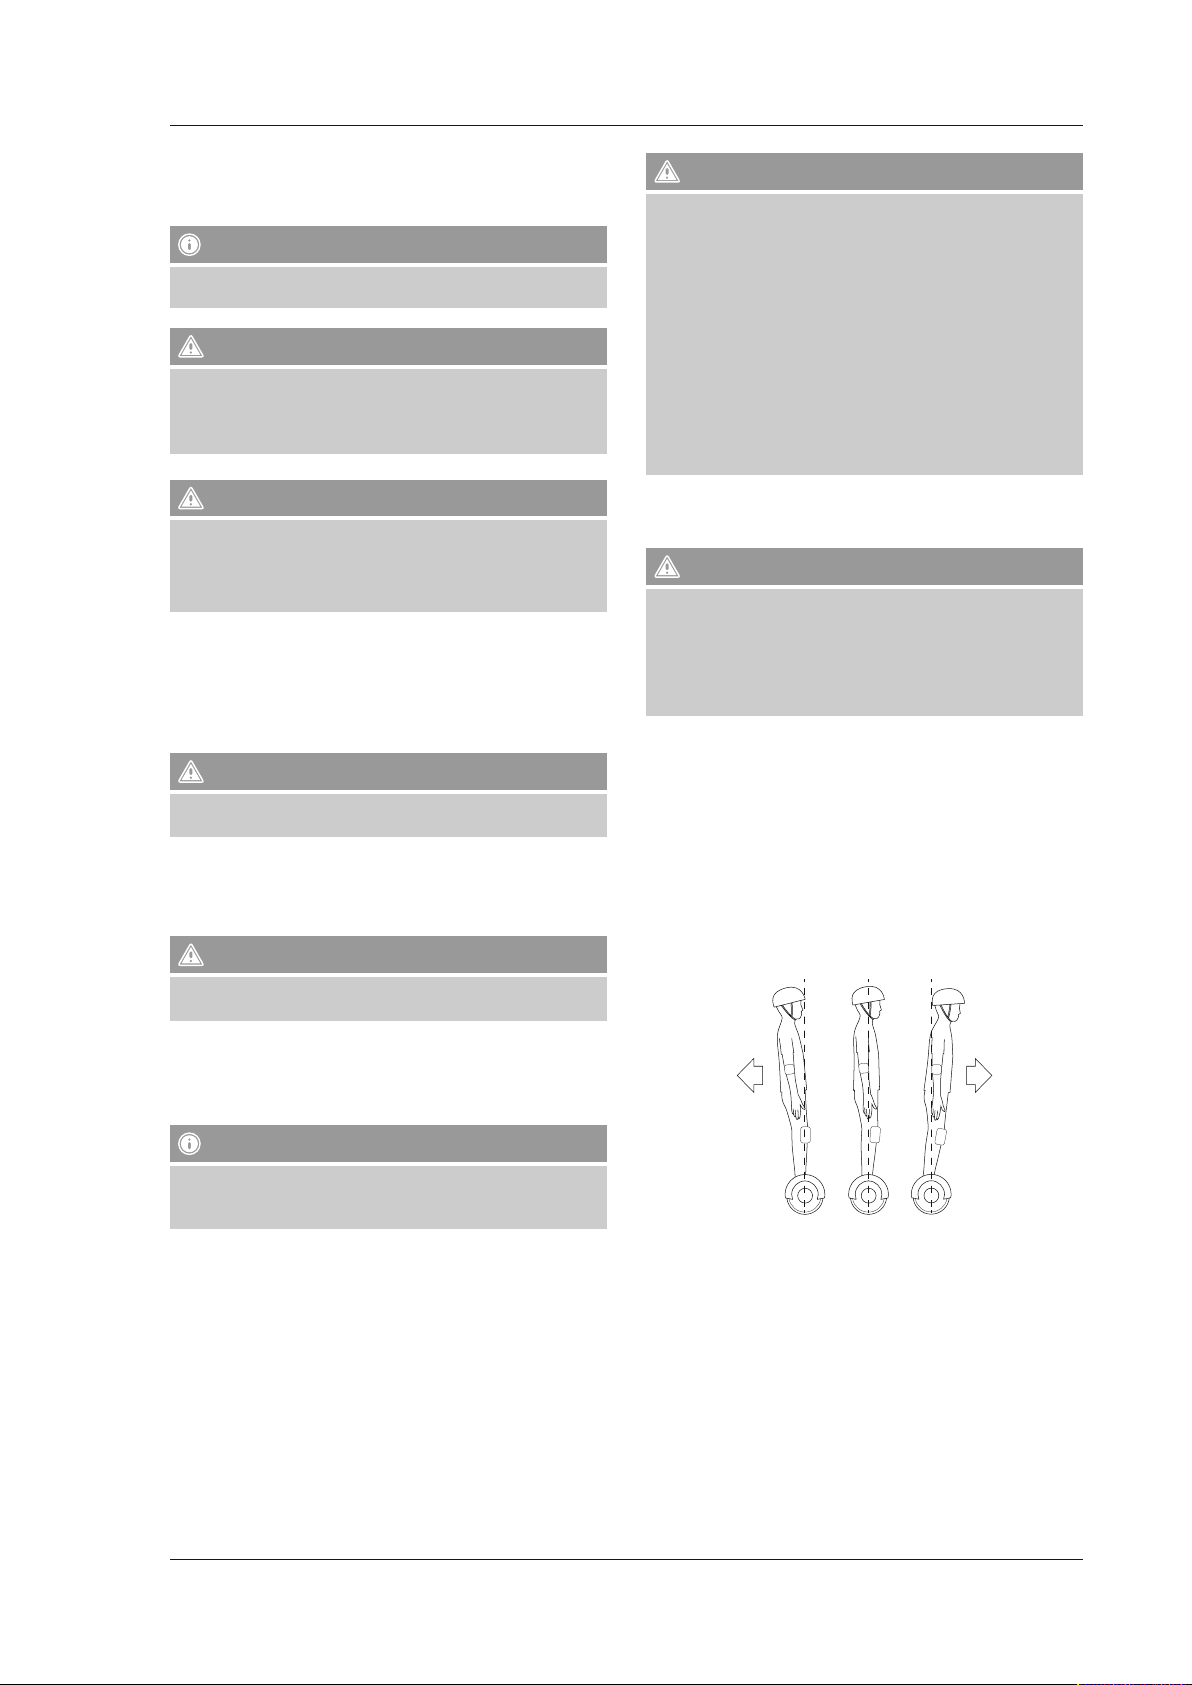
This product does not have any lateral stabilising mechanisms.
If the product is tilted far enough that the wheel loses traction, it can no
longer centre itself beneath you and you may tip over.
You have to keep balance laterally by yourself, as well. Therefore, always
make sure that your body is aligned with the centreline of the product.
Do not lean into turns or into slopes if you are driving across the slope.
Note – USB charging socket
• Extended charging of one device, or charging multiple devices one
after the other, may reduce the Cruiser’s range.
Caution - Risk of falling
• Use the USB charging socket only when the Cruiser is parked, not
while driving.
• Otherwise you may be at risk of falling and injuring yourself due to
being distracted, losing your balance, or the charging cable.
7.2.2 U-Scooter
Note
When switching on, make sure that the product is on a at, even
surface.
Caution
Note
• Do not overestimate yourself. Accelerate slowly to develop full
control over the product. We also recommend that only experienced
drivers drive across the slope.
• If this is your rst time using this kind of product, we recommend
receiving help from a second person. This person should hold
your hands to keep you stable. Try to keep yourself steady to start
with and try not to make any hectic movements. The device will
support your balance, so try not to work against the compensating
movements. Instead, concentrate on your own balance.
7.2.1.1 Energy recovery (recuperation)
• All of the Cruisers are equipped with a feature for recovering
(recuperating) energy while braking or driving downhill.
• Under ideal conditions, energy recovery can boost the Cruiser’s
range by ve to ten percent. However, this depends on many factors,
including the terrain prole as well as the frequency of braking
manoeuvres, and therefore cannot be predicted for every case.
Caution with fully charged battery
• Avoid extended braking or downhill stretches with the battery fully
charged, as under these conditions the battery may not be able to
hold the recovered energy.
• First drive for one or two minutes on level terrain in order to deplete
the battery a bit.
• Otherwise you may damage the battery.
7.2.1.2 Lighting systems (F Cruiser)
Note – Front and rear lights/Adjusting to the driving
direction
• The Freestyle Cruiser is equipped with separate, high-visibility lights
in the front and rear.
• The Freestyle Cruiser automatically recognizes the direction of travel
and adjusts the lights accordingly (front light coloured white, rear
light coloured red).
• Recognition of the direction of travel and the adjustment of the
lights occurs after ve wheel revolutions.
7.2.1.3 USB charging socket (F Cruiser)
The Freestyle Cruiser is equipped with an USB type A charging socket
with which devices can be charged with a current of up to 2.0 A.
• Always use appropriate lifting and charging technology.
• Choose sturdy, stationary lifting points, for example, in the middle of
the lower section.
• Always lift from a squatting position and not from the back.
Warning
• Pay attention to your ngers. Do not lift the product onto tyres,
protective plates or wheels.
• You could catch your hands or ngers between the tyres and the
protective plate, resulting in injury.
Figure 8
3 4
B
M
S
SPEED
SLO
ODO
0000
OO
.0
Km/h
7
Km
ECO
POWER
1
ON/OFF
MODE
2
1. On/off switch
2. Mode switch
3. Display
4. Accelerator
To start the scooter, hold down the on/off switch until the display lights
up. The scooter has three different operating modes.
• Beginner mode: In this mode, the speed is limited to 6 km/h and the
scooter accelerates slowly.
To choose this mode, press the mode switch [MODE] until the display
shows “SLO”.
• Advanced mode: In this mode, the speed is limited to 15 km/h and
the scooter accelerates more quickly than in beginner mode.
To choose this mode, press the mode switch [MODE] until the display
shows “MID”.
• Pro mode: In this mode, the speed is limited to 25 km/h and the
scooter accelerates as fast as it can.
9
Page 10

Caution – Pro mode
• In this mode, take care to keep sucient distance from obstacles,
people and animals.
• Start out by getting used to the acceleration and speed in a spacious
area free of obstacles.
• The high speeds increase the risk of injury.
To choose this mode, press the mode switch [MODE] until the display
shows “FAS”.
The scooter can be set in motion as follows:
In order to use the auxiliary electric motor, you must rst switch on
the scooter. To do this, press the on switch (see gure 8) until the
speedometer lights up.
Tabs
Note
In principle, the device can also be used without the electric auxiliary
motor.
• To use the electric auxiliary motor, you need to rst get the device
moving at about 4 km/h using your own muscle power.
• Then pull the gas lever to start the auxiliary motor. Now you can
accelerate the scooter to the speed limit dened by the mode you are
in.
Caution
• Take some time to get used to the handling characteristics of the
scooter in order to minimise the risk of falling and injuries.
• Practise in a spacious, unobstructed area to get used to the
acceleration and driving characteristics.
• Be sure to wear quality protective clothing.
Brake using the brake lever on the left side of the handlebar.
Caution - Braking
• Get accustomed to the braking time. Try to develop a feeling for how
long the scooter takes to stop.
• Always brake well in time and do not risk colliding with people,
animals or obstacles.
Note – Additional displays
Once the scooter has been switched on by pressing and holding the
ON/OFF switch, you can switch to various other displays by briey
pressing the ON/OFF switch again.
ODO = total kilometres
TRIP = kilometres since the scooter was last switched on
TM = time since the scooter was last switched on
You need not pay attention to the RM and ERRO modes, which are
intended for use by Hama Support.
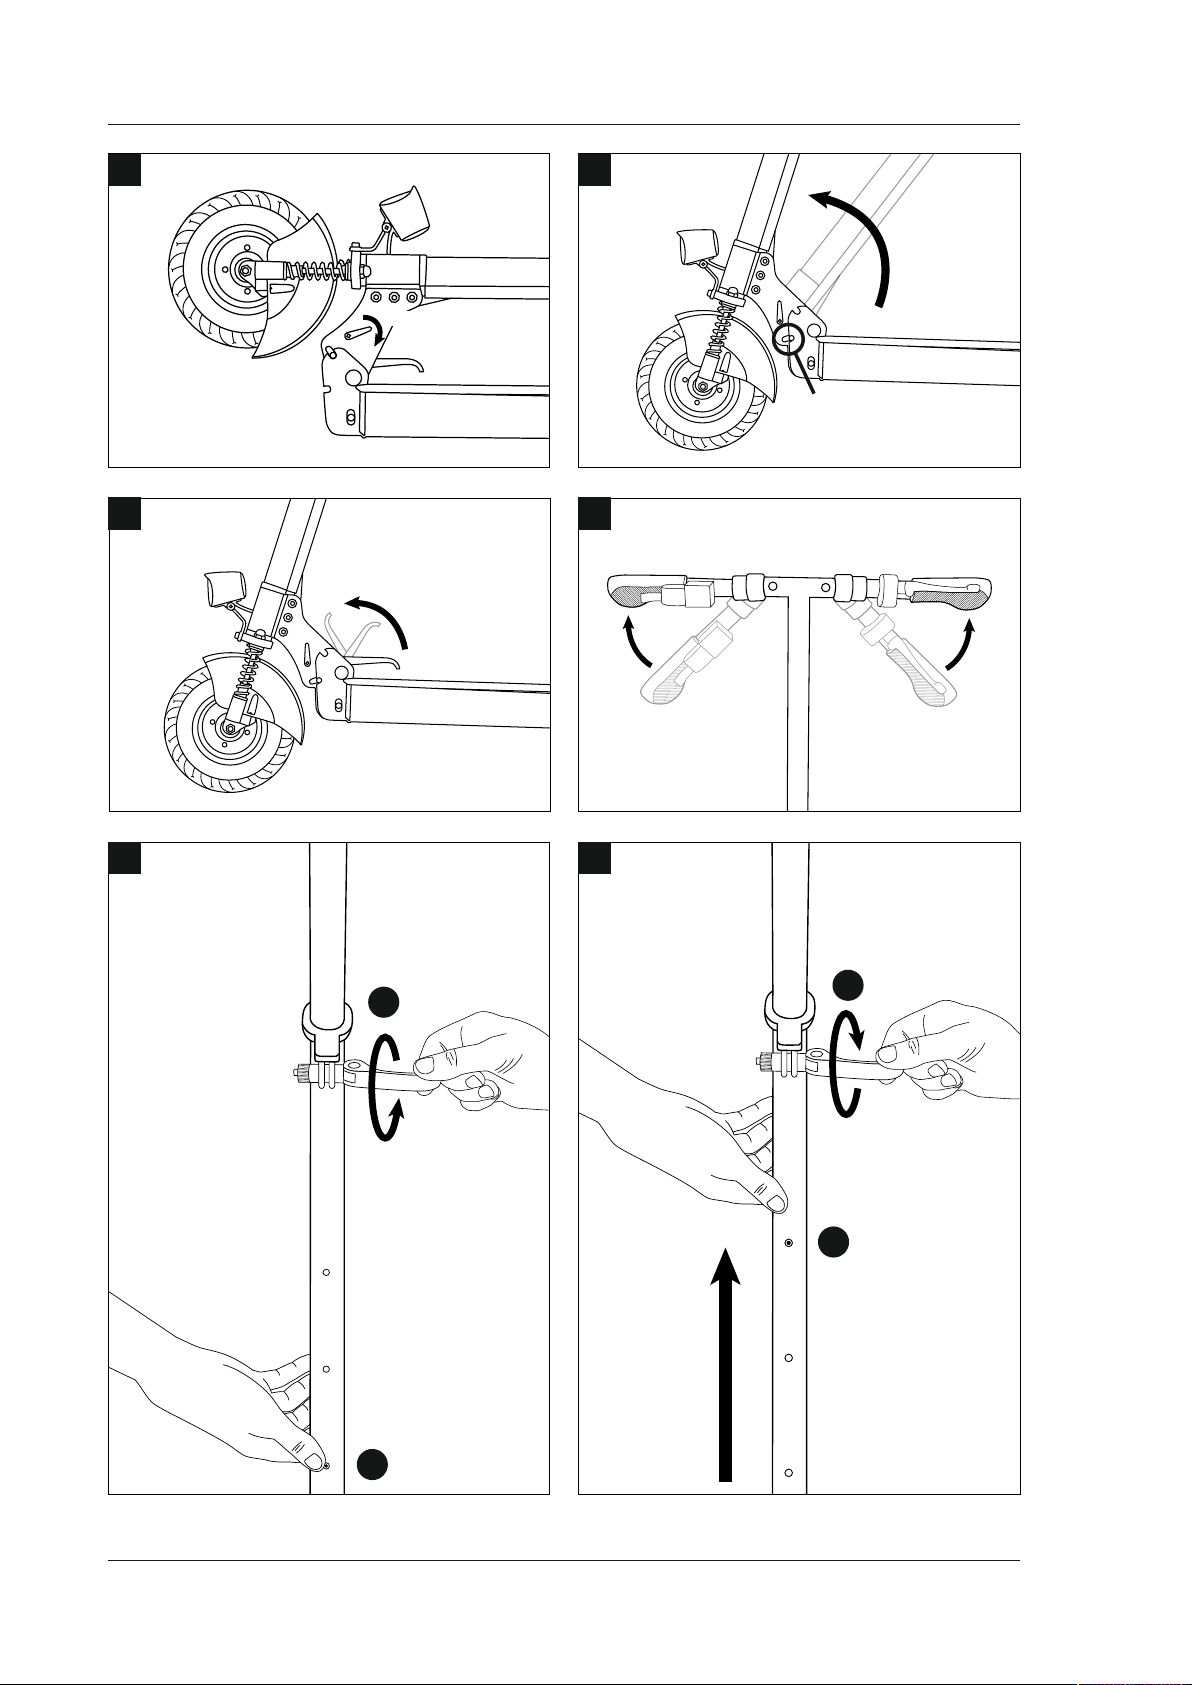
7.3 Assembling and starting the device for the rst time
Note
Footrest
7.3.2 U-Scooter
• When unpacking the scooter, lift it out of the packaging by the steering
column.
• Assemble the scooter as shown in the gures below.
• As shown in the gures below, the steering column’s height can be
adjusted between three different positions.
Note
Please fully charge the product before using it for the rst time.
7.3.1 F- / S- / X-Cruisers
For the S and X Cruisers, other than the notes listed under 7.2.1, no steps
are necessary before starting the device for the rst time.
For the F Cruiser, please additionally note the following:
Two rugged mudguards and an assembly kit are additionally included.
Attach the mudguards as shown in the gures below.
• Insert the mudguards between the drive wheels and the vehicle body.
• Make sure that the top of each mudguard cleanly slots into the collar
and that the tabs are inserted all the way into the recesses on the
underside of the vehicle body.
• Take care that the attachment screws are screwed in straight.
10
• Ensure that all locking mechanisms are locked in place.
Page 11
A
PUSH
B
CLICK
C
E
OPEN
1
D
CLICK CLICK
F
CLOSE
4
CLICK
3
PUSH
2
11
Page 12

7.4 Battery charge level displays
7.4.1 S- / X-Cruiser
Discharging
Battery charge level
100 – 10% Green Green
9 – 5% Green Green / ashing
4 – 0%
(Safety mode)
No driver on footrests OFF According to
Charging
Battery charge level
0 – 4% OFF Red
5 – 9% OFF Flashing red
10 – 99% OFF Green / ashing
100% OFF Green
7.4.2 F-Cruiser
Discharging
100% – 67%
Three LEDs
steadily lit
Charging
0% – 33%
One LED
ashing
66–34% 33–11% 10–5% 4–0%
Two LEDs
steadily lit
Two LEDs
ashing
Status LED
Red Red
Flashing front LEDs, alarm tone, brakes
Status LED
One LED
steadily lit
34 – 66% 67 – 99% 100%
One LED
ashing
Three LEDs
ashing
Battery LED
the battery charge
level
Battery LED
Safety
mode, see
section
7.2.1
Three LEDs
steadily lit
Note – Fluctuation of the battery charge level
• Steep upward slopes, extreme driving manoeuvres, and extended
periods of full acceleration are highly energy-intensive and
demanding on the battery.
• If you take a break or turn the vehicle off after such activities, it may
subsequently report a slight increase in battery charge level.
• This behaviour is normal, because the rechargeable battery
regenerates a bit during the break.
8. Battery
Note
The battery should last around 1500 charging cycles from normal use
and appropriate maintenance. You will know that the battery is dead
when it needs to be charged more frequently and the range decreases.
8.1 Safety when handling the battery
Warning
To ensure safety and to maximise the life and performance of the
battery, you must strictly follow the instructions in this manual.
• You may not use the battery under the following conditions:
- when the housing is damaged
- If the battery emits an unusual odor or is excessively hot
- when substances are leaking
• Avoid contact with leaking substances.
• Contact with the battery voltage may cause death or serious injury.
• Working on the product while the power cable is connected is
dangerous. Electric shocks may cause severe personal injury or
damage to property.
• Never remove the battery from the device or open the battery.
Opening the battery damages the housing and may release
poisonous substances.
• Never insert objects into the battery or try to break the battery
housing open. By inserting something into one of the connections or
openings, you may suffer an electric shock, injuries or burns, or you
may cause a re.
• Only charge the battery with chargers permitted by the
manufacturer.
• Do not expose the scooter or the charger to high temperatures
or moisture under any circumstances, and never use a damaged
charger.
• To avoid damage, you should check the charger regularly,
particularly cables and plugs. A damaged charger may no longer be
used. Please contact Hama Support if this is the case
• You must comply with all applicable laws and regulations when
disposing of and transporting the scooter.
7.4.3 U-Scooter
The battery charge level is indicated by a battery icon with up to 6 bars
for a fully charged battery (see gure 8).
Note
When the battery charge level indicator shows a single bar, recharge
the scooter. Otherwise the battery will take damage.
12
Page 13
8.2 Technical Specifications (Table 3)
Charging time
Recharging from empty approx. 1.5 hours F- / S- / X-Cruiser
approx. 3 hours U-Scooter
Temperature ranges
Operation -10° C to 40° C
Charging, storage and transport 10° C to 25° C
General information
Capacity (Ah) and voltage 36V, 2.5 Ah (F-/ S-/X-Cruiser)
5.8 Ah (U-Scooter)
Dimensions 13.5 cm x 6 cm x 9 cm
Weight 0.50 kg (F- / S- / X-Cruiser)
0.97 kg (U-Scooter)
Technology Lithium-ion
Charging error
Charging is interrupted when an error occurs. The status LED on the
power supply will go out completely. If the charge level indicator on the
product also goes out, proceed as follows:
• Make sure that the power is connected and the cable ts securely in
the charging socket.
• If the charge level indicator does not light up with proper power supply,
unplug the power cable and start the charging process over.
• If this does not solve the problem, please contact our Support team.
Warning
Do not drive the product when the batteries are completely drained.
Hinweis
Since the charging process may vary slightly due to factors such as
temperature, charging voltage, and device charging behaviour, it may
occur that the battery only charges to 99%, meaning that the charge
level indicator does not display a full battery charge. This is normal
behaviour and no cause for concern.
Note
• When using, charging or storing the battery outside the specied
temperature ranges, you risk voiding your warranty and in some
circumstances, you have to take into account a lesser range and
decreased battery charging performance.
• Fully charge the product before using it for the rst time.
Furthermore, charge the product at least once per month.
• Only charge the battery in the specied charging temperature range.
Caution
• If the battery is not regularly fully charged, it may drain completely
over time and be permanently damaged.
• The charging time depends on the following factors:
- current charge level. The lower the charge level, the longer it will
take to charge.
- Battery temperature – a battery that is too hot or cold requires
more time to charge or may not charge at all. Keeping the
temperature in the middle of the specied temperature range is
the best way to charge the battery.
8.3 Charging the devices
Only charge the product in a clean, dry location at a temperature within
the recommended charging temperature range.
Warning
• Never plug in the plug if the charging socket, power supply cable
or the electrical socket are wet. The electrical equipment is not
adequately protected against moisture.
• Do not charge the product indenitely. This can damage the battery
despite overcharge protection.
• Only connect the product to a socket that has been approved for the
device. The socket must be installed close to the product and easily
accessible.
• Connect the included power supply unit to an electrical socket and
to the charging socket to charge the battery. The product activates
automatically when connected. Charging begins automatically.
• The status LED on the power supply lights up in red during charging.
Once the battery is fully charged, the status LED on the power supply
becomes green.
8.4 Effect of the temperature on performance
The battery is usually signicantly warmer than the ambient temperature.
This temperature rise comes from the electricity emitted (by driving) or
absorbed (by charging).
Travelling in heat and cold
• The battery is the most ecient in temperatures that are approximately
in the middle of the recommended operating temperature range.
• Cold batteries usually decrease the range more than batteries at close
to room temperature.
Charging in heat and cold
• Always keep the battery within the recommended charging temperature
range before and during charging.
(See Table 3, Temperature range)
• Your battery charges best when the temperature is approximately in the
middle of the recommended charging temperature range. Batteries that
are too hot or cold may require more time or may not charge at all.
Empty battery
• The F, S and X Cruisers report an almost empty battery by going into
safety mode. In this case, maintain control and dismount.
Note
• It is possible that old, cold, over-stressed or poorly maintained
batteries will develop a high resistance.
• This, however, may indicate that a battery is almost empty, even
when the batteries had been recently charged.
• The battery is then depleted and must be replaced by Hama
Support.
8.5 Replacing the battery
Note
• Never replace your battery yourself.
• You will void your warranty by changing the battery independently
and you will have to take into account a lesser range and reduce
battery charging performance.
• If damaged, do not use the device any more.
8.6 Shipping lithium ion batteries
Caution
You must comply with all applicable laws and regulations when
transporting batteries.
13
Page 14
9. Maintenance
Warning
• Do not modify the product under any circumstance.
• Before carrying out any of the following procedures, make sure that
the product is switched off and the power cable is unplugged.
• These procedure are dangerous when the product is switched on or
charged.
9.1 Checking the tyres/wheel components
• Make sure that the wheel does not wobble. Grip the wheel and try to
move it from one side to the other. It must not move from side to side.
• If the wheel wobbles, please contact our Support team.
9.2 Checking the tyre pressure (X-Cruiser / U-Scooter)
• Check the tyre pressure for models with pneumatic tyres regularly.
Incorrect tyre pressure negatively affects the range.
• If the pressure in one or both tyres does not correspond to the
Technical Specications for your product model, you should inate
the tyres accordingly.
• Make sure that both tyres have the same pressure and are free from
debris and residue.
Warning
• The pressure given in the operating instructions, not the pressure of
the tyres themselves, is the required pressure.
• Higher tyre pressure reduces suspension and traction and increases
the risk of losing control, collision or falling.
• Lower tyre pressure decreases the range and may damage the tyres/
wheel components.
• Unequal tyre pressure causes the product to pull in the direction of
the tyre with lesser pressure while driving.
9.3 Cleaning the product
Clean the product carefully with a moist cloth. Do not let any moisture
enter the product while cleaning!
Warning
• Avoid excessive water exposure.
• Do not immerse the product in water. This may result in permanent
damage.
• Do not expose the product to heavy rain or persistent downpours
(including while driving, storing or transporting).
• Do not clean with pressure washers or high-pressure hoses. These
devices may introduce water in components that should remain dry.
• No water may enter the charging socket under any circumstance.
Caution
Do not clean the treads or tyres with special cleaning products. These
products may affect traction and stability.
9.4 Storing the product
• Store the product indoors in a dry location. Avoid moisture, high
humidity and extreme temperatures by all means.
• Only store the product in the recommended charging and storing
temperatures (see Table 3) to guarantee the battery’s full performance.
10. Fault tracing and troubleshooting
(F-/ S- / X-Cruiser)
Warning
• Always switch the product off and unplug the power cable before
servicing.
• Do not open the device under any circumstances.
• There are no parts inside that you can service yourself.
• Opening the housing voids the warranty.
10.1 Replacing components and spare parts
If you have to replace a damaged or worn part, please contact our
Support team.
10.2 Troubleshooting
Troubleshooting methods
You may correct certain problems with your device by yourself.
Warning
Always switch the product off and unplug the power cable before
servicing or attaching components or accessories.
The device pulls to one side while driving
You must read the following maintenance procedures before trying to
correct the problem.
Recommended solutions:
• Make sure that both tyres have the same tyre pressure and that it
corresponds to the recommended values
(see Tyre pressure, Table 1/2).
• If one or both tyres are not inated appropriately, inate the tyre(s) to
the correct value and make sure that the pressure is the same in both
tyres.
• Distribute your weight equally on both feet. If you press harder on one
foot, the Cruiser will pull in this direction.
A tyre has a at or is leaking air.
You must read the following maintenance procedures before trying to
correct the problem.
Recommended solutions:
• Check the tyre for damage. If there is damage, contact our Support
team.
• Inate the tyre (see Tyre pressure, Table 1/2) and check for leaks.
Contact our support team if there is another at or air is leaking
somewhere.
Warning
Do not mount until all faults are remedied.
Caution
Use only genuine Hama spare parts and accessories. Contact Hama
Product Consulting/Support for more information about your local
supplier.
14
Page 15

11. Charger
12. Appendix
11.1 Safety instructions
• Please make sure the charger and power supplies are in perfect
working order before every use. If there is visible damage, do not use
the charger under any circumstance.
• The charger is not suitable for use in damp environments.
• Only use the charger for your Cruiser.
• Make sure there is adequate ventilation during operation.
• Do not cover the charger during operation.
• Contact with liquids may lead to electric shock. Disconnect the device
immediately from the power supply. To prevent any damage, do not use
the charger again.
• The charger does not contain any parts that require maintenance from
the user. Do not open the housing.
• Unplug the power cable when the charger is not in use.
Warning
Using an operating voltage that is higher than specied by the
manufacturer may lead to serious damage to the product and charger.
Therefore use only the original accessories provided by Hama.
11.2 Technical specifications
Input voltage range 100-240V ~ 50/60Hz
Maximum performance 90 W
Output current 2A
Output voltage 42 V DC
ating temper
Oper
11.3 Cleaning
Use a soft, dry cloth. We recommend using a non-abrasive microbre
cloth. Please do not use any solvents or liquids.
e1
atur
0°~25°C
12.1 Contact person and legal information
Always follow the applicable laws and regulations.
Driving these devices on public streets and pavements are regulated by
law in many countries. Amongst other requirements, these laws and
regulations usually dictate the minimum driver age and speed limits, as
well. They may also require wearing protective clothing. Some countries
prohibit driving the device on public streets and pavements. Please
contact your competent authorities and familiarise yourself with the
applicable laws and regulations.
12.2 Warranty Disclaimer
Hama GmbH & Co. KG assumes no liability and provides no warranty for
damage resulting from improper installation/mounting, improper use of
the product or from failure to observe the operating instructions and/or
safety notes.
12.3 Service and Support
Please contact Hama Product Consulting if you have any questions about
this product.
Hotline: +49 9091 502-115 (German/English)
Further support information can be found here:
www.hama.com
12.4 Recycling Information
Note on environmental protection:
After the implementation of the European Directive 2012/19/EU
and 2006/66/EU in the national legal system, the following
applies: Electric and electronic devices as well as batteries must
not be disposed of with household waste. Consumers are obliged
by law to return electrical and electronic devices as well as batteries at
the end of their service lives to the public collecting points set up for this
purpose or point of sale. Details to this are dened by the national law of
the respective country. This symbol on the product, the instruction
manual or the package indicates that a product is subject to these
regulations. By recycling, reusing the materials or other forms of utilising
old devices/Batteries, you are making an important contribution to
protecting our environment.
15
Page 16
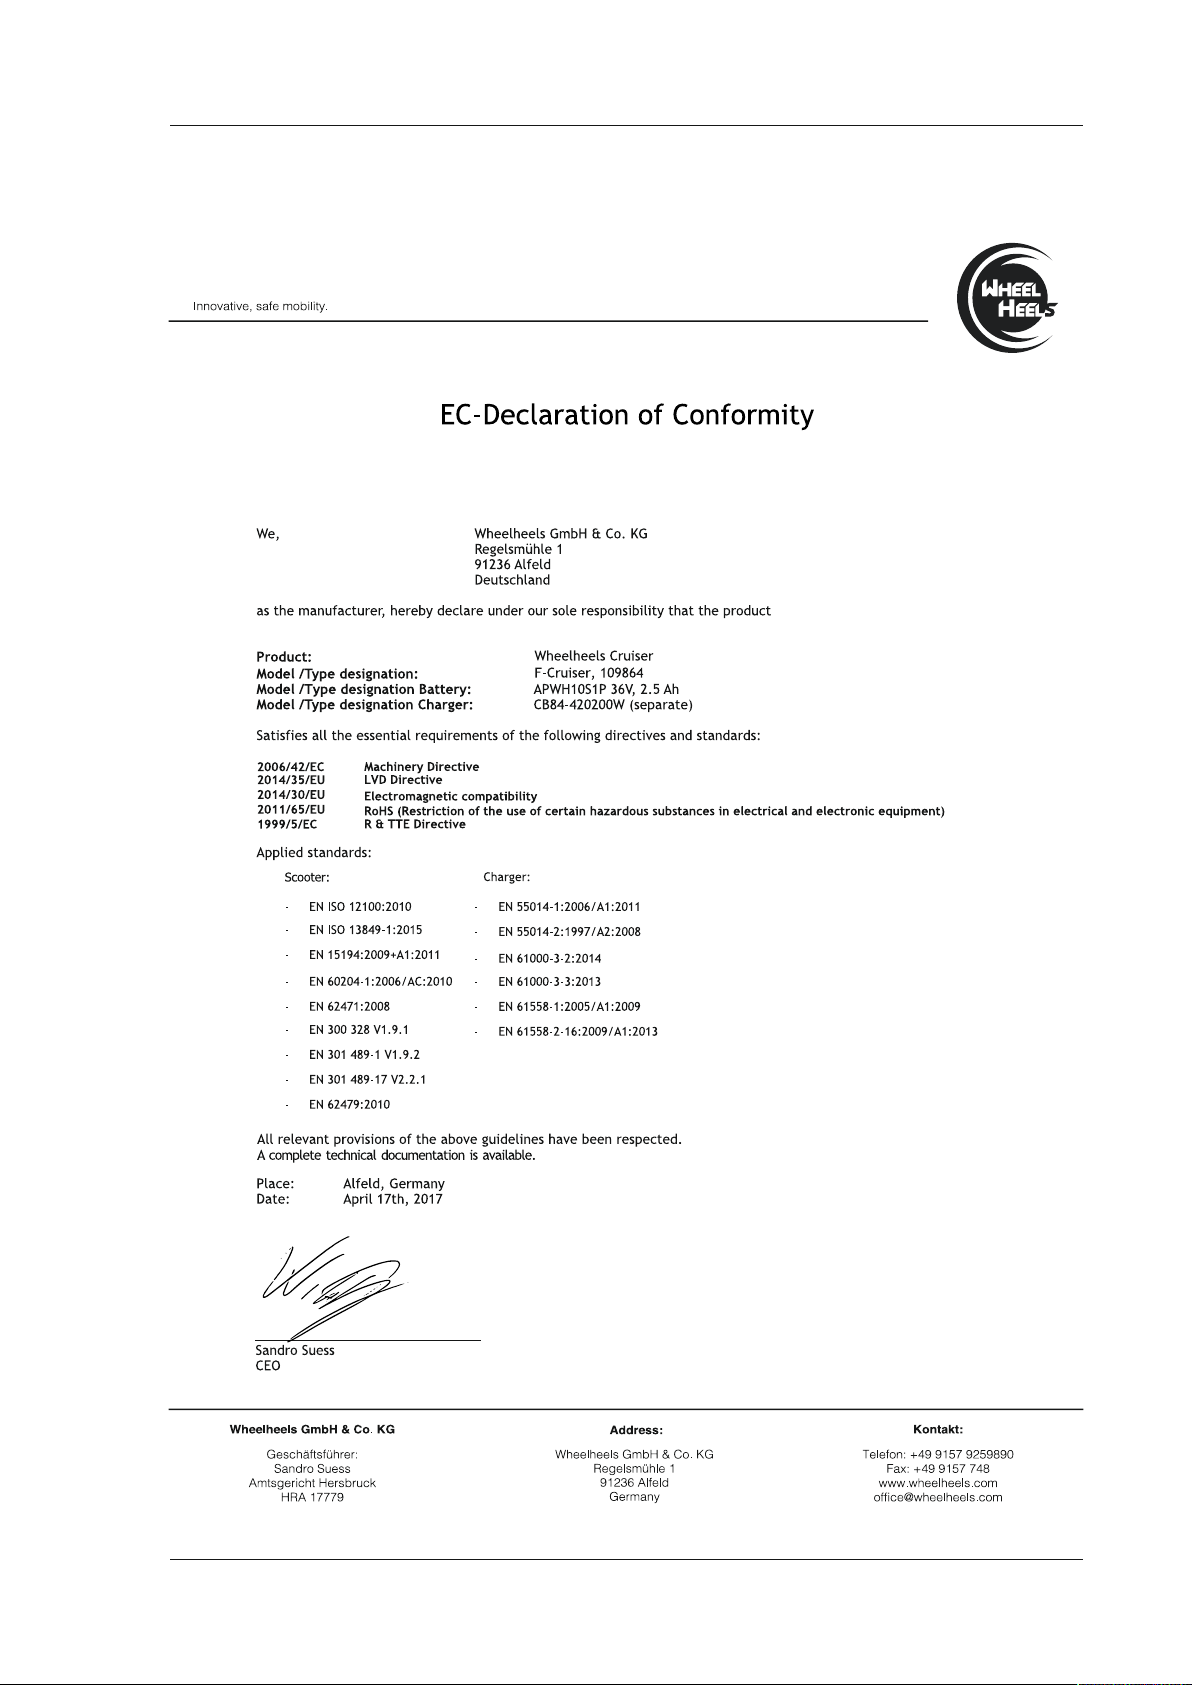
12.5 Declaration of Conformity
00109864 F-Cruiser
16
Page 17

00109865 X-Cruiser
17
Page 18
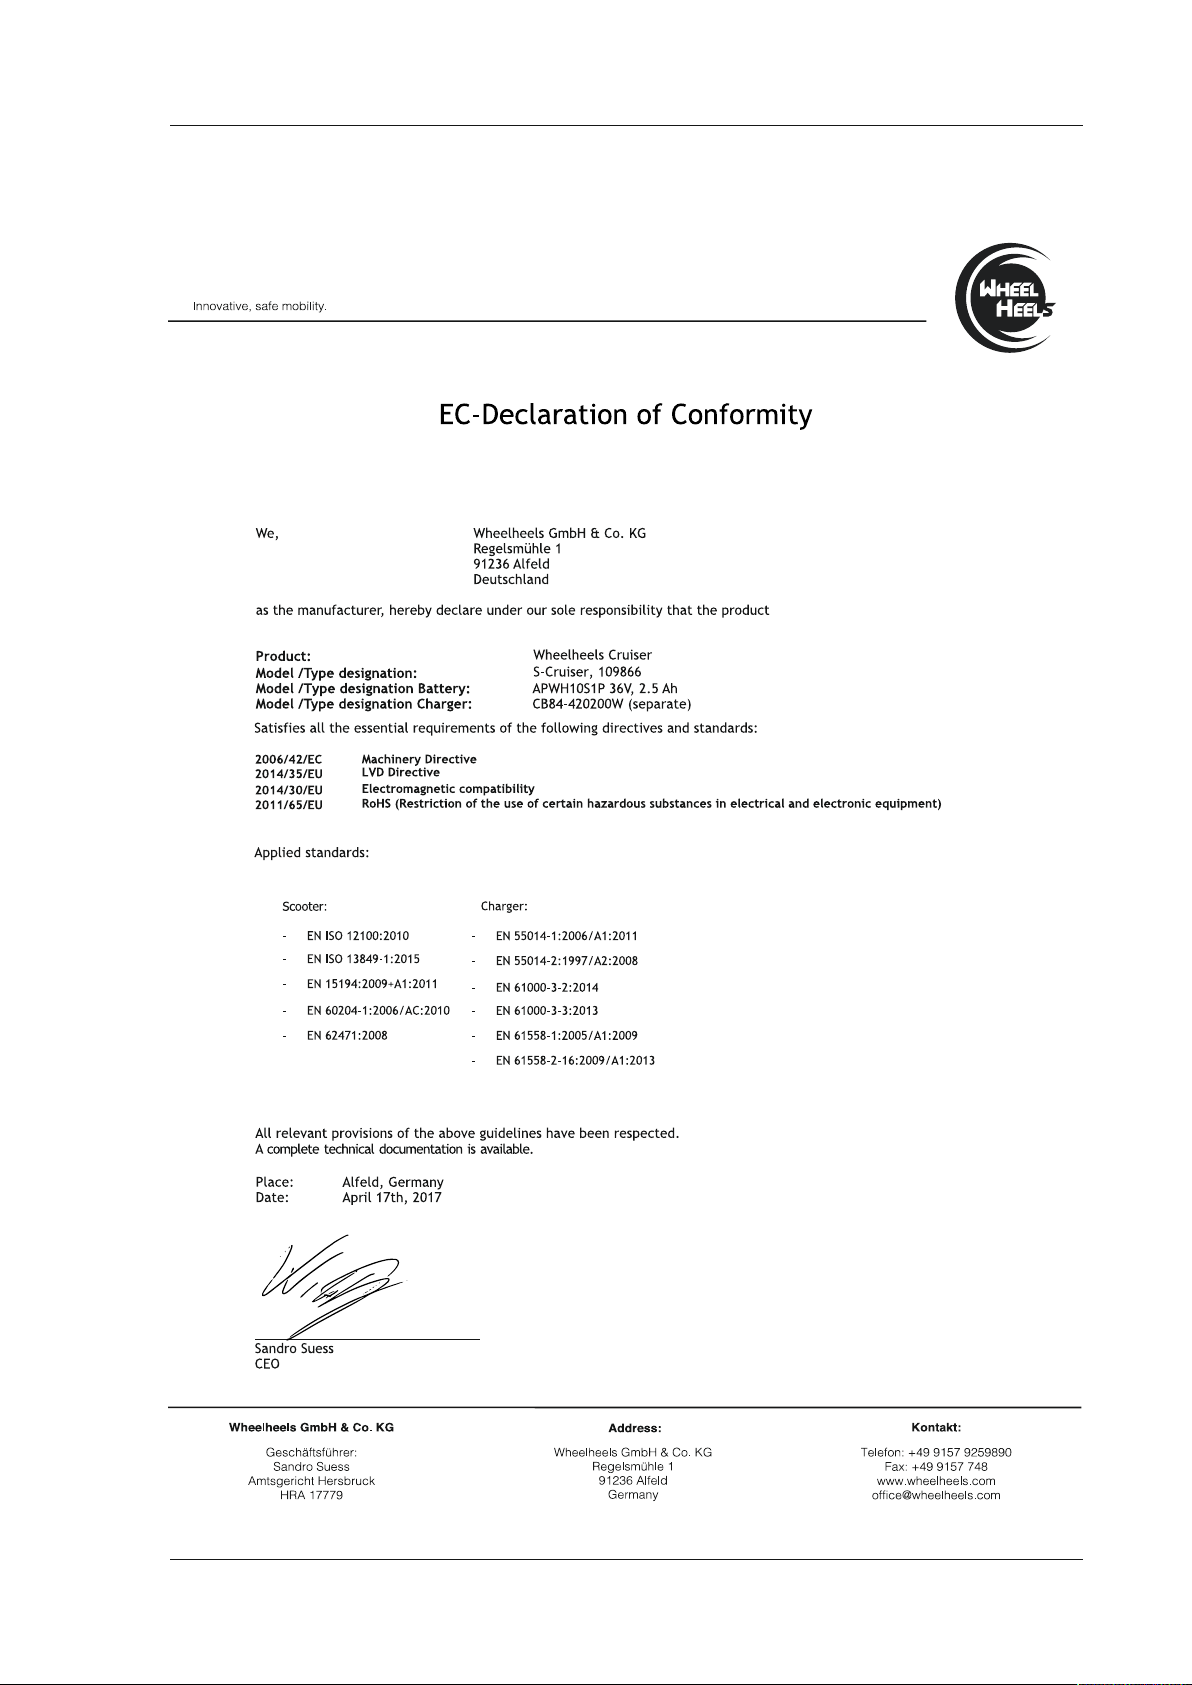
00109866 S-Cruiser
18
Page 19

00109870 U-Scooter
19
Page 20

D Bedienungsanleitung
Inhalt
1. Erklärung von Warnsymbolen und Hinweisen......20
Packungsinhalt ..............................20
2.
Auspacken..........................................20
2.1
2.2
Aufzeichnen der Seriennummern.........................20
2.3
Zubehörartikel .......................................21
Sicherheitshinweise...........................21
3.
Einsatzbereiche und Leistungsgrenzen ...........21
4.
Einsatzbereiche ......................................21
4.1
4.2
Leistungsgrenzen.....................................21
Beschreibungen der unterschiedlichen Modelle ....22
5.
5.1
S-/X-Cruiser.........................................22
5.2
F-Cruiser/U-Scooter...................................23
App........................................24
6.
Anwendung .................................24
7.
Bedienelemente und Anzeigen ..........................24
7.1
7.1.1 S-
/X-Cruiser ...................................24
7.1.2 F-Cruiser
7.1.3 U-Scooter
7.2
Funktionsweise des Produkts............................26
7.2.1 F-
7.2.2 U-Scooter
7.3
Inbetriebnahme und Montage des Geräts..................28
7.3.1 F-
7.3.2 U-Scooter
7.4
Ladestandsanzeigen ..................................30
7.4.1 S-
7.4.2 F-Cruiser
7.4.3 U-Scooter
Akku.......................................30
8.
8.1
Sicherheit im Umgang mit dem Akku .....................30
8.2
Technische Daten Akku (Tabelle 3) .......................31
8.3
Laden der Geräte.....................................31
8.4
Auswirkungen der Temperatur auf die Leistung .............31
8.5
Austauschen des Akkus................................32
8.6
Versand von Li-Ion-Akkus ..............................32
Wartung....................................32
9.
Überprüfen der Reifen-/Radbaugruppe ....................32
9.1
9.2
Überprüfen des Reifendrucks (X-Cruiser / U-Scooter) ..........32
9.3
Reinigen des Produkts.................................32
9.4
Lagern des Produkts ..................................32
Fehlersuche und Fehlerbehebung (F- / S- / X-Cruiser) 32
10.
Austauschen von Bau- und Ersatzteilen...................32
10.1
10.2
Fehlerbehebung.....................................32
Ladegerät..................................33
11.
11.1
Sicherheitshinweise .................................33
11.2
Technische Daten ...................................33
Reinigung .........................................33
11.3
Anhang ...................................33
12.
Ansprechpartner und rechtliche Informationen.............33
12.1
Haftungsausschluss ..................................33
12.2
Service und Support..................................33
12.3
Entsorgungshinweise.................................33
12.4
CE Erklärung .......................................34
12.5
......................................25
.....................................25
/S-/X-Cruiser.................................26
7.2.1.1 Energierückgewinnung (Rekuperation)
7.2.1.2 Beleuchtungseinrichtungen (F-Cruiser)
7.2.1.3 USB-Ladebuchse (F-Cruiser)
......................................27
/S-/X-Cruisers ................................28
......................................28
/X-Cruiser....................................30
.......................................30
......................................30
.................27
........27
.........27
Vielen Dank, dass Sie sich für ein Hama Produkt entschieden haben!
Nehmen Sie sich Zeit und lesen Sie die folgenden Anweisungen und
Hinweise zunächst ganz durch. Bewahren Sie diese Bedienungsanleitung
anschließend an einem sicheren Ort auf, um bei Bedarf darin
nachschlagen zu können. Sollten Sie das Gerät veräußern, geben Sie
diese Bedienungsanleitung an den neuen Eigentümer weiter.
1. Erklärung von Warnsymbolen und Hinweisen
Warnung
Warnt vor Handlungen, bei denen Sie sich verletzen können.
Vorsicht
Warnt vor Handlungen, bei denen der Betrieb des Geräts
beeinträchtigt wird bzw. das Gerät Schaden nehmen kann.
Hinweis
Macht wichtige Punkte, hilfreiche Tipps, besondere Umstände oder
alternative Methoden kenntlich.
2. Packungsinhalt
F-Cruiser
• Hama Cruiser
• Ladegerät
• 2x Schutzblech, inkl. Montageset
• diese Bedienungsanleitung
• Konformitätserklärung
S-/X-Cruiser
• Hama Cruiser
• Ladegerät
• diese Bedienungsanleitung
• Konformitätserklärung
U-Scooter
• Hama Scooter
• Ladegerät
• diese Bedienungsanleitung
• Konformitätserklärung
2.1 Auspacken
• Bevor Sie Ihr Produkt auspacken, überprüfen Sie die Verpackung und
achten Sie auf eventuelle Beschädigungen.
• Sollten Sie Beschädigungen feststellen, kontaktieren Sie bitte Ihren
Lieferanten.
• Ist alles in Ordnung, prüfen Sie den Inhalt der Verpackung auf
Vollständigkeit.
• Sollte der Verpackungsinhalt unvollständig sein, kontaktieren Sie bitte
Ihren Lieferanten.
• Heben Sie den S- und X- Cruiser nicht an den Radabdeckungen aus der
Verpackung
2.2 Aufzeichnen der Seriennummern
Hinweis
Die Seriennummer ist eindeutig. Sie ist wichtig bei einem möglichen
Garantiefall und wird bei Verlust oder Diebstahl und deren Anzeige
benötigt.
• Die Seriennummer bendet sich auf dem Typenschild, welches am
Produkt angebracht ist. Die Seriennummer ist wie folgt aufgebaut:
F-Cruiser: 91XXXXXX
X-Cruiser: 92XXXXXX
S-Cruiser: 93XXXXXX
U-Scooter: 94XXXXXX
• Notieren Sie sich die Seriennummer. Bewahren Sie diese Informationen
getrennt vom Produkt an einem sicheren Ort auf.
20
Page 21
2.3 Zubehörartikel
Hinweis
Bei allen in dieser Bedienungsanleitung beschriebenen Geräte ist das
Hama Zubehör 109888 Hovercart anwendbar.
3. Sicherheitshinweise
Um mit Ihrem Produkt sicher fahren zu lernen, müssen Sie alle
Anleitungen und Warnhinweise in der Bedienungsanleitung lesen und
sich mit der Benutzung des Geräts vertraut machen.
Alle in den Benutzerunterlagen des Produkts aufgeführten Warnhinweise
und Vorsichtsmaßnahmen müssen unbedingt beachtet werden.
Warnung – VERLETZUNGS- UND LEBENSGEFAHR!
• Dieses elektrische Gerät ist kein straßenzugelassenes Fahrzeug!
• Die Benutzung kann durch Kontrollverlust, Zusammenstöße
und Stürze lebensgefährlich werden oder zu schweren
Verletzungen führen. Zur Minimierung des Verletzungsrisikos müssen
Sie sich alle Anleitungen und Warnhinweise in den
Benutzerunterlagen durchlesen und befolgen.
Tragen Sie bei der Verwendung des Produktes stets
•
hochwertige Schutzbekleidung, wie Schutzhelm, Knie- und
Ellenbogenschützer, Handschuhe, sowie festes Schuhwerk!
• Halten Sie ausreichend Abstand von anderen Personen oder Tieren,
insbesondere wenn Sie mit dem Gerät nicht vertraut sind.
• Überschätzen Sie sich nicht. Legen Sie langsam an Geschwindigkeit
zu und bewahren sie einen vorausschauenden Fahrstil, um Stürze zu
vermeiden.
• Fahren Sie NIEMALS unter Einuss von Drogen oder Alkohol!
Hinweis
Durch das Öffnen des Gerätes oder das Entfernen der angebrachten
Siegeletiketten verlieren Sie Ihre Garantieansprüche.
•Das Produkt ist für den privaten, nicht-gewerblichen Haushaltsgebrauch
vorgesehen.
•Verwenden Sie das Produkt ausschließlich für den dazu vorgesehenen
Zweck.
•Schützen Sie das Produkt vor Schmutz, Feuchtigkeit und Überhitzung
und verwenden Sie es nur in trockenen Umgebungen.
•Lassen Sie das Produkt nicht fallen und setzen Sie es keinen heftigen
Erschütterungen aus.
•Dieses Produkt ist nicht dafür bestimmt, durch Personen, einschließlich
Kinder, mit eingeschränkten physischen, sensorischen oder geistigen
Fähigkeiten oder mangels Erfahrung oder mangels Wissen benutzt
zu werden, es sei denn, Sie werden durch eine für Ihre Sicherheit
zuständige Person beaufsichtigt oder erhielten von ihr Anweisungen,
wie das Produkt zu benutzen ist.
• Kinder dürfen nicht mit dem Gerät spielen. Die Reinigung darf nicht
von Kindern durchgeführt werden.
•Betreiben Sie das Produkt nur an einer dafür zugelassenen Steckdose.
Die Steckdose muss in der Nähe des Produktes angebracht und leicht
zugänglich sein.
•Der Akku ist fest eingebaut und kann nicht entfernt werden, entsorgen
Sie das Produkt als Ganzes gemäß den gesetzlichen Bestimmungen.
•Versuchen Sie nicht, das Produkt selbst zu warten oder zu reparieren.
Überlassen Sie jegliche Wartungsarbeiten, mit Ausnahme der unter 9
beschriebenen Fälle, dem zuständigen Fachpersonal.
•Durch das Öffnen des Gerätes oder das Entfernen der angebrachten
Siegeletiketten verlieren Sie Ihre Garantieansprüche.
• Öffnen Sie das Produkt nicht und betreiben Sie es bei Beschädigungen,
davon ausgehender Rauchentwicklung, Geruchsbildung oder lauten
Geräuschen nicht weiter. Wenden Sie sich umgehend an Ihren Händler
oder unsere Serviceabteilung (Siehe 12.3 Service und Support).
4. Einsatzbereiche und Leistungsgrenzen
4.1 Einsatzbereiche
Hinweis
• Dieses Gerät verfügt über keine Zulassung gem. StVZO für
den öffentlichen Straßenverkehr (z.B. auch nicht für Geh- und
Fahrradwege).
• Das Gerät darf nur auf abgesperrten, nichtöffentlichen
Privatgeländen benutzt werden und dort nur, solange keine andere
Regelung die Nutzung verbietet.
• Das Mindestalter zur Nutzung beträgt 14 Jahre.
• Der Gebrauch des Geräts ist ausschließlich nur für einen Fahrer
konzipiert.
• Das Gewicht des Fahrers darf 120 kg nicht überschreiten.
• Betreiben Sie das Produkt nicht außerhalb seiner in den technischen
Daten angegebenen Leistungsgrenzen.
• Benutzen Sie das Produkt nicht in Bereichen, in denen elektronische
Produkte nicht erlaubt sind.
• Das Produkt ist nur zur Verwendung im Trockenen bestimmt. Es ist
zwar gegen Spritzwasser geschützt, bietet jedoch keinen ausreichenden
Schutz vor permanenten Wasserkontakt und kann folgend beschädigt
werden.
4.2 Leistungsgrenzen
Machen Sie sich unbedingt mit den Leistungsgrenzwerten des Produktes
vertraut. Sie sind so bemessen, dass sie die Sicherheit für den Fahrer
maximieren und das Beschädigungsrisiko für das Gerät minimieren.
• Über- oder unterschreiten Sie in keinem Fall das in den Technischen
Daten (siehe 5.1/5.2 Technische Daten, Tabelle 1/2) angegebene
maximale Gewicht für Fahrer und mitgeführte Lasten (max. Nutzlast)
oder das Mindestgewicht für den Fahrer.
• Ein Nichteinhalten der Leistungsgrenzen kann Fahrzustände
verursachen, in denen ein sicheres Fahren nicht mehr möglich ist!
Faktoren, für die mehr Leistung erforderlich ist, sind unter anderem:
- höhere Nutzlasten
(Fahrergewicht und alle mitgeführten Lasten)
- steileres Gefälle/steilere Steigung
- holpriges Gelände
- höhere Geschwindigkeiten als 15 km/h (nur bei F-, S- und X-Cruiser)
- abrupte Manöver
Warnung
Werden die Gewichtsbeschränkungen nicht eingehalten, insbesondere
im Zusammenspiel mit anderen Faktoren, für die mehr Leistung
erforderlich ist, erhöht sich das Risiko von Personen- und Sachschäden.
21
Page 22

5. Beschreibungen der unterschiedlichen Modelle
5.1 S-/X-Cruiser
Modell Beschreibung
Abbildung 1
S-Cruiser
Abbildung 2
X-Cruiser
Technische Daten (Tabelle 1)
Gewichtsbeschränkung für Fahrer
und mitgeführte Lasten
Maximale Nutzlast 120 kg 120 kg
Mindestgewicht Fahrer 25 kg 25 kg
Mindestalter Fahrer 14 Jahre14 Jahre
Leistung Slalom Cruiser Cross Cruiser
Höchstgeschwindigkeit 6 km/h (Beginner-Modus)
15 km/h (Fortgeschrittener-Modus)
30 km/h (Cart-Modus)
Reichweite ca. 15 km (abhängig von Fahrer,
Geschwindigkeit und Untergrund)
Stromversorgung zum Auaden
(ausschließlich durch das mitgelieferte Netzteil
oder original Zubehör)
Energie Lithium-Ion (Li-Ion) wieder auadbarer
Akku
Motorleistung 700 Watt 700 Watt
Reifendruck -35 psi (2,4 bar)
Lautstärke kleiner 70 dB(A) im Fahrbetrieb kleiner 70 dB(A) im Fahrbetrieb
Der Slalom Cruiser (siehe Abbildung 1) bietet sowohl innen als auch
außen in verschiedenen Umgebungen optimalen Fahrspaß. Dieses
Modell darf nur auf festem und ebenem Untergrund eingesetzt werden.
Für unwegsames Gelände wie z.B. Kopfsteinpaster ist dieses Modell
nicht ausgelegt.
Der Cross Cruiser (siehe Abbildung 2) ist für den Einsatz im Freien
optimiert. Der Cross Cruiser hat einen größeren Raddurchmesser,
mehr Bodenfreiheit und breitere Reifen mit Stollenprol, so dass er auf
unterschiedlicherem und unebenerem Gelände als die anderen Modelle
gefahren werden kann. Die Niederdruckreifen verleihen dem Cross
Cruiser auf unebenem Gelände mehr Stabilität und Traktion.
Slalom Cruiser Cross Cruiser
6 km/h (Beginner-Modus)
15 km/h (Fortgeschrittener-Modus)
30 km/h (Cart-Modus)
ca. 18 km (abhängig von Fahrer,
Geschwindigkeit und Untergrund)
42V, ≤ 5 A42V, ≤ 5 A
36V, 2,5 Ah 36V, 2,5 Ah
Maße & Gewichte Slalom Cruiser Cross Cruiser
Gerätegewicht ohne Akkus 9,1 kg 11,5 kg
Gewicht des Akkus 0,97 kg 0,97 kg
Länge und Breite 58 cm x 18,5 cm 67 cm x 26 cm
Höhe 17,5 cm 26 cm
Reifendurchmesser 6,5 Zoll/ 16,5 cm 10 Zoll/ 25,4cm
Reifentyp Vollgummi Schlauchreifen
Temperaturbereiche Slalom Cruiser Cross Cruiser
Betrieb -10 °C bis 40 °C -10 °C bis 40 °C
Auaden, Lagerung und Transport10 °C bis 25 °C 10 °C bis 25 °C
22
Page 23

5.2 F-Cruiser/U-Scooter
Modell Beschreibung
Abbildung 3
F-Cruiser
Abbildung 4
U-Scooter
Technische Daten (Tabelle 2)
Gewichtsbeschränkung für Fahrer
und mitgeführte Lasten
Maximale Nutzlast 120 kg 120 kg
Mindestgewicht Fahrer 25 kg -
Mindestalter Fahrer 14 Jahre14 Jahre
Leistung Freestyle Cruiser Urban Scooter
Höchstgeschwindigkeit 6 km/h (Beginner-Modus)
Reichweite ca. 15 km (abhängig von Fahrer,
Stromversorgung zum Auaden
(ausschließlich durch das mitgelieferte Netzteil
oder original Zubehör)
Energie Lithium-Ion (Li-Ion) wieder auadbarer
Akku
USB-Ausgang für externe Geräte 5V DC, 2A Motorleistung 800 Watt 250 Watt
Reifendruck -2,5 bar vorne, keiner hinten
Lautstärke kleiner 70 dB(A) im Fahrbetrieb kleiner 70 dB(A) im Fahrbetrieb
Freestyle Cruiser Urban Scooter
15 km/h (Fortgeschrittener-Modus)
30 km/h (Cart-Modus)
Geschwindigkeit und Untergrund)
Der Freestyle Cruiser (siehe Abbildung 3) wird inklusive App, USBLadebuchse und Buchse für ein Kensington-Schloss ausgeliefert und
bietet sowohl innen als auch außen in verschiedenen Umgebungen
optimalen Fahrspaß. Dieses Modell sollte auf festem und ebenem
Untergrund eingesetzt werden. Die extra breiten Vollgummireifen sorgen
auch bei hoher Geschwindigkeit für optimale Bodenhaftung.
Der Urban Scooter (siehe Abbildung 4) kann mit wenigen Handgriffen
in Sekundenschnelle auf- und zusammengeklappt werden. Ausgestattet
mit Tacho, Licht, Trommelbremse und luftgefülltem Niederdruckreifen,
welche für mehr Stabilität und Traktion sorgen, ist er für den Einsatz im
Freien optimiert. Der Scooter kann auf unterschiedlichem und unebenem
Gelände gefahren werden. Verarbeitet aus pulverbeschichtetem
Aluminium-Druckgussmaterial bietet der Scooter Stabilität und Schutz vor
Korrosion.
6 km/h (Beginner-Modus)
15 km/h (Fortgeschrittener-Modus)
25 km/h (Pro-Modus)
ca. 15 km (abhängig von Fahrer,
Geschwindigkeit und Untergrund)
42V, ≤ 5 A42V, ≤ 5 A
36V, 2,5 Ah 36V, 5,8Ah
Maße & Gewichte Freestyle Cruiser Urban Scooter
Gerätegewicht ohne Akkus 14 kg 14 kg
Gewicht des Akkus 0,50 kg 0,97 kg
Länge und Breite 66,9 cm x 24,3cm 115 cm x 15 cm
Höhe 22 cm 118 cm
Reifendurchmesser 8 Zoll / 20,4 cm 8 Zoll / 20,4 cm
Reifentyp Vollgummi Vollgummi & Schlauchreifen
Temperaturbereiche Freestyle Cruiser Urban Scooter
Betrieb -10 °C bis 40 °C -10 °C bis 40 °C
Auaden, Lagerung und Transport10 °C bis 25 °C 10 °C bis 25 °C
23
Page 24

6. App
Eine ausführliche Anleitung zur App "Wheelheels" für iOS und Android ist unter folgendem Link zu nden:
www.wheelheels.com/#app
7. Anwendung
Warnung
• Die Benutzung des Produkts erfolgt auf eigene Verantwortung!
• Prüfen Sie die Funktionstüchtigkeit Ihres Produkts vor jeder Fahrt!
• Halten Sie Ihre Finger und andere Gliedmaßen von möglichen Gefahrenstellen oder beweglichen Teilen, insbesondere den angetriebenen Rädern,
fern!
• Vermeiden Sie die Fahrt mit umhängenden Fremdkörpern, wie herabhängenden Kopfhörern, deren Anschlusskabel oder Kleidung mit losem Textil. Es
besteht die Gefahr, dass Teile davon in die sich bewegenden Räder gelangen können.
• Vermeiden Sie den Gebrauch bei schlechtem Wetter (Regen, Schnee, Glatteis, Frost bzw. Schneefall sowie auf öligen Strecken). Fahren Sie nicht über
Bordsteine und vermeiden Sie das Überfahren von Hindernissen.
• Das Produkt ist für den öffentlichen Straßenverkehr nicht zugelassen! Der Einsatz ist nur auf privatem, nichtöffentlichem Gelände zulässig. Der
Hersteller distanziert sich ausdrücklich von jeglichen Schäden, die auf eine unsachgemäße Benutzung der Produkte zurückzuführen sind.
• Tragen Sie bei der Verwendung des Produktes stets hochwertige Schutzbekleidung, wie Schutzhelm, Knie- und Ellenbogenschützer,
Handschuhe, sowie festes Schuhwerk!
7.1 Bedienelemente und Anzeigen
7.1.1 S-/X-Cruiser
Abbildung 5
1
2
5 6
1. Radabdeckungen
2. Trittächen mit Druck-Sensorsystem
3. Statusanzeigen
4. Status LED f. Ladestand
5. Ein-/Ausschalter, Schalter für den Betriebsmodus
6. Ladebuchse
3 4
24
Page 25
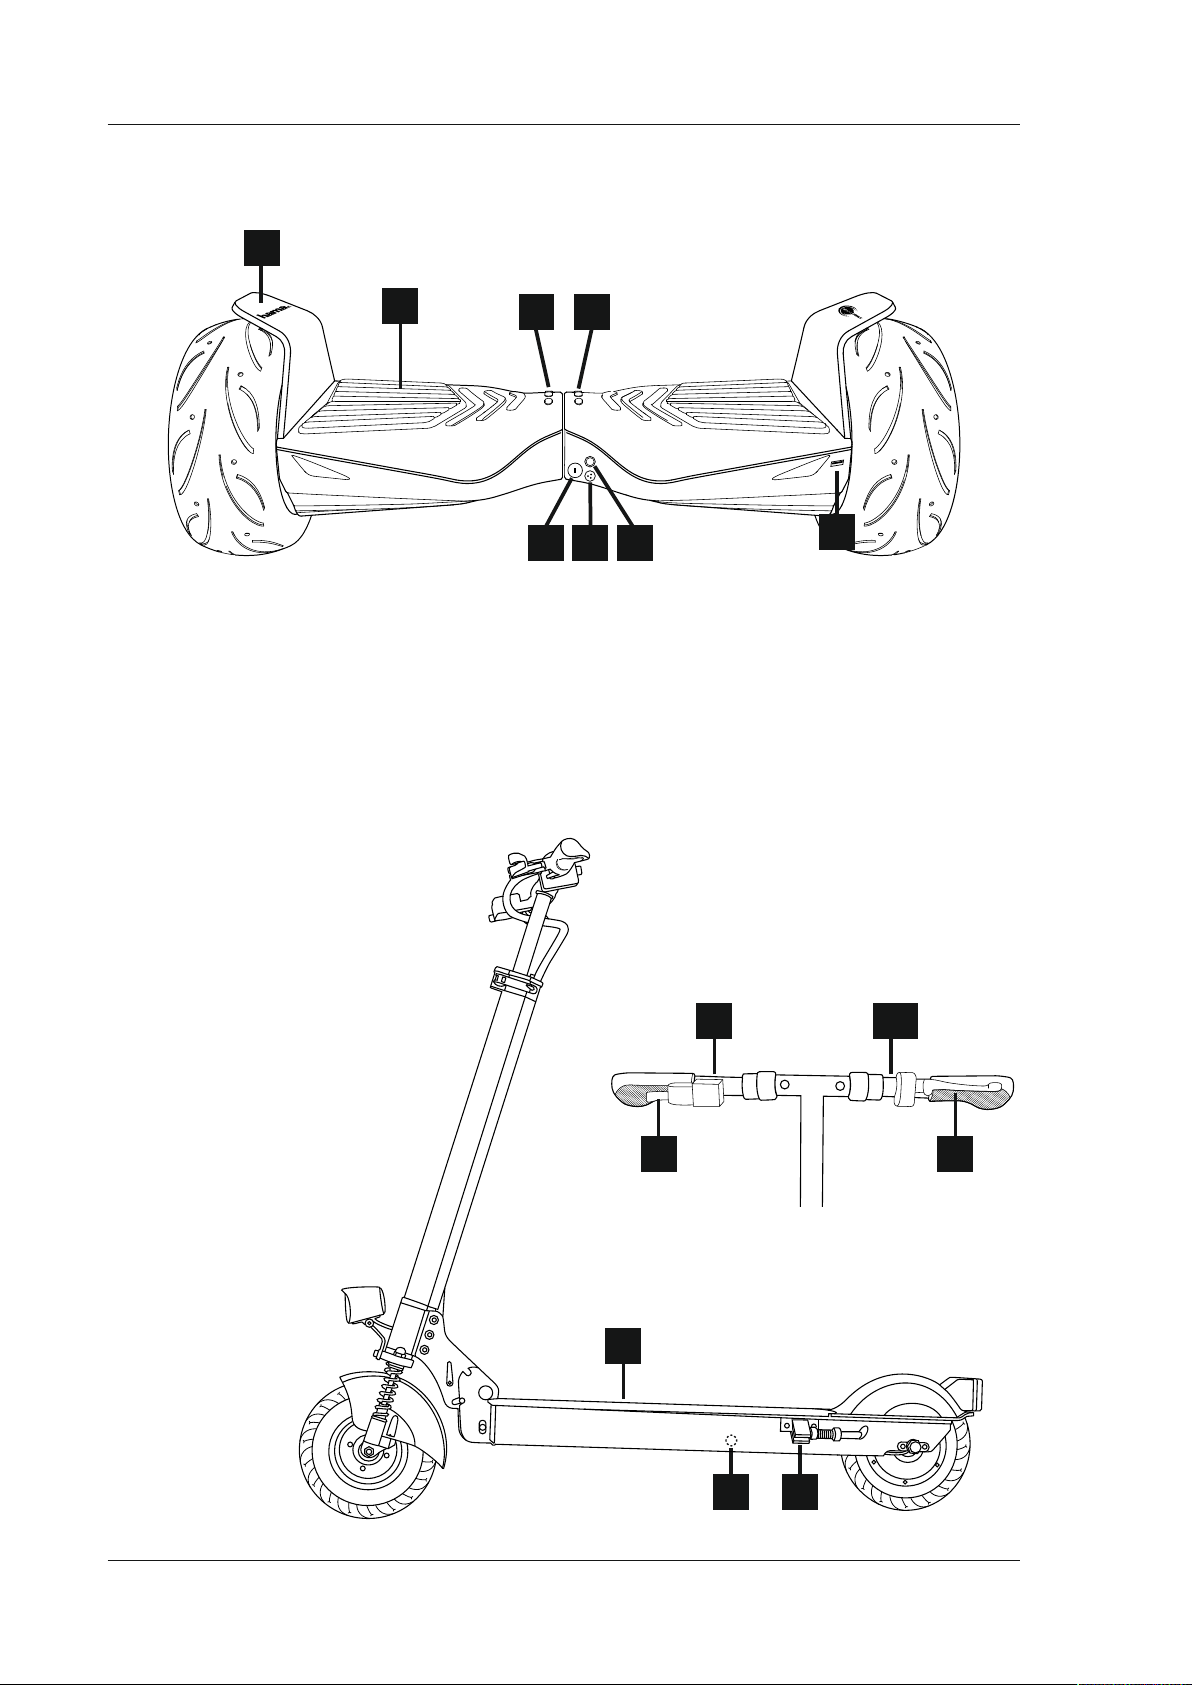
7.1.2 F-Cruiser
Abbildung 6
1
2
1. Schutzbleche
2. Trittächen mit Druck-Sensorsystem
3. Status LED für Ladestand
4. Statusanzeigen
5. Ein-/Ausschalter, Schalter für den Betriebsmodus
6. Ladebuchse
7. Kensington-Buchse
8. USB-Ausgang
7.1.3 U-Scooter
Abbildung 7
3
4
6 5
7
8
1. Display
2. Gashebel
3. Hupe
4. Lichtschalter
5. Bremse
6. Trittäche
7. Ständer
8. Ladebuchse
1
2 5
6
3,4
78
25
Page 26
7.2 Funktionsweise des Produkts
7.2.1 F-/S-/X-Cruiser
Hinweis
Achten Sie beim Einschalten darauf, dass das Produkt auf einem
achen, ebenen Untergrund steht.
Vorsicht
• Wenden Sie stets die richtigen Hebe- und Ladetechniken an.
• Wählen Sie robuste, unbewegliche Hebepunkte, beispielsweise in
der Mitte des Unterteils.
• Heben Sie stets aus der Hocke und nicht aus dem Rücken.
Warnung
• Achten Sie auf Ihre Finger! Das Produkt darf nicht an den Reifen,
Schutzblechen oder Rädern angehoben werden.
• Hände und Finger können zwischen dem Reifen und dem Schutzblech
eingeklemmt und verletzt werden.
Das Gerät enthält vier Betriebsmodi:
• Beginner-Modus: In diesem Modus ist die Geschwindigkeit
auf 6 km/h begrenzt. Das Gerät reagiert zurückhaltender auf
Lenkbewegungen.
Zum Wählen des Modus stellen Sie das Gerät im ausgeschalteten
Zustand auf den Boden. Durch einmaliges, kurzes Drücken der Taste
5 richtet sich das Gerät automatisch auf die neutrale 0° Position aus.
Das Gerät bendet sich im Beginner-Modus.
Vorsicht
Sobald Sie 6 km/h erreicht haben, verhindert das Gerät eine weitere
Beschleunigung. Das Wippen des Cruisers beim Erreichen der
Geschwindigkeitsgrenze ist normal.
• Fortgeschrittener-Modus: In diesem Modus ist die Geschwindigkeit
auf 15 km/h begrenzt.
Zum Wählen des Modus stellen Sie das Gerät im ausgeschalteten
Zustand auf den Boden. Durch zweimaliges, kurzes Drücken der
Taste 5 richtet sich das Gerät automatisch auf die neutrale 0° Position
aus. Das Gerät bendet sich im Fortgeschrittenen-Modus.
Vorsicht
Warnung
• Beachten Sie, dass in diesem Modus einer Überlastung des Geräts
und daraus folgend ein kurzzeitiger Ausfall der Elektronik nicht
auszuschließen ist.
• Im Falle eines Ausfalls der Elektronik ist ein Überkippen des Fahrers
möglich, wodurch aufgrund der hohen Geschwindigkeit schwere
Verletzungen verursacht werden können.
• Die Leistungsgrenzen sind unter anderem von Akkuladezustand,
Fahrergewicht, Fahrbahnbelag und Gefälle/Steigung abhängig.
Sollten Sie beispielsweise von einer Ebene in eine Steigung fahren,
kann dieser Übergang zu einer Überschreitung der Leistungsgrenze
führen.
• Verwenden Sie den Cart-Modus ausschließlich mit hochwertiger
Schutzausrüstung.
• Für etwaige Sach- und Personenschäden in diesem Fahrmodus,
entstanden durch eine Überlastung des Geräts, übernimmt die
Hama GmbH & Co KG keinerlei Haftung.
• Sicherheits-Modus: Im Falle einer zu hohen Temperatur des
Motors, des Akkus oder der Steuerelektronik, sowie eines zu niedrigen
Ladezustands des Akkus, wechselt das Produkt automatisch in den
Sicherheits-Modus.
Warnung
Steigen Sie sofort ab und schalten Sie das Produkt aus, wenn
folgende Alarmsignale den Sicherheitsmodus anzeigen:
• Blinkende Front LEDs (bzw. Front und Rück LED bei F-Cruiser)
• Rote Status LEDs (bzw. grüne Status LEDs bei F-Cruiser
• Produkt bremst automatisch ab
• Alarmton
Kontaktieren Sie den Support (Siehe 12.3 Service und Support), falls
das Gerät nach dem Laden ungewöhnlich schnell in den Alarmmodus
wechselt.
Das Gerät wird wie folgt in Bewegung gesetzt:
Durch Gewichtsverlagerung auf Ihre Fußballen oder Fersen aktivieren
Sie die Bewegungstaster unter den Trittächen, dadurch drehen sich die
Räder in die Richtung, in die Sie Ihre Füße belasten und Sie bewegen
sich vor- oder rückwärts. Wenn Sie sich nach vorn oder hinten lehnen,
verlagert sich Ihr Schwerpunkt und damit die Kontaktäche der Räder
(der Punkt, an dem die Räder den Boden berühren) entsprechend, und
das Gerät lehnt sich ebenfalls vor oder zurück.
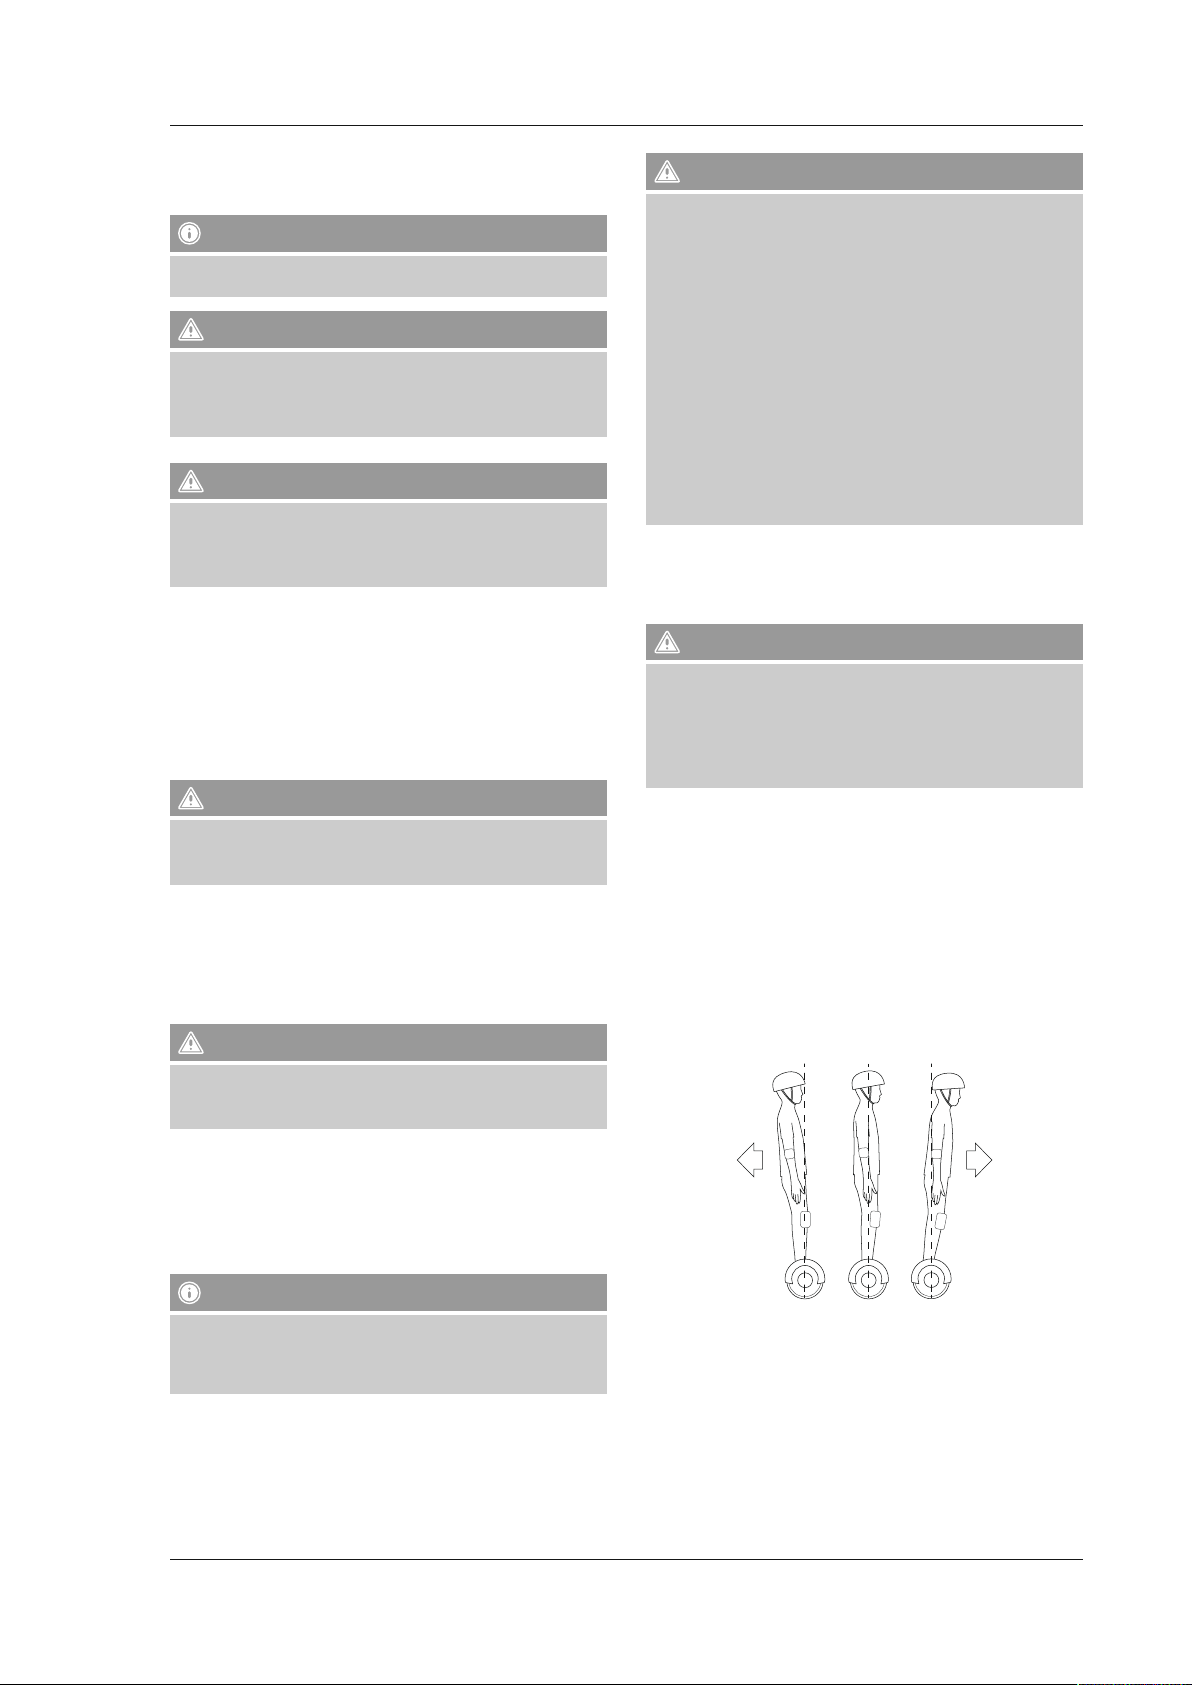
Sie müssen jedoch das Gleichgewicht selbst aufrechterhalten. Andernfalls
können Sie umkippen.
Sobald Sie die 15 km/h erreicht haben, verhindert das Gerät eine
weitere Beschleunigung. Das Wippen des Cruisers beim Erreichen der
Geschwindigkeitsgrenze ist normal.
• Cart-Modus: In diesem Modus lassen sich Geschwindigkeiten von bis
zu 30 km/h erreichen.
Zum Wählen des Modus stellen Sie das Gerät im ausgeschalteten
Zustand auf den Boden. Durch dreimaliges, kurzes Drücken der
Taste 5 richtet sich das Gerät automatisch auf die neutrale 0° Position
aus. Das Gerät bendet sich im Cart-Modus.
Hinweis – Cart Modus
• Der Cart-Modus ist nur zur Verwendung mit dem Cart-Aufsatz (Art.
Nr.109888) vorgesehen.
• Die Verwendung des Cart-Modus geschieht auf eigenes Risiko des
jeweiligen Fahrers!
26
Page 27

Das Produkt verfügt über keine seitlichen Stabilisierungsmechaniken.
Wird das Produkt so weit geneigt, dass ein Rad die Bodenhaftung
verliert, kann es sich nicht mehr unter Ihnen zentrieren und Sie können
umkippen.
Sie müssen auch das seitliche Gleichgewicht selbst aufrechterhalten.
Achten Sie also stets darauf, dass Ihr Körper mit der Mittelachse des
Produkts eine Linie bildet.
Lehnen Sie sich nicht in die Kurven bzw. in die Steigung, wenn Sie quer
zum Hang fahren.
7.2.1.3 USB-Ladebuchse (F-Cruiser)
Der Freestyle-Cruiser verfügt über eine USB-Type A Ladebuchse, mit
der mobile Geräte bis zu einem Ladestrom von 2.0 A geladen werden
können.
Hinweis - USB Ladebuchse
• Längeres Laden eines oder mehrerer Geräte nacheinander kann die
Reichweite des Cruisers verringern.
Vorsicht - Sturzgefahr
• Nutzen Sie die USB-Ladebuchse nicht während des Fahrbetriebs,
sondern nur bei abgestelltem Gerät.
• Es besteht sonst Sturz- und Verletzungsgefahr durch Ablenkung,
verlorenes Gleichgewicht und das Ladekabel.
7.2.2 U-Scooter
Hinweis
Achten Sie beim Einschalten darauf, dass das Produkt auf einem
achen, ebenen Untergrund steht.
Vorsicht
Hinweis
• Überschätzen Sie sich nicht. Legen Sie langsam an Geschwindigkeit
zu, um die volle Kontrolle über das Produkt zu entwickeln.
Außerdem empfehlen wir nur erfahrenen Fahrern, quer zum Hang
zu fahren.
• Sollten Sie zum ersten Mal ein solches Produkt benutzen, empfehlen
wir dies mit Unterstützung einer zweiten Person zu tun. Diese sollte
Sie von vorne an den Händen halten, um Ihnen Stabilität zu geben.
Versuchen Sie sich vor allem ruhig zu halten und keine hektischen
Bewegungen auszuführen. Das Gerät unterstützt Ihr Gleichgewicht,
versuchen Sie also nicht gegen die Ausgleichsbewegungen
entgegenzuarbeiten, sondern konzentrieren Sie sich auf Ihr
Gleichgewicht.
7.2.1.1 Energierückgewinnung (Rekuperation)
• Alle Cruiser verfügen über eine Funktion zur Energierückgewinnung
beim Bremsen oder Bergabfahrten (Rekuperation).
• Die Energierückgewinnung kann unter idealen Umständen die
Reichweite des Cruisers um 5-10% erhöhen. Dies ist jedoch von vielen
Faktoren, wie dem gefahrenen Geländeprol und der Häugkeit der
Bremsmanöver abhängig und kann individuell nicht vorhergesagt
werden.
Vorsicht bei voll geladenem Akku
• Vermeiden Sie bei einem voll aufgeladenen Akku lange
Bergabfahrten oder Bremsvorgänge, da der Akku in diesem Zustand
die rückgewonnene Energie nicht speichern kann.
• Fahren Sie zunächst 1-2 Min. auf ebenem Gelände, um den Akku
etwas zu entladen.
• Der Akku kann sonst beschädigt werden.
7.2.1.2 Beleuchtungseinrichtungen (F-Cruiser)
• Wenden Sie stets die richtigen Hebe- und Ladetechniken an.
• Wählen Sie robuste, unbewegliche Hebepunkte, beispielsweise in
der Mitte des Unterteils.
• Heben Sie stets aus der Hocke und nicht aus dem Rücken.
Warnung
• Achten Sie auf Ihre Finger! Das Produkt darf nicht an den Reifen,
Schutzblechen oder Rädern angehoben werden.
• Hände und Finger können zwischen dem Reifen und dem Schutzblech
eingeklemmt und verletzt werden.
Abbildung 8
3 4
B
M
S
SPEED
SLO
ODO
0000
OO
.0
Km/h
7
Km
ECO
POWER
1
ON/OFF
MODE
2
1. Ein-/Ausschalter
2. Modusschalter
3. Display
4. Gashebel
Hinweis - Front und Rücklichter/Anpassung Fahrtrichtung
• Der Freestyle-Cruiser verfügt über gut sichtbare, separate Front- und
Rücklichter.
• Der Freestyle-Cruiser erkennt selbstständig die Fahrtrichtung und
passt die Lichter automatisch entsprechend an (Frontlichtfarbe
Weiß, Rücklichtfarbe Rot).
• Die Erkennung der Fahrtrichtung und die Anpassung erfolgen nach
5 Radumdrehungen.
Um den Scooter zu starten, halten Sie zunächst den Ein-/Ausschalter
gedrückt, bis das Display zu leuchten beginnt. Der Scooter verfügt über
drei unterschiedliche Betriebsmodi:
• Beginner-Modus: In diesem Modus ist die Geschwindigkeit auf 6
km/h begrenzt und der Scooter beschleunigt langsam.
Zum Wählen des Modus drücken Sie den Modusschalter [MODE]
solange bis auf dem Display die Anzeige „SLO“ erscheint.
• Fortgeschrittener-Modus: In diesem Modus ist die Geschwindigkeit
auf 15 km/h begrenzt und der Scooter beschleunigt stärker als im
Beginner-Modus.
27
Page 28

Zum Wählen des Modus drücken Sie den Modusschalter [MODE]
solange bis auf Display der Hinweis „MID“ erscheint.
• Pro-Modus: In diesem Modus ist die Geschwindigkeit auf 25 km/h
begrenzt und der Scooter nutzt seine volle Leistung.
Vorsicht – Pro-Modus
• Achten Sie in diesem Modus darauf, dass Sie ausreichend Abstand
zu Gegenständen, Personen oder Tieren haben.
• Gewöhnen Sie sich an diese Beschleunigung und Geschwindigkeit
zunächst nur auf weitläugen und hindernisfreien Flächen.
• Aufgrund der hohen Geschwindigkeit entsteht ein erhöhtes
Verletzungsrisiko.
Zum Wählen des Modus drücken Sie den Modusschalter [MODE]
solange bis auf dem Display der Hinweis „FAS“ erscheint.
Der Scooter wird wie folgt in Bewegung gesetzt:
Um den elektrischen Hilfsmotor nutzen zu können, müssen Sie den
Scooter zunächst anschalten. Betätigen Sie hierfür den Einschaltknopf
(siehe Abbildung 8), bis der Tacho zu leuchten beginnt.
Für den F-Cruiser gilt zusätzlich folgendes:
Es liegen zusätzlich zwei stabile Schutzbleche, sowie ein Montageset
bei. Bringen Sie die Schutzbleche an, wie in den folgenden Abbildungen
dargestellt.
• Stecken Sie die Schutzbleche zwischen Antriebsrad und Fahrzeugkörper.
• Achten Sie darauf, dass sich die Schutzbleche an der Oberseite der
Standäche sauber in die beiden Kragen einhängen und sich die
Befestigungsnasen vollständig in den Aussparung an der Unterseite des
Fahrzeugkörpers benden.
• Achten Sie darauf, die Befestigungsschrauben gerade einzuschrauben!
Hinweis
Grundsätzlich ist das Gerät auch ohne elektrischen Hilfsantrieb
verwendbar.
• Zur Verwendung des elektrischen Hilfsmotors müssen Sie das Gerät
zunächst auf etwa 4 km/h aus eigener Muskelkraft in Bewegung setzen.
• Ziehen Sie im Anschluss den Gashebel, um den Hilfsmotor
zuzuschalten. Sie können den Scooter nun bis zur jeweiligen
Geschwindigkeitsbegrenzung des von Ihnen verwendeten Modus
beschleunigen.
Vorsicht
• Sie sollten sich zunächst an das Fahrverhalten des Scooters
gewöhnen, um einen Sturz und Verletzungsrisiken zu vermeiden.
• Üben Sie hierfür auf einer weiträumigen Fläche und testen Sie das
Beschleunigungs- und Fahrverhalten.
• Tragen Sie in jedem Fall hochwertige Schutzkleidung.
Zum Bremsen ist der Bremshebel an der linken Seite des Lenkers zu
betätigen.
Vorsicht - Bremsvorgang
• Gewöhnen Sie sich an die Bremsverzögerung. Gewinnen Sie ein
Gefühl, wie lange der Scooter in etwa zum Bremsen benötigt.
• Bremsen Sie immer rechtzeitig und riskieren Sie keine Kollision mit
Personen, Tieren oder Gegenständen.
Hinweis - weitere Anzeigen
Nachdem der Scooter durch ein längeres Drücken auf den ON/OFF
Schalter aktiviert wurde, können Sie durch ein kurzes Drücken auf den
ON/OFF Schalter zwischen weiteren Anzeigen wechseln:
ODO = Gesamtkilometer
TRIP = Kilometer seit einschalten des Scooters
TM = Zeit seit einschalten des Scooters
Die Modi RM und ERRO sind für den Hama Support bei Servicefällen
vorgesehen und nicht weiter zu beachten.
7.3 Inbetriebnahme und Montage des Geräts
Hinweis
Bitte laden Sie das Produkt vor der ersten Benutzung vollständig auf.
7.3.1 F-/S-/X-Cruisers
Für den S-Cruiser und X-Cruiser gibt es zur Inbetriebnahme keine
weiteren Punkte als die unter 7.2.1. beschriebenen Hinweise zu beachten
Befestigungsnasen
Trittäche
7.3.2 U-Scooter
• Heben Sie den Scooter beim Auspacken an der Lenksäule aus der
Verpackung.
• Bauen Sie den Scooter wie in den folgenden Abbildungen dargestellt
auf.
• Wie in den folgenden Abbildungen dargestellt, ist die Lenksäule
dreifach höhenverstellbar.
Hinweis
• Achten Sie darauf, dass alle Verschlüsse sicher eingerastet sind.
28
Page 29
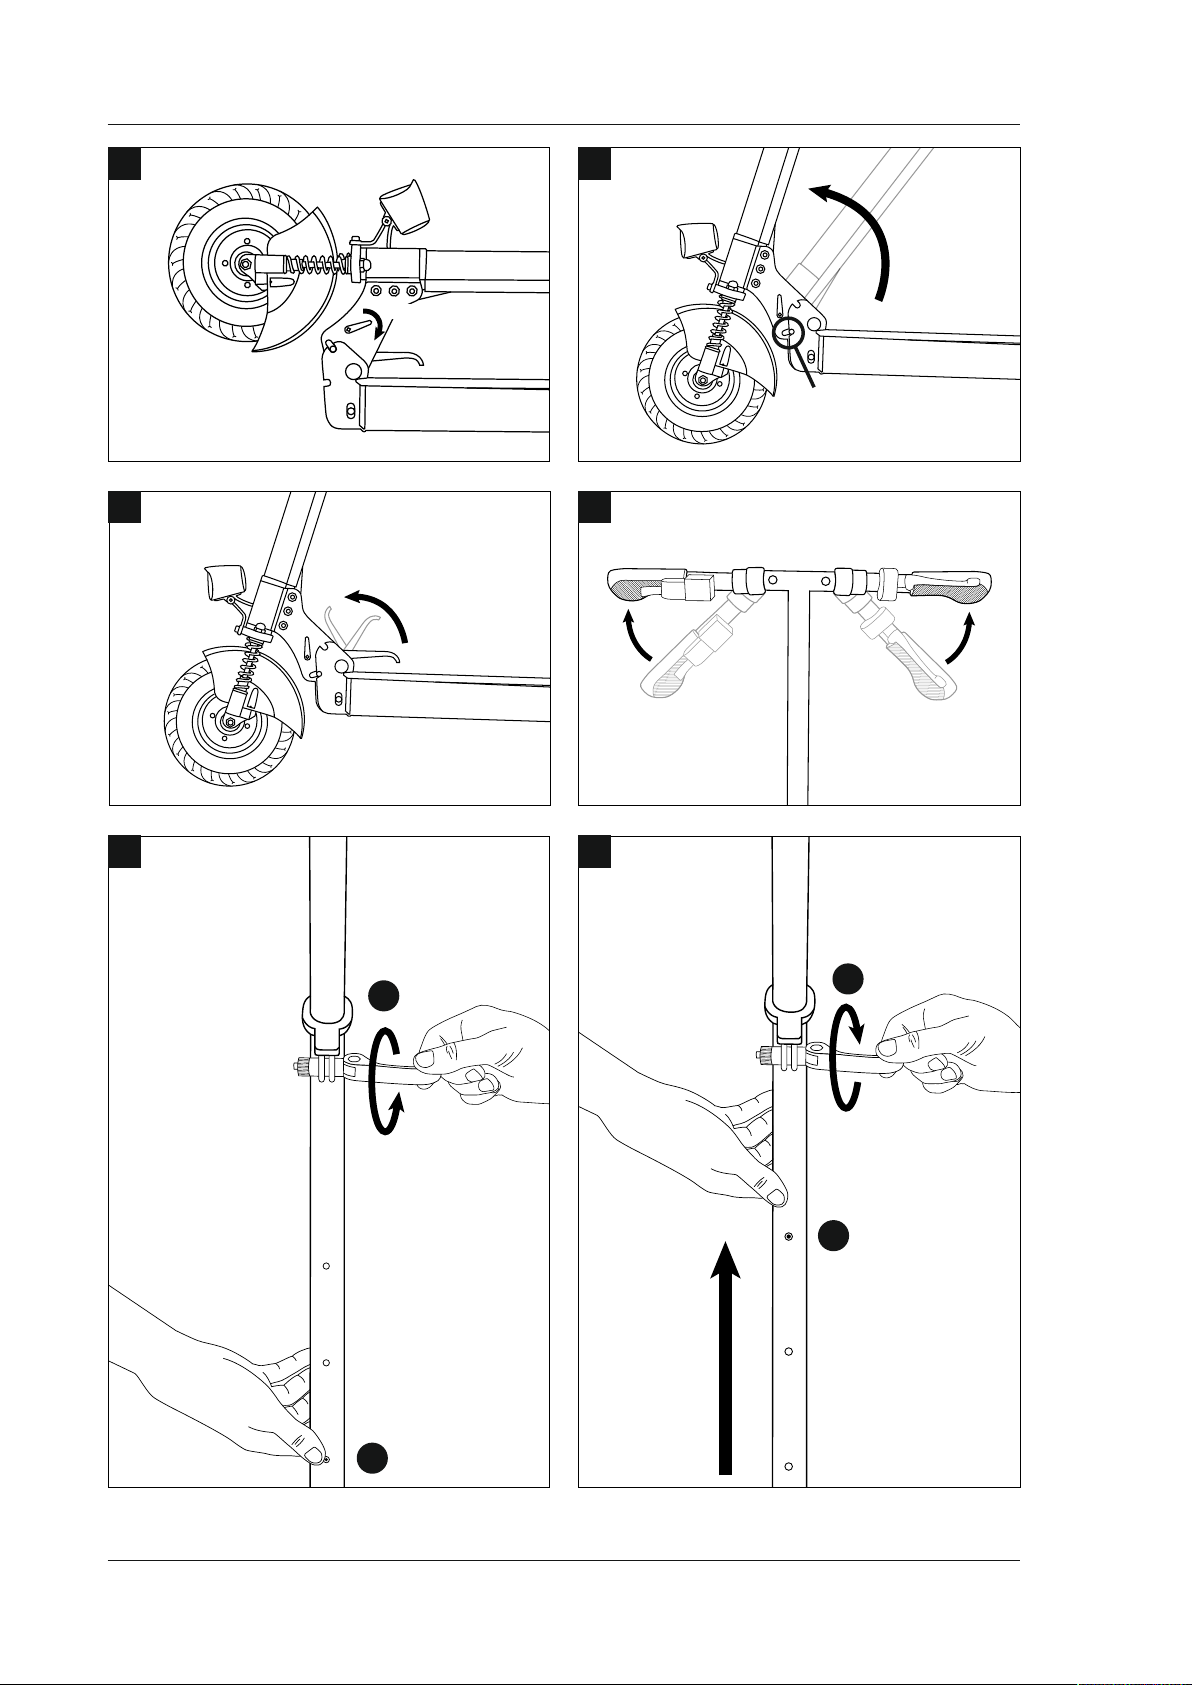
A
PUSH
B
CLICK
C
E
OPEN
1
D
CLICK CLICK
F
CLOSE
4
CLICK
3
PUSH
2
29
Page 30

7.4 Ladestandsanzeigen
7.4.1 S- / X-Cruiser
Entladen
Ladestand
100% – 10% Grün Grün
9% – 5% Grün Grün/blinkend
4% – 0%
(Sicherheitsmodus)
Kein Fahrer auf Trittächen
Laden
Ladestand
0 – 4% OFF Rot
5% – 9% OFF Rot/blinkend
10% – 99% OFF Grün/blinkend
100% OFF Grün
7.4.2 F-Cruiser
Entladen
100% – 67%
Drei LEDs
sind permanent an
Laden
0% – 33%
Eine LED blinkt Zwei LEDs
7.4.3 U-Scooter
Der Ladestand wird durch das Batteriesymbol mit bis zu 6 Balken (Akku
voll) im Display dargestellt (siehe Abbildung 8).
Hinweis
66–34% 33–11% 10–5% 4–0%
Zwei LEDs
sind permanent an
blinken
Status LED
Rot Rot
Blinkende Front LEDs, Alarmton, Bremsen
OFF dem Ladestand
Status LED
Eine LED ist
permanent
an
34 – 66% 67 – 99% 100%
Eine LED
blinkt
Drei LEDs
blinken
Battery LED
entsprechend
Battery LED
Sicherheitsmodus
siehe Punkt
7.2.1.
Drei LEDs
sind permanent
an
Hinweis - Schwankungen des Ladezustands
• Starke Steigungen, längere, extreme Fahrmanöver und /oder
Dauervollgas fordern dem Akku eine überdurchschnittlich hohe
Energieleistung ab.
• Macht man nach einer solchen Fahrt eine Pause und/oder schaltet
das Gerät kurz ab, kann es vorkommen, dass sich der Ladestand
nach dieser Pause wieder leicht erhöht.
• Dieses Verhalten ist normal, da sich der Akku in der kurzen Pause
etwas regeneriert.
8. Akku
Hinweis
Bei normaler Benutzung und angemessener Pege sollte der Akku etwa
1500 Ladezyklen überstehen. Einen verbrauchten Akku erkennen Sie daran,
dass er immer häuger geladen werden muss und dass die Reichweite
abnimmt.
8.1
Sicherheit im Umgang mit dem Akku
Warnung
Zur Gewährleistung der Sicherheit und zur Maximierung der Lebensdauer
und Leistung des Akkus ist den Vorgaben in dieser Anleitung unbedingt
Folge zu leisten.
• Der Akku darf unter folgenden Bedingungen nicht weiter benutzt
werden:
- wenn das Gehäuse beschädigt ist
-
wenn aus dem Akku ein ungewöhnlicher Geruch ausströmt oder
dieser übermäßig heiß ist
- wenn Substanzen austreten
• Vermeiden Sie Kontakt mit austretenden Substanzen.
• Kontakt mit der Batteriespannung kann zum Tod oder schweren
Verletzungen führen.
• Bei eingestecktem Stromkabel sind Arbeiten am Produkt gefährlich.
Stromschläge können schwere Personen- und Sachschäden
verursachen.
• Der Akku darf auf keinen Fall aus dem Gerät entnommen oder geöffnet
werden. Durch Öffnen wird das Gehäuse beschädigt und es können
giftige Substanzen freigesetzt werden.
• Sie dürfen niemals Gegenstände in den Akku einführen oder
versuchen, das Akkugehäuse aufzubrechen. Wenn Sie etwas in einen
der Anschlüsse oder eine der Öffnungen einführen, können Sie einen
Stromschlag, Verletzungen oder Verbrennungen erleiden oder einen
Brand auslösen.
• Der Akku darf nur mit vom Hersteller zugelassenen Ladegeräten
aufgeladen werden.
• Setzen Sie den Scooter und das Ladegerät unter keinen Umständen
hohen Temperaturen oder Feuchtigkeit aus, und benutzen Sie niemals
ein beschädigtes Ladegerät.
• Um Schäden vorzubeugen, sollten Sie das Ladegerät insbesondere
Kabel und Stecker in regelmäßigen Abständen überprüfen. Ein
beschädigtes Ladegerät darf nicht weiter benutzt werden. Bitte setzen
Sie sich in diesem Fall mit dem Hama-Support in Verbindung.
• Bei Entsorgung und Transport des Scooter sind alle geltenden Gesetze
und Vorschriften einzuhalten.
Laden Sie den Scooter sobald der Ladestand nur noch einen Balken
beträgt! Andernfalls wird der Akku beschädigt.
30
Page 31
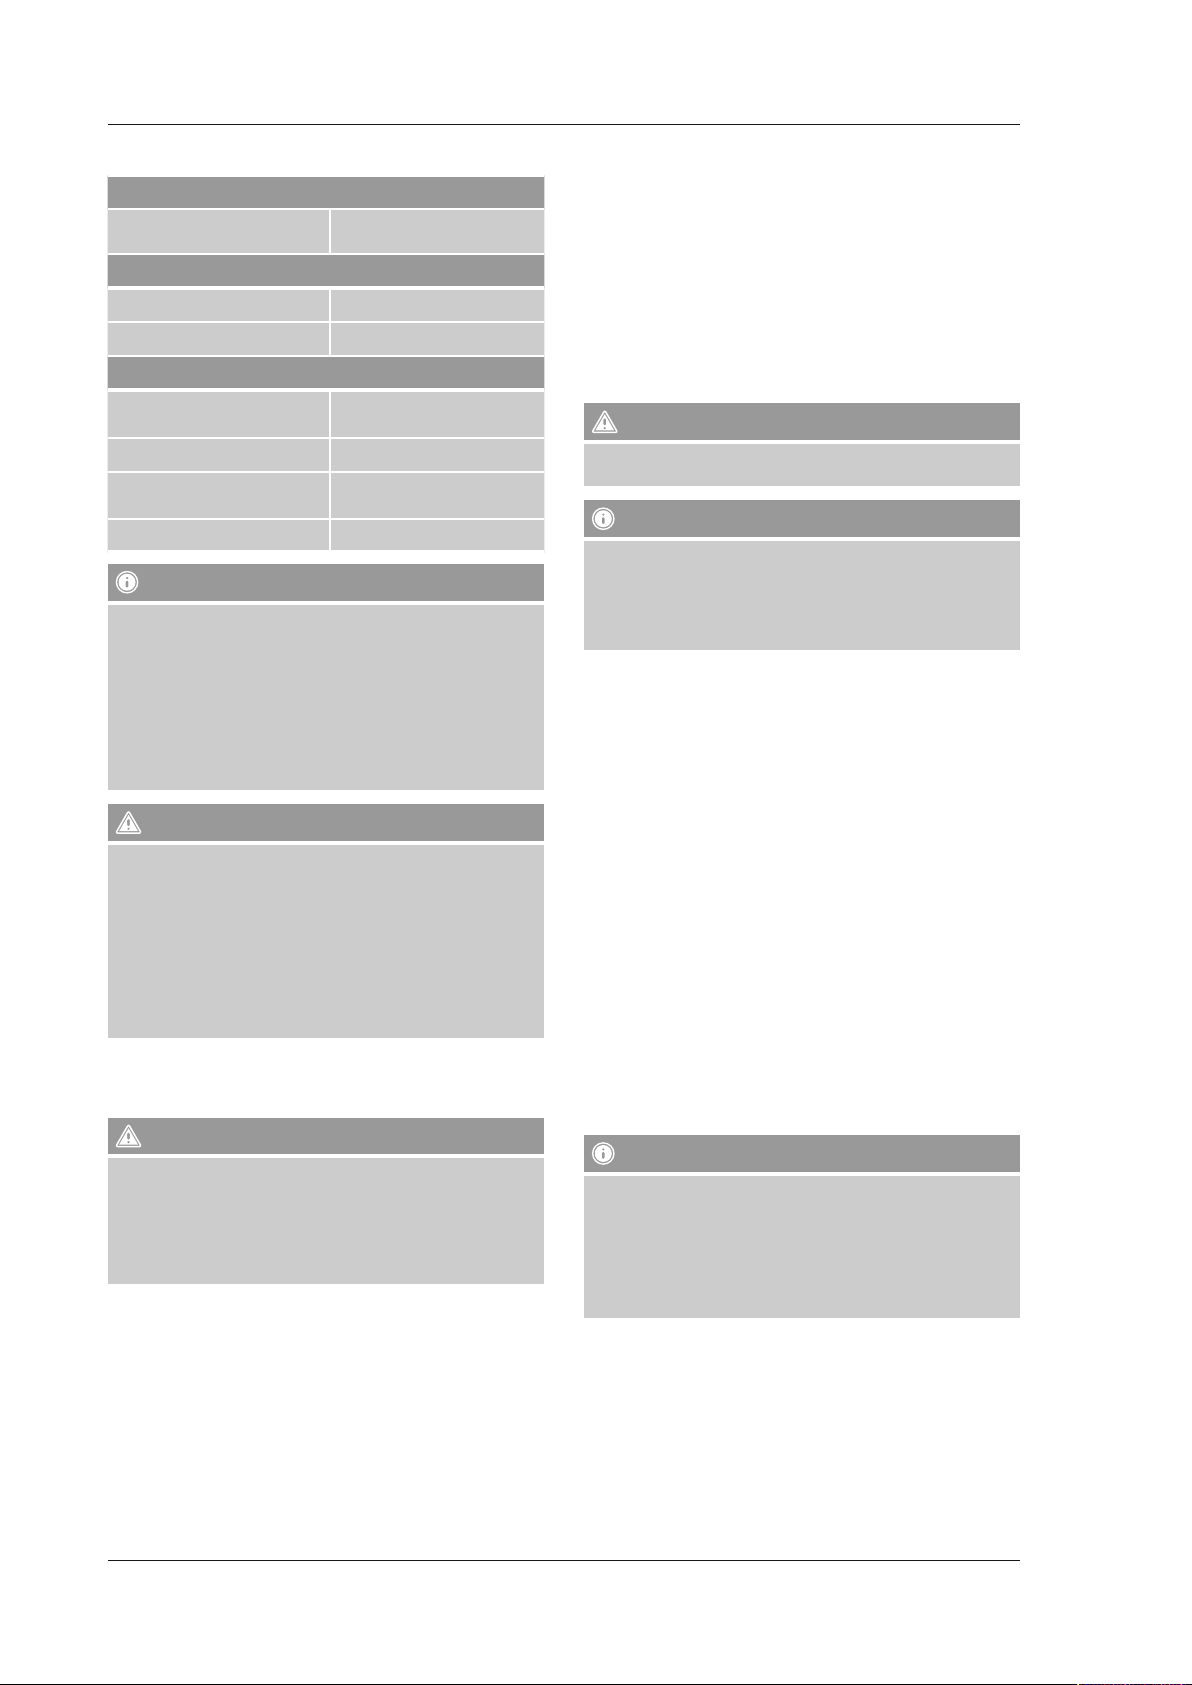
8.2 Technische Daten Akku (Tabelle 3)
Ladezeit
Nachladen vom Leerzustand Ca. 1,5 Stunden F- / S- / X-Cruiser
Ca. 3 Stunden U-Scooter
Temperaturbereiche
Betrieb -10 °C bis 40 °C
Auaden, Lagerung und Transport 10 °C bis 25 °C
Allgemeines
Kapazität (Ah) und Spannung 36V, 2.5 Ah (F- / S- / X-Cruiser)
5,8 Ah (U-Scooter)
Abmessungen 13,5 cm x 6 cm x 9 cm
Gewicht 0,50 kg (F-/S-/X-Cruiser)
0,97 kg (U-Scooter)
Technologie Lithium-Ionen
Hinweis
• Wenn Sie den Akku außerhalb der angegebenen Temperaturbereiche
benutzen, auaden oder lagern, können Sie Ihre Garantieansprüche
verlieren und müssen unter Umständen mit geringerer Reichweite
und verminderter Akku-Ladeleistung rechnen.
• Vor dem erstmaligen Gebrauch muss das Produkt vollständig
geladen werden. Laden Sie das Produkt zusätzlich mindestens
einmal monatlich auf.
• Der Akku darf nur in dem angegebenen Ladetemperaturbereich
aufgeladen werden.
Vorsicht
• Wird der Akku nicht regelmäßig vollständig geladen, kann er sich
mit der Zeit tiefentladen und dauerhaft beschädigt werden.
• Die Ladedauer hängt von folgenden Faktoren ab:
- aktueller Ladestand – je niedriger der Ladestand, desto länger
dauert der Ladevorgang.
- Temperatur des Akkus – ein zu heißer oder zu kalter Akku braucht
länger oder ladet sich eventuell gar nicht auf, am effektivsten ist
der Ladevorgang bei Temperaturen in der Mitte des angegebenen
Temperaturbereichs.
8.3 Laden der Geräte
Laden Sie das Produkt nur an einem sauberen, trockenen Ort mit einer
Temperatur im empfohlenen Ladetemperaturbereich.
Warnung
• Der Stecker darf auf keinen Fall eingesteckt werden, wenn die
Ladebuchse, das Stromkabel oder die Steckdose nass sind. Die
elektrische Ausrüstung ist nicht ausreichend gegen Feuchtigkeit
geschützt!
• Laden Sie das Produkt nicht unbegrenzt, dies kann Ihren Akku trotz
Überladungsschutz schädigen.
• Betreiben Sie das Produkt nur an einer dafür zugelassenen Steckdose.
Die Steckdose muss in der Nähe des Produktes angebracht und leicht
zugänglich sein.
• Verbinden Sie das mitgelieferte Netzteil mit einer Steckdose und der
Ladebuchse, um den Akku aufzuladen. Das Produkt aktiviert sich beim
Anschließen selbstständig. Der Ladevorgang beginnt automatisch.
• Während des Ladevorgangs leuchtet die Status LED am Netzteil rot.
Sobald der Akku vollgeladen ist, leuchtet die Status LED am Netzteil
grün.
Ladefehler
Tritt bei laufender Auadung ein Fehler auf, wird der Vorgang
abgebrochen. Die Status LED am Netzteil erlischt hierbei ganz. Sollte die
Ladestandanzeige am Produkt ebenfalls erloschen sein, gehen Sie wie
folgt vor:
• Stellen Sie sicher, dass Strom anliegt und das Kabel fest in der
Ladebuchse sitzt.
• Sollte die Ladestandanzeige bei ordnungsgemäßer Stromzufuhr
nicht aueuchten, ziehen Sie das Stromkabel ab und starten Sie den
Ladevorgang erneut.
• Lässt sich das Problem damit nicht beheben, wenden Sie sich bitte an
unseren Support.
Warnung
Das Produkt darf nicht bis zur völligen Entladung der Batterien
gefahren werden.
Hinweis
Da der Ablauf des Ladevorgangs durch Einüsse wie Ladetemperatur,
Ladeverhalten und Ladespannung geringfügig variieren kann, kann
es vereinzelt vorkommen, dass der Akku lediglich zu 99% geladen
wird, wodurch die Ladestandsanzeige keine vollständige Akkuladung
aufzeigt. Dies ist unbedenklich und normal.
8.4 Auswirkungen der Temperatur auf die Leistung
Der Akku ist gewöhnlich deutlich wärmer als die Umgebungstemperatur.
Diese Erwärmung geht auf die abgegebene (beim Fahren) bzw.
aufgenommene Elektrizität (beim Laden) zurück.
Unterwegs bei Hitze und Kälte
• Der Akku arbeitet am ezientesten, wenn Sie bei Temperaturen
ungefähr in der Mitte des empfohlenen Betriebstemperaturbereichs
fahren.
• Bei kalten Akkus ist die Reichweite meist geringer, als bei Akkus, deren
Temperatur annähernd bei Raumtemperatur liegt.
Auaden bei Hitze und Kälte
• Der Akku muss sich vor und bei dem Ladevorgang innerhalb des
empfohlenen Ladetemperaturbereichs benden. (Siehe Tabelle 3,
Temperaturbereiche)
• Ihr Akku lädt sich am besten auf, wenn die Temperatur ungefähr in der
Mitte des empfohlenen Ladetemperaturbereichs liegt. Zu heiße oder zu
kalte Akkus brauchen eventuell länger oder laden sich möglicherweise
gar nicht auf.
Leerer Akku
• Ein fast leerer Akkus wird bei F- / S- und X-Cruiser durch den
Sicherheitsmodus gemeldet. Halten Sie in diesem Fall kontrolliert an
und steigen Sie ab.
Hinweis
• Es kann vorkommen, dass alte, kalte, überstrapazierte oder schlecht
gewartete Akkus einen hohen Widerstand entwickeln.
• Dies wiederum kann dazu führen, dass ein fast leerer Akku
angezeigt wird, auch wenn die Akkus vor kurzem aufgeladen
worden sind.
• Der Akku ist dann verbraucht und muss vom Hama-Support
ausgetauscht werden.
31
Page 32
8.5 Austauschen des Akkus
Hinweis
• Tauschen Sie unter keinen Umständen Ihren Akku selbst!
• Wenn Sie den Akku eigenständig tauschen, verlieren Sie Ihre
Garantieansprüche und müssen mit geringerer Reichweite und
verminderter Akku-Ladeleistung rechnen.
• Im Falle einer Beschädigung nehmen Sie das Gerät nicht mehr in
Betrieb.
8.6 Versand von Li-Ion-Akkus
Vorsicht
Beim Transport der Akkus sind alle geltenden Gesetze und V
einzuhalten.
orschriften
9. Wartung
Warnung
• Das Produkt darf auf keinen Fall modiziert werden.
• Bevor Sie eines der nachstehenden Verfahren ausführen, stellen Sie
sicher, dass das Produkt ausgeschaltet und das Stromkabel abgezogen
ist.
• Diese Verfahren sind gefährlich, wenn das Produkt eingeschaltet ist
oder aufgeladen wird.
Überprüfen der Reifen-/Radbaugruppe
9.1
• Stellen Sie sicher, dass das Rad nicht taumelt. Greifen Sie das Rad und
versuchen Sie, es von einer Seite zur anderen zu bewegen. Es darf sich
nicht seitlich bewegen.
• Sollte das Rad taumeln, wenden Sie sich bitte an unseren Support.
9.2 Überprüfen des Reifendrucks (X-Cruiser / U-Scooter)
• Kontrollieren Sie regelmäßig den Reifendruck bei Modellen mit
Luftdruckreifen. Ein falscher Reifendruck beeinträchtigt die Reichweite.
• Sollte der Druck in einem oder beiden Reifen nicht den Spezikationen
in den Technische Daten für Ihr Produkt-Modell entsprechen, sind die
Reifen vorschriftsgemäß aufzupumpen.
• Achten Sie darauf, dass beide Reifen den gleichen Druck haben und frei
von Schmutz und Ablagerungen sind.
Warnung
• Der in der Bedienungsanleitung angegebene Druck ist maßgeblich,
nicht der auf den Reifen selbst angegebene.
• Bei höherem Reifendruck nehmen Federung und Traktion ab und das
Kontrollverlust-, Kollisions- und Sturzrisiko steigt.
• Bei niedrigerem Reifendruck verringert sich die Reichweite und die
Reifen-/Radbaugruppe kann Schaden nehmen.
• Ungleicher Reifendruck führt dazu, dass das Produkt beim Fahren in die
Richtung des Reifens mit dem geringeren Druck zieht.
9.3
Reinigen des Produkts
Reinigen Sie das Produkt vorsichtig mit einem angefeuchteten Tuch. Es
darf beim Reinigen keine Feuchtigkeit ins Produkt eindringen!
Warnung
• Übermäßige Wassereinwirkung vermeiden!
• Das Produkt darf nicht in Flüssigkeiten eingetaucht werden; es kann
dadurch dauerhafte Schäden davontragen.
• Das Produkt darf keinen heftigen Regenschauern oder lang
anhaltenden Regengüssen ausgesetzt werden (das schließt Fahrten,
Lagerung und Transport mit ein).
• Das Produkt darf nicht mit Hochdruckreinigern oder
Hochdruckschläuchen gereinigt werden. Durch diese Geräte kann
Wasser in Bauteile gelangen, die trocken bleiben müssen.
• In die Ladebuchse darf auf keinen Fall Wasser gelangen.
Vorsicht
Die Trittächen und Reifen dürfen nicht mit Spezialreinigern
gereinigt werden. Derartige Produkte können die Traktion und die
Standsicherheit beeinträchtigen.
9.4 Lagern des Produkts
• Lagern Sie das Produkt im Haus an einem trockenen Ort. Vermeiden Sie
unbedingt Nässe, hohe Luftfeuchtigkeit und extreme Temperaturen.
• Lagern Sie das Produkt nur bei den empfohlenen Lade- und
Lagertemperaturen (siehe Tabelle 3), um die volle Leistungsfähigkeit
des Akkus zu gewährleisten.
10. Fehlersuche und Fehlerbehebung (F- /S-/ X-Cruiser)
Warnung
• Schalten Sie das Produkt stets aus und ziehen Sie das Stromkabel ab,
bevor Sie Wartungsarbeiten vornehmen.
• Das Gerät darf auf keinen Fall geöffnet werden.
• Im Inneren gibt es keine Teile, die Sie selbst warten können.
• Durch das Öffnen des Gehäuses verlieren Sie ihre Garantieansprüche.
10.1
Austauschen von Bau- und Ersatzteilen
Wenn ein beschädigtes oder abgenutztes Teil ersetzt werden muss,
wenden Sie sich bitte an unseren Support.
10.2 Fehlerbehebung
Fehlerbehebungsverfahren
Sie können bestimmte Probleme mit Ihrem Gerät selber beheben.
Warnung
Schalten Sie das Gerät stets aus und ziehen Sie das Stromkabel ab, bevor
Sie Wartungsarbeiten vornehmen oder Teile bzw. Zubehör anbringen.
Das Gerät zieht beim Fahren zu einer Seite
Bevor Sie versuchen, dieses Problem zu beheben, sollten Sie sich
unbedingt das nachstehende Wartungsverfahren durchlesen.
Empfohlene Abhilfemaßnahme:
• Vergewissern Sie sich, dass beide Reifen den gleichen Reifendruck
haben und dass dieser den empfohlenen Werten entspricht (siehe
Reifendruck, Tabelle 1/2).
• Sollten einer oder beide Reifen nicht vorschriftsgemäß aufgepumpt
sein, pumpen Sie den/die Reifen auf den korrekten Wert auf und stellen
sicher, dass der Druck in beiden Reifen gleich ist.
• Verteilen Sie Ihr Gewicht gleichmäßig auf beide Füße. Wenn Sie einen
Fuß stärker belasten, zieht der Cruiser in diese Richtung.
Ein Reifen hat einen Plattfuß bzw. lässt Luft entweichen
Bevor Sie versuchen, dieses Problem zu beheben, sollten Sie sich
unbedingt das nachstehende Wartungsverfahren durchlesen.
Empfohlene Abhilfemaßnahme:
• Kontrollieren Sie den Reifen auf Beschädigungen. Sollte er beschädigt
sein, wenden Sie sich an unseren Support.
• Pumpen Sie den Reifen auf (siehe Reifendruck, Tabelle 1/2) und
überprüfen Sie ihn auf Undichtigkeiten. Sollte sofort wieder ein Plattfuß
auftreten oder irgendwo Luft entweichen, wenden Sie sich an unseren
Support.
Warnung
Sie dürfen erst dann aufsteigen, wenn alle Fehler behoben sind.
Hinweis
Bitte verwenden Sie ausschließlich Hama Originalzubehör bzw.
Ersatzteile. Sie erhalten Informationen zum Erhalt dieser Produkte
durch unseren Support.
32
Page 33
11. Ladegerät
11.1 Sicherheitshinweise
• Überprüfen Sie bitte vor jeder Inbetriebnahme den einwandfreien
Zustand des Ladegeräts und der Zuleitungen. Sind Schäden erkennbar,
das Ladegerät auf keinen Fall in Betrieb nehmen.
• Das Ladegerät ist nicht für den Betrieb in feuchter Umgebung geeignet.
• Das Ladegerät darf ausschließlich für Ihren Cruiser eingesetzt werden.
• Im Betrieb auf ausreichende Belüftung achten.
• Ladegerät im Betrieb nicht abdecken.
• Bei Kontakt mit Flüssigkeiten besteht die Gefahr eines elektrischen
Schlages, das Gerät muss sofort vom Netz getrennt werden. Um
Schäden zu vermeiden, darf das Ladegerät nicht weiter benutzt werden.
• Das Ladegerät enthält keine vom Anwender zu wartenden Teile. Das
Gehäuse darf nicht geöffnet werden.
• Netzkabel abziehen, falls das Ladegerät nicht verwendet wird.
Warnung
Die Wahl einer höheren Betriebsspannung als vom Gerätehersteller
angegeben kann zu schweren Schäden am Produkt und Ladegerät
führen. Verwenden Sie deshalb ausschließlich das von Hama
angebotene Originalzubehör.
11.2 Technische Daten
Eingangsspannungsbereich 100-240V ~ 50/60Hz
Dauerleistung maximal 90 W
Ausgangsstrom 2A
Ausgangsspannung 42 V DC
12.3 Service und Support
Bitte wenden Sie sich bei Fragen zum Produkt gerne an die HamaProduktberatung.
Hotline: +49 9091 502-115 (Deu/Eng)
Weitere Supportinformationen nden sie hier:
www.hama.com
12.4 Entsorgungshinweise
Hinweis zum Umweltschutz:
Ab dem Zeitpunkt der Umsetzung der europäischen Richtlinien
2012/19/EU und 2006/66/EG in nationales Recht gilt folgendes:
Elektrische und elektronische Geräte sowie Batterien dürfen nicht
mit dem Hausmüll entsorgt werden. Der Verbraucher ist
gesetzlich verpichtet, elektrische und elektronische Geräte sowie
Batterien am Ende ihrer Lebensdauer an den dafür eingerichteten,
öffentlichen Sammelstellen oder an die Verkaufsstelle zurückzugeben.
Einzelheiten dazu regelt das jeweilige Landesrecht. Das Symbol auf dem
Produkt, der Gebrauchsanleitung oder der Verpackung weist auf diese
Bestimmungen hin. Mit der Wiederverwertung, der stoichen
Verwertung oder anderen Formen der Verwertung von Altgeräten/
Batterien leisten Sie einen wichtigen Beitrag zum Schutz unserer Umwelt.
Betriebstemperatur 10°~25°C
11.3 Reinigung
Verwenden Sie ein weiches trockenes Tuch. Wir empfehlen Ihnen ein
nicht scheuerndes Mikrofasertuch zu verwenden. Bitte setzen Sie keine
Lösungsmittel und keine Flüssigkeiten ein.
12. Anhang
12.1 Ansprechpartner und rechtliche Informationen
Befolgen Sie stets alle geltenden Gesetze und Vorschriften
In vielen Ländern ist das Fahren mit solchen Geräten auf öffentlichen
Straßen und Bürgersteigen gesetzlich geregelt. Neben anderen
Anforderungen schreiben die Gesetze und Vorschriften meistens auch
das Mindestalter des Fahrers und Geschwindigkeitsbegrenzungen vor.
Auch das Tragen entsprechender Schutzkleidung kann verlangt werden.
In manchen Ländern darf das Gerät auf öffentlichen Straßen und
Bürgersteigen überhaupt nicht gefahren werden. Bitte wenden Sie sich
an Ihre zuständigen Behörden und machen Sie sich mit den geltenden
Gesetzen und Vorschriften vertraut.
12.2 Haftungsausschluss
Die Hama GmbH & Co. KG übernimmt keinerlei Haftung oder
Gewährleistung für Schäden, die aus unsachgemäßer Installation,
Montage und unsachgemäßem Gebrauch des Produktes oder
einer Nichtbeachtung der Bedienungsanleitung und/oder der
Sicherheitshinweise resultieren.
33
Page 34
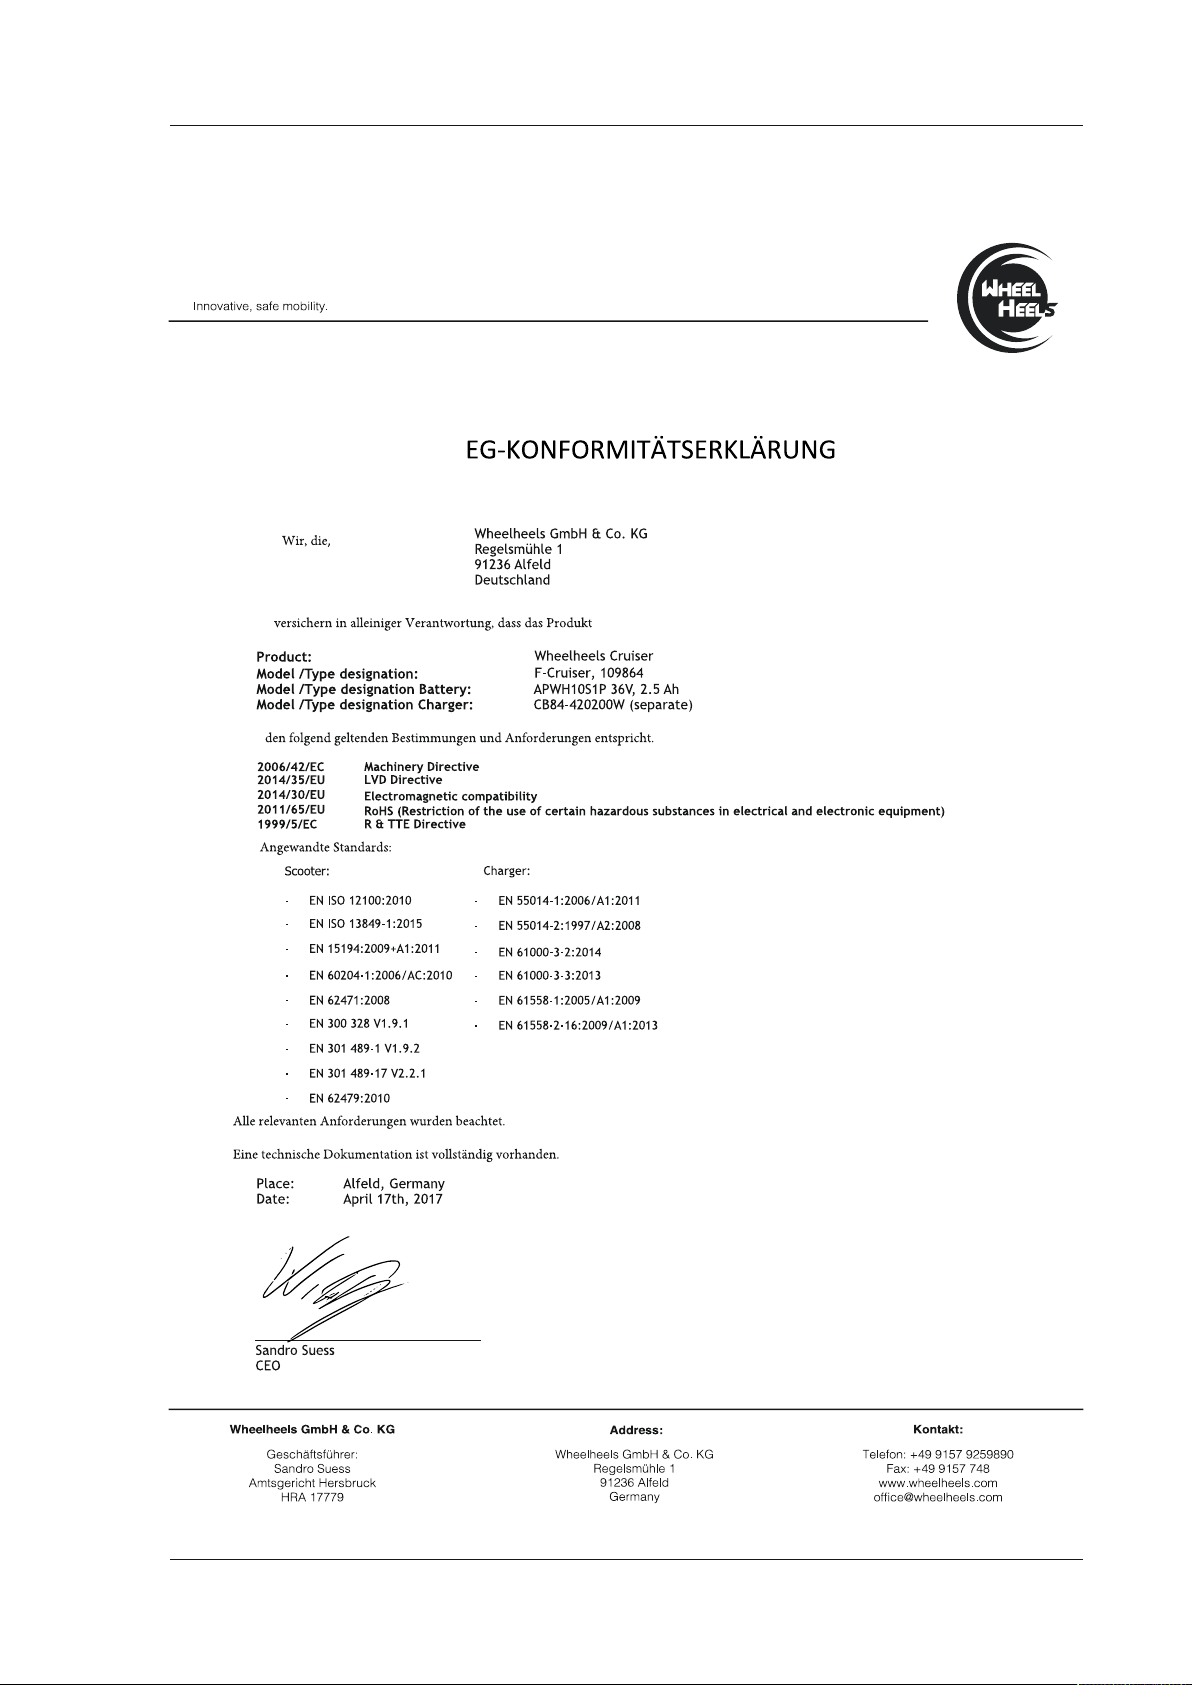
12.5 CE Erklärung
00109864 F-Cruiser
34
Page 35
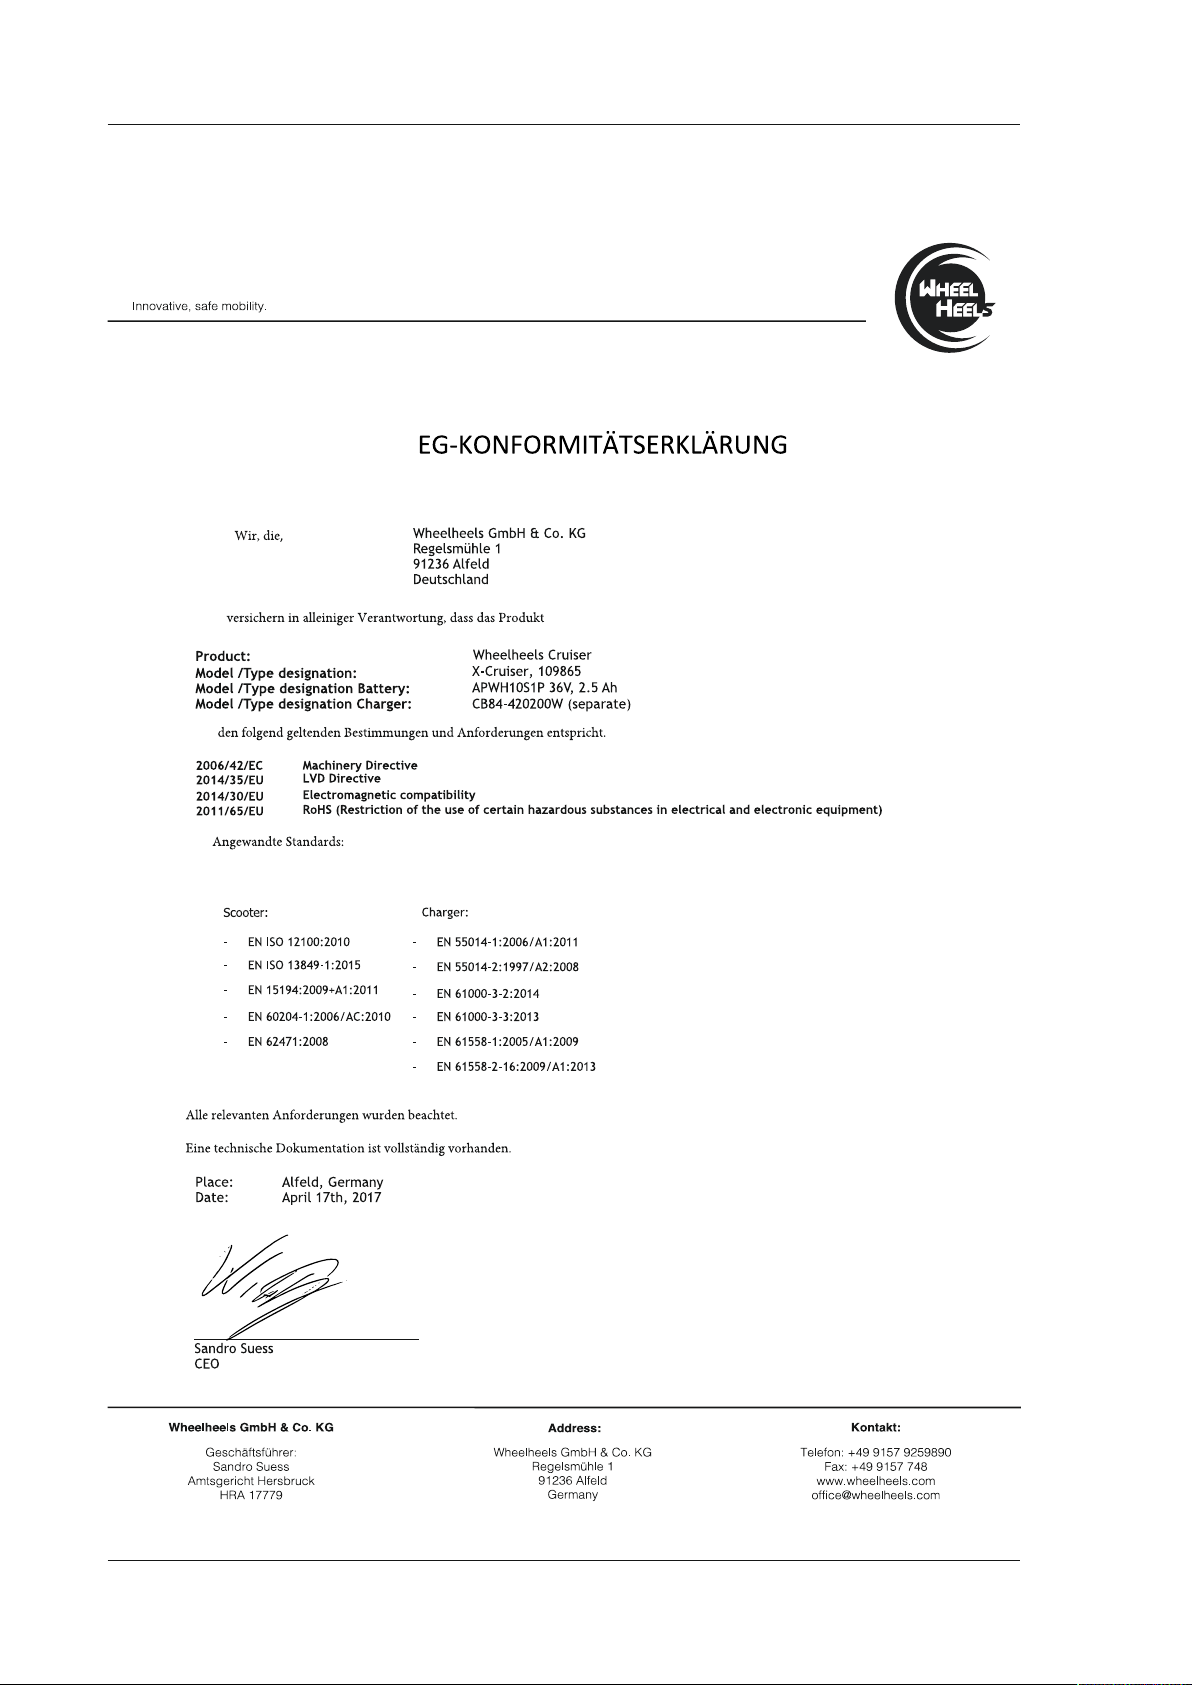
00109865 X-Cruiser
35
Page 36

00109866 S-Cruiser
36
Page 37
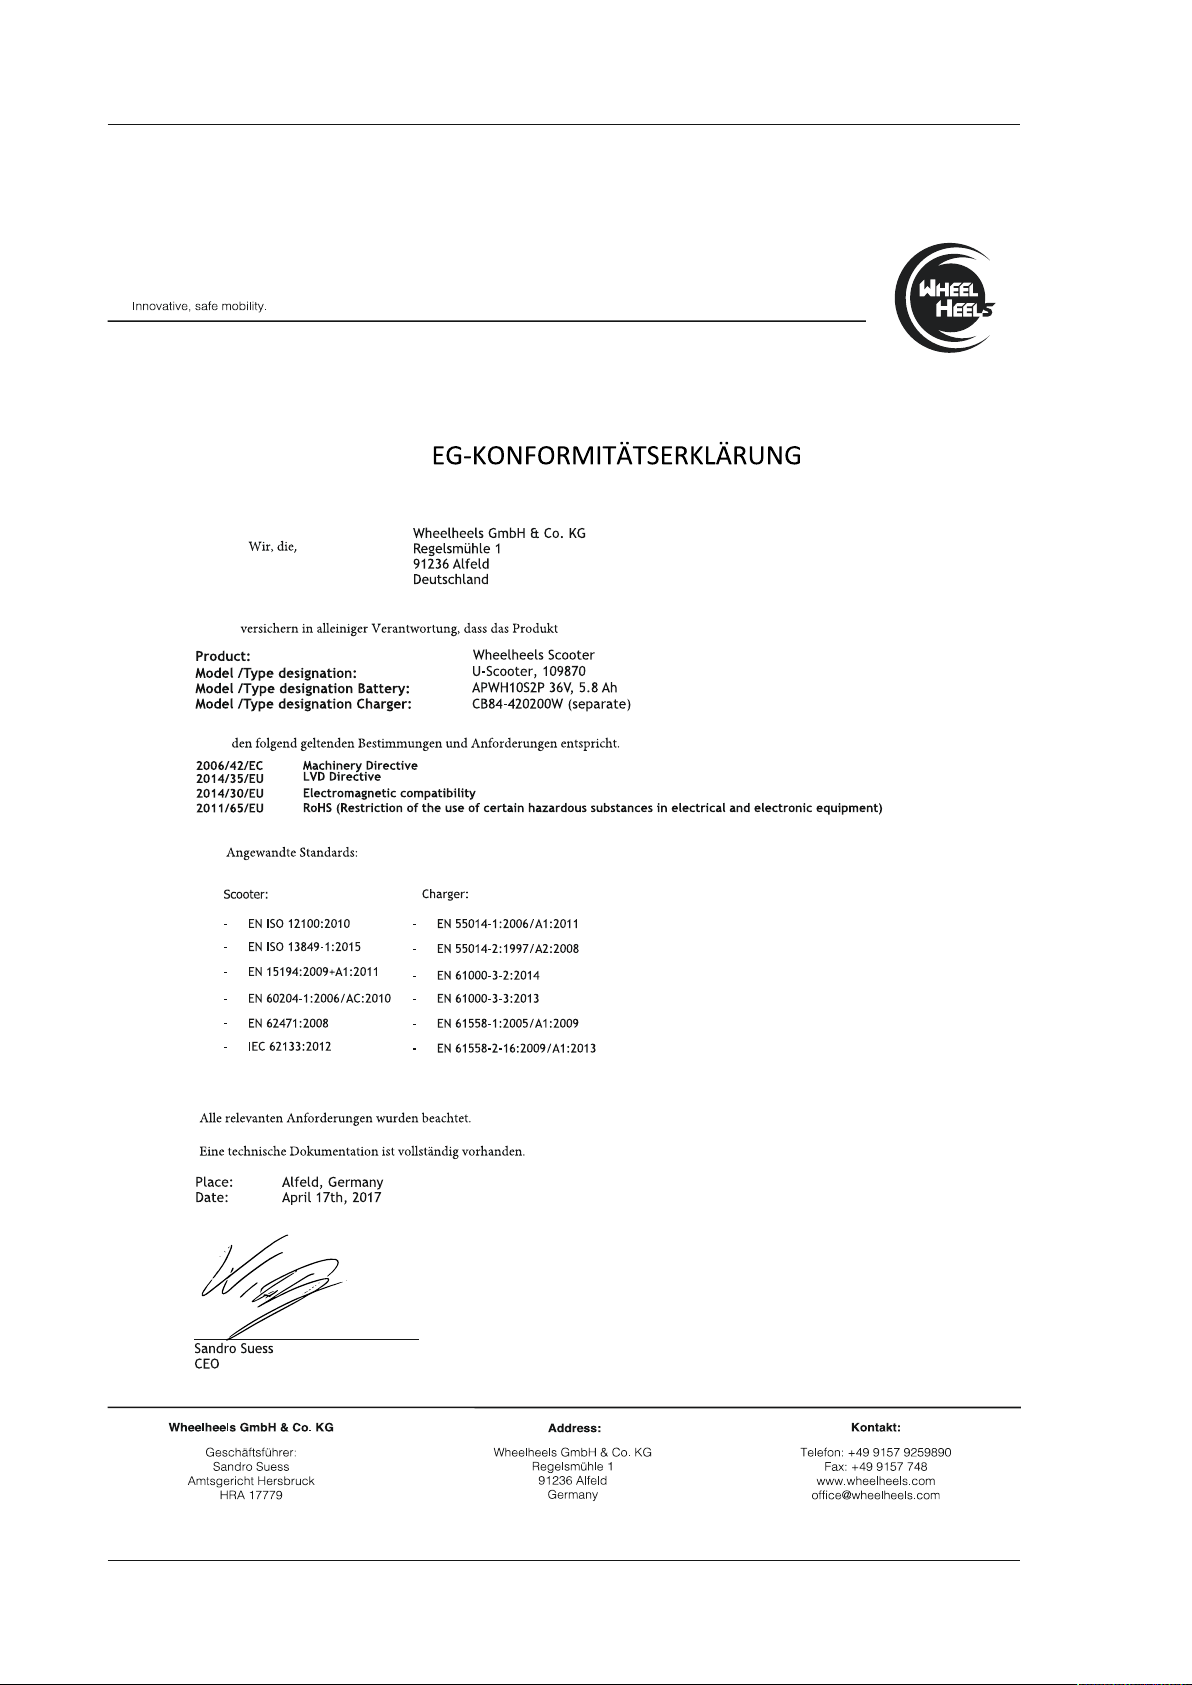
00109870 U-Scooter
37
Page 38
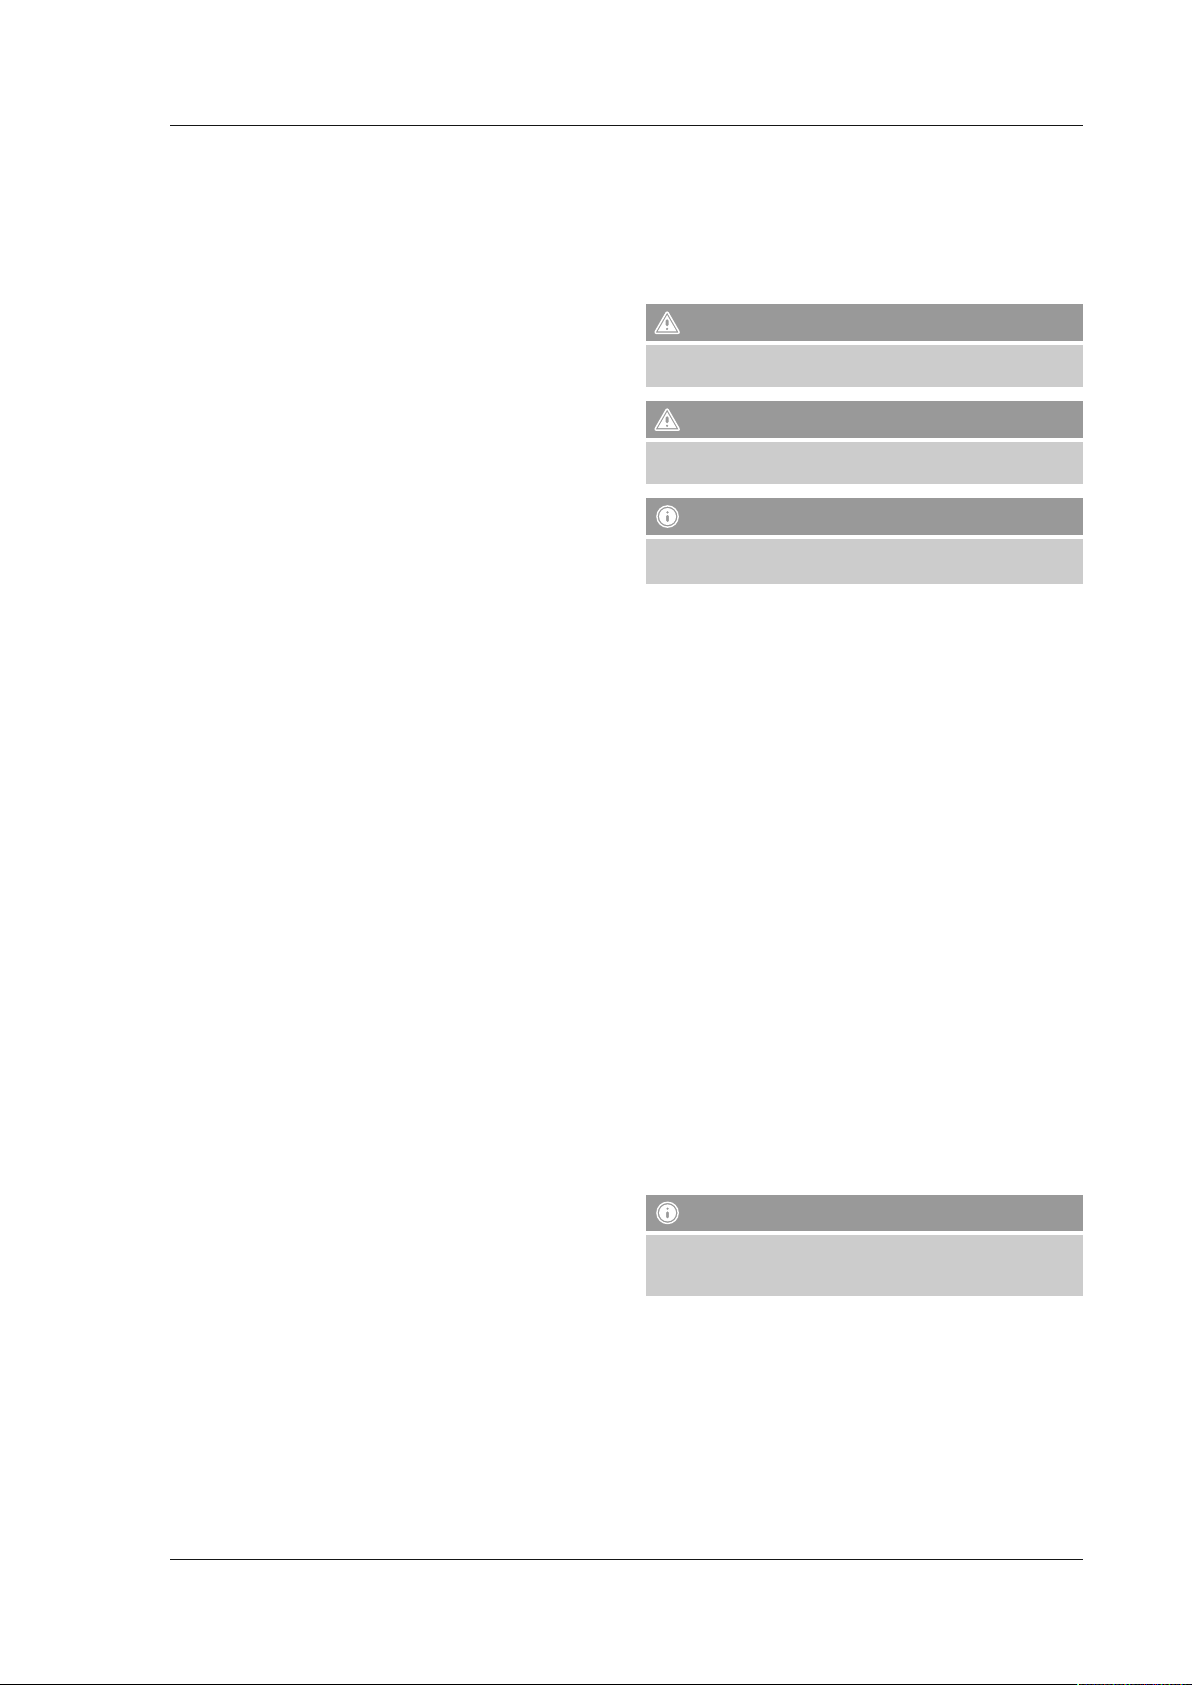
F Mode d‘emploi
Sommaire
1. Explication des symboles d‘avertissement et des
remarques ..................................38
Contenu de l‘emballage .......................38
2.
Déballage ..........................................38
2.1
2.2
Enregistrement des numéros de série .....................38
2.3
Accessoires .........................................39
Consignes de sécurité .........................39
3.
Domaines d’utilisation et limitations
4.
des performances ............................39
Domaines d’utilisation.................................39
4.1
4.2
Limitations des performances ...........................39
Description des différents modèles ..............40
5.
5.1
S-/X-Cruiser.........................................40
5.2
F-Cruiser/U-Scooter...................................41
Application .................................42
6.
Utilisation ..................................42
7.
Éléments de commande et d'affichage ....................42
7.1
7.1.1 S-
/X-Cruiser ...................................42
7.1.2 F-Cruiser
7.1.3 U-Scooter
7.2
Fonctionnement du produit.............................44
7.2.1 F-
7.2.2 U-Scooter
7.3
Mise en service et montage de l’appareil...................46
7.3.1 F-
7.3.2 U-Scooter
7.4
Affichages d’état de charge.............................48
7.4.1 S-
7.4.2 F-Cruiser
7.4.3 U-Scooter
Batterie ....................................48
8.
8.1
Sécurité dans le maniement de la batterie..................48
8.2
Caractéristiques techniques des batteries (Tableau 3) .........49
8.3
Charge des appareils..................................49
8.4
Effets de la température sur les performances ...............49
8.5
Remplacement de la batterie............................50
8.6
Expédition de batteries Li-Ion ...........................50
Entretien ...................................50
9.
Contrôle des pneus / de l’élément mobile ..................50
9.1
9.2
Contrôle de la pression des pneus (X-Cruiser / U-Scooter) ......50
9.3
Nettoyage du produit .................................50
9.4
Entreposage du produit................................50
Recherche d’erreurs et élimination des erreurs
10.
(F-/S-/ X-Cruiser) ............................50
Remplacement de pièces..............................50
10.1
10.2
Élimination des pannes ...............................50
Chargeur ..................................51
11.
11.1
Consignes de sécurité ................................51
Caractéristiques techniques............................51
11.2
Nettoyage .........................................51
11.3
Annexe....................................51
12.
Partenaire et informations juridiques.....................51
12.1
Exclusión de responsabilidad...........................51
12.2
Servicio y soporte....................................51
12.3
Instrucciones para desecho y reciclaje ....................51
12.4
Déclaration de conformité.............................52
12.5
......................................43
.....................................43
/S-/X-Cruiser.................................44
7.2.1.1 Récupération de l’énergie
7.2.1.2 Dispositifs d’éclairage (F-Cruiser)
7.2.1.3 Port de charge USB (F-Cruiser)
......................................45
/S-/X-Cruisers ................................46
......................................46
/X-Cruiser....................................48
.......................................48
......................................48
...................45
.............45
...............45
Nous vous remercions d’avoir choisi un produit Hama.
Veuillez prendre le temps de lire l‘ensemble des remarques et consignes
suivantes. Veuillez conserver ce mode d‘emploi à portée de main an
de pouvoir le consulter en cas de besoin. Transmettez-le au nouveau
propriétaire avec l’appareil le cas échéant.
1. Explication des symboles d‘avertissement et des
remarques
Avertissement
Avertissement indiquant qu’une manipulation comporte un risque de
blessure.
Attention
Avertissement indiquant qu’une manipulation est susceptible de
perturber le fonctionnement de l’appareil ou l’endommager.
Remarque
Indique un point important, donne un conseil utile, rend attentif à
certaines circonstances particulières ou des méthodes alternatives.
2. Contenu de l‘emballage
F-Cruiser
• Gyropode Hama Cruiser
• Chargeur
• 2 garde-boue, kit de montage inclus
• Mode d‘emploi
• Déclaration de conformité
S-/X-Cruiser
• Gyropode Hama Cruiser
• Chargeur
• Mode d‘emploi
• Déclaration de conformité
U-Scooter
• Hama Scooter
• Chargeur
• Mode d‘emploi
• Déclaration de conformité
2.1 Déballage
• Avant de déballer le produit, veuillez contrôler l’emballage et vous
assurer qu’il ne présente aucun endommagement.
• Veuillez contacter votre fournisseur en cas d’endommagement.
• Veuillez contrôler que la livraison est complète après en avoir vérié
l‘emballage.
• Veuillez contacter votre fournisseur en cas de livraison incomplète.
• Ne saisissez pas les gyropodes Cruiser S ou X au niveau des garde-boue
lorsque vous les déballez
2.2 Enregistrement des numéros de série
Remarque
Le numéro de série est univoque. Ce numéro est important en cas de
recours à la garantie et sera nécessaire en cas de perte ou de vol du
produit et de sa dénonciation.
• Le numéro de série est indiqué sur la plaque signalétique apposée sur
le produit. Le numéro de série constitué comme suit :
F-Cruiser: 91XXXXXX
X-Cruiser: 92XXXXXX
S-Cruiser: 93XXXXXX
U-Scooter: 94XXXXXX
• Veuillez noter le numéro de série. Veuillez conserver cette information
en un endroit sûr, séparément du produit.
38
Page 39
2.3 Accessoires
Remarque
Vous pouvez utiliser l’accessoire Hama 109888 Hovercart pour tous les
appareils décrits dans ce mode d’emploi.
3. Consignes de sécurité
Vous devez avoir lu toutes les consignes et avertissements mentionnés
dans le mode d’emploi de votre appareil et vous être familiarisé avec ce
dernier avant d’apprendre à le conduire.
Vous devez impérativement respecter tous les avertissements et toutes les
précautions d’utilisation mentionnés dans la documentation destinée à
l’utilisateur.
Avertissement – RISQUE DE BLESSURE
ET DANGER DE MORT !
• Cet appareil électrique n’est pas autorisé à circuler sur les voies
ouvertes à la circulation publique.
• Son utilisation est susceptible de mettre la vie de l’utilisateur
en danger ou provoquer de graves blessures corporelles à la
suite d’une perte de contrôle, d’une collision ou d’une chute. Vous
devez avoir lu toutes les consignes et avertissements mentionnés
dans la documentation destinée à l’utilisateur an de minimiser les
risques de blessures corporelles.
Veuillez porter en permanence des vêtements de protection
•
tels que casque, coudières et genouillères, gants ainsi que
des chaussures solides pendant l’utilisation du produit.
• Veillez à garder une distance susante avec les autres usagers et
les animaux, tout particulièrement lors de votre familiarisation avec
le produit.
• Ne surestimez pas vos capacités. Accélérez lentement et adoptez un
mode de conduite anticipatif an d’éviter tout risque de chute.
• N’utilisez EN AUCUN CAS le produit sous l’emprise de drogues ou
d’alcool.
Remarque
• L’ouverture de l’appareil ou le retrait des étiquettes de scellement
apposées entraîne la perte des droits de garantie
• Ce produit est destiné à une installation domestique non commerciale.
• Utilisez le produit exclusivement conformément à sa destination.
• Protégez le produit de toute saleté, humidité, surchauffe et utilisez-le
uniquement dans des locaux secs.
• Protégez le produit des secousses violentes et évitez tout choc ou toute
chute.
• Ce produit n‘est pas destiné à être utilisé par des personnes (y compris des
enfants) aux capacités physiques, mentales ou motrices réduites ou dont
l‘expérience et le savoir présentent des lacunes, à moins que ces personnes
ne soient surveillées par une personne compétente en matière de sécurité ou
qu‘elles aient reçu des instructions sur la manière d‘utiliser ce produit.
• Ne laissez pas les enfants jouer avec l‘appareil. Le nettoyage ne doit pas être
fait par des enfants.
• Branchez l‘appareil à une prise de courant appropriée. La prise de courant
doit être facilement accessible à tout moment.
• La batterie est installée de façon permanente et ne peut pas être retirée ;
recyclez le produit en bloc conformément aux directives légales.
• Ne tentez pas de réparer l’appareil vous-même ni d’effectuer des travaux
d’entretien. Laissez le personnel spécialisé compétent s’occuper de toute
opération d’entretien, à l’exception des cas mentionnés au point 9.
• L’ouverture de l’appareil ou le retrait des étiquettes de scellement apposées
entraîne la perte des droits de garantie
• N‘ouvrez pas l‘appareil et cessez de l’utiliser en cas de détérioration, de
dégagement de fumée, de formation d‘odeurs ou de niveau de bruit élevé.
Adressez-vous dans les plus brefs délais à votre revendeur ou à notre service
e (voir 12.3 Service et assistance).
clientèl
4.
Domaines d’utilisation et limitations des
performances
4.1 Domaines d’utilisation
Remarque
• Le produit n’est pas autorisé à circuler sur les voies ouvertes à la
circulation publique. L’appareil peut être uniquement utilisé sur un
terrain privé, non accessible au public. Observez les lois et règlements
nationaux applicables.
• L’appareil peut être uniquement utilisé sur un terrain privé, clos et non
accessible au public pour autant qu’aucune autre règlementation n’en
restreigne l’usage.
• L’âge minimal d’utilisation est de 14 ans.
• L’appareil a été conçu pour être exclusivement utilisé par une seule
personne.
• Le poids du conducteur ne doit pas dépasser 120 kg.
• N‘utilisez pas le produit en dehors des limites de puissance indiquées
dans les caractéristiques techniques.
• N‘utilisez pas le produit dans les zones dans lesquelles l‘utilisation
d‘appareils électroniques est interdite.
• Ce produit est uniquement conçu pour une utilisation sur terrain sec.
Il est certes protégé contre les éclaboussures mais n’offre pas de
protection susante pour un contact permanent avec l’eau, d’où un
risque d’endommagement.
4.2 Limitations des performances
Veuillez impérativement vous familiariser avec les performances du
produit. Elles sont calculées de telle sorte à maximiser la sécurité de
l’utilisateur et minimiser les risques d’endommagement.
• Respectez impérativement les indications de poids indiquées pour le
conducteur et pour les charges emportées (charge utile maximale) ainsi
que l’indication concernant l’âge minimal pour le conducteur dans les
Caractéristiques techniques (voir 5.1/5.2 Caractéristiques techniques,
tableau 1/2).
• Le non-respect des limitations de performances est susceptible
d’empêcher une conduite en toute sécurité. Les facteurs nécessitant
davantage de performance sont, entre autres :
- des charges utiles plus lourdes
(poids du conducteur et des charges emportées)
- Montée/descente très pentue
- des terrains cahoteux
- vitesses supérieures à 15 km/h
(uniquement pour gyropode Cruiser F, S ou X)
- des manœuvres brusques
Avertissement
Le risque de dommages corporels et matériels augmente avec le nonrespect des limitations de poids, tout particulièrement en conjonction
avec d’autres facteurs nécessitant davantage de performance.
39
Page 40
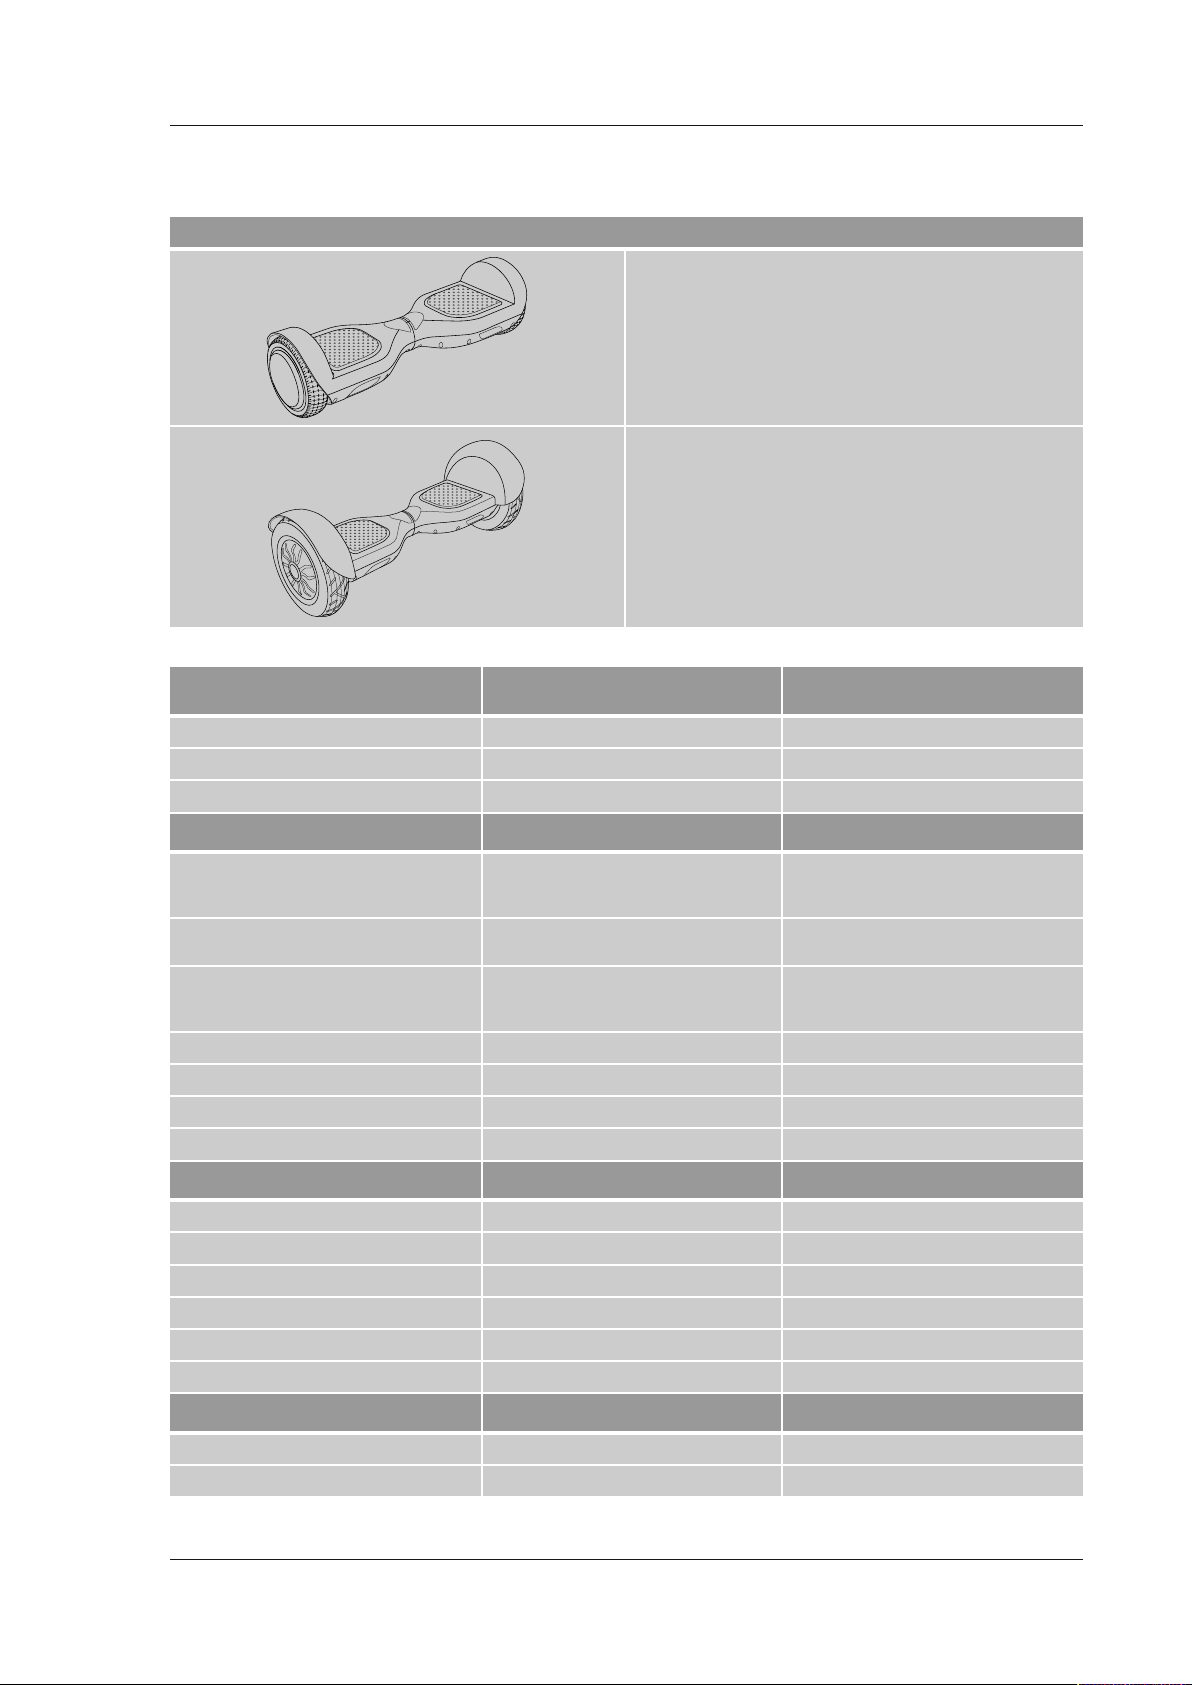
5. Description des différents modèles
5.1 S-/X-Cruiser
Modèle Description
Illustration 1
S-Cruiser
Illustration 2
X-Cruiser
Caractéristiques techniques (Tableau 1)
Limitation de poids du conducteur Slalom Cruiser Cross Cruiser
Charge utile maximale 120 kg 120 kg
Poids minimal du conducteur 25 kg 25 kg
Âge minimal du conducteur 14 ans 14 ans
Performance Slalom Cruiser Cross Cruiser
Vitesse maximale 6 km/h (mode débutant)
15 km/h (mode avancé)
30 km/h (mode karting)
Portée env. 15 km (en fonction du conducteur,
de la vitesse et du terrain)
Alimentation électrique pour la charge
(uniquement à l’aide du bloc secteur fourni ou
d’un accessoire original)
Batterie rechargeable Lithium-Ion (Li-Ion)
Puissance du moteur 700 watts 700 watts
Pression des pneus -35 psi (2,4 bar)
Volume sonoremoins de 70 dB(A) en régime de conduite moins de 70 dB(A) en régime de conduite
Le gyropode Slalom Cruiser (cf. illustration 1) vous réserve un plaisir
de conduite dans différents environnements, à l’intérieur ainsi qu’à
l’extérieur. Ce modèle doit être utilisé exclusivement sur un terrain stable
et plat. Il n’est pas adapté à une terrain impraticable, tel qu’un chemin
recouvert de pavés.
Le gyropode Cross Cruiser (cf. illustration 2) est conçu pour une utilisation
en plein air. Le gyropode Cross Cruiser dispose d’un plus grand diamètre
de roue, d’une garde au sol plus importante et de pneus plus larges avec
prol à crampons de telle sorte qu’il peut être utilisé sur des terrains
plus divers et plus accidentés que les autres modèles. Les pneus à basse
pression du gyropode Cross Cruiser augmentent la stabilité et la traction
sur terrains accidentés.
6 km/h (mode débutant)
15 km/h (mode avancé)
30 km/h (mode karting)
env. 18 km (en fonction du conducteur,
de la vitesse et du terrain)
42V, ≤ 5 A42V, ≤ 5 A
36V, 2,5 Ah 36V, 2,5 Ah
Dimensions & poids Slalom Cruiser Cross Cruiser
Poids de l’appareil sans batteries 9,1 kg 11,5 kg
Poids de la batterie 0,97 kg 0,97 kg
Longueur et largeur 58 cm x 18,5 cm 67 cm x 26 cm
Hauteur 17,5 cm 26 cm
Diamètre des roues 6,5" / 16,5 cm 10" / 25,4 cm
Tape de pneus Caoutchouc plein Pneus à chambre à air
Plages de températures Slalom Cruiser Cross Cruiser
Fonctionnement de -10 °C à +40 °C de -10 °C à +40 °C
Charge, entreposage et transport de 10 °C à 25 °C de 10 °C à 25 °C
40
Page 41
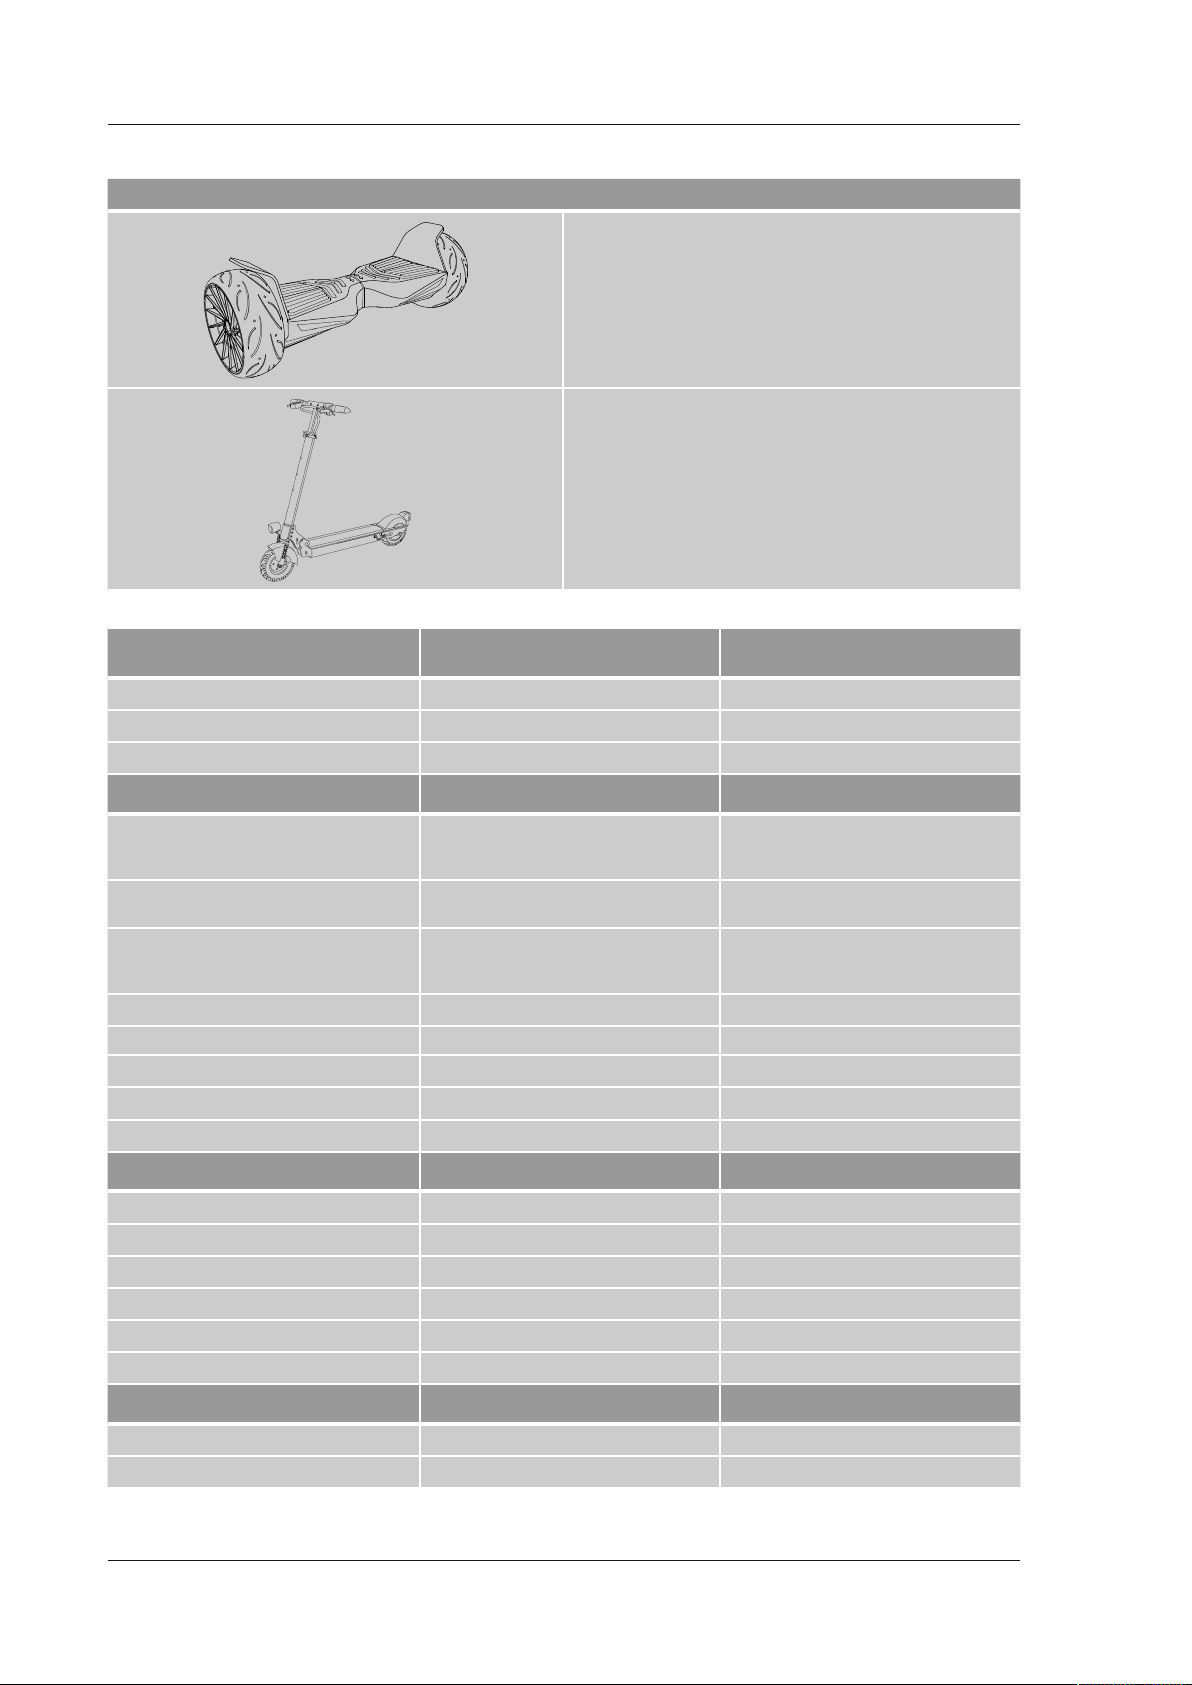
5.2 F-Cruiser/U-Scooter
Modèle Description
Illustration 3
F-Cruiser
Illustration 4
U-Scooter
Caractéristiques techniques (Tableau 2)
Limitation de poids du conducteur Freestyle Cruiser Urban Scooter
Charge utile maximale 120 kg 120 kg
Poids minimal du conducteur 25 kg -
Âge minimal du conducteur 14 ans 14 ans
Performance Freestyle Cruiser Urban Scooter
Vitesse maximale 6 km/h (mode débutant)
15 km/h (mode avancé)
30 km/h (mode karting)
Portée env. 15 km (en fonction du conducteur,
de la vitesse et du terrain)
Alimentation électrique pour la charge
(uniquement à l’aide du bloc secteur fourni ou
d’un accessoire original)
Batterie rechargeable Lithium-Ion (Li-Ion)
Port USB pour appareils externes 5V DC, 2A Puissance du moteur 800 watts 250 watts
Pression des pneus -2,5 bars devant, 0 derrière
Volume sonoremoins de 70 dB(A) en régime de conduite moins de 70 dB(A) en régime de conduite
Le gyropode Cruiser Freestyle (voir gure 3) est livré avec une application,
une prise de charge USB et une douille pouvant recevoir un antivol
Kensington ; il offre un plaisir de conduite sans égal aussi bien à
l’intérieur qu’à l’extérieur. Nous vous recommandons d’utiliser ce produit
sur un terrain stable et plat. Des pneus pleins ultra-larges assurent une
adhérence optimale au sol, même à grande vitesse.
Quelques gestes et quelques secondes susent à déplier ou plier la
trottinette Urban Scooter (voir gure 4). Elle est munie d’un compteur,
d’un éclairage, d’un frein à tambour et de pneumatiques basse pression
garantissant une excellente stabilité et une parfaite traction, elle est
optimisée pour une utilisation en plein air. La trottinette peut être
utilisée sur des terrains divers et inégaux. Fabriquée dans un matériau
en aluminium moulé sous pression thermopoudré, la trottinette vous
garantit stabilité et protection contre la corrosion.
6 km/h (mode débutant)
15 km/h (mode avancé)
25 km/h (mode pro)
env. 15 km (en fonction du conducteur,
de la vitesse et du terrain)
42V, ≤ 5 A42V, ≤ 5 A
36V, 2,5 Ah 36V, 5,8Ah
Dimensions & poids Freestyle Cruiser Urban Scooter
Poids de l’appareil sans batteries 14 kg 14 kg
Poids de la batterie 0,50 kg 0,97 kg
Longueur et largeur 66,9 cm x 24,3cm 115 cm x 15 cm
Hauteur 22 cm 118 cm
Diamètre des roues 8" / 20,4 cm 8" / 20,4 cm
Tape de pneus Caoutchouc plein Caoutchouc plein & pneus à chambre à air
Plages de températures Freestyle Cruiser Urban Scooter
Fonctionnement de -10 °C à +40 °C de -10 °C à +40 °C
Charge, entreposage et transport de 10 °C à 25 °C de 10 °C à 25 °C
41
Page 42

6. Application
Vous trouverez une notice détaillée sur l’application "Wheelheels" pour iOS et Android sur le lien suivant :
www.wheelheels.com/#app
7. Utilisation
Avertissement
• L’utilisation du produit est à vos propres risques et périls.
• Veuillez contrôler le bon fonctionnement du produit avant chaque trajet.
• Éloignez vos doigts et autres parties du corps d’endroits potentiellement dangereux ou de pièces en rotation, tout particulièrement des roues en
mouvement.
• Évitez d’utiliser le gyropode avec des éléments non plaqués tels qu’un casque qui pendille, un l de casque ou des vêtements amples. Des parties de
tels éléments pourraient être happés par les roues en mouvement.
• Évitez d’utiliser le gyropode par mauvais temps (pluie, neige, glace, givre ou chute de neige ainsi que sur une surface grasse). Ne roulez pas sur les
rebords de trottoirs et évitez de passer sur des obstacles.
• Le produit n’est pas autorisé à circuler sur les voies ouvertes à la circulation publique. L’appareil peut être uniquement utilisé sur un terrain privé, non
accessible au public. Le fabricant décline expressément toute responsabilité pour tout dommage résultant d’une utilisation non conforme du produit.
• Veuillez porter en permanence des vêtements de protection tels que casque, coudières et genouillères, gants ainsi que des chaussures solides
pendant l’utilisation du produit.
7.1 Éléments de commande et d'affichage
7.1.1 S-/X-Cruiser
Illustration 5
1
2
3 4
5 6
1. Enjoliveurs
2. Plateforme avec système de détection de pression
3. Achages d’état
4. LED d’état pour le niveau de charge
5. Interrupteur sous/hors tension, sélecteur de mode de fonctionnement
6. Prise de charge
42
Page 43
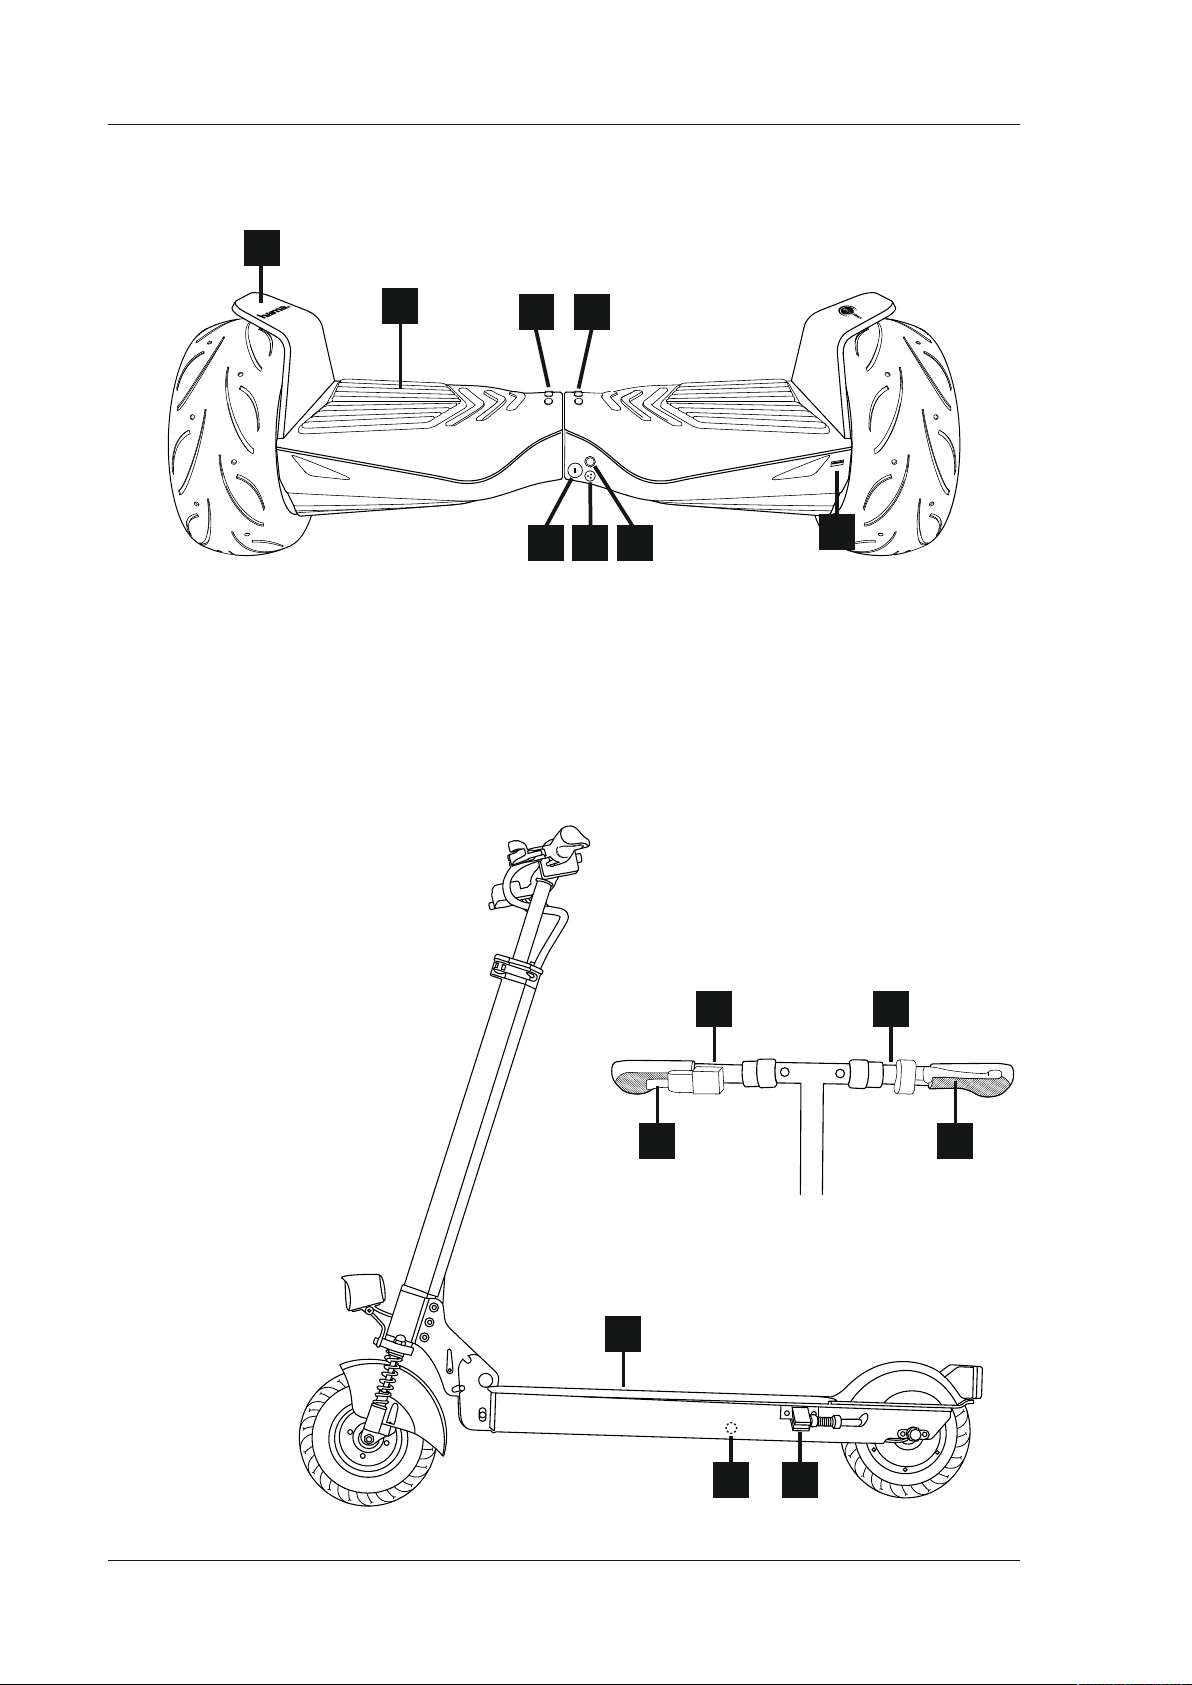
7.1.2 F-Cruiser
Illustration 6
1
2
3
7
1. Garde-boue
2. Plateforme avec système de détection de pression
3. LED d’état pour le niveau de charge
4. Achages d’état
5. Interrupteur sous/hors tension, sélecteur de mode de fonctionnement
6. Prise de charge
7. Antivol Kensington
8. Port USB
7.1.3 U-Scooter
Illustration 7
1. Écran
2. Accélérateur
3. Klaxon
4. Interrupteur d’éclairage
5. Frein
6. Plate-forme d’appui
7. Béquille
8. Prise de charge
4
6 5
8
1
3
2 5
6
78
43
Page 44

7.2 Fonctionnement du produit
7.2.1 F-/S-/X-Cruiser
Remarque
Lors du démarrage, veillez à ce que le produit soit sur une surface
plane et régulière.
Attention
• Utilisez les bonnes techniques de soulèvement et de charge.
• Sélectionnez des points de levage solides et immobiles, le centre de
la partie inférieure, par exemple.
• Pliez en tous les cas les genoux lorsque vous soulevez une charge.
Avertissement
• Faites attention à vos doigts. Ne soulevez pas le produit par les
pneus, les tôles de protection ou les roues.
• Vos mains et vos doigts pourraient être coincées entre les pneus et
la tôle de protection ; risque de blessure.
L’appareil dispose de quatre modes de fonctionnement :
• Mode débutant : La vitesse de ce mode est limitée à 6 km/h.
L’appareil réagit avec retenue aux mouvements de direction.
Pour sélectionner ce mode, placez l’appareil hors tension sur le sol.
Appuyez une fois brièvement sur la touche 5 ; l’appareil se
met automatiquement en position neutre 0°. L‘appareil est en mode
débutant.
Attention
L’appareil empêche toute accélération dès que vous atteignez 6 km/h.
Il est normal que le gyropode Cruiser bascule lorsque la vitesse limite
est atteinte.
• Mode avancé : La vitesse de ce mode est limitée à 15 km/h. Pour
sélectionner ce mode, placez l’appareil hors tension sur le sol.
Appuyez deux fois brièvement sur la touche 5 ; l’appareil se met
automatiquement en position neutre 0°. L’appareil est en mode avancé.
Attention
L’appareil empêche toute accélération dès que vous atteignez 15 km/h.
Il est normal que le gyropode Cruiser bascule lorsque la vitesse limite
est atteinte.
• Mode karting : Dans ce mode, la vitesse peut atteindre 30 km/h.
Pour sélectionner ce mode, placez l’appareil hors tension sur le sol.
Appuyez trois fois brièvement sur la touche 5 ; l’appareil se met
automatiquement en position neutre 0°. L'appareil est en mode
karting.
Avertissement
• Veuillez noter qu’il est impossible d’exclure totalement
une surcharge de l’appareil, donc une brève défaillance
de l’électronique, lorsque vous sélectionnez ce mode de
fonctionnement.
• En cas de défaillance de l’électronique, le conducteur risque de
basculer vers l’arrière et se blesser très grièvement du fait de la
vitesse élevée.
• Les limites de puissance dépendent, entre autres, de l’état de
charge de la batterie, du poids du conducteur, du revêtement de
la chaussée et des dénivellations. La transition entre un terrain
plan vers une montée est, par exemple, susceptible d’entraîner un
dépassement de la limite de puissance.
• Utilisez le mode karting uniquement avec un équipement de
protection de haute qualité.
• Hama GmbH & Co KG décline toute responsabilité pour d’éventuels
dommages matériels et corporels survenant avec ce mode de
fonctionnement en raison d’une surcharge de l’appareil.
• Mode sécurité : Le produit commute automatiquement en mode
sécurité en cas de température excessive du moteur, de la batterie
ou du système électronique de commande, ainsi que d’un niveau de
charge de la batterie insusant.
Avertissement
Descendez immédiatement de l’appareil et mettez-le hors tension
lorsque les signaux d’alarme suivants indique le mode sécurité :
• LED avant clignotantes (ou LED avant et arrière sur le gyropode
Cruiser F)
• LED d’état rouges (ou LED d’état vertes sur le gyropode Cruiser F)
• le produit freine automatiquement
• l‘alarme retentit
Contactez le support technique (voir 12.3 Service et assistance) dans
le cas où l’appareil commute très rapidement en mode alarme après la
recharge.
L’appareil est mis en mouvement comme suit :
Un transfert du poids de votre corps à l’aide de vos plantes de pieds
ou de vos talons active les capteurs de mouvement placés sous la
plateforme ; les roues se mettent en rotation dans la direction captée
par vos pieds et l’appareil se met à rouler en avant ou en arrière. Votre
centre de gravité se déplace dès que vous vous penchez vers l’avant ou
vers l’arrière et, conformément à la surface de contact des roues (le point
de contact des roues avec le sol), l’appareil se penche également vers
l’avant ou vers l’arrière.
Vous devez cependant vous tenir vous-même en équilibre. Vous pourriez
sinon tomber.
Remarque concernant le mode karting
• Le mode karting est uniquement conçu pour être utilisé avec le
module karting (réf. 109888).
• Le conducteur assume pleinement les risques liés à l’utilisation du
mode karting.
44
Page 45
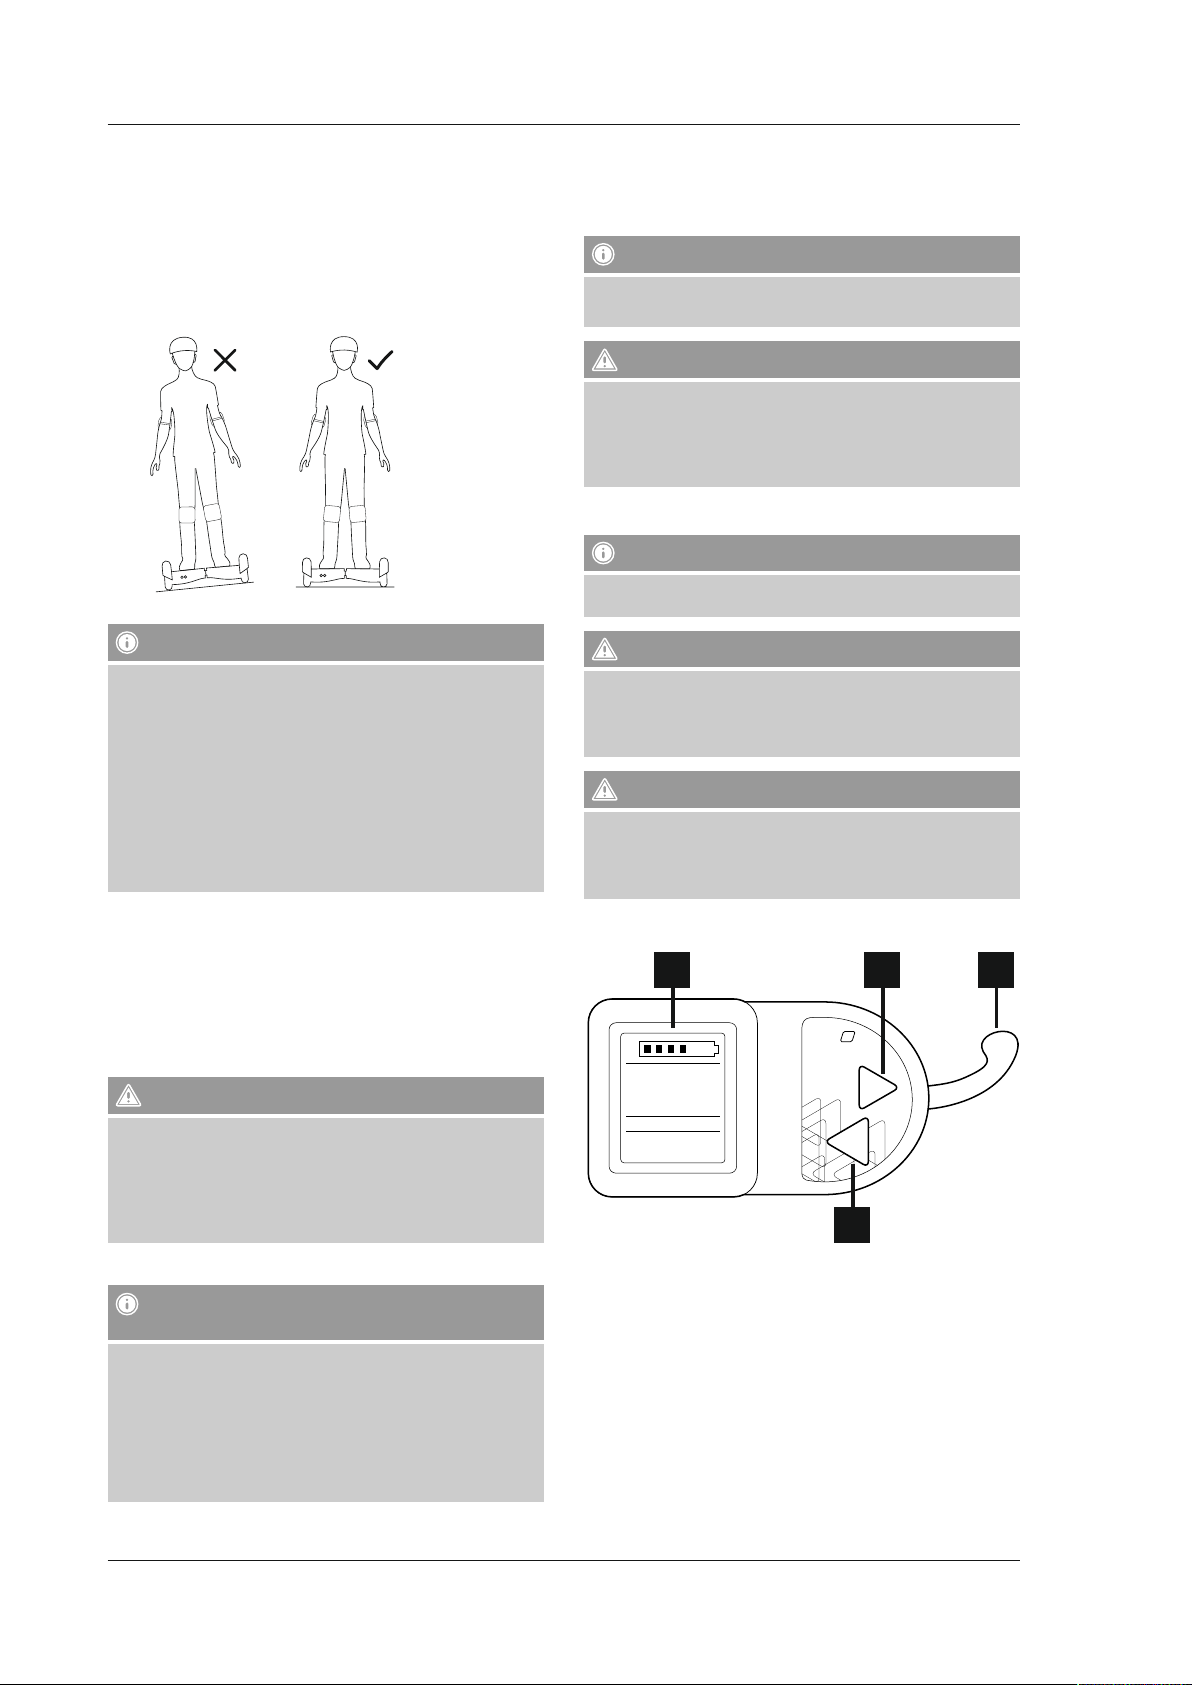
Le produit ne dispose pas de mécanismes de stabilisation latérale.
Dès que vous penchez l’appareil jusqu’au point où une roue perd
l’adhérence au sol, il ne peut plus se centrer et vous pouvez tomber.
Vous devez vous-même tenir votre équilibre latéral. Veillez donc en
permanence à ce que votre corps forme une ligne avec l’axe médian de
l’appareil.
Ne vous penchez pas dans les virages ou dans une pente lorsque vous
roulez de biais par rapport à la pente.
7.2.1.3 Port de charge USB (F-Cruiser)
Le gyropode Cruiser Freestyle dispose d’un port de charge USB Type A
permettant de recharger des appareils mobiles jusqu’à un courant de
charge de 2,0 A.
Remarque concernant le port de charge USB
La recharge successive et prolongée d’un ou plusieurs appareils est
susceptible de diminuer la portée du gyropode.
Attention au risque de chute
• N’utilisez pas le port de charge USB pendant un trajet, mais
uniquement lorsque l’appareil est à l’arrêt.
• Risque de chute et blessures provoqué par distraction, perte
d’équilibre ou par le câble de charge lorsque le gyropode est en
mouvement.
7.2.2 U-Scooter
Remarque
Lors du démarrage, veillez à ce que le produit soit sur une surface
plane et régulière.
Remarque
• Ne surestimez pas vos capacités. Accélérez lentement an
de développer un bon contrôle de l’appareil ; en outre, nous
déconseillons aux débutants de rouler en biais par rapport à une
pente.
• Nous vous conseillons de demander l’assistance d’une autre
personne lors de vos premiers essais avec un tel appareil.
Vous devriez tenir les mains de cette personne par l’avant an
d’augmenter votre stabilité. Essayez surtout de rester très calme
et de ne pas faire de mouvement brusques. L’appareil soutient
votre équilibre ; ne tentez donc pas de contrer les mouvements de
compensation, mais concentrez-vous sur votre équilibre.
7.2.1.1 Récupération de l’énergie
• Tous les gyropodes Cruiser disposent d’une fonction de récupération de
l’énergie dégagée lors du freinage ou d’un trajet en descente.
• En conditions idéales, la récupération de l’énergie peut augmenter
la portée du Cruiser de 5-10%. Cette récupération dépend toutefois
de nombreux facteurs, tels que le prol du terrain emprunté et la
fréquence des manœuvres de freinage ; ces chiffres ne peuvent donc
pas être estimés à l’avance.
Attention lorsque la batterie est entièrement chargée
• Avec une batterie totalement chargée, évitez les longues descentes
ou les longues manœuvres de freinage car la batterie ne sera pas en
mesure de stocker l’énergie récupérée.
• Roulez tout d’abord sur un terrain plat pendant 1-2 min. an de
décharger un peu la batterie.
• Risque de détérioration de la batterie dans le cas contraire.
7.2.1.2 Dispositifs d’éclairage (F-Cruiser)
Remarque concernant l’éclairage avant et arrière /
l’ajustement de la direction de conduite
Attention
• Utilisez les bonnes techniques de soulèvement et de charge.
• Sélectionnez des points de levage solides et immobiles, le centre de
la partie inférieure, par exemple.
• Pliez en tous les cas les genoux lorsque vous soulevez une charge.
Avertissement
• Faites attention à vos doigts. Ne soulevez pas le produit par les
pneus, les tôles de protection ou les roues.
• Vos mains et vos doigts pourraient être coincées entre les pneus et
la tôle de protection ; risque de blessure.
Illustration 8
3 4
B
M
S
SPEED
SLO
ODO
0000
OO
.0
Km/h
7
Km
ECO
POWER
1
ON/OFF
MODE
2
1. Interrupteur de mise sous/hors tension
2. Sélecteur de mode
3. Écran
4. Accélérateur
• Le gyropode Cruiser Freestyle dispose d’un éclairage avant et d’un
éclairage arrière séparés et bien visibles.
• Le gyropode Cruiser Freestyle reconnaît automatiquement la
direction de conduite et adapte l’éclairage en conséquence
(éclairage avant blanc, éclairage arrière rouge).
• La détection de la direction de conduite et l’adaptation de
l’éclairage sont effectuées après 5 tours de roue.
Pour démarrer la trottinette, appuyez sur l’interrupteur de mise sous/hors
tension jusqu’à allumage de l’écran. La trottinette dispose de trois modes
de fonctionnement :
• Mode débutant : La vitesse de ce mode est limitée à 6 km/h et le
gyropode accélère lentement.
Pour sélectionner ce mode, appuyez sur le sélecteur de mode [MODE]
jusqu’à ce que « SLO » apparaisse à l’écran.
45
Page 46
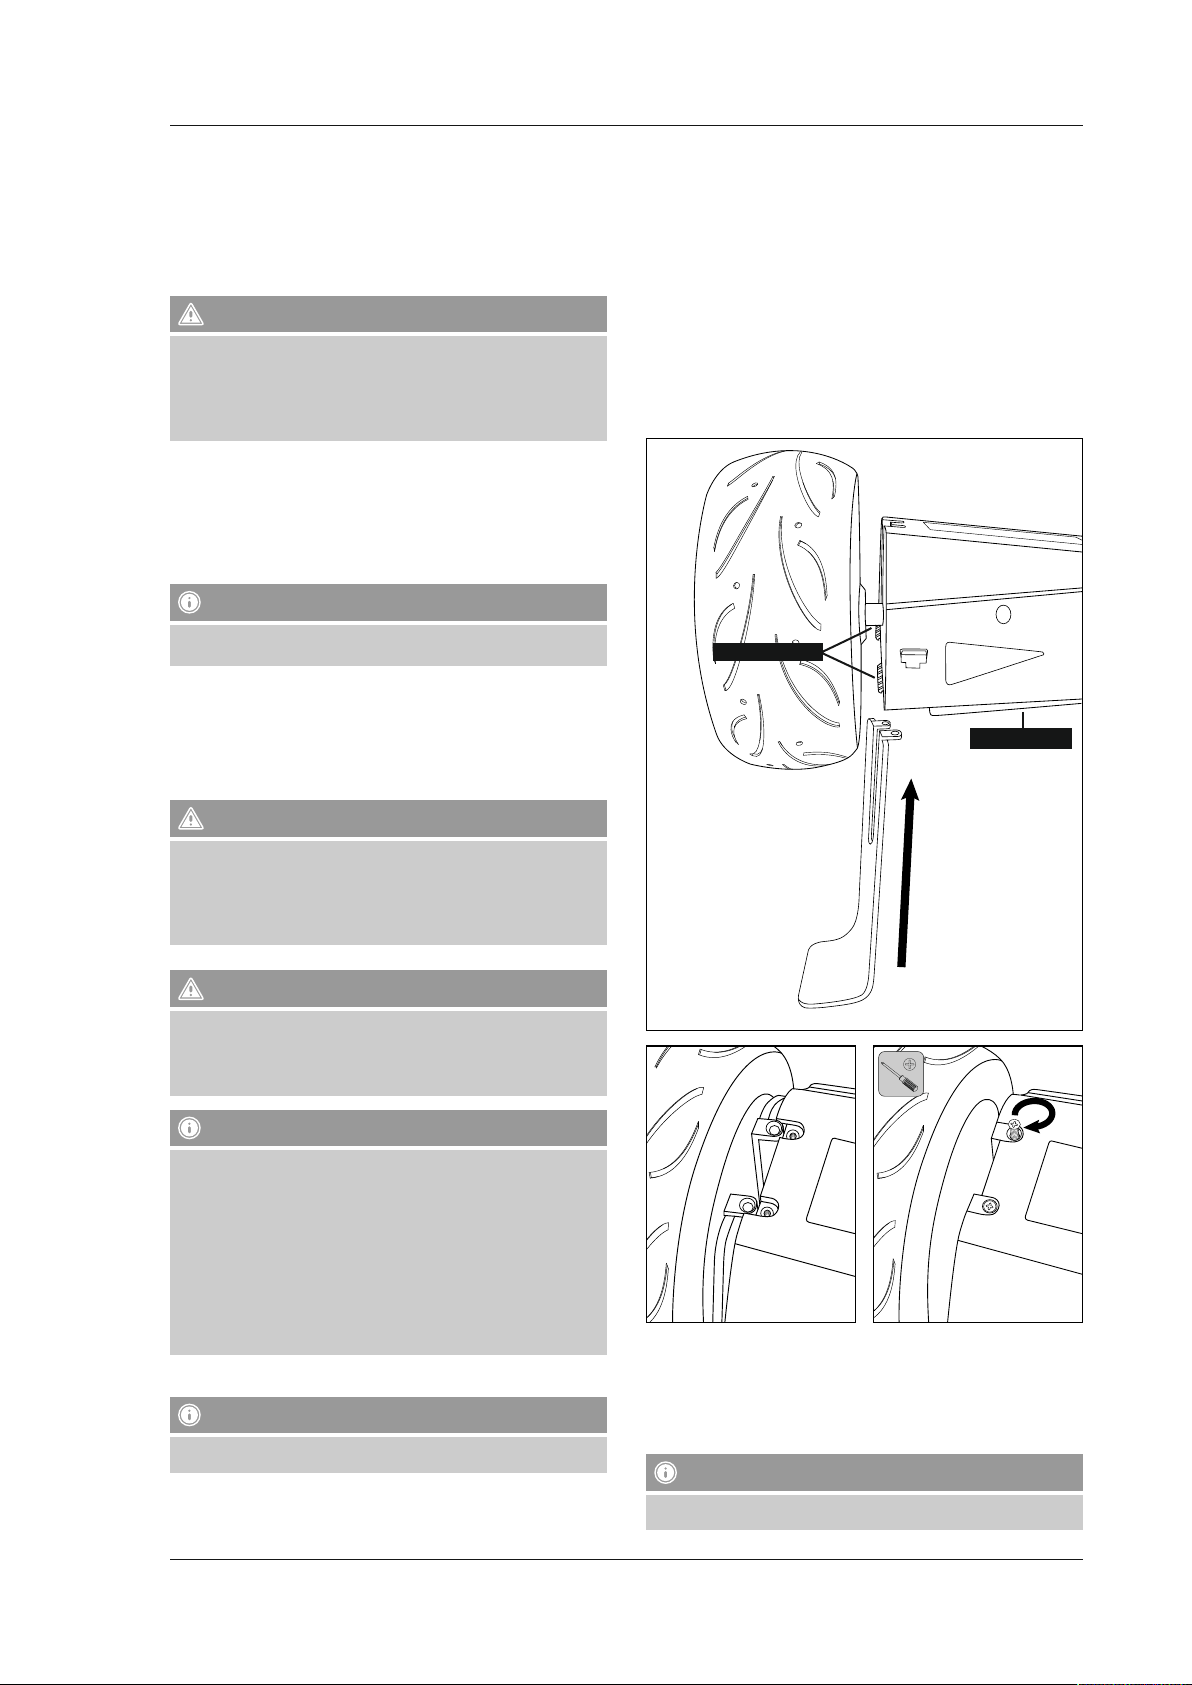
• Mode avancé : La vitesse de ce mode est limitée à 15 km/h et
l’accélération de la trottinette est plus nette que dans le mode
débutant.
Pour sélectionner ce mode, appuyez sur le sélecteur de mode [MODE]
jusqu’à ce que « MID » apparaisse à l’écran.
• Mode pro : La vitesse de ce mode est limitée à 25 km/h et la
trottinette utilise toute sa puissance.
Attention avec le mode pro
• Avec ce mode, veillez à maintenir une distance susante par rapport
aux objets, aux personnes et aux animaux.
• Exercez-vous premièrement sur des terrains vastes sans obstacles
an de vous habituer à l’accélération et à la vitesse.
• Le risque de blessure augmente en raison de la vitesse.
Pour sélectionner ce mode, appuyez sur le sélecteur de mode [MODE]
jusqu’à ce que « FAS » apparaisse à l’écran.
Mettez la trottinette en mouvement comme suit :
Commencez par mettre la trottinette sous tension an d’utiliser le moteur
électrique auxiliaire. Actionnez le bouton de mise sous tension (voir gure
8) jusqu’à allumage du compteur.
Remarque
Cet appareil peut généralement être utilisé sans entraînement
électrique auxiliaire.
• Pour utiliser le moteur électrique auxiliaire, vous devez d’abord mettre
l’appareil en mouvement par votre propre force musculaire jusqu’à une
vitesse approximative de 4 km/h.
• Tirez ensuite sur le levier d’accélérateur an d’activer le moteur
auxiliaire. Vous pouvez désormais accélérer jusqu’à la limitation de
vitesse du mode sélectionné.
Attention
7.3.1 F-/S-/X-Cruisers
Pour les gyropodes Cruiser S et X, prenez note uniquement des points
décrits au chapitre 7.2.1. relatifs à la mise en service.
Pour le gyropode Cruiser F, veuillez noter également ceci :
Cet appareil dispose en outre de deux garde-boue stables et d’un kit
de montage. Montez les garde-boue comme illustré dans les gures
suivantes.
• Insérez les garde-boue entre la roue motrice et le corps du véhicule.
• Veillez à ce que les garde-boue soient parfaitement bien accrochés
dans les deux cols de la partie supérieure de la surface d’appui et à
insérer entièrement les ergots de xation dans les encoches de la partie
inférieure du corps du véhicule.
• Serrez les vis de xation tout droit.
Ergots de xation
Surface d’appui
• Habituez-vous premièrement au comportement dynamique de la
trottinette an d’éviter toute chute et tout risque de blessure.
• Exercez-vous sur un terrain vaste et testez le comportement
dynamique ainsi que l’accélération de l’appareil.
• Dans tous les cas, portez un équipement de protection de qualité.
Pour freiner, actionnez le levier de freinage situé à gauche du guidon.
Attention lors du freinage
• Habituez-vous à la décélération du freinage. Habituez-vous au temps
de freinage de la trottinette.
• Anticipez le freinage et ne risquez aucune collision avec des
personnes, animaux ou objets.
Remarque concernant les autres achages
Après avoir mis la trottinette sous tension en appuyant longuement
sur l’interrupteur ON/OFF, vous pouvez passer à d’autres achages en
appuyant brièvement sur le même interrupteur :
ODO = kilométrage total
TRIP = kilomètres parcourus depuis la mise sous tension de la
trottinette
TM = temps écoulé depuis la mise sous tension de la trottinette
Les modes RM et ERRO sont conçus pour le service après-vente de
Hama en cas d’intervention du service ; vous pouvez donc les ignorer.
7.3 Mise en service et montage de l’appareil
Remarque
Chargez entièrement le produit avant la première utilisation.
7.3.2 U-Scooter
• Saisissez la trottinette au niveau du guidon lorsque vous la déballez.
• Montez la trottinette comme illustré dans les gures suivantes.
• Le guidon est réglable à trois hauteurs, comme illustré dans les gures
suivantes.
Remarque
46
Veillez à bien bloquer toutes les attaches.
Page 47

A
PUSH
B
CLICK
C
E
OPEN
1
D
CLICK CLICK
F
CLOSE
4
CLICK
3
PUSH
2
47
Page 48
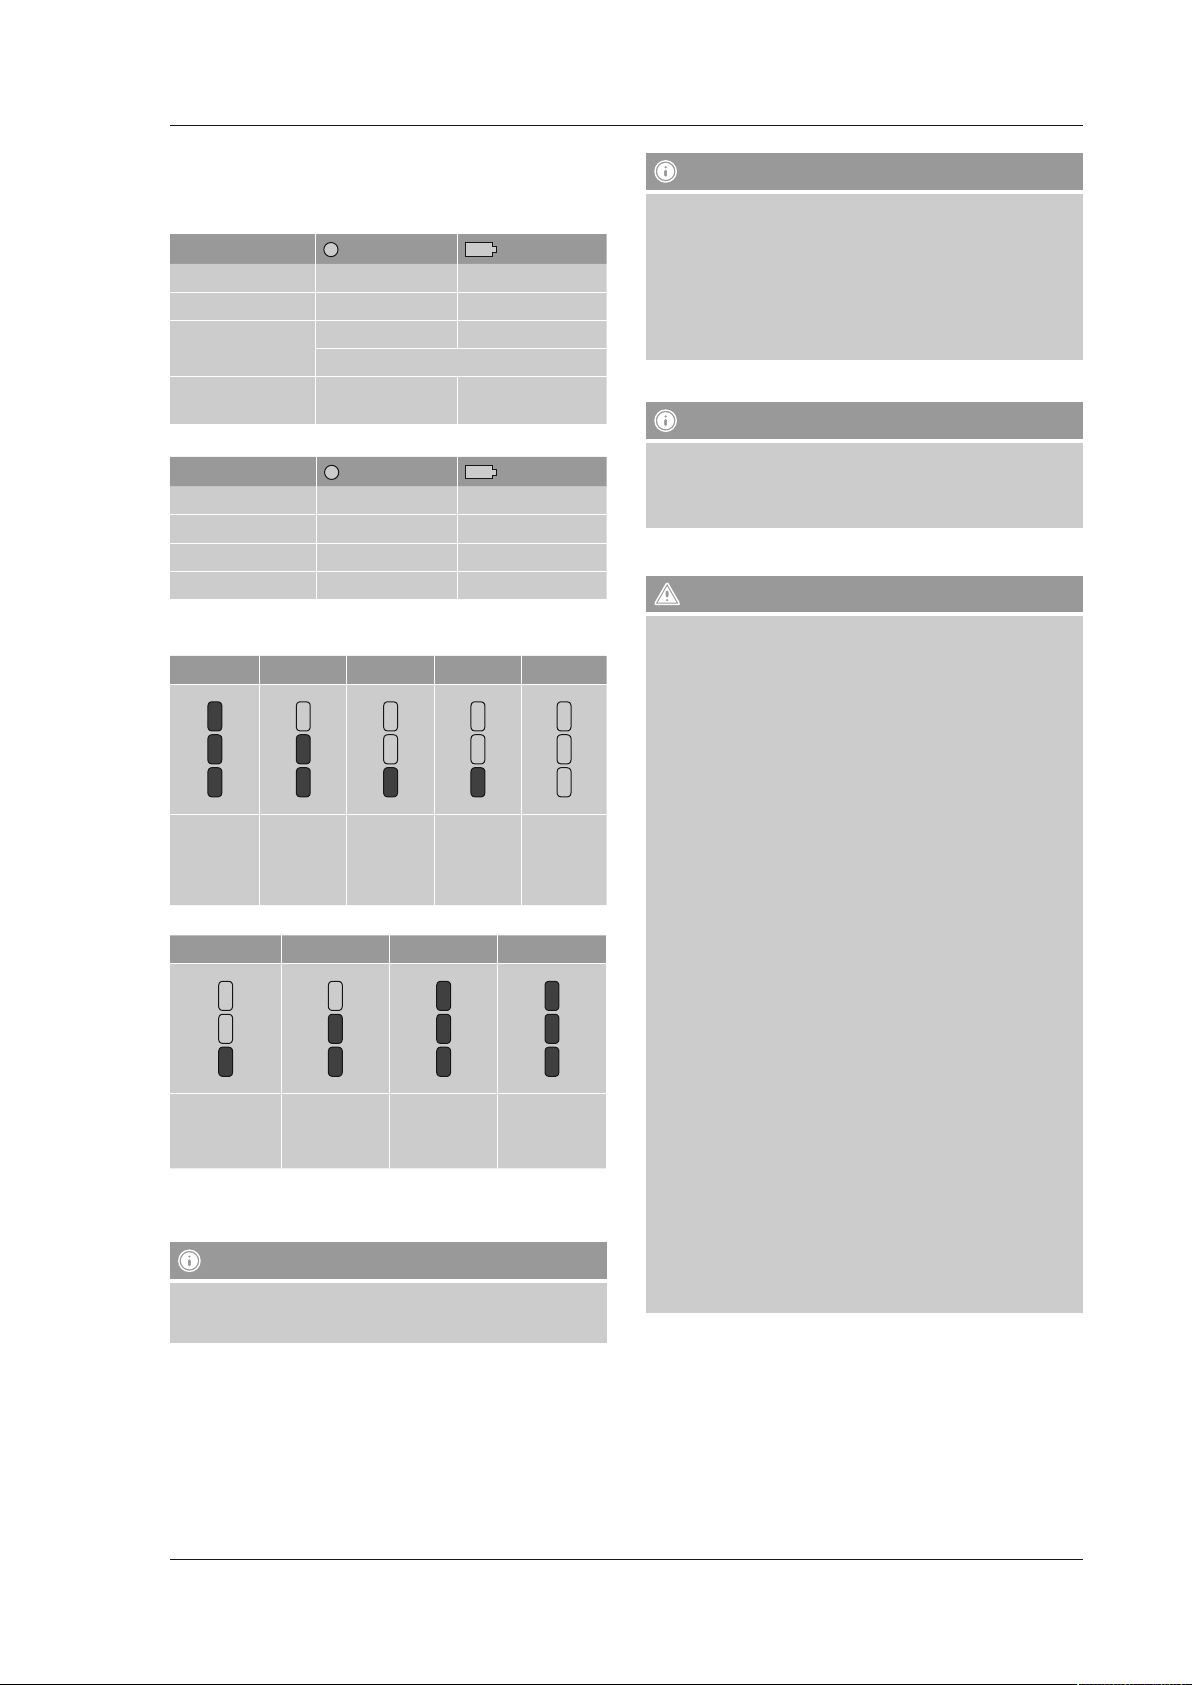
7.4 Affichages d’état de charge
7.4.1 S- / X-Cruiser
Décharge
État de charge
100% – 10% Vert Vert
9% – 5% Vert Vert / clignotant
4% – 0%
(mode de sécurité)
Aucun conducteur
sur les plates-formes
Charge
État de charge
0 – 4% OFF Rouge
5% – 9% OFF Rouge / clignotant
10% – 99% OFF Vert / clignotant
100% OFF Vert
7.4.2 F-Cruiser
Décharge
100% – 67%
Trois
LED sont
allumées en
permanence
Charge
0% – 33%
Une LED
clignote
7.4.3 U-Scooter
L’état de charge est représenté à l’écran par un symbole de batterie
pouvant comporter jusqu’à 6 barres (batterie pleine) (voir gure 8).
Remarque
Rechargez la trottinette dès que l’état de charge n’ache plus
qu’une seule barre. Risque de détérioration de la batterie dans le cas
contraire.
66–34% 33–11% 10–5% 4–0%
Deux
LED sont
allumées en
permanence
LED d’état
Rouge Rouge
LED avant clignotantes, alarme, freinage
OFF en fonction de
LED d’état
Une LED est
allumée en
permanence
34 – 66% 67 – 99% 100%
Deux LED
clignotent
Trois ED
clignotent
l’état de charge
Une LED
clignote
LED de batterie
LED de batterie
Mode de
sécurité :
voir chapitre 7.2.1.
Trois LED
sont allumées
en permanence
Remarque concernant les variations de l’état de charge
• Les fortes montées, les manœuvres de conduite extrêmes et
prolongées et/ou un trajet permanent à pleine vitesse requièrent une
puissance énergétique plus élevée qu’une utilisation moyenne.
• En cas de pause et/ou de brève mise hors tension de l’appareil avoir
effectué ce type de trajet, il est possible que le niveau de charge
remonte légèrement après la pause.
• Ce fonctionnement est normal, car la batterie se régénère un peu
durant la pause.
8. Batterie
Remarque
En utilisation normale et avec des soins appropriés, la batterie devrait
assurer environ 1 500 cycles de charge. Vous reconnaîtrez une batterie
usée au fait que vous devrez la recharger toujours plus souvent et à la
perte d’autonomie.
8.1 Sécurité dans le maniement de la batterie
Avertissement
Veuillez impérativement suivre les consignes de cette notice an de
garantir la sécurité et de maximiser la durée de vie et les performances de
la batterie.
• La batterie ne doit plus être utilisée dans les cas suivants :
- dans le cas où le boîtier est endommagé
- si une odeur inhabituelle s’échappe de la batterie ou si la batterie
est extrêmement chaude
- dans le cas où des substances s’en dégagent
• Évitez tout contact avec les substances s’échappant des batteries.
• Le contact avec la tension de batteries est susceptible de provoquer
la mort ou des blessures graves.
• Les travaux sur le produit sont dangereux dans le cas où le câble
électrique est branché. Une électrocution est susceptible de
provoquer de graves dommages corporels et matériels.
• La batterie ne doit en aucun cas être retirée de l’appareil ni être
ouverte. L’ouverture de la batterie endommage le boîtier et est
susceptible de provoquer l’épanchement de substances nocives.
• Il est formellement interdit d’introduire des objets dans la batterie ou
de tenter de casser le boîtier de la batterie pour l’ouvrir. L’introduction
d’un objet dans les raccords ou l’une des ouvertures de la batterie
est susceptible de provoquer une électrocution, des blessures ou des
brûlures ou encore de déclencher un incendie.
• La batterie doit être rechargée exclusivement à l’aide d’un chargeur
autorisé par le fabricant.
• N‘exposez en aucun cas le gyropode ou son chargeur à des
températures très élevées ni à l’humidité et cessez immédiatement
d’utiliser un chargeur endommagé.
• Le chargeur doit être régulièrement contrôlé pour garantir son parfait
état, tout particulièrement le câble et la prise, an d’écarter tout risque
de détérioration. Un chargeur endommagé ne peut plus être utilisé.
Dans un tel cas, veuillez contacter l’assistance de Hama.
• Veuillez respecter toutes les lois et directives en vigueur concernant
l’élimination et le transport du gyropode.
48
Page 49

8.2 Caractéristiques techniques des batteries (Tableau 3)
Temps de charge
Recharge d’une batterie vide env. 1,5 heures F- / S- / X-Cruiser
Plages de températures
Fonctionnement de -10 °C à +40 °C
Charge, entreposage et transport de 10 °C à 25 °C
Caractéristiques générales
Capacité (Ah) et tension
Dimensions 13,5 cm x 6 cm x 9 cm
Poids 0,50 kg (F- / S- / X-Cruiser)
Technologie lithium-ion
Remarque
• L’utilisation, la charge ou l’entreposage de batteries hors des plages
de températures indiquées sont susceptibles de vous faire perdre vos
droits de garantie et diminuer la portée de l’appareil ainsi que les
performances des batteries.
• Vous devez charger entièrement ce produit avant la première
utilisation. Rechargez le produit au moins une fois par mois.
• La batterie doit être rechargée exclusivement dans la plage de
température ambiante indiquée.
Attention
• Une batterie non régulièrement rechargée à pleine capacité est
susceptible de présenter une décharge profonde au l du temps et
se détériorer durablement.
• Le temps de charge dépend des facteurs suivants :
- état de charge actuel – plus la charge est faible, plus long est la
durée de charge.
- Température de la batterie – une batterie trop chaude ou trop
froide nécessite un temps de charge plus long ou ne se recharge
plus du tout ; la recharge la plus ecace est effectuée à une
température située dans la moyenne de la plage de températures
indiquée.
8.3 Charge des appareils
Chargez le produit exclusivement dans un endroit propre et sec à une
température correspondant aux indications de la plage de température.
Avertissement
• Ne branchez la prise secteur mâle en aucun cas dans le cas où la
prise de charge, le câble électrique ou la prise secteur femelle est
humide. L’équipement électrique n’est pas susamment isolé contre
l’humidité.
• Ne chargez pas le produit indéniment ; une charge trop longue
de la batterie est susceptible de la détériorer malgré sa protection
contre la surcharge.
• Utilisez l‘appareil exclusivement branché à une prise de courant
appropriée. La prise de courant doit être située à proximité du produit et
doit être facilement accessible.
• Branchez le bloc secteur fourni à une prise de courant et à la prise de
charge an de recharger l’appareil. Le produit s’active de lui-même lors
du branchement. Le cycle de charge commence automatiquement.
• La LED d’état du bloc secteur s’allume en rouge pendant la charge. La
LED d’état du bloc secteur s’allume en vert après charge complète de
la batterie.
env. 3 heures U-Scooter
36V, 2.5 Ah (F-/ S-/X-Cruiser)
5,8 Ah (U-Scooter)
0,97 kg (U-Scooter)
Erreur de charge
Le cycle de charge s’interrompt en cas d’erreur pendant le cycle. La LED
d’état du bloc secteur s’éteint alors. Procédez comme suit dans le cas où
l’achage de l’état de charge du produit est également éteint :
• Assurez-vous que la prise est bien alimentée en courant et que le câble
est correctement branché dans la prise.
• Retirez le câble électrique, puis relancez le cycle de charge dans le
cas où l’achage de l’état de charge ne s’allume pas malgré une
alimentation correcte.
• Veuillez vous adresser à notre service de support technique si cette
méthode ne résout pas le problème.
Avertissement
Le produit ne doit pas être utilisé jusqu’à décharge totale des batteries.
Remar
que
La charge de la batterie pouvant légèrement varier sous l’inuence
de facteurs tels que la température, le mode ou la tension de charge,
il est possible que la char
que l’achage n’indique pas une charge complète. Cet achage est
normal et sans inconvénient.
8.4 Effets de la température sur les performances
La batterie est généralement plus chaude que la température ambiante.
Ce réchauffement est produit par l’électricité utilisée (lors de la conduite)
ou l’électricité absorbée (lors de la charge).
Chaud et froid pendant l’utilisation
• La batterie fonctionne le plus ecacement lorsqu’elle est utilisée à une
température située environ dans la moyenne des températures de la
plage de température indiquée.
• Une batterie froide diminue la portée du produit par rapport à une
batterie dont la température équivaut à la température ambiante.
Chaud et froid pendant la recharge
• La batterie doit être à la température recommandée avant et pendant
le cycle de charge. (voir tableau 3, Plages de températures)
• La batterie se recharge le plus ecacement à une température
située environ dans la moyenne des températures de la plage de
température indiquée. Une batterie trop froide ou trop chaude prendra
éventuellement plus de temps à se recharger ou ne se rechargera pas
du tout.
Batterie vide
• Sur un gyropode Cruiser F, S ou X, une batterie presque vide est
signalée par le mode de sécurité. Arrêtez-vous avec précaution si tel est
le cas et descendez du produit.
Remarque
• Il est possible qu’une vieille batterie ou une batterie trop sollicitée
ou mal entretenue développe une grande résistance.
• Ce cas de gure est susceptible d’inuer sur l’achage qui indique
une batterie presque déchargée alors que vous l’avez rechargée peu
avant.
• La batterie est alors usée et l’assistance de Hama doit être chargée
de son remplacement.
ge de la batterie n’atteigne que 99 % et
49
Page 50
8.5 Remplacement de la batterie
Avertissement
Remarque
• Ne remplacez en aucun cas la batterie vous-même.
• Le remplacement d’une batterie par vos propres moyens vous ferait
perdre vos droits de garantie et pourrait diminuer la portée de
l’appareil ainsi que les performances des batteries.
• En cas de détérioration, cessez immédiatement d’utiliser ce
l’appareil.
8.6 Expédition de batteries Li-Ion
Attention
Veuillez respecter toutes les consignes et directives en vigueur lors du
transport de batteries.
9. Entretien
Avertissement
• Ne tentez en aucun cas de modier le produit.
• Avant d’effectuer une des manœuvres suivantes, veuillez contrôler
que le produit est bien hors tension et que le câble électrique a été
débranché.
• Ces manœuvres sont dangereuses lorsque le produit est sous
tension ou en charge.
9.1 Contrôle des pneus / de l’élément mobile
• Assurez-vous que la roue ne présente pas de jeu. Saisissez la roue et
essayez de la bouger d’un côté vers l’autre. Vous ne devez observer
aucun mouvement latéral.
• Veuillez vous adresser à notre service de support technique en présence
de jeu au niveau de la roue.
9.2 Contrôle de la pression des pneus (X-Cruiser / U-Scooter)
• Contrôlez régulièrement la pression des pneus (modèles avec pneus
gonables). Une mauvaise pression des pneus inue négativement sur
la portée.
• Gonez les pneus lorsque leur pression ne correspond pas aux
spécications des Caractéristiques techniques de votre modèle.
• Les deux pneus doivent présenter la même pression et doivent être
exempts de saletés et dépôts.
Avertissement
• La pression indiquée dans le mode d’emploi est déterminante, pas
celle indiquée sur les pneus.
• Une pression trop importante inue négativement sur la suspension
et la traction ; le risque de perte de contrôle, de collision et de chute
augmente.
• Une pression insusante diminue la portée du produit et est
susceptible d’endommager les pneus / l’élément mobile.
• Un pression inégale fausse la direction du produit ; il se dirige alors
vers le pneu le moins goné.
9.3 Nettoyage du produit
Nettoyez le produit avec précaution à l‘aide d‘un chiffon humide. Aucune
humidité ne doit pénétrer dans le produit pendant le nettoyage.
• Évitez tout contact exagéré avec de l’eau.
• N’immergez en aucun cas le produit dans un liquide ; risque de
détérioration durable.
• N’exposez pas le produit à de fortes averses ou de longues pluies
(cette consigne concerne les trajets, l’entreposage et le transport).
• N’utilisez pas de nettoyeur à haute pression ou de jet à haute
pression pour nettoyer le produit. Avec ce type d’appareils, de l’eau
pourrait pénétrer dans des éléments du produit destinés à rester
secs.
• De l’eau ne doit en aucun cas pénétrer dans la prise de charge.
Attention
N’utilisez aucun détergent spécial pour le nettoyage des plateformes
et des pneus. Les produits de ce type sont susceptibles d’inuer
négativement sur la traction et la stabilité.
9.4 Entreposage du produit
• Entreposez le produit à l’intérieur, dans un endroit sec. Évitez
impérativement l’humidité et les températures extrêmes.
• Entreposez le produit uniquement aux températures recommandées
(voir tableau 3) an de garantir la longévité de la batterie.
10. Recherche d’erreurs et élimination des erreurs
(F-/ S- / X-Cruiser)
Avertissement
• Mettez en tous les cas le produit hors tension et retirez le câble
électrique avant d’effectuer des travaux d’entretien.
• N’ouvrez l’appareil en aucun cas.
• Aucune pièce interne ne réclame un entretien par vos propres
moyens.
• L’ouverture du boîtier entraîne la perte des droits de garantie.
10.1 Remplacement de pièces
Veuillez vous adresser à notre service de support technique pour tout
remplacement d’une pièce défectueuse ou usée.
10.2 Élimination des pannes
Méthodes d’élimination des pannes
Vous pouvez, vous-même, résoudre certains problèmes survenant sur
votre appareil.
Avertissement
Mettez en tous les cas le produit hors tension et retirez le câble
électrique avant d’effectuer des travaux d’entretien ou remplacer des
pièces.
L’appareil tire d’un côté
Avant d’essayer de résoudre ce problème, vous devriez impérativement
lire le chapitre ci-dessous concernant les travaux d’entretien.
Solution conseillée :
• Assurez-vous que les deux pneus disposent de la même pression
conformément aux indications du tableau 1/2 du chapitre Pression
des pneus.
• Contrôlez que les pneus sont disposent de la même pression ; un pneu
(ou les deux) n’est/ne sont peut-être pas gonés correctement.
• Partagez équitablement votre poids sur les deux pieds. Votre gyropode
Cruiser tire dans une direction si vous appuyez plus fortement sur un
lied.
50
Page 51
Un pneu est plat ou de l’air s’échappe
Avant d’essayer de résoudre ce problème, vous devriez impérativement
lire le chapitre ci-dessous concernant les travaux d’entretien.
Solution conseillée :
• Vériez le parfait état des pneus. Veuillez vous adresser à notre service
de support technique en cas de pneu défectueux.
• Gonez le pneu (voir Pression des pneus, tableau 1/2) et contrôlez-
en l’étanchéité. Veuillez vous adresser à notre service de support
technique si le pneu se redégone immédiatement ou si il perd de l’air.
Avertissement
Montez sur l’appareil uniquement lorsque toutes les erreurs ont été
corrigées.
Remarque
Veuillez uniquement utiliser des accessoires d’origine ou des pièces de
rechange de Hama. Vous obtiendrez des informations concernant la
réception de ces produits par notre support.
11. Chargeur
11.1 Consignes de sécurité
• Avant chaque utilisation, veuillez contrôler le parfait état du chargeur
et des connexions. N’utilisez en aucun cas un chargeur visiblement
endommagé.
• Le chargeur n’est pas adapté à une utilisation dans un environnement
humide.
• Utilisez ce chargeur exclusivement pour recharger votre gyropode
Cruiser.
• Veillez à assurer une aération susante lors du fonctionnement.
• Ne recouvrez pas le chargeur pendant son fonctionnement.
• Un risque d’électrocution apparaît en cas de contact avec un liquide ;
si tel est le cas, débranchez immédiatement l’appareil du secteur. Il est
interdit de continuer à utiliser le chargeur an d’écarter tout risque de
dommage.
• Le chargeur ne comprend aucune pièce nécessitant un entretien. Il est
interdit d’ouvrir le boîtier de l‘appareil.
• Débranchez le chargeur du secteur lorsque vous ne l’utilisez pas.
Avertissement
La sélection d’une tension de service supérieure à celle indiquée
par le fabricant est susceptible de provoquer des dommages graves
au produit et au chargeur. Par conséquent, utilisez uniquement les
accessoires originaux de Hama.
12. Annexe
12.1 Partenaire et informations juridiques
Veuillez respecter toutes les lois et directives en vigueur
La conduite de gyropodes sur les voies ouvertes à la circulation publique
et les trottoirs est réglementée dans de nombreux pays. Parallèlement
à d’autres exigences, les lois et directives imposent généralement un
âge minimal pour le conducteur et des limitations de vitesse. Le port de
vêtements de protection est éventuellement requis. Dans certains pays, la
conduite de gyropodes sur les voies ouvertes à la circulation publique et
les trottoirs est interdite. Veuillez consulter les autorités de votre pays de
résidence et prenez note des lois et directives en vigueur.
12.2 Exclusión de responsabilidad
Hama GmbH & Co KG no se responsabiliza ni concede garantía por los
daños que surjan por una instalación, montaje o manejo incorrectos del
producto o por la no observación de las instrucciones de manejo y/o de
las instrucciones de seguridad.
12.3 Servicio y soporte
Si tiene que hacer alguna consulta sobre el producto, diríjase al
asesoramiento de productos Hama.
Línea directa: +49 9091 502-115 (Alemán/Inglés)
Encontrar más información de soporte aquí:
www.hama.com
12.4 Instrucciones para desecho y reciclaje
Nota sobre la protección medioambiental:
Después de la puesta en marcha de la directiva Europea
2012/19/EU y 2006/66/EU en el sistema legislativo nacional, se
aplicara lo siguiente: Los aparatos eléctricos y electrónicos, así
como las baterías, no se deben evacuar en la basura doméstica.
El usuario está legalmente obligado a llevar los aparatos eléctricos y
electrónicos, así como pilas y pilas recargables, al nal de su vida útil a
los puntos de recogida comunales o a devolverlos al lugar donde los
adquirió. Los detalles quedaran denidos por la ley de cada país. El
símbolo en el producto, en las instrucciones de uso o en el embalaje hace
referencia a ello. Gracias al reciclaje, al reciclaje del material o a otras
formas de reciclaje de aparatos/pilas usados, contribuye Usted de forma
importante a la protección de nuestro medio ambiente.
11.2 Caractéristiques techniques
Plage de tension d'entrée 100-240V ~ 50/60Hz
Puissance continue maximale 90 W
Courant de sortie 2A
Tension de sortie 42 V DC
Température de service 10°~25°C
11.3 Nettoyage
Utilisez uniquement un chiffon doux et sec pour nettoyer l’appareil. Nous
vous conseillons d’utiliser un chiffon micro-bres non abrasif. Veillez à ce
qu‘aucun solvant ni liquide ne pénètre dans l‘appareil.
51
Page 52
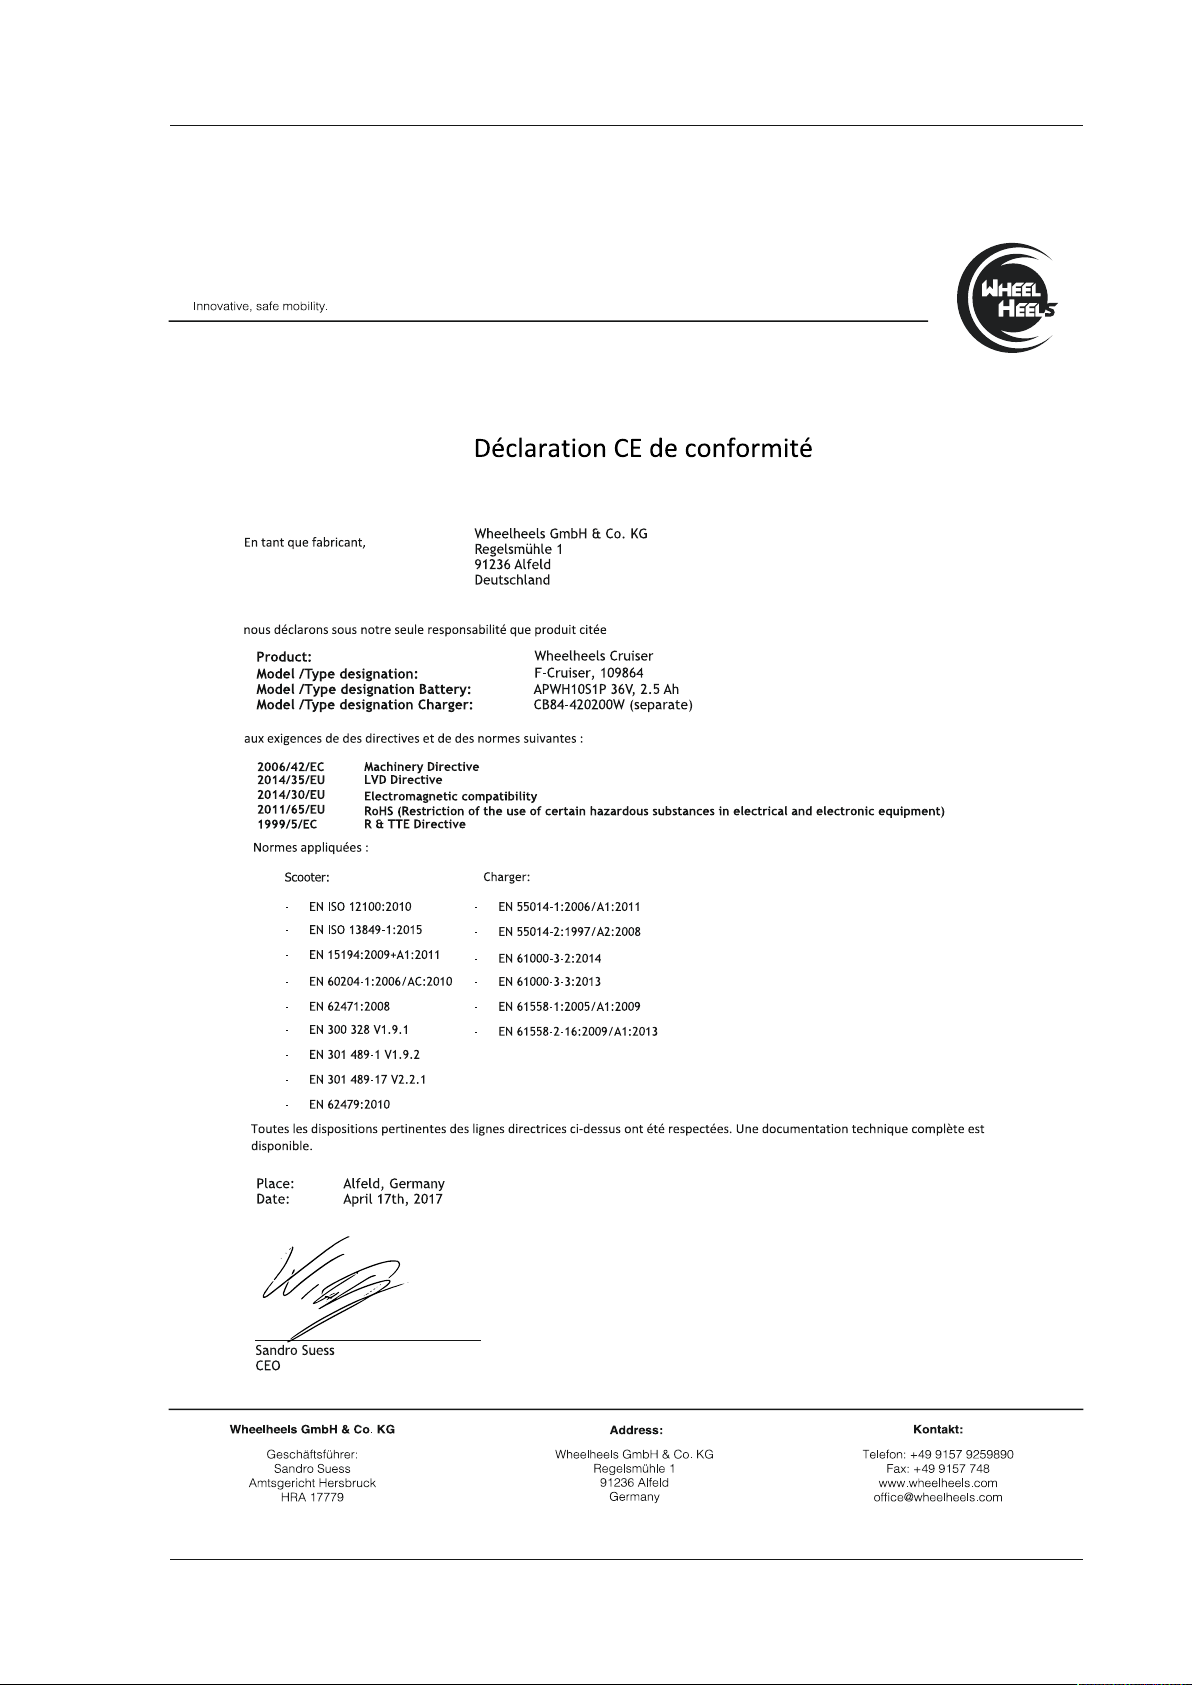
12.5 Déclaration de conformité
00109864 F-Cruiser
52
Page 53

00109865 X-Cruiser
53
Page 54
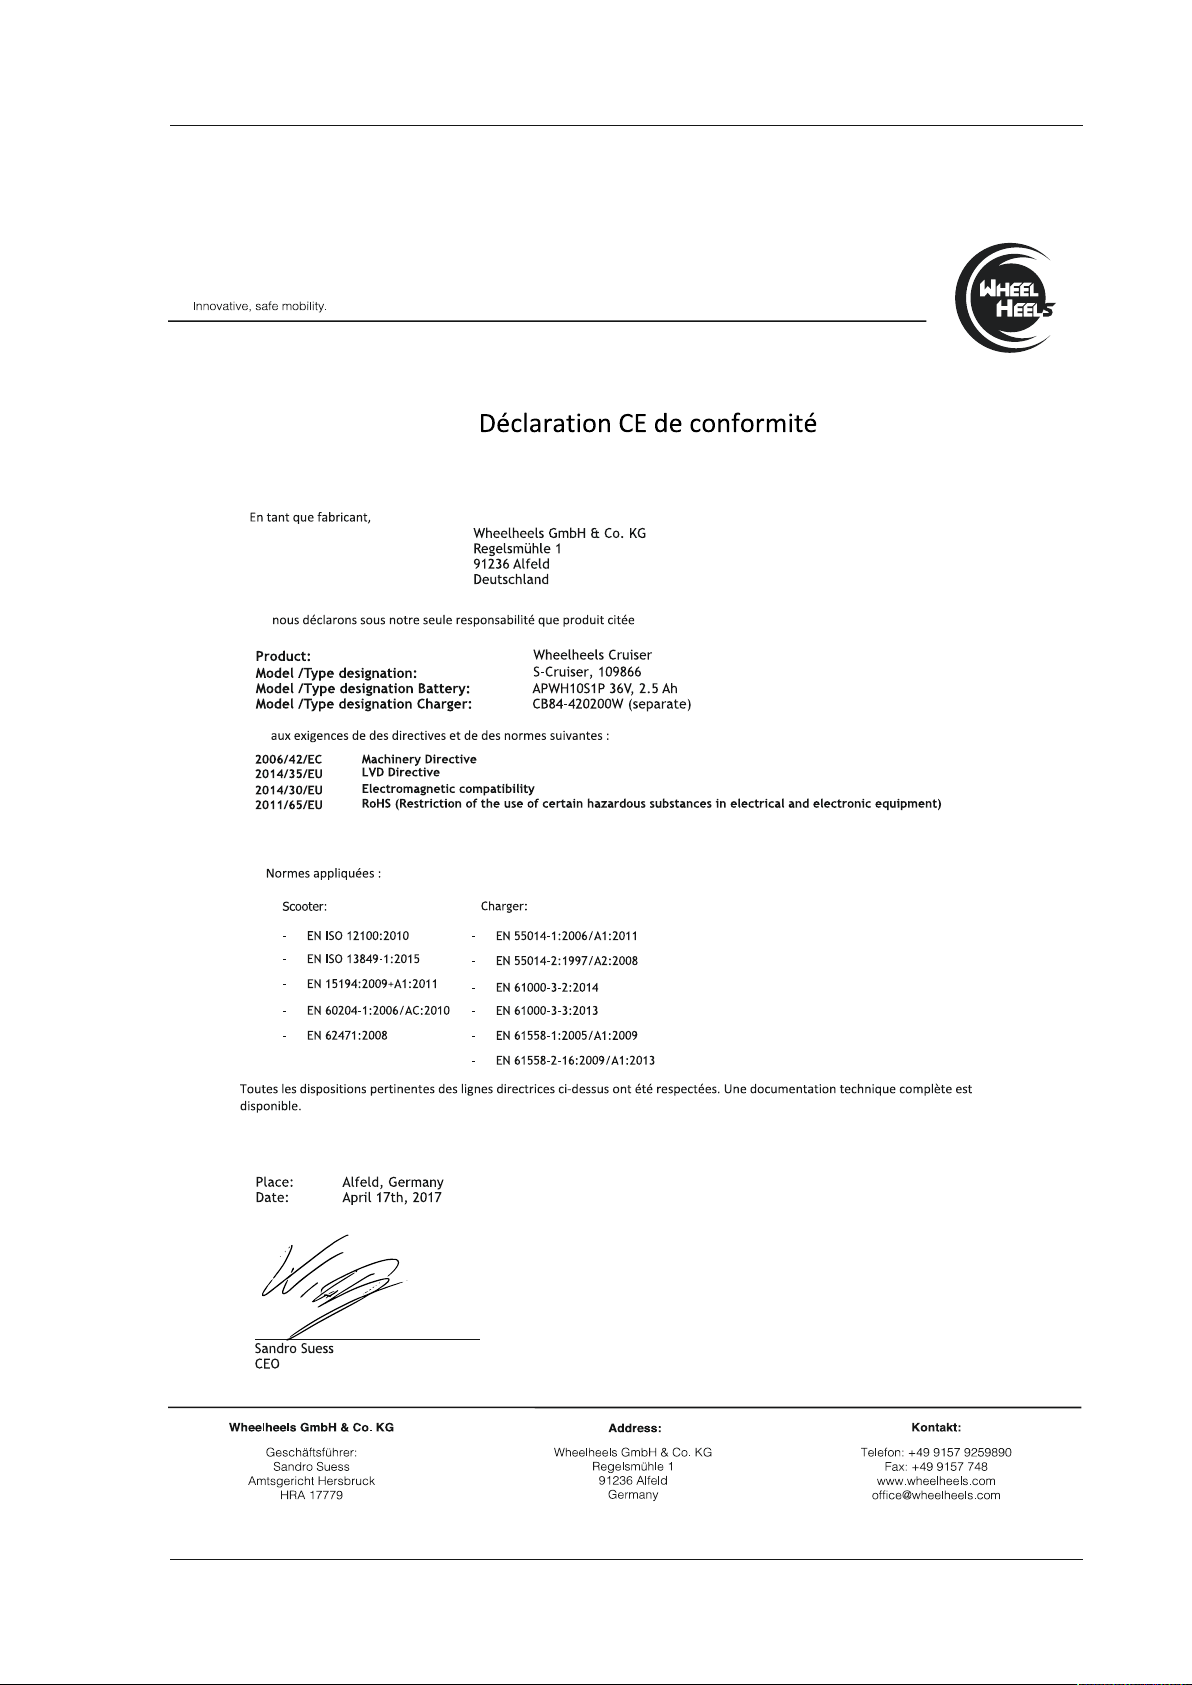
00109866 S-Cruiser
54
Page 55
00109870 U-Scooter
55
Page 56

I Istruzioni per l‘uso
Indice
1. Spiegazione dei simboli di avvertimento e delle
indicazioni ..................................56
Contenuto della confezione ....................56
2.
Disimballaggio.......................................56
2.1
2.2
Annotazione dei numeri di serie .........................56
2.3
Accessori ...........................................57
Indicazioni di sicurezza: .......................57
3.
Campi d’impiego e limiti di potenza .............57
4.
Campi d’impiego .....................................57
4.1
4.2
Limiti di potenza .....................................57
Descrizione dei diversi modelli ..................58
5.
5.1
S-/X-Cruiser.........................................58
5.2
F-Cruiser/U-Scooter...................................59
App........................................60
6.
Utilizzo .....................................60
7.
Elementi di comando e indicazioni .......................60
7.1
7.1.1 S-
/X-Cruiser ...................................60
7.1.2 F-Cruiser
7.1.3 U-Scooter
7.2
Funzionamento del prodotto ............................62
7.2.1 F-
7.2.2 U-Scooter
7.3
Messa in funzione e montaggio dello scooter ...............64
7.3.1 F-
7.3.2 U-Scooter
7.4
Indicatore dello stato di carica ..........................66
7.4.1 S-
7.4.2 F-Cruiser
7.4.3 U-Scooter
Batteria ....................................66
8.
8.1
Utilizzo sicuro delle batterie.............................66
8.2
Dati tecnici batteria (tabella 3) ..........................67
8.3
Carica dello scooter ...................................67
8.4
Effetti della temperatura sulla potenza ....................67
8.5
Sostituzione della batteria ..............................68
8.6
Spedizione di batterie Li-Ion ............................68
Manutenzione ...............................68
9.
Verifica del gruppo pneumatici/ruote......................68
9.1
9.2
Verifica della pressione degli pneumatici (X-Cruiser / U-Scooter) 68
9.3
Pulizia del prodotto ...................................68
9.4
Lagern des Produkts ..................................68
Ricerca ed eliminazione degli errori
10.
(F-/S-/ X-Cruiser) ............................68
Sostituzione di componenti e pezzi di ricambio .............68
10.1
10.2
Eliminazione degli errori ..............................68
Caricabatterie ..............................69
11.
11.1
Avvertenze di sicurezza ...............................69
Dati tecnici ........................................69
11.2
Pulizia ............................................69
11.3
Appendice .................................69
12.
Referenti e informazioni legali..........................69
12.1
Esclusione di garanzia ................................69
12.2
Assistenza e supporto ................................69
12.3
Indicazioni di smaltimento.............................69
12.4
Dichiarazione di conformità............................70
12.5
......................................61
.....................................61
/S-/X-Cruiser.................................62
7.2.1.1 Recupero dell’energia (Recupero)
7.2.1.2 Impianto di illuminazione (F-Cruiser) . . . . . . . . . .63
7.2.1.3 Presa di carica USB (F-Cruiser)
......................................63
/S-/X-Cruisers ................................64
......................................64
/X-Cruiser....................................66
.......................................66
......................................66
.............63
...............63
Grazie per avere acquistato un prodotto Hama!
Prima della messa in esercizio, leggete attentamente le seguenti istruzioni
e avvertenze, quindi conservatele in un luogo sicuro per una eventuale
consultazione. In caso di cessione dell‘apparecchio, consegnate anche le
presenti istruzioni al nuovo proprietario.
1. Spiegazione dei simboli di avvertimento e delle
indicazioni
Attenzione
Avverte di azioni che potrebbero causare lesioni.
Attenzione
Avverte di azioni con le quali l’esercizio dell’apparecchio potrebbe
essere compromesso o l’apparecchio potrebbe essere danneggiato.
Avvertenza
Evidenzia punti importanti, consigli utili, circostanze particolari o
metodi alternativi.
2. Contenuto della confezione
F-Cruiser
• Hama Cruiser
• Caricabatterie
• 2x parafanghi, compreso set di montaggio
• Queste istruzioni per l’uso
• Dichiarazione di conformità
S-/X-Cruiser
• Hama Cruiser
• Caricabatterie
• Queste istruzioni per l’uso
• Dichiarazione di conformità
U-Scooter
• Hama Scooter
• Caricabatterie
• Queste istruzioni per l’uso
• Dichiarazione di conformità
2.1 Disimballaggio
• Prima di disimballare il prodotto, vericare la confezione e prestare
attenzione a eventuali danni.
• In caso di danni, contattare il proprio fornitore.
• Se tutto è a posto, vericare il contenuto della confezione.
• Se dovesse essere incompleto, contattare il proprio fornitore.
• Non sollevare il Cruiser S e il Cruiser X dalla confezione afferrandoli
dalle coperture delle ruote
2.2 Annotazione dei numeri di serie
Avvertenza
Il numero di serie è univoco. È importante per un possibile ricorso alla
garanzia ed è necessario per la denuncia in caso di smarrimento o
furto.
• Il numero di serie si trova sulla targhetta applicata sul prodotto. Il
numero di serie è composto come segue:
F-Cruiser: 91XXXXXX
X-Cruiser: 92XXXXXX
S-Cruiser: 93XXXXXX
U-Scooter: 94XXXXXX
• Annotare il numero di serie. Conservare queste informazioni separate
dal prodotto, in un luogo sicuro.
56
Page 57

2.3 Accessori
Avvertenza
Per tutti gli scooter descritti in questi istruzioni d’uso si può utilizzare
l’accessorio Hovercart 109888 di Hama.
3. Indicazioni di sicurezza:
Per imparare a guidare in modo sicuro con il proprio prodotto, leggere
attentamente tutte le istruzioni e le avvertenze contenute nelle istruzioni
per l’uso, al ne di acquisire familiarità con l’apparecchio.
Osservare attentamente tutte le avvertenze e le misure precauzionali
contenute nella documentazione per l’utente del prodotto.
Attenzione
• Questo veicolo elettrico non è omologato per l’utilizzo su strada!
• L’eventuale perdita di controllo, scontro o caduta possono
minimizzare il rischio di lesioni, leggere e seguire le istruzioni e le
avvertenze contenute nella documentazione per l’utente.
•
calzature robuste!
• Mantenere una distanza di sicurezza dalle altre persone o dagli
animali, in particolare se non si ha familiarità con lo scooter!
• Non sopravvalutare le proprie capacità. Aumentare lentamente la
velocità e guidare in modo prudente per evitare cadute.
• Non guidare MAI sotto l’inusso di droghe o alcol!
Avvertenza
Aprendo l’apparecchio oppure togliendo l’etichetta di sigillo applicata
si perde la garanzia.
• Il prodotto è concepito per l’uso domestico privato, non commerciale.
•Utilizzare il prodotto esclusivamente per lo scopo previsto.
• Proteggere il prodotto da sporcizia, umidità e surriscaldamento e
utilizzarlo solo in ambienti asciutti.
• Non fare cadere il prodotto e non sottoporlo a forti scossoni!
• Questo prodotto non è concepito per essere utilizzato da persone bambini inclusi - con capacità siche, sensoriali o psichiche ridotte o
con mancanza di esperienze e competenze, a meno che non vengano
debitamente istruite in merito da un incaricato alla sicurezza.
• Non acconsentire ai bambini di giocare con l‘apparecchio. La pulizia
non deve essere effettuata dai bambini.
• Collegare il prodotto solo a una presa di rete appositamente
omologata. La presa di rete deve poter essere raggiungibile in qualsiasi
momento.
• L‘ accumulatore è sso e non può essere rimosso, smaltirlo
conformemente alle normative locali vigenti.
• Non tentare di aggiustare o riparare l’apparecchio da soli. Rivolgersi
a personale specializzato per tutti i lavori di manutenzione, fatta
eccezione per i 9 casi qui descritti.
• Aprendo l’apparecchio oppure togliendo l’etichetta di sigillo applicata
si perde la garanzia.
• Non aprire il prodotto e non utilizzarlo più se danneggiato, se si rileva
la formazione di fumo, di odore di bruciato oppure se si sentono
dei rumori dell‘apparecchio. Rivolgersi immediatamente al proprio
rivenditore oppure al nostro servizio assistenza (Vedi 12.3 Assistenza e
Supporto)
– PERICOLO DI LESIONI E DI MORTE!
essere mortalmente pericolosi o causare gravi lesioni. Per
Quando si utilizza il prodotto, indossare sempre protezioni di
qualità come casco, ginocchiere e gomitiere, guanti e
4. Campi d’impiego e limiti di potenza
4.1 Campi d’impiego
Avvertenza
• Il prodotto non è omologato per l‘utilizzo su strade pubbliche!
L’impiego è ammesso esclusivamente su strade private, non
pubbliche. Osservi le leggi e le normativi nazionali vigenti!
• L’apparecchio può essere utilizzato solo su strade chiuse, private,
nella misura in cui nessun’altra regolamentazione ne vieti l’utilizzo.
• L’età minima per l’utilizzo è 14 anni.
• L’apparecchio è concepito esclusivamente per un conducente.
• Il peso massimo del conducente non deve superare i 120 kg.
• Non mettere in esercizio il prodotto al di fuori dei suoi limiti di
rendimento indicati nei dati tecnici.
• Non utilizzare il prodotto in zone in cui non sono ammesse le
apparecchiature elettroniche.
• Il prodotto è previsto esclusivamente per l’utilizzo in condizioni asciutte.
Presenta una protezione agli schizzi di acqua, ma non è protetto in
modo adeguato al permanente contatto con l’acqua e quindi si può
danneggiare.
4.2 Limiti di potenza
Leggere attentamente i limiti di potenza del prodotto. Sono misurati in
modo da garantire la massima sicurezza per il conducente e minimizzare
il rischio di danni per l’apparecchio.
• Non superare in nessun caso il peso massimo del conducente e del
carico al seguito (max. carico utile) o il peso minimo del conducente
indicati nei Dati tecnici (Vedi 5.1/5.2 Dati Te cnici, tabella 1/2)
• La mancata osservanza dei limiti di potenza può compromettere
la sicurezza di guida per il conducente! Fattoti che richiedono una
maggiore potenza sono, tra gli altri:
- carichi utili superiori
(peso del conducente e di tutti i carichi al seguito)
- discesa ripida/salita ripida
- strade accidentate
- velocità superiori a 15 km/h (solo per Cruiser F, S e X)
- manovre improvvise
Attenzione
Se non vengono osservati i limiti di peso, in particolare in
concomitanza con altri fattori per i quali è richiesta una maggiore
potenza, aumenta il rischio di danni alle persone e alle cose.
57
Page 58

5. Descrizione dei diversi modelli
5.1 S-/X-Cruiser
Modello Descrizione
Figura 1
S-Cruiser
Figura 2
X-Cruiser
Varianti di modelli (Tabella 1)
Limite di peso per il conducente
e i carichi al seguito
Carico utile max.
Peso minimo conducente
Età minima conducente
Potenza Slalom Cruiser Cross Cruiser
Velocità massima 6 km/h (modalità principiante)
15 km/h (Modalità esperti)
30 km/h (Modalità cart)
Portata ca. 15 km (in base al conducente, alla velocità
e al fondo stradale)
Alimentazione elettrica per la carica
(effettuabile solo con il cavo elettrico fornito
oppure con accessorio originale)
Energia tramite batteria ricaricabile agli ioni di
litio (Li-Ion)
Potenza motore700 Watt 700 Watt
Pressione pneumatici -35 psi (2,4 bar)
Livello sonorominore di 70 dB(A) durante la guida minore di 70 dB(A) durante la guida
Lo Slalom Cruiser (vedi gura 1) offre il massimo divertimento in interni
ed esterni in diversi ambienti. Questo modello può essere impiegato
esclusivamente su suolo stabile e piano. Non è adatto per terreni
irregolari, come ad es. l’acciottolato.
Il Cross Cruiser (vedi gura 2) è ottimizzato per l’impiego all’aperto. Ha
le ruote di diametro maggiore, può essere impiegato su suoli di diverso
genere e ha pneumatici più larghi con prolo scolpito per cui, rispetto
agli altri modelli, può essere utilizzato su terreni diversicati e meno
pianeggianti. Gli pneumatici a bassa pressione conferiscono maggiore
stabilità e trazione al Cross Cruiser su terreni accidentati.
Slalom Cruiser Cross Cruiser
120 kg 120 kg
25 kg 25 kg
14 anni 14 anni
6 km/h (modalità principiante)
15 km/h (Modalità esperti)
30 km/h (Modalità cart)
ca. 18 km (in base al conducente, alla velocità
e al fondo stradale)
42V, ≤ 5 A42V, ≤ 5 A
36V, 2,5 Ah 36V, 2,5 Ah
Misure e pesi Slalom Cruiser Cross Cruiser
Peso dell’apparecchio senza batteria 9,1 kg 11,5 kg
Peso della batteria 0,97 kg 0,97 kg
Lunghezza e larghezza 58 cm x 18,5 cm 67 cm x 26 cm
Altezza 17,5 cm 26 cm
Diametro pneumatici 6,5 Zoll/ 16,5 cm 10 Zoll/ 25,4cm
Tipo di pneumatici
Campi di temperaturaSlalom Cruiser Cross Cruiser
Esercizio
Carica, conservazione e trasporto
Gomma piena Tubolari
da -10°C a +40°C. da -10°C a +40°C.
da 10°C a +25°C. da 10°C a +25°C.
58
Page 59

5.2 F-Cruiser/U-Scooter
Modell Beschreibung
Figura 3
F-Cruiser
Figura 4
Scooter
U-
Varianti di modelli (Tabella 2)
Limite di peso per il conducente
e i carichi al seguito
Carico utile max.
Peso minimo conducente
Età minima conducente
Potenza Freestyle Cruiser Urban Scooter
Velocità massima 6 km/h (modalità principiante)
Portata ca. 15 km (in base al conducente, alla velocità
Alimentazione elettrica per la carica
(effettuabile solo con il cavo elettrico fornito
oppure con accessorio originale)
Energia tramite batteria ricaricabile agli ioni di
litio (Li-Ion)
Uscita USB per dispositivi esterni 5V DC, 2A Potenza motore800 Watt 250 Watt
Pressione pneumatici -2,5 bar davanti, nessuna dietro
Livello sonorominore di 70 dB(A) durante la guida minore di 70 dB(A) durante la guida
Freestyle Cruiser Urban Scooter
15 km/h (Modalità esperti)
30 km/h (Modalità cart)
e al fondo stradale)
Il Cruiser Freestyle (vedi gura 3) viene fornito con app., collegamento
USB e bussola per chiusura Kensington e vi garantisce sia indoor
che outdoor un grande piacere di guida. Questo modello può essere
impiegato esclusivamente su terreno stabile e piano. I pneumatici extra
larghi in gomma mantengono un’eccellente presa sul terreno anche alle
alte velocità.
Lo scooter urbano (vedi gura 4) si può piegare e aprire in pochi secondi
e con poche, facili gesti. Dotato di tachimetro, luci, freni a tamburo e
pneumatici a con camera d’aria a bassa pressione che garantiscono
maggiore stabilità e trazione. Ideale per l’utilizzo outdoor. Lo scooter è
adatto per terreni dalle diverse caratteristiche anche non piani. Realizzato
con una struttura in alluminio pressofusa e con verniciatura a polvere, lo
scooter garantisce sia stabilità che alta protezione alla corrosione.
120 kg 120 kg
25 kg -
14 anni 14 anni
6 km/h (modalità principiante)
15 km/h (Modalità esperti)
25 km/h (modalità esperti)
ca. 15 km (in base al conducente, alla velocità
e al fondo stradale)
42V, ≤ 5 A42V, ≤ 5 A
36V, 2,5 Ah 36V, 5,8Ah
Misure e pesi Freestyle Cruiser Urban Scooter
Peso dell’apparecchio senza batteria 14 kg 14 kg
Peso della batteria 0,50 kg 0,97 kg
Lunghezza e larghezza 66,9 cm x 24,3cm 115 cm x 15 cm
Altezza 22 cm 118 cm
Diametro pneumatici 8 Zoll / 20,4 cm 8 Zoll / 20,4 cm
Tipo di pneumatici Gomma piena Gomma piena & Pneumatici tubolari
Campi di temperaturaFreestyle Cruiser Urban Scooter
Esercizio
Carica, conservazione e trasporto
da -10°C a +40°C. da -10°C a +40°C.
da 10°C a +25°C. da 10°C a +25°C.
59
Page 60
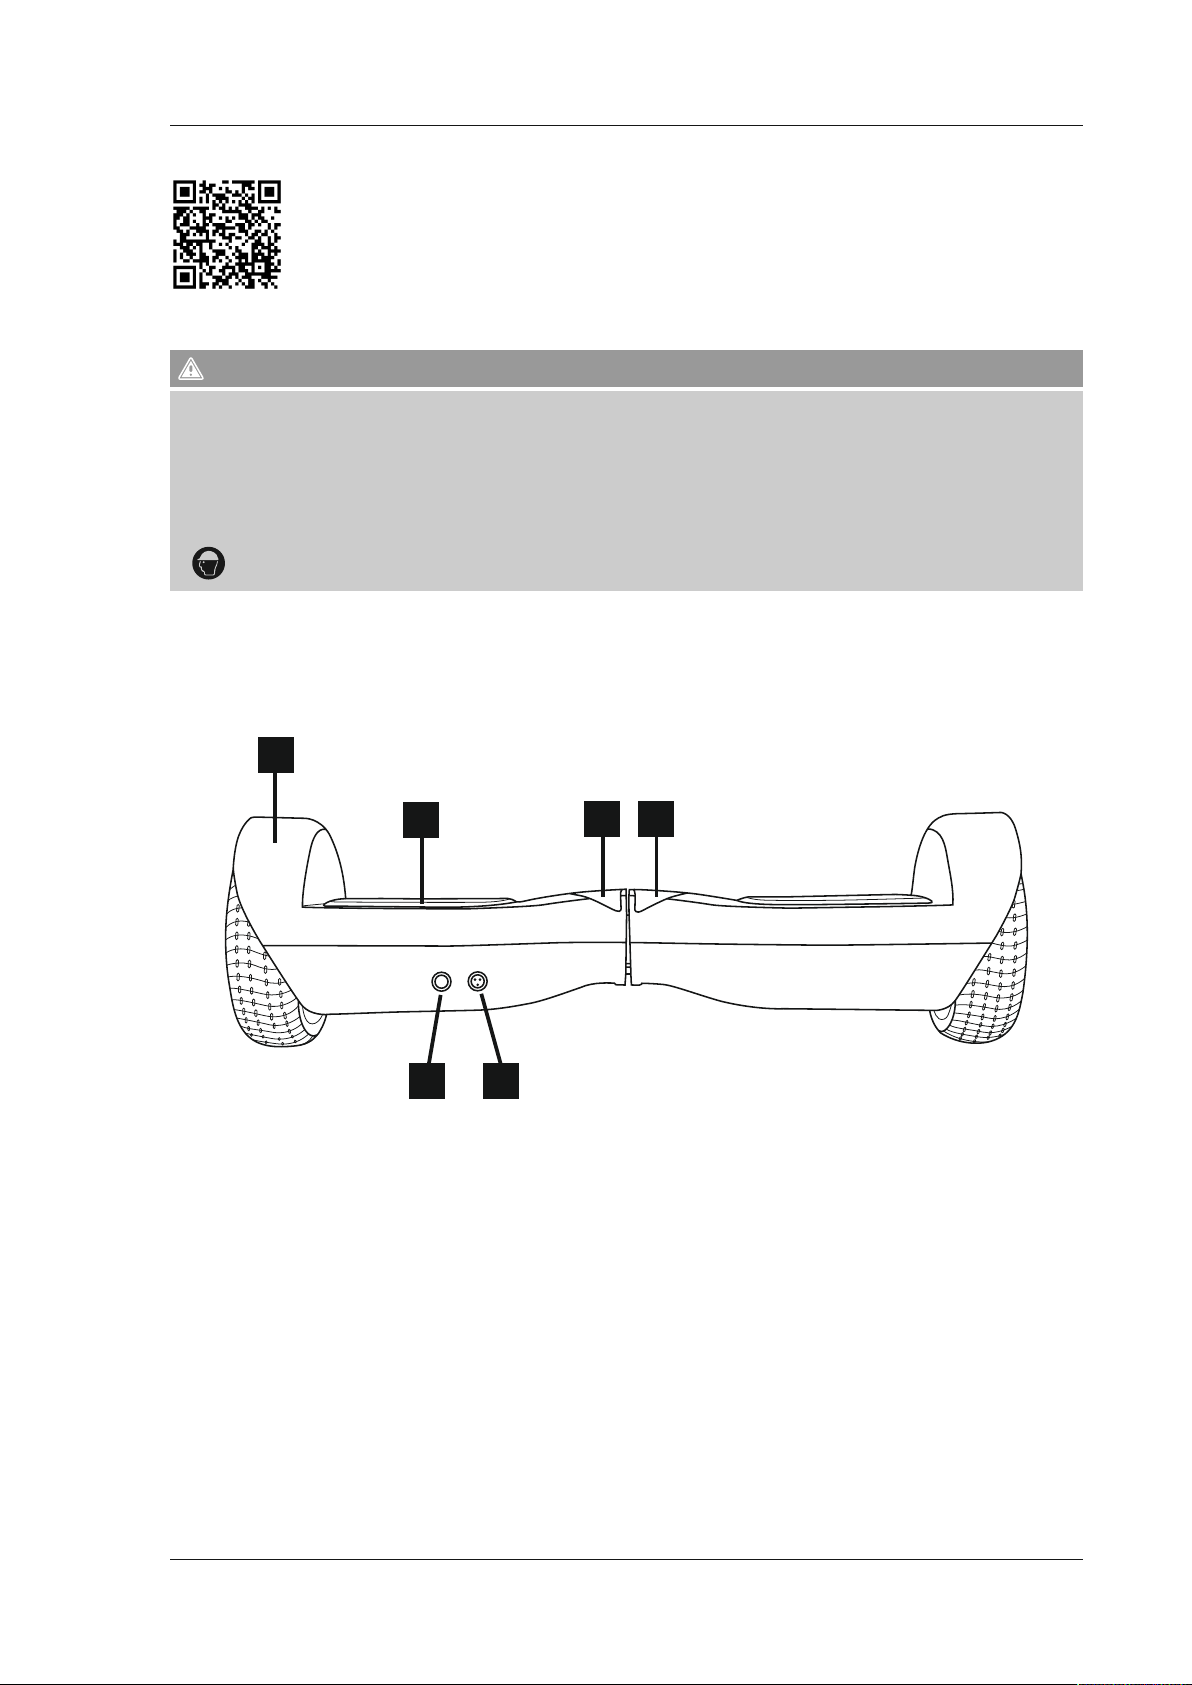
6. App
Le istruzioni dettagliate per la app “Whelheels” per iOS e Android si trovano al seguente link: www.wheelheels.com/#app
7. Utilizzo
Attenzione
• L’utilizzo del prodotto è a propria responsabilità.
• Vericare il funzionamento corretto del prodotto prima di ogni utilizzo!
• Tenere le dita e altre parti del corpo lontane da possibili punti pericolosi o parti in movimento, in particolare dalle ruote in funzione!
• Evitare di guidare con oggetti pendenti, come auricolari con il lo o abiti con stoffa cascante per evitare che niscano nelle ruote che girano.
• Evitare l’utilizzo con cattivo tempo (pioggia, neve, ghiaccio, gelo, neve e su tratti oleosi). Non salire sui marciapiedi ed evitare di passare sopra ad
ostacoli.
• Il prodotto non è omologato per l‘utilizzo su strade pubbliche! L’impiego è ammesso esclusivamente su strade private, non pubbliche. Il costruttore
prende espressamente distanza da qualsiasi danno riconducibile a un utilizzo non corretto del prodotto.
Quando si utilizza il prodotto, indossare sempre protezioni di qualità come casco, ginocchiere e gomitiere, guanti e calzature robuste!
•
7.1 Elementi di comando e indicazioni
7.1.1 S-/X-Cruiser
Figura 5
1
2
5 6
1. Copriruote
2. Pedane con sistema di sensori a pressione
3. Indicazioni di stato
4. LED di stato per stato di carica
5. Interruttore on/off, interruttore per la modalità di esercizio
6. Presa di carica
3 4
60
Page 61
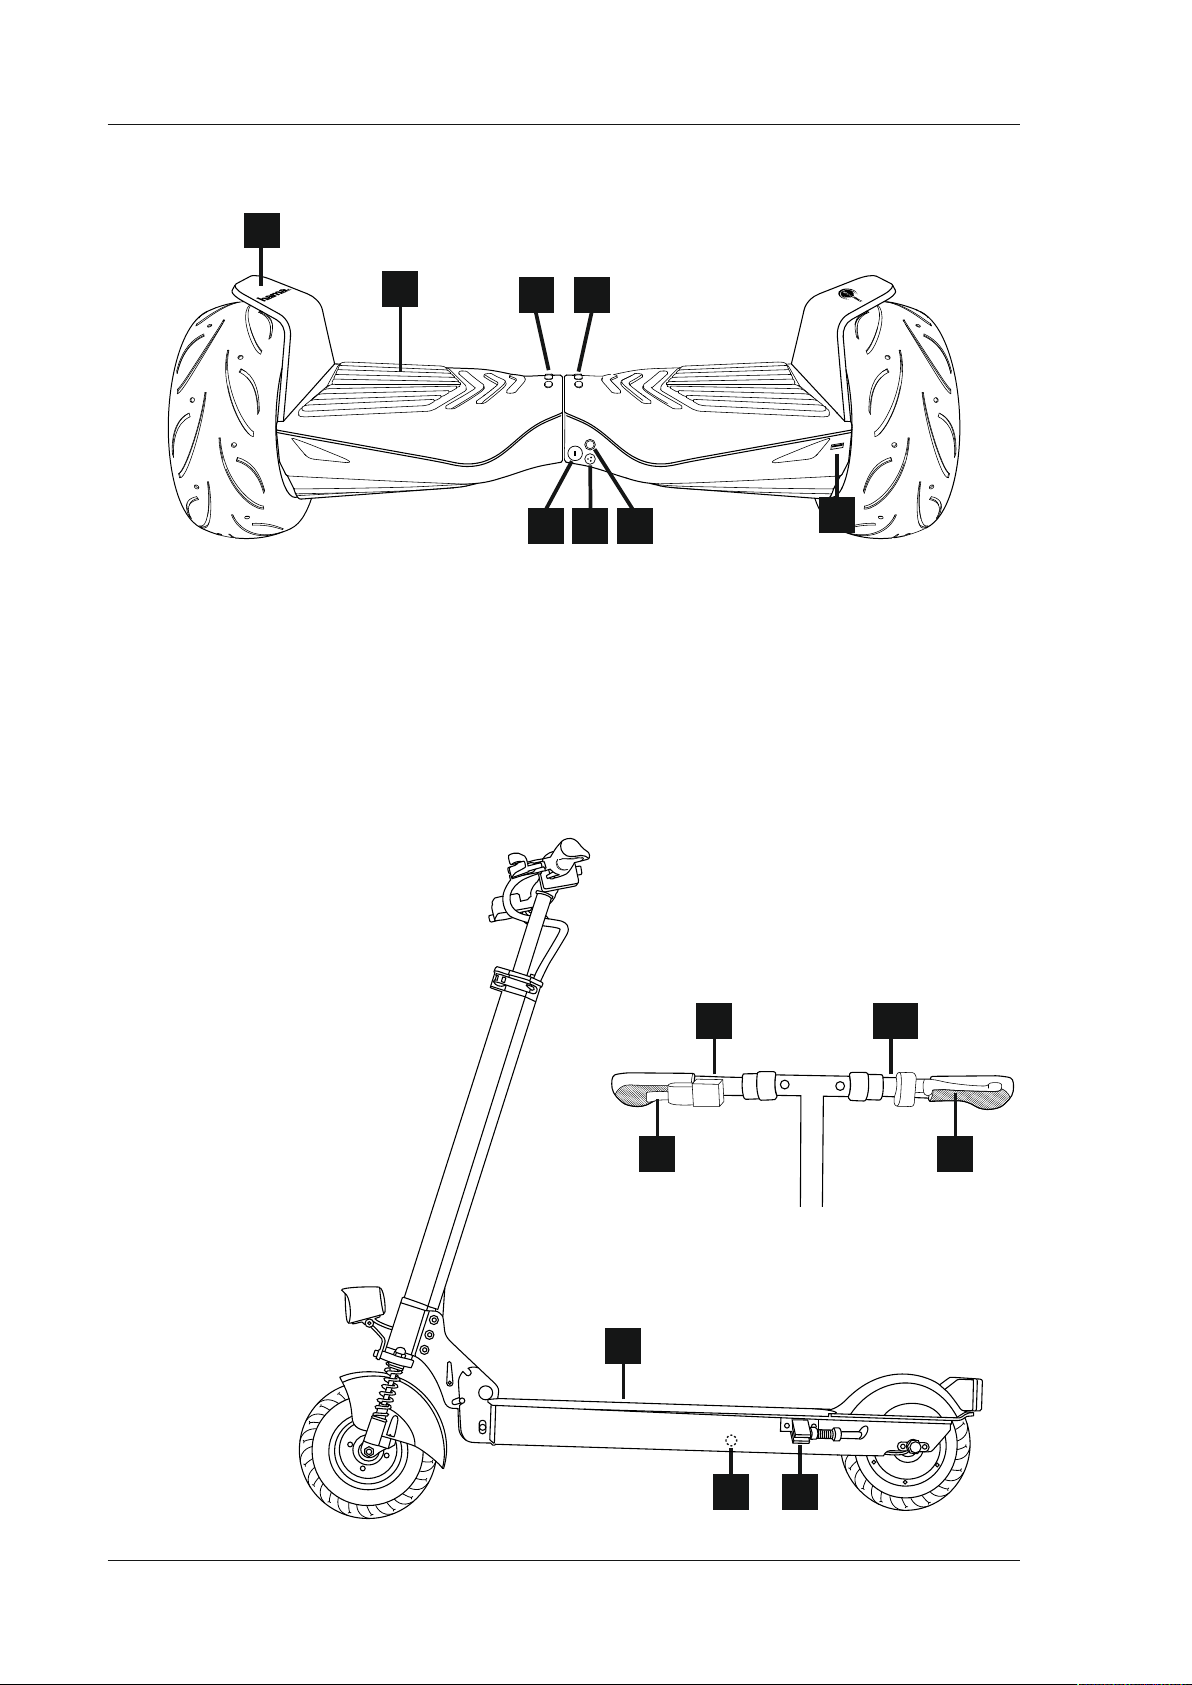
7.1.2 F-Cruiser
Figura 6
1
2
1. Parafango
2. Pedane con sistema di sensori a pressione
3. LED di stato per stato di carica
4. Indicazioni di stato
5. Interruttore on/off, interruttore per la modalità di esercizio
6. Presa di carica
7. Bussola per chiusura Kensington
8. Uscita USB
7.1.3 U-Scooter
Figura 7
1. Display
2. Acceleratore
3. Clacson
4. Interruttore fari
5. Freno
6. Pedana
7. Cavalletto
8. Presa di carica
3
4
6 5
7
1
8
3,4
2 5
6
78
61
Page 62

7.2 Funzionamento del prodotto
7.2.1 F-/S-/X-Cruiser
Avvertenza
Al momento dell’accensione del prodotto, prestare attenzione che il
prodotto si trovi su un fondo piano e regolare.
Attenzione
• Utilizzare sempre le tecniche di sollevamento e di carica corrette.
• Scegliere punti di sollevamento robusti e non mobili, ad esempio al
centro della parte inferiore.
• Sollevare il prodotto sempre con le gambe piegate per evitare di
sforzare la schiena.
Attenzione
• Attenzione alle dita! Il prodotto non deve essere sollevato dagli
pneumatici, dalle lamiere di protezione o dalle ruote.
• Pericolo di lesioni poiché le e mani e le dita possono rimanere
bloccate tra la ruote e la lamiera di protezione.
Lo scooter presenta quattro modalità di funzionamento:
• Modalità principiante: in questa modalità la velocità è limitata a 6
km/h. L’apparecchio reagisce lentamente ai movimenti dello sterzo.
Per selezionare la modalità, mettere l’apparecchio spento sul suolo.
Premendo brevemente una volta il tasto 5, l’apparecchio si porta
automaticamente nella posizione neutra 0°. L’apparecchio si trova in
modalità principiante.
Attenzione
Una volta raggiunti i 6 km/h, il veicolo impedisce un’ulteriore
accelerazione. Una volta raggiunto il limite di velocità il movimento
ondulatorio del Cruiser è assolutamente normale.
• Modalità esperti: In questa modalità la velocità è limitata a 15 km/h.
Per selezionare la modalità, bisogna spegnere lo scooter e poggiarlo sul
pavimento. Premendo brevemente due volte il tasto 5, lo scooter si
porta automaticamente nella posizione neutra 0°. Lo scooter si trova in
modalità esperti.
Attenzione
Attenzione
• Fare attenzione che in questa modalità è possibile un sovraccarico
dello scooter e quindi non è possibile escludere una disattivazione
temporanea dell’elettronica.
• Nel caso di malfunzionamento delle parti elettroniche è possibile
che il conducente possa cadere dalla pedana e ciò ad alte velocità
può causare ferite gravi.
• I limiti di potenza dipendono tra l’altro dallo stato della batteria, dal
peso del conducente, dalla supercie stradale e dalla pendenza. Se
si passa da un terreno piano ad uno in pendenza, questo passaggio
può portare a superare i limiti di prestazione.
• Utilizzare la modalità cart solo indossando indumenti protettivi di
alta qualità.
• L’azienda Hama GmbH & Co KG non si assume alcuna responsabilità
per eventuali danni a cose o a persone risultanti dal sovraccarico
dello scooter dovuto a questa modalità di guida.
• Modalità di sicurezza: nel caso di temperatura troppo elevata del
motore, della batteria o della centralina, nonché di livello di carica
troppo basso della batteria, il prodotto passa automaticamente in
modalità di sicurezza.
Attenzione
Scendere immediatamente e spegnere il prodotto, se i seguenti
segnali di allarme indicano la modalità di sicurezza:
• LED frontali lampeggianti (o LED anteriori e posteriori per il Cruiser F)
• LED di stato rossi (e LED di stato verdi per il Cruiser F)
• Il prodotto frena automaticamente
• Tono di allarme
Contattare il Servizio assistenza (Vedi 12.3 Assistenza e Supporto) se
dopo la carica l’apparecchio passa in modo insolitamente rapido in
modalità di allarme.
L’apparecchio viene messo in movimento come segue:
Spostando il peso sui talloni o sulle eminenze della pianta del piede, il
sensore di movimento sotto le pedane si attiva e fa girare le ruote nella
direzione in cui si carica il peso sui piedi, per cui ci si muove in avanti
o indietro. Se si sposta il peso del corpo in avanti o indietro, il proprio
baricentro si sposta e, di conseguenza, si sposta la supercie di contatto
delle ruote (il punto in cui le ruote toccano il pavimento), per cui anche
l’apparecchio si sposta in avanti o indietro.
Tuttavia è necessario mantenersi in equilibrio per evitare di ribaltarsi.
Una volta raggiunti i 15 km/h, lo scooter impedisce l’ulteriore
accelerazione. Una volta raggiunto il limite di velocità il movimento
ondulatorio del Cruiser è assolutamente normale.
• Modalità cart: In questa modalità si può arrivare ad una velocità di
30 km/h.
Per selezionare la modalità, bisogna spegnere lo scooter e poggiarlo
sul pavimento. Premendo brevemente tre volte il tasto 5, lo scooter
si porta automaticamente nella posizione neutra 0°. Lo scooter si trova
in modalità cart.
Nota - Modalità cart
• La modalità cart può essere utilizzata esclusivamente utilizzando
l’apposito supporto cart (Art.Nr.109888).
• L’utilizzo della modalità cart avviene a proprio rischio e pericolo!
62
Page 63
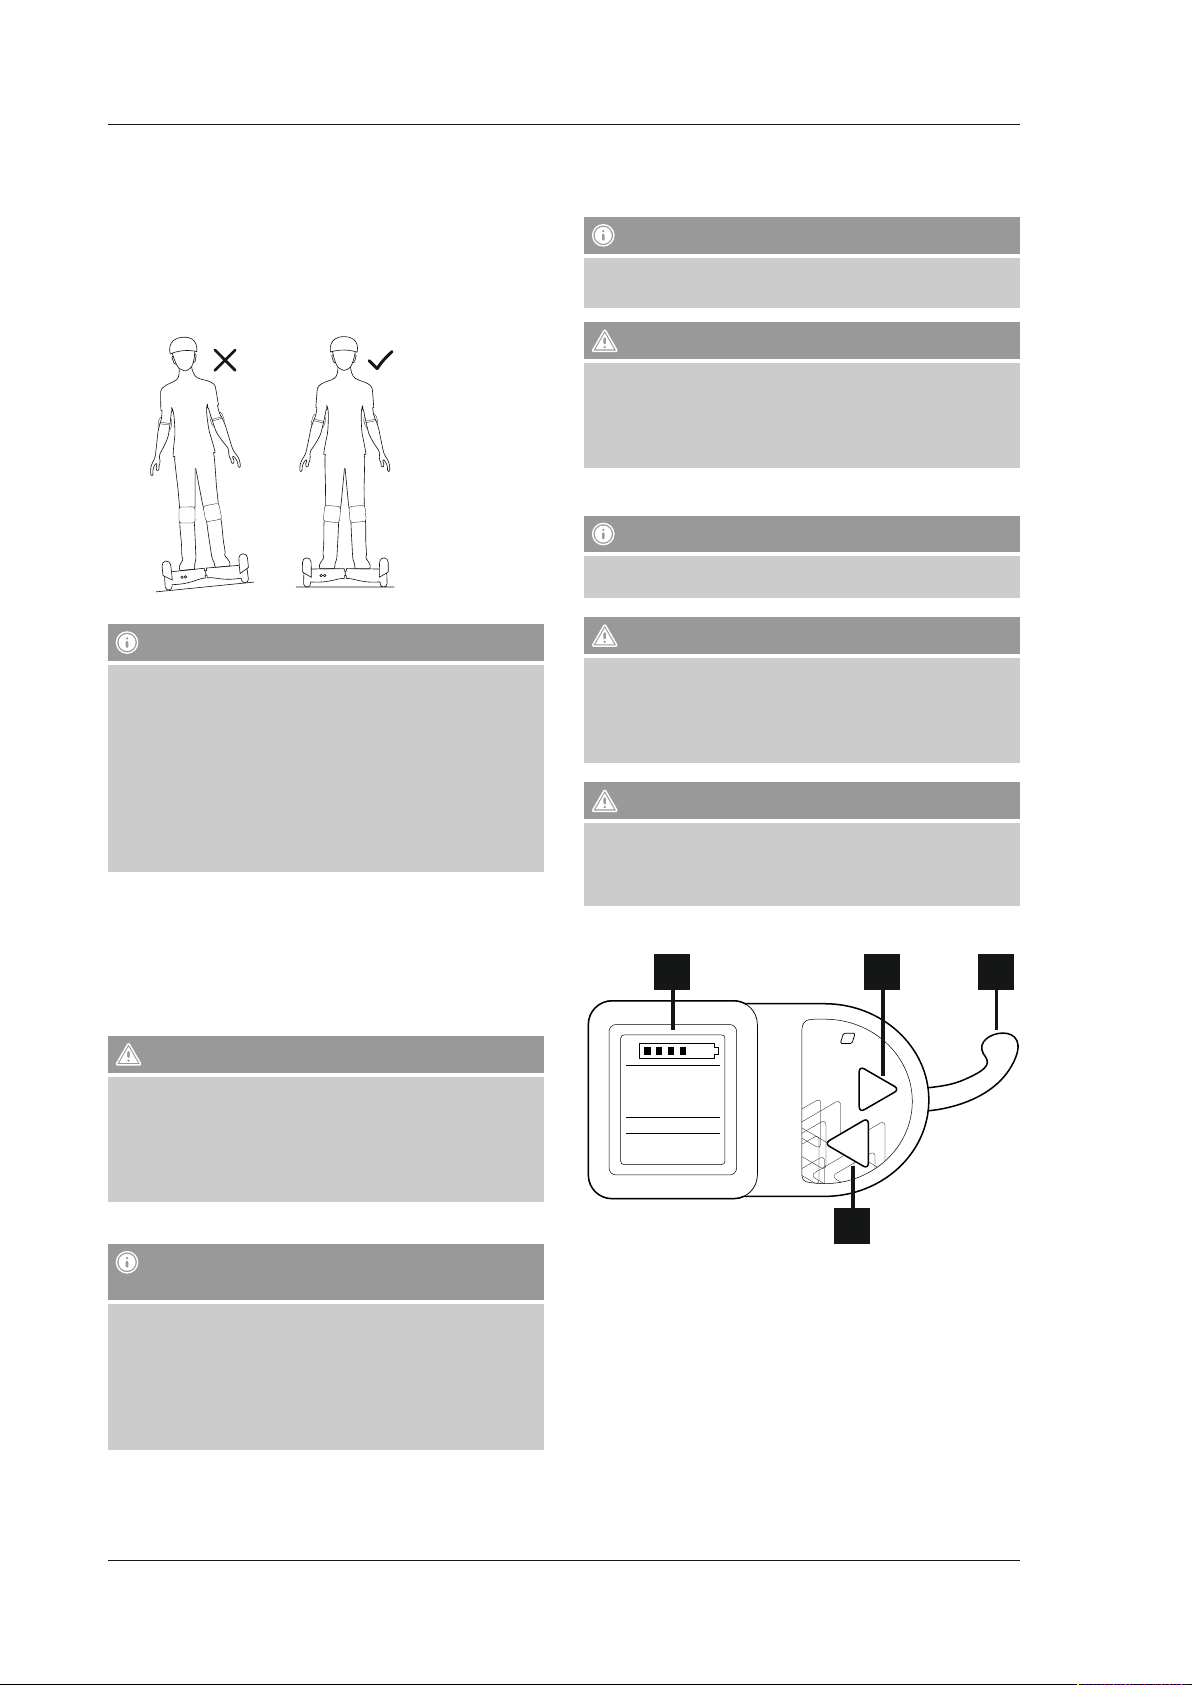
Il prodotto non dispone di meccanismi di stabilizzazione laterali.
Se il prodotto viene inclinato nché una ruota non perde l’aderenza con il
suolo, non riesce più a stare in centro ed è possibile ribaltarsi.
È quindi necessario mantenere anche l’equilibrio lateralmente. Prestare
sempre attenzione che il corpo formi una linea con l’asse centrale del
prodotto.
Non piegarsi in curva o in salita se si viaggia di traverso rispetto alla
pendenza.
7.2.1.3 Presa di carica USB (F-Cruiser)
Il Cruiser Freestyle è dotato di una presa di carica USB tipo A con cui è
possibile caricare dispositivi mobili con una corrente no a 2.0 A.
Nota - Presa di carica USB
• Se si caricano uno o più dispositivi l’uno dopo l’altro è possibile che
l’autonomia dello scooter diminuisca.
Attenzione - Pericolo di caduta
• Non utilizzare la presa di carica USB durante la guida ma solo
quando lo scooter è parcheggiato.
• Diversamente si potrebbe cadere e ferirsi a causa della alla
mancanza di attenzione, della perdita dell’equilibrio o del cavo di
carica.
7.2.2 U-Scooter
Avvertenza
Al momento dell’accensione del prodotto, prestare attenzione che il
prodotto si trovi su un fondo piano e regolare.
Avvertenza
• Non sopravvalutare le proprie capacità. Aumentare gradualmente
la velocità per sviluppare il pieno controllo sul prodotto, inoltre
consigliamo soltanto ai guidatori esperti di guidare di traverso
rispetto alla pendenza.
• Se si utilizza per la prima volta un prodotto di questo tipo,
consigliamo di farlo con il supporto di una seconda persona che
può dare stabilità al conducente tenendolo per le mani da davanti.
Cercate di restare calmi e di non fare movimenti improvvisi.
L’apparecchio aiuta il vostro equilibrio per cui non lavorate contro i
movimenti di compensazione, bensì concentratevi sull’equilibrio.
7.2.1.1 Recupero dell’energia (Recupero)
• Tutti i Cruiser hanno a disposizione una funzione per il recupero
dell’energia durante la frenata oppure la corsa in discesa (recupero).
• In determinate situazioni ottimali, il recupero dell’energia può
estendere l’autonomia del Cruiser del 5-10%. Ciò dipende però da
diversi fattori, come il prolo del terreno e la frequenza delle frenate,
quindi non si può prevedere individualmente.
Attenzione con la batteria a pieno carico
• Evitare lunghe discese o frenate quando le batterie sono cariche,
dato che quando sono in questo stato non possono immagazzinare
l’energia di recupero.
• Guidare dapprima 1-2 min. su un terreno piano, in modo da
utilizzare un po’ di energia della batteria.
• Altrimenti la batteria potrebbe danneggiarsi.
7.2.1.2 Impianto di illuminazione (F-Cruiser)
Attenzione
• Utilizzare sempre le tecniche di sollevamento e di carica corrette.
• Scegliere punti di sollevamento robusti e non mobili, ad esempio al
centro della parte inferiore.
• Sollevare il prodotto sempre con le gambe piegate per evitare di
sforzare la schiena.
Attenzione
• Attenzione alle dita! Il prodotto non deve essere sollevato dagli
pneumatici, dalle lamiere di protezione o dalle ruote.
• Pericolo di lesioni poiché le e mani e le dita possono rimanere
bloccate tra la ruote e la lamiera di protezione.
Figura 8
3 4
B
M
S
SPEED
SLO
ODO
0000
OO
.0
Km/h
7
Km
ECO
POWER
1
ON/OFF
MODE
2
Nota - Luci anteriori e posteriori/Regolazione alla
direzione di marcia
• Il Cruiser Freestyle è dotato di luci anteriori e posteriori ben visibili e
separate.
• Il Cruiser Freestyle riconosce autonomamente la direzione di marcia
e quindi regola automaticamente le luci (luce anteriore bianca, luce
posteriore rossa).
• Il riconoscimento della direzione di marcia e la regolazione
automatica avvengono dopo 5 rotazioni delle ruote.
1. Interruttore on/off
2. Selettore modalità
3. Display
4. Acceleratore
Per accendere lo scooter premere dapprima l’interruttore on/off no
a che il display si accende. Lo scooter è dotato di tre modalità di
funzionamento:
• Modalità principiante: in questa modalità la velocità è limitata a 6
km/h e lo scooter accelera lentamente.
Per selezionare la modalità premere l’interruttore di modalità [MODE]
no a che non viene visualizzata la dicitura „SLO“ sul display.
• Modalità esperti: in questa modalità la velocità è limitata a 15
km/h e lo scooter accelera più velocemente rispetto alla modalità
principiante.
63
Page 64
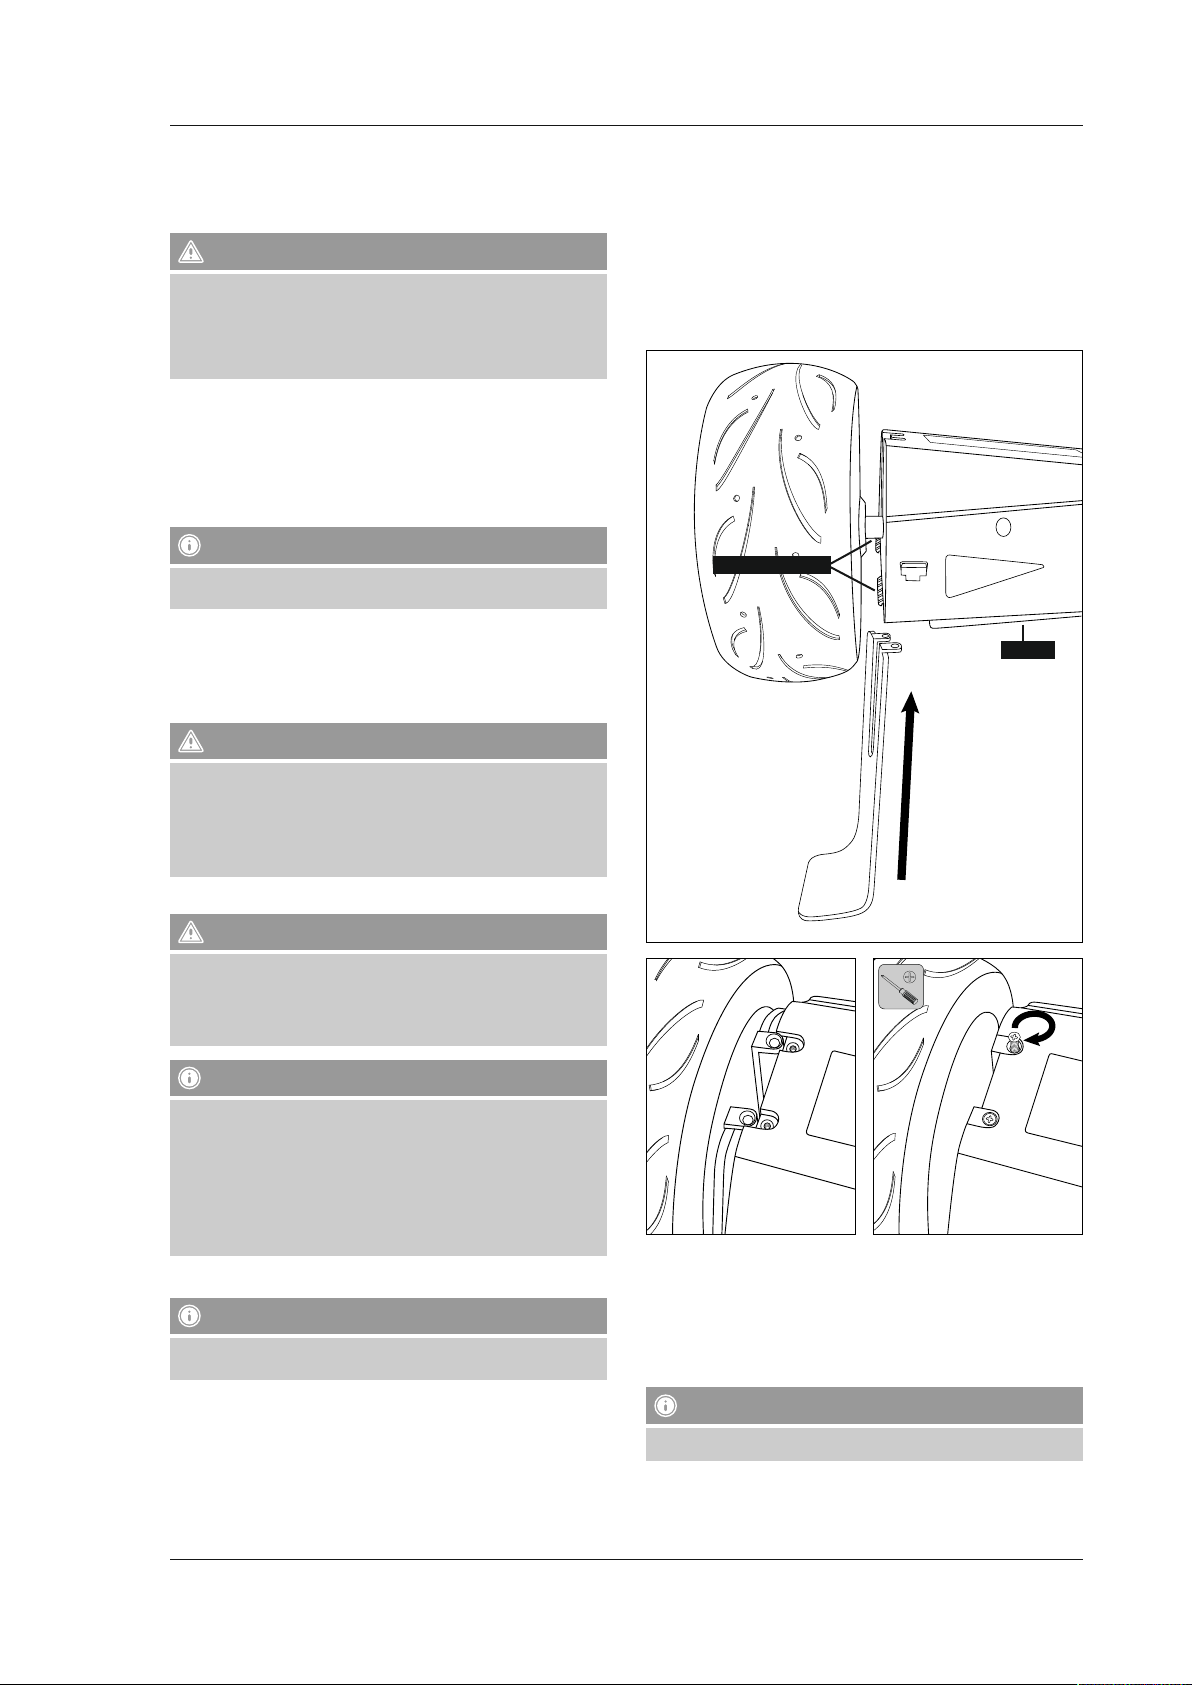
Per selezionare la modalità premere l’interruttore di modalità [MODE]
no a che non viene visualizzata la dicitura „MID“ sul display.
• Modalità professionista: in questa modalità la velocità è limitata a
25 km/h e lo scooter utilizza tutta la sua potenza.
Attenzione - Modalità professionista
• Fare attenzione che in questa modalità lo scooter sia a distanza di
sicurezza dagli oggetti, dalle persone o dagli animali.
• Per abituarsi ad accelerazione e velocità consigliamo le prime volte
di guidare lo scooter lungo aree ampie e prive di ostacoli.
• Data l’alta velocità vi è un altrettanto alto rischio di lesioni.
Per selezionare la modalità premere l’interruttore di modalità [MODE]
no a che non viene visualizzata la dicitura „FAS“ sul display.
Lo scooter viene messo in movimento come segue:
per poter utilizzare il motore elettrico ausiliario, è necessario accendere
dapprima lo scooter. Per fare ciò azionare il pulsante di accensione (vedi
gura 8), sino a che il tachimetro si accende.
Per il Cruiser F vale inoltre quanto segue:
vi sono due parafanghi stabili e un kit di montaggio. Montare i
afanghi come dimostr
par
• Inserire i parafanghi tra la ruota di trazione e il corpo dello scooter.
• Fare attenzione che i parafanghi si inseriscano bene sulla parte
superiore della base di appoggio di entrambi i manicotti e che i perni
di ssaggio siano completamente inseriti sulla parte inferiore del corpo
dello scooter.
• Attenzione: serrare perpendicolarmente le viti di ssaggio!
ato nelle seguenti gur
e.
Avvertenza
Generalmente lo scooter si può utilizzare anche senza motore elettrico
ausiliare.
• Per poter utilizzare il motore elettrico ausiliare è necessario che il
conducente proceda con lo scooter a ca. 4 km/h.
• Quindi azionare l’acceleratore per attivare il motore ausiliario.
È possibile accelerare solo no al rispettivo limite di velocità
corrispondente alla modalità scelta.
Attenzione
• Per evitare cadute e il rischio di lesioni gravi è necessario dapprima
abituarsi alla guida dello scooter.
• Perciò consigliamo di esercitarsi su un fondo stradale piano e di
testare la guida e l’accelerazione.
• Indossare sempre indumenti protettivi di alta qualità.
Per frenare azionare la leva del freno sul lato sinistro del manubrio.
Attenzione - Frenata
• Abituarsi alla decelerazione dovuta alla frenata. In questo modo si
impara quanto lo scooter ci impiega a frenare.
• Frenare sempre per tempo e non rischiare collisioni con persone,
animali o oggetti.
Nota - Altre indicazioni
Dopo aver acceso lo scooter premendo a lungo sul pulsante on/off,
è possibile selezionare altre impostazioni premendo brevemente sul
pulsante on/off.
ODO = Chilometri complessivi percorsi
TRIP = Chilometri percorsi dall’accensione dello scooter
TM = Tempo trascorso dall’accensione dello scooter
Le modalità RM e ERRO sono impostate da Hama Support in caso di
servizio e quindi non sono rilevanti per il conducente.
7.3 Messa in funzione e montaggio dello scooter
Avvertenza
Prima della prima messa in funzione e necessario caricare
completamente lo scooter.
7.3.1 F-/S-/X-Cruisers
Per il Cruiser S e per il Cruiser X non vi sono altre istruzioni oltre a quelle
riportate alla voce 7.2.1.
Perni di ssaggio
Pedana
7.3.2 U-Scooter
• Sollevare lo scooter dalla confezione prendendolo dal montante del
manubrio.
• Montare lo scooter come dimostrato nelle seguenti gure.
• Come dimostrato nelle seguenti gure il montante del manubrio si può
regolare secondo tre altezze.
Avvertenza
• Fare attenzione che tutte le chiusure siano ben inserite.
64
Page 65
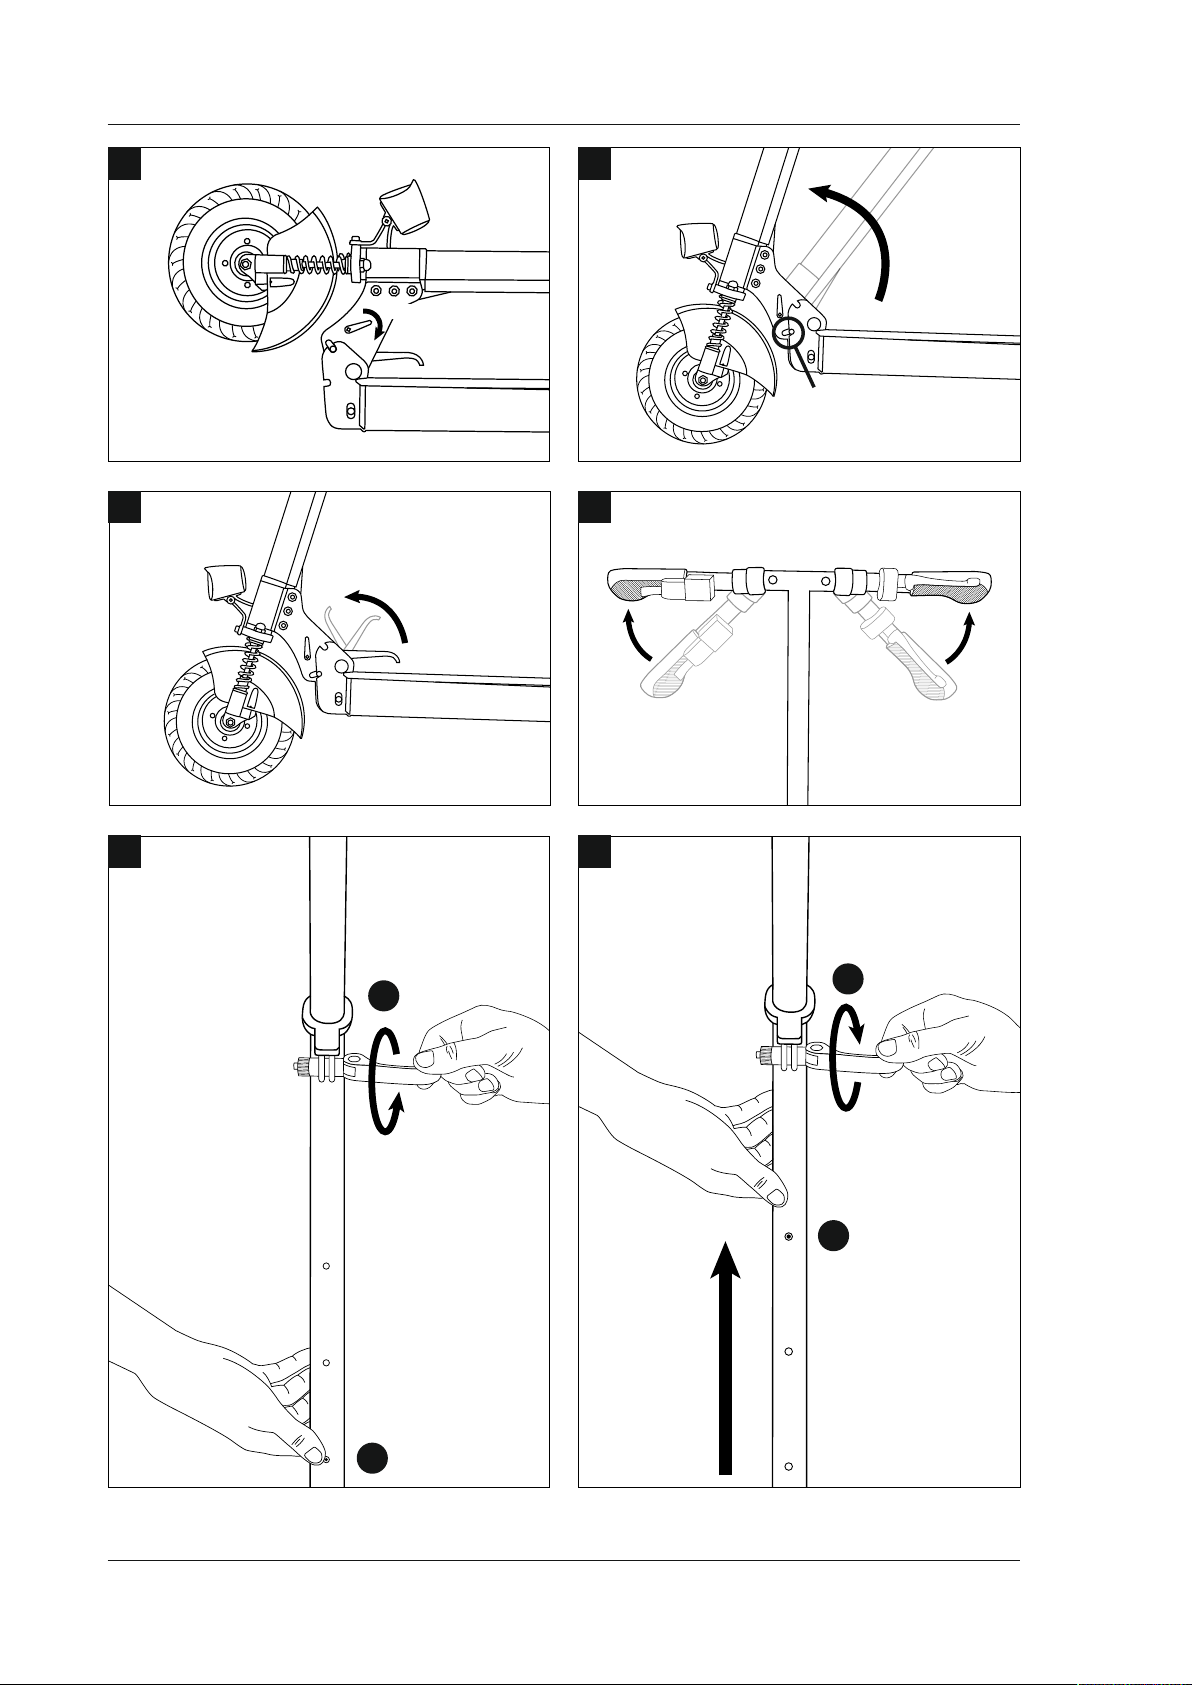
A
PUSH
B
CLICK
C
E
OPEN
1
D
CLICK CLICK
F
CLOSE
4
CLICK
3
PUSH
2
65
Page 66
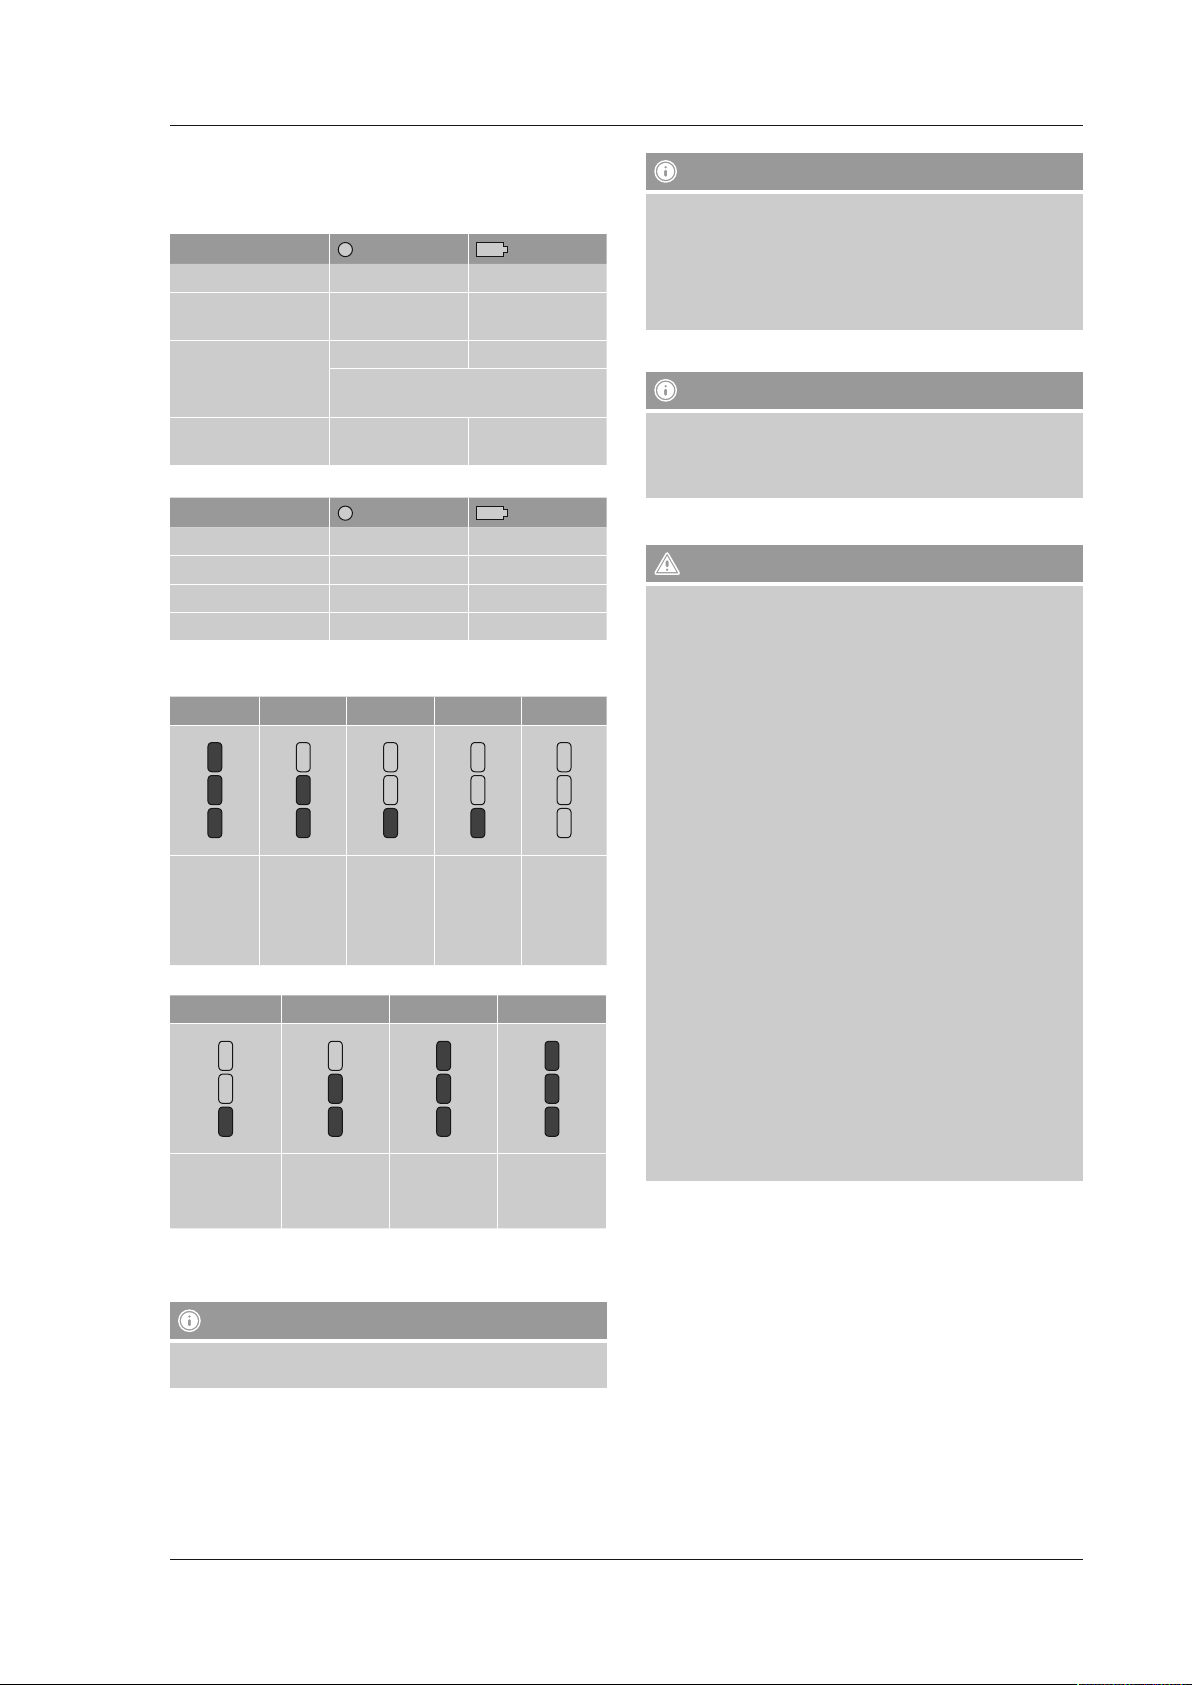
7.4 Indicatore dello stato di carica
7.4.1 S- / X-Cruiser
Scaricare
Stato di carica
100% – 10% VerdeVerde
9% – 5% VerdeVerde / lampeg-
4% – 0%
(Modalità di sicurezza)
Nessun conducente
sulla pedana
Caricare
Stato di carica
0 – 4% OFF Rosso
5% – 9% OFF Roso / lampeggiante
10% – 99% OFF
100% OFF Verde
7.4.2 F-Cruiser
Scaricare
100% – 67%
Tre LED
sono costantemente
accesi
Laden
0% – 33%
Il LED lampeggia
66–34% 33–11% 10–5% 4–0%
Due LED
sono
costantemente
accessi
Due LED
lampeggiano
LED di stato
Rosso Rosso
LED anteriori lampeggianti, segnale di
allarme. freni
OFF in base allo stato
LED di stato
Un LED è
costantemente
acceso
34 – 66% 67 – 99% 100%
Il LED
lampeggia
Tre LED lampeggiano
LED batteria
giante
di carica
LED batteria
Verde / lampeggiante
Modalità
di sicurezza
vedi Punto
7.2.1.
Tre LED
sono costantemente accessi
Nota - Oscillazioni dello stato di carica
• Forti pendenze, lunghe ed estreme manovre di guida e/o marcia a
piena velocità richiedono alla batteria una potenza superiore alla
media.
• Se dopo una tale corsa si fa una pausa e/o si spegne brevemente lo
scooter, può succedere che lo stato di carica aumenti leggermente.
• Ciò è del tutto normale, dato che la batteria si rigenera anche con
brevi pause.
8. Batteria
Avvertenza
Con il normale utilizzo e le dovute attenzioni, la batteria dovrebbe
sopportare circa 1500 cicli di carica. Una batteria scarica si riconosce
dal fatto che deve essere ricaricata sempre più spesso e che la portata
diminuisce.
8.1 Utilizzo sicuro delle batterie
Attenzione
Per garantire la sicurezza e massimizzare la durata e l’ecienza della
batteria, seguire le indicazioni contenute in queste istruzioni.
• Le batterie non devono essere più utilizzate nelle seguenti condizioni:
- se il corpo è danneggiato
- se le batterie emanano un odore anomalo o sono particolarmente
calde
- se fuoriescono delle sostanze
• Evitare il contatto con le sostanze che fuoriescono.
• Il contatto con la tensione delle batterie può causare la morte o
lesioni gravi
• Se il cavo elettrico è inserito, è pericoloso effettuare lavori sul
prodotto. Le scosse elettriche possono causare gravi danni alle
persone e alle cose.
• Non togliere in nessun caso le batterie dall’apparecchio o aprirle.
L’apertura delle batterie può danneggiare il corpo dell’apparecchio e
possono venire sprigionate sostanze tossiche.
• Non introdurre mai alcun oggetto nelle batterie o cercare di spaccare il
corpo delle batterie. Se si introduce qualcosa in uno degli attacchi o in
una delle aperture, possono vericarsi scosse elettriche, lesioni o ustioni
oppure si può scatenare un incendio.
La batteria può essere caricata esclusivamente con i caricabatterie
•
omologati dal costruttore.
• Non esporre mai lo scooter e il caricabatterie a temperature elevate o
all’umidità e non utilizzare mai un caricabatterie danneggiato.
• Per evitare danni, vericare a intervalli regolari lo stato del
caricabatterie, in particolare del cavo e della spina. Non continuare ad
utilizzare un caricabatterie danneggiato. in questo caso contattare il
servizio di supporto di Hama
• In caso di smaltimento e trasporto dello scooter, attenersi a tutte le
leggi e prescrizioni vigenti.
7.4.3 U-Scooter
Lo stato di carica viene indicato con il simbolo della batteria con no a 6
barre (batteria carica) sul display (vedi gura 8).
Avvertenza
Caricare lo scooter non appena lo stato di carica mostra una sola
barra! Altrimenti la batteria si danneggia.
66
Page 67
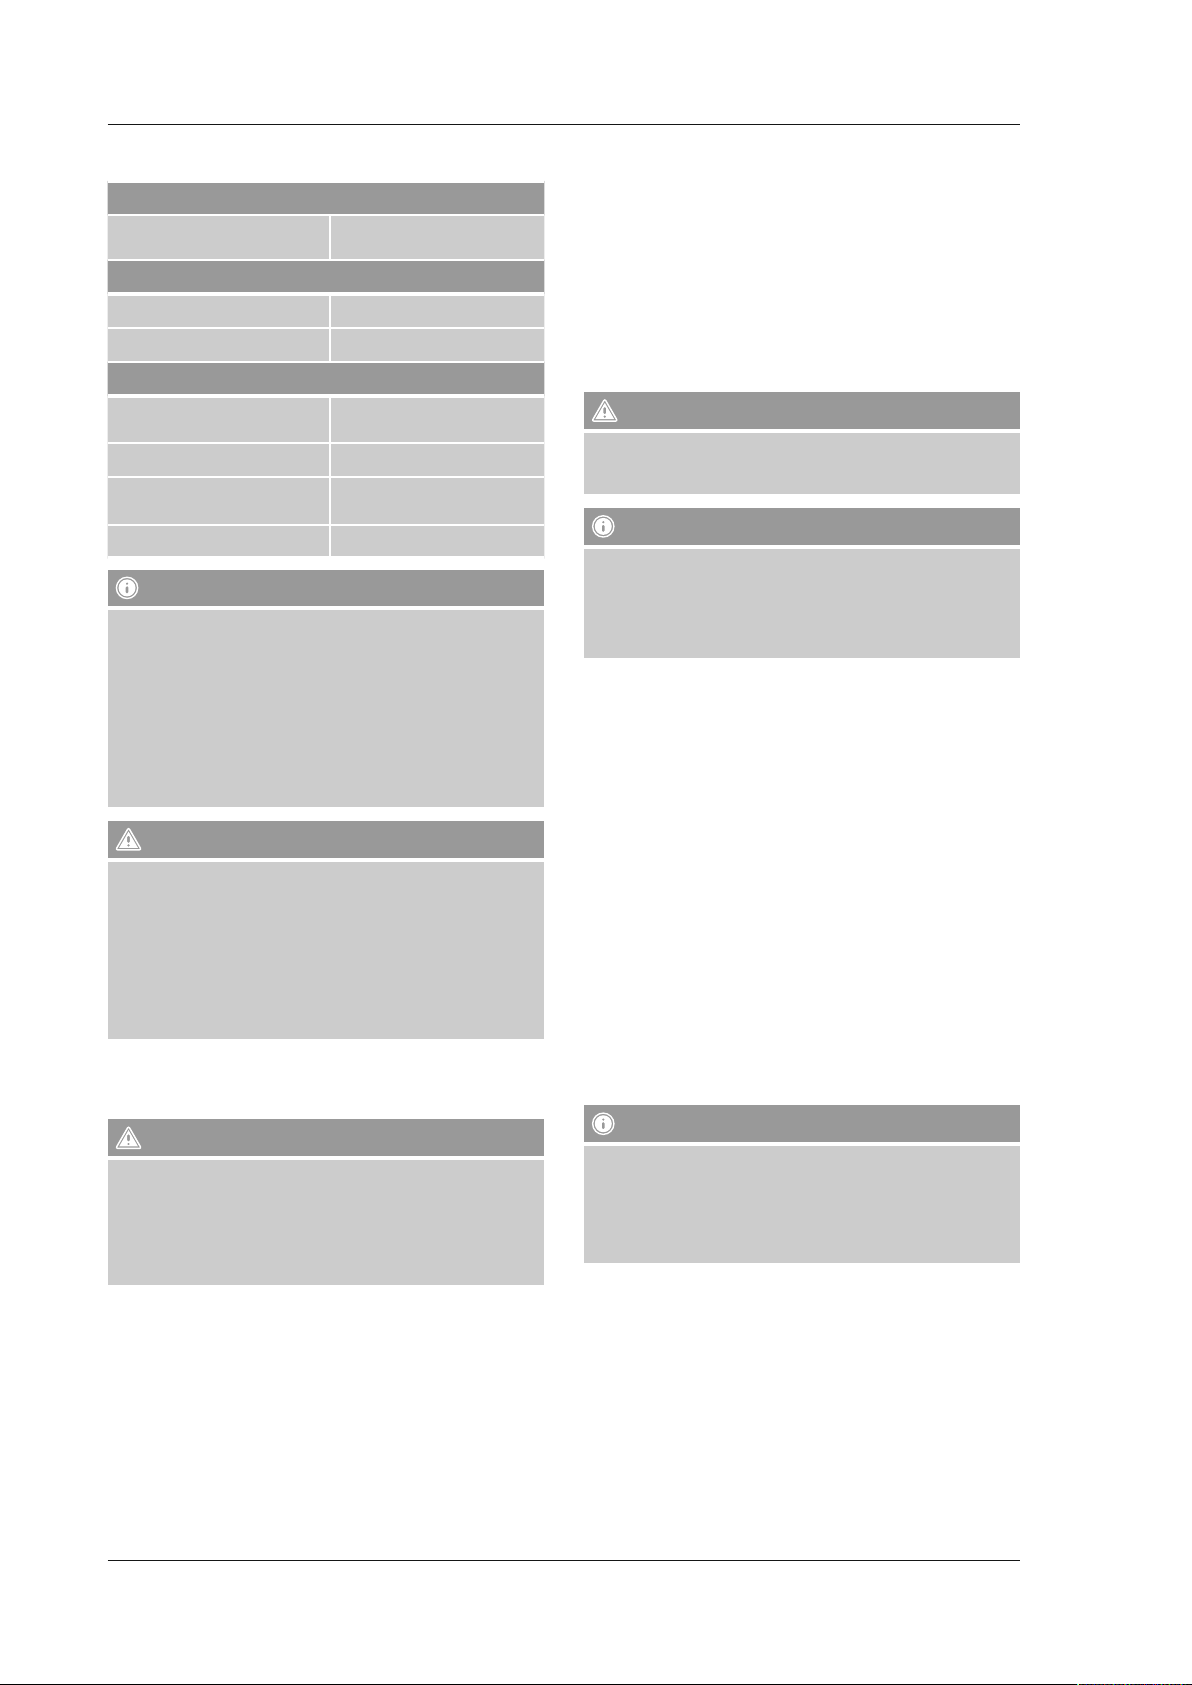
8.2 Dati tecnici batteria (tabella 3)
Tempo di carica
Carica quando la batteria è
completamente scarica
Campi di temperatura
Esercizio da -10°C a +40°C.
Carica, conservazione e trasporto da 10°C a +25°C.
In generale
Capacità (Ah) e tensione 36V, 2,5 Ah (F- / S- / X-Cruiser)
Dimensioni 13,5 cm x 6 cm x 9 cm
Peso 0,50 kg (F- / S- / X-Cruiser)
Teconologia Agli ioni di litio
Avvertenza
• Se si utilizza, si carica o si ripone la batteria all’esterno del campo
di temperatura indicato, è possibile perdere i diritti di garanzia ed
eventualmente possono anche diminuire la portata e la potenza di
carica della batteria.
• Prima della prima messa in funzione è necessario caricare
completamente lo scooter. Inoltre è necessario caricare lo scooter
una volta al mese.
• La batteria deve essere caricata esclusivamente nel campo di
temperatura di carica indicato.
Attenzione
• Se la batteria non viene regolarmente caricata completamente, col
tempo può scaricarsi e riportare danni permanenti.
• La durata della carica dipende dai seguenti fattori:
- stato di carica attuale – minore è lo stato di carica, più è lungo il
processo di carica;
- Temperatura della batteria – le batterie troppo calde o troppo
fredde hanno un tempo di carica maggiore o potrebbero
non caricarsi affatto; il processo di carica è più ecace con
temperature medie rispetto al campo di temperatura indicato.
8.3 Carica dello scooter
Caricare il prodotto esclusivamente in un luogo pulito e asciutto con una
temperatura nel campo di temperatura di carica consigliato.
Attenzione
• La spina non deve essere assolutamente inserita se la presa
di carica, il cavo elettrico o la presa elettrica sono bagnati.
L’equipaggiamento elettrico non ha suciente protezione
dall’umidità!
• Non lasciare in carica il prodotto oltre il tempo necessario per
evitare di sovraccaricare la batteria e danneggiarla.
• Collegare il prodotto solo a una presa appositamente omologata.
La presa deve trovarsi nei pressi del prodotto ed essere facilmente
accessibile.
• Per caricare la batteria, collegare l‘alimentatore in dotazione
a una presa elettrica e alla presa di carica. Il prodotto si attiva
automaticamente nel momento in cui avviene il collegamento. Il
processo di carica si avvia automaticamente.
• Durante il processo di carica, il LED di stato dell’alimentazione è
rosso. Quando la batteria è completamente carica, il LED di stato
dell’alimentazione è verde.
Ca. 1,5 ore F- / S- / X-Cruiser
Ca. 3 ore U-Scooter
5,8 Ah (U-Scooter)
0,97 kg (U-Scooter)
Errore di carica
Se durante la carica si verica un errore, il processo di carica viene
interrotto. Il LED di stato sull’alimentatore si spegne completamente.
Se anche l’indicazione dello stato di carica sul prodotto dovesse essere
spenta, procedere come segue:
• accertarsi che ci sia corrente e che il cavo sia bene inserito nella presa
di carica.
• Se in presenza di corrente l’indicazione dello stato di carica non
dovesse accendersi, estrarre il cavo elettrico e avviare nuovamente il
processo di carica.
• Se non è possibile risolvere il problema, rivolgersi al nostro Servizio
assistenza.
Attenzione
Il prodotto non deve essere utilizzato no alla scarica completa delle
batterie. Attivare la fase di carica appena l’indicatore di stato della
carica è rosso.
Avvertenza
Dato che il processo di carica può variare leggermente in base alla
temperatura, alla modalità e alla tensione di carica, in alcuni casi si
può vericare che la batteria si carichi solo al 99% e quindi l’indicatore
di carica indica che la batteria è carica solo in parte. Ciò non comporta
alcun problema ed è normale.
8.4 Effetti della temperatura sulla potenza
Di solito la batteria è notevolmente più calda della temperatura
ambiente. Questo riscaldamento è da ricondurre all’elettricità rilasciata
(quando si circola) o accumulata (durante la carica).
Per strada quando fa caldo o freddo
• La batteria è più eciente quando si utilizza il prodotto a temperature
nella media del campo di temperatura di esercizio consigliato.
• Se le batterie sono fredde, la portata è di regola inferiore rispetto alle
batterie la cui temperatura è simile alla temperatura ambiente.
Carica quando fa caldo o freddo
• Prima e durante il processo di carica, la batteria deve trovarsi
all’interno del campo di temperatura di carica consigliato. (Vedi tabella
3, Campi di temperatura)
• La carica ottimale della batteria si ha quando la temperatura è nei
valori medi del campo di temperatura di carica consigliato. Batterie
troppo calde o troppo fredde hanno bisogno di un tempo di carica più
lungo o potrebbero non caricarsi affatto.
Batteria scarica
• Nei modelli Cruiser F, Cruiser S e Cruiser X la batteria quasi scarica
viene indicata dalla modalità di sicurezza. In questo caso fermarsi e
scendere.
Avvertenza
• Può accadere che le batterie vecchie, fredde, usurate o tenute male
sviluppino una maggiore resistenza
• che può avere come causa la visualizzazione di una batteria quasi
scarica, anche se le batterie erano state caricate da poco.
• Ciò signica che la batteria è rovinata e deve essere sostituita da un
tecnico specializzato.
67
Page 68
8.5 Sostituzione della batteria
Avvertenza
• Non sostituire mai da soli la batteria!
• Se si sostituisce la batteria da soli, si perdono i diritti di garanzia ed
eventualmente possono anche diminuire la portata e la potenza di
carica della batteria.
• In caso di danni, non mettere più in funzione l’apparecchio.
8.6 Spedizione di batterie Li-Ion
Attenzione
Per il trasporto delle batterie, attenersi a tutte le leggi e prescrizioni
vigenti.
9.3 Pulizia del prodotto
Pulire delicatamente il prodotto con un panno inumidito. Durante la
pulizia, non deve penetrare umidità nel prodotto!
Attenzione
• Evitare un’esposizione eccessiva all’acqua!
• Il prodotto non deve essere immerso nei liquidi perché può riportare
danni permanenti.
• Il prodotto non deve essere esposto a forti scrosci di pioggia o
lunghi acquazzoni (quando si circola, durante la conservazione e il
trasporto).
• Il prodotto non deve essere pulito con pulitori ad alta pressione
o tubi essibili ad alta pressione. Questi apparecchi possono fare
penetrare l’acqua nei componenti che devono rimanere asciutti.
• Nella presa di carica non deve mai penetrare acqua.
9. Manutenzione
Attenzione
• Il prodotto non deve essere modicato in nessun caso.
• Prima di eseguire una delle procedure descritte qui di seguito,
accertarsi che il prodotto sia spento e che il cavo elettrico sia
scollegato.
• Queste procedure sono pericolose se il prodotto è acceso o viene
caricato.
9.1 Verifica del gruppo pneumatici/ruote
• Accertarsi che la ruota non traballi. Afferrare la ruota e cercare di
muoverla da un lato all’altro. Non deve muoversi lateralmente.
• Se la ruota dovesse traballare, rivolgersi al nostro Servizio assistenza.
9.2 Verifica della pressione degli pneumatici (X-Cruiser /
U-Scooter)
• Controllare regolarmente la pressione degli pneumatici nei modelli con
pneumatici ad aria compressa. Una pressione errata compromette la
portata.
• Se la pressione di uno o entrambi gli pneumatici non dovesse
corrispondere alla speciche indicate nei Dati tecnici del vostro
modello, gonare gli pneumatici attenendosi alle prescrizioni.
• Prestare attenzione che entrambi gli pneumatici abbiano la stessa
pressione e che siano privi di sporcizia e depositi.
Attenzione
• Fa fede la pressione indicata nelle istruzioni per l’uso, non quella
indicata sugli pneumatici.
• In caso di maggiore pressione degli pneumatici, le sospensioni e la
trazione diminuiscono e aumenta il rischio di perdita di controllo,
collisione e caduta.
• In caso di minore pressione degli pneumatici, diminuisce la portata
e il gruppo penumatici/ruote può danneggiarsi.
• Una pressione degli pneumatici non uniforma comporta che il
prodotto durante la guida tiri in direzione dello pneumatico con
pressione minore.
Attenzione
Le pedane e gli pneumatici non devono essere puliti con detergenti
speciali poiché prodotti di questo tipo possono comprometterne la
trazione e la stabilità.
9.4 Lagern des Produkts
• Conservare lo scooter in casa in un luogo asciutto. Evitare l’acqua,
l’umidità elevata e le temperature estreme.
• Al ne di garantire la piena capacità della batteria, conservare il
prodotto solo alle temperature di carica e conservazione consigliate
(vedi tabella 3).
10. Ricerca ed eliminazione degli errori
(F-/ S- / X-Cruiser)
Attenzione
• Prima di effettuare i lavori di manutenzione, spegnere sempre il
prodotto e scollegare il cavo elettrico.
• Non aprire in nessun caso il prodotto.
• Non contengono pezzi a cui potete effettuare da soli la
manutenzione.
• Aprendo il corpo si perde la garanzia.
10.1 Sostituzione di componenti e pezzi di ricambio
Se è necessario sostituire un pezzo danneggiato o usurato, rivolgersi al
nostro Servizio assistenza.
10.2 Eliminazione degli errori
Procedure per l’eliminazione degli errori
È possibile risolvere autonomamente determinati problemi del proprio
apparecchio.
Attenzione
Spegnere sempre l’apparecchio e scollegare il cavo elettrico prima di
effettuare lavori di manutenzione o applicare componenti o accessori.
L’apparecchio tira da un lato quando si guida
Prima di cercare di risolvere questo problema, leggere attentamente la
procedura di manutenzione riportata qui di seguito.
Provvedimenti consigliati:
• Accertarsi che entrambi gli pneumatici abbiano la stessa pressione
e che essa corrisponda ai valori consigliati (vedi Pressione degli
pneumatici, tabella 1/2).
• Se uno o entrambi gli pneumatici non dovessero essere gonati come
prescritto, gonarli alla pressione corretta e accertarsi che la pressione
dei due pneumatici sia uguale.
• Distribuire il peso uniformemente su entrambi i piedi. Se si sposta il
peso su un piede, il Cruiser tira da quella direzione.
68
Page 69
Uno pneumatico è a terra o fuoriesce aria.
Prima di cercare di risolvere questo problema, leggere attentamente la
procedura di manutenzione riportata qui di seguito.
Provvedimenti consigliati:
• Controllare che lo pneumatico non sia danneggiato. Se dovesse essere
danneggiato, rivolgersi al nostro Servizio assistenza.
• Gonare lo pneumatico (vedi Pressione degli pneumatici, tabella
1/2) e vericare che non ci siano delle perdite. Se dovesse sgonarsi
di nuovo immediatamente o se si riscontra qualche perdita d’aria,
rivolgersi al nostro Servizio assistenza.
Attenzione
Si può salire di nuovo sul prodotto soltanto quando tutti i problemi
sono stati risolti.
Avvertenza
Utilizzare esclusivamente accessori e pezzi di ricambio originali Hama.
Riceverete informazioni sulla consegna del prodotto attraverso la
nostra assistenza.
11. Caricabatterie
11.1 Avvertenze di sicurezza
• Prima di ogni utilizzo del caricabatterie, vericare sempre che
caricabatterie e cavi siano in perfetto stato. In presenza di danni visibili,
non utilizzare mai il caricabatterie.
• Il caricabatterie non è concepito per l’utilizzo in ambienti umidi.
• Il caricabatterie deve essere impiegato esclusivamente per il proprio
Cruiser.
• Durante l’esercizio, garantire una ventilazione suciente.
• Non coprire mai il caricabatterie durante l’utilizzo.
• Se il caricabatterie viene a contatto con liquidi, sussiste il pericolo di
scossa elettrica per cui deve essere scollegato immediatamente dalla
rete. Per evitare danni, non utilizzare più il caricabatterie.
• Il caricabatterie non contiene parti soggette a manutenzione da parte
dell‘utente. Non aprire il corpo!
• Scollegare il cavo dalla rete elettrica quando non si utilizza
l’apparecchio.
Attenzione
La selezione di una tensione di esercizio più alta di quella indicata dal
costruttore può causare gravi danni al prodotto e al caricabatterie.
Utilizzare esclusivamente gli accessori originali offerti da Hama.
12. Appendice
12.1 Referenti e informazioni legali
Attenersi sempre alle leggi e alle prescrizioni vigenti.
In molti paesi l’utilizzo di questi apparecchi su strade e marciapiedi
pubblici è regolamentato da apposite normative. Oltre a vari requisiti, le
leggi e le prescrizioni stabiliscono anche l’età minima del conducente e i
limiti di velocità. Può essere espressamente richiesto anche di indossare
l’apposito equipaggiamento di protezione. In alcuni paesi è vietato
l’utilizzo dell’apparecchio su strade e marciapiedi pubblici. Rivolgersi
alle autorità competenti e informarsi dettagliatamente sulle leggi e le
normative in vigore.
12.2 Esclusione di garanzia
Hama GmbH & Co.KG non si assume alcuna responsabilità per i danni
derivati dal montaggio o l‘utilizzo scorretto del prodotto, nonché dalla
mancata osservanza delle istruzioni per l‘uso e/o delle indicazioni di
sicurezza.
12.3 Assistenza e supporto
In caso di domande sul prodotto, rivolgersi alla Consulenza prodotto Hama.
Hotline: +49 9091 502-115 (ted./ing.)
Ulteriori informazioni sul supporto sono disponibili qui: www.hama.com
12.4 Indicazioni di smaltimento
Informazioni per protezione ambientale:
Dopo l’implementazione della Direttiva Europea 2012/19/EU e
2006/66/EU nel sistema legale nazionale, ci sono le seguenti
applicazioni: Le apparecchiature elettriche ed elettroniche e le
batterie non devono essere smaltite con i riuti domestici. I
consumatori sono obbligati dalla legge a restituire I dispositivi elettrici ed
elettronici e le batterie alla ne della loro vita utile ai punti di raccolta
pubblici preposti per questo scopo o nei punti vendita. Dettagli di quanto
riportato sono deniti dalle leggi nazionali di ogni stato. Questo simbolo
sul prodotto, sul manuale d’istruzioni o sull’imballo indicano che questo
prodotto è soggetto a queste regole. Riciclando, ri-utilizzando i materiali
o utilizzando sotto altra forma i vecchi prodotti/le batterie, darete un
importante contributo alla protezione dell’ambiente.
11.2 Dati tecnici
Campo di tensione d’ingresso 100- 240 V ~ 50 / 60 Hz
Potenza continua max. 90 W
Corrente di uscita 2A
Tensione di uscita 42 V DC
Temperatura di esercizio 10°~25°C
11.3 Pulizia
Utilizzare un panno morbido e asciutto. Consigliamo di utilizzare un
panno in microbra non abrasivo. Non utilizzare soluzioni detergenti, né
liquidi.
69
Page 70

12.5 Dichiarazione di conformità
00109864 F-Cruiser
70
Page 71
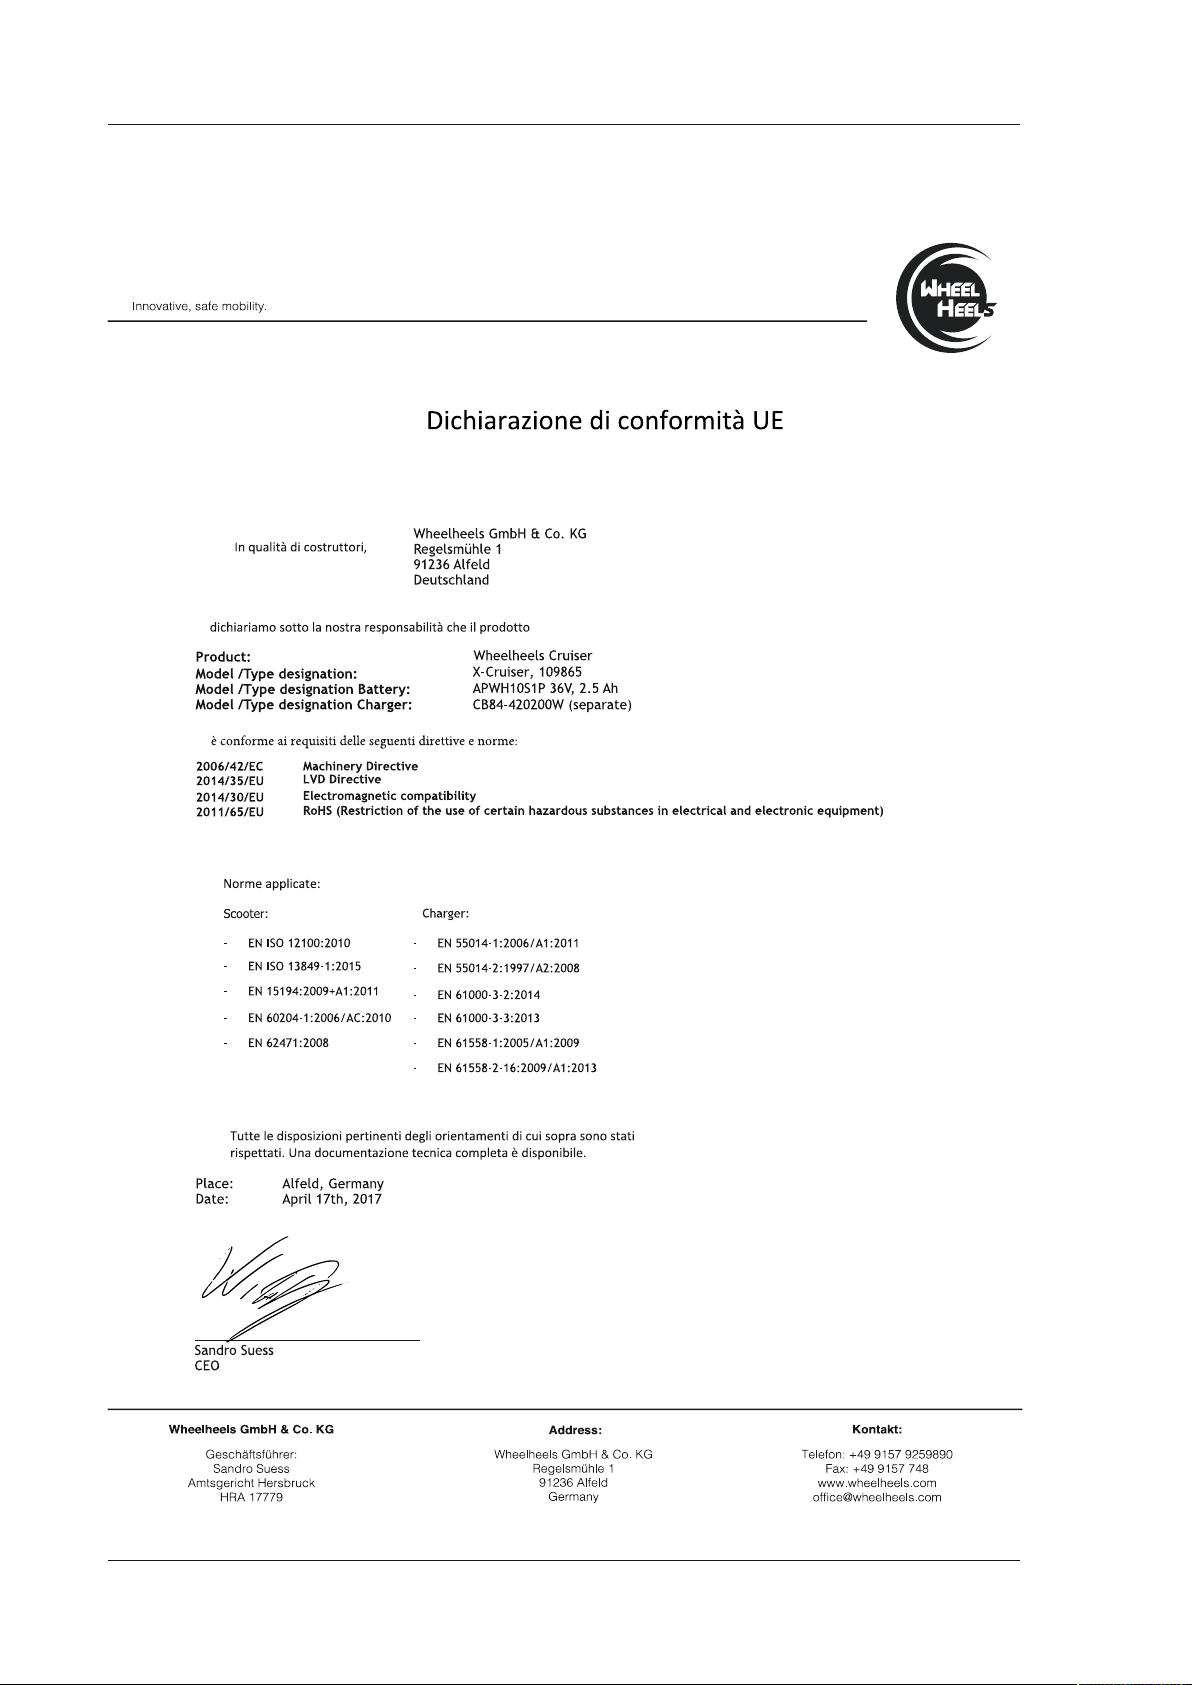
00109865 X-Cruiser
71
Page 72

00109866 S-Cruiser
72
Page 73
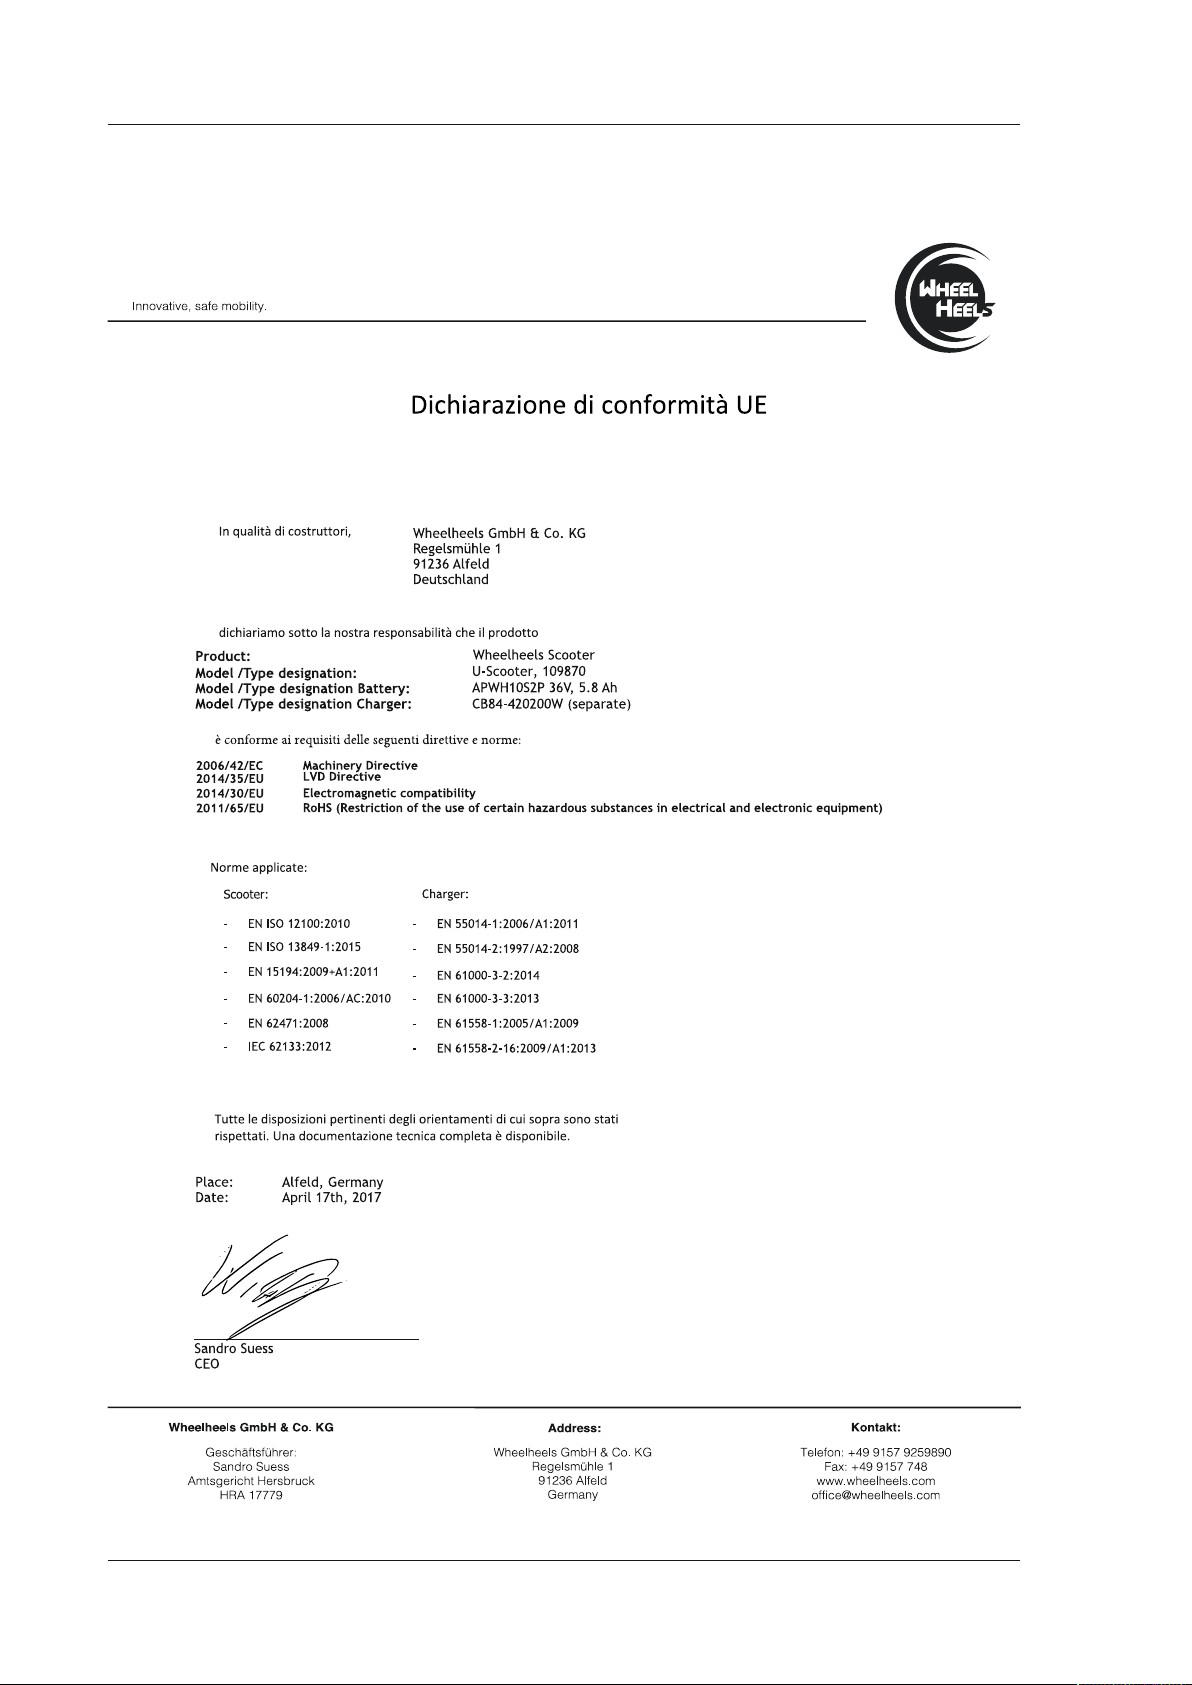
00109870 U-Scooter
73
Page 74

C Návod k použití
Obsah
1. Vysvětlení výstražných symbolů a pokynů.........74
Obsah balení ................................74
2.
Vybalení............................................74
2.1
2.2
Zaznamenání sériového čísla ............................74
2.3
Příslušenství.........................................75
Bezpečnostní pokyny. . . . . . . . . . . . . . . . . . . . . . . . . .75
3.
Oblasti použití a meze výkonu ..................75
4.
Oblasti použití . . . . . . . . . . . . . . . . . . . . . . . . . . . . . . . . . . . . . . .75
4.1
4.2
Meze výkonu . . . . . . . . . . . . . . . . . . . . . . . . . . . . . . . . . . . . . . . .75
Popisy různých modelů ........................76
5.
5.1
S-/X-Cruiser.........................................76
5.2
F-Cruiser/U-Scooter...................................77
Aplikace ....................................78
6.
Použití .....................................78
7.
Ovládací prvky a indikace ..............................78
7.1
7.1.1 S-
/X-Cruiser ...................................78
7.1.2 F-Cruiser
7.1.3 U-Scooter
7.2
Způsob fungování produktu.............................80
7.2.1 F-
7.2.2 U-Scooter
7.3
Uvedení zařízení do provozu a montáž ....................82
7.3.1 F-
7.3.2 U-Scooter
7.4
Zobrazení stavu nabití .................................84
7.4.1 S-
7.4.2 F-Cruiser
7.4.3 U-Scooter
Baterie .....................................84
8.
8.1
Bezpečnost při zacházení s bateriemi .....................84
8.2
Technické údaje baterie (Tabulka 3) ......................85
8.3
Nabíjení přístrojů.....................................85
8.4
Vliv teploty na výkon ..................................85
8.5
Výměna baterie ......................................86
8.6
Zaslání baterií Li-Ion ..................................86
Údržba .....................................86
9.
Kontrola kol/sestavy kol................................86
9.1
9.2
Kontrola tlaku v pneumatikách ..........................86
9.3
Čištění produktu .....................................86
9.4
Lagern des Produkts ..................................86
Hledání a odstranění závad (F- /S-/X-Cruiser) .....86
10.
Výměna konstrukčních a náhradních dílů .................86
10.1
10.2
Odstranění závad....................................86
Nabíječka .................................87
11.
11.1
Bezpečnostní pokyny .................................87
11.2
Technické údaje.....................................87
Čištění . . . . . . . . . . . . . . . . . . . . . . . . . . . . . . . . . . . . . . . . . . . .87
11.3
Dodatek ...................................87
12.
Kontaktní osoby a právní informace .....................87
12.1
Vyloučení záruky ....................................87
12.2
Servis a podpora ....................................87
12.3
Pokyny k likvidaci....................................87
12.4
Prohlášení o shodě ..................................88
12.5
......................................79
.....................................79
/S-/X-Cruiser.................................80
7.2.1.1 Zpětné získávání energie (rekuperace)
7.2.1.2 Osvětlovací zařízení (F-Cruiser)
7.2.1.3 USB nabíjecí zdířka (F-Cruiser)
......................................81
/S-/X-Cruisers ................................82
......................................82
/X-Cruiser....................................84
.......................................84
......................................84
.........81
...............81
...............81
Děkujeme, že jste si vybrali výrobek Hama.
Přečtěte si, prosím, všechny následující pokyny a informace. Uchovejte
tento text pro případné budoucí použití. Pokud výrobek prodáte, předejte
tento text novému majiteli.
1. Vysvětlení výstražných symbolů a pokynů
Upozornění
Varuje před činnostmi, při kterých byste se mohli zranit.
Pozor
Varuje před činnostmi, které mohou ovlivnit provoz zařízení nebo
zařízení poškodit.
Poznámka
Upozorňuje na důležité body, tipy, zvláštní okolnosti nebo alternativní
metody.
2. Obsah balení
F-Cruiser
• Hama Cruiser
• Nabíječka
• 2x ochranný plech, vč. montážní sady
• tento návod k obsluze
• Prohlášení o shodě
S-/X-Cruiser
• Hama Cruiser
• Nabíječka
• tento návod k obsluze
• Prohlášení o shodě
U-Scooter
• Hama Scooter
• Nabíječka
• tento návod k obsluze
• Prohlášení o shodě
2.1 Vybalení
• Než produkt rozbalíte, zkontrolujte balení a přítomnost případných
poškození.
• Pokud zjistíte poškození, kontaktujte prosím svého prodejce.
• Pokud je vše v pořádku, zkontrolujte, zda je obsah balení kompletní.
• Pokud není obsah balení kompletní, kontaktujte svého prodejce.
• Při vytahování z balení nechytejte S-Cruiser nebo X-Cruiser za kryty kol.
2.2 Zaznamenání sériového čísla
Poznámka
Sériové číslo je jednoznačné. Je důležité pro případ uplatnění záruky a
je nutné v případě nahlášení ztráty nebo krádeže.
• Sériové číslo se nachází na typovém štítku, který je umístěn na
produktu. Sériové číslo má následující strukturu:
F-Cruiser: 91XXXXXX
X-Cruiser: 92XXXXXX
S-Cruiser: 93XXXXXX
U-Scooter: 94XXXXXX
• Zapiště si sériové číslo. Tyto informace uchovávejte odděleně od
produktu na bezpečném místě.
74
Page 75
2.3 Příslušenství
4. Oblasti použití a meze výkonu
Poznámka
U všech přístrojů popsaných v tomto návodě je možné použít
příslušenství Hama 109888 Hovercart.
3. Bezpečnostní pokyny
Abyste se s vaším produktem naučili bezpečně jezdit, musíte si přečíst
všechny návody a výstražná upozornění v návodu k obsluze a seznámit se
s používáním zařízení.
Všechna výstražná upozornění uvedená v uživatelské dokumentaci k
produktu je naprosto nezbytné respektovat.
Upozornění
• Toto elektrické zařízení nemá oprávnění jezdit po silnicích!
•
Pro snížení rizika poranění si musíte přečíst všechny návody a
výstražná upozornění v uživatelské dokumentaci a řídit se jimi.
•
pevnou obuv!
• Udržujte dostatečnou vzdálenost od ostatních osob nebo zvířat,
zejména pokud zařízení ještě zcela neovládáte!
• Nepřeceňujte se. Pomalu přidávejte rychlost a zachovejte předvídavý
způsob jízdy, abyste zabránili pádům.
• NIKDY nejezděte pod vlivem drog ani alkoholu!
Poznámka
Otevřením zařízení nebo odstraněním připevněných pečetících štítků
ztratíte nárok na záruku.
• Výrobek je určen k nekomerčnímu použití v domácnosti.
• Výrobek používejte výhradně ke stanovenému účelu.
• Výrobek chraňte před znečištěním. Nepoužívejte ve vlhkém prostředí a
zabraňte styku s vodou. Používejte pouze v suchých prostorách.
• Výrobek chraňte před pádem a velkými otřesy.
• Tento produkt nesmí používat děti a osoby s omezenými fyzickými,
senzorickými nebo duševními schopnostmi nebo osoby s nedostatečným
množstvím zkušeností nebo vědomostí. Používání je možné pod
dozorem osoby odpovědné za jejich bezpečnost, nebo pokud tyto osoby
obdržely pokyny o použití výrobku.
• Děti nesmí přístroj používat jako hračku. Děti nesmí provádět čištění.
• Výrobek provozujte pouze připojený ke schválené zásuvce. Zásuvka
musí být vždy snadno přístupná.
• Akumulátor je pevně instalován a nelze jej vyjmout. Výrobek likvidujte
jako celek v souladu s platnými předpisy.
• Do výrobku samovolně nezasahujte a neopravujte ho. Všechny práce
údržby, kromě případů popsaných v bodě 9, přenechte odborníkům.
Otevřením zařízení nebo odstraněním připevněných pečetících štítků
•
ztratíte nárok na záruku.
• Výrobek neotvírejte a v případě poškození již dále nepoužívejte, např.
při vzniku kouře, zápachu nebo hlasitých zvuků. Ihned se obraťte na
prodejce nebo odborný servis (viz 12.3 Servis a podpora).
– NEBEZPEČÍ PORANĚNÍ A ÚMRTÍ!
Používání zařízení může být životu nebezpečné nebo vést k
vážným zraněním v případě ztráty kontroly, srážky nebo pádu.
Při používání tohoto produktu vždy noste kvalitní ochranné
pomůcky, jako helmu, chrániče kolen a loktů, rukavice a
4.1 Oblasti použití
Poznámka
• Produkt není schválen pro provoz na veřejných komunikacích!
Použití je přípustné pouze na soukromých, neveřejných
prostranstvích. Dodržujte příslušné zákony a předpisy!
• Zařízení lze používat pouze v uzavřených, neveřejných, soukromých
areálech a pouze tam, kde používání nezakazuje jiný předpis.
• Minimální věk pro používání je 14 let.
• Používání tohoto zařízení je koncipováno pouze pro jednoho řidiče.
• Hmotnost řidiče nesmí překročit 120 kg.
• Přístroj nepoužívejte mimo rozsah předepsaných hodnot v technických
údajích.
• Výrobek nepoužívejte na místech, kde je používání elektronických
zařízení zakázáno.
• Produkt je určen pouze k použití v suchu. Je sice chráněn proti stříkající
vodě, neposkytuje však dostatečnou ochranu proti neustálému styku s
vodou a může se v důsledku toho poškodit.
4.2 Meze výkonu
Seznamte se bezpodmínečně s mezními hodnotami výkonu produktu.
Jsou vytvořeny tak, aby maximalizovaly bezpečnost pro řidiče a
minimalizovaly riziko poškození zařízení.
• Vždy dodržujte v technických údajích (viz 5.1/5.2 Technické údaje,
tabulka 1/2) uvedenou maximální hmotnost pro řidiče a vezené zátěže
(max. užitná zátěž) i minimální hmotnost řidiče.
• Nedodržení mezí výkonu může zapříčinit jízdní stavy, při nichž není
možná bezpečná jízda! Faktory, pro které je nutný vyšší výkon, jsou
mimo jiné:
- vyšší užitné zátěže
(hmotnost řidiče a všechny vezené zátěže)
- strmější klesání / strmější stoupání
- nerovný povrch
- vyšší rychlosti než 15 km
(pouze u produktů F-Cruiser, S-Cruiser a X-Cruiser)
- prudké manévry
Upozornění
Pokud nedodržíte omezení hmotnosti, zejména v souvislosti s ostatními
faktory, pro které je nutný vyšší výkon, zvyšuje se riziko poškození osob
i věcí.
75
Page 76
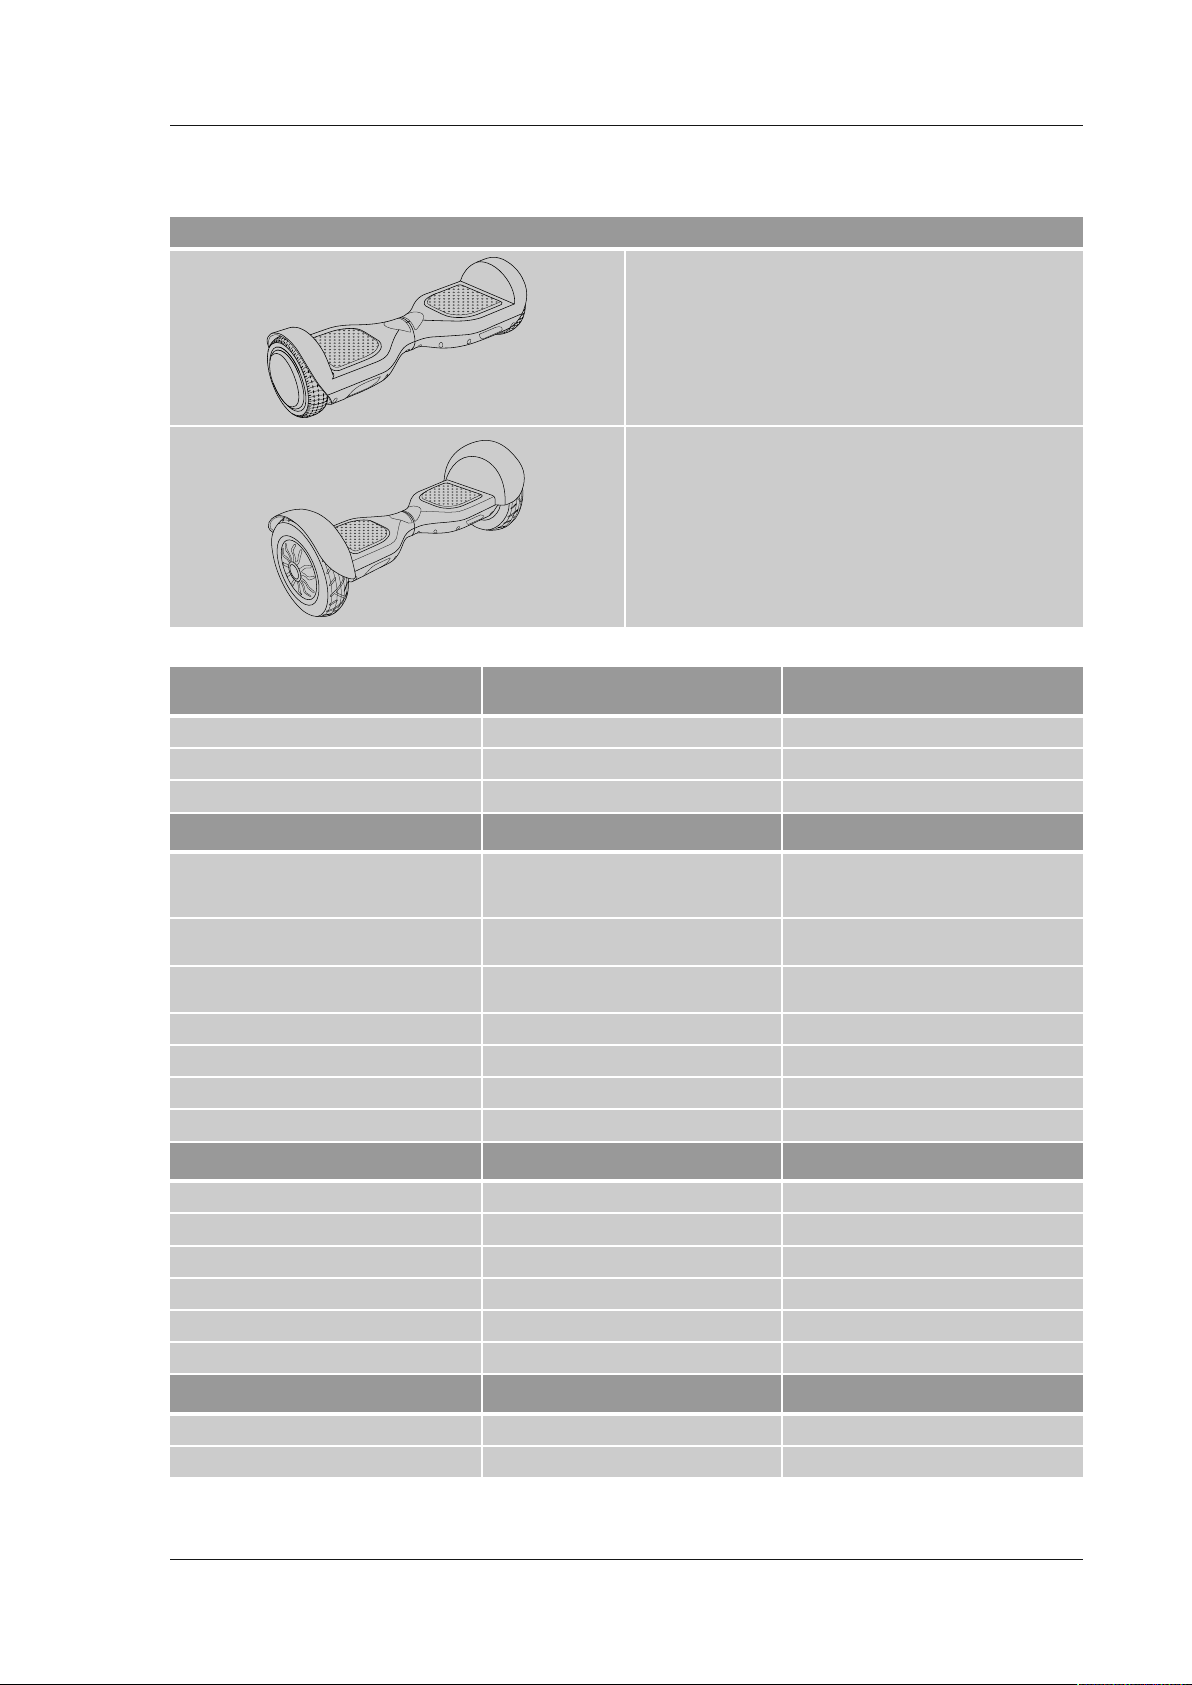
5. Popisy různých modelů
5.1 S-/X-Cruiser
Model Popis
Obrázek 1
S-Cruiser
Obrázek 2
X-Cruiser
Technické údaje (Tabulka 1)
Omezení hmotnosti pro řidiče Slalom Cruiser Cross Cruiser
Maximální užitné zatížení
Minimální hmotnost řidiče
Minimální věk řidiče
Výkon Slalom Cruiser Cross Cruiser
Nejvyšší rychlost 6 km/h (režim začátečník)
Dosah cca 15 km
Napájení pro nabíjení (pouze pomocí dodaného
napájecího zdroje nebo originálního příslušenství)
Energie Lithium-Ion (Li-Ion) nabíjecí baterie
Výkon motoru 700 Wattů 700 Wattů
Tlak v pneumatikách -35 psi (2,4 bary)
Hlasitost
15 km/h (režim pro pokročilé)
30 km/h (režim motokáry)
(v závislosti na jezdci, rychlosti a podkladu)
méně než 70 dB(A) při jízdě méně než 70 dB(A) při jízdě
Slalom Cruiser (viz obrázek 1) nabízí uvnitř i venku v různých prostředích
optimální potěšení z jízdy. Tento model lze používat pouze na pevném a
rovném podkladu. Pro nerovný povrch, jako např. kočičí hlavy, není tento
model koncipován.
Cross Cruiser (viz obrázek 2) je optimalizován pro použití venku. Cross
Cruiser má velký průměr kol, větší světlou výšku a širší kola s ozubeným
prolem, takže je možné na něm jezdit na nerovnějších a rozdílnějších
površích, než u jiných modelů. Balonové pneumatiky propůjčují produktu
Cross Cruiser na nerovném povrchu více stability a trakce.
120 kg 120 kg
25 kg 25 kg
14 let 14 let
6 km/h (režim začátečník)
15 km/h (režim pro pokročilé)
30 km/h (režim motokáry)
cca 18 km
(v závislosti na jezdci, rychlosti a podkladu)
42V, ≤ 5 A42V, ≤ 5 A
36V, 2,5 Ah 36V, 2,5 Ah
Rozměry a hmotnost Slalom Cruiser Cross Cruiser
Hmotnost zařízení bez baterií
Hmotnost baterie
Délka a šířka
Výška
Průměr pneumatik
Typ pneumatik
Teplotní rozsahy Slalom Cruiser Cross Cruiser
Provoz
Nabíjení, skladování a transport
9,1 kg 11,5 kg
0,97 kg 0,97 kg
58 cm x 18,5 cm 67 cm x 26 cm
17,5 cm 26 cm
6,5 palců/ 16,5 cm 10 palců/ 25,4 cm
Celopryžové Pneumatiky s duší
-10 °C až 40 °C -10 °C až 40 °C
10 °C až 25 °C 10 °C až 25 °C
76
Page 77

5.2 F-Cruiser/U-Scooter
Model Popis
Obrázek 3
F-Cruiser
Obrázek 4
U-Scooter
Technické údaje (Tabulka 2)
Omezení hmotnosti pro řidiče Freestyle Cruiser Urban Scooter
Maximální užitné zatížení
Minimální hmotnost řidiče
Minimální věk řidiče
Výkon Freestyle Cruiser Urban Scooter
Nejvyšší rychlost 6 km/h (režim začátečník)
Dosah cca 15 km
Napájení pro nabíjení (pouze pomocí dodaného
napájecího zdroje nebo originálního příslušenství)
Energie Lithium-Ion (Li-Ion) nabíjecí baterie
USB výstup pro externí přístroje 5V DC, 2A Výkon motoru 800 Wattů 250 Wattů
Tlak v pneumatikách -2,5 baru vpředu, žádný vzadu
Hlasitost
15 km/h (režim pro pokročilé)
30 km/h (režim motokáry)
(v závislosti na jezdci, rychlosti a podkladu)
méně než 70 dB(A) při jízdě méně než 70 dB(A) při jízdě
Freestyle Cruiser (viz obrázek 3) je dodáván včetně aplikace, USB
nabíjecí zdířky a zdířky pro zámek Kensington a nabízí optimální zážitek
z jízdy uvnitř i venku v nejrůznějších prostředích. Tento model by se měl
používat pouze na pevném a rovném podkladu. Extra široké celopryžové
pneumatiky zajistí optimální přilnavost i při vysoké rychlosti.
Urban Scooter (viz obrázek 4) je možné pomocí několika kroků složit
a rozložit během pár sekund. Díky vybavení tachometrem, světlem,
bubnovou brzdou a vzduchem plněnými nízkotlakými pneumatikami,
které zajišťují vyšší stabilitu a přilnavost, je vhodný pro venkovní použití.
Scooter může jezdit v nejrůznějších a i v nerovných terénech. Scooter je
zpracován z hliníku litého pod tlakem s práškovým nástřikem a nabízí tak
stabilitu a ochranu před korozí.
120 kg 120 kg
25 kg -
14 let 14 let
6 km/h (režim začátečník)
15 km/h (režim pro pokročilé)
25 km/h (režim pro)
cca 15 km
(v závislosti na jezdci, rychlosti a podkladu)
42V, ≤ 5 A42V, ≤ 5 A
36V, 2,5 Ah 36V, 5,8Ah
Rozměry a hmotnost Freestyle Cruiser Urban Scooter
Hmotnost zařízení bez baterií 14 kg 14 kg
Hmotnost baterie 0,50 kg 0,97 kg
Délka a šířka 66,9 cm x 24,3cm 115 cm x 15 cm
Výška 22 cm 118 cm
Průměr pneumatik 8 palců / 20,4 cm 8 palců / 20,4 cm
Typ pneumatik Celopryžové celopryžové pneumatiky s duší
Teplotní rozsahy Freestyle Cruiser Urban Scooter
Provoz
Nabíjení, skladování a transport
-10 °C až 40 °C -10 °C až 40 °C
10 °C až 25 °C 10 °C až 25 °C
77
Page 78
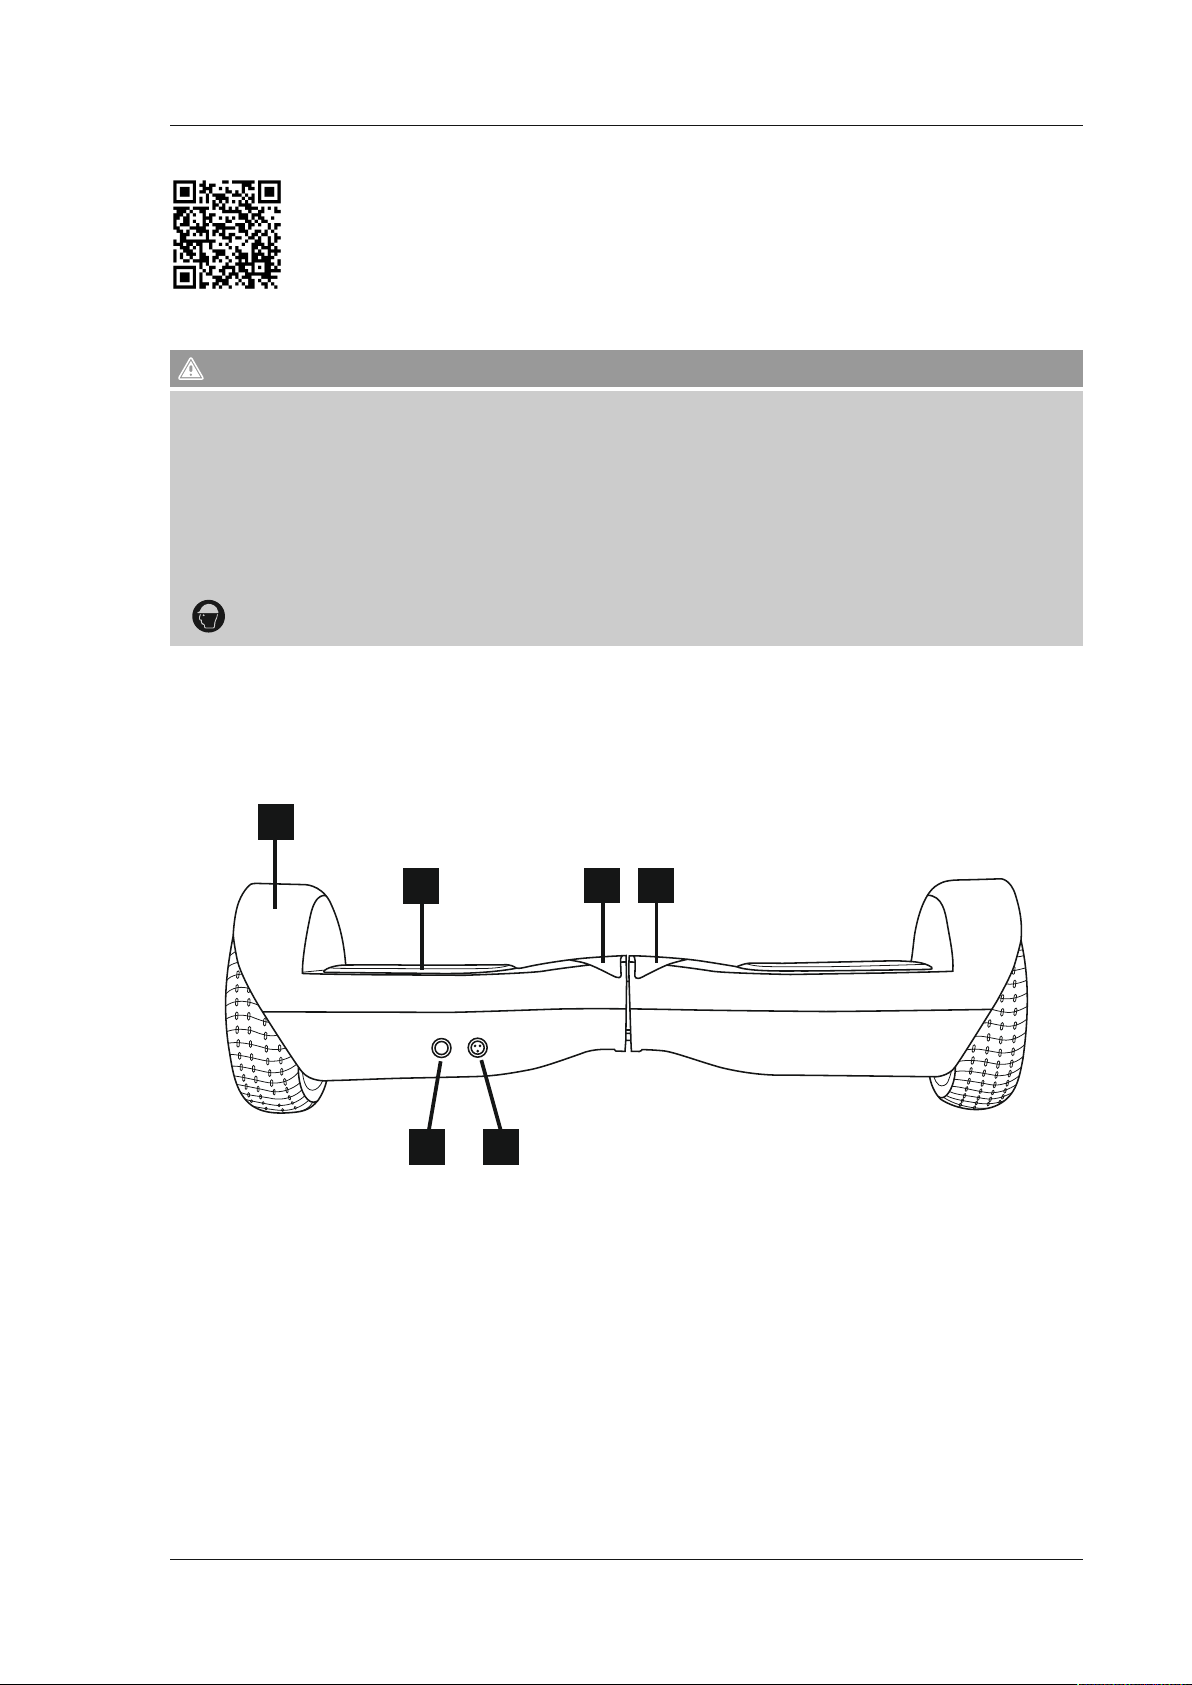
6. Aplikace
Podrobný návod k aplikaci „Wheelheels“ pro iOS a Android najdete v následujícím odkazu: www.wheelheels.com/#app.
7. Použití
Upozornění
• Použití produktu je na vlastní nebezpečí!
• Před každou jízdou zkontrolujte funkčnost produktu!
• Nestrkejte prsty ani jiné části těla do blízkosti potenciálně nebezpečných míst nebo pohybujících se součástí, zejména poháněných kol!
• Nejezděte se zavěšenými cizími předměty, jako jsou např. visící sluchátka, připojovací kabely nebo volné oblečení. Hrozí nebezpečí, že se takové volné
části dostanou do pohybujících se kol.
• Nepoužívejte při špatném počasí (déšť, sníh, led, námraza nebo sněžení, nebo např. na površích s rozlitým olejem). Nejezděte přes obrubníky a
vyhýbejte se přejíždění překážek.
• Produkt není schválen pro provoz na veřejných komunikacích! Použití je přípustné pouze na soukromých, neveřejných prostranstvích. Výrobce se
výslovně distancuje od jakýchkoliv škod, které vzniknou následkem použití v rozporu s určením.
• Při používání tohoto produktu vždy noste kvalitní ochranné pomůcky, jako helmu, chrániče kolen a loktů, rukavice a pevnou obuv!
7.1 Ovládací prvky a indikace
7.1.1 S-/X-Cruiser
Obrázek 5
1
2
5 6
1. Kryty na kola
2. Stupačky se systémem tlakových snímačů
3. Stavové indikace
4. Stavová LED dioda pro nabíjení
5. Vypínač, přepínač pro provozní režim
6. Nabíjecí zdířka
3 4
78
Page 79
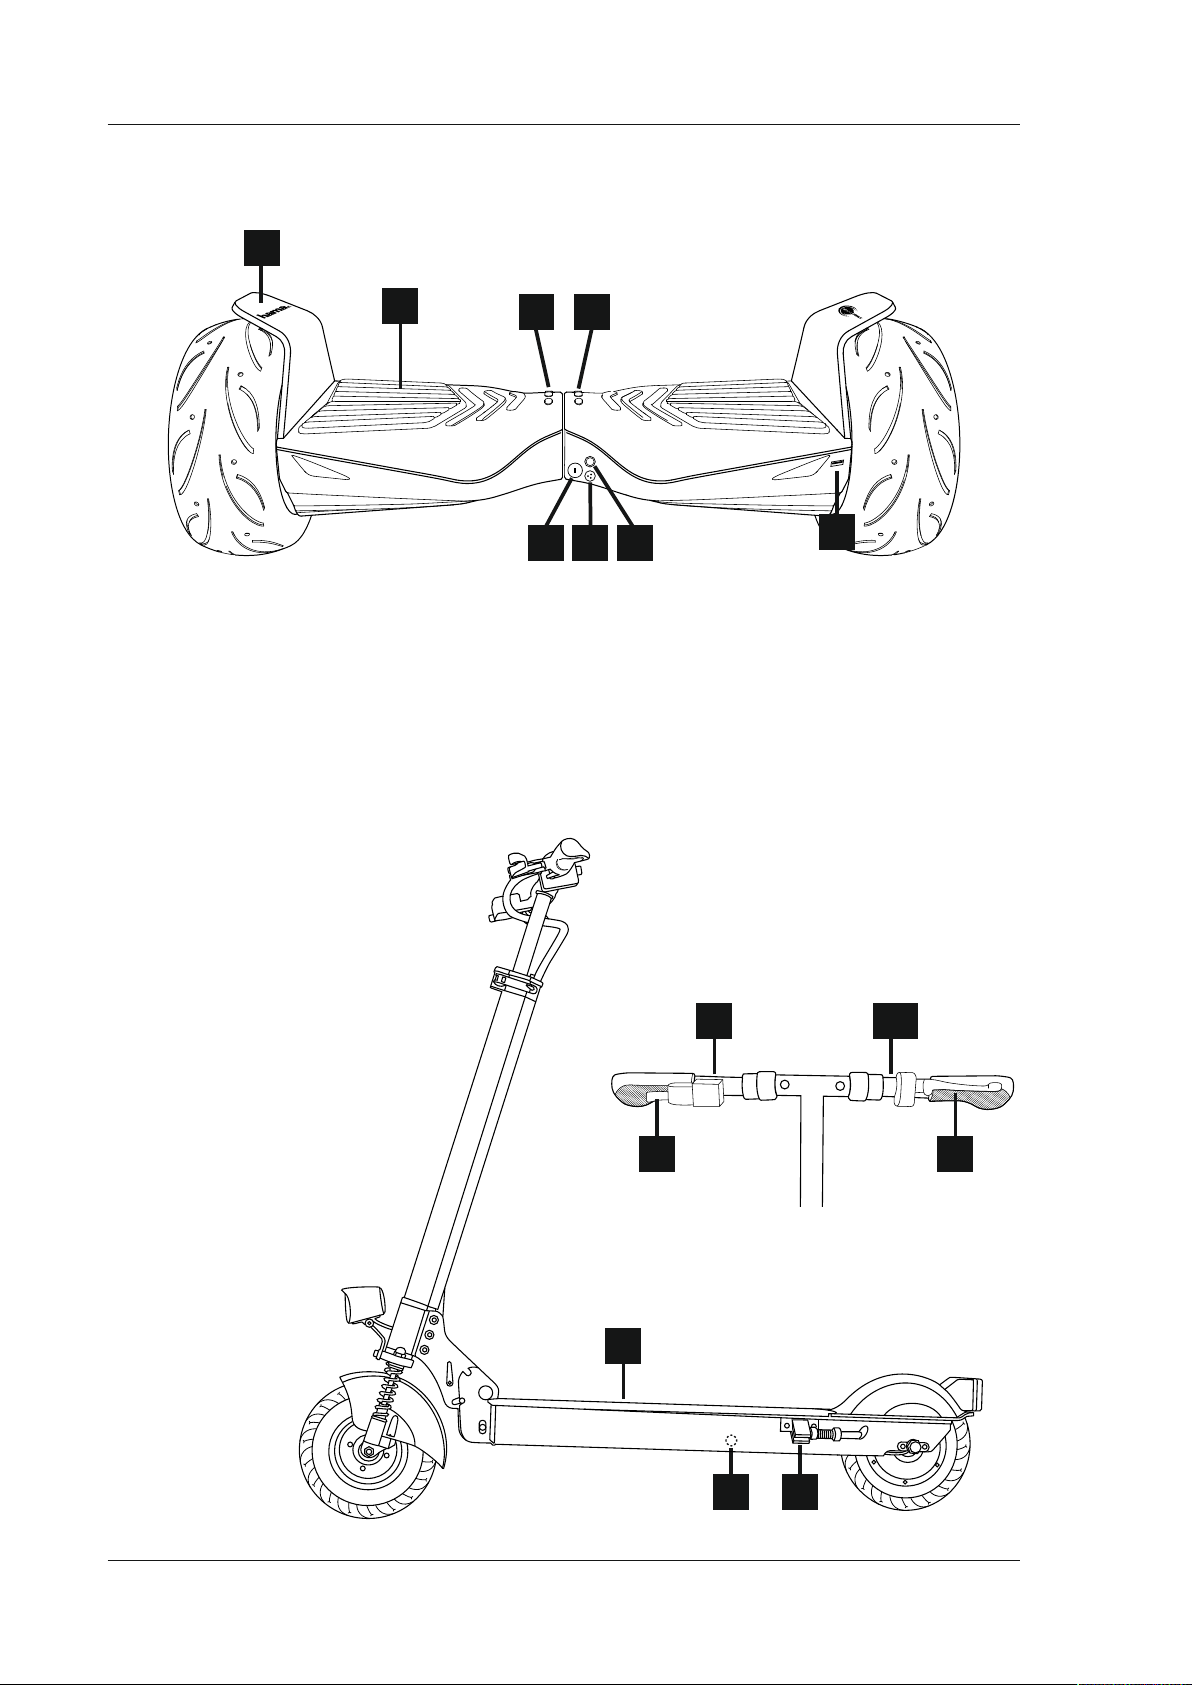
7.1.2 F-Cruiser
Obrázek 6
1
1. Ochranné plechy
2. Stupačky se systémem tlakových snímačů
3. Stavová LED dioda pro nabíjení
4. Stavové indikace
5. Vypínač, přepínač pro provozní režim
6. Nabíjecí zdířka
7. Zdířka Kensington
8. Výstup USB
7.1.3 U-Scooter
Obrázek 7
2
3
4
6 5
7
8
1. Displej
2. Plynová páčka
3. Klakson
4. Vypínač světla
5. Brzda
6. Stupátka
7. Stojan
8. Nabíjecí zdířka
1
2 5
6
3,4
78
79
Page 80
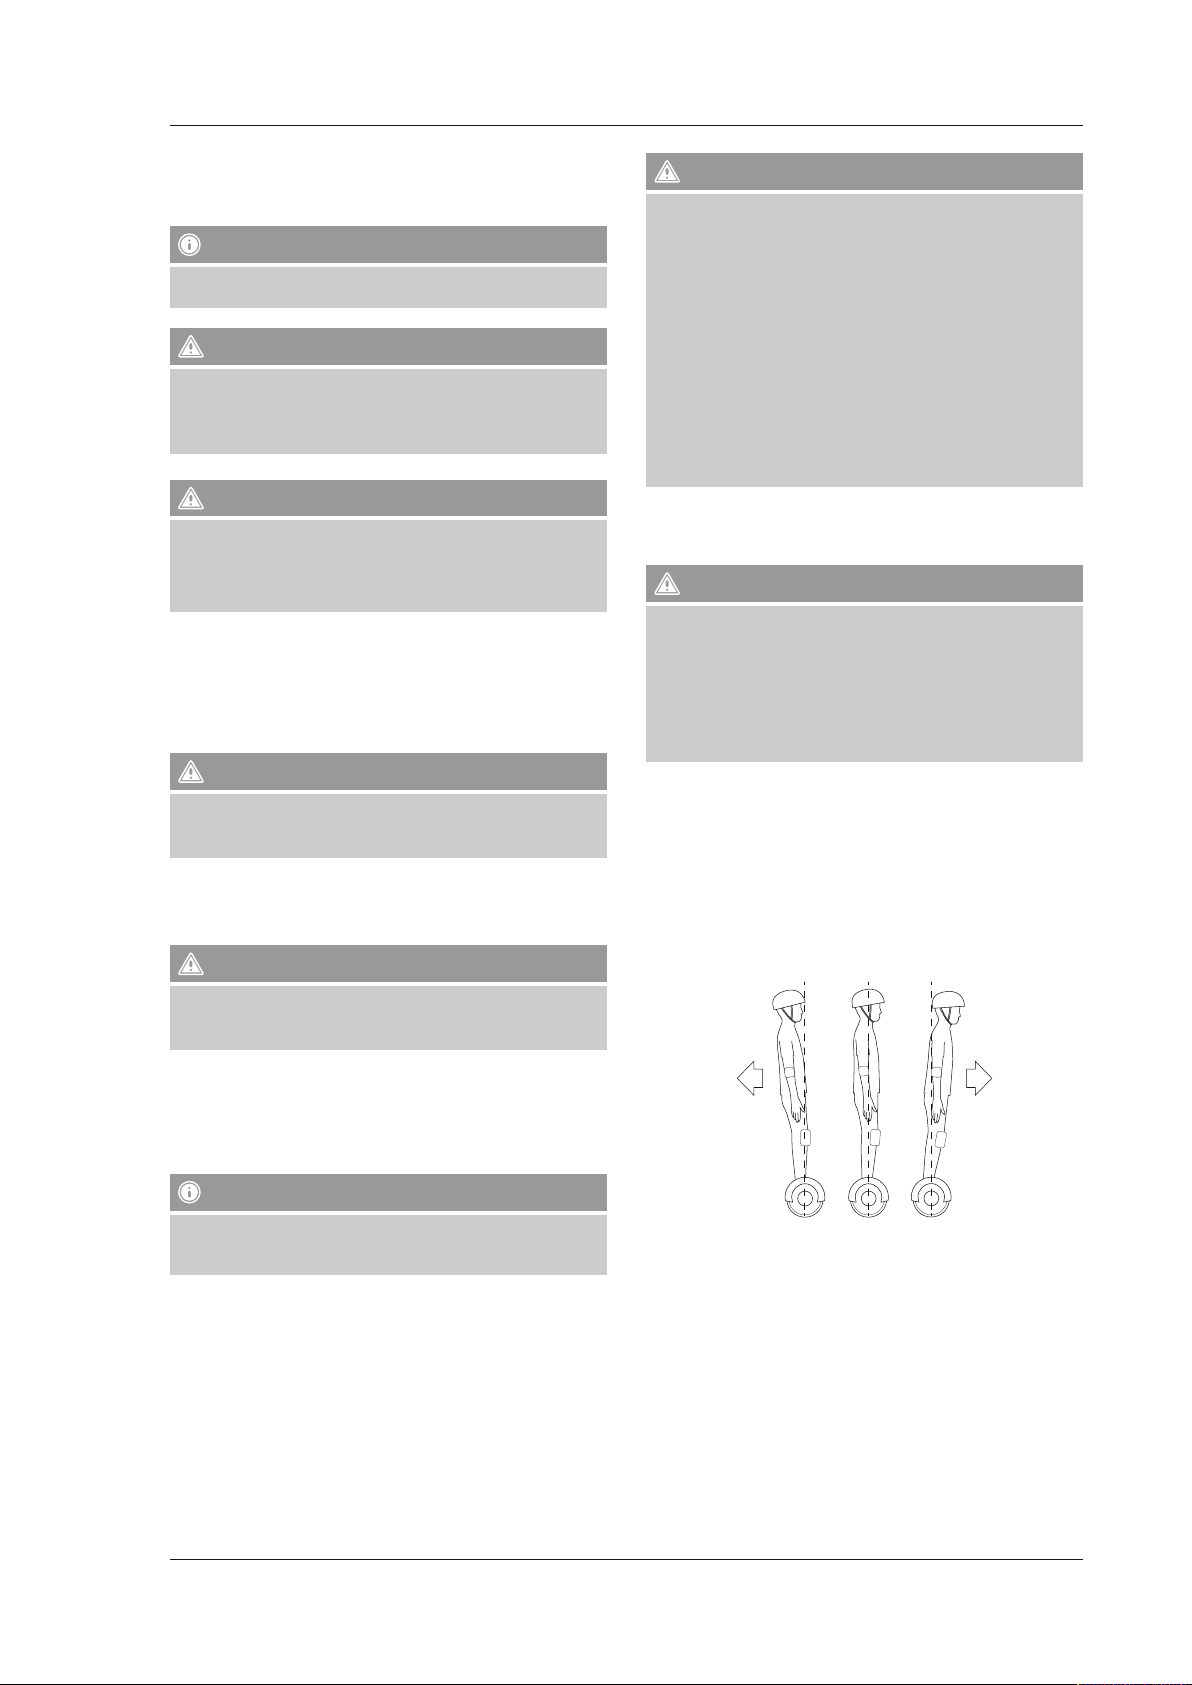
7.2 Způsob fungování produktu
7.2.1 F-/S-/X-Cruiser
Poznámka
Při zapínání dbejte na to, aby produkt stál na plochém, rovném
povrchu.
Pozor
• Vždy používejte správné techniky zdvihání a nakládání.
• Vybírejte si pevné, nepohyblivé body pro zdvihání, například
uprostřed podvozku.
• Vždy zdvihejte zařízení z podřepu, nikoliv ze stoje.
Upozornění
• Pozor na prsty! Produkt nezvedejte za pneumatiky, ochranné plechy
ani za kola.
• Ruce a prsty se mohou dostat mezi pneumatiky a ochranný plech a
poranit se.
Zařízení má čtyři provozní režimy:
• Režim začátečník: V tomto režimu je rychlost omezena na 6 km/h.
Zařízení reaguje zdrženlivěji na pohyby zatáčení.
Pro výběr režimu postavte zařízení ve vypnutém stavu na zem. Jedním
krátkým stisknutím tlačítka 5 se zařízení automaticky nastaví do
neutrální polohy 0°. Zařízení je v režimu začátečník.
Pozor
Jakmile dosáhnete rychlosti 6 km/h, zařízení neumožní další zrychlení.
Při dosažení rychlostní hranice se zařízení Cruiser může houpat. Jedná
se o běžný jev.
• Režim pro pokročilé: V tomto režimu je rychlost omezena na 15 km/h.
Pro výběr režimu postavte zařízení ve vypnutém stavu na zem. Dvěma
krátkými stisknutími tlačítka 5 se zařízení automaticky nastaví do
neutrální polohy 0°. Zařízení se nachází v režimu pro pokročilé.
Pozor
Upozornění
• Upozorňujeme, že v tomto režimu může dojít k přetížení zařízení a
není tak možné vyloučit krátkodobý výpadek elektroniky.
• V případě výpadku elektroniky je možné převrácení jezdce, v jehož
důsledku a ve spojení s vysokou rychlostí může dojít k těžkému
zranění.
• Mezní hodnota výkonu závisí mimo jiné na stavu nabití baterie,
hmotnosti jezdce, povrchu vozovky a klesání/stoupání. Pokud
například jedete z roviny do stoupání, může tento přechod vést k
překročení mezní hodnoty výkonu.
• Režim motokáry používejte výhradně s vysoce kvalitním ochranným
vybavením.
• Společnost Hama GmbH & Co KG nepřebírá jakoukoliv odpovědnost
za věcné škody nebo zranění v tomto režimu, které vznikly v
důsledku přetížení zařízení.
• Bezpečnostní režim: V případě vysoké teploty motoru, baterie
nebo ovládací elektroniky, nebo při nízkém stavu nabití baterie přejde
produkt automaticky do bezpečnostního režimu.
Upozornění
Okamžitě slezte a produkt vypněte, pokud následující signály alarmu
upozorní na bezpečnostní režim:
• Blikající čelní LED diody (popř. přední a zadní LED diody u varianty
F-Cruiser)
• Červené stavové LED diody (popř. zelené stavové LED diody u
varianty F-Cruiser)
• Produkt se automaticky zabrzdí
• Tón alarmu
Kontaktujte podporu (viz 12.3 Servis a podpora), pokud zařízení po nabití
přejde neobvykle rychle do režimu alarmu.
Zařízení se dává do pohybu následujícím způsobem:
Přenesením váhy na bříška nohou nebo na paty aktivujete tlačítka pro
pohyb pod stupátky, tím se kola otočí do směru, kterým zatěžujete nohy
a můžete se tak pohybovat dopředu i dozadu. Když se nakloníte dopředu
nebo dozadu, přesune se těžiště a podle toho také kontaktní plocha kol
(bod, kterým se kola dotýkají země) a zařízení se také naklání dopředu
nebo dozadu.
Rovnováhu však musíte udržovat sami. Jinak můžete spadnout.
Jakmile dosáhnete rychlosti 15 km/h, zařízení neumožní další zrychlení.
Při dosažení rychlostní hranice se zařízení Cruiser může houpat. Jedná
se o běžný jev.
• Režim motokáry: V tomto režimu je možné dosáhnout rychlosti až 30
km/h.
Pro výběr režimu postavte zařízení ve vypnutém stavu na zem. Třemi
krátkými stisknutími tlačítka 5 se zařízení automaticky nastaví do
neutrální polohy 0°. Zařízení je v režimu motokáry.
Upozornění – režim motokáry
• Režim motokáry je určen pouze pro použití s nástavbou pro
motokáry (č. pol. 109888).
• Použití režimu motokáry je na vlastní riziko dotyčného jezdce!
80
Page 81

Produkt nemá žádnou boční stabilizační mechaniku.
Pokud se produkt nakloní tak daleko, že kola ztratí kontakt se zemí,
nemůže se pod vámi vycentrovat a můžete upadnout.
Musíte sami udržovat i boční rovnováhu. Dbejte proto neustále na to, aby
vaše tělo a středová osa produktu tvořili jednu rovinu.
Nenaklánějte se v zatáčkách ani do stoupání, když jedete napříč svahem.
Upozornění - USB nabíjecí zdířka
• Delší nabíjení jednoho nebo více přístrojů za sebou může snížit
dojezd zařízení Cruiser.
Pozor - nebezpečí pádu
• Nepoužívejte USB nabíjecí zdířku během jízdy, ale vždy jen, když je
zařízení zastaveno.
• Hrozí nebezpečí pádu a zranění způsobené vybočením, ztrátou
rovnováhy a nabíjecím kabelem.
7.2.2 U-Scooter
Poznámka
Při zapínání dbejte na to, aby produkt stál na plochém, rovném
povrchu.
Pozor
Poznámka
• Nepřeceňujte se. Pomalu přidávejte rychlost, abyste získali úplnou
kontrolu nad produktem, navíc doporučujeme pouze zkušeným
řidičům jezdit příčně ke svahu.
• Pokud produkt používáte poprvé, doporučujeme požádat o podporu
druhou osobu. Ta by vás měla zepředu držet za ruce, abyste měli
dostatečnou stabilitu. Především se pokuste stát klidně a neprovádět
žádné zbrklé pohyby. Zařízení podporuje vaši rovnováhu, pokuste
tedy proti vyrovnávacím pohybům netlačit, koncentrujte se pouze na
svou rovnováhu.
7.2.1.1 Zpětné získávání energie (rekuperace)
• Všechna zařízení Cruiser disponují funkcí rekuperace energie při brzdění
nebo jízdě z kopce.
• Rekuperace energie může v ideálních podmínkách zvýšit dojezd zařízení
Cruiser o 5 - 10 %. Závisí to ale na mnoha faktorech, jako je prol
terénu a četnost brzdění, a není možné to v jednotlivých případech určit
předem.
Pozor v případě plně nabité baterie.
• V případě, že je baterie plně nabitá, vyvarujte se dlouhých sjezdů z
kopce nebo dlouhého brzdění. Baterie v tomto stavu nemůže ukládat
rekuperovanou energii.
• Baterii nejdříve lehce vybijte jízdou v rovném terénu po dobu 1 - 2
minut.
• V opačném případě může dojít k poškození baterie.
7.2.1.2 Osvětlovací zařízení (F-Cruiser)
Upozornění - přední a zadní světla/přizpůsobení směru
jízdy
• Vždy používejte správné techniky zdvihání a nakládání.
• Vybírejte si pevné, nepohyblivé body pro zdvihání, například
uprostřed podvozku.
• Vždy zdvihejte zařízení z podřepu, nikoliv ze stoje.
Upozornění
• Pozor na prsty! Produkt nezvedejte za pneumatiky, ochranné plechy
ani za kola.
• Ruce a prsty se mohou dostat mezi pneumatiky a ochranný plech a
poranit se.
Obrázek 8
3 4
B
M
S
SPEED
SLO
ODO
0000
OO
.0
Km/h
7
Km
ECO
POWER
1
ON/OFF
MODE
2
1. Vypínač
2. Přepínač režimů
3. Displej
4. Plynová páčka
• Zařízení Freestyle-Cruiser má k dispozici dobře viditelná, samostatná
přední a zadní světla.
• Zařízení Freestyle-Cruiser pozná samostatně směr jízdy a
automaticky přizpůsobí odpovídajícím způsobem světla (přední
barva světel bílá, zadní barva světel červená).
• Rozpoznání a přizpůsobení směru jízdy proběhne po 5 otočeních kol.
7.2.1.3 USB nabíjecí zdířka (F-Cruiser)
Zařízení Freestyle-Cruiser má k dispozici nabíjecí zdířku USB typu A,
pomocí které je možné nabíjet mobilní přístroje nabíjecím proudem až
2,0 A.
Scooter spustíte stisknutím a podržením vypínače, dokud se nerozsvítí
displej. Scooter má tři různé provozní režimy:
• Režim začátečník: V tomto režimu je rychlost omezena na 6 km/h a
scooter zrychluje pomalu.
Režim vyberete stisknutím a podržením přepínače režimů [MODE],
dokud se na displeji neobjeví text „SLO“.
• Režim pro pokročilé: V tomto režimu je rychlost omezena na 15 km/h
a scooter zrychluje prudčeji než v režimu pro začátečníky.
Režim vyberete stisknutím a podržením přepínače režimů [MODE],
dokud se na displeji neobjeví text „MID“.
• Režim pro: V tomto režimu je rychlost omezena na 25 km/h a scooter
využívá svůj plný výkon.
81
Page 82

Pozor - režim pro
• V tomto režimu dbejte na dodržování dostatečného odstupu od
předmětů, osob a zvířat.
• Na toto zrychlení a rychlost si nejdříve zvykněte na rozsáhlých
plochách bez překážek.
• Díky vysoké rychlosti hrozí zvýšené nebezpečí zranění.
Režim vyberete stisknutím a podržením přepínače režimů [MODE], dokud
se na displeji neobjeví text „FAS“.
Scooter se dává do pohybu následujícím způsobem:
Pro použití elektrického pomocného motoru musíte scooter nejdříve
vypnout. Stiskněte a držte spínací tlačítko (viz obrázek 8), dokud nezačne
svítit tachometr.
Poznámka
Zařízení je v zásadě možné použít také bez elektrického pomocného
pohonu.
• Pro použití elektrického pomocného motoru musíte zařízení nejdříve
vlastními silami rozpohybovat na rychlost asi 4 km/h.
• Následně zapněte pomocný motor zatažením za plynovou páčku.
Můžete zvyšovat rychlost scooteru pouze do hodnoty omezení rychlosti
vámi použitého režimu.
Pozor
• Nejdříve byste si měli zvyknout na jízdní chování scooteru tak, abyste
předešli pádu a nebezpečí zranění.
• Trénujte proto na rozsáhlém ploše a vyzkoušejte si zrychlení a jízdní
vlastnosti scooteru.
• V každém případě používejte ochranné oblečení.
Brzdění se provádí stisknutím brzdové páčky na levé straně.
Pozor - brzdění
• Zvykněte si na prodlevu brzd. Získejte cit pro to, jakou dobu scooter
zhruba potřebuje pro zabrzdění.
• Vždy zabrzděte včas a neriskujte střet s osobami, zvířaty nebo
předměty.
upevňovací výčnělky
stupátka
Upozornění - další zobrazené informace
Po spuštění scooteru delším stlačením přepínače ON/OFF můžete
krátkým stisknutím přepínače ON/OFF přepínat mezi zobrazením
dalších informací:
ODO = celkový počet kilometrů
TRIP = kilometry od zapnutí scooteru
TM = čas od zapnutí scooteru
Režimy RM a ERRO jsou určeny pro podporu Hama při provádění
servisu a není třeba jim věnovat pozornost.
7.3 Uvedení zařízení do provozu a montáž
Poznámka
Před prvním použitím nabijte výrobek naplno.
7.3.1 F-/S-/X-Cruisers
V případě variant S-Cruiser a X-Cruiser nejsou žádné další body pro
uvedení do provozu než pokyny uvedené v bodě 7.2.1.
Pro variantu F-Cruiser platí navíc následující:
Navíc jsou přiloženy dva stabilní ochranné plechy i montážní sada.
Nainstalujte ochranné plechy dle následujícího obrázku.
• Vložte ochranné plechy mezi hnací kolo a těleso vozidla.
• Dávejte pozor na to, aby ochranné plechy byly na horní straně čistě
zavěšeny do obou přírub a upevňovací výčnělky se nacházely kompletně
v otvorech na spodní straně vozidla.
• Dbejte na to, aby byly upevňovací šrouby našroubovány rovně!
7.3.2 U-Scooter
• Při vybalování zvedejte scooter z balení za sloupek řízení.
• Smontujte scooter dle následujícího obrázku.
• Jak je zobrazeno na následujících obrázcích, je možné nastavit výšku
řídícího sloupku do tří poloh.
Poznámka
• Dávejte pozor na to, aby všechny pojistky bezpečně zapadly.
82
Page 83
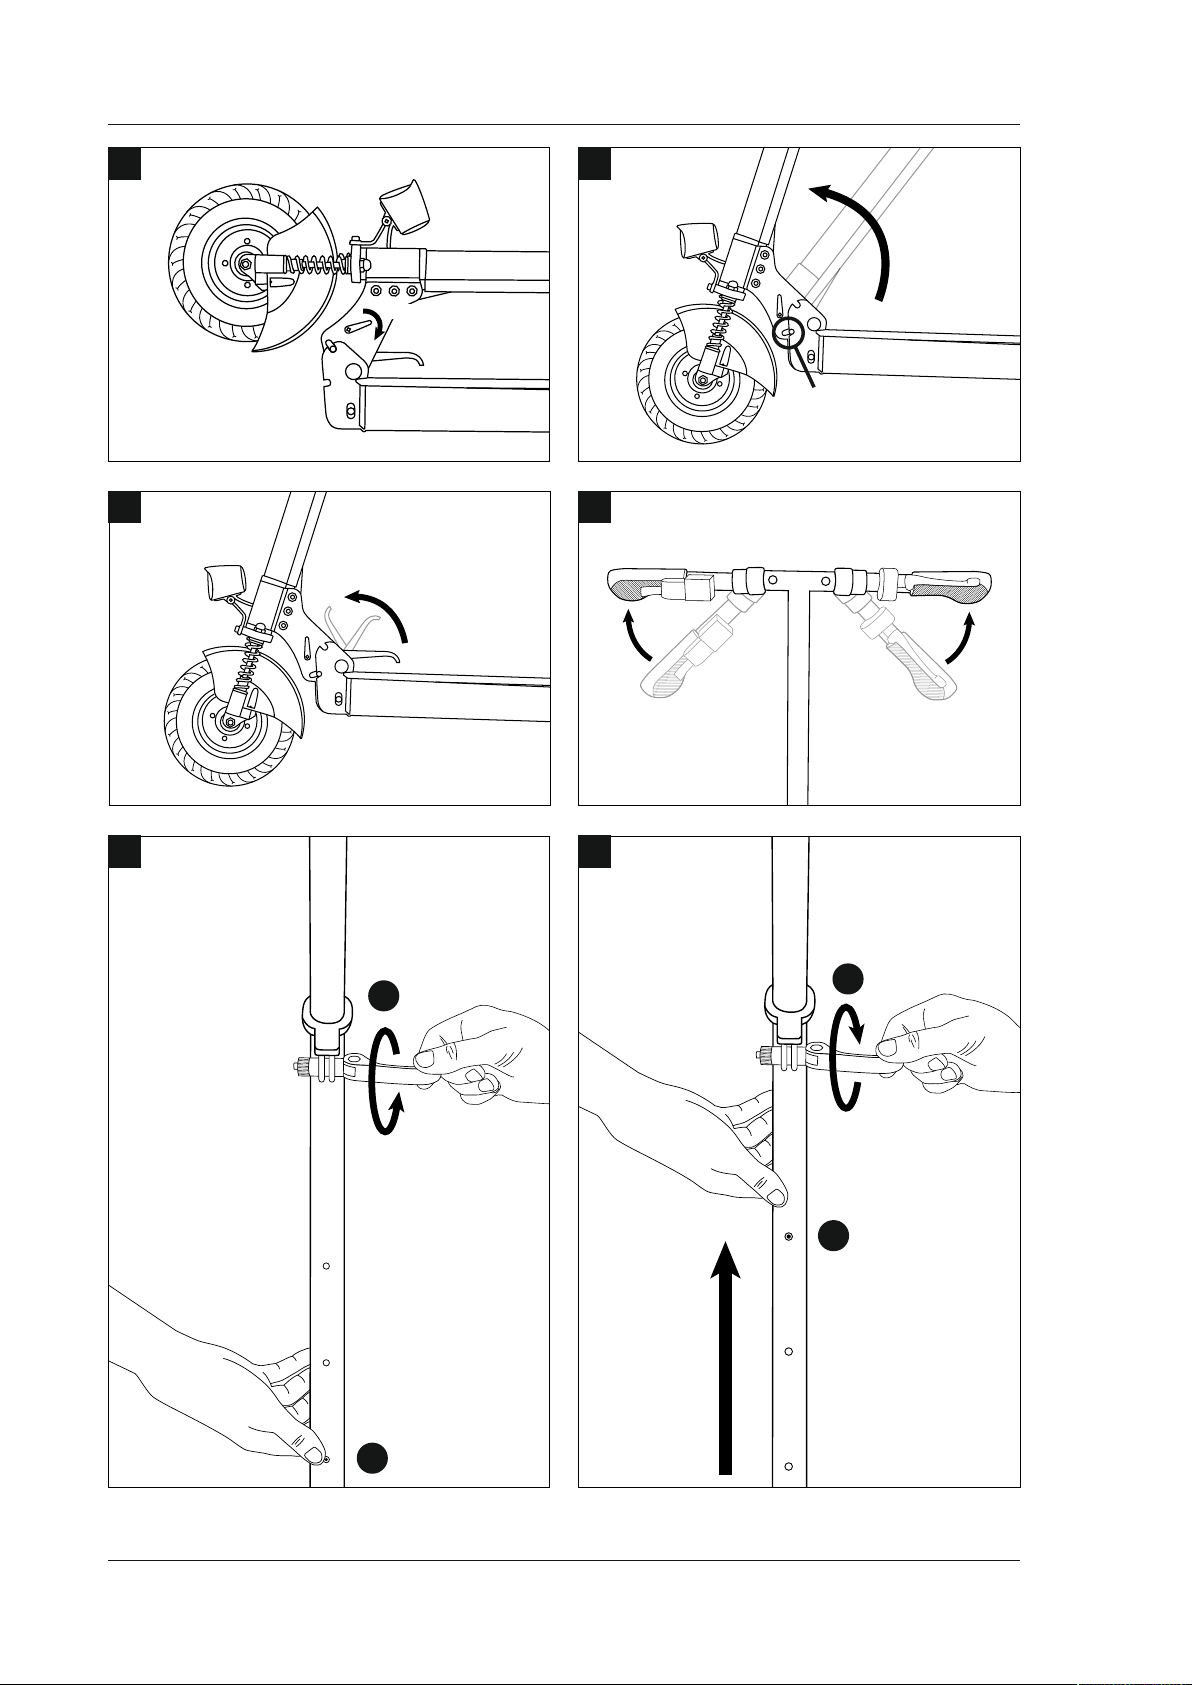
A
PUSH
B
CLICK
C
E
OPEN
1
D
CLICK CLICK
F
CLOSE
4
CLICK
3
PUSH
2
83
Page 84

7.4 Zobrazení stavu nabití
7.4.1 S- / X-Cruiser
Vybíjení
Stav nabití
100 % - 10 %Zelená Zelená
9 % - 5 %Zelená Zelená/blikající
4 % - 0 %
(bezpečnostní režim)
Na stupátkách není
žádný jezdec.
Nabíjení
Stav nabití
0 - 4 %OFF Červená
5 % - 9 %OFF Červená/blikající
10 % - 99 % OFF Zelená/blikající
100 %OFF Zelená
7.4.2 F-Cruiser
Vybíjení
100% – 67%
Nepřerušovaně svítí tři
LED diody.
Nabíjení
0% – 33%
Jedna LED
dioda bliká.
66–34% 33–11% 10–5% 4–0%
Nepřerušovaně svítí
dvě LED
diody.
Dvě LED diody
blikají.
Stavová LED
dioda
Červená Červená
Blikající čelní LED diody, tón alarmu,
brzdění
OFF podle
Stavová LED
dioda
Nepřerušovaně svítí
jedna LED
dioda.
34 – 66% 67 – 99% 100%
Jedna LED
dioda bliká.
Tři LED diody
blikají.
LED dioda
baterie
stavu nabití
LED dioda
baterie
Bezpečnostní
režim viz
bod 7.2.1.
Tři LED diody
nepřerušovaně
svítí.
Upozornění - výkyvy stavu nabití.
• Prudká stoupání, delší, extrémní jízdní manévry a/nebo dlouhodobá
jízda na plný plyn vyžadují nadprůměrně vysoký energetický výkon
baterie.
• Pokud po takové jízdě uděláte přestávku a/nebo krátce vypnete
zařízení, může dojít k tomu, že se stav nabíjení po této přestávce
opět lehce zvýší.
• Toto chování je běžné, protože baterie se během krátké přestávky
mírně regeneruje.
8. Baterie
Poznámka
Při normálním používání a přiměřené péči by měla baterie vydržet
přibližně 1500 nabíjecích cyklů. Opotřebovanou baterii poznáte podle
toho, že je třeba ji stále častěji dobíjet a že se snižuje dojezdová
vzdálenost.
8.1 Bezpečnost při zacházení s bateriemi
Upozornění
• Pro zaručení bezpečnosti a pro maximální prodloužení životnosti
a výkonu baterií je bezpodmínečně nutné dodržet pokyny v tomto
návodu.
• Baterii je zakázáno dále používat v následujících případech:
- když je poškozený kryt
- když baterie neobvykle zapáchá nebo je nadměrně horká
- když z nich vytékají substance
• Zabraňte styku s vytékajícími substancemi.
• Kontakt s napětím v baterii může zapříčinit smrt nebo vážná zranění.
• Je-li zapojený přívodní elektrický kabel, jsou práce na produktu
nebezpečné. Elektrický proud může způsobit vážná zranění osob
nebo věcné škody.
• Baterii je zakázáno vytahovat ze zařízení nebo otevírat. Otevřením
dojde k poškození krytu a jedovaté substance se mohou uvolnit.
• Nikdy do baterie nestrkejte žádné předměty ani se nepokoušejte
kryt baterie rozbít. Vložením cizích předmětů do zdířek nebo otvorů
můžete způsobit elektrický výboj, zranění nebo popáleniny nebo
požár.
• Baterie je povoleno nabíjet pouze výrobcem schválenými
nabíječkami.
• Scooter ani nabíječku nevystavujte v žádném případě vysokým
teplotám ani vlhkosti a nikdy nepoužívejte poškozenou nabíječku.
• Abyste zabránili poškození, kontrolujte pravidelně nabíječku, a to
zejména kabel a zástrčku. Poškozenou nabíječku je zakázáno dále
používat. V takovém případě kontaktujte zákaznický servis Hama.
• Při likvidaci a přepravě scooteru dodržujte všechny platné zákony a
předpisy.
7.4.3 U-Scooter
Stav nabití se zobrazuje na displeji pomocí symbolu baterie s celkem až 6
proužky (baterie plná), viz obrázek 8.
Poznámka
Nabijte scooter, jakmile je stav nabití zobrazen pouze jedním
proužkem! V opačném případě dojde k poškození baterie.
84
Page 85
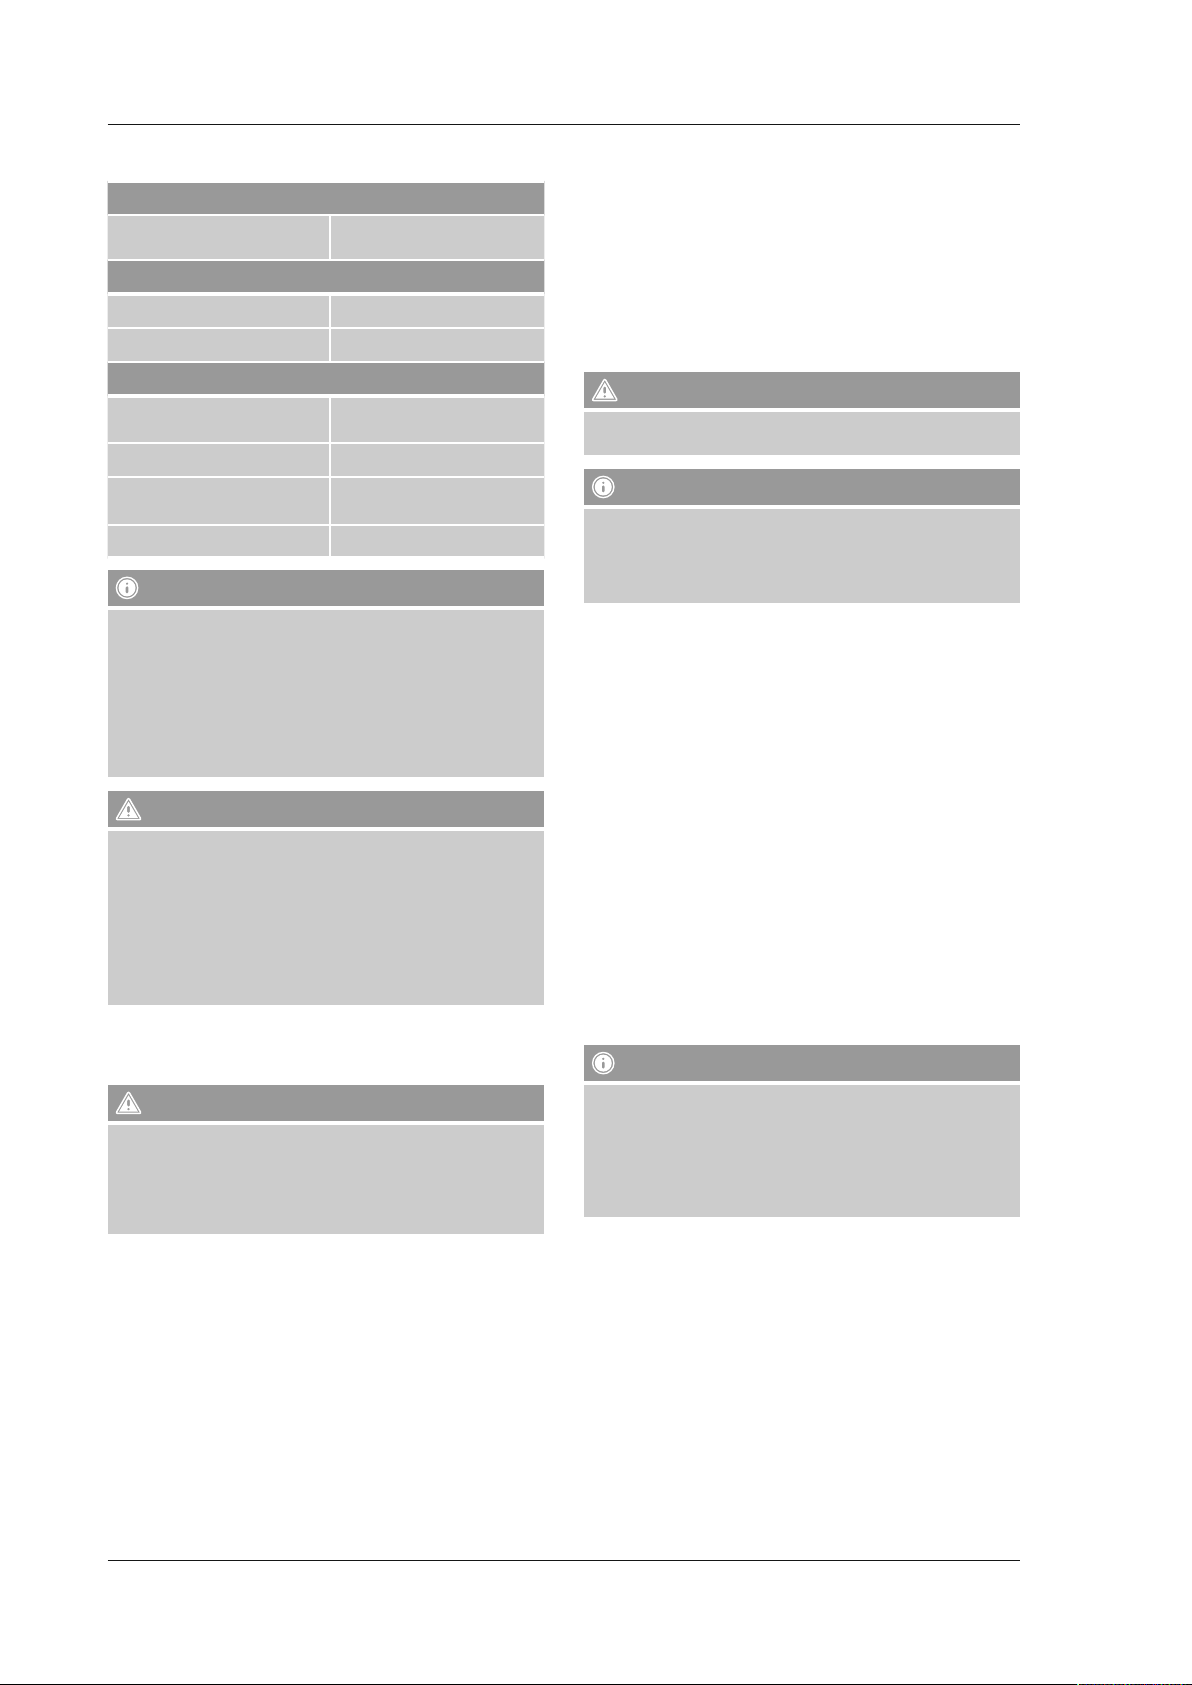
8.2 Technické údaje baterie (Tabulka 3)
Doba nabíjení
Dobíjení při úplném vybití Cca 1,5 hodiny F- / S- / X-Cruiser
Cca 3 hodiny U-Scooter
Teplotní rozsahy
Provoz -10 °C až 40 °C
Nabíjení, skladování a transport 10 °C až 25 °C
Obecné údaje
Kapacita (Ah) a napětí 36V, 2.5 Ah (F-/ S-/X-Cruiser)
5,8 Ah (U-Scooter)
Rozměry 13,5 cm x 6 cm x 9 cm
Hmotnost 0,50 kg (F- / S- / X-Cruiser)
0,97 kg (U-Scooter)
Technologie Lithium-iontová
Poznámka
• Pokud baterii používáte, nabíjíte nebo skladujete mimo uvedené
teplotní rozsahy, můžete ztratit nárok na záruku a případně počítat
s menší dojezdovou vzdáleností a se sníženým výkonem nabíjení
baterie.
• Před prvním použitím je nutné výrobek kompletně nabít. Navíc
výrobek nabíjejte alespoň jednou měsíčně.
• Baterii lze nabíjet pouze v rámci uvedeného teplotního rozsahu pro
nabíjení.
Upozornění
• Pokud baterii nebudete pravidelně nabíjet, může se časem vybít a
trvale poškodit.
• Doba nabíjení závisí na následujících faktorech:
- aktuální stav nabití – čím nižší je stav nabití, tím déle nabíjení
trvá,
- Teplota baterie – příliš horká nebo příliš studená baterie potřebuje
déle, nebo se případně vůbec nenabije; nejefektivnější je nabíjení
při teplotách uprostřed uvedeného teplotního rozsahu.
8.3 Nabíjení přístrojů
Produkt nabíjejte pouze na čistém, suchém místě s teplotou v rámci
uvedeného teplotního rozsahu pro nabíjení.
Pozor
• Zástrčku v žádném případě nestrkejte do elektrické zásuvky, pokud
je nabíjecí zdířka, napájecí kabel nebo zásuvka mokrá. Elektrická
instalace není dostatečně chráněna proti vlhkosti!
• Baterii nenabíjejte neomezeně, může ji to poškodit i navzdory
ochraně proti přebíjení.
• Výrobek provozujte pouze připojený ke schválené zásuvce. Zásuvka se
musí nacházet v blízkosti výrobku a být snadno přístupná.
• Připojte dodaný napájecí zdroj do elektrické zásuvky a do nabíjecí
zdířky, aby se baterie nabila. Produkt se při připojení aktivuje sám.
Nabíjení se spustí automaticky.
• Během nabíjení svítí stavová LED dioda na napájecím zdroji. Jakmile je
baterie nabitá, svítí stavová LED dioda na napájecím zdroji zeleně.
Závady nabíjení
Pokud při probíhajícím nabíjení dojde k závadě, nabíjení se přeruší.
Stavová LED dioda na napájecím zdroji přitom zcela zhasne. Pokud
zhasne i indikace stavu nabití na produktu, postupujte následujícím
způsobem:
• Zjistěte, zda není vypnutý proud a zda je kabel pevně zastrčený do
zásuvky.
• Pokud indikace stavu nabití nesvítí při normálním přívodu proudu,
vytáhněte napájecí kabel a znovu spusťte nabíjení.
• Pokud problém nelze touto cestou odstranit, obraťte se prosím na naši
podporu.
Upozornění
Produkt nesmí jezdit až do úplného vybití baterií. Aktivujte nabíjení,
jakmile se indikace stavu nabití rozsvítí červeně.
Poznámka
Protože proces nabíjení může být ovlivněn vlivy jako je teplota nabíjení,
vlastnosti nabíjení a nabíjecí napětí, může v ojedinělých situacích dojít
k tomu, že se baterie nabije pouze na 99 %, díky čemuž se nezobrazí
informace o kompletním nabití. Nejedná se o závadu a je to normální.
8.4 Vliv teploty na výkon
Baterie bývá obvykle výrazně teplejší, než okolní teplota. Toto zahřátí je
důsledkem vydané (při jízdě) nebo přijaté elektrické energie (při nabíjení).
Jízda při horkém a chladném počasí
• Baterie pracuje nejefektivněji, když jezdíte při teplotách přibližně
uprostřed doporučeného provozního teplotního rozsahu.
• Při studené baterii je dojezdová vzdálenost většinou nižší, než u baterie,
jejíž teplota se blíží pokojové teplotě.
Nabíjení v horku a chladu
• Teplota baterie musí být před i během nabíjení v rámci doporučeného
rozsahu teplot pro nabíjení. (viz tabulku 3, Teplotní rozsahy)
• Baterie se nejlépe nabíjí, když je teplota přibližně ve středu
doporučeného teplotního rozsahu pro nabíjení. Příliš horké nebo příliš
studené baterie potřebují případně delší dobu nabíjení, nebo se možná
nenabijí vůbec.
Vybitá baterie
• Skoro prázdná baterie se v případě variant F-Cruiser, S-Cruiser
a X-Cruiser ohlásí bezpečnostním režimem. V takovém případě
kontrolovaně zastavte a sestupte.
Poznámka
• Může se stát, že staré, studené, přetížené nebo špatně udržované
baterie budou mít vysoký odpor.
• To může zase vést k tomu, že se zobrazí téměř vybitá baterie, ačkoliv
byla před nedávnem dobitá.
• V takovém případě je baterie opotřebovaná a je třeba ji nechat
vyměnit společností Hama.
85
Page 86

8.5 Výměna baterie
Poznámka
• V žádném případě baterie nevyměňujte sami!
• Budete-li baterii vyměňovat sami, zanikne nárok na záruku a
musíte počítat s menší dojezdovou vzdáleností a sníženým výkonem
nabíjení baterie.
• V případě poškození zařízení neuvádějte do provozu.
8.6 Zaslání baterií Li-Ion
Pozor
Při přepr
avě baterie dodržujte platné zákony a předpisy
.
Pozor
Stupátka a pneumatiky nečistěte pomocí speciálních čisticích
prostředků. Takové prostředky mohou negativně ovlivnit trakci a
stabilitu.
9.4 Lagern des Produkts
• Produkt skladujte v budově na suchém místě. Nesmí přijít do styku s
vlhkostí, vysokou vlhkostí vzduchu a extrémními teplotami.
• Skladujte produkt pouze při doporučených nabíjecích a skladovacích
teplotách (viz tabulku 3), tím zajistíte plnou výkonnost baterií.
10. Hledání a odstranění závad (F- / S- /X-Cruiser)
Upozornění
9. Údržba
Upozornění
• Produkt je zakázáno jakkoliv upravovat.
• Než provedete nějakou z následujících činností, ubezpečte se, že je
produkt vypnutý a napájecí kabel vytažený ze zásuvky.
• Tyto činnosti jsou nebezpečné, je-li produkt zapnutý nebo nabíjí-li
se.
9.1 Kontrola kol/sestavy kol
• Ujistěte se, že se kolo nevychyluje z osy. Chytněte kolo do ruky a zkuste
s ním zahýbat do stran. Nesmí se bočně vychylovat.
• Pokud se kolo vychyluje z osy, obraťte se prosím na naši podporu.
9.2 Kontrola tlaku v pneumatikách
• U modelů s pneumatikami s duší pravidelně kontrolujte tlak v
pneumatikách. Nesprávný tlak v pneumatikách negativně ovlivňuje
dojezdovou vzdálenost.
• Pokud v jedné nebo v obou pneumatikách nedopovídá tlak specikacím
v Technických údajích pro váš model, dopumpujte je podle
předepsaných hodnot.
• Dbejte na to, aby byl v obou pneumatikách stejný tlak a aby byly bez
nečistot a usazenin.
Upozornění
• Směrodatný je tlak uvedený v návodu k obsluze, nikoliv tlak uvedený
přímo na pneumatikách.
• Při vyšším tlaku v pneumatikách slábne odpružení a trakce a roste
riziko ztráty kontroly a pádu.
• Při nižším tlaku v pneumatikách se zkracuje dojezdová vzdálenost a
může dojít k poškození pneumatik/sestavy kol.
• Nerovnoměrný tlak v pneumatikách vede k tomu, že produkt za jízdy
táhne ve směru pneumatiky s nižším tlakem.
9.3 Čištění produktu
Produkt čistěte opatrně navlhčeným hadříkem. Při čištění se do produktu
nesmí dostat žádná vlhkost!
Upozornění
• Nepoužívejte zbytečně vodu.
• Produkt je zakázáno ponořovat do kapalin, může ho to trvale
poškodit.
• Produkt nesmíte vystavovat vydatnému dešti ani déle trvajícím
přeháňkám (to se týká jízdy, skladování i přepravy).
• Produkt je zakázáno čistit vysokotlakým čističem nebo hadicí.
Použitím takových zařízení může voda vniknout do konstrukčních
celků, kterým může uškodit.
• Do nabíjecí zdířky se v žádném případě nesmí voda dostat.
• Vždy produkt nejdříve vypněte a vytáhněte napájecí kabel, než
začnete provádět údržbu.
• Zařízení je zakázáno otevírat.
• Uvnitř nich nejsou součástky, které byste měli sami udržovat.
• Otevřením krytu ztrácíte nárok na záruku.
10.1 Výměna konstrukčních a náhradních dílů
Bude-li třeba vyměnit poškozený nebo opotřebený díl, obraťte se na naši
podporu.
10.2 Odstranění závad
Postup odstranění závad
Určité problémy na vašem zařízení můžete odstranit sami.
Upozornění
Vždy produkt nejdříve vypněte a vytáhněte napájecí kabel, než začnete
provádět údržbu nebo připevňovat díly nebo příslušenství.
Zařízení při jízdě táhne jedním směrem
Než se pokusíte tento problém odstranit, přečtěte si prosím
bezpodmínečně následující postup údržby.
Doporučená opatření:
• Zkontrolujte, zda je tlak v obou pneumatikách stejný a zda tento
tlak odpovídá doporučeným hodnotám (viz Tlak v pneumatikách,
tabulka 1/2).
• Pokud nejsou jedna nebo obě pneumatiky napumpovány podle
předepsaných hodnot, napumpujte pneumatiku/pneumatiky na správné
hodnoty a zajistěte, aby byl tlak v obou pneumatikách stejný.
• Svou váhu rozložte rovnoměrně na obě nohy. Pokud jednu nohu
zatěžujete více, jede Cruiser tímto směrem.
Jedna pneumatika je prasklá nebo z ní uniká vzduch
Než se pokusíte tento problém odstranit, přečtěte si prosím
bezpodmínečně následující postup údržby.
Doporučená opatření:
• Zkontrolujte, zda nejsou pneumatiky poškozené. Pokud zjistíte
poškození, obraťte se na naši podporu.
• Napumpujte pneumatiky (viz Tlak v pneumatikách, tabulka 1/2)
a zkontrolujte jejich těsnost. Pokud pneumatika ihned splaskne nebo
pokud někde uniká vzduch, obraťte se na naši podporu.
Upozornění
Nastoupit na zařízení můžete pouze, když jsou všechny závady
odstraněny.
Poznámka
Prosím použijte výhradně originální příslušenství, resp. náhradní díly
značky Hama. Informace o získání těchto produktů Vám ochotně sdělí
naše zákaznická služba.
86
Page 87
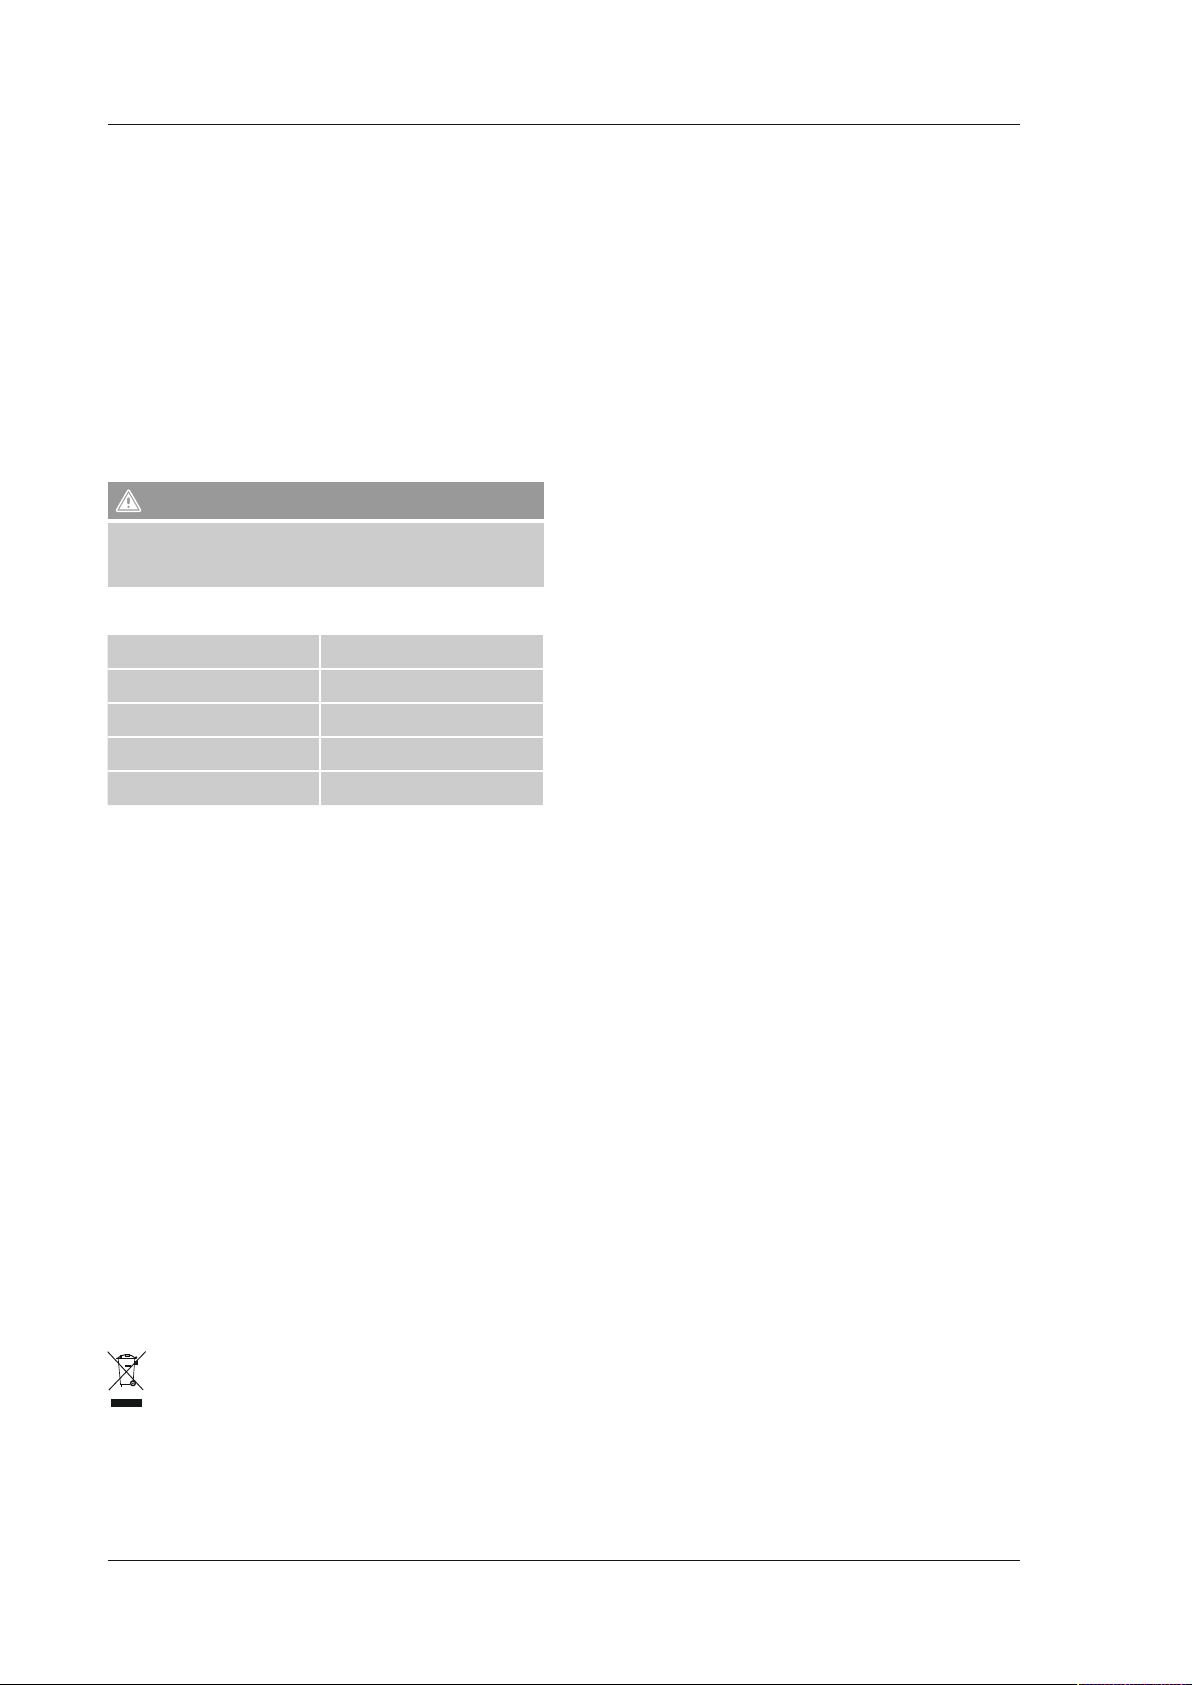
11. Nabíječka
11.1 Bezpečnostní pokyny
• Zkontrolujte prosím před každým uvedením do provozu bezvadný stav
nabíječky a přívodních vedení. Pokud jsou na něm viditelná poškození,
v žádném případě nabíječku nepoužívejte.
• Nabíječka není určena pro provoz ve vlhkém prostředí.
• Nabíječku je možné používat výlučně pro váš Cruiser.
• Během provozu zajistěte dostatečné větrání.
• Nabíječku během provozu nezakrývejte.
• Dojde-li ke styku s kapalinami, vzniká riziko úrazu elektrickým proudem,
zařízení ihned odpojte ze sítě. Aby nedošlo ke vzniku škod, je zakázáno
dále nabíječku používat.
• Nabíječka neobsahuje žádné součástky, které by vyžadovaly údržbu ze
strany uživatele. Kryt je zakázáno otevírat.
• Pokud nabíječku nepoužíváte, odpojte síťový kabel.
Upozornění
Pokud zvolíte provozní napětí vyšší než uvádí výrobce zařízení, může
to způsobit závažná poškození produktu i nabíječky. Používejte proto
pouze originální příslušenství od společnosti Hama.
11.2 Technické údaje
Rozmezí vstupního napětí 100-240V ~ 50 / 60 Hz
Stálý výkon maximálně 90 W
Výstupní proud 2A
Výstupní napětí 42 V DC
Provozní teplota 10°~25°C
11.3 Čištění
Používejte měkký, suchý hadřík. Doporučujeme použití neškrábavé
mikrovláknové utěrky. Nepoužívejte ředidla ani kapaliny.
12. Dodatek
12.1 Kontaktní osoby a právní informace
Vždy se řiďte platnými zákony a předpisy
V mnoha zemích je jízda na takovýchto zařízeních na veřejných
komunikacích a chodnících regulována zákonem. Kromě jiných nároků
předepisují zákony a předpisy většinou také minimální věk řidiče a
rychlostní omezení. I nošení odpovídajícího ochranného oděvu může být
předepsané. V některých zemích nesmí takováto zařízení vůbec jezdit po
veřejných komunikacích a chodnících. Obraťte se prosím na příslušné
úřady a seznamte se s platnými zákony a předpisy.
12.2 Vyloučení záruky
Hama GmbH & Co. KG nepřebírá žádnou odpovědnost nebo záruku za
škody vzniklé neodbornou instalací, montáží nebo neodborným použitím
výrobku nebo nedodržováním návodu k použití a/nebo bezpečnostních
pokynů.
12.3 Servis a podpora
Máte otázky k produktu ? Obraťte na na poradenské oddělení Hama.
Horká linka: +49 9091 502-115 (německy/anglicky)
Další podpůrné informace naleznete na adrese: www.hama.com
Pokyny k likvidaci
12.4
Ochrana životního prostředí:
Evropská směrnice 2012/19/EU a 2006/66/EU ustanovujete
následující: Elektrická a elektronická zařízení stejně jako baterie
nepatří do domovního odpadu. Spotřebitel se zavazuje odevzdat
všechna zařízení a baterie po uplynutí jejich životnosti do
příslušných sběren. Podrobnosti stanoví zákon příšlušné země. Symbol na
produktu, návod k obsluze nebo balení na toto poukazuje. Recyklací a
jinými způsoby zužitkování přispíváte k ochraně životního prostředí.
87
Page 88

12.5 Prohlášení o shodě
00109864 F-Cruiser
88
Page 89
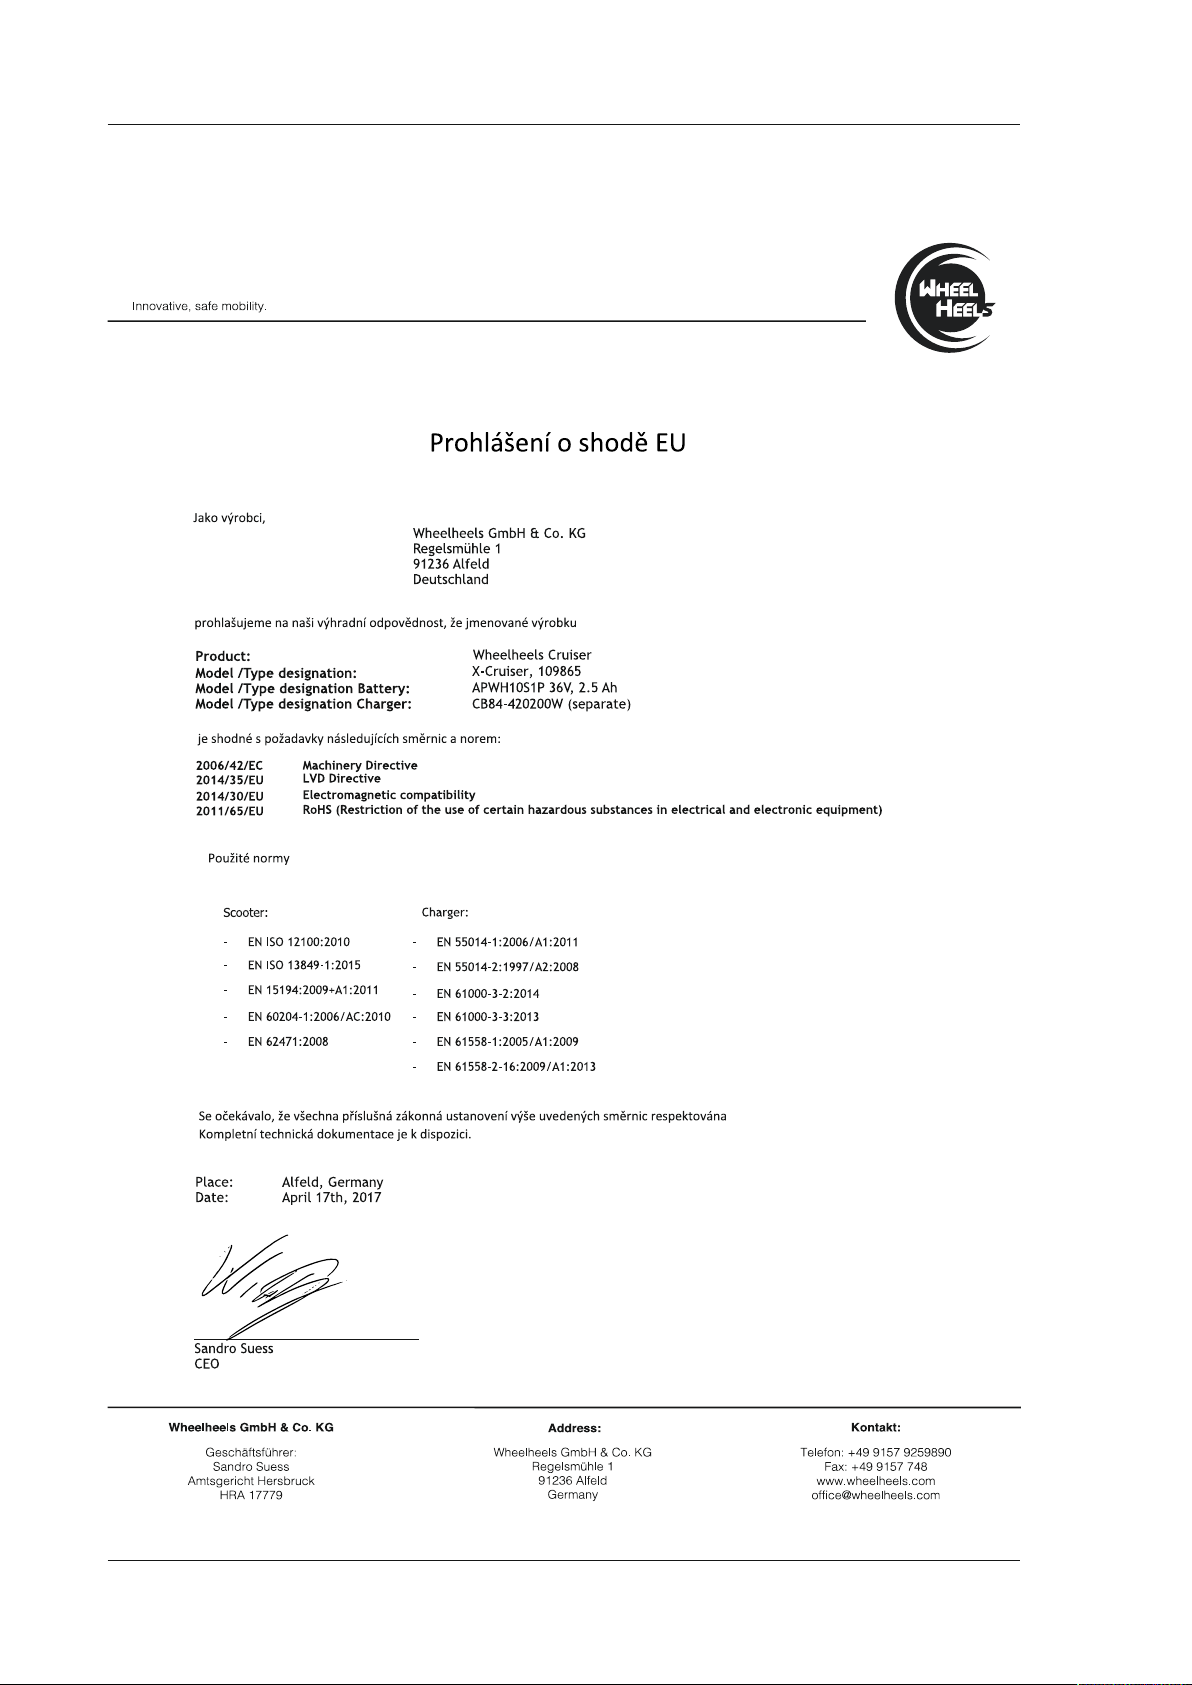
00109865 X-Cruiser
89
Page 90
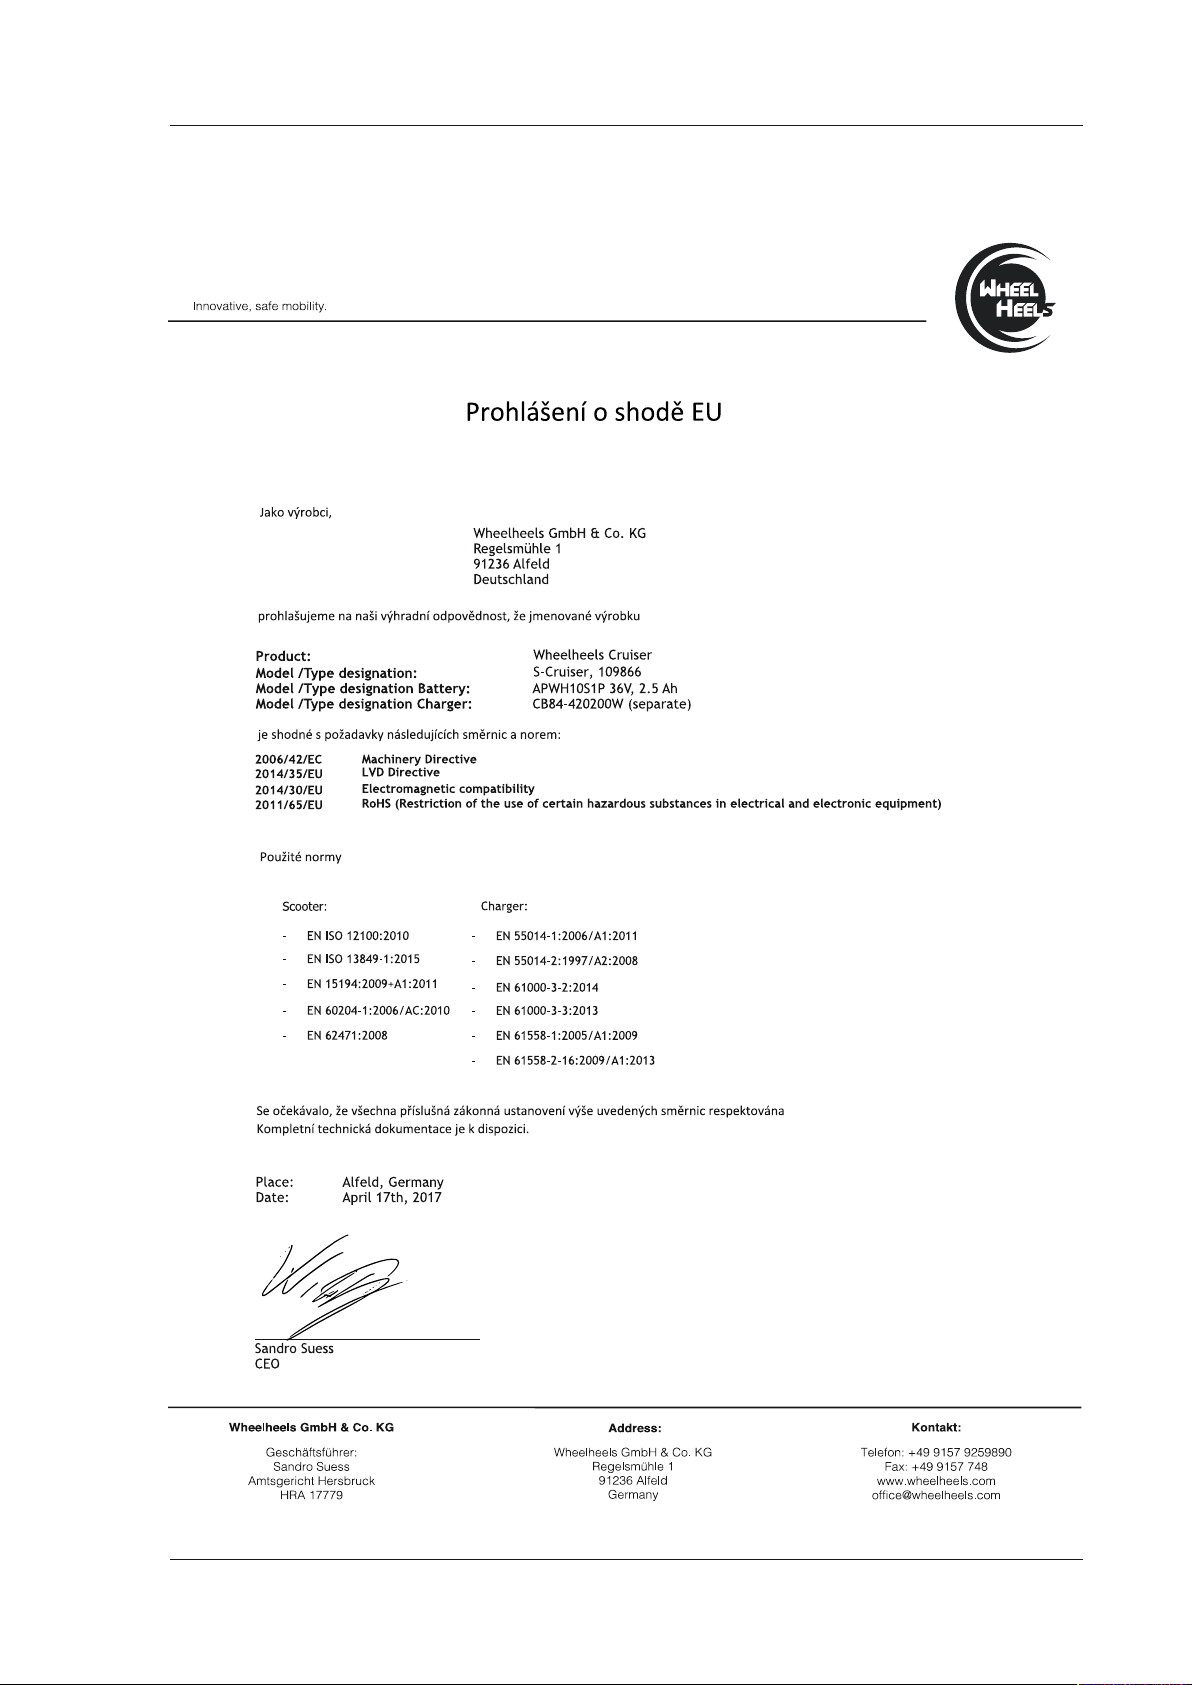
00109866 S-Cruiser
90
Page 91
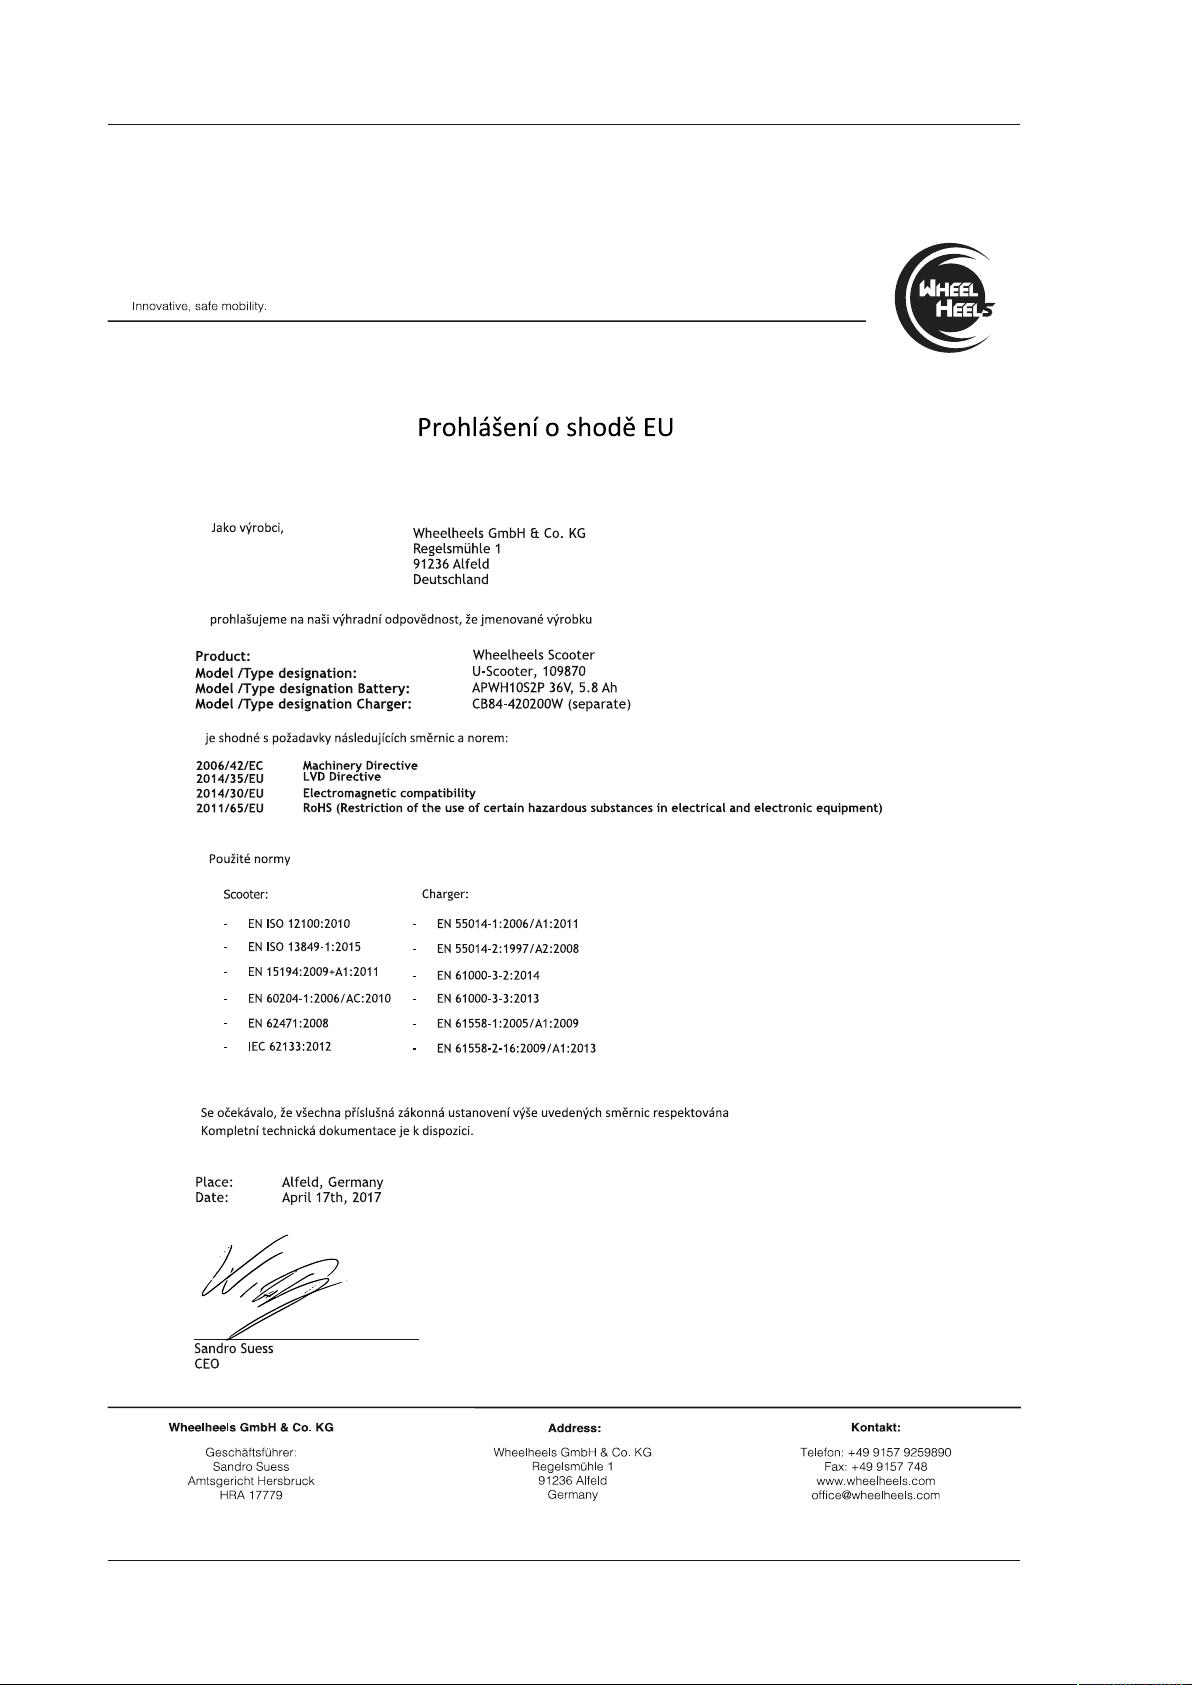
00109870 U-Scooter
91
Page 92
S Bruksanvisning
Innehåll
1. Förklaring av varningssymboler och hänvisningar ..92
Förpackningsinnehåll .........................92
2.
Packa upp ..........................................92
2.1
2.2
Notera serienumret ...................................92
2.3
Tillbehör............................................93
Säkerhetsanvisningar .........................93
3.
Användningsområden och effektgränser .........93
4.
Användningsområden .................................93
4.1
4.2
Effektgräns .........................................93
Beskrivning av de olika modellerna ..............94
5.
5.1
S-/X-Cruiser.........................................94
5.2
F-Cruiser/U-Scooter...................................95
Appen......................................96
6.
Användning .................................96
7.
Manöverelement och indikationer........................96
7.1
7.1.1 S-
/X-Cruiser ...................................96
7.1.2 F-Cruiser
7.1.3 U-Scooter
7.2
Funktionsprincip .....................................98
7.2.1 F-
7.2.2 U-Scooter
7.3
Idrifttagning och montering av produkten.................100
7.3.1 F-
7.3.2 U-Scooter
7.4
Laddningsindikering .................................102
7.4.1 S-
7.4.2 F-Cruiser
7.4.3 U-Scooter
Uppladdningsbart batteri .....................102
8.
8.1
Säkerhet vid hantering av det uppladdningsbara batteriet ....102
8.2
Tekniska data, laddningsbart batteri (Tabell 3) .............103
8.3
Ladda produkten ....................................103
8.4
Hur temperaturen påverkar batteriernas prestanda..........103
8.5
Byte av batteri ......................................104
8.6
Försändelse av Li-jon-batterier..........................104
Service ....................................104
9.
Kontroll av däcken och hjulen ..........................104
9.1
9.2
Kontroll av däcktrycket (X-Cruiser / U-Scooter) .............104
9.3
Rengöring .........................................104
9.4
Förvaring ..........................................104
Felsökning och felåtgärdning (F- / S- / X-Cruiser) ..104
10.
Byta ut komponenter och reservdelar ...................104
10.1
10.2
Felåtgärdning .....................................104
Laddare ..................................105
11.
11.1
Säkerhetsanvisningar................................105
11.2
Tekniska data .....................................105
Rengöring ........................................105
11.3
Bilaga....................................105
12.
Kontaktpersoner och rättslig information ................105
12.1
Garantifriskrivning..................................105
12.2
Service och support .................................105
12.3
Kasseringshänvisningar ..............................105
12.4
Försäkran om överensstämmelse.......................106
12.5
......................................97
.....................................97
/S-/X-Cruiser.................................98
7.2.1.1 Energiåtervinning (rekuperation)
7.2.1.2 Belysning (F-Cruiser)
7.2.1.3 USB-laddningsport (F-Cruiser)
......................................99
/S-/X-Cruisers ...............................100
.....................................100
/X-Cruiser...................................102
......................................102
.....................................102
.......................99
..............99
................99
Tack för att du valt att köpa en Hama produkt.
Ta dig tid och läs först igenom de följande anvisningarna och
hänvisningarna helt och hållet. Förvara sedan den här bruksanvisningen
på en säker plats för att kunna titta i den när det behövs. Om du gör dig
av med apparaten ska du lämna bruksanvisningen till den nya ägaren.
1. Förklaring av varningssymboler och hänvisningar
Varning
Varnar för handlingar som kan orsaka skador för dig.
Varning
Varnar för handlingar som kan orsaka försämrad drift och skador på
produkten.
Hänvisning
Visar viktiga punkter, hjälpsamma råd, speciella fall och alternativa
metoder.
2. Förpackningsinnehåll
F-Cruiser
• Hama Cruiser
• Laddare
• 2x skyddsplåtar, inkl. monteringsset
• denna bruksanvisning
• Försäkran om överensstämmelse
S-/X-Cruiser
• Hama Cruiser
• Laddare
• denna bruksanvisning
• Försäkran om överensstämmelse
U-Scooter
• Hama Scooter
• Laddare
• denna bruksanvisning
• Försäkran om överensstämmelse
2.1 Packa upp
• Kontrollera om förpackningen är skadad och i bra skick innan du
packar upp din produkt.
• Om det nns allvarliga skador kontakta leverantören.
• KontrolleRa fullständigheten av förpackningens innehåll och om
yttersidan är oskadad.
• Vänligen kontakta leverantören om innehållet är ofullständigt.
• Håll inte i hjulskydden när du lyfter S- eller X- boarden ur förpackningen
2.2 Notera serienumret
Hänvisning
Serienumret är tydligt. Numret är viktigt vid eventuellt garantianspråk
och vid förlust eller stöld behövs det för din anmälan.
• Du hittar serienumret på namnskylten, som sitter på produkten.
Serienumret ser ut som följande:
F-Cruiser: 91XXXXXX
X-Cruiser: 92XXXXXX
S-Cruiser: 93XXXXXX
U-Scooter: 94XXXXXX
• Notera serienumret. Bevara dessa informationer på ett säkert ställe
separat från produkten.
92
Page 93

2.3 Tillbehör
Hinweis
Hama-tillbehöret 109888 Hovercart kan användas med all den
utrustning som beskrivs i bruksanvisningen.
3. Säkerhetsanvisningar
För att kunna åka med produkten säkert måste du göra dig bekant
med användningen genom att läsa alla anvisningar och varningar i
bruksanvisningen.
Alla varningar och säkerhetsåtgärder i användarhandboken måste läsas
och följas noga.
Varning – LIVSHOTANDE SKADERISK OCH FARA FÖR LIV
OCH LEM!
• Produkten är inte godkänd som fordon för trak på offentliga vägar!
• Användning av produkten kan orsaka svåra och livshotande
skador om du tappar kontrollen, ramlar eller kolliderar. För
att minimera risken för skador är det särskilt viktigt att du läser,
förstår och följer alla instruktioner, varningssymboler och -texter som
nns i bruksanvisningen.
Använd alltid skyddsutrustning av hög kvalitet (hjälm,
•
armbåge- och knäskydd) när du använder produkten men
även fasta skor och handskar!
• Håll tillräckligt mycket avstånd från andra personer eller djur, särskilt
om du inte känner dig riktigt säker på produkten.
• Överskatta inte dig själv! Öka hastigheten långsamt och kolla framåt
för att förhindra fall.
• Åk ALDRIG med påverkan av droger eller alkohol!
Hänvisning
Om apparaten öppnas eller sigillet tas bort gäller inte längre garantin.
• Produkten är avsedd för privat hemanvändning, inte yrkesmässig
användning.
• Använd bara produkten till det som den är avsedd för.
• Skydda produkten mot smuts, fukt och överhettning och använd den
bara i inomhusmiljöer.
• Tappa inte produkten och utsätt den inte för kraftiga vibrationer.
• Den här apparaten är inte avsedd att användas av personer, inklusive
barn, som har nedsatt fysisk-, sensorisk- eller förståndsförmåga eller
saknar erfarenhet eller kunskap, om de inte övervakas av en person
som ansvarar för deras säkerhet eller har fått anvisningar av denne om
hur produkten ska hanteras.
• Barn får inte leka med apparaten. Rengöring får inte utföras av barn.
• Anslut bara apparaten till ett godkänt uttag. Eluttaget måste alltid vara
lätt att nå.
• Det uppladdningsbara batteriet är fast monterat och kan inte tas bort.
Kassera hela produkten enligt de lagstadgade bestämmelserna.
• Försök inte utföra service på produkten eller reparera den själv. Överlåt
alla typer av servicearbeten, med undantag av de i punkt nio beskrivna
fall till kompetent fackpersonal.
• Om apparaten öppnas eller sigillet tas bort gäller inte längre garantin.
• Öppna inte produkten och använd den inte mer om den är skadad eller
när det ryker, luktar eller om det hörs höga ljud. Kontakta omgående
inköpsstället eller vår serviceavdelning (se 12.3. Service och support).
4. Användningsområden och effektgränser
4.1 Användningsområden
Hänvisning
• Produkten är ej tillåten för användning på offentliga vägar!
Produkten är bara avsedd för användning på privata områden.
Observera alla nationella lagar, förordningar och rekommendationer
som kan tillämpas användningen av en balance scooter.
• Produkten får bara användas på avspärrade, privata områden, men
bara om det inte nns andra reglar som förbjuder användningen.
• Åldergränsen för användningen är 14 år.
• Användningen är enbart avsedd för en förare.
• Maximalvikten för föraren är upp till 120 kg.
• Använd inte produkten utöver de effektgränser som anges i den
tekniska datan.
• Använd inte produkten inom områden där elektroniska apparater inte
är tillåtna.
• Produkten är endast avsedd för användning i torr miljö. Den är
visserligen stänkvattenskyddad, men ger inte tillräckligt skydd mot
permanent vattenkontakt och kan därför skadas.
4.2 Effektgräns
Det är viktigt att du gör dig bekant med produktens gränsvärden.
Effekten har begränsats för att kunna garantera maximal säkerhet för
föraren och även mindre skaderisk för produkten.
• Över- eller underskrida, under inga omständigheter, maximal vikt som
anges i tekniska data (se 5.1/5.2 Tekniska data, tabell 1/2) för föraren
och medkörande laster (max. nyttolast) eller minimal vikt för föraren.
• Om du inte håller dig inom produktens effektgräns kan körsituationer
uppstå som inte längre kan garantera säker körning! Faktorer som
kräver högre effekt är bland annat:
- högre nyttolast (förarens vikt plus medförda laster)
- branta nedförs-/uppförslutningar
- guppig terräng
- högre hastighet än 15 km/h (endast för F-, S- och X-board)
- snabba manöver
Varning
Om du över- eller underskrider viktgränserna, särskilt i samband med
andra faktorer som behöver högre effekt, ökar risken för person- och
sakskador.
93
Page 94
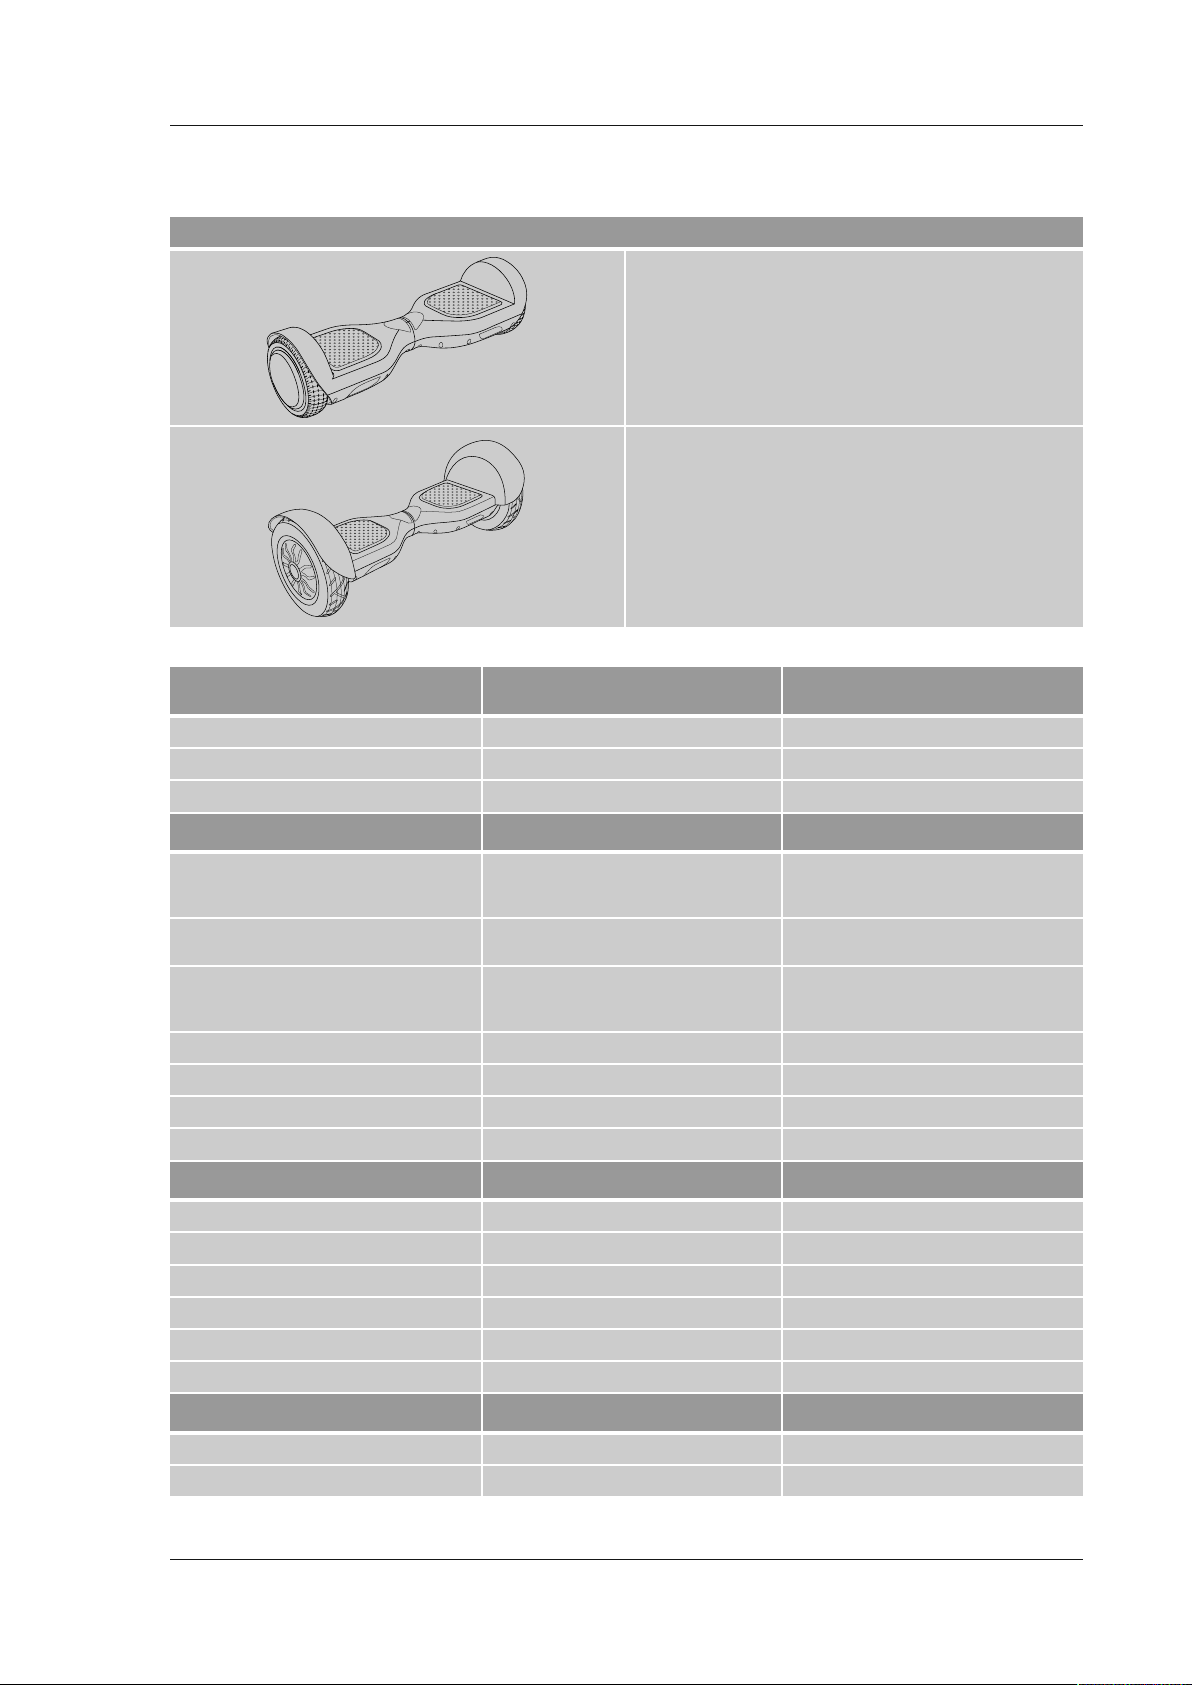
5. Beskrivning av de olika modellerna
5.1 S-/X-Cruiser
Modell Beskrivning
Bild 1
S-Cruiser
Bild 2
X-Cruiser
Tekniska data (Tabell 1)
Viktbegränsning för föraren
och medförda laster
Maximal nyttolast 120 kg 120 kg
Minimal vikt för förare25 kg 25 kg
Minimiålder för förare14 år 14 år
Effekt Slalom Cruiser Cross Cruiser
Toppfart 6 km/h (nybörjarläge)
15 km/h (avancerat läge)
30 km/h (Cart-läge)
Räckvidd ca. 15 km (beroende på föraren,
hastigheten och underlaget)
Strömförsörjning för laddning
(uteslutande med medföljande nätadaptern eller
originaltillbehör)
energi litiumjon, uppladdningsbar batteri
Motoreffekt 700 Watt 700 Watt
Däcktryck -35 psi (2,4 bar)
Bullernivå mindre än 70 dB(A) vid drift mindre än 70 dB(A) vid drift
Slalom Cruiser (se bild 1) erbjuder rolig körning både inomhus och
utomhus i olika miljöer. Denna modell får bara användas på fast och plan
yta. Modellen är inte lämplig för svår terräng som t.ex. kullerstenar.
Cross Cruiser (se bild 2) är optimerad för användning utomhus. Cross
Cruiser har större hjuldiameter, mer markfrigång och bredare däck med
dubbprol som gör att man kan åka i alla möjliga miljöer och på mycket
ojämnt underlag till skillnad till de andra modellerna. Lågtryckdäcken
skapar bättre grepp, traktion och stabilitet för Cross Cruiser på ojämnt
underlag och svår terräng.
Slalom Cruiser Cross Cruiser
6 km/h (nybörjarläge)
15 km/h (avancerat läge)
30 km/h (Cart-läge)
ca. 18 km (beroende på föraren,
hastigheten och underlaget)
42V, ≤ 5 A42V, ≤ 5 A
36V, 2,5 Ah 36V, 2,5 Ah
Mått och vikt Slalom Cruiser Cross Cruiser
Vikt utan batteri 9,1 kg 11,5 kg
Vikt av batteriet 0,97 kg 0,97 kg
Längd och bredd 58 cm x 18,5 cm 67 cm x 26 cm
Höjd 17,5 cm 26 cm
Däckdiameter 6,5 tum/ 16,5 cm 10 tum/ 25,4cm
Däcktyp Fullgummi Schlauchreifen
Temperaturområde Slalom Cruiser Cross Cruiser
Drift -10 °C till 40 °C -10 °C till 40 °C
Laddning, lagring och transport 10 °C till 25 °C 10 °C till 25 °C
94
Page 95
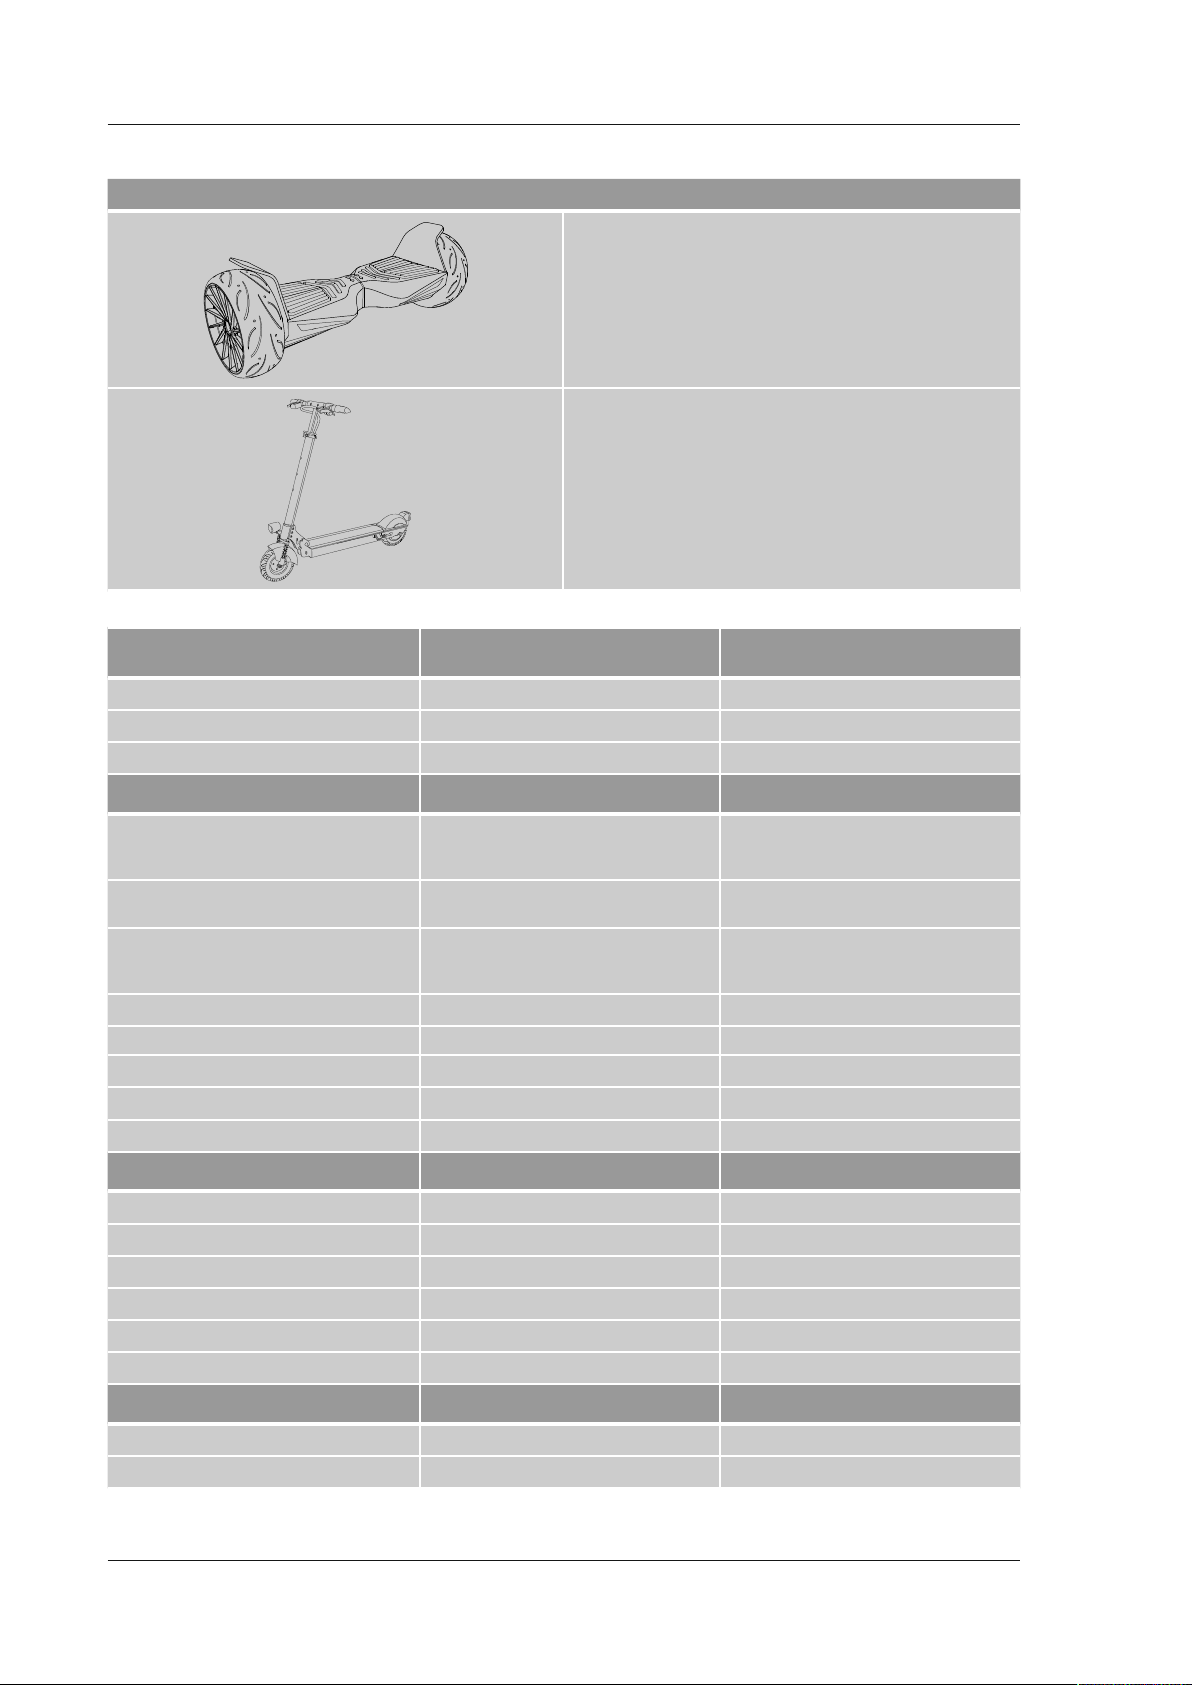
5.2 F-Cruiser/U-Scooter
Modell Beskrivning
Bild 3
F-Cruiser
Bild 4
U-Scooter
Technische Daten (Tabell 2)
Viktbegränsning för föraren
och medförda laster
Maximal nyttolast 120 kg 120 kg
Minimal vikt för förare25 kg -
Minimiålder för förare14 år 14 år
Effekt Freestyle Cruiser Urban Scooter
Toppfart 6 km/h (nybörjarläge)
Räckvidd ca. 15 km (beroende på föraren,
Strömförsörjning för laddning
(uteslutande med medföljande nätadaptern eller
originaltillbehör)
energi litiumjon, uppladdningsbar batteri
USB-utgång för extern utrustning 5V DC, 2A Motoreffekt 800 Watt 250 Watt
Däcktryck -2,5 bar framtill, inget tryck baktill
Bullernivå mindre än 70 dB(A) vid drift mindre än 70 dB(A) vid drift
Freestyle Cruiser Urban Scooter
15 km/h (avancerat läge)
30 km/h (Cart-läge)
hastigheten och underlaget)
Freestyle-boarden (se bild 3) levereras inklusive app, USB-laddningsport
och port till ett Kensington-lås och ger optimalt körnöje i olika miljöer,
både inomhus och utomhus. Denna modell bör bara användas på en fast
och plan yta. De extra breda hjulen av helgummi ger optimal dragkraft
även vid hög hastighet.
Urban-boarden (se bild 4) kan fällas upp och fällas ihop på några
sekunder med hjälp av ett par enkla handgrepp. Produkten är utrustad
med hastighetsmätare, lykta, trumbroms och luftfyllda lågtrycksdäck för
bättre stabilitet och dragkraft, vilket gör den idealisk för utomhusbruk.
Boarden kan köras i olika terränger med ojämnt underlag. Boarden är
tillverkat av pulverbelagd tryckgjuten aluminium, vilket ger stabilitet och
skyddar mot korrosion.
6 km/h (nybörjarläge)
15 km/h (avancerat läge)
25 km/h (expertläge)
ca. 15 km (beroende på föraren,
hastigheten och underlaget)
42V, ≤ 5 A42V, ≤ 5 A
36V, 2,5 Ah 36V, 5,8Ah
Mått och vikt Freestyle Cruiser Urban Scooter
Vikt utan batteri 14 kg 14 kg
Vikt av batteriet 0,50 kg 0,97 kg
Längd och bredd 66,9 cm x 24,3cm 115 cm x 15 cm
Höjd 22 cm 118 cm
Däckdiameter 8 tum / 20,4 cm 8 tum / 20,4 cm
Däcktyp Fullgummi Helgummi och innerslang
Temperaturområde Freestyle Cruiser Urban Scooter
Drift -10 °C till 40 °C -10 °C till 40 °C
Laddning, lagring och transport 10 °C till 25 °C 10 °C till 25 °C
95
Page 96
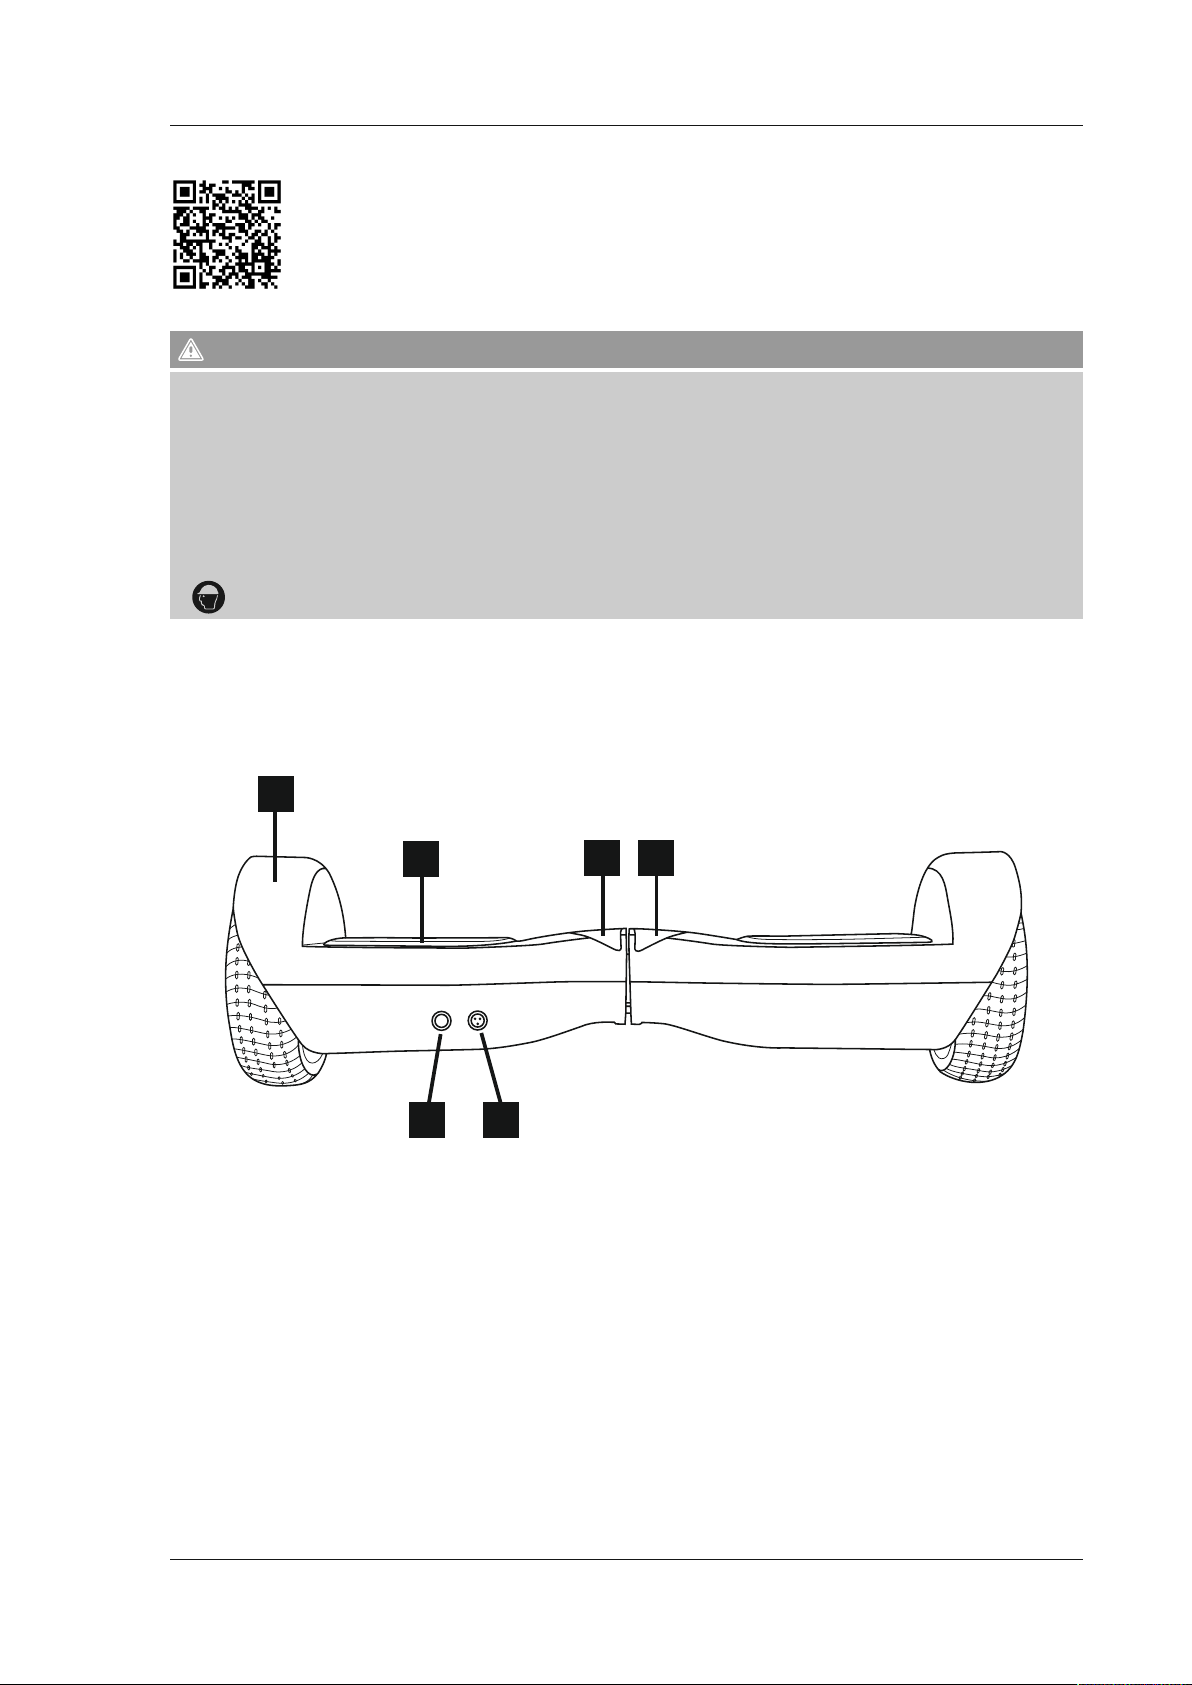
6. Appen
Detaljerade instruktioner till appen "Wheelheels" för iOS och Android hittar du här: www.wheelheels.com/#app
7. Användning
Varning
• Användning av produkten sker på egen risk!
• Kontrollera alltid om produkten är helt fungerande innan användning!
• Håll avstånd från potentiella risker eller rörliga delar med både ngrar och andra kroppsdelar, framförallt de drivande hjulen!
• Undvik att köra med hängande föremål som t.ex. nedhängande hörlurar, deras kablar eller kläder med lösa tygbitar. Det nns risk att delar av
föremålen hamnar i de drivande hjulen.
• Undvik användning vid dåligt väder (regn, snö, is, frost, snöfall och oljiga sträckor). Åk aldrig ner för trottoarer, över kanter och undvik även andra
hinder.
• Produkten är ej tillåten för användning på offentliga vägar! Produkten är bara avsedd för användning på privata områden. Tillverkaren ansvarar inte
för skador som orsakas av oavsedd eller felaktig användning av produkten.
• Använd alltid skyddsutrustning av hög kvalitet (hjälm, armbåge- och knäskydd) när du använder produkten men även fasta skor och
handskar!
7.1 Manöverelement och indikationer
7.1.1 S-/X-Cruiser
Bild 5
1
2
5 6
1. Hjulskydd
2. Ytor med trycksensorer
3. Statusindikatorer
4. Statuslysdiod för laddningsnivå
5. Strömbrytare AV/PÅ, omkopplare för driftlägen
6. Laddningsport
3 4
96
Page 97
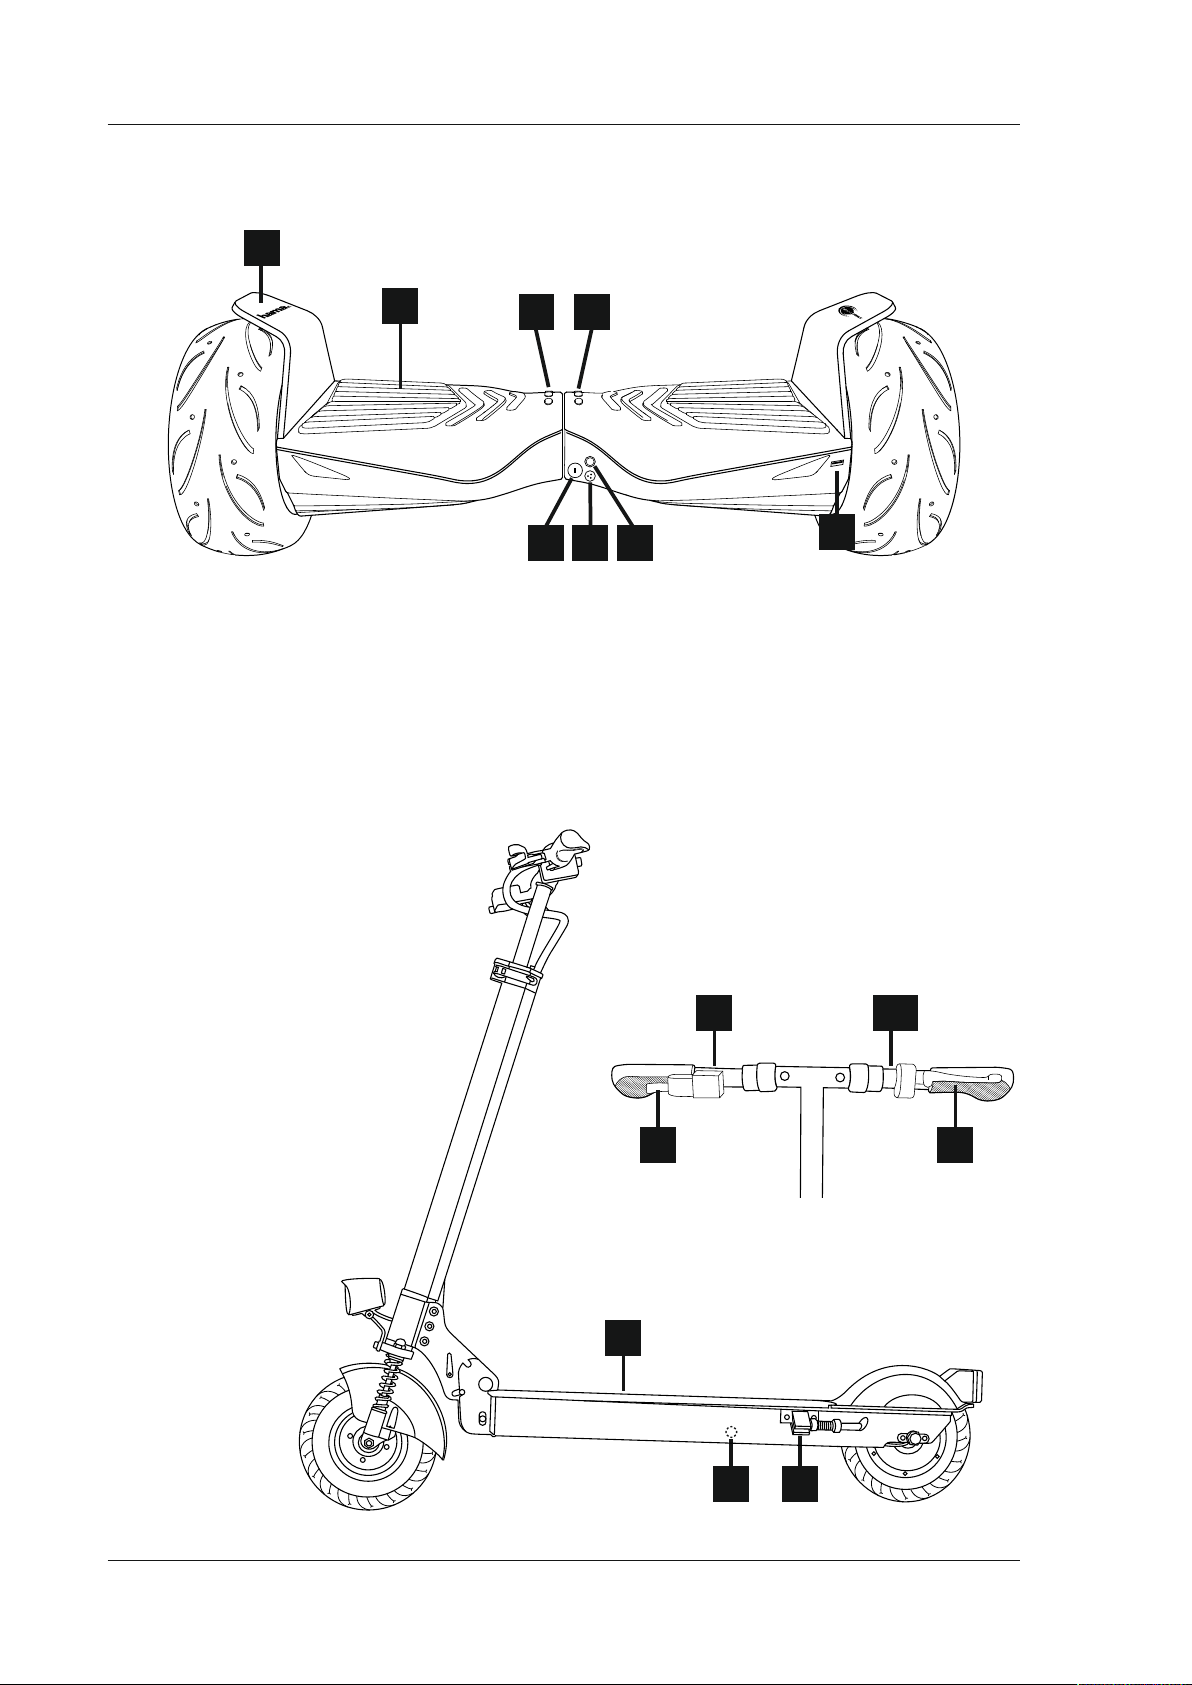
7.1.2 F-Cruiser
Bild 6
1
2
1. Skyddsplåtar
2. Ytor med trycksensorer
3. Statuslysdiod för laddningsnivå
4. Statusindikatorer
5. Strömbrytare AV/PÅ, omkopplare för driftlägen
6. Laddningsport
7. Kensington-port
8. USB-utgång
7.1.3 U-Scooter
Bild 7
3
4
6 5
7
8
1. Display
2. Gasspak
3. Tuta
4. Ljusbrytare
5. Broms
6. Fotbräda
7. Stativ
8. Laddningsport
1
2 5
6
3,4
78
97
Page 98
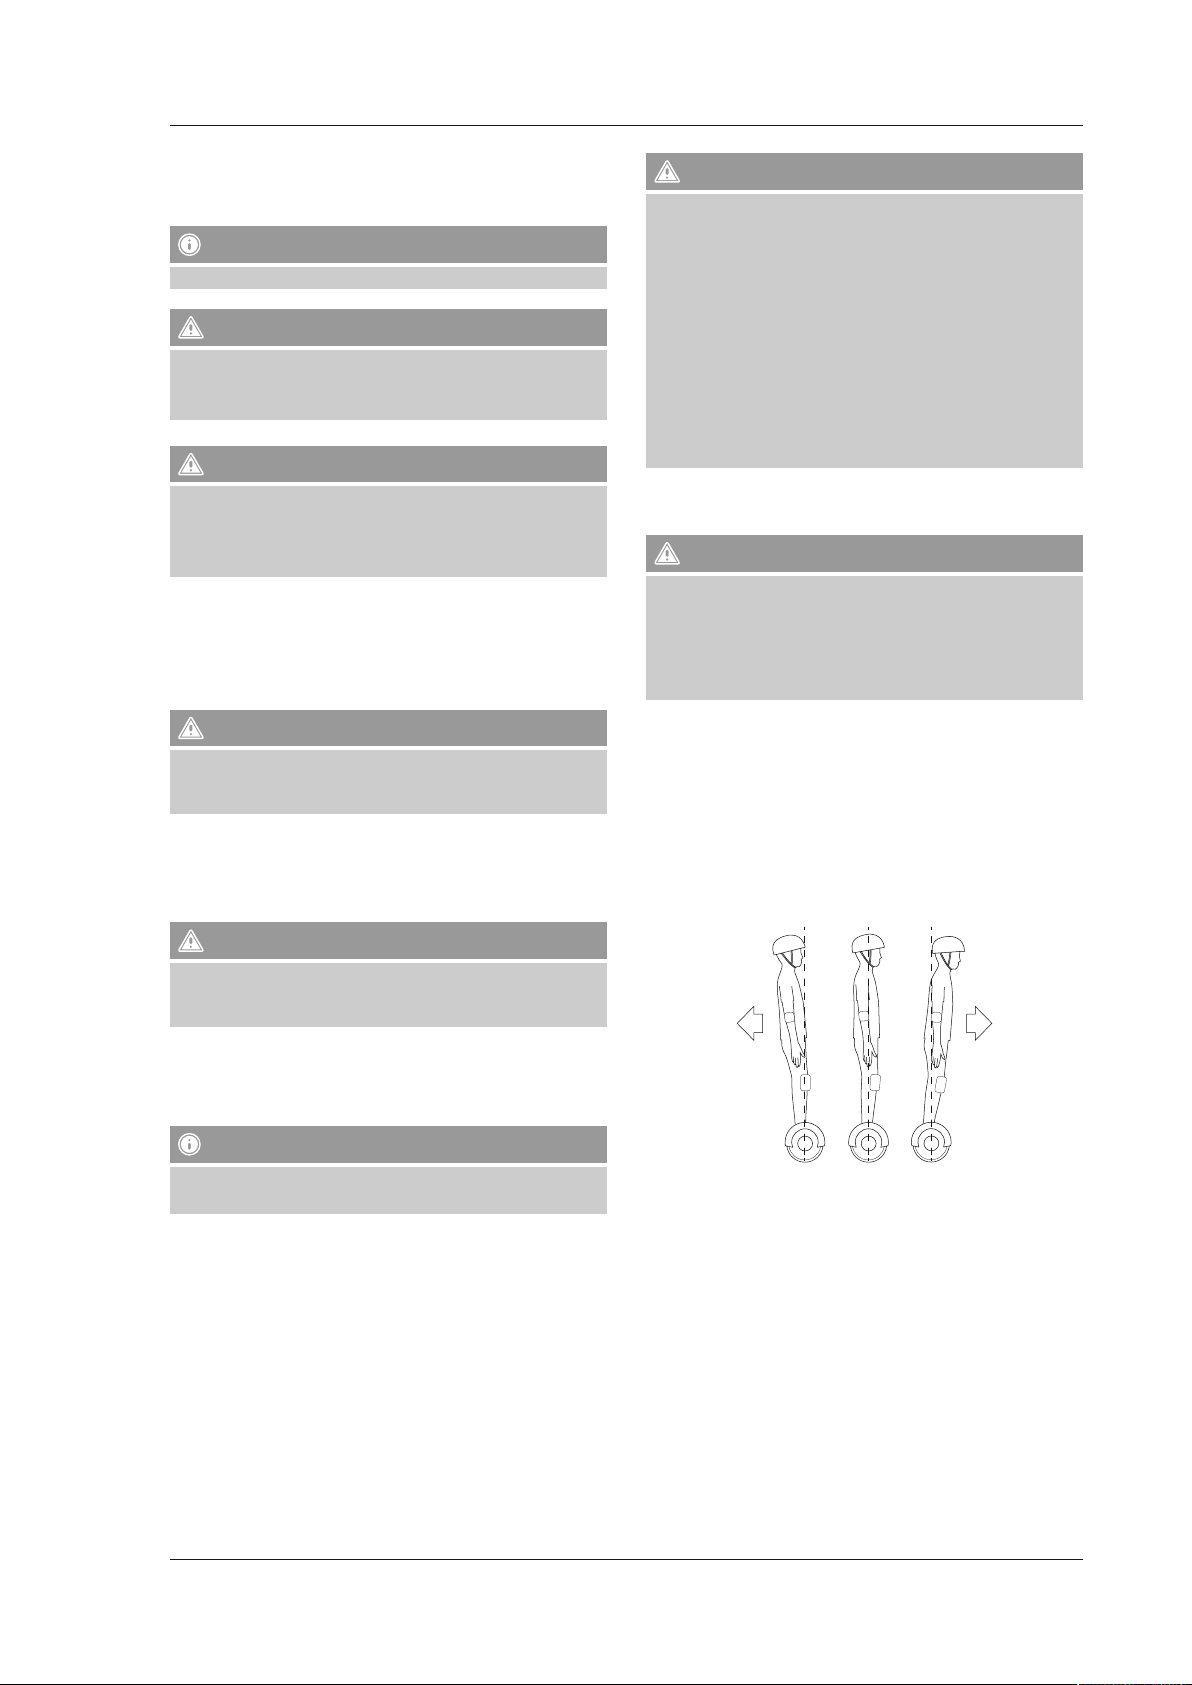
7.2 Funktionsprincip
7.2.1 F-/S-/X-Cruiser
Hänvisning
Vid påslagning måste produkten stå på jämnt underlag.
Varning
• Använd rätt teknik för lyft och lastning av produkten.
• Välj robusta, fasta, orörliga lyftpunkter, t. ex. i mitten av underdelen.
• Kom ihåg att alltid använda benen och inte ryggen när du lyfter!
Varning
• Se upp för dina ngrar! Produkten får inte lyftas på däcken,
stänkskärmar eller på hjulen.
• Det nns risk för att händer och ngrar kan klämmas in mellan däck
och stänkskydd och skadas allvarligt.
Produkten har fyra driftlägen:
• Nybörjare-läge: I nybörjare-läge är hastigheten begränsad till 6 km/h.
Boardet reagerar lite trögare på dina länkrörelser.
För val av driftläge ställer du boardet på marken, det ska vara avstängt.
Genom att en gång kort trycka på knappen 5 riktas boarden upp
automatiskt till neutral 0°-position. Boardet är nu i nybörjare-läge.
Varning
Så snart hastigheten uppnått 6 km/h förhindrar enheten
ytterligare acceleration. Det är normalt att boarden gungar till när
hastighetsbegränsningen uppnåtts.
• Avancerat läge: I detta läge är hastigheten begränsad till 15 km/h.
För val av driftläge ställer du produkten på marken, den ska vara
avstängd. Genom att trycka kort två gånger på knappen 5 riktas
produkten automatiskt i neutral 0°-position. Produkten benner sig i
avancerat läge.
Varning
Varning
• Observera att det inte kan uteslutas att produkten överbelastas och
att således fel uppstår på den elektroniska utrustningen.
• Vid fel på den elektroniska utrustningen kan föraren ramla av, vilket
kan ge upphov till allvarliga personskador vid hög hastighet.
• Funktionsgränsen beror bl.a. på batteriets laddningsnivå, förarens
vikt, underlaget på körbanan och markens lutning. Om du till
exempel kör upp på en höjd från en plan yta kan funktionsgränsen
överskridas.
• Använd endast Cart-läget om du samtidigt använder en bra
skyddsutrustning.
• Hama GmbH & Co KG tar inget ansvar för eventuella material- eller
personskador som uppstår om produkten överbelastas i detta
driftläge.
• Säkerhetsläge: Produkten byter automatiskt till säkerhetsläge om
motorn, batteriet eller styrelektroniken är överhettad, men även om
batteriet har för lågt laddningstillstånds.
Varning
Stig ner från produkten genast och stäng av den om följande
varningssignaler visar säkerhetsläget:
• Blinkande frontdioder (resp. front- och bakdioder på F-Cruiser)
• Röda statuslysdioder (resp. gröna statuslysdioder på F-Cruiser
• Produkten bromsar automatiskt
• Varningsljud
Om ditt board byter till varningsläge ovanligt snabbt efter laddning,
vänligen kontakta supporten (se 12.3. Service och support).
Boardet sätts i rörelse som följande:
Genom att balansera och fördela vikten på dina fotsulor och hälar
aktiveras rörelsesensorerna som sitter under ytan. Hjulen roterar i samma
riktning som ytan belastas och du kör fram eller bakåt. När du lutar dig
fram eller bak ändras också tyngdpunkten och på så sätt även hjulens
kontaktyta (ytan där hjulen möter marken) och ditt board lutar också
fram eller bakåt.
Du är dock tvungen att bibehålla balansen. Annars skulle du ju tilta och
till sist välta.
Så snart hastigheten uppnått 15 km/h förhindrar enheten
ytterligare acceleration. Det är normalt att boarden gungar till när
hastighetsbegränsningen uppnåtts.
• Cart-läge: I detta läge kan hastigheten uppgå till högst 30 km/h.
För val av driftläge ställer du produkten på marken, den ska vara
avstängd. Genom att trycka kort tre gånger på knappen 5 riktas
produkten automatiskt i neutral 0°-position. Boarden är nu i Cart-läge.
Hänvisning – Cart-läge
• Cart-läget får endast tillämpas med vagntillbehöret (art.nr. 109888).
• Cart-läget tillämpas på förarens egen risk!
98
Page 99
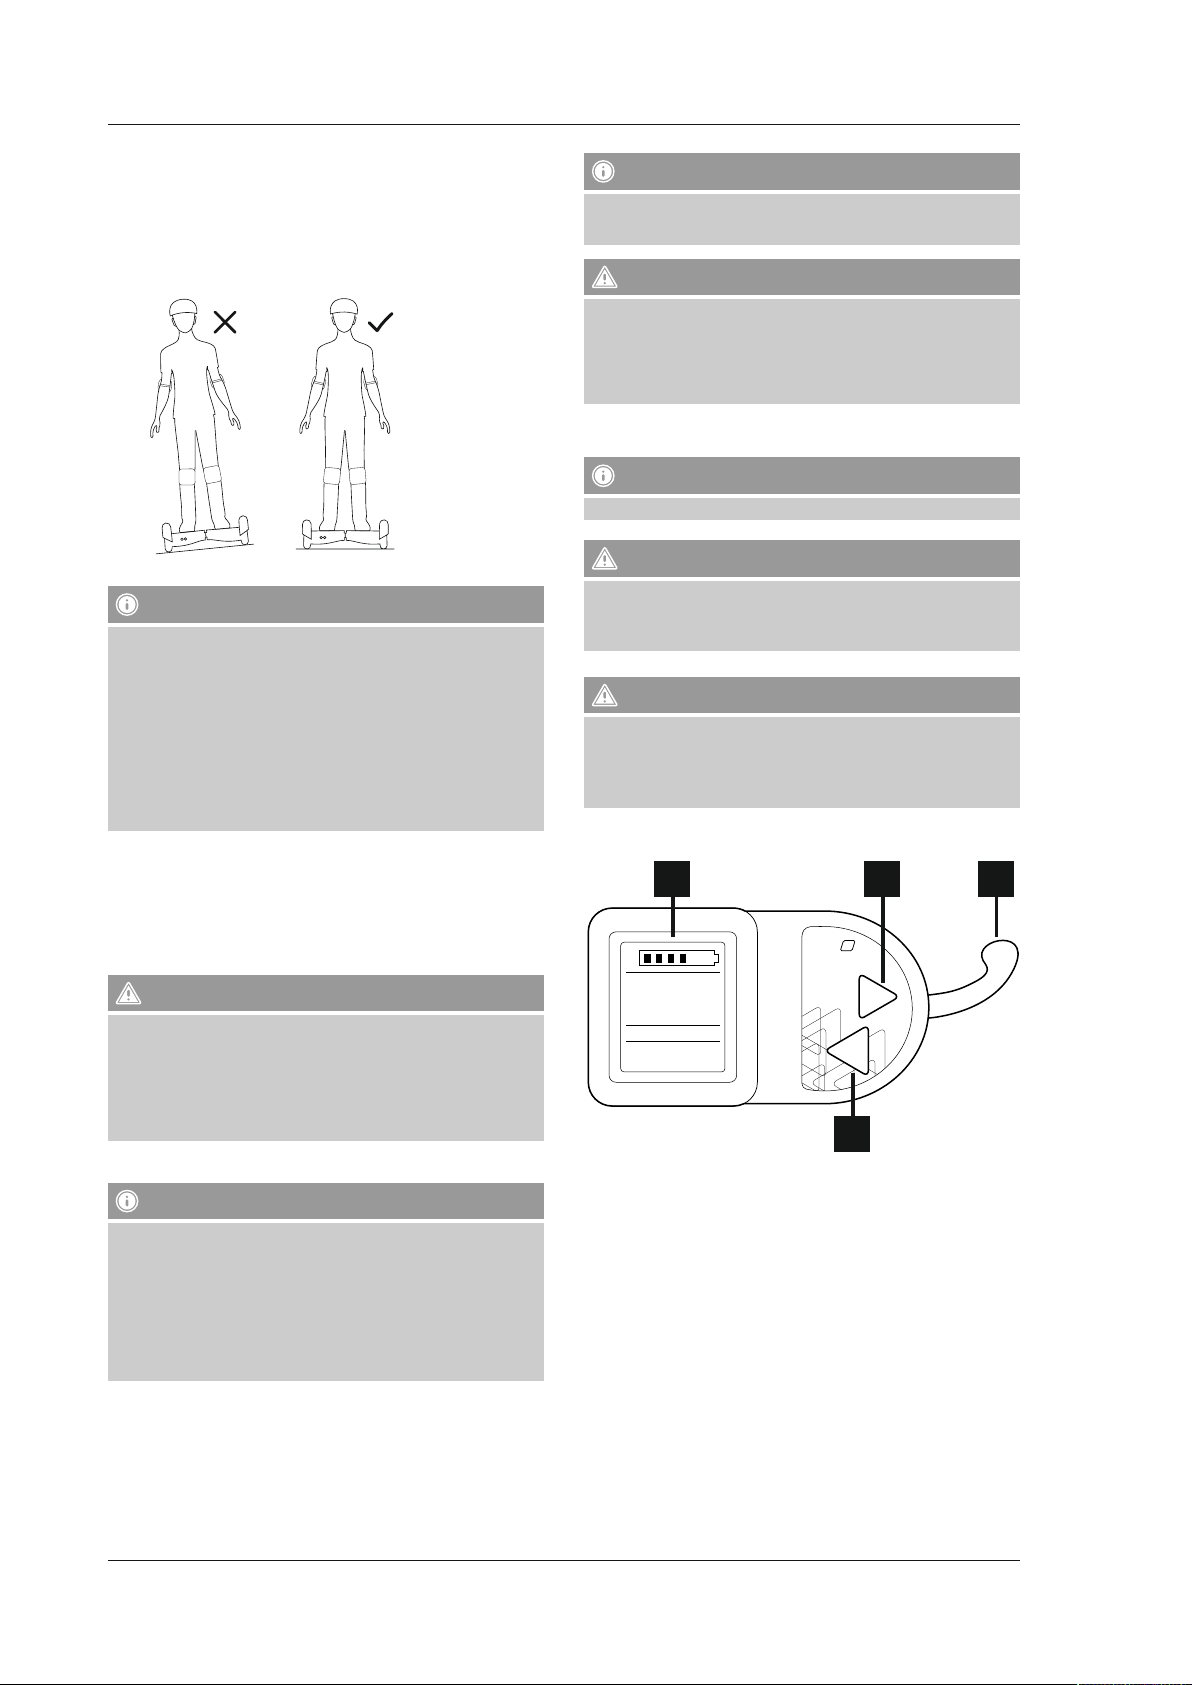
Produkten har ingen stabiliseringsmekanism åt sidan.
Lutas produkten för långt, så att ett hjul tappar kontakten med marken,
kan det inte centrera sig längre och du kan välta.
Du är också tvungen att bibehålla balansen åt sidan. Se därför till att din
kropp är i linje med produktens mittaxel.
Luta dig inte i kurvor eller mot slutningar när du kör parallellt i backen.
Hänvisning - USB-laddningsport
Boardens kapacitet minskar vid längre laddningsprocesser eller om
era enheter laddas efter varandra.
Varning - fallrisk
• Använd inte USB-laddningsporten under körningen, utan endast om
enheten står stilla.
• Annars nns risk för att du ramlar och skadar dig på grund av avledd
uppmärksamhet, om du tappar balansen eller om kabeln kommer i
vägen.
7.2.2 U-Scooter
Hänvisning
Vid påslagning måste produkten stå på jämnt underlag.
Varning
Hänvisning
• Överskatta inte dig själv! Vi rekommenderar: Öka farten långsamt
för att få full kontroll över din produkt. Endast erfarna användare
ska köra parallellt mot backen.
• Om det är första gången du använder en sådan produkt
rekommenderar vi att du tar hjälp av en annan person. Personen
kan hålla dig i händerna och gå framför dig för att ge stabilitet
och säkerhet. Försök att ta det lugnt utan några snabba rörelser.
Produkten stöder din balans. Därför ska du inte försöka att
motarbeta produktens rörelser. Istället ska du koncentrera dig på
din balans.
7.2.1.1 Energiåtervinning (rekuperation)
• Alla brädor har en energiåtervinningsfunktion som tillämpas vid
inbromsning eller i nedförsbackar (rekuperation).
• Energiåtervinningen kan i idealfall öka boardens batterikapacitet med
5-10%. Detta beror dock på många olika faktorer, t.ex. på terrängen
och hur ofta du bromsar, och kan inte förutsägas individuellt.
Var försiktig när batteriet är fulladdat
• Undvik långa nedförsbackar och inbromsningar om batteriet är
fulladdat, eftersom batteriet inte kan spara återvunnen energi i detta
skick.
• Kör först i 1-2 minuter på plan mark för att ladda ur batteriet en
smula.
• Annars kan batteriet skadas.
7.2.1.2 Belysning (F-Cruiser)
Hänvisning – fram- och baklykta/justera körriktningen
• Freestyle-boarden är försett med väl synliga separata fram- och
baklyktor.
• Freestyle-boarden identierar körriktningen automatiskt och
anpassar belysningen på motsvarande sätt (vit framlykta, röd
baklykta).
• Boarden identierar körriktningen och justerar belysningen när
hjulen har rullat 5 varv.
7.2.1.3 USB-laddningsport (F-Cruiser)
Freestyle-boarden är försett med en USB-laddningsport av typ A, som kan
ladda mobila enheter med en laddningsström på upp till 2,0 A.
• Använd rätt teknik för lyft och lastning av produkten.
• Välj robusta, fasta, orörliga lyftpunkter, t. ex. i mitten av underdelen.
• Kom ihåg att alltid använda benen och inte ryggen när du lyfter!
Varning
• Se upp för dina ngrar! Produkten får inte lyftas på däcken,
stänkskärmar eller på hjulen.
• Det nns risk för att händer och ngrar kan klämmas in mellan däck
och stänkskydd och skadas allvarligt.
Bild 8
3 4
B
M
S
SPEED
SLO
ODO
0000
OO
.0
Km/h
7
Km
ECO
POWER
1
ON/OFF
MODE
2
1. Strömbrytare
2. Lägesomkopplare
3. Display
4. Gasspak
För att starta boarden håller du strömbrytaren intryckt tills displayen
tänds. Boarden kan köras i tre olika driftlägen:
• Nybörjare-läge: I detta läge är hastigheten begränsad till 6 km/h och
boarden accelererar långsamt.
För att välja detta läge trycker du på lägesomkopplaren [MODE] tills
indikeringen “SLO” visas på displayen.
• Avancerat läge: I detta läge är hastigheten begränsad till 15 km/h
och boarden accelererar snabbare än i nybörjarläget.
För att välja detta läge trycker du på lägesomkopplaren [MODE] tills
indikeringen “MID” visas på displayen.
99
Page 100

• Expertläge: I detta läge är hastigheten begränsad till 25 km/h och
boarden utnyttjar hela sin kapacitet.
Varning - expertläge
• I detta läge måste du hålla dig på avstånd från föremål, personer
och djur.
• Testa accelerationen och hastigheten i detta läge på en stor och
öppen yta först, för att vänja dig.
• På grund av den höga hastigheten nns större risk för personskador.
För att välja detta läge trycker du på lägesomkopplaren [MODE] tills
indikeringen “FAS” visas på displayen.
Så här sätter du boarden i rörelse:
Koppla till boarden, så att den elektriska stödmotorn kan användas. Tryck
på startknappen (se bild 8) tills hastighetsmätaren tänds.
Hänvisning
Produkten kan i princip även användas utan stödmotor.
• Om du vill använda den elektriska stödmotorn måste du först accelerera
produkten till ca. 4 km/h med hjälp av din egen muskelkraft.
• Dra sedan i gasspaken för att koppla till stödmotorn. Boarden kan
endast accelereras till den max. hastighet som gäller för respektive
driftläge.
Varning
• Du bör vänja dig vid boardens körbeteende först för att minska
risken för att du ramlar och skadar dig.
• Öva på en öppen yta och testa boardens accelerations- och
körbeteende.
• Ta alltid på dig lämplig skyddsutrustning.
Dra i bromsspaken på vänster sida om styranordningen om du vill
bromsa.
Varning - inbromsning
För F-boarden gäller dessutom följande:
Två stabila skyddsplåtar och ett monteringsset medföljer. Montera
skyddsplåtarna enligt följande illustrationer.
• Sätt skyddsplåtarna mellan drivhjulet och chassit.
• Se till att skyddsplåtarna placeras i de båda hållarna på fotbrädans
ovansida, och att fästtapparna sitter ordentligt i skårorna på chassits
undersida.
• Fästskruvarna måste skruvas i rakt!
Fästtappar
Fotbräda
• Vänj dig vid bromsfördröjningen. Skapa dig en känsla av hur länge
det tar innan boarden bromsar.
• Bromsa alltid i tid och ta inga risker när det gäller kollisioner med
personer, djur eller föremål.
Hänvisning - övriga instruktioner
När du har kopplat till boarden genom att trycka länge på
strömbrytar
trycka kort på strömbrytaren:
ODO = kilometer totalt
TRIP = kilometer sedan boarden startades
TM = tid sedan boarden startades
Lägena RM och ERRO är avsedda för Hamas kundtjänst vid service och
kan ignoreras.
7.3 Idrifttagning och montering av produkten
Innan produkten tas i drift måste den laddas upp fullständigt.
7.3.1 F-/S-/X-Cruisers
För S-boarden och X-boarden måste inga andra punkter observeras än
den information som anges i 7.2.1.
en kan du växla mel
Hänvisning
lan följande indikeringar genom att
7.3.2 U-Scooter
• Greppa boarden i styrpelaren när du lyfter produkten ur förpackningen.
• Montera boarden enligt följande illustrationer.
• Som du ser på följande bilder kan styrpelaren justeras till tre höjdlägen.
Hänvisning
Se till att alla fästanordningar sitter säkert.
100
 Loading...