

owner’s manual

2011-2013 Wheego LiFe
Owner’s Manual
wheego.net
CAUTION
Keep your car plugged in when not in use.
My Wheego Dealer’s Telephone number:__________________________
The vehicle identification number (VIN) can be found on the VIN plate, located on the
driver’s side of the dashboard. Record the VIN in the space below for easy reference.
Vehicle Identification Number (VIN): __________________________
Key # ___________ (stamped on key finger)
Date purchased: _____ /_____ /_____
Private online driver forum for Wheego Drivers wheegodriver.com
Login: Your first and last name (case sensitive)
Password: the last 4 digits of your VIN
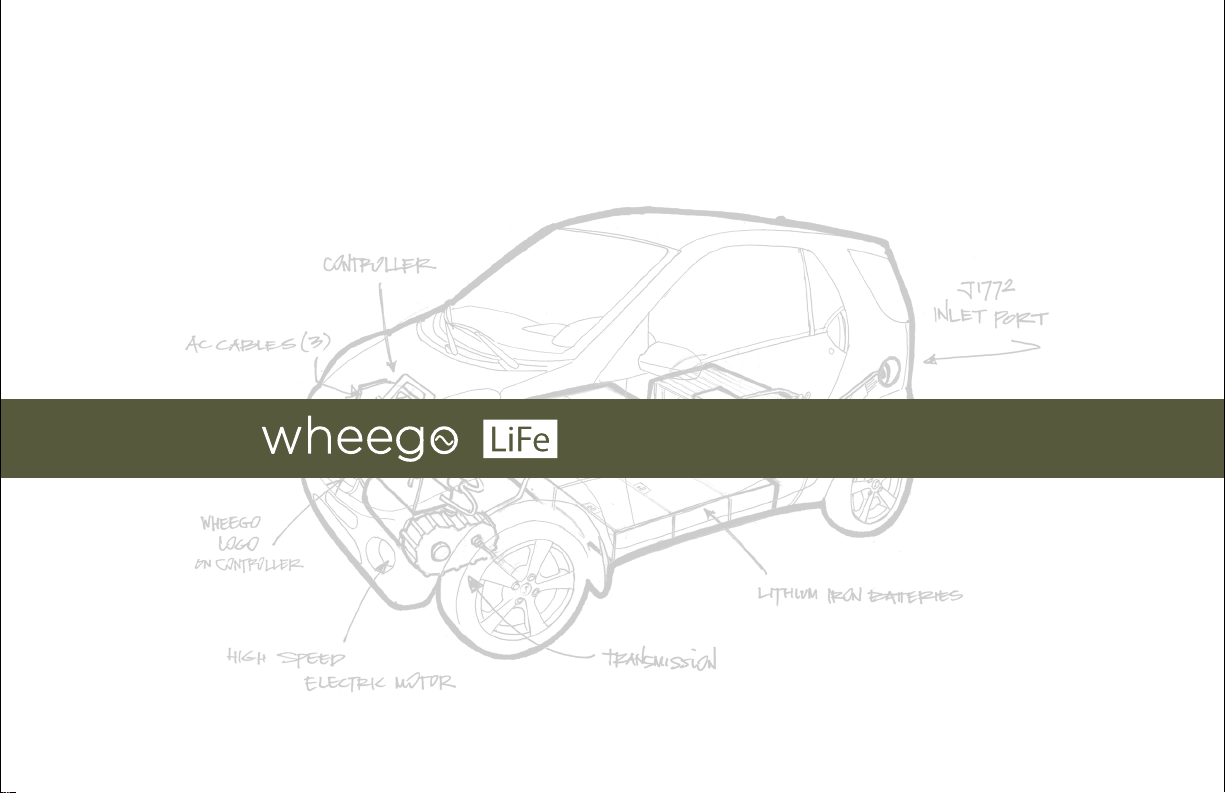
The Wheego LiFe is designed to be plugged in when not in use; the batteries
gradually discharge when the car is not plugged in. Damage due to failure to keep
batteries properly charged is not covered under your warranty. Batteries must not
be allowed to fully discharge; if the batteries fully discharge, your warranty is void.
Refer to “Charging Your Car” for details.
All cars are tested for a minimum of 60 miles prior to being shipped to dealers.
Your odometer will reflect this.
All new Wheego vehicles come with 12 months of The Wheego Advantage EasyCare, offering
24 hour roadside assistance. Provided by Road America
¨
, Wheego Roadside Assistance
offers 24-Hours dispach, emergency towing and flat tire assistance. This service is only
available in the US.
Roadside Assistance: 866.882.3374
EasyCare: 800.230.2434
32

Table of Contents
1. INTRODUCTION
1. Introduction
2. Consumer Information/ Reporting Safety Issues
3. Things to Know Before You Operate Your Car
4. Understanding Your Car’s Features
5. Charging Your Car
6. Driving Your Car
7. Vehicle Maintenance
8. Diagnostics/Troubleshooting
9. Customer Service and Warranty
10. Vehicle Identification and Specifications
11. Index
05 - 07
08
09 - 1 0
1 1 - 59
60 - 65
66 - 67
68 - 98
90 - 94
95 - 102
103 - 105
106 - 1 1 1
A. About this Owner’s Manual
B. Introduction to the Safe Ownership of a WHEEGO
C. Cautions, Warnings and Notes
You can be badly injured while working on an electric vehicle. Take your vehicle to your
dealer or call WHEEGO Customer Service at 678-904-4795 Ext. 3 for help.
WARNING
Any modifications or alterations to this vehicle could seriously affect its road
worthiness and safety and may lead to an accident resulting in serious injury or death.
A. ABOUT THIS MANUAL
Thank you for purchasing your electric vehicle from WHEEGO.
Your vehicle is designed to operate exclusively on battery power. It is an emission-free
vehicle. WHEEGO’s objectives include customer safety, product satisfaction and pride
of ownership. This Owner’s Manual is designed to acquaint you with the proper and safe
operation of your WHEEGO. Please take the time to read and understand the manual
before operating your vehicle.
54

Maintenance schedules and general care instructions are included in the Maintenance section.
This manual is applicable to the following WHEEGO line of vehicles:
LiFe 2011-2013 Model Years
NOTE: All information and specifications in this Owner’s Manual are current at the time of printing.
However, due to WHEEGO’s policy of continuous improvement, we reserve the right to
make changes to the manual, at any time, without written notice or obligation.
B. INTRODUCTION TO SAFE OWNERSHIP OF WHEEGO ELECTRIC VEHICLES
WHEEGO battery-electric vehicles are different from vehicles you might be accustomed to
driving. Special precautions should be followed when owning and operating a WHEEGO.
Please pay particular attention to the cautions and warnings in this manual as well as
those placed as notices on the vehicle in various locations. Electric cars provide a great
amount of torque when the accelerator is pressed. This may cause the car to spin its tires
particularly on wet or slippery pavement.
Specific to WHEEGO models, the following safe habits should always be followed:
• Safety belts should always be worn by all occupants while the vehicle is in operation.
• WHEEGO battery-electric vehicles should be recharged from a standard 120VAC 15amp
electrical outlet or an approved 240VAC Charging Station. Charging from a circuit of
lesser capacity and/or using a cord from an outlet to the WHEEGO that is not sufficient in
wire gauge could create a fire hazard. Please consult this manual for the proper extension
cord gauge and length.
• The lithium battery pack is what you charge and provides the “energy” to the WHEEGO
electric drive system. The voltage in a WHEEGO battery pack is sufficient to cause
death by electrocution. For this reason, no one should EVER attempt to do any
maintenance or repair work on their WHEEGO electric drive system, including the
battery pack, unless they have had special training or are authorized by WHEEGO to do so.
• Please read, understand and abide by the above safety precautions for years of safe
operation and enjoyment of your WHEEGO.
C. CAUTIONS, WARNINGS AND NOTES
Throughout this Owner’s Manual you will find the words WARNING, CAUTION and NOTE.
These serve as reminders that special attention is required.
WARNING - indicates a direct hazard which could result in an accident causing bodily injury.
CAUTION - identifies something that could result in damage to your vehicle.
NOTE - marks information to make procedures easier to understand.
76

2. CONSUMER INFORMATION/ REPORTING SAFETY ISSUES
3. THINGS TO KNOW BEFORE YOU OPERATE YOUR CAR
If you believe that your vehicle has a defect which could cause a crash or could cause
injury or death, you should immediately inform the National Highway Traffic Safety
Administration (NHTSA) in addition to notifying Wheego Electric Cars.
If NHTSA receives similar complaints, it may open an investigation, and if it finds that a
safety defect exists in a group of vehicles, it may order a recall and remedy campaign.
However, NHTSA cannot become involved in individual problems between you, your
dealer, or Wheego Electric Cars.
To contact NHTSA, you may:
call the Vehicle Safety Hotline toll-free at 1–888–327–4236 (TTY: 1–800–424–9153);
go to http://www.safercar.gov
or write to: Administrator, NHTSA, 1200 New Jersey Avenue, S.E., Washington, DC 20590.
You can also obtain other information about motor vehicle safety from
http://www.safercar.gov
A. Driving and alcohol
A. DRIVING AND ALCOHOL
Your ability to drive your WHEEGO can be seriously impaired with blood alcohol levels
far below the level allowed by law. If you are drinking alcohol, don’t drive. Ride with a
designated non-drinking driver, call a cab, or use public transportation.
Driving after drinking alcohol can lead to an accident. Your perceptions are less sharp,
your reflexes are slower, and your judgment is impaired when you have been drinking.
Never drink alcohol and drive.
B. SAFETY INFORMATION
• Read the Owner’s Manual before operating this vehicle.
• Charge the vehicle in a well-ventilated area only.
• Keep children away from the vehicle during charging.
• Never use (or substitute for) any battery other than the original factory supplied batteries
that come in your Wheego or those authorized by Wheego as aftermarket replacements.
B. Safty Information
WARNING
Drinking alcohol can seriously impair your ability to operate this vehicle.
98

Your vehicle is battery powered. If handled improperly, batteries can be dangerous. During
charging operations, follow the precautions provided in the Charging and Maintenance
section of this manual to avoid personal injury or damage to electrical components in the
vehicle.
WARNING
Your Wheego LiFe’s 12V battery under the front hood powers the accessories such
as headlights and horn. Electrolytes can leak from damaged or defective batteries.
Avoid contact with skin, eyes, or clothing.
• Batteries contain acid, which can cause severe burns. If battery fluid comes in contact
with your skin, flush the affected areas with water for at least 15 minutes and then seek
medical assistance.
• If battery acid is ingested, seek immediate medical assistance.
• Contact with eyes: Flush with water and get medical assistance as soon as possible.
While you are being driven to get medical assistance, continue to rinse your eyes by
using a sponge or soft cloth saturated with water.
• Battery posts, terminals, and related accessories contain lead and lead compounds.
WARNING
Improper handling of high voltage wiring, batteries or control systems could result
in serious or fatal injury by electric shock. Only qualified technicians should repair
or access high voltage wiring, battery packs, and associated systems.
4. UNDERSTANDING YOUR CAR’S FEATURES
A. Key Fob
B. Dashboard and Controls
C. Shifter and Parking Brake
D. Foot Pedals & Hood Release
E. Seats and Safety Features
1110
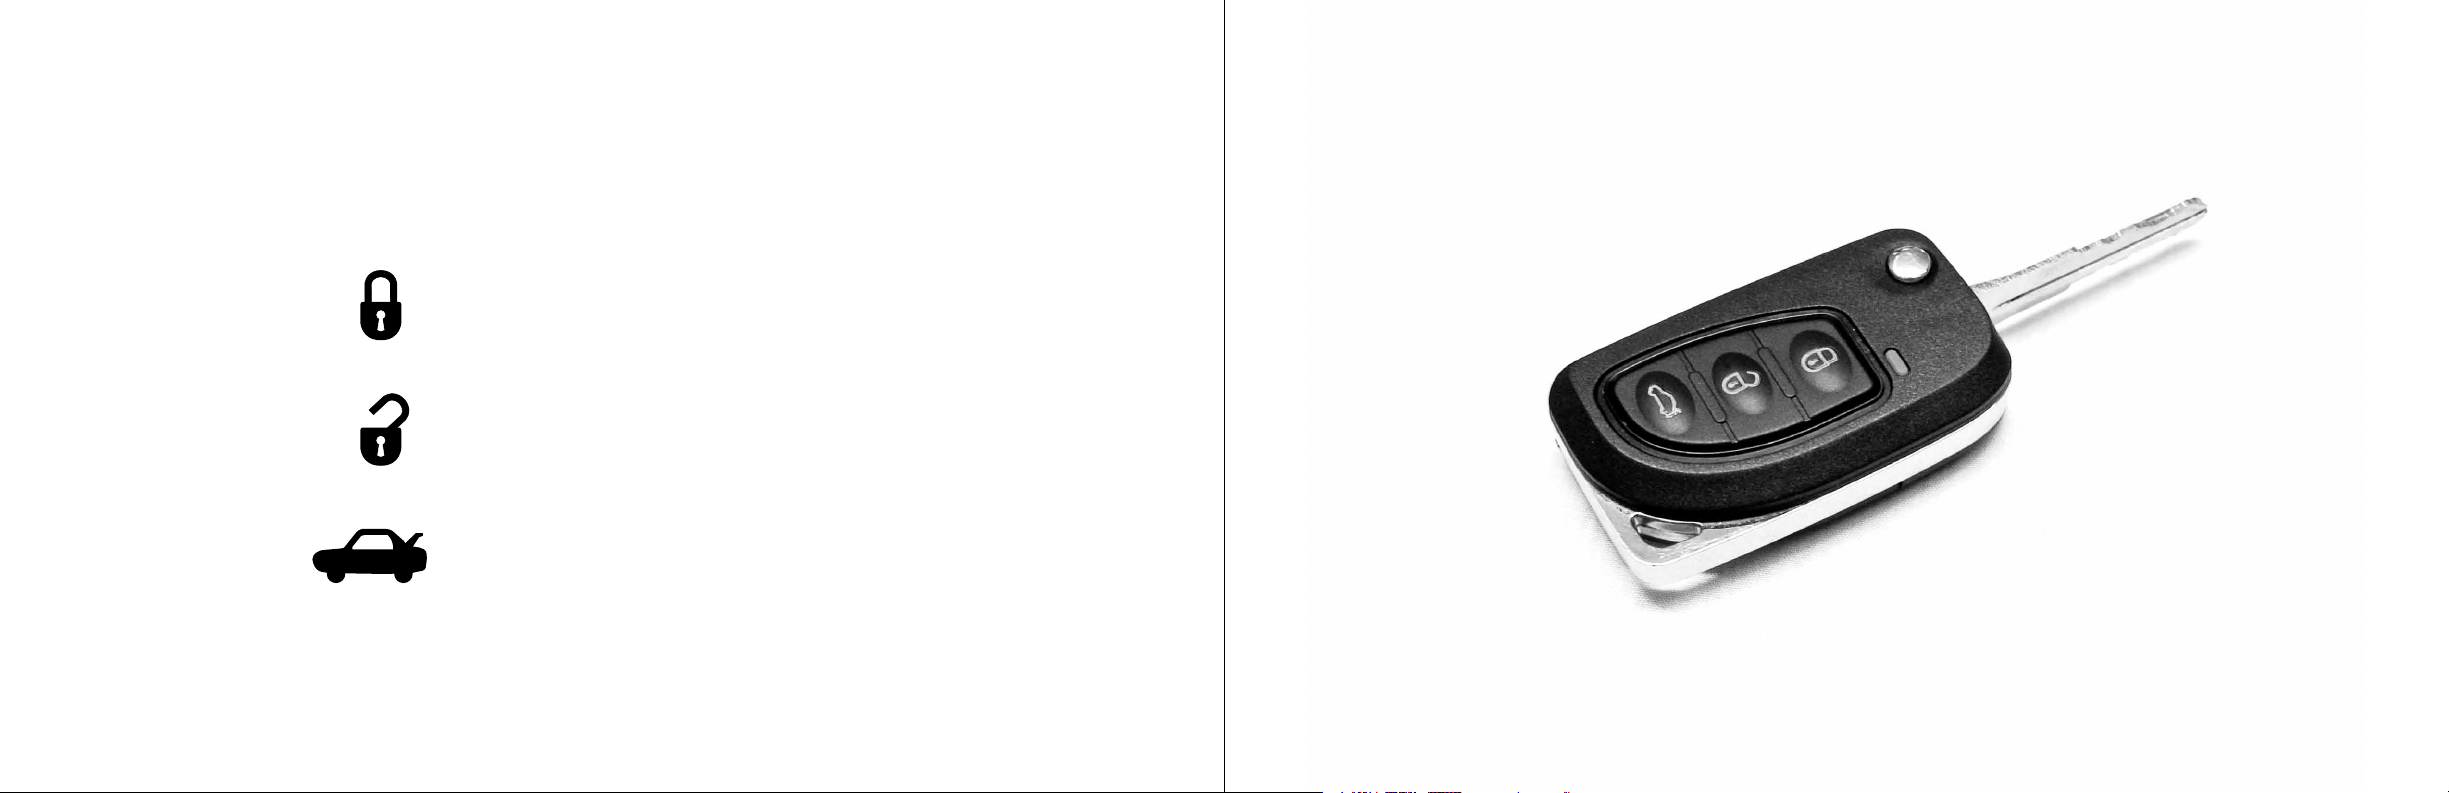
A. Key Fob
Your key fob allows remote locking and unlocking of the driver and passenger doors and
the rear hatch. Press the round silver button to release the ignition key.
Lock doors
Unlock doors
Open rear hatch
(press and hold for 3 seconds)
3 BUTTON KEY FOB
1312
B. DASHBOARD AND CONTROLS
• Instrument Panel
o Speedometer
o Odometer/Trip Meter/Miles on Charge
o BDI Gauge
o Amp Meter
o Volt Meter Eco-Meter
o Indicator Lights
o Setting Clock, Metric/English, Contrast Level
• External Lights, Turn Signals and Hazard Warning Flashers
• Windshield Wipers and Washer
• Horn
• Key Switch
• Tire Pressure Monitoring System
• Ventilation Controls
• Rear Defroster
• Airbag Controls
• 12V Accessory Jack
• Dome Light
• Radio
• Windows, Doors and Mirrors
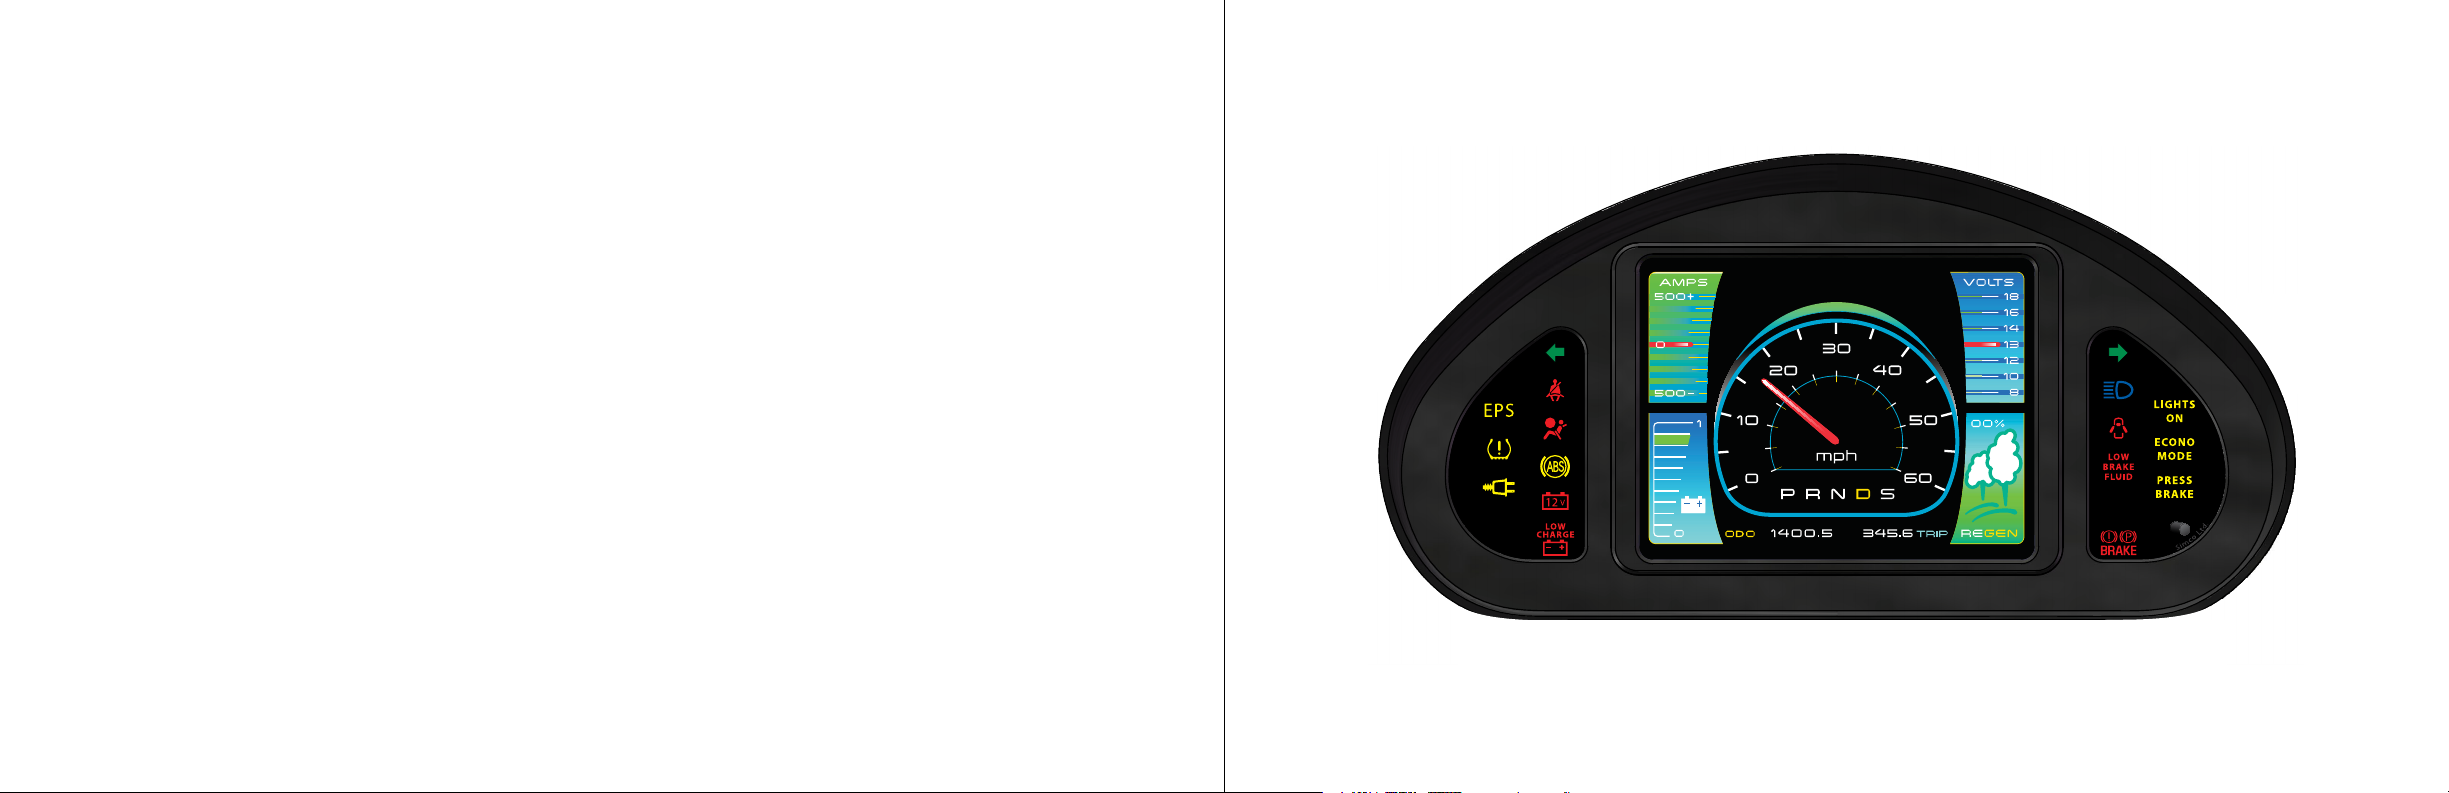
INSTRUMENT PANEL
1514

SPEEDOMETER
The Speedometer shows the current driven
speed of the vehicle in miles per hour.
The display beneath the speedometer
shows the status of the shifter: Park,
Reverse, Neutral, Drive and Sport. If the
Econo button by the shifter is depressed,
a green E is displayed.
ODOMETER/TRIP METER/
MILES ON CHARGE
Press the stem on the lower right of the
console to access the Odometer (miles),
Trip Meter (miles), and Miles remaining
on Current Charge Meter. The odometer
indicates the total distance the vehicle has
been driven. The Trip Meter is useful for
keeping track of specific distances traveled.
While viewing the Trip Meter, press the stem
for 3-4 seconds to reset the Trip Meter.
The Miles Remaining on Current Charge
Meter will automatically reset each time the
vehicle completes a charging cycle.
1716
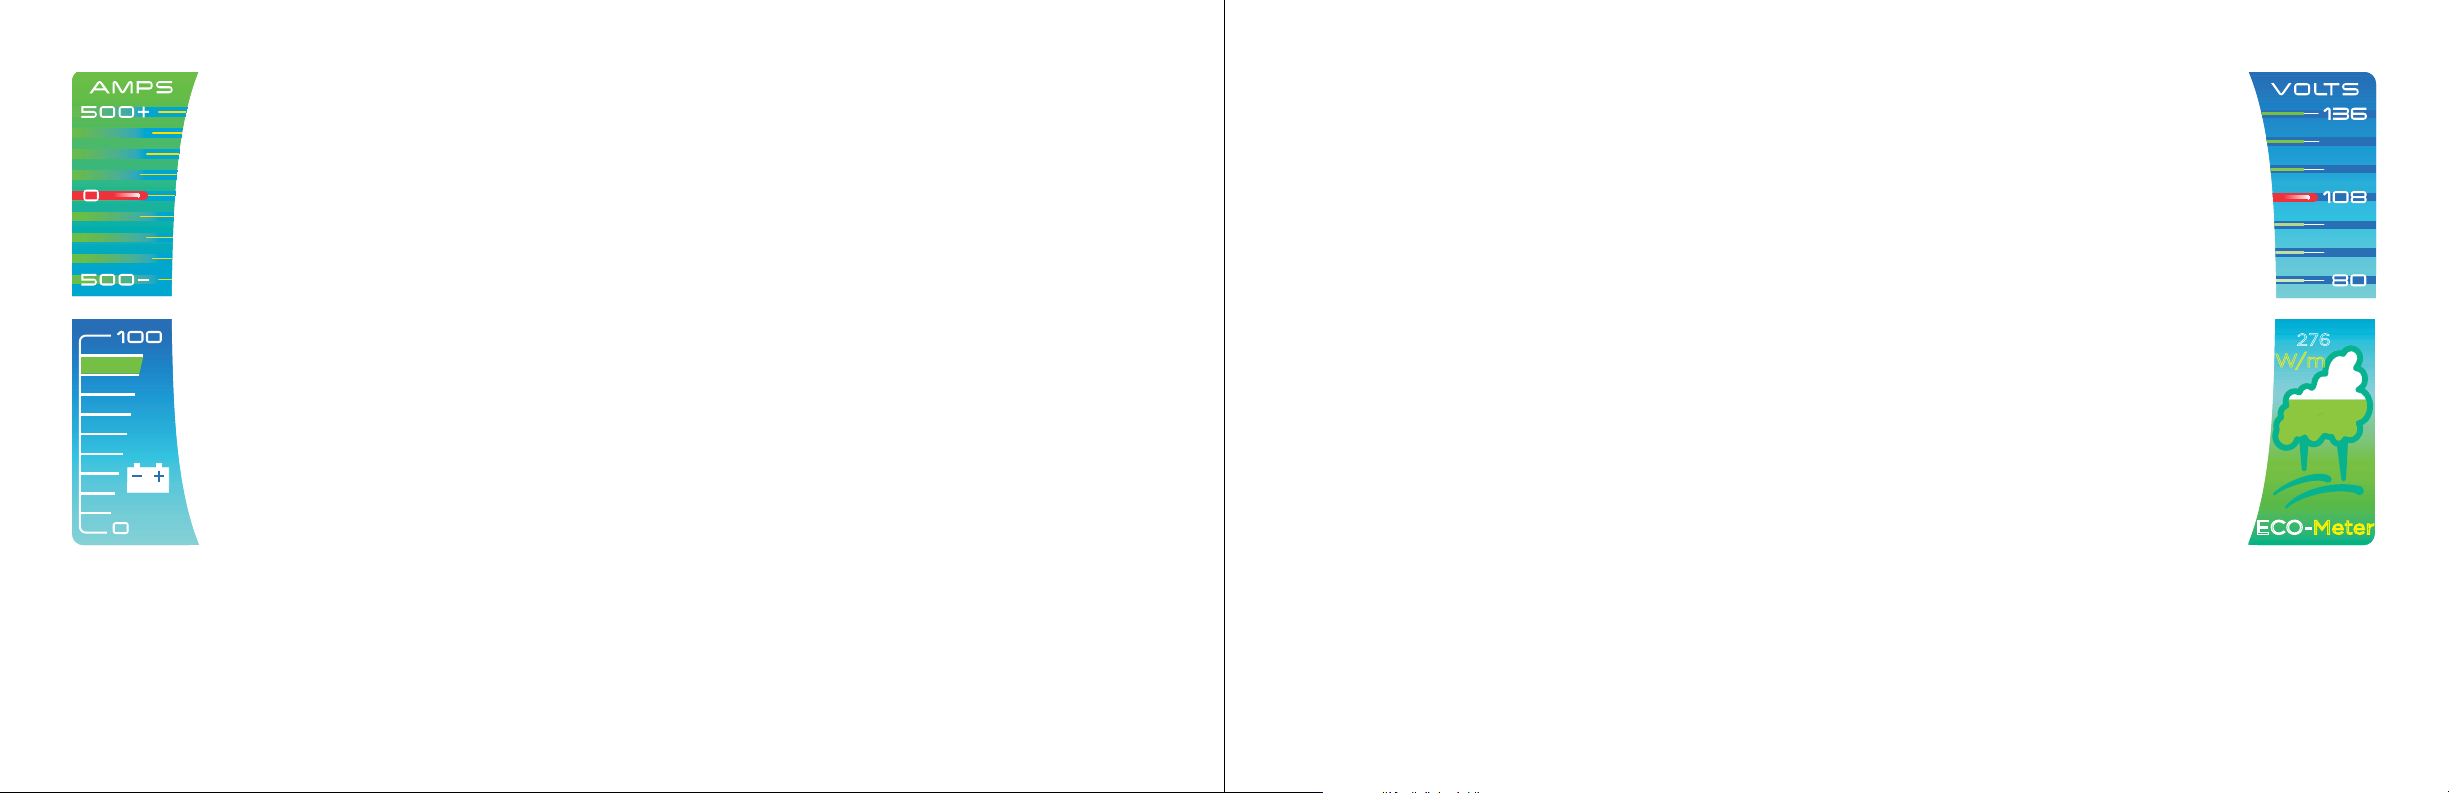
AMP METER
The AMP Meter indicates how many amperes are being drawn in
order to move the car. This is a rough indication of the amount of
electrical energy being used.
BDI GAUGE
The BDI (Battery Discharge Indicator) is similar to a fuel gauge
on a gas-fueled vehicle. It gives the current state of charge of
the battery pack while the key is in the ON position. The 100%
charged position is all the way to the top and the fully discharged
position is on the bottom. When the indicator reaches about
10% remaining charge, the Power Conservation Mode feature will
begin to help economize battery usage for the remainder of the
discharge cycle.
Note: in order to safeguard your batteries, only the top 90% of
your charge is shown on this gauge. When you hit 0% on the BDI
gauge, you actually have 10% battery charge left. Your car will
shut down at this point so that you do not void your warranty. You
need to recharge your car as soon as possible so it does not drain
below this point.
VOLT METER
The VOLT Meter indicates the voltage of the lithium battery pack.
This is a rough measure of the present charge status of the battery pack.
ECO-METER
The ECO-METER provides feedback as to how your driving habits (and
the terrain) are affecting the draw on the batteries, which affects your
driving range. The more green that is showing, the more you are driving
in a fashion that is economical on the battery pack. The Wheego LiFe
utilizes regenerative braking, which captures kinetic energy normally lost
during braking, and feeds it back into the battery pack.
276
W/m
ECO-Meter
Note: If you have left your car unplugged for more than a few days
the BDI Gauge will not accurately reflect the remaining charge.
1918

INDICATOR LIGHTS
The following indicator lights may be displayed on your dash. In general, they will be
displayed briefly when the car is turned on to indicate the lights are working properly.
After the initial startup sequence, the lights indicate the following conditions:
A/C Light – indicates the air conditioning is on.
Charge Light - Indicates the car is being charged.
The car must be unplugged before it can be driven.
12V Battery Light - Indicates the 12V battery needs service. Contact your
Wheego dealer.
Hazard Light - Indicates the hazard lights are on. Press the hazard button on
top of the steering column to turn the hazard lights on or off.
Service Light - indicates your car needs service. Contact your Wheego dealer.
Turn Signal - indicates left or right blinker activation.
APPLY
BRAKE
Heater Light – indicates the heater is on.
Apply Brake Light – reminds you to depress the brake pedal.
EPS Light –indicates the Electronic Power Steering needs service. Contact your
Wheego dealer for service as soon as possible.
Tire Pressure Monitoring Light – Indicates a tire is low on pressure. Check tire
pressure on all of your tires
(Flashing) Tire Pressure Monitor Failure Indicator – Indicates the Tire Pressure
Monitoring system is not working. Contact your Wheego dealer for service.
Seatbelt Light – Reminds you to fasten your seatbelt.
2120

Low Charge Light – Indicates your lithium batteries are low on charge.
You need to charge your batteries immediately.
CAUTION
Electrical wiring, circuit boards, and components are located under and behind the upper
and lower dash. Liquids can damage electrical components and the circuit board. Handle
liquids with care. Do not spray water directly into the dash.
Bright Light Indicator – Indicates the bright lights/ high beams are on.
Door Open Light – Indicates one of the car doors is open.
Low Brake Fluid Light – Indicates you are low on brake fluid.
Airbag Light – Indicates the airbag may not be working properly; you need to
have it checked immediately.
Parking brake on – indicates the parking brake is pulled up/engaged.
Anti-lock Braking System – indicates a problem with the anti-lock braking
system. Contact your Wheego dealer for service immediately.
CONSOLE SETTINGS
You can change the settings of the console by using the 5-way D-pad, located in front of
the parking brake.
With the car in Park and the key in the “on” position, press and hold the center button of
the 5-way switch. A screen displays the following four options:
OEM Settings – for manufacturer use only (password protected)
Maintenance/Service – for Wheego technicians only (password protected)
User Functions – Allows you to set clock, metric/English, contrast levels
Exit Menu – exits screens
The four sides of the 5-way switch allow you to move up/down and right/left within
a menu. The center of the switch “selects” a field. Use up/down to move to the User
Functions option, and press the center button to select it.
2322
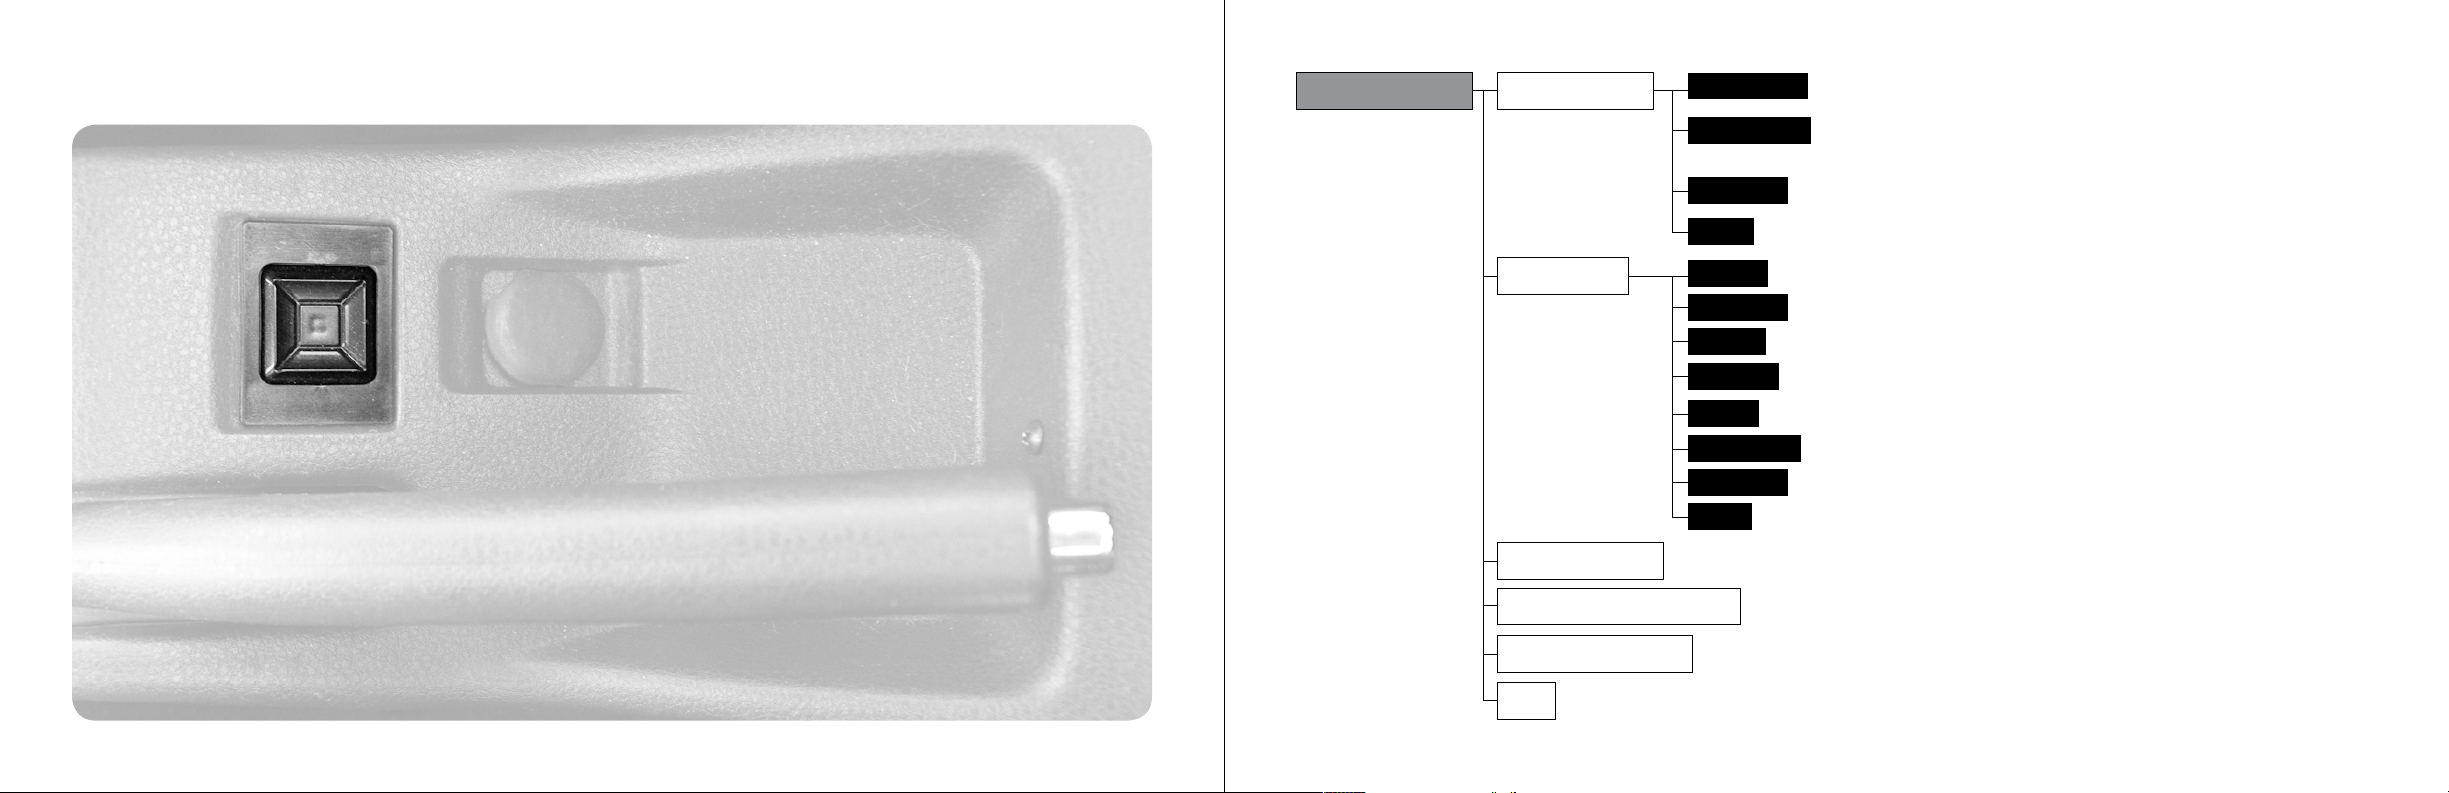
CONSOLE CONTROL D-PAD
User Functions LCD Settings
Backlight Low
Backlight High
Save & Exit
– Screen contrast when the headlights are on (night driving). Default is 02.
Choose value between 1 and 10. The higher the number, the brighter the screen.
– Screen contrast when the headlights are off (daytime driving).
Default is 10. Choose a value between 1 and 10. The higher the number,
the brighter the screen.
– Select this to save your new values.
Cancel
Time/Date
Metric/English
Set Hour
Set Minutes
Set Year
Set Month
Set Day
Set Weekday
Save & Exit
Cancel
– Selects Metric or English units.
Maintenance Monitors
Reset Odometers
– Password protected.
Exit
– Select this to cancel, keep your current values and exit.
– Choose 01-24. 01 is 1 a.m.; 13 is 1 p.m.
– Choose 00 to 59
– Choose the year
– Choose 01 to 12
– Choose 01 to 31
– Choose Mon to Sun
– Select this to save your new values.
– Select this to cancel, keep your current values and exit.
– Password protected; for trained technician only.
2524
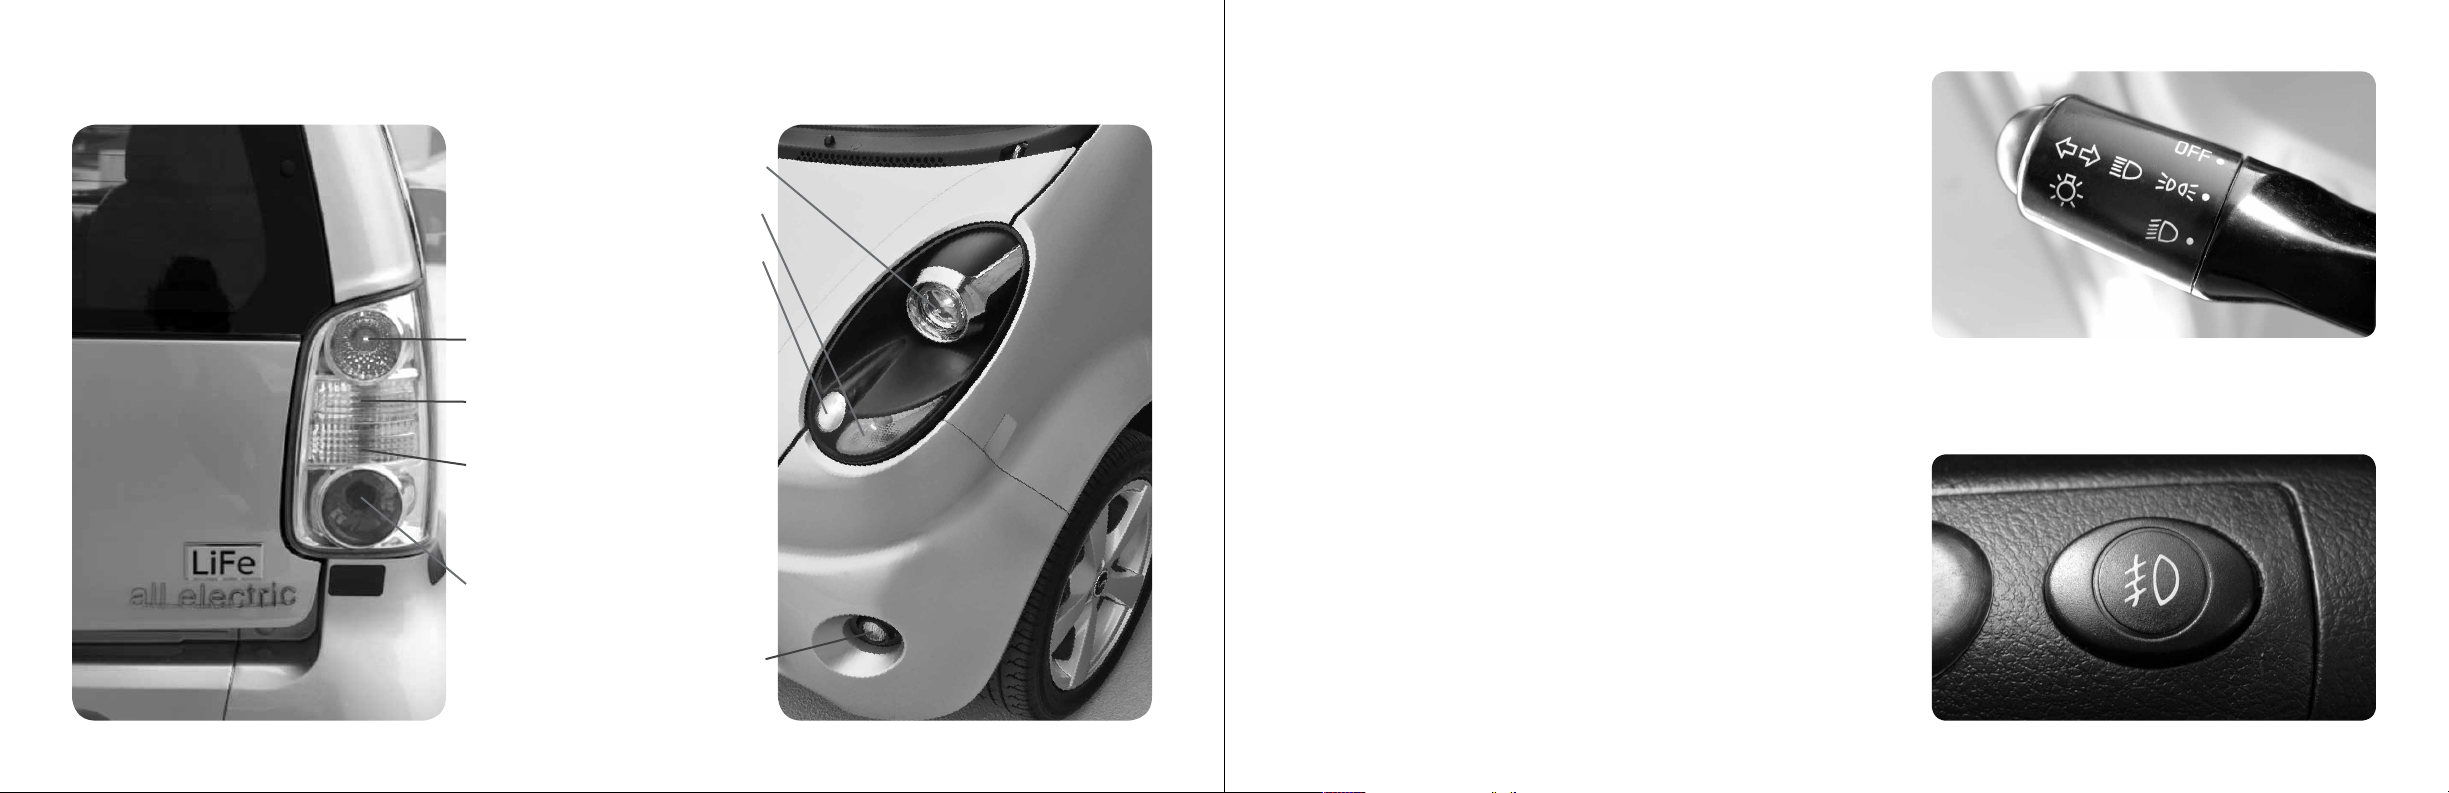
EXTERNAL LIGHTS AND TURN SIGNALS
Headlights / Highbeams
Turn signal / side marker
Tail light / Brake light
/Parking light
Reverse light
Amber turn signal /
Hazard light
Brake light
Parking lights
Fog light
The left lever controls the turn signals and lights. To
turn on the parking lights, instrument panel lights
and other external lights, rotate the lever knob up
one click. To turn on the headlights, rotate the lever
knob up one more click. You should turn off the
lights before exiting the vehicle. If you accidentally
leave the lights on, a buzzer will sound to remind
you to turn them off.
To turn on the bright lights (hi-beams), push the
lever away from you while the headlights are
on. The bright light indicator will illuminate on
the dash. To temporarily turn on the hi-beams,
pull the lever toward you. When you release the
lever, the hi-beams will turn off. For a left turn
move the lever down until it clicks. For a right
turn move the lever up until it clicks.
Below the steering column to the left is the Fog
Lights switch. When the taillights or headlights
are turned on, pressing this switch will activate
the fog lights.
2726
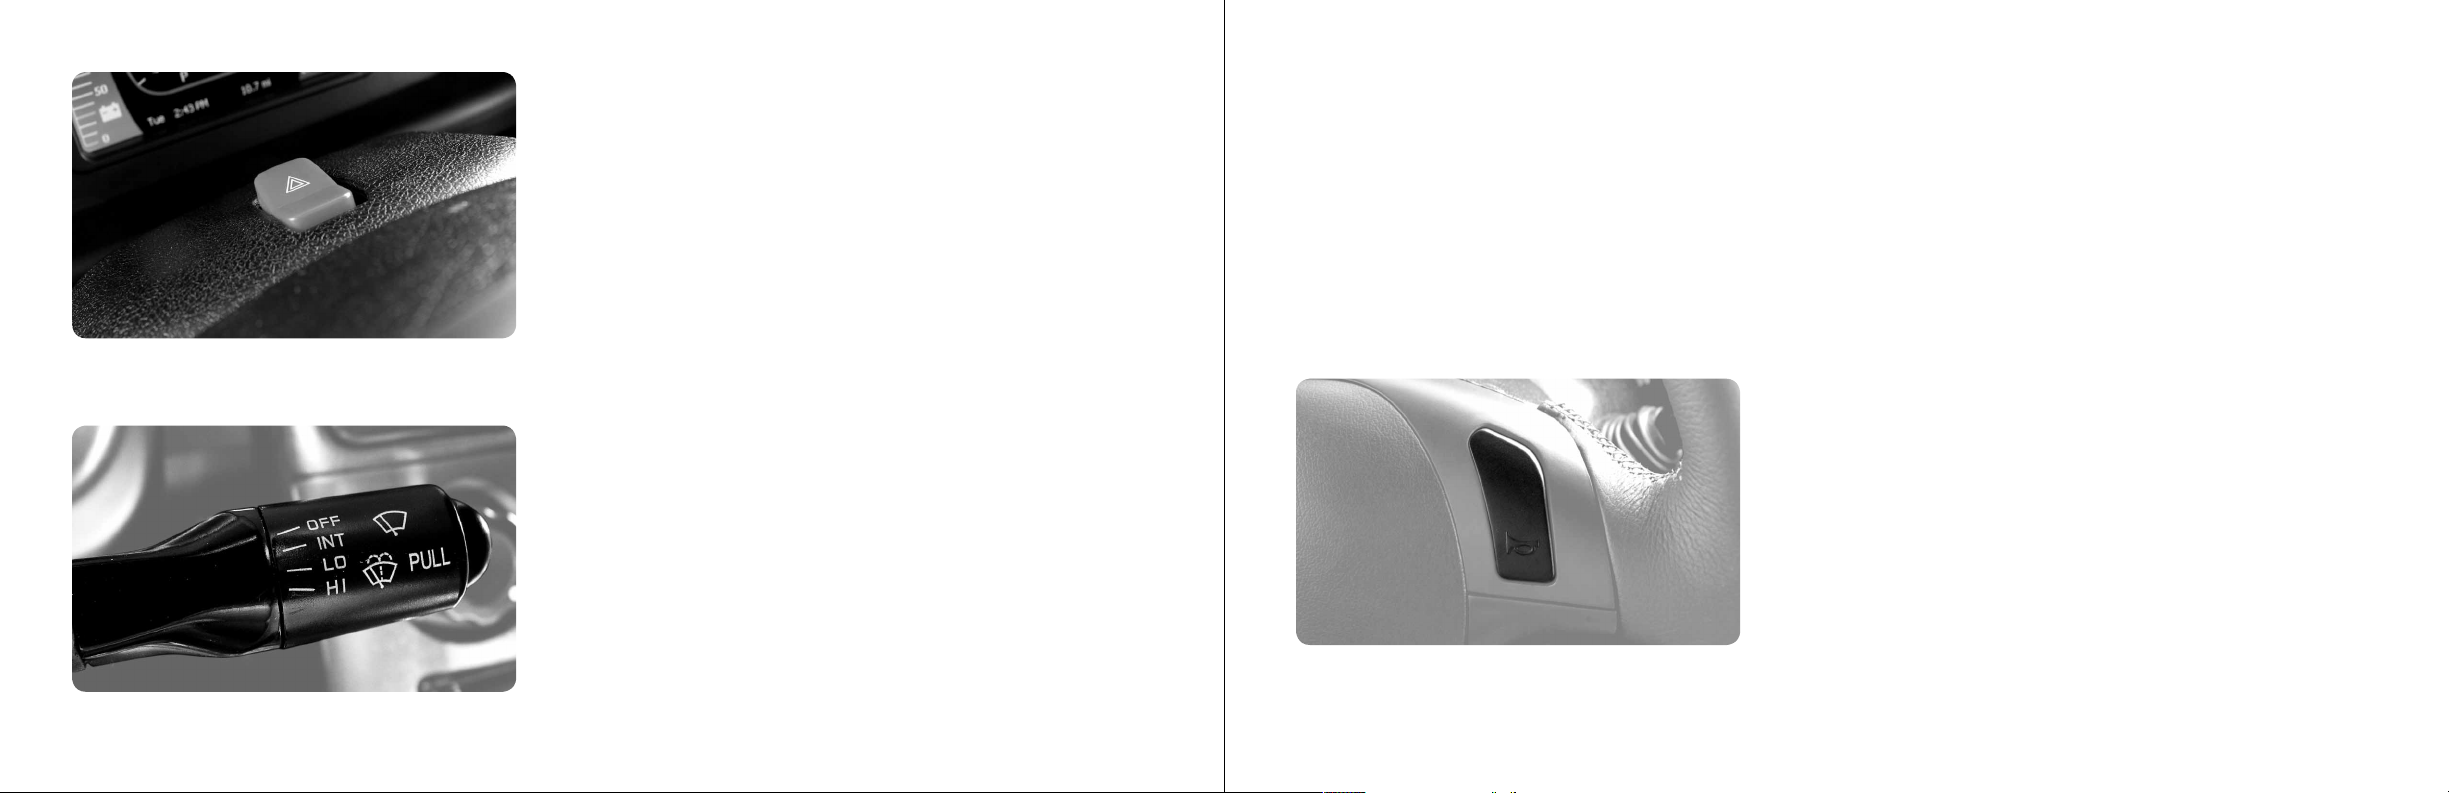
HAZARD WARNING FLASHER
Your vehicle’s hazard warning flasher is an
emergency warning system. When you activate
it, front and rear directional signals will flash
intermittently. Use it when your vehicle is
disabled on or near the road. It warns other
drivers to steer clear of you and your vehicle.
To activate the warning flashers, press the red
button on the top of of the steering wheel.
To turn the warning flashers off, press the red
button again.
WINDSHIELD WIPERS AND WASHER
The wiper lever to the right of the steering
column controls the windshield wipers and
washer. Move the wiper signal lever down to turn
on the windshield wipers (1-click intermittent,
2-clicks low speed, 3-clicks high speed). Move
the wiper lever back up to turn off. Pull the wiper
lever momentarily toward the driver to spray the
windshield with fluid from the washer reservoir.
CAUTION
A damaged or worn wiper blade may reduce vision and impair you from seeing well
enough to drive safely. A worn wiper blade could damage windshield glass. If your wiper
blades become damaged or worn, please replace them immediately.
HORN
Press one of the buttons on the steering wheel
to activate the horn.
2928

KEY SWITCH TIRE PRESSURE MONITORING SYSTEM
Unplug cord before inserting the key into switch. The car must be in park before
you begin the starting sequence. When the key is turned clockwise to the first
“ACC” position the accessory circuits will be on (radio, lights, etc.). Turn the
key past “ACC” to “ON”, press the brake, turn key to “STAR T” (the red hazard
symbol on the dash turns off) after starting it will spring back to on. There is no
audible sound when the car is on. (If the key is in the “ON” position and a buzzer
sounds, there is an alert condition such as a door open or seatbelt not fastened.)
If the charging light is illuminated, unplug the charger before starting to drive.
CAUTION
Do not leave the key in the “ON” position when not in use. Doing so will discharge
the batteries.
WARNING
Never turn the key to the “OFF” position while the vehicle is in motion. This could lead
to loss of speed and loss of control of the vehicle. This can cause a serious accident.
Each tire should be checked monthly when cold and inflated to the inflation pressure
recommended by the vehicle manufacturer on the vehicle placard or tire inflation pressure
label. (If your vehicle has tires of a different size than the size indicated on the vehicle
placard or tire inflation pressure label, you should determine the proper tire inflation
pressure for those tires.)
As an added safety feature, your vehicle has been equipped with a tire
pressure monitoring system (TPMS) that illuminates a low tire pressure
telltale when one or more of your tires is significantly under-inflated.
Accordingly, when the low tire pressure telltale illuminates, you should stop and check
your tires as soon as possible, and inflate them to the proper pressure. Driving on a
significantly under-inflated tire causes the tire to overheat and can lead to tire failure.
Under-inflation also reduces fuel efficiency and tire tread life, and may affect the vehicle’s
handling and stopping ability. Please note that the TPMS is not a substitute for proper tire
maintenance, and it is the driver’s responsibility to maintain correct tire pressure, even
if under-inflation has not reached the level to trigger illumination of the TPMS low tire
pressure telltale.
Your vehicle has also been equipped with a TPMS malfunction indicator to
indicate when the system is not operating properly.
3130

The TPMS malfunction indicator is combined with the low tire pressure telltale. When the
system detects a malfunction, the telltale will flash for approximately one minute and then
remain continuously illuminated. This sequence will continue upon subsequent vehicle
start-ups as long as the malfunction exists.
When the malfunction indicator is illuminated, the system may not be able to detect or
signal low tire pressure as intended. TPMS malfunctions may occur for a variety of reasons,
including the installation of replacement or alternate tires or wheels on the vehicle that
prevent the TPMS from functioning properly. Always check the TPMS malfunction telltale
after replacing one or more tires or wheels on your vehicle to ensure that the replacement
or alternate tires and wheels allow the TPMS to continue to function properly.
VENTILATION CONTROLS
There are 3 knobs to control the ventilation system. The left knob controls the temperature. Turn
it counterclockwise to increase the temperature and clockwise to decrease the temperature.
The center knob controls the volume of air. Turn it clockwise to increase airflow and
counterclockwise to decrease airflow. If the vehicle is equipped with Air Conditioning, after
selecting the volume of air you desire by turning the center knob, you may press the center
knob to turn on the AC compressor. A red light comes on in the center of the knob to
indicate the AC is on. Pressing the center knob a second time will turn the AC off.
To turn the heat on, turn the temperature knob on the left to red (warm air) and the adjust
the volume of air using the center knob. The heater icon will illuminate on the dash.
The right knob controls the airflow. By selecting different positions you can choose where to
have the air enter the passenger compartment. Turning the knob to defrost allows the air to
blow across the face of the windshield to de-fog it.
Below the center knob is a control that slides from left to right. Moving it to the left position
will recirculate the air in the vehicle and moving it to the right position will allow outside air
to enter the vehicle through the ventilation system.
To defog the front winshield, press the button to turn on the A/C and adjust the temperature
to room temperature or above using the temperature selection knob. Set the fan speed to
your preference, turn the vent knob clockwise to defrost, and turn off recirculation by sliding
the selector to the right.
To defrost, press the button to turn off the A/C, set the temperature to hot, turn on
recirculation by moving the slider to the left, and select the defrost mode on the vent knob
by rotating it to clockwise. After a few minutes, you may want to use the wipers to assist.
3332
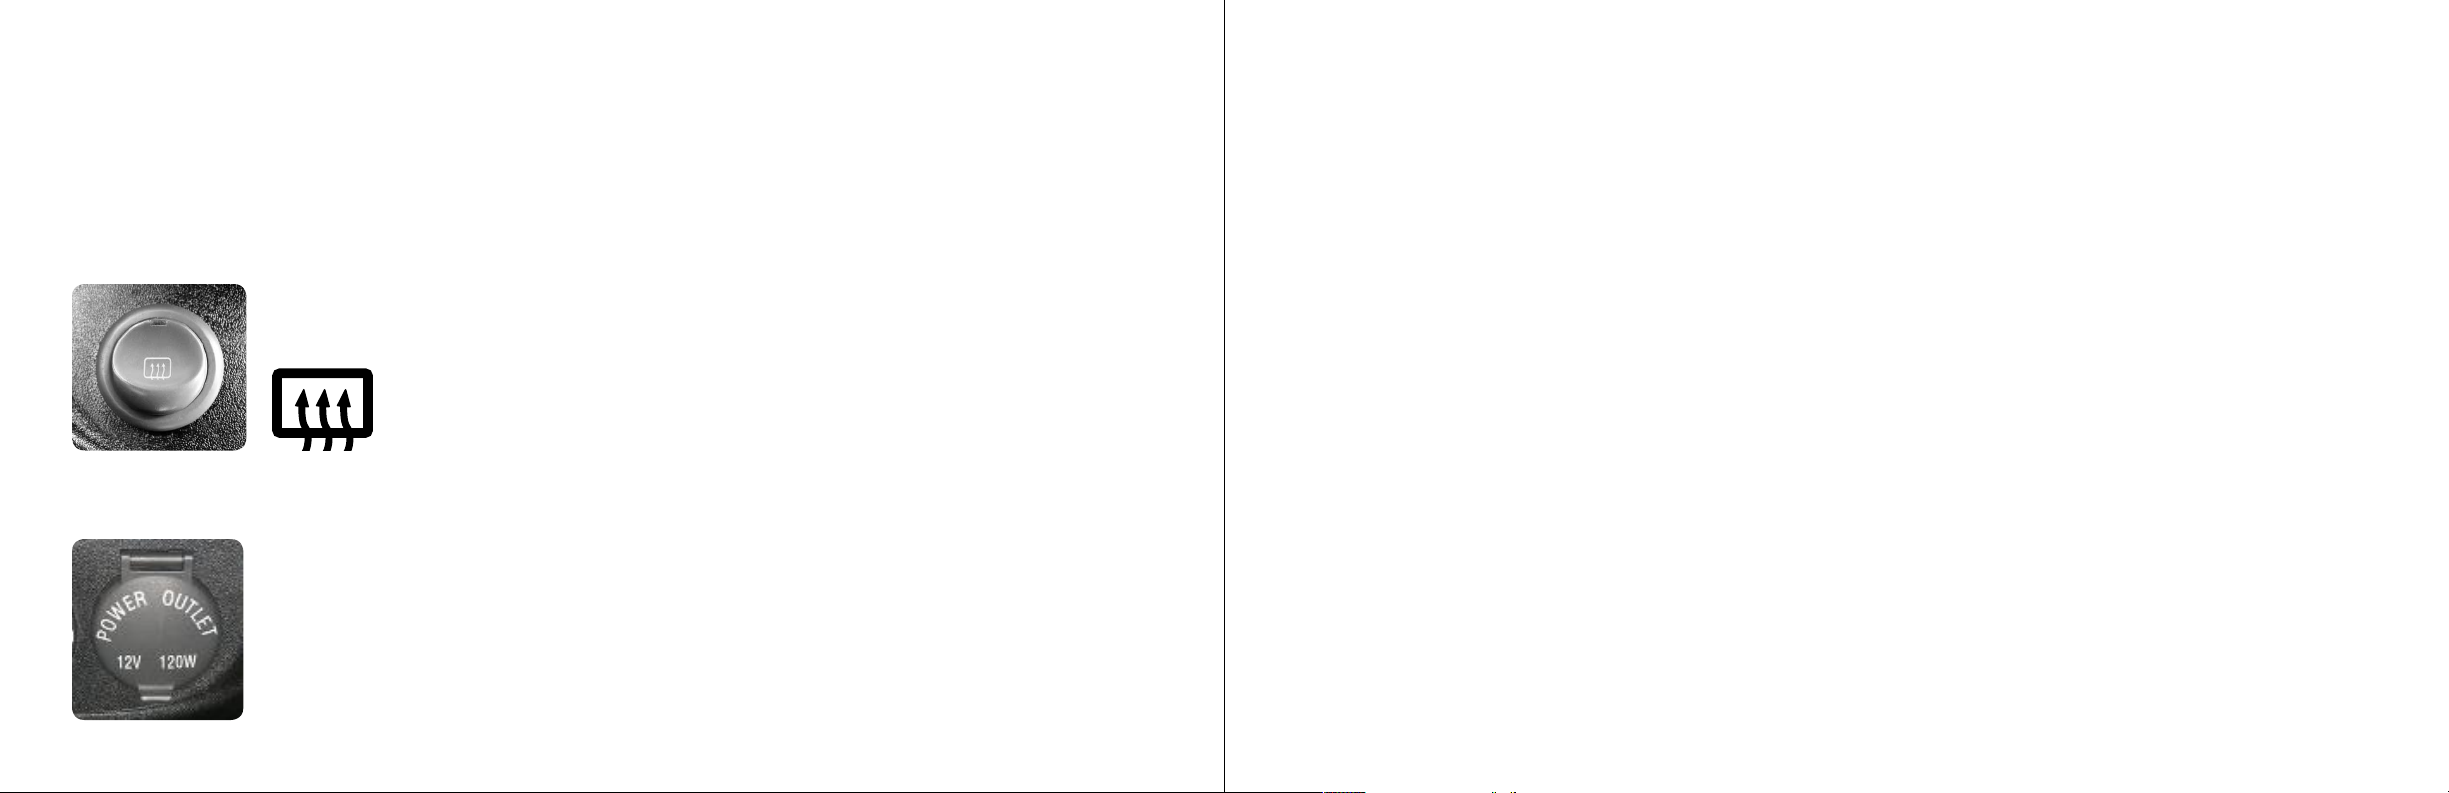
REAR DEFROSTER/12V ACCESSORY JACK/AIRBAG SYSTEM AIRBAG SYSTEM CONTROLS
Below the radio are 2 console- mounted Accessory controls. On the left is the Rear
Defroster, and on the right is the 12V accessory jack.
Your vehicle is equipped with driver and passenger airbags. The driver airbag is located in
the center of the steering column; the passenger airbag is located in the console in front
of the passenger.
When infants in rear-facing child safety seats and children who are unrestrained are placed
REAR DEFROST
Press the rear defroster button to turn on the rear window defroster.
The indicator light will come on. Press the button a second time to turn it off.
in the front seat with an airbag, they may be too close to an inflating airbag in the event
of a crash. An airbag will inflate at speeds up to 200 mph, which can hurt passengers who
are too close to the airbag. In addition, because of the child’s size, the airbag can strike
him/her on the head or neck, resulting in serious or fatal injuries.
To ensure your child is as safe as possible in a vehicle, never place him/her in front of an
airbag. If your child rides in the WHEEGO, move the seat as far back as possible, away
from the airbag. Infants will only be safe in their rear-facing child safety seats if the airbag
has been switched off.
12V ACCESSORY JACK
The 12 volt accessory jack can be used to provide power for 12 volt
accessories that have a cord with a “lighter plug” style connector.
The maximum power available is 10 Amps of 12 Volt power. Lift the
cover to expose the 12 Volt accessory jack.
The passenger airbag may be turned on or off by inserting the ignition key into the switch
located on the right side of the lower dash and turning it to the appropriate position.
When the passenger airbag feature is turned off, the airbag will not deploy in the event of
an accident.
3534

RADIO - AM/FM/CD/USB/MP3 RECEIVER
INTERIOR DOME LIGHT
The interior dome light illuminates the passenger compartment of the vehicle. There are
three switch positions:
Forward (toward you) = On
Center = Door activated (on when a door is open)
Back (away from you) = Off
Ejects the disc
Detaches the panel Control dial Auxiliary input jackRemote sensor
Loading slot Display window
USB input jack
Included in this section are the basics for operating the radio/CD player. Please refer to the
JVC Owner’s Manual for a detailed description of its operation. The ON-OFF/Source button
is in the upper left corner of the display, just below the Eject button. Press and hold the Source
button to turn the radio on or off. The round knob controls the volume. Press the controls to
the left of the Menu button to change the station tuner. Press the up or down arrow to scroll
through the preset stations. Press the Source button to change the source (AM/FM/AUX/etc.).
The USB input jack will communicate with iPhones, iPods, and thumb drives.
3736

WINDOWS, DOORS AND MIRRORS
A. Power assisted windows
B. Power assisted outside mirrors
C. Door locks
D. Remote charging door release
E. Rear window and tailgate
A. POWER ASSISTED
WINDOWS
The windows in your
WHEEGO vehicle are
motor operated. Push on
the button located on the
inner door handle to roll
the window down and pull
it gently to roll the window
up.
B. POWER ASSISTED OUTSIDE MIRRORS
The power controls for the outside mirrors are located on the
driver’s side inner door handle at the top. Move the selector to
choose the left or right hand mirror and then press one of the four
directional buttons to change the position of the mirror.
C. DOOR LOCKS
Press the electronic lock/unlock button to electronically lock or
unlock the doors. You may also manually push down or pull up the
door lock buttons.
There are lock and unlock buttons on the vehicle key that will
electronically lock and unlock the doors. The doors can also be
locked and unlocked manually with the key. If the doors are locked
using the remote control, they should also be unlocked using the
remote control. Otherwise, the hazard warning lights will begin to
flash.
NOTE: Should the hazard flashers start to automatically flash after
turning the vehicle ON, remove the key from the switch, press
the lock button on the key, then press the unlock button, put the
key back into the switch and turn the vehicle back ON to restore
normal operation of the vehicle.
3938

D. REMOTE CHARGING PORT DOOR RELEASE
The charging port door is released when you pull up on the
remote lever located on the floor next to the driver’s door
(toward the rear of the driver seat).
HOOD RELEASE
The hood release is located to the left of the brake pedal in front
of the driver’s door. Pull it gently toward you to open the hood.
E. REAR WINDOW AND TAILGATE
To unlock and open the rear window, press the open tailgate icon on the key
fob for three seconds. Raise the window using the finger lift. Pull the left and
right red latch releases at the top corners of the tailgate simultaneously to
release and open the gate. Close the tailgate before lowering and latching
the rear window. Alternately the tailgate can be opened by using the key.
TAILGATE LATCH RELEASES
4140

C. SHIFTER AND PARKING BRAKE
The transmission positions are:
P - Park Stop / out of gear
R - Reverse Go backward
N - Neutral Stay in place / remain in gear
D - Drive Forward using 550 amps of motor controller power
2 - Sport Forward using 650 amps of motor
controller power generating additional low end
power or torque for faster off-the-line acceleration
While in “Drive,” you can press the “Econo” button
on the right side of the shifter to go into Econo Mode
to increase range: Forward using 475 amps of motor
controller power, limiting acceleration and increasing
regenerative braking upon accelerator pedal release.
Park (P)
With the key turned ON and the brake depressed, push in the button on the left of the
shifter knob and move the shifter to Park (P) position. Pull up on the emergency brake.
The car is now ready to be turned off.
Reverse (R)
With the key turned ON and the brake depressed, release the emergency handbrake.
Push in the button on the left of the shifter knob and move the shifter to Reverse (R)
position. Release the brake and push down on the accelerator to move the vehicle in
reverse. The top speed in the reverse direction is limited for safety.
Neutral (N)
With the key turned ON and the brake depressed, push in the button on the left of the shifter
knob and move the shifter to Neutral (N) position. The car will remain in gear.
It will roll forward if the brake is released, but will not accelerate if the accelerator is pressed.
When you are in Econo mode, a green “E” and the
words “Econo Mode” appear on the console. To get
out of Econo mode, press the button again.
Drive (D)
With the key turned ON and the brake depressed, release the emergency handbrake.
Push in the button on the left of the shifter knob and move the shifter to the Drive (D) position.
Release the brake and push down on the accelerator pedal to move the vehicle forward.
4342

Sport (2)
With the key turned ON and the brake depressed, release the emergency handbrake if it
is engaged. Push in the button on the left of the shifter knob and move the shifter to the
Sport (S) position. Release the brake and push down on the accelerator pedal to move
the vehicle forward in Sport mode (using 650 amps of motor controller power, generating
additional low end power or torque for faster off the line acceleration). You can also shift
into Sport mode while you are driving in D.
EconoMode (E)
Depress the Econo Mode button on the right side of the shifter while in Drive to put the
car in Econo mode to increase range: Forward using 475 amps of motor controller power,
limiting acceleration and increasing regenerative braking upon accelerator pedal release.
When you are in Econo mode, a green “E” and the words “Econo Mode” appear on the
console. To get out of Econo mode, press the button again.
PARKING BRAKE
On the floor between the seats is the hand actuated parking brake. This brake must be
engaged when parking the vehicle or prior to exiting the vehicle. Grasp the brake and pull
up to engage. Press the silver button on the end and lower the brake handle to release the
parking brake.
NOTE
The parking brake is adjustable and should be checked periodically by a trained
service technician as shown in the vehicle maintenance schedule.
WARNING
Always turn the vehicle OFF, put the car in Park and engage the parking brake prior
to exiting the vehicle or it could roll and cause damage or injury.
Leaving children unattended in a vehicle is dangerous. Children should be warned not to
touch the parking brake or the shifter lever. Don’t leave the keys in the ignition. A child
could operate controls or move the vehicle.
Be sure the parking brake is fully disengaged before driving. Failure to do so can lead to
brake problems due to excessive heating of the rear brakes.
4544

D. FOOT PEDALS
E. SEATS
BRAKE PEDAL
The brake pedal is located on the driver’s floor to the left of the accelerator pedal. To slow
or stop the vehicle, firmly press the foot brake pedal.
Riding the brakes can lead to brake failure and possibly an accident. Driving with your
foot resting or riding on the brake pedal can result in abnormally high brake temperatures,
excessive lining wear, possible brake damage, and reduced driving range. Excessive
brake wear could lead to not having full braking capacity in an emergency. Your vehicle is
equipped with Regenerative Braking. This allows the kinetic energy recovered from the
motion of the car during braking to be stored in the battery pack for later use.
ACCELERATOR PEDAL
The accelerator pedal is located on the driver’s floor next to the center console and is used
to control your speed. Pressing down on the pedal will increase vehicle speed.
WARNING
Always accelerate carefully to prevent possible injury to yourself or others.
1. Adjustable Bucket Seats
2. Head Rests
3. Seat Belts
4. Child Restraints
5. Airbag System
6. Impact Sensor
4746

1. ADJUSTABLE BUCKET SEATS
The driver and passenger seats have a metal bar located under
the front edge of the seat to allow the seats to be moved toward
the front or rear of the vehicle as needed by the passengers.
They have a lever on the outside rear of the seat base to adjust
the angle of the seat back.
The 2 knobs on the front outside edge of the seat base adjust
the angle of the seat base. The front knob controls the angle of
the front of the seat base and the rear knob controls the same
adjustment on the rear of the seat base.
2. HEAD RESTS
Your vehicle is equipped with driver and passenger head rests
which are designed to help protect the seat occupant in the
event of a crash. All occupants, including the driver, should
not operate the vehicle or sit in a vehicle’s seat until the head
restraints are placed in their proper positions.
The head rest should be adjusted to fit the occupant of the seat:
the center “hole” in the head rest cushion should line up with
the back of the occupant’s head for the maximum cushion and
protection during a crash.
The head rest is composed of the upper cushion and two
adjustable placement bars. To raise the upper cushion, put your
fingers under it and pull it up to the desired height.
To remove the cushion completely, press the lever down and
lift the cushion all the way off. Always replace the head cushion
before operating the car: line up the placement bars into the
holes at the top of the seats, depress the lever at the base, and
lower the cushion into position so it “clicks” and locks into place.
All head rests must be reinstalled to properly protect vehicle
occupants.
4948

3. SEAT BELTS
The WHEEGO is equipped with safety belts for driver and passenger. Research has shown
that safety belts save lives. Safety belts can reduce the seriousness of injuries in a single
vehicle accident. Some of the worst injuries happen when people are thrown from the
vehicle. Safety belts provide protection and they reduce the risk of injury caused by striking
the inside of the vehicle. Everyone needs to buckle up all the time, even for short trips.
WARNING
Wearing a safety belt incorrectly is dangerous. Wearing your safety belt incorrectly
could increase your risk for injury in a collision. You could suffer internal injuries or
even slide out of part of the belt. Use the instructions in this manual to insure you
and your passengers are wearing the safety belts properly.
Two people should never be belted into a single safety belt. People belted together
can crash into one another in an accident, causing injury. Never use a lap/shoulder
belt for more than one person, regardless of the size of the person.
PROPER USE OF YOUR LAP AND SHOULDER BELT
1. Enter the vehicle and sit back.
2. The safety belt buckle is located just behind the outer side edge of the seat. Grasp
the buckle and pull out the belt. Slide the buckle up the webbing as far as necessary
to make the belt go across your lap.
3. When the safety belt is long enough, insert the buckle into the latch until you hear a click.
4. Position the lap belt across your thighs and below your abdomen. To remove slack in
the lap belt portion of the belt, pull up on the shoulder belt. A snug belt reduces the
risk of sliding under the belt in a collision. Make sure the button on the latch faces
upward or outward so that you are able to unbuckle your safety belt quickly.
5. Position the shoulder belt on your chest so that it is comfortable and not resting on
your neck. The retractor will withdraw any slack in the belt.
6. To release the belt, push the red button on the latch. If necessary, slide the
buckle down the webbing to allow it to retract fully. A frayed or torn belt could
rip apart in a collision and leave you with no protection. Inspect the belt system
periodically, checking for cuts, frays or loose parts. Damaged parts must be replaced
immediately. Do not modify or disassemble the system. Seat belt assemblies
must be replaced after a collision if they have been damaged (bent retractor, torn
webbing, etc.).
5150

WARNING
In a collision, you and your passenger can suffer injuries, including fatalities, if
you do not have your seat belts securely and properly latched. You can strike the
interior of your vehicle or your passenger, or you can be thrown out of the vehicle.
Always be sure you and others in your vehicle have their seat belts securely and
properly latched.
SEAT BELTS AND PREGNANT WOMEN
We recommend that pregnant women use seat belts throughout their pregnancy. Keeping
the mother safe is the best way to keep the baby safe. Pregnant women should wear the
lap part of the belt across the thighs and as snug across the hips as possible. Keep the belt
low so that it does not come across the abdomen. That way the strong bones of the hips
will take the force if there is a collision.
Maximum occupancy is limited to 2 people (including the driver) in the WHEEGO LiFe.
It is extremely dangerous to ride in a cargo area of a vehicle. In a collision, people
riding in these areas are more likely to be seriously injured or killed.
Do not allow people to ride in any area of your vehicle that is not equipped with
seats and seat belts.
Be sure everyone in your vehicle is in a seat and wearing a seat belt.
WARNING
Using a seat belt extender when not needed can increase the risk of injury in a
collision. Only use when the seat belt is not long enough when it is worn low and
snug and in the recommended seating positions.
5352

4. CHILD RESTRAINTS INFANTS AND CHILD RESTRAINTS
Safety experts recommend that children ride rearward-facing in the vehicle until
they are at least one year old and weigh at least 20 lbs (9 kg). Two types of child
WARNING
Everyone in your vehicle needs to be buckled up at all times–babies and children,
too. Every state in the United States and all Canadian provinces require that small
children ride in proper restraint systems. This is the law, and you can be prosecuted
for ignoring it. There are different sizes and types of restraints for children from
newborn size to the child almost large enough for an adult safety belt. Always check
the child seat owner’s manual to ensure you have the correct seat for your child. Use
the restraint that is correct for your child. In a collision, an unrestrained child, even
a tiny baby, can become a missile inside the vehicle. The force required to hold an
infant could become so great during an accident that you could not hold the child
no matter how strong you are. The child and others could be badly injured. Any child
riding in your vehicle should be in a proper restraint for the child’s size.
restraints can be used rearward-facing: infant carriers and “convertible” child seats.
The infant carrier is only used rearward-facing in the vehicle. It is recommended for children
who weigh up to about 20 lbs (9 kg). “Convertible” child seats often have a higher weight limit in
the rearward-facing direction than infant carriers do so they can be used rearward-facing by children
who weigh more than 20 lbs (9 kg) but are less than one year old. Both types of child restraints
are held in the vehicle by the lap/shoulder belt. This vehicle is equipped with a LATCH (Lower
Anchors and Tethers for CHildren) child restraint anchorage system on the passenger seat.
Fasten the child safety seat’s lower attachments to the vehicle’s lower anchors. Tighten and
adjust according to the instructions and check for a secure fit. If the child seat has an upper
tether, pull the tether strap over the seat and secure it to the tether anchor on the lower back
of the vehicle seat. Improper installation can lead to failure of an infant or child restraint. It
could become loose in a collision. The child could be badly injured or killed. Follow the child
seat manufacturer’s directions exactly when installing an infant or child restraint.
Refer to the airbag section for important information regarding passenge airbags. If you have a child
or infant on the passenger seat, turn the passenger airbag off.
Turn the passenger airbag system off if you have a child or infant in the passenger seat; refer
to the airbag section.
5554

1. Attach the lower anchor strap to the two anchor
points located between the bottom cushion and the
back support.
2. Raise the head rest, put the strap(s) under it, then
attach to the rear anchor point on the lower back side
of the seat.
TIPS FOR GETTING THE MOST OUT OF YOUR CHILD RESTRAINT
• Before buying any restraint system, make sure that it has a label certifying that it
meets all applicable Safety Standards. The manufacturer also recommends that you
try a child restraint in the vehicle seats where you will use it before you buy it.
• The restraint must be appropriate for your child’s weight and height. Check the
label on the restraint for weight and height limits.
• Carefully follow the instructions that come with the restraint. If you install the
restraint improperly, it may not work when you need it.
• All passenger seat belts are equipped with cinching latch plates.
• Seat belts are designed to keep the lap portion tight around the child restraint so
that it is not necessary to use a locking clip. If the seat belt has a cinching latch
plate, pulling up on the shoulder portion of the lap/shoulder belt will tighten the belt
(the cinching latch plate will keep the belt tight; however, any seat belt system will
loosen with time so check the belt occasionally and pull it tight if necessary).
• If the belt still cannot be tightened, or if pulling and pushing on the restraint loosens
the belt, disconnect the latch plate from the buckle, turn the buckle around and
insert the latch plate into the buckle again. If you still cannot make the child restraint
secure try a different seating position.
• Buckle the child into the restraint exactly as the manufacturer’s instructions tell you.
• When your child restraint is not in use, secure it in the vehicle with the seat belt or
remove it from the vehicle. Do not leave it loose in the vehicle. In a sudden stop or
collision it could strike the occupants or seat backs and cause serious personal injury.
5756

NOTE
For additional information refer to seatcheck.org or call 1-866-SEATCHECK.
OTHER CHILDREN AND CHILD RESTRAINTS
Children who weigh more than 20 lbs (9 kg) and who are older than one year can ride
forward-facing in the vehicle. Forward-facing child seats and convertible child seats used
in the forward-facing direction are for children who weigh 20 to 40 lbs (9 to 18 kg), and
who are older than one year. These child seats are also held in the vehicle by the lap/
shoulder belt. The belt-positioning booster seat is for children weighing more than 40
lbs (18 kg), but who are still too small to fit the vehicle’s seat belts properly. If the child
cannot sit with knees bent over the vehicle’s seat cushion while the child’s back is
against the seat back, they should use a belt-positioning booster seat. The child and beltpositioning booster seat are held in the vehicle by the lap/shoulder belt.
CHILDREN TOO LARGE FOR BOOSTER SEATS
Children who are large enough to wear the shoulder belt comfortably, and whose legs are
long enough to bend over the front of the seat when their back is against the seat back,
should use the lap/shoulder belt.
• Make sure that the child is upright in the seat.
• The lap portion should be low on the hips and as snug as possible.
• Check belt fit periodically. A child’s squirming or slouching can move the belt out of
position.
• If the shoulder belt contacts the face or neck, move the child closer to the center
of the vehicle. Never allow a child to put the shoulder belt under an arm or behind
their back. Not all child restraint systems will be installed as we have described here.
Again, carefully follow the instructions that come with the child restraint system.
Transporting Pets
Pets should be restrained in a pet harness or in a pet carrier that is secured by seat belts.
5. AIRBAG SYSTEM
Your vehicle is equipped with driver and passenger front airbags. The driver airbag
is located in the center of the steering column; the passenger airbag is located in the
console in front of the passenger. Do not place any object over or near the airbag on the
instrument panel, because any such objects could cause harm if the vehicle is in a crash
severe enough to cause the airbag to inflate. The airbag system is a supplemental safety
system; the driver and passenger should always wear their lap/shoulder belt to minimize
the risk of severe injury or death in the event of a crash.
5958

The passenger airbag may be turned on or off by inserting
the ignition key into the switch
below the dash on the passenger side, and turning it to the
appropriate position. When the passenger airbag
feature is turned off, the airbag will not deploy in the event of
an accident.
To turn the passenger airbag back on, insert the key and turn
it to the “on” position.
When infants in rear-facing child safety seats and children
who are unrestrained are placed in the front seat with an
airbag, they may be too close to an inflating airbag in the
event of a crash. An airbag will inflate at speeds up to 200
mph, which can hurt passengers who are too close to the
airbag. In addition, because of the child’s size, the airbag can
strike him/her on the head or neck, resulting in serious or
fatal injuries.
To ensure your child is as safe as possible in a vehicle, never
place him/her in front of an airbag. If your child rides in the
WHEEGO LiFe, move the seat as far back as possible, away
from the airbag, and turn the passenger airbag off. Infants
will only be safe in their rear-facing child safety seats if the
airbag has been switched off.
Passenger air bag ON position
Passenger air bag OFF position
6. IMPACT SENSOR / BATTERY DISCONNECT
The LiFe is equipped with an Impact Sensor that disconnects all power from the lithium
battery pack in the event of an impact of 30G or greater, and/or airbag deployment. This
enables emergency responders arriving at an accident scene to work on victims without
worrying about the danger of shock (to either the victims or to themselves) from the
lithium battery pack. Emergency personnel should turn the ignition key off and take it out
to make sure the car is turned off. Only a Wheego authorized service technician should
reconnect the battery.
6160

5. CHARGING YOUR CAR
A. CHARGING CABLES AND OPTIONS
A. Charge cables and options
B. Charging the vehicle
C. Long term storage
D. Range information
CAUTION
Do The Wheego LiFe is designed to be plugged in when not in use; the batteries
gradually discharge when the car is not plugged in. Damage due to failure to keep
batteries properly charged is not covered under your warranty. Batteries must not
be allowed to fully discharge; if the batteries fully discharge, your warranty is void.
Your WHEEGO vehicle is
equipped with three on-board
chargers totaling 27amps.
You can charge the LiFe
using either a 110V/120V or
220V/240V power supply.
Your car comes with a 120V
cable with a standard plug on
the end. We offer the 120V
charging option so that you
can charge your car anywhere
there is standard 120V power.
If you are only driving your
car about 30 miles a day, you
can recharge overnight using
120V power. If however, you are
driving greater distances each
day, it is recommended that
you purchase a 220V charging
station for your home. It takes
approximately 5 hours to
charge the car from 50% to
100% using 220V power.
6362

If you purchase the recommended 220V charging station, it comes equipped with a
hardwired charging cord with J1772 standard connection as shown.
The J1772 charge port receptacle on the car is an industry standard, so your car can be
charged from any 120V or 240V public charging station equipped with the J1772 connector.
The charging status lights are located in the charging port. When the vehicle is charging,
the three LEDs in the charge port will flash, indicating power input to the charger. (If you
are using the 120V cord, only one LED will flash green, indicating that only one of the three
on-board chargers are being used.)
B. CHARGING THE VEHICLE
To charge the batteries, park the vehicle, put it in Park, set the parking brake, and turn
the key OFF. Open the charge port door by pulling up the release lever to the left of the
driver’s seat on the floor. If you are using a charging station, line up the pins and plug the
cord from the station into the car.
If you are using the 120V cord, plug the power cord into the power source first and
then plug the cord into the vehicle. (You may use a UL listed 120-Volt 3-wire grounded
extension cord if needed. Use a 14-gauge cord for lengths 25 feet or less and a 12-gauge
cord for lengths 50 feet or less.)
WARNING
Use only the correct gauge 120V extension cords as listed above. An incorrect
gauge extension cord could result in fire or heat damage.
If the car is turned on during charging, an indicator light will be activated to remind you to
disconnect the charge cord.
When the charging cycle has completed, the green LED(s) in the charging port will stay lit.
A storage bag has been provided for your 120V power cord so it can be easily kept in the
vehicle at all times.
Whenever possible, you should charge your car. Lithium batteries are different from lead
acid in that lithium batteries will lose their charge if they are sitting idle. If you plan to go
on vacation and leave your car in your garage, it must be plugged in. The charging system
will “wake up” periodically and recharge the battery if needed. If the car is left unplugged,
your batteries will gradually lose their charge. If your batteries are allowed to fully
discharge, your battery warranty will be voided.
6564

It is your responsibility to keep your batteries charged at all times. You cannot accidently
“overcharge” your batteries; the charging system will shut itself off when the car is fully
charged. Note: in order to safeguard your batteries, only the top 90% of your charge is
shown on the BDI gauge. When you hit 0% on the BDI gauge, you actually have 10% battery
charge left. Your car will shut down at this point so that you do not void your warranty. You
need to recharge your car as soon as possible so it does not drain below this point.
CAUTION
Only use approved power stations, and power cords supplied with your WHEEGO
vehicle or replacement cords purchased from your Dealer when recharging your
battery pack. Should your cord become misplaced or damaged, you should obtain
a replacement power cord from the Dealer.
LONG TERM STORAGE
Should you need to store your WHEEGO vehicle for a period of more than a week, you will need to
make sure it is plugged in. Do not store your car at extreme high or low
temperatures as this will
decrease the life of your battery pack.
D. RANGE INFORMATION (Driving Range between Charges)
How far you can travel on a full charge is subject to a lot of factors. You may be able to get
as much as 100 miles or more. Depending on how you drive, you may get far fewer miles.
Factors that will reduce your range include higher average speeds, local driving terrain
(hills), use of the heater and air conditioner, fast starts and stops, and the local ambient
temperature. Running your air conditioner or heater in a normal mode will reduce your
maximum range by about 8%-15%.
As an alert to having limited range remaining and to help maximize your range when the
battery pack capacity is low, your car has a Power Conserve Mode. When the battery pack
is down to 10% capacity on the BDI gauge, the air conditioner and the heating system will
automatically shut off. At 5% remaining capacity, the maximum speed of the vehicle will
be reduced to about 45 mph. vThis should give you enough power to get off the road and
either drive somewhere to recharge or call to have the vehicle towed.
6766

6. DRIVING YOUR CAR
A. Operating sequence
B. Power Conserve modes
C. Transporting your vehicle
A. OPERATING SEQUENCE
B. POWER CONSERVE MODE
The Power Conserve Mode is designed to protect the batteries and the motor. Battery
low voltage would coincide with a low charge reading on the BDI gauge on the dash.
When the battery pack has been discharged to 10% remaining power, the controller will
disable the heating and optional AC system to conserve power. At 5%, the controller will
limit the motor to a top speed of about 45 mph. This will allow an increase in range on the
remaining battery power and assist the driver in getting the vehicle to a safe location to
recharge the batteries.
1. Disconnect the power cord, and store it in a safe place (or return cord to charging station holder).
2. Enter the vehicle and close both doors.
3. Adjust height of head rests.
4. Have all occupants buckle their seat belts.
5. Confirm the shifter is in Park.
6. Release the parking breake.
7. Insert key into ignition and turn clockwise to the first AAC position the accessory
circuits will be on (radio, lights, etc.) Turn the key past AAC to ON.
8. Press the brake.
9. Turn the key to START (red hazard symbol on the dash turns off), then turn key back to
ON. There is no audible sound whtn the car is on.
10. Move the shifter to drive, sport or reverse.
11. Release the brake pedal, press the accelerator and begin to drive.
C. TRANSPORTING YOUR VEHICLE
Should you need to transport your WHEEGO vehicle, the best way is to use a car carrier or
a trailer. Secure the vehicle properly to the trailer and tow the trailer at speeds no greater
than 55 mph. Secure any loose items that may be inside the vehicle. You may also use a
tow dolly that lifts the front 2 wheels off of the ground. Do not tow the vehicle on all 4
wheels; this car is different from an internal-combustion vehicle. Towing it on all 4 wheels
affords significant wear and tear on the car as the drive train would be spinning the entire
time the car is towed. Use a trailer, car carrier or tow dolly.
6968

7. VEHICLE MAINTENANCE
A. Batteries and charging
B. Battery disposal
C. Brakes and fluid level
D. Tires
E. Tire changing
F. Fuse blocks
G. Key replacement, Key fob battery replacement
H. Care and cleaning
I. Maintenance schedule
J. Fluids and lubricants
7170

A. BATTERIES AND CHARGING
CAUTION
The Wheego LiFe is designed to be plugged in when not in use; the batteries
gradually discharge when the car is not plugged in. Damage due to failure to keep
batteries properly charged is not covered under your warranty. Batteries must not
be allowed to discharge below 10% (this shows as 0% on your BDI gauge); if the
batteries discharge below 10%, your warranty is void.
The 12 Volt AGM accessory battery is located under the front hood of the vehicle. This
battery provides power to the vehicle’s 12 Volt system for items such as lights, windshield
wipers and the radio. It is automatically maintained by a DC to DC converter that draws
its power from the traction battery pack and constantly charges the 12 Volt battery. This
insures that it will not become discharged if an accessory were to be left on overnight. It is
a sealed, maintenance free lead-acid battery.
Your WHEEGO vehicle has a battery monitoring and charging system especially designed
for electric vehicle usage.
The type of batteries used in this vehicle are Lithium Iron Phosphate. They will perform
better when kept fully charged and do not have to be discharged to any specific point
prior to recharging. Therefore, whenever possible, recharge the batteries without regard to
the state of charge. These batteries are sealed and maintenance free so they do not need
to have fluid added to them like some other types of batteries. The traction battery pack
of 36 batteries is under the car and under the rear storage compartment. You should never
open the compartment or try to perform any type of maintenance on your car without the
advice of an authorized service technician. The battery pack is very high voltage and the
chance of a severe electrical shock is very real.
A full recharge cycle can take approximately 8 hours with a Level 2 charging system
(240V), or 24 hours with a standard household outlet (120V). “Opportunity” recharge
cycles will be shorter. Charge the batteries after each use of the vehicle. Any time it is
possible to have the vehicle plugged in, you should do so.
7372

WARNING
• Improper handling of high voltage wiring, batteries or control systems could
result in serious or fatal injury by electric shock.
• Only qualified technicians should repair or access high voltage wiring, battery
packs and associated systems.
• Do not attempt to use jumper cables on battery packs.
CAUTION
• Batteries can be permanently damaged (and the warranty voided) if they are
allowed to remain 30 days or more with a low charge, or to discharge to under
10% (0% on the BDI gauge).
WARNING
• Improper handling of high voltage wiring, batteries or control systems could
result in serious or fatal injury by electric shock.
• Always use insulated tools when working with or near 12v accessory battery.
• Battery fluid is a corrosive acid solution and can burn or even blind you.
• Always wear safety glasses or approved eye protection when servicing the
vehicle. Wear a full-face shield and gloves when working with or around
batteries and electrical connectors.
• Do not allow battery fluid to contact eyes, skin, or clothing. If acid splashes in
eyes or on the skin, flush the area immediately with large quantities of water.
• Battery gas is flammable and explosive. Keep flame or sparks away from the
battery or any other booster source.
• Do not allow cable clamps to come in contact with each other.
• 12v battery posts, terminals, and related accessories contain lead and lead
compounds. Wash your hands after handling.
• It is essential when replacing the cables on the 12v battery that the positive
cable is attached to the positive post and the negative cable is attached to the
negative post. Battery posts are identified on the 12v battery case as positive
(red ; +) and negative (black ; -). Cable clamps should be tight on the terminal
posts and free of corrosion.
• When replacing the 12v battery, always use exactly the same battery model that
was removed. Changing the battery type, size, or manufacturer can result in
on-standard performance and could void the vehicle warranty.
7574

B. BATTERY DISPOSAL
The 12Volt AGM sealed lead-acid accessory batteries are recyclable. Contact your Wheego
dealer for information on recycling your battery. If a battery becomes punctured and leaks,
neutralize the spill by placing residue in acid-resistant containers with absorbent material,
sand, or earth and dispose in accordance with local, state, and federal regulations for acid
and lead compounds.
The Lithium batteries are also recyclable - contact a certified Wheego technician for removal.
Contact your local and/or state environmental officials regarding battery disposal information.
C. BRAKES AND FLUID LEVEL
The vehicle is equipped with a four-wheel hydraulic braking system. The fluid level of your
brake system is a very important safety component. The brake fluid reservoir is located
under the hood next to the accessory battery.
If the fluid level is below the “MAX” mark, add DOT-3 brake fluid from a sealed container
to the reservoir as needed. Always clean the reservoir cap before removing to prevent
foreign material from entering the brake lines.
7776

Inspections of the front and rear brakes should be performed according to the
maintenance schedule. Brake pads and shoes should be replaced before the thickness is
reduced to 1.0mm. The brake pads have built in wear indicators that make a high pitched
noise to indicate that the pads are worn and need to be replaced.
The parking brake is adjustable and should be checked periodically by a trained service
technician as shown in the vehicle maintenance schedule.
D. TIRES
The standard tire delivered on your Wheego LiFe is a Triangle Tire Talon Sport tubeless
steel belted radial tire, Model TR918. The size is 195/50R15. Proper tire inflation is essential
to the safe and satisfactory operation of your vehicle.
Three areas are affected by improper tire inflation:
1. Safety
Under-inflation increases tire flexing and can result in tire failure. Over-inflation causes a
tire to lose its ability to cushion shock. Objects on the road and potholes could cause tire
damage that may result in tire failure. Unequal tire pressure can cause steering problems.
2. Economy
Improper inflation pressures can cause uneven wear patterns to develop across the tire tread.
These abnormal wear patterns will reduce tread life, resulting in premature replacement.
Under-inflation increases tire rolling resistance, resulting in lower vehicle range.
3. Ride Comfort and Stability
Proper tire inflation contributes to a comfortable ride. Both over-inflation and underinflation affect the stability of the vehicle and can produce a feeling of sluggish response
or over-responsiveness.
WARNING
Improperly inflated tires are dangerous and can cause accidents. Always drive with
each tire inflated to the recommended pressure that is shown on the sidewall of
the tire. The tires on your WHEEGO vehicle are specifically chosen for this electric
vehicle. They should be inspected regularly for damage, wear, and correct inflation
pressure as shown in the maintenance schedule. WHEEGO strongly recommends
that you use tires equivalent to the originals in quality and performance when
replacement is needed. Failure to use equivalent replacement tires may adversely
affect the safety, handling, and ride of your vehicle. We recommend that you
contact your dealer or WHEEGO customer service regarding any questions you
may have on tire specifications or capability. The tire information for your vehicle
can be found on the VIN sticker located in the driver’s door jamb.
7978

WARNING
• Do not use a tire size other than the one specified on your vehicle’s tire label.
• Improperly sized tires can cause vehicle components to wear out prematurely
and may change your vehicle’s ride, handling, and steering behavior. In
addition, it may affect the accuracy of your speedometer and odometer. Using
tires sized other than specified on your vehicle’s tire label could cause you to
lose control, resulting in serious injury or death.
• Never use a tire smaller than the minimum tire size listed on your vehicle’s tire
label. Using a smaller tire could result in tire overload and failure.
• Failure to equip your vehicle with tires having adequate speed capability can
result in sudden tire failure and loss of vehicle control.
• Overloading your tires is dangerous. Like under-inflation, overloading can cause
tire failure. Use tires of the recommended load capacity for your vehicle and
never overload them.
Tire inflation pressure is shown on the sidewall of the 195/50R15 tires and in the following table:
TIRE AND LOADING INFORMATION
SEATING CAPACITY
The combined weight of occupants and cargo should never exceed 284kg or 627lbs*
TIRE SIZE COLD TIRE PRESSURE
FRONT 195/50R15
REAR 51 PSI
SPARE NONE NONE
195/50R15
TOTAL 2
51 PSI
FRONT 2REAR 0
SEE OWNER’S
MANUAL FOR
ADDITIONAL
INFORMATION
This table can also be found on a label on the frame of the car inside the driver door.
8180

The following chart shows the recommended tire inflation pressure
Term Definition Reading
Cold inflation pressure Inflation pressure of tire
51psi
before the car is driven
and the tire warms up
Maximum inflation pressure The maximum pressure
51psi
which should be put in the
tire
Recommended inflation
pressure
The tire pressure
recommended by the tire
51psi
manufacturer for optimal
performance and safety
Use a tire pressure gauge to determine the pressure of your tires.
When tires are rotated the insides of the tires should stay inside and the outsides on the
outside. Left tires should stay on the left side, right side tires on the right. Keep spare as spare.
The following information is imprinted on your tire
Label Value Meaning
Tire Manufacturer Triangle Tire
Tire Model Talon Sport
US DOT Compliance Code DOT 2VXD w wyy DOT compliant
Tire construction materials Tread 4 plies:
Tire Size Designation 195/50R15 19 5 mm wide /Aspect ratio 5 0 , R adial tire, for
Service Description 82V 82 indicates max load per tire is 1047 lbs
Construction Type Tubeless steel
Performance M+S Mud + Snow
Treadware 400 Rating of wear rate in lab tests; 100 is baseline;
Traction A
Temperature A
N. Amer. Load & Pressure
Marking:
Max Load Rating
Cold Inflated pressure 51psi Inflated pressure before car is driven and tires
Standard Rim 6J
1 polyester, 2 steel
1 nylon
Sidewall: 1 ply
polyester
belted radial
475Kg (1047 lbs) Load supported by 1 tire at cold inflated
2V= Manufacturer is Triangle Tires
XD = Manuf. code for this tire
Made in “ww” week of “yy” year
Describes the content of the “plies” (or layers)
of the tire
1
5” rim.
Aspect ratio is the ratio of the hei ght of the
tire's cross-section to its width. 50 means that
the height of the cross-section is equal to 50%
of the tire's width
V indicates Laboratory max speed 149mph
In Radial tires, the plies run 90° to the direction
the tire is rolling
above 100 is better
Rating of tire’s ability to stop on wet
pavement in lab tests; A is best.
Rating of tire’s resistance to heat in lab tests;
A is best.
pressure under lab conditions
are warmed up (by driving or by sun)
Fits standard 6
” wide rim
8382

TIRE CHANGING/ EMERGENCY REPAIR
Your car comes standard with an emergency tire repair kit rather than a spare tire.
You do not need to jack up the car in order to use the kit. Follow the instructions provided
in the tire repair kit to inject a sealant into the tire and re-inflate it while the tire is still on
your car.
At the earliest opportunity, you should have the tire inspected and repaired or replaced;
the emergency sealant is designed to allow you to safely get off the road and drive to a
gas station or other repair location. Contact your WHEEGO Dealer for a replacement tire.
Should you choose instead to change the tire yourself, you need to observe the following
precautions:
• Park the vehicle on a firm level surface, avoiding icy or slippery areas.
• Set the parking brake and block both the front and rear of the tire diagonally
• opposite the jacking position. For example, if the left front tire is being changed,
block the right rear wheel.
• Use a small floor-style jack or low-profile scissor jack.
• Jack the vehicle only from the side of the vehicle on the main frame rail or from the
rear axle.
WARNING
Getting under a jacked-up vehicle is dangerous. The vehicle could slip off of the
jack and fall on you. Never get any part of your body under a vehicle that is on a
jack. Never start or run the motor when the vehicle is on the jack. If you need to get
under the vehicle, make sure the vehicle is first located on a flat solid surface and is
supported securely by automotive jack stands of appropriate capacity or take the
vehicle to a service center where a technician can put it on a hoist.
Jacking at any location other than a proper jacking point may cause major vehicle
body damage.
8584

F. FUSE BLOCKS
The fuse block is located under
the hood on the driver’s side
next to the firewall. A sticker
is attached to the inside of the
fuse block cover that shows the
function and amp rating of the
fuses. Should one of the fuses
need to be replaced, use a fuse
of the same type and amperage
rating. The use of a fuse with a
rating other than indicated may
result in a dangerous electrical
system overload. If a properly
rated fuse continues to blow, it
indicates a problem in the circuit
that must be corrected.
A second fuse box is located
inside the car, on the driver’s side
under the dash. A sticker on the
cover indicates the function and
amp rating of each fuse.
8786

G. KEY REPLACEMENT / KEYFOB BATTERY REPLACEMENT
To obtain an extra or replacement key for your vehicle, please contact your WHEEGO dealer.
You will need to have your key code and VIN available when you call. Your local locksmith
will not be able to provide a duplicate key.
The key fob uses three CR2016 batteries. To replace the batteries, open the case using a
small phillips-head screwdriver. The batteries are stacked discs; slide the batteries out to
replace them.
H. CARE AND CLEANING
Windows and windshield glass can be cleaned using a liquid household glass cleaner.
Do not use abrasive cleaners on the vehicle glass as it can cause scratches. On the interior
vinyl panels use a clean damp cloth to remove dust and debris. The seats and carpet may
be cleaned using an upholstery cleaner and a clean damp cloth. Test the cleaner in an
inconspicuous area to insure compatibility with the vehicle’s interior before using on high
visibility areas. The best way to preserve your vehicle’s exterior finish is to wash and wax the
vehicle regularly. Use mild liquid detergents only (no strong soaps or chemical detergents)
and rinse promptly. Dry the finish with a soft clean chamois or towel to avoid water scratches
and water spotting. To avoid spotting, do not wash the vehicle in direct sunlight.
CAUTION
Do not spray the interior of the vehicle. Water contact with the dash and instrument
area could damage the gauges and the electrical system.
1. Remove screw on the back of the
key fob and open the housing.
2. Separate interior circuit board from back
housing.
3. Slide out batteries (3) and
replace.
8988

I. MAINTENANCE SCHEDULE
Miles in thousands
Parking brake & cable adjustment
Brake pedal clearanc e
Rear wheel brake shoe/drum
Front wheel brake pad/disc
Tire pressure and condition
Tire rotation and balanc e
Traction battery pack
Accessory battery
Windshield wiper blades and fluid
Headlight, taillight and interior bulbs
Seat belt condition and function
Brake fluid
Transmission lubricant
Grease fittings
Steering system
Wheel and lug nuts
AC system, refrigerant and oil
Brake lines
Shock absorbers
CV shafts and boots
Airbags – *Replace at 10 years
2.5 5 10 15 20 25 30 35 40 45 50
I I I I I I I I I I I
I I I I I I I I I I I
I I I I I I I I I I I
I I I I I I I I I I I
I I I I I I I I I I I
I I I I I I I I I I
I I I I I I I I I I I
I I I I I I I I I I I
I I I I I I I I I I I
I I I I I I I I I I I
I I I I I I I I I I I
I I I I I R I I I I R
I R I R I I R
I L L L L L L L L L L
I I I I I I
I I I I I I
I I I I I I
I I I I I I
I I I I I
I I I
R*
I = inspect
R = replace
L = lubricate
J. FLUIDS AND LUBRICANTS
Brake fluid DOT-3
Transmission lubricant - 75W85 Castrol PD oil (should not need to be refilled)
AC refrigerant 134a
9190

8. DIAGNOSTICS/TROUBLESHOOTING
Diagnostic Screens
NOTE: Should the hazard flashers start to automatically flash after turning the vehicle ON,
remove the key from the switch, press the lock button on the key, then press the unlock
button, put the key back into the switch and turn the vehicle back ON to restore normal
operation of the vehicle.
To access the Diagnostic Screens, place car in Park and turn the car off. Turn the key to
“On” while pressing the stem on the dashboard for several seconds. Once the Diagnostic
Screens are displayed, you can cycle through the screens by pressing the stem. To get out
of the Diagnostics, turn the key to Off.
Battery Diagnostics 1
Field Value/Range Meaning/Notes
Pack Voltage 0 to 130V Normal range is 80 to 130V
DC Current -500 to 1000
Amps
SOC (State of charge) 0 to 100% State of Battery Pack Charge, normal is 20 to 100
High Cell Volts 2.00 to 4.55 volts Highest volt reading of 36 batteries; normal is 2.50
High Cell 1 to 36 Which battery cell has high volts
Low Cell Volts 2.00 to 4.55 volts Lowest volt reading of 36 batteries; normal is 2.50
Low Cell 1 to 36 Which battery cell has low volts
Highest Cells Temp
Highest Temp Cell ID 1 to 36 Which battery cell has highest temp
-50 to 150 °F
DC Amps
to 3.90V
to 3.90V
Highest battery cell temperature; normal is 1 to 120
9392

Batte ry Dia gnos tic s 2
When ON the motor cooling fan is being commanded to run
Watts per Mile Raw 0 to 32767 W/m Real time watts per mile calculation without
Watts per Mile 0 to 32767 W/m Average watts per mile
Miles Remaining 0 to 300 Miles Estimated miles remaining on charge
Ahrs Remaining 0 to 234 A hrs Amp-hours remaining in the battery calculated
Auxiliary Battery 0 to 20 DC Volts Reading of auxiliary (accessory) battery: 12.5 to
Driv e S yste m D iagn ost ics
Motor Temp
Controller Temp
Motor RPM 0 to 9000
Encoder A 0 to 9000
Encoder B 0 to 9000
Throttle 1 Voltage 0 to 5.0 Volts Normal range is .9 to 3.8 Volts
Throttle 2 Voltage 0 to 5.0 Volts Normal range is .6 to 2.0 Volts
Brake Voltage 0 to 10 Volts Indicates amount of brake pressure
Controller Fault 0 to 99 Indicates fault code
-40 to 200°C Temperature of the motor in °C; normal range max 140
-40 to 100°C Temperature of the controller in °C; normal range max 85
RPM
RPM
RPM
filtering
from a maximum of 234 Ahrs
13.9 volts is normal
Revolutions per minute of the motor in real time
Phase A encoder signal
Phase B encoder signal
Clim ate Con tro l Di agn ost ics
Temp Set Point
Cabin Temperature
Evaporator Temp
Low Pressure Switch ON/OFF ON indicates AC pressure is greater than 15 PSI
AC High Side 0 to 300psi Shows high side pressure in the AC conditioning system
Compressor Speed 0 to 100% Indicates the speed of the AC compressor
Condenser Fan ON/OFF When ON, the condenser fan is being commanded to run
Blower Input ON/OFF Should indicate ON when the cabin blower is running
68 to 95°F
0 to 150°F
-20 to 75° F
Char ging Di agn ost ics
J1772 PWM 0 to 50% Indicates the pilot PWM coming from the charging station
I/O Di agnos tic s
Field Va l u e Mean i n g
Brake Light Switch ON/OFF Should be ON if brake pedal is pressed
Start Switch ON/OFF Should be ON when ignition switch is in the Start position
Accel Switch ON/OFF Should be ON when Accelerator pedal is pressed
Econo Mode Sw ON/OFF Should be ON when E button is pressed
Park Sw ON/OFF Should be ON when shifter is in the Park position
Reverse Sw ON/OFF Should be ON when shifter is in the Reverse position
Drive Sw ON/OFF Should be ON when shifter is in the Drive position
Sport Mode Sw ON/OFF Should be ON when shifter is in the Sport position
Motor Cooling Fan ON/OFF
Sets desired cabin temperature
Shows estimated cabin temperature
Shows the temperature of the AC evaporator
9594

Fau lts
Field Value Meaning
Controller Fault 0 to 99 Indicates motor controller fault code
BMS Module Fault 0 to 9 Indicates Battery Management System Module fault
Cell Fault 0 to 36 Indicates a battery module failure
CAN Node Fault 0 to 14 Identifies node failure on the CAN bus
oftw are
S
Field Value Meaning
OS Operating System Version in the motor controller
Build Number Identifies the build number of the operating system
VCL Version Shows the VCL version installed in the controller
Date code Shows date the motor controller was manufactured
Serial Number Unique serial of motor controller
9. CUSTOMER SERVICE & WARRANTY
A. Wheego LiFe Warranty – 2011/2012/2013 Model Year
B. How to obtain service and make a warranty claim
C. Scope and limitation on warranty
D. Impact of state laws and regulations
E. Transfer of warranty
F. Disclaimer
Owners of a WHEEGO can obtain maintenance and warranty service, if required, from
a local WHEEGO Authorized Service Provider, which typically will be the Dealer from
whom you purchased your car.
9796

A. WHEEGO LiFe WARRANTY–2011/2012/2013 MODEL YEAR
This information may change. Please refer to the valid warranty in place at the time of your
vehicle purchase.
1. WARRANTY COVERAGE
The WHEEGO warranty is that each car will be free from any original defect in parts,
materials and workmanship when normally and properly used in accordance with the
maintenance and service program contained in the Owner’s Manual. This warranty does
not in any way cover the normal and usual maintenance of the car including common
wear items such as bulbs, wiper blades, brake shoes, brake fluid nor does it cover road
hazard damage to glass or tires. Any warranty repair work not performed by an authorized
Wheego dealer must be pre-approved by the manufacturer.
3. LABOR WARRANTY
All car labor which is required to repair the car other than normal use and maintenance
items will be covered through an authorized dealer without charge for labor during the
36 Month, 36000 miles (whichever comes first)LABOR warranty period.
The lithium battery pack is covered for 48 months, 60,000 miles (whichever comes first)
LABOR warranty period. An extended warranty is available offering an additional
24 months/40,000 miles (whichever comes first) warranty for the battery pack at an
MSRP of $1995.00.
4. WARRANTY PERIOD RENTAL USE OWNERS
The entire car warranty (parts and labor) shall run for a period of 90 days from the date of
delivery to rental use owners. Extended Service Contracts are not available to rental use owners.
2. PARTS WARRANTY
All car parts which are found to be defective under normal use and maintenance will be
repaired or replaced through an authorized dealer without charge for parts during the
36 Month, 36,000 miles (whichever comes first) PARTS warranty period. The lithium
battery pack is covered for 48 months, 60,000 miles (whichever comes first) PARTS
warranty period. An extended warranty is available offering an additional
24 months/40,000 miles (whichever comes first) warranty for the battery pack at an
MSRP of $1995.00.
5. EXCLUSIONS FROM WARRANTY COVERAGE
Warranty coverage will not in any event cover:
o Damage, loss or failure by reason of uses of the car for which it was not intended or
designed by the manufacturer.
o Events occurring or damage or failure by reason of alteration of the car in any way whatsoever.
o Damage, loss or failure occasioned by dangerous or reckless use.
o Events occurring or damage or failure by reason of not following the maintenance
and service suggestions and requirements set forth in the Owner’s Manual.
9998

o Wear, tear and failure through normal operation to parts such as wiper blades, trims
or decals, light bulbs, mats, carpeting, upholstery, seat coverings, tires and brake shoes.
o Parts which may rust or deteriorate or deterioration of finish or surfaces due to
exposure to the elements.
o Damage or failure from unauthorized repairs or use of non-genuine parts.
o Damage or loss resulting from causes force majeure, accident, theft, fire, collision or
acts of war, terrorism or vandalism.
o Misuse or tampering with the car or any of its constituent parts.
o All normal wear and tear and scratches or damage to plastic or metal finish.
o Use of the car to tow trailers or other cars or to push other vehicles.
o Damage or loss caused by tire puncture or failure to maintain correct tire pressure.
o Road hazard damage to glass or tires.
o The cost of manufacturer’s suggested initial and periodic check up and maintenance
procedures (see Owner’s Manual Maintenance section).
o Lack of achieving advertised performance parameters due to the variability of driving conditions.
o Damage due to airborne chemicals, tree sap, road debris (including stone chips), rail
dust, salt, hail, floods, wind storms, lightening and other environmental conditions, or
water contamination.
o Failure to keep batteries properly charged.
o Damage caused by water or other liquid entering the battery compartment.
o Discharged batteries that can be recharged and returned to service.
o Rust on the body of the vehicle.
Scope & Limitation on Warranty
WHEEGO makes no warranty of any kind express or implied which exceeds the warranty
or time limits expressly stated herein and no representation or agreements to the contrary
by any person may vary or alter the terms of this warranty. Our only liability under this
warranty is limited to the repair and replacement described herein, and WHEEGO shall not
be held liable for any implied warranty or incidental or consequential damages including
loss to person or property or loss of use of the car.
Impact of State Laws & Regulations
Some states have laws which may impact limitation of warranties, exclusions for incidental
or consequential damages or fees upon transfer of warranty. Accordingly, some limitations
or exclusions or fees contained herein may not apply to you or your car.
Transfer of Warranty
Upon the sale or transfer of a Wheego, the original owner may transfer this Warranty in
accordance with Company procedures for a fee of $100.00. Please see your dealer for
details.
Disclaimer
In no event shall Wheego Electric Cars or any of its affiliates be liable for any incidental,
special, consequential or punitive damages, or for any costs, attorney fees, expenses,
losses or delays alleged to be as a consequence of any damage to, failure of, or defect
101100

in any product including, but not limited to, any claims for loss of profits. This warranty
is exclusive and in lieu of all other warranties or conditions, written or oral, expressed or
implied. Without limiting the generality of the foregoing, Wheego Electric Cars disclaims
any implied warranty of merchantability or fitness for a particular use or purpose, and all
other warranties, and any implied warranty of merchantability or fitness for a particular
purpose applicable to the vehicle. The remedy provided above is the exclusive remedy
under this written warranty or any implied warranty.
HOW TO OBTAIN SERVICE AND MAKE A WARRANTY CLAIM
Warranty service can be obtained from your local authorized WHEEGO Dealer which
typically will be the Dealer from whom you purchased your car. Owners desiring to make
a warranty claim may do so through an authorized WHEEGO dealer, service provider or
by contacting Wheego Electric Cars. Manufacturer is not responsible for loss of use or
transportation costs to dealer or repair facility.
Owners desiring to make a Warranty Claim directly to WHEEGO should do so at:
B. HOW TO OBTAIN SERVICE
Warranty Service can be obtained from your local authorized Wheego Electric Cars Dealer
and it may be the dealer from whom you purchased your vehicle, or from an
authorized Wheego Electric Cars service provider.
Fleets and other multiple vehicle owners can elect to have warranty repairs and
remediation performed by their own or designated mechanics who have been certified by
the company to perform warranty services.
Warranty Parts and prior approval of Warranty Service can be obtained by contacting
the Company in the manner set forth under “Making a Warranty Claim” below.
National Parts and Service Department
Wheego Electric Cars, Inc.
888 3rd Street NW
Atlanta, GA 30318
Phone 678 904 4795 x3
Fax 678 904 4791
warranty@wheego.net
wheego.net
Please send requests to the Wheego National Parts and Service Manager by email to
warranty@wheego.net to obtain faster service.
Wheego Electric Cars will promptly address the matter and take the necessary remedial
action under the terms and conditions of its warranty policy.
103102

C. SCOPE AND LIMITATION ON WARRANTY
WHEEGO makes no warranty of any kind express or implied which exceeds the warranty
or time limits expressly stated herein and no representation or agreements to the contrary
by any person may vary or alter the terms of this warranty.
Our only liability under this warranty is limited to the repair and replacement described
herein, and WHEEGO shall not be held liable for any implied warranty or incidental or
consequential damages including loss to person or property or loss of use of the car.
D. IMPACT OF STATE LAWS AND REGULATIONS
Some states have laws which may impact limitation of warranties, exclusions for incidental
or consequential damages or fees upon transfer of warranty. Accordingly, some limitations
or exclusions or fees contained herein may not apply to you or your car.
E. TRANSFER OF WARRANTY
Upon the sale or transfer of a Wheego, the original owner may transfer this Warranty in
accordance with Company procedures for a fee of $100.00. Please see your Dealer for details.
F. DISCLAIMER
In no event shall Wheego Electric Vehicles or any of its affiliates be liable for any
incidental, special, consequential or punitive damages, or for any costs, attorney fees,
expenses, losses or delays alleged to be as a consequence of any damage to, failure of,
or defect in any product including, but not limited to, any claims for loss of profits. This
warranty is exclusive and in lieu of all other warranties or conditions, written or oral,
expressed or implied. Without limiting the generality of the foregoing, Wheego Electric
Cars disclaims any implied warranty of merchantability or fitness for a particular use or
purpose, and all other warranties, and any implied warranty of merchantability or fitness
for a particular purpose applicable to the vehicle. The remedy provided above is the
exclusive remedy under this written warranty or any implied warranty.
10. VEHICLE IDENTIFICATION AND SPECIFICATIONS
VEHICLE IDENTIFICATION
For all model vehicles, the vehicle identification number (VIN) can be found on the VIN
plate, located on the driver’s side of the dashboard. The VIN indicates the model year,
model type and the serial number of the vehicle. It can also be found on the information
label inside the driver’s door jamb.
NOTE
Record the VIN on the first page of this manual for easy reference.
105104

GENERAL SPECIFICATIONS WHEEGO LiFe
Motor: AC50 Brushless
Radial Tires: 195/50/R15
Battery Pack: 115V Lithium; 36 cells, 3.2V each; 260 AH; 30 kwh
Onboard Chargers: Three Delta-Q Fully Automatic; 27 amps combined
Vehicle Width: 63.19 inches
Vehicle Length: 118.90 inches
Vehicle Height: 62.99 inches
Wheelbase: 79.74 inches
Turning Circle (the diameter of a circle required to make a U-turn maneuver): 362.2 inches
(5) Determine the combined weight of luggage and cargo being loaded on the vehicle.
That weight may not safely exceed the available cargo and luggage load capacity
calculated in Step 4.
(6) If your vehicle will be towing a trailer, load from your trailer will be transferred to
your vehicle. Consult this manual to determine how this reduces the available cargo and
luggage load capacity of your vehicle.
For the Wheego Life, the following load limits apply.
Curb Weight (weight of the car with no passengers or cargo): approximately 2,828 lbs.
The curb weight, GVWR and payload may be found on the placard on the frame of the car
inside the driver’s door.
The Federal Motor Vehicles Safety Standards provide the following Steps for Determining
Correct Load Limit:
(1) Locate the statement ”The combined weight of occupants and cargo should never
exceed XXX kg or XXX lbs.’’ on your vehicle’s placard.
(2) Determine the combined weight of the driver and passengers that will be riding in your
vehicle.
(3) Subtract the combined weight of the driver and passengers from XXX kg or XXX lbs.
(4) The resulting figure equals the available amount of cargo and luggage load capacity.
For example, if the ``XXX’’ amount equals 1400 lbs. and there will be five 150 lb.
passengers in your vehicle, the amount of available cargo and luggage load capacity is
650 lbs. (1400-750 (5 x 150) = 650 lbs.)
Gross Vehicle Weight Rating (GVWR): approximately 3,300 lbs. Must not be exceeded.
The GVWR is the actual weight of the vehicle including the weight of the entire payload of
options, passengers, and cargo.
Payload Capacity: approximately 627 lbs. (options + passengers + cargo). For example,
if the driver and passenger each weigh 175 pounds for a total of 350 pounds, the cargo
space may hold a maximum of 277 pounds. If there is no extra passenger, the driver may
pack 452 pounds of cargo. Exceeding the weight restrictions will have a negative impact
on the handling of the car, and on the ability of the car to stop quickly. It will also impact
the reliability and life of the tires. Do not exceed the GVWR.
Maximum passengers: 2, including the driver. Passengers may not ride in the cargo area.
107106

INDEX INDEX
12V Battery Jack - 20, 34
A
A/C Light - 21
Adjustable Bucket Seats - 48
Airbag Light - 22
Airbag System - 35, 59, 60
Amp meter - 18
Anti-lock Braking System - 22
Apply Brake Light - 21
B
Battery - 6, 7, 9, 10, 30, 61, 72-76
Battery Disposal - 76
BDI Gauge - 18
Brakes - 76-78
Brake Fluid - 76, 77
Bright Light Indicator
C
Cautions - 7, 23, 29, 30, 62, 66, 72, 74, 89
Charging - 62-67
Charging Cable - 62, 63
Charge Light - 20, 30
Child Restraints - 54-59
Cleaning - 89
Console D-pad controller - 24
Console Menu - 25
Console Settings - 23-25
Consumer Information - 8
Customer Service - 97-107
D
Dashboard - 14-25
Diagnostics - 92-96
Diagram - 71
Door Open Light - 22
Drivers forum - 2
E
EasyCare - 3
Eco-Meter - 19
F
First Responder Info - 111
Fluids - 91
Foot Pedals - 46
Fuses - 86, 87
EPS Light - 21
H
Hazard Light - 20, 28
Head Rests - 49
Heater Light - 21
I
Impact Sensor - 61
Indicator Lights - 20-22
Interior Dome Light - 36
Introduction - 5, 6, 7
K
Key Fob - 12, 13, 88
Key Switch - 30
L
Lights - 26
Long Term Storage - 66
Low Brake Fluid Light - 22
Low Charge Light - 22
Lubricants - 91
Door Locks - 39
109108

INDEX INDEX
M
Maintenance - 90
Mirror Controls - 39
N
Notes - 7, 45
O
Odometer - 17
Operating Sequence - 68
P
Parking Brake On Light - 22
Power Assisted Windows - 38
Power conserve Mode - 69
R
Radio - 37
Range - 67
Rear Defrost - 34
Roadside Assistance - 3
S
Safety Information - 9, 10
Seatbelts - 21, 50-54
Seats - 47-49
Service Light - 20
Shifter - 42-45
Specifications - 106, 107
Speedometer - 16
T
Table of Contents - 4
Tires - 21, 31, 78-85
Tire Changing - 84
Tire Pressure Monitoring Light - 21, 31
Transporting Your Vehicle - 69
Troubleshooting - 92-96
Turn Signal - 20, 26, 27
V
Vehicle Identification Number (VIN) - 2, 105
Vehicle Maintenance - 70
Ventilation Controls - 32, 33
Volt Meter - 19
W
Warnings - 5, 7, 9, 10, 11, 30, 45, 46, 50,
52-54, 66, 74, 75, 79, 80, 85
Warranty - 97-107
Window Controls - 38
Windshield Wipers - 28
111110

NOTICE TO FIRST RESPONDERS
Emergency Power Disconnect Instructions for EMT Personnel
• Always assume the vehicle is powered-up despite no engine noises.
• Never touch, cut, or open any orange cable or components protected by orange shields.
To disconnect main power in the Wheego LiFe:
1. Put vehicle in park, turn ignition off, and remove key.
2. Open the hood. The hood release is located to the
left of the brake pedal in front of the driver’s door.
3. Locate the disconnect on the passenger side of the
control box, shown circled in the picture.
4. Squeeze latch and remove disconnect jumper.
The power from the lithium battery pack has now been disconnected from the main power cables that run from the back to the front of the car.
(no pack voltage power is present in the front of the car)
Note: This car is equipped with an Impact Sensor that automatically cuts off power in the event of an impact of 30G or greater, and/or airbag deployment.
If the Impact Sensor was tripped during the collision, the power will already be disconnected.
The 12 volt accessory battery is located in the front of the car; the 12 volt circuits will not be affected by disconnecting the jumper.
113112
 Loading...