

Page 1
U S E R M A N UA L
T his u se r m an u al a ppl ie s t o:
Tr a ns mi t te r : C B8 8 01 /C B 88 0 8
R ec e iv e r : CB 3 85 8 / CB3801 / CB3805
Was te el ectr ica l prod uct s sho uld n ot
be di spos ed of wi th hous ehol d waste .
Pl eas e re cyc le w her e fa cil iti es e xis t.
Check with you local authority or retailer
for re cycl ing adv ice.
EU Enviro nment al Prote ction
WIRELESS HD TRANSMISSION SYSTEM
210 mm
Page 2
Ple ase rea d this us er manu al befor e you use t his pro duct, i t conta ins all t he notes a nd impo rtan t thing s regard ing ope ratin g this pr oduct .In ac cordan ce with t he safe t preca ution s and
ope ratin g instr uctio ns list ed on thi s user ma nual, o ur appl ies prov ided th e produ ct is han dled
pro perly f or its int ended u se, but m ay not ap ply to be low cas es:
● Rep airs or p roduc t modif icati on and al terat ions hav e been ex ecute d by unau thori zed
per sonne l.
● The da mages a re caus ed by acci dents i nclud ing but n ot limi ted to li ghtni ng, fire , expos ed
to ra in or wate r,and mo istur e.
● Do no t use pro vided p ower ada pter wi th spec ific po wer volt age whi ch are no t compl iant
wit h the rat ed volta ge rang e in the at tache d label o f the pow er adap ter in pa ckage .
● The mo del lab el on the p roduc t has bee n modif ied or th e warra nty tag h as been r emoved
by un autho rized p erson nel.
The h igh tem peratu re in the p roces s of oper ating t he devi ce
may c ause th e high ri sk of sca lding .
To redu ce the ri sks of el ectri city , do not rem ove or op en the
cove r. No use r-se rvice able pa rts ar e insid e. Pleas e retur n to
ori ginal f actor y for mai ntena nce
Saf ety Precaution
● As co nnect ing any e quipm ent (su ch as any p layer or T V , etc. ),
ple ase tur n off the p ower to th e produ ct befo re any op eratio n is unde rtak en.
● Powe r outle t: To pre vent ele ctri c shock o r fire, sh ort ci rcuit , pleas e make su re the ty pe of
ele ctric al plug u sed on th e recei ver's a nd tran smitte r's pow er cord a re compl iant wi th the
rat ed volta ge rang e in the at tache d label o f the pow er adap ter in pac kage .
● Powe r cord: D o not pla ce any hea vy art icles a bove on th e power c ord. To avoi d being
ste pped on o r pinch ed by heav y item s, the pow er cord s hould n ot be loc ated on th e place
whe re peop le pass b y freque ntly.
● Powe r overl oadin g: Avoid o verlo ading wa ll's el ectr ical ou tlets a nd exte nsion c ord or ot her
mul ti-so cket; o ther wise co uld res ult in ele ctro nic sho ck or fire .
● Lig htnin g: For pro tecti on from l ightn ing or wh en the pro duct i s left un atten ded for a lo ng
per iod, pl ease di sconn ect it fr om the po wer sour ce.
● Ple ase dis conne ct the po wer cord f rom the p ower ou tlet whe n you are n ot usin g the
rec eiver an d trans mitte r, this w ill red uce the r isk of el ectri c shock o r fire.
Dan ger: Be c arefu l with el ectricit y.
● This p roduc t shoul d not be ex posed t o dripp ing or sp lashi ng. Do no t place a ny objec t fill ed
wit h liqui d on the pr oduct (eg. va ses).
● To avoid e lectr ic shoc k, plea se do not b lock or s tick an ythin g on the ai r vent of p roduc t; do
not r emove th e cover o r put the o bject j ust lik e pins, s teel wi re into th e gap of th e air ven t.
● Ple ase pla ce the rec eiver /emit ter on a fl at with h ard and s table s urfa ce.
● Venti latio n: plea se do not b lock th e air ven ts on the re ceive r/tra nsmit ter or pl ace any h eavy
obj ect on to p of them . B locki ng the ai r flow ca n damag e the pro duct it self. P lease m ake
sur e that th ere is ade quate v entil ation d istan ce betwe en the re ceive r and TV , and als o put
the p roduc t away fro m direc t sunli ght or an y sourc e of heat.
● Water E xposu re: To redu ce the ri sk of ele ctric s hock or f ire , ple ase do no t expos e the
rec eiver/ tra nsmit ter to rai n or mois ture.
● We're n o respo nsibl e for any da mage or r esult c aused b y unsin g other a dapte rs inste ad of our
sta ndard a dapte rs
Imp ortant Inform ation
Warn ing
● Alt hough t he prod uct has p rovid ed the fu nctio n of data e ncryp tion wh en tran smitt ing,
you s till ne ed to pay at tenti on to del ibera te signa l inter cepti on. The re will be t he
Poss ibili ty of a th ird par ty inte ntion ally in tercep t the tra nsmis sion si gnal si nce the p roduc t
ado pt wire less co mmuni cation . Pleas e do not us e the pro duct on c onfid entia l and imp orta nt
com munic ation s, or life -rel ated com munic ation s The m ain conc ern is th at the co ntent o f
wir eless c ommun icatio n might b e recei ved by th e third pa rty' s wirel ess dev ices de liber ately
or ac ciden tally .
● The im pact of r adio wa ves (su ch as the f ollowi ng envi ronme nt may cau se the ab norm al
aud io and vi deo(b locke d image , noise . ..etc. ).
1 ) Tran smit ne ar the wa ll whic h is hard fo r the rad io waves t o get thr ough.
2 ) Qui te clos e to the ref riger ator, m etal fi tment a nd appl iance s, or nex t to the cr owded
sit uatio n.
● This p roduc t has bee n teste d and man ufact ured to co mply wi th nati onal el ectr ical sa fety
rul es, how ever, th ere wil l be nois e cause d by the in terfe rence w ith oth er mach ines in ra re
cas es. If th e inter feren ce is hap pened , pleas e keep a ce rtain d istan ce away f rom othe r
mac hines .
● The pr oduct i s susce ptibl e to inter feren ce from 5 GHz wir eless l ocal ar ea netw ork or ot her
wir eless d evice s.
● Opt imal ra nge bet ween tr ansmi tter an d receiv er is bet ween 1 me ter and 3 0 meter s within
lin e of sigh t indoo r.
● Ple ase do no t set up th e trans mitte r and rece iver in m etal sh elf, or i t will hi nder th e
wir eless c ommun icatio ns.
● 108 0P/60 H z Wirel ess tra nsmit ting.
● It wi ll take 1 5-20 s econd s to boot th e syste m befor e wirele ss comm unica tion st art, t he
med ia rece iver can n ot be ope rated d uring t his tim e.
Spe cial No tice
Dange r!
High vo ltage
Bewar e of
hot sur face s!
Caut ion!
Ple ase use o ur stan dard pow er adap ter.De taile d infor matio n
refe r to the ra ted vol tage ra nge show ed on the l abel at
the b ack of pa ckage 's powe r adapt er.
Ple ase
This wireless for indoor only, has minute amounts of radiation, pls keep at least 20cm
away from while using.
●
Page 3

01 02
CONTENTS
Abo ut the in struc tions
02
Bri ef intr oduct ion
02
Pac king Li st
03
Int erfac e Intro ducti on
05
Wire less HD Tra nsmit ter int roduc tion( CV660 8, CV88 01, CB8 808, CB 2601)
05
Wire less HD R eceiv er intr oduct ion(C V6620 , CV380 1)
07
Ins talla tion an d Use
09
Con nect to H D player
09
How t o connec t to PC
10
12
Ins talla tion in struc tions f or CB38 01
14
Bas ic Func tion
16
IR Re mote Ex tensi on Conn ector I nstru ction
16
Uni cast (p oint- to-po int) Code Mat ching Proce dures
17
Ext ensio n Opera tion In struc tion
18
WHD I Function
18
WHD I Remot e Control Ope ration Inst ruction
19
HID K eyboa rd/Mo use Rem ote Control O peration In struc tion
23
3D Vid eo Transmissi on
25
App endix
27
OSD(O n Scree n Displ ay)
27
Lis t of Supp orted HID Wireles s Keybo ard/M ouse Mo del
27
Gra phic Ca rd Setting
28
Ind ictor d escri ption
32
Pro duct Sp ecifi catio ns
34
Troubles hooti ng
35
CONTENTS
Tha nk you for cho osing th is product. This produc t a dopt the la test high-defin ition
(HD ) wireless au dio/v ideo( AV) t ransm issio n techn ology w hich ca n enabl e the wir eless
tra nsmis sion of any unco mpres sed HD 1080P vi deo and au dio fro m an HD source
dev ice(S et-to p-box / HD P layer / Blu-ray DVD/ PC/ T V/ Ga me Ma chine /Recorder ) to a n
HD displ ay de vice( LCD TV /LED T V/Pro jector). You can always en joy t he qu ality of life
and m ore conv enien t life wi thout t he expe nse, mess or ha ssle of H D cable s.
■ Sup port 1 080P/6 0Hz, n o laten cy with u sing re al-ti me HD vid eo tran smiss ion tech nolog y
■ Sup port p oint-t o-poi nt, mul ti-po int to mu lti-p oint tr ansmi ssion
■ Sup port U SB HID rem ote con trol,
■ Sup port I R remote c ontro l .(Sup port 38 K remot e’s signal p rotoc ol.)
■ Com patib le with E DID 1.1 , suppo rt HDMI 1 .3 (3D se ries pr oduct s uppor t HDMI 1 .4)
■ Sup port 2 56 AES ima ge encr ypti on
■ Sup port O SD, WHDI 1. 0 speci ficat ions
■ Full h ardwa re desi gn, no sof twar e reques ted, pl ug-an d-pla y.
Product Feature
Brief Introduction
CB2 601 Loo p Outpu t Insta llati on Inst ructi on
- Ple ase rea d this ma nual ca refull y befor e you use t hese pro duct s and reta in it pro perly f or
fut ure refe rence .
- If th ere is an y doubt o r diffi culty i n the pro cess of pr oduct u sage, p lease f eel fre e to conta ct
us or t he deal er.
- The co mpany re serve s the aut hori ty to ame nd the sp ecifi cation .
- The us er manu al is app lied to fo llowi ng mode ls of wir eless H D trans mitte r and rece iver:
About The Instruction
TX: C B8801 / RX: CB 3801
Page 4
03 04
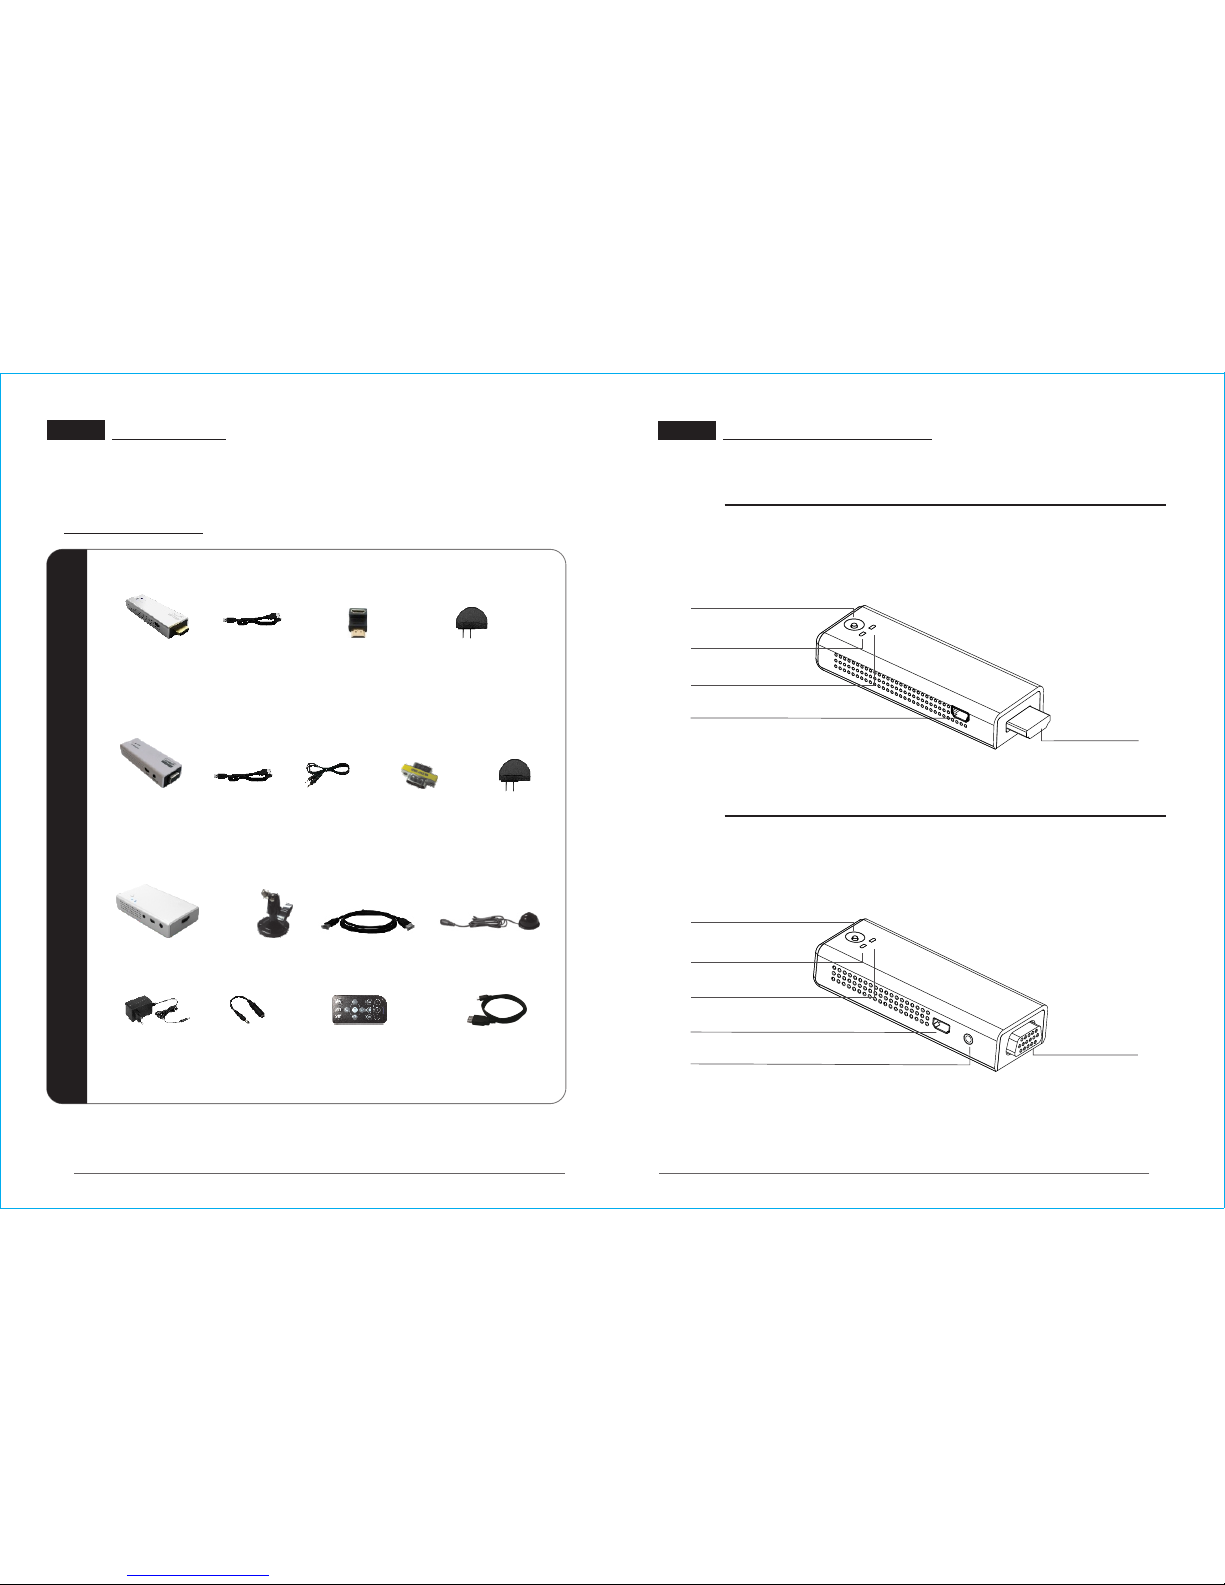
STICK Packing List
* Ple ase tak e all the a ctual a ccess ories a s the sta ndard.
Ple ase che ck the pa cking l ist car efull y after u npack ing, if any pa rt is mis sing, p lease
con tact yo ur deal er. Acce ssories of a ll mode ls are subjec t to the fo llowi ng pack ing lis t.
Packing List
TX :CB88 01
TX :CB88 08
RX :CB38 01
Wire less HD R eceiv er
CB3 801 x 1
Bra cketx 1 HDM I Cable x 1
Powe r Suppl y
(5V /2A) x 1
AD Ad apter
x 1
Min i USB to US B female
x 1
WHD I Remot e Contro l x1
IR Re mote Ex tensi on
Rec eiver x 1
Wire less HD
CB8 808 x 1
Tran smitt er
VGA A dapte r
x 1
USB C able
x 1
Powe r Suppl y
(5V /1A) x 1
Aud io Cable
x 1
Wire less HD
Tran smitt er
CB8 801 x 1
USB C able
x 1
*
OPT ION
HDM I Adapt er
( )
Powe r Suppl y
(5V /1A) x 1
Interface Introduction
Wire less HD Tra nsmit ter
Mod el: CB8 808
Transmitter Inte rface Introduction
CB8808
CB8801
Wire less HD Tra nsmit ter
Mod el: CB8 801
MINI U SB IN
HDMI I N
CODE K EY
NET WORK I NDICATOR
VIDE O INDIC ATOR
MINI U SB IN
VGA IN
CODE K EY
NET WORK I NDICATOR
VIDE O INDIC ATOR
AUDI O IN
Page 5
05 06
con nect Mini US B input p ort to the com puter ’s USB p ort or the 5V/ 1A po wer
ada pter by t he USB ca ble for power suppl ying.
* HID K eyboa rd/Mo use Remote Contr ol func tion is s uppor ted when con necte d the
min i USB inp ut port to the c omputer.
Con nect to t he HDMI O utput p ort of a HD AV source device.
Con nect to t he VGA po rt of com puter .
Con nect to t he audi o outpu t port of comp uter by the aud io cabl e.
Cod e Key Func tion: p ress th e code ke y for 5 seconds , t he tran smitter wil l turn in to
the c ode matchin g proce ss.
1. MI NI USB IN PUT POR T
2. HD MI IN
3. VGA I N
4. AUDIO IN
5. CODE KEY
6. NE TWOR K INDIC ATOR
On: Th e wireless ne twork c onnec tion betwe en tran smitter and r eceiver is su ccess ful .
Flash Slo wly: Transmi tter is ready f or connecting.
Flash Rapidl y: The device i s fault y.
On: Th e HD AV source is connec ted suc cessf ully.
Off: The HD AV source is fa iled to conne ct.
Not e: The ext ended f uncti on whic h marke d in * requ ires ha rdware s uppor ting, as to
mor e detai led informa tion, p lease r efer to th e opera tion in struc tions of HID K eyboa rd/
Mou se Remo te Cont rol functio n on P23.
7. VID EO INDI CATOR
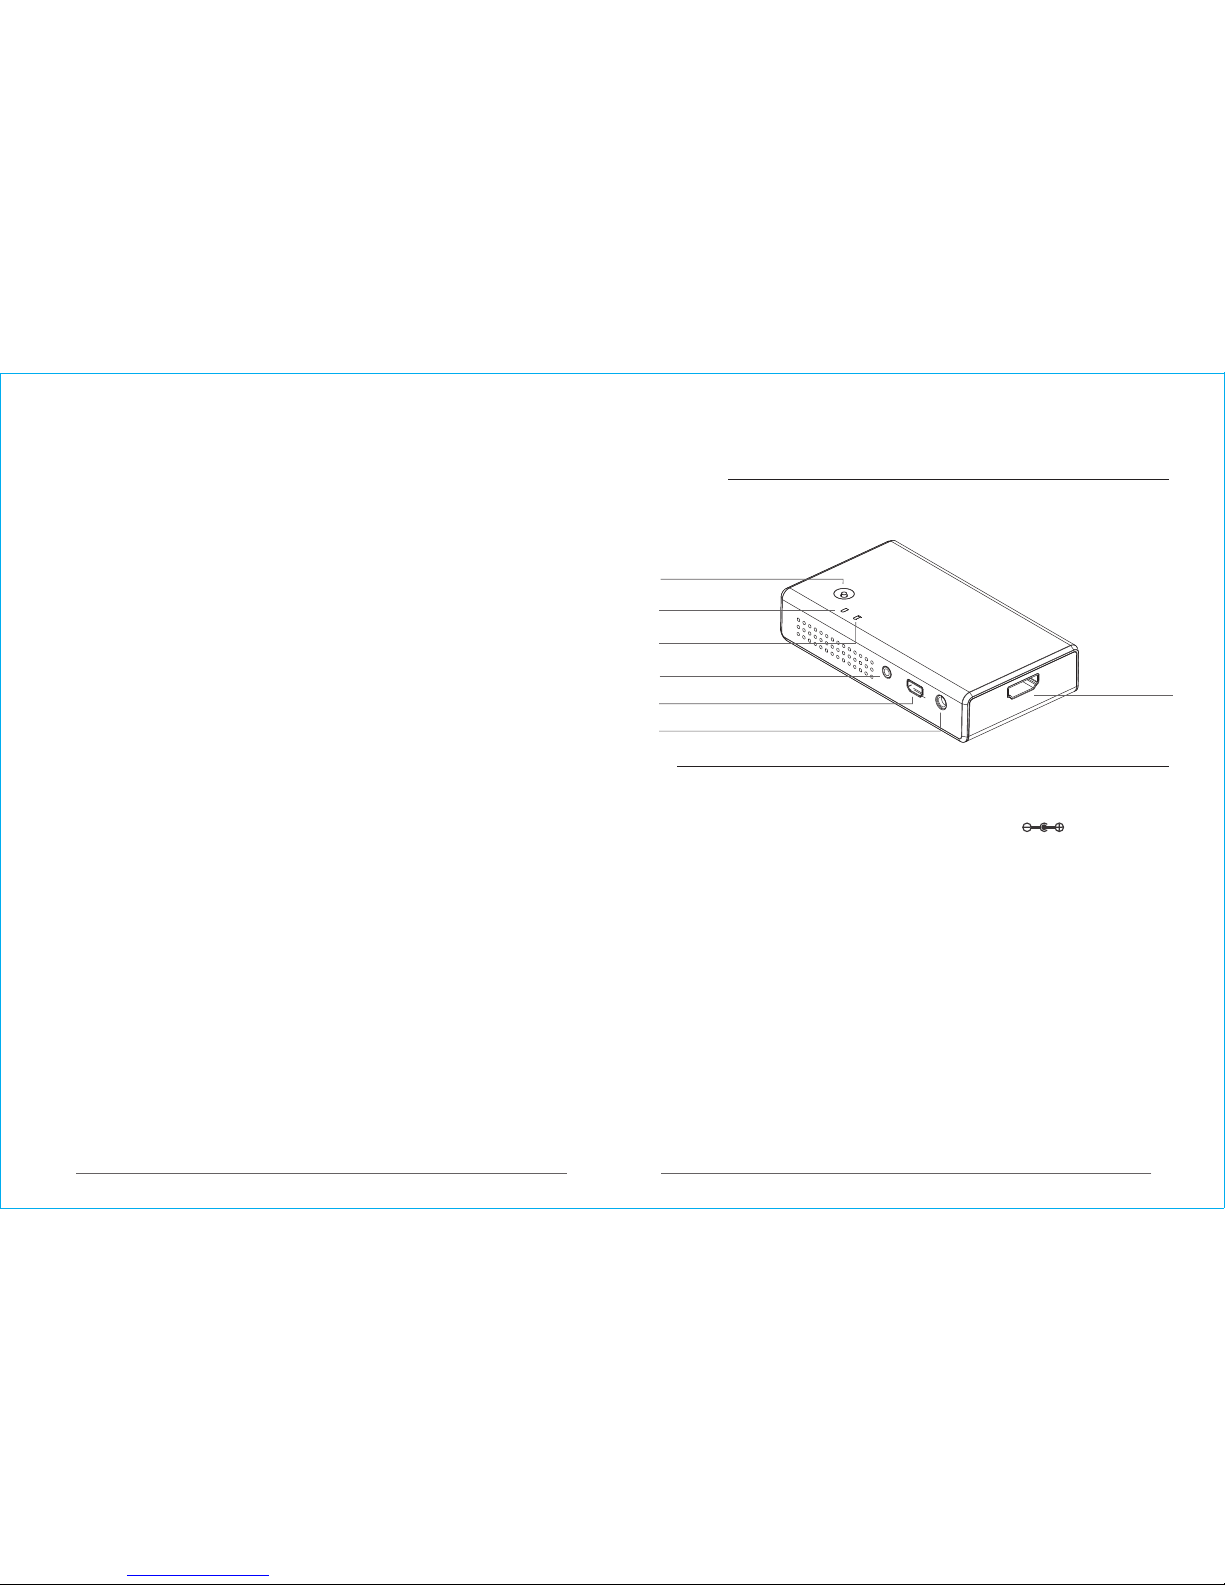
CB3801
Wire less HD R eceive r
Mod el: CB3 801
MINI U SB IN
DC IN
IR IN
NET WORK I NDICATOR
VIDE O INDIC ATOR
HDMI I N
CODE K EY
Receiver Interface Introduction
1. DC I N
2. HD MI IN
3. MI NI USB IN PUT POR T
4. CODE KEY
5. NE TWOR K STATUS IND ICATOR
6. VID EO INDI CATOR
Con nect th is port to 5V/ 2A power adap ter ( spe c: 5.5m m, DC 5V ).
Con nect to H DMI Out put of a HD d ispla y devices (HDTV, projec tor).
* HID R emote C ontrol func tion is s uppor ted when con necte d the min i USB inp ut por t
to th e Mouse o r keybo ard.
Not e: MINI U SB port do not s uppor t power s upply
Cod e Key Func tion: p ress th e code ke y for 5 seconds , t he receiver w ill tur n into the
cod e matching pr ocess.
(It need s to use remote c ontrol to match cod e under WH DI soft ware mo de)
On: The wireles s netwo rk conn ection bet ween tr ansmi tter and rece iver is succe ssful .
Flash slo wly: Transmi tter is ready f or connecting.
Flash rap idly: The dev ice is fa ulty.
On: Th e video s ource is conn ected s ucces sfull y.
Off: The video s ource is fail ed to con nect.
Not e: The ext ended f uncti on whic h marke d in * requ ires ha rdware s uppor ting, as to
mor e detai led informa tion, p lease r efer to th e opera tion in struc tions of HID
Key board /Mous e Remot e Contro l
Page 6
09 10
HDM I
USB
Lap top
USB c abl e
Tran smitter
TX: CB880 1
HDM I Inter face
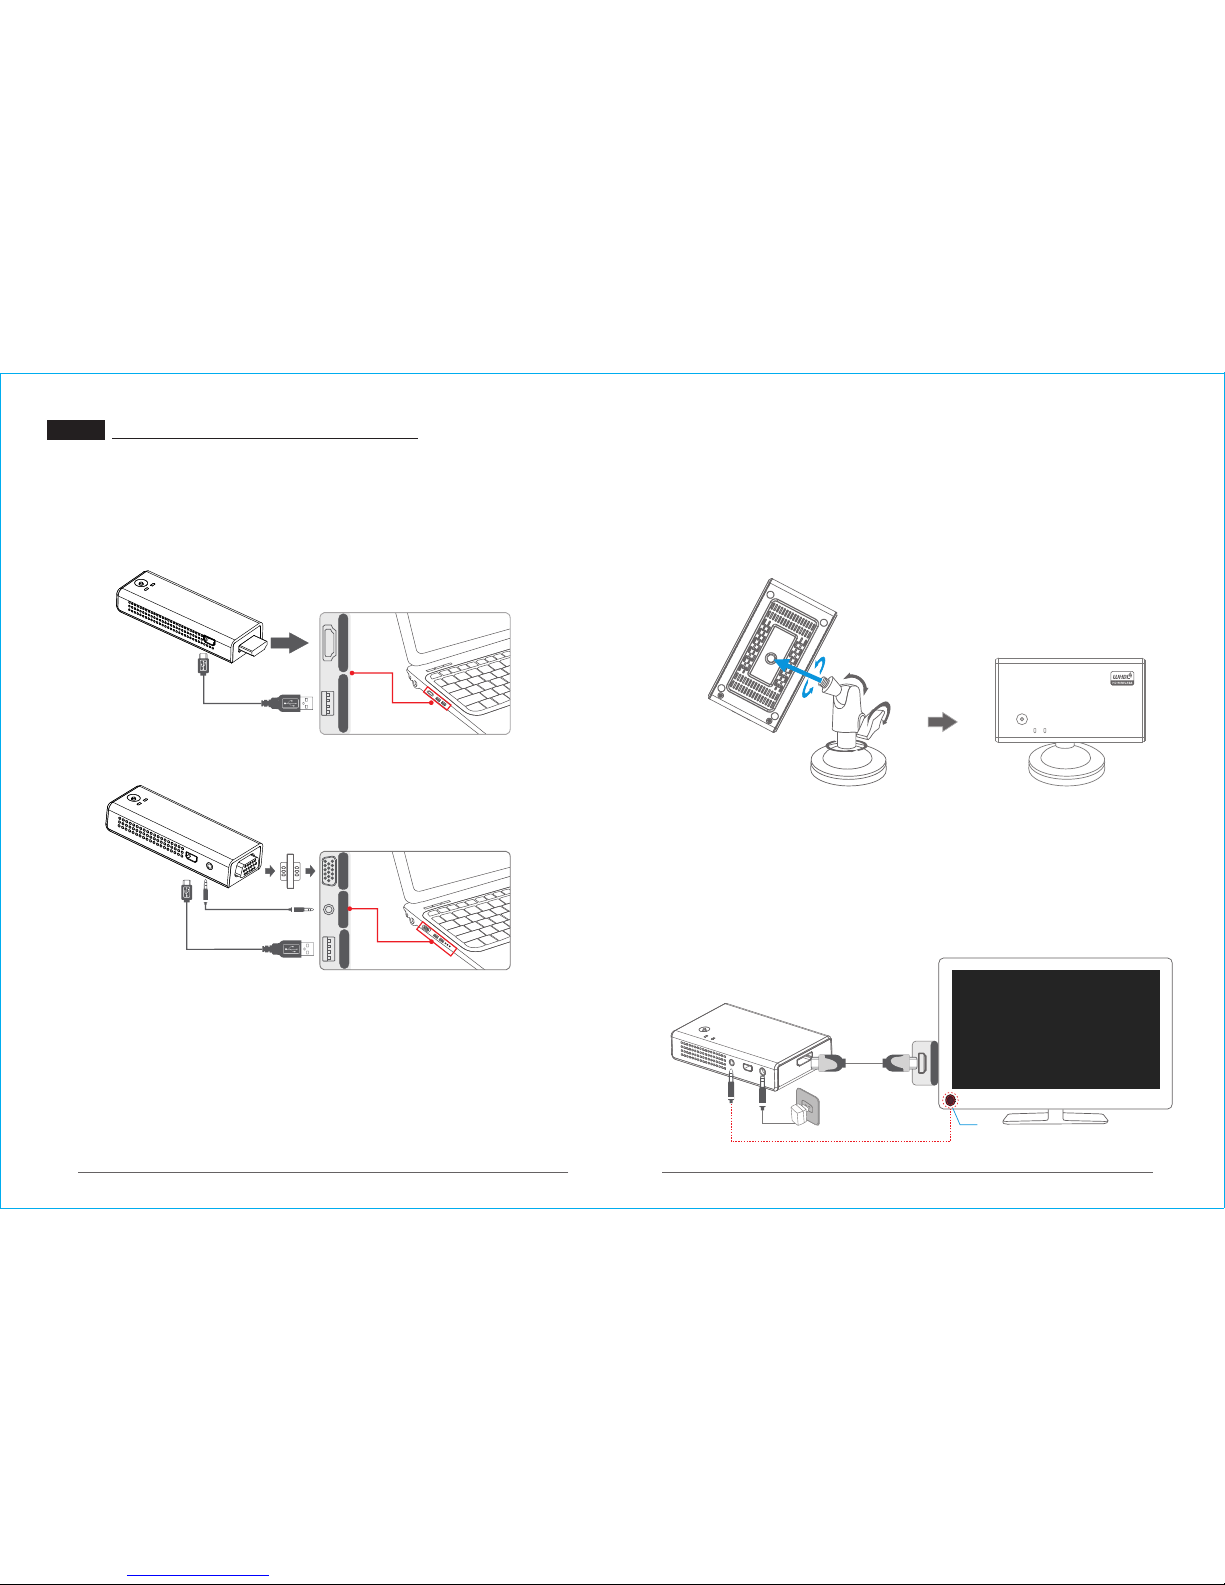
How to connect to PC
1.C B8808 s hould b e conne cted wi th the VGA p ort through the VG A adapt er.
2.Connect CB8801/C B8808 t o Laptop/ PC USB po rt by the USB cable ; conne ct
the Audio In port of transmit ter wit h Audio Out port of Laptop/P C by the
aud io cabl e.
Product Installation Instructions
VGA
USB
AUDIO O UT
Lap top
VGA ad apter
USB c able
Aud io cabl e
Tran smitter
TX: CB880 8
VGA In terf ace
HDT V
90°
360°
VIDEO NETWORK
Barcke t
Barcke t
HDMI I N
HDMI
HD T V
Conn ecting to CB 3801...
HDMI
IR Rec eiver
Rece iver
Ins talla tion in struc tions f or CB38 01
1. Sc rew CB3 801 wit h the bracket, rot ate the screw cloc kwise unti l fix it, a djust
the receiver u p and down, then fix i t with pr oper an gle, and twist the wren ch
clo ckwise to fi x the direction of rece iver.
2.Connect the CB3801 w ith mon itor by HDMI cable , plug th e IR cabl e into th e IR
jac k of receiver a nd use th e suppl ied dou ble sid ed tape t o fix the I R head in t he
front side of th e monit or. Plug into th e power supply of re ceiver, the OS D
informatio n on TV scr een wil l be prompted as: “Connecting t o CB380 1”
Powe r suppl y
Page 7
11
12
N
E
T
WO
RK
VID
E
O
VIDEO NETWORK
RX:1.x.xx
1920x1080P Fre q:5 xxx
NETWO RK CO NNE CTI NG. ..
Rec eive r
HD T V
Rem ote co ntrol
Tran smit ter
Conn ected to CB3 801
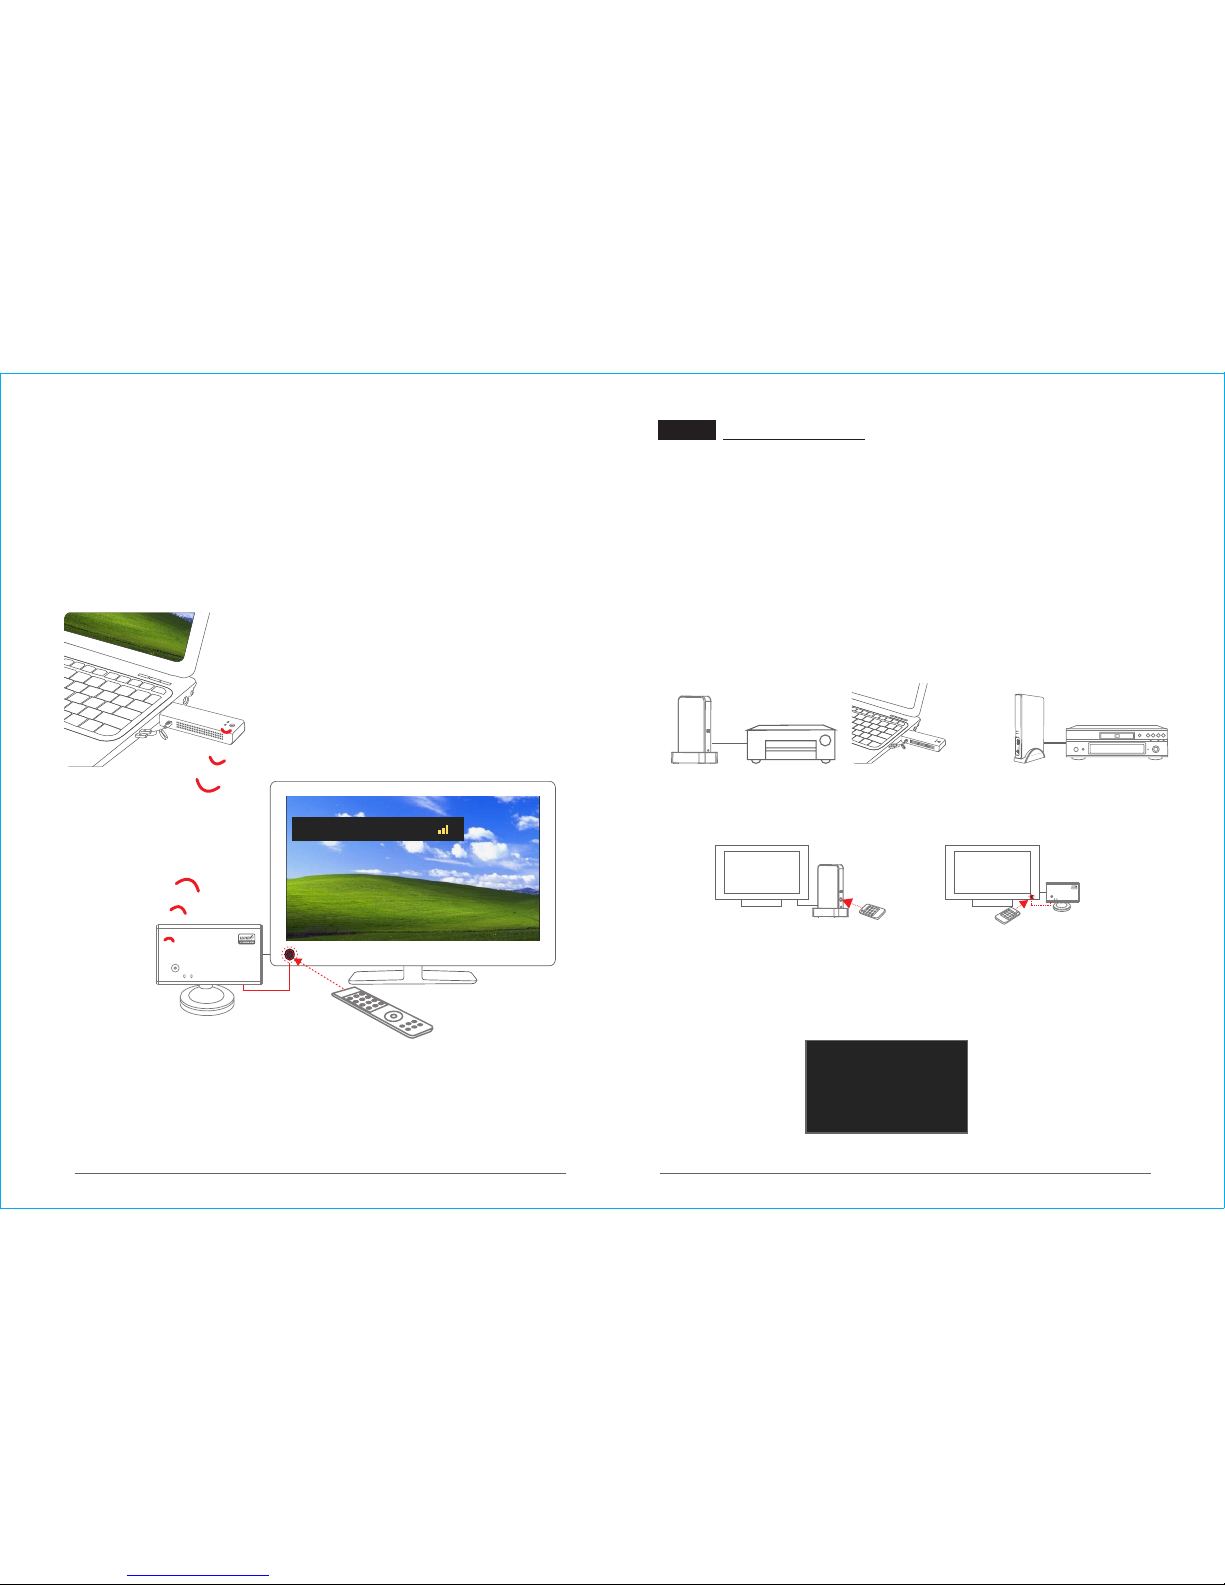
3. Wait for 15 to 25 second s, the network and vide o indic ators will turn on, the
vid eo conn ectio n is succ essfu l. OSD inform ation o n proje ctor (HDT V) sc reen wi ll
be prompted as “Connected t o CB380 1" and di splay video source conten t of PC/
Lap top.
Not ice: As to the speci fic mod el of tra nsmit ter's i nstallatio n steps, please refer to
the p roduc t insta llati on inst ruction in t his cha pter.
N
ET
W
OR
K
V
ID
EO
TX2 :CB88 01W
Sti ck02 03
TX1 :CV66 08W
DVB
TX3 :CV66 08W
SON Y BD
VIDEO
NETWORK
H1
V2
RX1 :CV66 20W RX2 :CB38 01W
Conne cting to Stick0 203...
OSD D ispla y
VIDEO NETWORK
WHD I (Mult ipoin t-to- Multi point /Mult i-cast) fu nction mea ns that a receiver c an be
con necte d to many transmit ters respectively, a nd the transmitter ca n also be
con necte d to differen t receivers r espec tivel y. Users c an choo se to connect to any
dif ferent tran smitt er by WHDI remote control a t receiver's sid e.(HD video sour ce)
Exa mple Ap plica tions o f WHDI Function ( 3 trans mitters and 2 r eceivers )
1. Ma tch code of 2 receivers with 3 tr ansmi tters respectivel y.
2. Connect transm itter t o different H D devic e source respectively by HDMI cable
and p ower on the device s.
(As to the device installati on inst ruction, p lease refer t o the ins talla tion
ins truction s for specific model of p roduc t on P09)
3. Connect 2 receivers to HDTV resp ect ively by HDMI c able.
4. Power on recei ver and H DTV, the receiver will autom atica lly con necti ng to
the t ransm itter which was co nnected wi th the receiver succes sfull y last ti me,
the O SD information o n TV scree n will be p rompted as the following pi cture :
WHDI Function
Page 8
19
20
N
ET
W
O
R
K
V
ID
E
O
TX2: CB880 1W
Stic k0203
TX3: C W
SON Y BD
B26 01
TX1: CV660 8W
DVB
RX2: CV380 1W
RX1: CV662 0W
HDT V1
HDT V2
VIDEO
NETWORK
H1
V2
Conne cted to Stick02 03
Addi ng Stick02 03
Press O K to continu e or Exit to ca ncel
2
Trans mitte r
Setup
Remove Vi deo Source
Modif y Video Sourc e
Add new Vi deo Source
Rec eive r
WHD I Remote C ontro l
1
Addi ng Stick02 03...
Conn ected to Stic k0203
VIDEO NETWORK
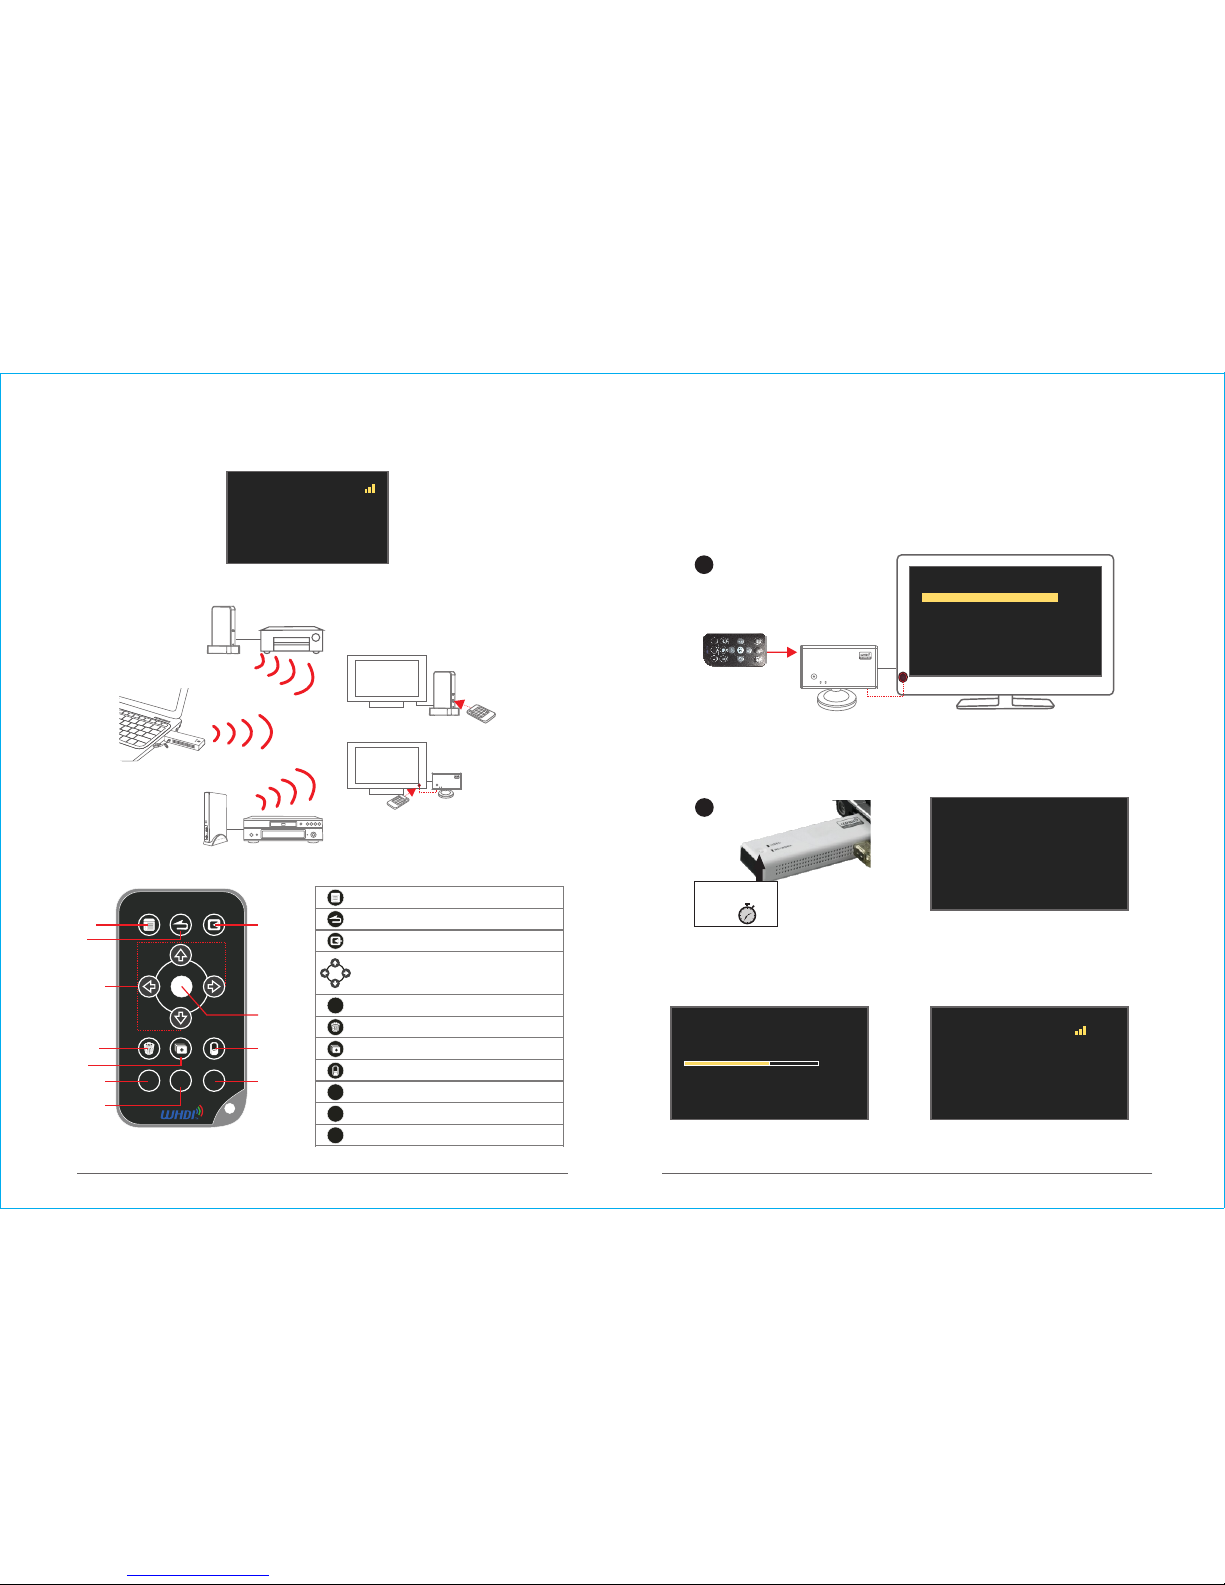
5. Wait for 15 to 25 second s, the network and vide o indic ators will turn on, the
OSD i nform ation on TV s creen w ill be prompted as t he following pic ture an d
the d isapp ear in 3 se conds.
6. You can u se WHDI re mote contro l to sele ct different tra nsmit ter (pl ayer)
OK
1
2
3
MENU
EXIT SOURCE
DELETE ADD GUEST
INPUT DEV ICES
WHD I Remote C ontro l
1 .MEN U
2 .EXI T
3. SOU RCE
4. Dir ectio n
key
5. OK
6. DEL ETE
7. ADD
8. GUE ST
9. 1st Vi deo
sour ce
10. 2n d Video
sour ce
11. 3n d Video
sour ce
1
2
3
OK
1. En ter the m ain men u
2. Re turn to p revio us menu
3. EN TER [Se lect Vid eo Sour ce]
4. Op erate fo r up, dow n, left a nd righ t
dir ectio ns on the m enu scr een
5. Pre ss OK to co nfirm t he oper ation
6. En ter [Re move Vide o Sourc e]
7. En ter [Add N ew Video S ource ]
8. Sy stem pow ering d own
9. Co nnect t o 1st Vide o source
10. C onnec t to 2nd Vid eo sourc e
11. C onnec t to 3nd Vid eo sourc e
Add New Video Sour ce (WHDI Product Code Match ing)
WHD I suppo rts multiple tr ansmi tters with one rec eiver. You can add addit ional
tra nsmit ters as refer t o the follo wing step s:
1. Press [M ENU] ke y of the WHDI remote control to enter the main men u, press
direct ion key to en ter [Add new Vid eo Source] or pres s [Add] key to ad d video
sou rce. Please m ake sure that the re mote contro l is poin ting to recei ver's I R
sen sor win dow at the operati on process.
2. Press th e code ke y of tran smitter for 3 ~5 seco nds and t hen loo sen from the
cod e key, OSD i nformation wil l be prom pted as “Please Acti vate Re gistration
On Tran smitter Unit”.
5. If there need to add m ore new v ideo source, pleas e repeat the above 1 to 4 steps.
3. Press [O K] key to enter the code
matching pro cess.
4. The c ode matchin g will be c omple ted
aft er abou t 30 seco nds, an d the vid eo
sou rce will be con necte d to auto matic ally.
WHD I Remot e Contro l Operation I nstru ction
Press t he code k eys
simu ltane ously f or
3~5 Se c
VIDEO NETWORK
Page 9
21
22
Removi ng Stick0203
Press OK to co ntinue or Exi t to cancel
Remov ing Stick0 203..
Setu p
Remove V ideo Source
Modif y Video Sourc e
Add new Vi deo Source
Sel ect Vide o Source
WHD I Remot e Control
2. Us e [UP]/ [DOWN ] direc tion ke ys to choose
a vid eo sour ce, pres s [OK] key to confir m
con necti ng to the o ne sele cted.
1. Press [S ource] key, th e list of v ideo
sou rces will be di splay ed on screen.
Rem ove Video S ource
Qui ck Connect to Video Sourc e
Setup
Add new Vid eo Source
Modif y Video Source
Disco nnect Wirele ss Link
Remove Vi deo Source
Choos e Source To Remove
Stick0 203
Selec t Video Source
SONY BD
DVB
Setup
Stick0 203
Conne cted to Stick02 03
Ren ame Video Sour ce
Poweri ng Down..
Powe r Down Mode
Selec t Video Source
SONY BD
DVB
Setup
Stick0 203
Renam e Video Sou rce
itck0 203R
Choos e Source To Rename
SONY BD
DVB
Stick0 203
Setup
Add new Vi deo Source
Remove Vi deo Source
Modif y Video Sourc e
Wireless Off
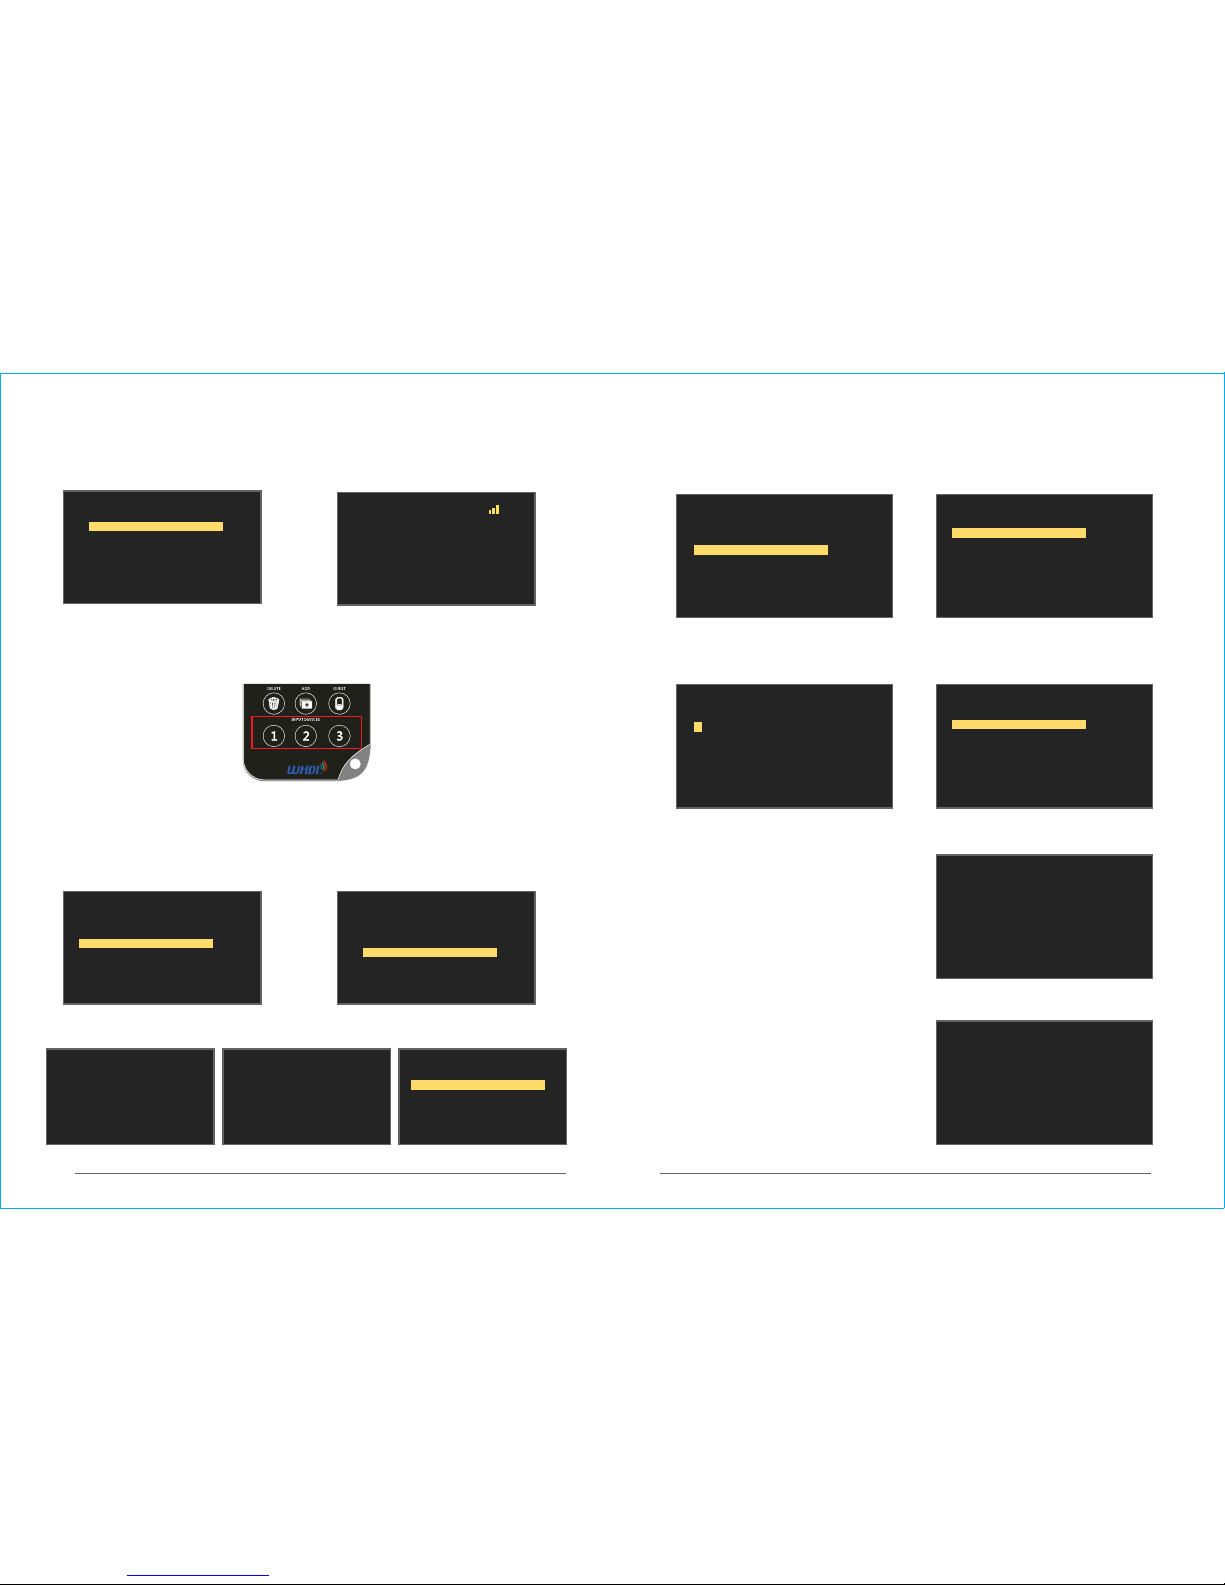
1. Press [1 ] key of in put dev ices to conne ct dire ctly to t he 1st vi deo sou rce in th e source
lis t; Press [2]/ [3] key t o connect direct ly to 2nd /3rd video so urce in the sou rce lis t.
1. Ch oose [R emove Video So urce] o n the
mai n menu or p ress [D ELETE ] key to
ent er [Rem ove Video S ource ] menu.
qui ck
2. Se lect the vid eo sour ce wante d be
del eted from the v ideo so urce li st.
3. pr ess [DE LETE] k ey
5. The v ideo so urce is re moved,
ret urn to ma in menu.
4. Press [o k] to Rem ove
1. Press [M ENU] ke y and cho ose "Mo dify
Vide o Source " from m ain men u.
2. Se lect the vid eo sour ce needed
ren aming f rom the video sour ce list
and pr ess [OK ] to con firm.
3. Us e [LEFT ][RI GHT ]directio n keys to
cha nge cur sor pos ition U se [UP] [DOWN ]
to mo dify th e content of th e chara cter
4. Press [OK] to save the modi fied na me.
1. Af ter pre ssing [GUES T] key, s ystem w ill
ent er power down m ode.
2. Press [GUEST ] again to resume w ork.
1. Whe n recei ver disc onnec t from tr ansmi tter
and t here is n ot any operat ion to run, the
sys tem wil l turn in to Standby Mo de, and t he
OSD i nform ation w ill be prompt ed as
“Wire less Off”.
2. Pre ss [SOU RCE] or [ MENU] k ey to res ume wor k.
Sta ndby Mode
Page 10
23
24
HID Remote Control Operation Instruction
N
ETW
O
RK
VID
EO
STI CK
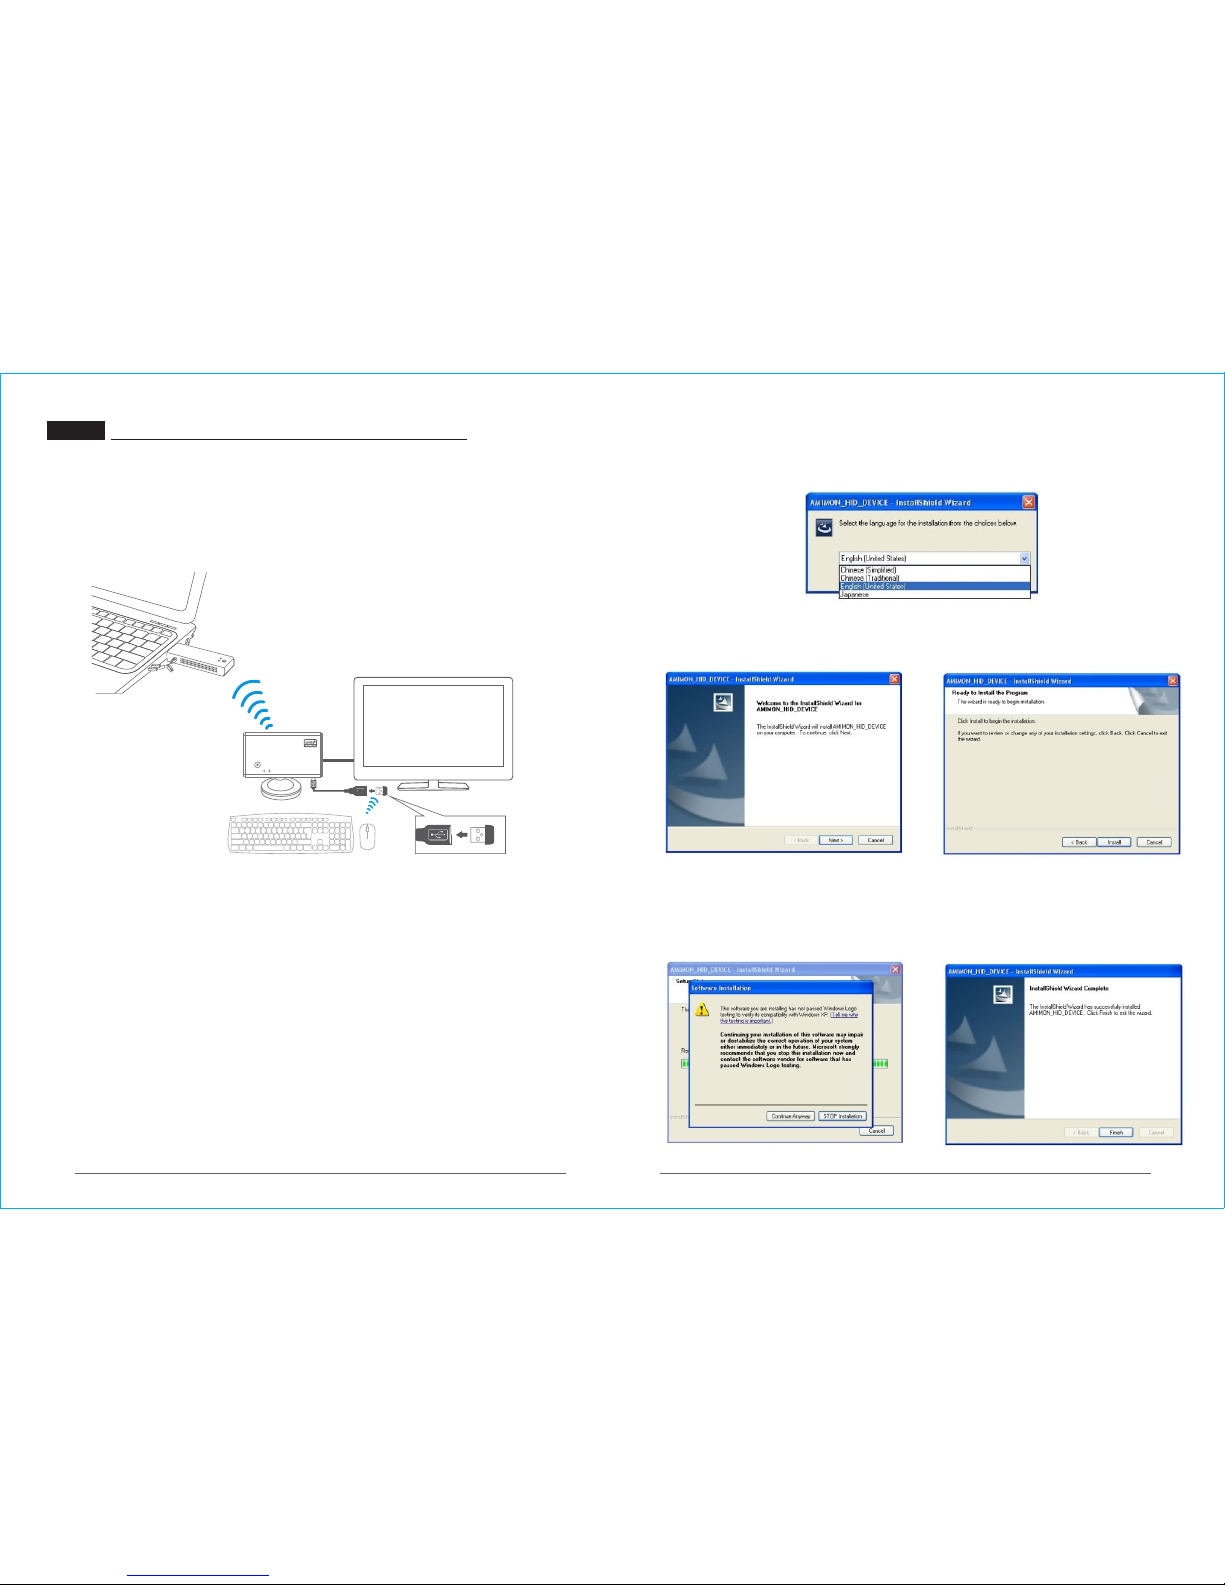
1. Ru n the dri ver ins tallation package , at the f irst in stall ation , the lan guage
sel ection dia log box will pop up as f ollows:
4. Si nce the d river is not certified by
Micros oft, so the foll owing dialog
box may pop up several time s durin g
ins talla tion process, please click
“Continue A nyway ” to install.
5. Cl ick “Finish” to comp lete th e
ins talla tion.
Ins talla tion of H ID Driver
2. Ch oose your language an d click “OK ”,
enter the foll owing installatio n inter face,
cli ck “ Next” t o enter the next step.
3. Cl ick “Install ” to star t insta llati on
1
2
3
4
5
Functio n Instr uction
HID K eyboa rd/Mo use Rem ote Control f uncti on supp ort users to u se keyb oard/ mouse at
receive r(Mon itor) s ide to contro l the PC at trans mitte r side.
Not e: Sinc e one USB p ort in re ceive r can onl y suppo rt one wi red
key board o r mouse a t a time, there recom mend to use the w irele ss keyb oard/mous e set
whi ch shar e one USB w ireless receive r conne ctor for this H ID func tion suppo rting.
App licat ion of HI D Function
1. Pl ease ma ke sure that bo th of the t ransm itter a nd receiver can sup port H ID func tion.
2. Co nnect t he Transm itter w ith PC' s HDMI po rt. (CB 8808 sh ould be c onnec ted wit h the
VGA po rt through t he VGA ada ptor)
(Pl ease refer to t he inst allation st ep of Lap top connecting o n .) P10 t o P12
3. Co nnect t he Transm itter w ith PC' s USB por t by the US B cable .
4. At t his tim e, the PC scree n will be p rompte d to inst all HID d river . A s to the op eration
ste p, pleas e refer to the la tter pa rt of this cha pter.
5. Co nnect R eceiv er to HDT V/Project or by HDM I cable, power on HDT V and rec eiver.
6. Wait for 15 to 25 sec onds, the net work an d video i ndica tors of recei ver wil l be turn
on, T V scree n will di splay video s ource conte nt of PC/ Laptop..
7. Co nnect t he USB wi reles s receiver connec tor of wi reles s keybo ard/m ouse se t or wired
Mou se/ke yboar d with Mi ni USB In port of receive r .
8. Af ter HID d river i nstal led, the wire d/wireles s keybo ard/m ouse wi ll be availab le to use
to remote c ontrol the PC /Lapt op from monit or's si de.
Lap top
Wir eless Ke yboar d/Mou se
USB w irele ss recei ver
VIDEO NETWORK
Rece iver
CB3 801
Page 11
27
28
Lis t of Supp orted HID Wireless Keyboard/Mouse Model
Mous e+Key board
Mous e+Key board
Mous e+Key board
Mous e+Key board
Mous e+Key board
Mous e+Key board
Mous e+Key board
Mous e+Key board
Mous e+Key board
Mous e
Mous e
Mous e
Mous e
Game C ontro ller
Game C ontro ller
Game C ontro ller
Game C ontro ller
Resu lt
OK
OK
OK
OK
OK
OK
OK
OK
OK
OK
OK
OK
OK
OK
OK
OK
OK
Devi ce Name Devi ce Type
RAPO O 1800E
Leno vo KM490 1
Fuhle n U79 2.4 G
HP VK42 9PA#AB2
Leno vo N5901 A
Leno vo Ultra slim Pl us Wirel ess KM
PRIM AX Blac k Silk US B KB T1
Logi tech MK2 50
Logi tech MK2 60
Logi tech M- BT96a
Logi tech M- BJ58
A4TE CH OP-2 20
Micr osoft Wi red Des ktop 60 0
BETO P BTP-C 033
Logi tech Ga mepad F 310
BETO P BTP-C 036
Sait ek CYBO RY F.L.Y 5
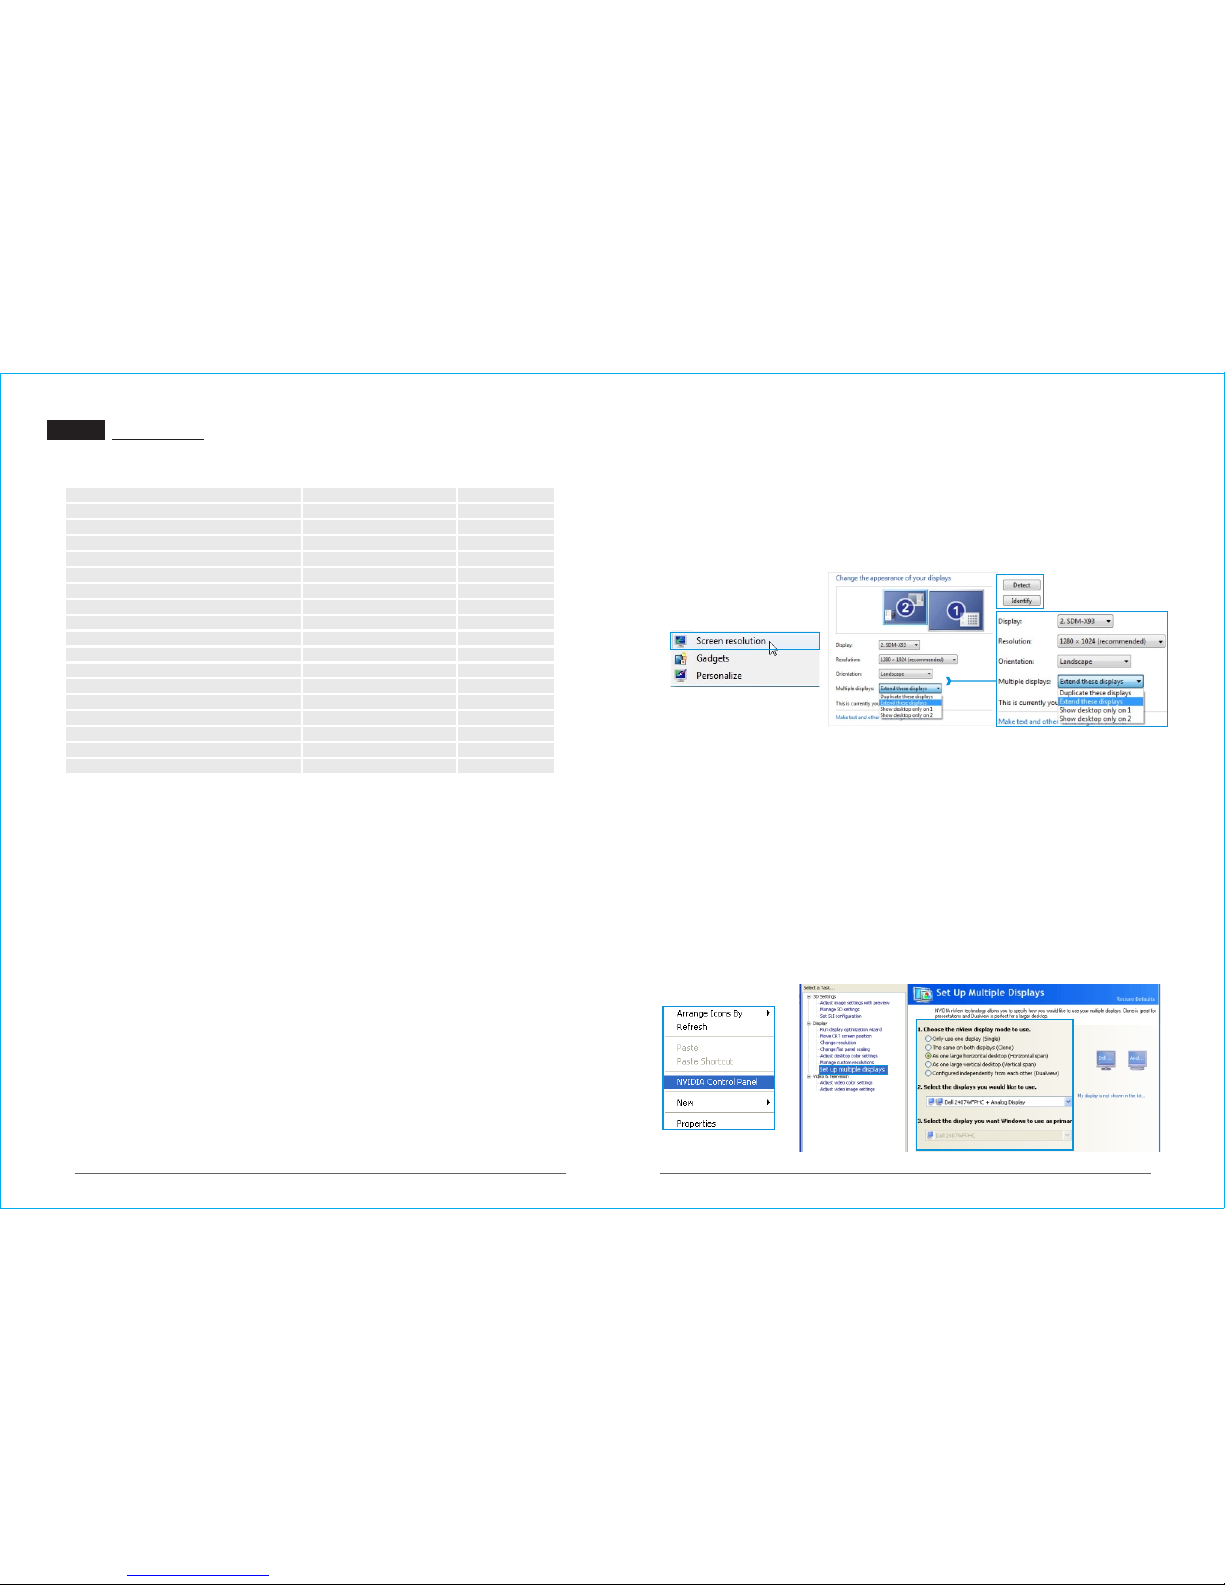
1. Whe n the dev ice is proper ly conn ected a nd the ne twork h as been c onnec ted, OS D
inf ormat ion on di splay devic e screen will b e promp ted as:
" NETWO RK CONNE CTED, VI DEO CON NECTING. .. ";
2. Ri ght-clic k on the de sktop a nd sele ct "Scr een res oluti on";
3. As t he belo w pictu re shows, the re will be two mo nitor s named ① ② in panel. I f only
mon itor ① ap peared, ple ase cli ck "Det ect" or u nplug a nd then p lug PC' s HDMI ca ble;
4. Se lect "Dupl icate t hese di splays" or "E xtend t hese di splay s" in "Multip le disp lays"
col umn, cl ick "Apply";
5. Whe n compu ter screen sh own on th e displ ay device, cl ick "Ke ep Chan ges" to compl ete
the s etup. Click " Resol ution " optio n to chan ge computer 's outp ut reso lutio n. If you
can 't set the resolut ion of 10 80P und er "Dup licat e these d ispla ys", pleas e chang e to
"Ex tend th ese dis plays ".
1.W hen the d evice i s properly co nnect ed and th e netwo rk has be en conn ected , OSD
inf ormat ion on di splay devic e screen will b e promp ted as:
" NETWO RK CONNE CTED, VI DEO CON NECTING. .. ";
2.R ight- click on the d eskto p and sel ect "NV IDIA Co ntrol Pa nel";
3.O pen the " NVIDI A Control Pane l", sel ect "Set up mu ltipl e displ ays", it wil l show
the f ollowing in terface:
Windows 7 System
Windows XP S ystem (NVID IA Graphic Ca rd Seri es)
Graphic Card Setting
Appendix
Page 12
29
30
*
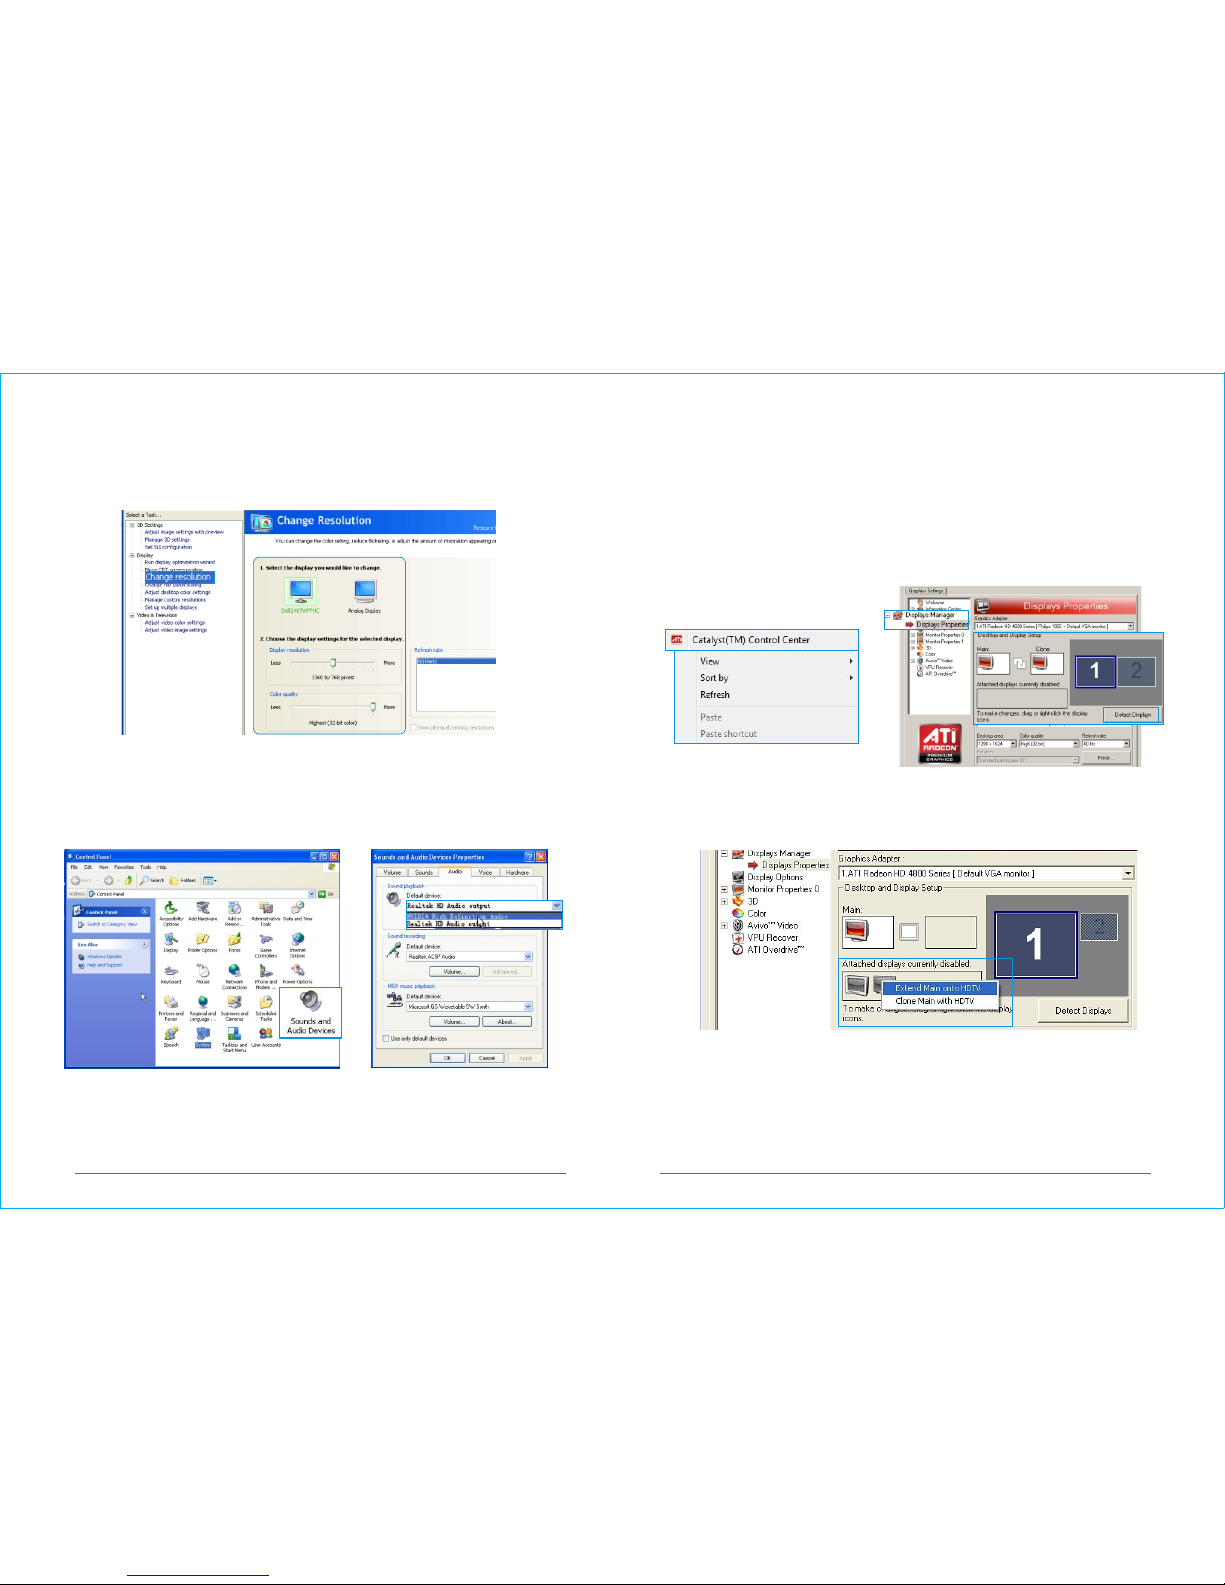
4. Se lect " The sam e on both d isplays (Clone) " o r "Conf igured inde pende ntly fr om each
oth er (Dua lview ) ", click "Apply ";
5. Whe n compu ter screen sh own on th e displ ay device, cl ick "Yes" t o save the s ettin g.
6. As b elow pi cture s how, sel ect the " Chang e resol ution" opti on, you c an modi fy the
com puter o utput resol ution a s dragg ing the " Displ ay Resoluti on" pro gress ba r.
7. Op en the Co ntrol Pa nel, run the "S ounds a nd Audi o Devic es" as follow s: Clic k the
"Audi o" tab in t he "Sou nds and A udio De vices " properties car d, change the " Defau lt
dev ice" of " Sound p layba ck" to "N VIDIA H igh Def initi on Audi o", t hen cli ck "OK" t o
com plete t he setu p.
*8. Th is step i s for HDMI audi o outpu t setti ngs, you can sk ip this s tep if yo u are using VGA
int erface of HD t ransm itter.
Windows XP S ystem (ATI G raphic Card S eries )
1. Whe n the dev ice is proper ly conn ected a nd the ne twork h as been c onnec ted, OS D
inf ormat ion on di splay devic e screen will b e promp ted as:
" NETWO RK CONNE CTED, VI DEO CON NECTING. .. ";
2. Ri ght-clic k the mou se on the d eskto p, selec t "Cata lyst( TM ) C ontrol Center", open t he
ATI gra phics s ettin gs;
3. Se lect "Disp lays Ma nager " which l isted in the gr aphic s setti ngs as refer to fo llow pi cture :
4 .Be low “Attache d displ ays cur rently disa bled”, there wil l be a gray di splay i n the dis play
box , if no gray d ispla y appea r, pleas e right-click "D etect D ispla ys" or un plug an d then
plu g the HDM I cable ;
5. Ri ght-clic k the gray disp lay, sel ect the " Exten ded Main ont o HDTV" or "Cl one Mai n
wit h HDTV ";
6. Whe n the vid eo imag e appea rs on the d ispla y screen, sel ect "Yes" on the p op-up dial og
box to save the set tings ;
7. Cl ick the " Deskt op Area" opti on, cha nge the c omputer's o utput r esolu tion;
8. Op en the co mpute r contro l panel , run the " Sound s and Aud io Devi ces";
9. Thi s step is for HDM I audio o utput s ettin gs, you can ski p this st ep if you a re usin g V GA
int erface of HD t ransm itter. Cl ick the "Audio " tab in th e "Soun ds and Audio De vices
" pro perti es card , chang e the "De fault d evice " of "Sou nd play back" to "ATI HD Audio
rea r outpu t", t hen cli ck "OK" t o compl ete the s etup.
Page 13
31 32
Indicator Description
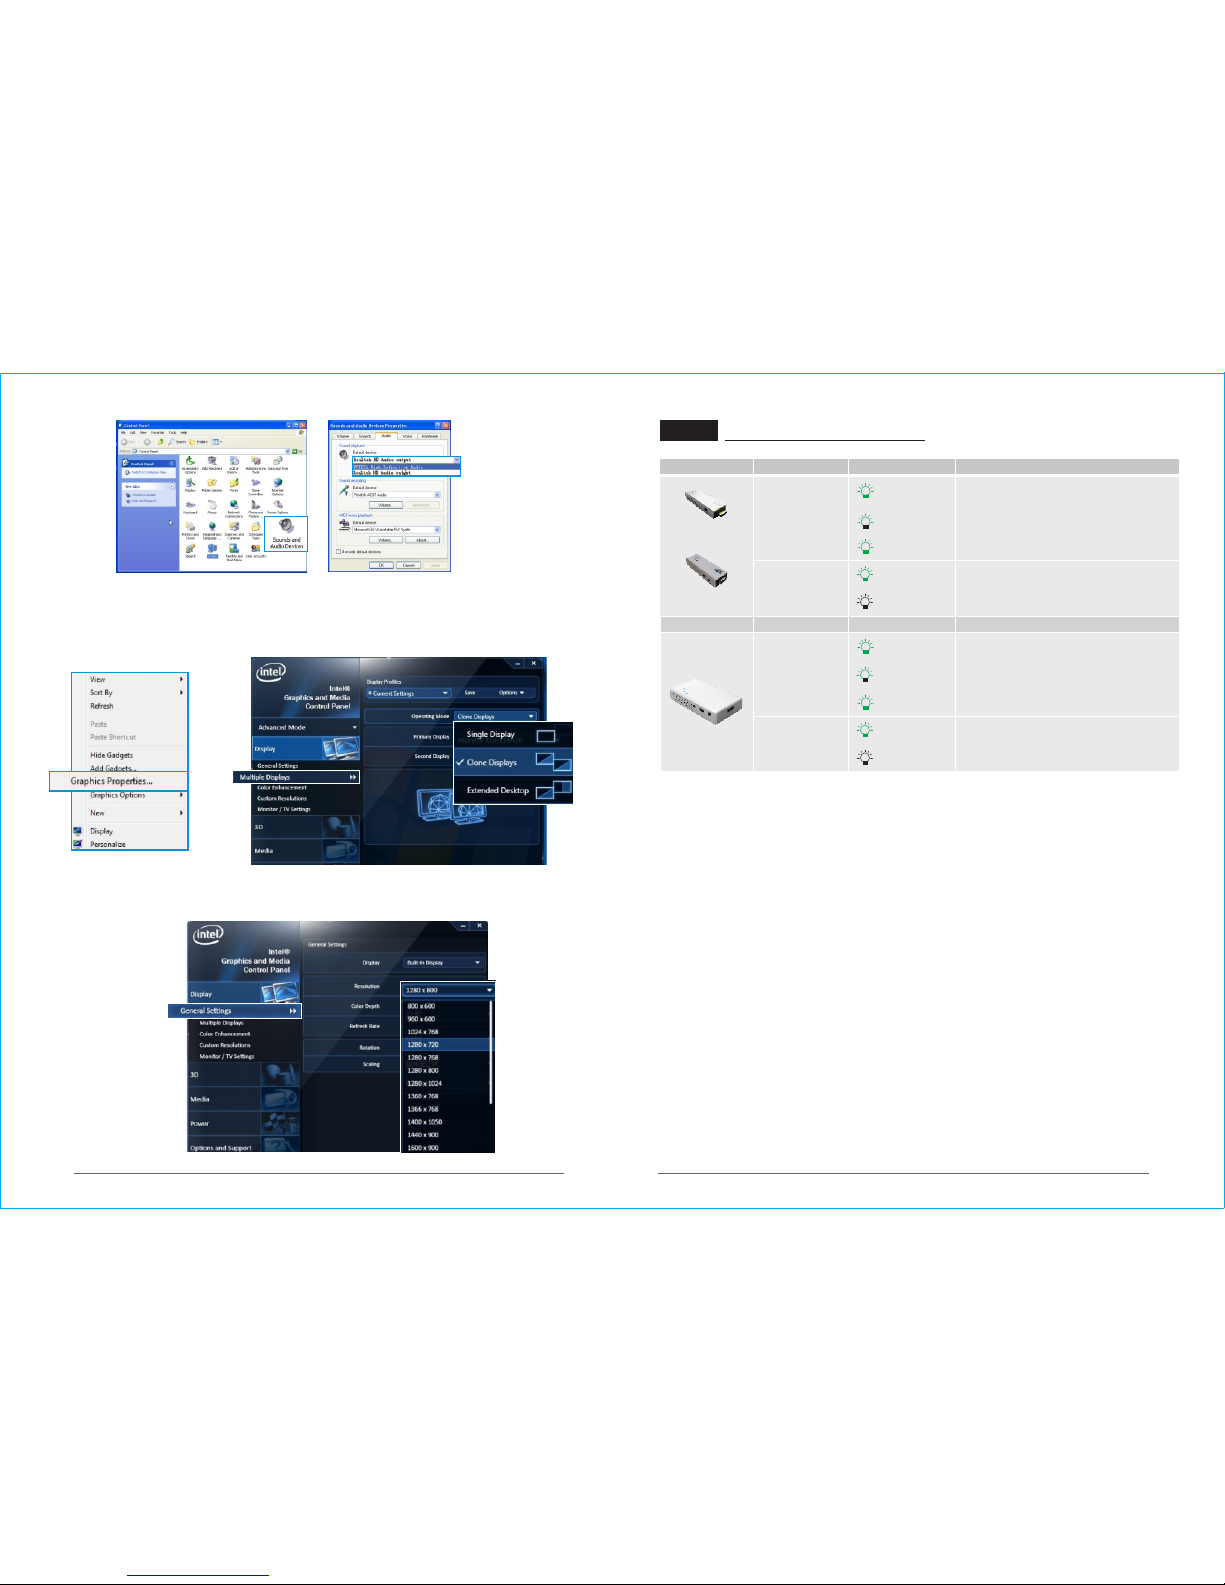
Windows XP System (INTEL G raphic Card S eries)
1. Right-cl ick the m ouse on t he desk top, select "Gra phics Prope rties ..";
2. Se lect "Mult iple Di splays" in "Intel Gra phics and Medi a Control Panel", change "
Ope ratin g Mode" to "Clon e Displ ays" or "Extended Des ktop";
3. Cl ick "Apply" and sel ect "Yes" on the pop-up di alog box to sav e the set tings ;
4. Cl ick the " Resol ution " optio n in the "G enera l Setti ngs" ta b, change the outp ut
resolution;
ON
OFF
ON
Flas h Rapid ly
Flas h Slowl y
TX: CB880 1
TX: CB880 8
— The dis play so urce is c onnec ted suc cessfu lly
— The dis play so urce fa ils to be co nnec ted
Net work
Ind icato r
Vid eo
Ind icato r
Mod el Ind icato r Ind icato r Statu s
Work ing St atus
— The wir eless n etwor k conne ction i s
succ essfu l betwe en tran smitt er and re ceiver.
— Transm itter i s ready f or conne ctin g.
— The dev ice is ab norma l.
ON
ON
OFF
Flas h Rapid ly
— The vid eo sour ce is con necte d succe ssful ly
— The vid eo sour ce fail s to be con necte d
Net work
Ind icato r
Vid eo
Ind icato r
Mod el Ind icato r Ind icato r Statu s
Work ing St atus
Flas h Slowl y
— The wir eless n etwor k conne ction i s
succ essfu l betwe en tran smitt er and re ceiver.
— Rece iver is r eady fo r connec ting.
— The dev ice is fa ulty.
Page 14

* Sin ce the pr oduct 's impr oving pr ocess , all the p erfor mance , desig n and spe cific ation s of our
pro ducts a re subj ect to mi nor cha nge wit hout pr ior not ice.
C B 3 8 0 1
R e c e i v e r
Product Specifications
5. 15~ 5. 25, 5 .2 5~5 .35 , 5. 47~ 5. 725 , 5. 725 ~5. 85 0 (GH z)
MI MO
HD MI 1 .3,HD CP 1 .2
OF DM
±1 0PP M
40 MHz
16 ± 2d Bm
≥30 m ( 50 m wi th CB 88 01)≥
5V / 2A
99 x 56 x 20. 5 (m m)
≤-7 5d Bm
≤1m s
5 RX /1T X
TV :10 80 p, 10 80 i, 72 0p, 576 p, 4 80p
PC :VG A( 640 X48 0), SVG A( 800 X60 0) ,
XGA :( 102 4X7 68 ), S XGA (12 80X 10 24)
PC M, DT S, D OCB Y DI GITA L
RF com munic ation s ystem
Mod ulatio n mode
Rece iving S ensi tivit y
Band width
Trans missi on Power
Power S upply
Dime nsion s (W x D x H)
Freq uency s tabil ity
Syst em late ncy
TX/ RX chan nel
Trans missi on Frequ ency
Trans missi on Dist ance
Stan dard Pr otocol
Vide o Format
Supp ort
Audi o Format S uppor t
T r a m s m i t t e r
Freq uency S tabil ity
Syst em Late ncy
TX/ RX chan nel
Trans missi on Frequ ency
Trans missi on Power
Band width
Trans missi on Dist ance
Rece iving S ensi tivit y
Stan dard Pr otocol
Power S upply
Dime nsion s (W x D x H)
5. 15~ 5. 25, 5 .2 5~5 .35 , 5. 47~ 5. 725 , 5. 725 ~5. 85 0 (GH z)
98 x 29 x 1 4.5 (mm )
91 .5 x 3 1x 1 7.5 (mm )
C B 8 8 0 1 C B 8 8 0 8
±1 0PP M
20 MHz / 40 MHz
HD MI 1 .3,HD CP 1 .2
13 ±2d Bm
≤-7 5d Bm
≤1m s
2 TX / 1R X
≥25 m
5V / 1A
10 ± 2d Bm
≤-7 5d Bm
≤1m s
2 TX / 1R X
≥25 m
5V / 1A
38 KHz
72 0P@ 50 , 720 P@ 59, 7 20 P@6 0
10 80P @2 3, 10 80 P@2 4
HD MI 1 .4, H DC P 2. 0
-1 0 - 40℃
-2 0℃ - 8 0℃
15 ~85 %R H
IR Mo de
3D Vid eo
Form at Supp ort
3D Sta ndard P rotoco l
Oper ating Tem peratu re
Oper ating H umidi ty
Stor age Tempe rature
( O P T I O N A L )
33 34
Page 15
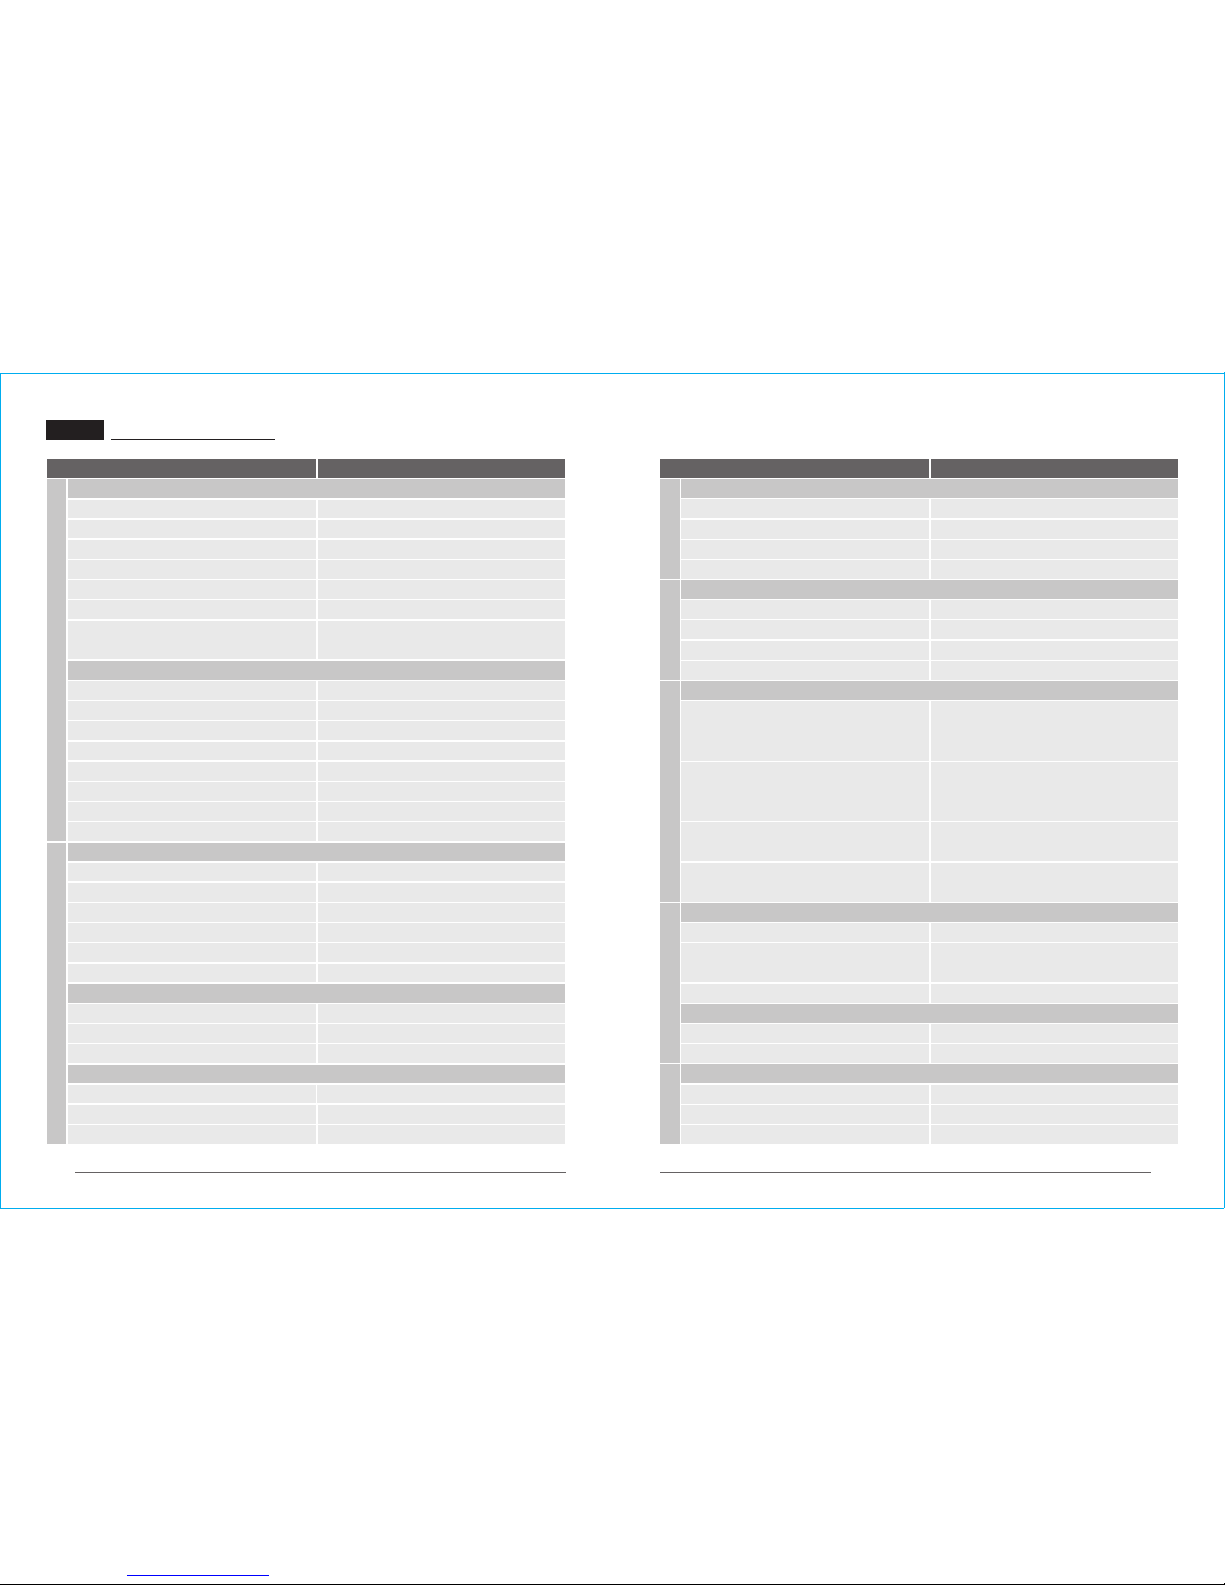
35 36
Trouble Shooting
Many n oises o r mosai cs on the i mage di splaye d on TV
Poss ible Re asons :
Solu tions :
Audi o
IR Rem ote Cont rol
HID Fu nctio n
Trans mitter
Imag e
Trans mitte r or rece iver is n ot place d erect ly.
The tr ansmi tter an d recei ver are ou t of effe ct rang e.
Plac e the TX or RX o nto the b ase and m ainta in them e rectl y.
Move t he rece iver cl oser to th e trans mitte r.
Red uce the nu mber of s olid wa lls bet ween TX a nd RX.
Move t he rece iver cl oser to th e trans mitte r.
Seve ral sol id wall p arti tion TX an d RX.
Plac e the IR re mote ex tensi on conn ector i n the fro nt
of pla yer and m ake sur e the IR re mote ex tensi on
connec tor is aligne d to the IR sensor win dow of player.
Mak e sure the r emote c ontrol i s align ed to the I R
sens or wind ow of rec eiver w hen usi ng.
IR rem ote ext ensio n conne ctor on ly supp orts 3 8KHz
remo te's si gnal pr otocol .
Plea se refe r to the HI D drive r's ins tallat ion ste p in P24.
Mak e sure the t ransm itter 's USB po rt is co nnect ed
with t he comp uter' s USB por t.
Refer to the List of Supported HID Accessories Model in P27.
Move t he rece iver cl oser to th e trans mitte r.
Reb oot the t ransmi tter an d recei ver.
Power o n recei ver.
Plac e the mac hine on to the ba se and ma intain t hem ere ctly.
Move t he rece iver cl oser to th e trans mitte r.
Can' t use the I R exten ded fun ctio n to remot e contro l the pla yer.
IR rem ote ext ensio n conne ctor is m isali gnmen t to the
IR sen sor win dow of pl ayer.
The re mote co ntrol is n ot alig ned to th e IR sens or
wind ow of rec eiver w hen usi ng.
A few sp ecial t ype of pl ayers d o not sup port in frare d
remo te cont rol.
Can' t use HID r emote c ontrol f unct ion
Have n't ins talle d the HID d river.
Trans mitte r's USB p ort is n ot conn ected w ith the
comp uter' s USB por t.
The ad opted k eyboa rd/mo use are n ot supp orted .
The ke yboard /Mous e's ope ratio n progre ss is not c ontin uous.
The tr ansmi tter an d recei ver are to o far awa y.
Abno rmal wo rkin g of tran smitt er or rece iver
Indi cator s tatus o f wirel ess conn ecti on is off.
Rece iver is n ot elec trif ied.
Trans mitte r or rece iver are n ot plac ed erec tly.
The TX a nd RX are t oo far awa y from ea ch othe r.
Open
the
volu me
of
play er
or
TV.
Turn up t he volu me of pla yer or TV.
Swit ch the ou tput au dio for mat of pl ayer.
Reb oot the t ransmi tter an d recei ver.
Play er or TV is m uted.
Play er or TV' s volum e is too lo w.
Curr ent pla yer don' t supp ort the o utput a udio fo rmat.
Abno rmal wo rkin g of tran smitt er or rece iver
Ther e are too m any obst acles b etwee n TX and RX .
Imag es appe ar on TV no rmall y but no vo ice is out put.
The tr ansmi tter ar e not con necte d with th e IR remo te
ext ensio n connec tor.
Plug t he IR ex tensio n cable i nto the I R Out jac k of
tran smitt er, plac e the IR re mote ex tensi on
conn ector i n front o f IR wind ows are a of playe r.
Solu tions :
Power o n trans mitte r.
Plac e the TX or RX o nto the b ase and r eplac e them er ectly.
Move t he rece iver cl oser to th e trans mitte r.
Red uce the nu mber of s olid wa lls bet ween TX a nd RX.
Move t he rece iver cl oser to th e trans mitte r.
Rem atch the c ode of tr ansmi tter an d recei ver.
Power o ff othe r indep enden t trans mitte r, place t he
rece iver aw ay from th e other s ource s of inte rfere nce.
Conn ect the t ransm itter w ith pla yer by the H DMI cab le
Power o n playe r.
Swit ch play er to HDM I outpu t.
Unpl ug and th en plug t he HDMI c able of t he tran smitt er
Reb oot the t ransmi tter.
Chan ge the HD MI cabl e.
Swit ch the pl ayer' s outpu t resolu tion to o ther mo des.
Rep laced wi th HDCP -cer tifie d TV.
Power o n recei ver.
Conn ect the r eceiv er and TV b y the HDM I cable.
Swit ch TV to HD MI inpu t.
Unpl ug and th en plug t he HDMI c able of t he rece iver or T V.
Swit ch the TV t o norma l opera tion mo de.
Reb oot the re ceive r.
Re- plug th e HDMI ca ble of th e recei ver or TV
Reb oot the re ceive r
Plea se cont act you r distr ibuto r
Unpl ug and th en plug t he HDMI c able of t he rece iver or TV.
Unpl ug and th en plug t he HDMI c able of t he TX and p layer.
Reb oot the t ransmi tter an d recei ver.
OSD In forma tion on TV
Imag e
Netw ork con nect fa iled, P lease c heck th e devic e is ready
Trans mitte r is not el ectr ified.
Trans mitte r or rece iver is n ot place d erect ly.
The tr ansmi tter an d recei ver are to o far awa y.
Seve ral sol id wall p arti tion TX an d RX.
Ther e are too m any obst acles b etwee n TX and RX .
Have n't mat ched th e code of T X and RX.
Ther e is othe r trans mitte r which i s under w orkin g
cond ition n ear the r eceiv er.
Vide o connec t fail ed,Pl ease ch eck the d evice is r eady
Trans mitte r and pla yer are no t conne cted.
Play er is not t urned o n.
Have n't swi tched p layer t o HDMI ou tput.
Poor c ontac t of tran smitt er's HD MI cabl e
Abno rmal wo rkin g of tran smitt er
Ther e are prob lems wi th HDMI c able be tween T X and pla yer.
Play er don' t suppo rt the o utput r esolu tion for mat.
The TV do n't su pport H DCP aut henti catio n when us ing Blu e-ray p layer.
No sig nals ar e input t o TV
Rece iver is n ot turn ed on.
Rece iver an d TV are no t conne cted.
Have n't swi tched T V to HDMI i nput.
No ima ge appe ar on TV
Poor c ontac t of rece iver or TV 's HDM I cable
TV tu rn into s tandb y mode
Abno rmal wo rkin g of recei ver.
Abno rmal co lor on TV s creen
Poor c ontac t of rece iver or TV 's HDM I cable.
Abno rmal wo rkin g of recei ver
Rece iver fa ilure
Poor c ontac t of rece iver or TV 's HDM I cable.
Poor c ontac t of tran smitt er or play er's HD MI cabl e.
Abno rmal wo rkin g of tran smitt er or rece iver
Poss ible Re asons :
Page 16
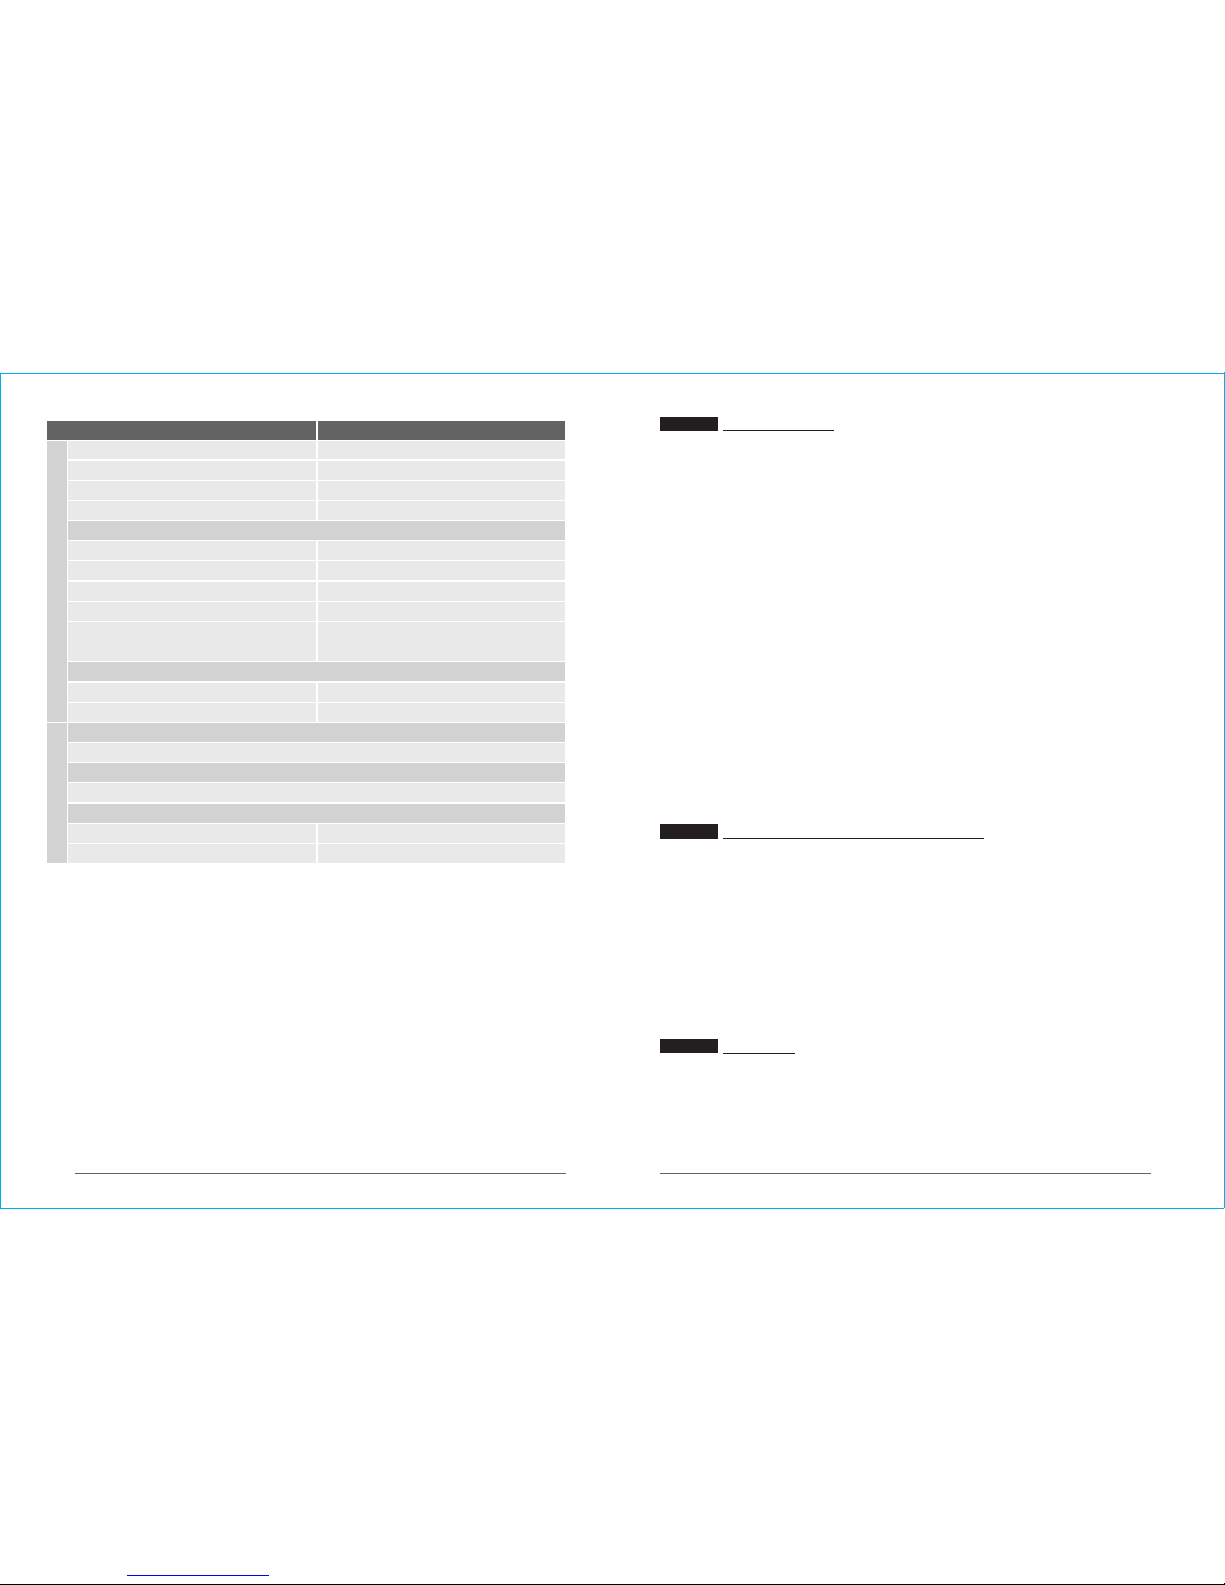
Rem atch the c ode of tr ansmi tter an d recei ver.
Plea se cont act you r distr ibuto r.
Have n't mat ched th e code of T X and RX.
Trans mitte r or rece iver fa ilure
Connect the tr ansmitter with playe r by the HDMI cable.
Power o n playe r.
Swit ch play er to HDM I outpu t.
Unplug and then plug the HDMI cable of the TX or player.
Chan ge the HD MI cabl e
Reb oot the t ransmi tter.
Plea se cont act you r distr ibuto r.
Reb oot the re ceive r.
Plea se cont act you r distr ibuto r.
Indi cator s tatus o f wirel ess conn ecti on is on, b ut vide o Indic ator is o ff.
Rece iver an d TV are no t conne cted.
Play er is not t urned o n.
Have n't swi tched p layer t o HDMI ou tput.
Poor c ontac t of tran smitt er or play er's HD MI cabl e.
Ther e are pro blems w ith HDM I cable b etwee n TX
and pl ayer.
Indi cator s tatus o f wirel ess conn ecti on is fla sh rapi dly.
Abno rmal wo rkin g of tran smitt er
Trans mitte r failu re
Indi cator s tatus o f wirel ess conn ecti on is off.
Plea se refe r to OSD in format ion: Ne twork c onnec t fail ed, plea se chec k the dev ice is re ady.
Indi cator s tatus o f wirel ess conn ecti on is on, b ut vide o indic ator is o ff.
Plea se refe r to OSD in format ion: vi deo con nect f ailed, P lease c heck th e devic e is read y
Indi cator s tatus o f wirel ess conn ecti on is fla sh rapi dly.
Abno rmal wo rkin g of recei ver.
Rece iver fa ilure
Redu ce the numb er of solid w alls bet ween TX and RX .
Move t he rece iver cl oser to th e trans mitte r.
Seve ral sol id wall s part ition t ransm itter an d recei ver.
Ther e are too m any obst acles b etwee n TX and RX .
Poss ible Re asons : Solu tions :
Trans mitter
Rece iver
37 38
Thi s equip ment co mplie s with FCC R F radia tion ex posur e limit s set for th for an un contr olled
env ironme nt. This t ransm itter m ust not b e co-lo cated o r opera ting in co njunc tion w ith any
oth er ante nna or tr ansmi tter. This e quipm ent com plies w ith Par t 15 of the F CC Rules .
Ope ratio n is subj ect to th e follow ing two c ondit ions:
(1) Th is devi ce may not c ause ha rmfu l inter ferenc e, and
(2) Th is devi ce must a ccept an y inter feren ce recei ved, in cludi ngint erfer ence th at may cau se
und esire d operat ion.
Thi s equip ment ha s been te sted and f ound to c omply w ith the l imits fo r a Class B d igita l
dev ice, pu rsuant t o part 1 5 of the FCC r ules. Th ese lim its are d esign ed to prov ide rea sonab le
pro tecti on agai nst har mful in terfe rence i n a reside ntial i nstal latio n. This eq uipme nt
gen erate s, uses an d can rad iate ra dio fre quenc y energ y and, if n ot inst alled a nd used i n
acc ordanc e with th e instr ucti ons, may c ause ha rmful i nter ferenc e to radi o commu nicati ons.
How ever, the re is no gu arante e that in terf erence w ill not o ccur in a p arti cular i nstal lation . If
thi s equip ment do es caus e harmf ul inte rfere nce to rad io or tel evisi on rece ption , which c an be
det ermin ed by tur ning th e equip ment of f and on, t he user i s encou raged to t ry to co rrect t he
int erfer ence by o ne or more o f the fol lowin g measu res:- Reori ent or rel ocate t he rece iving
ant enna. I ncrea se the se parati on bet ween the e quipm ent and r eceiv er. Conne ct the
equ ipmen t into an o utlet o n a circui t diffe rent fro m that to w hich th e recei ver is con nect ed.
Con sult th e deale r or an exp erien ced radi o/TV t echni cian fo r help. To ass ure cont inued
com plian ce, any ch anges o r modif icati ons not e xpres sly app roved by t he part y respo nsibl e
for c omplia nce cou ld void t he user 's auth ority t o opera te this e quipm ent. (E xampl e use onl y
shi elded i nterf ace cab les whe n conne cting t o compu ter or pe riphe ral dev ices) .
FCC Statement
The m anufa cture r is not re spons ible for a ny radi o or TV int erfer ence ca used by un autho rized
mod ifica tions t o this eq uipme nt. Suc h modif icatio nscou ld void t he user a uthor ity to op erate
the e quipm ent.
FCC Radiation Exposure Statement
Cautions!
 Loading...