

Page 1
WA-T8
WA-T4
WA-S4
WA-S2
WA-S1
WA-8SB
WA-12SB
CODE: WH10-MNL0007
Page 2
Page 3
Page 4
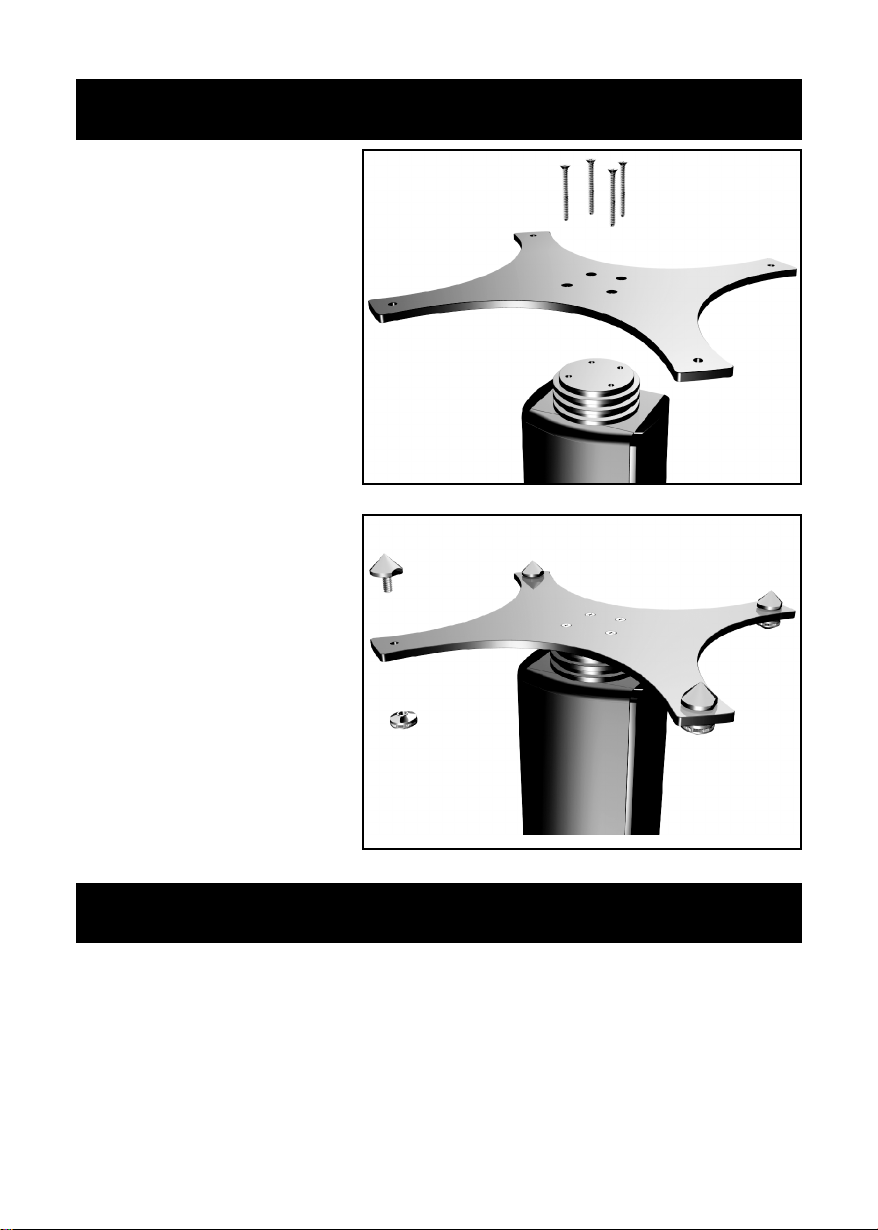
PREPARING THE TOWERS
ATTACHING THE PLINTH
Place a soft cloth on the floor to protect the
speaker.
Invert the loudspeaker and place it on the cloth.
Place the plinth on the loudspeaker noting the
orientation.
Align the plinth with the mounting holes in the
base of the speaker.
Attach all four screws firmly to secure the plinth.
ATTACHING THE SPIKES
CAUTION: SPIKES ARE SHARP.
Make sure that there are no wires or hidden
obstacles that could be damaged by the spikes
in the immediate operational area of the
speakers.
NEVER drag a loudspeaker on its spikes. Always
lift it. If the item is heavy get assistance.
A mounting hole is located at each corner of the
plinth. Thread a spike through each hole.
Tighten the collar finger tight so that the spike
is secure but not locked in place.
After all the spikes are attached, invert the
loudspeaker and place it carefully on the floor.
LEVELLING THE TOWERS
Loosen the top collar on each spike one turn.
Place a small spirit level on the plinth.
If the floor is not perfectly level you will find that one spike is off the ground. Starting with this spike, unscrew it so that it touches
the floor. Move the other spikes in and out so the speaker does not wobble and is level front and back and sideways. Now tighten
the top collars to lock the spikes firmly in position
4
Page 5

Page 6

For WA-S1
For WA-S2 & WA-S4
Page 7

Page 8

CENTRE
L
L
R
R
C
R
L
FRONT RIGHT FRONT LEFT
SURROUND LEFTSURROUND RIGHT
BACK RIGHT BACK LEFT
CENTRE
L
L
R
C
R
FRONT RIGHT FRONT LEFT
SURROUND LEFTSURROUND RIGHT
CONNECTING YOUR LOUDSPEAKERS - 2
5 CHANNEL CONNECTIONS
7 CHANNEL CONNECTIONS
ROOM PLACEMENT
ROOM PLACEMENT
8
Page 9

PRELIMINARIES
Open the carton and remove all the top packing pieces. Lift the
subwoofer out taking care not to damage the cabinet. DO NOT
lift the subwoofer out of the carton using the protective bag. The
unit is heavy; if you cannot manage it easily, get assistance.
Retain the packing materials. If you decide not to keep the
packing, please dispose of it having regard to any recycling
regulations in your area. Please retain the user manual. If you
transfer this equipment to a third party, please ensure all the
instructions are passed on with the product.
POWER CONNECTIONS
This subwoofer is factory set to operate from the mains voltage
marked on the amplifier panel. Before connecting check this
voltage is correct for your mains supply.
! 230 volt products - 220 volts to 240 volts
! 115 volt products - 110 volts to 120 volts
If you move to an area with a different mains supply, consult your
Wharfedale dealer for advice.
INSTALLING THE WA-8SB & WA-12SB SUBWOOFERS
b Phase Control
c Line Level Outputs
d Line Level Inputs
e Volume Control
f Crossover Frequency Control
g Auto Power Switch
h Power ON/OFF Switch
i IEC Mains Input Socket
j Mains Power Fuse
b
c
d
e
f
g
h
i
j
REAR PANEL CONNECTIONS
The WA-8SB and WA-12SB subwoofers use he
same power amplifier. The differences are that
the WA-12SB will produce higher sound levels
with deeper bass reproduction. Connection and
operation of the two units is identical.
PLACEMENT
Although the unit may be placed almost
anywhere in the room, we recommend that is
placed in front of the listener central to the
listening position. There should be a mains
outlet within easy reach.
The bass port is mounted under the subwoofer
firing downward and moves a lot of air at high
volume, so make sure the floor is sound. The
subwoofer is front-firing so do not place it
behind surfaces or objects that may rattle.
9
Page 10

5- 2"-"
Page 11

OPERATION
SETTING UP
HOME THEATRE TOPICS
! Set the subwoofer power switch to OFF.
As the ear is unable to detect the direction from which deep bass
! Turn the system Volume Control to minimum.
originates, this allows freedom in positioning the subwoofer.
! Re-check all system connections.
Varying the distance from the wall alters the amount of bass.
! Connect the supplied subwoofer power lead to the IEC
Some prefer to place the subwoofer against a room corner. This
power socket on the subwoofer and connect the mains plug
arrangement gives more bass at the possible expense of clarity.
into the wall socket.
LOUDSPEAKER SIZES
! Set the subwoofer volume control to the mid position
Many digital AV processors require you to specify the size of
(12o'clock)
speakers in the various channels. These are usually ‘Large’ or
! Switch on the mains power.
‘Small’. We recommend that you set all the Achromatic speakers
FINE TUNING
in the system to 'Small'. This will direct all the bass in the system
to the subwoofer and provide clean, deep and louder bass.
Switch on the subwoofer power switch. Check that the power
indicator on the front of the cabinet glows. Now switch on the
You may wish to experiment with setting the WA-T8 to “large”
system. Play a programme with extended bass and set the
depending on the level of bass you prefer.
system volume to a reasonable level. Adjust the subwoofer
Set the ‘Subwoofer’ option on the processor to 'On’ or 'Yes'.
volume control to produce the desired level of bass.
SETTING LEVELS
PHASE SWITCH: If the bass is indistinct or lacks depth, the Phase
Once the loudspeaker settings have been finalised, put the AV
switch may need adjustment. Set the switch to 0º and listen
amplifier into its “Test” mode (see your processor instructions),
carefully to some music with extended bass. If there is
Adjust the levels until all channels are equally loud.
insufficient bass output from the sub-woofer set the Phase
switch to 180º. Select the position which produces the most
You may need to adjust the subwoofer output level. Avoid
natural, extended bass.
setting too high a level or you will swamp the sound with bass
which be tiring to listen to and may limit the subwoofer’s ability
LOW PASS FILTER. This adjusts the blend between the
to respond to large bass transients. Set a sensible level going
subwoofer and the main speakers. and enables the system to be
into the subwoofer. The subwoofer volume control should be
set up for optimum bass performance. The system has been
between 12 o’clock and 3 o’clock .
optimised for a setting of 65Hz. For stronger bass you can set the
switch to 75 or 85 Hz. If you choose too low a setting there may
LFE
be a ‘hole’ in the bass response; too high a setting with the
The Low Frequency Effects channel was designed as an additional
tower speakers may result in bloated upper bass.
bass channel with its own dedicated subwoofer. In practice
AUTO SWITCH. In normal mode the subwoofer is permanently
however, if all the speakers are set to Small, the LFE channel will
on. This may result in low level hum or noise if the rest of the
be combined with the bass from other channels and all this feeds
system is switched off and the subwoofer is left switched on.
into the subwoofer. When you set the LFE level from your AV
processor, use care with this setting as the LFE channel may
contain powerful low frequencies which, although normal in a
cinema, may overload a domestic subwoofer.
If, during a programme, you hear popping or thumping noises
coming from the subwoofer, immediately turn the AV
Processor's volume level down and then back off the LFE level. If
this does not cure the problem, back off the volume level at the
subwoofer.
When the system is not in use for extended periods, we suggest
Please read the relevant sections of your AV amplifier manual
you switch off the subwoofer to protect it from switching noises
and familiarise yourself with the various issues. If you are
caused by domestic appliances, etc.
unsure, consult your dealer for help.
Setting the AUTO switch to ON automatically turns the
subwoofer on when a signal is detected at any of the inputs and
turns it off (Standby Mode) after a period of inactivity. We
recommend the AUTO switch be set to ON for normal operation.
In AUTO mode the indicator on the front of the subwoofer will
glow RED when the unit is in Standby and GREEN when
operational. If your subwoofer is disconnected from the mains
or the Power switch is “Off”, the indicator will be extinguished.
11
Page 12

Dolby Labs Recommended 7.1 Placement (Single Back channel for 6.1 shown dotted)
5.1 system with freestanding Centre Channel and wall mounted rear surround speakers
SAMPLE MULTICHANNEL PLACEMENTS
12
Left Surround
Left Back
90º
110º
135º
150º
22º
30º
LFE
Centre
Right Back
Right Front
Left Front
Right Surround
Page 13

Page 14

600
Page 15

 Loading...