


Instructions for use
RIL-1 - ENG - Rev04
RIL-117 RIL-122


Table of contents
Conformity 5
Symbols and messages 6
Introduction 7
About this manual 7
Use restrictions 8
Safety information 9
Safety warnings 9
Responsibility 10
Getting started 11
Unpacking 11
Handling 13
Product description 14
Installing the sterilizer 19
Operating with the sterilizer 21
User interface menu 23
Sterilizer setup 29
User authentication (optional) 31
USB pen drive 32
Standby mode 33
Administrator 35
User management (optional) 35
Traceability options (optional) 38
Managing printers 39
Printer selection (optional) 39
Label printer selection (optional) 39
Label printer usage (optional) 41
Label content description 44
Sterilizer tests 45
Sterilizer performance tests 45
Bowie and Dick test 45
Helix test 49
Vacuum test 52
Sterilization cycles 54
Load maintenance and preparation 54
Prepare the sterilizer 56
Sterilization cycle description 57
Sterilization cycle management 58
Unloading 65
Sterilization cycle report 65
Maintenance 72
Warnings for maintenance operations 72
Ordinary maintenance 73
Monthly or 50-cycle maintenance 75
400-cycle maintenance 80
800-cycle or biannual maintenance 83
800-cycle maintenance 89
LARA| Instructions for use |RIL-1 ENG Rev04 |28/02/2019 |© 2019 W&H SterilizationSrl iii

4000 cycle or five-year maintenance 91
Extraordinary maintenance 92
Battery-operated door opening tool 96
Disposal 99
Diagnostic 100
Errors 100
Troubleshooting 106
Technical data 111
Sterilization cycles 111
Sterilization cycle phases 115
Technical data 118
Recommendations for validation 120
Diagrams 121
Water quality 122
Accessories, spare parts, consumables 123
Authorized W&H service partners 128
Documentation forms 131
W&H installation check-list 131
Helix test documentation form 134
iv LARA| Instructions for use |RIL-1 ENG Rev04 |28/02/2019 |© 2019 W&H SterilizationSrl

Conformity
CONFORMITY TO EUROPEAN STANDARDS AND DIRECTIVES
STERILIZER featuring sterilization cycles conform with the following
standards:
Standards
and
Directives
93/42/EEC
2014/68/EU
2012/19/EU Waste Electrical and Electronic Equipment (WEEE).
EN 13060 Small steam sterilizers.
IEC 61010-1 Safety requirements for electricalequipment for measurement,
IEC 610102-040
IEC 61326-1 Electrical equipment for measurement, control and laboratory use -
IEC 61770 Electricappliances connected to the water mains - Avoidanceof
Description
Medical Device Directive (MDD).
Medical Device Directive 93/42/EEC for devices class IIb, in
accordancewith the Rule 15 – ANNEX IX of the above Directive.
Pressure Equipment Directive (PED).
Directive 2014/68/EU (PED – Pressure Equipment Directive) for
every sterilization chamber designed and manufactured in
conformity to the ANNEX 1 and to the procedure described in the
module D1 Annex III.
control and laboratory use, general requirements.
Safety requirements for electrical equipment for measurement,
control and laboratory use; particular requirements for sterilizers and
washer-disinfectors used to treat medicalmaterials.
EMC requirements; general requirements.
backsiphonage and failureof hose-sets.
Note: Every new sterilizer is delivered with a Declaration of Conformity and a
Warranty Card.
Note: LARA sterilizers can be validated in accordance to EN17665-1.
LARA| Instructions for use |RIL-1 ENG Rev04 |28/02/2019 |© 2019 W&H SterilizationSrl 5

Symbols and messages
SAFETY SYMBOLS USED IN THIS MANUAL
WARNING: Indicates a hazardous situation that, if not avoided, could
result in death or serious injury.
Related to a sterilizer, these warnings indicate hazardous situations
that could result in non-sterile conditions (e.g. non-sterile instruments)
which could lead to fatal personal injury.
CAUTION: Indicates a hazardous situation that, if not avoided, could
result in minor or moderate injury.
SYMBOLS DISPLAYED ON THE PRODUCT
Hot surfaces!
Risk of burns.
Hot steam!
Risk of burns.
Consult the Instructions
for use for important
cautionary information.
Consult the Instructions
for use.
Do not dispose of with
normal waste
PROPERTY DAMAGE MESSAGES
Notice: Indicates information considered important, but not hazard-related. Typically to avoid damage to the product.
6 LARA| Instructions for use |RIL-1 ENG Rev04 |28/02/2019 |© 2019 W&H Sterilization Srl
Introduction
CONTENTS
This section deals with the following subjects:
About this manual 7
Use restrictions 8
About this manual
INTRODUCTION
This manual contains the Instructions for use of the W&H sterilizers
RIL-117 and RIL-122, hereinafter referred to as LARA 17 and
LARA22.
FORYOUR SAFETY AND THE SAFETY OF YOUR PATIENTS
The purpose of this manual is to provide information about LARA
sterilizers to ensure:
n proper installation and set-up;
n optimal use;
n safe and reliable operation;
n compliance with regular maintenance and servicing
requirements
Please carefully read the safety information (see "Safety warnings"
on page9).
OBLIGATIONS WITH REGARD TO THIS MANUAL
This manual is an integral part of the product and accompanies it for
its entire working life. It must be consulted in all situations related
to the life cycle of the product, from its delivery through to
decommissioning. For this reason, it should always be accessible
to operators both online and offline.
Contact customer service in the event the manual is unavailable. If
the device is transferred, always attach the manual for the new
owner.
MANUAL CONTENT
This manual contains the Instructions for use and for maintenance
of the following sterilizer versions:
n RIL-117
n RIL-122
Versions differ only for the chamber volume.
DISCLAIMER
All pictures, graphics and illustrations provided in this manual are
for the comprehension of the text. They are not meant to be an
accurate representation of product details. Thus, they should be
taken as indicative only, and may differ from the actual product.
For any suggestions or remarks please send an email to
office.sterilization@wh.com.
LARA| Instructions for use |RIL-1 ENG Rev04 |28/02/2019 |© 2019 W&H SterilizationSrl 7

Introduction
COPYRIGHT NOTICE
Copyright © 2019, W&H Sterilization Srl
All rights reserved in all countries.
All drawings, images and texts contained in this manual are the
property of the manufacturer. Even partial duplication of drawings,
images or text is prohibited.
The information contained in this document is subject to change
without prior notice.
Use restrictions
INTENDED USE
LARA sterilizers are widely used for medical purposes, e.g. in
general medical practices, dentistry, facilities for personal hygiene
and beauty care and also veterinary practices. They are also used
for materials and equipment that is likely to be exposed to blood or
body fluids, e.g. implements used by beauty therapists, tattooists,
body piercers and hairdressers.
The types of loads that can be sterilized with LARA sterilizers are
described in Table 1 of the reference technical norm EN 13060.
These loads include solid, porous, hollow loads type A and hollow
loads type B, unwrapped, single wrapped and double wrapped.
LARA sterilizers cannot be used to sterilize liquids or
pharmaceutical products. The device is intended for professional
use only by trained people.
PROVIDED FEATURES
See "Sterilization cycles" on page111 for the full list of key program
features, including sterilization time, temperature and
recommended load type.
USER QUALIFICATION
The users who may operate the sterilizer are the following.
User
qualification
Head of the
clinic/practice
Trained
operators
Competences
Legallyresponsible for:
n the efficiencyof the hygiene protocol in place
n the sterilization process
n the operators' training and training documentation
n the correct operation and maintenance of the equipment
n Regularly attend the training for operating and using the
sterilizer safely.
n Use the sterilizer according to the Head of the
clinic/practice's instructions.
8 LARA| Instructions for use |RIL-1 ENG Rev04 |28/02/2019 |© 2019 W&H Sterilization Srl

Safety information
CONTENTS
This section deals with the following subjects:
Safety warnings 9
Responsibility 10
Safety warnings
THERMAL HAZARDS
n The chamber automatically begins to heat to
high temperature as soon as the sterilizer is
switched on – risk of burns!
n The trays and the sterilization load are hot at the
end of each cycle. Use tray or cassette holders
to empty the sterilization chamber.
n Always wear appropriate PPE during use of the
sterilizer (e.g. gloves for cleaning, maintenance,
etc...).
ELECTRICAL RISKS
n Do not pour water or any other liquids over the
sterilizer (risk of electrical short circuits).
n Switch off the sterilizer and unplug the mains
cable before inspecting, carrying out
maintenance or servicing the sterilizer.
n Ensure that the power receptacle the sterilizer is
connected to is properly grounded.
n All electric devices connected to the sterilizer
shall be of Insulation Class II (double insulated)
or higher.
n Use only the power cord provided by the
manufacturer.
IMPROPER USE OF THE STERILIZER
n The sterilizer must not be used in presence of
explosive or flammable gases, vapors, liquids or
solids.
n The sterilizer has not been designed for the
sterilization of foodstuff or waste.
n Do not exceed the maximum load weight limits
as specified in this manual (see "Sterilization
cycle management" on page58).
n Do not drink any water that has been inside the
sterilizer.
LARA| Instructions for use |RIL-1 ENG Rev04 |28/02/2019 |© 2019 W&H SterilizationSrl 9

Safety information
TAMPERING
n Do not remove the name plate or labels from the
sterilizer.
n Repairs, maintenance or service must be carried
out by authorized service providers always using
genuine spare parts.
REQUIREMENTS
n Use only the power cord set and accessories
provided by the manufacturer.
n If the sterilizer is connected to a water supply
system, this must be fitted with a backflow
preventing device complying to IEC 61770.
Responsibility
USER RESPONSIBILITY
n The user is responsible for the proper installation, the correct
use and maintenance of the sterilizer in accordance with these
Instructions for use.
n The safety devices of the sterilizer are impaired when the
product itself is not installed, used and serviced in accordance
with these Instructions for use.
n The Instructions for use updated to the latest version is always
available at www.wh.com.
n Keep these Instructions for use for future reference.
MANUFACTURER RESPONSIBILITY
n The manufacturer can only accept responsibility for the safety,
reliability and performance of the product when the product
itself is installed, used and serviced in accordance with the
Instructions for use.
n Servicing by unauthorized persons invalidates all claims under
warranty and any other claims.
10 LARA| Instructions for use |RIL-1 ENG Rev04 |28/02/2019 |© 2019 W&H SterilizationSrl

Getting started
CONTENTS
This section deals with the following subjects:
Unpacking 11
Handling 13
Product description 14
Installing the sterilizer 19
Operating with the sterilizer 21
User interface menu 23
Sterilizer setup 29
User authentication (optional) 31
USB pen drive 32
Standby mode 33
Unpacking
UNPACK THE STERILIZER
CAUTION! Heavy product. The sterilizer must be removed
from the box and transported by two authorized technicians.
The sterilizer must be removed from the box and
transported using the specific straps.
Weight:
n LARA 17: 42.5 kg (93.7 lbs)
n LARA22: 44 kg (97 lbs)
LARA| Instructions for use |RIL-1 ENG Rev04 |28/02/2019 |© 2019 W&H SterilizationSrl 11
Getting started
WARNINGS
Notice: Check the external condition of the box and the sterilizer. In
case of any damage, immediately contact the dealer or shipping
agent that has carried out the transport. Keep the packaging for
shipping or transporting the sterilizer in the future.
Note: The packaging of the product is environmentally friendly and can be
disposed of by industrial recycling companies.
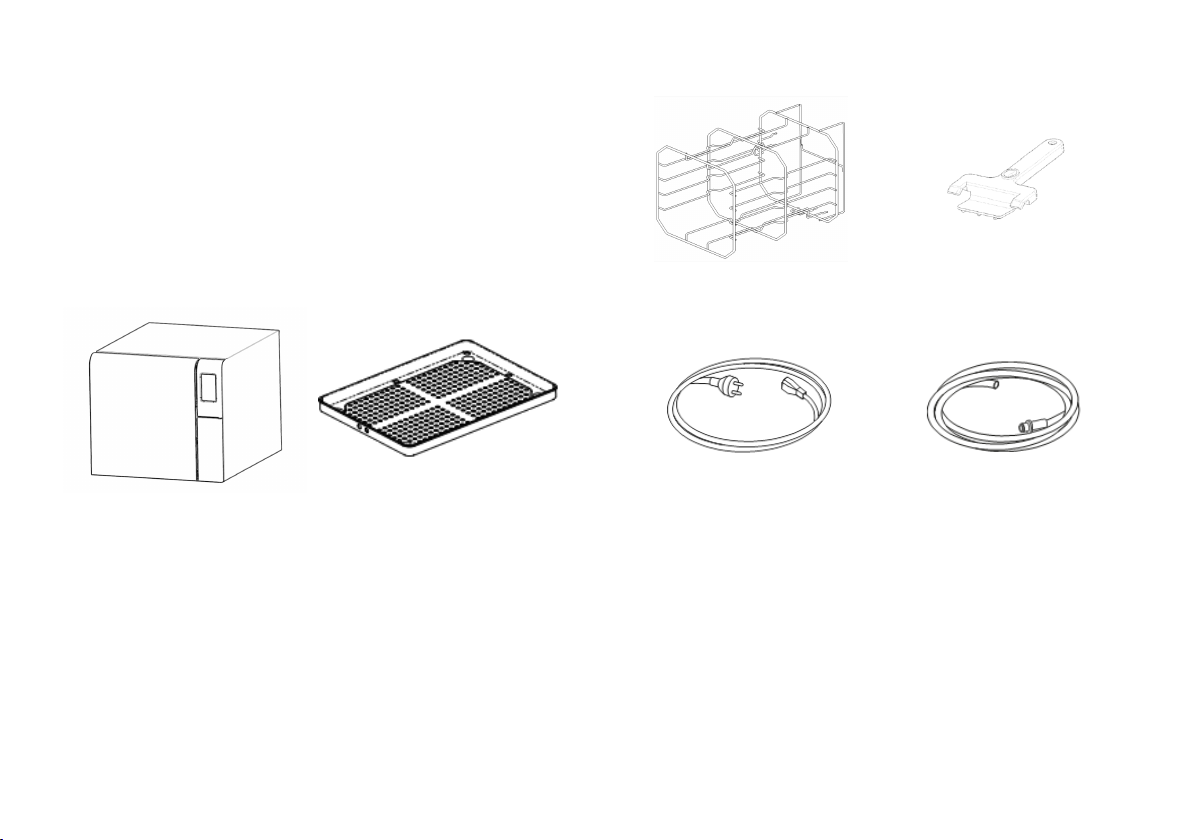
CONTENTS OF THE PACKAGING
Sterilizer Trays (three)
12 LARA| Instructions for use |RIL-1 ENG Rev04 |28/02/2019 |© 2019 W&H SterilizationSrl
Reversible rack Tray holder
Mains cable Drain tube
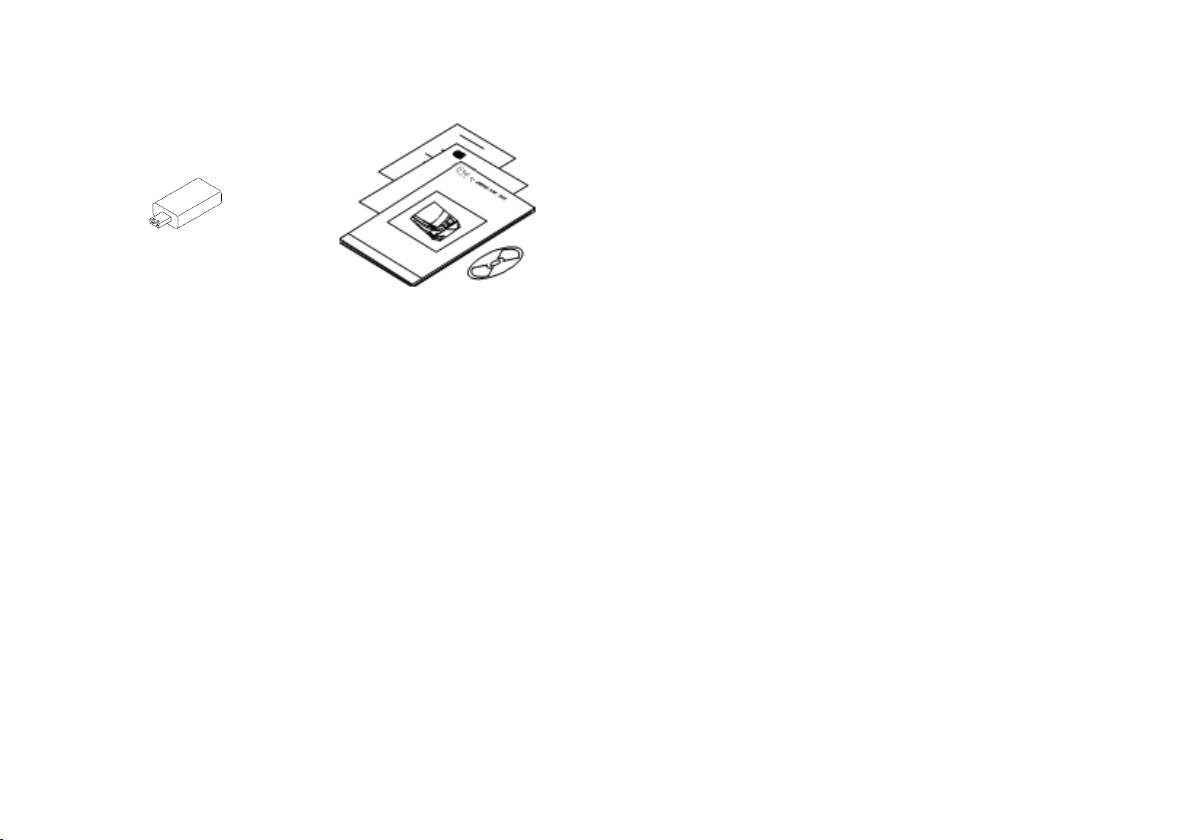
USB pen drive This manual, declaration of
conformity, documentation CD,
warranty card, work test report,
maintenance sheet
ITEMS NOT PROVIDED WITH THE STERILIZER
The following items are not provided:
n Water container to capture waste water during manual tank
draining (volume larger than (5 l (1.3 gal))
n LAN cable for connecting the sterilizer to a network (optional)
See "Accessories, spare parts, consumables" on page123 for a full
list of optional accessories.
Getting started
Handling
HOW TO RELOCATE THE STERILIZER
Before transport:
n Completely drain both water tanks (see "Draining the used and
clean water tank" on page92).
n Allow the sterilization chamber to cool down.
n Use original packaging when shipping or transporting the
sterilizer. Replacement packaging materials are available from
Service W&H.
LARA| Instructions for use |RIL-1 ENG Rev04 |28/02/2019 |© 2019 W&H SterilizationSrl 13

Getting started
Product description
FRONT VIEW
Part Description
A Chamber door
B Tank filling cover-cap
C Water tank cover
D Touchscreen
E Service door
F Sterilization chamber
G
Dust filter
H Reset button of the thermostat switch
I Door seal
L Door pin
14 LARA| Instructions for use |RIL-1 ENG Rev04 |28/02/2019 |© 2019 W&H SterilizationSrl

UPPER INTERNAL STRUCTURE
Part Description
A Tank
B
Water level sensor
C Water tank cover
D Internal tank cover
E Tank internal filters with metal cartridges
Getting started
LARA| Instructions for use |RIL-1 ENG Rev04 |28/02/2019 |© 2019 W&H SterilizationSrl 15

Getting started
COMPONENTS BEHIND THE SERVICE DOOR
Part Description
A Bacteriological filter
B Mains switch
C Identification label
D Used water drainport (grey)
E Clean water drain port (blue)
F Drain tube release button
G USBport
16 LARA| Instructions for use |RIL-1 ENG Rev04 |28/02/2019 |© 2019 W&H SterilizationSrl

REAR VIEW
Part Description
A
USB port (optional)
B
Air gap cover
C
Test connection
D
Pressure safety valve cover
E Used water drain
F
Water supply inlet
G Condenser grid
H Mains cable guide
I Mains cable plug socket
Getting started
LARA| Instructions for use |RIL-1 ENG Rev04 |28/02/2019 |© 2019 W&H SterilizationSrl 17

Getting started
CHAMBER ACCESSORIES
Part Description
A
Tray
B
Chamber rack.
n In the normal position, it can host 5 trays horizontallyor 3
cassettes/containers vertically.
n In a 90° degrees rotated position, it can host 3 trays or 3
cassettes/containers horizontally.
18 LARA| Instructions for use |RIL-1 ENG Rev04 |28/02/2019 |© 2019 W&H SterilizationSrl

Getting started
Installing the sterilizer
LOCATION REQUIREMENTS
Notice:
Do not place the sterilizer so that it is difficult to operate the
controls behind the service door. Do not place the sterilizer so that
it is difficult to disconnect the power supply plug.
Leave the condenser grid (rear side of the sterilizer) free from
anything that might obstruct the air passage.
Surface materials should be water resistant. If sterilization cycles
will be continuous, pay attention to the surrounding materials:
steam can damage them.
The sterilizer must operate in absence of explosive atmospheres.
The sterilizer must operate in a well ventilated room far from
sources of heat and from flammable materials.
Place the sterilizer on a flat and level surface.
Clearance requirements to ensure proper air circulation:
ELECTRICAL CONNECTIONS
All the cables and tubes connected on the rear side of the sterilizer
must be placed far from the condenser grid (e.g. using the available
guides).
Notice:
Use only the cord set provided by the manufacturer.
Ensure that external and internal surfaces are free from moisture or
condensation before connecting to power.
The installation of the sterilizer shall be performed by two
authorized technicians using PPE (Personal Protective Equipment)
according to applicable standards.
LARA| Instructions for use |RIL-1 ENG Rev04 |28/02/2019 |© 2019 W&H SterilizationSrl 19

Getting started
The electrical power supply of the sterilizer must fulfill all applicable
standards in the country of use, and must comply with the data
label on the back of the sterilizer.
WATER CONNECTIONS
The sterilizer clean water tank can be filled manually by the user or
automatically with a water supply system. The water supply
system must deliver demineralized or distilled water meeting the
specifications listed in these instructions. Do not add any
chemical/additive to the water.
The manufacturer’s warranty is void if the sterilizer was used with
water containing either chemical additives, or contaminant levels
exceeding those listed in these instructions. See "Feed water
specifications (EN 13060)" on page122.
Notice: The maintenance of the external water filling system must
be done in exact accordance with the Instructions for use given with
the relevant system.
WI-FI CONNECTION
For the Wi-Fi connection proceed as follows:
1 Insert the Wi-Fi key in the USB port.
2 Read the Instructions for use provided with the Wi-Fi key.
INSTALLINGTHE STERILIZER
WARNING! In case of sterilizer malfunctions immediately
unplug the sterilizer and call for service. Do not attempt to
repair the sterilizer yourself.
Notice:
Please refer to technical requirements before to plug the sterilizer!
See "Diagrams" on page121.
No other devices should be connected to the sterilizer power panel
circuit.
1 Place the sterilizer on a resistant, flat and level surface.
2 Open the chamber door, remove all items except the chamber
rack from the sterilizer and close.
3 Remove all the plastic covers from the items.
4 Optional. Connect the used and clean water tubes on the rear.
5 Plug the power cord into the socket in the back of the
sterilizer.
6 Place the power cord in the power cord guides.
7 Connect the power cord to a wall outlet. For power supply
requirements, see "Technical data" on page118.
20 LARA| Instructions for use |RIL-1 ENG Rev04 |28/02/2019 |© 2019 W&H SterilizationSrl

Getting started
Operating with the sterilizer
POWER ON/OFF THE STERILIZER
1 Press the power switch behind the
service door: the visual indicator
on the power switch will turn
green.
2 After a quick autotest the
sterilizer automatically turns in
standby mode. See "Standby
mode" on page33.
3 Tap . The homepage appears
with the enabled sterilization
cycles.
LARA| Instructions for use |RIL-1 ENG Rev04 |28/02/2019 |© 2019 W&H SterilizationSrl 21

Getting started
HOMEPAGE DESCRIPTION
Part Description
A Title/purpose of the screen,
or the cycle number and the
current date and time
B Available cycles
Note: The S Fast 134 cycle is
optional, activatedwith Fast Cycle
activationcode, see "S Fast 134
cycle activation" on page58.
C Available tests
D Additional buttons used to
navigate the menu.
22 LARA| Instructions for use |RIL-1 ENG Rev04 |28/02/2019 |© 2019 W&H SterilizationSrl

Getting started
User interface menu
STRUCTURE AND NAVIGATION
=optional with Activation code
= optional
LARA| Instructions for use |RIL-1 ENG Rev04 |28/02/2019 |© 2019 W&H SterilizationSrl 23

Getting started
MAIN MENU FUNCTIONS
Icon
Label
Menu Opens the menu.
Settings Sets the device.
Traceability
Opens the pages to monitor the performed cycledata and
manage users and printing.
Accessories Opens the pages to select and calibrate the printers,
format the USB pen drive and activate special functions.
Maintenance Carries out the maintenanceprocedure.
System Info
n In general, shows the system information.
n During a cycle,shows the cycle parameters in real
time.
SETTINGS MENU FUNCTIONS
Icon
Device
Label
Opens the pages to set the device.
Function
Function
Icon
Label
Function
Language Sets the language.
Date & Time Sets time and date values and format.
Sterilizer
Sets the sterilizer name.
Name
Energy
Sets the standby mode.
management
Display Sets the display brightness.
Cycle Opens the pages to manage cycles.
Measurement
Sets the unit of measure.
Units
Connectivity Opens the pages to manage the network connection.
WI-FI Activates a communication protocol between the
sterilizer and an external gateway to extend connectivity
features.
Network
Status
Onlywitha network connectionset. Provides information
about the network status.
24 LARA| Instructions for use |RIL-1 ENG Rev04 |28/02/2019 |© 2019 W&H SterilizationSrl

Getting started
Icon
Label
Remote data
storage
Onlywitha network connectionset. Opens the page to
manage the remote storage.
Settings Onlywitha network connectionset. Sets the parameters
of the network location.
Save all Only with a network connection set. Copies all the files in
the specified location in the network.
Test Only with a network connection set. Checks if the files can
be copied to the specified location.
TRACEABILITY MENU FUNCTIONS
Icon
Label
CycleHistory Shows all the sterilizationcycles and tests and prints
reports and labels.
Save Saves allthe sterilization cycle reports in the USBpen
drive.
User
Management
Add User
Optional,activated with an activation code. Permits
manage the users.
Administrator only.Adds a user.
Function
Function
Icon
Label
Delete User Administrator only. Deletes a user.
Reset user PIN
Administrator only.Resets a user PIN code.
code
Change your
Changes the PIN code.
PIN code
Options
Optional,activated with an activation code. Administrator
only. Permits the following:
n identify and save the operator who starts the
cycle and releases the load.
n Protect with a password the cycle starts, the load
release and the label printing.
Label Printer
Optional,activated with an activation code.
n Sets the maximum storage time of the wrapped
sterilized items.
n Sets the automatic or manual printing of the
labels.
ACCESSORIES MENU FUNCTIONS
Icon
Label
USB Pen
Drive
Opens the formatting page of the USB pen drive.
Function
Function
LARA| Instructions for use |RIL-1 ENG Rev04 |28/02/2019 |© 2019 W&H SterilizationSrl 25

Getting started
Icon
Label
Format
Label
Printer
Local
Formats the USB pen drive.
Optional,activated with an activation code. Selects the
label printer and sets the printout layout.
Selects a printer connected to the sterilizer.
Printer
Calibration
Test
Printer
Special
Codes
Adjusts the label printer to the edge of the label.
Prints a test label.
Selects the printer model connected to the sterilizer.
Saves the codes issued by the manufacturer to activate
special functions. See "Activation codes" on page127.
MAINTENANCE MENU FUNCTIONS
Icon
Label
Bact. Filter Shows the status of the bacteriological filter for
replacement and resets its counter to zero.
Function
Function
Icon
Label
Function
Dust Filter Shows the status of the dust filter for replacement and
resets its counter to zero.
Door
Gasket
Software
Shows the status of the door gasket for replacement and
resets its counter to zero.
Updates the software.
Update
4000 cycle
service
Shows the number of cycles performed and left before the
necessary maintenance.
26 LARA| Instructions for use |RIL-1 ENG Rev04 |28/02/2019 |© 2019 W&H SterilizationSrl

Getting started
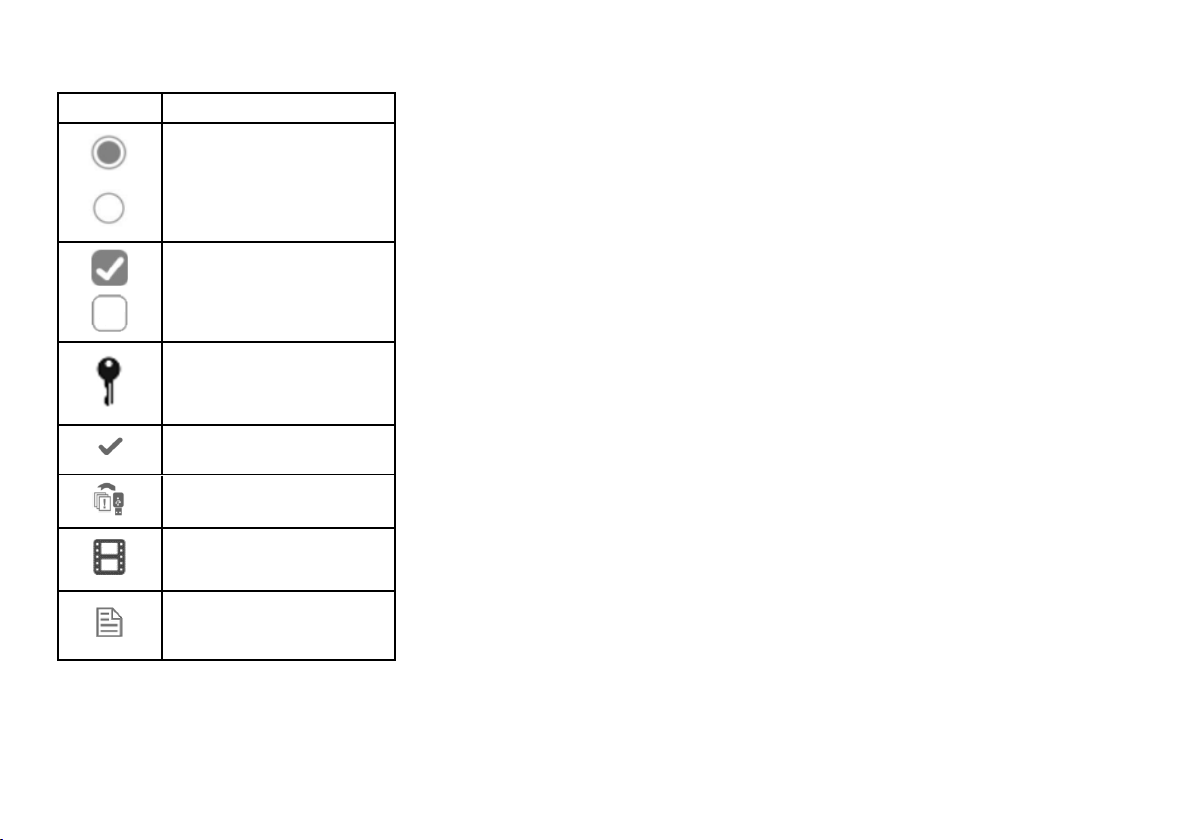
COMMON COMMANDS AND ICONS
Icon Function
Enters/exits the standby mode.
Moves to the previous/nextscreen.
Opens the homepage.
Accesses to the sub-menus.
Provides access to the setting
screen of a specific area.
Shows the list of all operating
parameters of the sterilizer.
Icon Function
Opens a screen withother
settings/options.
Refreshes the page.
Indicates the value that may be
changed and appears by clicking on
it.
n Confirm the active option.
n Saves a setting or a
parameter.
n Answers YES to a question.
n Aborts the action/function.
n Moves to the previous screen
without confirming/making
any changes nor saving any
parameters.
n Answers NO to a question.
Indicates that the AUTO DRYmode is
operating.
Optional,activated with an activation
code.Indicates that the ECO DRY plus
mode is operating.
Increases/decreases the value.
Icon Function
Indicates that an error occurs.
Indicates that the option checked is
working properly.
n Plays a video.
n Starts a procedure.
Pauses a video.
Indicates that the chamber door is
locked.
Indicates that the chamber door is
locking/unlocking.
Indicates that the chamber door is
unlocked and can be open.
Indicates that the option is ON and
allows to set it OFF by touching it.
Indicates that the option is OFF and
allows to set it ON by touching it.
LARA| Instructions for use |RIL-1 ENG Rev04 |28/02/2019 |© 2019 W&H SterilizationSrl 27
Getting started
Icon Function
Indicates that the option is
active/not active.
Indicates that the option is
enabled/disabled.
Indicates that the user is using the
administrator credentials.
Confirms the active option and
saves a setting or a parameter.
Copy the system info to the USBpen
drive.
Shows an animation about the
replacement procedure.
Shows a sterilization summary.
28 LARA| Instructions for use |RIL-1 ENG Rev04 |28/02/2019 |© 2019 W&H SterilizationSrl

Getting started
Sterilizer setup
SET THE LANGUAGE
1 On the homepage tap > >
>
2 Tap the language you prefer.
3 Tap to confirm: a confirmation
message requiring the restarting of
the sterilizer appears.
4 Turn the sterilizer OFF and then ON.
SET THE DATE AND TIME
To change the current date and time:
1 On the homepage tap > >
>
2 Tap the value you want to change
(time, date, format): the highlighted
value can be changed.
3 Tap or to change the value.
4 Tap to confirm and go back to
the previous page.
LARA| Instructions for use |RIL-1 ENG Rev04 |28/02/2019 |© 2019 W&H SterilizationSrl 29

Getting started
SET THE STERILIZER NAME
To change the sterilizer name that appears in the cycle reports:
1 On the homepage tap > >
>
2 Tap the text box:a keyboard
appears.
3 Enter the new sterilizer name.
4 Tap to confirm.
5 Tap to go back to the previous
page.
SET THE DISPLAY BRIGHTNESS
To change the display brightness:
1 On the homepage tap > >
>
2 Tap or to change the value.
3 Tap to confirm and go back to
the previous page.
30 LARA| Instructions for use |RIL-1 ENG Rev04 |28/02/2019 |© 2019 W&H SterilizationSrl
 Loading...