

Page 1

Owners Manual for
Worr Game Products
252 Granite Street
Corona, CA 92879
Tech: 909.520.9911 • Fax: 909.520.9699
www.worr.com
Page 2
WARNING
•Protect all Electronic Components from moisture and water at all times.
•Always disconnect the battery when marker is not in use.
•Use only 9volt battery in marker.
•Do not use rechargeable batteries in your E-Ranger.
•Using rechargeable batteries voids your warranty.
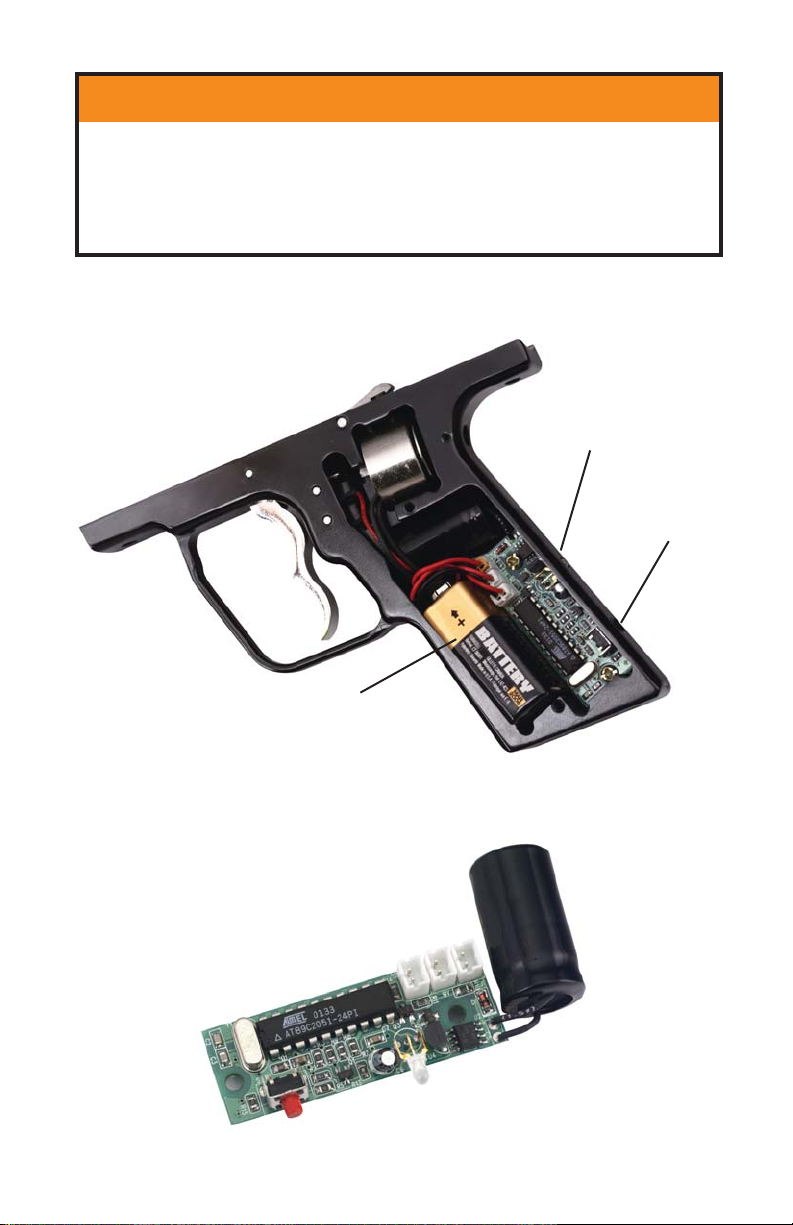
L.E.D. light
on/off button
9v battery
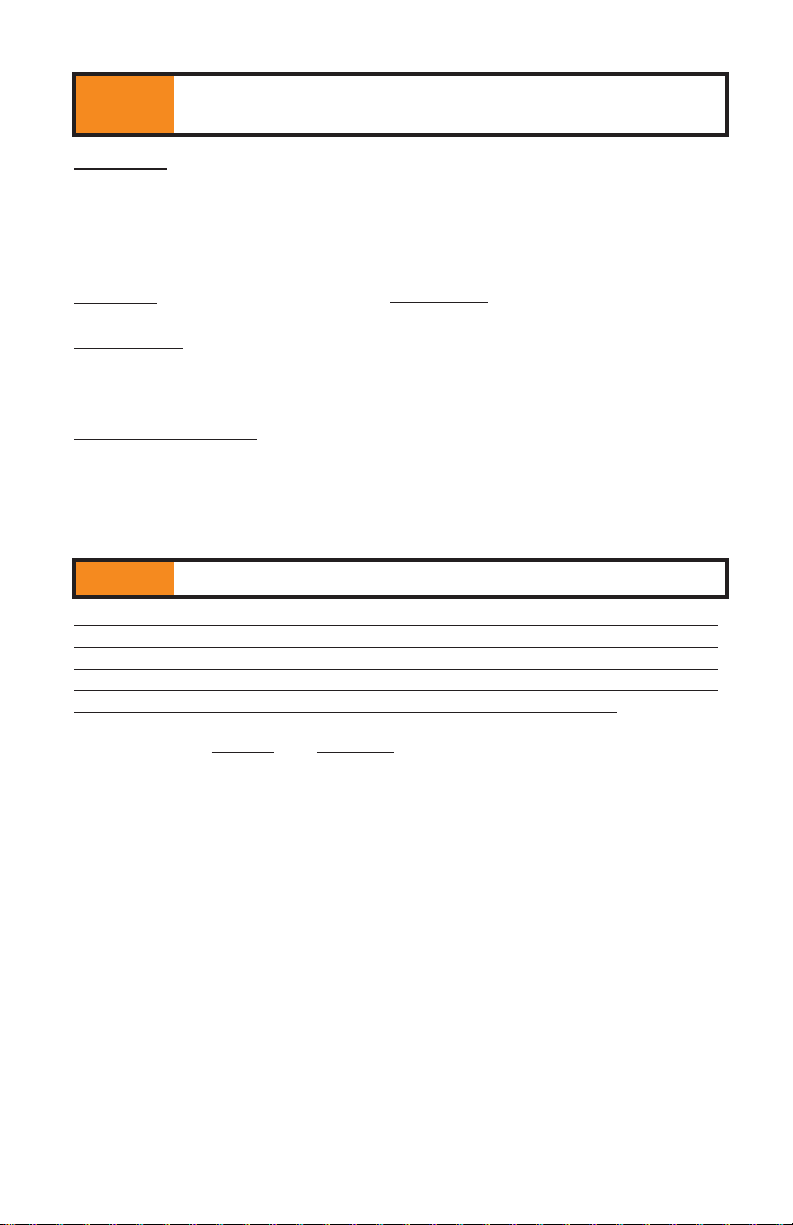
Electric Grip frame and circuit
board for E-Ranger.
Page 3

RANGER SERIES MARKERS
Thank you for purchasing a Ranger Series marker. Ranger Series are
considered to be the "ultimate" in semi automatic markers, featuring the
most sophisticated internal components in the industry. All Ranger Series
come with the Dura valve system, perhaps the world's most advanced
valve system. Often considered upgrade items by other manufacturers,
all Ranger Series come standard with the following components: A true
.45 grip frame, custom barrel, external velocity adjuster, and an anti-double feed system.
In addition to the standard features all Ranger Series markers come
equipped with, the T-Ranger and E-Ranger mar kers come standard with
extra features. The T-Ranger comes standard with a gas through front
grip, Torpedo drop forward with on/off dial.The E-ranger comes standard
with an electronic .45 grip, vertical regulator, two piece barrel, and
Torpedo drop forward with on/off dial.
As a new Ranger consumer, please read this manual in its entirety to
understand safe operation of the paintball marker. Once you have read
the entire manual, please help us, help you, by taking the time to fill out
the warranty registration card and sending it in immediately.
We want our Ranger Series owners to get the most enjoyment out of our
markers and we can better serve your needs if you take the time to fully
understand your marker and submit your warranty card.
Table of Contents
I. Liability Statement
II. Ranger Series Introduction
III. Safety and Handling
IV. Preparing the Ranger for Usage:
Cylinders, Loaders & other Accessories
V. Preparing the Ranger for Field Operation
VI. Cleaning and Maintenance
VII. Field Stripping
---Ranger Schematic
---Parts List
VIII. Transportation and Storing Your Ranger
IX. Ranger-Fine Tuning
X. Troubleshooting
XI. Warranty
3
Page 4

I. Liability
Worr Game Products ships its markers with the user, distributor and sales agent
understanding that Worr Game Products will not accept any responsibility for its
handling and use in public or private. The user accepts this sole liability when
purchasing and using any marker produced/sold by Worr Game Products. Worr
Game Products disclaims any implied warranties or any responsibility for any
errors that may appear in this manual.
Even if all safety rules are adhered to and equipment is worn, Worr Game
Products limits its liability solely and strictly to the replacement of the marker.
, as the user of the marker, you do not accept total liability, Worr Game Products
If
requests that you do not use our paintball markers. You are not to use this marker
unless you accept all liability and release Worr Game Products of all liability
through any use or misuse thereof.
By using the paintball marker you release Worr Game Products of any and all liability associated with its use.
The paintball marker you have chosen is not a toy. It is imperative that it is used
under adult supervision or by adults. When using the marker please adhere to all
local, state and federal laws. Read the entire manual before using this
paintball marker.
II. Ranger Introduction
It is very important that before using the Ranger paintball marker, every individual
that will be using the marker reads this entire manual for proper operation, safety
and handling. The most important understanding of the paintball marker is to
realize that it is NOT a toy, caution should be used at all times. Never point the
marker at anyone that does not have the appropriate head, eye and body protection.
thermore, the marker should never be pointed or fired at anyone, and should
Fur
only be used at a supervised, licensed and insured paintball field.
Paintball is a sport that the entire family can enjoy. However, proper guidelines
should be followed to ensure safety and enjoyment for everyone involved. It is
important that before using the Ranger, you must become knowledgeable of the
marker -- bef
before handling the marker. You should become completely familiar with the
assembly, disassembly and learn to inspect the mar ker for wear, nicks and burs
on all parts. This will ensure proper operation of the marker before heading to
the field. O-rings and cup seals often need replacement. A detail schematic is
included for reference on all parts of the marker and should allow for easy
maintenance. However, if you do not feel comfortable, take the marker to an
authorized dealer with all the proper documentation for a qualified technician to
perform proper maintenance.
ore going to the paintball field to use it. Leave the CO2cylinder off
4
Page 5

We are confident that you will be satisfied with your purchase of the Ranger and
look forward to serving you. Plus we are always looking for ways to improve and
listen to changes consumers want on their markers. So please call us at 800-755-5061
and tell us what you think.
III. Safety and Handling
Always have a barrel “condom” or other barrel blocking device (approved by the
Paintball Products Manufacturers Association) in place and keep the safety ON
when handling your marker. When repair ing or cleaning your marker first remove
barrel and gas cylinder, then depressurize your marker by pointing in safe direction and dry-firing. Always treat the paintball marker as if it were loaded.
When handling the marker, always keep your fingers or any other objects away
from the trigger assembly to avoid accidental discharges. Make sure when
carrying or transporting the mar ker, to keep the muzzle pointed downward.
It is very important to have the proper paintball protection before going to the
paintball field for play. This includes and is not limited to eye, head, throat, and
body protection. All protection used should be designed for the sport of paintball,
e.g.: eye gear designed specifically for paintball usage.
Remember
, the Ranger paintball marker should never be pointed or fired at anyone,
and should only be used at a supervised, licensed and insured paintball field.
IV. Preparing the Ranger for Usage
Cylinders-- The Ranger is designed to use CO
blow back system. You may attach the proper CO
standard American threading on the CO
cylinders or adapters that are designed for the paintball industry. Please purchase
your cylinders and accessories from stores specializing in paintball products and
make sure the cylinders they are selling meet American Industry Standards.
Foreign cylinders with different threading may strip your air connection assembly.
Do not use them. If you have problems screwing a cylinder onto your marker, go
back to the store and consult with knowledgeable staff members. Do not force the
cylinder into the assembly. When purchasing your CO
paintball store employees for the proper procedure in handling and storage of
your cylinder(s).
Make sure to always get your cylinders filled by authorized, skilled and
knowledgeable technicians for the correct fill limits of each cylinder. Do not try to
refill cylinders by yourself. Do not use cylinders that have not been properly maintained
or that are damaged. It is very important that caution be exercised when refilling
or attaching CO2cylinders.
cylinder. The Ranger is designed to use
2
5
for the proper function of the
2
cylinder that uses the industry
2
cylinder, consult with the
2
Page 6
CAUTION: Please be aware that your marker may still be pressurized even
after the removal of the CO2cylinder!
Loaders-- All Rangers come with its own BOSS™loader. However, there are
several loaders on the market that will fit the Ranger. If you want a different loader,
go to a local paintball store and purchase one that fits your needs and will work correctly with the Ranger. They range from simple gravity feed loaders to motorassisted loaders. The choice is yours, but make sure it fits correctly.
Barrels -- All Ranger markers will fit Autococker style threaded barrels.
Regulator -- If your Ranger came equipped with a regulator, you can adjust
pressure by turning the screw on the bottom of the regulator. To raise the pressure,
turn the screw counter clockwise and clockwise to lower.
.45 Grip Frames -- Only use aftermarket .45 Grip Frames approved by
Worr Game Products. Other grip frames may void your warranty.
V. Preparing the Ranger for
Field Operation
CAUTION: Always wear proper eye protection when firing your marker.
As previously noted, you are to treat the marker as if it were loaded at all times.
When handling the mar
any other objects away from the trigger assembly so there are no accidental discharges. There should always be a barrel plug in the muzzle or a barrel blocking
device covering the muzzle of the marker until it is ready to be fired.
ker always have the safety
ON and k
eep your fingers or
Instructions for Ranger and T-Ranger (Skip ahead for E-Ranger instructions)
A) With the muzzle of the Ranger pointed in a safe direction (away from people,
animals or other objects) place the loader onto the Ranger.
B) Pull the bolt back until it is locked into position. Activate Firing Safety Pin.
C) Gently and carefully screw the CO
On the Ranger this would be directly into the air receiver. On the T-Ranger,
turn the on/off knob on the ASA counterclockwise (placing it in the off position).
Gently and carefully screw the CO
Now turn the on/off knob on the ASA clockwise (placing it in the on position).
This will now pressurize the marker.
D) At this point you are ready to fill the loader with .68 caliber paintballs designed
specifically for use with paintball markers. Fill the loader until it reaches its
capacity as designated by loading instructions or MPG requirements.
E) You may now remove the barrel plug or other barrel blocking device, keeping
the muzzle pointed in a safe direction.
cylinder onto the air receiver of the Ranger.
2
cylinder onto the air receiver of the T-Ranger.
2
6
Page 7

F) When you are ready to begin play, aim at target and turn safety off. The Ranger
is now ready to fire. Pulling the trigger will result in a paintball being projected
from the barrel of the marker. Remember, you are to fire the Ranger only if
ALL safety rules are being followed. Do not fire until all safety rules are followed
and proper safety equipment is worn. Please remember, the marker should
never be pointed or fired at anyone, and should only be used at a supervised,
licensed and insured paintball field.
Instructions for E-Ranger
A) With the muzzle of the Ranger pointed in a safe direction (away from people,
animals or other objects) place the loader onto the Ranger.
B) Remove the two grip screws from the left side of the marker and remove grip.
Hookup a 9 volt battery to proper connector. Do not use rechargeable batteries.
Push the red button for 3 seconds to turn the marker on. A blinking light
indicates the marker is ready to fire. Pull trigger to make sure solenoid is
firing. Replace grip and two grip screws and make sure all wires are under
the cover so that the cover closes correctly.
(Pushing the red button for 5 seconds will turn the marker off. Be sure to
remove the battery from the marker if you are not going to use it for a period
of time to prevent leaking and damage to the marker.)
CAUTION:Your marker can still shoot after being turned off. Be sure to dry
fire in a safe direction to completely deactivate your marker. When
removing battery make sure E-Ranger is off. Otherwise electrical
damage may occur.
C) Pull the bolt back until it is locked into position. Activate Firing Safety Pin
D) Turn the on/off knob on the ASA counterclockwise (placing it in the off position).
Gently and carefully screw the CO
cylinder onto the air receiver of the E-Ranger.
2
Now turn the on/off knob on the ASA clockwise (placing it in the on position).
This will now pressurize the marker.
E) At this point you are ready to fill the loader with .68 caliber paintballs designed
specifically for use with paintball markers. Fill the loader until it reaches its
capacity as designated by loading instructions or MPG requirements.
F) You may now remove the barrel plug or other barrel blocking device, keeping
the muzzle pointed in a safe direction.
G) When you are ready to begin play, aim at a target and turn safety off. The Ranger
is now ready to fire. Pulling the trigger will result in a paintball being projected
from the barrel of the marker. Remember, you are to fire the Ranger only if ALL
safety rules are being followed. Do not fire until all safety rules are followed and
proper safety equipment is worn. Please remember, the marker should never be
pointed or fired at anyone, and should only be used at a supervised, licensed
and insured paintball field.
7
Page 8

VI. Cleaning and Maintenance
BEFORE attempting any disassembly, make sure that the loader and all CO
sources have been disconnected and the marker is NOT pressurized. After playing
with, or storing the marker for any period of time, proper maintenance is necessary
for accurate operation and to maintain peak performance. Make sure the breech
of the marker is clear of any debris or paintballs. Be certain that the barrel plug
is in place and the SAFETY is ON.
Proper maintenance includes cleaning and lubricating the Ranger before playing
or storing the marker. It is imperative that the Ranger be properly lubricated and
kept free of debris and dirt to eliminate any friction that would prevent proper
operation. Use lubricants only if they do not contribute to the deterioration of parts
inside the Ranger, especially O-rings and seals. It is recommended that you use
Teflon or Silicone based lubricants.
You begin cleaning only after the marker has been depressurized. Remove all
CO2 cylinders and remote accessories. Then carefully begin to unscrew the barrel
in a counter-clockwise direction until it is removed. Once it has been taken off it
should be cleaned using soap and water with a squeegee. Then lubricate the
threads with an e
barrel clean as it affects the accuracy of the Ranger. Paintballs have a gelatin
shell that tends to leave residue in the barrel and after use there tends to be a
build up of this gelatin. By cleaning the barrel, you ensure top accuracy, speed
and performance, while limiting the chances of friction-caused ball breakage.
xtremely thin layer of lubricant. It is very important to keep the
VII. Field Stripping
(Be sure to have the schematic drawing available as a reference.)
You begin field stripping only after the marker has been depressurized.
2
A) Make sure that the Ranger is uncocked, by squeezing the trigger, making
sure no foreign objects or paintballs are in the breech.
B) First remove push pin, then unscrew IVG from body. Be careful, it is under
pressure from the main spring. Hold the plug as you unscrew. Next remove the
main spring and spring guide. Then remove the rubber bumper.
Caution: Use only genuine Ranger design bumpers in your marker.
C) By tilting the marker back, the bolt and hammer will now come out.
Note:Watch as the bolt and hammer come out to see how they
join with the connecting pin.
D) It is now possible to clean the upper part of the receiver, including the breech
and power feed tube area. After cleaning the upper frame area with mild
detergent, the bolt and hammer should be lightly lubricated (using Teflon or
silicone based lubricants). Do not o
ver lube.
8
Page 9

E) To reassemble, take the bolt and hammer and join together using the
connecting pin. Point the Ranger toward the ground and slide the bolt and
hammer in their respective holes until they stop. You will notice that they do
not go in completely. At this point, apply slight pressure to the back of the
hammer and squeeze the trigger. The bolt and hammer should now slide all
the way in.
F) Then install the “Ranger” bumper. Carefully slide the main spring and
spring guide through the bumper. Make sure main spring slides into hammer.
G) Screw in the velocity adjuster plug.
H) Hold securely, and screw IVG into the body of the marker. Be careful not to
crossthread the velocity plug as you screw it back in. The body should
thread in easily by hand. NO
I) After installing the retainer pin back out IVG until it has light pressure against
the pull pin.
TOOLS NEEDED.
VIII. Transporting or Storing Your Ranger
When storing or transporting your Ranger, you should always keep the marker
depressurized. No cylinders or remote accessories should be attached. Because
your marker should never be loaded until you are ready to use it, take the loader
off and keep a barrel plug in the muzzle. Keep the safety on, and try and place
the Ranger in a carrying case to prevent mishandling and keep it clean.
Caution:
Never store your E-Ranger with the battery installed.
General Reminder
Your Ranger is not a toy. It should be used only by adults or with adult supervision.
This marker is not intended for use by non-adults without supervision. Respect other
peoples' property. When using the Ranger, obey all local, state and federal laws.
When entering a paintball field, become aware of their rules and regulations.
Before taking the Ranger on holidays or transporting it through public areas, such
as airports, or bus and trains stations, call ahead for regulatory information
regarding the carrying and transporting of such an item.
9
Page 10

Vertical Feed
Rear Cocking
Bolt
Bolt O-ring
Connecting Pin
Set Screw
Slide Bolt
Low Pressure
Chamber
Low Pressure
Chamber O-rings
45 Grip for the
T-Rang er &
Ranger
Grip O-ring
Gas Through
Grip for the
T-Ranger
2 Piece Barrel
for the E-Ranger
Trigger
Trigger
Spring
Safety Bearing
& Spring
Lock
Washer
Frame
Screw
Grip Cover
Screws
Barrel O-ring
Sear
Safety
Valve
Spring
Cover
Sear
Spring
Grip
C-Clip
1 Piece Barrel
for the T-Ranger
& Ranger
Cup Seal
Guide
Trigger Pin
3/4”
Sear Spring
Aluminum
.45 Grip Frame
Aluminum
Cup Seal
Vertical
Adapter O-ring
Sear
Pins
Pin
Vertical
Adapter
Vertical
Adapter
Retaining
Screw
Regulator
O-ring
Vertical Feed
O-ring
Regulator
Main Body
Washer
Plate Cover
Lock
Frame
Screw
Screws
Retaining
Screw
Trigger
Spring
Plate
Cover
90º Fitting
Gas line
Valve O-ring (PU)
Valve O-ring (NBR)
Dura
Valve
Ball Detent
Trigger
Aluminum
.45 Grip Frame
Drop Forward
Set Screws
Drop
Forward
ASA
Dial
Sear
Sear
Spring
Bumper
Pin 7/8”
Sear Adj.
Trigger Pin 3/4”
Drop Forward
ASA Adapter
Hammer
Retaining
Clip
Valve
Screw
Circuit
Board
Switch Pins
Screws
Main Spring
Connecting Pin
Hammer
O-ring
Sear Pin
Solenoid
Set Screws
Set
Screw
Screw & O-ring
Slide Bolt Rod
Pull Pin
Switch
Solenoid
Capacitor
Plate Cover
& Screws
Circuit
Board
Screws
Velocity
Adjuster
Velocity
Plug
Spring Guide
CAUTION: Before repairing or cleaning your marker, always
remove barrel and propellant source. Then depressurize your marker
by pointing in safe direction and dry-firing.
90º Fitting
Parts in picture may be different from actual product.
Page 11

Ranger Series Parts List
1 Piece Barrel . . . . . . . . . . . . . . . . . . . . . . . . . . . . . . . . . . . . . . . .RG-0201
2 Piece Barrel . . . . . . . . . . . . . . . . . . . . . . . . . . . . . . . . . . . . . . . .RG-0201E
2 Piece Barrel O-ring . . . . . . . . . . . . . . . . . . . . . . . . . . . . . . . . . . .RG-0201Ea
Main Body (Ranger & T-Ranger) . . . . . . . . . . . . . . . . . . . . . . . . . .RG-0202
Main Body (E-Ranger) . . . . . . . . . . . . . . . . . . . . . . . . . . . . . . . . . .RG-0202E
Vertical Feed (Ranger & T-Ranger) . . . . . . . . . . . . . . . . . . . . . . . . .RG-0203
Vertical Feed (E-Ranger) . . . . . . . . . . . . . . . . . . . . . . . . . . . . . . . .RG-0203E
Vertical Feed O-ring . . . . . . . . . . . . . . . . . . . . . . . . . . . . . . . . . . . .RG-0203a
Low Pressure Chamber (black) . . . . . . . . . . . . . . . . . . . . . . . . . . .RG-0204
Low Pressure Chamber (chrome) . . . . . . . . . . . . . . . . . . . . . . . . .RG-0204E
Low Pressure Chamber O-ring . . . . . . . . . . . . . . . . . . . . . . . . . . . .RG-0204a
Aluminum .45 Grip Frame (Ranger & T-Ranger) . . . . . . . . . . . . . . .RG-0205
Trigger . . . . . . . . . . . . . . . . . . . . . . . . . . . . . . . . . . . . . . . . .RG-0214
Trigger Spring . . . . . . . . . . . . . . . . . . . . . . . . . . . . . . . . . . .RG-0214s
Trigger Assembly Insert . . . . . . . . . . . . . . . . . . . . . . . . . . . .RG-0214a
Trigger Assembly Spring . . . . . . . . . . . . . . . . . . . . . . . . . . .RG-0214b
Trigger Assembly Pin . . . . . . . . . . . . . . . . . . . . . . . . . . . . . .RG-0214c
Sear . . . . . . . . . . . . . . . . . . . . . . . . . . . . . . . . . . . . . . . . . .RG-0215
Sear Spring . . . . . . . . . . . . . . . . . . . . . . . . . . . . . . . . . . . . .RG-0216
Aluminum .45 Grip Frame (E-Ranger) . . . . . . . . . . . . . . . . . . . . . .RG-0205E
Trigger . . . . . . . . . . . . . . . . . . . . . . . . . . . . . . . . . . . . . . . . .RG-0205E1
Trigger Spring . . . . . . . . . . . . . . . . . . . . . . . . . . . . . . . . . . .RG-0205E2
Sear . . . . . . . . . . . . . . . . . . . . . . . . . . . . . . . . . . . . . . . . . .RG-0205E3
Sear Spring . . . . . . . . . . . . . . . . . . . . . . . . . . . . . . . . . . . . .RG-0205E4
Sear Pin . . . . . . . . . . . . . . . . . . . . . . . . . . . . . . . . . . . . . . .RG-0205E5
Sear Adj. Screw . . . . . . . . . . . . . . . . . . . . . . . . . . . . . . . . .RG-0205E6
Set Screw . . . . . . . . . . . . . . . . . . . . . . . . . . . . . . . . . . . . . .RG-0205E7
Switch . . . . . . . . . . . . . . . . . . . . . . . . . . . . . . . . . . . . . . . . .RG-0205E8
Switch Pin . . . . . . . . . . . . . . . . . . . . . . . . . . . . . . . . . . . . . .RG-0205E9
Solenoid . . . . . . . . . . . . . . . . . . . . . . . . . . . . . . . . . . . . . . .RG-0205E10
Solenoid Set Screw . . . . . . . . . . . . . . . . . . . . . . . . . . . . . . .RG-0205E11
Circuit Board . . . . . . . . . . . . . . . . . . . . . . . . . . . . . . . . . . . .RG-0205E12
Circuit Board Screw . . . . . . . . . . . . . . . . . . . . . . . . . . . . . .RG-0205E13
Plate Cover (L) . . . . . . . . . . . . . . . . . . . . . . . . . . . . . . . . . .RG-0205E14
Plate Cover (R) . . . . . . . . . . . . . . . . . . . . . . . . . . . . . . . . . .RG-0205E15
Vertical Adapter (Ranger & T-Ranger) . . . . . . . . . . . . . . . . . . . . . .RG-0206
Vertical Adapter (E-Ranger) . . . . . . . . . . . . . . . . . . . . . . . . . . . . . .RG-0206E
Vertical Adapter O-ring . . . . . . . . . . . . . . . . . . . . . . . . . . . . . . . . .RG-0207
Valve Spring . . . . . . . . . . . . . . . . . . . . . . . . . . . . . . . . . . . . . . . . .RG-0208
Cup Seal Guide . . . . . . . . . . . . . . . . . . . . . . . . . . . . . . . . . . . . . . .RG-0209
Aluminum Cup Seal . . . . . . . . . . . . . . . . . . . . . . . . . . . . . . . . . . . .RG-0210
Valve O-ring (valve side - PU) . . . . . . . . . . . . . . . . . . . . . . . . . . . .RG-0211PU
Valve O-ring (hammer side - NBR) . . . . . . . . . . . . . . . . . . . . . . . . .RG-0219NB
Dura Valve . . . . . . . . . . . . . . . . . . . . . . . . . . . . . . . . . . . . . . . . . . .RG-0212
Vertical Adapter Retaining Screw . . . . . . . . . . . . . . . . . . . . . . . . . .RG-0213
Bumper . . . . . . . . . . . . . . . . . . . . . . . . . . . . . . . . . . . . . . . . . . . . .RG-0217
Main Spring . . . . . . . . . . . . . . . . . . . . . . . . . . . . . . . . . . . . . . . . . .RG-0218
12
Page 12

Ranger Series Parts List
Spring Guide . . . . . . . . . . . . . . . . . . . . . . . . . . . . . . . . . . . . . . . . .RG-0219
Velocity Plug . . . . . . . . . . . . . . . . . . . . . . . . . . . . . . . . . . . . . . . . .RG-0221
Velocity Adjuster Screw . . . . . . . . . . . . . . . . . . . . . . . . . . . . . . . .RG-0222
Velocity Adjuster Screw O-ring . . . . . . . . . . . . . . . . . . . . . . . . . . .RG-0222a
Pull Pin . . . . . . . . . . . . . . . . . . . . . . . . . . . . . . . . . . . . . . . . . . . . .RG-0223
Retaining Clip . . . . . . . . . . . . . . . . . . . . . . . . . . . . . . . . . . . . . . . .RG-0223A
Safety Spring . . . . . . . . . . . . . . . . . . . . . . . . . . . . . . . . . . . . . . . . .RG-0224
Safety Bearing . . . . . . . . . . . . . . . . . . . . . . . . . . . . . . . . . . . . . . . .RG-0225
Safety . . . . . . . . . . . . . . . . . . . . . . . . . . . . . . . . . . . . . . . . . . . . . .RG-0226
Safety C-Clip . . . . . . . . . . . . . . . . . . . . . . . . . . . . . . . . . . . . . . . . .RG-0226c
Trigger Pin 3/4” . . . . . . . . . . . . . . . . . . . . . . . . . . . . . . . . . . . . . . .RG-0228
Sear Pin . . . . . . . . . . . . . . . . . . . . . . . . . . . . . . . . . . . . . . . . . . . .RG-0229
Sear Spring Pin . . . . . . . . . . . . . . . . . . . . . . . . . . . . . . . . . . . . . . .RG-0230
Rear Cocking Bolt . . . . . . . . . . . . . . . . . . . . . . . . . . . . . . . . . . . . .RG-0231
Slide Bolt . . . . . . . . . . . . . . . . . . . . . . . . . . . . . . . . . . . . . . . . . . . .RG-0231S
Slide Bolt Rod . . . . . . . . . . . . . . . . . . . . . . . . . . . . . . . . . . . . . . . .RG-0231R
Bolt O-ring . . . . . . . . . . . . . . . . . . . . . . . . . . . . . . . . . . . . . . . . . . .RG-0232
Connecting Pin . . . . . . . . . . . . . . . . . . . . . . . . . . . . . . . . . . . . . . .RG-0233
Hammer . . . . . . . . . . . . . . . . . . . . . . . . . . . . . . . . . . . . . . . . . . . .RG-0234
Hammer O-ring . . . . . . . . . . . . . . . . . . . . . . . . . . . . . . . . . . . . . . .RG-0235
Connecting Pin Set Screw . . . . . . . . . . . . . . . . . . . . . . . . . . . . . . .RG-0236
Ball Detent (black) . . . . . . . . . . . . . . . . . . . . . . . . . . . . . . . . . . . . .RG-0237
Ball Detent (chrome) . . . . . . . . . . . . . . . . . . . . . . . . . . . . . . . . . . .RG-0237c
Valve Pin 7/8” . . . . . . . . . . . . . . . . . . . . . . . . . . . . . . . . . . . . . . . .RG-0240
Gas line . . . . . . . . . . . . . . . . . . . . . . . . . . . . . . . . . . . . . . . . . . . . .RG-0241
90º Fitting . . . . . . . . . . . . . . . . . . . . . . . . . . . . . . . . . . . . . . . . . . .RG-0242
Retaining Screw . . . . . . . . . . . . . . . . . . . . . . . . . . . . . . . . . . . . . .RG-0243
Lock Washer . . . . . . . . . . . . . . . . . . . . . . . . . . . . . . . . . . . . . . . . .RG-0244
Frame Screw . . . . . . . . . . . . . . . . . . . . . . . . . . . . . . . . . . . . . . . . .RG-0245
Grip Cover . . . . . . . . . . . . . . . . . . . . . . . . . . . . . . . . . . . . . . . . . . .RG-0246
Grip Cover Screw . . . . . . . . . . . . . . . . . . . . . . . . . . . . . . . . . . . . .RG-0247
Regulator . . . . . . . . . . . . . . . . . . . . . . . . . . . . . . . . . . . . . . . . . . .RG-0249
Regulator O-ring . . . . . . . . . . . . . . . . . . . . . . . . . . . . . . . . . . . . . .RG-0249a
Drop Forward (chrome) . . . . . . . . . . . . . . . . . . . . . . . . . . . . . . . . .RG-0250c
Drop Forward (black) . . . . . . . . . . . . . . . . . . . . . . . . . . . . . . . . . . .RG-0250b
Drop Forward Set Screw (for ASA) . . . . . . . . . . . . . . . . . . . . . . . . .RG-0250a
Drop Forward Screw . . . . . . . . . . . . . . . . . . . . . . . . . . . . . . . . . . .RG-0250x
ASA Adapter (black) . . . . . . . . . . . . . . . . . . . . . . . . . . . . . . . . . . .RG-0251b
ASA Adapter (chrome) . . . . . . . . . . . . . . . . . . . . . . . . . . . . . . . . . .RG-0251c
ASA Adapter Dial (black) . . . . . . . . . . . . . . . . . . . . . . . . . . . . . . . .RG-0251d
ASA Adapter Dial (chrome) . . . . . . . . . . . . . . . . . . . . . . . . . . . . . .RG-0251e
Gas Through Grip . . . . . . . . . . . . . . . . . . . . . . . . . . . . . . . . . . . . .RG-0252
Gas Through Grip O-ring . . . . . . . . . . . . . . . . . . . . . . . . . . . . . . . .RG-0252a
13
Page 13

IX. Ranger - Fine Tuning
Velocity Adjustment- Varying the Speed of the Paintball:With the Ranger pointed
in the downward direction, rotate the velocity screw clockwise. This increases the
mainspring tension and increases the velocity. Turning the velocity screw counterclockwise decreases the pressure on the mainspring and decreases the momentum gained by the hammer. Thus, there is a decrease of gas flow, causing a
decrease of velocity. Once the velocity is set, take the small allen wrench supplied
and lock the velocity into place by turning the set screw clockwise.
When adjusting the velocity, be sure to have the marker chronographed at the
field where you intend to play and make necessary adjustments. Different fields
have different velocity requirements. Please consult range officer when to going
to play.
X. Troubleshooting
CAUTION: Before repairing or cleaning your marker, always remove barrel
and propellant source. Then depressurize your marker by
pointing in safe direction and dry-firing.
If marker auto-triggers or fires and does not re-cock:
1)
A. Check grip frame screws and see if they are loose.
B. Check CO
C. Check hammer O-ring, it may be the wrong size or broken.
D. Make sure the hammer and all bolt and hammer O-rings are lightly lubricated.
E. Look down the back of your Ranger inside of the slide bolt to check if the bolt
rod is bent. If the bolt rod is bent make sure to not crossthread the bolt rod
when reinstalling if needed.
cylinder, it may be low on CO2.
2
Recommendation: Put 2 or 3 drops of lubricant into the bottom line and fire the
marker 20 or 30 times. This will lube the marker from the inside.
2)
Ball Breakage:
A. Check the quality and age of the paintballs when excessive breakage has
occurred.
B. Check the ball detent pin. If detent pin does not protrude into the inside
diameter of the breech, the marker may double feed. This will cause the
marker to chop balls. To correct this problem, replace detent pin. To do
so you must loosen the screws and push the ball detent pin down and
then tighten the screws.
C. Excessively high velocity may also cause paintball breakage.
Air Leaks:
3)
A. If air leaks from the barrel:
i. Replace cup seal.
ii. Replace O-rings on valve
14
Page 14

CAUTION: When handling valve, do not use any abrasive objects or tools
for removal of valve,as this will cause damage to valve and lead to
further gas leakage.
B. If air leaks from the front of the body:
i. Replace O-ring on vertical adapter.
C. If air leaks from bottom line:
i. Replace CO
4)
Velocity Problems:
cylinder O-ring.
2
CAUTION: Before repairing or cleaning your marker,always remove barrel
and propellant source. Then depressurize your marker by
pointing in safe direction and dry-firing.
A. High Velocity:
i.Turn velocity adjuster counter-clockwise. If the velocity screw
has been turned to the point at which it comes out of the velocity
adjuster and velocity is still high, then,
ii. Cut main spring by one or two coils, if problem remains cut
additional coils, one at a time. If you cut two many coils the Ranger
will not function. BE CAREFUL: You are responsible if you cut your
own spring.
B. Low Velocity:
i.Turn velocity adjuster clockwise. If the velocity screw has been
screwed in completely and velocity continues to be low, the main
spring will need to be replaced with a longer or stiffer spring.
C. Inconsistent Velocity:
i. Remove CO
filter.
2
ii. Remove grip frame and tighten valve retaining screw.
5)
Possible E-Ranger Problems:
A. There is no function after attaching the battery:
i. Is the batter y dead? Make sure the battery you are using is good.
ii. Check to see if connectors are fitted. Does it connect to the battery snug.
B. There is juice (battery is good) but the light is not on:
i. Check switch button to see if the on/off is connected correctly.
ii. The program may not be in. Call 1-909-520-9911 and ask for a
technical support representative.
C. Light is on but trigger pull does nothing:
i. Is the mar ker cocked? Pull back on the bolt to cock it.
ii. Is the air tank filled? Refill tank.
iii. Is t here a brok en paintball in the breach? Clean out the marker and barrel.
iv. Check the wires. They may be loose, allowing enough power for the
light to work but not enough to power the marker.
v. Trigger is not hitting the micro switch correctly.
vi.The solenoid and sear may be sticking together. Remove the grip
panel and lubricate with silicon based lubricant as recommended.
15
Page 15

D. Light is on and you hear the solenoid working but the marker will not cock:
E. Regulator Pressure:
i. The height of the sear must be adjusted.
ii. Loosen the sear set screw.
iii. Raise the height of the sear. Turning counterclockwise raises the
height. (Turning clockwise lowers the height)
iv. If the sear is raised too high it will be in too much contact with the
hammer and the marker will not fire.
v. Tighten the sear set screw after adjusting the height of the sear.
The pressure on your regulator should be between 550psi and 800psi.
NEVER exceed 800psi. If it is set too low the marker will not recock. If
the velocity needs to be adjusted lower turn the velocity adjuster screw
counterclockwise. If velocity needs to be increased start at 550 psi and
increase pressure by increments of 10 psi until marker functions properly.
F. You are shooting at a high rate of fire then the marker burps:
G. When you pull the trigger it doesn't feel smooth (or you must pull the trigger
6)
A. Go online at www.worr.com and download our updated troubleshooting guide.
B. Call 1-909-520-9911 for a technical support representative and we will be
NO
Please make sure that when replacing any parts they are supplied by Worr Game
Products. Do NOT replace O-rings that have not been supplied by Worr Game
Products from your dealer. Only Worr Game Products parts for Rangers should
be used. Proper lubrication is also necessary. Use Unique synthetic or K.C.
Trouble Free lube.
i. You need to raise the height of the sear.
ii. Loosen the sear set screw
iii.Turn counterclockwise to raise the sear.
i. Tighten the sear set screw after adjusting the height of the sear.
twice to get it to shoot once.
i. The battery may be dead.
ii.The sear may need to be lowered.
iii.The solenoid is stuck. Remove panel and spray the solenoid with WD-40.
Still can't figure it out?
more than happy to answer any questions you might have.
TE: Most common problems are O-ring related or improper cleaning/lube.
16
Page 16

XI. Warranty
Worr Game Products warrants the replacement of any original Ranger part due
to a defect in material and/or workmanship. The warranty period will be effective
for 12 months for parts and labor except the electronic grip frame, on the
E-Ranger, which is 30 days. It becomes effective from the date of purchase and
is valid with a receipt of sale. The warranty card must be filed within 30 days of
purchase to be valid. All warranty repairs will be performed only if the warranty
card is filled out and is on file with Worr Game Products . A photocopy of the sales
receipt must be included with the warranty card. All other services will be charged
for and returned via common mail carrier. Payment may be made in advance, or
shipment will be returned C.O.D., requir ing a $7.50 C.O.D. charge.
Worr Game Products will replace any part determined by Worr Game Products to
be defective, under the terms of this warranty. Any improper operation of the
marker that has been considered a result of, but not limited to, abuse, neglect,
normal wear, improper maintenance or accidental mishaps, or not using original
parts (or par ts not intended for this marker) is not covered by this warranty.
Worr Game Products always reserves the right to judge what will be covered by
warranty.
No other warranties or guarantees, expressed or implied, are made by Worr
Game Products. The sole and exclusive liability of Worr Game Products, or its
authorized dealers, affiliates, or agents pursuant to this warranty will be solely and
limited to repair or replacement of the defective part. Once again, Worr Game
Products always reserves the right to judge what will be covered by warranty.
Other incidental or consequential damages are expressly excluded hereunder.
Worr Game Products, and its authorized dealers, agents, or affiliates will not be
liable under this warranty, nor under any local, state or federal law , or common la w
or otherwise, for any damage or failure, including personal injury, resulting from
misuse, normal use, accidental discharge, alteration or any other possible acts.
Warranty Service is available by calling Worr Game Products for a return authorization number and then sending your marker to:
Worr Game Products
252 Granite St.
Corona, CA 92879
Phone: 800-755-5061
Fax: 909-520-9699
Tech line: 909-520-9911
Email: tech@worr.com
Warranty: You must obtain a return authorization number from Worr
Game Products before sending your marker in for repair.
17
Page 17

Page 18

New Items Summer2002
The Kaner barrel comes in two pieces a back end
and a front end and it has Autococker threads . You
get to pick the front length that creates a 10”, 12”
or 14” barrel and then you pick the back end.The back ends are available with different bore
dimensions including .685, .687, .689, .691, and .693.The one piece back end threads into
any front end from the Kaner barrel series. These barrels produce tight groupings and are
made of aluminum to keep the weight down.
Worr Game Products is pleased to announce the
availability of Worrpaint Paintballs. Made in the
U.S.A. Manufactured solely to Bud Orr’s specifica-
tions. You can be assured nothing but the highest quality paintballs will be produced.
Worrpaint is available in three different grades of paint. Field paint for recreational players,
mid-grade paint for amateur/tournament play and high end paint for the Pro’s.
Competition
Field
Domination
Mid
The Worrgas air system
is the most consistent
high flow air system ever
made for paintball markers. They feature a patent
pending design that blows away the competition. The
result? A tiny very light weight regulator that surpasses
other regs in high flow capabilities.The 3000/4500 psi.
"Worrgas" air systems are available NOW from Worr
Game Products.
Perfection
High
Page 19

Worr Game Products
252 Granite Street
Corona, CA 92879
TECH: 909.520.9911 • FAX: 909.520.9699
www.worr.com
 Loading...