

Page 1
AV AND INSTALLATION GUIDE
WEXER VIRTUAL
Page 2

1
Content
EQUIPMENT ....................................................................................................................................................... 3
WHAT YOU NEED ........................................................................................................................................... 4
WEXER VIRTUAL PLAYERS .............................................................................................................................. 4
BASIC PLAYER ............................................................................................................................................. 4
ON DEMAND PLAYER ................................................................................................................................. 5
PROJECTOR .................................................................................................................................................... 6
PROJECTOR SCREEN ....................................................................................................................................... 6
AUDIO SYSTEM .............................................................................................................................................. 7
INTERNET ....................................................................................................................................................... 7
Tightened Security ..................................................................................................................................... 7
SYSTEM OVERVIEW ....................................................................................................................................... 8
AV GUIDE ....................................................................................................................................................... 8
PREPARATIONS .................................................................................................................................................. 9
INTRODUCING FIVE PREPARATIONAL STEPS ............................................................................................... 10
STEP 1: PLACEMENT OF PLAYER .................................................................................................................. 10
ON DEMAND PLAYER ............................................................................................................................... 10
BASIC PLAYER ........................................................................................................................................... 11
STEP 2: PLACEMENT OF SCREEN.................................................................................................................. 11
WALL CHOICE ........................................................................................................................................... 11
SCREEN TO FLOOR DISTANCE .................................................................................................................. 11
CENTER SCREEN ....................................................................................................................................... 11
SCREEN TO PARTICIPANT DISTANCE ....................................................................................................... 12
MANAGING MIRRORS .............................................................................................................................. 12
STEP 3: PLACEMENT OF PROJECTOR ........................................................................................................... 12
INSTALLATION HEIGHT ............................................................................................................................ 12
STEP 4: POWER AND INTERNET ................................................................................................................... 13
STEP 6: CHECK YOUR CABLES ...................................................................................................................... 14
CABLING & INSTALLATION ............................................................................................................................... 15
READY TO INSTALL? ..................................................................................................................................... 16
1: MOUNTING THE PLAYER.......................................................................................................................... 16
ON DEMAND PLAYER ............................................................................................................................... 16
Page 3

2
BASIC PLAYER ........................................................................................................................................... 17
2: MOUNTING THE PROJECTOR ................................................................................................................... 18
4: FINAL ADJUSTMENTS ............................................................................................................................... 19
ADDITIONAL RECOMMENDATIONS ............................................................................................................. 19
APPENDICES ..................................................................................................................................................... 20
APPENDIX 1 .................................................................................................................................................. 21
INSTALLATION CONFIRMATION .............................................................................................................. 21
Page 4

3
EQUIPMENT
Page 5
4
WHAT YOU NEED
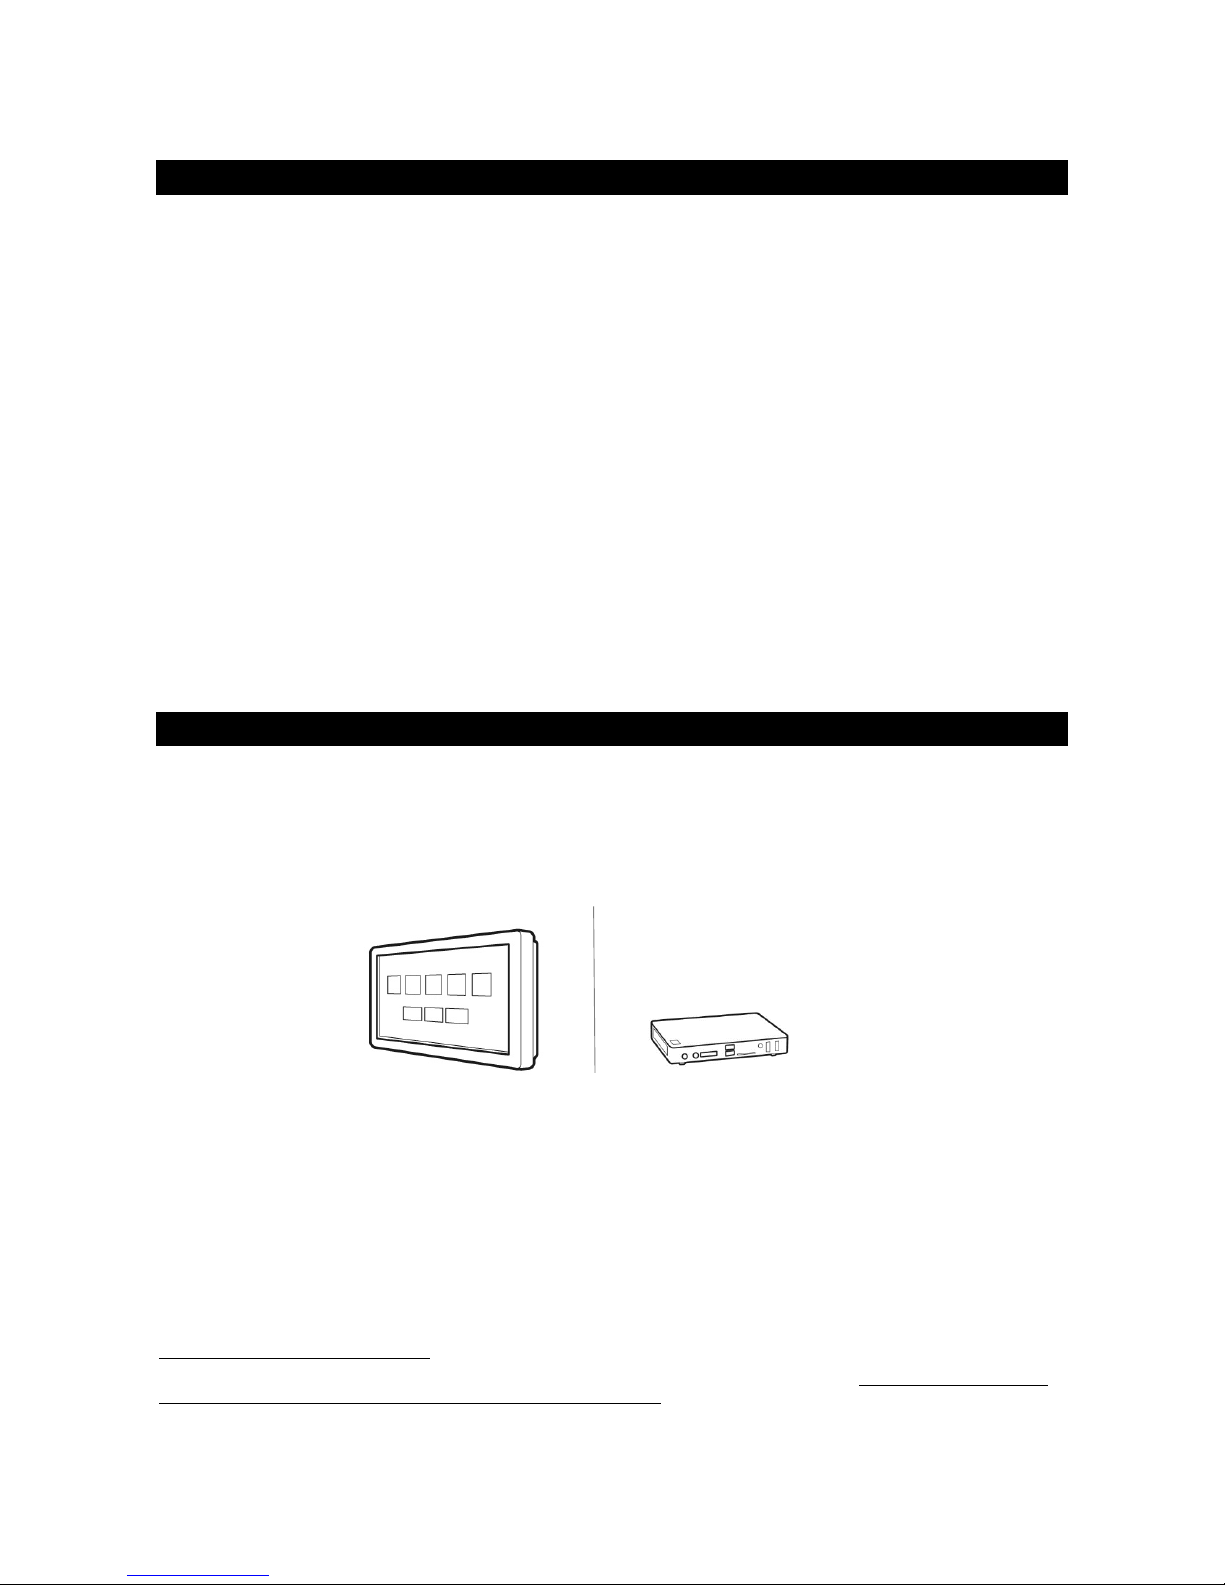
For the Wexer Virtual setup, you need the following hardware:
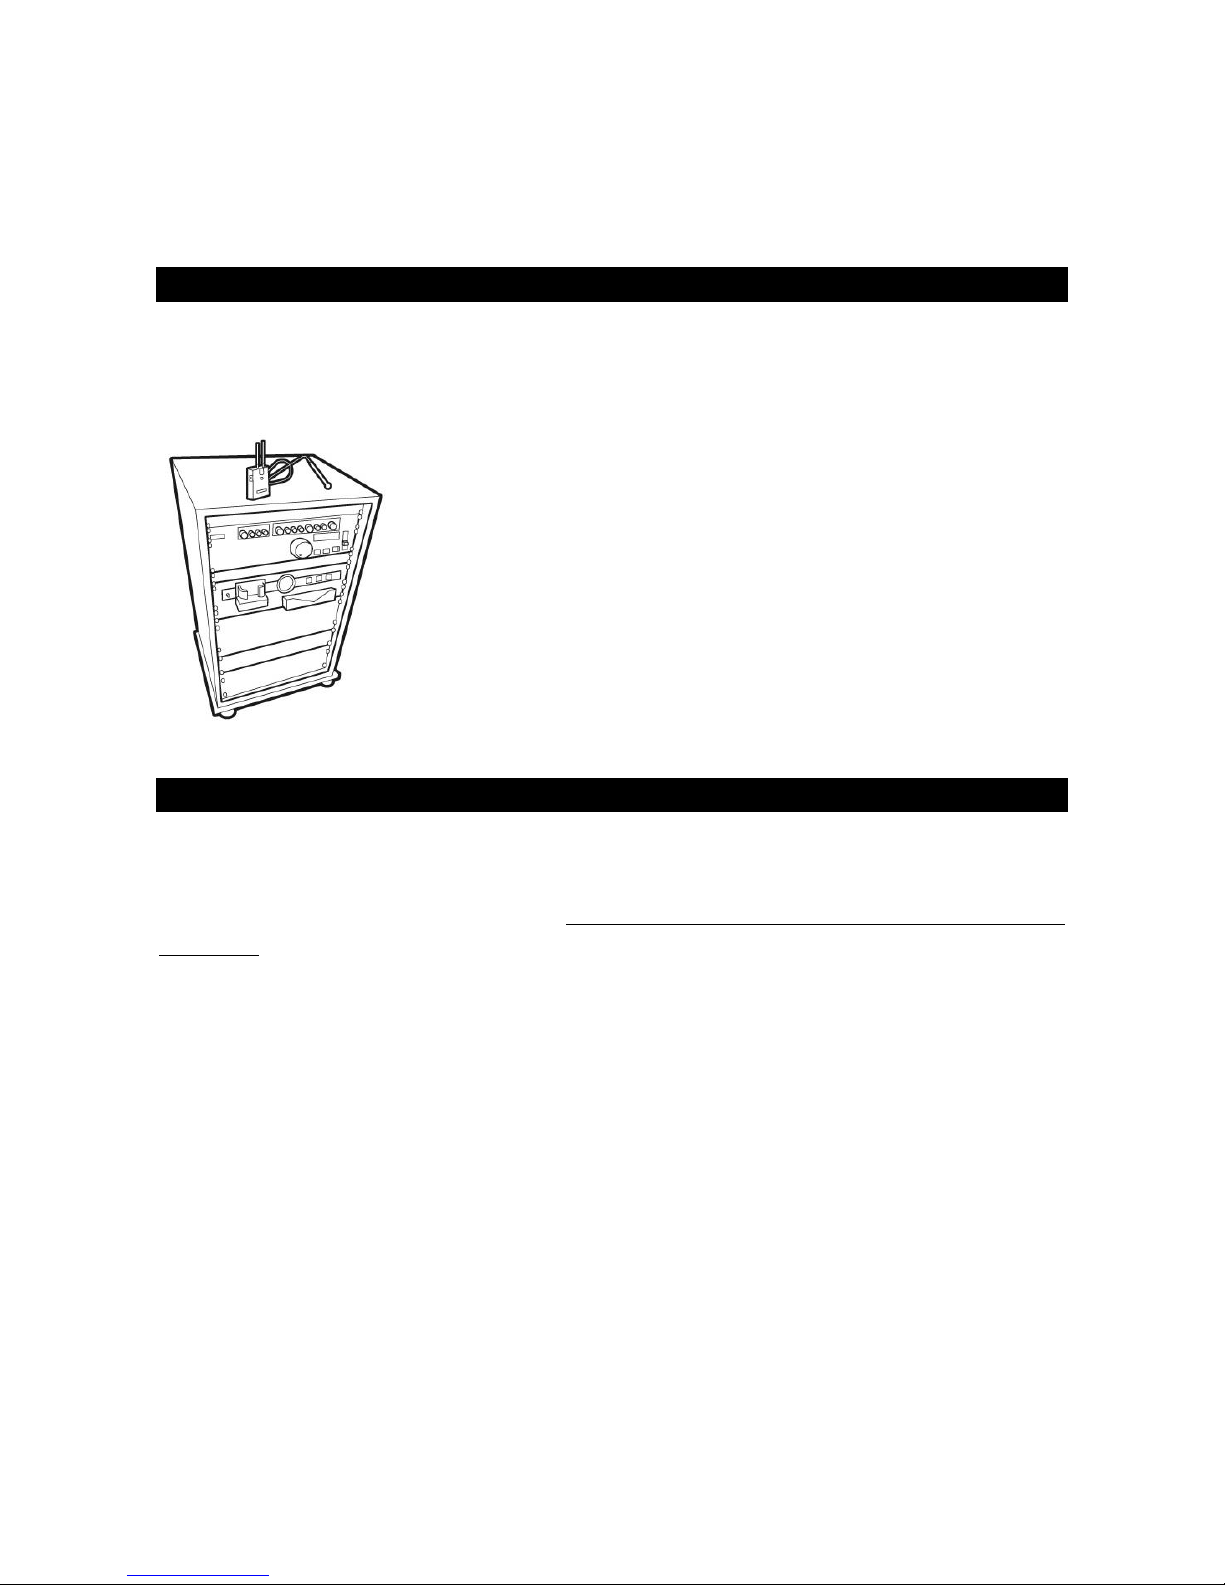
Wexer Player
Projector
Projector screen
Audio system
Internet connection
(Relay box)1
*As an alternative to projectors and projector screens, some use multiple TV screens put together. Our recommendation is
always, “the bigger, the better!”
In order to better understand the functionality of the items listed above, a brief introduction is
provided in the following.
WEXER VIRTUAL PLAYERS
The Wexer Virtual system comes in two different versions using two different players.
1. On Demand Player
2. Basic Player
BASIC PLAYER
The Basic Player features a pre-schedule system in which user interaction is not possible and all
classes are scheduled in advance. The player is a small and exquisite Celeron player with 24/7 1 TB
HHD. It comes preloaded with Windows 7 embedded and a full customer configured Wexer
installation. It is pre-loaded with all selected content (i.e. no streaming) and whenever a new video
1
The relay box (controlling e.g. projector and motorized screen) is only a necessity when using motorized screens. NOTE: The Wexer Relay Box RF
(for motorized screens) is built for screen and projector provided by Wexer Virtual. A separate installation/information guide can be acquired from
your Wexer contact person. The relay box is only mentioned briefly in this guide.
On Demand Player
Basic Player
Page 6
5
is available, the player will automatically download it and store it locally on the hard drive.
A constant
internet connection is therefore a necessity.
ON DEMAND PLAYER
The On Demand system combines pre-scheduling with the on demand functionality. This means
that you can pre-schedule classes during peak hours, and leave the schedule open during non-peak
hours, allowing members to choose the classes they want to attend. Alternatively, you can run prescheduled classes all day, or have classes on demand all day. The functionalities can be combined
as you see fit.
The On Demand Player is an advanced industrial wide screen all-in-one touchscreen player. The
player utilizes Intel Sandy Bridge core I5 CPUs and 24/7 high capacity 1 TB HHD. The touch player
also features a bright 18.5” LED panel with True Flat Projected Capacitive Multi-Touch. It has a dust
and waterproof display and to ensure the quality and stability, the manufacturer tests all systems in
special heating cabinets.
As with the Basic Player, the On Demand Player is preloaded with Windows 7 embedded and a full
customer configured Wexer software. All selected content is pre-loaded onto the player (i.e. no
streaming) and whenever a new video is available, the player will automatically download it and store
it locally on the hard drive.
A constant internet connection is therefore a necessity.
Both players are set to search for updates every two hours. Besides traffic generated by downloading
new videos, the system will not use much bandwidth.
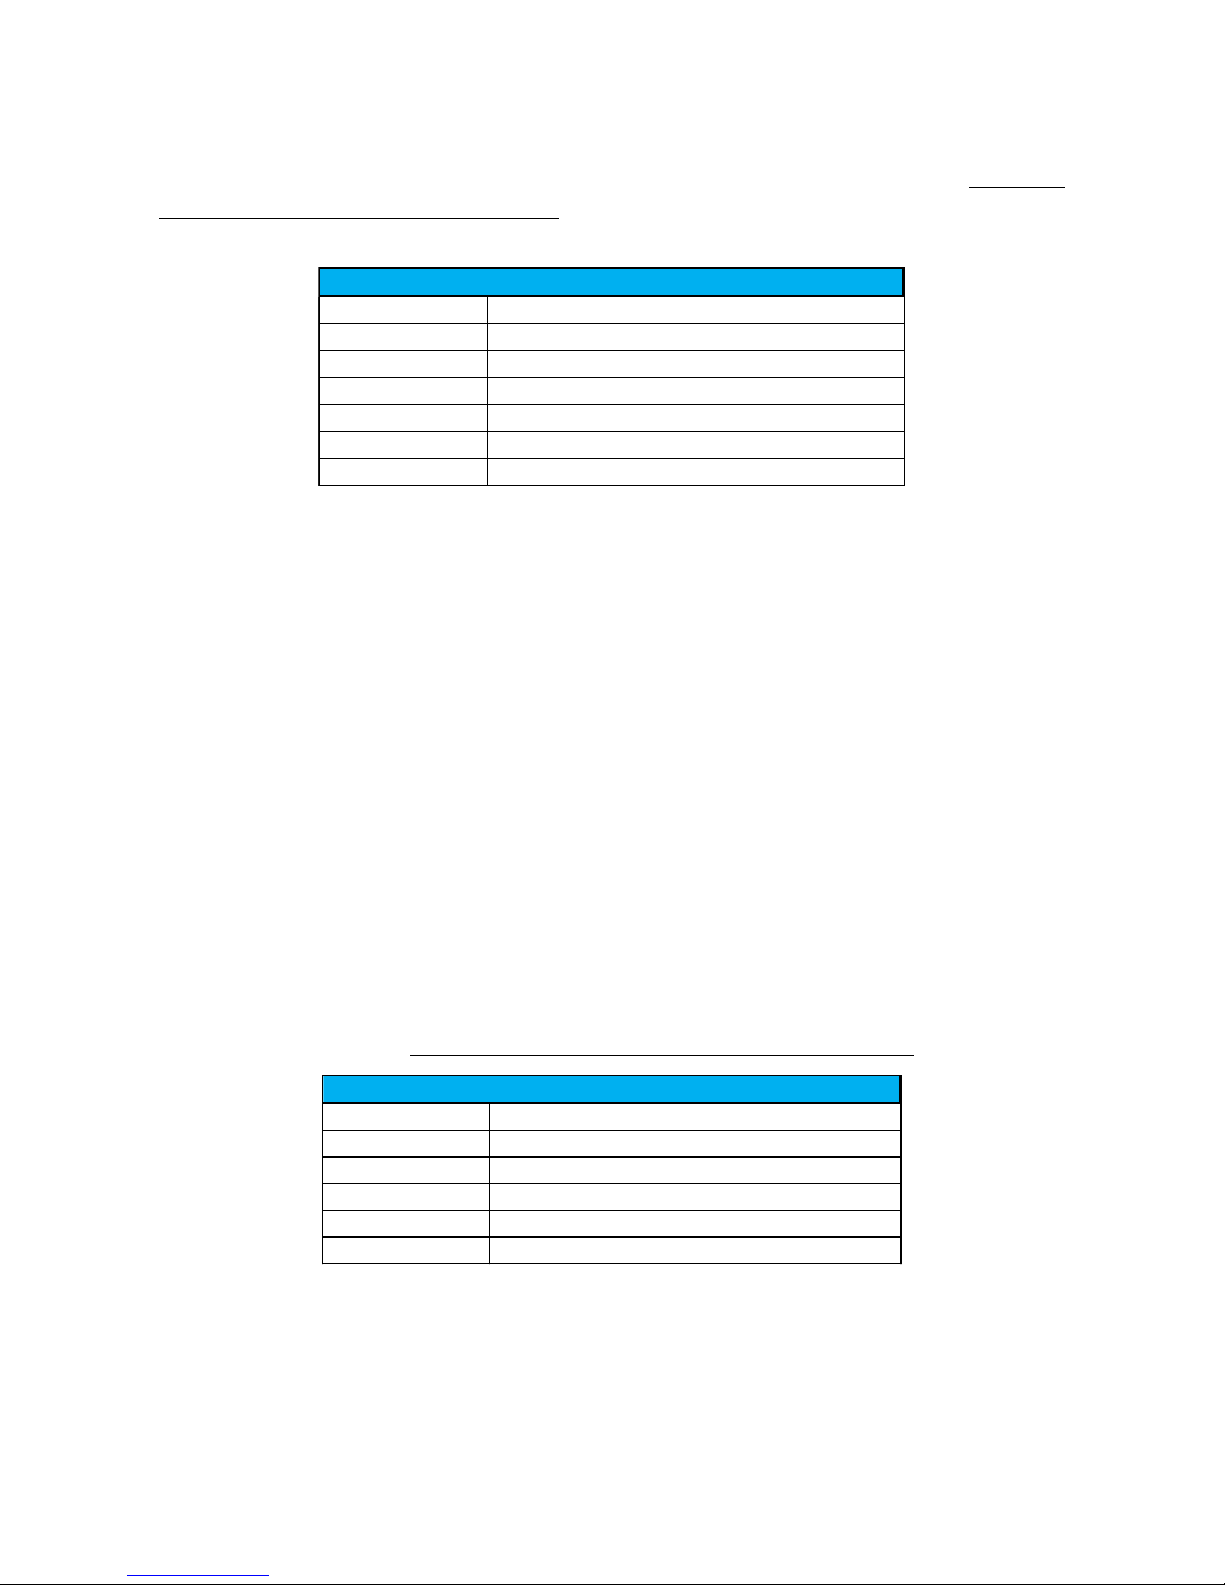
Relevant I/O Ports 6 x USB Type A
1 x Mic-in, 1 x Line-out
2 x internet (RJ45)
1 VGA (DB15 Female)
4 x HDMI
Power Supply 120W/19V
Wexer Virtual Basic Player
Relevant I/O Ports 4 x USB Type A
1 x Mic-in, 1 x Line-out
1 x internet (RJ45)
1 VGA (DB15 Female)
Power Supply 120W/19V
Wexer Virtual On Demand Player
Page 7
6
PROJECTOR
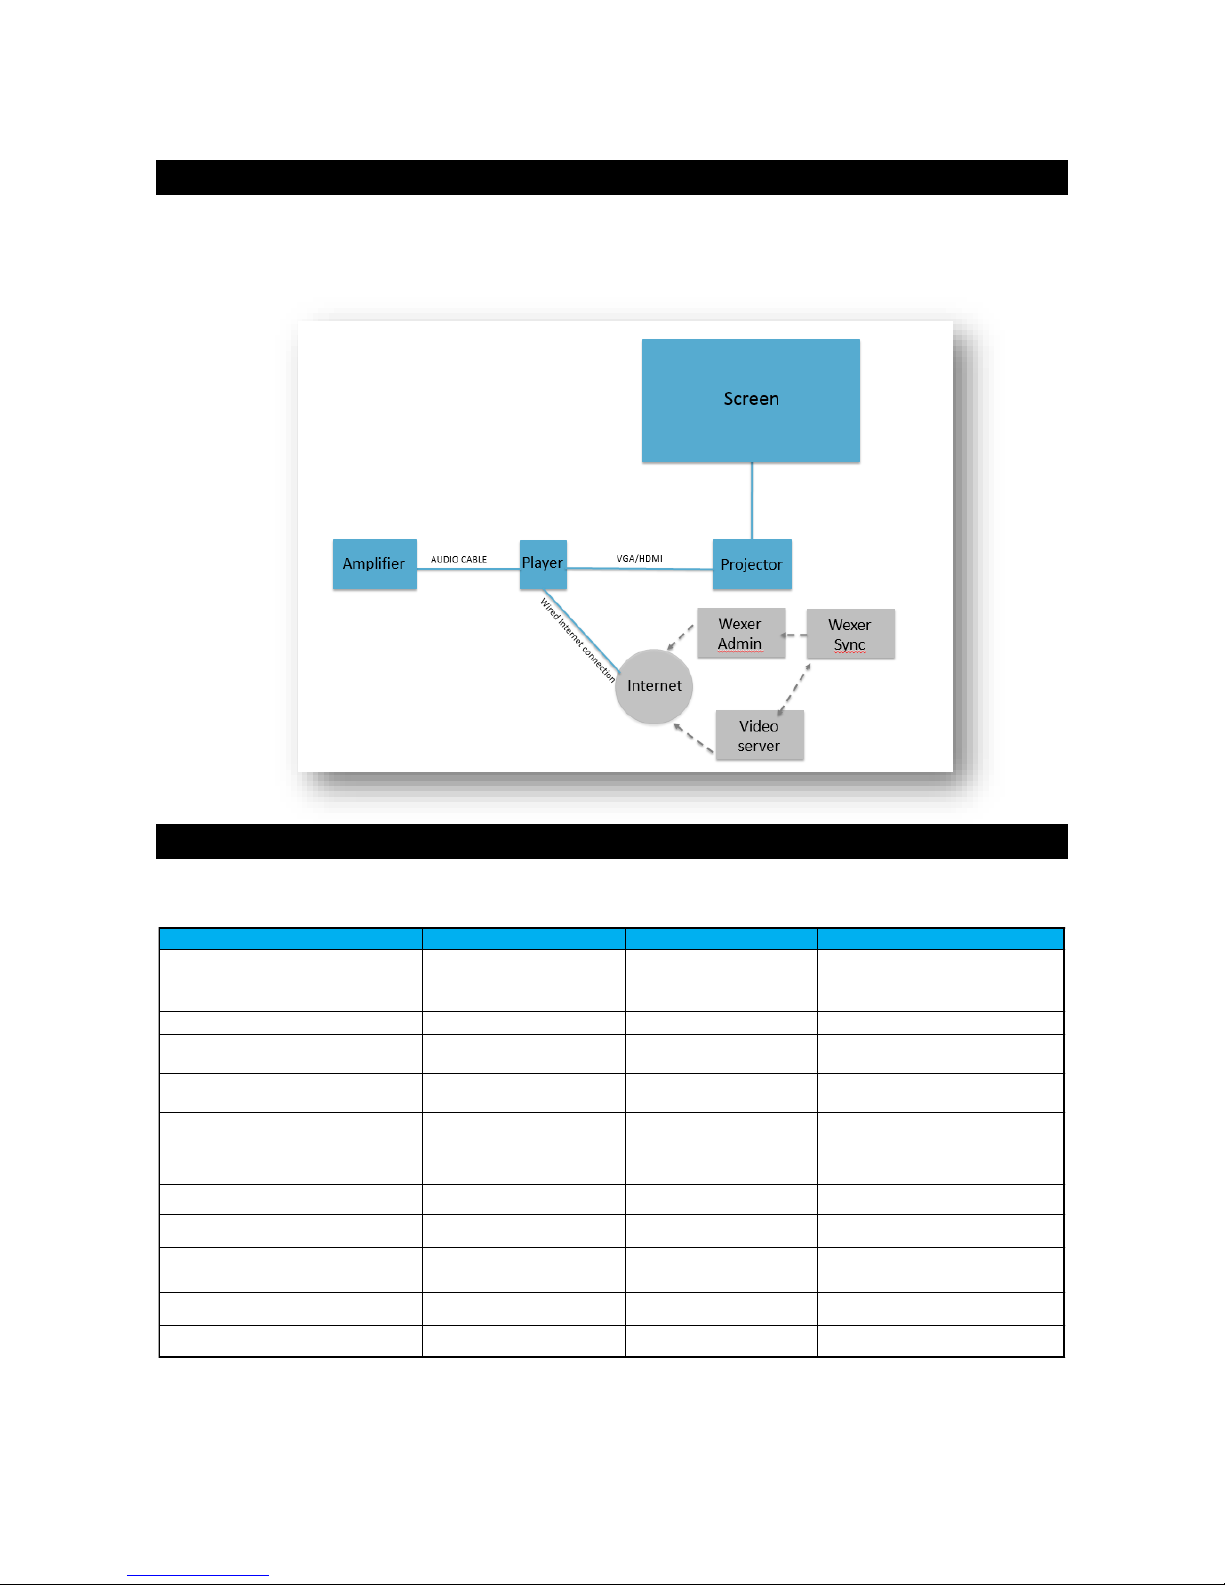
The projector is the output device used to take the display from the player and project it onto a
projector screen. The projector is connected to the player via VGA or HDMI. The Wexer Virtual relay
box can control the projector and turn it on/off at any given time. Alternatively, a switch can be
purchased to control when the projector turns on/off.
PROJECTOR SCREEN
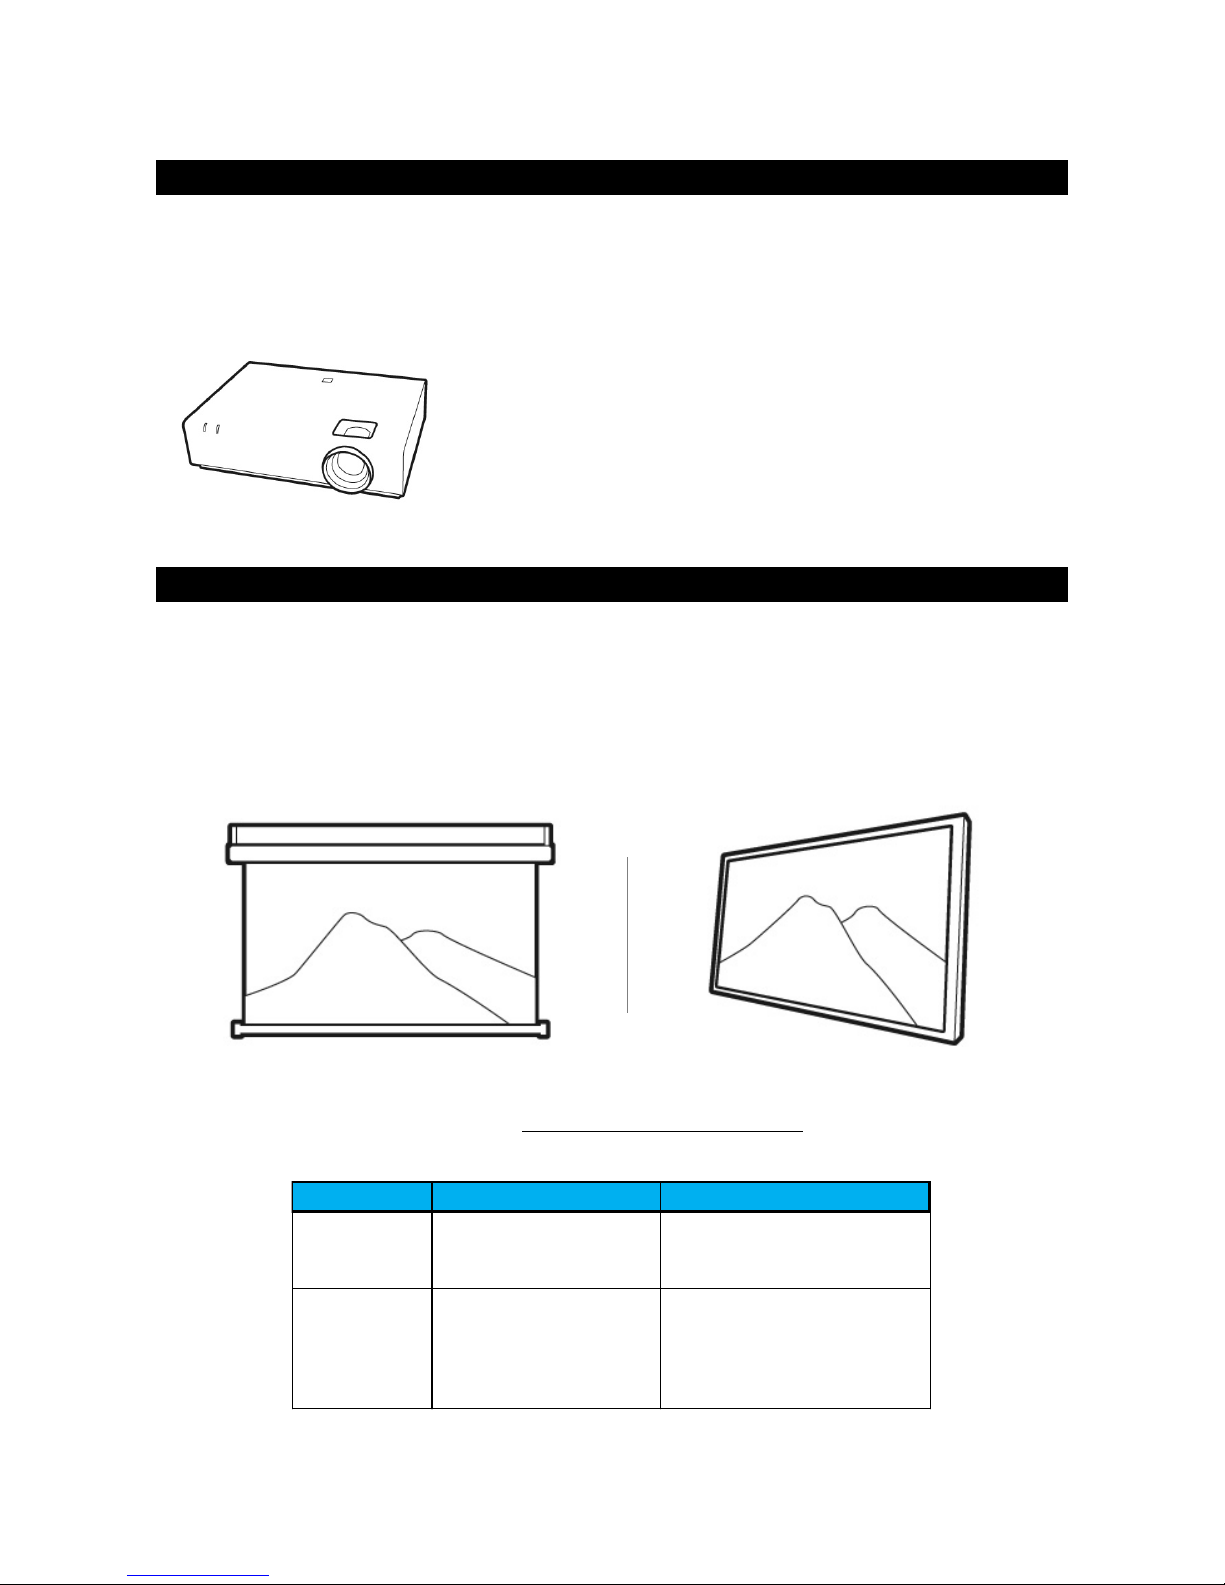
The screen is used for displaying the projected image. Wexer Virtual provides two types of projector
screens:
Fixed screen
Motorized screen (incl. relay box controlling when the screen rolls up and down)
For the best experience of the videos, we recommend a fixed screen due to the improved image
quality.
Scr e en Type Benefits Lim itation s
Motorized
The screen is out of the way
when not in use.
Potential loss of flatness translates
directly to a decrease in image
quality.
Fixed
Permanent installation fixed
against the wall helps
preserve the flatness of the
screen resulting in improved
image quality.
Requires a border, and this can
reduce the available screen space.
Motorized Screen
Fixed Screen
Page 8
7
Both screens are available in different sizes, please contact your Wexer Virtual contact person for
details.
AUDIO SYSTEM
The audio system is used to play the sound of the videos. The audio system is connected to the
player via an audio cable. Most use a pre-installed audio system, whereas others prefer installing a
new system meant specifically for the virtual training. Both will work perfectly fine.
INTERNET
The Wexer players need continuous access to the internet as changes and updates are provided
online. Without internet access, operating stability cannot be guaranteed, new videos cannot be
uploaded and support cannot be provided. In other words, the system requires a cabled internet
connection.
In daily operation, the internet download speed is recommended to be at least 2 Megabits per
second.
TIGHTENED SECURITY
If the network security is tightened, you need to open up communications for the addresses below:
Prime server: 80.70.5.32, port 21
Secondary server: 174.132.128.157, port 21
Server Århus: 217.116.232.212, port 21
Server TV2 News: 193.88.88.38, port 21
Prime server: www.nfoo-server1.dk, port 80
Prime Århus: www.nfoo.eu, port 80
Film server: 194.255.38.44, port 21
Page 9
8
SYSTEM OVERVIEW
To illustrate how the above-mentioned items are connected, a technical drawing of the general
principles of the Wexer Virtual system is included below:
AV GUIDE
To help you select the right hardware, we have outlined a few details and suggestions below:
TV Projector Projector screen
Minimum screen size
TV wall (with a minimum of
4 screens)
NA
3m (horizontal width) 1.78m
(vertical width) or 135'' (bigger
the bett er)
Minimum screen resolution 1280×720 1280×720 NA
Minimum ANSI lumens NA 3000 lumen NA
The display ratio must be 16:09 16:09 16:09
The source inputs must include
1 x HDMI (ONLY for Basic
Player) or 1 x VGA + 1
Audio output (works for
both players)
1 x VGA NA
Mounting requires Wall Ceiling Wall
Screen for multipurpose st udio NA NA Motorized sc reen
Screen for group x or cyc ling studio NA NA Fixed screen
I have no ambient light NA 3000 lumen Low Gain
I have natural ambient light NA 5000-6500 lumen High Gain
Page 10

9
PREPARATIONS
Page 11
10
INTRODUCING FIVE PREPARATIONAL STEPS
Knowing what hardware you need and having chosen the perfect setup for your studio(s), it is time
to start planning the installation. Below, we have listed five steps that will help you be fully prepared
for installation. In case, you already have a projector and projector screen installed, only steps 1, 4,
5 and 6 are relevant but we do recommend going through all steps.
STEP 1: PLACEMENT OF PLAYER
Depending on choice of player, there will be different considerations when deciding where to install
it. Our recommendations are described below:
ON DEMAND PLAYER
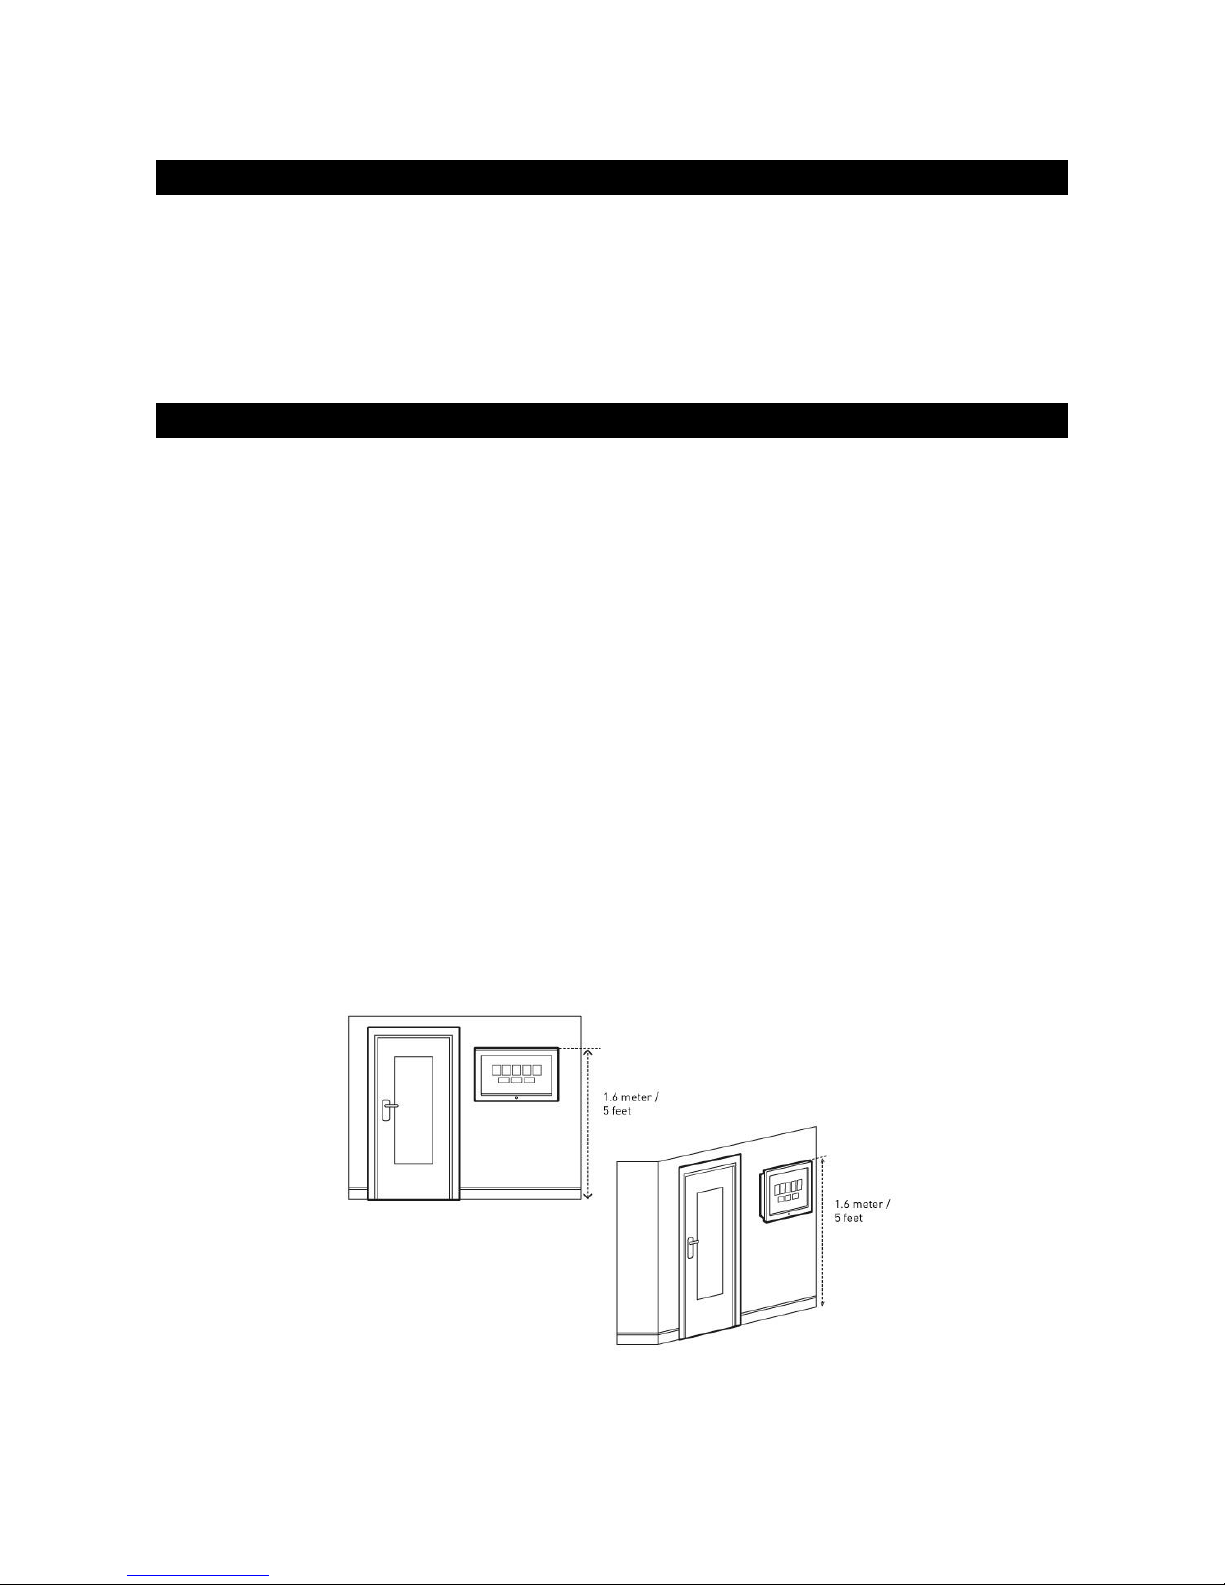
Our recommendation: outside the studio as close to the studio door as possible (Attracts
attention, might bring new people into the studio, members can browse the system, and it
simply looks good)
Alternative: inside the studio as close to the studio door as possible (No unnecessary
attention will be brought to the On Demand player)
The On Demand player can be placed on any type of wall, except for glass walls. We offer two types
of wall brackets; 1) a slim wall bracket for when wires can be hid elsewhere, 2) a wall bracket with
tilt allowing wires to be hidden behind the player. Make sure to select the right bracket on the PreInstallation Order Form. Regardless of wall-bracket choice, we recommend an installation height
between 1.6–1.7 meters/5 feet to the top of the player. If your studio has glass walls only, it is
possible to purchase a stand. Ask your Wexer Virtual contact person for more details.
Page 12
11
BASIC PLAYER
Our recommendation: close/next to the audio system (allows staff to reboot the system if
need be, power will typically already be accessible and it is easy to connect the audio cable)
STEP 2: PLACEMENT OF SCREEN
The considerations when placing a screen, be it fixed or motorized, are very similar. All
considerations are listed below.
WALL CHOICE
We recommend placing the screen on the wall from which instructor-led classes are taught. In your
cycling studio, all bikes need to face the screen, whereas more options exist for the screen in the
group exercise studio. If your instructors are teaching from a wall with mirrors, our suggestion is to
place the screen on another wall (see
Managing Mirrors
further down).
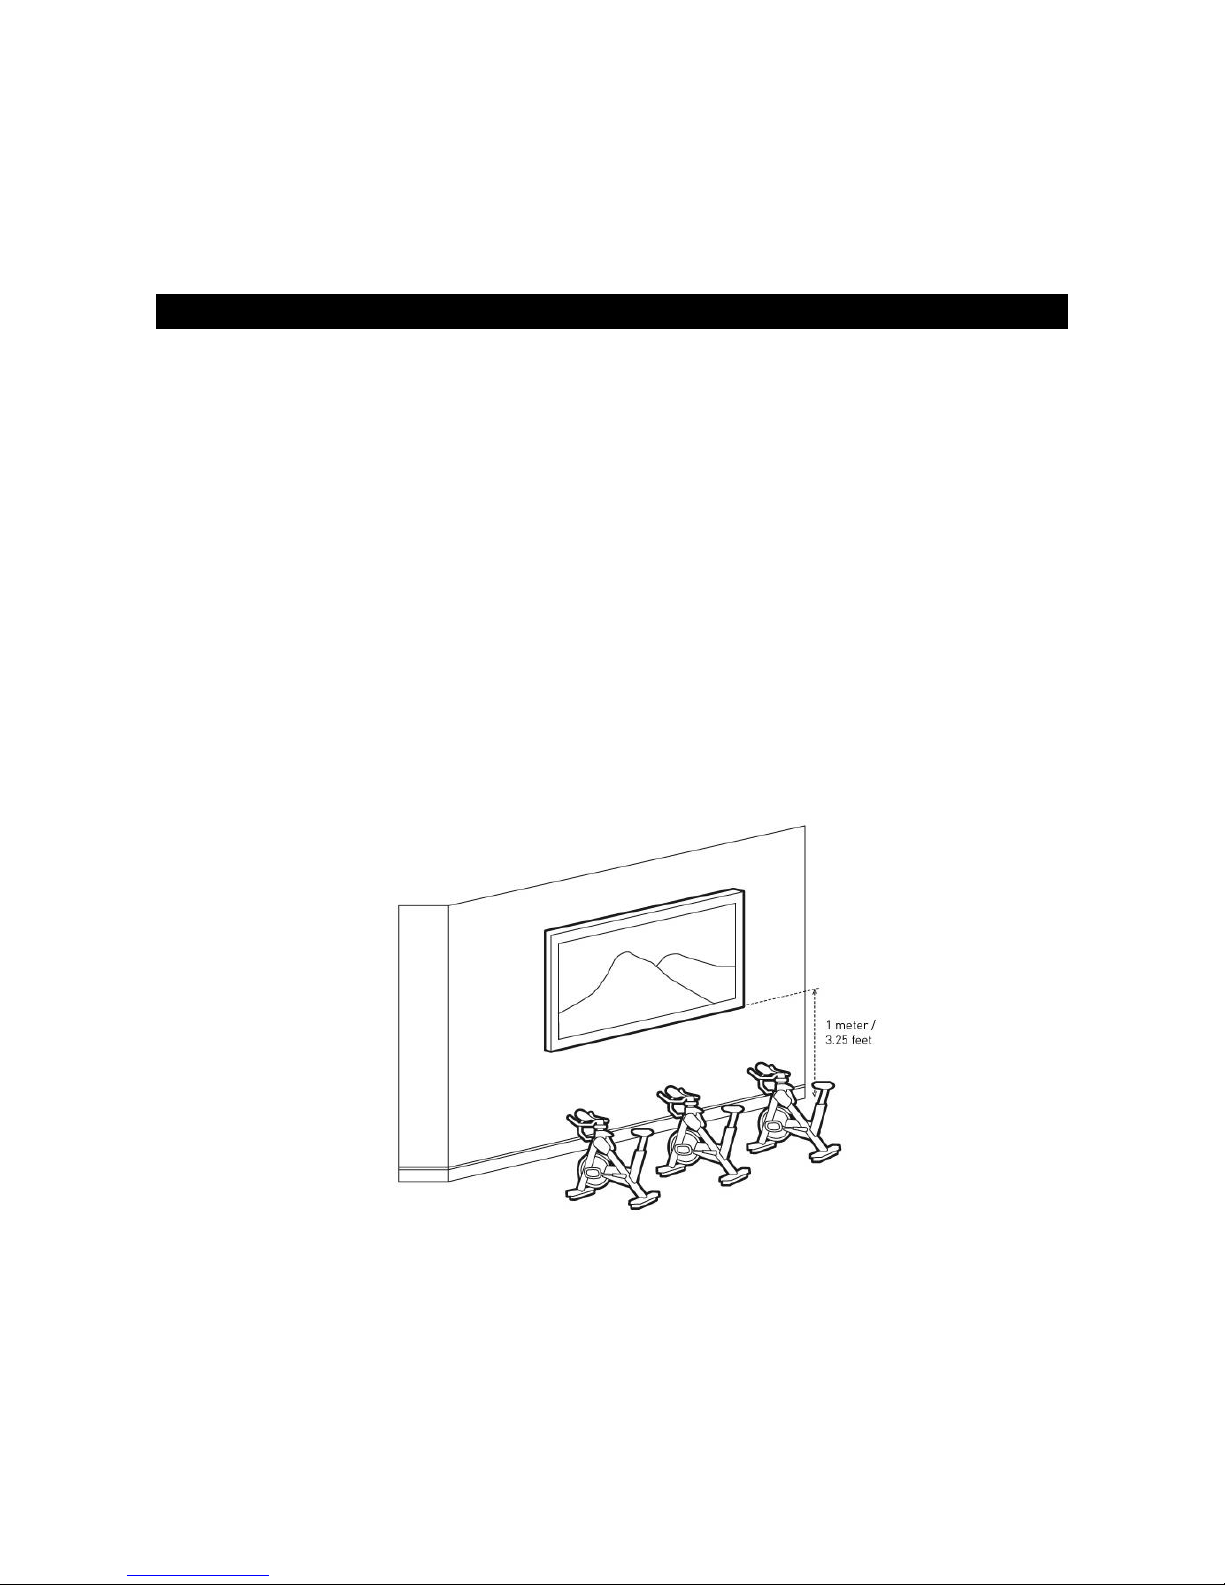
SCREEN TO FLOOR DISTANCE
The screen to floor distance is recommended to be 1 meter/3.25 feet from the bottom of the screen
(motorized or fixed) to the floor.
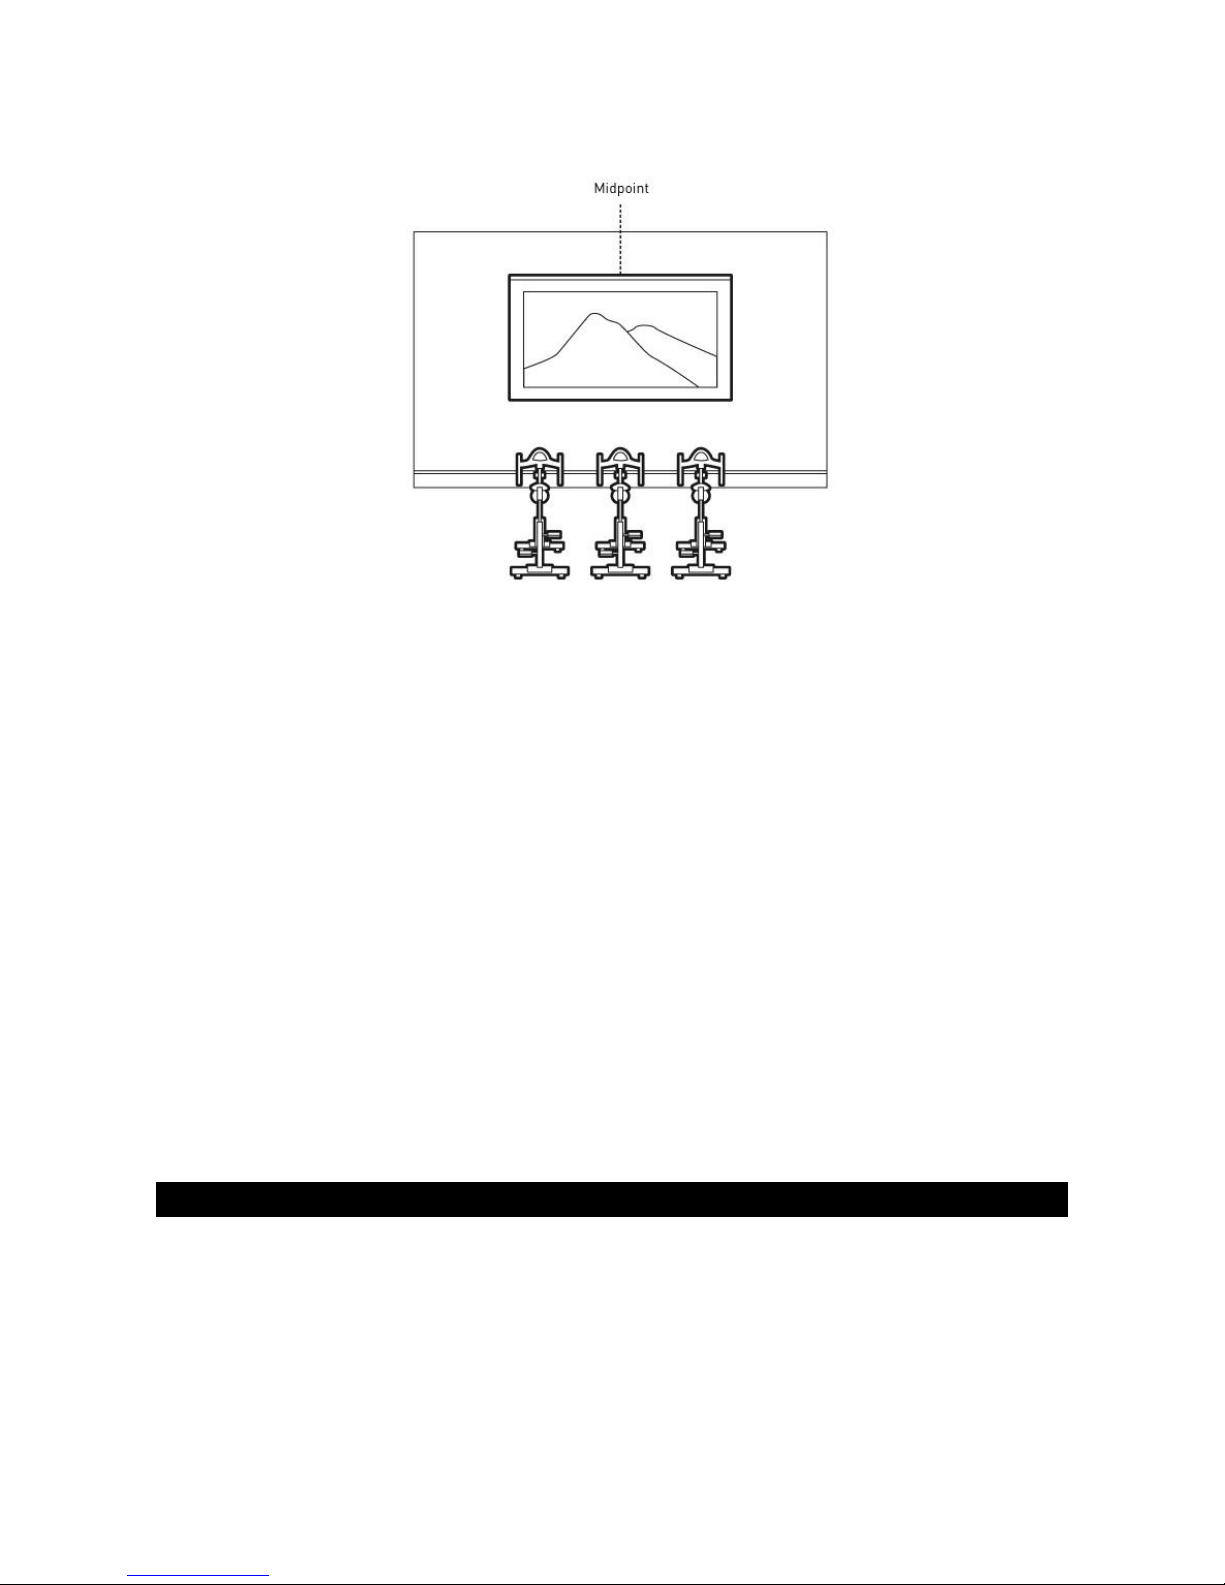
CENTER SCREEN
The screen should be placed in the center of the group of cycles/participants, or as close to it as
possible, taking into consideration the overall width of the space.
Page 13
12
SCREEN TO PARTICIPANT DISTANCE
For both your group exercise and cycling studio, we recommend placing the screen according to the
below:
For every 1 meter/3.25 feet of screen width, the front row of bikes or participants should be 0.7-1
meter/2.25-3.25 feet back.
In a studio with a 3 meter/135 inch screen (
Wexer Standard Projector Package Screen)
, our
Installation team would typically suggest the front row of bikes to be approximately 3 meters/10
feet back.
MANAGING MIRRORS
In a studio with mirrors, we suggest placing the screen at a sidewall. Alternatively and for cycle
studios with bikes facing the mirrors, it is possible to install a motorized screen, but due to picture
quality (see above), we only recommend this, when installing a fixed screen is not an option.
STEP 3: PLACEMENT OF PROJECTOR
INSTALLATION HEIGHT
The projector screen is recommended to be placed so that the bottom of the projector is in line with
the top of the screen. Alternatively, and if the projector is placed higher, the projector can correct
keystone distortion by +/- 20% for perfect installation adjustment to the screen. In other words, it
Page 14
13
is possible to get a high quality image even when placing the projector slightly higher. Information
on how to do this can be found in the projector user manual included in the package.
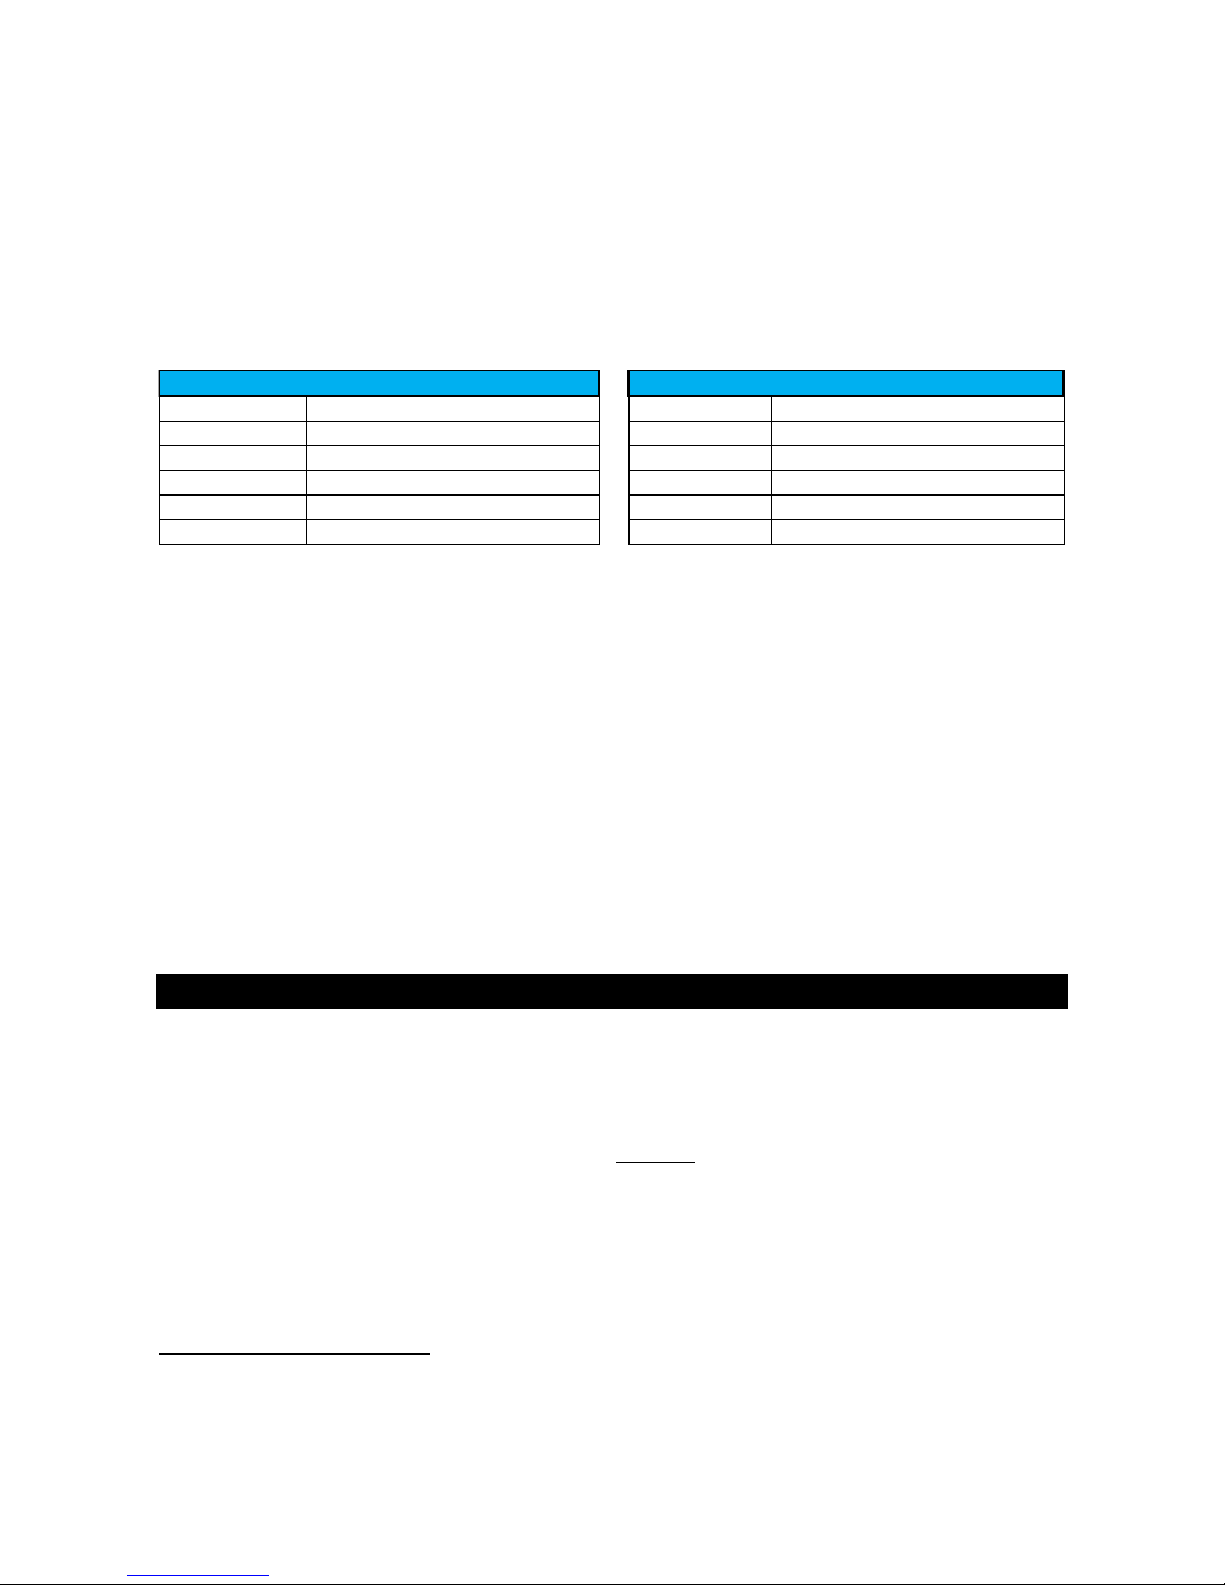
We suggest placing the projector according to the information in the Projection Distance Formula
below:
Projection Distance Formula
When purchasing another type of projector, ensure to get the projection distance and place it
accordingly.
Lower ceiling heights (below 2.5 meters/8.2 feet) will affect buying decisions for projectors and
screens. If the ceiling height is too low, it might not be possible to achieve a larger projected image
without participants in the front row casting shadows on the screen. To avoid shadows, the screen
should be smaller and the projector should be brought closer to, and slightly above, the front row
of bikes/participants (not behind them). An alternative is getting a stronger performance shortthrow projector.
For higher ceiling heights (more than 5 meters – 16.4 feet), we recommend contacting your preferred
technician or the Wexer Virtual Tech Team as the installation will require an extended ceiling mount.
STEP 4: POWER AND INTERNET
Prior to installation it is of key importance to establish power for the following:
Wexer Player
Projector2
Motorized projector screen (
*Fixed screen does not require power
)
(Relay box)
Make sure to establish power sockets as close to the above items as possible. Besides power, a
cabled internet connection should be established as close to the player as possible.
2
NOTE: If you purchased a Wexer Virtual relay box, power for the projector is fed directly from the relay box to the projector, thus requiring only one
power socket.
Pr oj ectio n dis tan c e Pr oj ectio n dis tan c e
3.66-5.88m/144''-231'' 3.36-4.91m/133''-193''
4.11-6.61m/162''-260'' 3.78-5.23m/149''-217''
4.58-7.36m/181''-289'' 4.21-6.15m/166''-242''
4.95-7.95m/195''-312'' 4.55-6.64m/179''-261''
6.11-9.82m/241''-386'' 5.63-8.21m/222''-323''
St andard
Sc ree n in c h
120
135
150
165
200
165
200
High-e n d
Sc ree n in c h
120
135
150
Page 15

14
STEP 6: CHECK YOUR CABLES
You need the following cables to install the Wexer Virtual player:
VGA cable (
for the Basic Player, an HDMI cable will work too
)
Audio cable
Power cable
Internet cable
The VGA/HDMI cable is to be connected between player and projector. The audio cable is to be
connected between player and audio system (see System Overview above). When you have
determined where to place the player, as well as the projector and projector screen, it is time to
determine the length of the cables. All cables can be purchased from Wexer Virtual3, just remember
to specify the length. Alternatively, make sure you purchase the correct length cables yourself.
3
The Wexer Virtual Pre-Installation Form specifies which cables are included as well as their lengths
Page 16

15
CABLING &
INSTALLATION
Page 17
16
READY TO INSTALL?
A well-executed installation is crucial to run virtual training successfully. With that, our
recommendation is always to go through all preparations listed above, to have professional people
perform the installation and to make sure the installation team signs off on the Installation
Confirmation (cf. app. 1). All hardware delivered by Wexer Virtual comes with Installation manuals.
NOTE: If hardware is NOT purchased from Wexer Virtual, make sure to get the installation manuals
from the supplier.
In the below, we go through the cabling for the players and the projector. We also provide quick tips
for the actual installation.
1: MOUNTING THE PLAYER
ON DEMAND PLAYER
Unpack the On Demand player and the package with the wall bracket and follow the guides as listed
below:
For the installation of the On Demand player with a slim wall bracket please follow the
installation manual called Install
On Demand Wall Bracket – slim
For the installation of the On Demand player with a wall bracket including space for cables,
please follow the installation manual called Install
On Demand Wall Bracket – tilt
The guides are included in the package but can also be downloaded on our website
(http://bit.ly/wexervirtual-installation). Having mounted the wall bracket on the wall and on the back
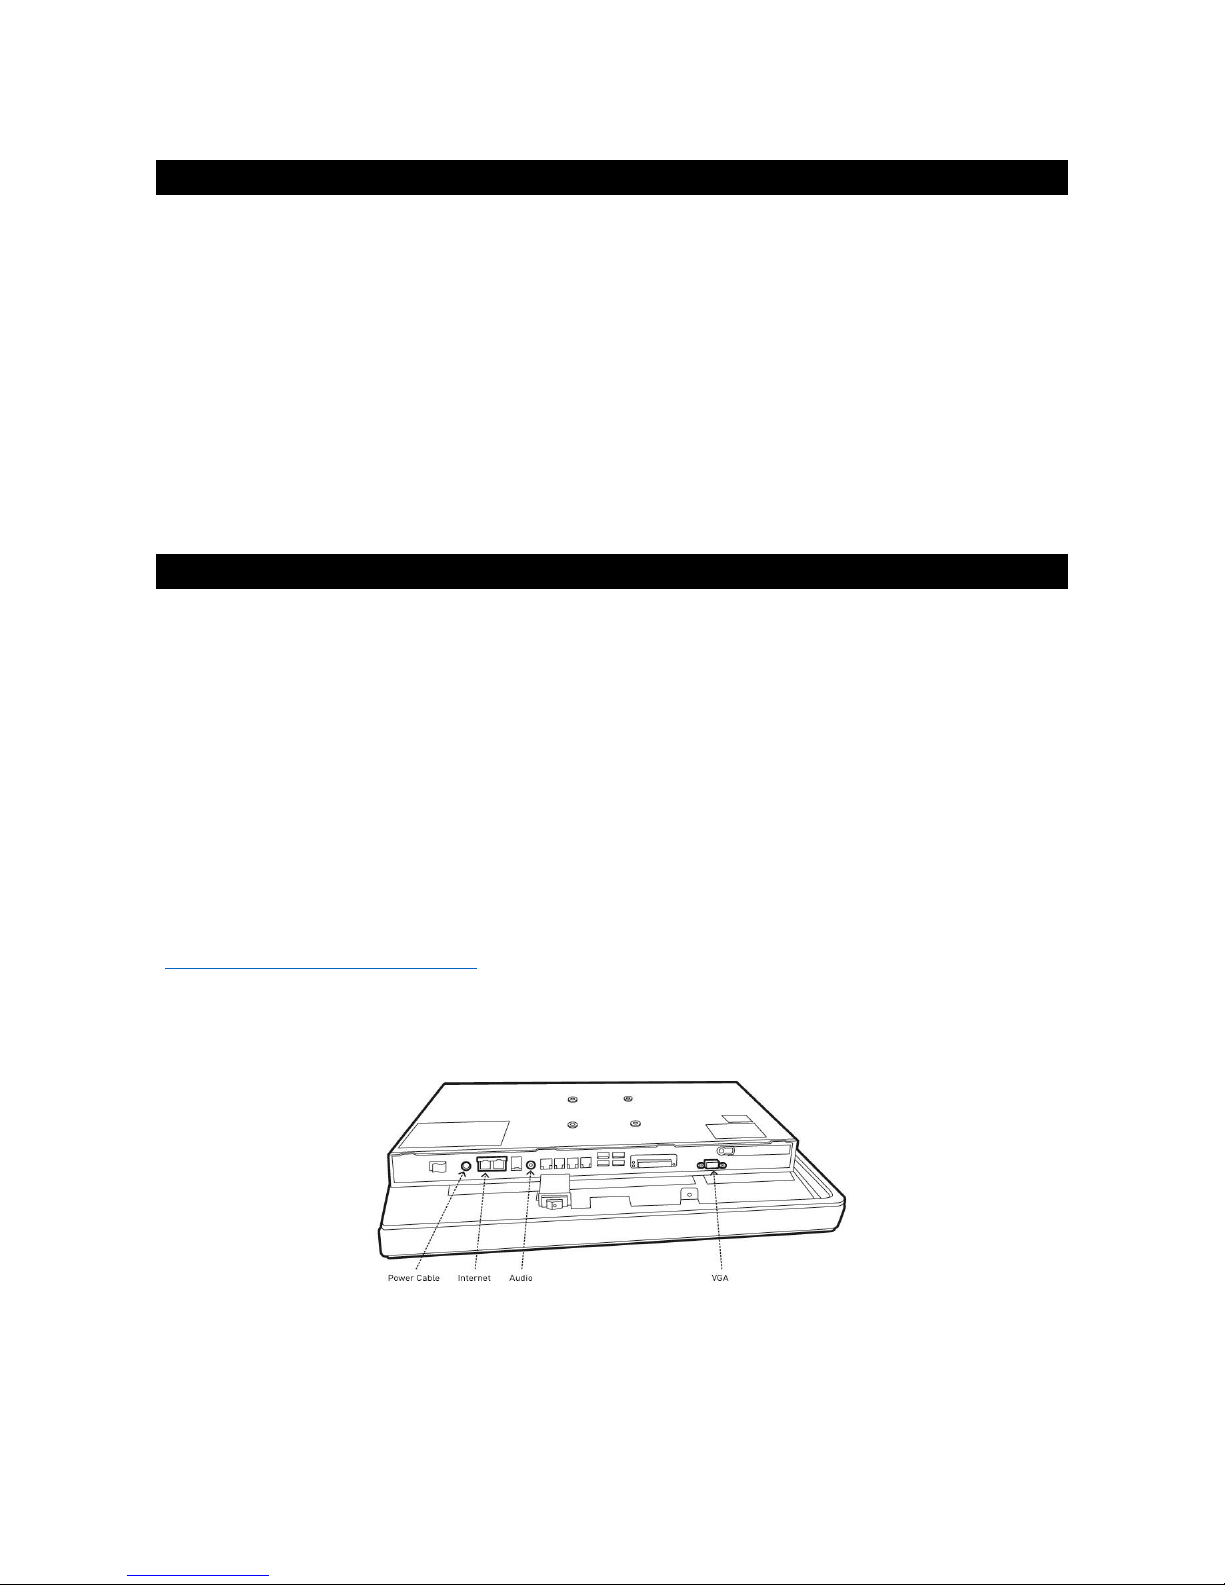
of the on demand player, it’s time to place the cables at the back of the player (Power, Internet,
Audio, VGA). Place the cables as shown below:
Having placed the cables, you are now ready to attach the player to the wall plate.
Page 18
17
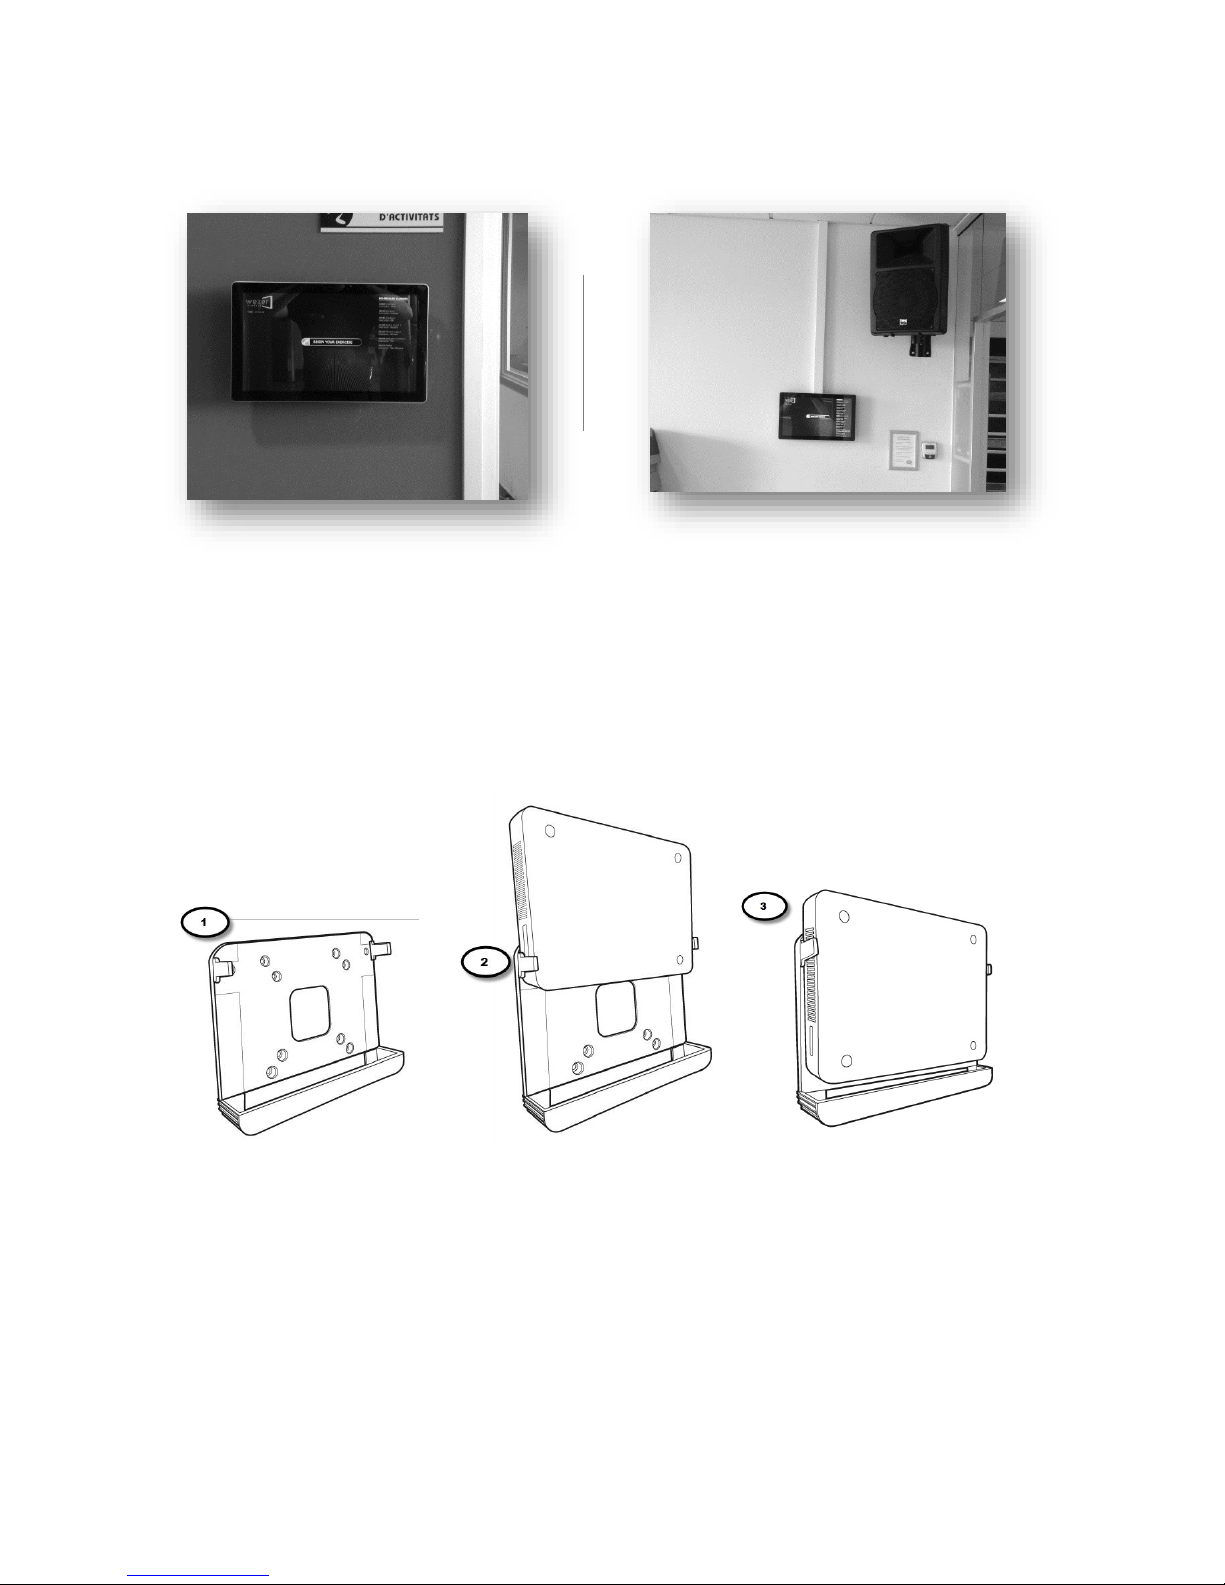
Examples of two different On Demand Player installations:
BASIC PLAYER
The Basic player can be installed on any wall using the wall bracket included in the package. Doing
so, simply requires mounting the bracket on the wall with four screws and then placing the player
in the bracket.
Most do, however, decide to place the player on top of the stereo or somewhere next to it; doing so
means no further installation than connecting the cables. Do note, however, that the player is not
meant to be moved around.
As with the On Demand Player, you need to place the following cables: power, VGA/HDMI, audio,
and internet (see below).
Installation with a hole drilled in drywall behind the
player and the wires hidden in the wall
Installation with a visible installation on the wall with
the power supply hidden above the ceiling
Page 19
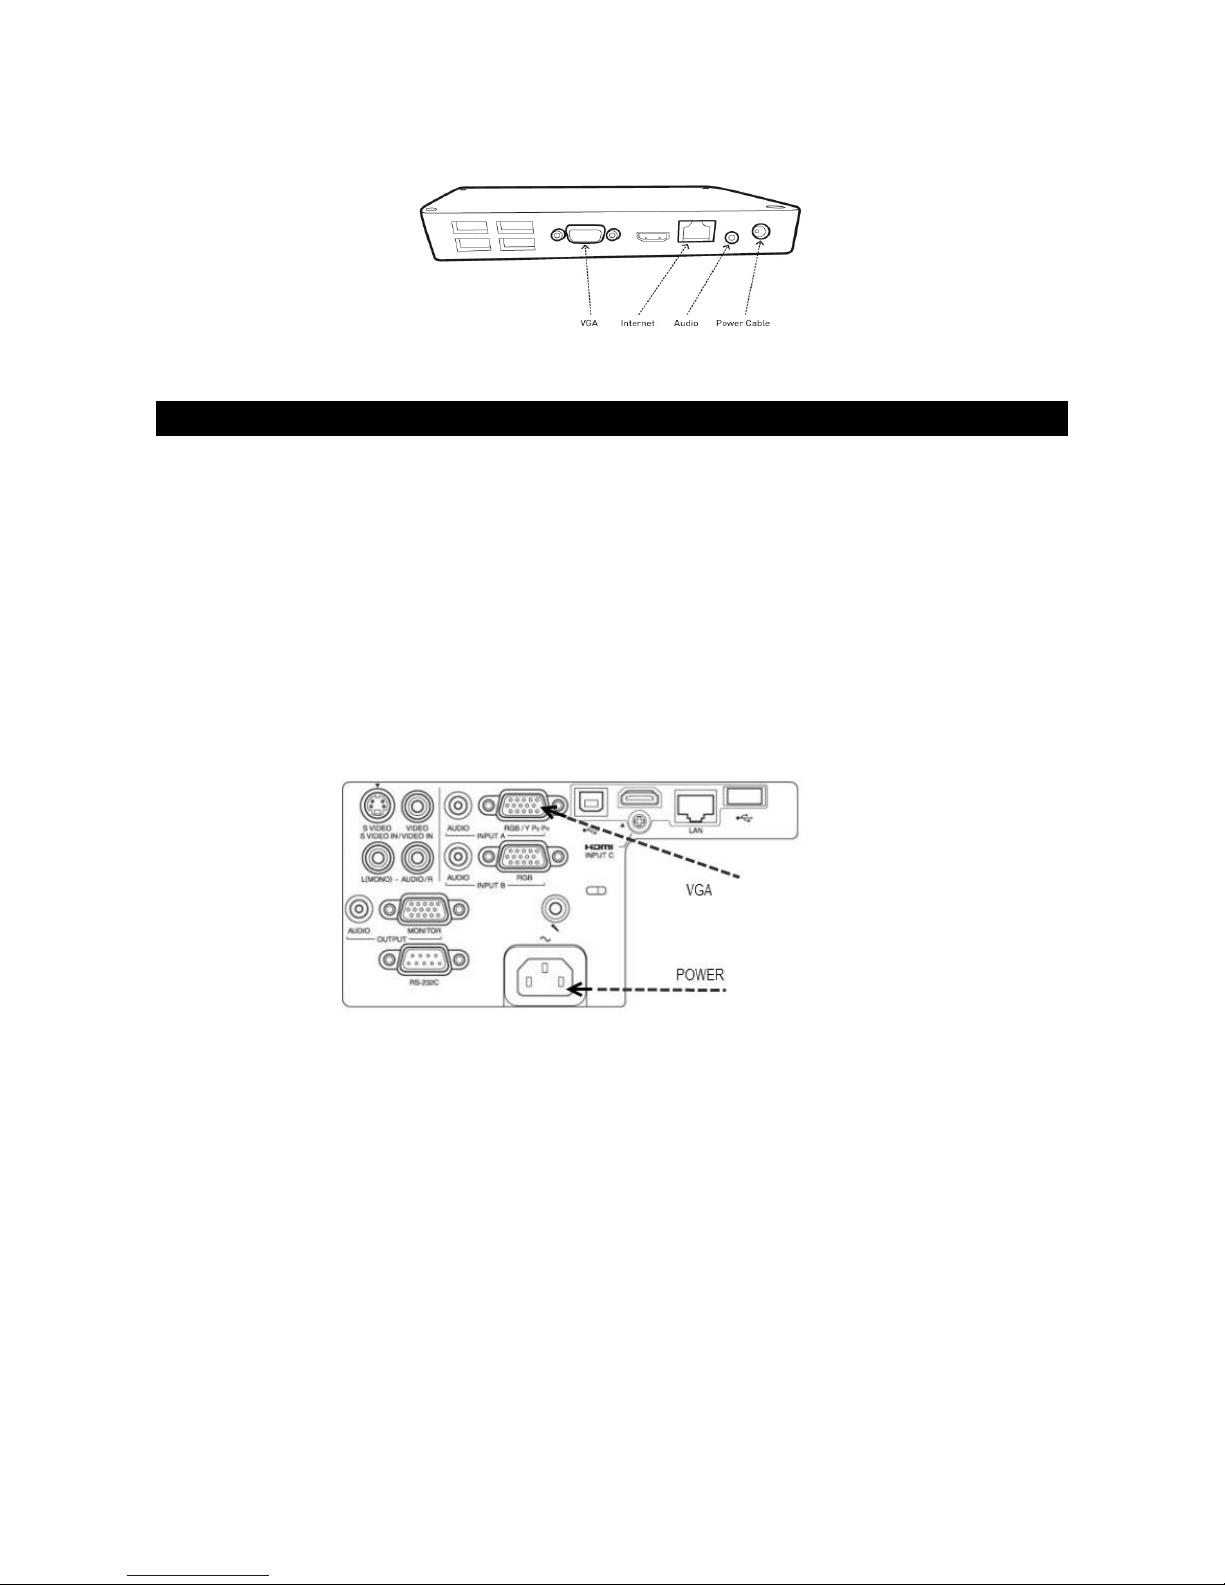
18
2: MOUNTING THE PROJECTOR
Depending on the choice of projector and the ceiling height in your studio, the choice of ceiling
mounting will vary. Wexer Virtual offers two brackets:
A standard ceiling mounting (for regular ceiling heights)
An extended ceiling mounting (for ceiling heights of more than 5 meters – 16.4 feet)
Both mountings come with manuals. When purchasing your projector and ceiling mounting from
another party, make sure installation manuals are included.
The image below illustrates where to place the VGA and power cable on our standard projector:
Having installed the projector, we suggest checking the settings on the projector using the projector
remote control:
Resolution: 1280x720 (
If you select “normal”, the image is projected in the same resolution
as the input signal
)
Direct Power on
Lamp dimming off
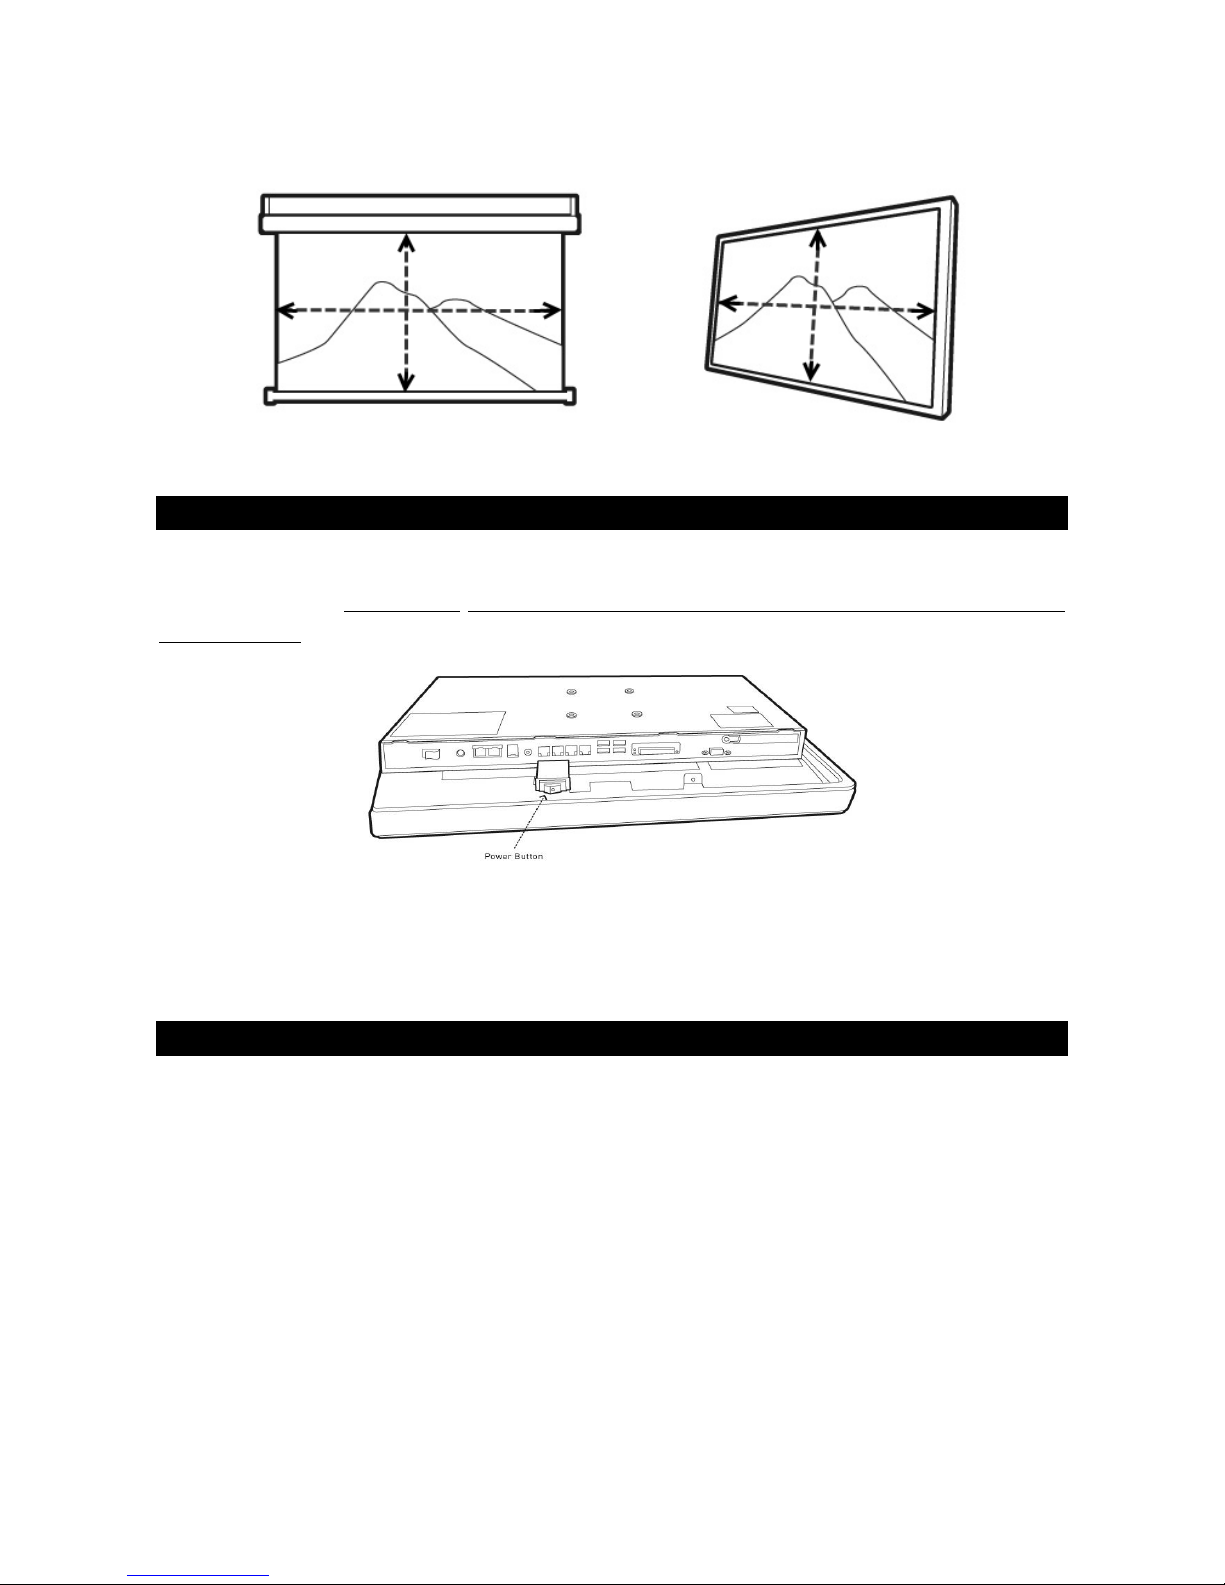
Make sure to adjust the projector in order for the image to fit the screen perfectly (see below). Also,
you will very likely need to adjust zoom and focus. More information can be found in the Projector
Manual included in the package.
Page 20
19
An image fitted perfectly to the screen
4: FINAL ADJUSTMENTS
Having followed the steps above, you are now ready to make the final adjustments. Make sure to
turn the player on (IMPORTANT: do not turn on player before having installed the projector and
screen properly). If everything is installed correctly, the player will start working immediately.
Also, make sure to test the network connection to the player (log in to your Wexer Admin account
and check the internet information in the top right corner. Finally, we suggest you test (and
potentially adjust) the sound.
ADDITIONAL RECOMMENDATIONS
Do not go cheap on the projector: If the room has a lot of daylight go for a projector with
more lumens, or even better – go for a TV wall solution.
Make sure the picture fits the screen perfectly (correct mounting of projector and screen)
Make sure the sound is good and loud enough. Also, ensure that instructors do not turn it
down without turning it back up.
To get the best and brightest footage, we always recommend a minimum amount of light in
the studio. The rule of thumb is “the darker, the better”. For studios with windows, we
suggest limiting sun exposure as much as possible.
A lot of group exercise and cycling studios have mirrors. Our recommendation is to place
the screen on the opposite wall or to remove the mirrors completely.
Page 21

20
APPENDICES
Page 22
21
APPENDIX 1
INSTALLATION CONFIRMATION
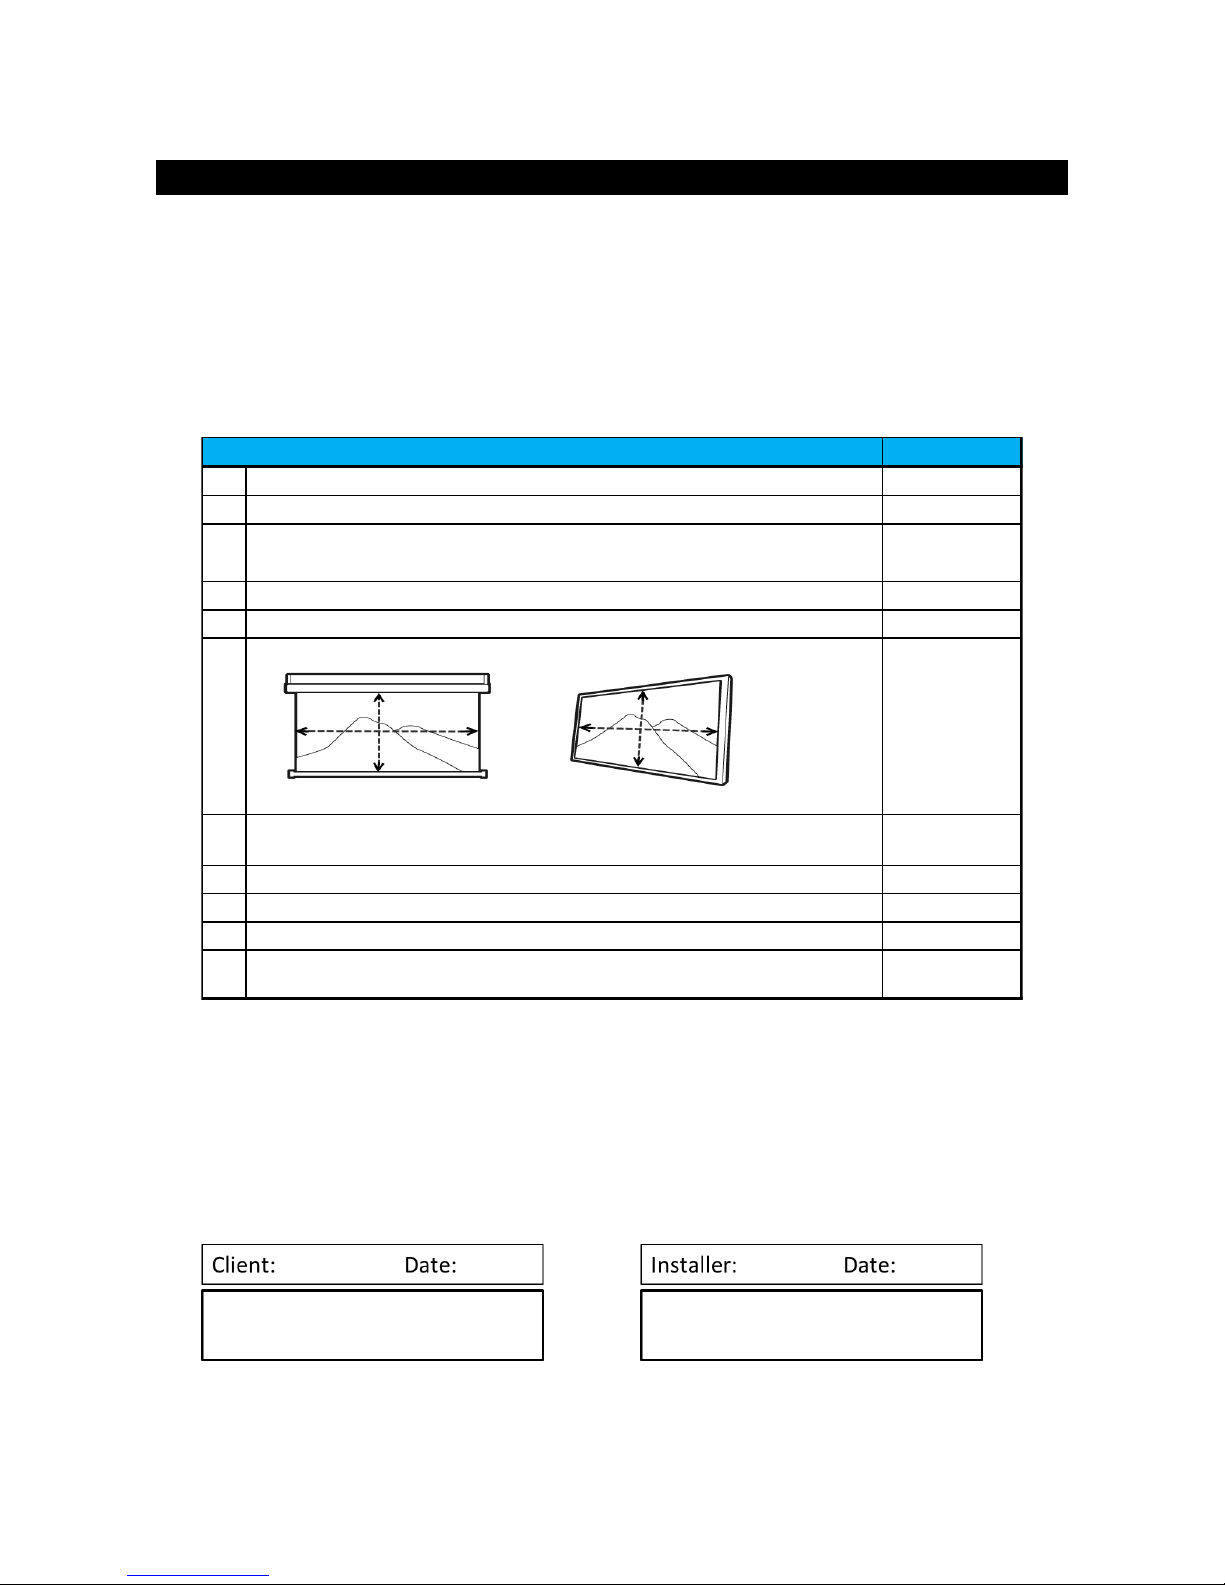
In order to secure a proper installation, all installations handled by a Wexer Installation Partner ends with a signed Installation
Confirmation. If installation is handled by another party, we do suggest for them to sign the Installation Confirmation as this
secures a proper installation.
Done (Tick Box)
1 Player is turned on and power cable is connected to a power socket
2 Player is online
Log into your WexerAdmin account.On the front page, the text in the top right corner will let you know if any
playeris offline. If the player is connected, the text will simply state “ √ Player is o nline” : Alternatively, call your
Wexer Virtual contact person.
3 Audio works
4 Picture fits the screen perfectly
5
Pictures of the studio(s) have been taken and will be sent to Wexer Virtual
contact person
Image of installed player
Image of installed projector
Image of installed screen
6
FOR INSTA L LATIO NS IN C L. RELA Y BO X: Make sure that relay works (screen
comes down, projector turns on when planned to do so)
 Loading...