

Page 1

Absorption and Attenuation
Meter with Data Handling
WET Labs, Inc.
ac-9 Plus
User’s Guide
PO Box 518
Philomath, OR 97370
541 929-5650
www.wetlabs.com
ac-9 Plus User’s Guide (ac-9plus) Revision J 11 April 2006
Page 2

Page 3

Attention!
Return Policy for Instruments with Anti-fouling Treatment
WET Labs cannot accept instruments for servicing or repair that are treated with
anti-fouling compound(s). This includes but is not limited to tri-butyl tin (TBT),
marine anti-fouling paint, ablative coatings, etc.
Please ensure any anti-fouling treatment has been removed prior to returning
instruments to WET Labs for service or repair.
ac-9 Plus User’s Guide (ac-9plus) Revision J 11 April 2006
Page 4

Page 5

ac-9 Plus Warranty
This unit is guaranteed against defects in materials and workmanship for one
year from the original date of purchase. Warranty is void if the factory determines
the unit was subjected to abuse or neglect beyond the normal wear and tear of
field deployment, or in the event the pressure housing has been opened by the
customer.
To return the instrument, contact WET Labs for a Return Merchandise
Authorization (RMA) and ship in the original container. WET Labs is not
responsible for damage to instruments during the return shipment to the factory.
WET Labs will supply all replacement parts and labor and pay for return via 3rd
day air shipping in honoring this warranty.
Shipping Requirements for Warranty and Out-of-warranty Instruments
1. Please retain the original shipping material. We design the shipping container to
meet stringent shipping and insurance requirements, and to keep your meter
functional.
2. To avoid additional repackaging charges, use the original box (or WET Labsapproved container) with its custom-cut packing foam and anti-static bag to return
the instrument.
• If using alternative container, use at least 2 in. of foam (NOT bubble wrap or
Styrofoam “peanuts”) to fully surround the instrument.
• Minimum repacking charge for ac meters: $240.00.
3. Clearly mark the RMA number on the outside of your shipping container and on
all packing lists.
4. Return instruments using 3rd day air shipping or better: do not ship via ground.
ac-9 Plus User’s Guide (ac-9plus) Revision J 11 April 2006
Page 6

Page 7

Table of Contents
1.
Overview and Setup................................................................. 1
1.1 Installing Software............................................................................................. 2
1.2 Bench Testing .................................................................................................... 2
1.3 Air Tracking....................................................................................................... 4
1.4 Cleaning............................................................................................................. 5
1.5 System Requirements......................................................................................... 6
1.6 Operating the Meter ............................................................................................ 7
2.
Instrument Description ........................................................... 13
2.1 Instrument Overview ....................................................................................... 13
2.2 Optics............................................................................................................... 15
2.3 Electronics........................................................................................................ 17
2.4 Pressure Housing Material............................................................................... 17
2.5 Signal Processing............................................................................................. 17
3. Calibration and Characterization ............................................... 19
3.1 Temperature Correction................................................................................... 19
3.2 Precision........................................................................................................... 19
3.3 Absolute Calibration ........................................................................................ 20
3.4 Linearity and Dynamic Range ......................................................................... 20
3.5 Air Calibration and Tracking........................................................................... 20
4. Specifications............................................................................ 23
4.1 Connectors ....................................................................................................... 23
4.2 Power Requirements ........................................................................................ 26
Appendix A:
Pressure Sensor Use and Care .............................. 27
ac-9 Plus User’s Guide (ac-9plus) Revision J 11 April 2006 i
Page 8

Page 9

1. Overview and Setup
An enhanced ac-9, or ac-9 Plus, provides additional capability that includes the simultaneous
collection, storage, and merging of digital data from an ac-9, a CTD and other optical
instruments in both profile and moored modes. Additionally, data from any one of the
instruments may be viewed in real-time while data is being collected and stored for all three. Set
up and use of the Plus requires an IBM-compatible PC running Windows 95 or later, and the
WET Labs-provided WET Labs Host program. The ac-9 Plus supports a growing number of
CTD instruments and a number of optical meters. Contact WET Labs for the current list of
supported meters.
The ac-9 Plus is delivered in a sturdy wooden shipping container with the following components:
• ac-9 Plus, with one absorption flow tube and one attenuation flow tube
• four flow sleeves
• four protective black plastic caps
• dummy plug with lock collar
• this manual
• WETView software
• WETView User’s Guide
• ac-9 Protocol document
• WET Labs Host software
• WETLabs Host User’s Guide
• instrument-specific calibration information
• ten-foot test cable
• double “Y” de-bubbler tubing
• stainless steel intake screens
Familiarize yourself with the ac-9 Plus: remove the black plastic flow tubes by grasping the
flow tube sleeves and sliding them away from the ends of the flow tube (toward the middle
of the flow tube). You only have to slide the collars about ½-in. to unlock the flow tube from
its fixed position. The flow tube will lift out, exposing the transmitter and detector windows
on the lower and upper flanges respectively. Observe the flow tubes. The attenuation tube is
different from the absorption tube. Its flow chamber is plastic and the two sleeves on the tube
are identical. This tube installs on the ‘c’ side of the instrument (the side with the identical
looking windows). The ‘c’ tube has no “up or down” orientation. The absorption tube is lined
with a quartz tube and one of the two sleeves is flat on top (the lip present on all the other
sleeves is missing). This tube installs on the ‘a’ side of the instrument, which can be
identified by the ‘a’ detector on the upper flange and is the only window, which is clearly
different from the other three. The flat flow tube sleeve goes on this detector.
You may want to mark the tubes and their orientation with tape or marking pen before using
the instrument at sea so that there is no confusion on reinstalling the tubes after cleaning the
optics. Reinstall the flow tubes before bench testing your instrument. If you have removed
the plastic caps from the stainless nozzles, replace them at this time.
ac-9 Plus User’s Guide (ac-9plus) Revision J 11 April 2006 1
Page 10

1.1 Installing Software
1.1.1 Install WETView
WETView is used to view data during air and water tracking procedures on the ac-9 Plus.
It runs on PC-compatible computers with at least 16 Mb of memory and 3 Mb free hard
disk space.
1. Place the WETView floppy disk in the floppy disk drive.
2. Open the floppy and double-click on the SETUP.EXE icon. Setup will guide you
through the rest of the installation process.
When installed, the following files should be on the hard disk: WETVIEW.EXE,
WETVIEW.UIR, AC9XXX.DEV, AIRXXYYY.CAL. The DEV and CAL files are the
calibration files for your particular instrument.
1.1.2 Install WET Labs Host Software
WET Labs Host allows configuration of the ac-9 Plus and instruments connected to it as
well as displaying and retrieving data they produce. It runs on PC-compatible computers
with at least 16 Mb of memory and 3 Mb free hard disk space.
1. Place the WET Labs Host CD in the appropriate drive.
2. Copy the .EXE files into a working directory for the AC9 plus. No installation is
required for these programs.
1.2 Bench Testing
The ac-9 Plus is designed to use the WET Labs Host software by default. However, the most
straightforward method of performing pre-deployment checks is to use WETView.
The following items are needed to bench test the ac-9 Plus:
• A clean, solid lab table or work bench
• The ac-9 Plus with 10-foot test cable (or sea cable)
• A 12–15 volt power supply (the ac-9 Plus requires 10–18 VDC)
• A PC with WETView and WET Labs Host installed.
1. Connect the test cable to the proper COMM port of the computer. Connect the power
leads to a 12–15 volt power supply. The black lead is the V+ lead. Before connecting the
cable to the instrument, use a multi-meter to check the input power.
2. With the power supply turned on, connect the ground probe to pin 1 on the pigtail
connector (the large pin as you are looking into the connector). Connect the hot probe to
pin 4 (the pin directly opposite from pin 1). You should measure 12–15 volts across these
two pins.
3. Turn the power supply off.
4. Connect the pigtail to the ac-9 Plus and apply power.
5. Run WET Labs Host. Select the proper COMM port and baud rate for the host port from
the Comm_Ports pull-down menu: go to Logger Port/Configure Logger Port. Make
2 ac-9 Plus User’s Guide (ac-9plus) Revision J 11 April 2006
Page 11
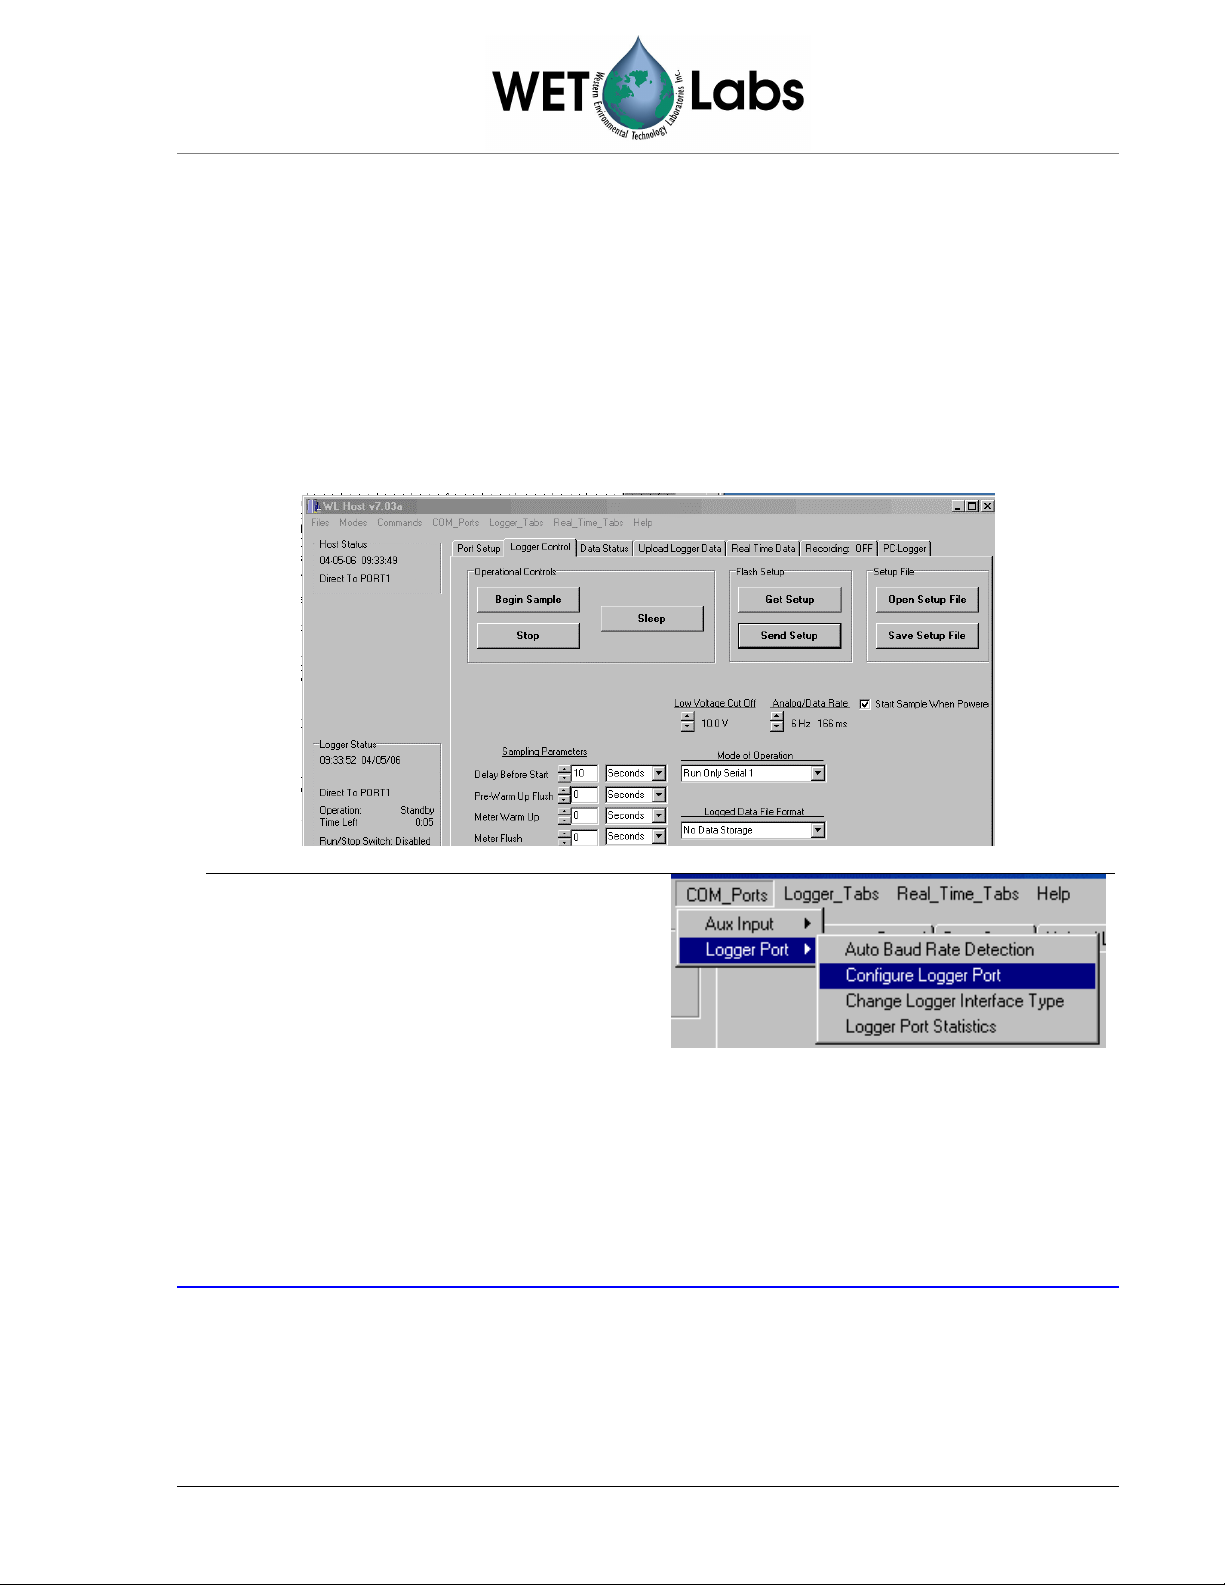
sure that communication is established with the AC9+ (the red fields on the “Configure
Host Port” window will turn white).
6. Select Modes/Advanced User from the pull-down menu (see below):
• Select the Logger Control tab.
• Select Run Only Serial 1 from the Mode of Operation pull-down in the center of
the tab.
• Check the Start Sample When Powered box at the right-center of the tab.
• Make sure the Delay Before Start under the Sampling Parameters column (left-
center) is 10 seconds.
• Press Send Setup and wait for the ac-9+ to clear the setting flags (yellow to gray).
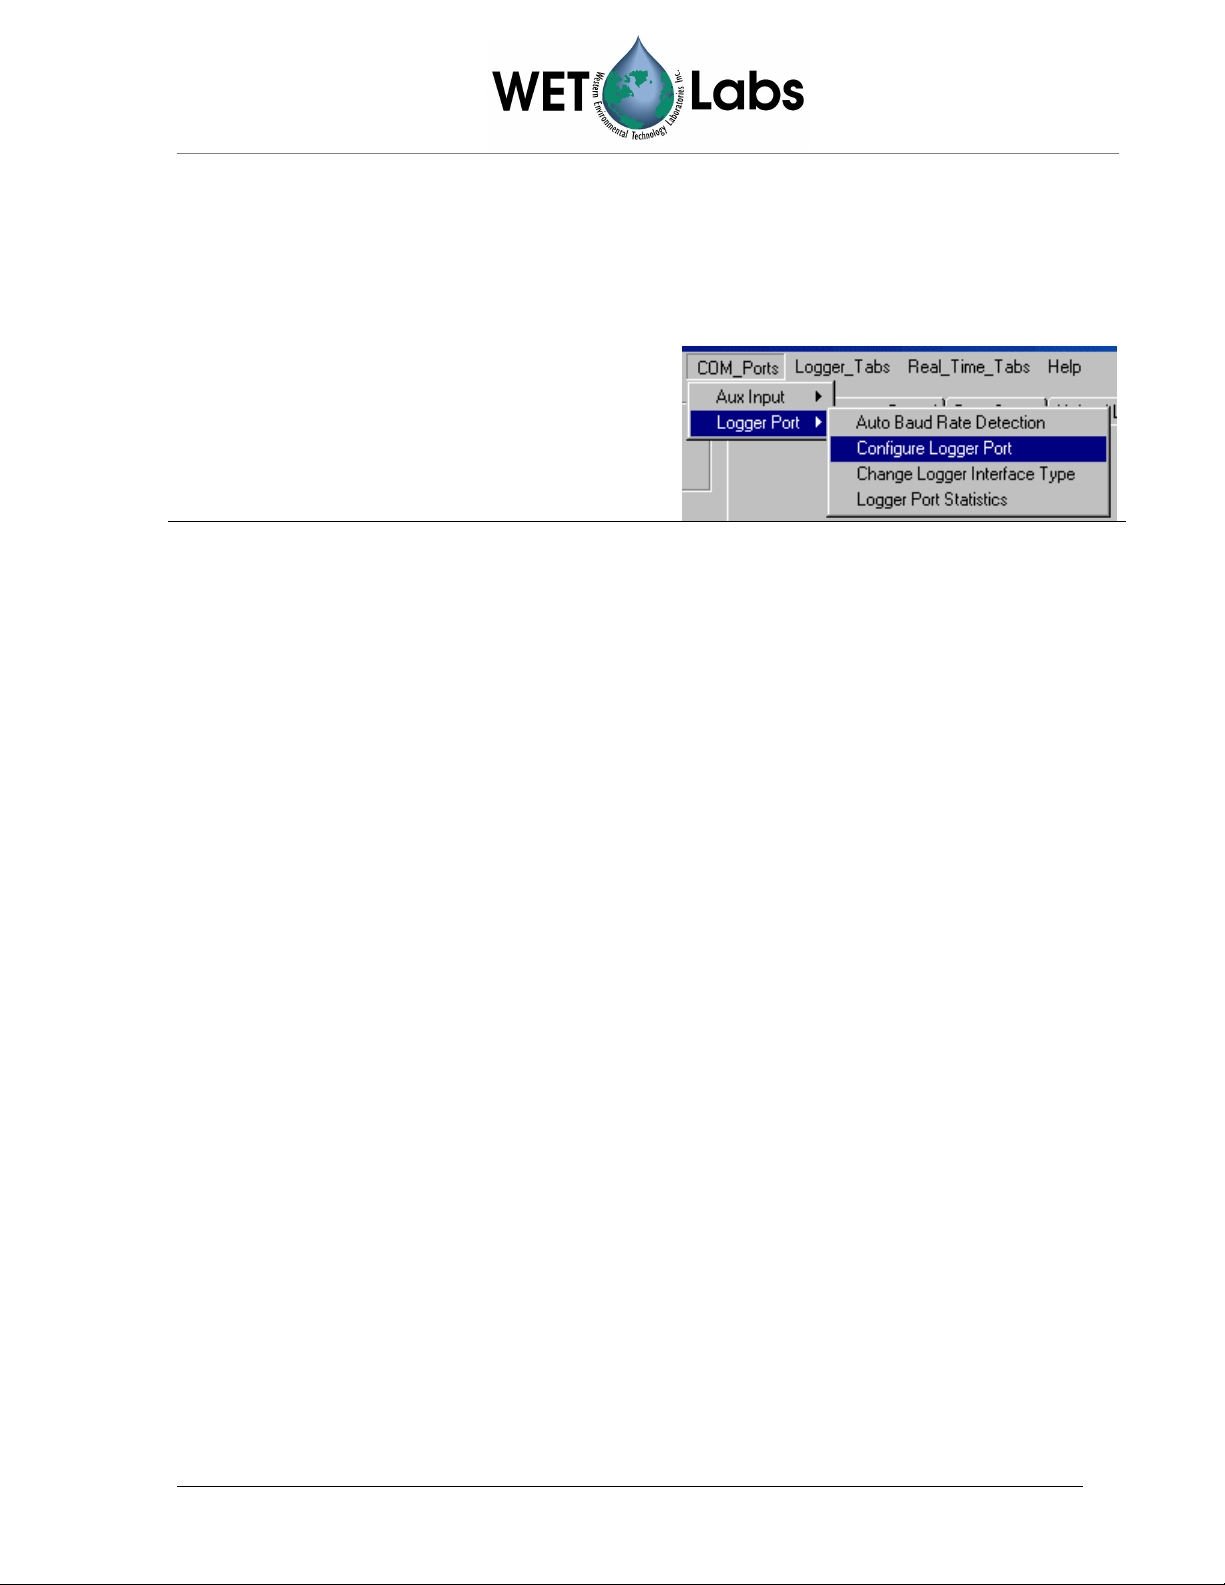
7. Select COM_Ports/Logger Port/
Configure Logger Port from the pulldown menu. Deselect the COMM port
(No Port Selected) in the resulting
window. Minimize WL Host. Power
down the AC9+, wait a few seconds
and power it back up (cycle the power).
8. Run WETView. When the interface is displayed, you will need to provide a .DEV file
name. Click on the <O> button in the center top of the screen or choose Open Device
File from the File menu at the top left of the screen. The program will ask you to choose
the proper COMM port. Select the appropriate COMM port.
Note
WETView supports COMM1 through COMM4 only.
9. Click on the center button or <F1> to start displaying data. After 5–10 seconds, tabular
data should be displayed on the right side of the screen. A real time graph will begin to
develop, depending on the graph parameters set at the time. Refer to the WETView
User’s Guide for details of running the WETView software.
ac-9 Plus User’s Guide (ac-9plus) Revision J 11 April 2006 3
Page 12
10. After a short time, again click on the center button that will stop the data collection and
ask for a file name to apply to the data if you should want to archive it. Press ESC if you
do not want to save the data. To quit the program, choose QUIT from the FILE menu. At
this point you have successfully completed a bench test of the instrument.
11. To reset the AC9+ communication with the WL Host:
a. Start the WET Labs Host program.
Go to Configure Logger Port and in
the resulting window, set the baud
rate to 9600 (BEFORE powering up
the AC9+).
b. Go to the Logger Control tab and power on the AC9+. When the status information
appears on the left side of the WET Labs Host tabs (counting down a delay time),
immediately press Stop on the Logger Control tab several times. If the ac-9+ is not
stopped before the delay time is finished, repeat the process (power down, power up,
click Stop a few times, wait for Standing By count to appear in the status area).
c. Once the AC9+ is successfully communicating with the WET Labs Host in Stand By,
change the Logger Control tab Mode of Operation back to Status and uncheck the
Start Sample When Powered box.
d. Press Send Setup and wait for the setting flags to clear (yellow to gray).
1.3 Air Tracking
We provide an air calibration (.CAL) file similar to the device (.DEV) file and can be applied
in WETView in the same manner. The .DEV file provides the clean water offsets so that
when measuring clean, fresh water, the instrument’s output should be very nearly 0.0 for all
channels. The .CAL file provides the offsets that provide 0.0 values when the instrument is
clean and dry and measuring air values. This is a useful tracking tool for catching instrument
drift, filter aging and improper cleaning.
When you installed WETView, the latest air .CAL file should have been transferred to your
WETVIEW directory. The name of the file takes the form:
AIRXXYYY.CAL where XX is the calibration number; YYY is the instrument number.
When a DEV file is opened in WETView, it will display *.DEV in the dialog box, which will
list all the DEV files on the default drive. If you change the *.DEV to *.CAL, the available
CAL files will be displayed. Select the latest CAL file and start collecting data. Make sure
the black plastic caps are installed on the flow tube nozzles so no ambient light can enter the
flow tubes. If the instrument is clean and dry, the values displayed in WETView should be
very close to 0.0 (within 0.005–0.01). If the values are within this range, the instrument is
clean and ready to deploy. If the values are outside this range, the first step is to re-clean the
instrument and then reapply the .CAL file offsets.
4 ac-9 Plus User’s Guide (ac-9plus) Revision J 11 April 2006
Page 13

1.4 Cleaning
1. Remove flow tubes and all O-rings. Remove the collars from the flow tubes. Wash with a
mild detergent diluted with distilled, reverse osmosis-filtered (RO) or de-ionized (DI)
water to gently wash all of the windows and rinse the flow tubes. Use Kimwipes or other
lint-free tissues to wash the windows. Rinse off the meter completely with water to
ensure no soap residue is left inside the flow tubes or on the windows.
2. Dry the meter. Place the instrument in a protected area where it can dry completely.
Using a small heater to blow warm air over the meter may help speed the process. Using
dry nitrogen to blow the meter dry and remove water from the small grooves around the
windows will also help speed the process. It is suggested that the instrument be left
overnight to dry out completely. Reassemble the meter. Carefully replace O-rings and
slide collars back on to the flow tubes. Replace O-rings around the windows.
3. Clean windows using a Kimwipe or lens paper. Place a couple of drops of methanol or
ethanol on the Kimwipe. With firm pressure, gently wipe the windows with methanol.
This should remove any visible streaks on the windows. If necessary, follow with a dry
wipe in one direction across the window face. Blow off any lint or dust with a dry air
source.
4. Clean the flow tubes by putting a few drops of methanol on a Kimwipe and, using a
wooden dowel rod, carefully slide the Kimwipe through the flow tube. Repeat this
procedure with both flow tubes. Examine each flow tube when you are through to ensure
there are no streaks or small pieces of lint left on the inside of the flow tube.
5. Dry the windows. Since small amounts of moisture can affect the air readings, it is
important to ensure the meter is completely dry. Using nitrogen to blow dry the windows
immediately before replacing the flow tubes works very effectively. This will remove any
water or methanol trapped in the small grooves around the window.
6. Replace the flow tubes. Carefully slide the flow tubes into place without sliding dirt
across the windows. Slide the sleeves up around the windows and over the O-rings,
making certain they are firmly in place and aligned correctly. Use small black caps, or
black electrical tape, over each of the nozzles on the flow tube to provide a dark
environment and to keep the meter clean and free of moisture while obtaining data.
7. Turn the meter on and allow it to warm up for at least 15 minutes. When the meter is
stable you should be able to collect 10 minutes worth of data and the values should not
vary more than 0.005 m-1 over the 10-minute time period.
8. Collect data. Record a one- to two-minute file and save data. Repeat steps 4–6 until you
can collect three data files, cleaning after each file, such that the average values for each
channel vary by no more than 0.005 m-1.
The meter is calibrated over a specific range of internal temperatures (refer to your
calibration sheet). If the meter’s internal temperature is higher than the maximum calibration
range, it may be operating out of spec. Setting the meter in a shallow pan of water (immerse
most of the lower can) can help keep the instrument cool. This process should be repeated
ac-9 Plus User’s Guide (ac-9plus) Revision J 11 April 2006 5
Page 14

until the air values are within specification. This may take three or more iterations but is very
important to be done carefully before taking your instrument to sea. The air calibration
procedure should be done again at the end of a cruise or data collection period to track the
instrument’s performance over time.
1.5 System Requirements
This section explains the basic system components necessary to operate the ac-9 Plus. If you
are using the instrument in a standard profiling configuration, you will generally need the
components described below. Other configurations, such as mooring and underway flowthrough systems, will require additional components such as battery packs, data loggers, antifouling canisters and/or de-bubblers. Test cables, software, and system configuration
engineering may be obtained by calling WET Labs. Alternatively, you will find additional
information about the various system components in the Technical Reference Section of this
manual. This manual concentrates on the use of the ac-9 Plus as an optical profiling
instrument.
The ac-9 Plus was designed for easy use. However, certain system requirements for power
and communication with the instrument must be met. More detailed information on most of
the system, the instrument, and data output format can be found in the Technical Reference
Section of this manual. Details about hooking the unit up and acquiring data are included in
this section.
Required system components include:
Instrument
The ac-9 Plus and its flow tube assembly form the basic optical sensor.
Pump
The flow-through system will typically require an ancillary pump in order to assure proper
operation. Pump requirements depend upon desired flow rates, required depth of operation,
power availability, and existing hardware.
Cabling
The ac-9 Plus requires a minimum of four conductors for power and RS-232 communication
or a minimum of eight conductors for power and RS-422 communication.
Power Supply
The ac-9 Plus requires a 10–18 VDC supply, capable of providing a minimum of 9 watts
continuous output. If a longer cable is used, power losses must be accounted for in
determining the power supply voltage and power requirements.
Serial Communications
Data from the ac-9 Plus is transmitted via RS-232 or RS-422 depending on the user’s
preference. Two-way communication via RS-422 is supported using a non-standard bulkhead
connector (at the user’s request). You must have a serial interface on your computer or data
logger capable of accepting the respective 232/422 data format from the instrument.
6 ac-9 Plus User’s Guide (ac-9plus) Revision J 11 April 2006
Page 15

Host/Data Logger
The ac-9 Plus can be interfaced to any computer or data logger capable of supporting a
19,200 baud rate serial interface. If you plan to use our WETView software acquisition
package you will need a Pentium® class IBM-compatible computer running Windows 95,
Windows 98 or Windows NT to support the software package.
Software
The WETView host software package interfaces directly to the ac-9 Plus via your computer
serial port. WETView allows real-time graphical visualization of the data in any of several
ways such as a function of time, depth or wavelength. WETView automatically applies
calibration constants, temperature corrections and generates a tab delimited ASCII text file
that can be imported into programs such as Excel or MatLab for post processing or
manipulation. The data output format of the ac-9 Plus is defined in the Technical Reference
Section of this manual.
1.6 Operating the Meter
1.6.1 Basic Power On
a. Check wiring of cable. Make sure the “+” lead of the test cable is connected to the
“+” terminal of your power supply. Make sure the “–” lead of the test cable is
connected to the “–” terminal of your power supply. Verify that your power supply is
providing between 10 and 18 VDC, and is rated for at least 2 amps. See section 3.1
for details of connector wiring.
WARNING
Power input on this unit is diode-protected from reverse polarity power-up, but
this is not 100 percent insurance against damaging the meter, nor will it protect it
from over-voltage.
b. Cable connections. The surface (dry) end of the cable should have terminations for
an RS-232 connection into the computer and leads that connect to a power supply.
Attach the power leads to a stable power source that supplies 10–18 VDC to the ac-9
Plus. Make sure the polarity is correct before switching on the power supply. Connect
the RS-232 connector to the desired serial port of the data collection computer. Plug
the submerged (wet) end of the cable into the ac-9 Plus. Applying a small amount of
silicone grease or equivalent to the base of the instrument bulkhead makes the plug
insertion easier and provides greater assurance of a good seal. Use a connector lock
ring if one is available.
c. Turn on power supply. To verify basic operation when not hooked directly to a
computer, remove one of the flow tubes and, in a darkened environment, place a
white piece of paper into the beam path. You should be able to see the beam image on
the piece of paper. You should be able to hear a faint whirring of the filter wheel
motor if you place your ear directly against the lower can. If you neither hear the
motor nor see the beam, the unit is not working. In this case, check your connections
and your power supply. If the instrument still does not run, you may want to seek
technical assistance from the factory.
ac-9 Plus User’s Guide (ac-9plus) Revision J 11 April 2006 7
Page 16

d. For optimum stability allow the instrument to warm up for 3–5 minutes before
acquisition. While this is not an absolute requirement, the instrument’s electro-optics
are subject to an initial stabilization period.
1.6.2 Assembly Check Out
Prior to any actual in-water profile, it is recommended that the Plus assembly be checked
out by collecting data with the Plus connected to the host computer to insure all electrical
connections are sound.
If possible, immerse the pump in water (i.e. in a water-filled bucket), run a profile with a
delay of 1 minute, a meter warm up of 1 minute, flush for 10 seconds, and sample data
for 1 minute. If it is not possible to immerse the pump in water, change the port setup to
have the pump off. As the meter is being checked during the warm up period, it is not
necessary to complete the drop to check the Plus assembly’s electrical connections.
WARNING
Do not run the pump dry. The pump will be damaged!
During the assembly check out:
• Check that the Meter Status during Meter Warm Up, Flush, and Sample is OK.
• If running the pump, check that the pump starts and its operation appears normal.
• Check that Log Status is OK.
Check that there is sufficient free disk space for the upcoming profile. The data storage
requirements for each minute of data collection will vary depending on the instruments
that are connected to the ac-9 Plus. To estimate the maximum ac-9 Plus’s run time, take a
1-minute sample with all instruments turned on. After the sample is completed, check the
file size under the “Upload” tab. Divide this number into the total flash disk size to
determine the total minutes the Plus will run.
Caution
After the assembly checkout is finished, be sure to load/reload the desired profile to the
Plus using “Send Setup” button.
1.6.3 Mounting Meter
ac-9 operation is optimized for a vertical to forty-five degrees off-vertical orientation
with the bulkhead connector facing upward (Figure 1). If your application requires a
horizontal mounting, take care to provide proper pump priming and to avoid trapping air
bubbles in the flow tubes. This can be accomplished by taking the system to a depth of 20
meters and allowing the required in-water warm up period to occur at depth. This helps
the pump to prime properly and compresses small air bubbles, allowing them to be
expelled from the ac-9.
In addition, operating the instrument in the horizontal position could potentially cause
small variations in the meter’s response due to the different orientation of the filter
wheel’s rotational plane. Therefore, we recommend that both air and water calibrations
be done in the orientation in which the meter will be deployed to obtain the best results.
8 ac-9 Plus User’s Guide (ac-9plus) Revision J 11 April 2006
Page 17

Figure 1. ac-9 Plus mounting positions
Specific mounting instructions will depend upon implementation of the sensor. To assure
long term instrument integrity and optimum operation, observe the following basic
procedures:
a. Do not make direct contact between the ac-9 Plus pressure housing and a metal
frame or hose clamp. The ac-9 Plus is available in one of two pressure-housing
materials. Aluminum is used for full ocean depth rated units and an acetal copolymer
plastic is used for the standard units rated to 500 meters. The aluminum housing is
hard anodized with a special plastic impregnation to assure minimum corrosion
damage and to provide electrical isolation from the aluminum housing and its
surrounding environment. However, metal-to-metal contact with the housing can
damage this coating and result in possible corrosion of the pressure case. We
recommend a neoprene spacer between the unit and its frame or clamp. At the very
least, any contact area should be taped carefully to assure mechanical and/or electrical
isolation.
b. Do not apply torsional stress to the instrument housing. The optical path is
encased in a rigid housing, but is still subject to distortion if the unit is subjected to
undue stress. The instrument has a delicate optical path that is subject to
misalignment if stress is applied unevenly to the upper and lower cans. Make sure the
unit is mounted on at least two points and that neither point is a stress point.
c. Make sure you have provided for an unobstructed upward flow through the flow
chambers and the pump (Figure 2).
ac-9 Plus User’s Guide (ac-9plus) Revision J 11 April 2006 9
Page 18

Figure 2. Proper connection of ac-9 Plus flow tube
1.6.4 Deployment Tips
The following suggestions will help you obtain the highest quality data from your ac-9
Plus:
• The instrument is extremely sensitive and should be handled carefully.
• A sturdy shipping/transport container should be used to transport your instrument to
the field. The instruments are sturdy, but the optics can be jarred out of alignment
when subjected to shock.
• The data will be adversely influenced by bubbles, dirt or grease in the flow path or
misalignment of the flow tubes. Make sure that the flow tubes, pump tubing and
screens are free of dirt and grease. Clean with ethanol or warm soapy water. Rinse
with clean tap or distilled water. Do not allow water to dry on the windows as this
will leave a residue that may be hard to remove.
• Secure the ac-9 Plus to a sturdy cage or lowering frame that will protect the
instrument from striking the deck, ship’s side, or sea bed. Use a dielectric isolator
(rubber sheeting or thick tape) to isolate the instrument’s aluminum case from the
steel cage.
•
When clamping the instrument to the cage, make certain no torsional stresses are
applied. Even slight wracking of the instrument can alter the beam alignment. This
will severely degrade the data quality, especially on the ‘c’ side, which requires an
extremely tight alignment tolerance.
10 ac-9 Plus User’s Guide (ac-9plus) Revision J 11 April 2006
Page 19

•
Once every couple of days, take a data file in air to track any instrument drift. This
procedure is outlined in Section 4.5. The instrument must be very clean and
completely dry in order to achieve an accurate air calibration measurement. Using
compressed dry nitrogen or oil-free dry air to blow the instrument’s flow tubes and
windows dry will speed the drying process.
• Upon deployment, the instrument should be lowered to just below the water’s surface.
Turn on the instrument and pump and check to ensure that the pump has primed and
is operating properly. Lower the package to a depth of 10–20 meters. Run the
instrument for 3–5 minutes to allow the motor controller to stabilize, the flow tubes to
clear and the instrument to begin to equilibrate with the water temperature.
• After the warm up period, raise the package to just below the surface and begin data
collection. The initial depth will be dependent on the natural surface conditions and
the amount of bubbles that the ship itself is generating. Steadily lower the cage
through the water column.
• The upcast can proceed immediately after the downcast. It is the user’s choice
whether to open a new data file for the upcast or include the down and upcast data in
a single file.
• Once the cage is back to the just below the surface, stop the data collection to turn off
the pump. Carefully bring the cage on deck and lash it down. Give the cage and
instrument a fresh water wash down after every cast. If this is not practical, wash the
instrument at the end of each data collection day. Holding a hose (low pressure) over
the pump discharge port will flush the tubing and the flow tubes. Rinse the flanges
and connectors. If leaving the instrument on deck for more than a few minutes, cover
the cage with a tarp to avoid over-heating the instrument due to solar insolation. At
the end of each data collection day, remove the tubes and carefully clean and dry both
the flow tubes and windows. Failure to flush the instrument with fresh water may
cause corrosion damage over time.
• For further information on deployment techniques, see the ac-9 Plus Protocol document.
1.6.5 Care and Maintenance
Built for field deployment, the ac-9 Plus requires minimal maintenance. However,
following these simple recommendations will assure optimum data integrity as well as
longer instrument life.
After a field deployment of the ac-9 Plus you should clean the instrument prior to storage.
Refer to Section 1.4 for detailed cleaning procedures. The following steps will help
prolong the life of the instrument:
a. Pressure housing: Begin with a thorough rinsing of the unit and its flow tubes with
fresh water. If a dummy plug for the connector is available, install it on the main
bulkhead connector before flushing the instrument. After rinsing, towel-dry the
pressure housing and remove the flow tubes.
ac-9 Plus User’s Guide (ac-9plus) Revision J 11 April 2006 11
Page 20

b. Windows: The windows should be cleaned with dilute soapy water, followed by ethyl
alcohol and should receive a final rinse with distilled or reverse osmosis-filtered water.
This will remove any fingerprint oil, grease or other contaminants from the windows.
Use lint-free lens cleaning paper to avoid scratching the windows or detectors.
WARNING
Do not use acetone on the windows. It will damage the window holders.
c. Flow Tubes: The flow tube assemblies are integral to the optical behavior of the ac-9
Plus. They are optical components that help produce a very precise measurement, and
thus they need to be dealt with accordingly. Before using, inspect both tubes and
make sure they are free of stains and dust. The reflective flow tube for the absorption
measurement operates using the principle of internal reflection. To maintain its
reflective properties, it requires a thin air gap between the outer wall of the quartz
tube and the inner wall of the surrounding sleeve. The reflective tube should be
periodically checked for leaks. To determine if the tube is maintaining its reflective
properties, immerse it in water and point towards a fairly light background. The
inside of the tube should appear uniformly bright. If the tube has leaked, call the
factory for repair instructions or tube replacement.
To clean the absorption path’s reflective tube, carefully plunge an alcohol-soaked
tissue through the tube, and rinse thoroughly with distilled water. Whenever plunging
a tissue through the tube, use a wooden or plastic dowel to prevent scratching the
sides of the tube. After rinsing, dry the tube either by blowing dry nitrogen through it
or by plunging a soft tissue. The attenuation path flow tube is virtually maintenance
free, except for occasional cleaning. Follow the same basic procedures supplied for
cleaning the absorption path tube. Remove the flow tube sleeves when drying the
flow tubes.
Storage: The ac-9 Plus should be stored and transported in a shock-protected
environment. Typically, units are shipped in a sturdy wooden crate. Using the crate
will assure that you can safely transport the instrument, providing it is handled in a
reasonably careful fashion.
12 ac-9 Plus User’s Guide (ac-9plus) Revision J 11 April 2006
Page 21

2. Instrument Description
This section provides a general description of how the ac-9 Plus operates. It provides a general
discussion of the primary instrument configuration as well as a description of the optical and
electronics system.
2.1 Instrument Overview
Figure 3 shows a diagram of the ac-9 Plus. The unit consists of two pressure housings
separated by a stand-off. The shorter of the two pressure cylinders houses the light sources,
filter wheel, and transmitter optics. The longer of the two cans houses the receiver optics and
the control and acquisition electronics for the unit. The absorption and attenuation beam
paths and flow tube assemblies are between the receiver and transmitter housings. Power to
the unit and signal out of the unit are provided via the bulkhead connector at the end of the
long (receiver) housing.
ac-9 Plus User’s Guide (ac-9plus) Revision J 11 April 2006 13
Page 22

Figure 3. ac-9 diagram (ac-9 Plus diagram pending)
14 ac-9 Plus User’s Guide (ac-9plus) Revision J 11 April 2006
Page 23

2.2 Optics
The ac-9 Plus performs concurrent measurements of the water’s attenuation and absorption
characteristics by incorporating a dual path optical configuration in a single instrument. Each
path contains its own source, optics, and detectors appropriate to the given measurement. The
two paths share a common filter wheel, control and acquisition electronics. For purposes of
description, we refer to the beam performing the attenuation measurement as the c beam
(Figure 4) and the beam used to make the absorption measurement as the a beam (Figure 5).
2.2.1 c Beam Optics
1 Lamp 6 Beam splitter
2 1 mm aperture 7 Reference detector
3 6 mm aperture 8 6 mm quartz pressure window
4 38 mm singlet lens 9 Flow tube
5 Interference filter 10 30 mm singlet lens
11 Signal detector
Figure 4. Optical Path Configuration for c beam
Light from a DC incandescent source passes through a 1 mm aperture. The light is then
collimated with a 38 mm lens followed by a 6 mm aperture. The collimated light passes
through bandpass filters mounted upon a continuously rotating filter wheel, creating a
narrow band spectral output. The filter wheel holds nine 12.5 mm diameter, 10 nm full
width half maximum (FWHM) filters that are spaced around the perimeter at
approximately a 3:1 ratio with associated blank spaces. This configuration provides a
chopped output for the detectors, which compensates for temperature coefficients in the
detector and amplifier circuitry as well as providing low-level ambient light rejection.
Once the light has passed through the filter wheel, the beam passes through a beam
splitter, creating a primary beam and a reflected beam. The reflected beam intensity is
measured by a reference detector. Using a ratiometric scheme with the reference and
signal detectors, we compensate for long-term lamp drift. The primary beam then passes
through a pressure window into the sample water volume.
ac-9 Plus User’s Guide (ac-9plus) Revision J 11 April 2006 15
Page 24

A flow tube encloses the water path. Scattered light that hits the blackened surface of the
flow tube is absorbed and therefore does not contribute to the measurement of transmitted
intensity. Light radiated through the flow path is therefore subject to both scattering and
absorptive losses by the water.
Once through the water path, the light passes through another pressure window and then
is re-focused through a 30 mm lens upon a receiver detector. A 1 mm aperture is placed
directly in front of the detector, creating a 0.75-degree acceptance angle in water.
2.2.2 a Beam Optics
1 Lamp 6 Beam splitter
2 1 mm aperture 7 Reference detector
3 6 mm aperture 8 6 mm quartz pressure window
4 38 mm singlet lens 9 Reflective flow tube
5 Interference filter 10 Diffuser/Signal detector
Figure 5. Schematic Representation of a beam optics
The a-beam and c beam optics are similar. The a beam light is 45 degrees out of phase
from that of the c beam. Beam splitter optics and aperturing of the beam are identical
with the c beam source optics.
The sample water volume is enclosed by a reflective flow tube. Light passing through the
tube is both absorbed by the water itself and by various pigments contained in particulate
matter within the sample volume. Forward scattered light is reflected back into the water
volume by the reflective tube. The light is then collected by a diffused large area detector
at the far end of the flow tube.
The flow tube uses the internal reflection principle in reflecting light back into the water
volume. A clear quartz tube is employed. The outer perimeter of the tube is enclosed by a
thin annular volume of air. Using the Fresnel Equation, one can see that with an index of
refraction of 1.33 in water and index of refraction of 1 in air, the total internal reflection
is achieved to 41.7 degrees with respect to the optical axis.
With our deep units (or upon request) we employ an aluminized flow tube with an oilfilled gap that provides pressure equalization over the rated depth of the instrument.
16 ac-9 Plus User’s Guide (ac-9plus) Revision J 11 April 2006
Page 25

2.3 Electronics
The primary electronic components of the spectral absorption meter include a DC/DC
converter power supply, motor regulation circuitry, an optical encoder mounted on the motor,
amplification circuitry for the detectors, an analog-to-digital converter, and a microprocessor
controller. The filter wheel spins continuously at a nominal rotation speed determined by a
pulse-width modulation circuit. The encoder breaks down a single rotation of the wheel into
512 steps. The position information from the encoder is then read by the controller. Signals
from the detectors are amplified by a single stage current to voltage operational amplifier
configuration. After a post gain stage used for signal level shifting, the signal is digitized by
an 18-bit digital signal processing analog-to-digital converter (A/D). The A/D continuously
samples the detector signals at a rate of 80 kilosamples/second. Its output is sent serially at 4
Mbaud to the controller. The controller watches the encoder output to determine when to
begin reading the A/D. Once sampling begins, the controller collects and averages
approximately 100 readings as a given filter scans through the light beam. The encoder once
again indicates when to stop sampling and the controller then begins processing the new data.
This cycle is repeated for each filter and associated blank space through the rotation of the
wheel. Processed data from the instrument is then sent serially in a binary format to a host
data-logging unit.
2.4 Pressure Housing Material
The ac-9 Plus is housed in a robust pressure can made from either acetal copolymer (500
meter depth rating) or type 7075 aluminum (6,000 meter depth rating).
2.5 Signal Processing
The purpose of the ac-9 Plus signal processing circuitry is to take a raw optical signal and
make it into a physically meaningful measurement ready for output. Signals from the
absorption path and attenuation path detectors go through several levels of analog and digital
processing before they are registered as output from the unit. To understand the exact nature
of signal processing, it is first necessary to better understand the primary data sampling.
Figure 6 is a timing representation of the ac-9 Plus signal sampling through a single filter
wheel rotation, so that each of the nine interference filters are brought in line with the optical
path once per revolution.
Figure 6. Acquisition Timing
ac-9 Plus User’s Guide (ac-9plus) Revision J 11 April 2006 17
Page 26

Trace one represents the optical signal from the absorption detector as the filter wheel spins
through its cycle. During the filter wheel rotation, signal output from the absorption detector
is continuously monitored and amplified through an analog current-to-voltage amplifier
circuit. The current-to-voltage amplifier serves as the primary gain stage for the signal.
Typical gains for the channels are set at 5 Mb. After the primary gain stage, the signal is
passed through two more analog stages for level shifting and voltage inversion. At this point,
the signal is ready for digitization. The Analog-to-Digital Converter (A/D) continuously
samples the incoming voltage level at a rate equal to approximately 80 kilosamples per
second. The A/D runs off its own clock and is, in effect, autonomous from the rest of the
system. The CPU determines when to sample the A/D.
Trace two shows the sampling periods in which the CPU obtains signal from the A/D. Input
from the motor encoder tells the unit when the source beam is either within a given filter’s
clear aperture or completely blocked. The CPU sampling period on the A/D is about 3 msecs.
It only samples in the middle of the filter’s aperture. This means that at a 6 Hz rotation speed
the CPU samples and averages about 100 samples per filter or blank per pass. Both the signal
and reference detectors are sampled simultaneously during this period. Once averaged, the
dark values are then subtracted from the raw light values in order to create a given datum
point:
Csig = Csig
Cref = Cref
light
light
- Csig
- Cref
dark
dark
The light sample period and the dark sample period are separated by 0.013- to 0.027-second
interval depending upon the rate of filter wheel rotation. This interval defines the limiting
frequency response of the electro-optical signal processing within the unit.
Trace three shows the analog signal from the attenuation detector. The absorption and
attenuation beams are located 45 degrees out of phase with respect to each other, in order to
provide optimum switching and sampling by the CPU. Trace four shows sampling of the
attenuation signal. Input from the primary gain stages is switched into the subsequent
processing stages by the CPU. Thus, processing for the ‘a’ and ‘c’ channels remains virtually
identical.
The CPU collects and buffers one revolution of raw signal data and then begins to output the
data as it is sampling the next revolution. Reference data is stored and accumulated for ten
revolutions, since its primary purpose is to compensate for long-term drift. After ten
revolutions, the reference channel data is sent along with a temperature reading, depth
(optional) and other status information.
18 ac-9 Plus User’s Guide (ac-9plus) Revision J 11 April 2006
Page 27

3. Calibration and Characterization
One can think of the ac-9 Plus as a single beam spectrophotometer whose output values are
related to a specific reference medium that is clean water. The instrument is calibrated to provide
a reading of 0.00 for each channel in clean fresh water. The offset value, determined during our
calibration process, is the number which, when added to the raw instrument output in clean
water, provides zeroes for all wavelengths with the meter at a specific temperature. This offset
value is referred to as N in the preceding sections. This is an important consideration for users
who want to compare data from other transmissometers that do not read 0.0 in clean water.
Therefore, the final output of the ac-9’s software is the absorption and attenuation with clean
water attenuation subtracted out.
3.1 Temperature Correction
Beyond confirming basic instrument operation and alignment, temperature corrections are
the first tests performed on the meter. Temperature corrections are requisite to all other tests.
Corrections are performed using WETView. WETView employs a correction algorithm that
uses multiple offset values,
temperature increments. Instrument values are collected and averaged every one to two
degrees Celsius through the operational temperature range of the instrument. From these
values we generate a table of temperature compensation offsets [
in each instrument’s device file. Using the table, WETView 5.0 then applies the algorithm
[a' = a
raw
–
∆
] for given temperatures in the table. For temperatures that fall between
Tn
table values, the program applies a linear interpolation upon the data for further
correction. By using this scheme, we can thus effectively compensate for non-linear
changes due to temperature in the instruments’ output.
∆
values obtained by measuring output differences over small
Tn
∆
]. This table is contained
Tn
3.2 Precision
Precision is determined by running the meter for an interval of time and determining the
standard deviation of the signal. We perform this measurement in air. With one-second
binning of the signals, nominal performance is approximately 0.001/m for a 25 cm path
instrument. Since the absorption or attenuation measurement is pathlength-dependent,
precision values increase approximately by a factor of 2.5 for the 10 cm pathlength
version of the ac-9.
It should be noted that both air value and water value measurements can be difficult to
perform. If running the tests in air, you must insure that the flow tubes and windows are
completely clean and dry. Do not allow any ambient light penetration into the cells. Use a
cap or black tape to seal the flow tube nozzle openings.
When operating the instrument in water, use clean water, free of bubbles, and do not exceed
flow rates of 1–2 liters per minute.
ac-9 Plus User’s Guide (ac-9plus) Revision J 11 April 2006 19
Page 28

3.3 Absolute Calibration
Absolute calibration of any underwater optical absorption or attenuation sensor is difficult as
there are no absolute standards that can readily be used. The most obvious choice for a
calibration medium, pure water, is difficult to obtain, is unstable once it is made, and its
absolute optical properties are not well known. Nevertheless, pure water is the baseline for all
oceanic property measurements. At WET Labs, we produce our calibration water with a
custom de-ionization and filtration system. After de-ionization, the water is processed by a
series of filters and held in a 60-liter reservoir that re-circulates through an ultra-violet
chamber and additional filters. Water for calibration is drawn through a final 0.01-micron
ultrafilter before being used. This system allows the highly reactive de-ionized water to
equilibrate, and the ultra-violet chamber prevents any biological contamination from entering
the reservoir.
A qualitative but surprisingly accurate test of water purity can readily be obtained using a
beaker and a small laser in a darkened room. By shining the laser through the water and
viewing slightly off axis to the impinging beam, one can readily detect scatterers in the
water. Try this first with some tap water. It will show you what to look for. Be very careful to
not look directly into the beam, and do not try this test with a high power laser. The pointing
lasers used in lectures work very well for this task. If you see more than one or two large
scatterers in the beam path, your water is unsuitable for a clean water calibration. WET Labs
and researchers from several institutions are presently developing methods for effective field
calibration and in-situ calibration techniques. We provide tech notes on these methods as
they are developed and validated.
3.4 Linearity and Dynamic Range
To determine linearity of the absorption and attenuation detection systems we first vary
scattering agent concentrations and plot apparent a and c. Typically, linearity in c throughout
the dynamic range is extremely high with a regression coefficient of 0.9999. Linearity in a
exceeds 0.998. Although this test doesn’t truly measure a it does give a good indication of
response. We have also tested linearity in a using an orange food coloring. Linearity in the
blue channels was on the order of 0.999. The red channels showed very little change due to
the food coloring. If you try this test in the lab, use a dye not likely to permanently stain the
receiver. A Japanese researcher has reported good results using Japanese green tea.
The scattering tests and dye tests also enable us to determine the instrument’s dynamic range.
We determine dynamic range by dividing the response range for a given channel that exceeds
a regression coefficient of 0.998. This relatively conservative criterion provides a worst-case
dynamic range of about 16,000 to 20,000 in a
channels exceeds 20,000. The worst-case c dynamic range is typically c
. The dynamic range of all other absorption
412
, which is about
412
50,000. That of the other c channels exceeds 100,000.
3.5 Air Calibration and Tracking
During the factory calibration, clean water values are obtained and used to correct the
meter’s output. We then thoroughly dry the meter and record air values. We supply these
values with the calibration page shipped with each meter. These air values represent the
effective measurement of air for a calibrated instrument. This means that if the instrument
20 ac-9 Plus User’s Guide (ac-9plus) Revision J 11 April 2006
Page 29

user cleans the windows and flow tubes and makes an air measurement and that if the air
measurement matches the factory supplied air values, then resulting clean water
measurements should provide zero values. Equally important—if the air values taken in the
field differ from factory air values, then that difference may be applied as a correction factor
to the original water calibration values contained in the DEV file:
a’
clean
= a
clean
+ (a’
air
- a
) (1)
air
where:
a
a’
a
a’
is the clean water offset value supplied with the ac meter
clean
is the corrected clean water offset
clean
is the factory supplied air value
air
is the field obtained air values
air
Alternatively, the offset air value difference can be applied directly to the data as a post-
processing step. Obtaining air values in the field is a much more straightforward process than
obtaining clean water values. This is a powerful technique that can track and compensate for
instrument drift and filter aging. Care must be taken when implementing this technique since
a drop of water or smudge on the windows will result in a reading quite different from the
factory air values. This difference might be interpreted as instrument drift. By iterating this
process several times (re-cleaning the instrument and obtaining a new set of air values), you
will gain experience in differentiating true instrument drift from smudged optics.
Caution
Back up the factory .DEV file before making any modifications to it.
Effective air calibration requires:
1. The instrument’s optical path is clean and dry.
2. The instrument’s optical path is completely shielded from ambient light.
To perform air tracking we recommend the following basic procedures.
a. Remove flow tubes and clean and dry completely. Remove the sleeves from the flow
tubes to assure there is no trapped moisture. Allow the flow tubes to sit in a dry
environment with good air flow.
b. Clean and completely dry the optical windows of the instrument. If the optics have not
been cleaned for some time, clean with a mild solution of detergent and distilled water,
rinse, and wipe dry. Follow with a single wipe across each window with an ethanolsoaked lens tissue (or other low water content alcohol-type solvent) and then a single
wipe with a dry tissue. If the windows are already fairly clean, simply use the ethanol
wipe procedure. You may wish to apply a stream of pressurized air or nitrogen around the
windows to force moisture from the window mount.
WARNING
Beware of using standard air compressor air. It can blow oil all over the optics.
c. Allow the unit to sit open for an hour or two to assure that it dries.
ac-9 Plus User’s Guide (ac-9plus) Revision J 11 April 2006 21
Page 30

d. Turn on meter and allow it to warm up about 15 minutes.
d. Reassemble and insert flow tubes.
e. Block ambient light from the flow tube entrances and obtain values using WET View or
your own custom program. Record and save about 5 minutes worth of data. Examine
your data in a spreadsheet. At one second binning (6 samples) the data should maintain a
standard deviation of 0.001 m-1 or less. If you have a substantial slope to the data over the
acquisition period your meter may have some residual moisture in the flow tubes or on
the windows. If the optical path isn’t getting dry, use a small flow of dry nitrogen through
the tubes while sampling.
f. Remove flow tube and re-clean the windows. The single wipe technique with ethanol will
work fine at this point.
g. Repeat steps D–F until mean values stabilize over three cycles. Use these values as air
calibration values.
22 ac-9 Plus User’s Guide (ac-9plus) Revision J 11 April 2006
Page 31

4. Specifications
Mechanical
Size 30.1 x 4.1 in diameter (76.5 x 10.25 cm diameter)
Weight in air: 14.5 lbs (6.6 kg); in water: 4.5 lbs (2.0 kg)
Pressure housing Acetal copolymer
Environmental
Temperature range 0–30 deg C
Rated Depth 500 m
Pressure sensor optional
Electrical
Serial Input Ports 3 (standard)
Input 10–16 VDC
Current Draw 0.85 Amps @ 12V nominal; 50 mA logger standby
Output RS-232 or RS 485
Sample Rate 6 scans/sec (nominal)
Optical
Spectral Range 410 nm–715 nm
Bandpass 10 nm/channel
Pathlength 25 cm (10 cm upon request)
Beam cross-section 8 mm diameter (nominal)
Linearity > 99% R
Output wavelengths 9
Accuracy +/- 0.01 m
Precision +/- 0.003 m-1 @ 6 Hz; +/- 0.001 m
0.0012 m
Dynamic Range 0.001 to 10 m-1
Data Handling
Instruments ac-9 (internal), CTD, other optical instruments (external)
Interfaces Digital (RS-232)
Memory 128 Mb standard (up to 192 Mb available)
Host Interface Windows 95 and up graphical
2
-1
-1
max. @ 4 Hz
-1
@ 1 Hz; +/- 0.005 m-1 typ.,
4.1 Connectors
The standard ac-9 Plus uses the connectors shown below. Custom connector configurations
will have a connector-specific sheet showing bulkhead connectors.
The ac-9 Plus has the following external connections:
1. Host port/Power input
2. RS-232 serial Port 1
3. RS-232 serial Port 2
4. RS-232 serial Port 3
5. RS-232 serial Port 4
ac-9 Plus User’s Guide (ac-9plus) Revision J 11 April 2006 23
Page 32

Figure 7. Plus connectors
24 ac-9 Plus User’s Guide (ac-9plus) Revision J 11 April 2006
Page 33

Figure 8. Sea/test cable connector pin and socket arrangements
1 Common
2 RS-232 RX
3 Reserved
4 Voltage in 10–18 VDC
5 RS-232 TX
6 Reserved
Sea/Test Cable Connector Pin or Socket Function
Figure 9. RS-232 pin and socket connections (2)
RS-232 Connector Pin or Socket Function
1 Ground
2 V+
3 RS-232 RX
4 RS-232 TX
Pump Power Cable Connector Pin or Socket Function
1 Ground
2 V+
3 N/C
4 N/C
ac-9 Plus User’s Guide (ac-9plus) Revision J 11 April 2006 25
Page 34

1 Ground
2 V+
3 N/C
Figure 10. Battery-in connector pin and socket arrangements
Battery In Connector Pin or Socket Function
4.2 Power Requirements
Voltage input: 10–18 VDC
Power Requirements (may differ by +/- 10 percent):
Lamp 1 2.5 watts
Lamp 2 2.5 watts
CPU board 2.0 watts
Other electronics 0.5 watts
DC/DC converter 1.5 watts
TOTAL 9.0 watts
26 ac-9 Plus User’s Guide (ac-9plus) Revision J 11 April 2006
Page 35

Appendix A: Pressure Sensor Use and Care
A pressure sensor is available as optional equipment on the ac-9 Plus. It is mounted in the top
flange next to the electrical connectors (Figure B1).
Figure B1. Pressure sensor on end flange
A plastic fitting and capillary tube, both filled with silicone oil, provide a buffer between the
pressure transducer and seawater. The transducer is both sensitive and delicate. Following the
procedures below will ensure the best results and longest life from your pressure sensor.
Pressure is transmitted from the water to the stainless steel transducer diaphragm via a capillary
tube filled with silicone oil. The inert silicone oil protects the pressure sensor from corrosion,
which would occur after long exposure to salt water. The capillary tube will generally prevent
the oil from escaping from the reservoir into the water. However, you may occasionally wish to
ensure that oil remains in the reservoir on top of the transducer.
WARNING
Never touch or push on the transducer.
ac-9 Plus User’s Guide (ac-9plus) Revision J 11 April 2006 27
Page 36

WARNING
Never attempt to fill the reservoir except by the procedure below.
Refilling procedure:
1. Thoroughly clean the top of your instrument.
2. Completely remove the white nylon Swagelock fitting using a 9/16 wrench.
3. Add silicone oil (Dow Corning DC200, supplied) to within 1/16 of the top of the threaded
cavity.
4. Wipe clean the o-ring at the base of the Swagelock fitting.
5. Hold a tissue over the end of the capillary tube.
6. Screw the Swagelock fitting into the end flange until finger tight.
7. Tighten it an additional 1/8 turn using a wrench only if necessary.
8. Wipe up any excess oil that may have squirted out of the capillary tube.
Hints
• If you can see drops of oil in the capillary tube, refilling is unnecessary.
• Rinsing the instrument with fresh water will help keep the tube end open.
28 ac-9 Plus User’s Guide (ac-9plus) Revision J 11 April 2006
Page 37

Revision History
Revision Date Revision Description Originator
A 6/21/01 New document (DCR 122) D. Romanko
B 01/09/02 Add deep unit weights (DCR 176) A. Derr
B1 09/24/02 Update references to software and bulkhead
connectors (DCR 244—pending approval)
C 09/27/02 Update references to software and bulkhead
connectors (DCR 244)
D 12/12/02 Update manual, remove WET Labs Host software and
RS-485 references (DCR 264)
E 01/29/03 Update pressure housing length, move pressure
sensor location and remove “off” switch hole on end
flange (DCR 268; ECN 162)
F 4/7/03 Add Host software setup procedures, RS-422 detail
(DCR 290)
G 2/27/04 Delete Optional Connectors Appendix (DCR 376) D. Hankins
H 6/29/04 Update specifications (DCR 401) D. Stahlke
I 1/13/06 Clarify warranty statement (DCR 481) A. Gellatly, S.
J 4/10/06 Update Section 1.2 to refer to WL Host 7.03a. Change
references “ac-9+ host” to “WET Labs Host.” DCR 493
D. Stahlke
D. Stahlke
D. Stahlke
A. Derr
D. Stahlke
Proctor
D. Stahlke
ac-9 Plus User’s Guide (ac-9plus) Revision J 11 April 2006
 Loading...