

Page 1

WeTelecom WMR-100 Mini Hotspot
Quick Set Up Guide
Page 2
1
TABLE OF CONTENTS
Getting Started ……………………………………………………………………….…….3
1. Minimum Requirement ………………………………………………….………..3
2. About WMR-100 Mini Hotspot …………………………....…………….………..3
3. LED State ……………………………………………………………….…...……..4
4. Insert RUIM card and Battery, and charge the battery ...………….…………..5
5. Wi-Fi Mode Connection …………………………………………….…………….6
6. USB Modem Mode Connection…………………………………….……………9
Important Notice …………………………………………………………………………..10
Battery Use and Removal ………………………………………………………………..11
Safety Hazards ……………………………………………………………………………11
Product Specification …………………………………………………………………….12
Page 3
2
Copyright © 2011 WeTelecom Co., Ltd.
1. Trademarks
and WeTelecom are trademarks of WeTelecom Co., Ltd. All other
trademarks mentioned in this manual are the property of their respective holders.
2. All Rights Reserved
No part of this manual may be reproduced or transmitted in any form or by any
means without prior written consent of WeTelecom Co., Ltd.
3. Notice
The information in this manual is subject to change without notice. Every effort has
been made in the preparation of this manual to ensure accuracy of the contents, but
all statements, information, and recommendations in this manual do not constitute
the warranty of any kind, expressed or implied.
4.Manufacturer
WeTelecom Co., Ltd.
The’O Plus #1604
Sanbon-dong, Gunpo City, Kyunggi-do, KOREA
Phone : +82-70-8699-3873
5. The WMR-100 Package
WMR-100 Mini Hotspot
Lithium Ion Battery
AC Travel Adaptor
MicroUSB Data Cable
User Manual CD
Quick Start Guide
Warranty Card
Page 4
3
Getting Started
1. Minimum Requirement
1.1. Hardware
PC/Notebook at speed of 300 MHz or higher.
Wireless LAN essential Required, 802.11 b/g/n 2.4GHz.
Recommend to use 128MB RAM or higher
At least 100 MB of free hard disk space is required.
Motherboard or PCI card that supports USB.
1.2. Operating System
Windows® XP Home/Professional with Service Pack 2
Windows® 2000 with Service Pack 4
Windows® Vista / 7 32bits/64bits
Mac OS 10.4 or higher
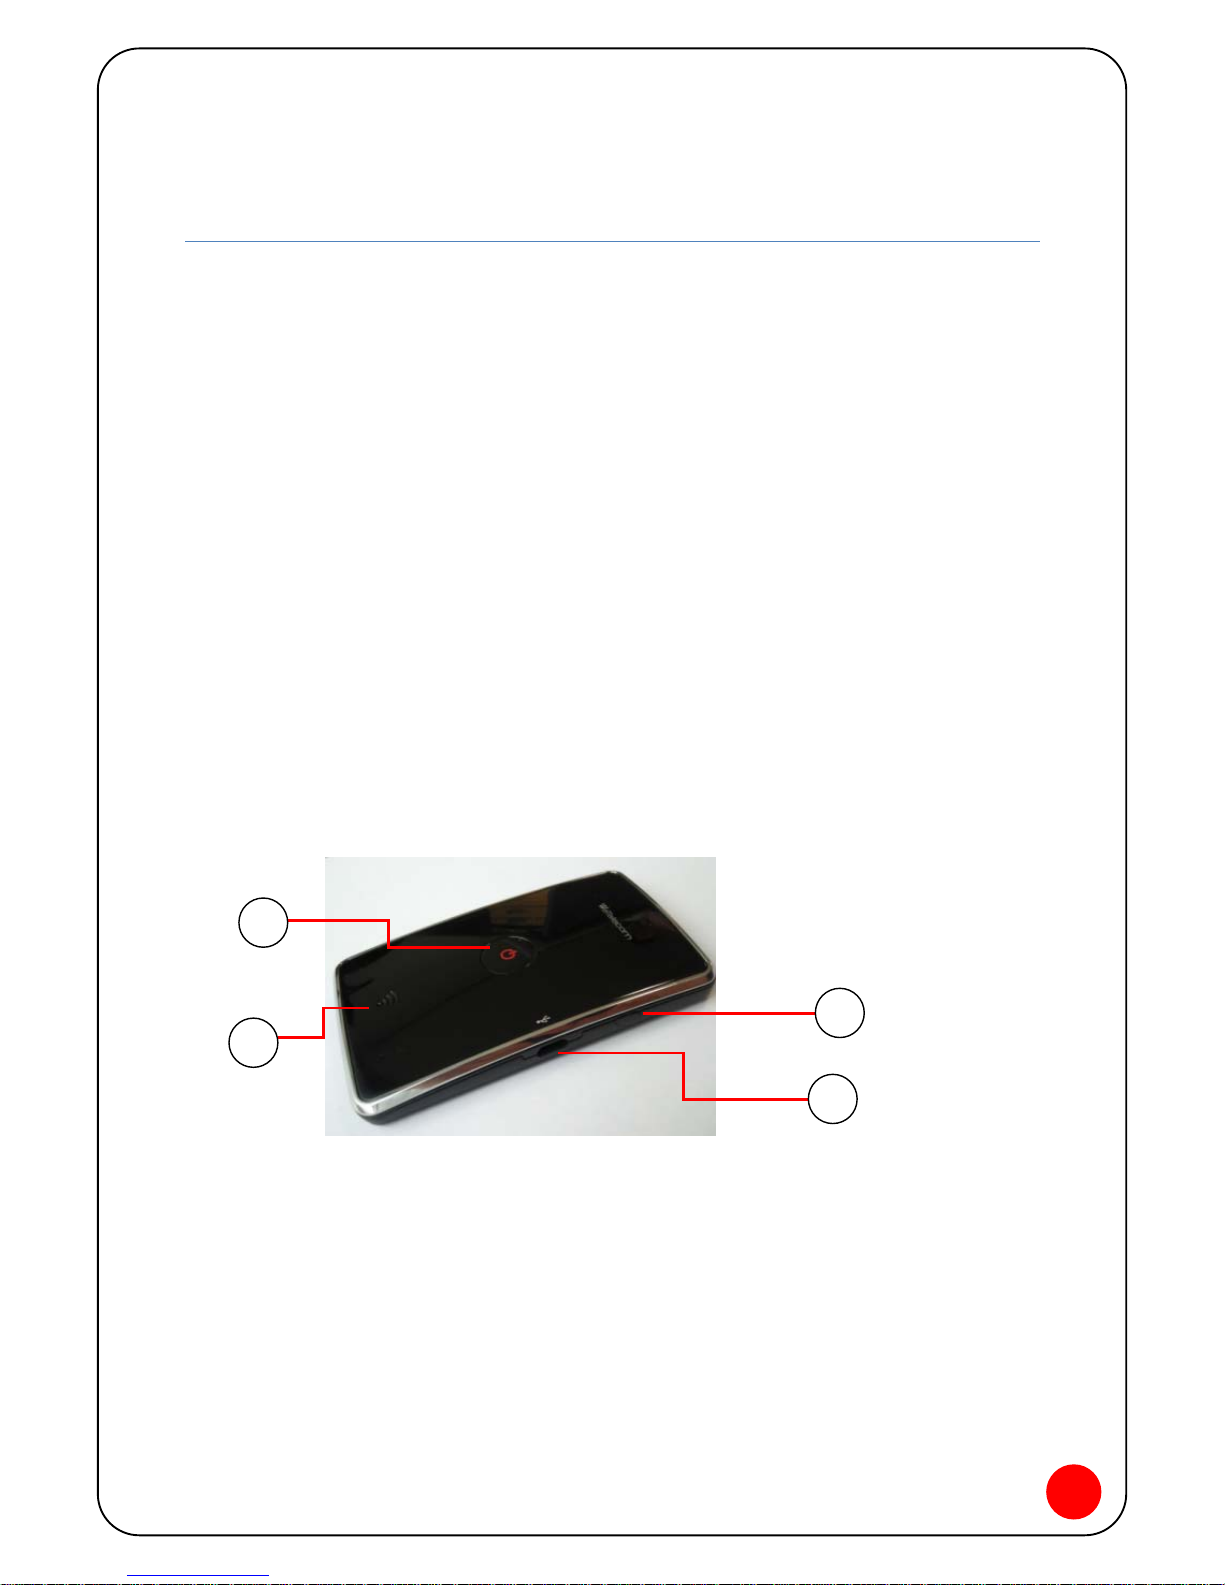
2. About WMR-100 Mini Hotspot
① Power Button and Status Indicators
Turn the device power on and off
Indicate power , battery and CDMA communication activities.(See page 9 for
Power Button LED description)
② Wi-Fi Router Status Indicator
Indicates Wi-Fi Router status.
2
4
3
1
Page 5
4
③ External Antenna Connector
Enables you use external antenna for better antenna performance.
④ MicroUSB Connector
Connects with MicroUSB data cable, AC Travel Adaptor.
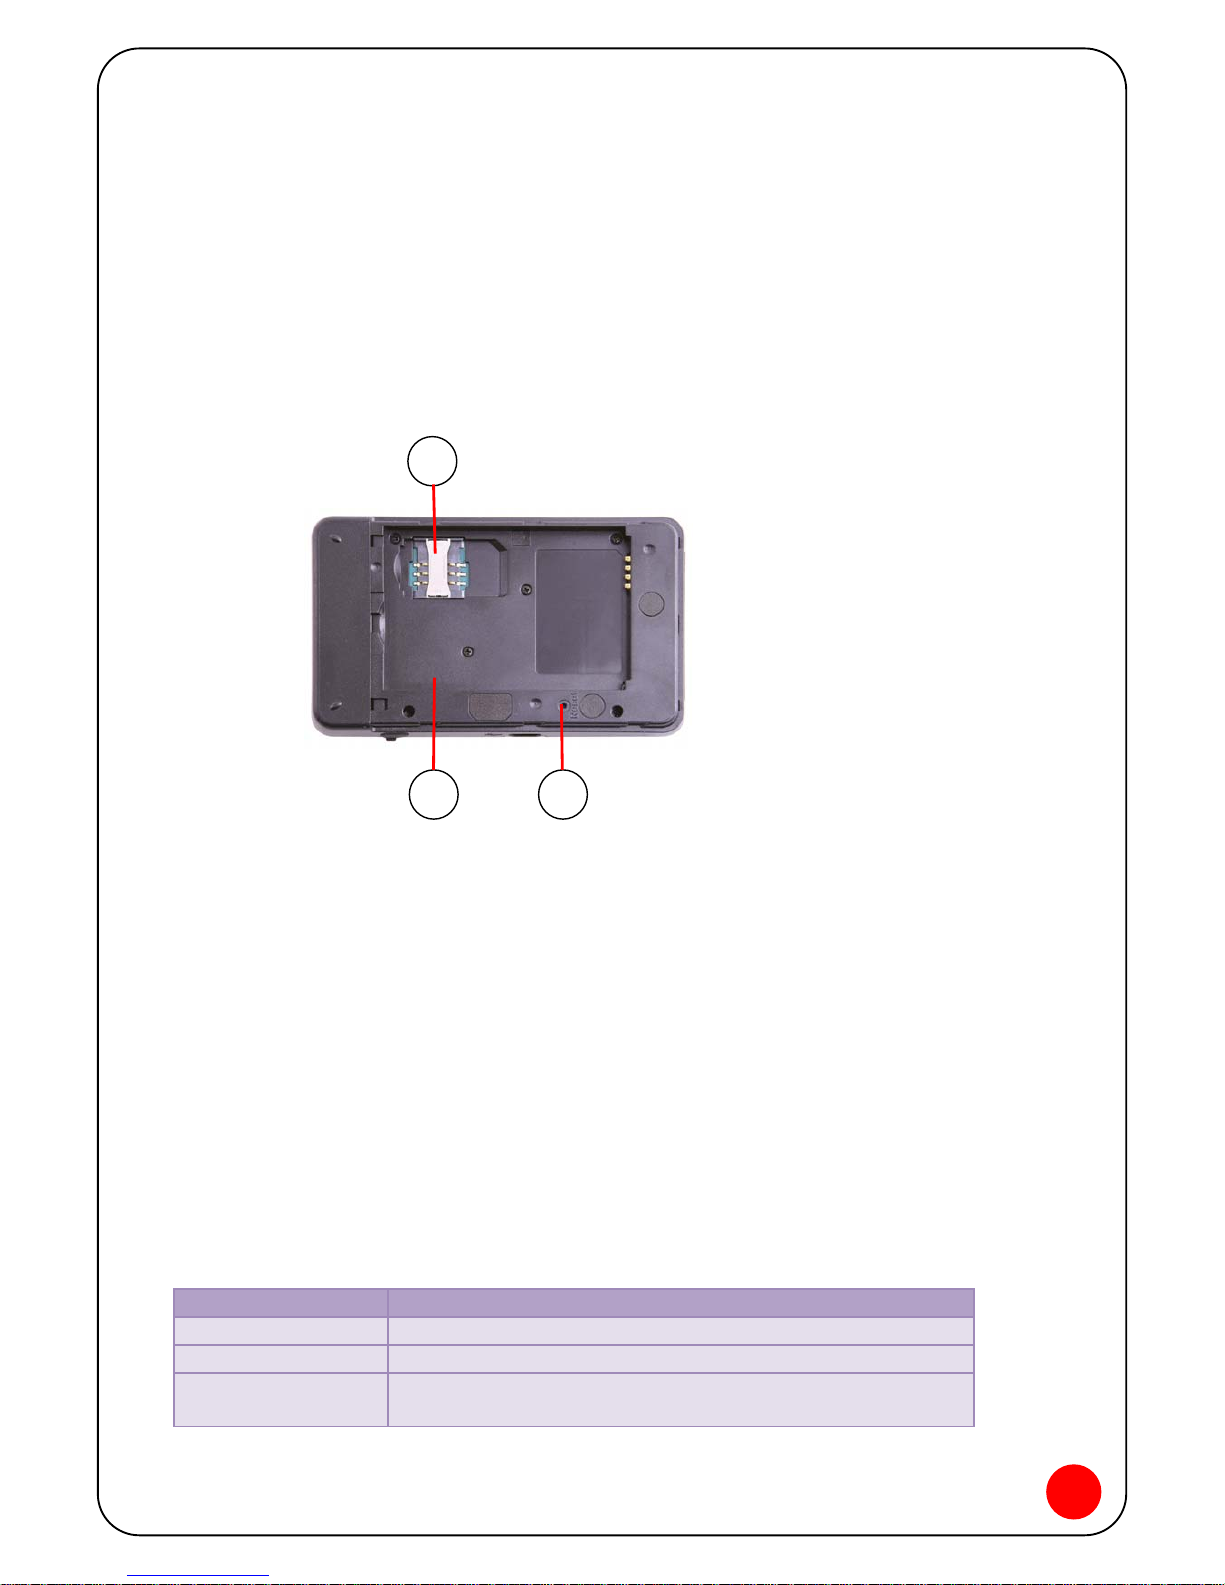
⑤ Factory Reset button
Resets device to replace factory setting
⑥ RUIM Card Slot
RUIM card is inserted here
⑦ Battery Compartment
Battery is inserted here.
3. LED State
3.1. Wi-Fi Router Status LED
LED Status Status information
LED not lit No Power (Wi-Fi mode off)
LED Green Solid Wi-Fi Powered
LED Green Blink Wi-Fi transmitting and receiving data;
Blinking rate proportional to data speed
6
7 5
Page 6
5
3.2. Power Button LED
LED Status Status information
LED not lit No Power
LED RED Solid Power ON
LED RED Blink Low Battery warning
LED Green Solid Service Available
LED Green Blink Service Not Available
LED Blue Solid Connected to EVDO
LED Blue Blink Connected to 1x
LED Orange Solid Charging
LED Orange Blink Fully Charged
4. Insert RUIM card and Battery, and charge the battery
Before powering your WMR-100 Mini Hotspot on for the first time, you must insert
the RUIM card supplied by service provider, insert the battery and charge the battery.
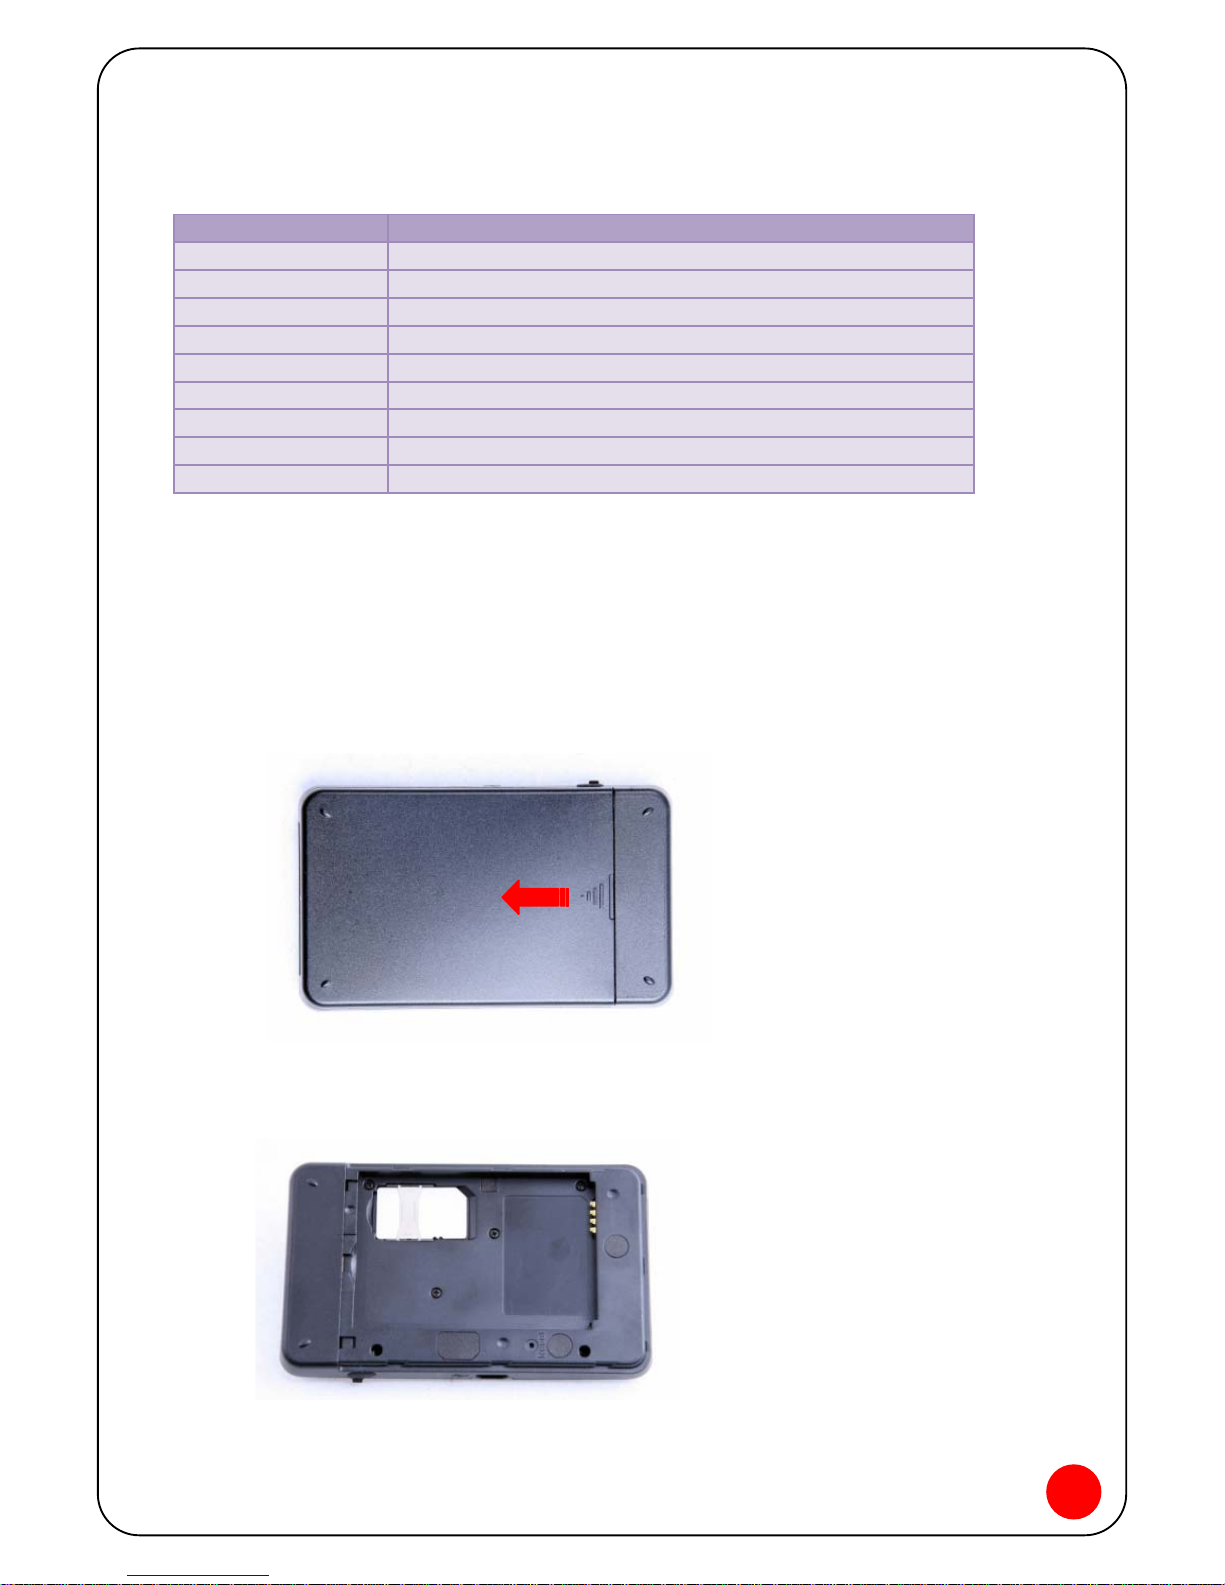
1. Slide to open the battery cover at the bottom of the device as shown.
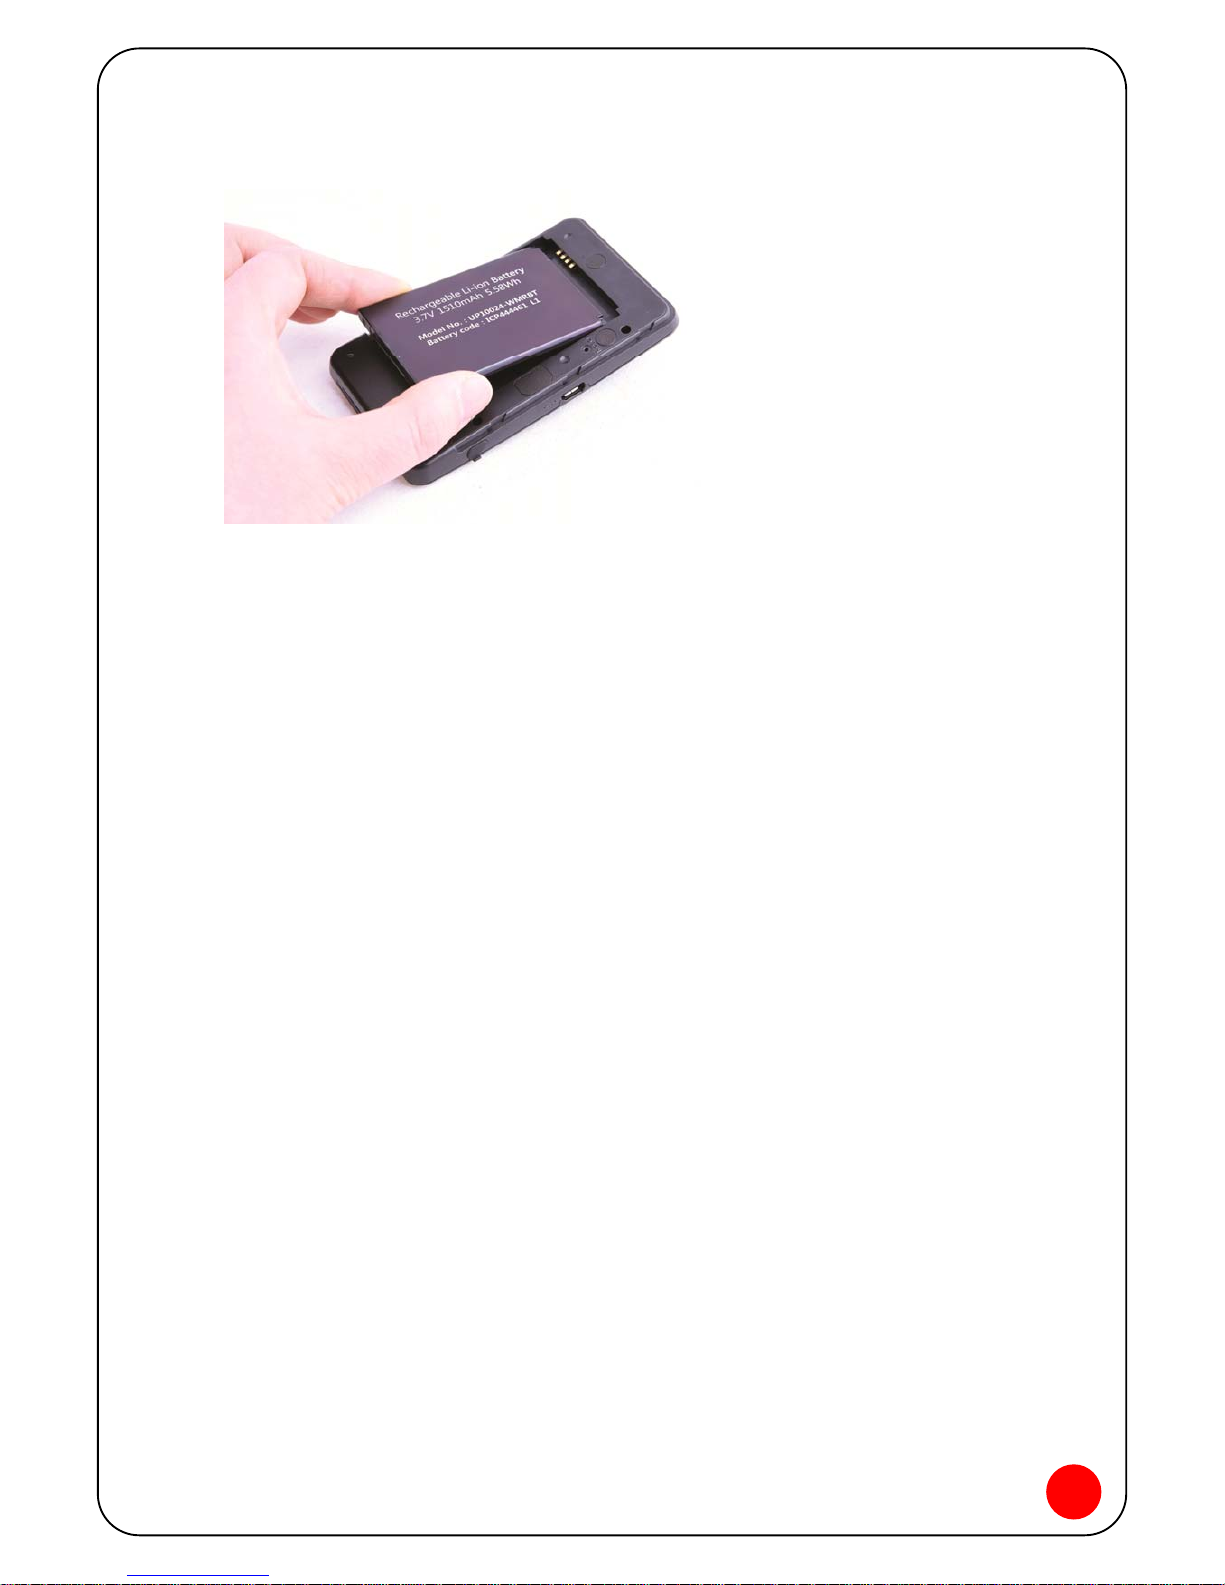
2. Insert the RUIM card into the RUIM card slot as shown.
Page 7
6
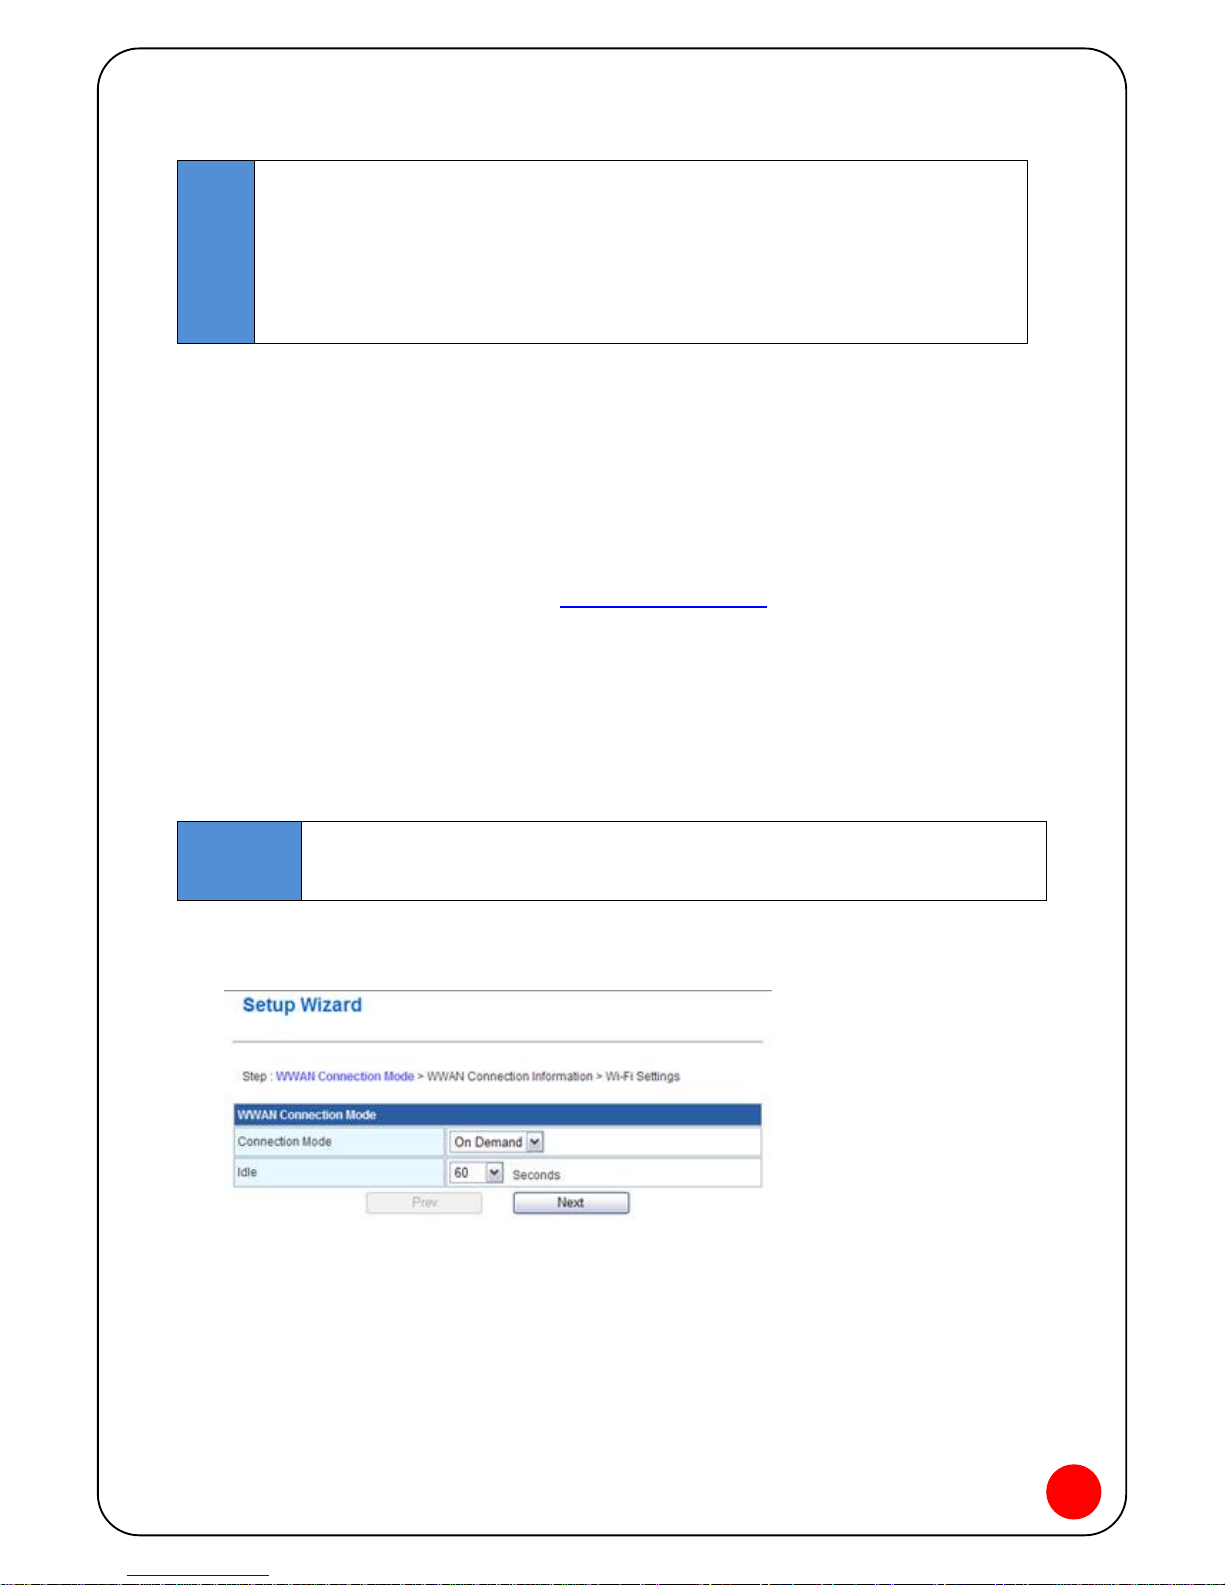
3. Insert the battery by lining up battery contact point with the gold contact points.
4. Once the battery is securely settled, put the battery cover back into the device
until it locks firmly.
5. Plug the AC travel adaptor into the proper electrical outlet and connect MicroUSB
port of the AC travel adaptor to the MicroUSB port of the device. Charge the
battery for at least three hours.
(The Power LED will flash solid orange while the device charging and flash blink
orange once charging is complete.)
5. Wi-Fi Mode Connection
You can connect the WMR-100 Mini Hotspot to your computer in two modes.
- Wi-Fi Mode
- USB Modem Mode
How to Connect WMR-100 via Wi-Fi
1. Insert RUIM Card and Battery with AC Travel Adaptor
2. Press Power button to connect to Wi-Fi mode .
3. Use your default Wi-Fi manager to locate the WMR-100 wireless network.
Page 8
7
Tip
The Steps of connecting to a Wi-Fi network vary depending on your
operating system whether you use the native application or third-party
software.
Generally you click an icon (often in the Windows notification area or
System Preferences>Network on a Mac) where you can select “View
Available Wireless Networks.” If you are unfamiliar with wireless networking
on your computer, consult the computer help system.
4. If multiple wireless networks are found, highlight the one that indicated as “WMR-
100AP_XXXXXX” in its name.
5. Click Connect.
6. If this is your first time connecting to the WMR-100, continue with these steps.
7. At computer’s Web browser, type http://192.168.0.254
into the address window
and press Enter or Return key.
8. Enter ID & password as “admin”, “admin” when requested.
9. A Setup wizard will launch and guide you through setting up security sequences
for your device.
Important
Be sure to write down both the administrative password and the network
key which you created from the initial Setup wizard.
If you cancel the wizard, your network will be left unsecure (open).
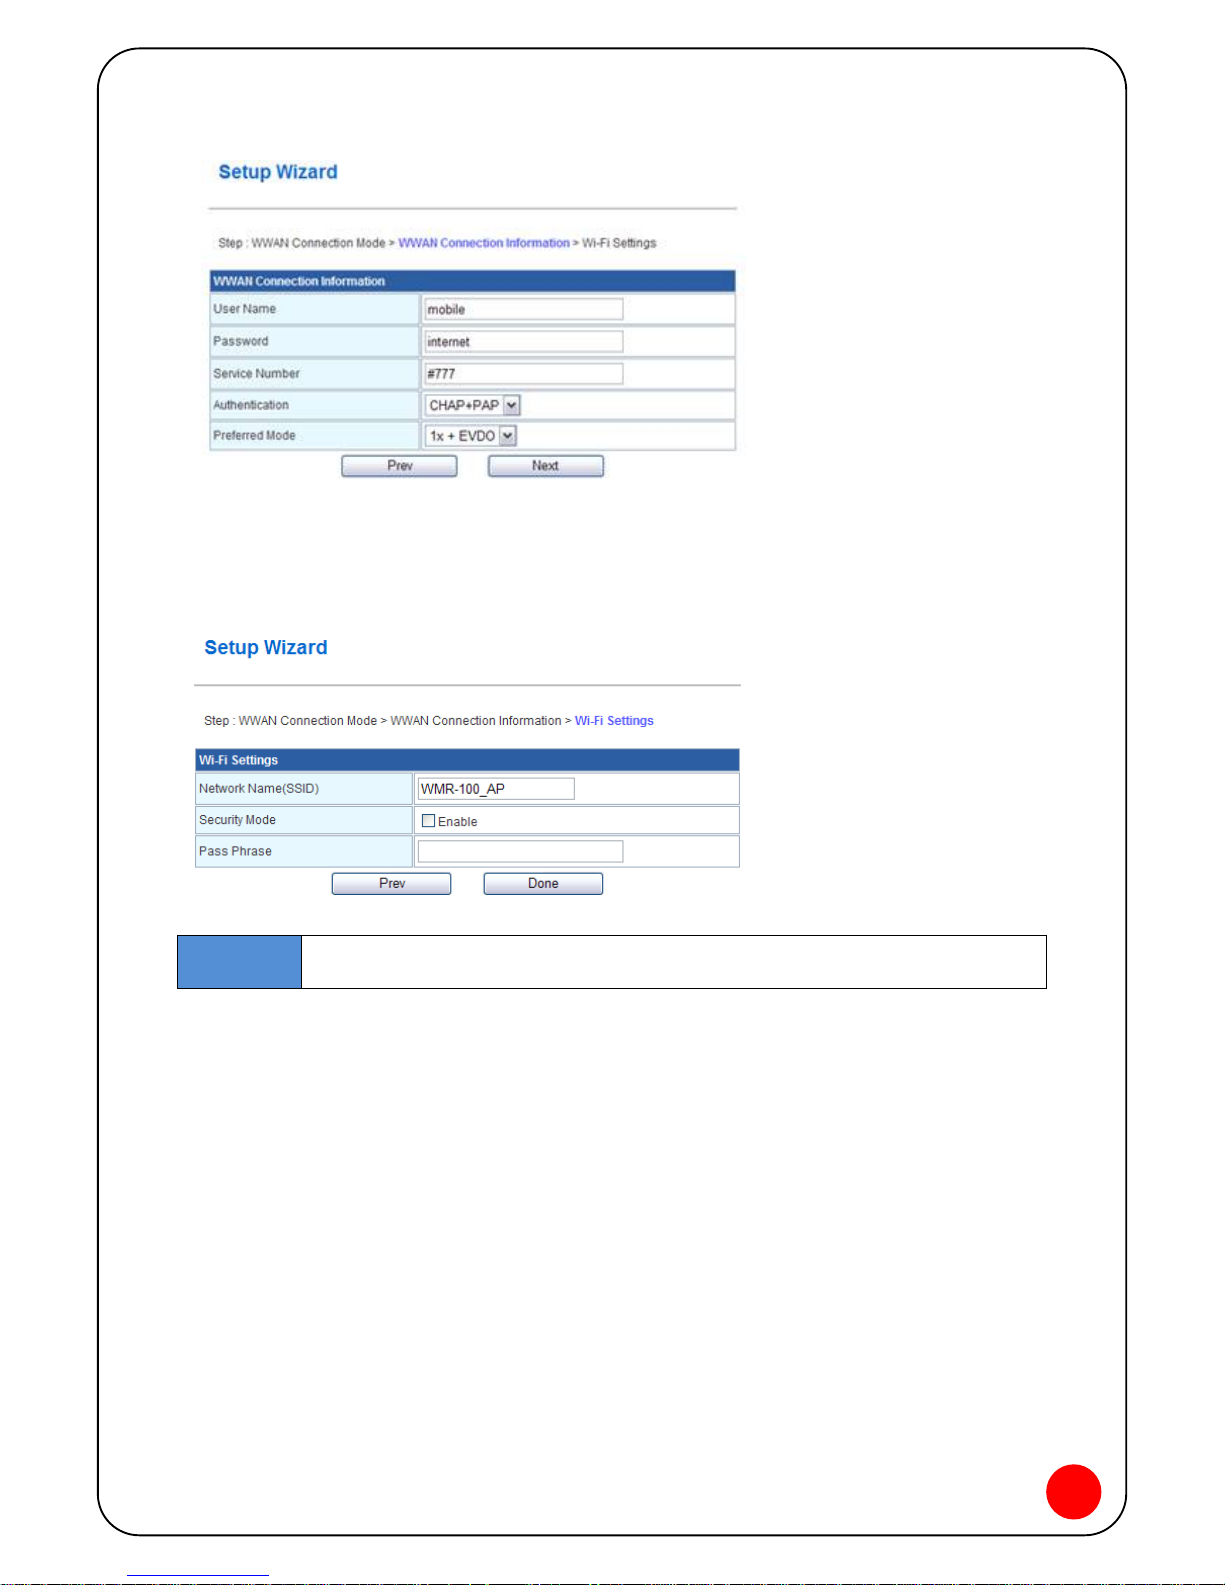
10. Follow the instructions on the screen as shown:
- Choose one from 3 different connection mode, “Auto”, “Manual” and “On Demand”.
- Click “Next” button.
Page 9
8
- Choose “Authentication” and “Preferred Mode”.
- Press “Next” button.
Important
To secure your personal information/files and virus attack, it is a must to
set “Security Mode” with password.
- Change “Network Name(SSID)” as you desire.
- It is strongly recommended to check “Enable” box and to write “Pass Phrase”.
“Pass Phrase” is your password.
11. After you click “Done”, your device will reboot.
12. At computer’s default wireless network connection manager, double-click the
network name (SSID) as you desire and type password in network key.
Page 10
9
6. USB Modem Mode Connection
USB Modem mode allows WMR-100 to use as USB Modem with Wi-Fi mode
disabled. First you must install MTS CONNECT program and drivers to use in this
mode.
How to connect WMR-100 via USB port with USB Cable
1. Press the Power button on WMR-100. The Power button LED and Wi-Fi LED will
flash.
2. Insert USB data cable into WMR-100 and USB port on your computer. The
Power button LED illuminates and The Wi-Fi status LED does not illuminate.
3. Launch MTS CONNECT software and driver as next steps.
MTS CONNECT Installation for Windows® OS
1. If USB DRIVER is not present, Modem package Installer will run automatically.
Tip
If Modem package Installer doesn’t work automatically, Execute
RunPack.exe manually.
2. Select the desire language and press “OK”. Welcoming message for using MTS
CONNECT window will be shown.
3. Press “Install” button. The program starts automatically.
4. Press “Finish” button once it is done with program installation.
5. It will now start to install the USB driver. Please check whether the driver has
been installed properly by checking <Device Manager>.
MTS CONNECT Installation for MAC® OS
1. Plug the WMR-100 in USB port of MAC PC.
2. Open MTS CONNECT CD, start mintechUSBCDC and install MAC Drivers.
Restart MAC PC.
Page 11

10
3. Execute any connection manager for WeTelecom Mobile Products.
4. Enter the User ID, Password and Number in Network Preference, and connect
Internet.
Removing the WMR-100 Modem
To remove the WMR-100 USB Modem, use the hardware deleting function of
Windows.
1. Double-click USB icon on the status area of desktop ; “ Safely Remove Hardware”
prompt is displayed.
2. Select “Mass Storage USB Device: to stop.
3. At the prompt, remove the WMR-100.
Important Notice
1. Connecting the device to Notebook only with USB Data Cable may cause more
consumption of Notebook’s battery.
2. Using the device for a long time may cause over heating problem, please be
careful. Always try to turn off the power if not in use.
3. Do not forcefully open, fix, or assemble the device; please visit assigned service
center for repair.
4. Be careful not to damage RUIM Card. Inside of RUIM Card, data are stored to
initiate the device and if it is damaged the device may not work.
5. When the device is connected to PC/Notebook do not logout by irregular method,
there might be some abnormal packet data in PC/Notebook. Logout by normal
procedure.
6. Protect the WMR-100 from liquids, dust and excessive heat.
7. Store the WMR-100 in a safe place, when not in use.
8. Turn the power off and remove the battery from device when not in use if possible.
9. Due to the transmission and reception properties of wireless communications,
data can occasionally be lost or delayed. This can be due to the variation in radio
signal strength that results from changes in the characteristics of the radio
transmission path. Although data loss is rare, the environment where you operate
the WMR-100 may adversely affect communications.
Skylink or its partners will not be held responsible for damages of any kind
resulting from the delays or errors in data transmitted or received with the WMR100 device, or failure of the WMR-100 device to transmit or receive such data.
Page 12
11
Battery Use and Removal
1. Never expose batteries to temperatures below -10°C (14°F) or above 45°C
(113°F). For example, never leave the device in a car.
2. Always use WeTelecom’s original battery and charger.
3. Do not disassemble/open, crush, or make hole/holes.
4. Do not expose to water or other liquids, expose to fire, explosion, or other
hazardous items.
5. Do not short circuit a battery.
6. Do not contact metallic or conductive object to the battery terminals.
7. Use only genuine battery from WeTelecom when replacing. Using improper
battery may cause a risk of fire, explosion, leakage, or other hazard.
8. When charging the battery, keep it near room temperature.
Safety Hazards
Please do not operate the WMR-100 device in any environment that may be
susceptible to radio interference resulting in danger specifically;
1. Areas where prohibited by the law
Follow any special rules and regulations and obey all signs and notices. Always turn
off the host device and remove the modem from the USB port when instructed to do
so, or when you suspect that it may cause interference or danger.
2. Where explosive atmospheres may be present
Do not operate the WMR-100 in any area where a potentially explosive
atmosphere may exist. Sparks in such areas could cause an explosion or fire
resulting in bodily injury or even death. Be aware and comply with all signs and
instructions.
Users are advised not to operate the WMR-100 while at a refueling point or
service station. Users are reminded to observe restrictions on the use of radio
equipment in fuel depots (fuel storage and distribution areas), chemical plants or
where blasting operations are in progress.
Area with a potentially explosive atmosphere are often but not always clearly
marked. Potential locations can include gas stations, below deck on boats,
chemical transfer or storage facilities, vehicles using liquefied petroleum gas
(such as propane or butane), areas where the air contains chemicals or particles,
such as grain, dust or metal powders, and any other area where you would
normally be advised to turn off your vehicle engine.
3. Near Medical and life support equipment
Do not operate the WMR-100 in any area where medical equipment, life support
equipment, or near any equipment that may be susceptible to any form of radio
interference. In such areas, the host communications device must be turned off.
The WMR-100 may transmit signals that could interfere with this equipment.
Page 13
12
4. On an aircraft, either on the ground or airborne
Many airline regulations state that you must suspend wireless operations before
boarding an airplane. Please ensure that the host device is turned off and the
WMR-100 is removed from the USB port prior to boarding aircraft in order to
comply with these regulations. The WMR-100 can transmit signals that could
interfere with various onboard systems and controls.
5. While operating a vehicle
The driver or operator of any vehicle should not operate a wireless data device
while in control of a vehicle. Doing so will detract from the driver or operator’s
control and operation of that vehicle. In some countries, operating such
communications device while in control of a vehicle is an offense.
Product Specification
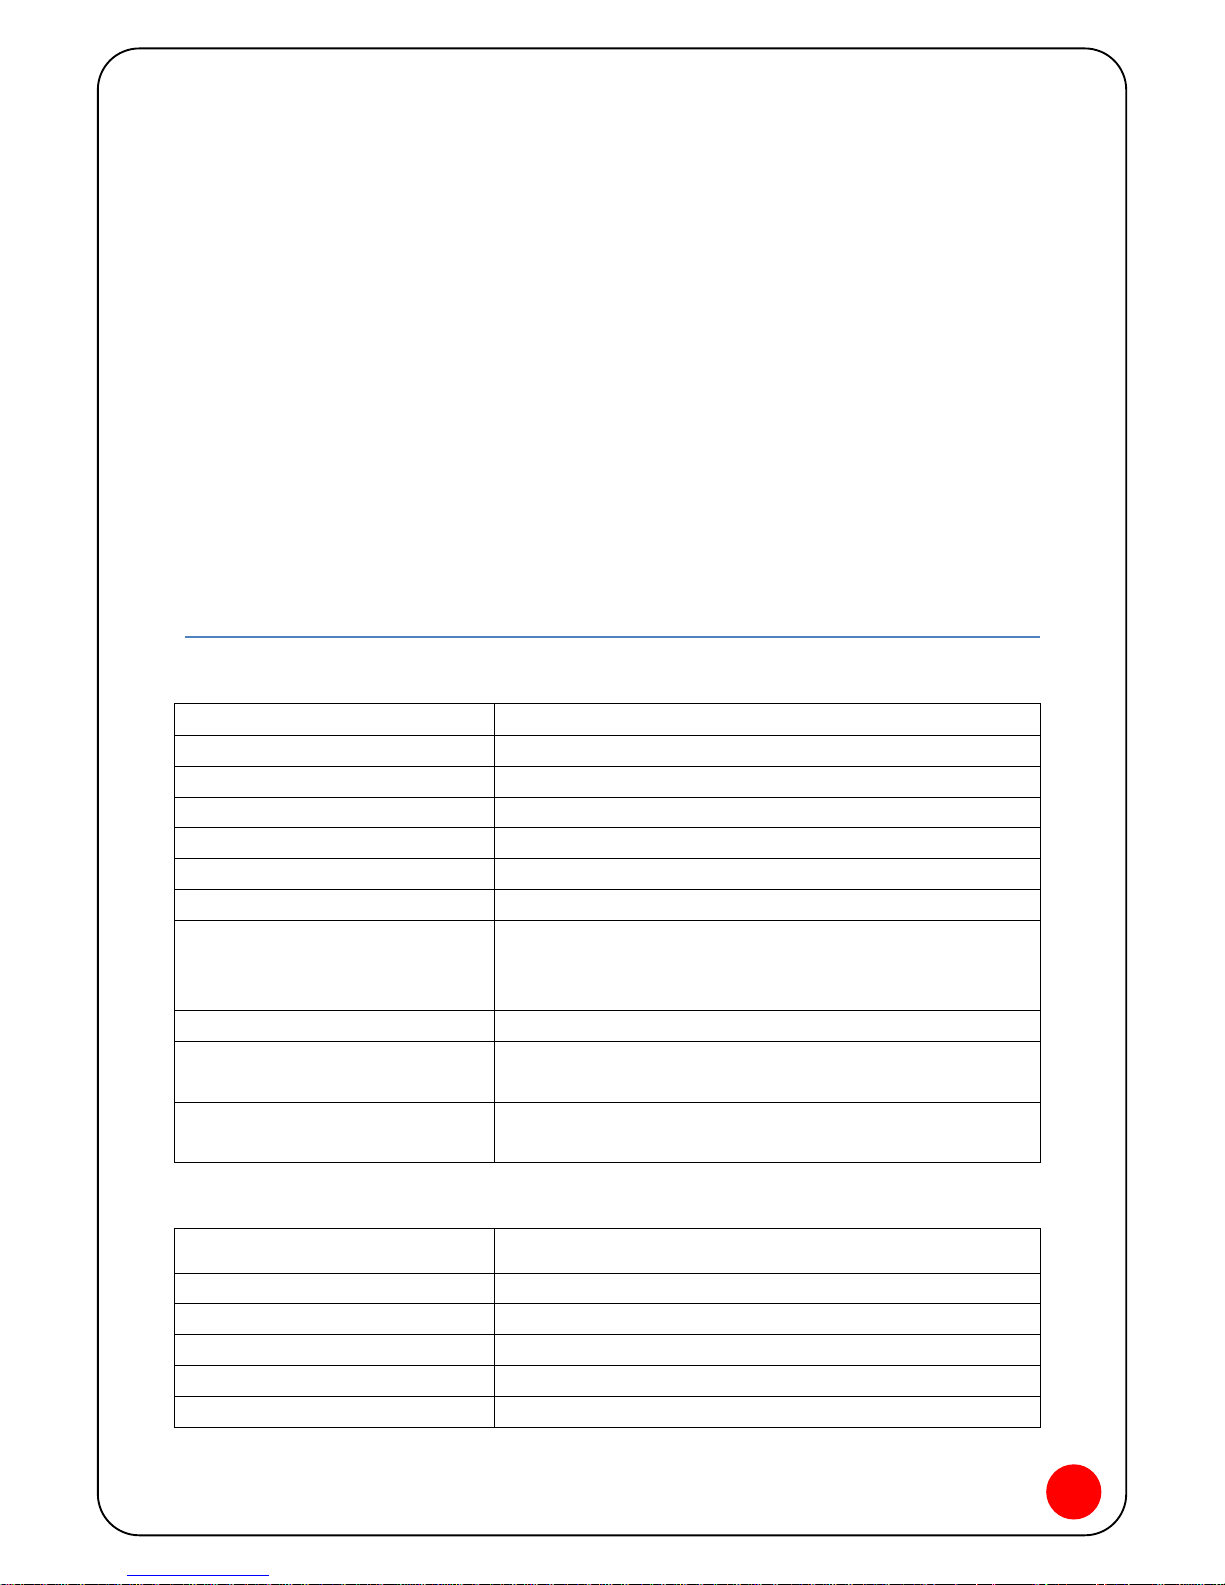
Table 1 : General Specifications
Model Name WMR-100
Type Mini Hotspot
Weight 83g
Dimensions 60.5mm X 100.5mm X 14.5mm
Wireless Network CDMA 1X/EV-DO
Wi-Fi Network 802.11 b/g/n 2.4GHz
Default SSID WMR-100AP_xxxxxx
Battery
-Charging Time by AC T/A
-Charging Time by USB port
1510mAh
3 hours (when not in use)
4-5 hours (when not in use)
Power Consumption 850mA,max
Chipset
QUALCOMM MSM6800A
RALINK RT3050
Interface Type
MicroUSB port for device
Type A USB Port for computer
Table 2 : CDMA Technology
Technology CDMA 1x EVDO Rev A/0
Band Designation 450MHz
Transmit Frequency 452.5~457.475MHz (A Block)
Receive Frequency 462.5~467.475MHz (A Block)
Nominal Output Power 0.25 W (+24dBm)
Receiver Sensitivity Level Below -105.4dBm
Page 14
13
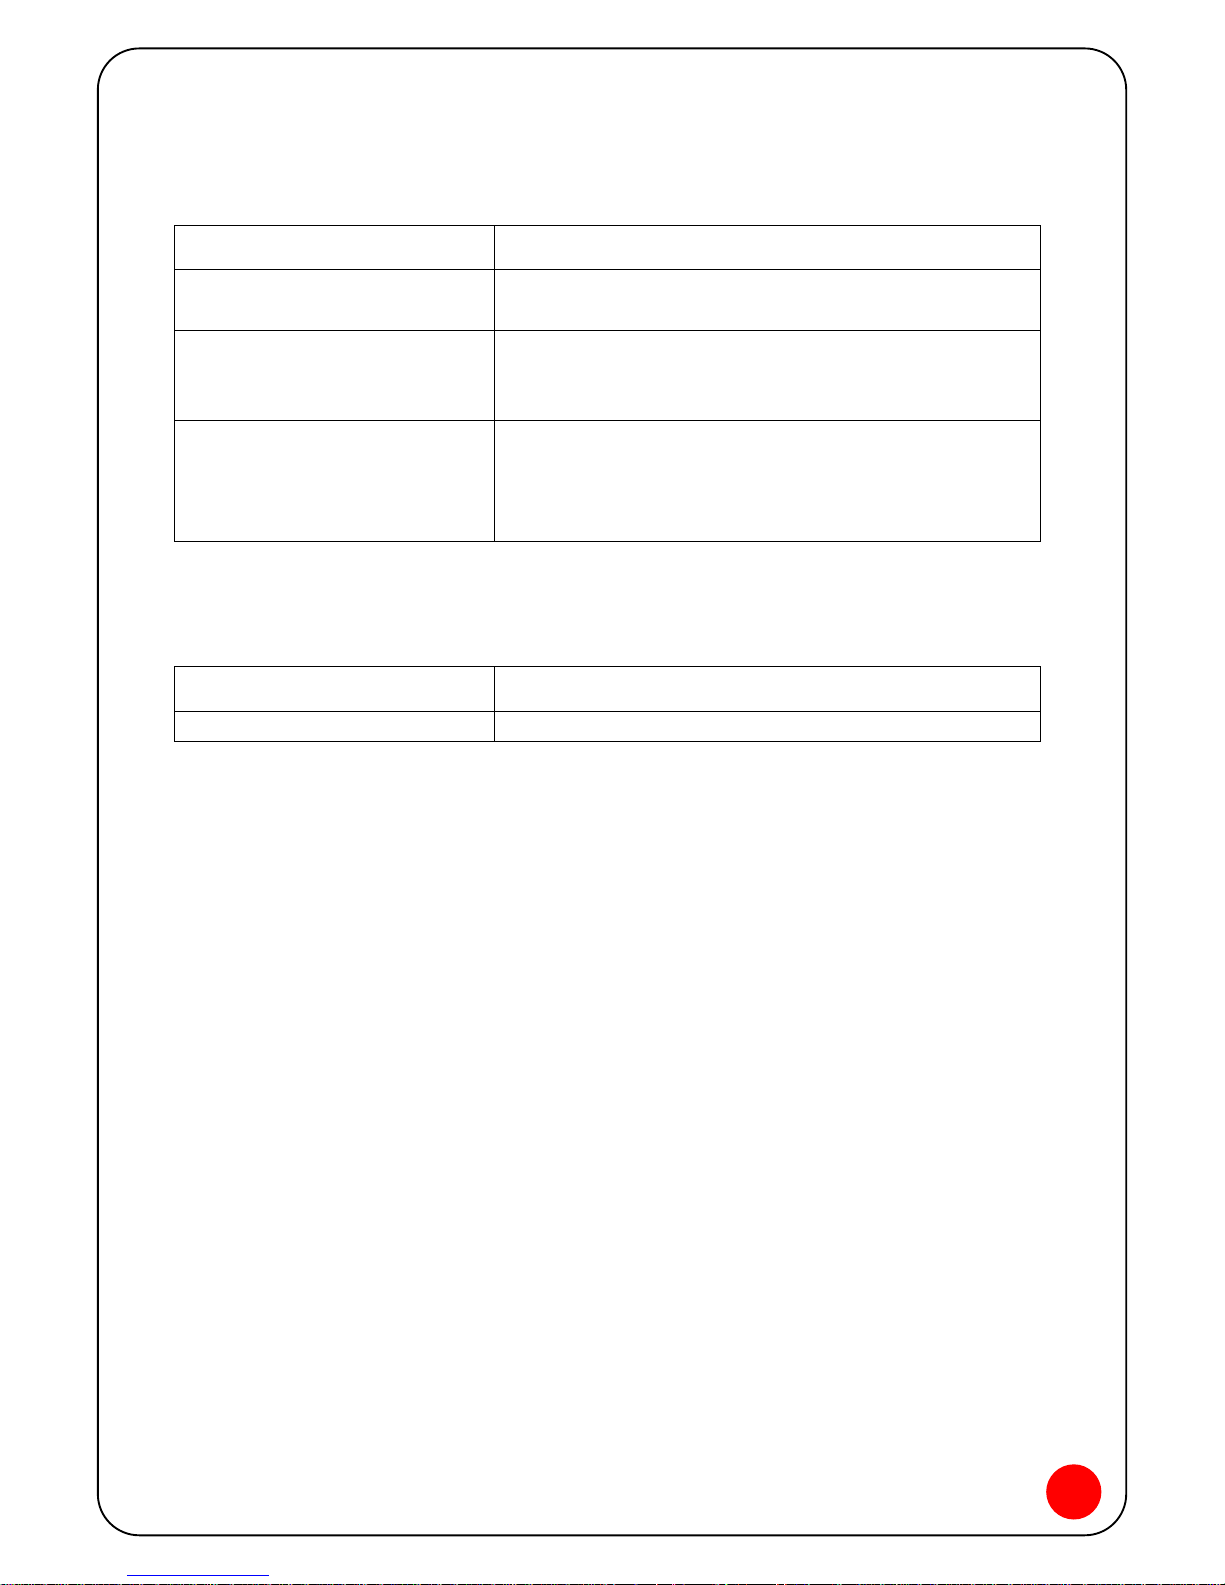
Table 3 : Wi-Fi Technology
Technology 802.11 b/g/n
Operating Frequency in
Europe
2.4–2.4835 GHz
Nominal Output Power
802.11 b
802.11 g/n
+17dBm
+14dBm
Receiver Sensitivity Level
802.11 b @ 11Mbps
802.11 g @ 54Mbps
802.11 n @ 135Mbps
Below -76dBm
Below -65dBm
Below -61dBm
Table 4 : Environmental Specifications
Operating Temperature -10°C ~+50°C
Storage Temperature -20°C ~+65°C
 Loading...