

Page 1
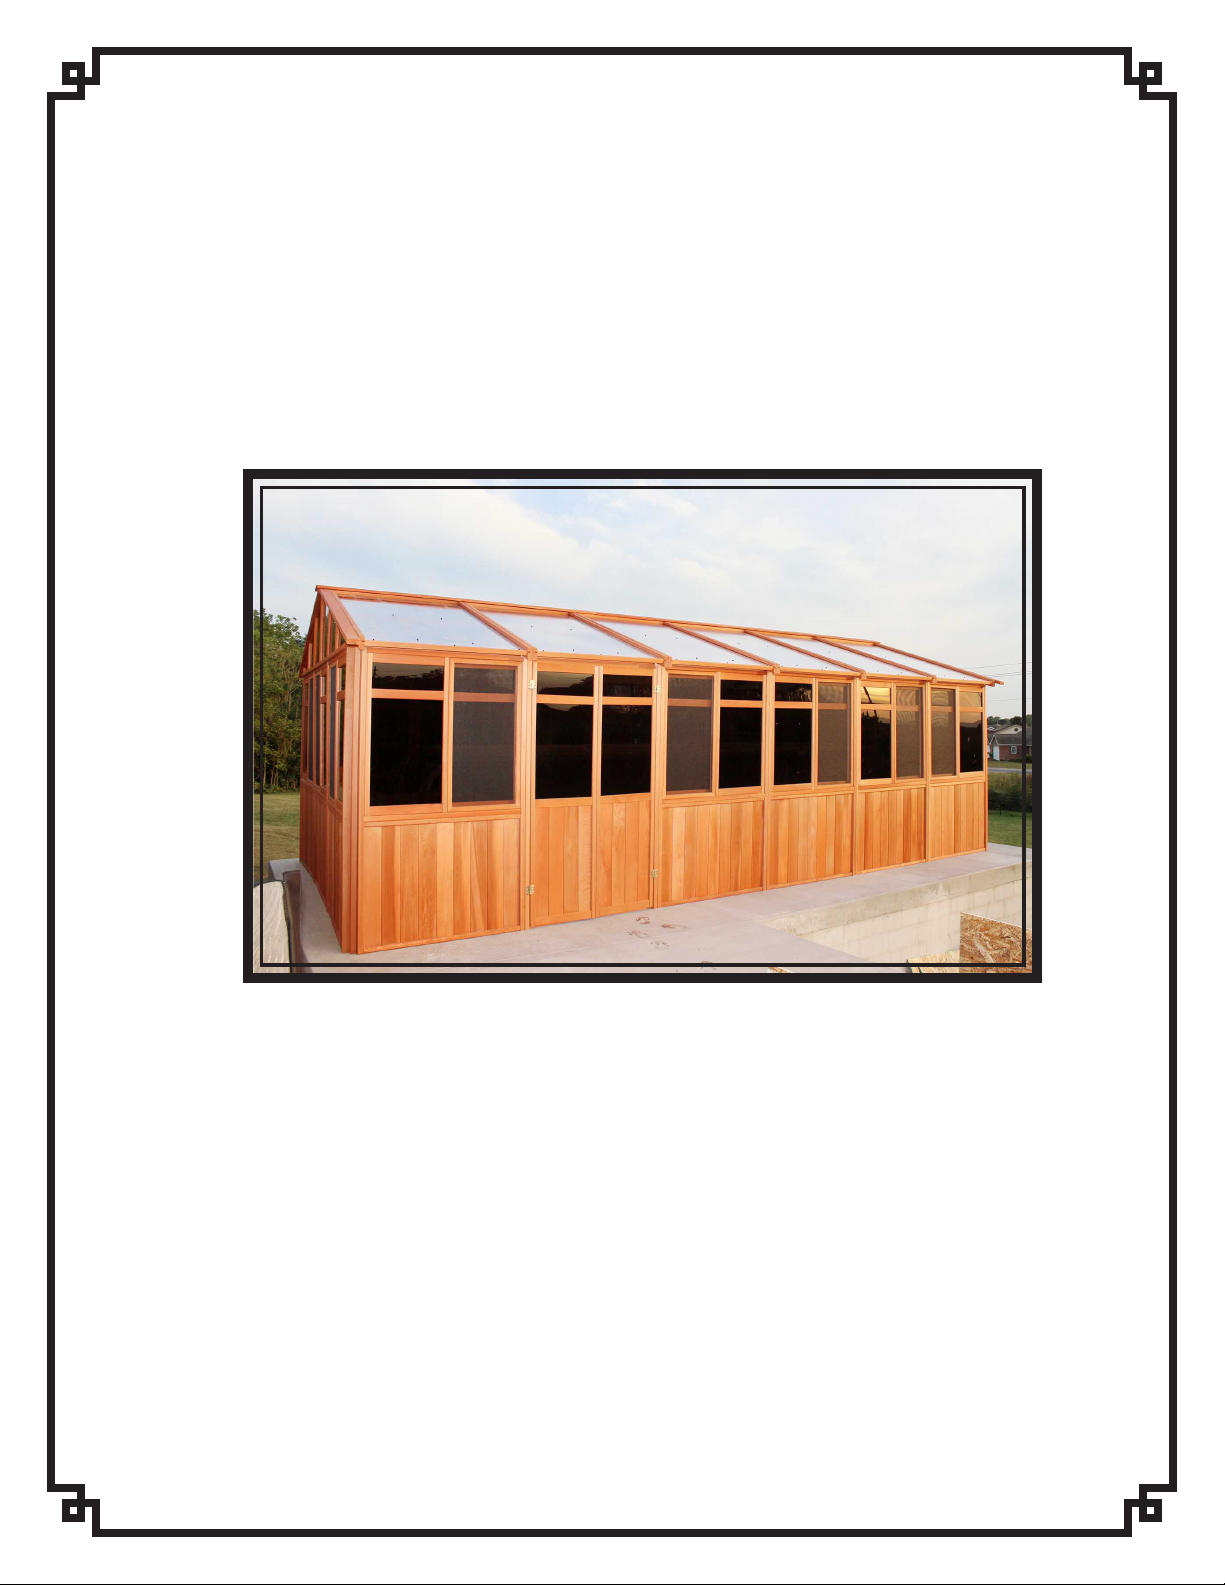
GAZEBO INSTALLATION
MANUAL
SIZE 13x25
~ 13x25 Gazebo ~
Page 2
PARTS LIST
ITEM# PART # DESCRIPTION QTY
1 WWRS-4884 Window Wall (Right Side) 48” ............................................... 9
2 WWLS-4884 Window Wall (Left Side) 48” .................................................. 8
3 DOOR-4884 Door 48” ................................................................................ 1
4 CRNR-0202 Corner 2”x2” .......................................................................... 4
5 BEAM-1325 Beam for 13x25 Gazebo (in 5 sections) ................................ 1
6 BCAP-1325 Beam Cap for 13x25 Gazebo (in 5 sections) ........................ 1
7 GABR-8700 Right Gable 87” ..................................................................... 2
8 GABL-8700 Left Gable 87” ....................................................................... 2
9 RPEN-4950 End Roof Panel 49.5” ............................................................ 4
10 RPMD-4800 Middle Roof Panel 48” ........................................................... 8
11 TRUS-0000 Truss ..................................................................................... 5
12 KNOB-0000 Door Knobs ........................................................................... 2
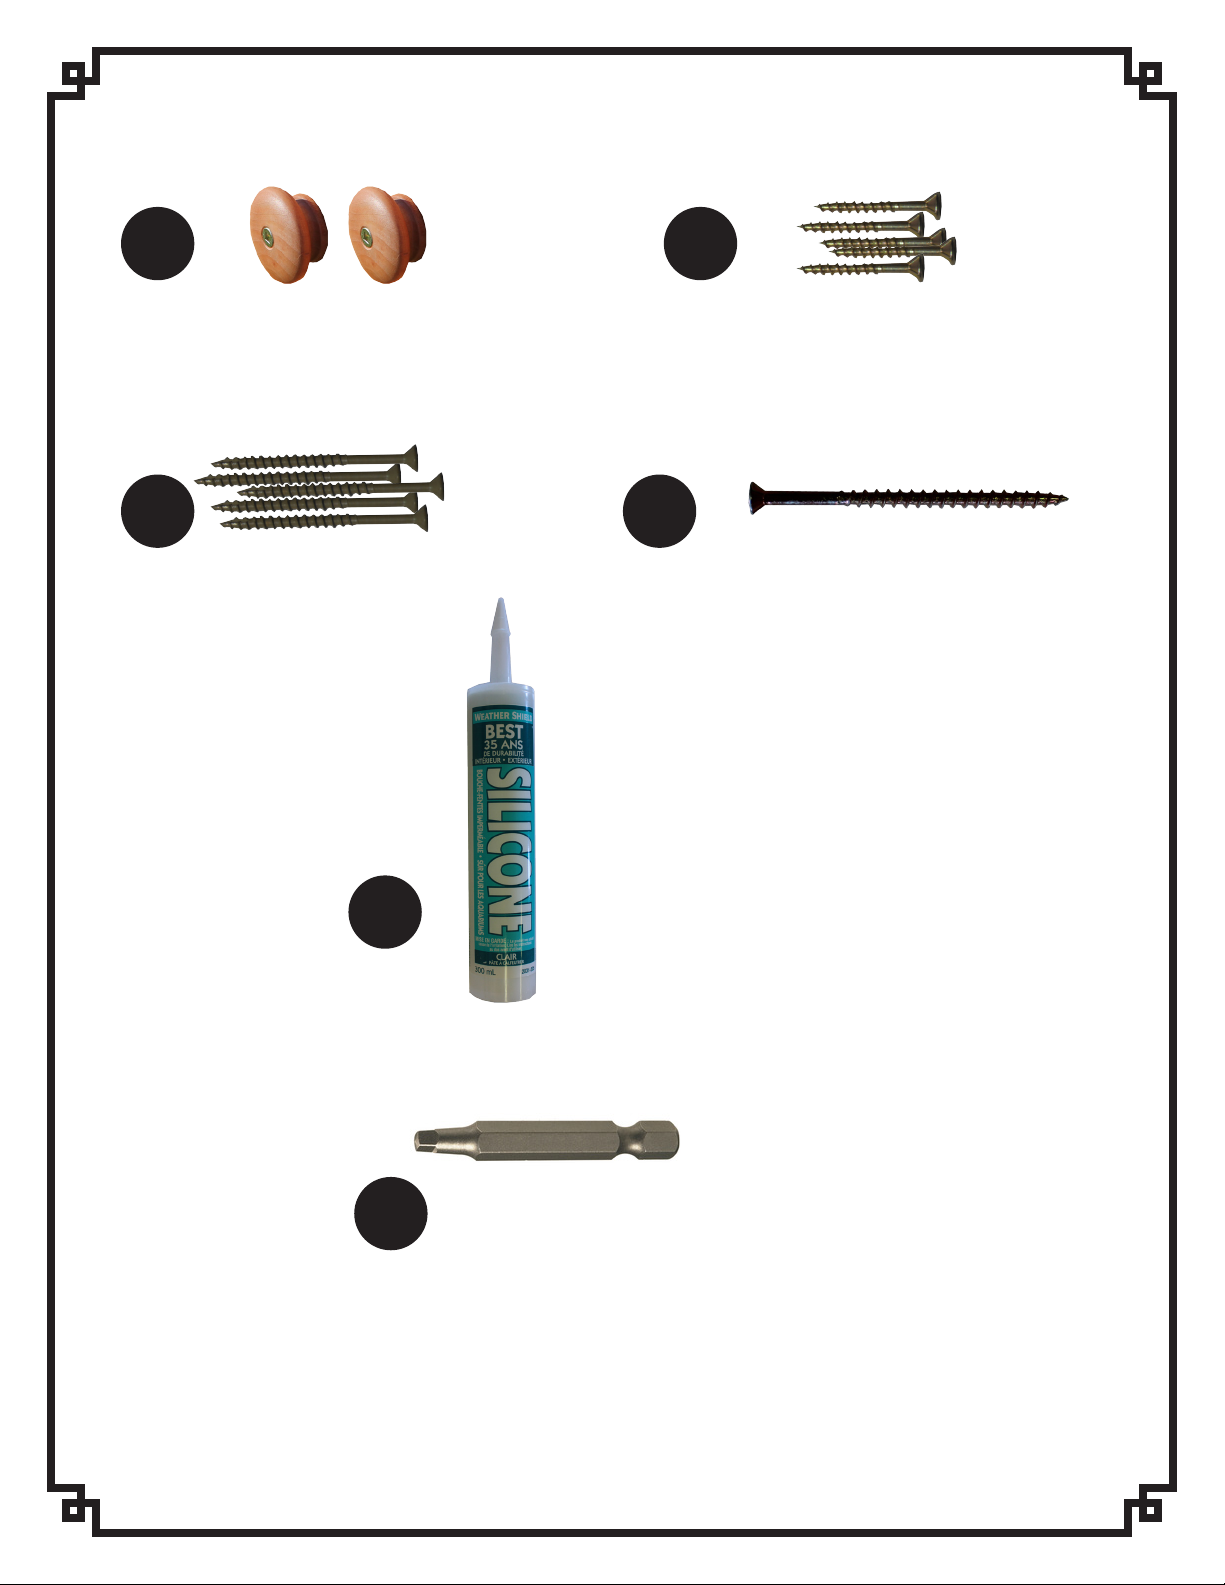
13 SCRW-0015 1.5” screws ........................................................................... 20
14 SCRW-0025 2.5” screws .......................................................................... 400
15 SCRW-0040 4” screws .............................................................................. 16
16 SBIT-0000 Robertson Screw Bit ............................................................. 1
17 SCNE-0000 Silicone Tube ......................................................................... 2
~ 13x25 Gazebo ~
Page 3
PARTS LIST
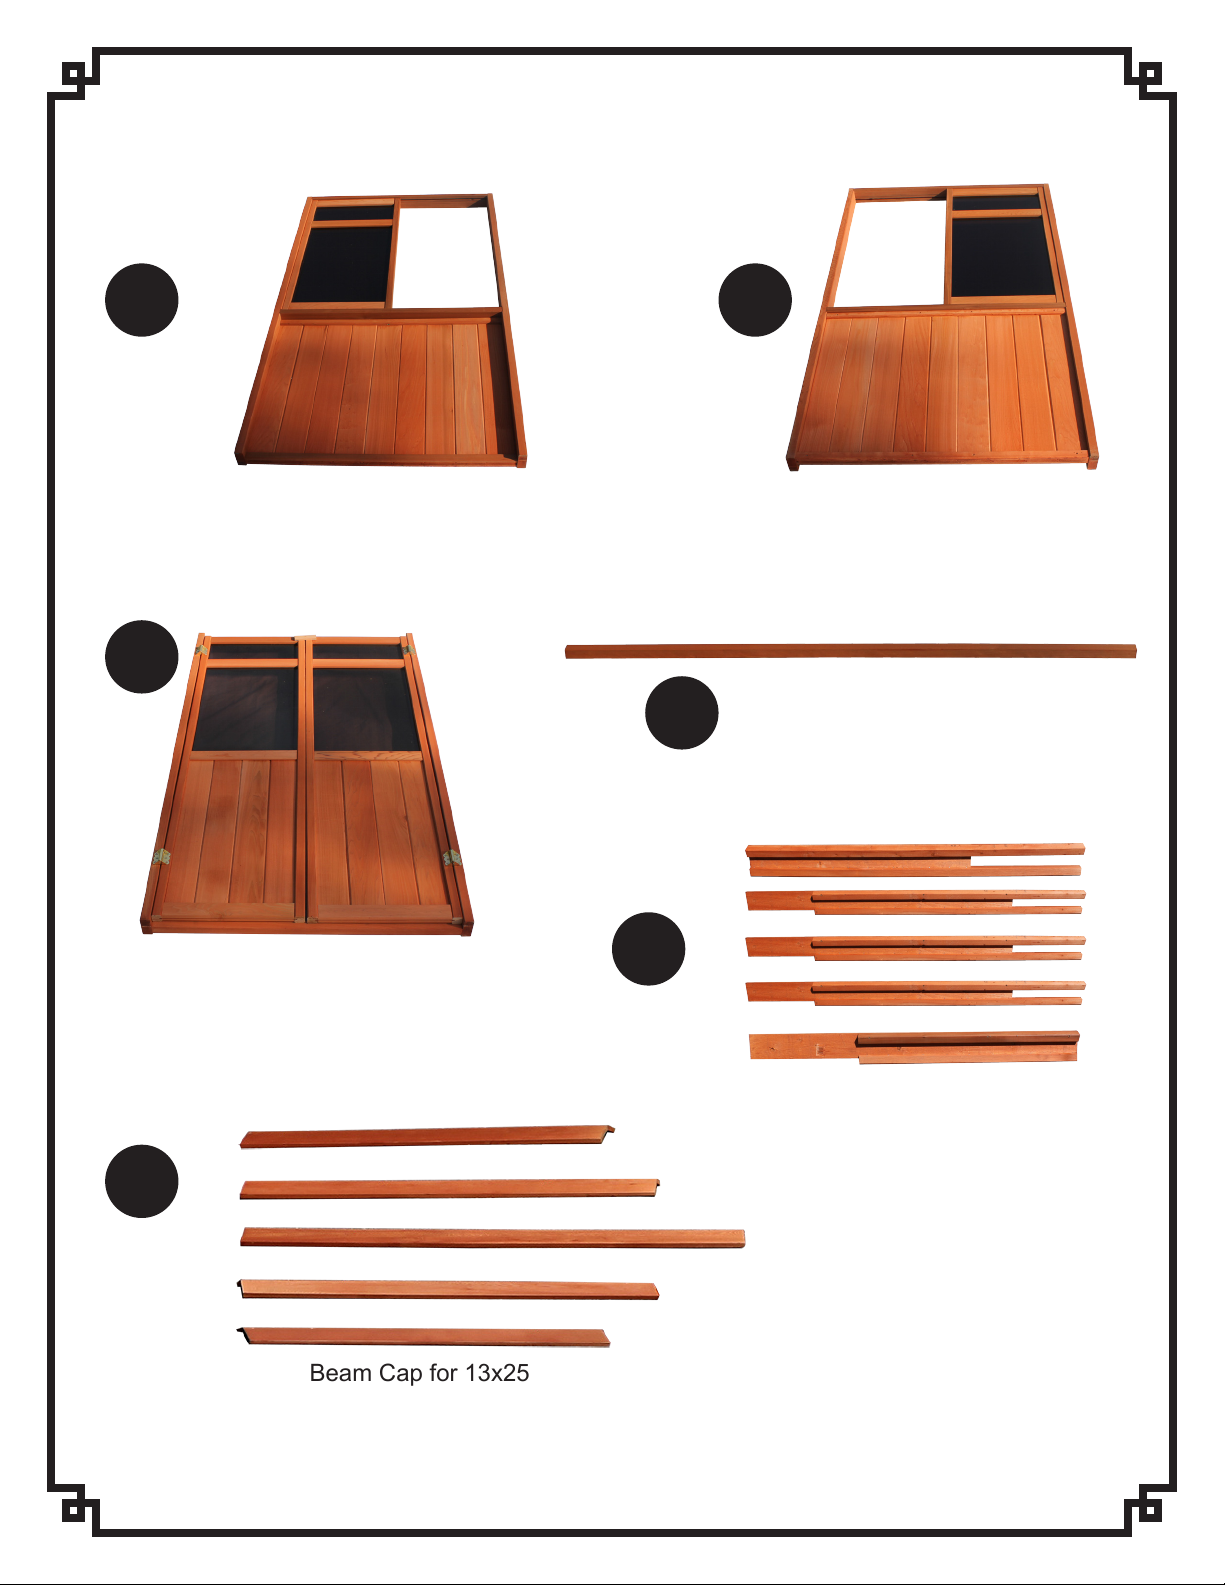
1 2
3
Window Wall
(Right Side)
Door 48”
48”
Window Wall
(Left Side)
48”
Corner 2”x2”
4
5
6
Beam for 13x25 Gazebo
(in 5 sections)
Beam Cap for 13x25
Gazebo (in 5 sections)
~ 13x25 Gazebo ~
Page 4
PARTS LIST
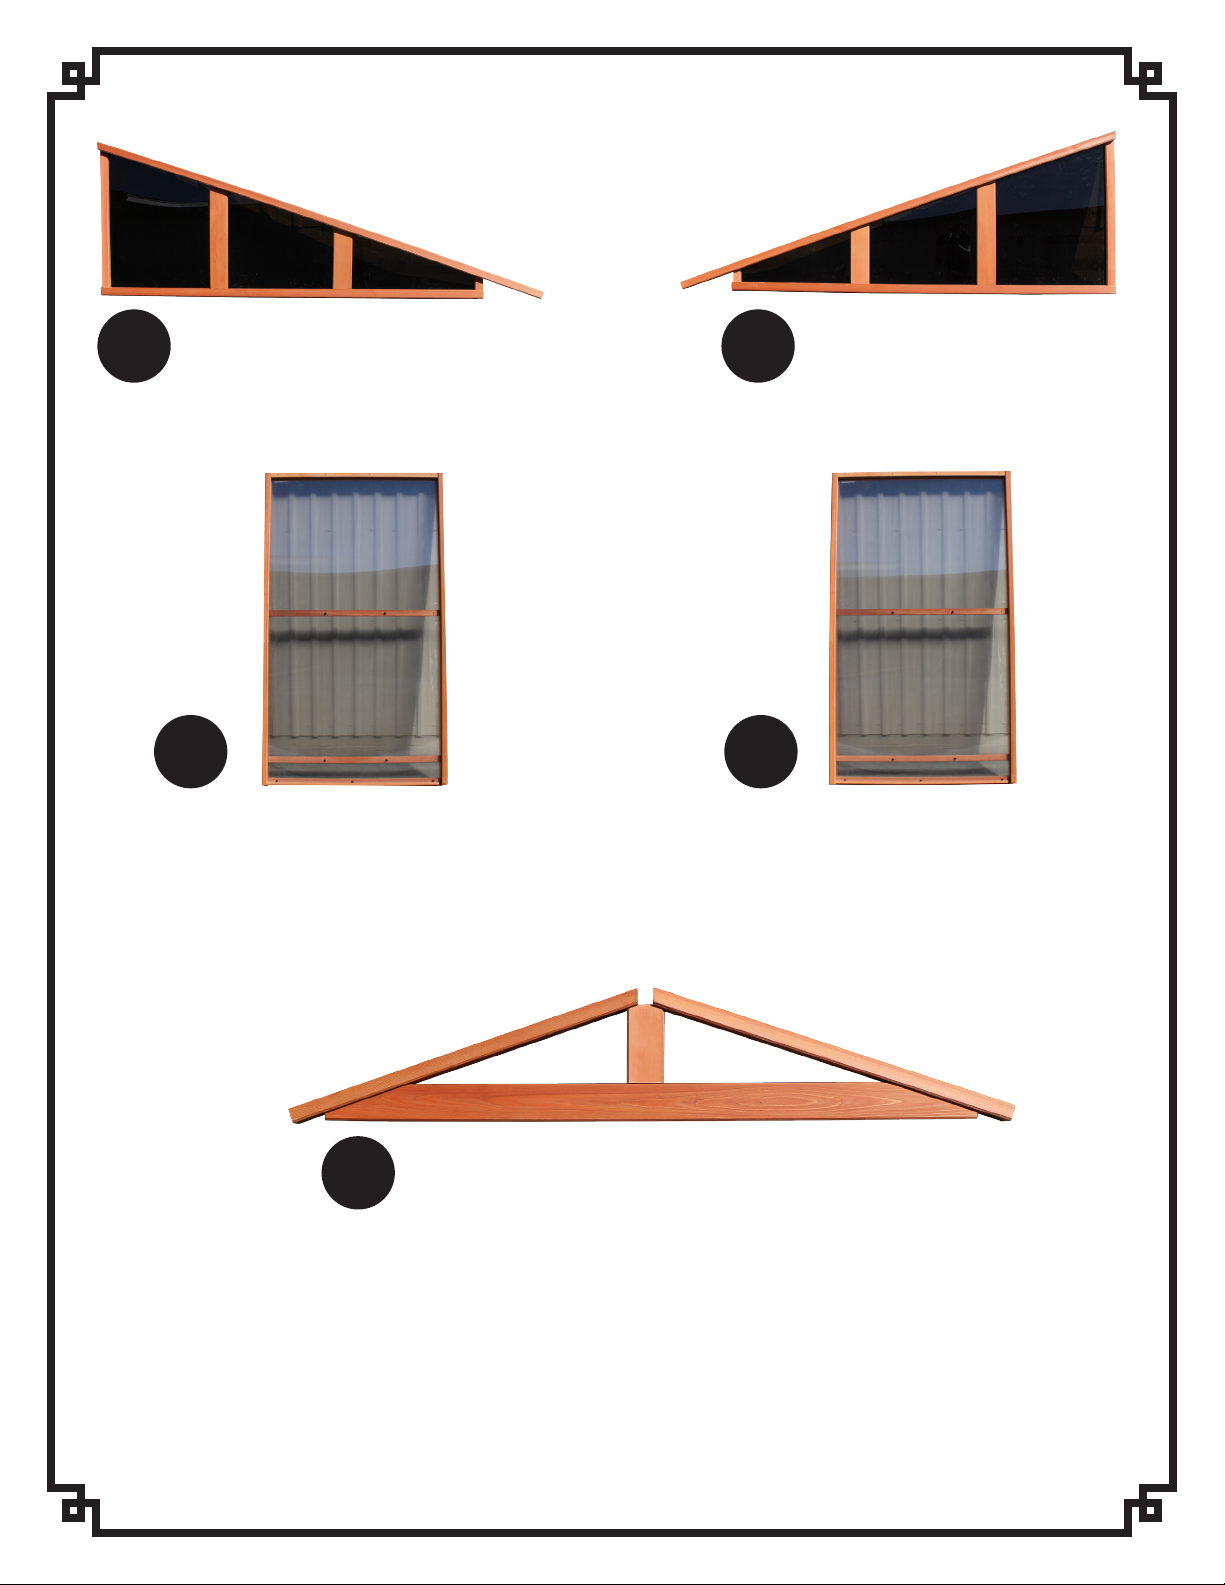
7 8
Right Gable 87”
9 10
End Roof Panel 49.5”
Left Gable 87”
Middle Roof Panel 48”
11
Truss
~ 13x25 Gazebo ~
Page 5
PARTS LIST
12
Door Knobs
14 15
2.5” screws
13
1.5” screws
4” screws
16
17
Silicone Tube
Robertson Screw
Bit
~ 13x25 Gazebo ~
Page 6
INSTALLATION PROCEDURE
IMPORTANT: Note: Please read the full instructions in entirety before starting
assembly of the gazebo. The assembly of this gazebo requires you to provide
a 6 foot step ladder, a cordless drill, caulking gun, and a minimum of 2 persons.
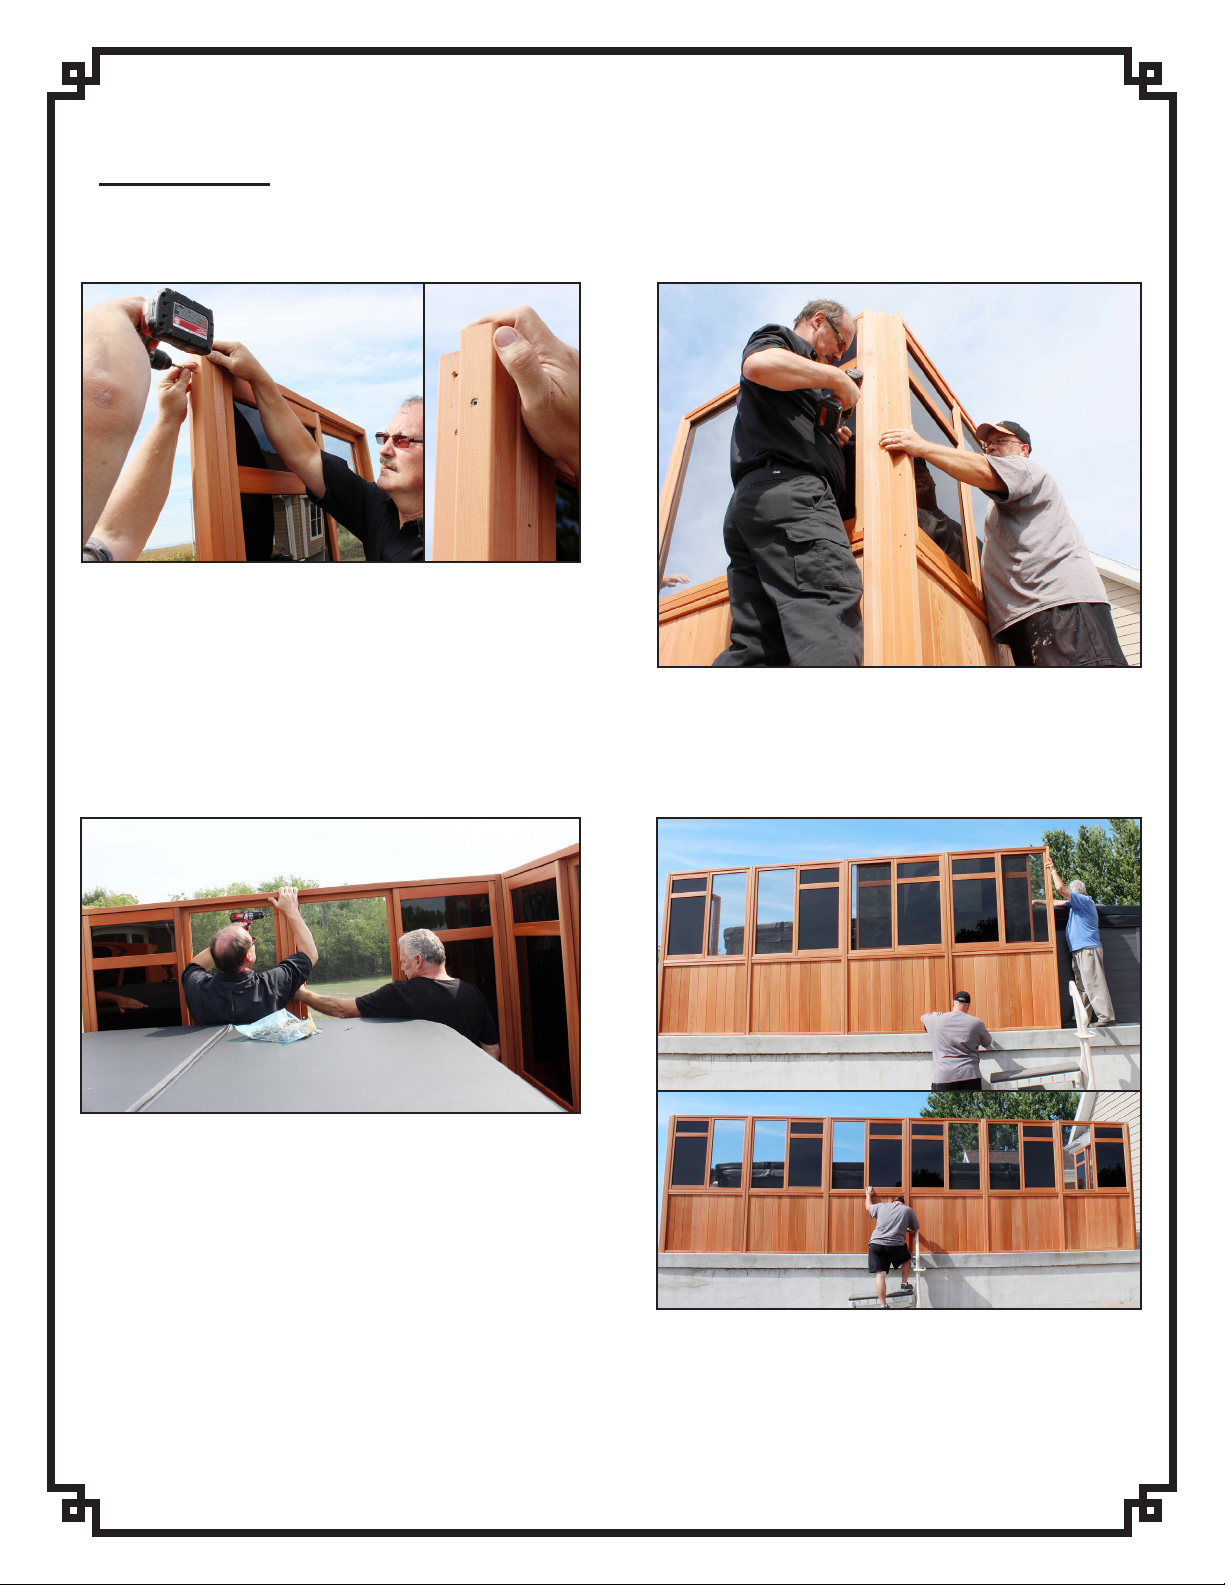
1. Ensure that the surface you will be installing the
enclosure on is at, smooth and level. Starting with a
Corner and Window Wall (48”) align them in an upright
position. The inside edge of the Window Wall (48”)
should be ush with the end of the Corner. Secure the
Corner to the Window Wall (48”) with four 2.5” screws.
3. Align another Window Wall (48”) next to the previous
Window Wall (48”) and secure with six 2.5” screws (more
specically, 2 screws side by side at the top; 2 screws side
by side adjacent to the bottom of the window opening; 2
2. Align a Window Wall (48”) at a 90 degree angle from
the rst Window Wall (48”) and secure the Corner to
the second Window Wall (48”) with four 2.5” screws.
screws one at the top and one at the bottom of the wood
skirt).
~ 13x25 Gazebo ~
4. Align four more Window Walls (48”) one after the
other, to one another, to complete the long side of
the gazebo. Secure each of the window walls to one
another as previously described with six 2.5” screws.
Page 7
INSTALLATION PROCEDURE
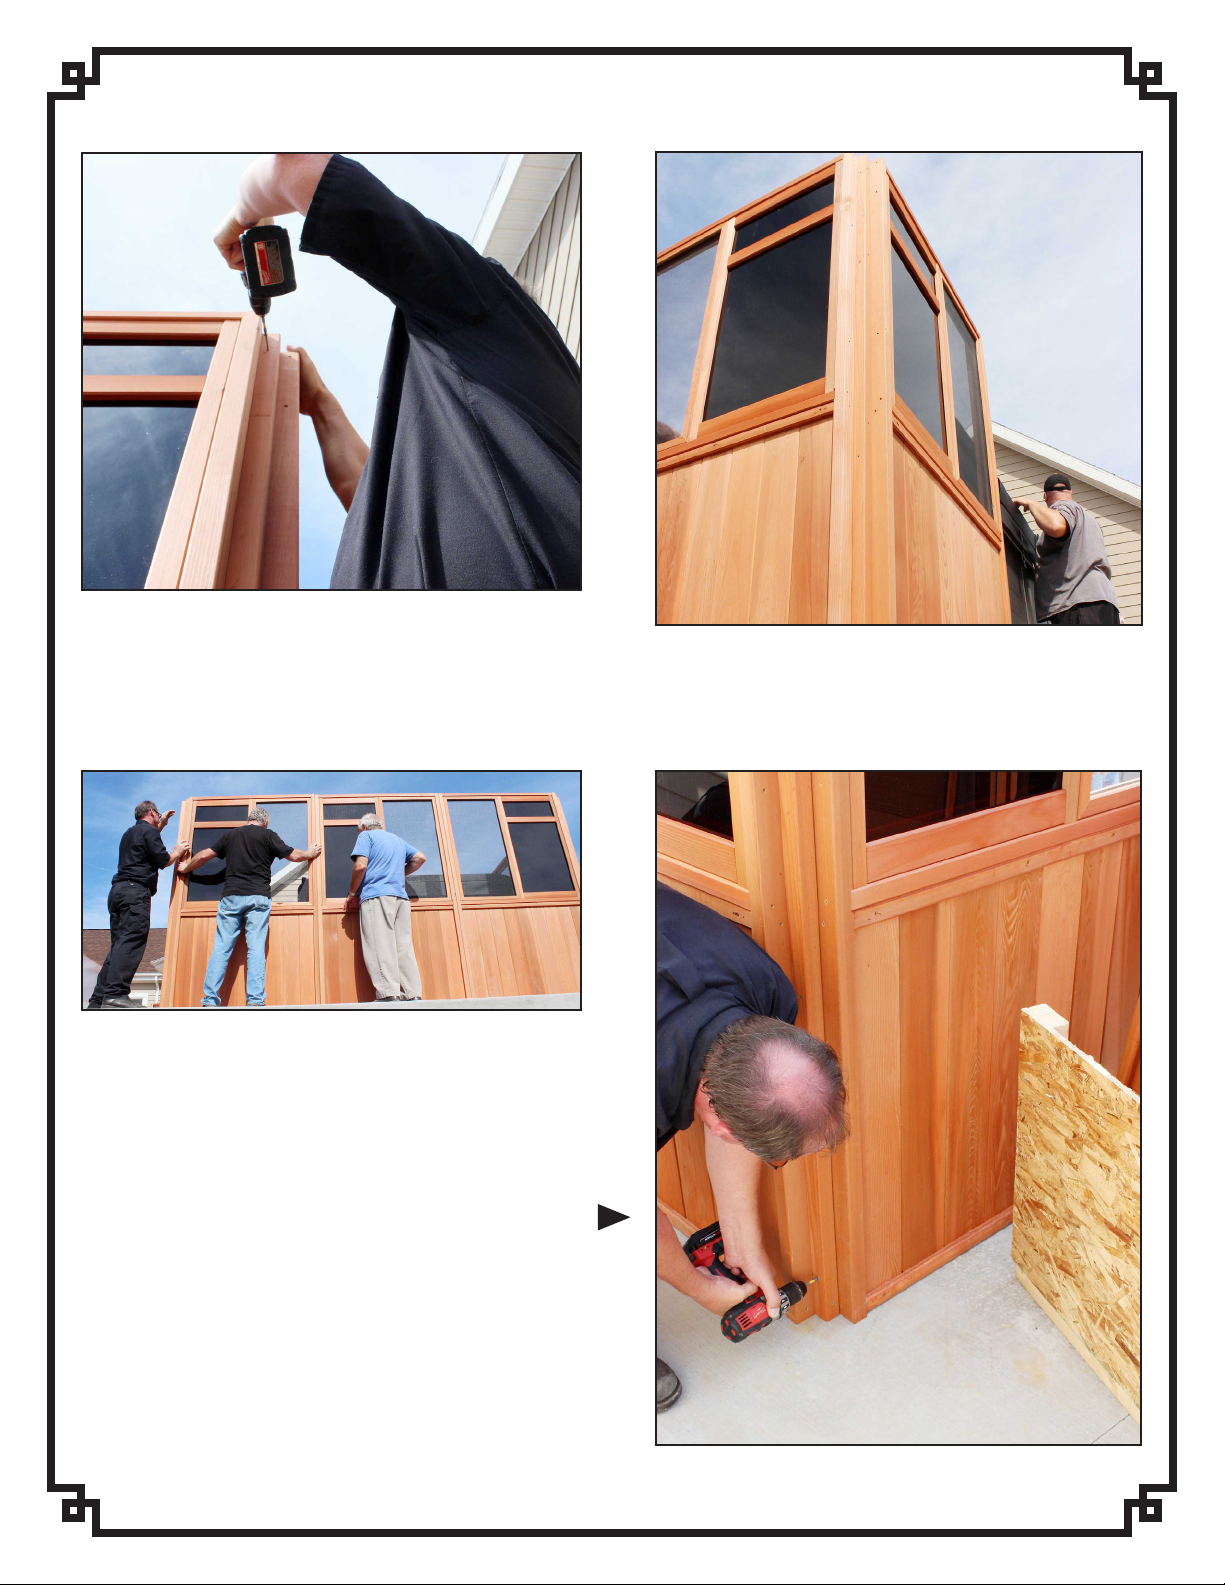
5. Align and secure a Corner to the previous Window
Wall (48”). Make sure the inside edge of the Window
Wall (48”) is ush with the end of the Corner. Secure the
Corner to the Window Wall (48”) with four 2.5” screws.
7. Align two more Window Walls (48”) one after the other
to complete the short side of the gazebo. Secure each of
the window walls to one another as previously described
with six 2.5” screws.
8. Align and secure a Corner to the previous Window Wall
6. Align the next Window Wall (48”) at a 90 degree angle
from the previous Window Wall. Secure the Corner to
the Window Wall (48”) with four 2.5” screws.
(48”). Make sure the inside edge of the Window Wall
(48”) is ush with the end of the Corner. Secure the Corner
to the Window Wall (48”) with four 2.5” screws. Proceed to
align another Window Wall (48”) at a 90 degree angle from
the previous Window Wall (48”) and secure the Corner to this
Window Wall (48”) with four 2.5” screws.
~ 13x25 Gazebo ~
Page 8
INSTALLATION PROCEDURE
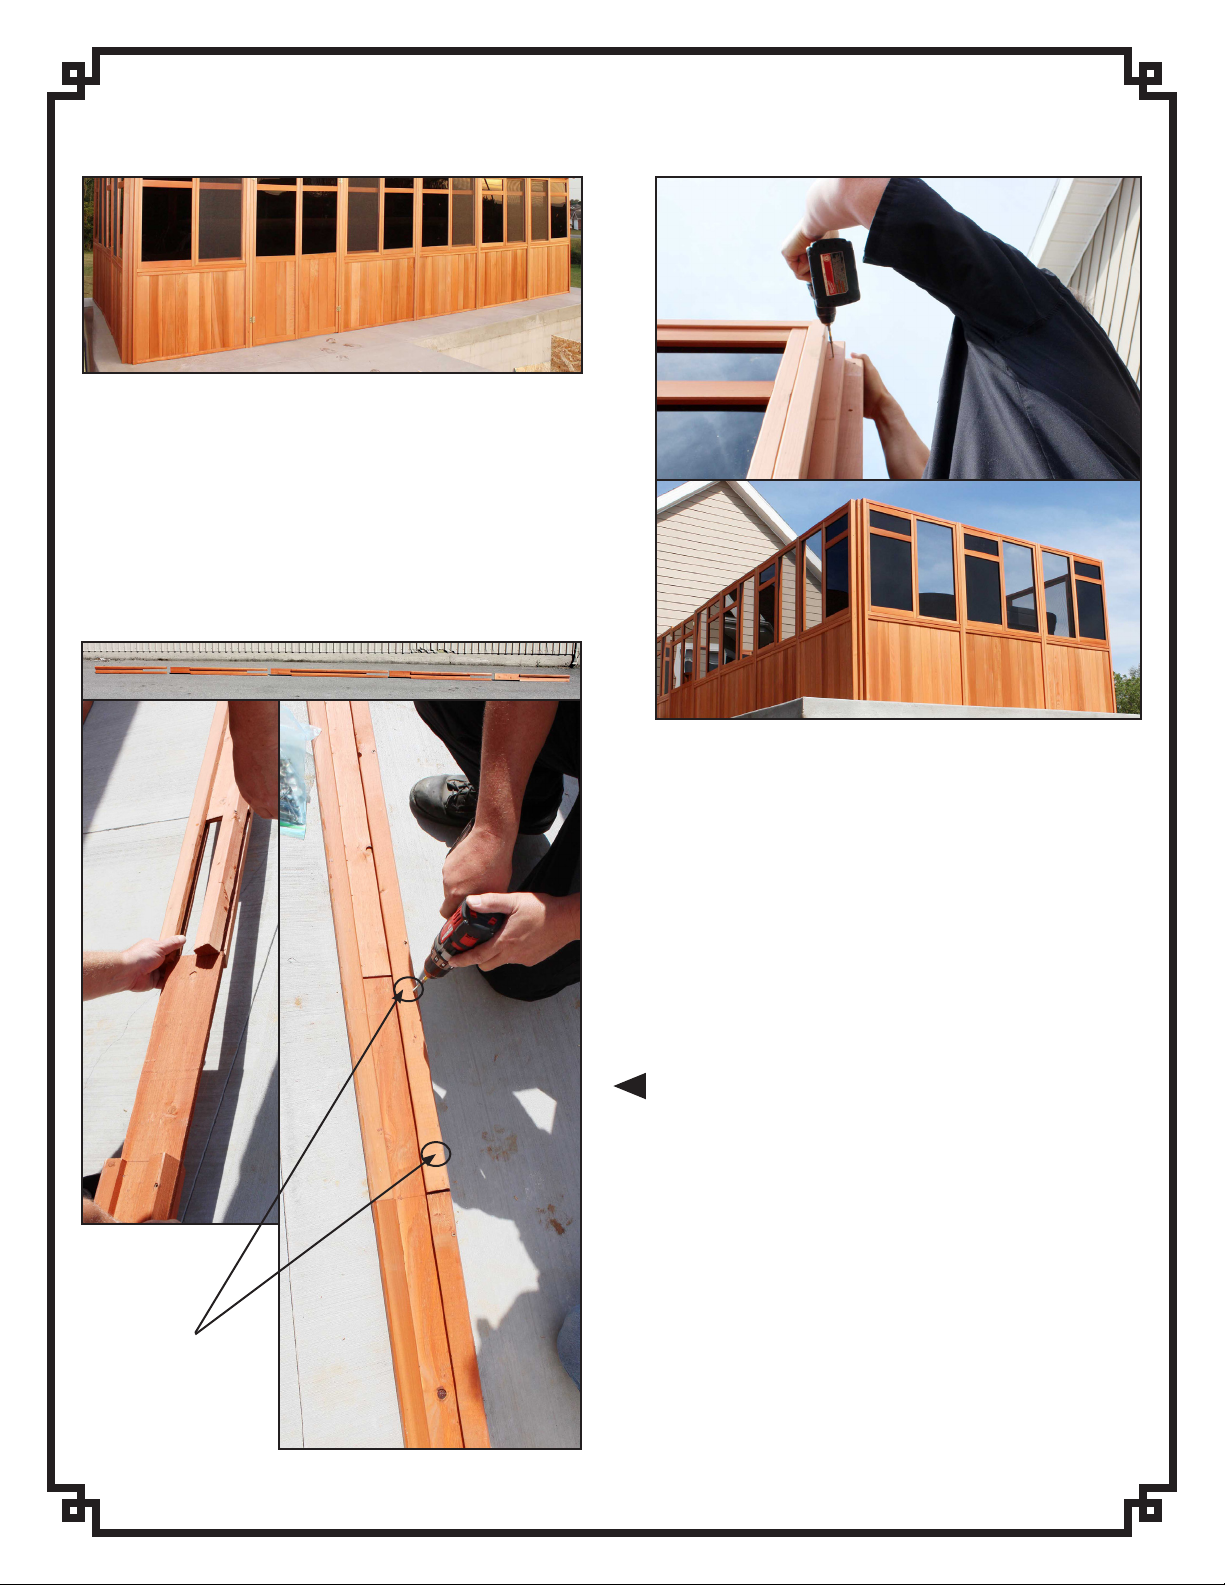
9. Align a Door (48”) and four more Window Walls (48”)
one after the other, to one another, to complete the
second long side of the gazebo. Secure each of the
Window Walls to one another as previously described
with six 2.5” screws.
10. Align and secure a Corner to the previous Window
Wall (48”). Make sure the inside edge of the Window
Wall (48”) is ush with the end of the Corner. Secure the
Corner to the Window Wall (48”) with four 2.5” screws.
Align two more Window Walls (48”) one after the other
to complete the nal short side of the gazebo. Secure
each of the window walls to one another as previously
described with six 2.5” screws.
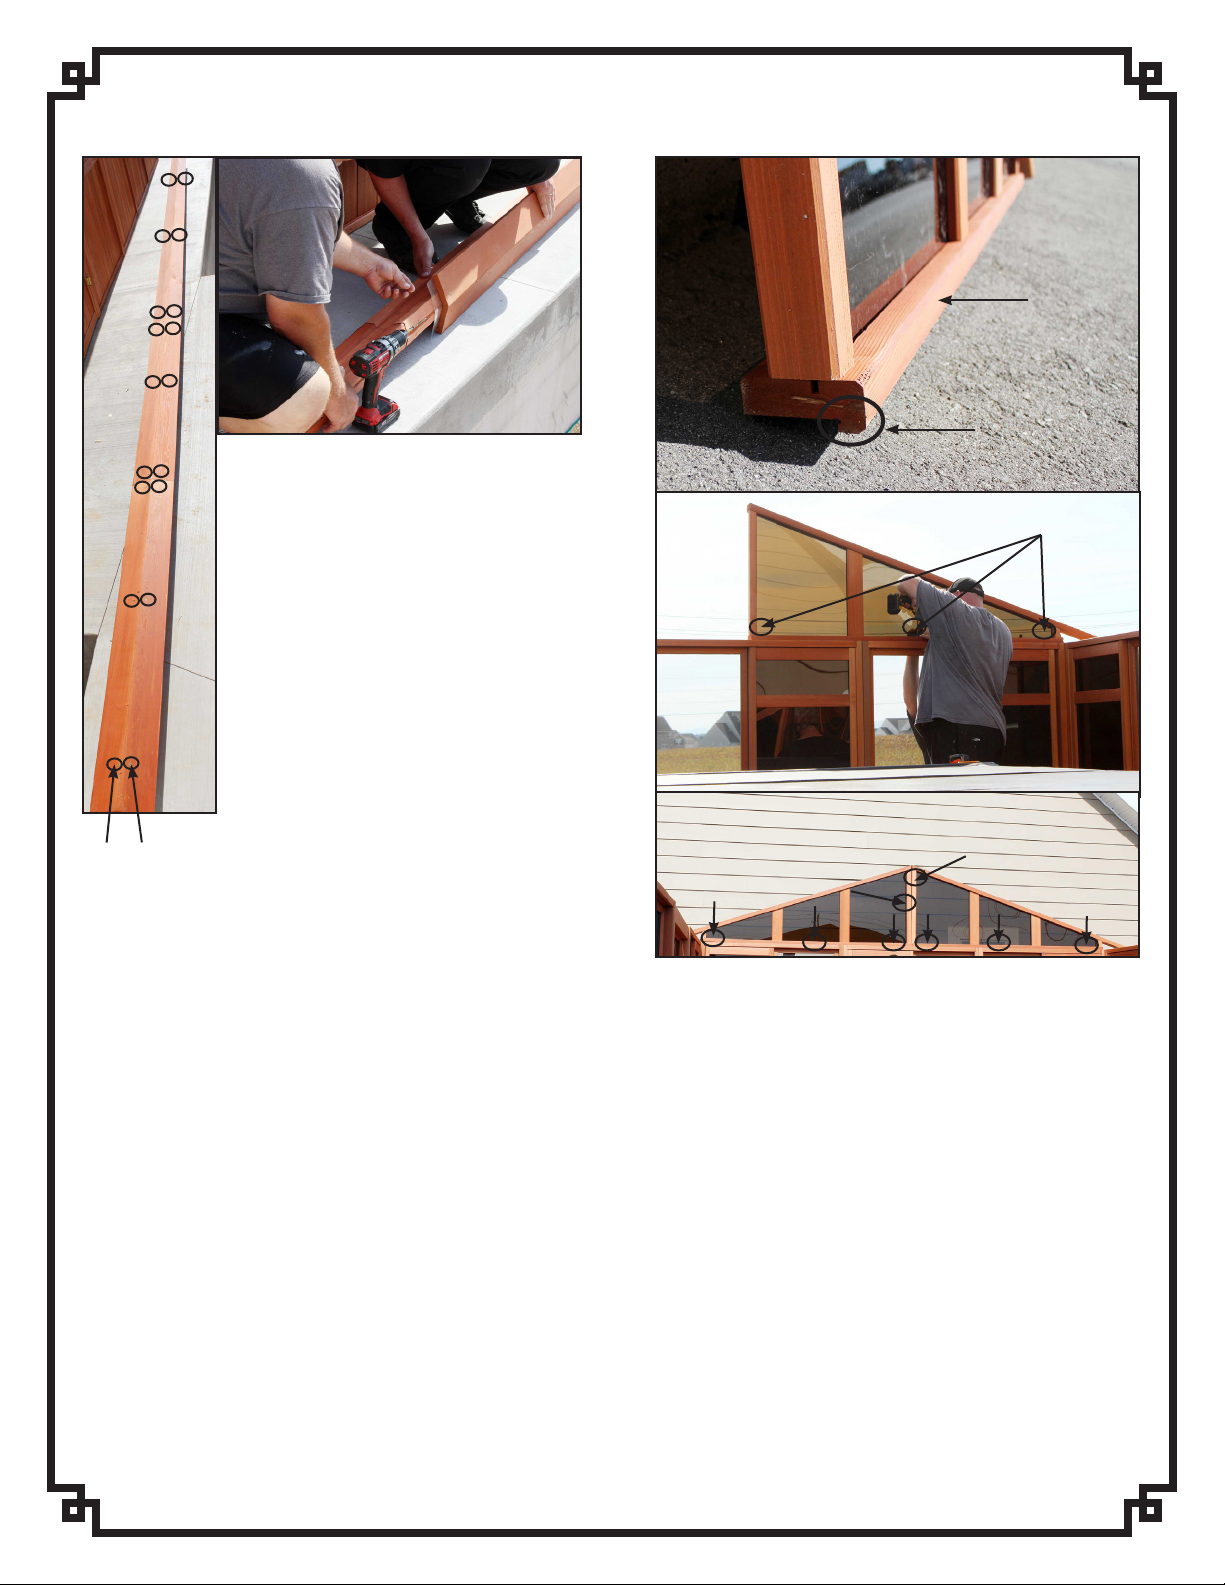
11. Now it is time to assemble the roof Beam. Lay all 5
sections of the Beam on a at surface. Insert one end
Beam section into the rst center Beam section. Secure the
sections together using two 2.5” screws as shown in photo.
Next, insert a second center Beam section into the rst center
Beam section. Secure in the same manner. Next insert
a third center Beam section into the second center Beam
screw here
section. Secure in the same manner. Next insert the nal
end Beam section into the third center Beam section. Secure
in the same manner. Now you have completed the assembly
of all 5 sections of the Beam.
~ 13x25 Gazebo ~
Page 9
INSTALLATION PROCEDURE
12. Now you will secure the Beam Cap
sections to the Beam. Please note
that the rst Beam Cap may be pre-
assembled to the rst end Beam section
at the factory. The Beam Cap will have
a 4 inch overhang on the end of the
Beam section. Attach each Beam Cap
outside
notch
screw here
screw here
section to the corresponding length of
the Beam Section (for example, 5 foot
Beam Cap section should be attached
to 5 foot Beam section; 6 foot Beam
Cap section should be attached to 6
foot Beam section). Remember that
the Beam Cap should have a 4 inch
overhang on both ends of the Beam
when completed. You should use six
1.5” screws to secure each Beam Cap
section to each Beam section.
screw here
13. Time to assemble the Gables. Identify the Right
Gable from the Left Gable. The notch side of the bottom
plate of the gable should face the outside (see photo).
Measure the center of the 12 foot side of the gazebo
and mark the center point on top of the wall. Place the
Right Gable on top of the wall with the end lined up to
the center mark. Secure the Right Gable with three
2.5” screws as shown. Next, align the Left Gable next
to the Right Gable. Screw the two Gables together
using three 2.5” screws. Next, secure the Left Gable
to the top of the wall with three 2.5” screws. See photo.
Repeat the assembly of the other Gables at the other
end of the gazebo in the same manner.
~ 13x25 Gazebo ~
Page 10
INSTALLATION PROCEDURE
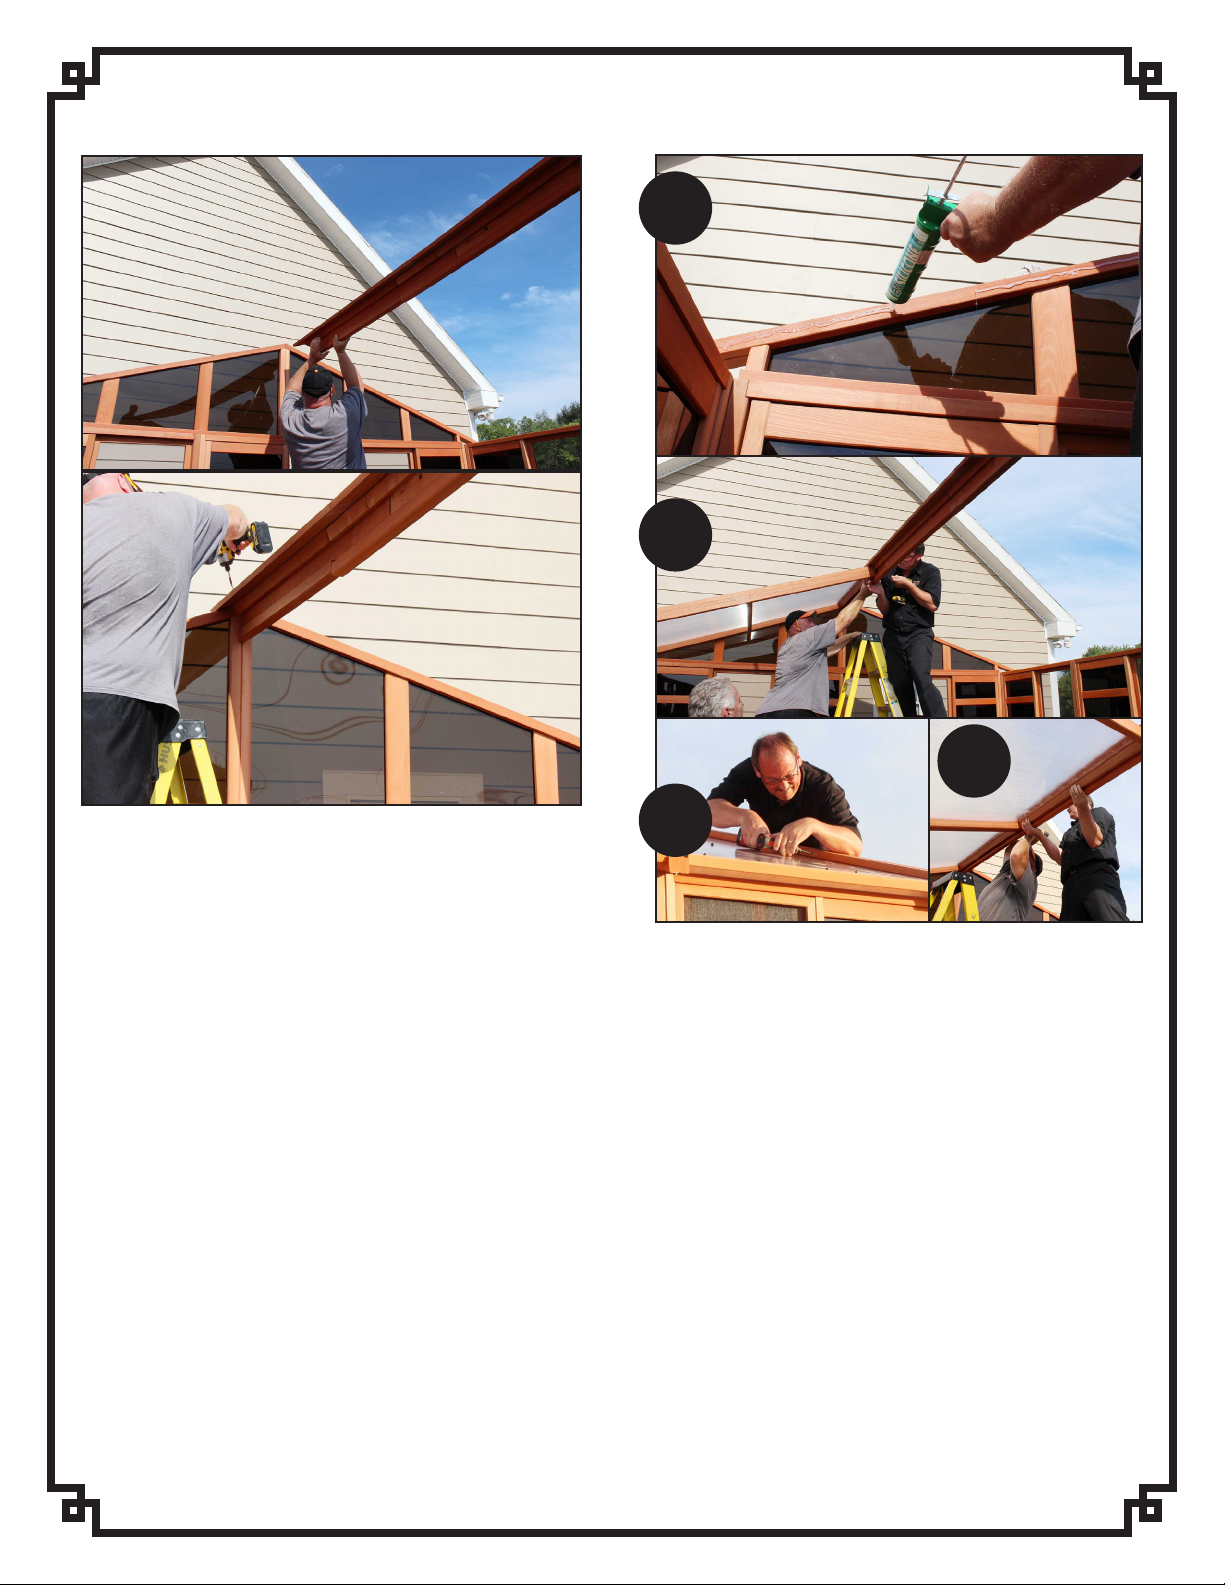
15.1
15.2
14. Lift the assembled Beam onto the center of the top of
the Gable ends. Screw down the Beam to the top of the
Gable at one end only for now using two 2.5” screws. For
now the other end of the Beam should be loose and not
attached to the other Gable. Please note that the Beam
will appear to sag slightly over the large distance and this
is normal at this point (the assembly of the roof panels to
the gazebo will subsequently square and strengthen the
entire building).
15.4
15.3
15. Time to install the rst two Roof Panels. Start by
caulking the top edge of one of the Gables (photo 15.1).
Place one 49.5” End Roof Panel against the caulked
Gable end and up to the Beam. Both connections
should be tight. Secure the End Roof Panel to the
Beam by screwing two 2.5” screws at each end from the
Beam side to the side 2x4s of the Roof Panel (photo.
15.2). Now screw the Roof Panel to the Gable end
on top side using three 2.5” screws (photo 15.3). Now
caulk the edge of the rst End Roof Panel and slide a
48” Middle Roof Panel next to it (photo 15.4). Screw
the Middle Roof Panel to the Beam in the same manner
as the previous Roof Panel. Now screw Middle Roof
Panel to the End Roof Panel using four 2.5” screws
evenly spaced.
~ 13x25 Gazebo ~
Page 11
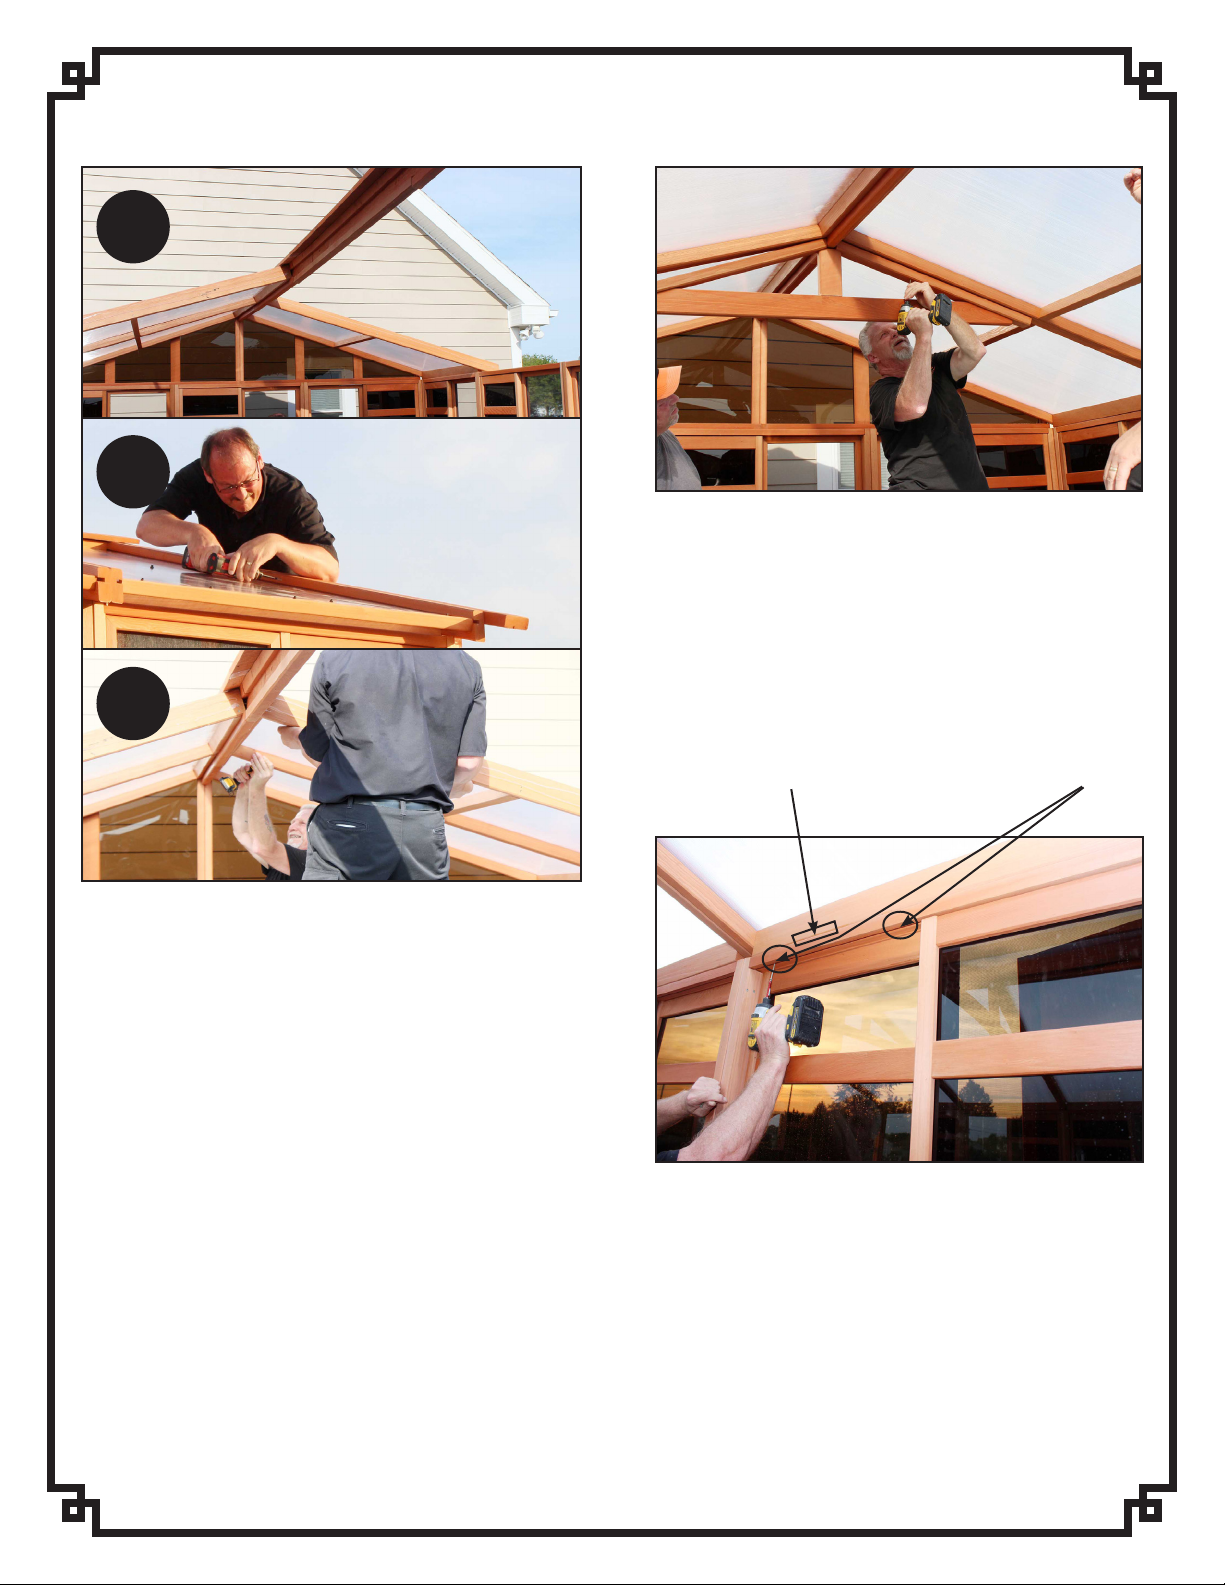
16.1
16.2
INSTALLATION PROCEDURE
17. Now install the rst Truss. Screw one side of the
Truss up to the Roof Panels using six 2.5” screws.
Push the Truss up tight to the Roof Panels and secure
the other side of the Truss with six 2.5” screws (photo
17).
16.3
16. Time to install the third and fourth Roof Panels. Start
by caulking the top edge of the other Gable. Place one
49.5” End Roof Panel against the caulked Gable end
and up to the Beam. Both connections should be tight.
Secure the End Roof Panel to the Beam by screwing two
4” screws though the end of the Roof Panel into the Beam
(photo 16.1). Now screw the Roof Panel to the Gable
end on the top side using three 2.5” screws (photo 16.2).
Note you may need to shift the end gazebo walls in order
to make roof panels tight against the gable end. It is
important not to force the roong panels but rather shift
the wall section. Next, caulk the edge of the End Roof
Panel and slide a 48” Middle Roof Panel next to it (photo
screw here
ush
18. At this point fasten down the rst four roong panels
to the top of the walls with 2.5” screws. Screw upwards
from the groove at the top of wall into the roong panel.
Make sure the roong panel is ush with the inside of
the wall.
in groove
16.3). Screw the Middle Roof Panel to the Beam using
two 4” screws. Now screw the Middle Roof Panel to the
End Roof Panel using four 2.5” screws evenly spaced.
~ 13x25 Gazebo ~
Page 12
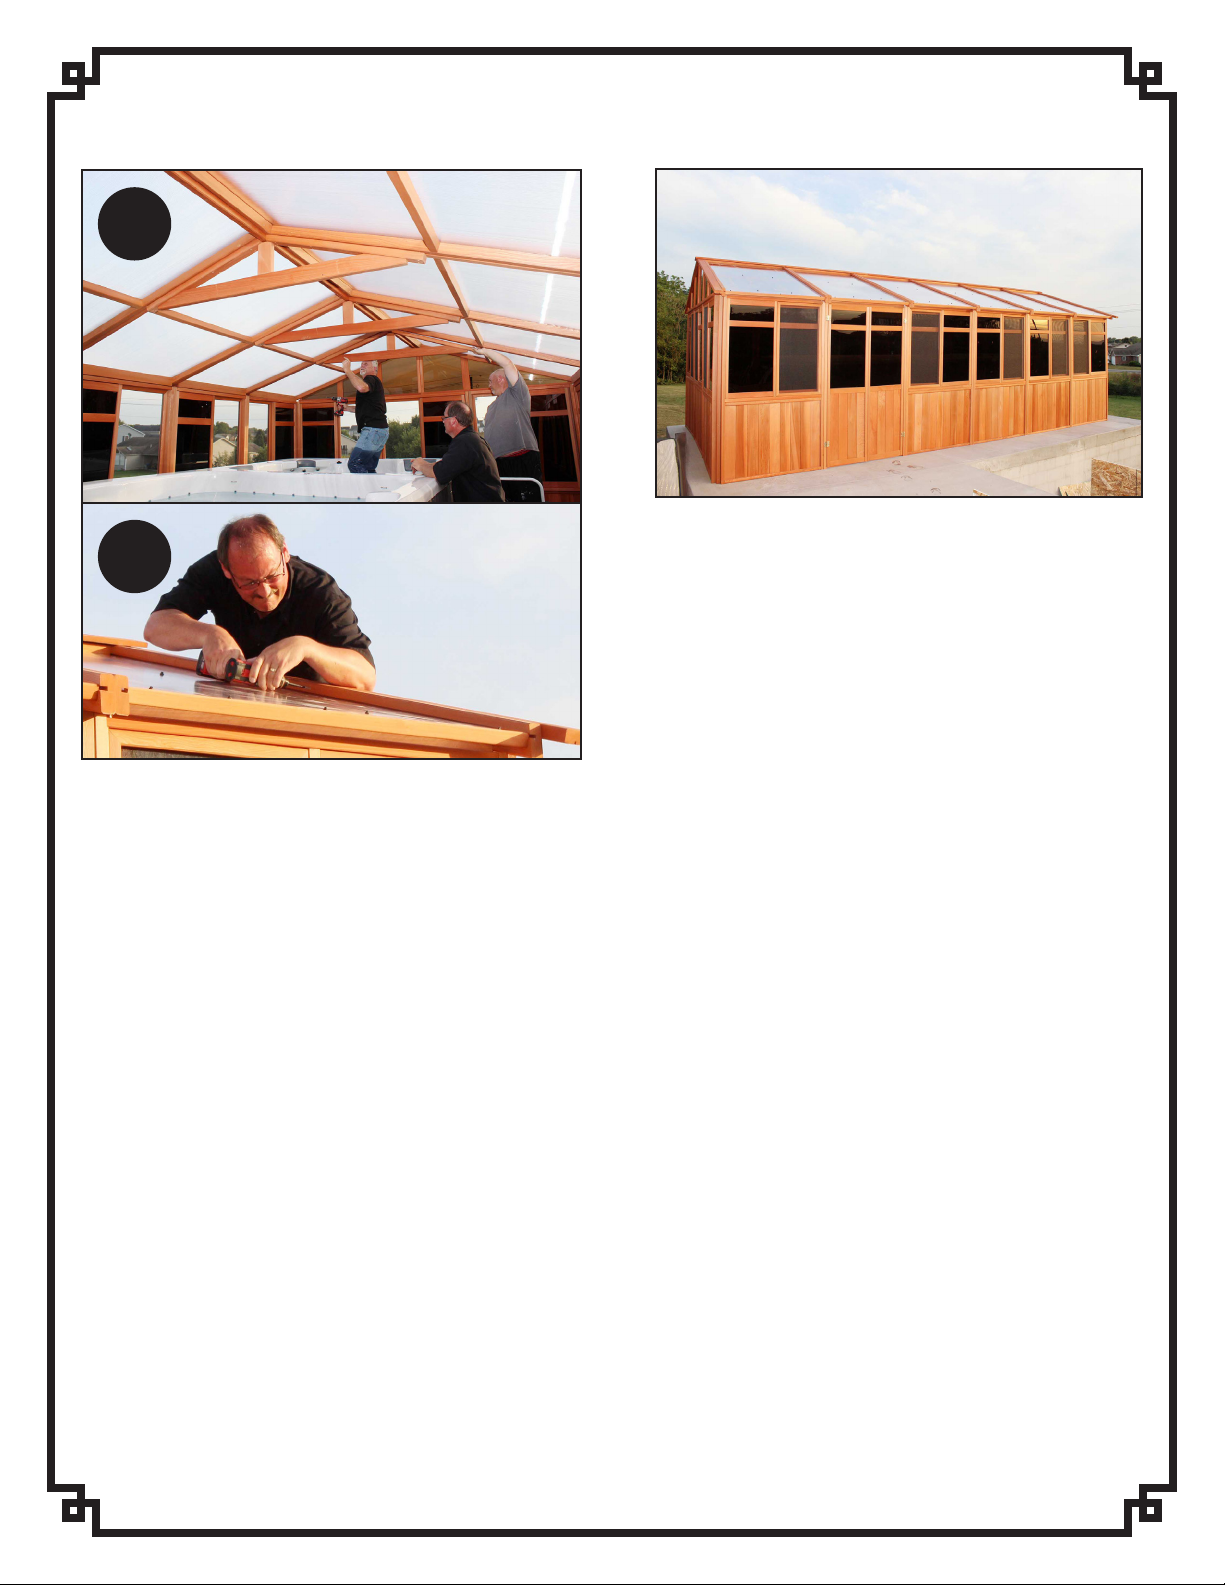
19.1
19.2
INSTALLATION PROCEDURE
20. Enjoy your gazebo.
19. Repeat the previous steps to install the remaining
Middle Roof Panels, End Roof Panel and Trusses.
Please note that the Middle Roof Panels are 48” and the
End Roof Panels are 49.5” and should not be mixed up.
The End Roof Panels go on last (photo 19.1). Please
note if the gazebo needs slight adjustment because the
last two End Roof Panels are not tight against the Gable
End you may simply adjust the end wall by unscrewing
and re-screwing the Corner 2”x2” and sliding the wall so
the Gable end is tight against the end Roong Panels
(photo 19.2).
~ 13x25 Gazebo ~
 Loading...