

Page 1
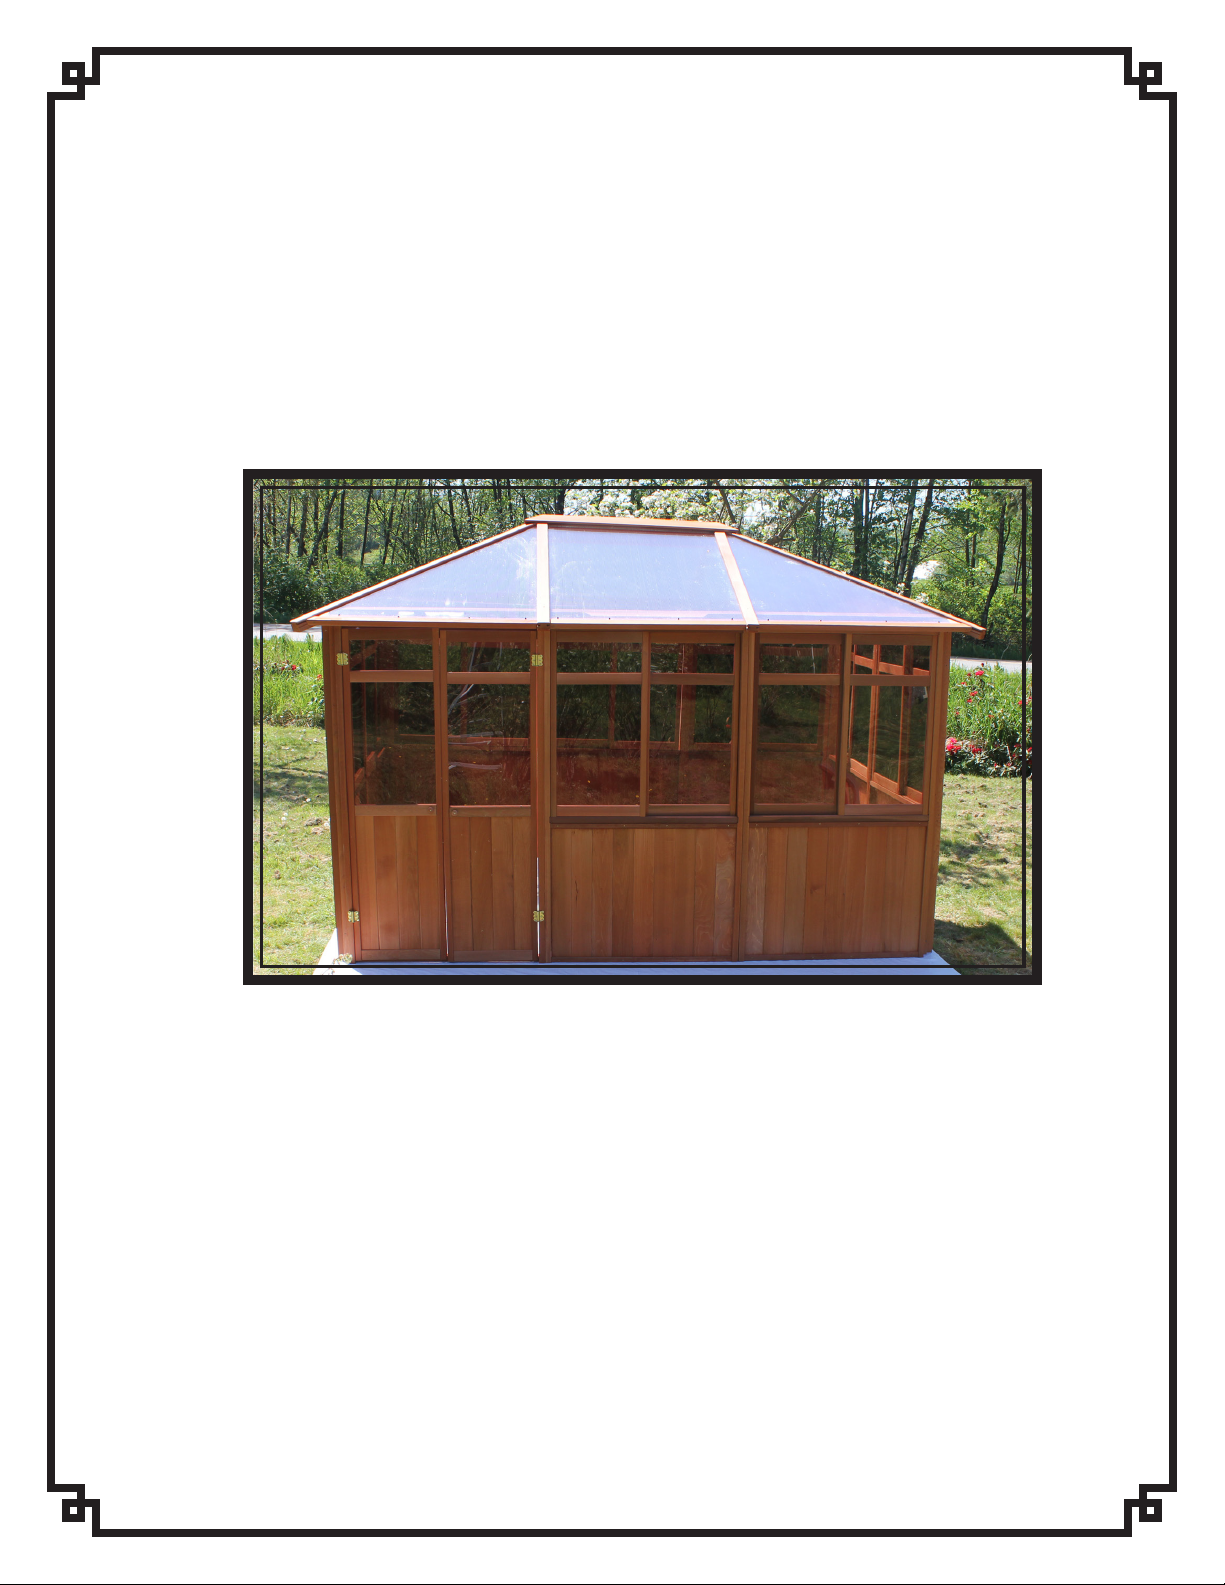
GAZEBO INSTALLATION
MANUAL
SIZE 9x13
~ 9x13 Gazebo ~
Page 2
PARTS LIST
ITEM# PART # DESCRIPTION QTY
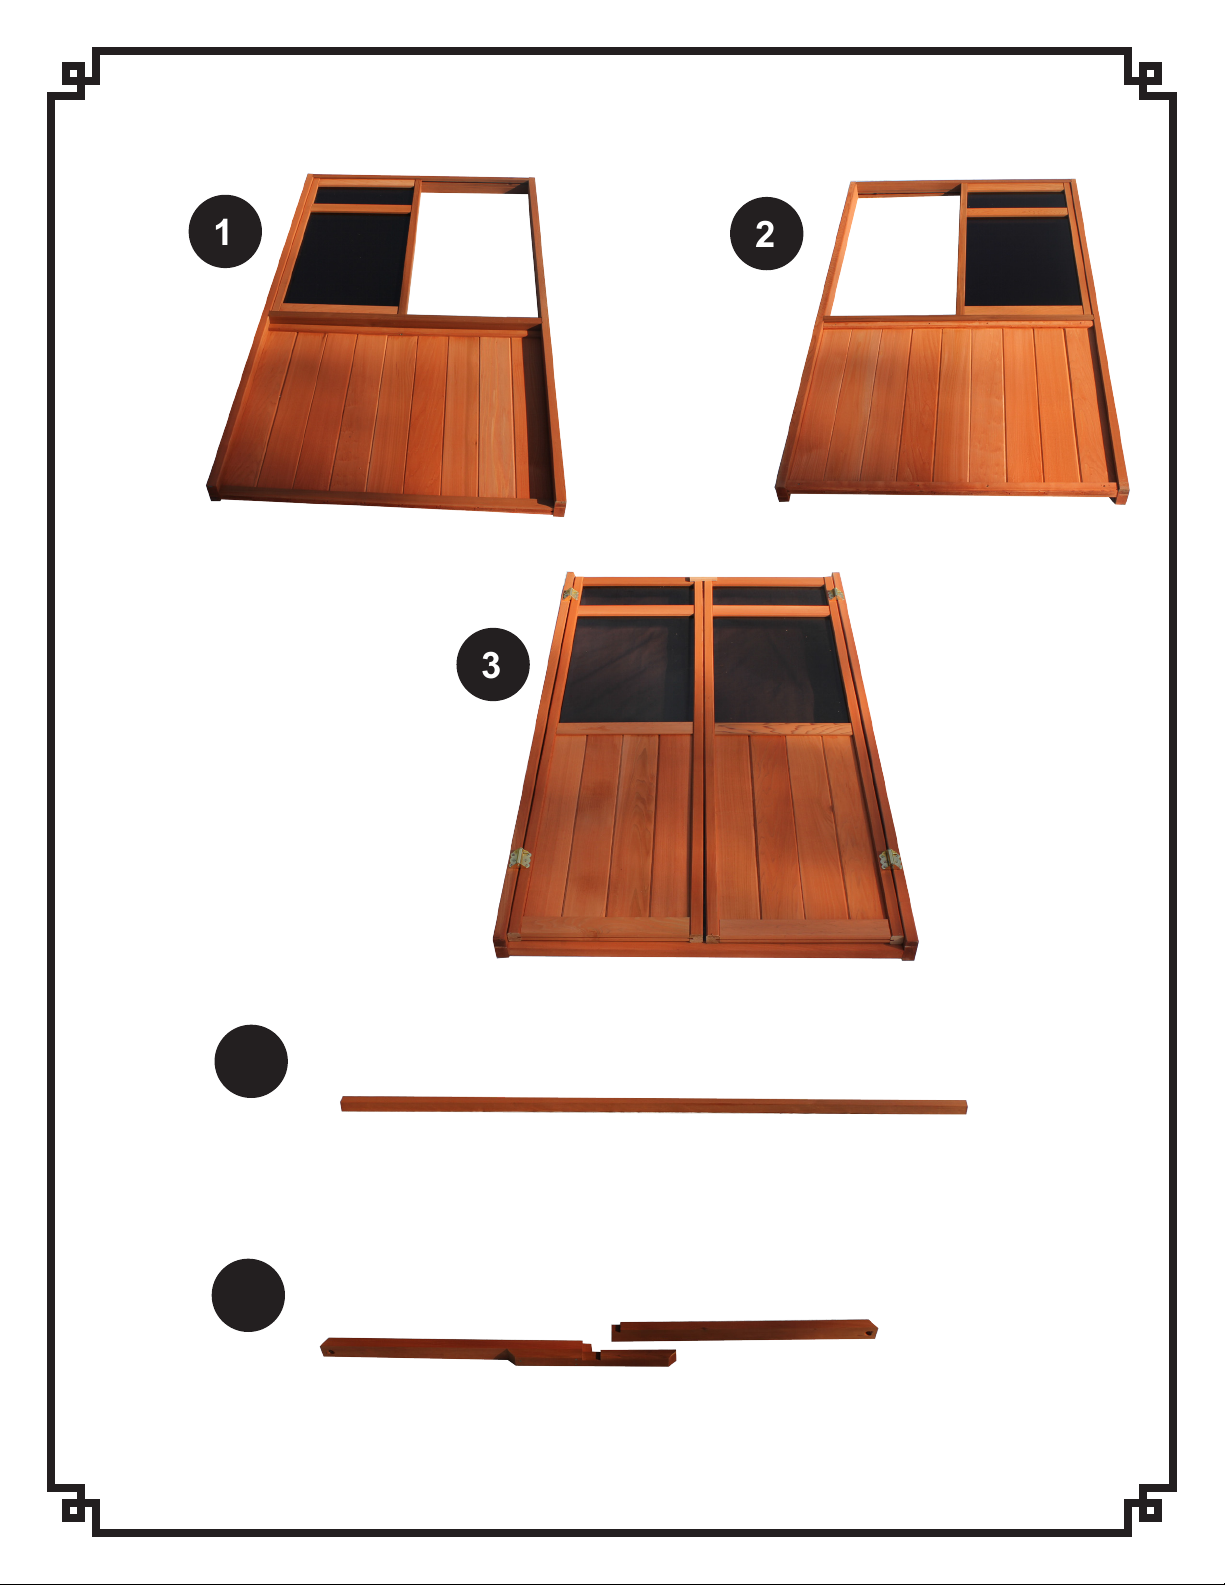
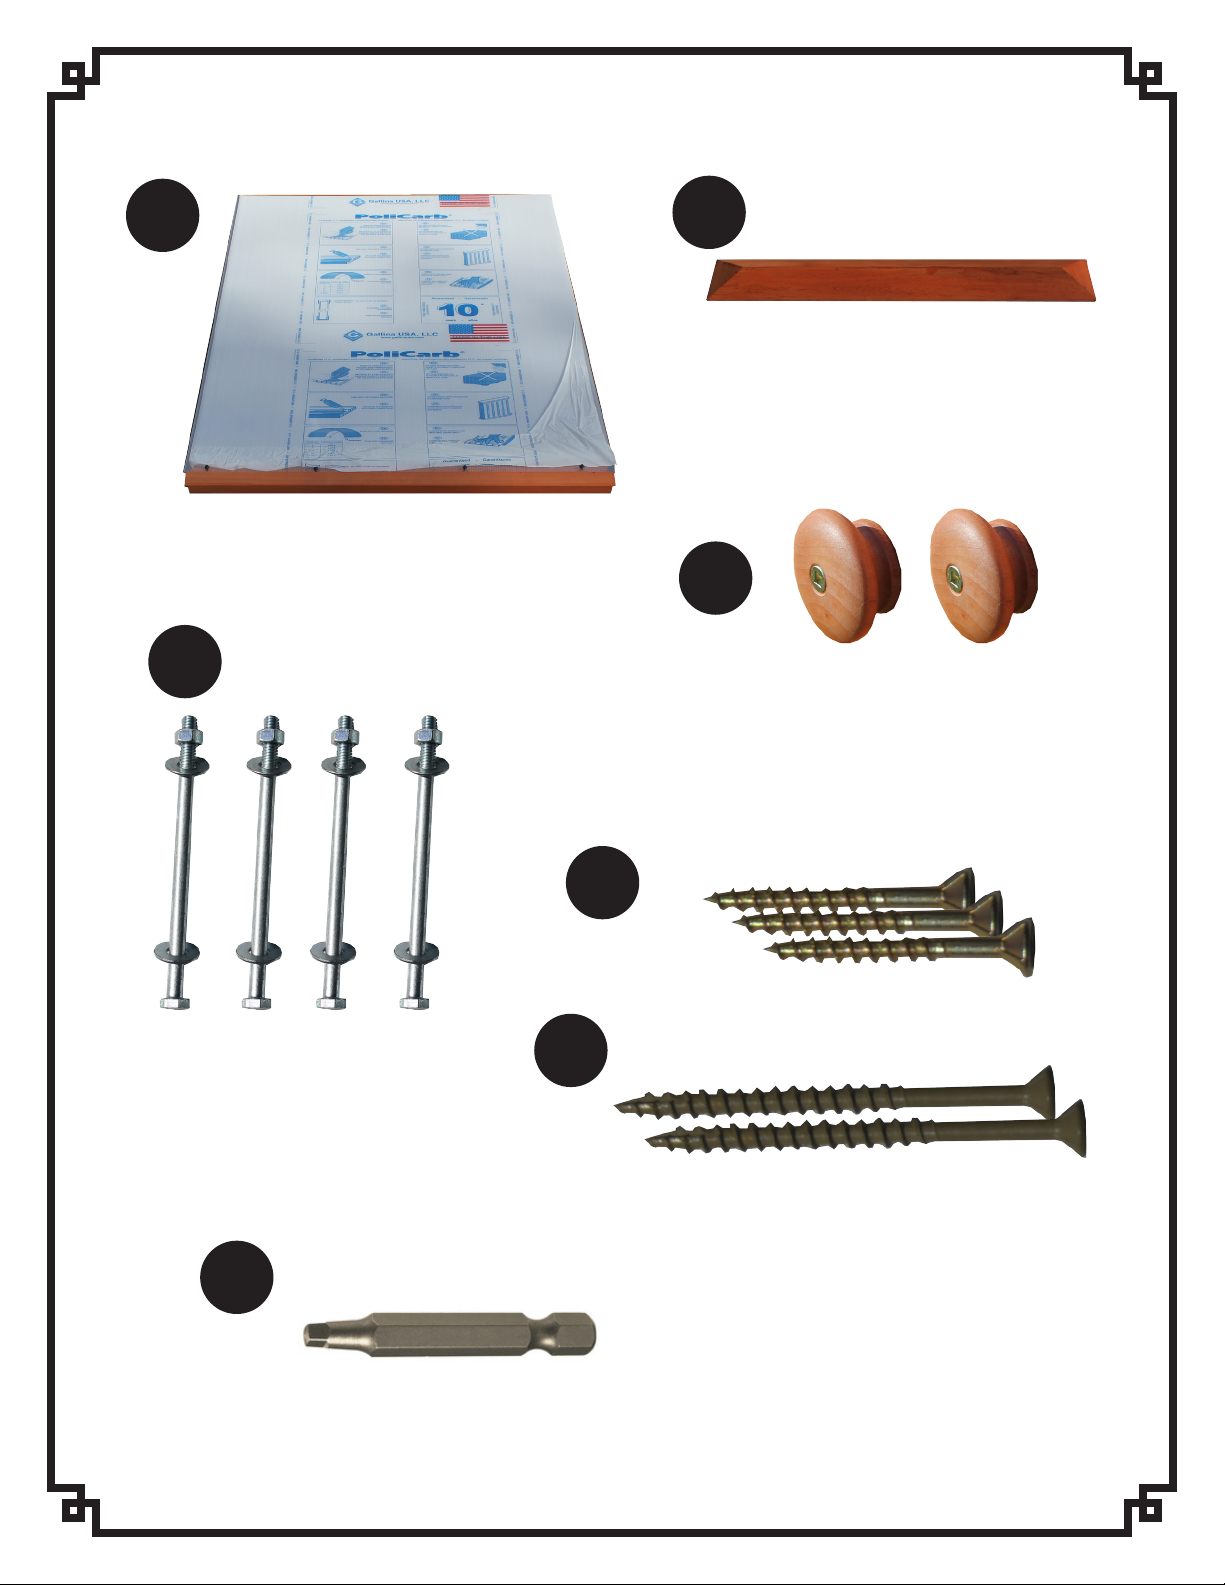
1 WWRS-4884 Window Wall (Right Side) 48” ............................................... 5
2 WWLS-4884 Window Wall (Left Side) 48” .................................................. 4
3 DOOR-4884 Door 48” ................................................................................ 1
4 CRNR-0202 Corner 2”x2” .......................................................................... 4
5 HEEN-94875 End Header 94.875” (2 sections) .......................................2 sets
6 HESI-14275 Side Header 142.75” (2 sections plus 1 joiner piece) ........2 sets
7 CHIP-0080 Corner Hip 80” ....................................................................... 4
8 SRAF-0585 Side Rafters 58.5” ................................................................. 6
9 CHUB-0913 Center Hub for 9x13 Gazebo ................................................ 1
10 PRCO-5225 Corner Roof Panel, Right 52.25” ........................................... 4
11 PLCO-5225 Corner Roof Panel, Left 52.25” ............................................. 4
12 PCSQ-0455 Center Roof Panel 45.5” ....................................................... 2
13 RCAP-0913 Roof Cap for 9x13 Gazebo ................................................... 1
14 KNOB-0000 Door Knobs ........................................................................... 2
15 BOLT-0000 Lag Bolts ............................................................................... 4
16 SCRW-0015 Door Knob screws 1.5” .......................................................... 2
17 SCRW-0025 Screws 2.5” ......................................................................... 150
18 SBIT-0000 Robertson Screw Bit ............................................................. 1
~ 9x13 Gazebo ~
Page 3
PARTS LIST
Window Wall
(Right Side)
48”
1
2
Window Wall
(Left Side)
48”
3
Door 48”
4
5
Corner 2”x2”
End Header 94.875” (2 sections)
~ 9x13 Gazebo ~
Page 4
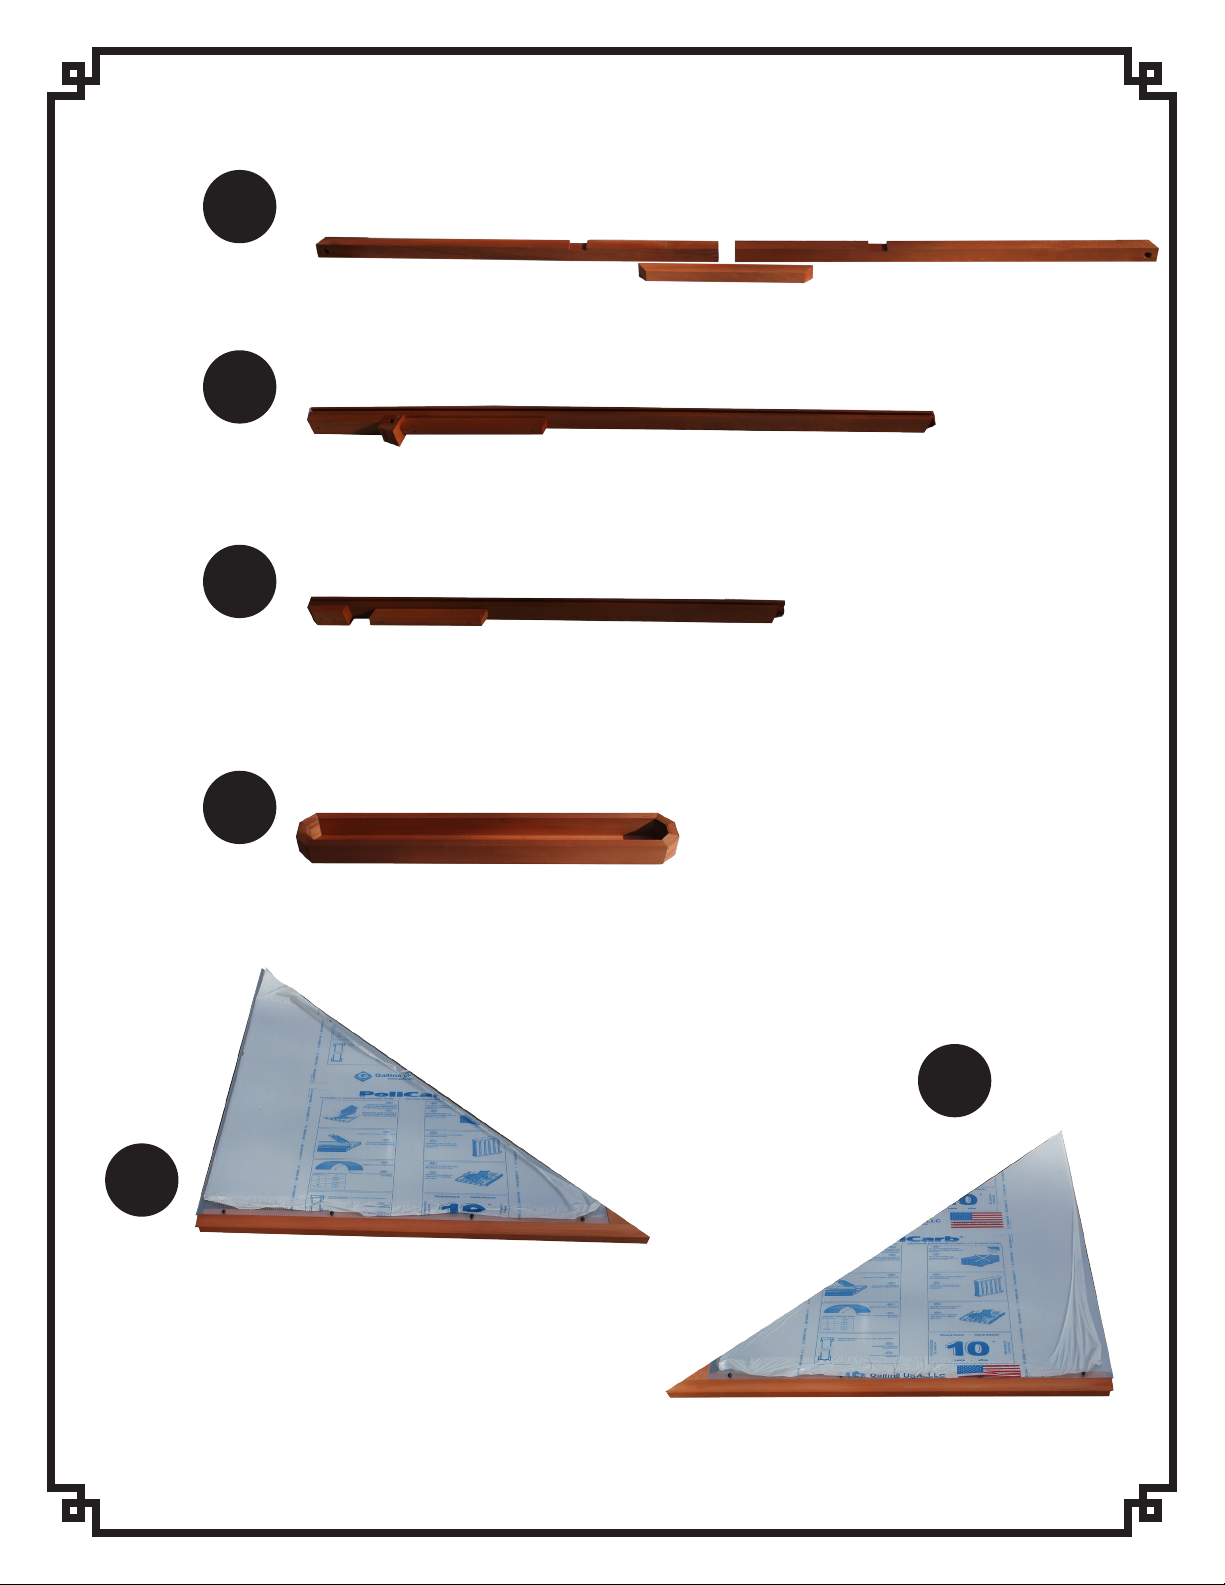
6
7
PARTS LIST
Side Header 142.75” (2 sections plus 1 jointer piece)
Corner Hip 80”
10
8
Side Rafters 58.5”
Center Hub for 9x13 Gazebo
9
11
Corner Roof Panel,
Left 52.25”
Corner Roof Panel, Right 52.25”
~ 9x13 Gazebo ~
Page 5
PARTS LIST
12
Center Roof
Panel 45.5”
15
Lag Bolts
13
14
Door Knobs
Roof Cap for 9x13 Gazebo
18
Robertson Screw Bit
17
Door Knob screws 1.5”
16
Screws 2.5”
~ 9x13 Gazebo ~
Page 6
INSTALLATION PROCEDURE
IMPORTANT: Please read the full instructions in entirety before starting
assembly of the gazebo. The assembly of this gazebo requires you to provide
a 1/2” socket wrench, a 6 foot step ladder, a cordless drill, and a minimum of 2
persons.
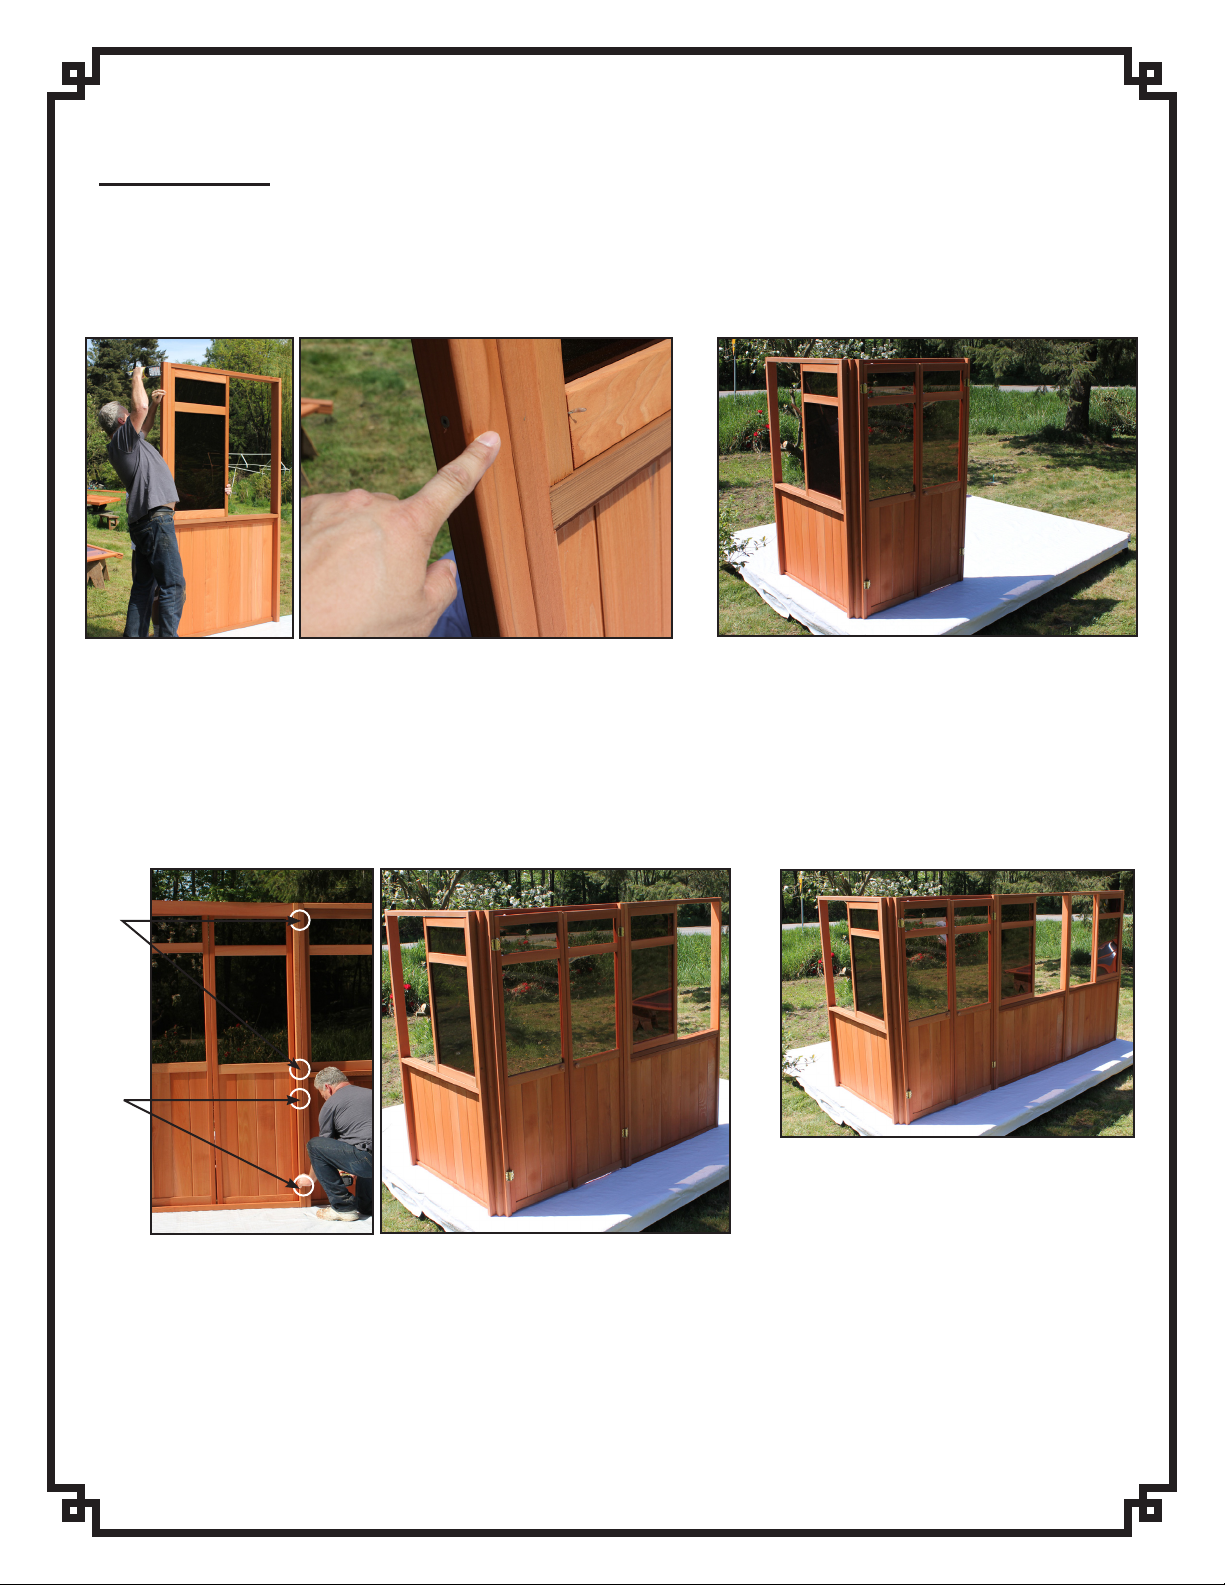
1. Ensure that the surface you will be installing the enclosure on is
at, smooth and level. Starting with a Corner and Window Wall (48”)
align them in an upright position. The inside edge of the Window
Wall (48”) should be ush with the end of the Corner. Secure the
Corner to the Window Wall (48”) with four 2.5” screws.
2 screws
1 screw
3. Align a Window Wall (48”) next to the Door (48”) and secure it
with six 2.5” screws (more specically, 2 screws side by side at the
top; 2 screws side by side adjacent to the bottom of the window
2. Align a Door (48”) at a 90 degree angle from
the rst Window Wall (48”) and secure the
Corner to the Door (48”) with four 2.5” screws.
4. Align and attach a Window Wall (48”)
to the previous Window Wall (48”).
Secure window walls to one another
as previously described with six 2.5”
screws.
opening; 2 screws one at the top and one at the bottom of the
wood skirt).
~ 9x13 Gazebo ~
Page 7
INSTALLATION PROCEDURE
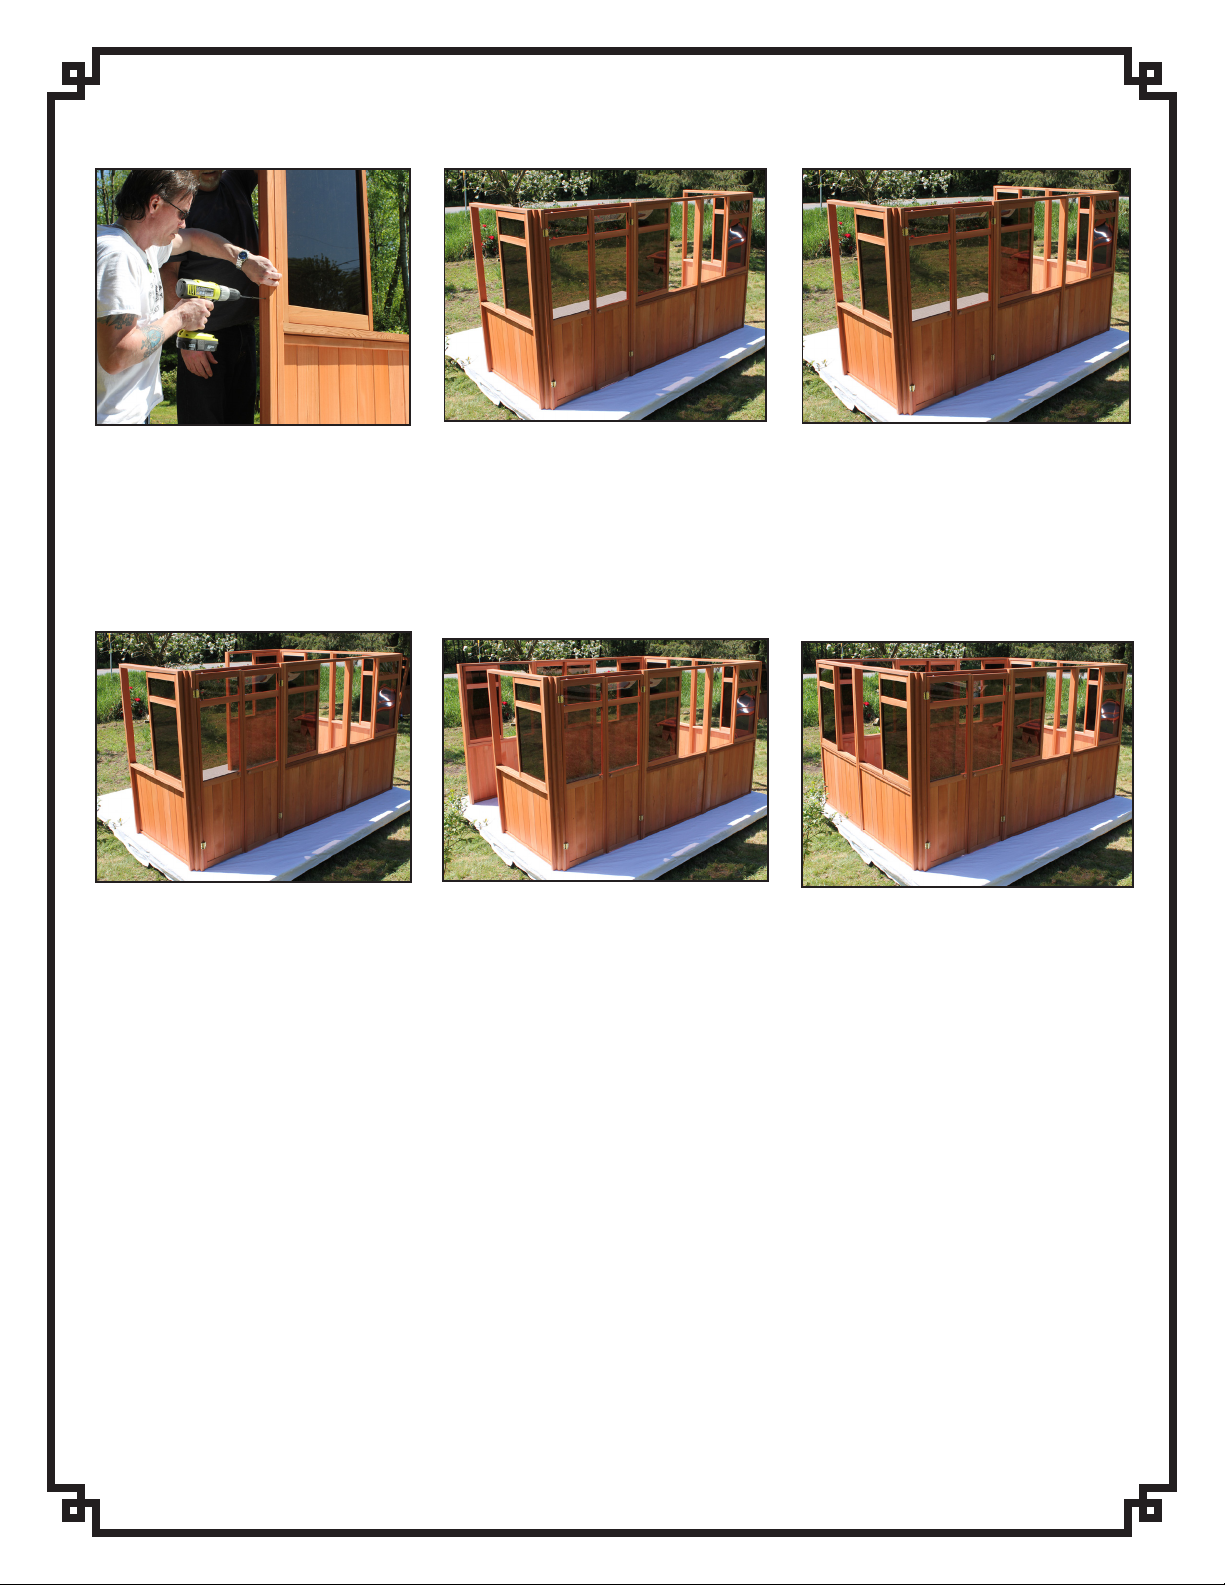
5. Align and secure a Corner to the
previous Window Wall (48”). Secure
the Corner to the Window Wall (48”)
with four 2.5” screws.
8. Align and attach a Corner to the
last Window Wall (48”) secure with
four 2.5” screws. Then align and
attach another Window Wall (48”) at
6. Align the next Window Wall
(48”) at a 90 degree angle from the
previous Window Wall. Secure the
Corner to this Window Wall (48”)
with four 2.5” screws.
9. Align and attach two more
Window Walls (48”) to the previous
Window Wall (48”). Secure window
walls to one another as previously
7. Align the next Window Wall (48”)
to the previous Window Wall (48”).
Secure window walls to one another
as previously described with six 2.5”
screws.
10. Align a Corner to the previous
Window Wall (48”). Make sure the
inside edge of the Window Wall
(48”) is ush with the end of the
a 90 degree angle from the previous
Window Wall (48”). Secure the
Corner to this subsequent Window
Wall (48”) with four 2.5” screws.
described with six 2.5” screws.
~ 9x13 Gazebo ~
Corner. Secure the Corner to the
Window Wall (48”) with four 2.5”
screws. Then align a Window Wall
(48”) at a 90 degree angle from the
previous Window Wall. Secure the
Corner to this Window Wall (48”)
with four 2.5” screws. Then secure
the nal Window Wall (48”) in place
to complete the assembly of the
gazebo body.
Page 8
INSTALLATION PROCEDURE
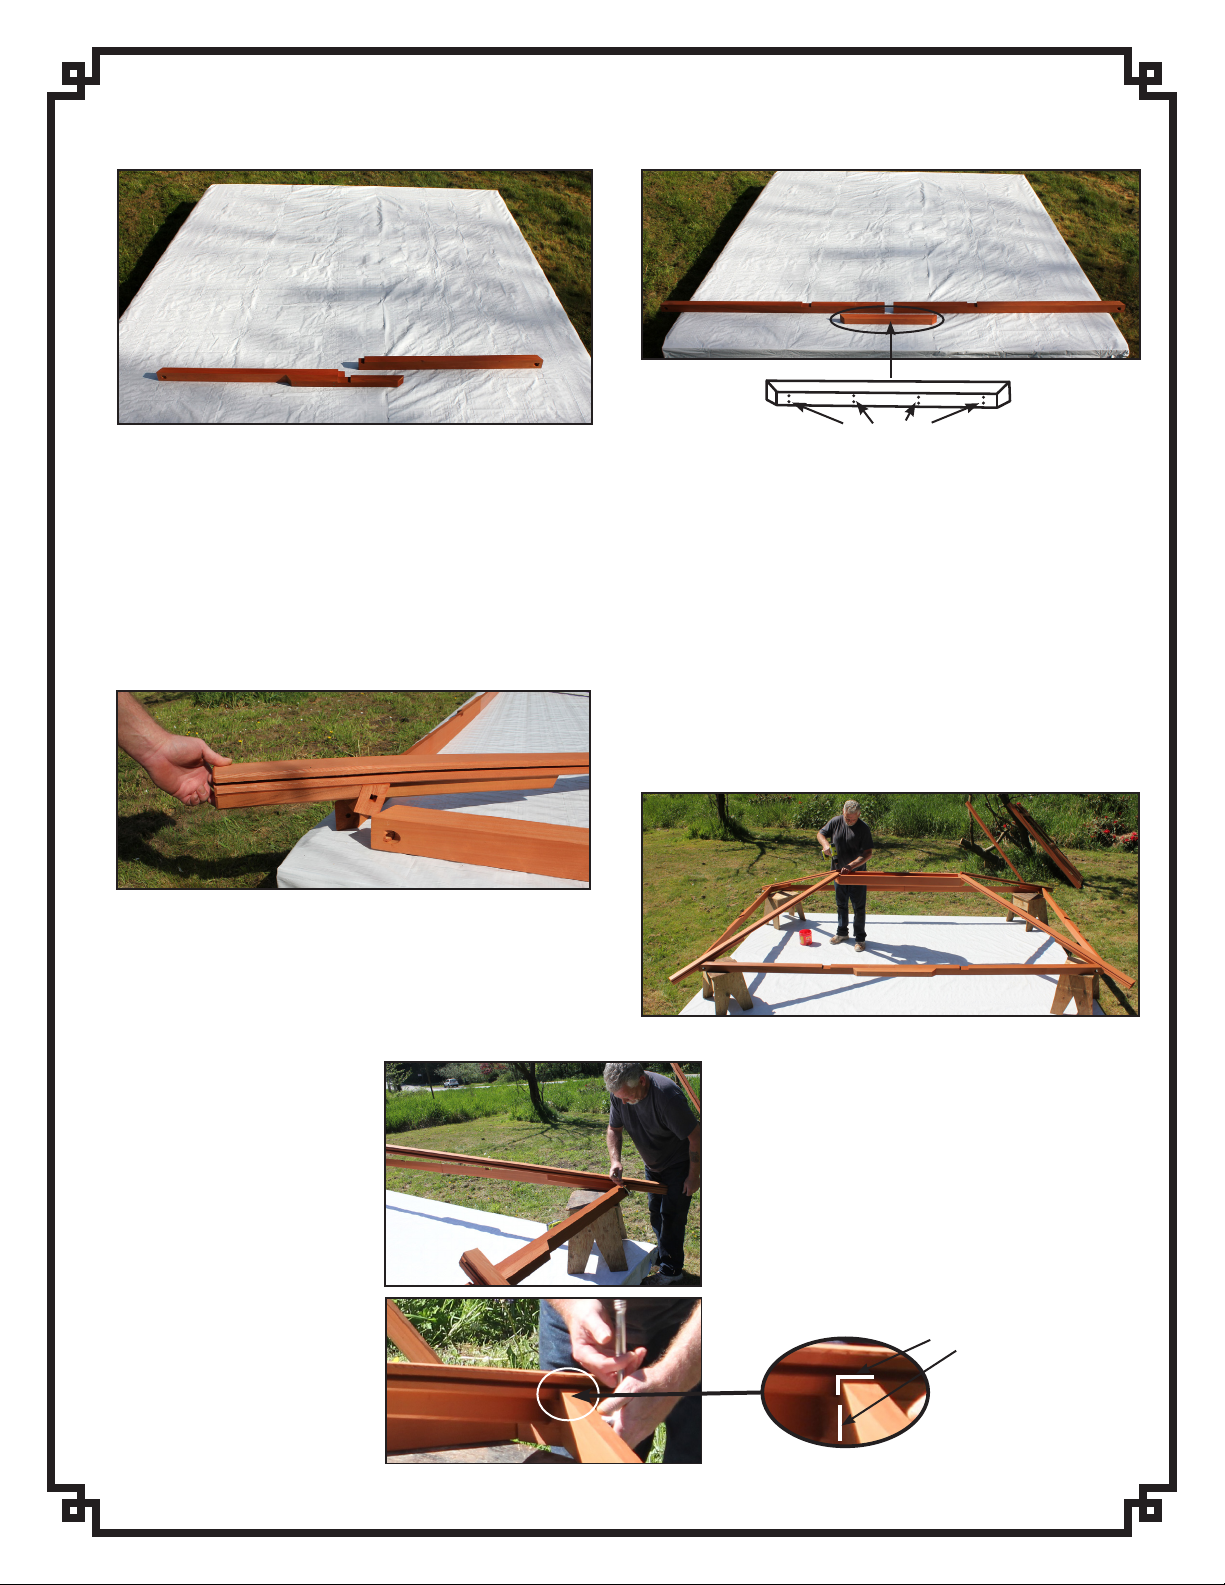
11. Assemble the End Headers. Each set of End
Headers consist of two sections. Connect the two
sections with three 2.5” screws. Do this again for the
second End Header. Once you have assembled the
End Headers the full length of each assembled End
Header should be 94.875”.
13. Align and attach the Corner Hips to the Side
Headers and End Headers with the Lag Bolts. The
Lag bolts should be only hand tight for now.
screw here
12. Assemble the Side Headers. Each set of Side
Headers consist of three pieces. There are two 71 3/8”
inch sections plus one joiner piece that is 29” in length.
Connect the two sections to the joiner piece with eight
2.5” screws. Do this again for the second Side Header.
Once you have assembled the Side Headers the full
length of each assembled Side Header should be 142
3/4 “.
15. Once the Corner Hips
are attached to the Center
Hub you can proceed to
tighten the Lag Bolts with a
socket wrench. Make sure
the top of the Header is ush
with the bottom of the dado.
Also, make sure the inside of
the Header is ush with the
inside block on the Corner
Hip.
14. Raise the Center Hub and attach
the Corner Hips to the Center Hub.
Use one 2.5” screw on each Corner
Hip.
ush
~ 9x13 Gazebo ~
Page 9
INSTALLATION PROCEDURE
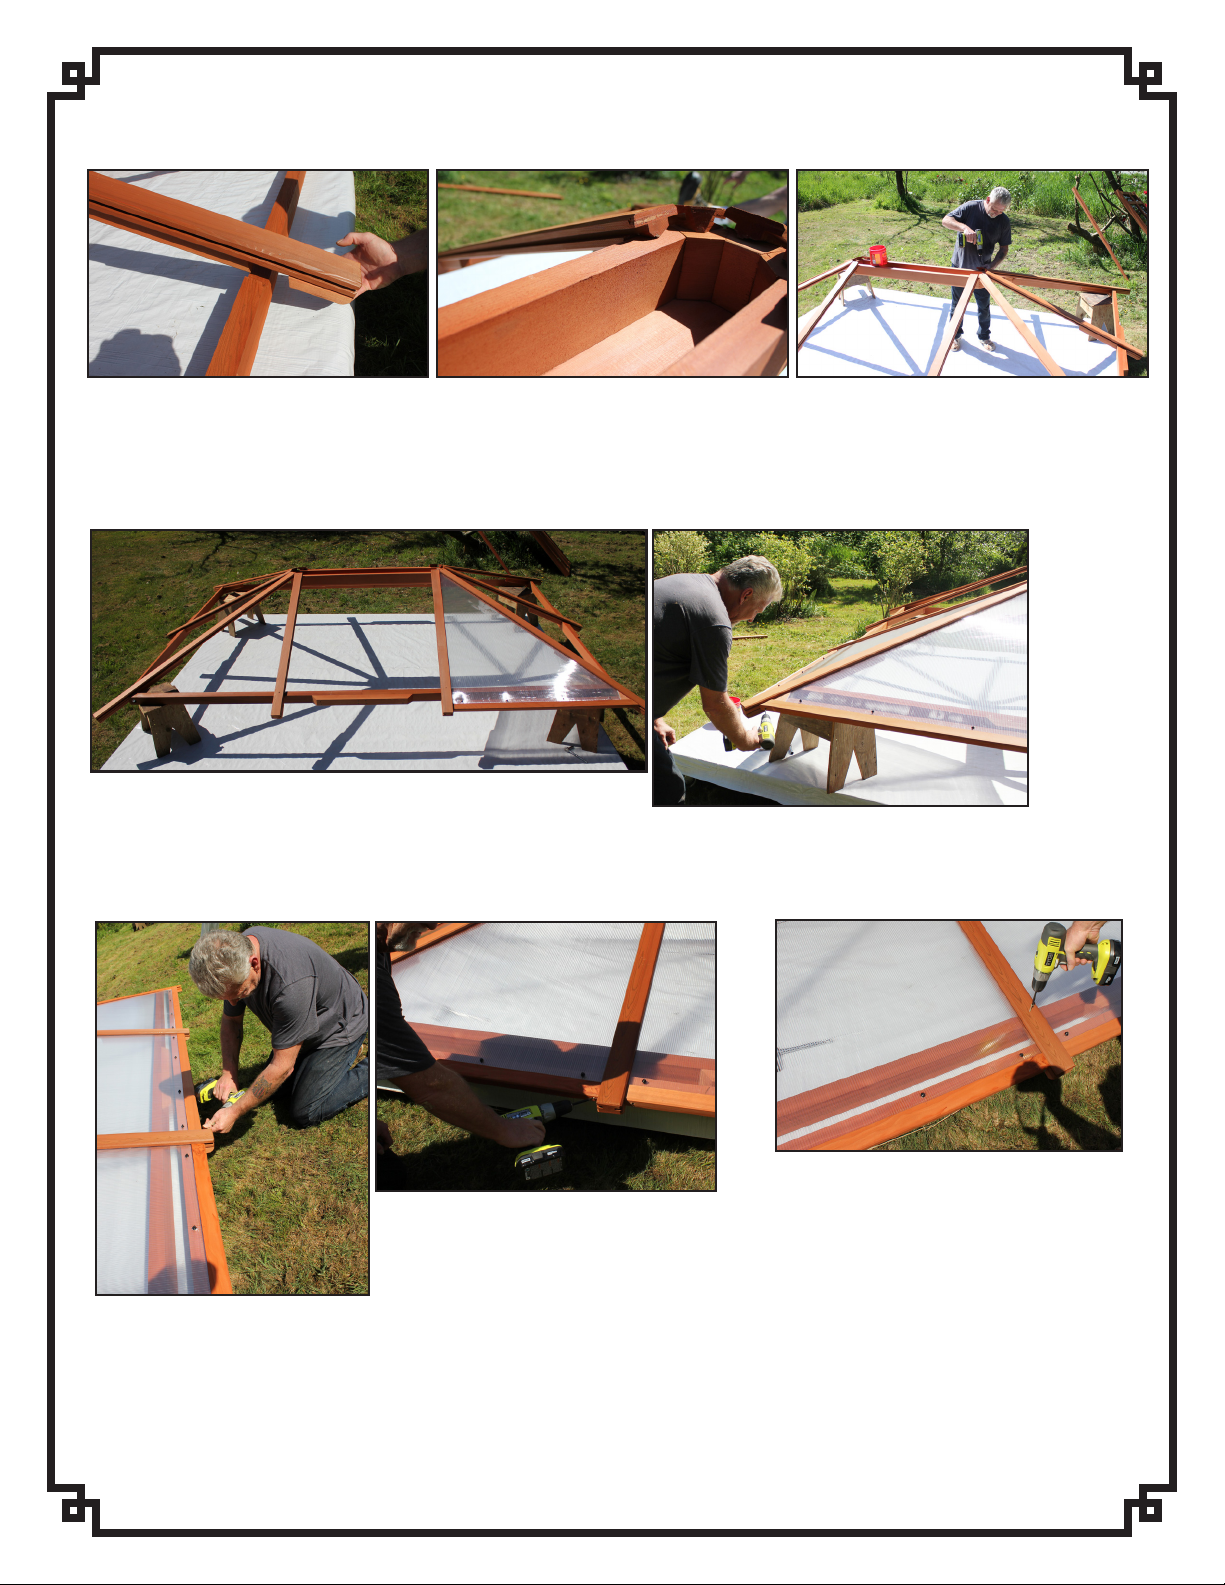
16. Place the Side Rafters in the slots along the Headers and attach the Side Rafters to the Center Hub. Make sure
the edge of the Side Rafter is ush with the miter of the Center Hub. Use one 2.5” screw. Do not screw down the Side
Rafters to the Headers at this time.
17. Insert Corner Roof Panels into the Roof Frame and secure
the Corner Roof Panels to the Corner Hips. Do not secure the
Corner Roof Panels to the Side Rafters at this time.
18. Once all the Corner Roof Panels
are attached to the Corner Hips, insert
the Center Roof Panels in place and
secure the Center Roof Panels and
the Corner Roof Panels to the Side
19. Attach each Side Rafter to the
Headers with one 2.5” screw.
Rafters. Use one 2.5” screw for each
Roof Panel.
~ 9x13 Gazebo ~
Page 10
INSTALLATION PROCEDURE
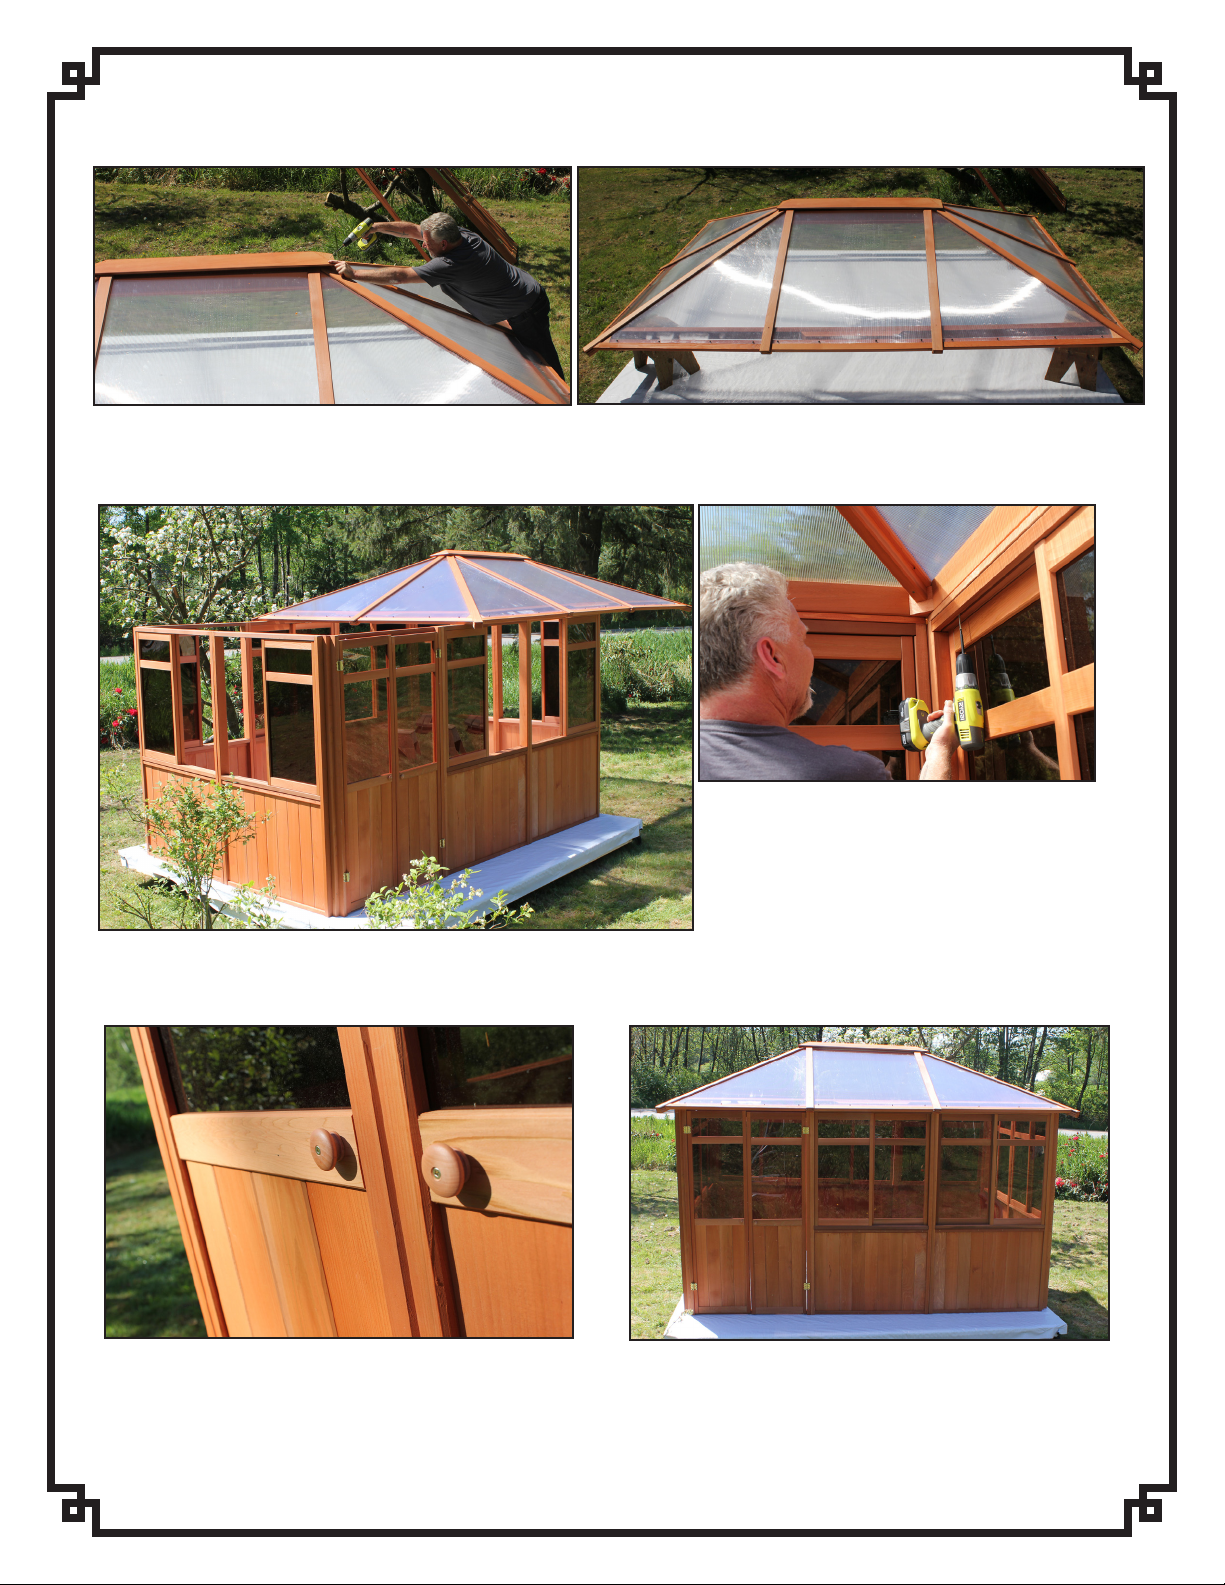
20. Attach the Roof Cap to the top of the Side Rafters with one 2.5” screws per Side Rafter. And now the Roof should
be completely assembled.
21. Slide the entire Roof onto the body of the
gazebo and secure the Roof to the body of
the gazebo by screwing along the perimeter.
Use two 2.5” screws for each Window Wall
(48”).
22. Attach Door Knobs to the Doors with 1.5” screws. 23. The gazebo is now complete and ready to enjoy.
~ 9x13 Gazebo ~
 Loading...