

Page 1
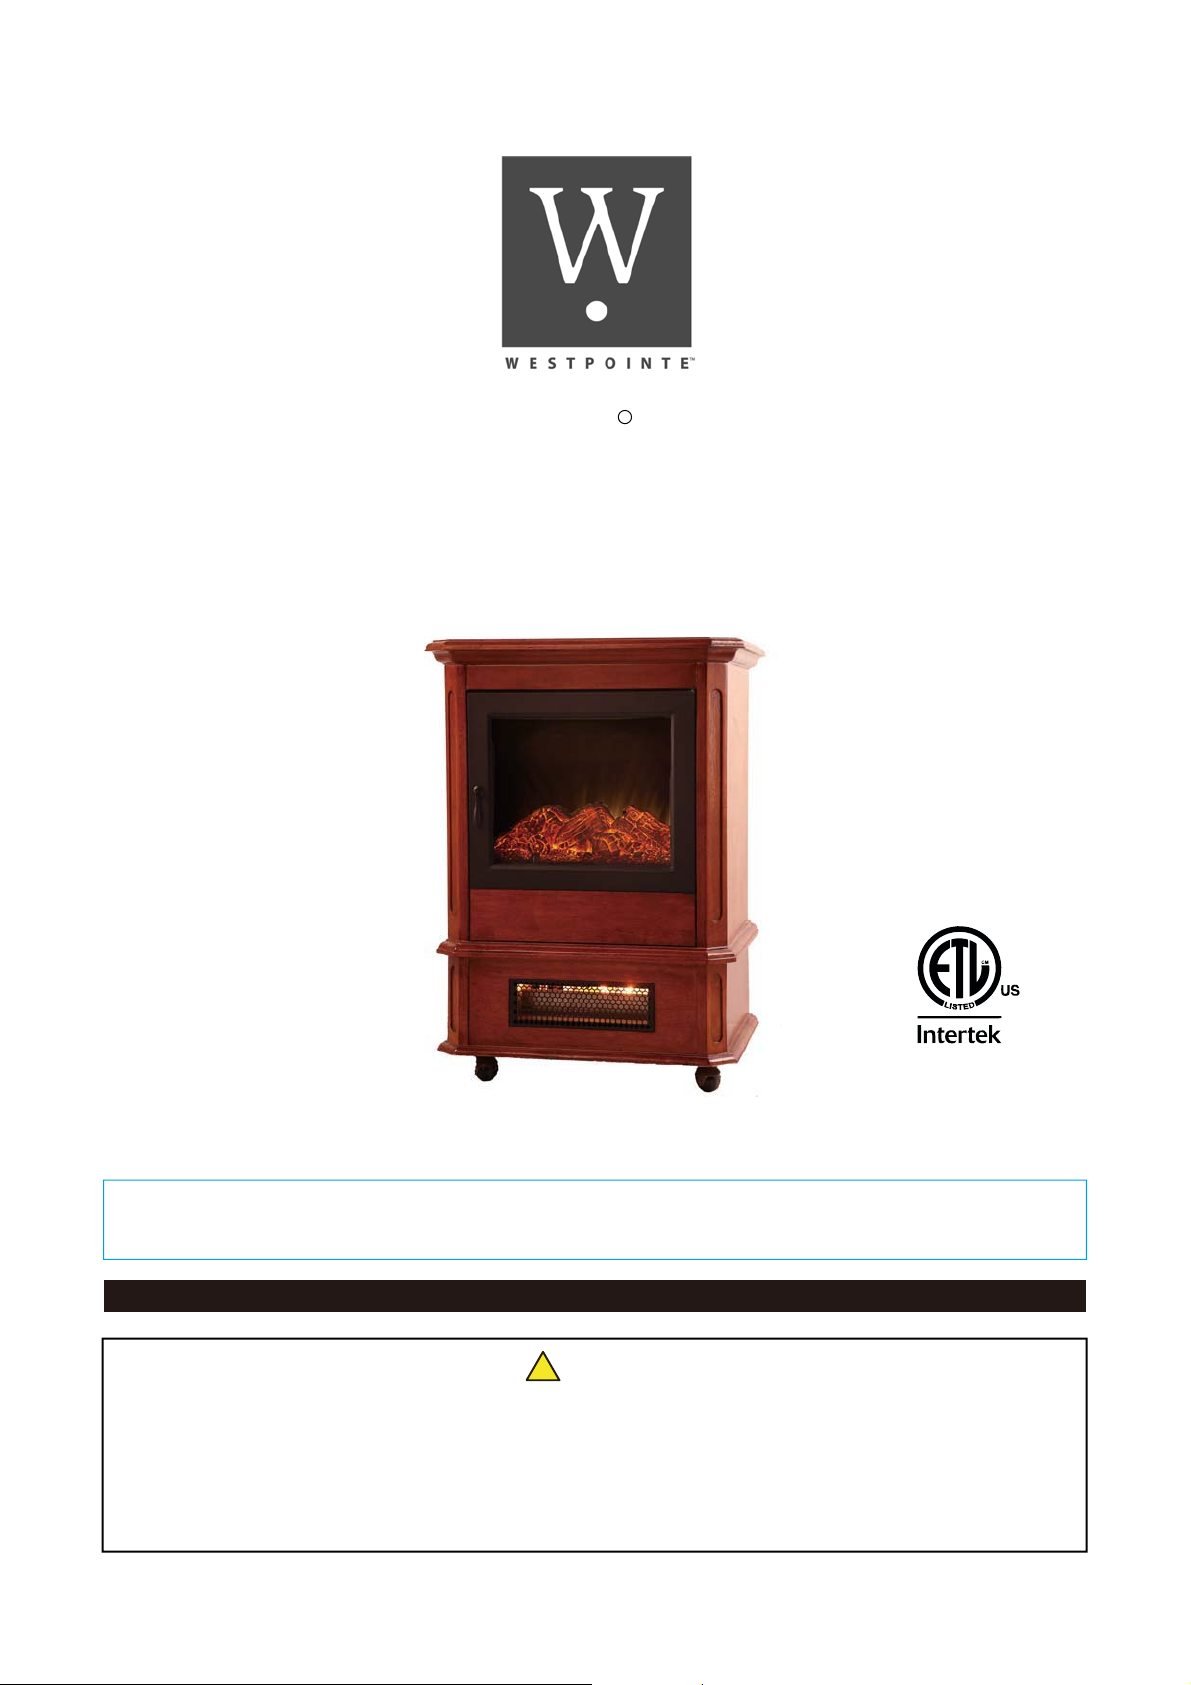
Westpointe Portable
R
Infrared Fireplace Heater
Instruction Manual
Model No.: SREF01 / TV NO.: 138807
3194320
FOR INDOOR USE ONLY
PLEASE READ THIS ENTIRE INSTRUCTION MANUAL BEFORE USING
CAUTION: TO PREVENT ELECTRIC SHOCK, MATCH WIDE BLADE
OF PLUG TO WIDE SLOT, FULLY INSERT.
Please keep this instruction manual for future reference
!
Warning:
Adult assembly required.
Keep screws and parts out of reach of children.
Customer Service: (866) 814-0585, 8:00am to 5:00pm, Eastern Standard Time
Monday thru Friday
(Made in China)
1
Page 2

Warnings
IMPORTANT INSTRUCTIONS
When using electrical appliances, basic precautions should always be followed to reduce
the risk of fire, electric shock, and injury to persons, including the following:
1. Read all instructions before using this heater.
2. This heater is hot when in use. To avoid burns, do not let bare skin touch hot surfaces.
The grill directly in front of the heater outlet becomes hot during heater operation. Keep
combustible materials, such as furniture, pillows, bedding, papers, clothes and curtains
at least 3 feet from the front of the unit and keep them away from the sides and rear.
3. Extreme caution is necessary when any heater is used by or near children or inv
and whenever the heater is left operating and unattended.
4. Always unplug heater when not in use.
5. Do not operate any heater with a damaged cord or plug or after the heater malfunctions
has been dropped or damaged in any manner. Discard heater, or return to authorized
service facility for examination and/or repair.
6. Do not use outdoors.
7. This heater is not intended for use in bathrooms, laundry areas and similar indoor
loca
8. Do not run cord under carpeting. Do not cover cord with throw rugs, runners, or similar
coverings. Do not route cord under furniture or appliances. Arrange cord away from traffic
area and where it will not be tripped over.
9. To disconnect heater, turn controls to off, then remove plug from outlet.
10. Do not insert or allow foreign objects to enter any ventilation or exhaust opening as this
may cause an electric shock or fire or damage the heater.
11. Connect to properly grounded outlets only.
12. To prevent a possible fire, do not block air intake or exhaust in any manner. Do not use
tions. Never locate heater where it may fall into a bathtub or other water container.
alids
on soft surfaces, like a bed, where openings may become blocked.
13. All electrical heaters have hot and arcing or sparking parts inside. Do not use it in
areas where gasoline, paint, or flammable liquids are used or stored.
14. Use this heater only as described in this manual. Any other use not recommended by
manufacturer may cause fire, electric shock, or injury to persons.
15. Always plug heaters directly into a wall outlet/receptacle. Never use with an extension
cord or relocatable power tap (outlet/power strip).
16. Always disconnect the heater from the power supply before performing any cleaning,
maintenance and relocating the heater.
17. When storing or transporting the unit and cord, keep in a dry place, free from excessive
vibration and store so as to avoid damage.
SAVE THESE INSTRUCTIONS FOR FUTURE USE.
2
Page 3
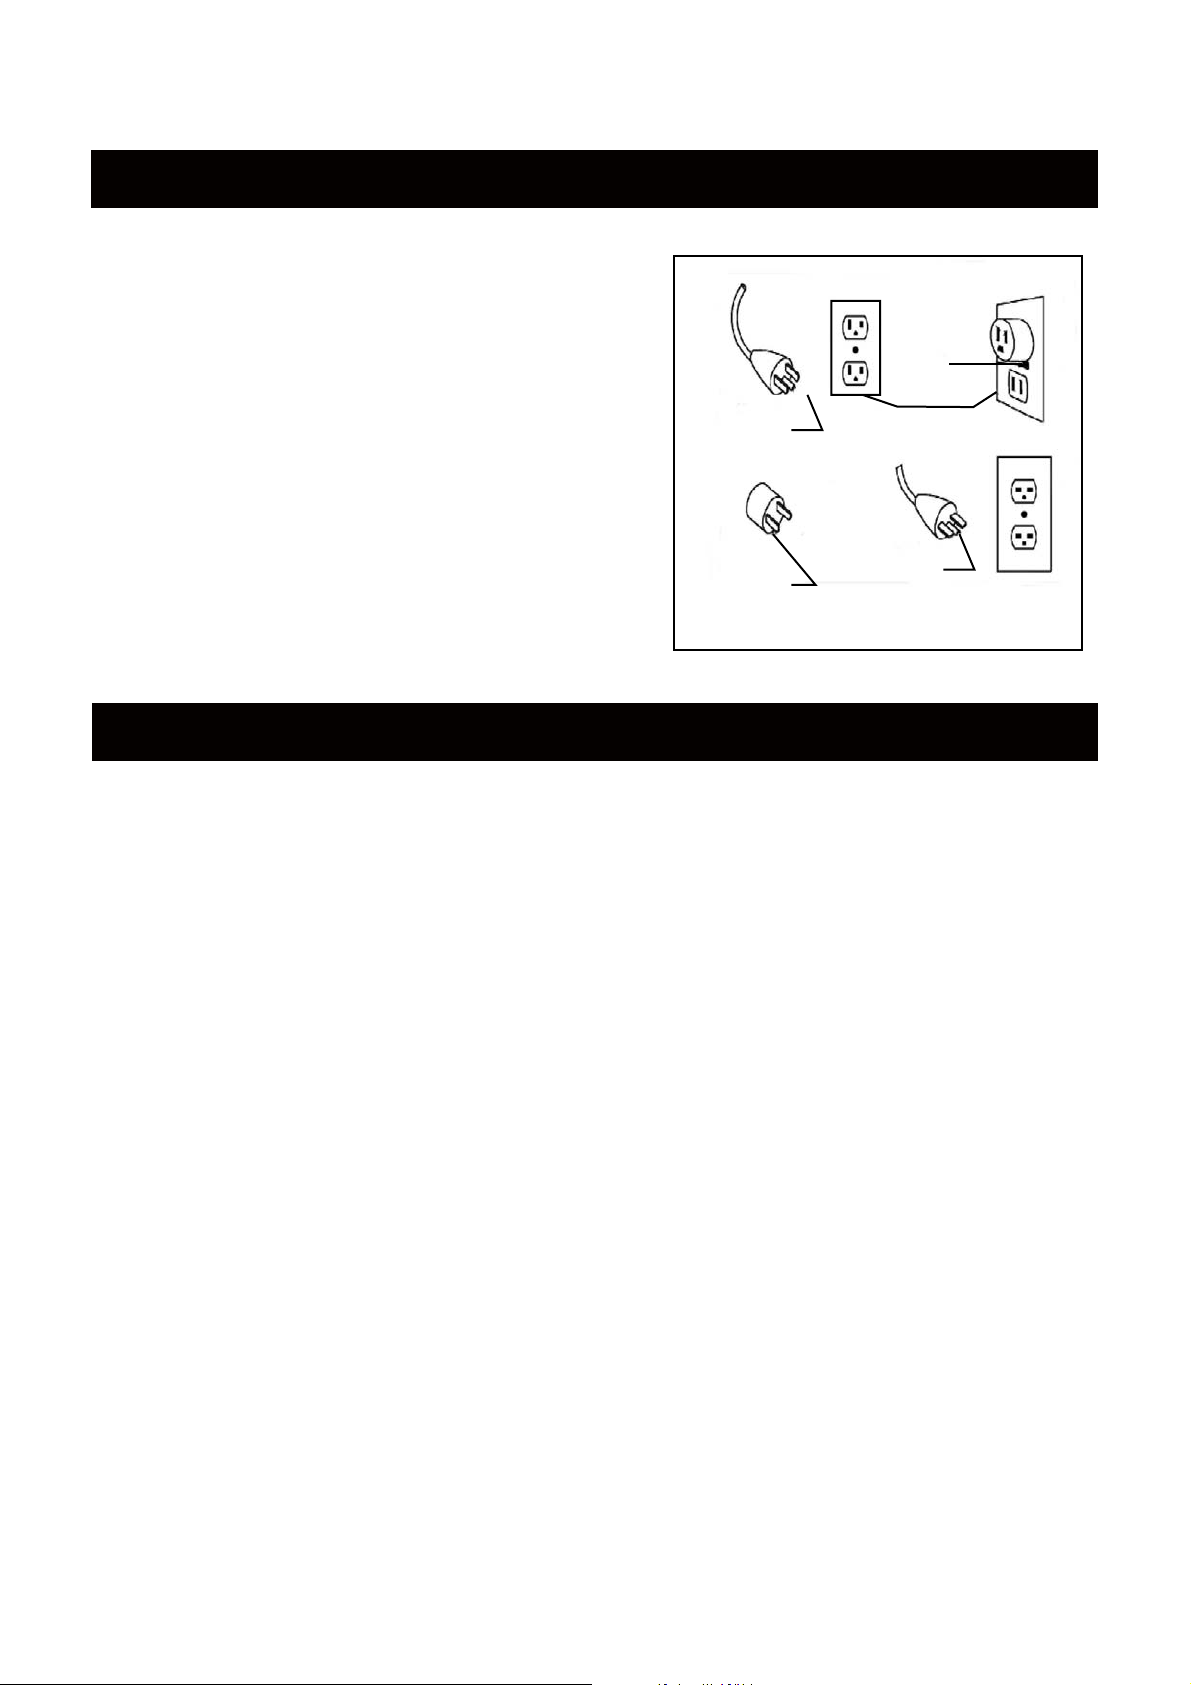
Grounding instructions
WARNING: This hearter has a voltage rating of 120
volts. The cord has a plug as shown in A. An adapter
as shown in C is available for connecting three-blade
grounding-type plugs to two-slot receptacles. The green
grounding lug extending from the adapter must be
connected to a permanent ground such as a properly
grounded outlet box. The adapter should not be used
if a three-slot grounded receptable is available.
GROUNDING
(A)
PIN
COVER OF GROUNDED
OUTLET BOX
ADAPTER
METAL
SCREW
(B)
DO NOT DEFEAT THE SAFETY PURPOSE OF THE
GROUNDED PLUG.
GROUNDING
MEANS
(C)
GROUNDING
PIN
(D)
Safety instructions
1. When the heater is tipped over, the internal tilt switch will automatically disconnect the power to
stop working. After the heater resumes upright, press the ON/OFF button on the control panel or
press power switch on the remote control to turn on the heater.
2. When the heater internal temperature unconventionally reaches 135 Centigrade (275 Fahrenheit),
the limit thermostat switch will automatically cut off the power to stop working. User needs to check
the following points, get rid of any malfunctions and then press the ON/OFF button on the control
panel or press power switch on the remote control to turn on the product.
A. Check the filter, if the net orifice is blocked by dust, remove the filter, wash with water and
assemble into the heater after dry.
B. Check the outlet, if it is blocked by obstruction, remove it to ensure the air vent ventilated and
then restart the heater.
Note: If the heater still does not work after above steps, please disconnect the power, and
have it repaired by professional electrician or contact our customer service.
3. When the front w
ooden panel is closed, the flame of the log set can be used as indicator light.
3
Page 4

Heater Specifications
Infrared Fireplace Heater
1. Power Supply: AC110-120V / 50-60Hz
2. Heat Output Rate: 1350W
3. Temperature range: 50 - 95 Fahrenheit
4. Heating elements: 3 U-shape infrared bulbs
5. Remote control
Unpacking the Infrared Fireplace Heater
1. First, check the carton to make sure there are no obvious damages that may
have occurred during shipment.
2. Open the Infrared Heater packaging and remove the heater by sliding it from
the box. You may want to gently and cautiously turn the entire box up side
down letting the heater slowly slide out.
3. Remove all the protective materials from the heater. It may be a good idea to
keep the protective materials and packaging for storaged during the off-season.
4
Page 5
Operating Instructions
Note: The heater may emit a slight harmless odor when first turned on. This is caused
by activating the internal heater components for the first time and should not occur
again.
Visually inspect the Infrared Heater for any damages before operation. Do not operate
the heater if any damages are detected. Contact your customer service at (866) 814-0585
immediately.
oC/o
NOTE: “HI/LOW” and “
capabilities.
Adjust TIME / TEMP with up arrow or adjust HI / LOW settings.
Adjust TIME / TEMP with down arrow or adjust
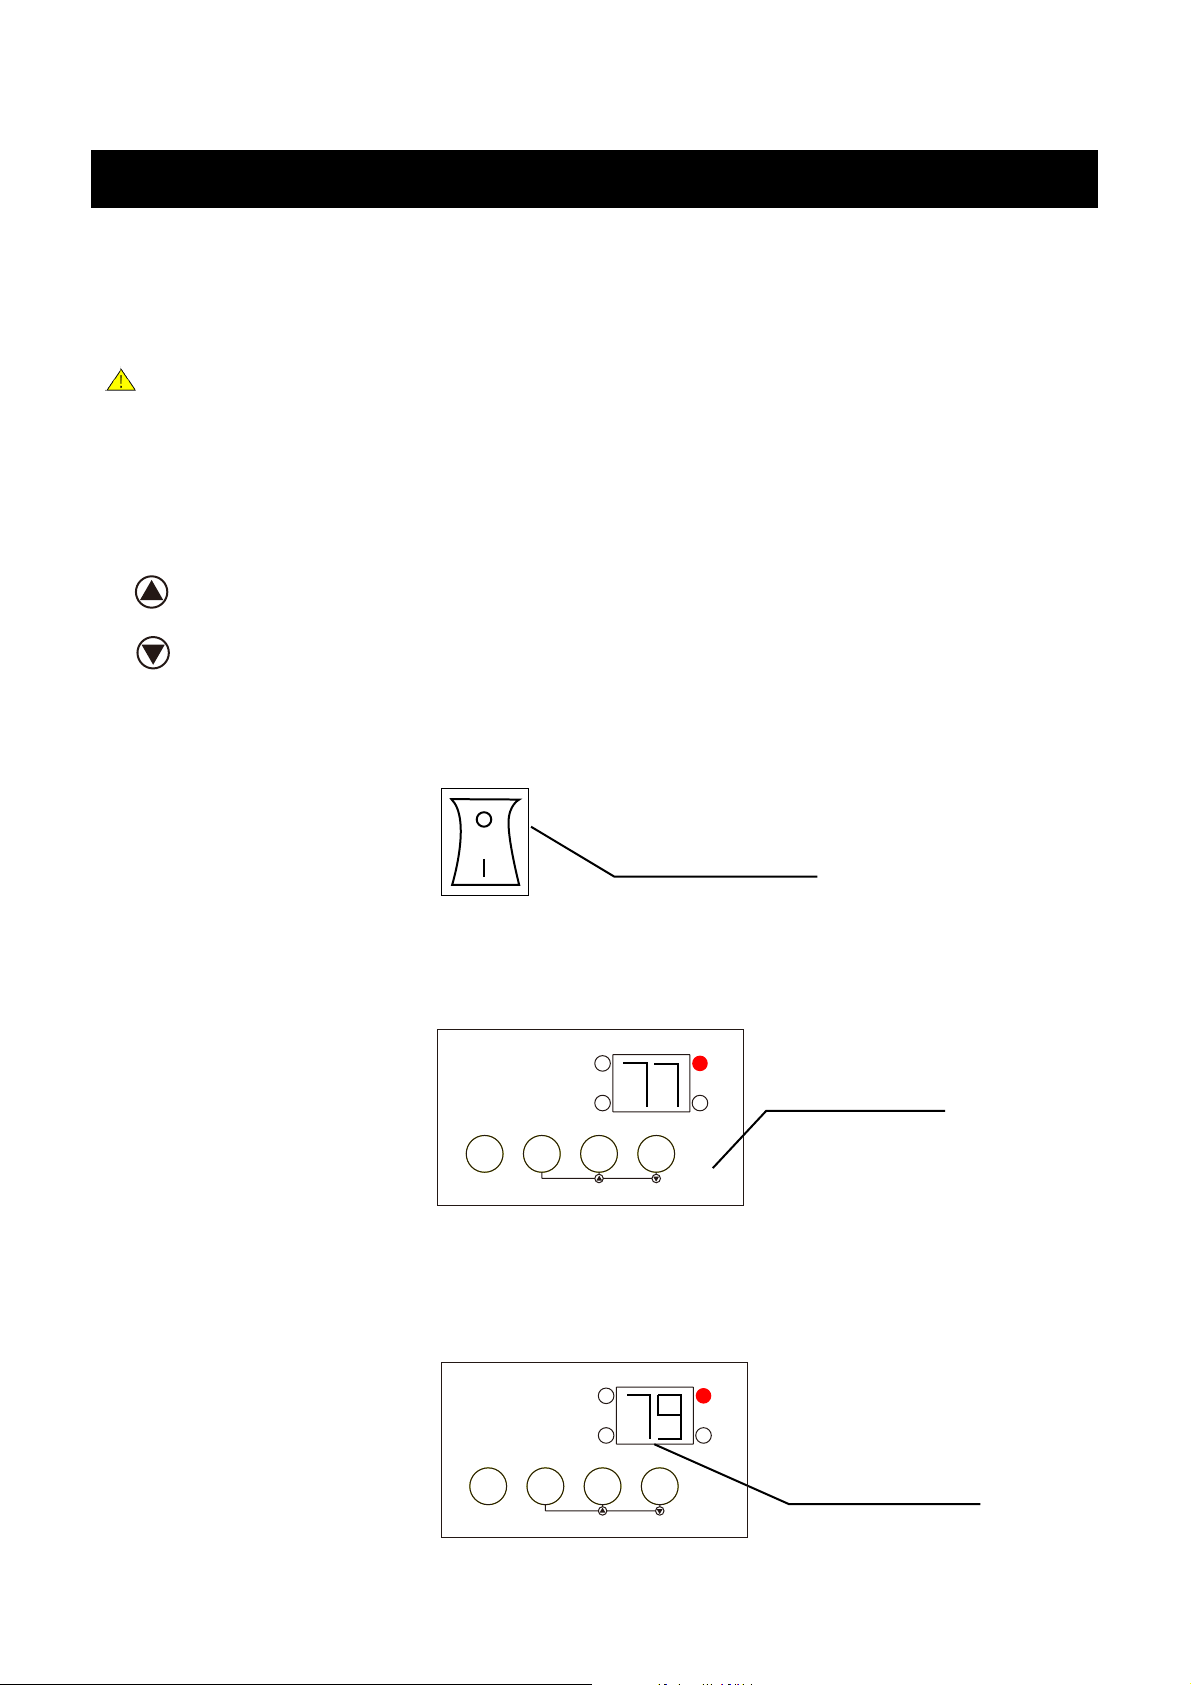
CONTROL PANEL OPERATION INSTRUCTION
1. Connect power supply and turn the main power switch on.
F” buttons on the control panel have dual function
oC/o
F settings.
Main Power Switch
2. Press ON/OFF button
1) Heater starts operation with default maximum fire flame, default temperature reads as 77
Fahrenheit (25 centigrade), indicator of temperature degree stops after flashing 4 seconds.
ON/OFF
HI
LOW
HI/LOW
OC/O
O
F
O
C
FSET
Function Display
2) Heating function does not work in initial start. It requires pressing HI/LOW button manually
or remote control to start. It will not work if
the ambient temperature is higher than the
default temperature. It works only if the ambient temperature is lower than the default
temperature.
HI
O
F
ON/OFF
LOW
HI/LOW
5
O
C
O
C/OFSET
Indicate the
ambient temperature
Page 6
Operating Instructions
o
3) If the heater internal temperature goes up to 104
working. The negative ions generated will be blown out with air through the vent.
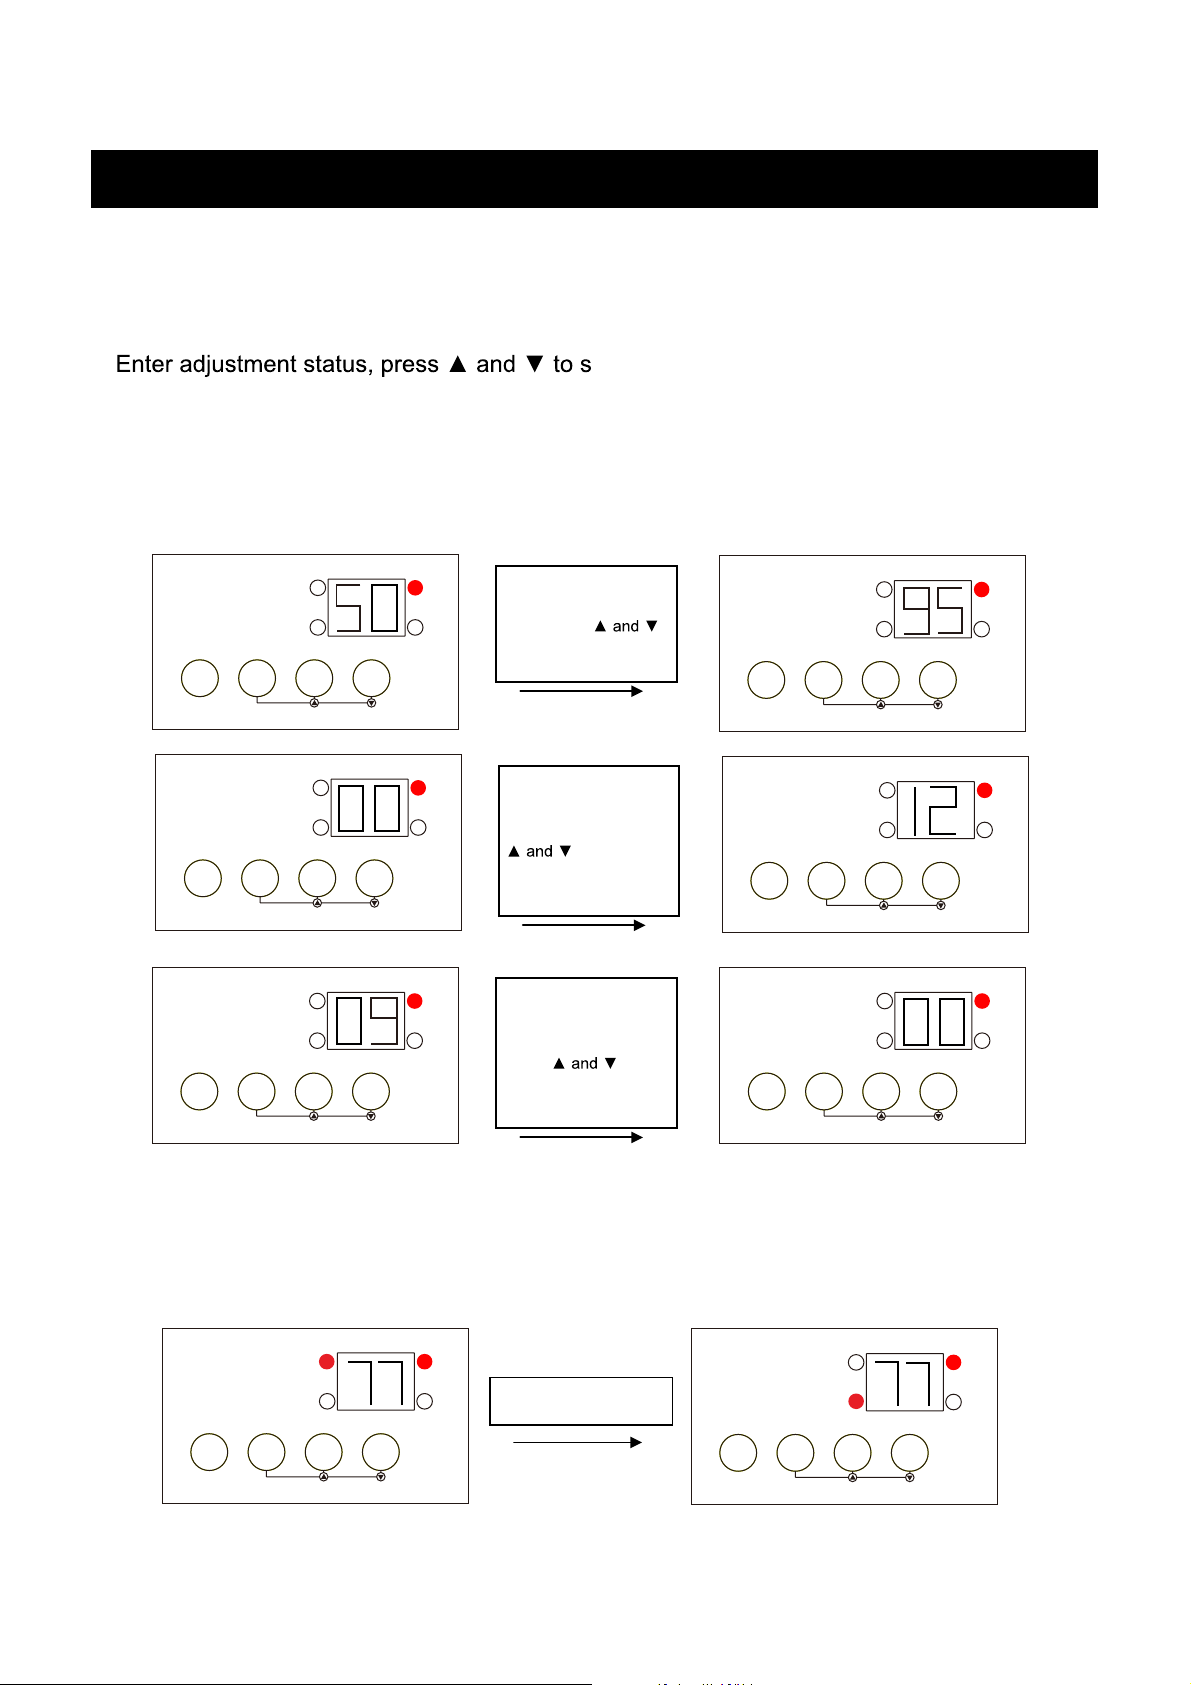
3. Press SET button
et parameter. In sequence it comes temperature -
timer – flame - set confirmation. The set range for temperature is from 50 - 95 Fahrenheit (10 35 centigrade); Timer set range is from 00 – 12 hours, 00 means timer is closed, 30 minutes a
F , the fan and electronic ionizer start
unit to go as 0.5, 1.0, to
maximum value.
HI
LOW
ON/OFF
ON/OFF
ON/OFF
HI/LOW
HI
LOW
HI/LOW
HI
LOW
HI/LOW
11, 12 hours; Flame brightness set range is from 00-09, 09 is the
OC/O
OC/O
O
F
Press SET button to
HI
switch to tem. status,
O
C
FSET
O
F
then press
button once within 5
seconds to scroll up.
Press SET button
ON/OFF
LOW
HI/LOW
HI
twice to switch to time
O
C
OC/O
FSET
O
F
status,then press
button once
within 5 seconds to
scroll up.
Press SET button
ON/OFF
LOW
HI/LOW
HI
thrice to switch to
O
C
FSET
flame status, then
press
button
once within 5 seconds
to scroll up.
ON/OFF
LOW
HI/LOW
OC/O
OC/O
O
F
O
C
FSET
O
F
O
C
OC/O
FSET
O
F
O
C
FSET
4. HI/LOW button
When heater is in normal operation, press HI/LOW button to switch heating mode, HI is high
heating level, LOW is low
heating level. Indicator lights for corresponding heating mode.
If indicator does not light, this means the heating function is off.
ON/OFF
HI
LOW
HI/LOW
O
F
O
C
OC/O
FSET
From HI to LOW
ON/OFF
HI
LOW
HI/LOW
OC/O
O
F
O
C
FSET
6
Page 7
Operating Instructions
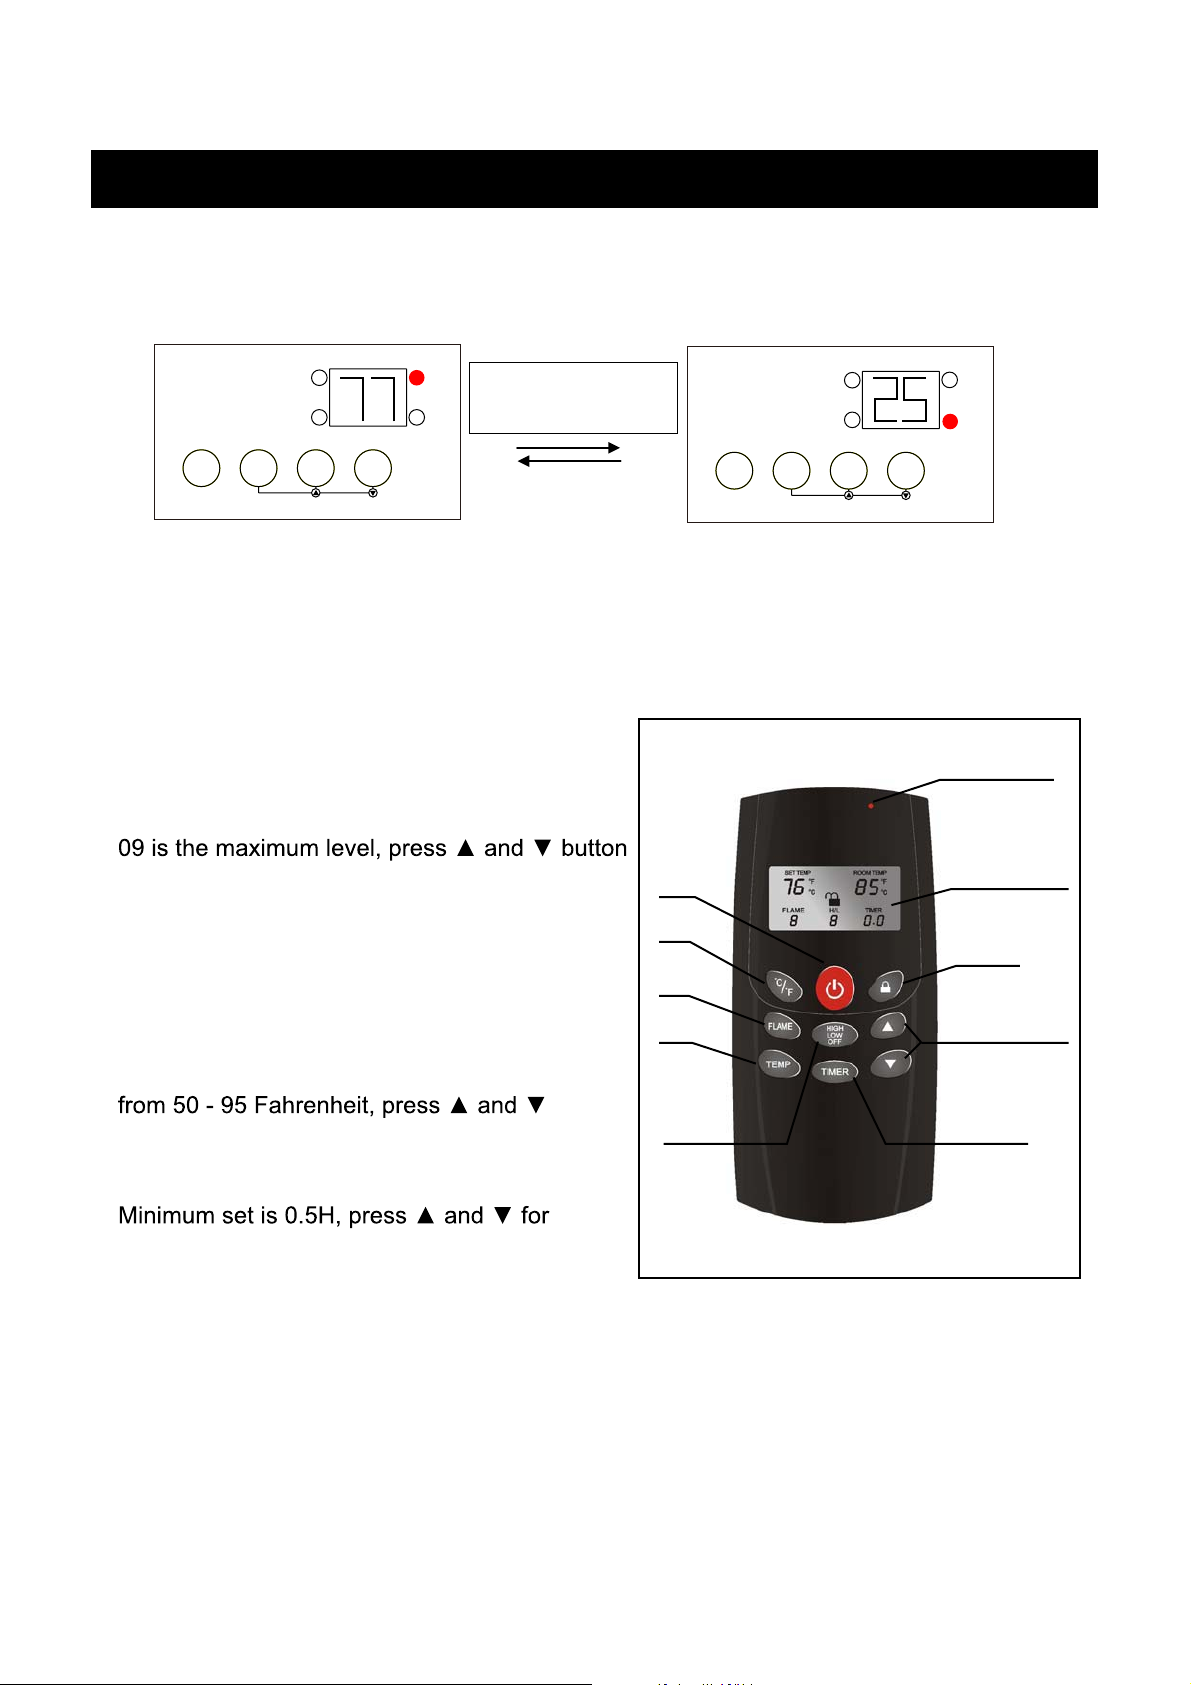
5.oC/oF button
When heater is in normal operating, press
O
Centigrade and
ON/OFF
F means Fahrenheit. Indicator lights for corresponding temperature mode.
OC/O
O
F
O
C
FSET
Press the oC/oF button to
switch from Fahrenheit to
Centigrade
HI
LOW
HI/LOW
6. Button sound
“Beep” sounds will accompany with each successful button press.
REMOTE CONTROL OPERATION INSTRUCTION
1.oC/oF button - switch from Fahrenheit to Centigrade.
2. Power button - turn on and turn off the heater.
3. Flame button - adjust flame, 00-09 range for
OC/O
F button to switch temperature mode, OC means
ON/OFF
HI
LOW
HI/LOW
O
F
O
C
OC/O
FSET
Indicator light
adjustment, 00 means flame function is off and
to operate.
4. Lock button - press 3 seconds to unlock and
activate all other buttons.
5. Heating level adjustment - HI is high heating
level, LOW is low heating level, OFF is close.
6. TEMP button - temperature set button,
for adjustment.
7. TIMER button - timer sets from 00 to 12 hours,
adjustment.
2
LCD display
1
4
3
Adjustment
6
5
button
7
7
Page 8
Assembly lnstructions
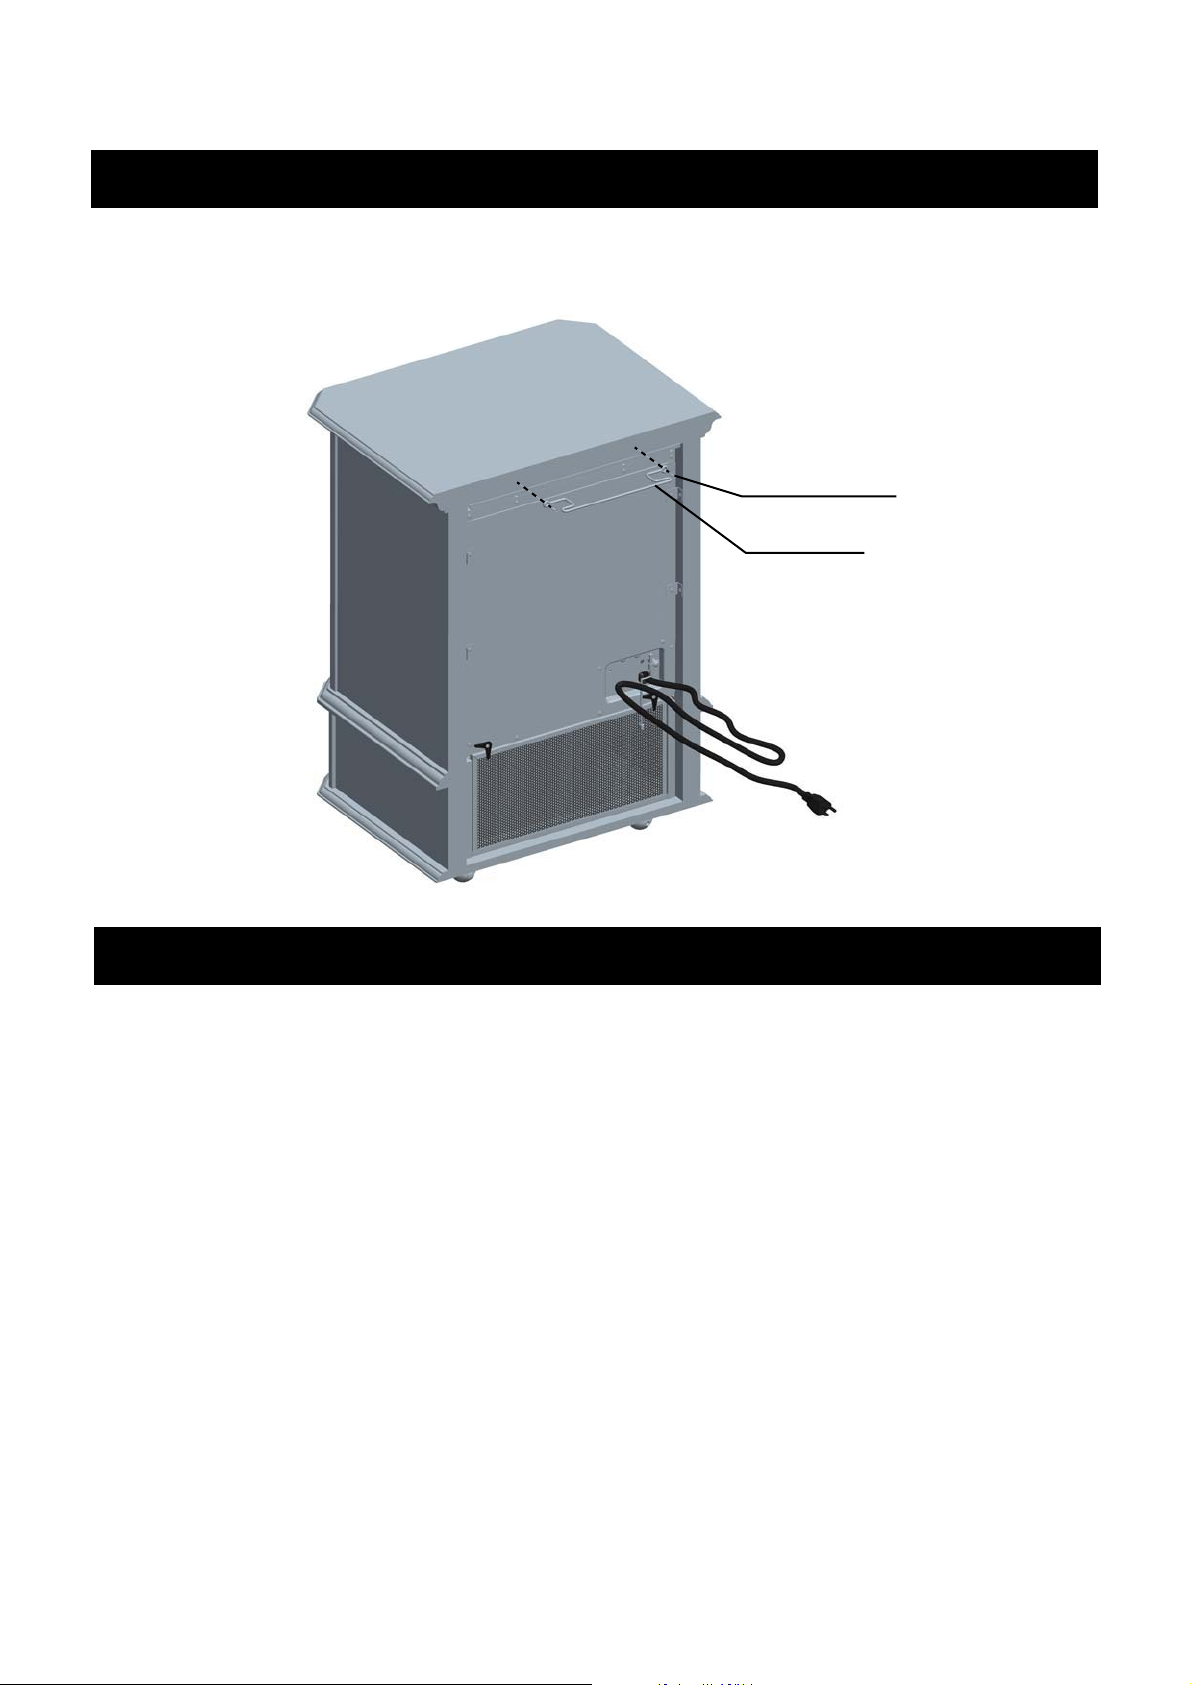
Install the cord wrap on the back of the heater as illustrated, fixing it by 2 tapping screws.
Tapping screw
Cord wrap
Care and Maintenance
Before care or maintenance is applied, always unplug the cord from the electrical outlet. The
cabinet housing can be wiped down with furniture polish. The heater has a washable filter.
The filter should be cleaned regularly to provide for maximum performance. Once the filter
is removed, run warm water through and over the filter to remove dirt and dust. Shake all
water residue from the filter and replace it back in the heater. (NOTE: A mild soap can be
applied to assist in removing dirt and dust from the filter)
Maintenance
If the heater is not to be used for an extended period of time, it can be stored away. Make
sure the power is turned off and the cord is unplugged from the outlet. Wrap the cord
around the handle on the rear of the portable heater. Cover the heater to prevent dust from
accumulating on the heater. You may want to repack it back in its original carton. Always
store the heater in a dry and dust free environment. (NOTE: You may want to clean the filter
prior to storing the heater so that it is ready for operation the next time it is put in use.)
8
Page 9
Negative Ion Generator
ELECTRONIC IONIZER SPECIFICATIONS
I/P: AC110-120V / 50-60Hz
PIN: 1W
O/P: DC3.8KV
ION DENSITY: 3 X 10
6
PCS/CM
WORK PRINCIPLE AND FUNCITIONS
The main work principle of the positive and negative ion generator (plasma generator) is to
increase the low voltage to positive high voltage and negative high voltage with voltage
increasing circuit. It generates large amount of positive ion and negative ion with positive
high voltage and negative ionized air (mainly oxygen). The quantity of negative ion is more
than positive ion (1.5 times of positive ion). The positive ion and negative ion can generate
enormous energy when neutralized w
the structure of bacteria or convert the energy and kill bacteria, thus achieving the effect of
sterilizing. Since there are more negative ions than positive ions, surplus negative ion will
also float in the air for remove smoke, dust and eliminate odor, improve air quality and promote
health.
3
ith positive negative electric charge, which may change
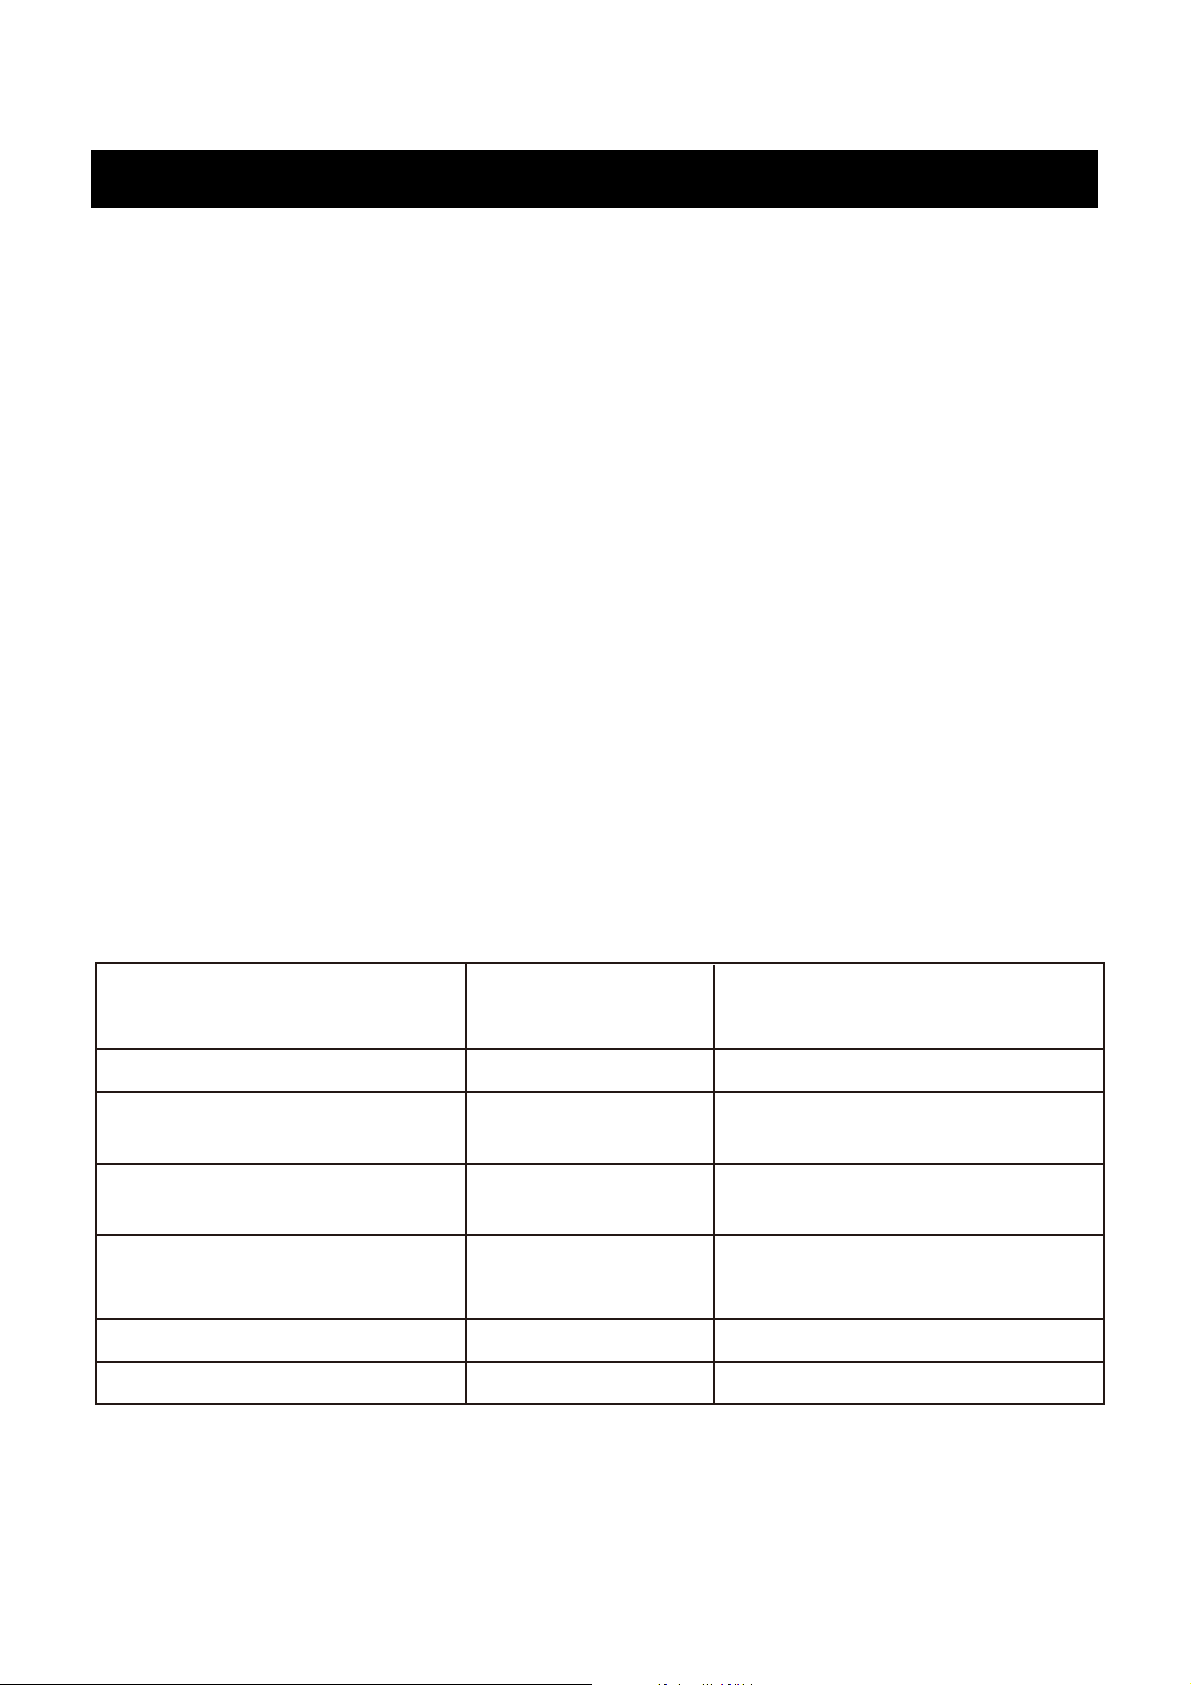
RELATION OF NEGATIVE ION DISTRIBUTION AND CONCENTRATION IN NATURE
WITH HUMAN HEALTH
Content of Negative
Space
Forest and Waterfall Area
High Mountain, Sea Shore
Suburb and Field
Closed Urban
Residential Area
Air Conditioning Room
Neg
ative Ion Oxygen Bar Room
Ion N-ion pcs/cm
100000-500000
50000-100000
5000-50000
40-50
0-250000
100000-500000
3
Relation with Human Health
Natural Recovery Force
Sterilizing, reducing
disease spreading
Improve Human
Immunity and Resistance
Cause physical disabilities such as
headache and insomnia
Cause “Air Condition Disease”
Natural Recovery Force
9
Page 10

Trouble Shooting
Warning:To avoid risk of electric shock, please unplug the heater before maintenance.
No. Malfunction Malfunction Cause Solution Remarks
1 No electricity 1) Disconnected plug
2) Fuse burned out
3) Main switch does
not turn on
1) Inspect main socket
switch and fuse
2) If fuse burned out,
contact our customer
service
2 Without
warmair
3 Without flame 1) Flame function is
4 DisplayE1 Temperature sensor
5 Short remote
distance
6 Remote control
button insensitive
7 Remote control
can not work
8 Suddenly shuts
off while running
Other malfunctions please contact our customer service for assistance.
1) Temperature set
improperly
2)Heating element
malfunction
closed
2)Component
malfunction
malfunction
Dead battery
1) Dead battery
2)
Remote control
defect
Dead battery
1)Obstruction in the
inlet or outlet
2)Fan stops or heater
internaltemperature
too high
1)Set the temperature
properly
2)If heater does not work
after temperature is
properly set, contact our
customer service.
1) Set the flame function
2) Restart the heater
3)If restart dose not work,
contact our customer
service
Contact our customer
service
Replace battery
1) Replace battery
2) Contact our customer
service
1) Replace battery
2) Contact our customer
service
1) Remove the obstruction
2) Please contact our
customer service
10
Page 11

Warranty Information
The appliance has been manufactured under the highest standards of
quality and workmanship. We warrant to the original consumer purchaser
that all aspects of this product will be free of defects in material and
workmanship for one year from the date of purchase. A replacement
for any defective part will be supplied free of charge f
consumer. Defects or damage caused by the use of other than genuine
parts are not covered by this warranty. This warranty shall be effective
from the date of purchase as shown in the purchaser’s receipt.
This warranty is valid for the original consumer purchaser only and
excludes industrial, commercial or business use of the product, product
damage due to shipment or failure which results from alteration, product
abuse, or product misuse, whether perf
ormed by a contractor, service
company, or consumer. We will not be responsible for labor charges
and/or damage incurred in installation, repair or replacement, nor for
incidental or consequential damage.
or installation by the
Westpointe Heater Warranty Registration
502 Business Center Dr.
Suit E
Birmingham, AL 35244
Need Help?
Call our toll free number At:
1-866-814-0585 Or
e-mail us at:
customerservice@shinerichgroup.com
Made in China
11
 Loading...