

Page 1

INSTALLATION MANUAL
Installing the Primo Compact
Connect the drip tray to a drain
Installing the milk cooler
Installing the cup warmer
Start using the compact
Westomatic Vending Services Ltd
Units 7 – 8 Block 4 Forde Court, Forde Road
Newton Abbot, Devon
TQ12 4BT
Page 2
PRIMO COMPACT INSTALLATION MANUAL
Page 1 of 12 P-COM-Install
MUST HAVES FOR THE PRIMO COMPACT
To get the most of the Primo Compact we strongly advise that you have the following:
25K VENDS BIRTHDAY MAINTENANCE KITS
INSTALLATION KIT – ALL MODELS
Qty
Water Blocker
1
Water Filter Brita/3M
1
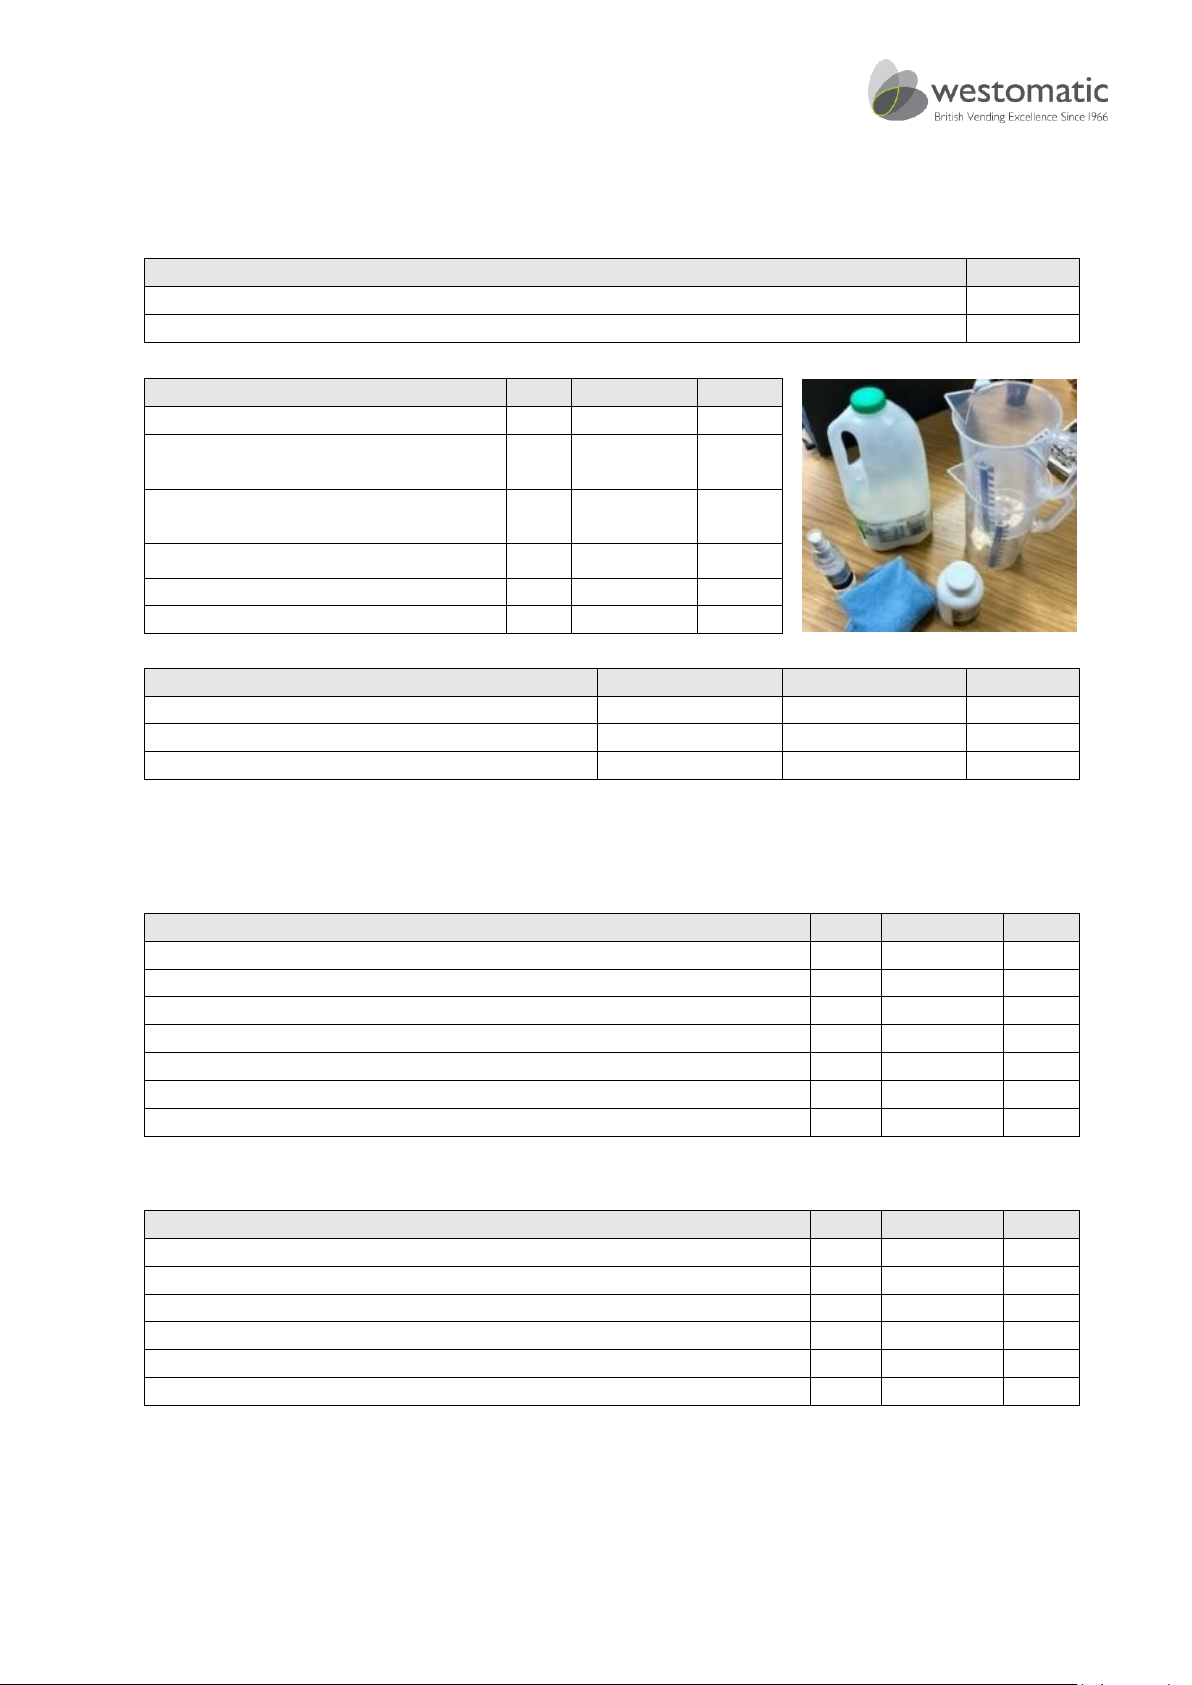
FRESH MILK Operators Care Kit
Qty
Part #
Price
1 Litre Milk line clear (Acid based)
1
BIO011B
£6.72
1 Litre Milk cleaning jug
(Vitlab 442081)
1
3451-901
£3.55
500 ml Milk cleaning jug
(Vitlab 441081)
1
3466-500
Brewer cleaning tablets - 50 tablets
1
1015015
Screen cleaner 100ml
1
1015014
Microfibre cloth
1
1015012
£1.00
HOT ONLY Operators Care Kit
Qty
Part #
Price
Brewer cleaning tablets - 50 tablets
1
1015015
Screen cleaner 100ml
1
1015014
Microfibre cloth
1
1015012
£1.00
FRESH MILK 25K Vends BIRTHDAY KIT 37mm or 44mm Brewer
Qty
Part #
Price
37mm Brewer Service Kit 25K
1
1057167
Descale Kit
1
TBC Hygiene Kit
1
1008125
Food Grade Silicone Spray
1
1015013
Milk Line non-return valve
2
Brewer cleaning tablets – 50 tablets
1
1015015
Water Filter Brita/3M
1
HOT ONLY 25K Vends BIRTHDAY KIT 37mm or 44mm Brewer
Qty
Part #
Price
37mm Brewer Service Kit 25K
1
1057167
Descale Kit
1
Hygiene Kit
1
1008125
Food Grade Silicone spray
1
1015013
Brewer Cleaning Tablets
1
1015015
Water Filter Brita/3M
1
Page 3
PRIMO COMPACT INSTALLATION MANUAL
Page 2 of 12 P-COM-Install
INSTALLING THE PRIMO COMPACT
These instructions will show you how to install the Primo Compact
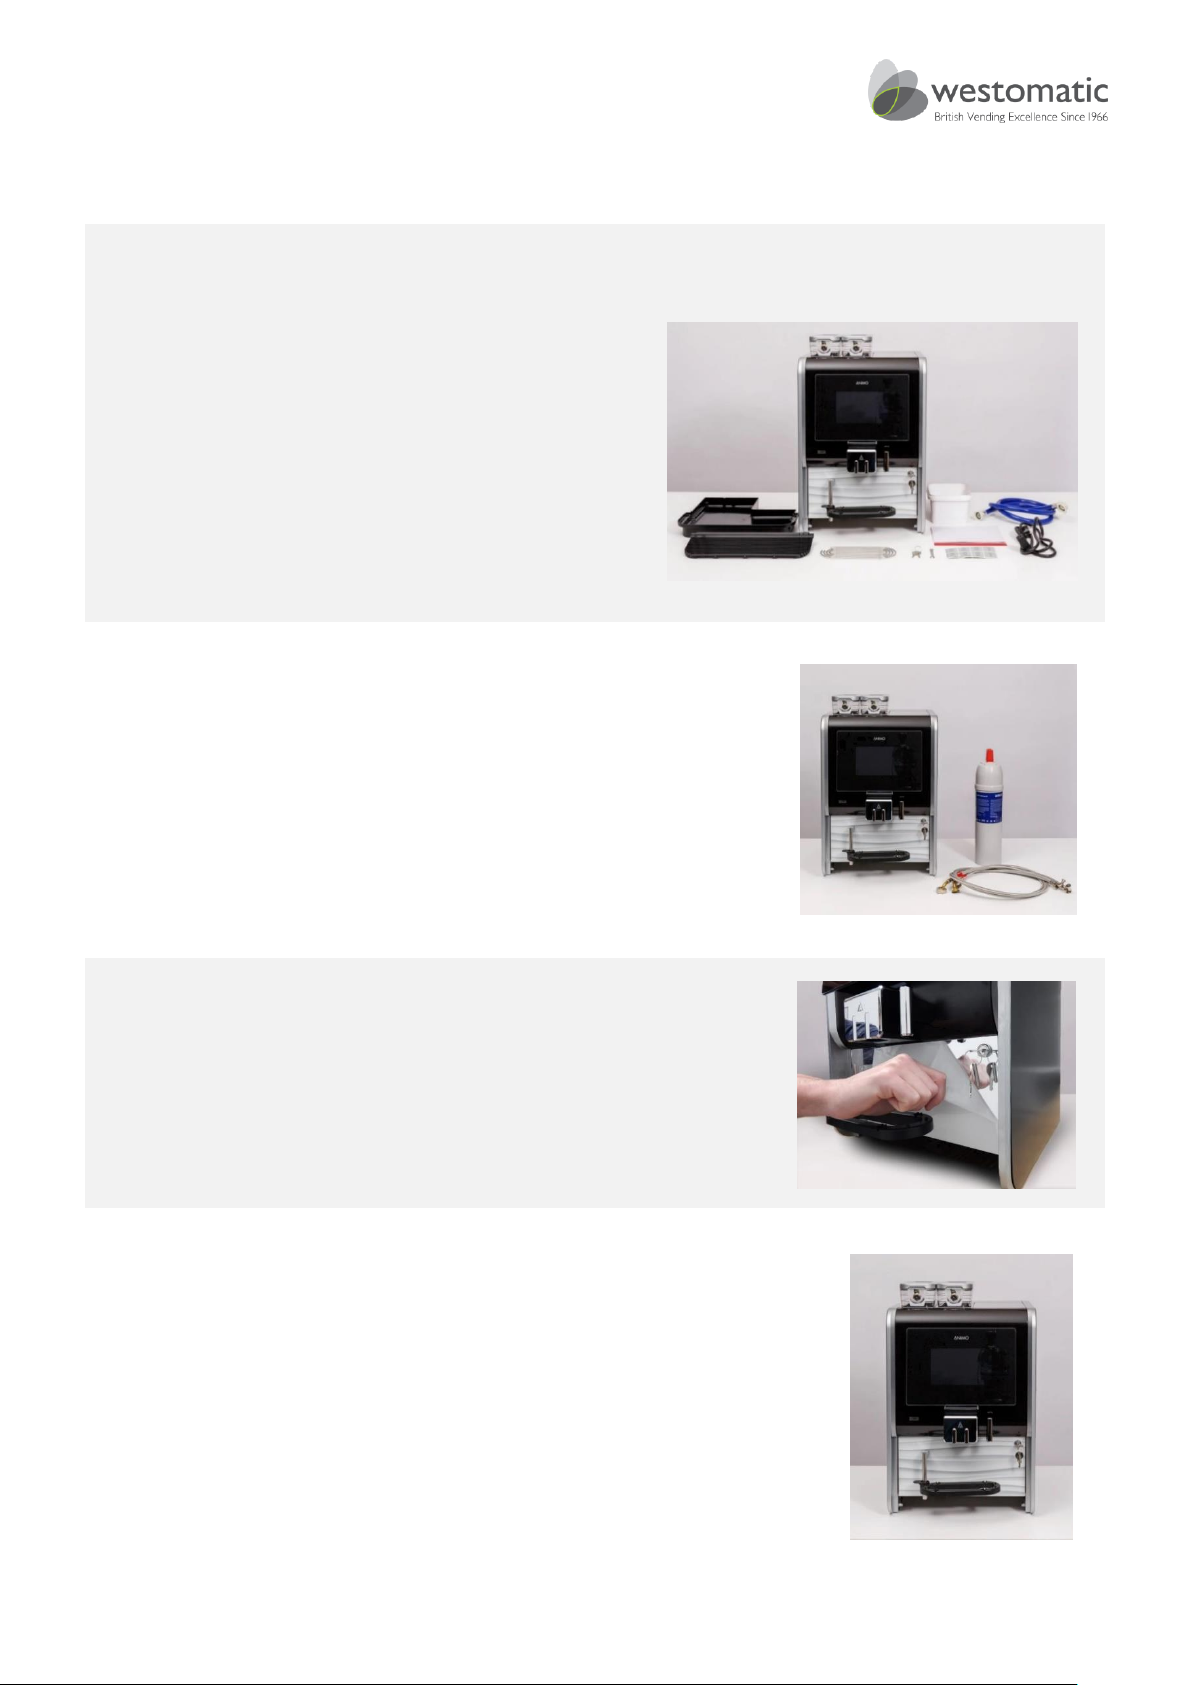
Check the Contents of your package:
• Primo compact machine
• Water Hose
• Drip Tray and grate
• Waste Bin (In the machine)
• Cleaning Container
• Power Cable
• Wrench (to adjust the grinder)
• Canister Labels
• Keys
• Safety Instructions
Before you start:
1. Westomatic recommends using a water filter.
Make sure you have one available.
2. Make sure that the surface on which the Primo
Compact is placed can hold at least 50kg
3. Make sure that a 230 V AC power supply is
available with a capacity of at least 2.5 kW
Remove the protective film from the machine
Place the machine on a firm, flat surface
Note: Make sure there is enough space above
the Compact to allow heat to escape and to fill
the canisters
Page 4
PRIMO COMPACT INSTALLATION MANUAL
Page 3 of 12 P-COM-Install
INSTALLING THE PRIMO COMPACT
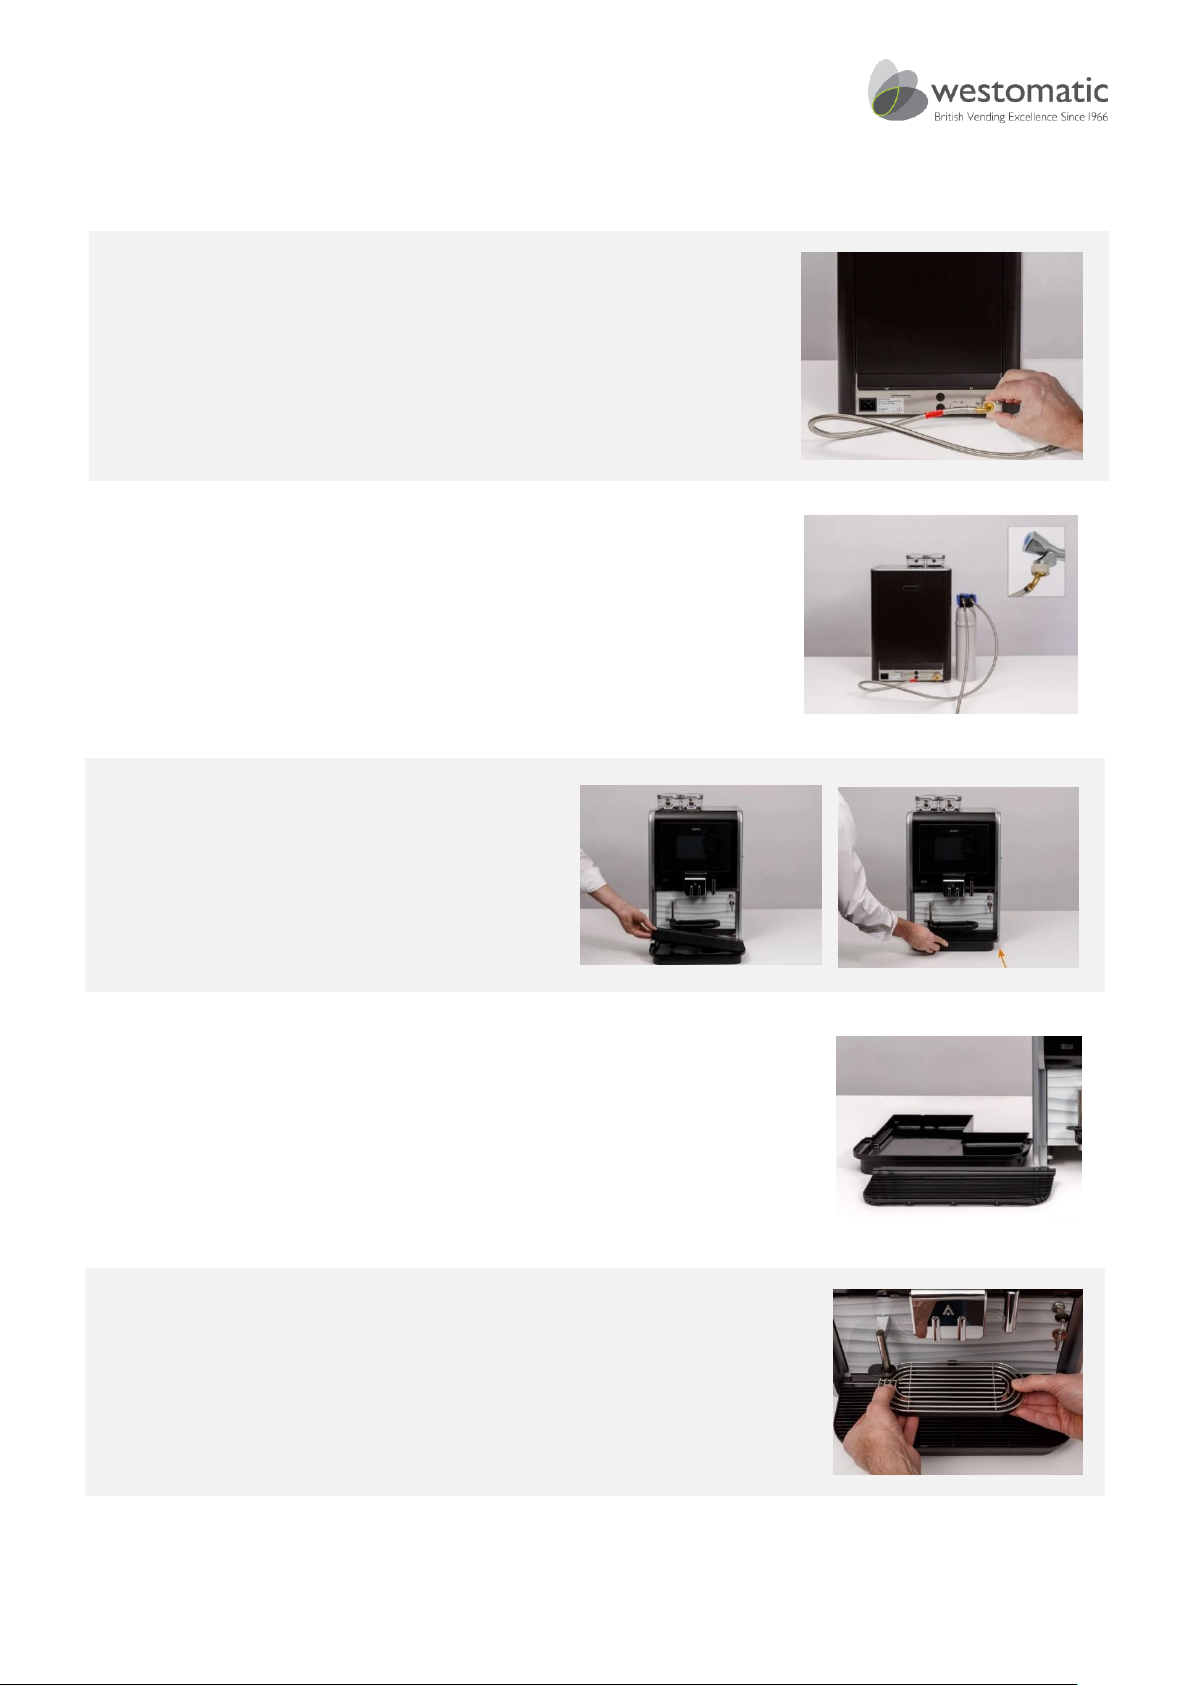
Connect the water filter to the Compact
Note: Only use original Primo hose sets provided
with the new machine and/or the new water
filter. Do not use old hoses.
1. Connect the water filter to the main
water tap.
2. Set the filter by-pass to the water
hardness of the local water tap point
(see the water filter manual for instructions)
1. Place the grate on the drip tray
2. Place the drip tray in the machine
Do you want to connect the drip tray to a
drain?
Then follow: ‘Connect the drip tray to a drain’
Place the cup tray grate
Firmly press the grate on the tray until it is fixed
Page 5
PRIMO COMPACT INSTALLATION MANUAL
Page 4 of 12 P-COM-Install
INSTALLING THE PRIMO COMPACT
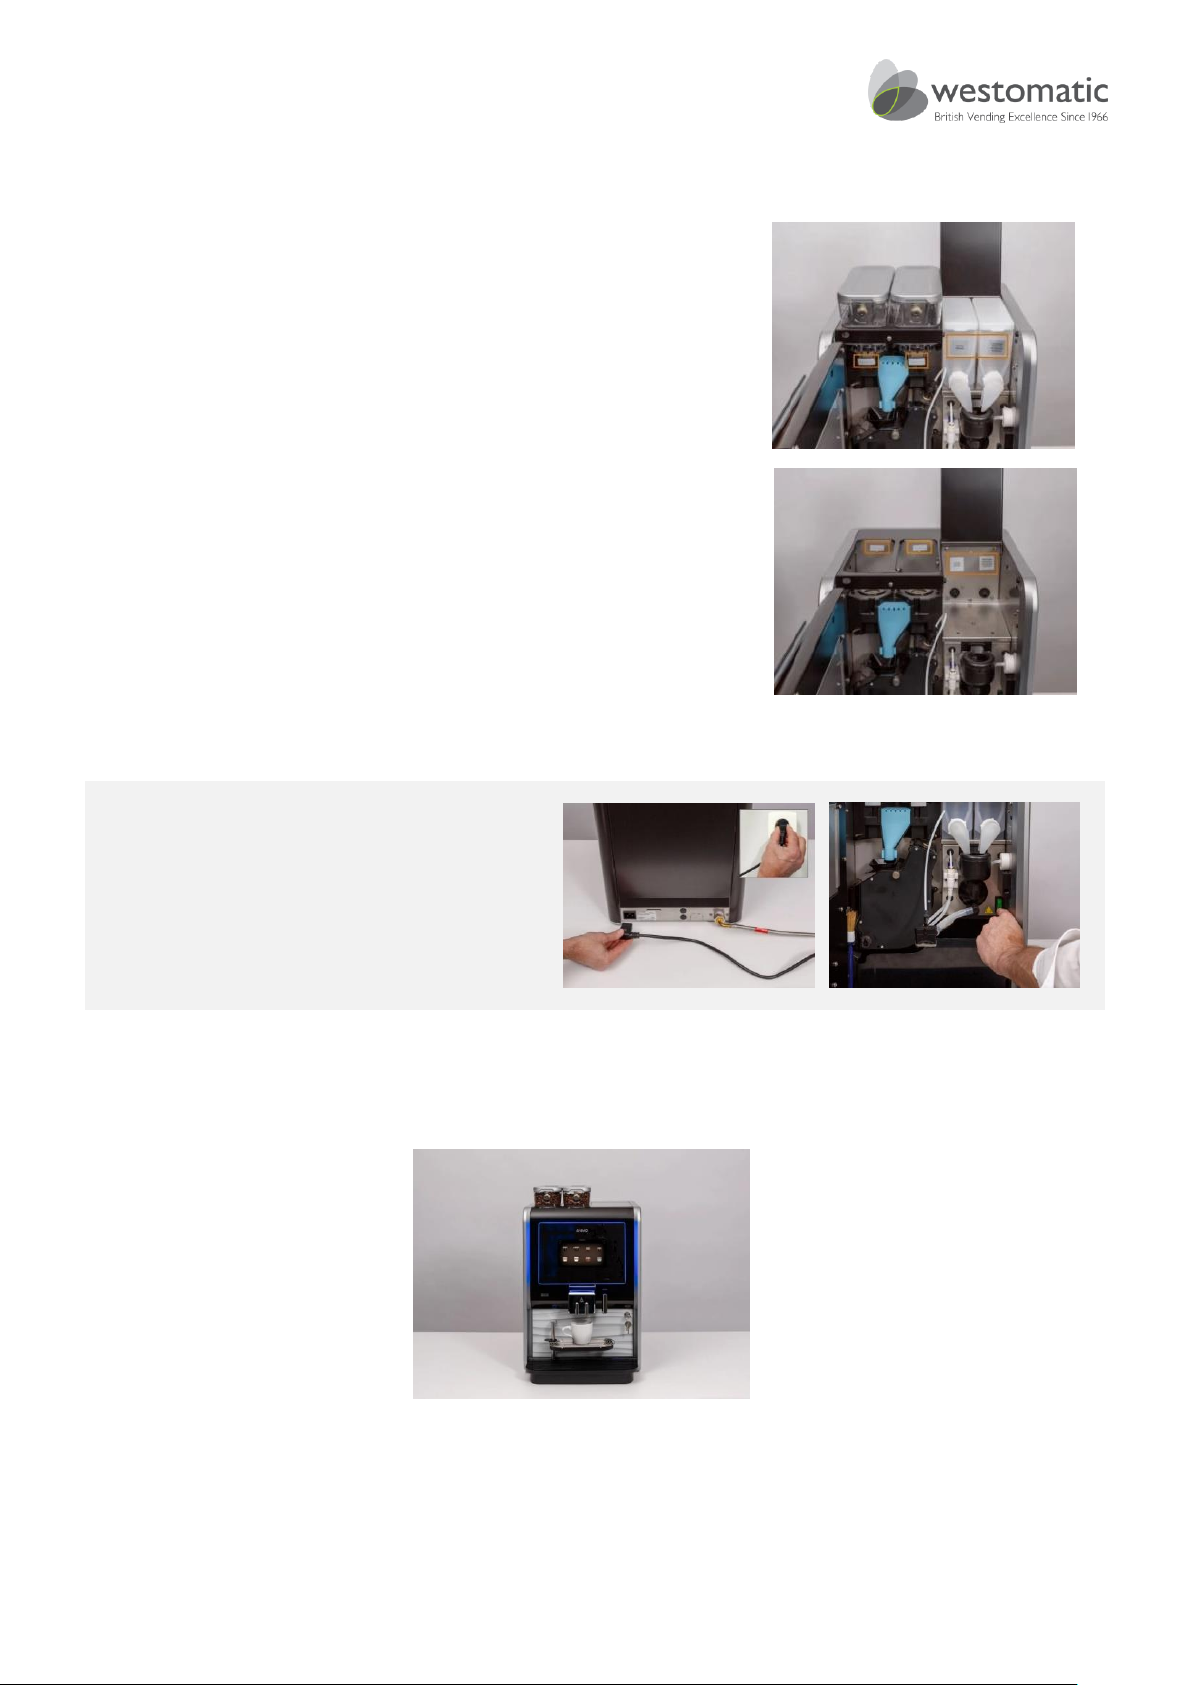
Stick the labels for your configuration on the bean and instant
canisters.
Stick the same labels in the back of the machine
For example: regular coffee beans, espresso beans, dark roast
beans and creamer, chocolate or sugar
For special products, contact your dealer
Connect the Compact to the mains power
socket
Switch on the machine
YOUR PRIMO COMPACT IS INSTALLED AND READY TO USE.
Page 6
PRIMO COMPACT INSTALLATION MANUAL
Page 5 of 12 P-COM-Install
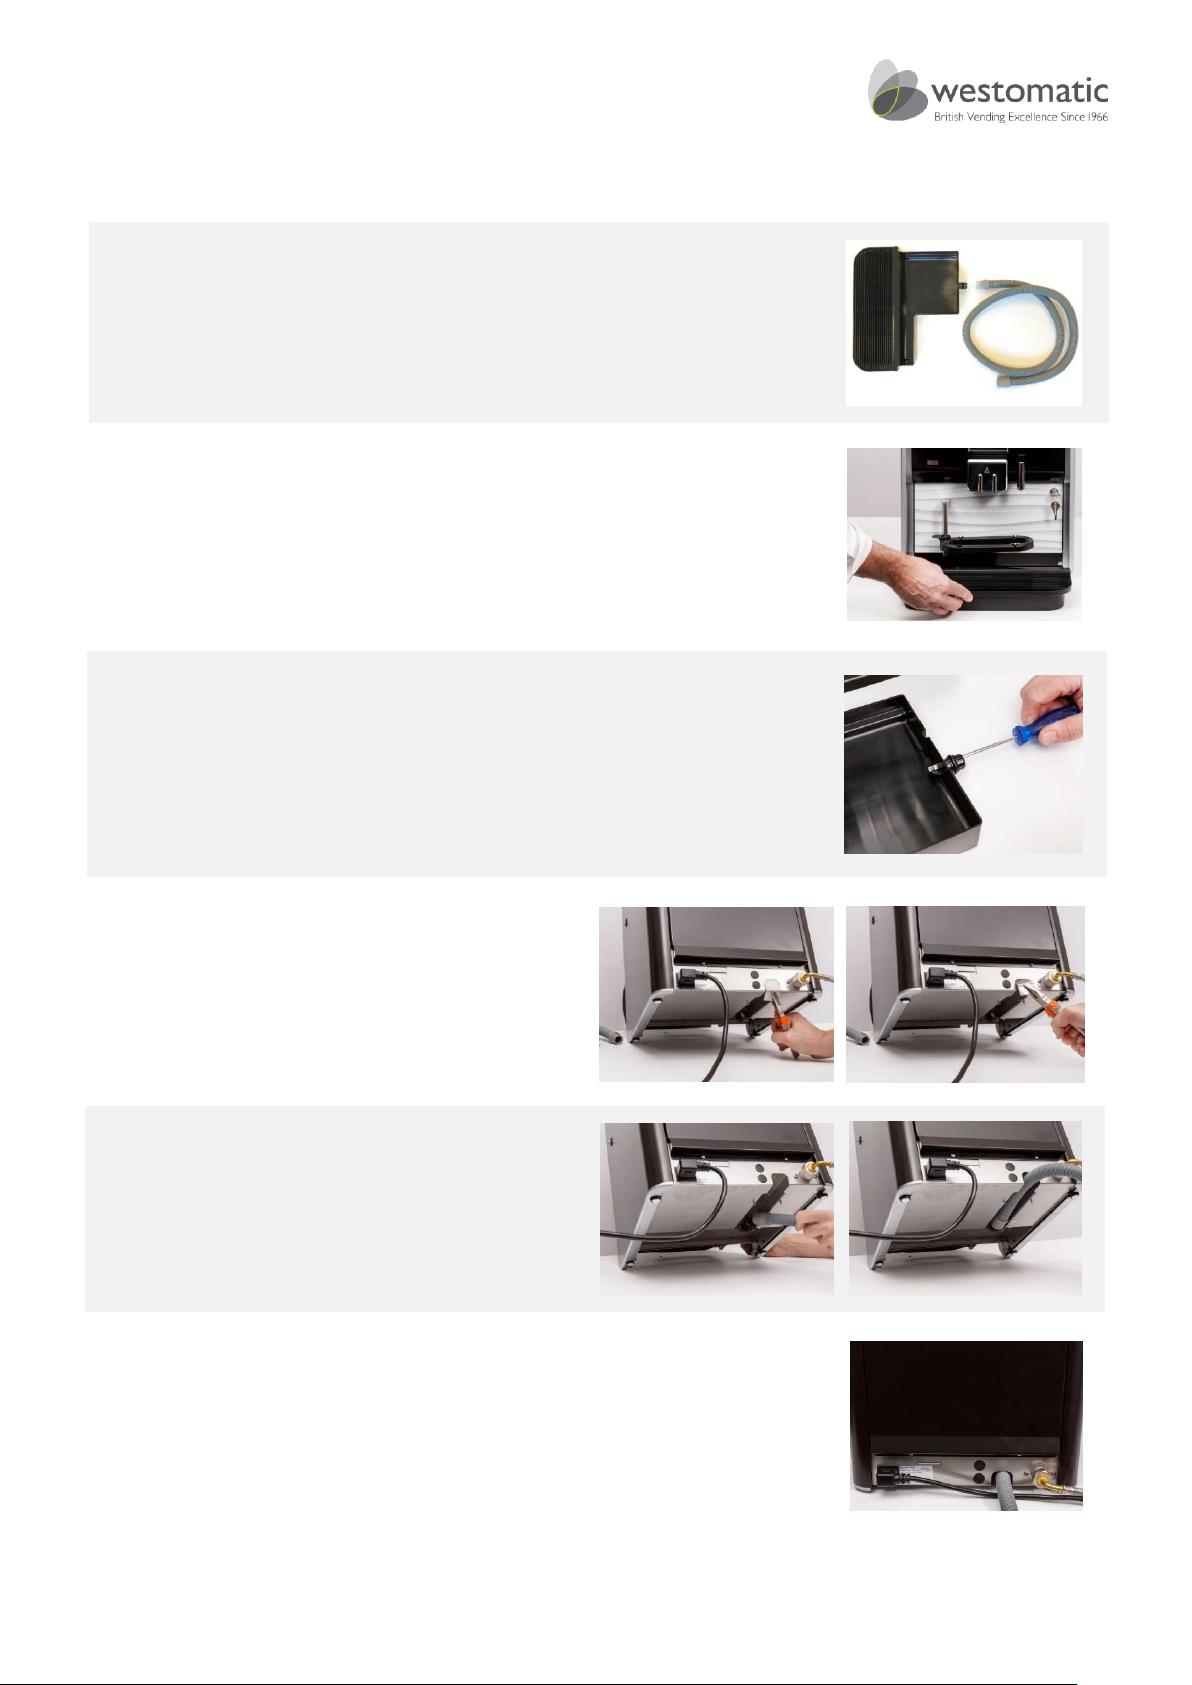
CONNECT THE DRIP TRAY TO A DRAIN
If you want to connect the drip tray to a drain you will
need the accessory drain hose (article No.1007650)
Remove the drip tray from the machine
At the back of the drip tray:
Punch out the perforated part for the liquid
drain
Open the drain hose outlet on the back of
the Compact
Connect the drain hose to the drip tray
connection
Feed the drain hose to your wastewater drain
Page 7
PRIMO COMPACT INSTALLATION MANUAL
Page 6 of 12 P-COM-Install
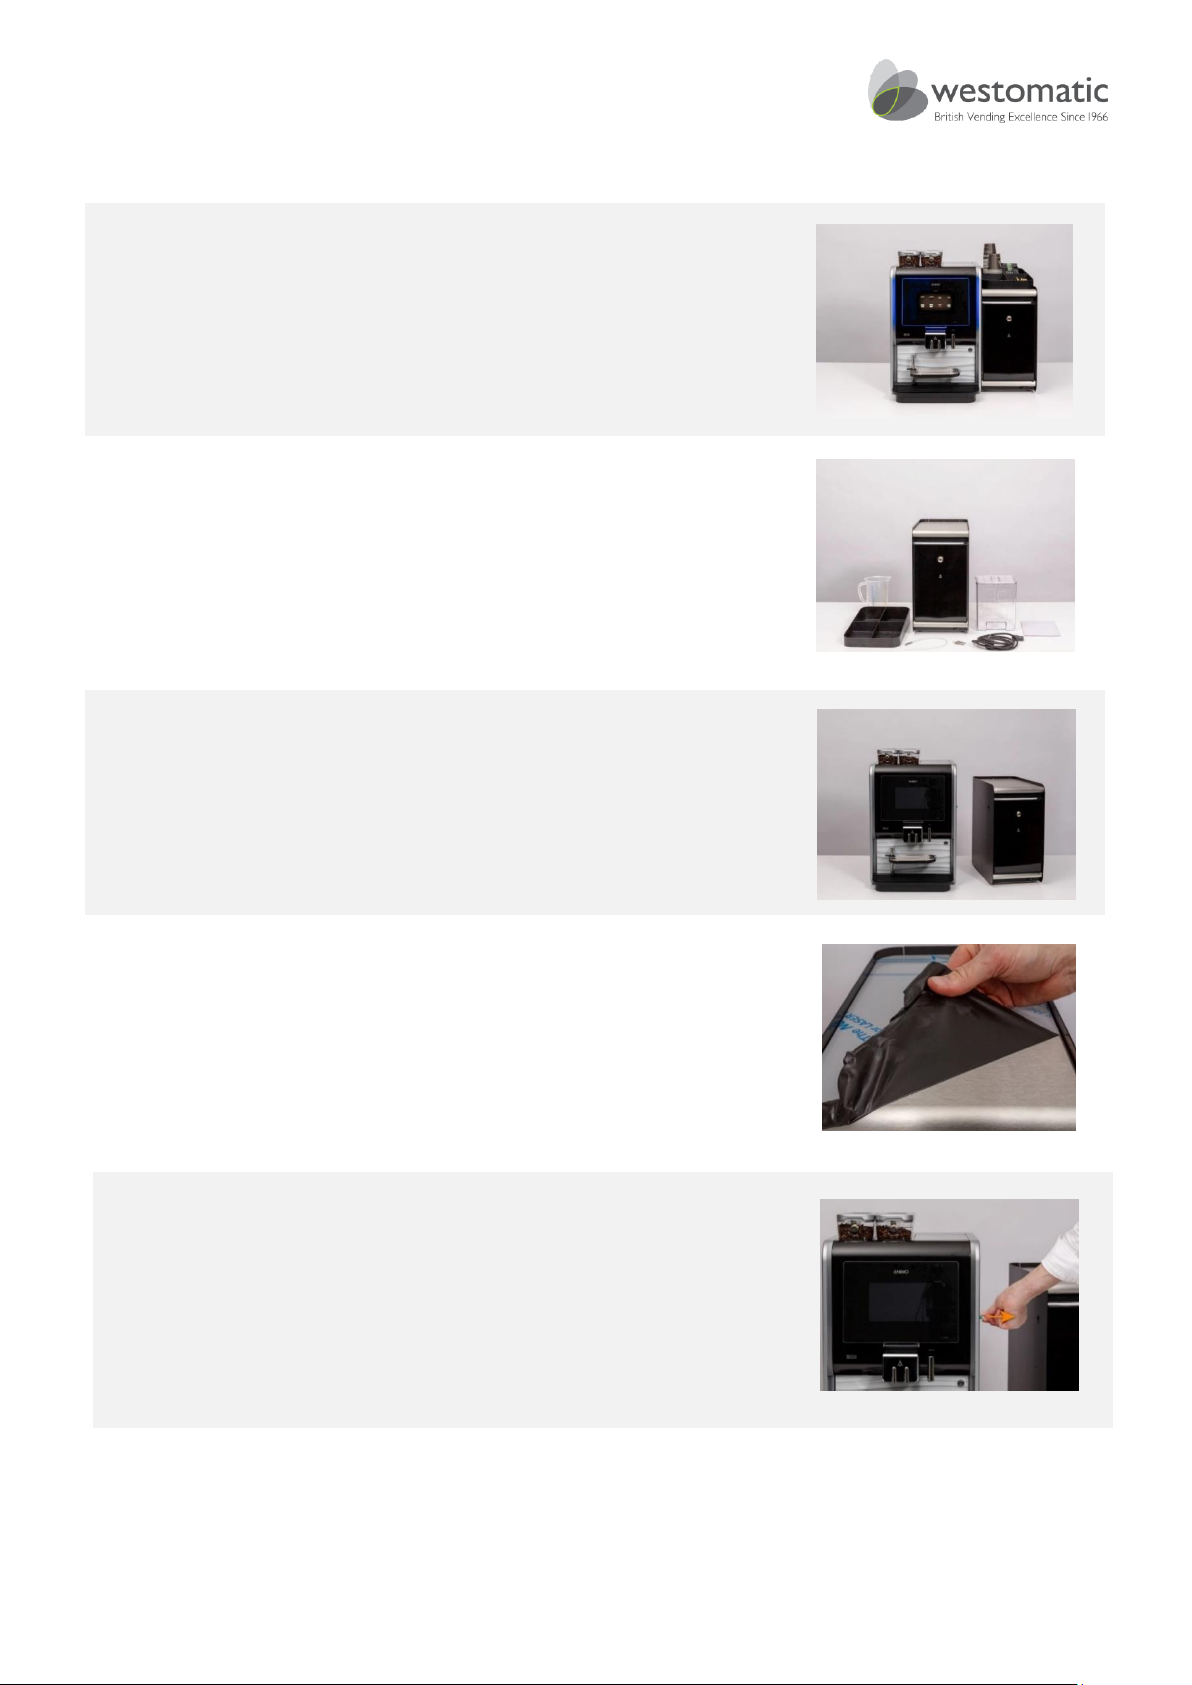
INSTALLING THE MILK COOLER
In these instructions we will show you how to
install the Westomatic Milk cooler
Check the contents of the package:
• Milk cooler Measuring Cup
• Power Cable Safety instructions
• Milk container with lid Ingredient box (optional 1007229)
• 2 keys
• Milk hose
Place the milk cooler on a firm, flat surface next to the
coffee machine.
Place the milk cooler with at least 5cm (2 inch) of space at
its back and top, to allow warm air from condensation to
escape.
Remove the protective foil
Remove the green cover from the nozzle on the right side of
the machine
Page 8
PRIMO COMPACT INSTALLATION MANUAL
Page 7 of 12 P-COM-Install
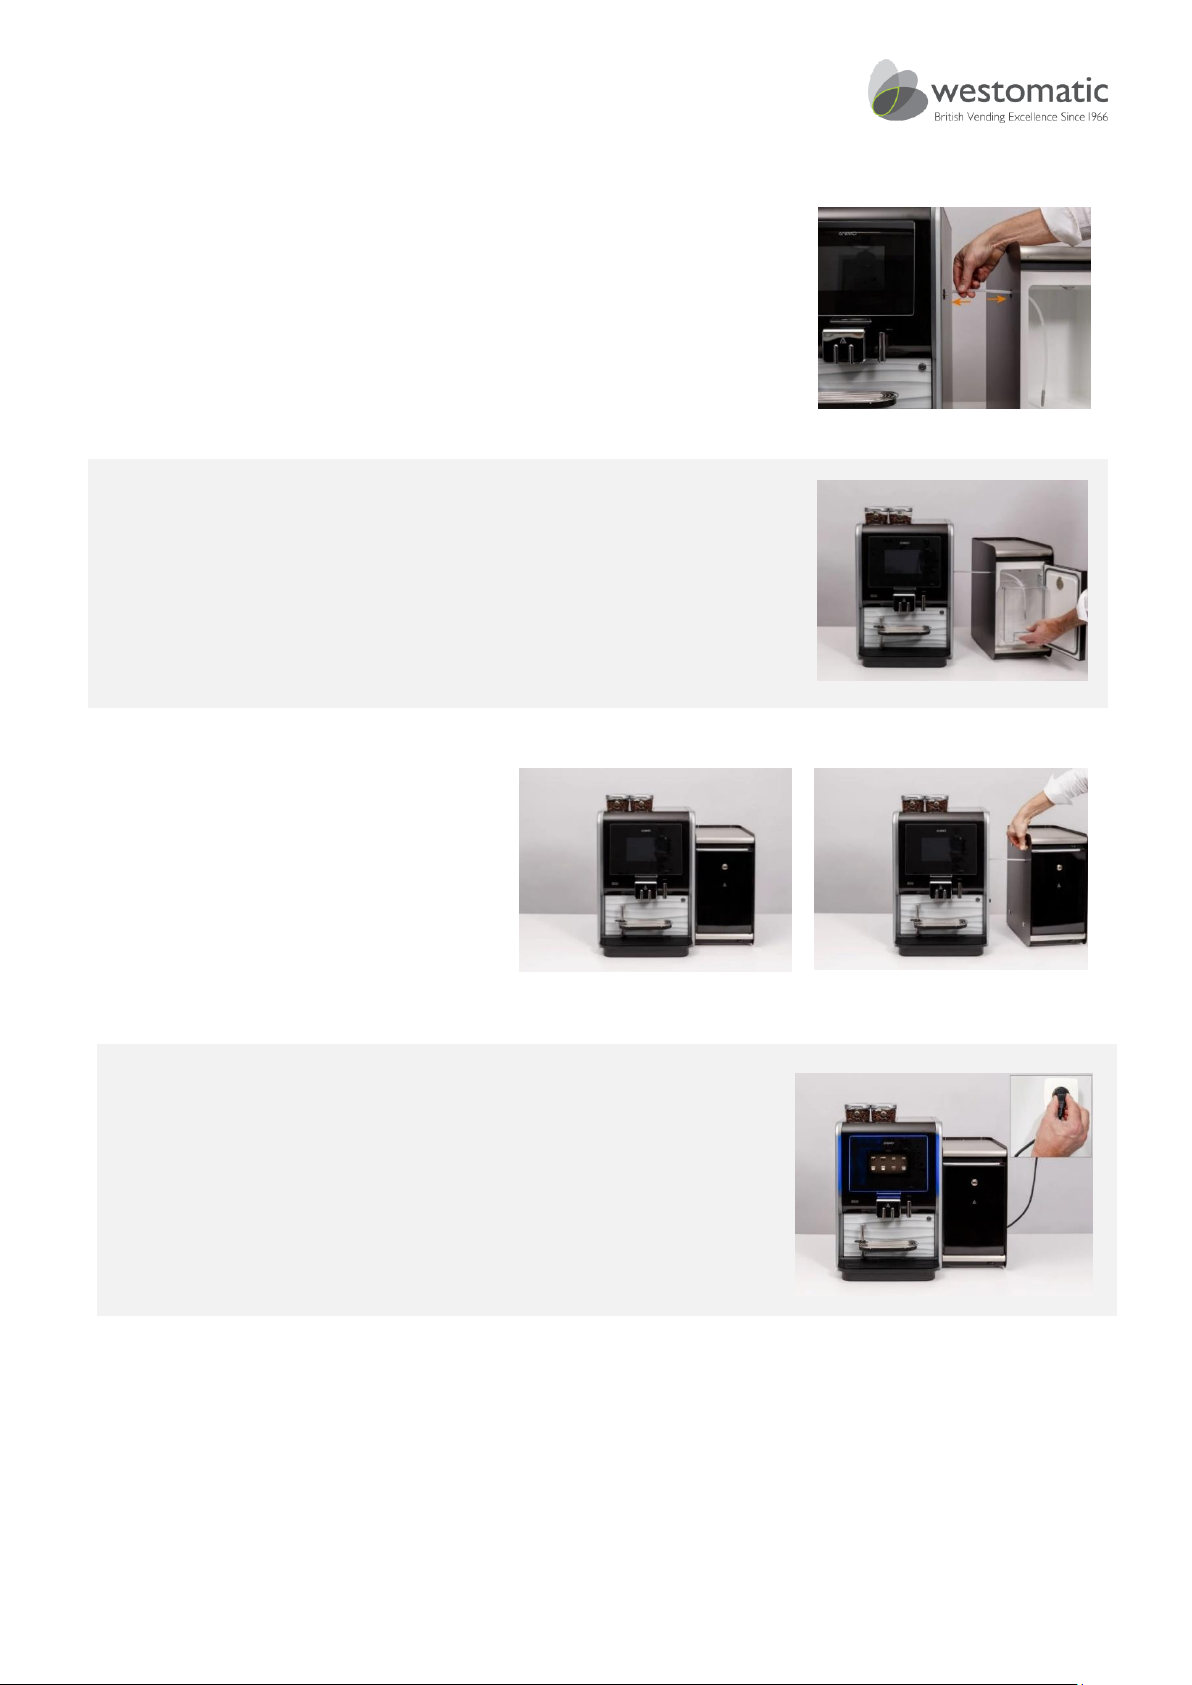
INSTALLING THE MILK COOLER
1. Connect the milk hose to the milk input nozzle of the
Compact coffee machine
2. Feed the milk hose through the hole in the left side
panel of the milk cooler
1. Clean the milk cooler with warm water
2. Place the milk hose in the milk container
3. Place the milk container in the milk cooler and
close the door
Position the milk cooler next to the
Compact coffee machine.
Optionally: use magnets
(# 1008139) to attach the milk
cooler to the machine
Connect the milk cooler to the 230v mains power
socket with the provided power cable.
Note: Make sure that the power supply has a capacity
of at least 45W
Page 9
PRIMO COMPACT INSTALLATION MANUAL
Page 8 of 12 P-COM-Install
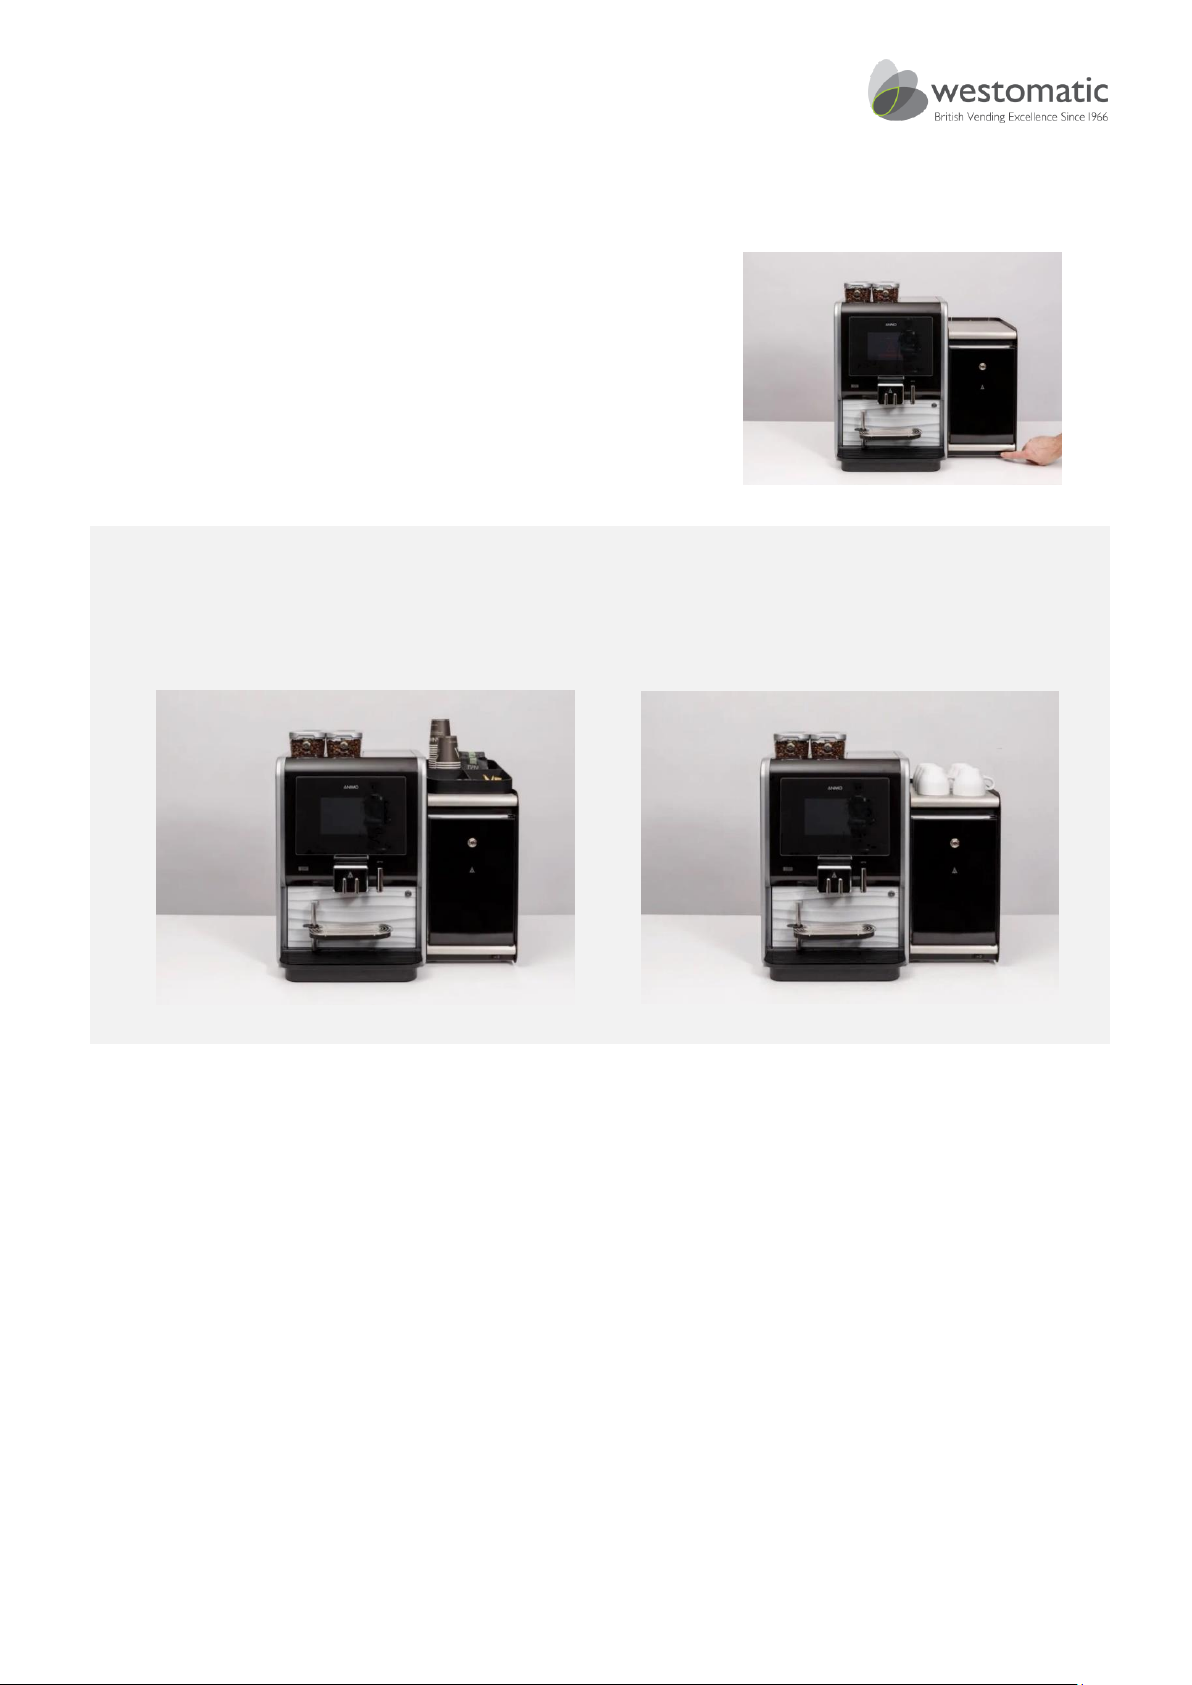
INSTALLING THE MILK COOLER
Switch on the Milk Cooler
Do you have an ingredient box in your package? Place it on top of the Milk Cooler
Attention: If you have a milk cooler with a cup warmer on top, then the ingredient box is not
included and must not be used!
Your fresh milk fridge is now installed and ready to use.
Page 10
PRIMO COMPACT INSTALLATION MANUAL
Page 9 of 12 P-COM-Install
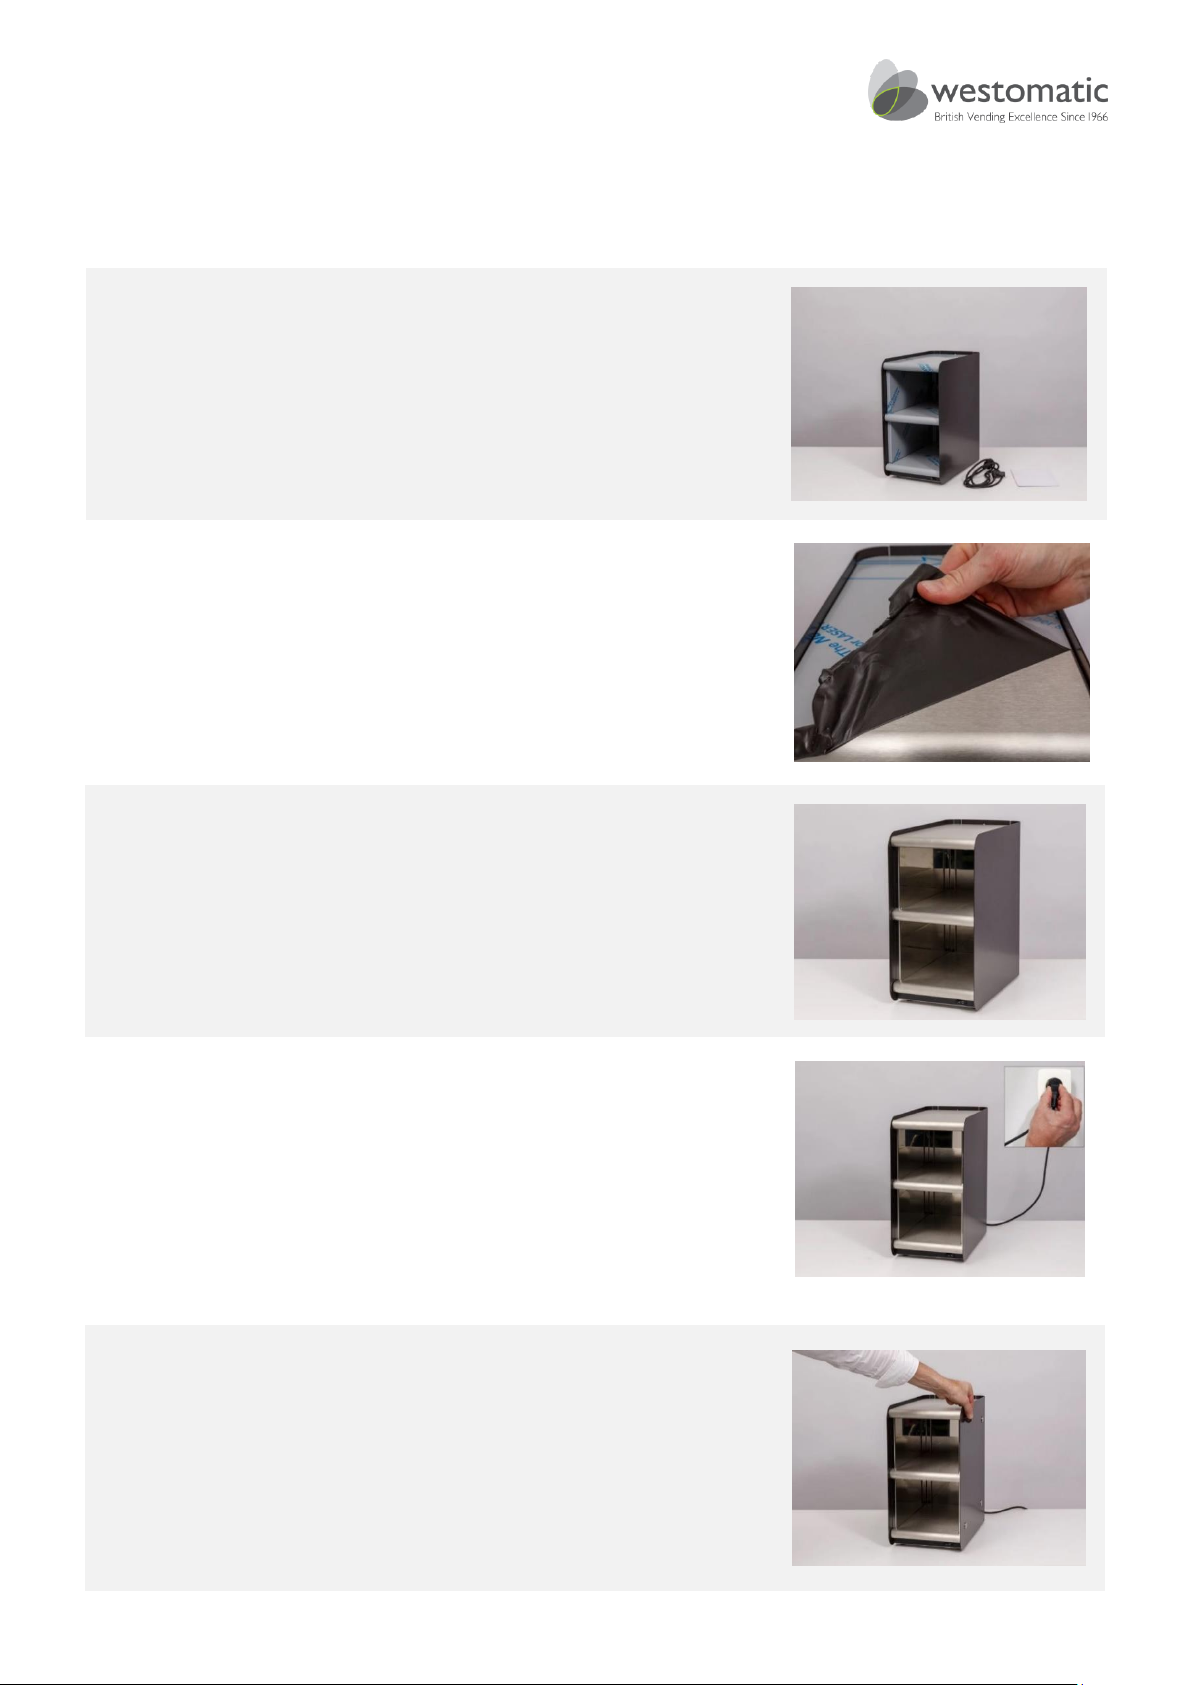
INSTALLING THE CUP WARMER
These instructions will show you how to install the
cup warmer
Check the contents of the package:
• Cup warmer
• Power Cable
• Safety instructions
Remove the protective foil
Place the cup warmer on a flat surface
Connect the cup warmer to a 230v mains power
source with the provided power cable
Attention: Make sure that the power cable does not
come into contact with the cup warming tray which
becomes very hot when in use
Optionally: use magnets (accessory 1008139) to attach the
cup warmer to the machine
Page 11
PRIMO COMPACT INSTALLATION MANUAL
Page 10 of 12 P-COM-Install
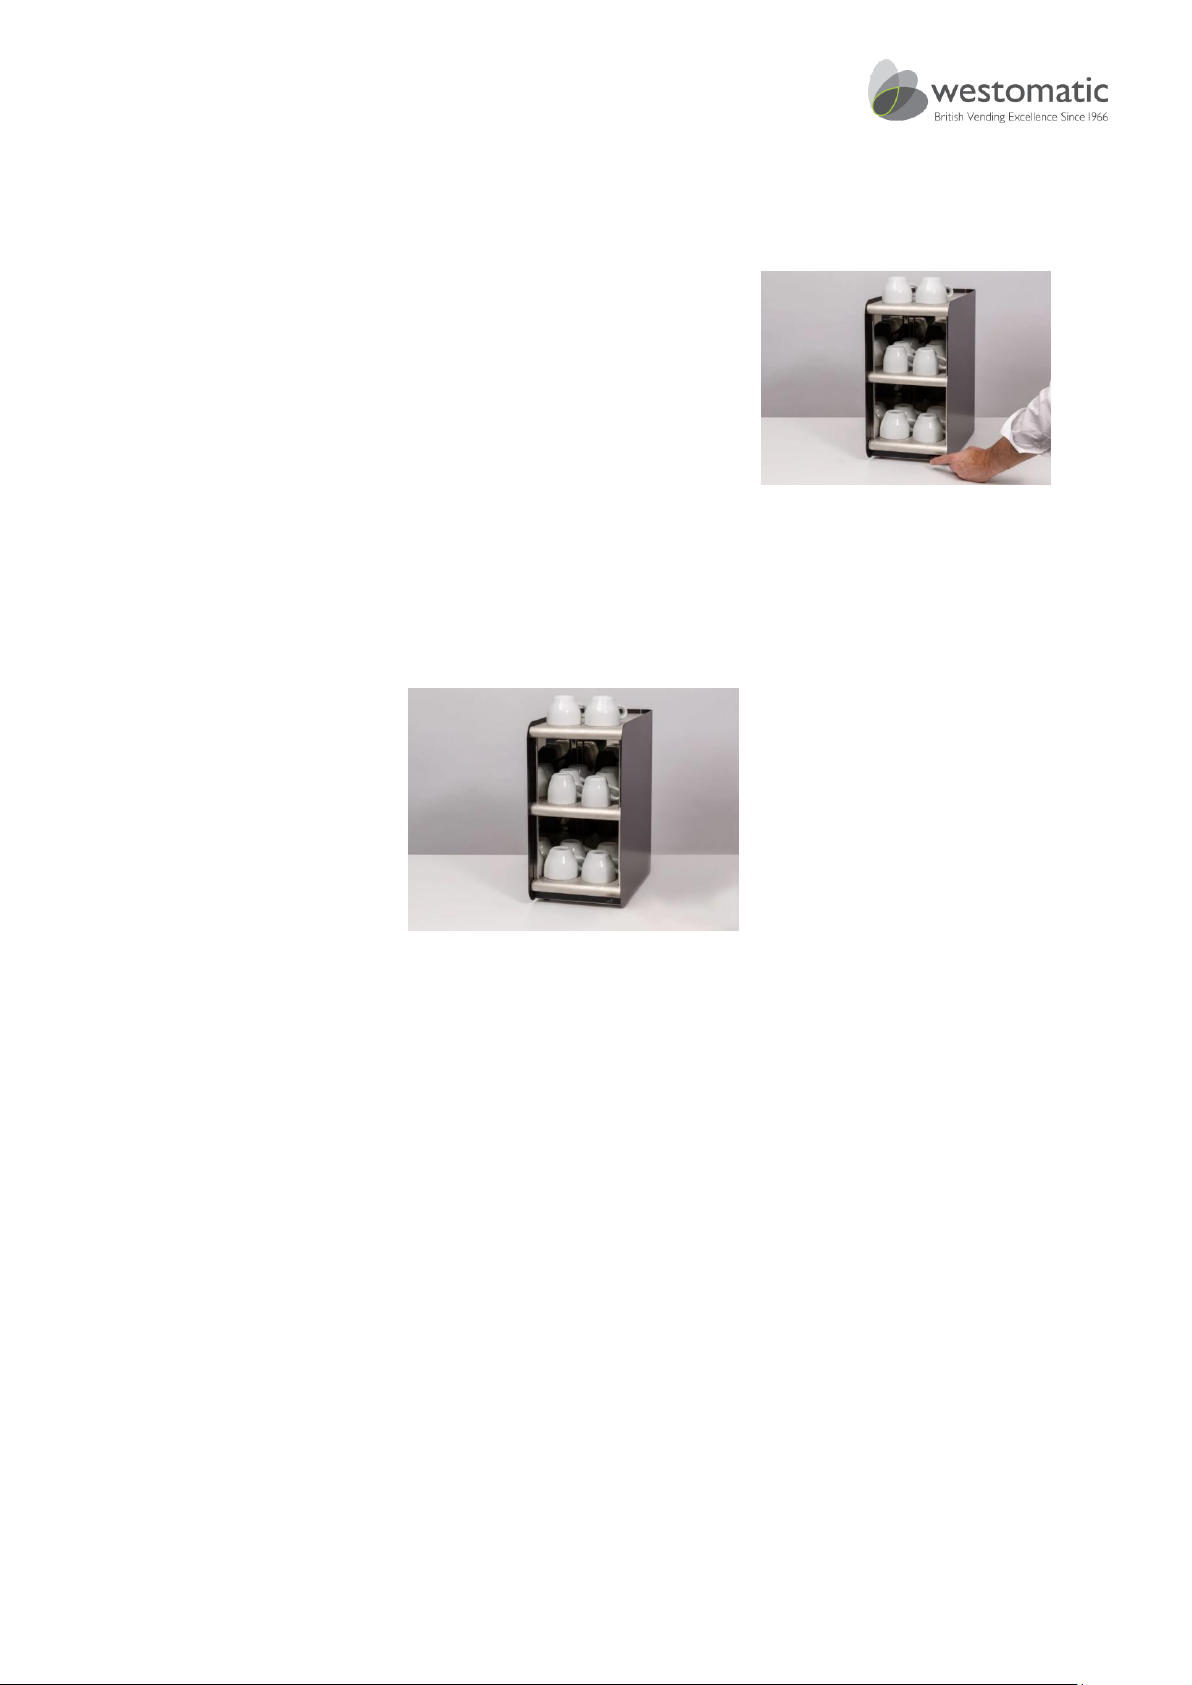
INSTALLING THE CUP WARMER
1. Switch on the trays with the front switches
2. Place dry cups upside down on the trays
Your cup warmer is now installed and ready to use
Page 12
PRIMO COMPACT INSTALLATION MANUAL
Page 11 of 12 P-COM-Install
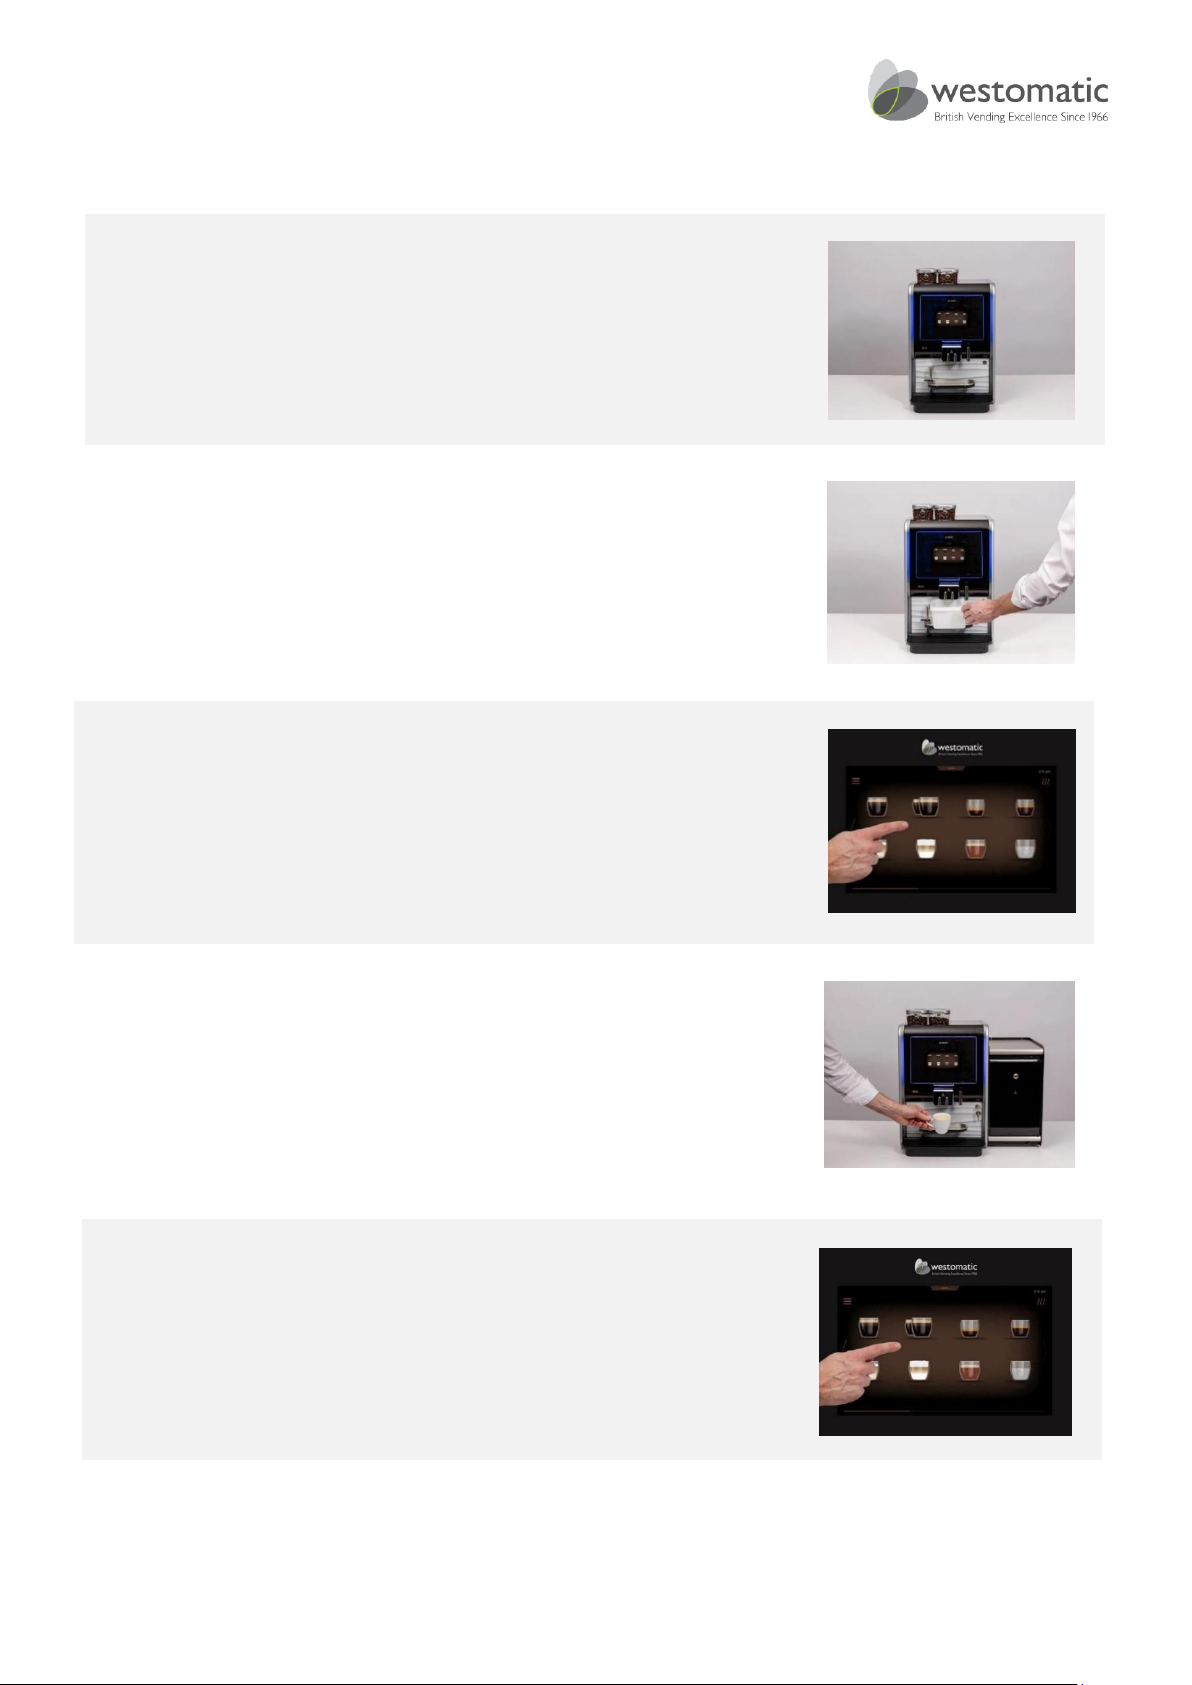
START USING THE COMPACT
Before you start:
• Make sure the Compact is connected to
the mains power
• Make sure the Compact is filled (see ‘fill
the compact’)
Place an empty container (min. 1.5 litres) below
the outlet
Use the touchscreen to select a recipe and dispense
the drinks
Check whether the taste and quantity is as desired.
If the taste or quantity is not as desired, inform your
dealer.
Repeat the previous steps for every recipe to
ensure all recipes are as desired.
Page 13
PRIMO COMPACT INSTALLATION MANUAL
Page 12 of 12 P-COM-Install
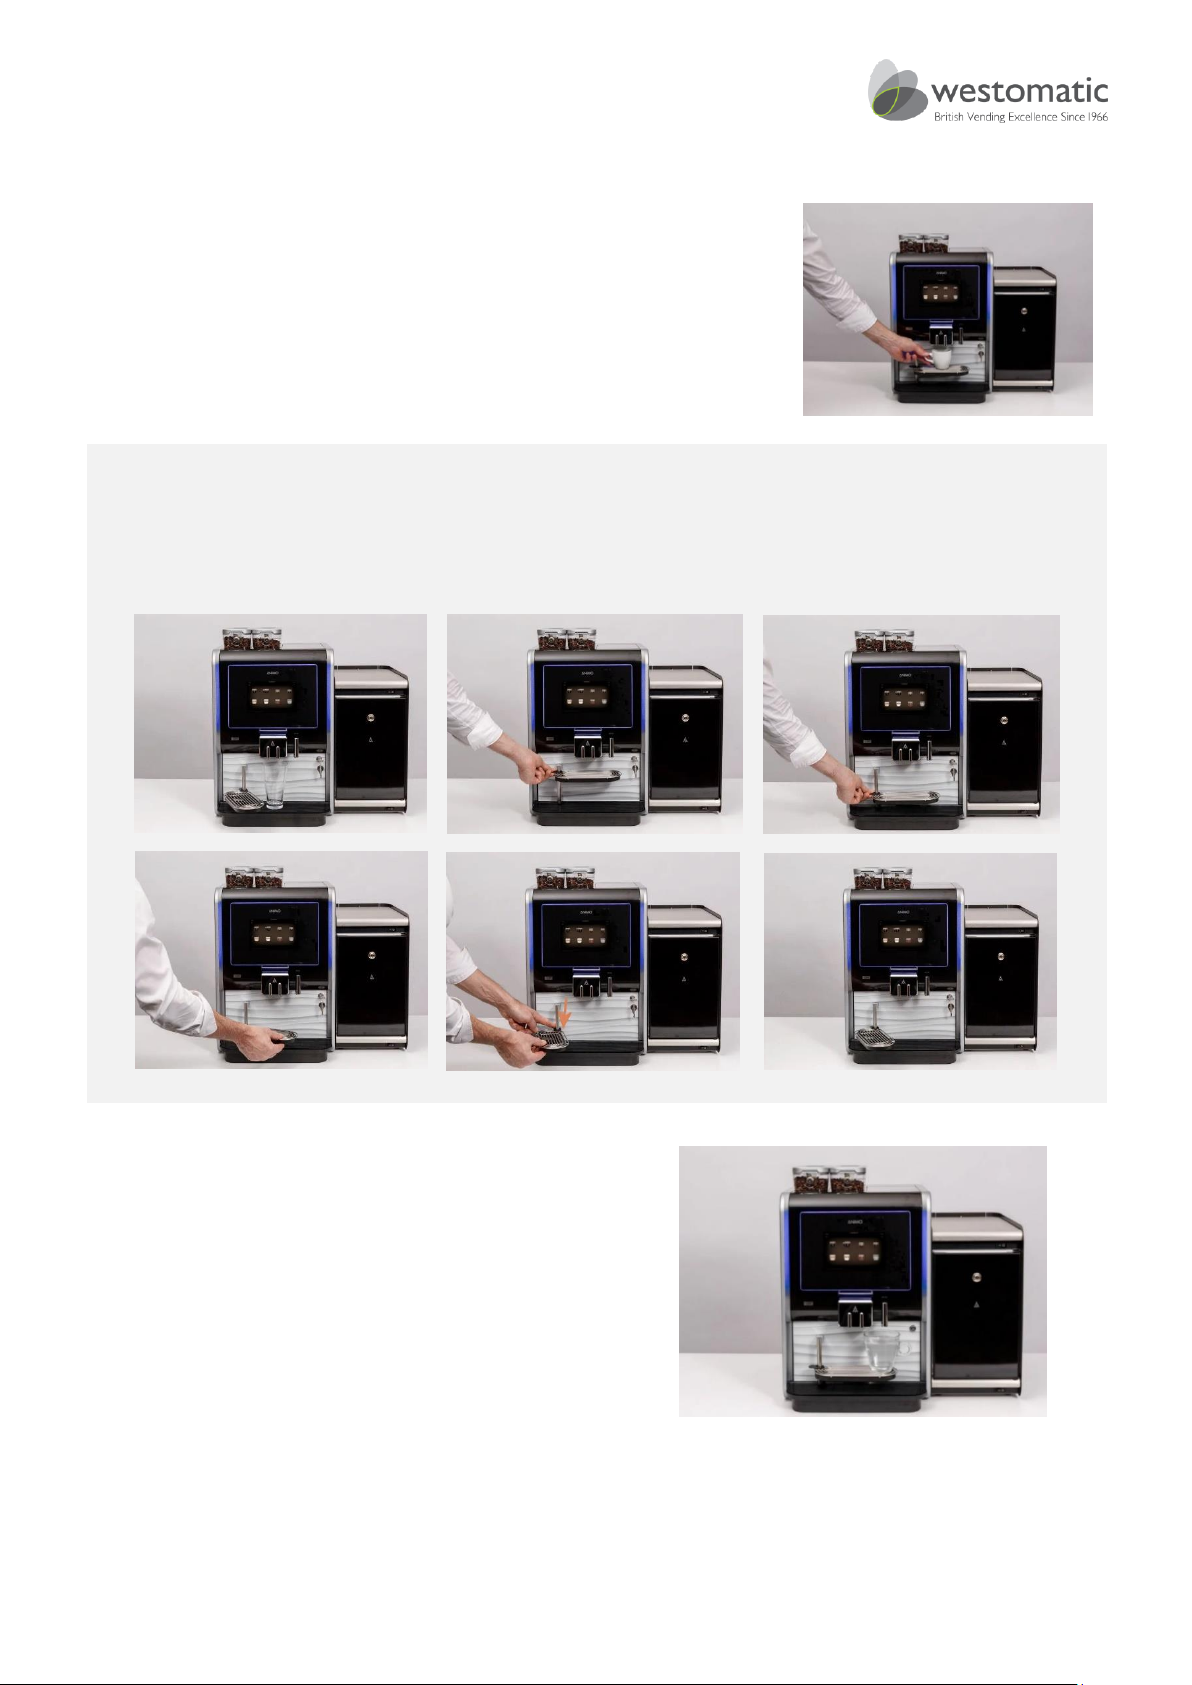
Place a cup below the outlet before selecting your coffee product
To place a glass or thermos jug below the outlet:
1. Lower the adjustable cup tray by pushing it down
2. Rotate the cup tray and fix the cup tray with a click
3. Place the glass or thermos jug
Hot water for tea can be obtained from the
outlet on the right.
 Loading...