

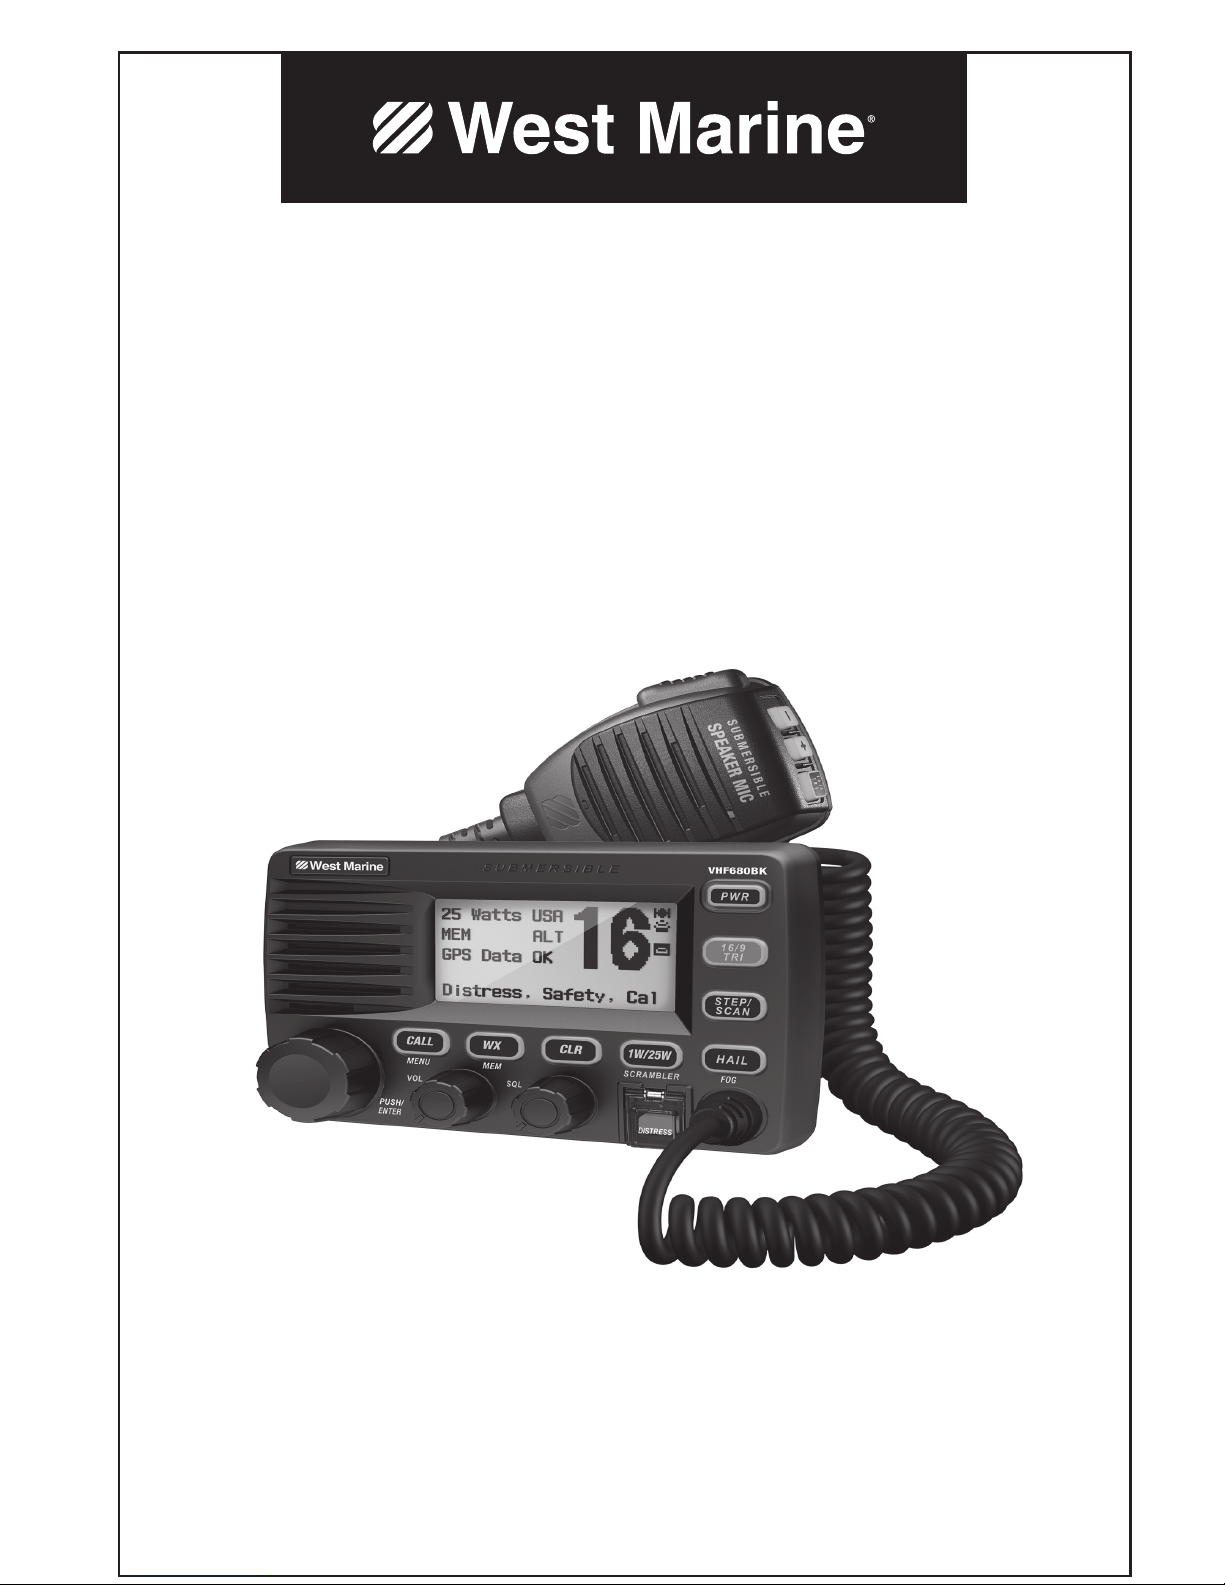
West Marine VHF680 Owner's Manual
Owner’s Manual
Guide d’utilisation
Model/modèle 12019147
VHF680
Class ‘D’ DSC Marine
Radio with Hailer
Radio maritime ASN de classe ‘D’
avec appel à la voix

MAKING A VOICE DISTRESS CALL
Lift the red cover. Press and hold the
DISTRESS
button for three seconds. Your radio transmits
your boat’s location every few minutes until you receive a response.
#
NOTE: If the radio displays
Enter User MMSI
, cancel the automatic distress call and make a
normal voice distress call.
Making a Voice Distress Call
Speak slowly - clearly - calmly.
For future reference, write your boat’s name & call sign here:
1. Make sure your radio is on.
2. On the radio, press the
16/9-TRI
button to switch to Channel 16 (156.8 MHz). (If the corner of
the display does not show 16, press the
16/9-TRI
button again until it does.)
3. Press the
PUSH-TO-TALK
button on the microphone and say: “MAYDAY -- MAYDAY --
MAYDAY.”
4. Say “THIS IS
{name of your boat (three times) and call sign/boat registration number
(once).}.
”
5. Say “MAYDAY
{name or call sign of your boat}.
”
6. Tell where you are: (what navigational aids or landmarks are near, or read the latitude and
longitude from your GPS).
7. State the nature of your distress, e.g. are you sinking, medical emergency, man overboard,
on fire, adrift, etc.
8. State the type of assistance you need (medical, towing, pumps, etc.).
9. Give number of persons aboard and conditions of any injured persons.
10. Estimate present seaworthiness of your ship (e.g. how immediate is the danger due to
flooding or fire or proximity to shore).
11. Briefly describe your ship, giving the ship name (e.g. “Blue Duck is 32 foot cabin cruiser,
white hull, blue deck house”).
12. Say: “I WILL BE LISTENING ON CHANNEL 16.”
13. End message by saying “THIS IS
{name or call sign of your boat}
, OVER.”
14. Release the
PUSH-TO-TALK
button and listen.
If you do not get an answer after 30 seconds, repeat your call, beginning at step 3, above.

FAIRE UN APPEL DE DÉTRESSE VOCAL
Soulevez le couvercle rouge. Maintenez la touche
DISTRESS
enfoncée pendant trois secondes. La
radio transmet la position de votre bateau à intervalles réguliers de quelques minutes, jusqu’à ce
que vous receviez une réponse.
#
REMARQUE : Si la radio affiche Enter User MMSI (Entrer l’ISMM de l’utilisateur), annulez l’appel
de détresse automatique et faites un appel de détresse couvercle rouge et vocal standard.
Faire un appel de détresse vocal
Parlez lentement – clairement – calmement.
Pour toute référence ultérieure, transcrivez ci-dessous le nom et l’indicatif d’appel de votre bateau :
1. Vérifiez si votre radio est en marche.
2. Appuyez sur la touche
16/9-TRI
de la radio afin de commuter au canal 16 (156,8 MHz). (Si le
canal 16 n’apparaît pas à l’affichage, appuyez de nouveau sur la touche
16/9-TRI
jusqu’à ce
qu’il soit affiché.)
3. Appuyez sur le bouton de microphone
PUSH-TO-TALK
et dites :“MAYDAY - MAYDAY –
MAYDAY”.
4. Donnez l’identité de votre navire en disant : “ICI {nom de votre bateau (trois fois) ou indicatif
d’appel et le numéro d’identification de votre bateau (une fois)}”.
5. Dites “MAYDAY {nom ou indicatif d’appel de votre bateau} une fois”.
6. Donnez votre position : (quels sont les points de repère ou aides à la navigation près de vous
ou lisez les coordonnées de longitude et de latitude apparaissant sur votre dispositif GPS).
7. Révélez la nature de votre détresse (par exemple, nous sommes en train de couler, urgence
médicale, un homme à la mer, un incendie, nous sommes à la dérive, etc.
8. Révélez la nature de l’assistance désirée (médicale, remorquage, essence, etc.)
9. Donnez le nombre de personnes à bord et les conditions des blessés, s’il y en a.
10. Donnez la condition de navigabilité actuelle de votre navire, tel que le degré de l’urgence par
rapport à l’inondation, à l’incendie ou à votre proximité de la côte.
11. Donnez une brève description de votre navire en donnant le nom du bateau (par exemple,
“Blue Duck est un yacht de croisière de 32 pieds, avec une coque blanche et un rouffle
bleu.”).
12. Dites : “JE VAIS ÉCOUTER SUR LE CANAL 16”.
13. Terminez le message en disant “ICI {nom ou indicatif d’appel de votre bateau}, À VOUS”.
14. Relâchez le bouton
PUSH-TO-TALK
du microphone et écoutez.
Si vous n’obtenez pas de réponse après 30 secondes, répétez l’appel encommençant à l’étape 3 cidessus.

CÓMO HACER UNA LLAMADA DE APURO
Levante la tapa roja. Mantenga oprimido el botón
DISTRESS
por tres segundos. La radio
transmitirá la localidad de su nave cada cuantos minutos hasta que reciba una respuesta.
#
Nota: Si la radio exhibe (
Inserte el MMSI del usuario
), cancele la llamada de apuro automática y
haga una llamada de apuro normal por voz.
Cómo hacer una llamada de apuro por voz
Hable despacio -- claro -- y con calma.
Para acordarse en el futuro, escriba el nombre y la señal de su nave aquí:
1. Asegúrese de que la radio está encendida.
2. En la radio, oprima el botón
16/9-TRI
para cambiar al canal 16 (156.8 MHz). (Si la esquina de
la pantalla no muestra 16, oprima el botón
16/9-TRI
otra vez hasta que lo haga.)
3. Oprima el botón
PUSH-TO-TALK
(Oprima para hablar) en el micrófono y diga: “MAYDAY ---
MAYDAY--- MAYDAY.”
4. Diga “ESTE ES
{nombre de su nave (tres veces) y la señal/ número de registración de la
nave (una vez)}
.”
5. Diga “MAYDAY
{nombre o señal de su nave}” una vez
.
6. Describa donde se encuentra: (ayudas de navegación o marcas destacadas cercanas, o lea
la latitud y la longitud en su GPS).
7. Describa la clase de su apuro, ej., se está hundiendo, emergencia médica, hombre al agua,
hay fuego, está a la deriva, etc.
8. Decriba el tipo de asistencia que necesita (atención médica, remolque, bombas, etc.).
9. Describa la cantidad de personas abordo y las condiciones de cualquier persona lesionada.
10. Estime la navegabilidad actual de su nave, ej., cuanto de inmediato es el peligro de
inundación o de incendio o proximidad a la costa.
11. Describa brevemente su nave (ej., “Blue Duck es un yate de 32 pies, casco blanco, cabina
azul”).
12. Diga: “ESTARÉ ESCUCHANDO EN EL CANAL 16.”
13. Termine el mensaje diciendo: “ESTE ES
{nombre o señal de su nave}
, OVER.”
14. Suelte el botón
PUSH-TO-TALK
y escuche.
Si no recibe una contestacion dentro de 30 segundos, repita su llamada, comenzando con el paso 3,
descrito arriba.
Visite www.westmarine.com para bajar el manual en español de la radio VHF680.

E - 1
Contents
Making a Voice Distress Call .................................................. ii
Faire un appel de détresse vocal .......................................... iii
Cómo hacer una llamada de apuro por voz ......................... iv
Introducon .........................................................................1
Radio Features ...................................................................... 1
Geng Started .....................................................................2
What’s Included ....................................................................2
Parts of the Radio ................................................................. 3
Turning on the Radio.............................................................. 5
Seng the UIC Channel Mode (USA/CAN/INT) ..................... 5
How It Works ........................................................................5
Normal Mode ........................................................................ 6
Scan Mode ............................................................................ 7
Weather Mode ...................................................................... 8
Using Your Radio ...................................................................9
Using the Menu ...................................................................... 9
Making a Voice MAYDAY Call ................................................ 9
Seng the Volume ................................................................ 9
Seng the Squelch Level ......................................................9
Changing the Channel ............................................................ 9
Renaming Channels ............................................................... 9
Making a Transmission......................................................... 10
Choosing Triple Watch or Dual Watch ................................. 11
Using FIPS Codes for Weather Alerts ................................... 11
Using the Scrambler ............................................................. 12
Changing Display and Sound Opons ................................. 12
Seng the GPS Posion Manually ...................................... 13
Using Digital Selecve Calling (DSC) Features ......................13
What Is DSC? ....................................................................... 13
Entering MMSI Numbers in Your Radio ...............................14
Using the Directory .............................................................. 15
Making DSC Calls .................................................................. 16
Making an Automac Distress Call....................................... 17
Receiving DSC Calls .............................................................. 17
Test Calls ..............................................................................19
Posion Request and Reply ................................................. 19
Pung the Radio into Standby ........................................... 21
Disabling Automac Channel Switching ............................... 21
Using the Hailer and FogHorn ..............................................21
Connecng the Hailer/Foghorn Speaker .............................. 21
Using the Hailer .................................................................... 21
Using the Foghorn ................................................................ 22
Installing the Hardware ......................................................23
Mounng the Radio ............................................................23
Using the Flush Mount Bracket ............................................ 23
Connecng the Radio ........................................................... 24
Connecng to a GPS Receiver ............................................. 25
Connecng to a Chartploer ............................................... 26
Connecng to an External Speaker ...................................... 26
Maintenance and Troubleshoong ......................................27
Performing a Self Test ..........................................................28
Engine Noise Suppression .................................................... 28
Specicaons ......................................................................28
Reference Tables ................................................................29
Channel Descripons and what They Mean ........................ 29
NMEA Operaon .................................................................. 34
NMEA Output ...................................................................... 34
Regulaons and Safety Warnings ........................................34
Three Year Limited Warranty Statement .............................35
INTRODUCTION
Radio Features
• Submersible design
• Large, dot matrix display
• Advanced DSC Class D functions, including Test Calling
• Channel select buttons on the microphone
• Memory scan mode – Lets you save channels to memory and monitor them in quick succession.
• Transmitter power level select – Lets you boost the transmitter power from 1 watt to 25 watts for added transmission
distance.
• Battery level display and tone – Sounds an alert tone if the battery voltage goes too high or too low.
• Triple watch operation – Checks the Coast Guard Distress/Hailing channels 16 and 9 in the background.
• All marine VHF channels for the U.S., Canada, and international waters
• National Oceanic and Atmospheric Administration (NOAA) weather channel watch – Checks the local NOAA weather
channel in the background and sounds a warning tone if a hazard alert is issued.
E - 2
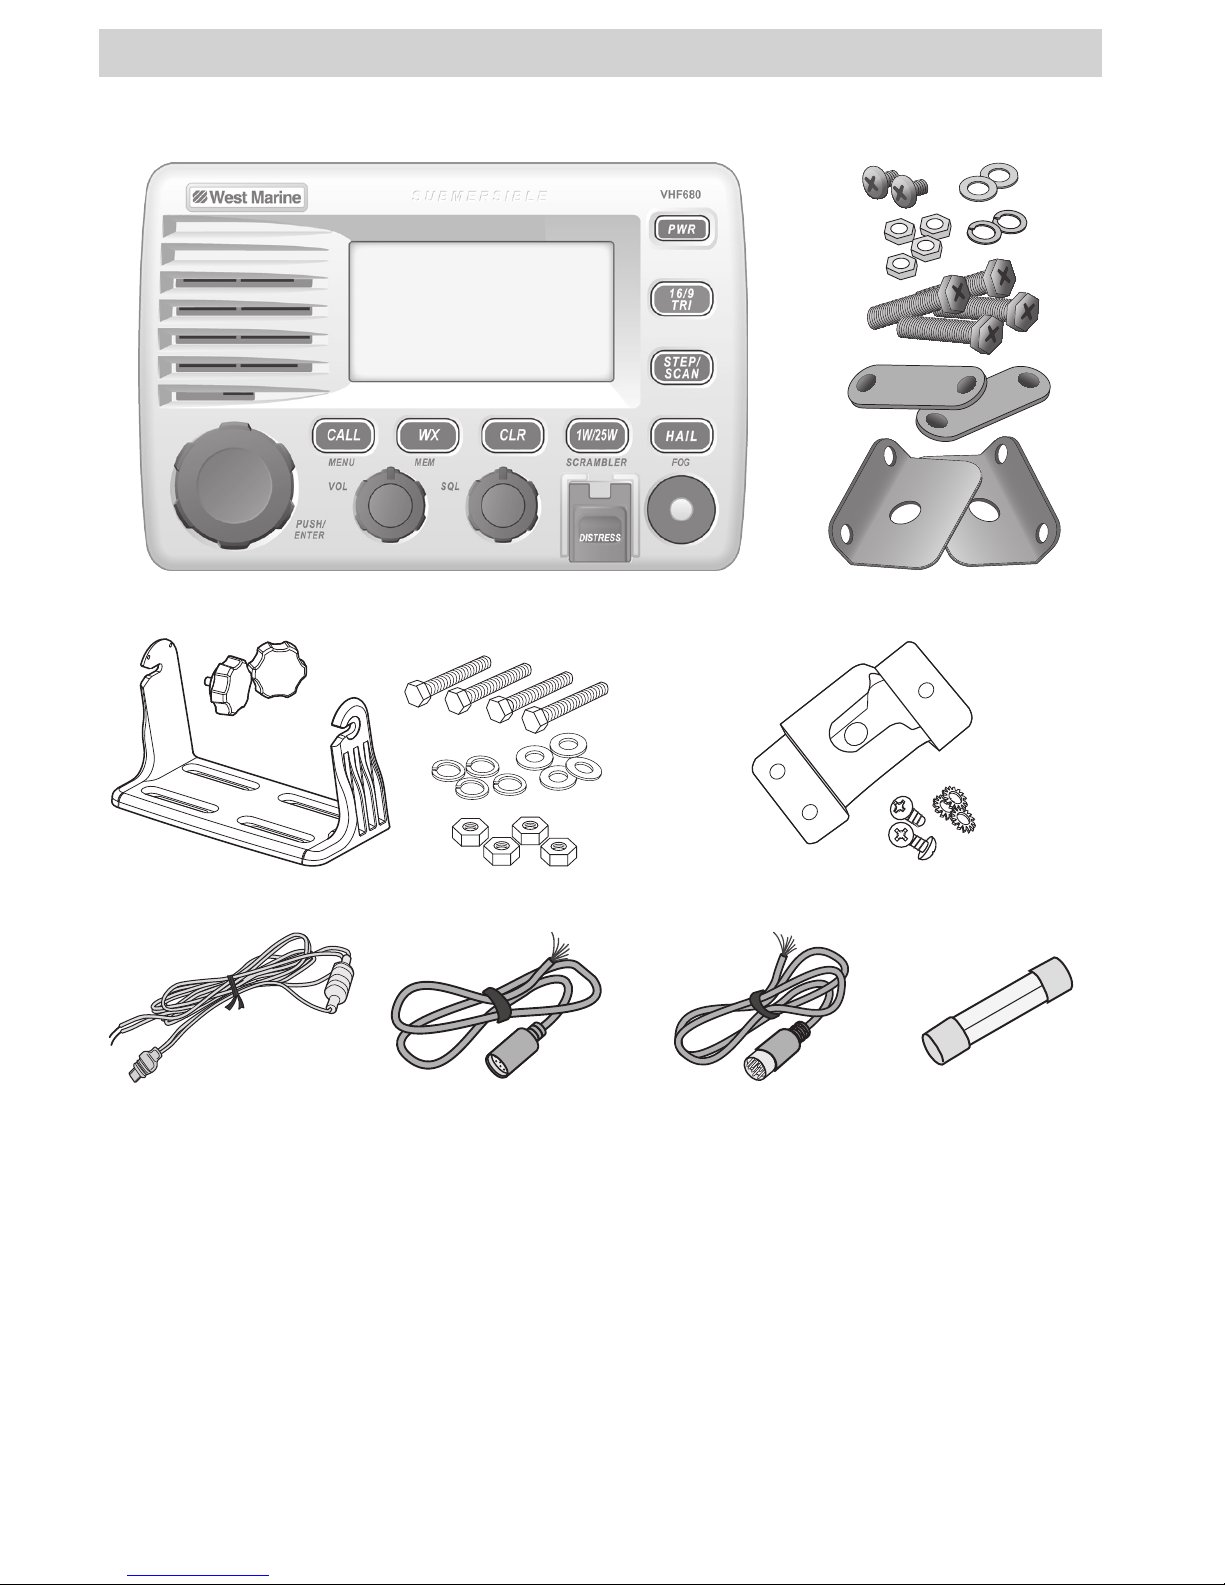
GETTING STARTED
What’s Included
VHF680 DSC radio
Flush mount bracket kit
Mounting bracket, knobs, and hardware Microphone hanger and mounting hardware
DC power cord Hailer cable Accessory cable Spare fuse
E - 3
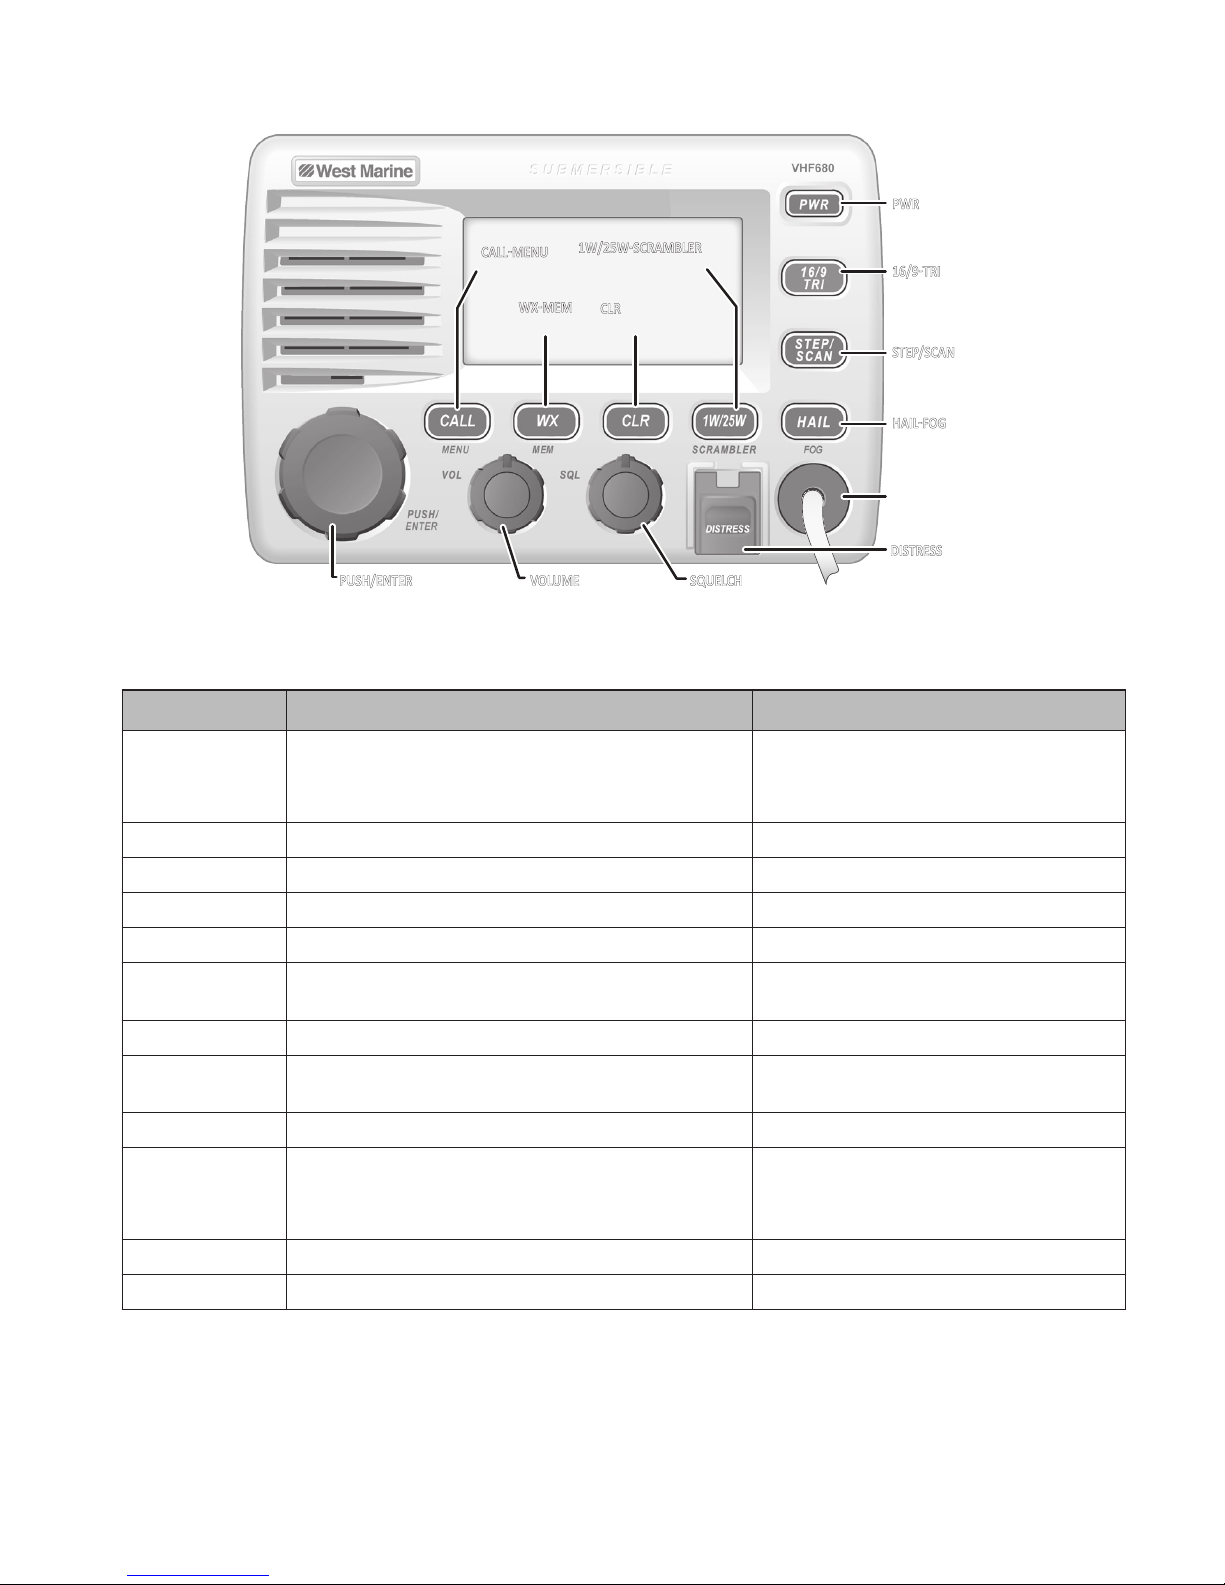
Parts of the Radio
Front view
Buon/Knob Press/Turn to... Press and hold to...
PUSH/ENTER
Press to choose an option on a menu or to display the GPS
data.
Turn to move up and down channels.
NA
VOL
Turn to increase or decrease volume. NA
SQL
Turn clockwise to decrease channel noise. NA
DISTRESS
Select the nature of your distress for a distress call. Transmit a distress call.
CALL-MENU
Open the call menu. Open the normal menu (see page 9).
WX-MEM
Listen to the current weather conditions in your area.
Save a channel into memory or remove a
channel from memory.
CLR
Go to previous menu or move the cursor back one space. NA
1W/25WSCRAMBLER
Change the transmit power (see page 10). Activate the voice scrambler (see page <?>).
PWR
Turn the radio on and off. NA
16/9-TRI
1st press: Go to Channel 16.
2
nd
press: Go to Channel 9.
3
rd
press: Go back to the original channel.
Go into Triple Watch or Dual Watch mode (see
page 7)..
STEP/SCAN
Go to the next channel in memory. Start scanning the channels saved in memory.
HAIL-FOG
Activate the hailing speaker. Display the fog horn menu (see page 21).
SQUELCH
knob
(turn clockwise to
decrease channel
noise)
16/9-TRI
(triple/
dual-watch)
buon
STEP/SCAN
buon
WX-MEM
buon
CALL-MENU
buon
DISTRESS
buon
(behind cover)
1W/25W-SCRAMBLER
buon
PWR
(power)
buon
Microphone
cord
CLR
(clear)
buon
VOLUME
knob
(turn clockwise to
increase volume)
HAIL-FOG
buon
PUSH/ENTER
knob
(turn clockwise to
move up channels;
press to select)
E - 4
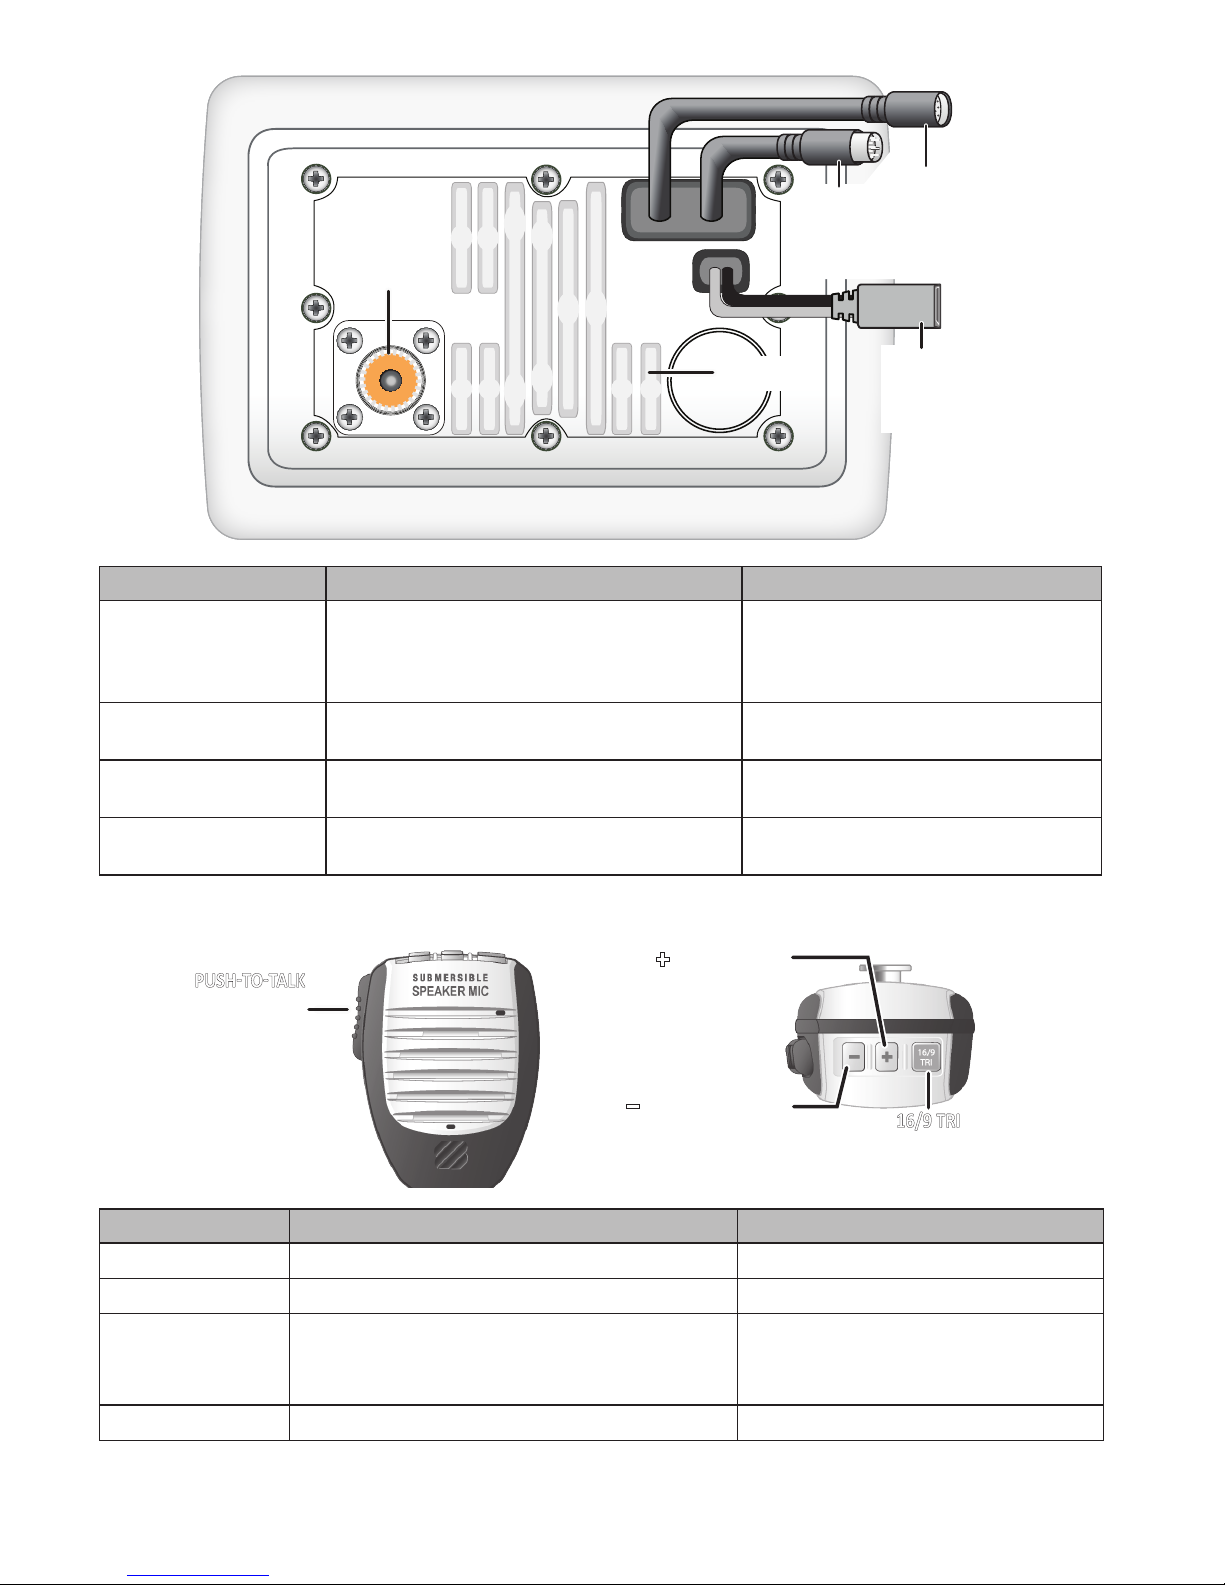
Rear view
Connector Connects to... For details, see ...
Antenna connector
External VHF antenna with a male PL259 (SO238)
connector and 50 Ω impedance. Minimum 4 ft, 3dB
rated antenna for sailboats, 8 ft, 6 dB rated for power
boats.
Connecting the radio (see page 24).
Power cable pigtail
Nominal 13.8 VDC power supply with negative ground
(10.4 VDC to 15.8 VDC).
Connecting the radio (see page 24).
Accessory cable pigtail
A GPS receiver, a chartplotter, and an external
monitoring speaker.
Connecting a GPS (see page 25).
Hailer cable pigtail A hailing speaker or fog horn.
Connecting an optional hailing speaker (see
page 26).
Microphone
Buon Press to... Press and hold to...
( + ) Move up one channel at a time. Move quickly up the channels.
( – ) Move down one channel at a time. Move quickly down the channels.
16/9-TRI
1
st
press: Go to Channel 16.
2
nd
press: Go to Channel 9.
3
rd
press: Go back to the original channel.
Go into Triple Watch or Dual Watch mode (see
page 7).
PUSH-TO-TALK
Cancel scanning and stay on a channel. Talk on a channel.
DC
13.8V
ANT
MIC
Accessory
cable pigtail
Hailer
cable
pigtail
Antenna
connector
(SO238)
Heat sink
Power
cable
pigtail
PUSH-TO-TALK
buon
16/9 TRI
(triple/dual
watch) buon
+
(up) buon
(move up a
channel)
−
(down) buon
(move down a
channel)
E - 5
Turning on the Radio
Press
PWR
to turn on the radio. As it powers on, the radio displays the user MMSI number, then goes to the last channel
used.
#
If there is no MMSI set, the radio displays MMSI not entered. See page 14 for information on entering MMSI number.
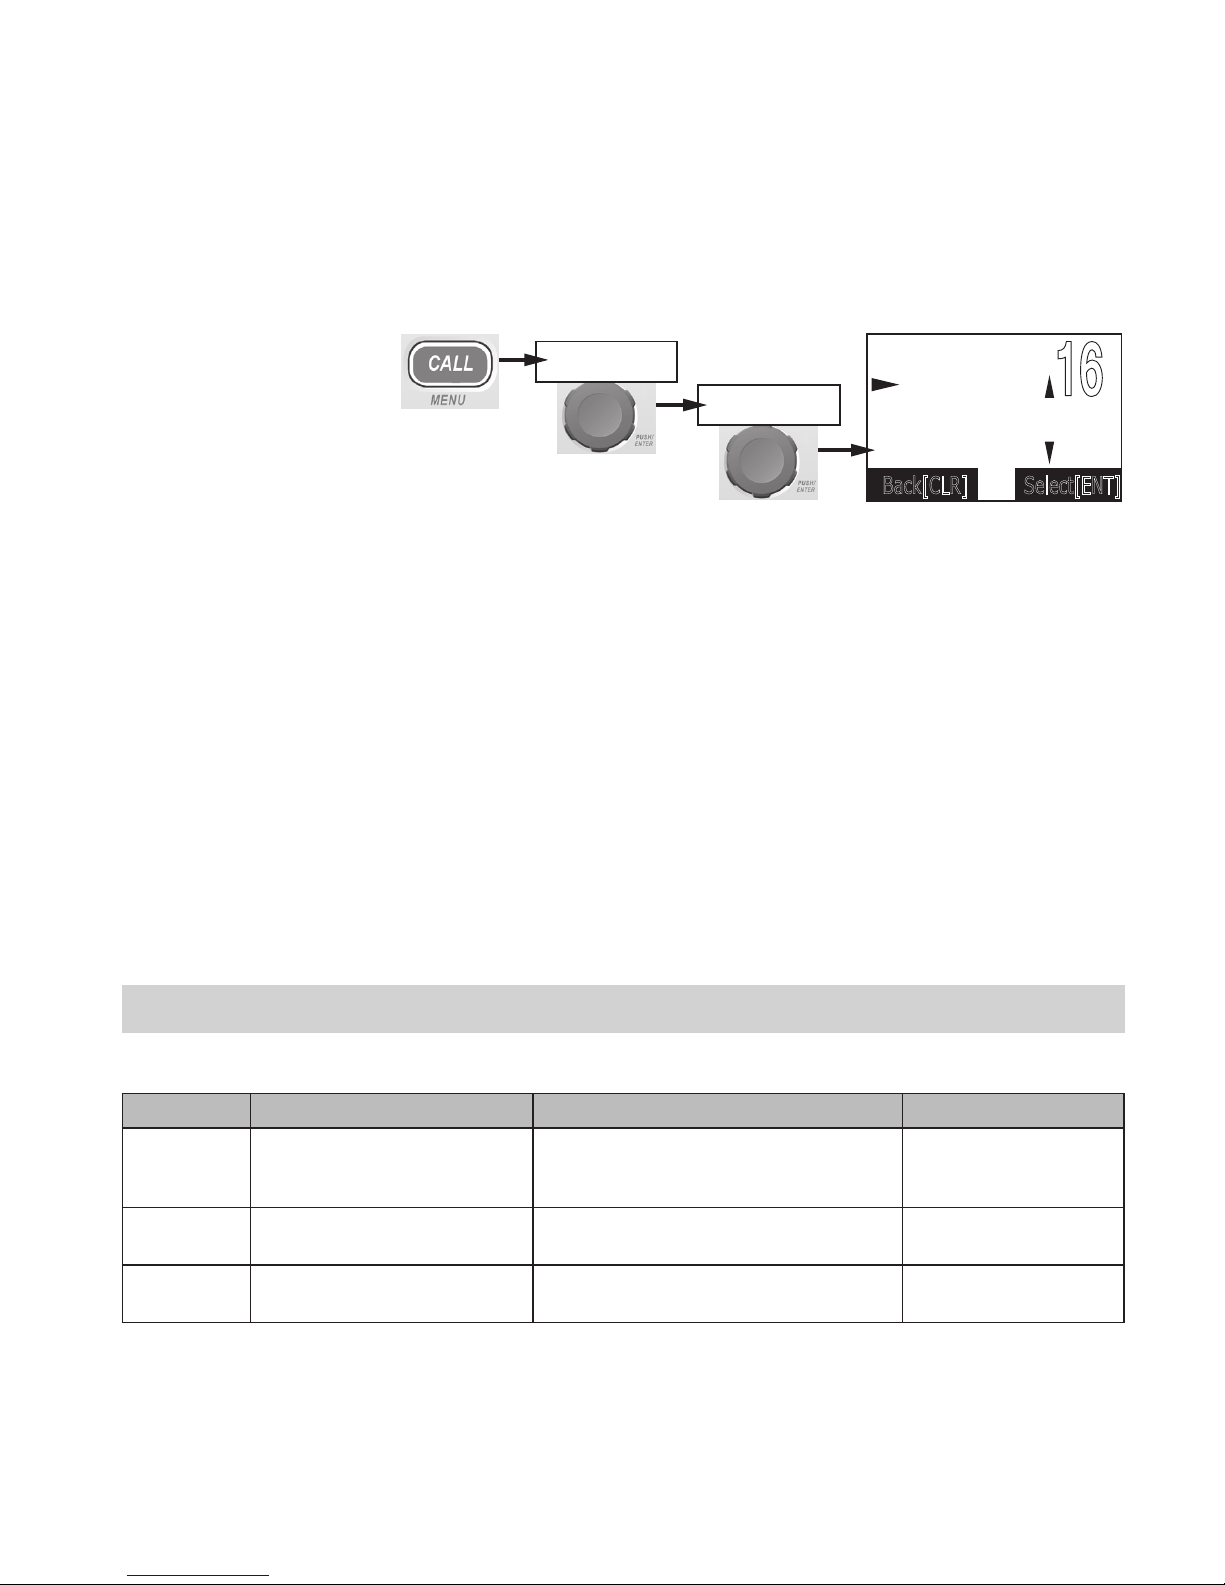
Setting the UIC Channel Mode (USA/CAN/INT)
The radio comes preset to use the UIC channels assigned for the United States. If you are operating in an area that uses
Canadian or international UIC channels, you will need to change the channel mode.
1. Press and hold
CALL-
MENU
to open the menu,
and choose the
Setup
sub-menu.
2. Select
USA/CAN/INT
.
The screen displays the
UIC channel setup.
3. Choose the channel
mode you want to use: US (
USA Mode
), Canadian (
Canada Mode
), or international (
Intl Mode
).
4. Press
PUSH/ENTER
. The radio activates the new channel mode and exits the menu.
Checking the UIC channel mode with your GPS
If you connect your radio to a GPS receiver (see page 25), the radio can use the data from the GPS to verify the UIC channel
mode setting.
1. Press and hold
CALL-MENU
to open the menu.
2. Select the
GPS Setup
sub-menu, then choose
UIC Waters
.
3. Choose
12 Miles
to have the radio use a margin of error of about 12 miles; choose
200 Miles
to have the radio use a
margin of error of about 200 miles.
4. Press
PUSH/ENTER
. The radio activates the new setting and returns to
GPS Setup
menu.
The radio compares the location received from the GPS against areas known to use US, Canadian, or international channels
(within the margin of error selected above). If the programmed UIC channel mode you does not match the mode used in the
current area, the radio displays an alert along with the correct channel mode.
HOW IT WORKS
Your radio has three basic modes of operation:
Mode What it does Use it when To turn it on/o...
Normal
Monitors a single marine radio
channel and lets you talk on that
channel.
You want to talk to another station on a specific
channel.
(default mode)
Scan
Monitors all the channels you save
into memory.
You have a small group of channels you use
most often and want to check them for traffic.
Press and hold
STEP/SCAN
.
Weather
Monitors the selected NOAA
weather channel.
You want to hear the current and forecasted
weather in your area.
Press WX-MEM.
In addition to the three basic operation modes, your radio also provides three different “watch” modes which you can activate
during any of the three basic modes. In these watch modes, the radio briefly checks for activity on a specific channel then
returns to its previous mode.
16
UIC Channels
USA Mode
Canada Mode
Intl Mode
Back[CLR]
Select[ENT]
USA/CAN/INT
Setup
Press and hold -
E - 6
Watch mode What it does Use it when To turn it on/o...
Weather Alert
Checks for alerts on the last-used
weather channel every 7 seconds.
You want to be made aware of
severe weather conditions in your
area.
Select
WX Alert Mode
in the
Setup
menu, and then choose ON
or
OFF
.
Triple
Checks for activity on channels 16 and 9
every 2 seconds.
You want to monitor a channel
yet maintain a watch on channels
16 and 9.
Press and hold
16/9-TRI
for 2
seconds.
Dual
Checks for activity on channel 16 every
2 seconds.
You want to monitor a channel yet
maintain a watch on channel 16.
Change
Triple Watch
to
Dual
Watch
in the
Setup
menu, then
press and hold
16/9-TRI
for 2
seconds.
#
NOTE: You are required to monitor channel 16 whenever your boat is underway. You should have either Triple Watch or
Dual Watch on at all times.
Normal Mode
Normal mode lets you monitor and transmit on
whatever channel you select. In normal mode, the
radio displays the information shown to the right (not
all indicators display at the same time).
Message Meaning
GPS Data OK
The radio is receiving valid GPS data.
Check GPS
The radio is not receiving valid GPS data: check the GPS status screen andthe GPS connection.
Input Position
The radio has been unable to receive valid GPS data for at least four hours; it can no longer track
your position. You need to manually input your position (see Setting the GPS Position Manually
on page 13).
BATTERY LOW
The battery voltage output is too low (below 10.4 VDC).
BATTERY HIGH
The battery voltage output is too high (above 15.8 VDC).
USA, CAN
, or
INT Area
The channel mode setting does not match the channel mode (
USA, CAN
adian, or
INT
ernational)
normally used in the current location (based on data provided by the GPS).
HAIL ERROR
The hailer speaker is not connected properly.
Auto Fog, Manual Fog, Underway
Fog, Stop Fog, Sail Fog, Tow Fog,
Anchor Fog, Aground Fog
, or
Yelp Fog
The type of tone or signal used by the fog horn (see page 21).
Using the radio in normal mode
• To transmit, press and hold
PUSH-TO-TALK
on the microphone. Release the button when you are finished talking.
• For the best sound quality, hold the microphone about 2 inches from your mouth while you’re talking.
• Turn the
PUSH/ENTER
knob clockwise to move up the channels. Turn it counter-clockwise to move down the channels.
• To change the transmit power, press
1W/25W-SCRAMBLER
. The transmit power switches between 1 Watt and 25 Watts
each time you press
1W/25W-SCRAMBLER
.
Normal mode with Weather Alert Watch
If you activate Weather Alert Watch while operating in normal mode, the radio checks the most recently-used weather
channel every 7 seconds. If it detects a weather alert, it will change the channel to the last-used weather channel. The radio
will not check the weather channel while you are actively transmitting; it waits until your transmission is finished and then
checks the weather channel.
25
Marine Operator
1 Watt USA
MEM SCRM ALT
GPS Data OK
Transmit power
(1 W or 25 W)
Current channel
is stored in
memory
Status messages
(see the status
message table)
Current
channel
number
Current channel name (if the
name is too long, this line scrolls)
Channel mode
(USA, CANadian,
or INTernational)
Weather Alert
Watch is on
Status
icons
Scrambler
is on

E - 7
To turn Weather Alert Watch on or off, press and hold
CALL-MENU
while the radio is idle. Select
Setup
and then
WX Alert
Mode
. Turn the
PUSH/ENTER
knob to choose On or
Off
, and press
PUSH/ENTER
to select.
Normal mode with Triple and Dual Watch
If you activate Triple Watch while operating in normal mode, the radio checks channels 16 and 9 every 2 seconds; with Dual
Watch turned on, the radio only checks channel 16. The radio will not check channels 16 or 9 while you are actively
transmitting; it waits until your transmission is finished and then checks the channels.
Press and hold
16/9-TRI
(on the radio or the microphone) for 2
seconds to turn Triple/Dual Watch on or off. (To change between
Triple or Dual Watch, see page 11.)
Normal mode with both Weather Alert and
Triple/Dual Watch
You can activate Weather Alert Watch and Triple/Dual Watch
at the same time. The radio performs both checks at their scheduled
time.
Scan Mode
You can save channels into memory and then use scan mode to
monitor those channels. When the radio detects a signal on a channel, it pauses on that channel as long as the signal is
received; when the transmission stops, the radio will continue scanning.
In scan mode, the radio displays the information
shown to the right (not all indicators display at the
same time).
Using the radio in scan mode
• You cannot transmit while in scan mode.
• You must have 2 or more channels in memory
to start a scan.
• To save a channel into memory, select the
channel, then press and hold
WX-MEM
for 2
seconds.
MEM
will show on the display.
• To remove a channel from memory, set the radio to that channel, then press and hold
WX-MEM
for 2 seconds.
MEM
will
no longer show on the display.
• To activate scan mode, press and hold
STEP/SCAN
. Press and hold
STEP/SCAN
again to return to the previous mode.
• When the radio automatically stops on a channel, turn the
PUSH/ENTER
knob clockwise to leave that channel and
resume scanning.
Scan mode with Weather Alert Watch
If you activate Weather Alert Watch while operating in scan mode, the radio checks the most recently-used weather channel
every 7 seconds, then continues scanning the next channel in memory.
To turn Weather Alert Watch
on or off, press and hold
CALL-MENU
while the radio is idle. Select
Setup
and then
WX Alert Mode
. Turn the
PUSH/ENTER
knob to choose On or
Off
, and press
PUSH/ENTER
to select.
Scan mode with Triple and Dual Watch
If you activate Triple Watch while operating in scan mode, the radio checks channels 16 and 9 every 2 seconds, then goes on
to scan the next channel; with Dual Watch turned on, the radio only checks channel 16.
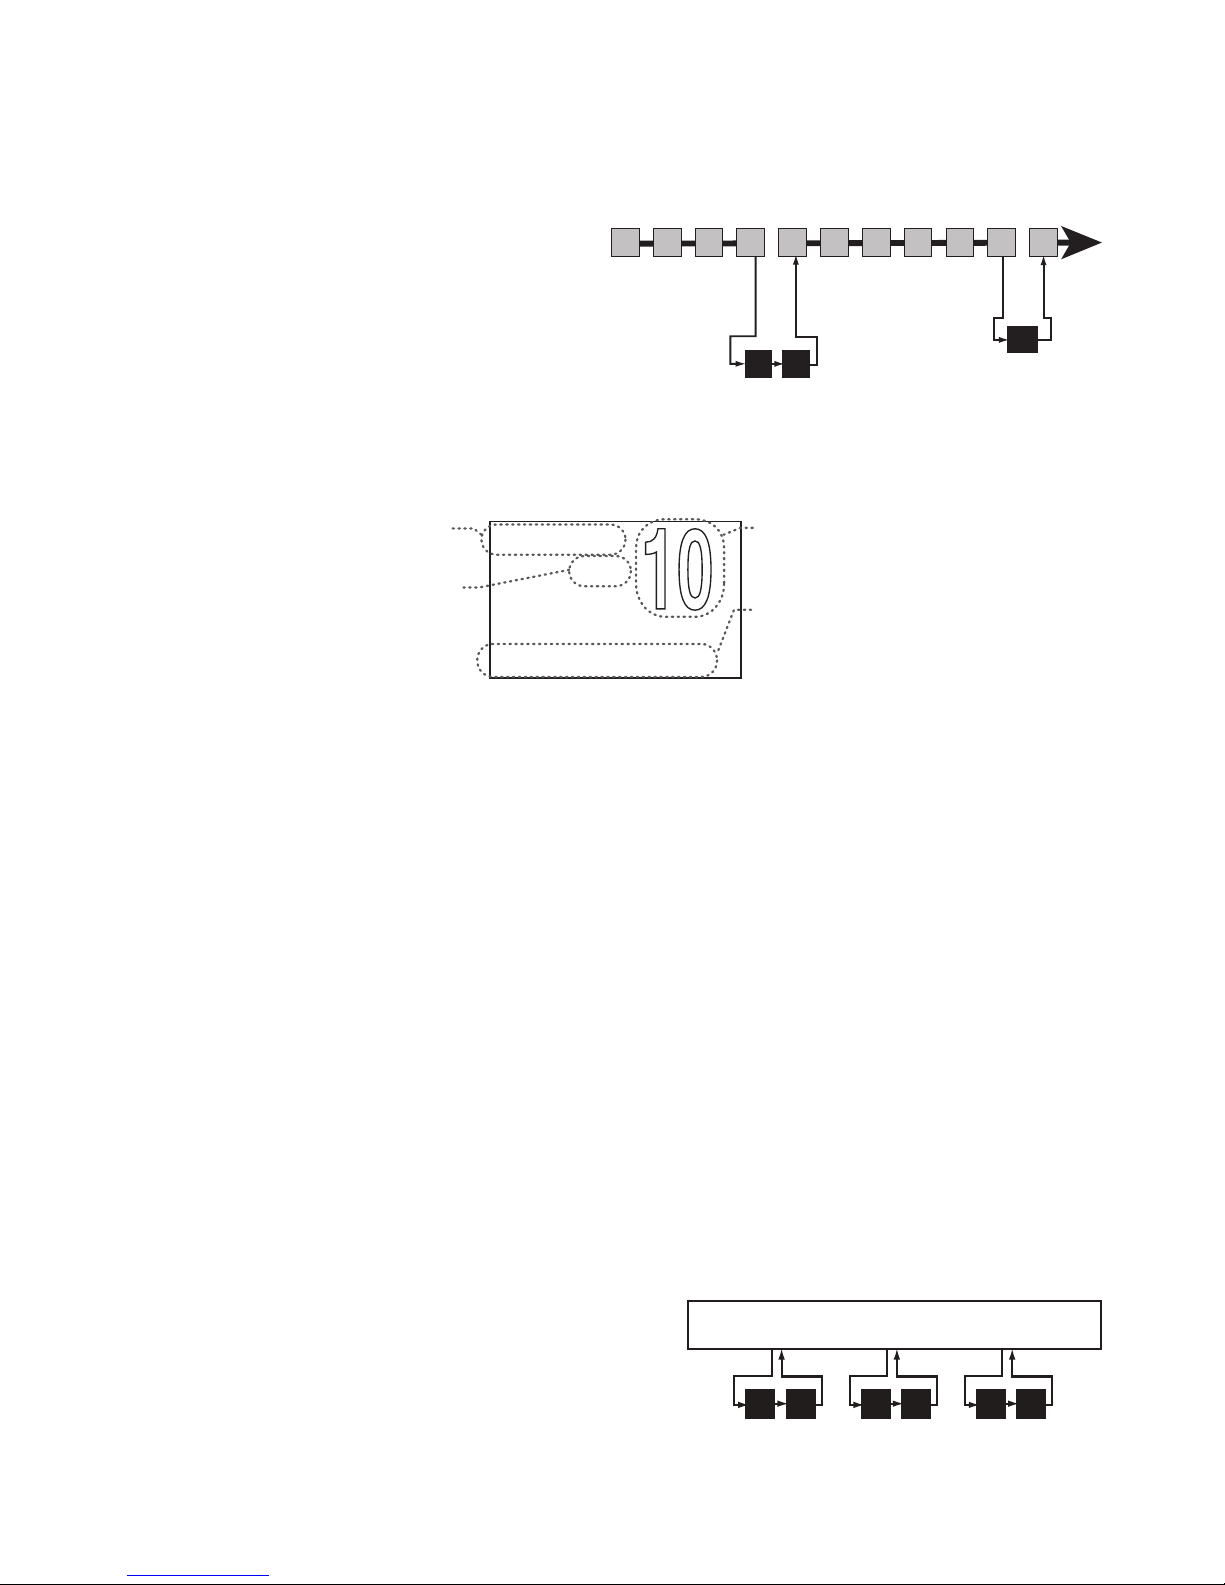
09 16 09 16 09 16
Every 2 seconds, the radio
checks channels 9 & 16.
Triple
Watch
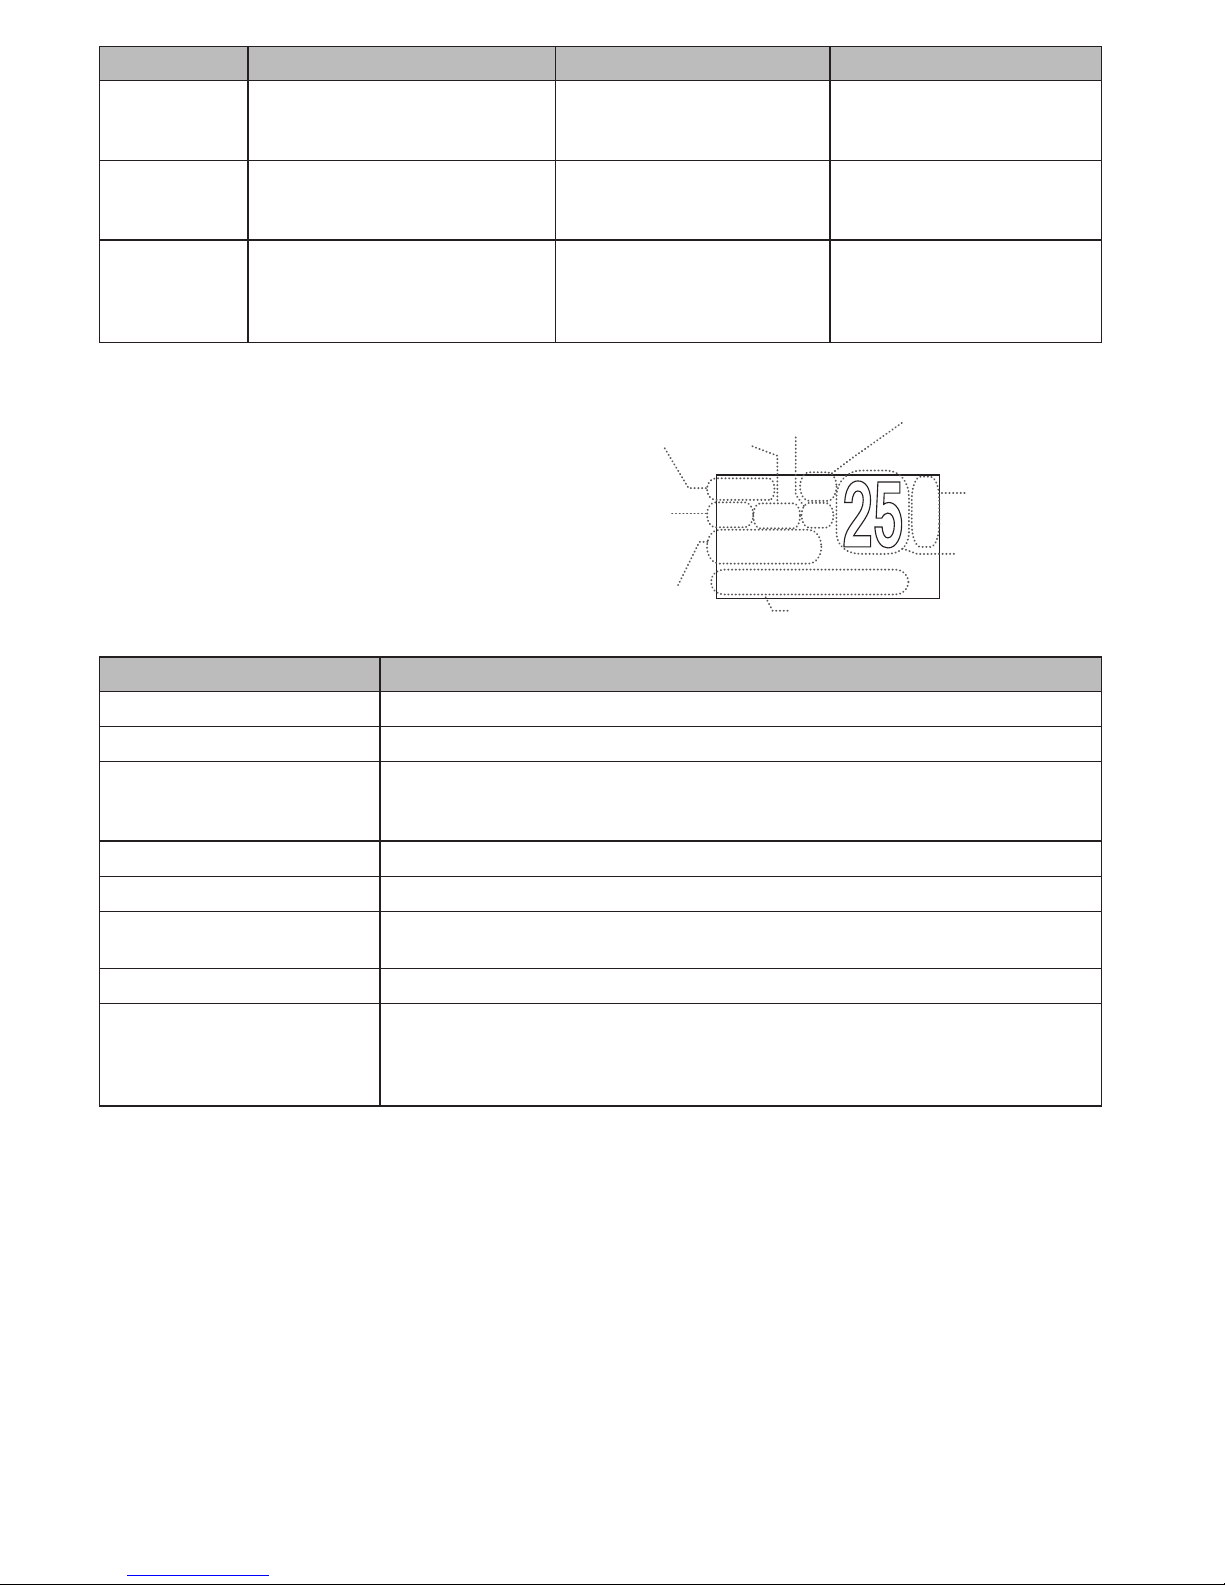
Monitoring Channel 25
WX
WX Alert
Watch
Every 7 seconds, the radio checks
the last-used weather channel.
09 16 09 16 09 16
Every 2 seconds, the radio
checks channels 9 & 16.
Triple
Watch
Monitoring Channel 25
1 Watt USA
MEM
Scanning Channels
01A,05A,06,07A,08
07A
Transmit power
last used
Channel mode (USA, CANadian,
or INTernational)
Current channel
being scanned
Scan list (if the
text is too long,
the line scrolls)
All scanned
channels must
be in memory
Normal scan
mode or Triple/
Dual-watch on
Status icons
E - 8
To activate Triple/Dual Watch with scan mode:
1. Turn off scanning mode.
2. Press and hold
16/9-TRI
(on the radio or the microphone) for 2 seconds. (To change between Triple or Dual Watch, see
page 11.)
3. Activate scan mode (press and hold
STEP/SCAN
).
Scan mode with both Weather Alert and
Triple/Dual Watch
You can activate Weather
Alert Watch and Triple/Dual Watch at the same time. The
radio performs both checks at their scheduled time.
Weather Mode
In cooperation with the FCC, NOAA also uses the weather
channels to alert you of other hazards besides weather (child abduction alerts, nuclear, biological, etc.). In weather mode, the
radio monitors one of the ten NOAA weather channels. In weather mode, the display shows the following:
Using the radio in weather mode
• You cannot transmit while in weather mode.
• To enter weather mode, press
WX-MEM
.
• To cancel weather mode and return to the previous marine channel, press
WX-MEM
.
Weather mode with Weather Alert Watch
Because weather mode already monitors the weather channels, you don’t need Weather Alert Watch to check the weather
channel every 7 seconds. If you activate Weather Alert Watch while operating in weather mode, it operates as a type of
“sleep mode”. This mode is very useful when you are anchoring for the night but want to stay informed of any hazards in your
area:
• The radio stays on the weather channel and mutes the speaker. If it detects an alert for your area, the radio sounds an
alert tone and turns the speaker back on.
• In order to filter out alerts that do not affect your area, you must have at least one location code (FIPS code)
programmed into your radio (see page 11). If the FIPS code of the alert matches a FIPS code entered in your radio, the
radio will sound the alert.
• To turn off the radio’s alert tone, press any button.
To turn Weather Alert Watch on or off, press and hold
CALL-MENU
while the radio is idle. Select
Setup
and then
WX Alert
Mode
. Turn the
PUSH/ENTER
knob to choose On or
Off
, and press
PUSH/ENTER
to select.
Weather mode with Triple and Dual Watch
If you activate Triple Watch while operating in weather mode, the
radio checks channels 16 and 9 every 2 seconds; with Dual Watch
turned on, the radio only checks channel 16.
Press and hold
16/9-TRI
(on the radio or the microphone)
for 2 seconds to turn Triple/Dual Watch on or off. (To change
between Triple or Dual Watch, see page 7.)
09 16
Triple
Watch
Every 2
seconds, the
radio checks
channels 9 & 16 then goes
on to the next channel.
WX Alert
Watch
wx
Every 7
seconds, the
radio checks the last-used
weather channel, then
scans the next channel.
Memory Channel Scan
08 252417151413121110 20
10
Hurricane Warning
Weather Band
ALT
Weather
mode is on
Current
channel
number
Type of alert
(If the text is too
long, it scrolls.)
Flashing: An alert
has been issued
Steady: Weather
Alert Watch is on
09
16
09
16
09
16
Triple
Watch
Every 2 seconds, the radio checks
channel 9, then channel 16.
Monitoring Weather Channel WX08
 Loading...