

West Marine 200SS Owner's Manual
Owner’s Manual
Read these instructions carefully before use. Familiarize yourself with the appliance before connecting it to its
gas container. Keep these instructions for future reference.
For questions regarding performance, assembly, operation, parts, or
returns, contact the kettle experts by calling (562) 627-0500
7:00 a.m. - 5:00 p.m. Pacific Time Monday thru Friday or
e-mail: mail@MagmaProducts.com
U.S. PATENTS 4,788,962 : 5,330,154 : 5,414,090 : D 292,163 : Other Patents and Design Patents Pending
• Utilisez cet appareil à l’extérieur seulement.
• N’utilisez pas cet appareil à l’intérieur du bateau ni dans un espace fermé.
• Les grilles produisent de la chaleur. Conservez un dégagement d’au moins 61 cm
(24 po) de tout combustible aux surfaces latérales et à l’arrière.
• N’utilisez jamais l’appareil sous des marquises, des auvents de patio, etc.
• N’utilisez que du gaz propane. Entreposez le carburant conformément à la norme A-1
(9) du American Boat And Yacht Council (ABYC), intitulée « Marine Liquified
• Petroleum Gas (LPG) Systems » [Systèmes marins à gaz de pétrole liquéfiés (GPL)].
• Pour les applications au gaz naturel, contactez la société Magma.
• Allumez toujours la grille avec le couvercle ouvert.
• Ne laissez jamais une grille chaude sans supervision.
• Ne surchauffez pas la grille ; voir les directives d’utilisation.
• Éteignez toujours la grille après l’usage.
• Utilisez des gants de cuisinier ou un tampon isolant en manipulant une grille chaude.
• Ne laissez jamais une bouteille de gaz ni le régulateur branché lorsque l’appareil est arrimé.
• Entreposez les bouteilles de gaz dans un endroit bien aéré.
• N’entreposez pas les bouteilles de gaz à l’intérieur, dans les rayons directs du soleil,
sous le pont d’un bateau ni dans un caisson qui n’est pas approuvé pour
l’entreposage de butane ou de propane.
• Mise en garde : Vérifiez s’il y a une fuite de gaz à chaque fois que la bouteille est remplacée.
• Ne vérifiez jamais la présence d’une fuite à l’aide d’une flamme !
• Ne pas bloquer, restreindre ni obstruer de toute autre façon les ouvertures d’air pour
la combustion ou l’aération.
• Ne modifiez pas cet appareil.
• Vérifiez que la rondelle d’étanchéité de la soupape (A) est en place et en bon état
avant de brancher la bouteille de gaz.
• Attachez les bouteilles dans un endroit bien aéré et éloigné des flammes nues, des
sources de chaleur et des étincelles. Gardez l’appareil à l’écart des personnes et des
matériaux inflammables.
IMPORTANT SAFETY WARNINGS (Read all instructions before operating)
This gas grill is individually fire tested before it leaves the factory.
For this reason, the burner on your BBQ may be slightly discolored.
CONTENTS
2
CALIFORNIA PROPOSITION 65 – WARNING – The burning of gas cooking fuel generates some by-products, which are on the
list of substances, which are known by the State of California to cause cancer or reproductive harm. California law requires
businesses to warn customers of potential exposure to such substances. To minimize exposure to these substances, always
operate this unit according to the use and care manual, ensuring you provide good ventilation when cooking with gas.
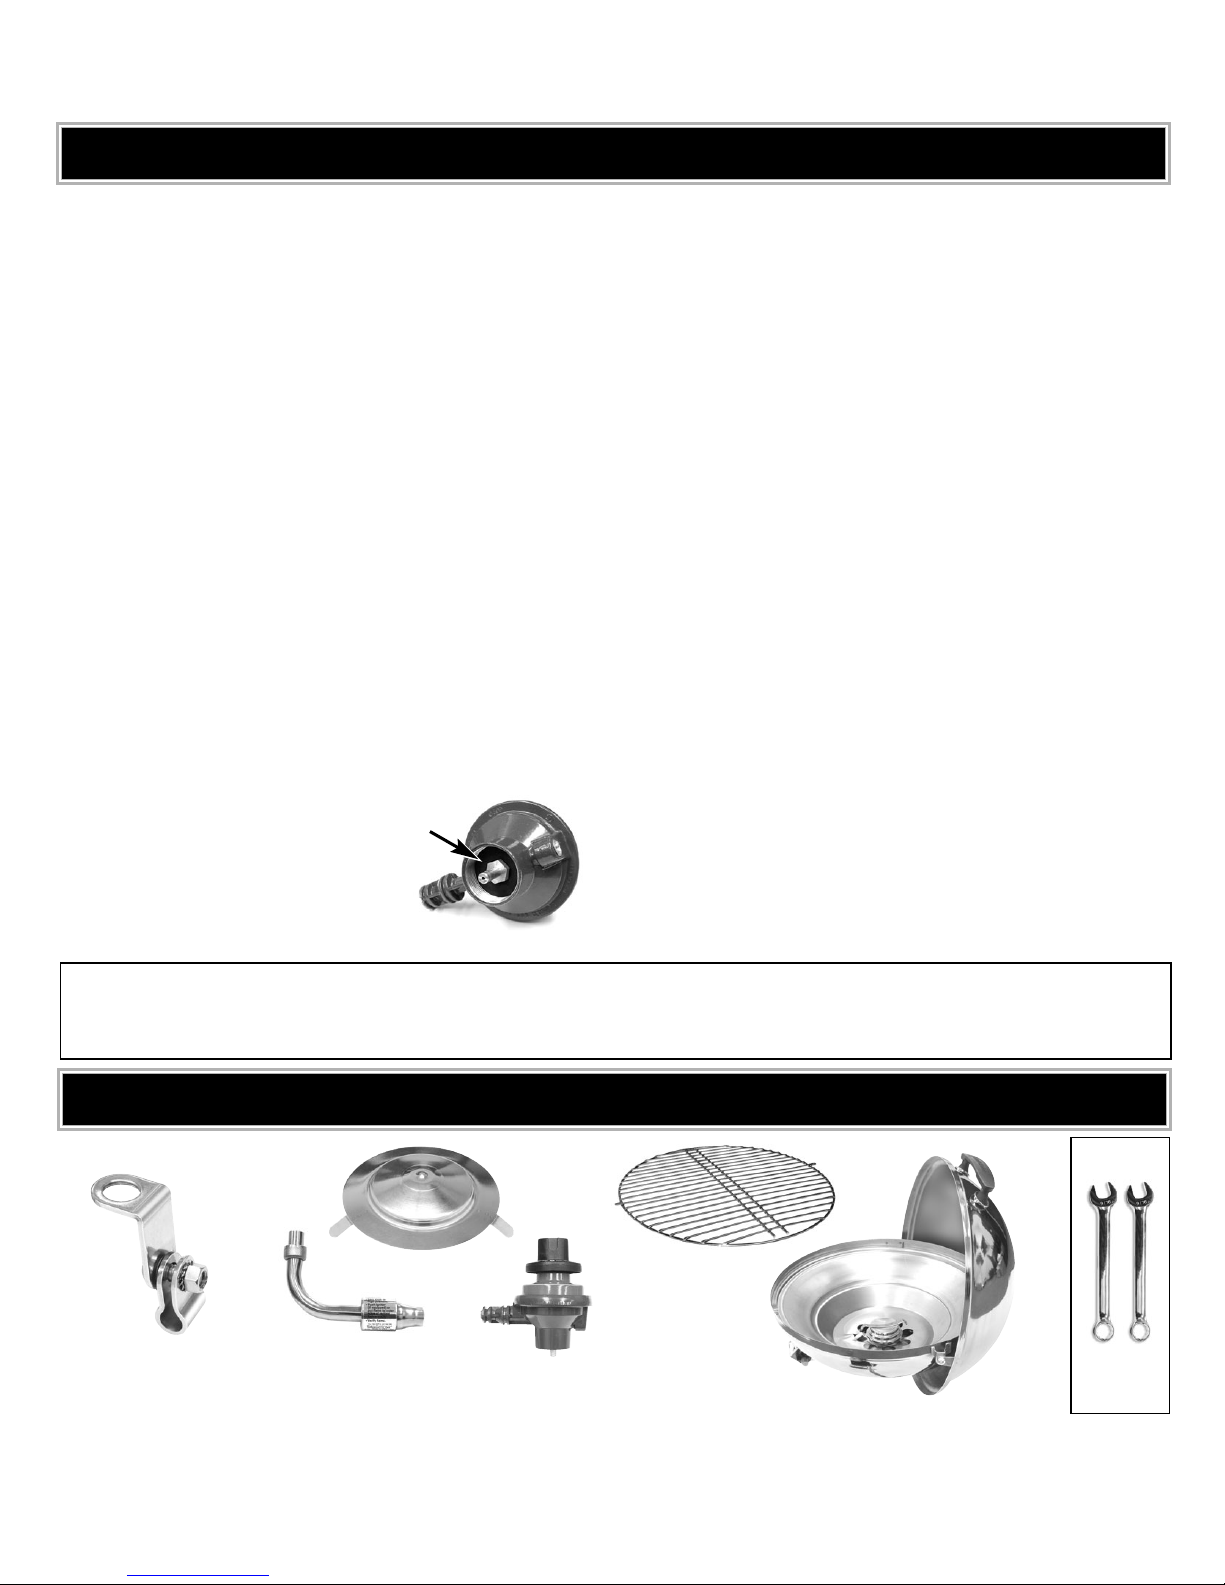
Grill Grate
Radiant
Plate
Turbo Venturi
Tube Assembly
Control Valve/
Regulator
Grill Body
“L” Bracket &
Clamp Assembly
Tools
Needed
2 - 9/16”
Wrenches
not included
• USE OUTDOORS ONLY.
• DO NOT USE THIS APPLIANCE INSIDE THE BOAT OR ANY ENCLOSED SPACE.
• GRILLS RADIATE HEAT. CLEARANCE FROM COMBUSTIBLES, 24” SIDES AND
BACK. NEVER USE UNDER AWNINGS, PATIO COVERS, ETC.
• USE PROPANE GAS ONLY. FUEL STORAGE SHOULD BE IN COMPLIANCE WITH
THE AMERICAN BOAT AND YACHT COUNCIL (ABYC) STANDARDS A-1 (9),
MARINE LIQUIFIED PETROLEUM GAS (LPG) SYSTEMS.
• FOR NATURAL GAS APPLICATION CONTACT (562) 627-0500.
• ALWAYS LIGHT GRILL WITH LID OPEN.
• NEVER LEAVE HOT GRILL UNATTENDED.
• DO NOT OVERHEAT GRILL, SEE OPERATING INSTRUCTIONS
• ALWAYS TURN GRILL OFF AFTER USE.
• USE GLOVE OR HOT PAD WHEN HANDLING HOT GRILL.
• NEVER LEAVE GAS CYLINDERS AND REGULATOR CONNECTED WHEN STOWED.
• STORE GAS CYLINDERS IN WELL VENTILATED AREA.
• DO NOT STORE GAS CYLINDERS INDOORS, IN DIRECT SUNLIGHT, BELOW
DECKS ON BOATS, OR IN LOCKERS NOT APPROVED FOR BUTANE OR
PROPANE STORAGE.
• CAUTION: CHECK FOR GAS LEAKS EACH TIME CYLINDER IS CHANGED.
• NEVER CHECK FOR GAS LEAKS WITH A FLAME!
• DO NOT BLOCK, RESTRICT, OR OTHERWISE OBSTRUCT COMBUSTION OR
VENTILATION AIR OPENINGS.
• DO NOT MODIFY THIS APPLIANCE.
• CHECK THAT VALVE SEALING WASHER (A) IS
IN PLACE AND IN GOOD CONDITION BEFORE
CONNECTING THE GAS CONTAINER.
• INSTALL CANISTERS IN WELL VENTILLATED AREA
AND AWAY FROM OPEN FLAME, HEAT SOURCE OR
SPARKS. KEEP AWAY FROM OTHER PEOPLE OR
FLAMMABLE MATERIALS.
A
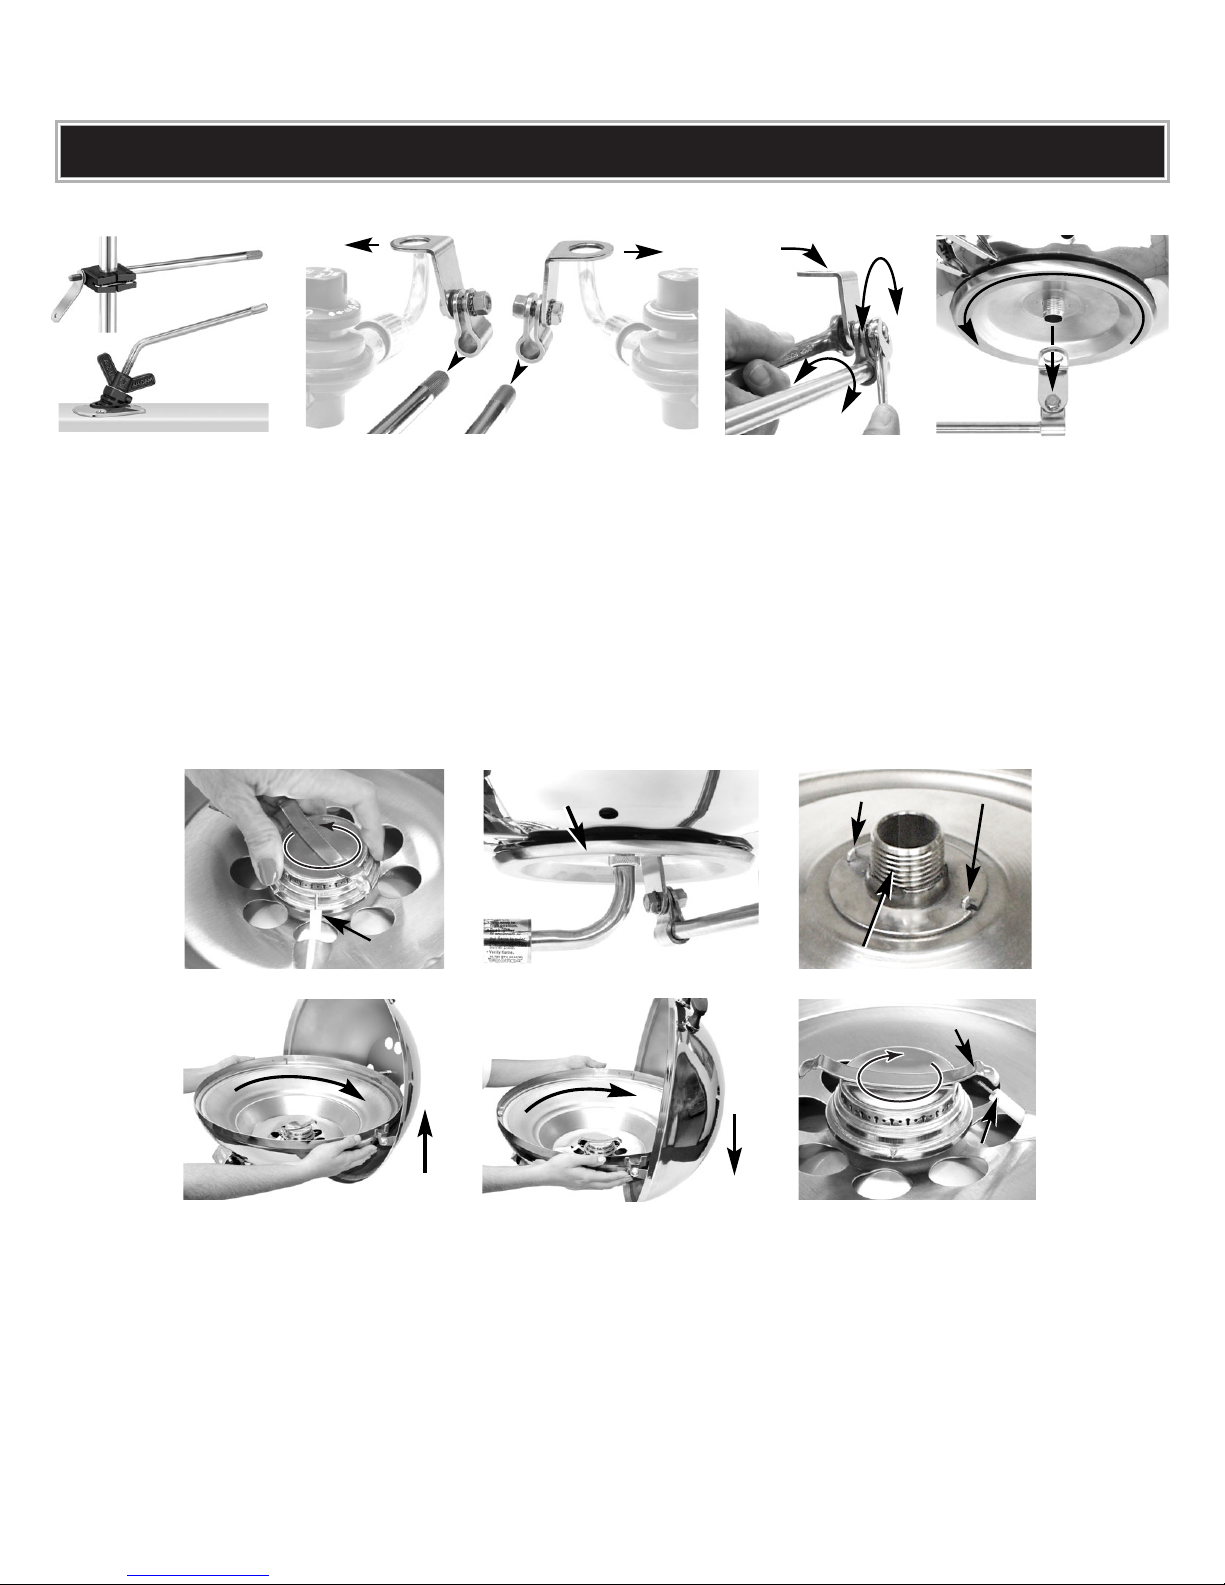
SETTING UP YOUR GRILL
3
Mounts sold separately.
Electrode Protection Cap
Grease Tray
Grease Tray Pins
Electrode
5 With grill body tightly attached to L-Bracket and taking care not to damage electrode, unthread burner
3 full
revolutions only. CAUTION: DO NOT UNTHREAD MORE THEN 3 REVOLUTIONS, AS GRILL MAY FALL OVERBOARD.
• Lift entire grill up to disengage from grease tray positioning pins (5a & 5b) and rotate so lid operates freely in
desired position (5a).
• Carefully lower back down (5d), making sure pins are re-engaged and rethreaded “burner” back 3 revolutions
until tight. If burner does not turn 3 revolutions the pins are not engaged properly.
6 Adjust burner electrode spark cap so it is directly over electrode wire. Check for good strong spark before
proceeding.
1 Select and install appropriate mount in your desired location. Prior to installing the grill, check that mount
does not easily move with a reasonble force applied.
2 Next, decide if gas control valve will be easier to access from the center right side or center left side of grill.
This will be based on your placement of the mount
(see picture front cover)
. Now, slide L-Bracket & Clamp on
to mount rod (ridged end) so that the threaded flat L-portion of the L-Bracket points in that direction (see above).
3 Adjust threaded flat surface of L-Bracket to level position and tighten firmly with two 9/16" or adjustable
wrenches so that L-Bracket & Clamp cannot be moved. NOTE: Level positoning is critical for even
temperatures across the cooking surface.
4 Carefully hold the grill body, with the lid closed, and thread on to L-Bracket
VERY TIGHT
so that grill does not
unthread easily. Check that grill is tight and level prior to proceeding.
Level
Flat
Surface
1
3
4
5a
5
5b
5c
6
5d
2
Threaded Burner Pipe
Electrode
 Loading...