

Westinghouse WGen6000 User Manual
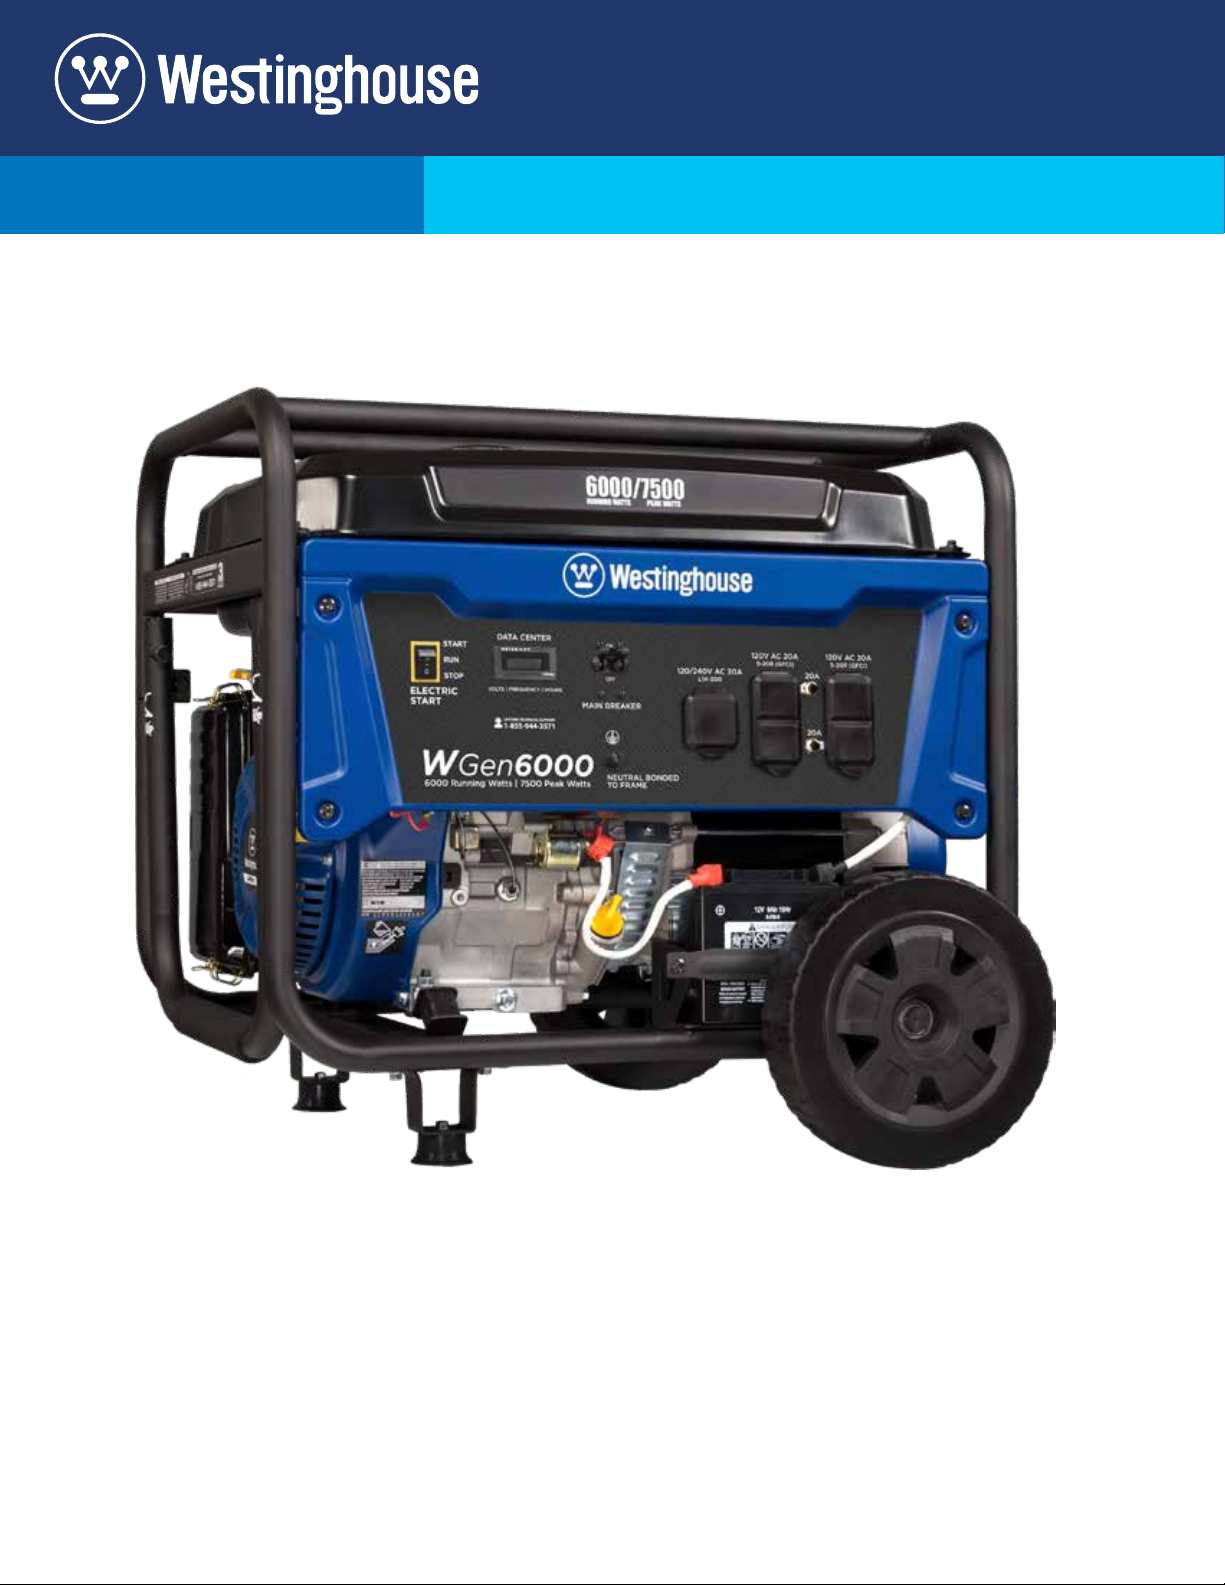
USER MANUAL
WGen6000
Portable Generator
6000 Running Watts | 7500 Peak Watts
WARNING
Operating, servicing and maintaining this equipment can expose you to chemicals including engine exhaust,
carbon monoxide, phthalates, and lead, which are known to the State of California to cause cancer and birth
defects or other reproductive harm. To minimize exposure, avoid breathing exhaust, do not idle the engine
except as necessary, service your equipment in a well-ventilated area and wear gloves or wash your hands
frequently when servicing your equipment. For more information go to www.P65Warnings.ca.gov.
DISCLAIMERS:
All information, illustrations and specications in this manual are based on the latest information available at the time of
publishing. The illustrations used in this manual are intended as representative reference views only. Moreover, because
of our continuous product improvement policy, we may modify information, illustrations and/or specications to explain
and/or exemplify a product, service or maintenance improvement. We reserve the right to make any change at any time
without notice. Some images may vary depending upon which model is shown.
ALL RIGHTS RESERVED:
No part of this publication may be reproduced or used in any form by any means – graphic, electronic or mechanical,
including photocopying, recording, taping or information storage and retrieval systems – without the written permission
of MWE Investments LLC.
DANGER
This manual contains important instructions for operating this generator. For your safety and the
safety of others, be sure to read this manual thoroughly before operating the generator. Failure to
properly follow all instructions and precautions can cause you and others to be seriously hurt or
killed.
TECHNICAL SPECIFICATIONS
Fuel
Model
Number
WGen6000 6000 7500 25/6.6 3600 TCI F7TC 420 66X90 1.10 10W30
Even with a carburetor modication, engine horsepower will decrease about 3.5% for each 300 meter (1,000 foot) increase in altitude. The
eect of altitude on horsepower will be greater if no carburetor modication is made. A decrease in engine horsepower will decrease the
power output of the generator. Contact our service team to order altitude kits.
Running
Watts
Peak
Watts
Tank
Size
(L/G)
FOR YOUR RECORDS:
Date of Purchase:
Generator Model Number:
Purchased from Store/Dealer:
Generator Serial Number:
Rated
Speed
(RPM)
Ignition
Type
NOTICE
Spark
plug
Engine
Disp (cc)
Stroke X
Bore
Oil
Capacity
(L) Oil Type
HAVE QUESTIONS? Email us at service@wpowereq.com
or call 1-855-944-3571
2 | Westinghouse Portable Power
IMPORTANT: KEEP YOUR PURCHASE RECEIPT TO ENSURE TROUBLE-FREE WARRANTY
COVERAGE.
PRODUCT REGISTRATION
To ensure trouble-free warranty coverage, it is important you register your Westinghouse generator.
You can register your generator by either:
1. Filling in the product registration form below and mailing to:
Product Registration
MWE Investments LLC
777 Manor Park Drive
Columbus, Ohio 43228
2. Registering your product Online at wpowereq.com/register
To register your generator you will need to locate the following information:
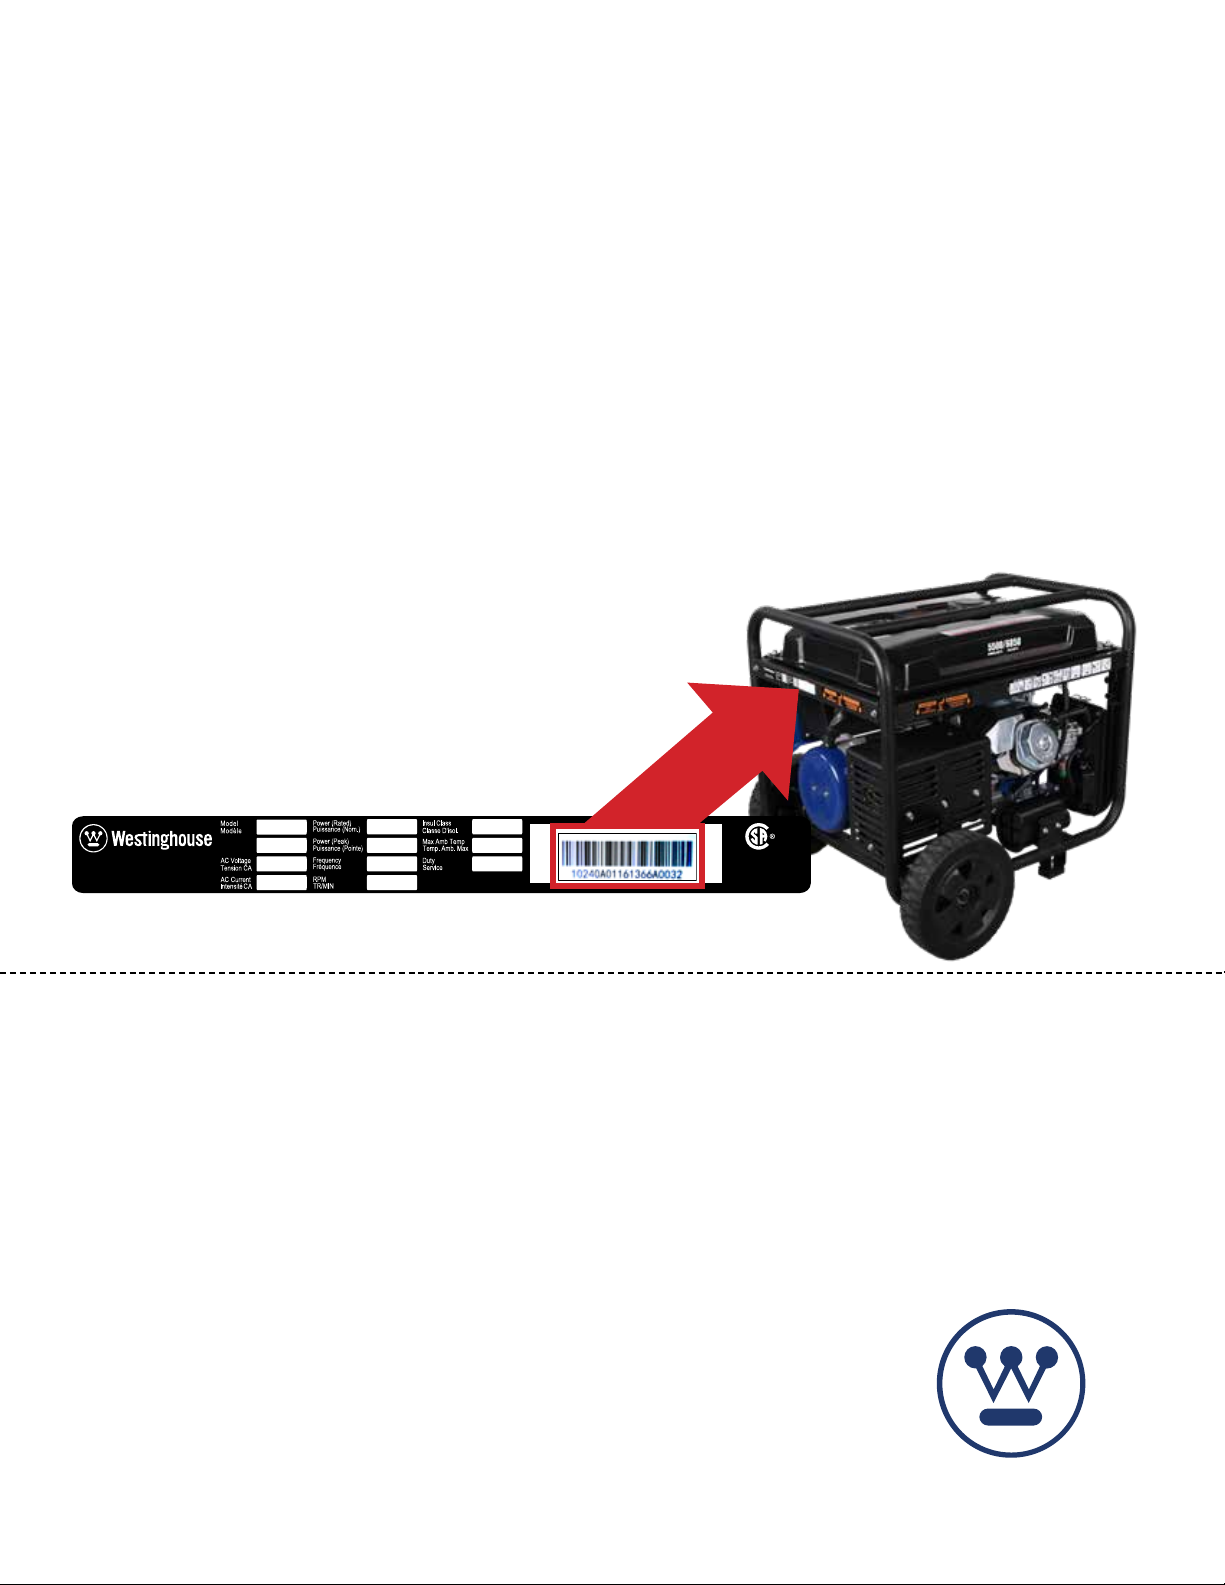
WHERE IS MY SERIAL NUMBER?
Part N0.
Numéro de
MWE Investments LLC
Columbus Ohio 43228 USA
MWE Investments LLC
Columbus Ohio 43228 Etats-Unis
pièce
Designed in Columbus , Ohio USA
Con u à columbus , Ohio,tats-Unis
Made i n China/ Fabriqu é en C hine
CSA Master Contract
Number :
Numéro de contrat
principa l de CS A
WESTINGHOUSE PRODUCT REGISTRATION FORM
PERSONAL INFORMATION GENERATOR INFORMATION
First Name: _______________________________________ Model Number: _____________________________________
Last Name: _______________________________________ Serial Number: ______________________________________
Street Address: ___________________________________ Date Purchased: ____________________________________
Street Address: ___________________________________ Purchased From: ____________________________________
City, State, ZIP: ____________________________________
Country: __________________________________________
Phone Number: ___________________________________
E-Mail: ___________________________________________
Westinghouse Portable Power | 3

TABLE OF CONTENTS
TECHNICAL SPECIFICATIONS .................. 2
PRODUCT REGISTRATION ..................... 3
For Your Records: ..........................3
Product Registration .......................3
Product Registration Form ...................3
SAFETY .....................................5
Safety Denitions ..........................5
Safety Symbol Denitions ...................5
General Safety Rules ........................6
Safety Labels and Decals ....................7
UNPACKING .................................9
What Comes in the Box ......................9
Wheel Kit Accessories Box ...................9
ASSEMBLY .................................10
Installing Wheels and Feet ....................10
Installing the Battery ........................11
MAINTENANCE ..............................21
Maintenance Schedule ......................22
Cleaning the Spark Arrestor ...................23
Draining Carburetor .........................23
Engine Oil Maintenance .....................24
Engine Oil Specication ...................24
Checking Engine Oil .....................24
Adding Engine Oil .......................24
Changing Engine Oil .....................25
Air Filter Maintenance .......................25
Cleaning the Air Filter ....................25
Spark Plug Maintenance .....................26
Checking and Adjusting Valve Lash. . . . . . . . . . . . . 27
Testing GFCI Outlets ........................27
Battery Service. . . . . . . . . . . . . . . . . . . . . . . . . . . . . 27
Replacing Battery ........................28
Cleaning the Generator ......................28
FEATURES .................................12
Generator Features .........................12
Control Panel Features .....................14
OPERATION ................................. 15
Before Starting the Generator .................15
Altitude Kit Part Number .....................15
Power Cord ..............................16
Using Extension Cords ...................16
Using Westinghouse Power Cord ...........16
Transfer Switch Connections .................. 17
How to Float the Neutral ...................17
Engine Fluids and Fuel .......................17
Adding Gasoline to the Fuel Tank ...........18
Power Output and Demand ...................19
Starting the Generator ......................20
Stopping the Generator ......................21
Normal Operation .......................21
During an Emergency ....................21
STORAGE ...................................28
TROUBLE SHOOTING .........................29
EXPLODED AND ENGINE VIEWS ................30
WGen6000 Exploded View ...................30
WGen6000 Engine View .....................32
SCHEMATICS ................................ 34
WGen6000 Schematic .......................34
SPECIFICATIONS .............................35
4 | Westinghouse Portable Power
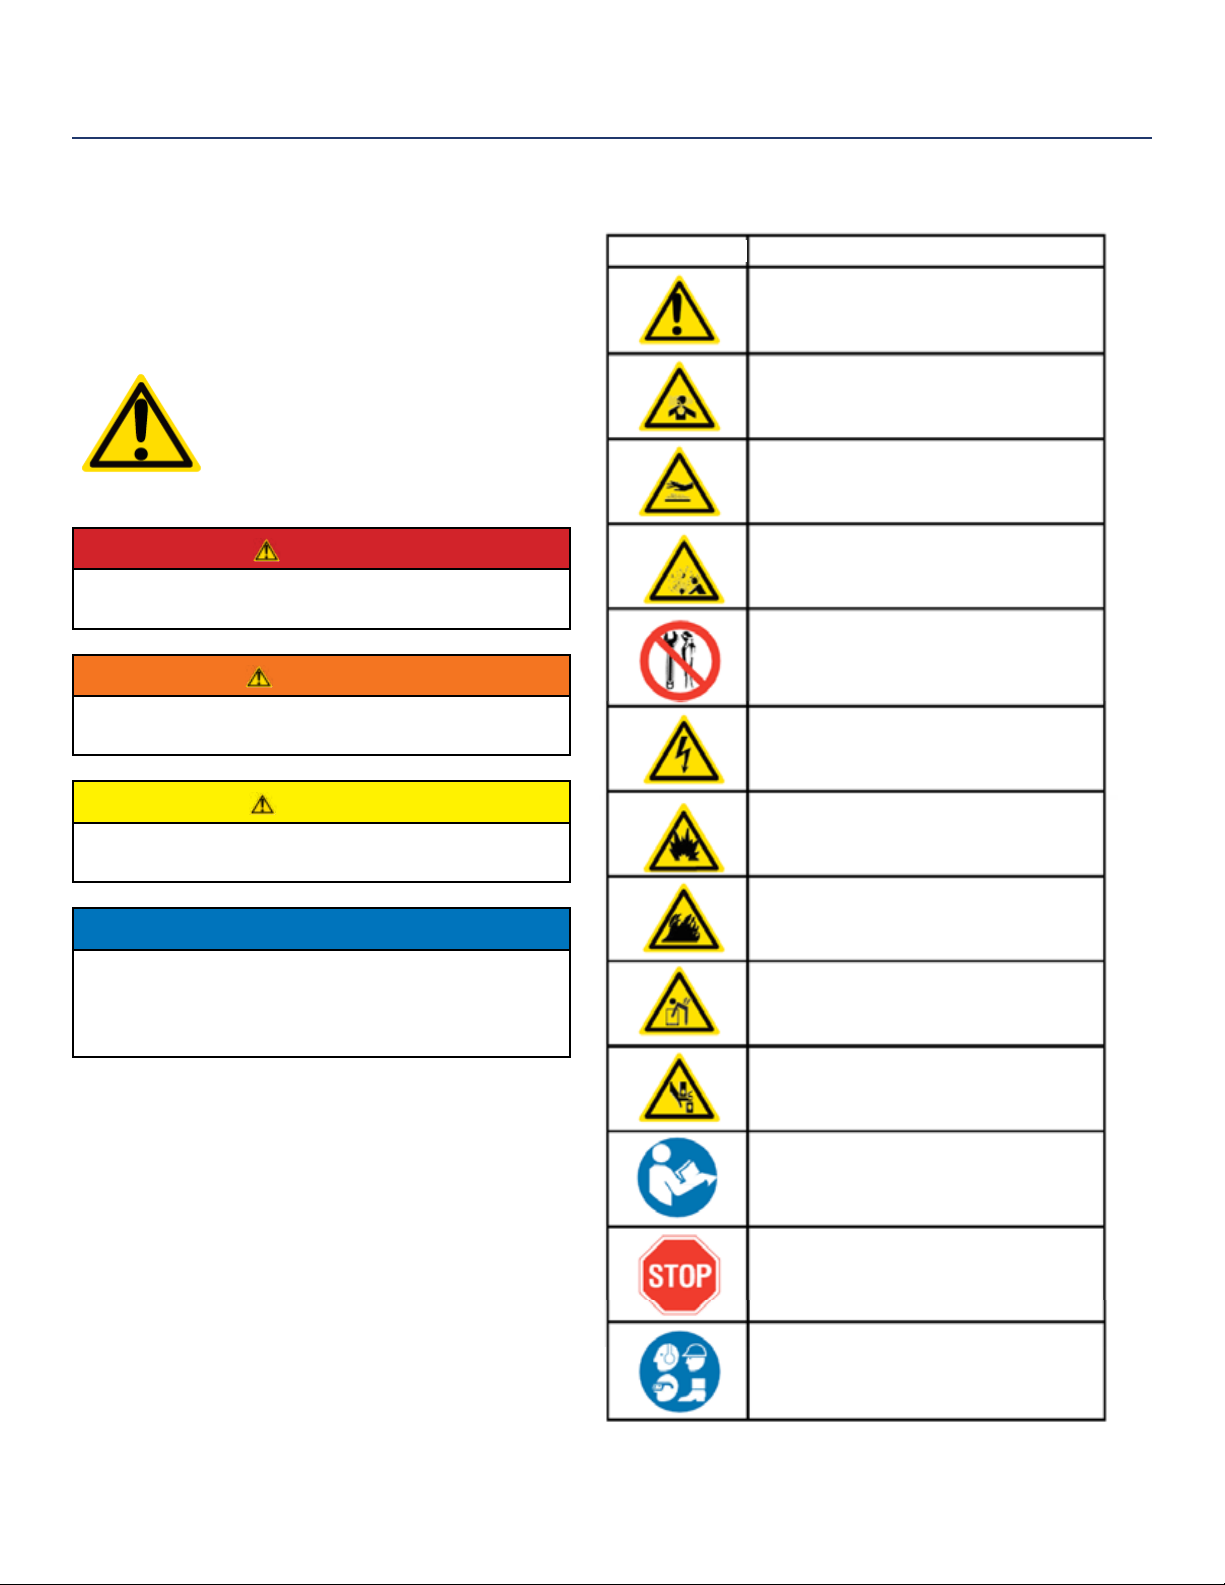
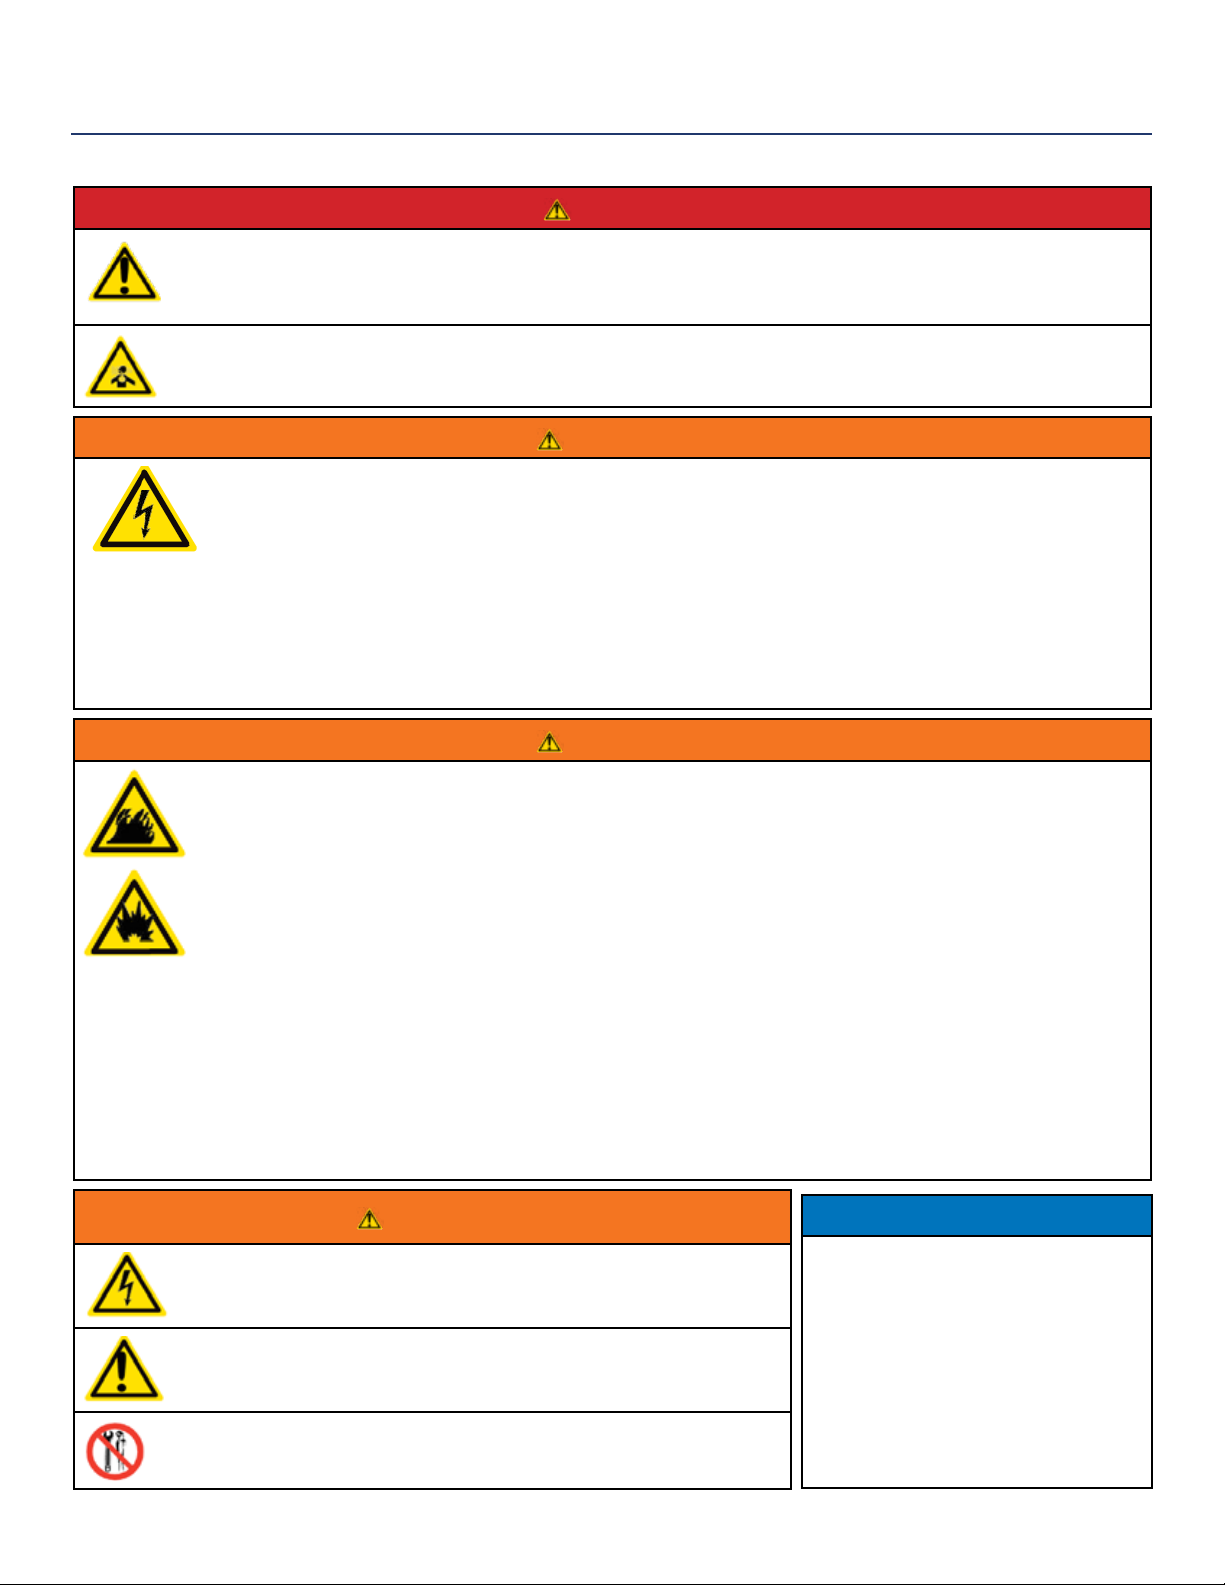
SAFETY
SAFETY DEFINITIONS
The words DANGER, WARNING, CAUTION and
NOTICE are used throughout this manual to highlight
important information. Be certain that the meanings of
these alerts are known to all who work on or near the
equipment.
This safety alert symbol appears
with most safety statements. It
means attention, become alert, your
safety is involved! Please read and
abide by the message that follows
the safety alerts symbol.
DANGER
Indicates a hazardous situation which, if not
avoided, will result in death or serious injury.
WARNING
Indicates a hazardous situation which, if not
avoided, could result in death or serious injury.
SAFETY SYMBOL DEFINITIONS
Symbol Description
Safety Alert Symbol
Asphyxiation Hazard
Burn Hazard
Burst/Pressure Hazard
Don’t leave tools in the area
Electrical Shock Hazard
CAUTION
Indicates a hazardous situation which, if not
avoided, could result in minor or moderate injury.
NOTICE
Indicates a situation which can cause damage
to the generator, personal property and/or the
environment, or cause the equipment to operate
improperly.
NOTE: Indicates a procedure, practice or condition
that should be followed in order for the
generator to function in the manner
intended.
Explosion Hazard
Fire Hazard
Lifting Hazard
Pinch-Point Hazard
Read Manufacturer’s Instructions
Read Safety Messages
Before Proceeding
Wear Personal Protective
Equipment (PPE)
Westinghouse Portable Power | 5
SAFETY
GENERAL SAFETY RULES
Never use the generator in a location that is wet or damp. Never expose the generator to rain, snow, water
spray or standing water while in use. Protect the generator from all hazardous weather conditions. Moisture
or ice can cause a short circuit or other malfunction in the electrical circuit.
Never operate the generator in an enclosed area. Engine exhaust contains carbon monoxide. Only operate
the generator outside and away from windows, doors and vents.
Voltage produced by the generator could result in death or serious injury.
• Never operate the generator in rain or a ood plain unless proper precautions are taken to avoid
being subject to rain or a ood.
• Never use worn or damaged extension cords.
• Always have a licensed electrician connect the generator to the utility circuit.
• Never touch an operating generator if the generator is wet or if you have wet hands.
• Never operate the generator in highly conductive areas such as around metal decking or steel works.
• Always use grounded extension cords. Always use three-wire or double-insulated power tools.
• Never touch live terminals or bare wires while the generator is operating.
• Be sure the generator is properly grounded before operating.
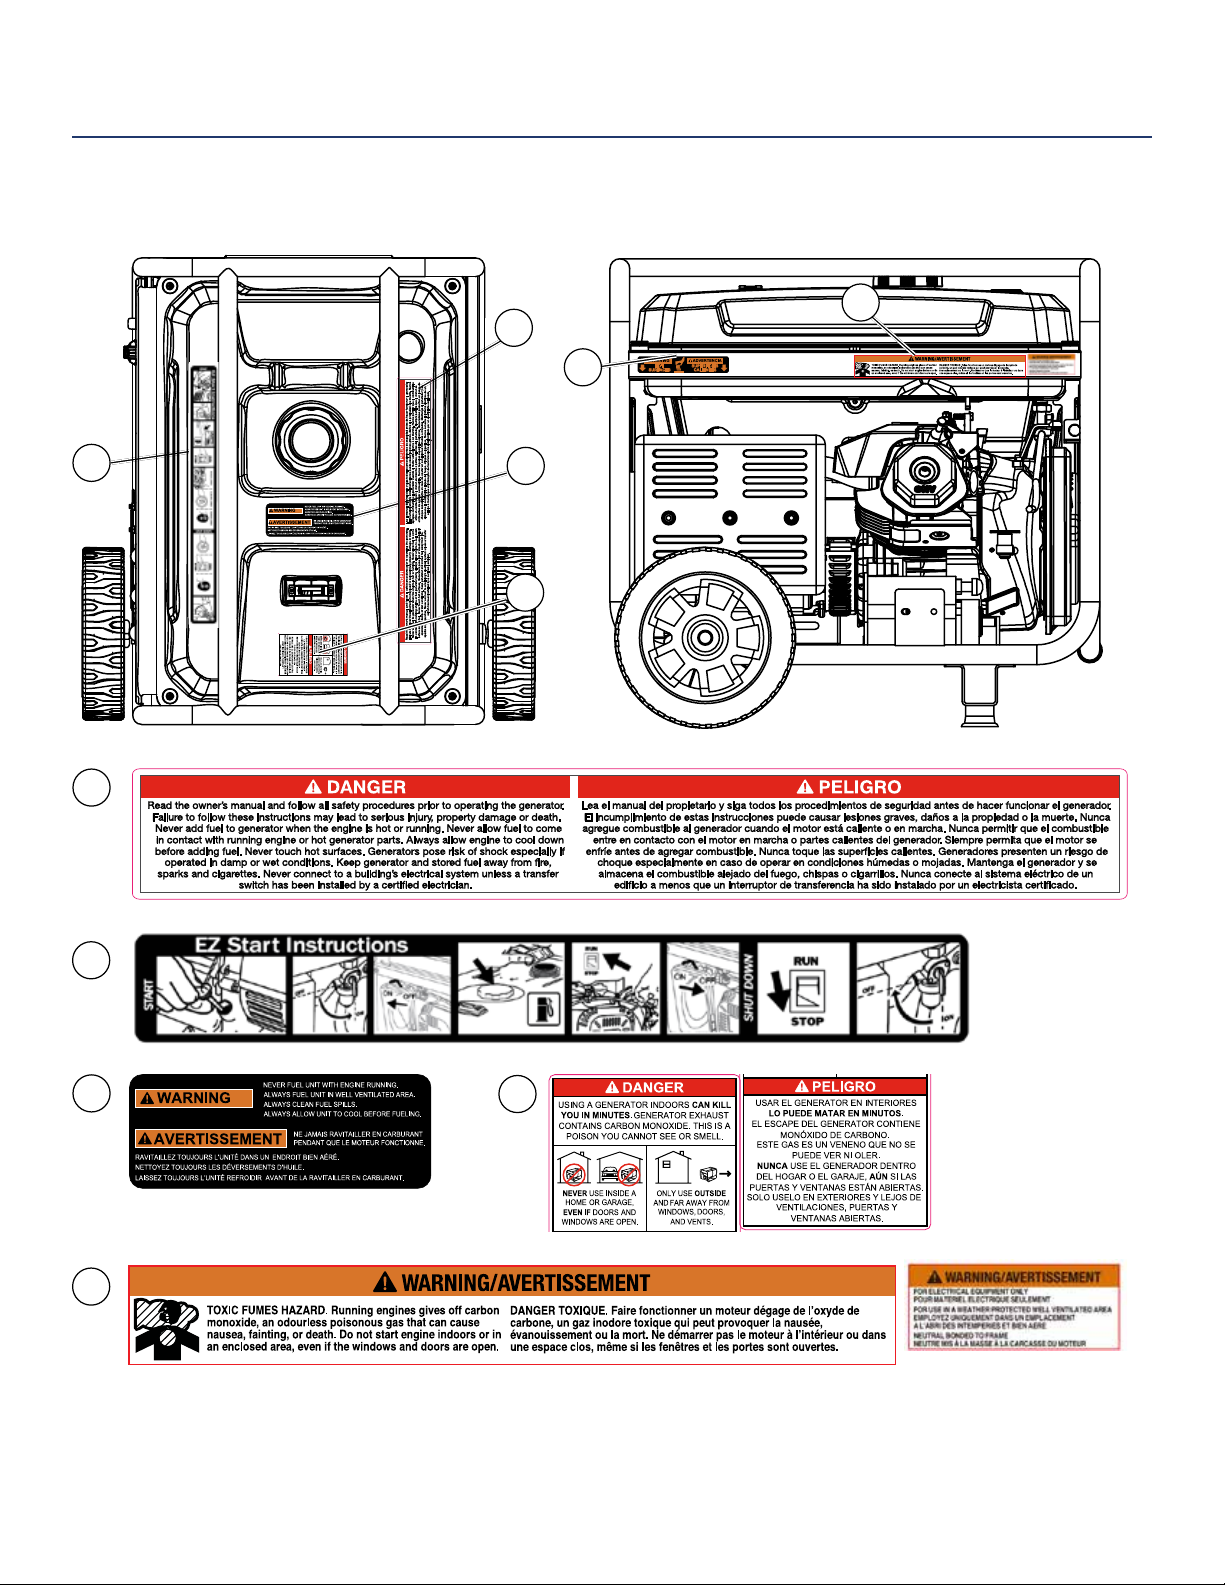
DANGER
WARNING
WARNING
Gasoline and gasoline vapors are extremely ammable and explosive under certain conditions.
• Always refuel the generator outdoors, in a well-ventilated area.
• Never remove the fuel cap with the engine running.
• Never refuel the generator while the engine is running. Always turn engine o and allow the generator
to cool before refueling.
• Only ll fuel tank with gasoline.
• Keep sparks, open ames or other form of ignition (such as match, cigarette, static electric source)
away when refueling.
• Never overll the fuel tank. Leave room for fuel to expand. Overlling the fuel tank can result in a
sudden overow of gasoline and result in spilled gasoline coming in contact with HOT surfaces.
Spilled fuel can ignite. If fuel is spilled on the generator, wipe up any spills immediately. Dispose of
rag properly. Allow area of spilled fuel to dry before operating the generator.
• Wear eye protection while refueling.
• Never use gasoline as a cleaning agent.
• Store any containers containing gasoline in a well-ventilated area, away from any combustibles or
source of ignition.
• Check for fuel leaks after refueling. Never operate the engine if a fuel leak is discovered.
WARNING
Never operate the generator if powered items overheat, electrical
output drops, there is sparking, ames or smoke coming from the
generator, or if the receptacles are damaged.
Never use the generator to power medical support equipment.
Never modify the generator.
Never operate the generator if it
vibrates at high levels, if engine
speed changes greatly or if the
engine misres often.
NOTICE
Always remove any tools or other service equipment used during
maintenance from the generator before operating.
6 | Westinghouse Portable Power
Always disconnect tools or
appliances from the
generator before starting.
SAFETY
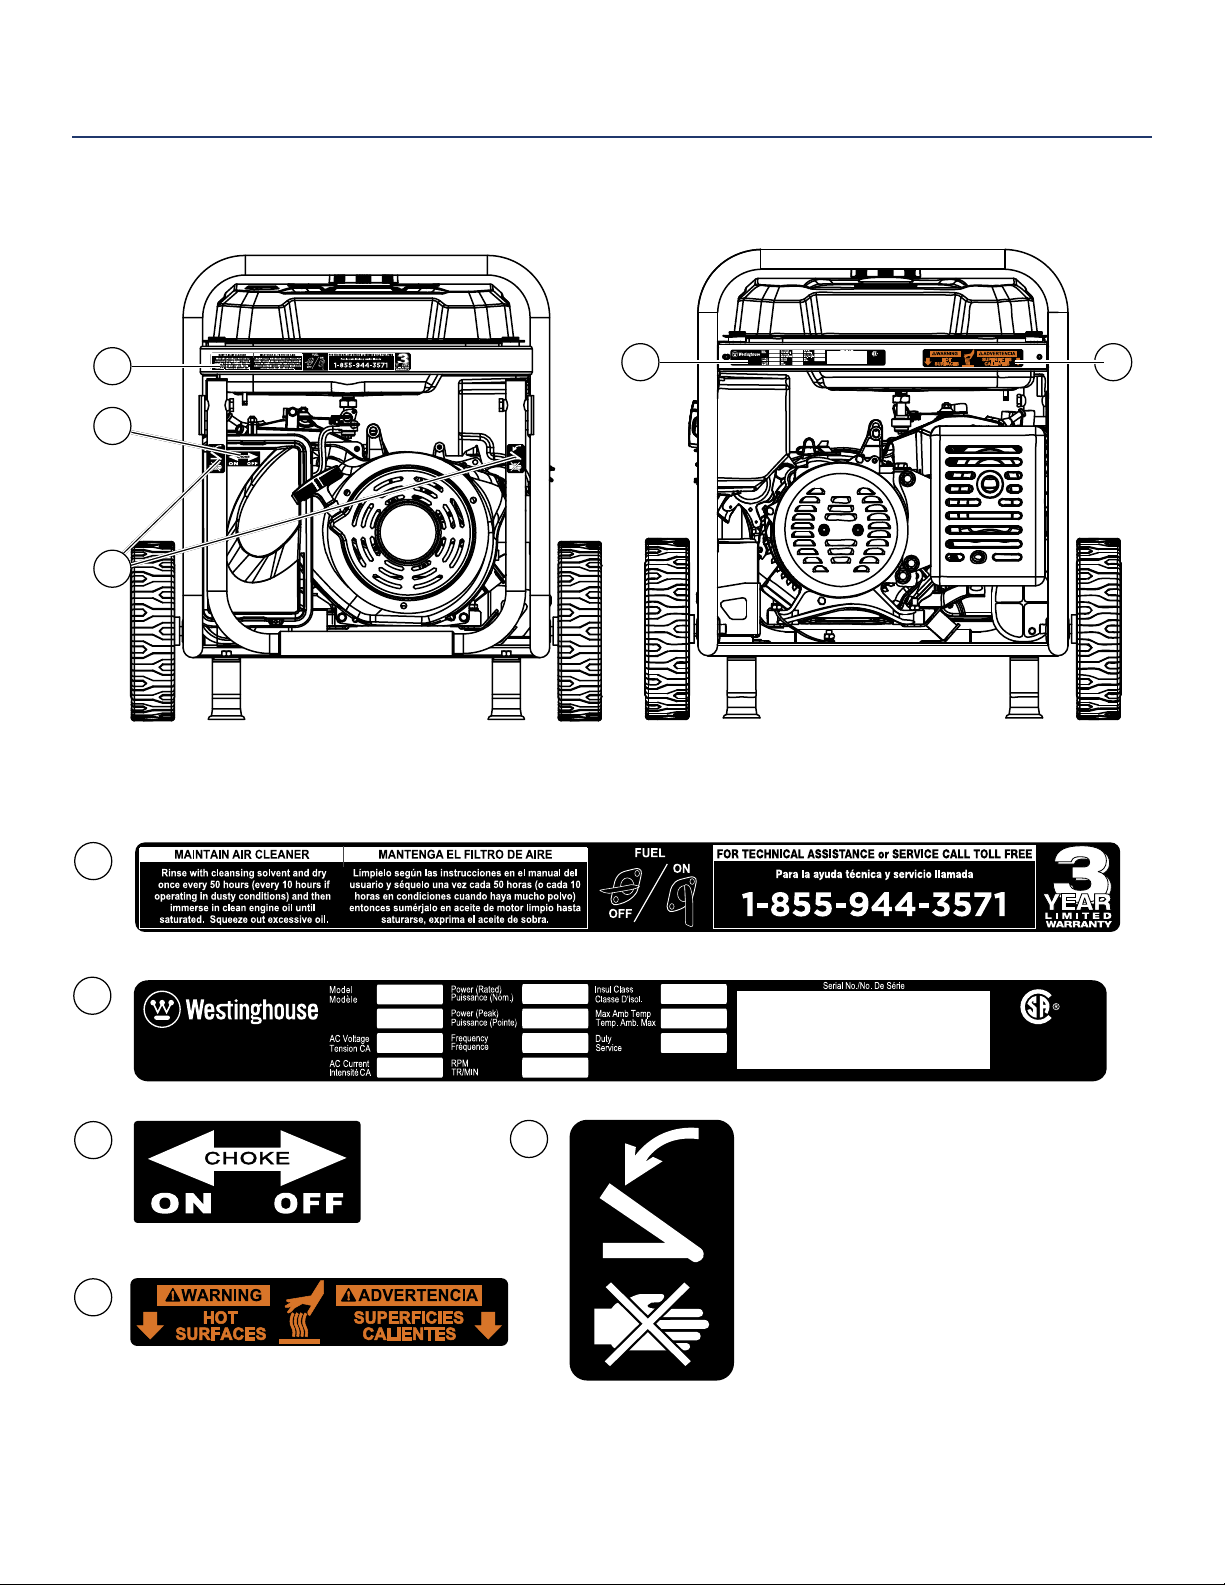
SAFETY LABELS AND DECALS
1
3
4
Part N0.
Numéro de
pièce
MWE Investments LLC
Columbus Ohio 43228 USA
MWE Investments LLC
2
Columbus Ohio 43228 Etats-Unis
Designed in Columbus, Ohio USA
Con u à columbus, Ohio,tats-Unis
Made in China/Fabriqu é en Chine
CSA Master Contract
Number :
Numéro de contrat
principal de CSA
5
1
4
2
MWE Investments LLC
Columbus Ohio 43228 USA
MWE Investments LLC
MWE Investments LLC
Columbus Ohio 43228 USA
Columbus Ohio 43228 Etats-Unis
MWE Investments LLC
Columbus Ohio 43228 Etats-Unis
3
Part N 0.
Numéro de
pièce
Part N 0.
Numéro de
pièc e
Designed in Columbus , Ohio USA
Con u à columbus , Ohio,tats-Unis
Designed i n Columbus , Ohio USA
Con u à columbus , O hio,tats-Unis
4
Made i n China/
Fabriqu é en C hine
Made in China/ Fabriqu é en Chine
CSA Master Contract
Number :
Numéro de contrat
principa l d e CSA
5
Westinghouse Portable Power | 7
SAFETY
SAFETY LABELS AND DECALS
10
6
5
7
6
7
8
9
8
10
8 | Westinghouse Portable Power
9
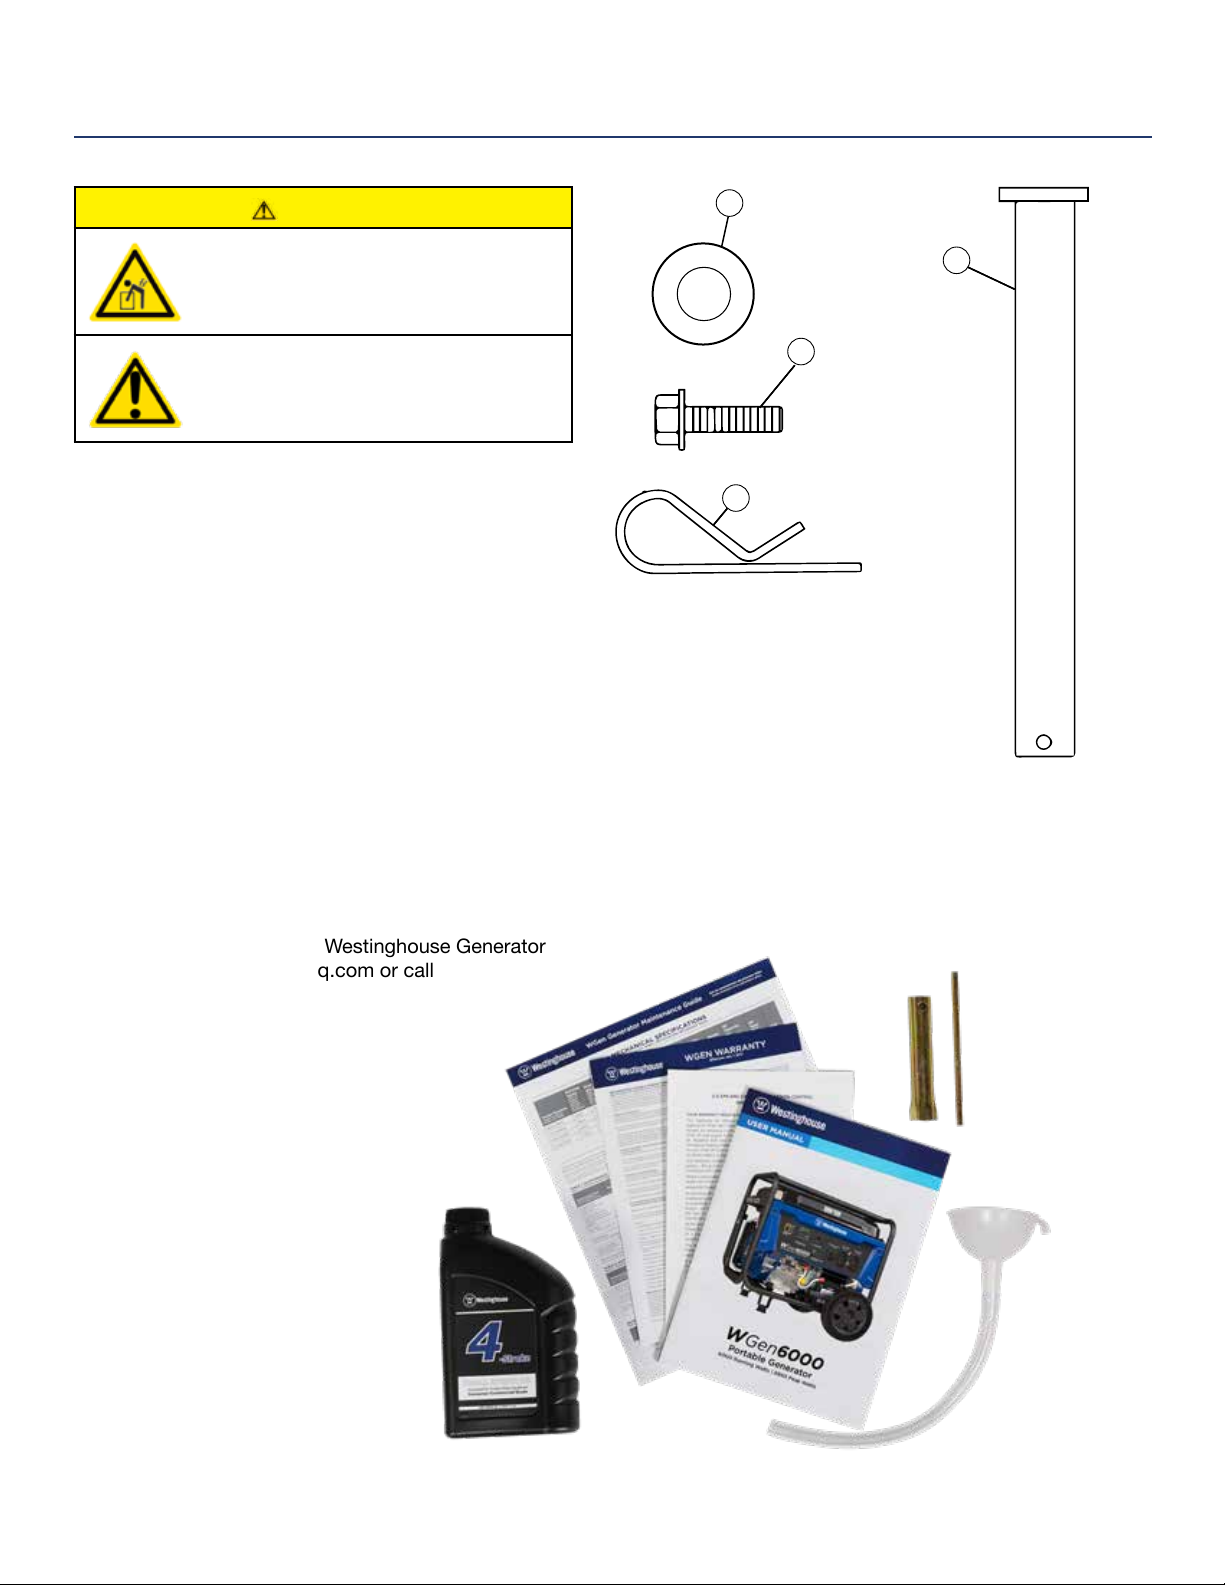
UNPACKING
CAUTION
Always have assistance when lifting
the generator. The generator is heavy;
lifting it could cause bodily harm.
Avoid cutting on or near staples
to prevent personal injury.
Tools required – box cutter or similar device.
1. Carefully cut the packing tape on top of the carton.
2. Fold back top aps to reveal the manual.
3. Remove the Wheel Kit Accessories cardboard box.
4. Carefully cut two sides of the carton to
remove the generator.
WHAT COMES IN THE BOX
Manual
Quick Start Guide/Maintenance Schedule
1.1 Liter Bottle of SAE 10W30 Oil (1)
Spark Plug Socket Wrench (1)
Wheel Kit Accessories Box
Funnel (1)
1
4
2
3
Wheel and Feet Kit Hardware
1. Washer (2 used)
2. Flange Bolt M8 x16mm (4 used)
3. Hairpin Cotter Pin (2 used)
4. Wheel Axle Pin (2)
WHEEL KIT ACCESSORIES BOX
Open the Wheel Kit Accessories box and verify the
contents against the list right. If any parts are missing,
please locate an authorized Westinghouse Generator
dealer at service@wpowereq.com or call
1-855-944-3571.
Westinghouse Portable Power | 9
ASSEMBLY
INSTALLING WHEELS AND FEET
BEFORE ASSEMBLING THE
GENERATOR, REVIEW THE SAFETY
SECTION STARTING ON PAGE 5.
CAUTION
Never lift the generator without
assistance. The generator is heavy
and lifting without assistance could
result in personal injury.
Never use the handles as a lifting point to
support the entire weight of the generator.
Only use the handles to move the
generator by lifting the handles and using
the wheels to move the generator.
Use caution when collapsing the handles.
Hands and ngers could get caught and
pinched.
NOTICE
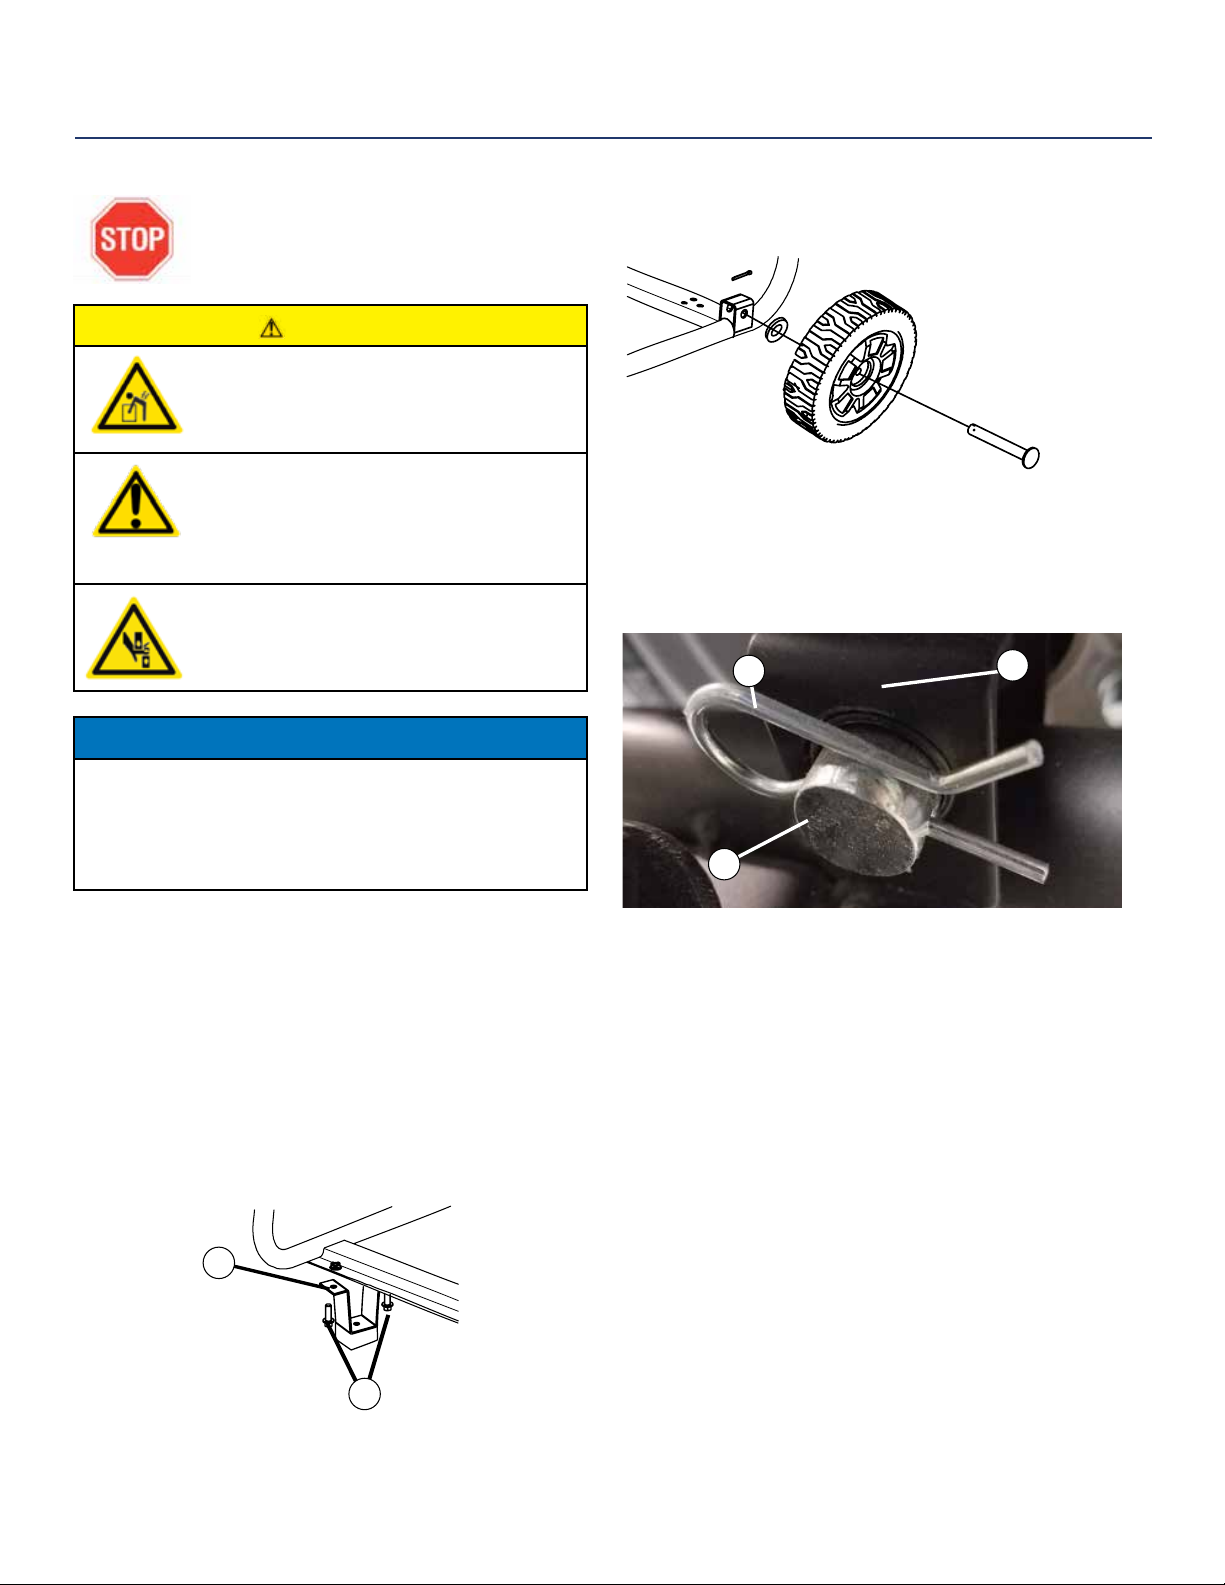
INSTALLING WHEELS TO FRAME
1. Insert axle pin through washer and wheel.
Figure 2 -Wheel Assembly
2. Install the wheel with axle pin through the axle
bracket on the frame. The eye of the bolt should be
facing toward the inside of the generator.
2
1
Assembling the generator will require lifting the unit on
one side. Make sure all engine oil and fuel are drained
from the unit prior to assembling. Once assembled, the
wheel kit is not intended for on-road use. The wheel kit
is designed for use on this generator only.
INSTALLING FEET TO FRAME
1. Place generator on a at surface.
2. Place a piece of cardboard or other soft material to
tip the generator onto, to protect the frame paint and
prevent the generator from sliding. Tip the generator
onto the side.
3. Install the mounting feet to the frame using the M8
ange bolts included.
1 - Mounting Foot
2 - Flange Bolts M8
1
3
Figure 3 - Assemble Wheel to Frame
3. Install the hairpin cotter through the axle pin to lock it
in place.
1 - Axle Bracket
2 - Hairpin Clip
3 - Axle Pin
4. Repeat previous steps on other wheel.
2
Figure 1 - Assemble Mounting Feet to Frame
10 | Westinghouse Portable Power
ASSEMBLY
CONNECTING THE BATTERY
WARNING
To avoid electrics shock:
• ALWAYS connect the positive (+)
battery cable (red boot) rst when
connecting battery cables.
• ALWAYS disconnect the negative (-)
battery cable (black boot) rst when
disconnecting battery cables.
• NEVER connect the negative (-)
battery cable (black boot) to the
positive (+) post on the battery.
• NEVER connect the positive (+)
battery cable (red boot) to the
negative (-) post on the battery.
• NEVER touch both battery posts
simultaneously.
• NEVER place a metal tool across
both battery posts.
• ALWAYS use insulated or
nonconducting tools when installing
the battery.
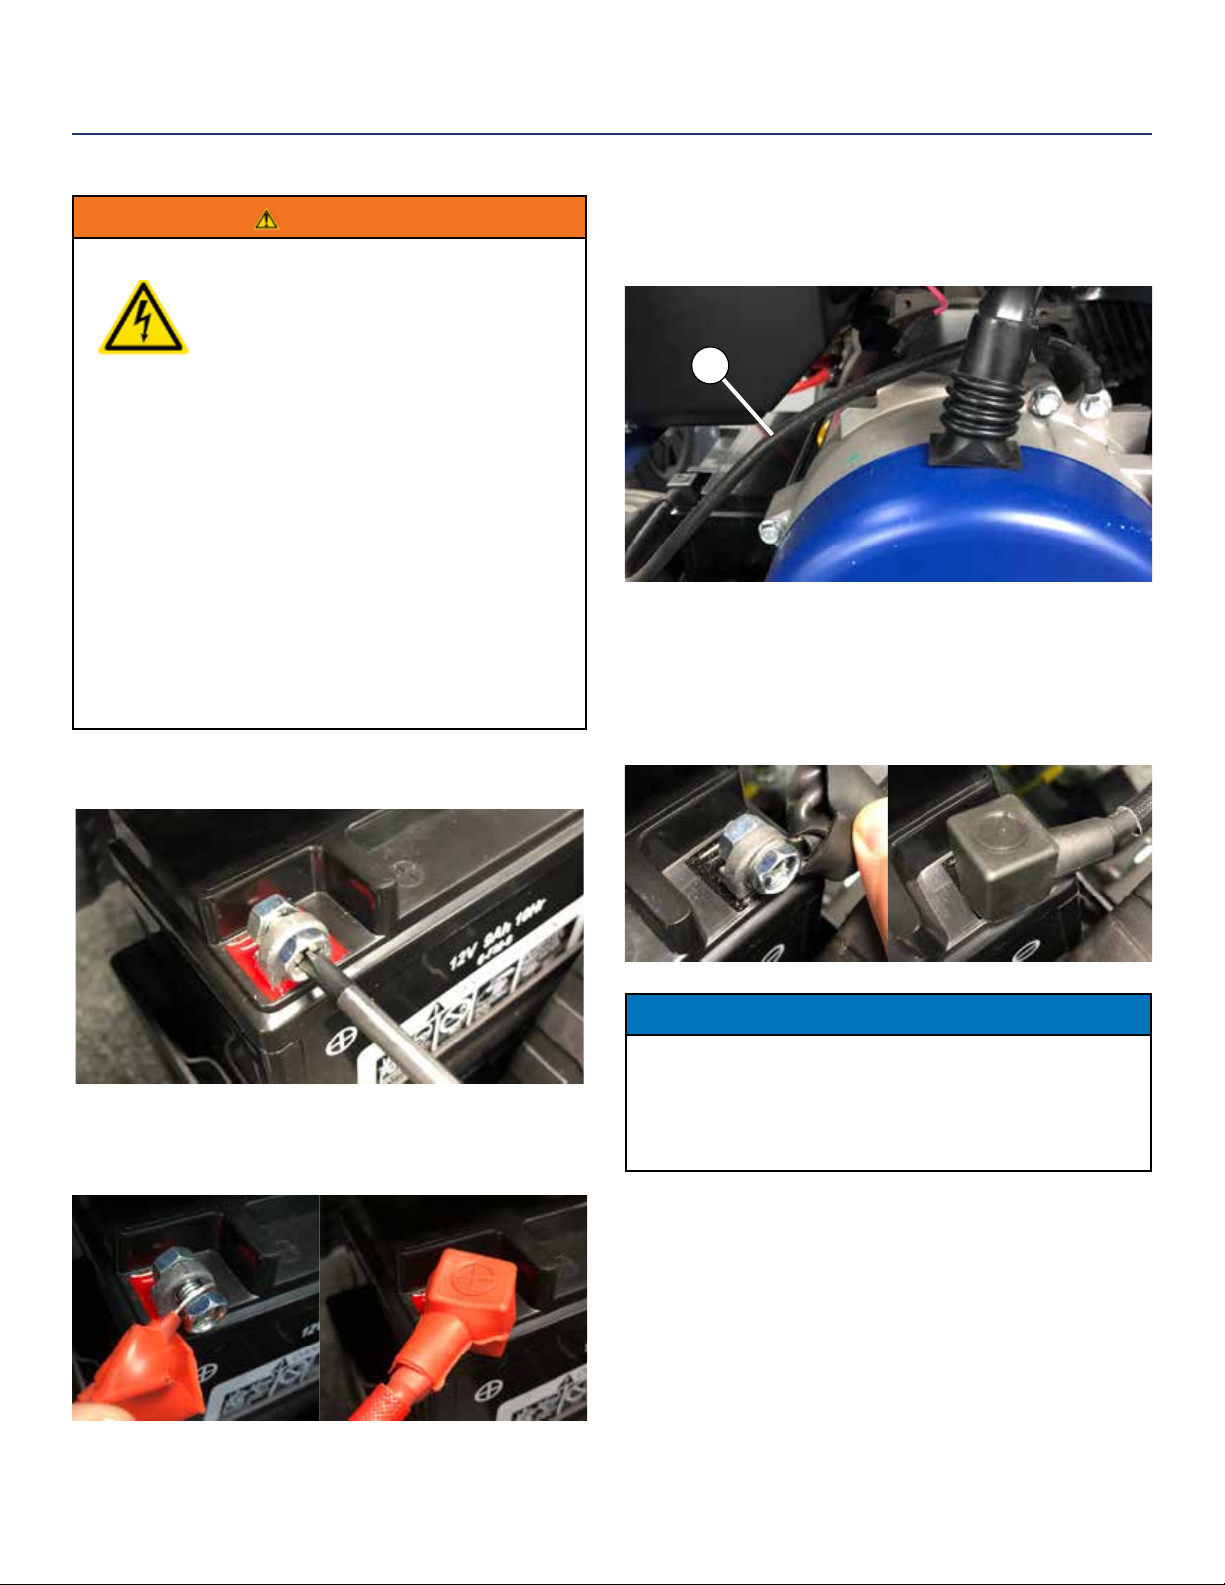
1. Using a screw driver, remove the screw on the red
positive (+) battery lead.
3. Locate the black negative (-) cable attached to the
alternator case, route it to the negative (-) battery
post. See Figure 5 below for location (1) of negative (-)
cable.
1
Figure 5 - Locating Negative (-) Cable
4. Remove the screw on the negative (-) battery post. Pull
back the black boot and securely attach the negative
(-) battery cable (black boot) to the negative (-) battery
post and tighten screw. Replace the black boot so it
protects the cable lug and battery post.
2. Securely tighten the positive (+) battery cable (red
boot) to the positive (+) battery post. Make sure boot
is over battery post.
NOTICE
The electric start generator is equipped with a battery
charging feature. Once the engine is running, a small
charge is supplied to the battery via the battery cables
and will slowly recharge the battery.
Westinghouse Portable Power | 11
 Loading...