

Page 1

INSTRUCTION MANUAL
VC2511210
WET / DRY VACUUM WITH DETACHABLE BLOWER
Note : Read and understand this manual before use.
Keep this manual for future reference.
C
US
120 V
60 Hz
10A
5HP
12
Gal
Page 2

Thank you for purchasing this Westinghouse wet/dry vacuum cleaner.
Feel confident that with Westinghouse you are obtaining a high quality product
engineered for optimal performance. This vacuum is capable of picking up liquids
and dry materials.
FOR YOUR SAFETY: CAREFULLY READ AND UNDERSTAND ALL INSTRUCTIONS.
2
WARRANTY
This product carries a limited two (2) year warranty against defects in workmanship and
materials from date of purchase under normal household use. If product is to be used for
commercial, industrial, or rental use, a 90 day limited warranty will apply. Warranty does
not apply to defects due to direct or indirect abuse, negligence, misuse, accidents,
repairs, alterations, or lack of maintenance. Please keep your receipt as proof of purchase.
Warranty ........................................................................................................................................
Safety Instructions and Warnings ..................................................................................................
Double Insulation Instructions .......................................................................................................
Extension Cords..............................................................................................................................
Unpacking and Checking Carton Contents....................................................................................
General Assembly Instructions ......................................................................................................
Dry Vacuum Operation ..................................................................................................................
Liquid Vacuum Operation ..............................................................................................................
Blowing Operation .........................................................................................................................
Care And Maintenance ..................................................................................................................
Installing & Cleaning Cartridge Filter ..............................................................................................
Installing & Cleaning Foam Sleeve Filter .......................................................................................
2
3
4
4
5
6
7
8
9
10
11
11
12
SECTION
TABLE OF CONTENTS
Troubleshooting .............................................................................................................................
Page 3

3
SAFETY INSTRUCTIONS & WARNINGS
IMPORTANT SAFETY INSTRUCTIONS
READ AND UNDERSTAND ALL INSTRUCTIONS BEFORE USING THIS VACUUM.
Read and understand this operator's manual and all labels on the Wet/Dry Vacuum
cleaner before operating. Safety is a combination of common sense, staying alert,
and knowing how your vacuum works. Use this Wet/Dry Vac only as described in
this manual. To reduce the risk of personal injury or damage to your Wet/Dry Vac,
use only recommended accessories.
Household Type
SAVE THIS MANUAL FOR FUTURE REFERENCE.
When using an electrical appliance, basic precautions should always be followed
including the following:
WARNING: TO REDUCE THE RISK OF FIRE, ELECTRIC SHOCK OR INJURY:
• Do not run vac unattended.
• Do not vacuum, or use this Wet/Dry Vac near flammable liquids, gases, or explosive
vapors like gasoline or other fuels, lighter fluids, cleaners, oil-based paints, natural gas,
hydrogen, or explosive dusts like coal dust, magnesium dust, grain dust, or gun power.
Sparks inside the motor can ignite flammable vapors or dust.
• Do not vacuum anything that is burning or smoking, such as cigarettes, matches, or
hot ashes.
• Keep cord away from heated surfaces.
• Do not expose to rain. Store indoors.
• Do not unplug by pulling on cord. To unplug, grasp the plug, not the cord.
• Do not use with damaged cord, plug, or other parts.
• If appliance is not working as it should, has been dropped, damaged, left outdoors, or
dropped into water, return it to a service center.
• Do not pull or carry by cord, use cord as handle, close a door on cord, or pull cord
around sharp edges or corners.
• Do not run Wet/Dry Vac over cord.
• Do not handle plug or the Wet/Dry Vac with wet hands.
• To reduce the risk of health hazards from vapors or dusts, do not vacuum toxic
materials.
• Do not use or store near hazardous materials.
• Do not use this Wet/Dry Vac with a torn filter or without the filter installed except
when vacuuming liquids as described in the operation section of this manual.
• Do not allow to be used as a toy. Close attention is necessary when used by or near
children.
• To reduce the risk of injury from accidental starting, unplug power cord before
changing or cleaning filter.
• Do not leave Wet/Dry Vac unattended when plugged in. Unplug from outlet when not
in use and before servicing.
• Turn off Wet/Dry Vac before unplugging.
• Do not put any object into ventilation openings. Do not vacuum with any ventilation
openings blocked; keep free of dust, lint, hair, or anything that may reduce air flow.
• Keep hair, loose clothing, fingers, and all parts of body away from openings and
moving parts.
• To reduce the risk of falls, use extra care when cleaning on stairs.
• Unplug before connecting hose.
• Use only as described in this manual. Use only manufacturer’s recommended attach-
ments.
• This appliance is provided with double insulation. Use only identical replacement
parts. See “DOUBLE INSULATION INSTRUCTIONS”.
When using as blower:
• Direct air discharge only at work area.
• Do not use Wet/Dry Vac as a sprayer.
• Do not direct air at bystanders.
• Keep children away when blowing.
• Use safety goggles.
Page 4

4
• To reduce the risk of electric shock-unplug before cleaning or servicing.
• DO NOT use without filters in place.
CAUTION: TO REDUCE THE RISK OF INJURY FROM MOVING PARTS- UNPLUG
BEFORE SERVICING.
EXTENSION CORDS
When using an extension cord with your Wet/Dry Vac refer to the following table to
determine the required A.W.G. wire size. Before using the cleaner make sure the power
cord and extension cord are in good working conditions. Make repairs or replacements
before using the vacuum cleaner. Only use extension cords that are rated for outdoor
use.
Length of Extension Cord
110V-120V
25 Feet
7.5 Meters
50 Feet
15.25 Meters
100 Feet
30.5 Meters
150 Feet
45.7 Meters
Amps A.W.G Wire Size
0-6 18 16 16 14
7-10
18
16
14
12
11-12
16
16
14
12
13-16
14
12
Not recommended
This Wet/Dry Vac is double-insulated, eliminating the need for a separate grounding
system. Use only identical replacements parts. Read the instructions for Servicing
Double-Insulated Wet/Dry Vacs before servicing. Use this Wet/Dry Vac as described in
this manual.
Observe the following warnings that appear on the motor housing of your Wet/Dry Vac.
DOUBLE INSULATED - GROUNDING NOT REQUIRED - WHEN SERVICING USE
ONLY IDENTICAL REPLACEMENT PARTS.
WARNING: TO REDUCE THE RISK OF ELECTRIC SHOCK-DO NOT EXPOSE TO RAIN.
STORE INDOORS.
WARNING: FOR YOUR OWN SAFETY, READ AND UNDERSTAND OPERATOR’S
MANUAL. DO NOT RUN UNATTENDED. DO NOT PICK UP HOT ASHES, COALS, TOXIC,
FLAMMABLE OR OTHER HAZARDOUS MATERIALS. DO NOT USE AROUND
EXPLOSIVE LIQUIDS OR VAPORS.
WARNING: SERVICING OF DOUBLE-INSULATED WET/DRY VACUUM WITH A
DOUBLE-INSULATED WET/DRY VACUUM, TWO SYSTEMS OF INSULATION ARE
PROVIDED INSTEAD OF GROUNDING. NO GROUNDING MEANS IS PROVIDED ON A
DOUBLE-INSULATED APPLIANCE, NOR SHOULD A MEANS FOR GROUNDING BE
ADDED. SERVICING A DOUBLE INSULATED WET/DRY VACUUM REQUIRES EXTREME
CARE AND KNOWLEDGE OF THE SYSTEM, AND SHOULD BE DONE ONLY BY
QUALIFIED SERVICE PERSONNEL. REPLACEMENT PARTS FOR A DOUBLEINSULATED WET/DRY VACUUM MUST BE IDENTICAL TO THE PARTS THEY REPLACE.
YOUR DOUBLE-INSULATED WET/DRY VAC IS MARKED WITH THE WORDS ‘DOUBLE
INSULATED’ AND THE SYMBOL (SQUARE WITHIN A SQUARE) MAY ALSO BE
MARKED ON THE APPLIANCE.
DOUBLE INSULATION INSTRUCTIONS
Page 5

5
UNPACKING AND CHECKING CARTON CONTENS
Remove entire contents of carton.
Check each item against the carton contents.
Carton contents lists
Key Description…………………… ..……
A Vac Assembly……………………… ...
B Hose…………………… .……………..
C Utility Nozzle……….………………….
D
Caster Foot Assembly…..………….…
E 4 Screws (Bag)……………………… .
F Foam Sleeve Filter……..……...........
G Extension Wand……………………...
H Car Nozzle……….……………………
I Concentrator Nozzle...…………….....
J Crevice Tool……….…………………
K Cartridge Filter… ………………….….
L Filter Retainer...………………………
M Adaptor………………………………..
N Diffuser………………………………..
O Operator’s Manual.....………………
.
P
High Efficiency Dust
Bags
……………
Qty.
1
1
1
4
1
1
2
1
1
1
1
1
1
1
1
1
Page 6
6
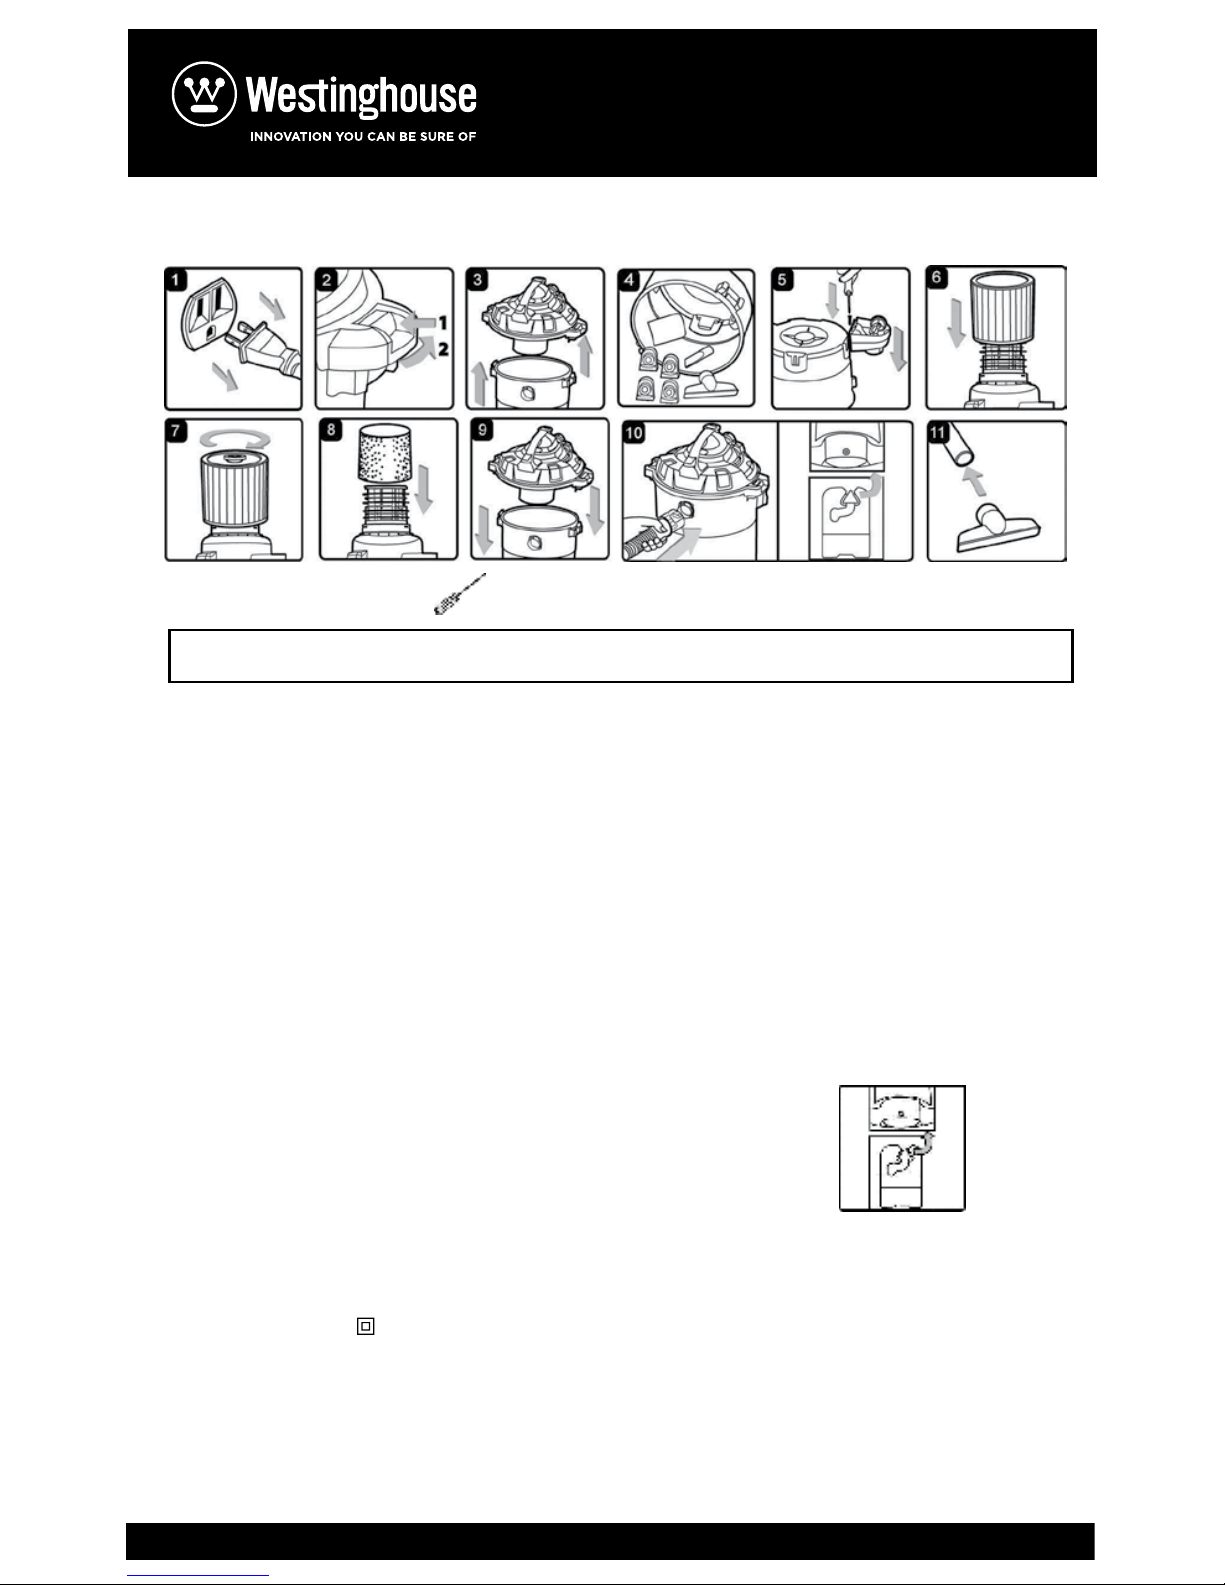
A Philips head screwdriver is required.
WARNING:DO NOT PLUG IN POWER CORD TO POWER OUTLET. MAKE SURE PLUG
IS DISCONNECTED BEFORE ASSEMBLING THE WET/DRY VAC.
UNPACKING YOUR WET/DRY VACUUM & GENERAL ASSEMBLY
1) Verify that the power cord is disconnected from the outlet. (fig. 1)
2) Undo the latches. (fig. 2)
3) Lift the power head off the collection tank. (fig. 3)
4) Remove the contents from inside the collection tank. Make sure you have all contents
as listed on page 5. (fig. 4)
5) Turn the collection tank upside down and insert the four caster feet into the slots on
the collection tank and tighten with supplied screws. Verify that the casters are
mounted correctly. Do not over-tighten the screws. (fig. 5)
6) Your vacuum comes ready for dry vacuum cleaning with cartridge filter pre-installed.
If cartridge filter is not installed, refer to page 11 for filter installation. (fig.6 & 7)
7) For wet vacuum cleaning, install the supplied foam filter. (fig. 8) See page 11 for filter
installation.
8) Place the power head back on the collection tank, aligning the top section with the
clasps, and snapping into place by applying downward pressure. (fig. 9)
9) Insert the locking end of the hose into the port of the collection tank and turn to lock
into place. (fig. 10)
10) Choose the desired accessories and push onto the vacuum hose. (fig.11)
NOISE DIFFUSER
For quiet operation during vacuuming, install the noise
diffuser into the blower port by inserting the locking
end of the diffuser into the blower port and turning clockwise
to lock into place.
POLARIZED PLUG
To reduce the risk of electrical shock, this appliance has a polarized plug (with one
blade wider than the other). This plug will fit in a polarized outlet only one way. If the
plug does not fit fully in the outlet, reverse the plug. If it still does not fit, contact a
qualified electrician to install the proper outlet. Do not change the plug in any way.
Double insulation eliminates the need for the three wire grounded power cord and
grounded power supply system.
GENERAL ASSEMBLY INSTRUCTIONS
INSTALACIÓN Y LIMPIEZA DEL FILTRO DE TELA
Instalación del filtro de tela reutilizable
1) Verifique que el enchufe esté desconectado del tomacorriente.
2) Quite la tapa del envase y colóquela con el filtro hacia arriba.
3) Instale el filtro de cartucho con el lado plano sobre la jaula de filtro. Cuidadosamente
empuje el filtro hacia adentro hasta que pare contra el cabezal. (fig. 2 y 3)
4) Coloque el detenedor del filtro encima del filtro sobre el labio levantado y apriételo
girándolo a la derecha. (fig. 4 y 5)
Para Quitar Y Limpiar El Filtro
1) Suelte y quite el retenedor girándolo en sentido contrario de las manecillas del reloj.
2) Sostenga y hale cuidadosamente el filtro para retirarlo. (fig. 6)
3) Limpie el filtro suavemente golpeando ligeramente o cepillando la suciedad. La
limpieza se debe realizar al aire libre y no en el interior de su vivienda. Para óptimo
resultado se recomienda utilizar un filtro nuevo.
4) Instale el filtro ya limpio o un filtro nuevo como se indica en los pasos 2 y 3 de Instala-
ción y Limpieza del Filtro De Cartucho.
5) Los filtros mojados se deben quitar y permitir ventilar hasta estar secos antes de
instalar sobre la jaula del filtro.
¡IMPORTANTE! Limpie o cambie el filtro regularmente para mejor funcionamiento.
SIEMPRE UTILICE EL FILTRO DE CARTUCHO PARA LIMPIAR CON LA ASPIRADORA EN
SECO. Si la máquina se utiliza sin el filtro de cartucho, el motor se quemará y la garantía
será anulada. Siempre tenga a mano repuestos de los filtros.
¡AVISO! El filtro incluido esta hecho con materiales de alta calidad diseñado para
atrapar partículas de polvo pequeñas. El filtro se debe utilizar para recoger en seco
solamente. Un filtro seco es necesario para recoger el polvo. Si el filtro de polvo esta
mojado, se estropeara rápidamente y serámuy difícil limpiar. Utilice cuidado al quitar el
filtro para limpiarlo y cambiarlo. Examine los filtros para ver si tienen rasgones o aguje-
ros pequeños, un agujero pequeño puede dejar pasar el polvo a través y fuera del
aspirador. No utilice un filtro con agujeros o rasgones, cambie inmediatamente.
INSTALACIÓN Y LIMPIEZA DEL FILTRO DE ESPONJA
Instalación del filtro de esponja
1) Verifique que el enchufe esté desconectado del tomacorriente.
2) Quite la tapa y colóquela con el filtro hacia arriba. Siga las instrucciones para quitar el
filtro de polvo.
3) Cuidadosamente resbale el filtro hacia abajo, sobre la jaula del filtro y empuje el filtro
hacia adentro hasta que cubra la jaula completamente. (fig.1 & 2)
4) Ponga la tapa de vuelta a su lugar en el envase.
Limpieza del filtro de esponja
1) Con la tapa en posición invertida quite cuidadosamente el filtro de esponja. (fig. 3)
2) Utilice una solución de jabón y agua para lavar el filtro de esponja, enjuague con agua
limpia.(fig. 4)
3) Permita que el filtro se seque antes de instalar y de usar otra vez.
Page 7
7
DRY VACUUMING
WARNING: BE SURE TO READ, UNDERSTAND, AND APPLY INFORMATION, ENTITLED
‘SAFETY INSTRUCTIONS & WARNINGS’. DO NOT VACUUM IN AREAS WITH FLAMMABLE GASES, VAPORS, OR EXPLOSIVE DUSTS IN THE AIR. FLAMMABLE GASES OR
VAPORS INCLUDE BUT ARE NOT LIMITED TO: LIGHTER FLUID, SOLVENT TYPE CLEANERS, OIL-BASE PAINTS, GASOLINE, ALCOHOL, OR AEROSOL SPRAYS. EXPLOSIVE
DUSTS INCLUDE BUT ARE NOT LIMITED TO: COAL, MAGNESIUM, GRAIN, OR GUN
POWDER. TO REDUCE THE RISK OF HEALTH HAZARDS FROM VAPORS OR DUST, DO
NOT VACUUM TOXIC MATERIALS.
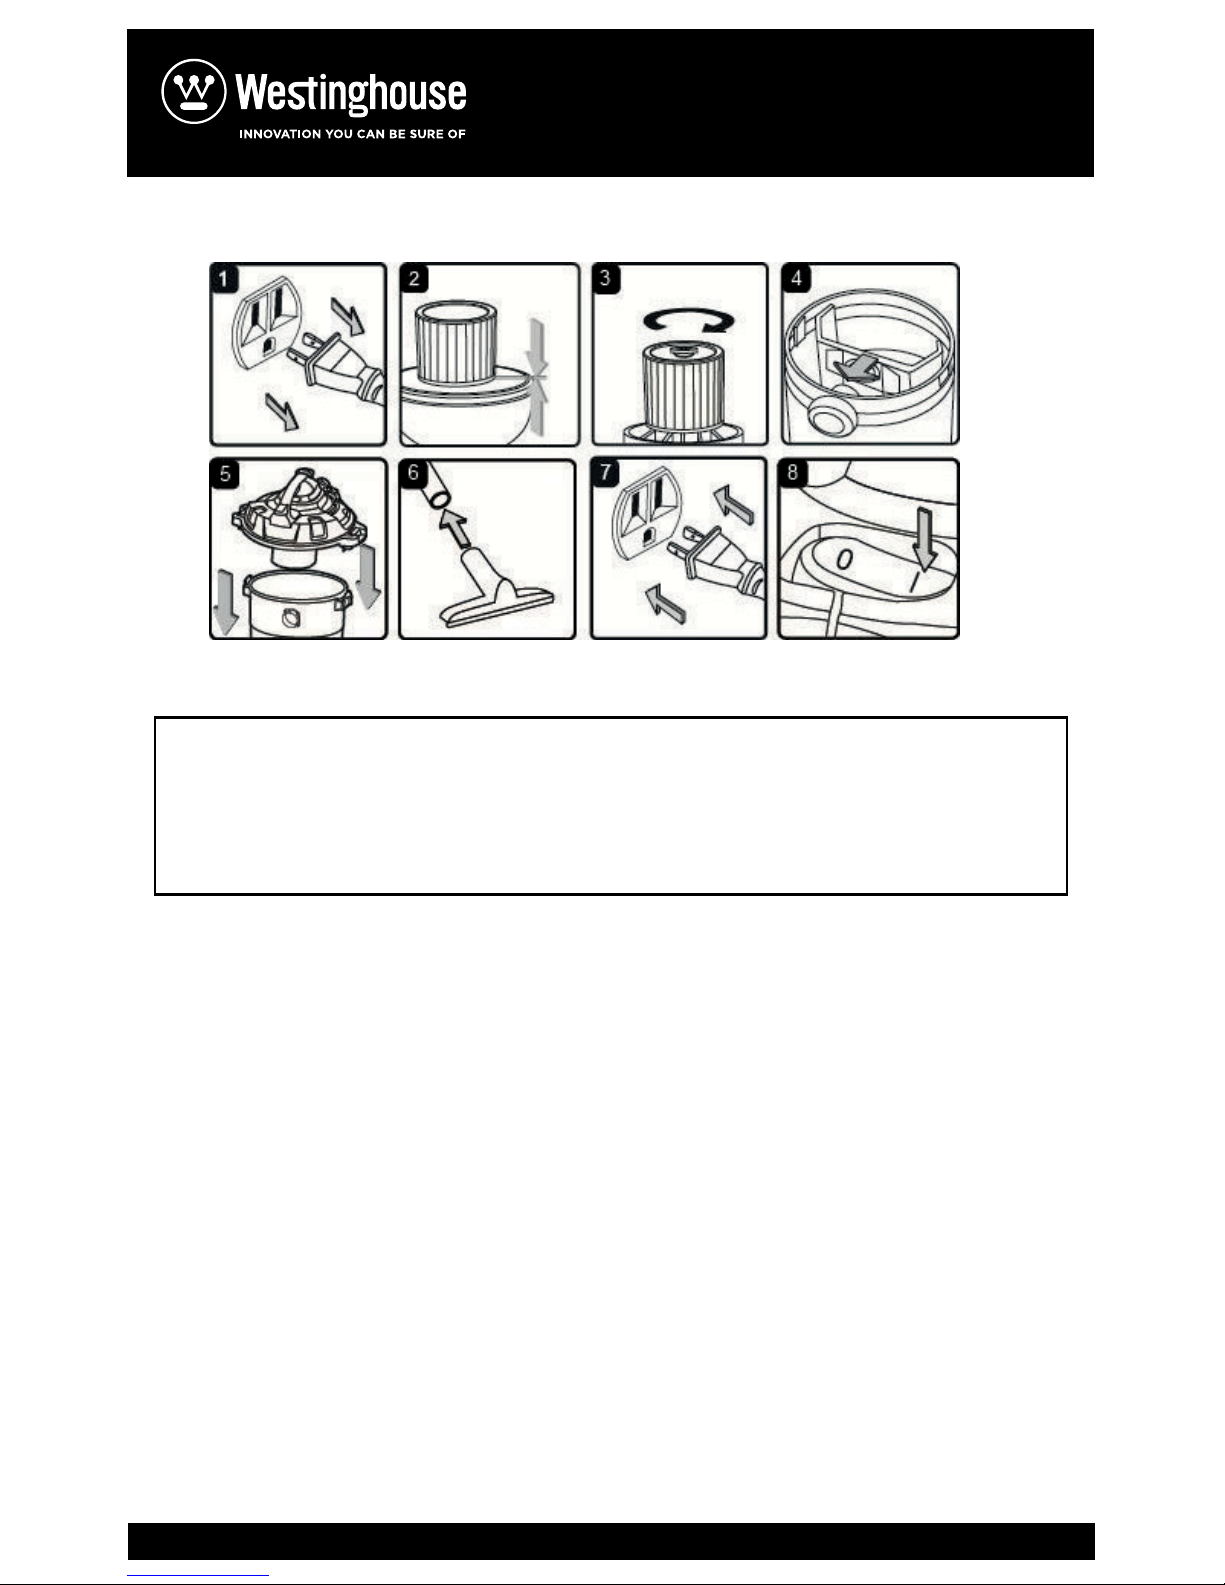
1) Verify that the power cord is disconnected from the outlet. (fig. 1)
2) In order to prepare your vacuum for dry vacuuming, verify that the cartridge filter is
securely mounted. With power head removed and in upside down position, make sure
the filter is pushed in until it stops against the power head and the retainer is installed.
(fig. 2 & 3) (Your Wet/Dry Vac comes with the cartridge filter pre-installed. If the filter is
not already installed, see page 10 for installation instructions.)
3) Optional: For improved dust filtering, fit collection bag flange onto the inlet port,
taking care not to damage the bag. (fig. 4)
4) Place the power head back on the container, and secure it in place using the latches.
(fig. 5)
5) Insert the locking end of the hose into the vacuum port and lock in place. Push the
required attachment onto the free end of the hose or extension. (fig. 6)
6) Plug the power cord into the outlet. (fig. 7)
7)Turn the motor on by flipping the switch to the ‘I’ ON position. (fig. 8)
8) Once you have completed vacuuming, flip the switch to the ‘O’ OFF position and
unplug the power cord
from the outlet.
O = OFF I = ON
DO NOT USE THE CARTRIDGE FILTER FOR LIQUID VACUUMING.
DO NOT USE COLLECTION BAG FOR LIQUID VACUUMING.
DRY VACUUM OPERATION
Page 8
8
LIQUID VACUUM OPERATION
LIQUID VACUUM CLEANING
WARNING: BE SURE TO READ, UNDERSTAND, AND APPLY INFORMATION,
ENTITLED ‘SAFETY INSTRUCTIONS & WARNINGS’. DO NOT VACUUM IN AREAS WITH
FLAMMABLE GASES, VAPORS, OR EXPLOSIVE DUSTS IN THE AIR. FLAMMABLE
GASES OR VAPORS INCLUDE BUT ARE NOT LIMITED TO: LIGHTER FLUID, SOLVENT
TYPE CLEANERS, OIL-BASE PAINTS, GASOLINE, ALCOHOL, OR AEROSOL SPRAYS.
EXPLOSIVE DUSTS INCLUDE BUT ARE NOT LIMITED TO: COAL, MAGNESIUM, GRAIN,
OR GUN POWDER. TO REDUCE THE RISK OF HEALTH HAZARDS FROM VAPORS OR
DUST, DO NOT VACUUM TOXIC MATERIALS.
WARNING: DO NOT PLUG IN POWER CORD TO POWER OUTLET. MAKE SURE PLUG
IS DISCONNECTED BEFORE ASSEMBLING THE WET/DRY VAC
DO NOT USE THE CARTRIDGE FILTER FOR LIQUID VACUUMING.
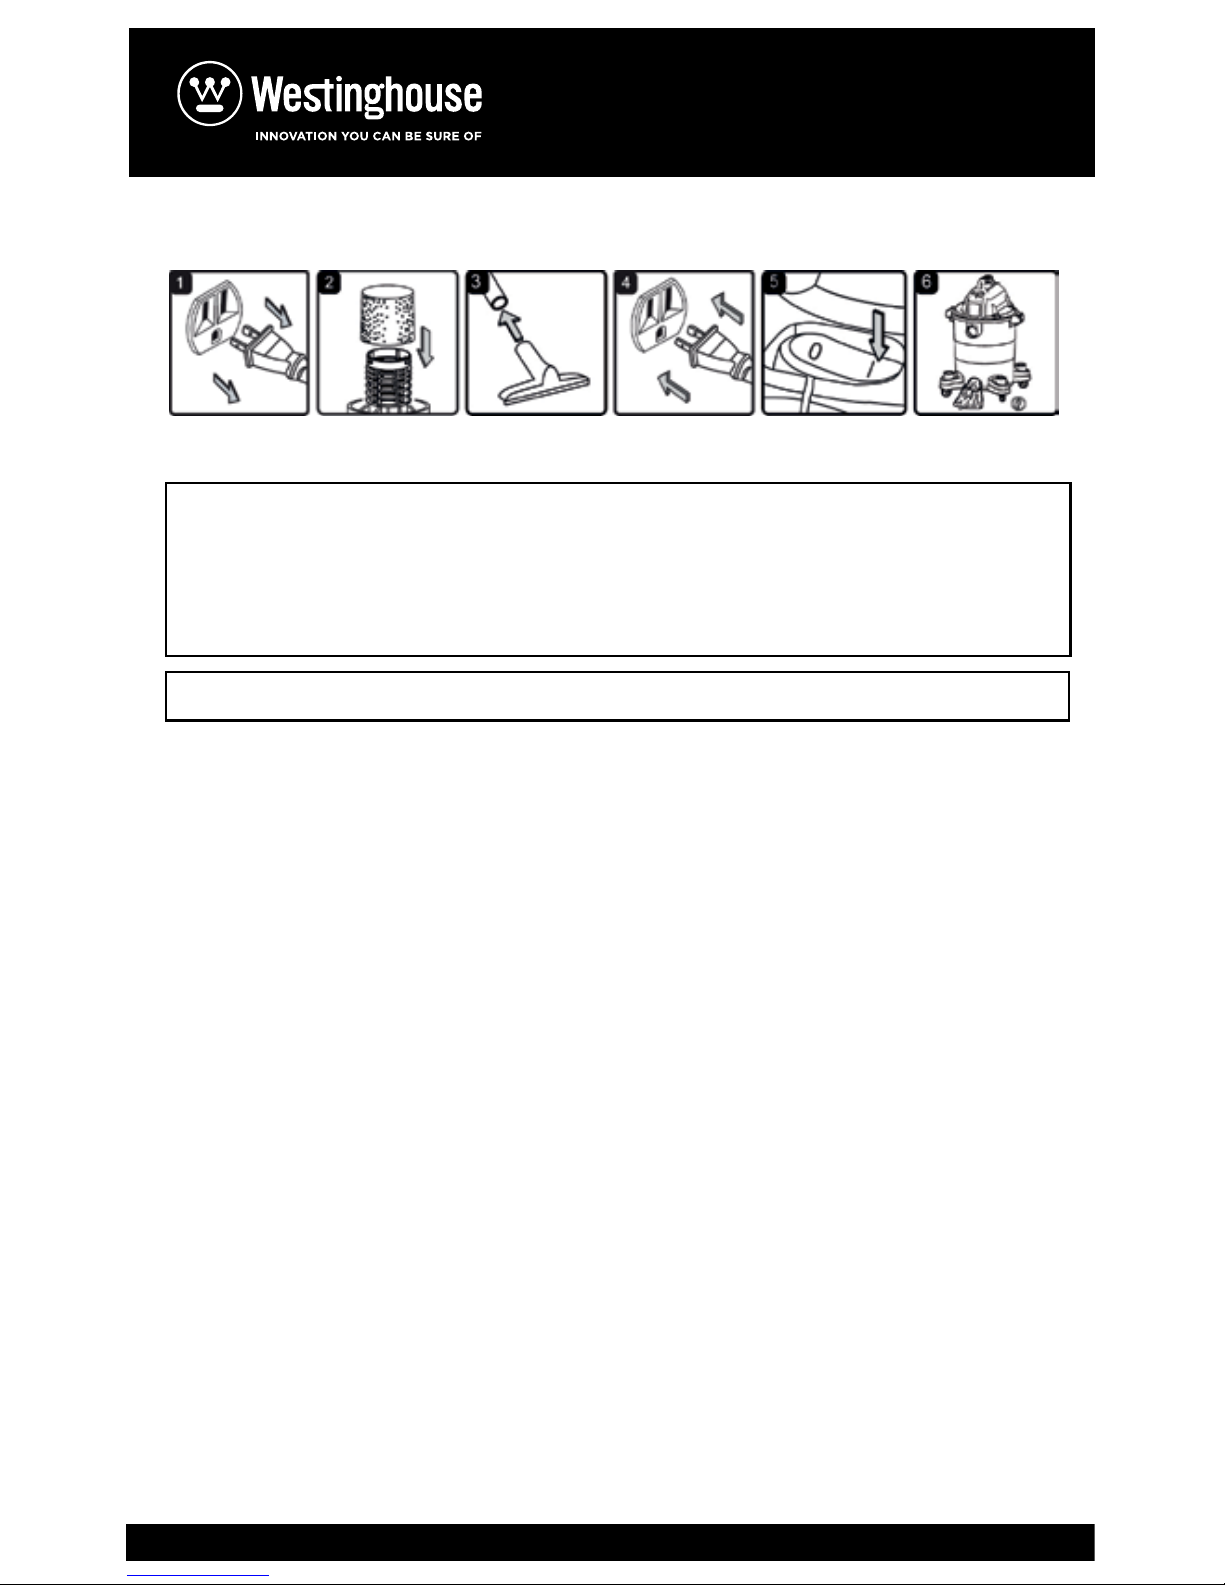
1) Verify that the power cord is disconnected from the outlet. (fig. 1) Verify that the
container is clean and free of dust and dirt.
2) Remove cartridge filter, then carefully install the foam sleeve filter over the filter
cage and place the power head back on the container. (fig. 2) See filter installing
instructions on page 11.
3) Fit the desired nozzle to the vacuum hose. (fig. 3)
4) Verify that the switch is in the ‘O’ OFF position before plugging the power cord into
the outlet. (fig. 4)
5) Turn the motor on by flipping the switch to the ‘I’ ON position. (fig. 5)
6) After use, empty the container by unscrewing the drain cap. Drain liquids into a
suitable receptacle or drain. Remember to refit the drain cap to the container after
draining container. (fig. 6)
IMPORTANT! When vacuuming large quantities of liquids, do not immerse the nozzle
completely in the liquid; leave a gap at the tip of the nozzle opening to allow air inflow.
The machine is fitted with a float valve that stops the suction action when the
collection tank reaches its maximum capacity. You will notice an increase in motor
speed. When this happens, turn off the machine, disconnect from power supply, and
drain the liquid into a suitable receptacle or drain. To continue vacuuming, refi t the
collection tank with the drain cap. After wet vacuuming, turn the machine off and
remove plug from power supply. Empty the collection tank, clean and dry the inside
and outside before storage.
REMEMBER! The foam filter must be removed after wet vacuuming, and a reusable
cloth filter must be installed before dry vacuuming again.
Esta aspiradora tiene capacidad para ser soplador. Para utilizar como soplador siga las
instrucciones enumeradas.
ADVERTENCIA: SIEMPRE UTILIZE ANTEOJOS DE SEGURIDAD QUE CONFORMEN CON
ANSI Z87.1 (O EN CANADA, CSAZ94.3) ANTES DE USAR EL SOPLADOR.
PRECAUCIÓN: PARA REDUCIR EL RIESGO DE PERDIDAD DE AUDICION, UTILIZE
PROTECCION PARA LOS OIDOS CUANDO ESTE USANDO EL SOPLADOR POR HORAS
EXTENDIDAS O EN AREAS RUIDOSAS.
PRECAUCIÓN: MANTENGA A LAS PERSONAS ALEJADAS DEL LOS RESIDUOS
SOPLADOS.
PRECAUCIÓN: UTILIZE UNA MASCARA ANTIPOLVO SI AL SOPLAR SE CREA POLVO
QUE PUEDA
1) Verifique que el cordón eléctrico esté desconectado del enchufe. (fig.1)
2) Quite el difusor del portal del soplador. (fig. 2)
3) Apriete la palanca de asegurar del soplador y levante el soplador de la tapa de la
aspiradora. (fig. 3 y 4)
4) Inserte el adaptador al portal del soplador e inserte la extensión o boquilla deseada .
(fig. 5 y 6).
5) Asegúrese de que el interruptor este en la posición de apagado y enchufe al
tomacorrientes. (fig. 7)
6) Antes de encender el soplador aguante el soplador con firmeza. Encienda el motor
moviendo el interruptor a la posición de ‘I’. (fig. 8).
Page 9
9
BLOWING OPERATION
This Wet/Dry Vac converts to a detachable blower that can be used for leaf blowing in
yards, decks and patios. To use the detachable blower feature follow the instructions
listed.
WARNING: ALWAYS WEAR SAFETY GOGGLES COMPLYING WITH ANSI Z87.1 (OR IN
CANADA, CSAZ94.3) BEFORE USING BLOWER.
CAUTION: TO REDUCE THE RISK OF HEARING DAMAGE, WEAR EAR PROTECTION
WHEN USING THE VAC/BLOWER FOR EXTENDED HOURS OR WHEN USING IT IN
NOISY AREAS.
CAUTION: KEEP BYSTANDERS CLEAR FROM BLOWING DEBRIS.
CAUTION: WEAR A DUST MASK IF BLOWING CREATES DUST THAT MIGHT BE
INHALED.
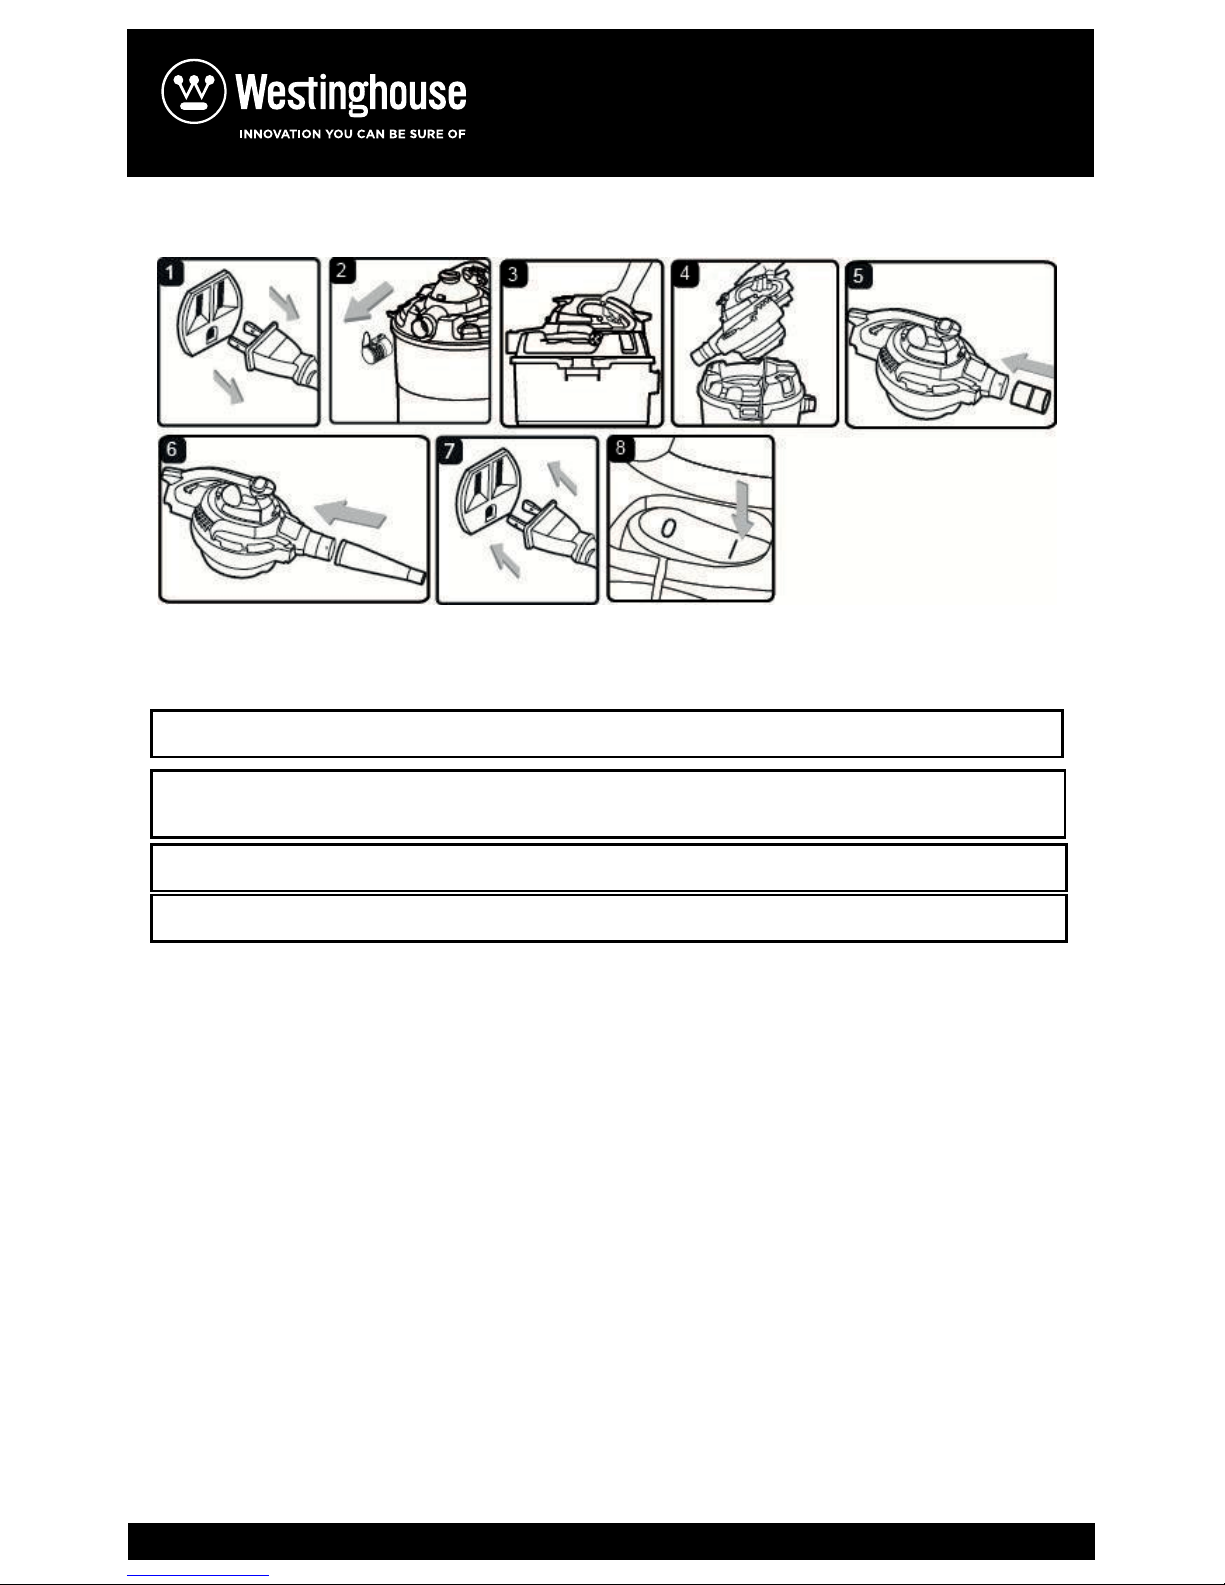
1) Verify that the power cord is disconnected from the outlet. (fig. 1)
2) Remove noise diffuser from the blower port. (fig. 2)
3) While squeezing the locking lever, lift the detachable blower from the vacuum lid.
(fig.3 & 4)
4) Insert the adaptor into the blowing port and fit it the desired extension wands and or
nozzles. (fig.5 & 6)
5) Ensure the power switch is turned off and plug into the power supply. (fig. 7)
6) Firmly hold the blower before turning it on. Turn the motor on by flipping the switch
to the ‘I’ ON position. (fig.8)
Page 10
10
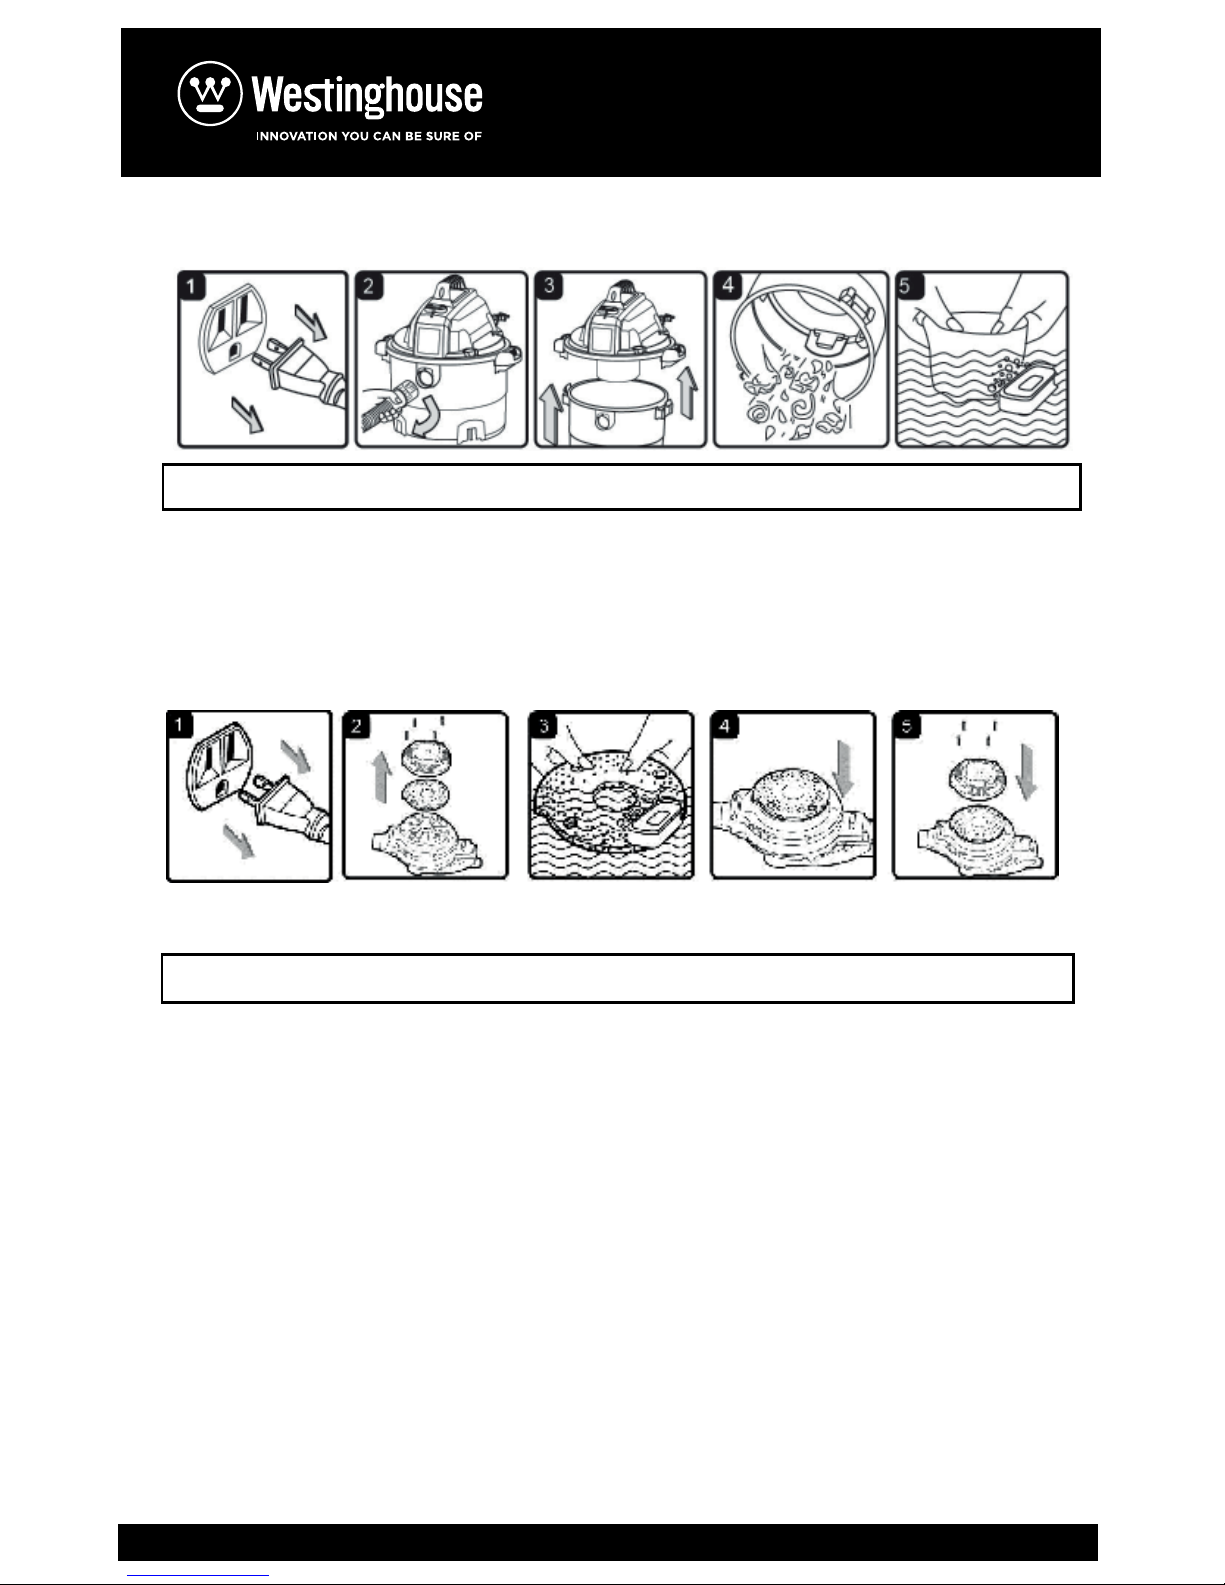
MAINTENANCE
1) Verify that the power cord is disconnected from the outlet. (fi g. 1)
2) Disconnect the hose from the vacuum. (fi g. 2)
3) Undo the latches and remove the power head from the collection tank. (fi g. 3)
4) Clear all dirt or debris from the collection tank and hose. (fi g. 4)
5) Check the hose, attachments, and power cord to verify that they have not been
damaged.
BLOWER INTAKE
WARNING:ALWAYS DISCONNECT THE PLUG FROM THE POWER OUTLET BEFORE
REMOVING THE POWER HEAD FROM COLLECTION TANK.
ASPIRAR MATERIALES EN SECO
ADVERTENCIA: ASEGURESE DE LEER, ENTENDER, Y APLICAR LA INFORMACIÓN,
DADA SOBRE LAS “INSTRUCCIONES DE SEGURIDAD Y ADVERTENCIAS”. NO LIMPIE
CON LA ASPIRADORA EN ÁREAS CON GASES INFLAMABLES, VAPORES, O POLVOS
EXPLOSIVOS EN EL AIRE. LOS GASES O LOS VAPORES INFLAMABLES INCLUYEN
PERO NO SE LIMITAN A; LÍQUIDO DE BUTANO, SOLVENTES EN FORMA DE AEROSOL
PARA LIMPIAR, PINTURAS A BASE DE ACEITE, GASOLINA, ALCOHOL O AEROSOL. EL
POLVO EXPLOSIVO INCLUYE PERO NO SE LIMITA A; POLVO DE CARBÓN, GRANO DE
MAGNESIO O POLVORA. PARA REDUCIR EL RIESGO DE LOS VAPORES A LA SALUD
NO ASPIRE MATERIALES TÓXICOS CON LA ASPIRADORA.
1) Verifique que el cordón eléctrico esté desconectado del enchufe. (fig. 1)
2) Para preparar su aspiradora para limpiar en seco, verifique que el filtro de
cartucho está bien asegurado en su lugar. Cerciórese de que el filtro estépuesto
contra el cabezal. (fig. 2) (Su aspiradora viene con el filtro pre-instalado para
referencia vea las instrucciones en la pagina 10.)
3) Coloque el retenedor del filtro encima del cartucho del filtro y apriete hacia
abajo dando vuelta a la manija hacia la derecha. (fig. 3)
4) Ponga la tapa en el envase, y asegúrela en su lugar usando las asas. (fig. 4)
5) Inserte el extremo de conexión de la manguera en el cabezal y asegúrela en su
lugar. Empuje el accesorio requerido sobre el final libre de la manguera o de la
extensión. (fig. 5)
6) Enchufe el cordón eléctrico en el tomacorriente. (fig. 6)
7) Encienda el motor moviendo el interruptor a la posición de encendido con el
símbolo ‘I’ ON. (fig. 7)
8) Una vez que usted haya terminado de limpiar con la aspiradora, mueva el
interruptor a la posición de apagado ‘O’ OFF y desenchufe el cordón eléctrico del
tomacorrientes.
O = Apagado I = Encendido
NO UTILICE EL FILTRO DE CARTUCHO PARA ASPIRAR LÍQUIDOS CON LA
ASPIRADORA
After using the blower, examine the bottom of the blower for debris and blockages and
remove if found. To clean the foam pad of the intake:
WARNING! ALWAYS DISCONNECT THE PLUG FROM THE POWER OUTLET BEFORE
REMOVING THE POWER HEAD FROM THE CONTAINER.
1) Verify that the power cord is disconnected from the outlet. (fig.1)
2) Remove the four screws holding the intake shield and lift off the shield. (fig.2)
3) Remove the foam pad from the blower and clean the foam pad with soapy water and
allow to dry. (fig. 3)
4) Check the foam pad for reuse. If you need to replace the foam pad consult the parts
list of the manual.
5) Replace the foam pad on to the blower, aligning the holes to the screw tabs. (fig. 4)
6) Reinstall the intake shield and the four screws. (fig. 5)
Page 11
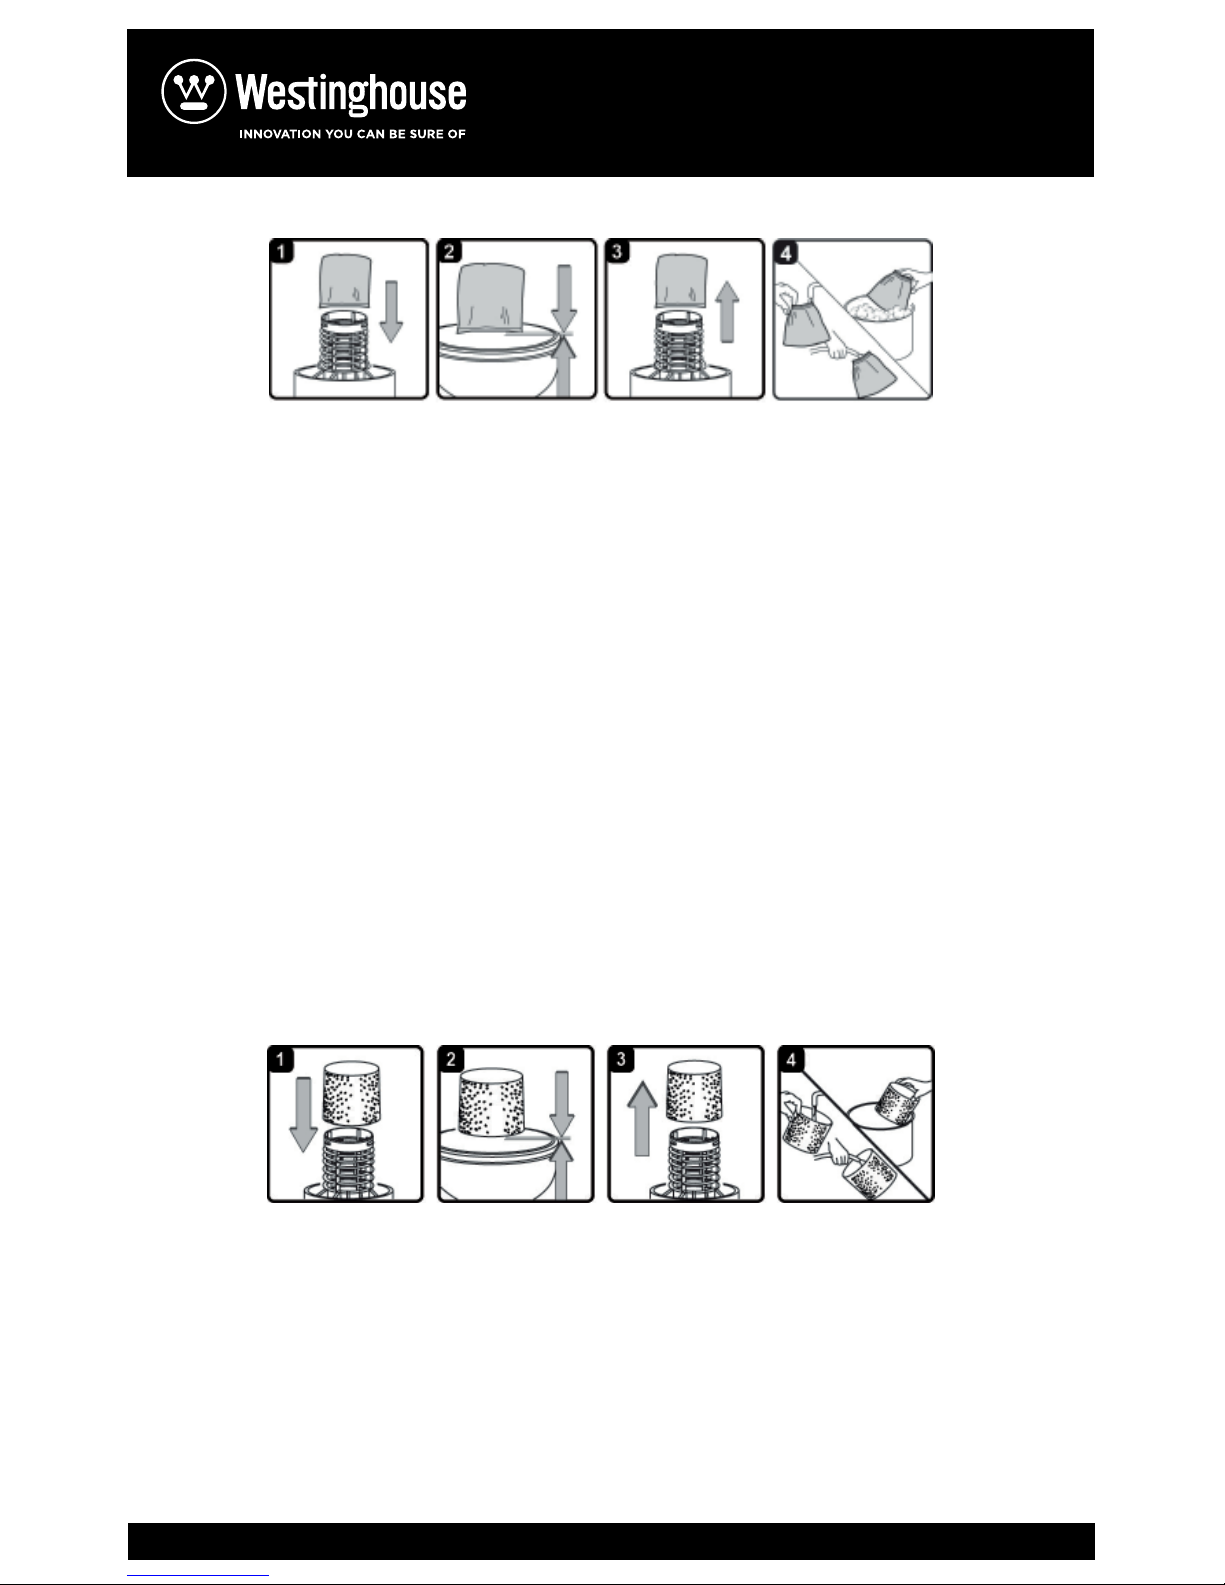
INSTALLING & CLEANING CARTRIDGE FILTER
Installing Cartridge Filter
1) Verify that the power cord is disconnected from the outlet. (fig.1)
2) Remove power head and place in upside down position.
3) Slide cartridge filter down over the filter cage making sure the whole cage is covered.
(fig.2 & 3)
4) Replace the power head on to the collection tank.
Removing and Cleaning Cartridge Filter
1) With the removed power head in the upside down position.
2) Carefully remove the cartridge filter from the filter cage. (fig. 4) Clean the filter by
gently tapping or brushing dirt off. Cleaning should not be done indoors in living areas.
3) Use a mild soap and water solution to wash cartridge filter and rinse with clean water.
(fig. 5)
4) Allow the wet filter to air dry for 24 hours before installing onto the filter cage.
5) Wet filters should be removed and allowed to air dry for 24 hours before installing onto
the filter cage.
IMPORTANT! Clean or change the cartridge filter regularly for best performance.
ALWAYS USE CARTRIDGE FILTER FOR DRY VACUUMING. If the machine is used with out
the cartridge filter, the motor will burn out and the warranty will be voided. Always keep
spare filters on-hand.
NOTICE! The filters included are made of high quality materials designed to stop small
dust particles. The cartridge filter should be used for dry pick-up only. A dry cartridge
filter is necessary to pick up dust. If the cartridge filter is wet, it will clog quickly and be
very difficult to clean. Handle the filter carefully when removing it for cleaning and replacing it. Check the filters for tears or small holes, a small hole can let dust pass through and
out of the cleaner. Do not use a filter with holes or tears-replace it immediately.
INSTALLING & CLEANING THE FOAM SLEEVE FILTER
Installing Foam Sleeve Filter
1) Verify that the power cord is disconnected from the outlet. (fig.1)
2) Remove power head and place in upside down position. Follow instructions to remove
cloth filter.
3) Carefully slide foam sleeve filter down over the filter cage making sure the whole cage
is covered. (fig. 2 & 3)
4) Replace the power head onto the collection tank.
Cleaning Foam Sleeve Filter
1) With the removed power head in the upside down position, carefully remove foam
sleeve filter. (fig. 4)
2) Use a mild soap and water solution to wash foam sleeve filter and rinse with clean
water. (fig. 5)
3) Allow filter to air dry before installing and using again.
11
Page 12
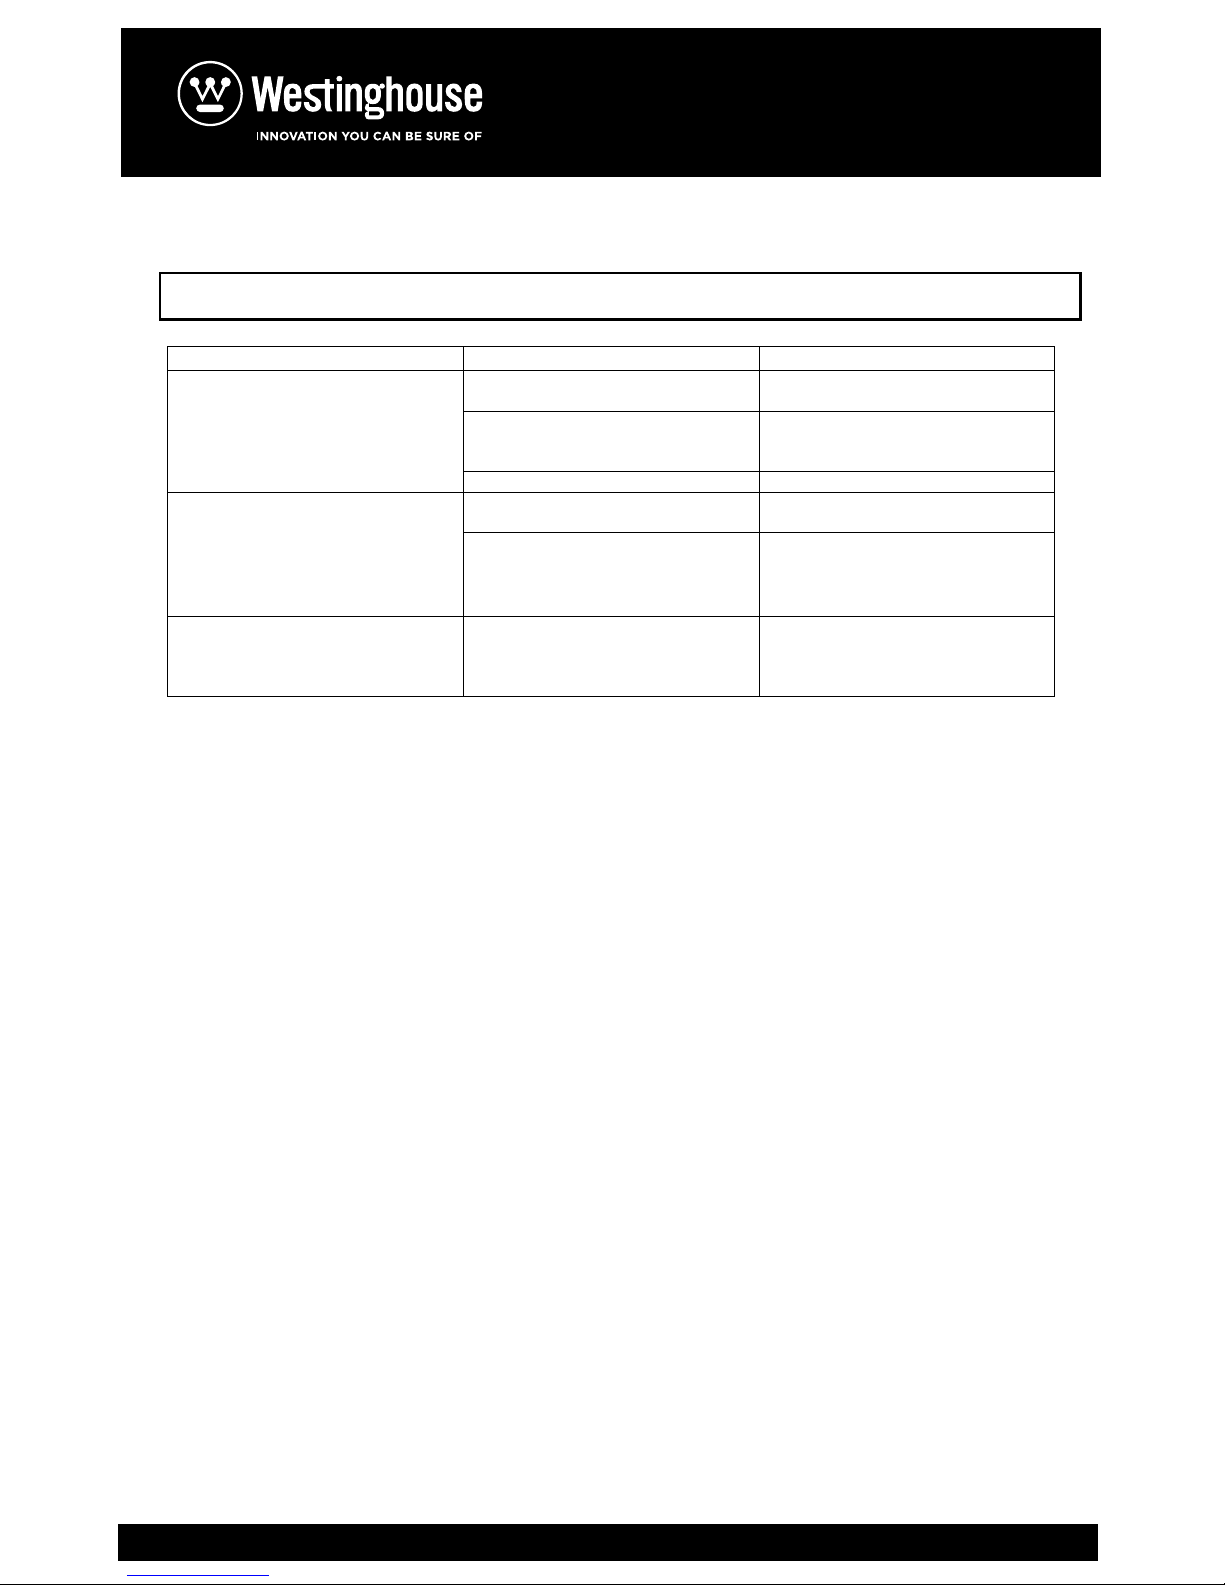
TROUBLESHOOTING
WARNING:TO REDUCE THE RISK OF ELECTRIC SHOCK-UNPLUG BEFORE
TROUBLESHOOTING.
12
Symptom
Possible Causes
Corrective Action
Vacuum will not operate. 1) No power supply. 1) Check power supply – cord,
breakers, fuses.
2) Faulty power cord.
2) Unplug and check the power
cord. If damaged, have it repaired
by a professional.
3) Container full.
3) Empty container.
Dust comes out from motor cover. 1) The cartridge filter is missing or
damaged.
1) Attach or replace cartridge filter.
2) Vacuum has been used to collect
fine dust, such as drywall dust,
fireplace soot, or ash, without a fine
dust filter equipped.
2) Remove the standard cartridge
filter and install the appropriate fine
dust cartridge filter.
Reduced efficiency and
motor/speed vibration.
1) There is a blockage in the
nozzle, hose, or the container inlet.
The cartridge filter is clogged by fine
dust.
1) Check nozzle, hose and
container inlets for blockage. Take
off the filter and clean it. Or install a
new cartridge filter.
1
NOTA: La Manguera y los accesorios de esta
aspiradora son de 2.5 pulgadas (63.5mm) de diámetro.
Page 13

13
NOTES / NOTAS
Page 14

WET / DRY VACUUM WITH DETACHABLE BLOWER
Note : Read and understand this manual before use.
Keep this manual for future reference.
 Loading...