

Page 1

INSTRUCTION MANUAL
VC14130
WET / DRY VACUUM
Note : Read and understand this manual before use.
Keep this manual for future reference.
C
US
120 V
60 Hz
7A
3HP
3
Gal
Page 2

When using an electrical appliance, basic precautions should be always followed,
including the following:
READ ALL INSTRUCTIONS BEFORE USING THIS APPLIANCE.
2
ATTENTION
Read all safety rules carefully before attempting to operate. Retain for future reference
DANGER
Never operate this unit when flammable materials or vapors are present because
electrical devices produce arcs or sparks that can cause a fire or explosion.
NEVER OPERATE UNATTENDED!
WARNING
To reduce the risk of fire, electric shock, or injury:
1. Do not leave appliance when plugged in. Unplug from outlet when not in use and
before servicing. Connect to a properly grounded outlet only. See Grounding
Instruction.
2. Do not expose to rain—store indoors.
3. Always disconnect the plug from the wall outlet before removing the tank cover
4. Do not allow to be used as a toy. Close attention is necessary when used by or
near children.
5. Do not use with damaged cord or plug. If appliance is not working as it should,
has been dropped, damaged, left outdoors or dropped into water, contact
WESTINGHOUSE for assistance.
6. Do Not: pull or carry by cord, use cord as a handle, close a door on cord or pull
cord around sharp edges or corners. Do not run appliance over cord. Keep cord
away from heated surfaces.
7. Do not unplug by pulling on cord. To unplug, grasp the plug; not the cord.
8. Do not handle plug or appliance with wet hands.
9. Do not put any object into openings. Do not use with any openings blocked; keep
free of dust, lint, hair and anything that may reduce air flow.
10. Keep hair, loose clothing, fingers and all parts of body away from openings and
moving parts.
11. Do not pick up anything that is burning or smoking, such as cigarettes, matches
or hot ashes.
12. Do not use without dust bag and/or filters in place.
13. Turn o all controls before unplugging.
14. Use extra care when cleaning on stairs.
15. Do not use to pick up flammable or combustible liquids such as gasoline or use
in areas where they may be present.
16. Do not use your cleaner as a sprayer of flammable liquids such as oil base paint,
lacquers, etc.
17. Do not vacuum toxic, carcinogenic, combustible or other hazardous materials
such as asbestos, arsenic, barium, beryllium, lead, pesticides or other health endangering materials.
18. Do not pick up soot, cement, plaster or drywall dust without filter and dust bag
in place. These are very fine particles that may aect the performance of the motor
or be exhausted back into the air. Additional dust bags are available.
19. Do not leave the cord lying on the floor once you have finished the cleaning job.
It can become a tripping hazard.
20. Use special care when emptying heavily loaded tanks.
21. To avoid spontaneous combustion, empty tank after each use.
22. The operation of a utility vac can result in foreign objects being blown into eyes,
which can result in eye damage.
Always wear safety goggles when operating vacuum.
Page 3

23. STAY ALERT. Watch what you are doing and use common sense. Do not use
vacuum cleaner when you are tired, distracted or under the influence of drugs,
alcohol or medication causing diminished control.
NOTE: Use only as described in this manual. Use only
manufacturer's recommended attachments
3
SAVE THESE INSTRUCTIONS / GROUNDING INSTRUCTIONS
This appliance must be grounded. If it should malfunction or breakdown, grounding
provides a path of least resistance for electric current to reduce the risk of electric
shock. This appliance is equipped with a cord having an equipment-grounding
conductor and grounding plug. The plug must be inserted into an appropriate outlet
that is properly installed and grounded in accordance with all local codes and
ordinances.
WARNING
IMPROPER CONNECTION OF THE EQUIPMENT GROUNDING CONDUCTOR CAN
RESULT IN A RISK OF ELECTRIC SHOCK. CHECK WITH A QUALIFIED ELECTRICIAN OR SERVICE PERSON IF YOU ARE IN DOUBT AS TO WHETHER THE OUTLET
IS PROPERLY GROUNDED. DO NOT MODIFY THE PLUG PROVIDED WITH THE
APPLIANCE. IF IT WILL NOT FIT THE OUTLET, HAVE A PROPER OUTLET INSTALLED BY A QUALIFIED ELECTRICIAN.
24. This appliance is for use on a nominal 120-volt circuit.
a). The grounded outlet that looks like the plug illustrated in picture.
b). The customer only needs to plug the grounded plug into the grounded outlet
which could accomplish the grounding.
25. No adaptor should be used with this appliance.
INTRODUCTION
This Wet/Dry Vacuum is intended to household and workshop use. Read this operator’s manual to familiarize yourself with the product features and to understand the
specific usage of your new vacuum
GROUNDING METHODS
GROUNDING PIN
PINTURE A
GROUNDING OUTLET
PINTURE B
Page 4
4
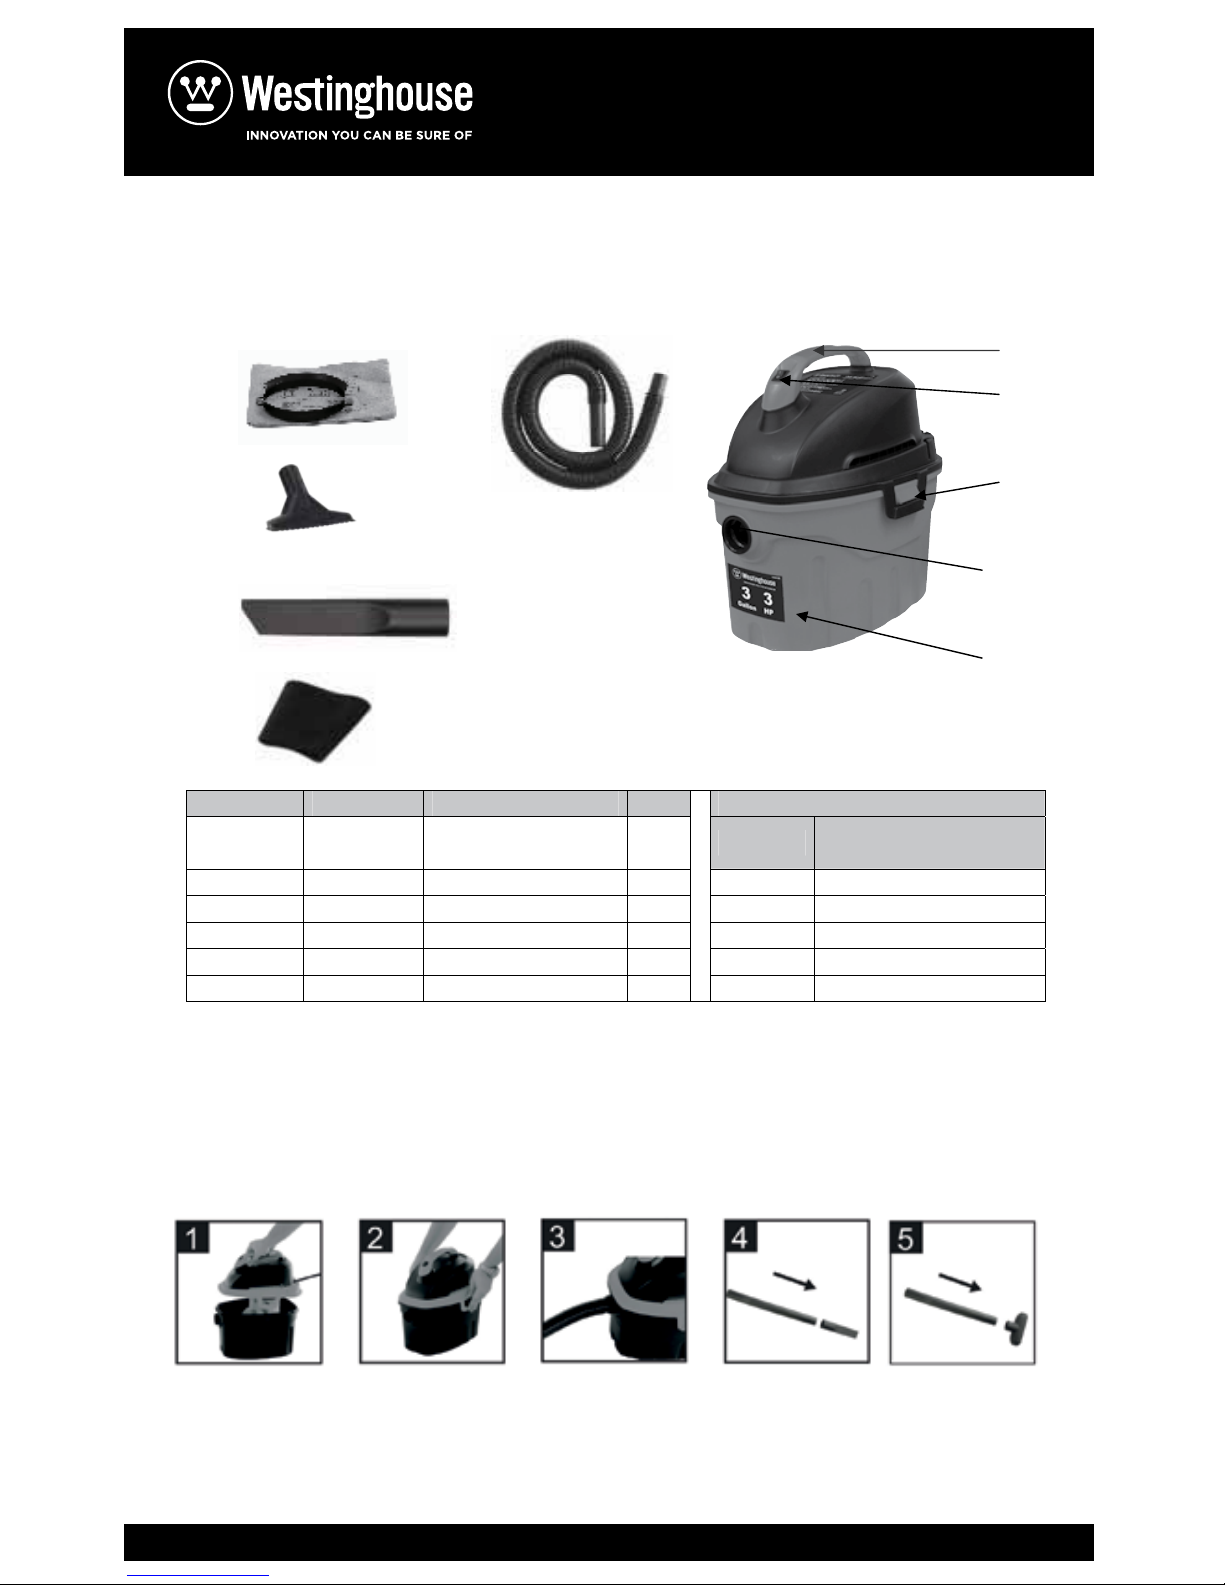
CARTON CONTENTS & CLEANER DESCRIPTION
ATTENTION: Remove contents of carton. Check each item against the Carton
Contents list.
ASSEMBLY INSTRUCTIONS
1. Return tank to its upright position.
2. Install proper filters are installed for your cleaning operation (See Wet Pick-Up or
Dry Pick-Up Operation).
3. Place power head assembly on unit as shown (Picture 1).
4. Push both latches down to lock in place (Picture 2).
5. Insert the flexible hose into inlet of tank (Picture 3).
6. Attach extensions wands and desired cleaning accessory (Picture 4 & 5)
VISTA EXPUESTA- UNIDADES PRINCIPAL
1
2
4
5
3
A
B
C
D
E
Item Part No. Description Qty Cleaner Descrtiption
A 20-1100
Reusable cloth dry filter
& Mounting ring
1
Item Descrtiption
B 13-1588
Gulper nozzle
1
1 Handle grip
C 13-1508
Crevice nozzle
1
2 On/Off switch
D 20-1200
Foam filter
1
3 Two side tabs
E 20-1300
1-1/4’’ Flexible hose
1
4 Vacuum port
5 Dust tank
.
Page 5
5
STORGE
Before storing your vacuum cleaner the tank should be emptied and cleaned. The
power cord can be wound around the housing of the unit for convenience. Cleaner
should be stored indoors.
OPERATION
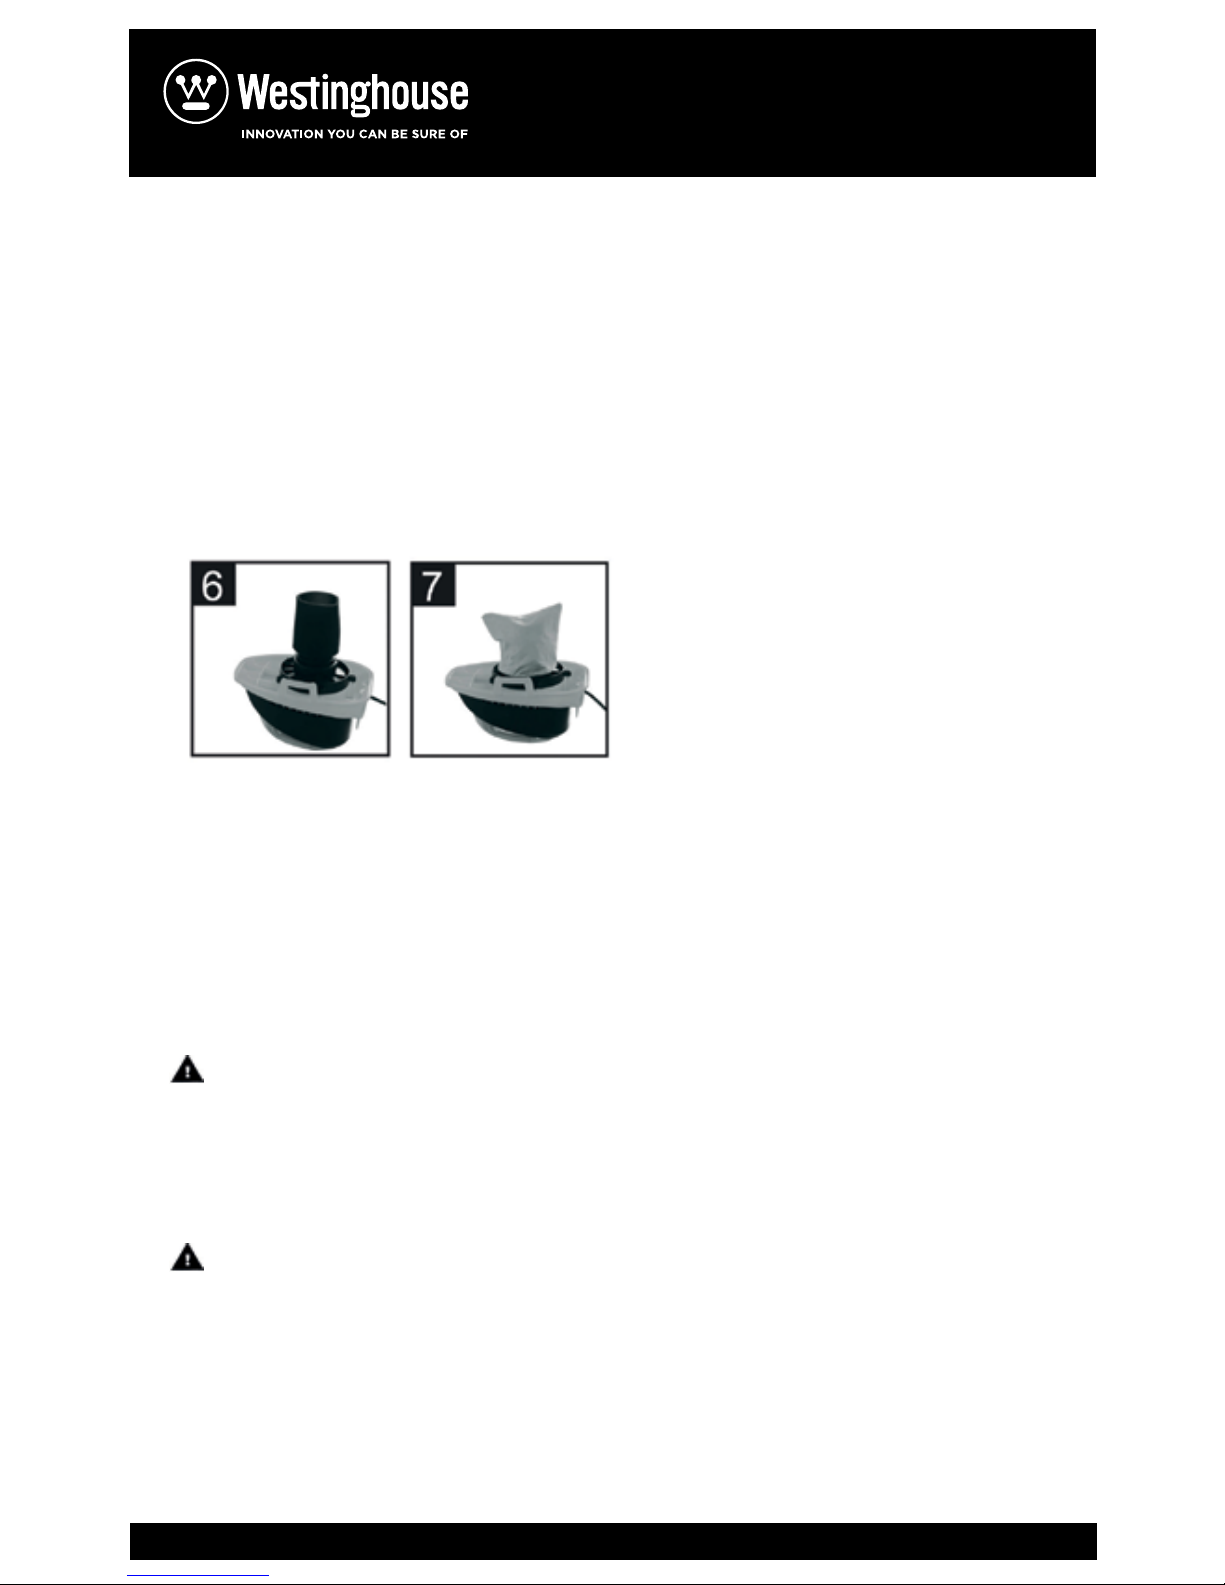
1. Slide foam filter over lide cage (Picture 6).
2. Slide cloth filter over foam filter (Picture 7).
3. If you use your vacuum to pick up dust when the filter is wet, the filter will clog
quickly and be very dicult to clean.
4. Attach power head to the tank and your vacuum is ready to use.
WET PICK-UP
1. Remove cloth filter and only use foam filter to pick up liquids.
2. If misting occurs, empty the tank and allow the filter to dry before continuing use.
3. When finished vacuuming, raise the hose to drain excess liquid into the tank. Interior
of the tank should be cleaned periodically.
4. After using, the foam filter must be dried to reduce the risk of mildew and damage to
the filter.
DRY PICK-UP
EMPTYING LIQUID WASTE FROM TANK
WARNING
TO REDUCE THE RISK OF INJURY, UNPLUG POWER CORD
BEFORE EMPTING THE TANK.
1.Remove power head and pour contents from the tank.
WARNING
TO REDUCE THE RISK OF BACK INJURY OR FALLS, DO NOT
VACUUM IF ITS CONTENTS ARE TOO HEAVY. SCOOP OR DRAIN
ENOUGH OUT TO MAKE THE VACUUM LIGHT ENOUGH TO
LIFT COMFORTABLY.
Page 6
6
AUTOMATIC SHUT-OFF
The cleaner is equipped with an automatic shut-o that operates when picking up
liquids. As the level of the liquid rises, an internal float rises until it seats itself against
a seal at the intake of the motor, shutting o suction. When this happens, the motor
will develop a higher than normal pitch noise. To continue use, empty the liquid waster
from the tank as outlined in the previous paragraph.
NOTE: IF ACCIDENTALLY TIPPED OVER, THE VACUUM COULD CLOSE SUCTION. IF
THIS OCCURS, PLACE VAC IN UPRIGHT POSITION AND TURN SWITCH OFF. THIS
WILL ALLOW THE FLOAT TO RETURN TO ITS NORMAL POSITION, AND YOU WILL
BE ABLE TO CONTINUE OPERATION.
BLOWER FUNCTION
WARNING!
ALWAYS WEAR SAFETY EYEWEAR COMPLYING WITH
ANSI Z87.1 (OR IN CANADA,CSA Z94.3) BEFORE USING ASBLOWER.
WARNING!
TO REDUCE THE RISK OF INJURY TO BYSTANDERS, KEEP THEM CLEAR OF
BLOWING DEBRIS.
ATTENTION!
WEAR A DUST MASK IF BLOWING CREATS DUST WHICH MIGHT BE INHALED.
ATTENTION!
TO REDUCE THE RISK OF HEARING DAMAGE WEAR EAR PROTECTORS WHEN
USING THE VAC/BLOWER FOR EXTENDED HOURS OR WHEN USING IN A NOISY
AREA.
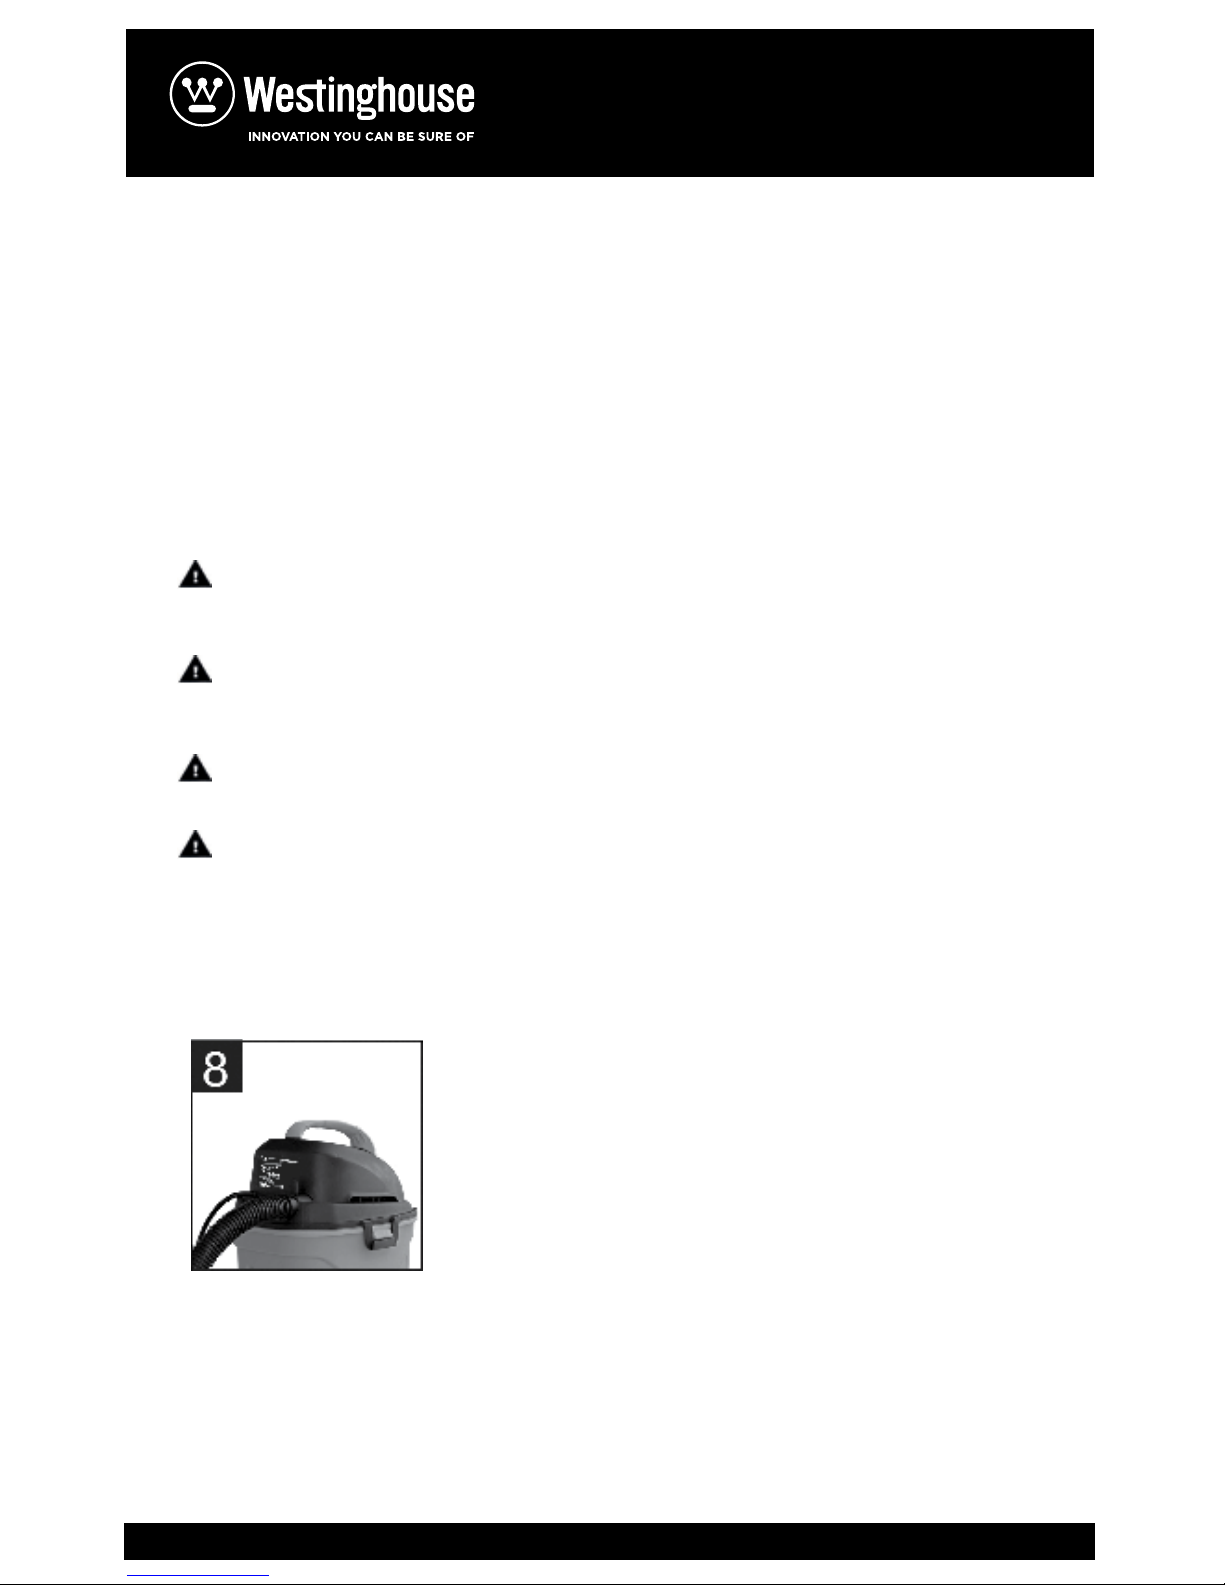
1. This vacuum features a blowing port. It can blow sawdust and other debris. Follow
the steps below to use your vac as a blower.
2. Locate blowing port of your vac(Picture 8).
3. Insert the end of the hose into the blowing port of the vac.
La aspiración está equipada con su sistema de apagado automático que funciona al
aspirar líquidos. Conforme el nivel del líquido aumenta, también lo hace un flotador
interno hasta o llega hasta la marca de la admisión del líquido, desconectando la
succión. Cuando esto suceda, el motor hará un ruido normal más fuerte de lo común.
Para continuar su uso, vacíe residuos líquidos del tanque como se describe en el
párrafo anterior.
NOTA: SI ACCIDENTALMENTE LA ASPIRADORA SE LLEGARA A VOLCAR, PODRÍA
PERDER SUCCIÓN. SI ESTO OCURRE, COLOQUE LA ASPIRADORA EN POSICIÓN
VERTICAL Y APAGUE INTERRUPTOR. ESTO PERMITIRÁ QUE EL FLOTADOR REGRE-
SE A SU POSICIÓN NORMAL, Y USTED PODRÁ CONTINUAR CON TRABAJO.
FUNCIÓN DE SOPLADOR
ADVERTENCIA!
SIEMPRE USE PROTECCION OCULAR DE SEGURIDAD QUE CUMPLA CONLA NORMA
ANSI Z87.1 (O CSAZ94.3 EN CANADÁ,) ANTES DE UTILIZAR LA ASPIRADORA COMO
SOPLADOR.
ADVERTENCIA!
PARA REDUCIRELRIESGODELESIONES A TRANSEÚNTES, MANTÉNGALA LIMPIA DE
DESHECHOS DE SOPLADO.
ATENCIÓN!
USE UNA MÁSCARA PARA POLVO SI EL SOPLADO PRODUCE POLVO QUE PODRÍA
SER INHALADO.
ATENCIÓN!
PARA REDUCIR EL RIESGO DE DAÑOS AUDITIVOS, USE PROTECTORES PARA
OÍDOS AL UTILIZAR LA ASPIRADORA / SOPLADOR DURANTE MUCHAS HORAS O
AL UTILIZARLA EN UN ZONA RUIDOSA
1. Esta aspiradora se caracteriza por una salida de soplado que puede soplar el
aserrín y otros deshechos. Siga los siguientes pasos para utilizar la aspiradora como
soplador.
2. Localice la salida de soplado de la aspiradora (Imagen 8).
3. Inserte el extremo de la manguera en el puerto de soplado de la aspiradora .
Page 7
7
TO REDUCE THE RISK OF INJURY FROM MOVING PARTS AND/OR ELECTRICAL
SHOCK, TURN POWER SWITCH OFF AND DISCONNECT GROUNDED PLUG
FROM ELECTRICAL OUTLET BEFORE PERFORMING TROUBLESHOOTING CHECKS.
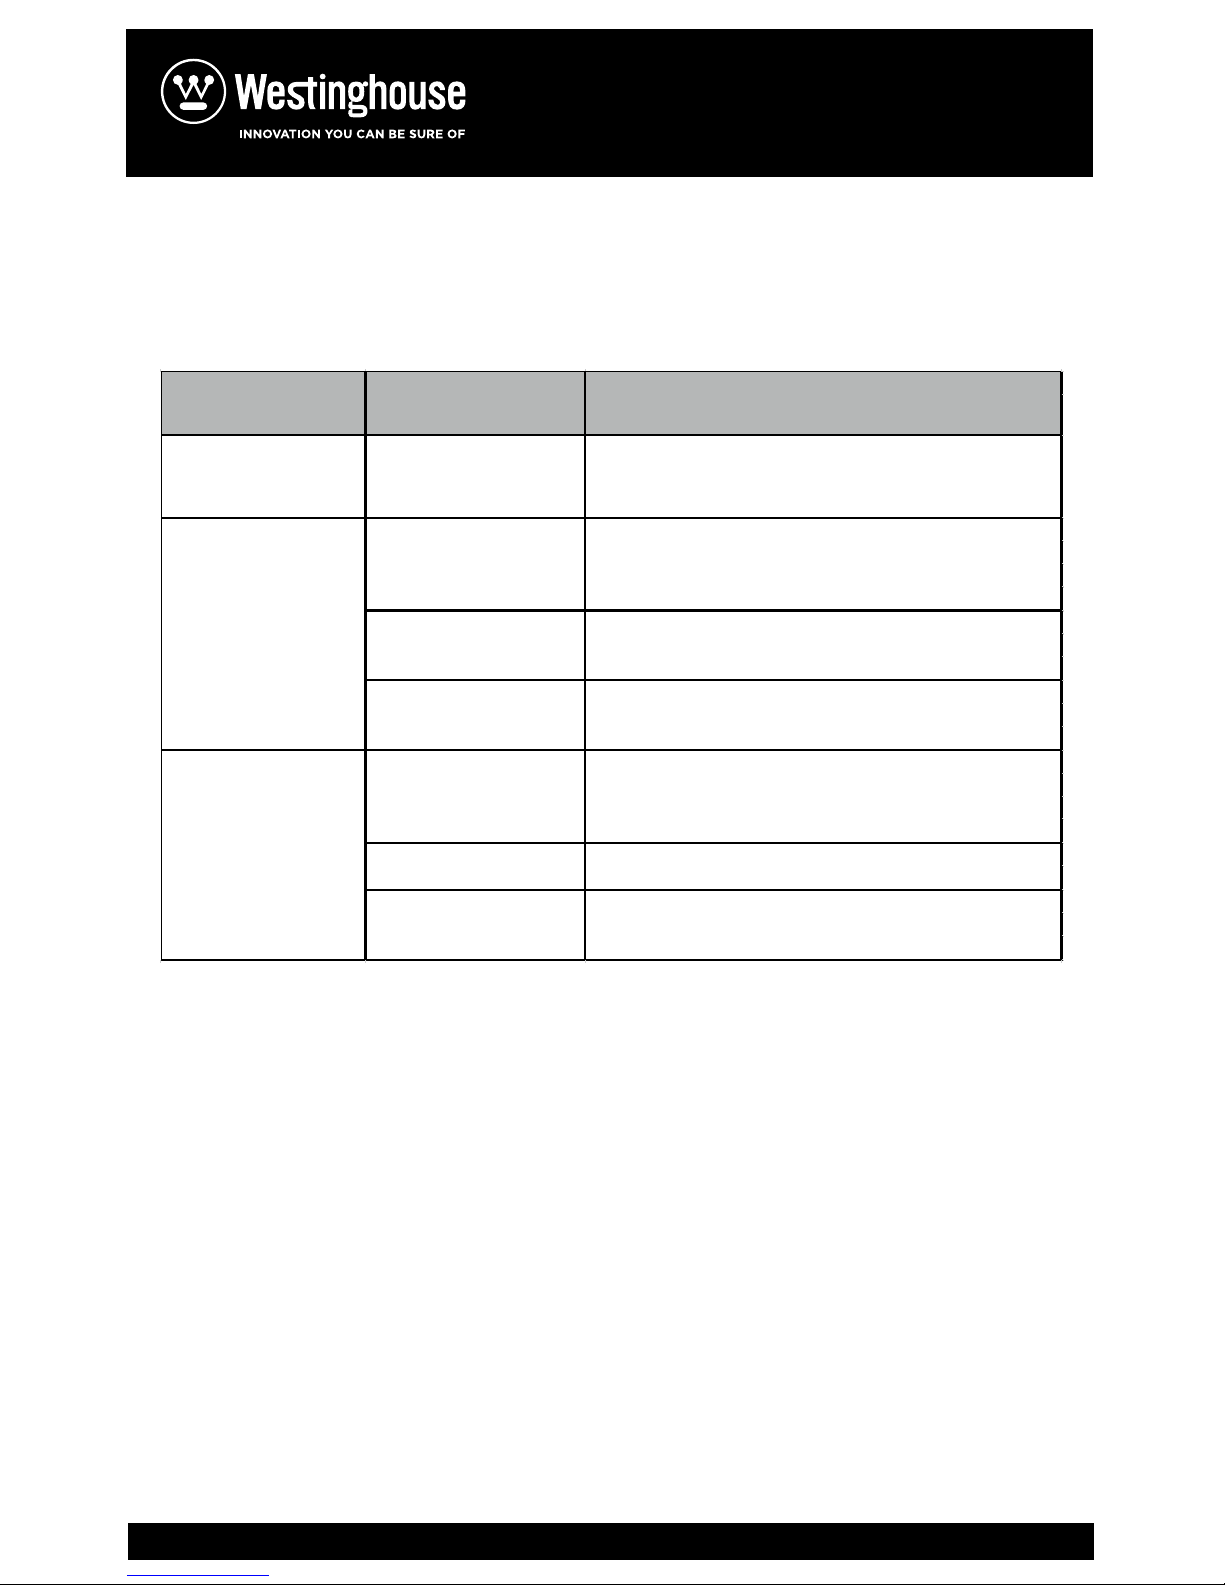
Minor problems often can be fixed without calling Agent Customer Service.
TROUBLESHOOTING
Clogged hose
Clean or replace filter
Loss of suction dry pick-up
SOLUTION
Drain and clean tank
Clogged hose
Clean or replace filter
Loss of suction wet pick-up
Full tank Drain and clean tank
PROBLEM CAUSE
Remove hose and clean
Clogged filter
Remove hose and clean
Clogged filter
Make sure electrical outlet has voltage (A qualified electrician may
need to be contacted)
No electricityVacuum will not run
Full tank
Page 8
8
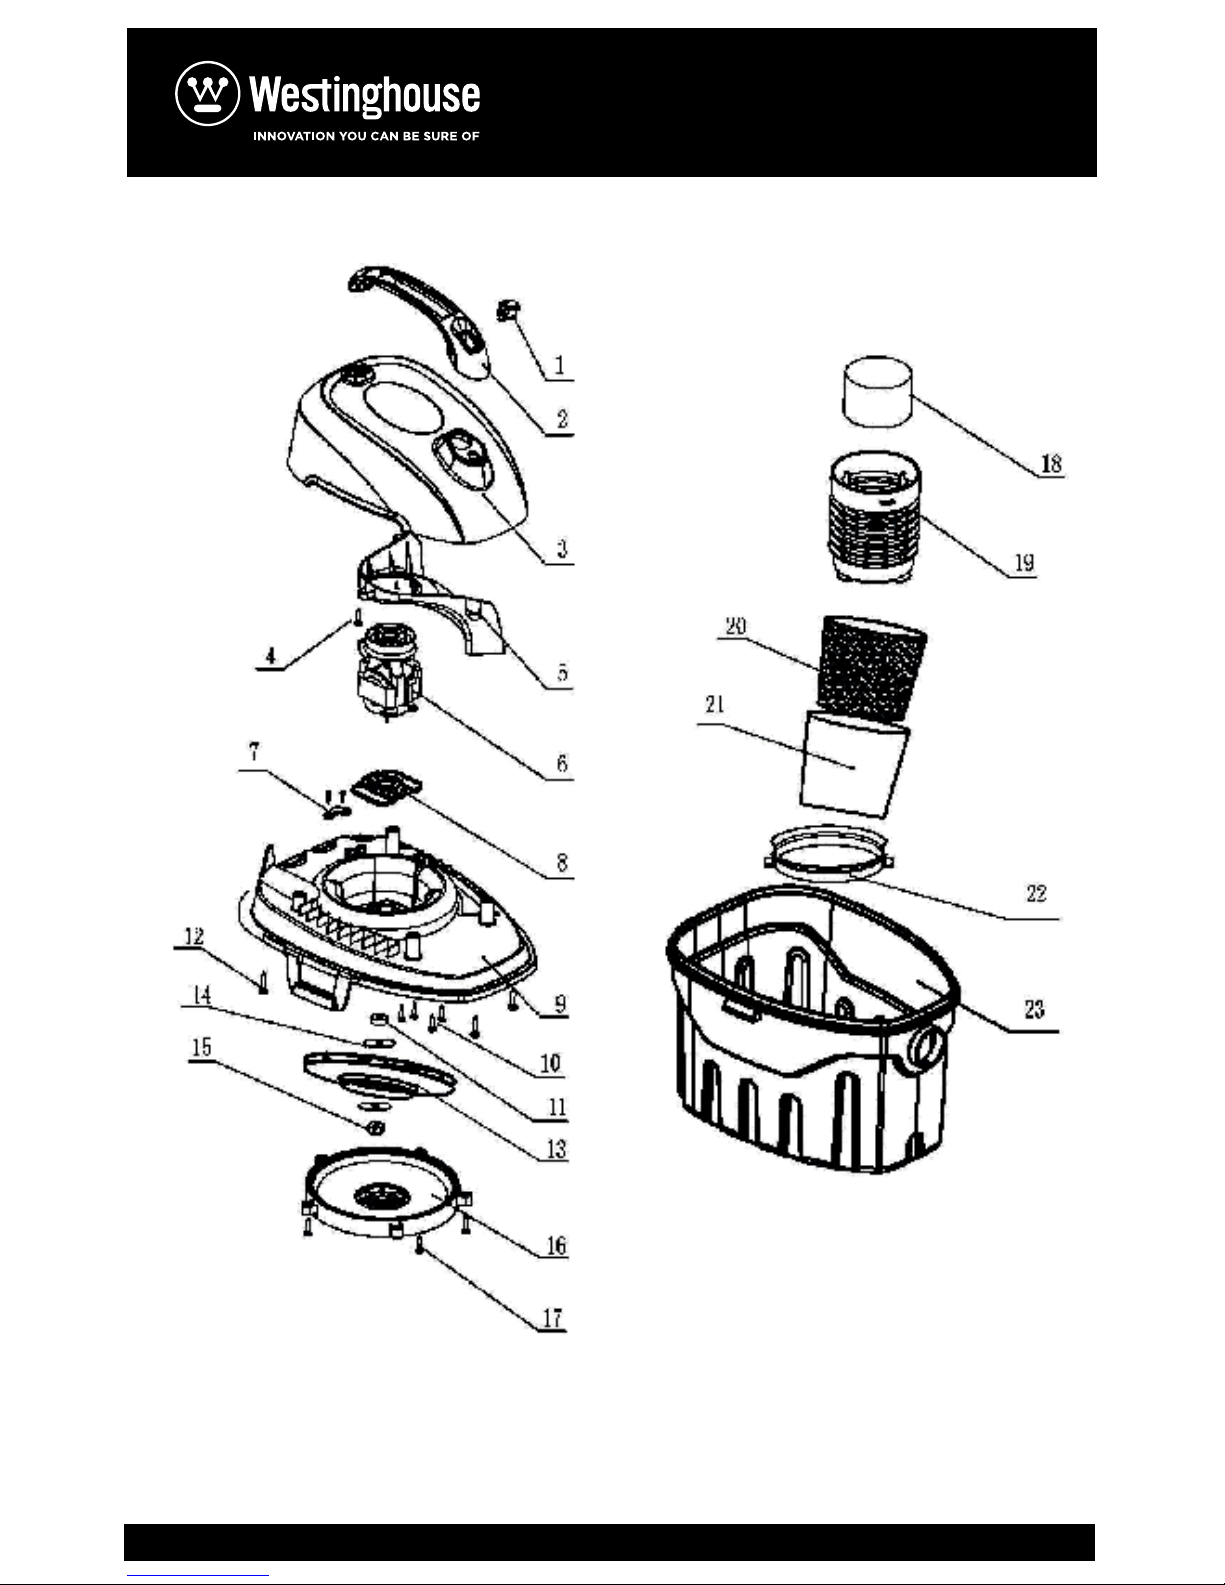
EXPLODED VIEW-MAIN UNIT
CONTENIDO DE LA CAJA Y DESCRIPCIÓN DE LA ASPIRADORA
ADVERTENCIA: Saque los contenidos de la caja. Verifique cada artículo contra la
Lista de Contenido de la Caja.
1. Retorno del depósito a su posición vertical.
2. Instalar filtros adecuados se han instalado para su operación de limpieza
(Verhúmedo Pick-Up o seco Pick-Up de Operaciones).
3.Coloque el conjunto del poder de la cabeza de la unidad como se muestra
(Imagen 1).
4. Empuje los dos pestillos para bloquear en su lugar(Imagen 2).
5. Inserte la manguera flexible en la entrada del tanque (Imagen 3).
6. Adjuntar varitas extensiones y accesorios de limpieza deseada (Imagen 4 y 5)
Artículo
Parte
Número
A 20-1100
B 13-1588
C 13-1508
D 20-1200
E 20-1300
A
B
C
Page 9
9
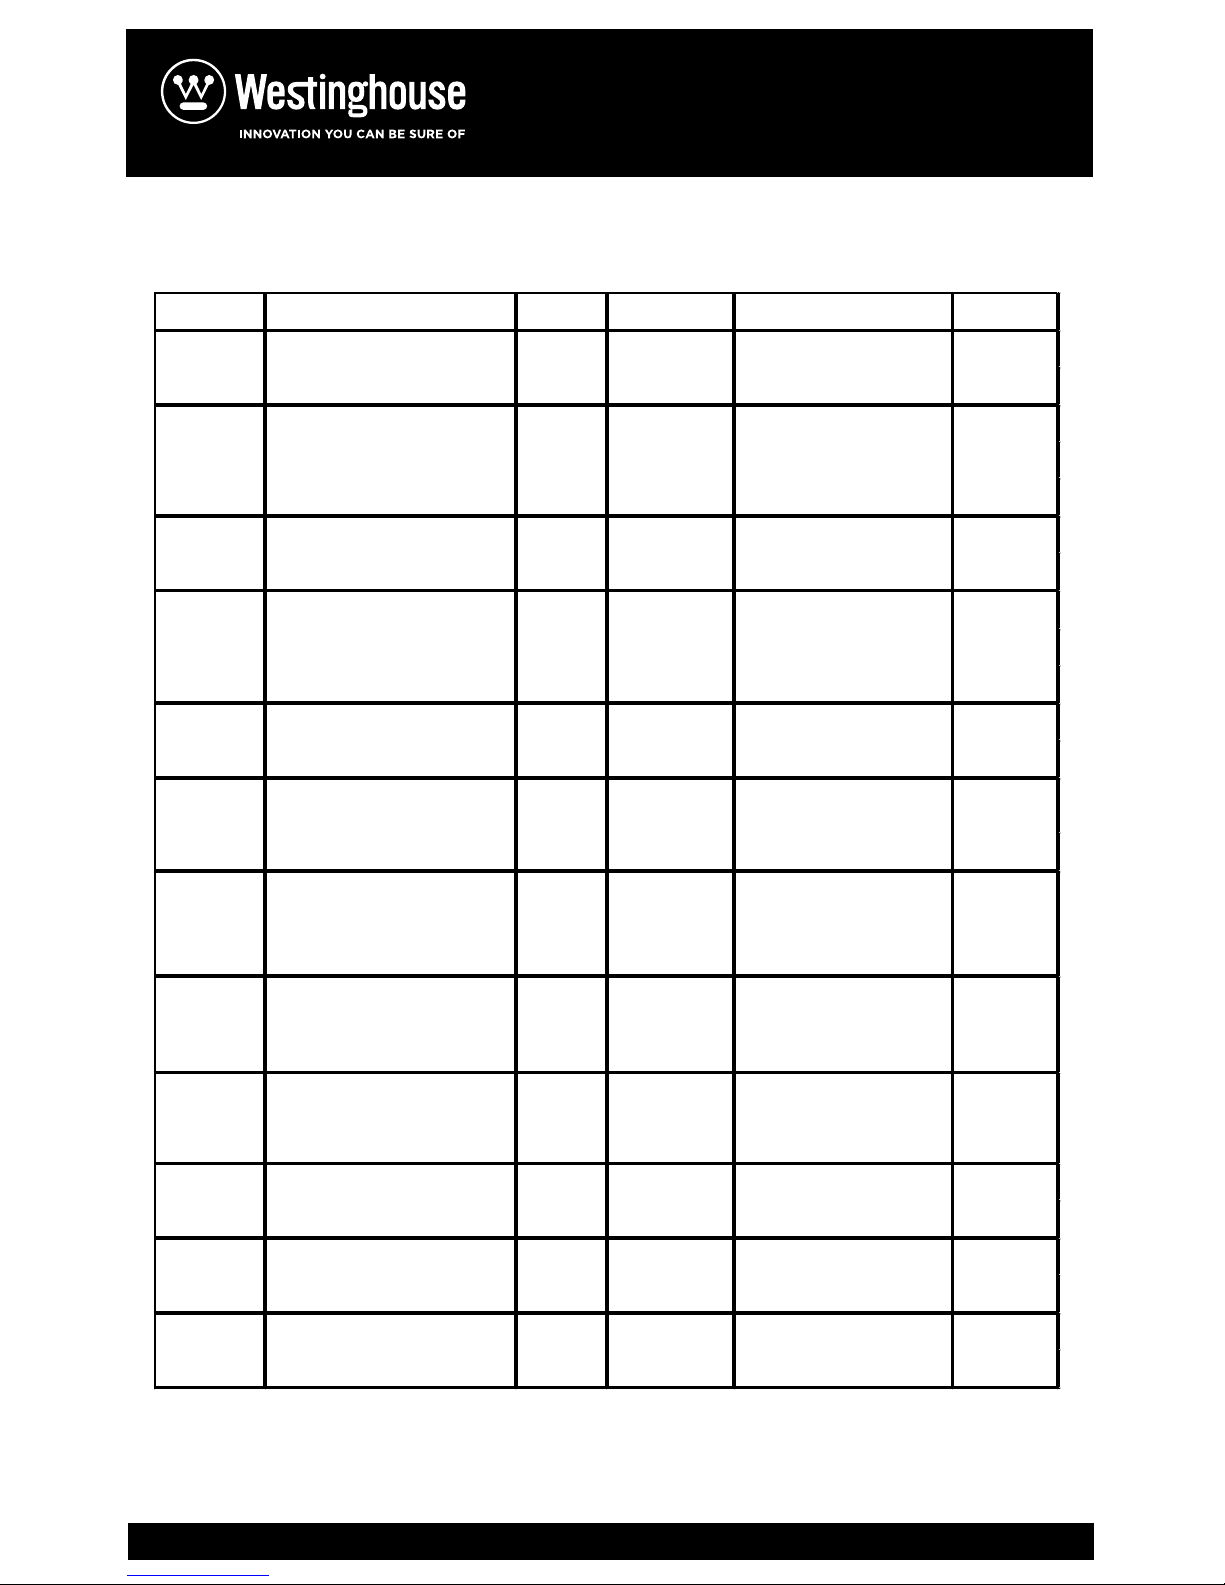
PARTS LIST—MAIN UNIT
ITEM DESCRIPTION QTY ITEM
DESCRIPTION
QTY
1
1
8Screw12
201
1224Screw10
11 Bushing 1 23 1
1917
8
9 1 21 1
5Screw1715
6 1 18 1
4 Screw 1 16
Motor bottom
support
1
12
3 1 15 Nut 1
1 1 13 Impeller 1
Handle 1
Motor support ring Foam filter
Motor base Reusable cloth filter
Clamp ring
Dust tank
Switch
Top cover
Thermal baffle
Motor Float
Holder plate for switch Float holder
14 Washer
Page 10

Note : Read and understand this manual before use.
Keep this manual for future reference.
 Loading...