

Page 1

English
If you have any questions or concerns,
Please call our toll free number
1-866-287-555
Owner’s Record
The model and serial numbers are located on the back of the
TV. Keep a record of the numbers in the spaces provided
below. Refer to them whenever you call upon your
Westinghouse Digital dealer regarding this product.
Model No. __________________________________
Serial No. ___________________________________
Page 2

Contents
ii
English
Welcome 1
1 Product Safety 3
2 INTRODUCTION: THE BASICS 8
3 HDTV/ACCESSORY SETUP 20
4 HDTV OPERATION 27
Package Contents 1
Contacting Westinghouse Digital 1
Important Notice Concerning Power Cord Selection 3
FCC Compliance Statement 4
Product Safety Instructions 4
Important Safety Instructions 5
Other Notices 5
Antenna Installation Safety 7
Outdoor Antenna Grounding 7
Lightning 7
Power Lines 7
Digital Television (DTV) 8
High Definition Television (HDTV) 8
About the Digital Television Picture 8
About Digital Channels 9
Controls and Connections 12
Front View 12
Side Connectors 13
Quick Reference: HDTV Connection 15
Inserting Remote Control Batteries 16
Precaution 16
Remote Control Features 17
Connecting Your HDTV 20
Power 20
Choose Your TV Source 21
Determining Available Channels 22
Set Your Time Zone 23
Connecting Your Personal Computer 24
Computer Settings 24
Connection Types 24
Power 24
Connecting Other Accessories 25
DVD or Game System 25
Video Cassette Recorder (VCR) 25
Cable or Satellite Receiver 26
Audio Equipment 26
About the On Screen Display (OSD) 27
OSD Menus and Features 28
Page 3

iii
List of Speed Keys Menu 28
Video Menu 29
TV Menu 36
Settings Menu (Screen 1) 39
About Parental Controls 41
Settings Menu (Screen 2) 47
5 Appendix 50
42-inch High Definition LCD TV Specifications 50
47-inch High Definition LCD TV Specifications 52
Troubleshooting 54
Cleaning the High Definition LCD TV 56
Wall mount and Base removal for the 42"/47" HD LCD TV57
Safety bracket Options 59
English
Page 4
1
English
Welcome
Congratulations on the purchase of your High Definition LCD TV-and thank you for
choosing Westinghouse. This User Manual was created to ensure simple, safe
setup and use of all the features offered by your new HDTV.
Package Contents
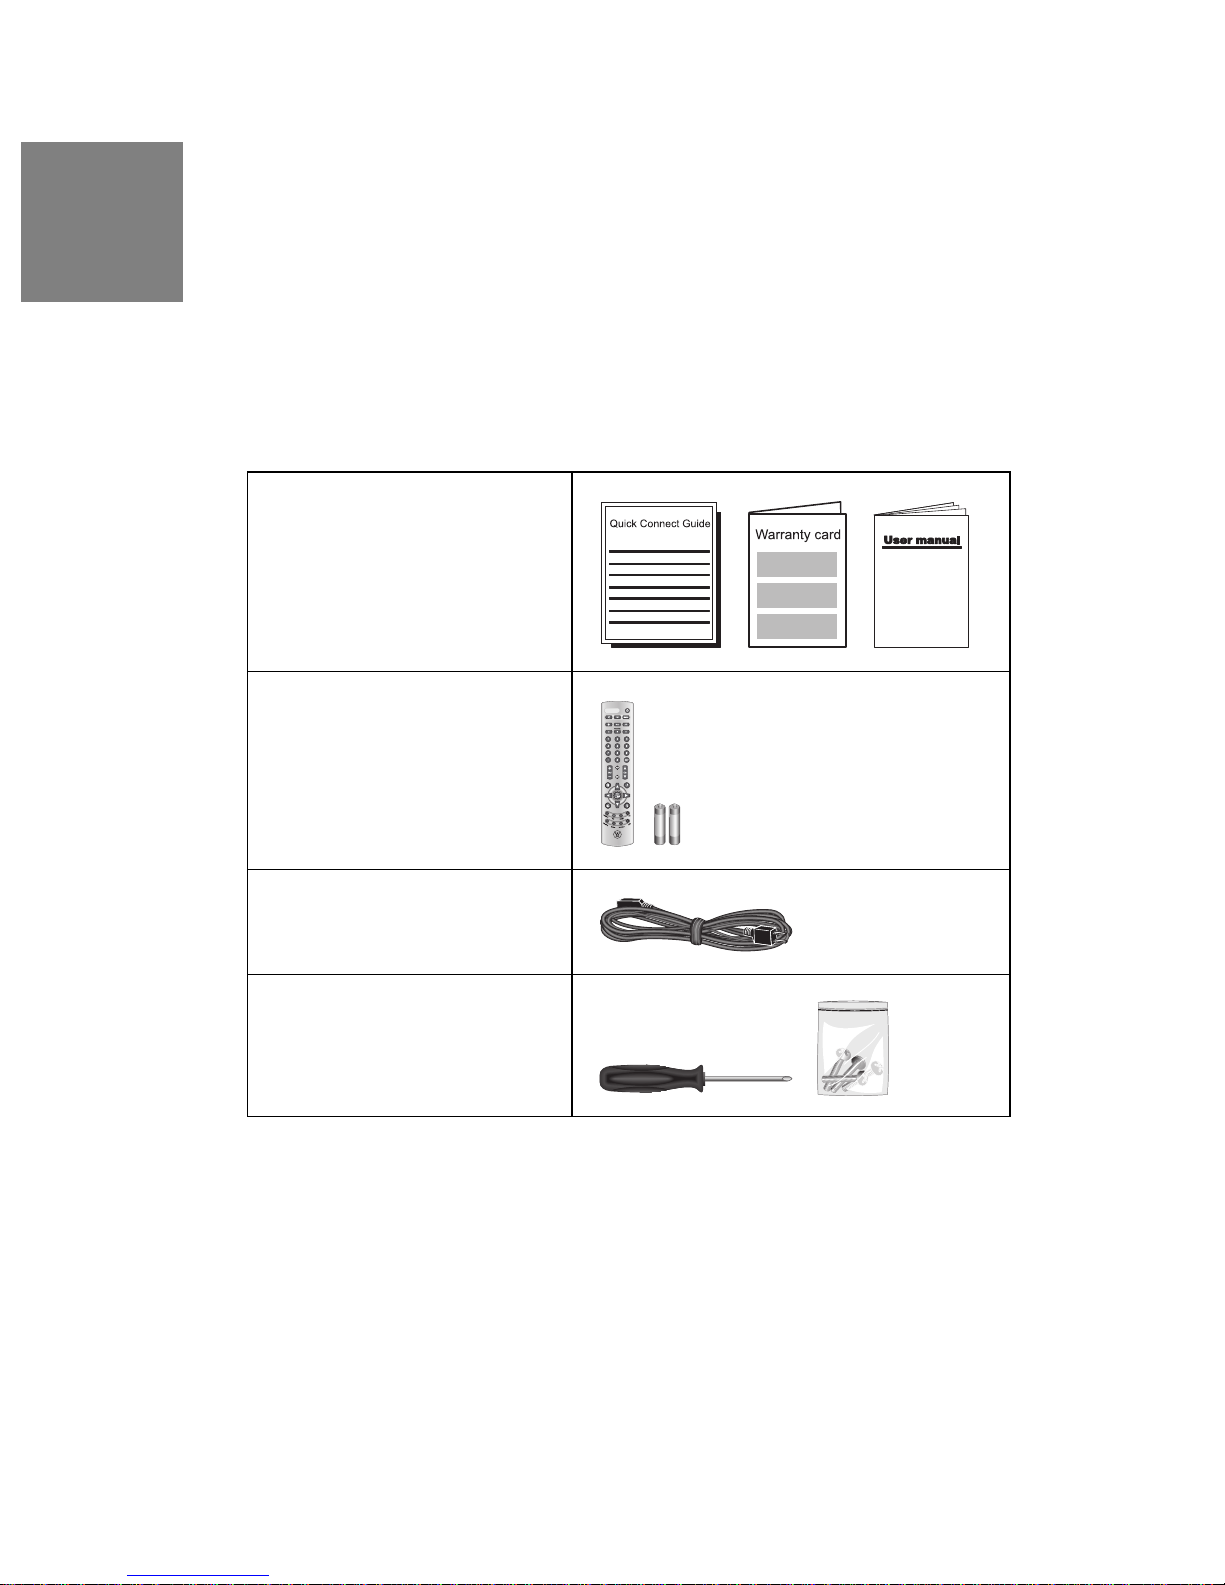
In addition to your new Westinghouse FHDTV and this User Manual, you'll also find
the following:
Quick Setup Guide,
Warranty Card and User
Guide
Remote control and 2 AAA
batteries
AC power cord
Screw driver and 4 screws
(42” model)
Contacting Westinghouse Digital
If you still have questions or require assistance after reading the Quick Setup Guide
and the instructions in this User Manual, please contact Westinghouse Customer
Service at 1-866-287-5555, or visit our Web site at www.westinghousedigital.com.
Don't forget to complete and return your Warranty card or use our online
Product Registration feature. Your Westinghouse HDTV is warranted for
Page 5
2
defects in materials or workmanship for a period of one year from original date
of purchase.
English
Page 6
3
English
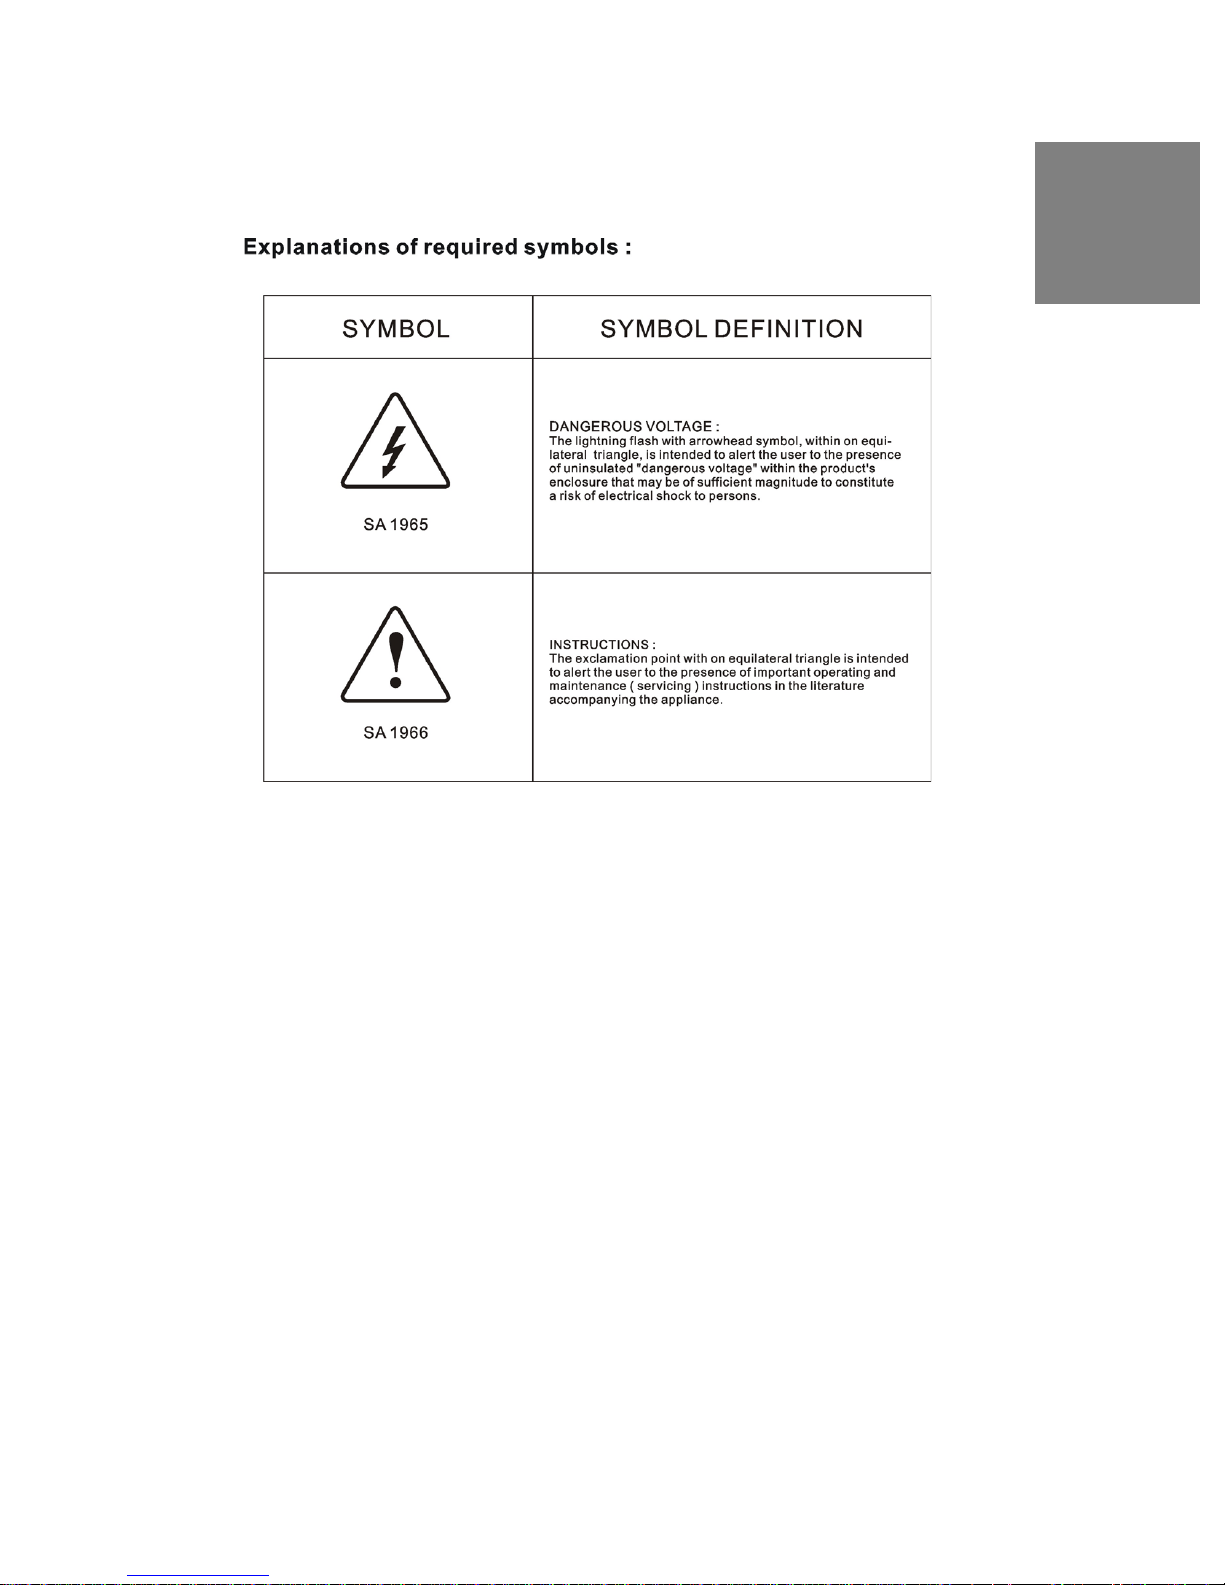
PLEASE READ FIRST:
1 Product Safety
WARNING: This device must be operated with the original power
supply, part number DPS-210 EP 2 C.
Caution: The power supply outlet should be located near High
Definition LCD TV and should be easily accessible. Always use the
appropriate AC cord that is certified for your specific country. Some
examples are listed below:
USA............................................UL Switzerland......................................SEV
Canada...................................CSA Britain......................................BASE/BS
Germany .................................VDE Japan.......Electric Appliance Control Act
Important Notice Concerning Power Cord
Selection
The specific power cord for this High Definition LCD TV is enclosed and has been
selected according to the country of destination and must be used to prevent electric
shock. Use the following guidelines if it is necessary to replace the original cord set,
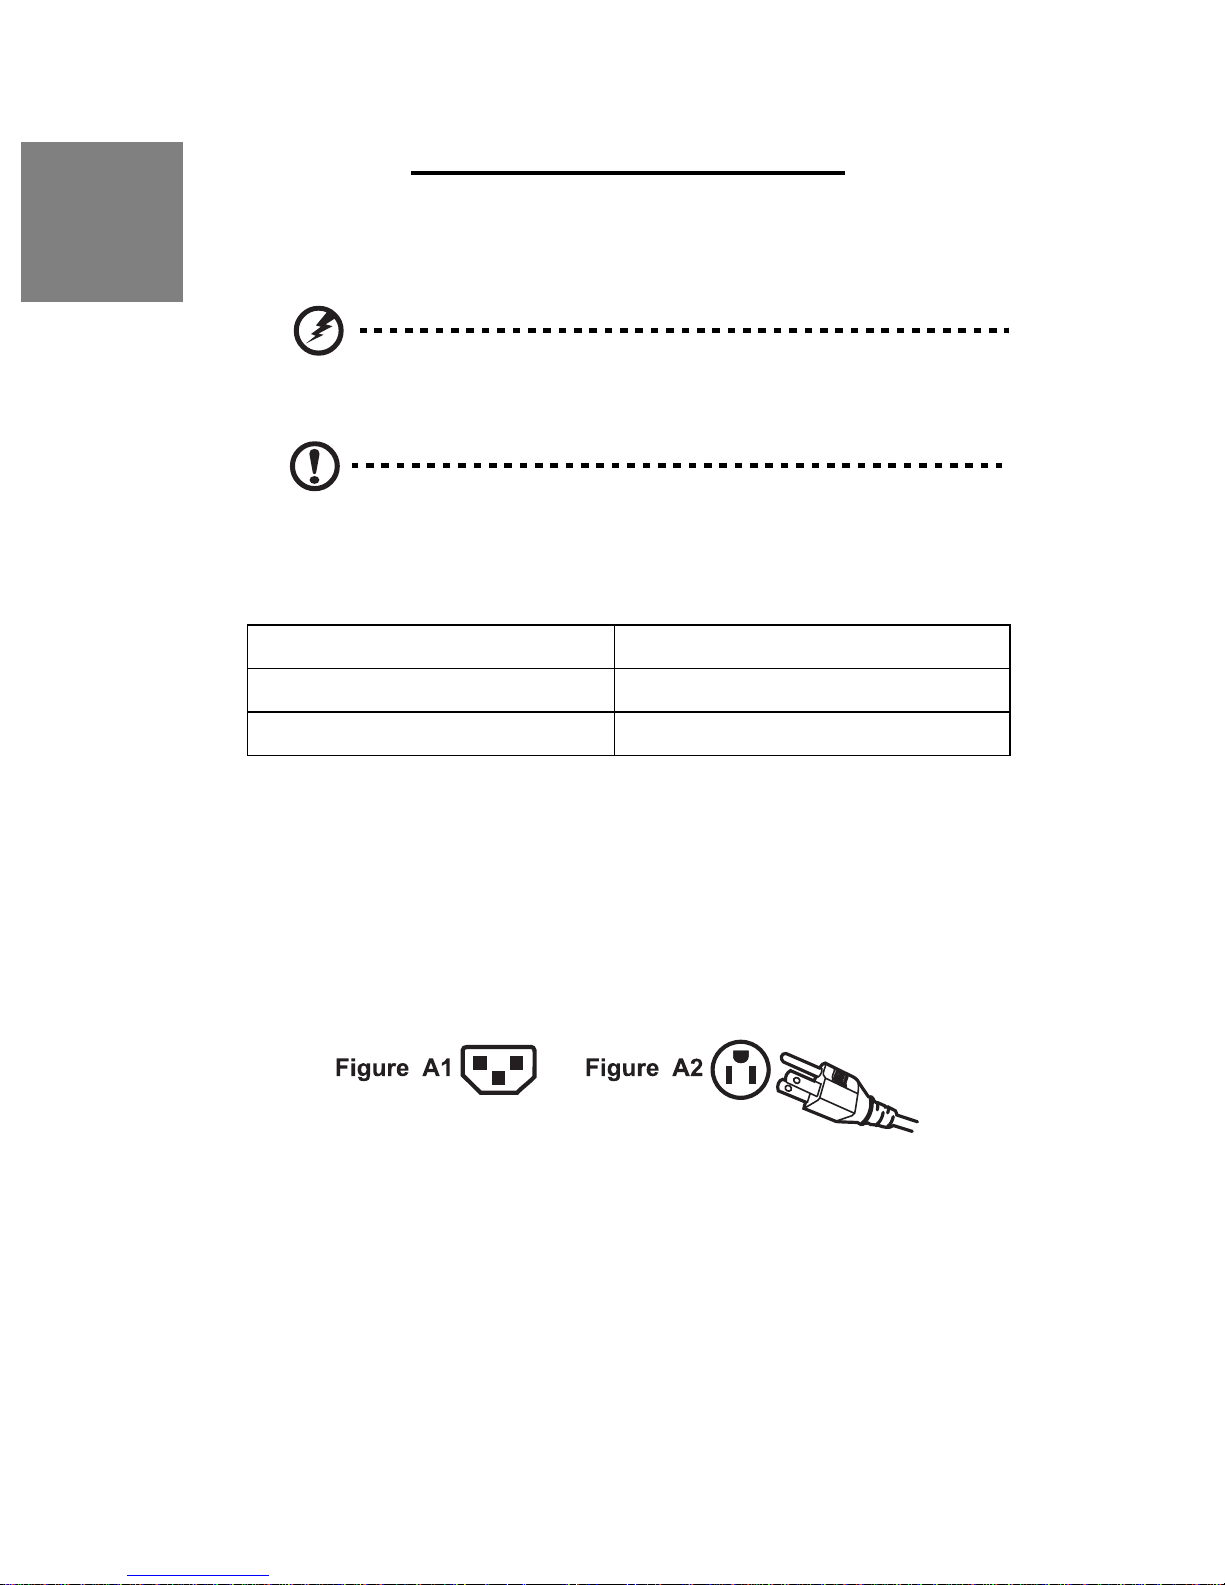
or if the cord set is not enclosed. The female receptacle of the cord set must meet
IEC-60320 requirements and should look like Figure A1 below:
For the United States and Canada
In the United States and Canada the male plug is a NEMA5-15 style (Figure A2), UL
Listed, and CSA Labeled. For High Definition LCD TVs that are placed on a desk or
table, type SVT or SJT cord sets may be used. For High Definition LCD TVs placed
directly on the floor, only SJT type cord sets may be used. The cord set must be
selected according to the current rating for the High Definition LCD TV. Please
Page 7
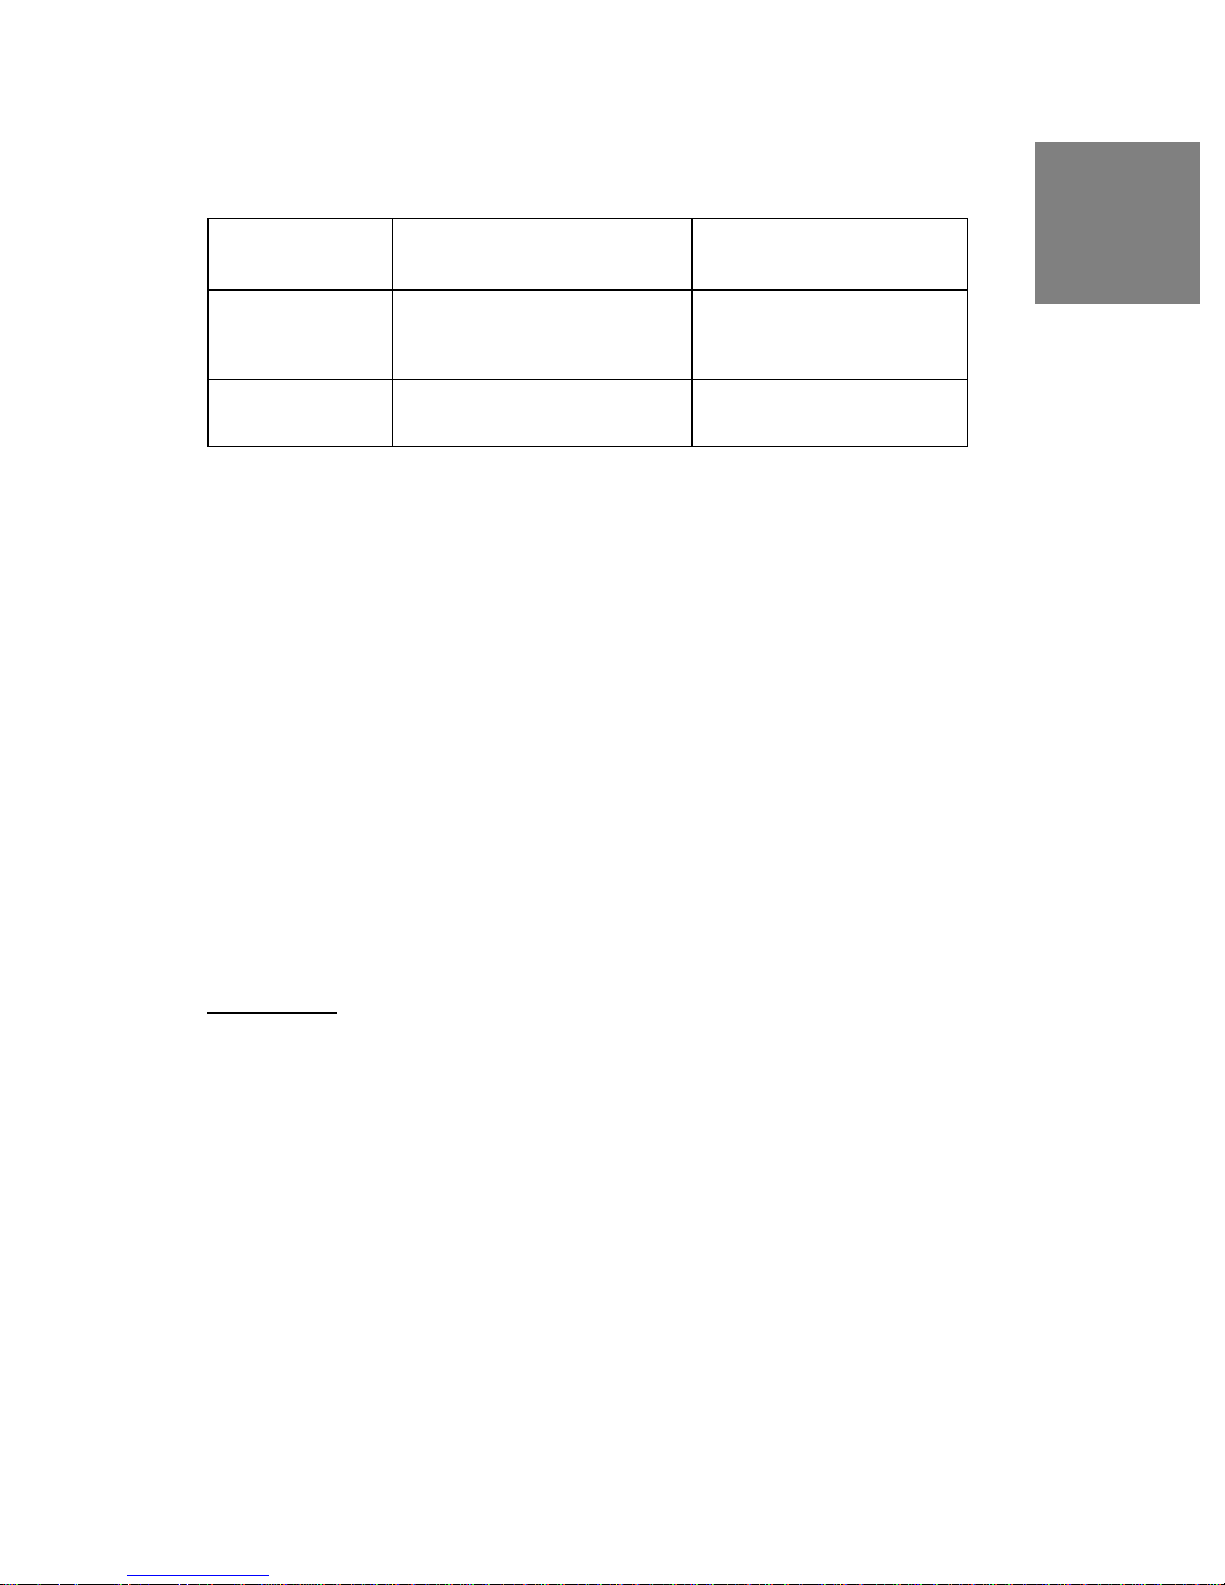
4
consult the table below for the selection criteria for power cords used in the United
States and Canada.
Cord Type Size of Conductors in Cord
SJT 18 AWG
16 AWG
14 AWG
SVT 18 AWG
17 AWG
Maximum Current Rating
of Unit
10 Amps
12 Amps
12 Amps
10 Amps
12 Amps
FCC Compliance Statement
This equipment has been tested and complies with the limits for a Class B digital
device, pursuant to part 15 of the FCC Rules. These limits are designed to provide
reasonable protection against harmful interference in a residential installation. This
equipment generates, uses, and can radiate radio frequency energy, and may cause
harmful interference to radio communications if not installed and used in accordance
with the instructions. However, there is no guarantee that interference will not occur
in a particular installation. If this equipment does cause harmful interference to radio
or television reception, which can be determined by turning the equipment off and
on, the user is encouraged to try to correct the interference by one or more of the
following measures:
• Reorient or relocate the receiving antenna.
• Increase the separation between the High Definition LCD TV and receiver.
• Connect the equipment into an outlet on a circuit different from that to which the
receiver is connected.
• Consult the Westinghouse Service Center or an experienced radio/TV
technician for assistance.
English
FCC Warning
To assure continued FCC compliance, the user must use a grounded power
supply cord and the provided shielded video interface cable with bonded
ferrite cores. If a BNC cable is used, use only a shielded BNC (5) cable. Also,
any unauthorized changes or modifications not expressly approved by
Westinghouse Digital will void the user's authority to operate this device.
Product Safety Instructions
Follow and obey all warnings and instructions marked on the High Definition LCD
TV. For your safety, please read all of the following safety and operating instructions
before you operate the High Definition LCD TV-and keep this User's Manual for
future reference.
Page 8

5
English
Important Safety Instructions
1 Never use your HDTV near water.
2 Clean only with dry cloth.
3 Never block any ventilation openings; install in accordance with the
manufacturer's instructions.
4 Do not install near any heat sources such as radiators, heat registers,
stoves or any other equipment (including amplifiers) that produce heat.
5 Take care to maintain the safety purpose of the polarized or grounding
type plug. A polarized plug has two blades with one wider than the
other. A grounding type plug has two blades and a third grounding
prong. The wide blade or the third prong are provided for your safety;
therefore, if the provided plug does not fit into your outlet, do not alter
the plug in any way to fir; consult an electrician for replacement of the
obsolete outlet.
6 Ensure the power cord is protected from being walked on or pinched,
particularly at plugs, convenience receptacles and the point where
they exit from the apparatus.
7 Only use attachments/accessories specified by the manufacturer.
8 Use only with the cart, stand, tripod, bracket, or table specified by the
manufacturer, or sold with the apparatus. When a cart is used, use
caution when moving the cart/apparatus combination to avoid the
potential for injuries caused by tipping over.
9 Unplug this apparatus during lightning storms or when unused for long
periods of time.
10 Refer all servicing to qualified service personnel. Servicing is required
when the apparatus has been damaged in any way, such as: damage
to the power supply cord or plug; liquid has been spilled into-or objects
have fallen onto-the apparatus; the apparatus has been exposed to
rain or moisture and does not operate normally, or it has been
dropped.
Other Notices
• Avoid exposing the High Definition LCD TV to direct sunlight or high
temperatures.
Page 9

6
• Avoid exposing the High Definition LCD TV to moisture or high humidity.
• Do not attempt repairs yourself. Your warranty does not cover repairs or
attempted repairs by anyone not authorized by the manufacturer.
• If your High Definition LCD TV will not be used for a long period of time, unplug
your HDTV and remove the batteries from the remote control.
• Only use attachments/accessories specified by the manufacturer.
• Avoid touching the screen. Skin oils are difficult to remove.
• Never remove the rear cover. Your High Definition LCD TV contains highvoltage parts. You may be seriously injured if you touch them.
• Always handle your LCD display with care when moving it.
• If the High Definition LCD TV emits smoke, abnormal noise, or a strange odor,
immediately turn it off and contact the Westinghouse Service Center.
English
Page 10
7
English
Antenna Installation Safety
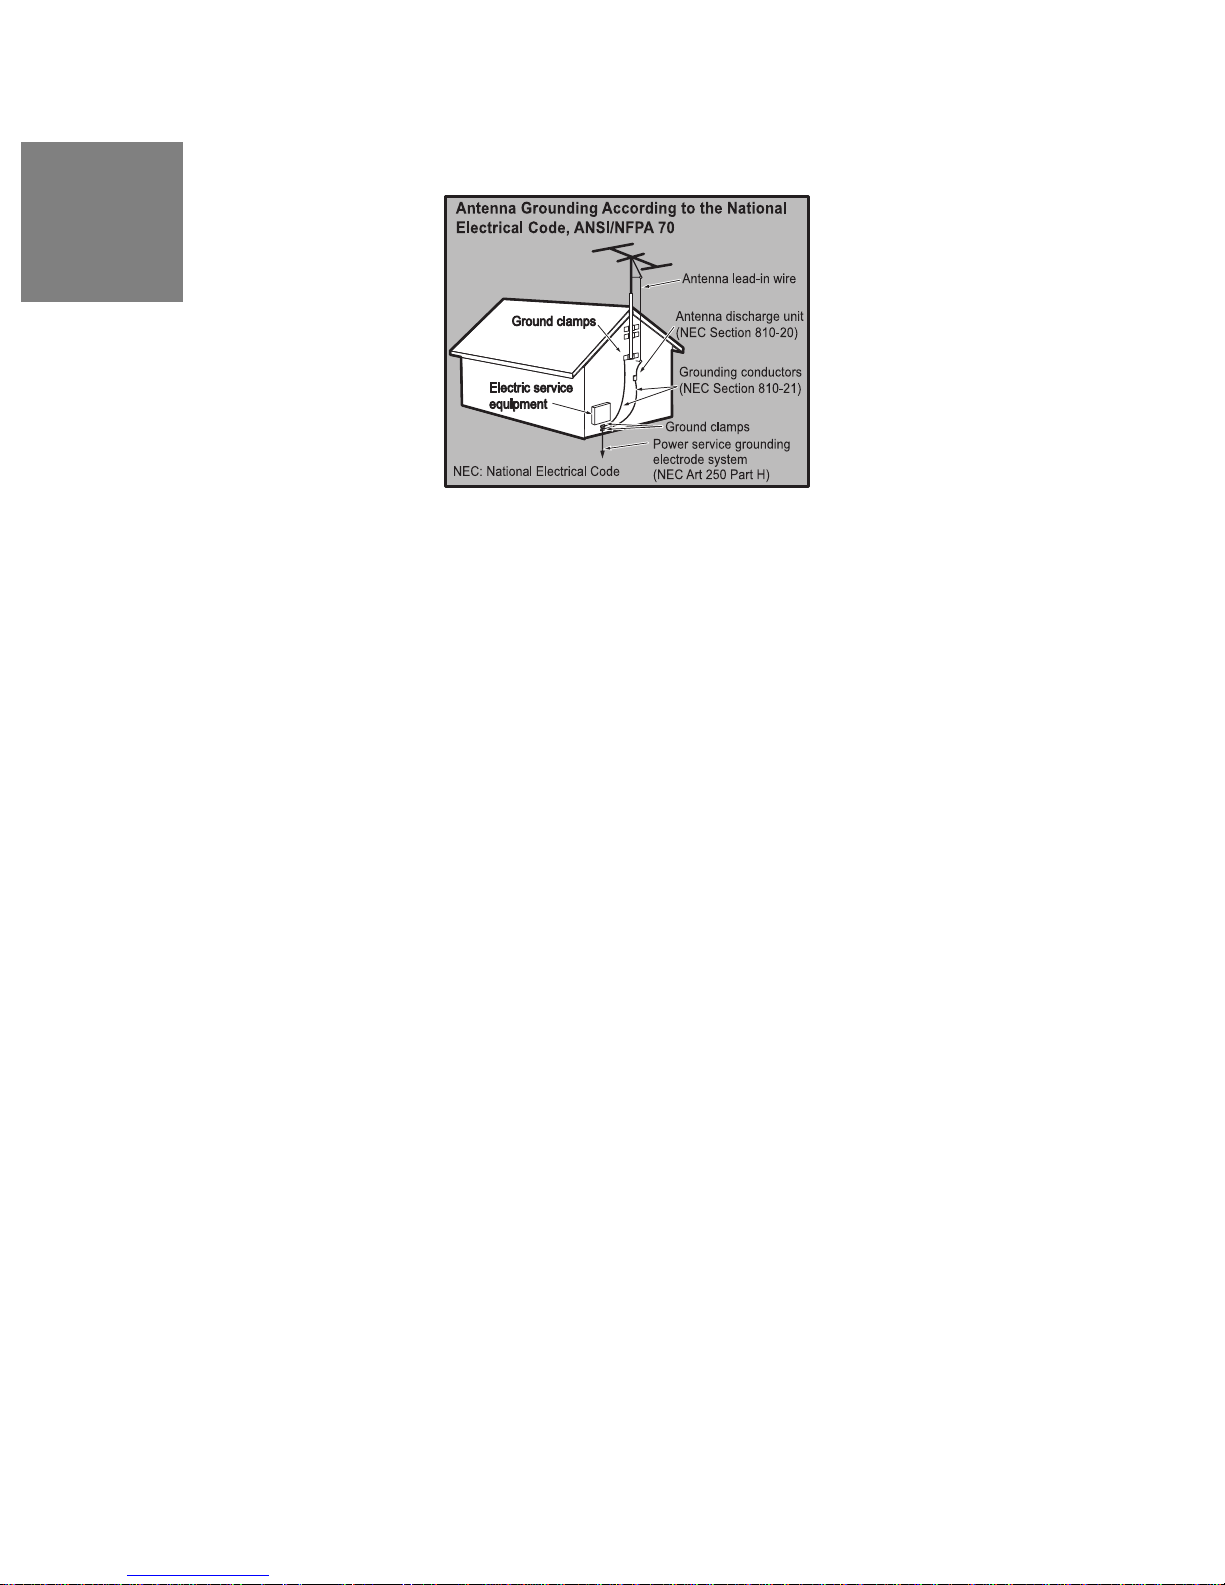
Outdoor Antenna Grounding
If an outside antenna or cable system is connected to the High Definition LCD TV,
be sure the antenna or cable system is grounded to prevent voltage surges and
built-up static charges. Article 810 of the National Electrical Code, ANS/NFPA 70,
provides information on proper grounding of the mast and supporting structure,
grounding of the lead-in wire to an antenna discharge unit, connection to grounding
electrodes, and requirements for the grounding electrode.
Lightning
For added protection for the High Definition LCD TV during a lightning storm, or
when it is left unattended and unused for long periods of time, unplug it from the wall
outlet and disconnect the antenna or cable system. This will prevent damage to the
High Definition LCD TV due to lightning and power-line surges. Do not disconnect
the antenna or the power cord during a heavy storm-lightning may strike while you
are holding the cable cord, causing serious injury. Turn off your High Definition LCD
TV and wait for the weather to improve.
Power Lines
An outside antenna system should not be located in the vicinity of overhead power
lines or other electric light or power circuits. When installing an outside antenna
system, extreme care should be taken to keep from touching such power lines or
circuits.
Page 11

8
2 INTRODUCTION: THE BASICS
Digital Television (DTV)
Television broadcasting is changing. By February of 2009, traditional analog TV
transmissions (the standard since TV's inception) will cease to exist, in compliance
with a federal mandate requiring all U.S. television stations to convert from analog to
the new digital television (DTV) standards.
In contrast to the magnetic waves used for analog transmission (also known as
NTSC, short for National Television Standards Committee), DTV transmits images
and sound as data, using ones and zeroes, the same digital code computers use. As
a result of this increased efficiency, DTV offers an array of benefits including
dramatic improvements to picture and sound quality. In addition, DTV allows the
same number of stations to broadcast using fewer channels, freeing parts of the
broadcast spectrum for other uses, such as public safety and wireless services
Note: DTV should not be confused with digital cable or digital
satellite systems. While these systems receive digital signals, the
signals are converted to analog for display on channel 3 or 4 of an
analog TV.
English
High Definition Television (HDTV)
The most common DTV formats are Standard Definition Television (SDTV) and High
Definition Television (HDTV). Of the two, HDTV delivers digital broadcasting's
highest resolution and picture quality. HDTV also uses a "widescreen format," which
refers to the aspect ratio (screen width vs. height) of the image. To put this in
perspective, analog television uses a 4 x 3 aspect ratio; HDTV's aspect ratio is 16 x
9, creating a more cinematic-like viewing experience. Plus HDTV increases the
number of horizontal scan lines on the screen, enabling it to render greater picture
detail. And, while HDTV uses approximately the same bandwidth, it transmits
approximately six times more information, further enhancing video and audio clarity.
About the Digital Television Picture
Your new Westinghouse High Definition LCD TV has a built-in HDTV/NTSC tuner,
meaning it can receive both analog and digital broadcasts from your antenna, cable
or satellite service. But because not all broadcasters have converted to the new DTV
standards, it's important to understand some fundamentals of the digital television
picture.
The elements that make up onscreen images are pixels. The more pixels, the more
detail, because the number of pixels determines picture resolution-and HDTV offers
Page 12
9
English
the highest pixel count and best resolution available. HDTV resolution is available in
both 720p and 1080i formats. The "p" and "i" refer to the scanning method used to
deliver the lines of resolution on the screen. Progressive "p" scanning means that
pixels on the screen are refreshed simultaneously, with each scan showing every
line for a complete picture at 1/60th of a second. Interlaced "i" scanning refreshes
pixels by alternating first, by showing every odd line, then following with the even
lines-for a complete picture at 1/30th of a second.
True high definition image quality is possible only with a true high definition displayand a 720p or 1080i signal coming into your HDTV. Lower resolution images from
analog broadcasts or VHS recordings, for example, may result in disappointing
picture quality as they simply don't have enough detail to display well in highdefinition. If you have cable or satellite service, you'll want to check with your
provider to determine which packages include stations broadcasting in high
definition, and if you need a different box or tuner to receive HDTV signals. You may
also find the "Aspect Ratio" feature found in the On Screen Display Menu's "Display"
option helpful in adjusting your picture. And, as more and more broadcasters change
to a digital signal, you will be able to view all of your programming choices in
stunning high definition-and the luxury of your personal home theater experience.
About Digital Channels
Currently, all broadcasters have an analog TV channel and a digital TV channel. The
digital bandwidth has the capability of accommodating more than one program
stream because each broadcaster's assigned digital channel carries a 19.39megabit-per-second (Mbps) digital data stream. This allows the broadcaster the
option of broadcasting a single program or dividing the digital data stream into
multiple programming streams. These streams include the "major" channel specific
to a broadcasting station, as well as any additional programming streams on the
bandwidth, which are referred to as "minor channels" or "sub-channels," each
broadcasting a different program. As a result, the numbering system for digital
channels is different than that of traditional analog TV.
Here's how it works:
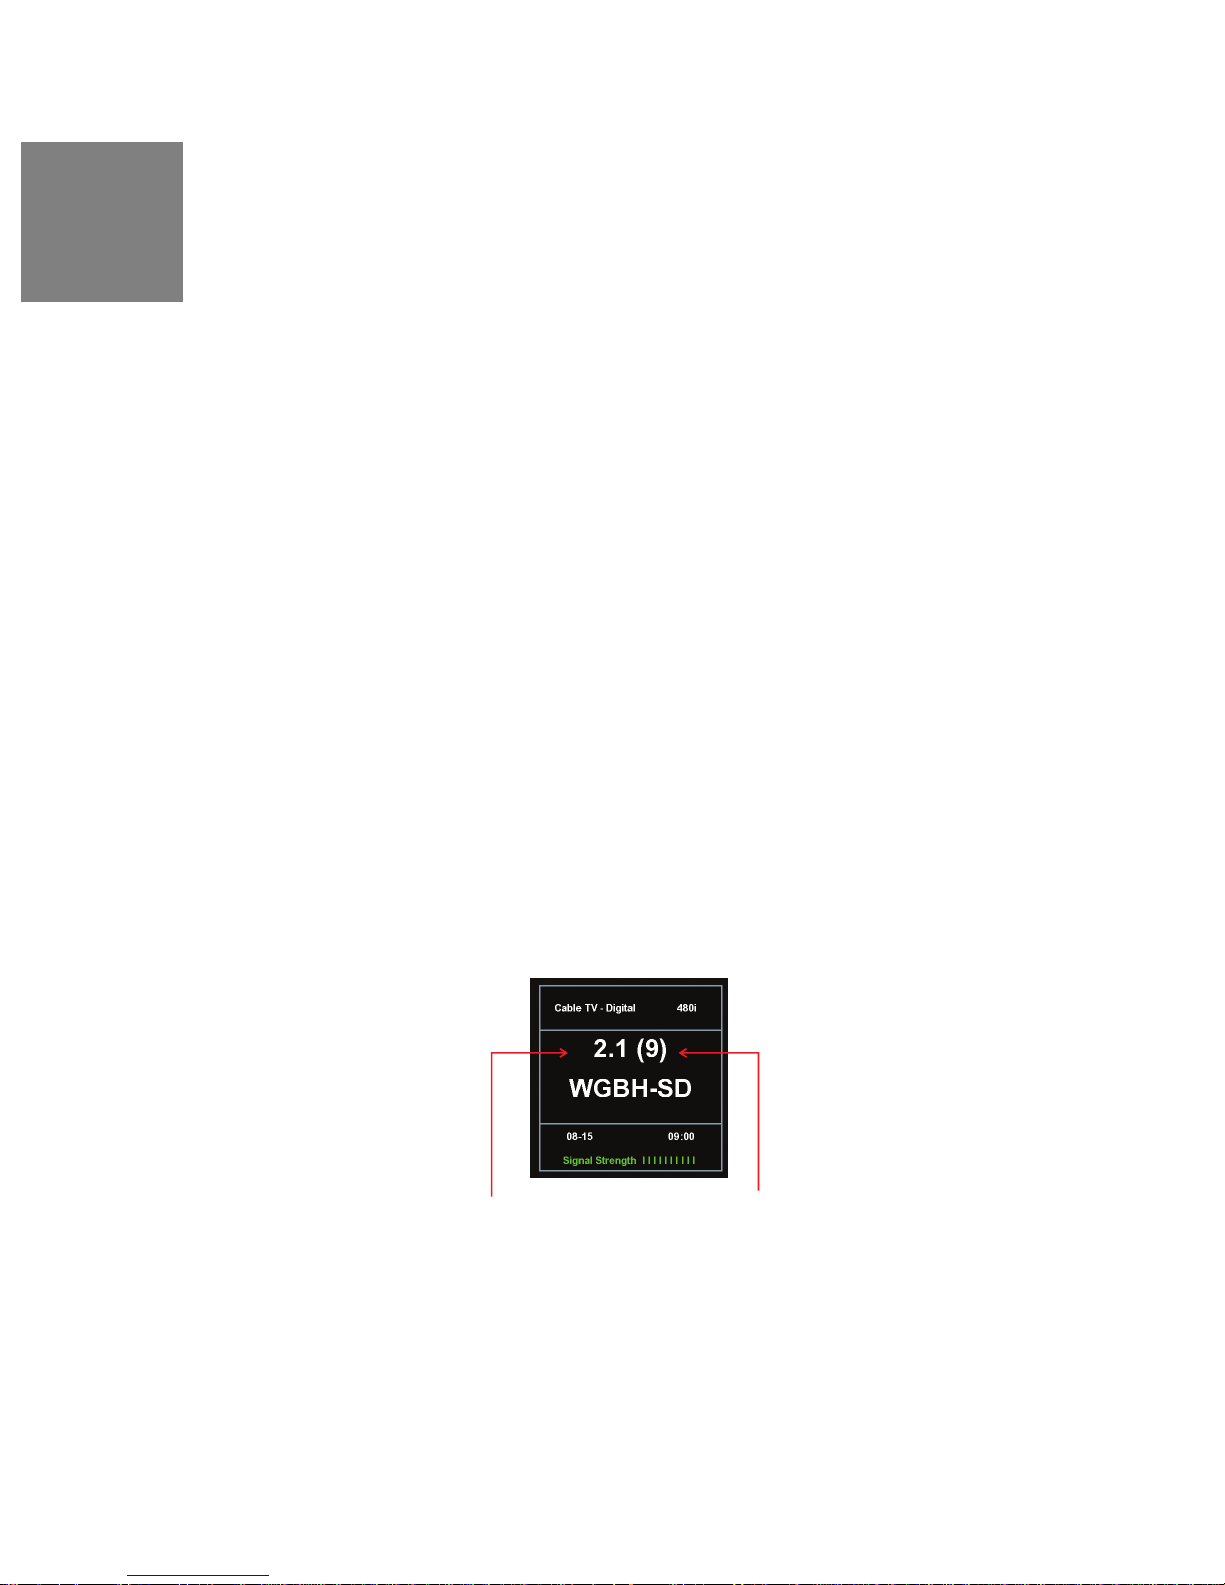
• The number in parentheses to the right is the actual physical channel number
of the transmitter used to broadcast the network programming in your region
• Each physical channel is mapped to one or more digital channel numbers,
known as "virtual channels," and represented by a number, followed by a dot
Digital Virtual Channel Number
Physical Channel Number
Page 13
10
and then another number; for example, 7.1, 7.2, etc. (the old analog channel is
always referenced to minor channel "0", as in 7.0, while 7.1 would represent the
new digital television channel)
• The first number is the major channel used for all channels of a
particular broadcasting station
• The number following the dot is the minor channel number
assigned to each broadcaster's additional programming streams;
digital television stations may have only one virtual channel, or as
many as six
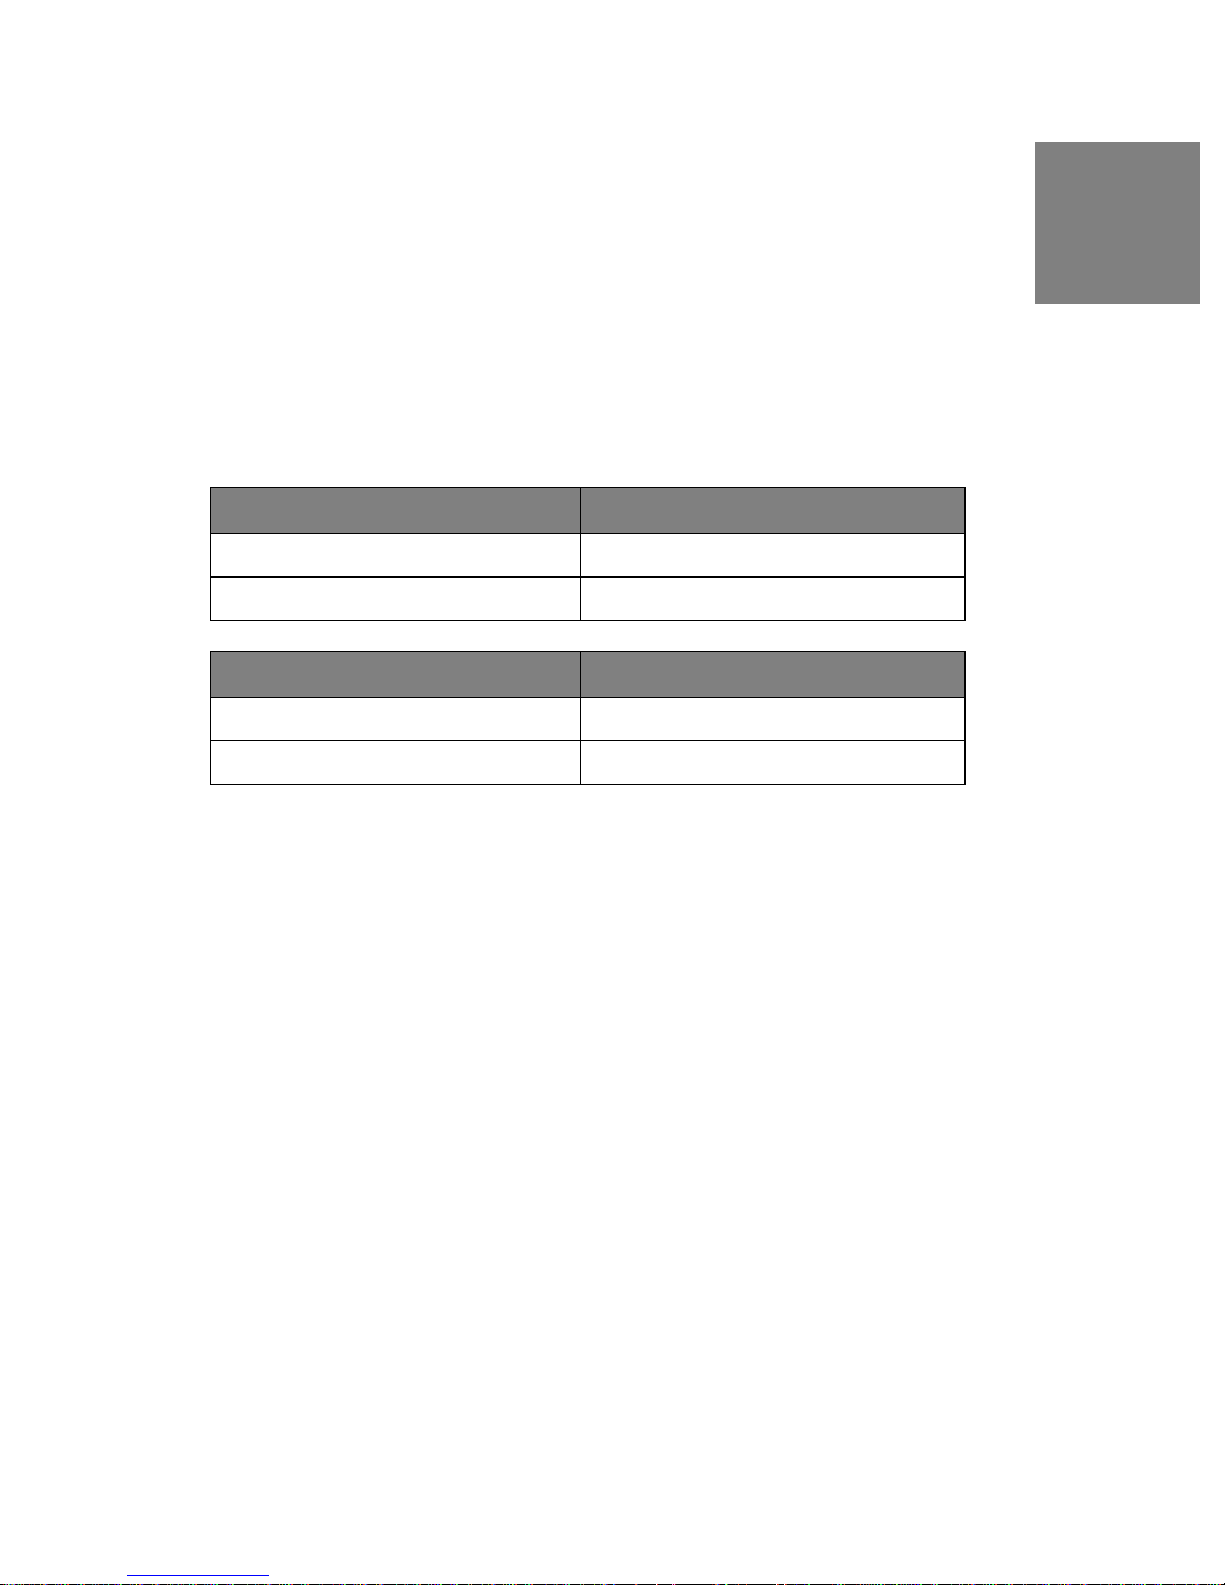
There are several ways to input digital television channels:
User Input (double-digit channels) Channel Displayed
11.3 Channel 11.3
113 Channel 11.3
User Input (single-digit channels) Channel Displayed
052 Channel 5.2
English
5.2 + Ent Channel 5.2
Page 14
12
Controls and Connections
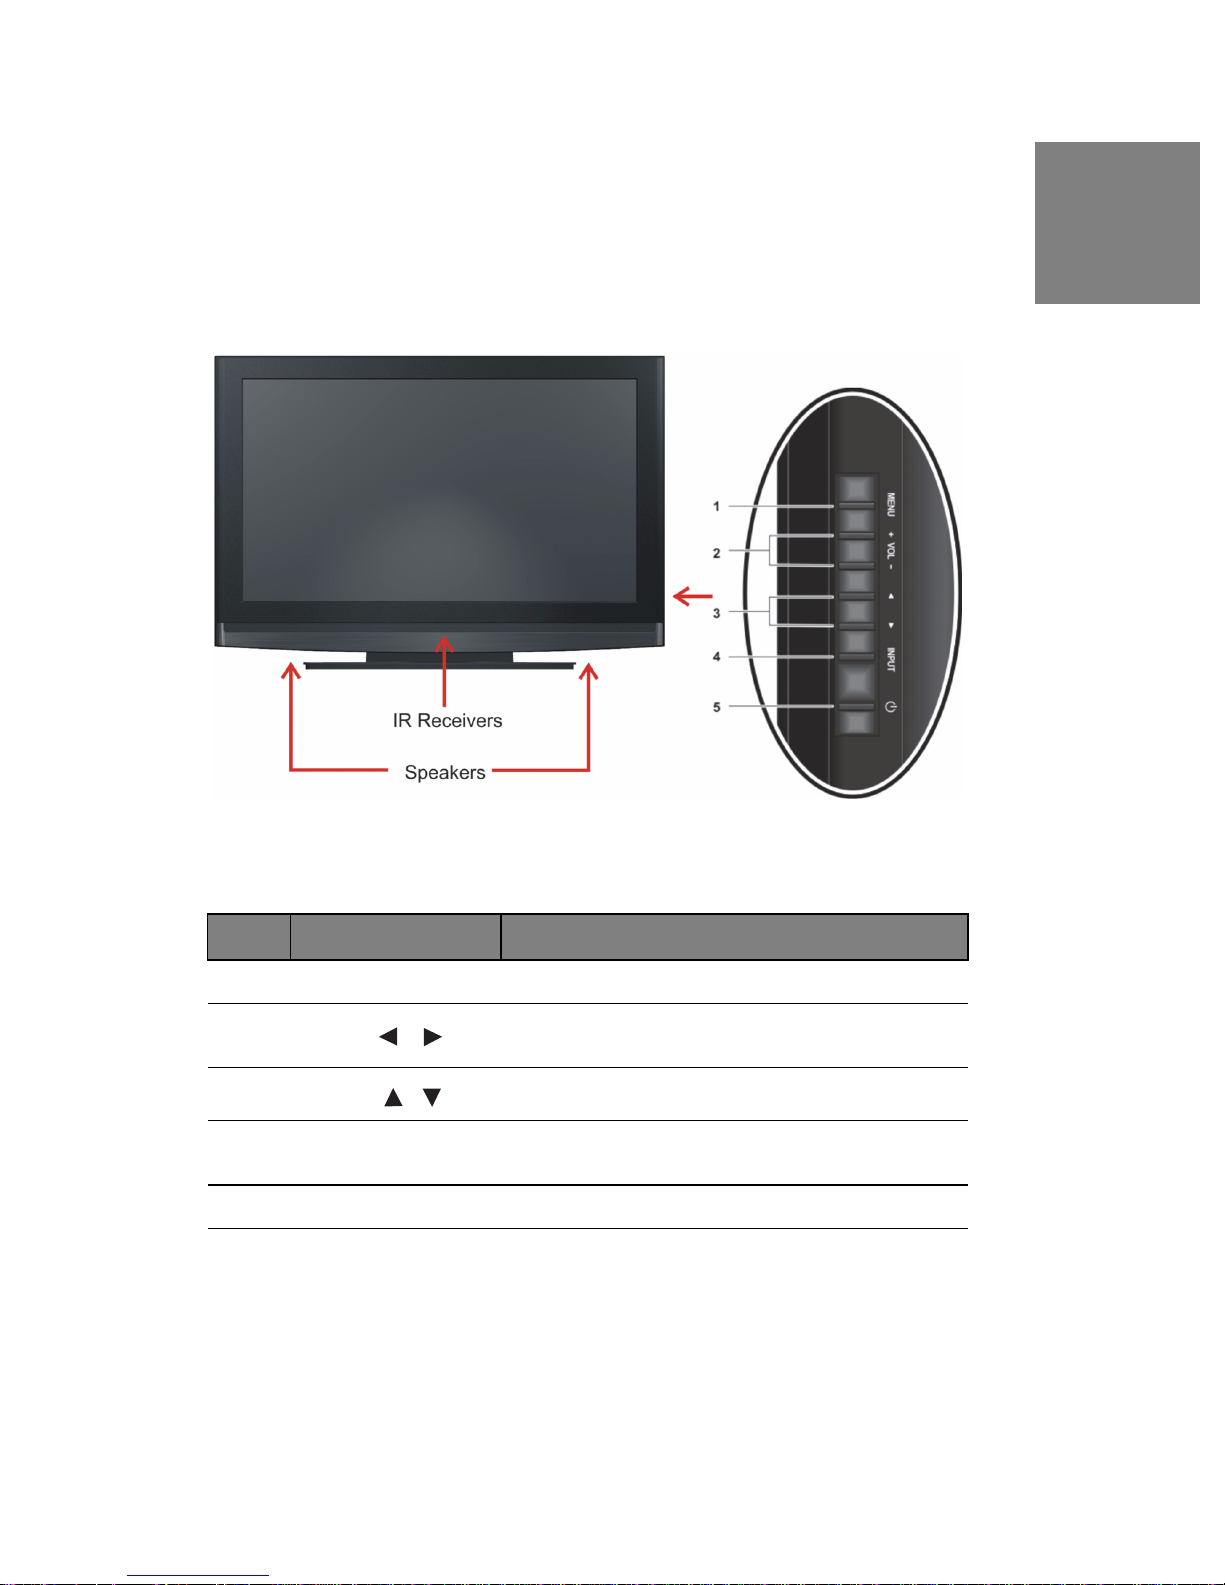
Front View
Use buttons on the right front side of your HDTV (or on remote control) for On
Screen Display (OSD), volume adjustment, channel selection, source, and turning
power on or off.
English
# Item Description
1 Menu OSD menu ON/OFF
2
3
4 Source Select active video source or a highlighted feature in
5 Power ON/OFF power button
Volume /
Channel /
Increase/decrease sound or adjust selected features in
OSD menus
Scroll up/down through channels or OSD menus
OSD menus
Page 15
13
English
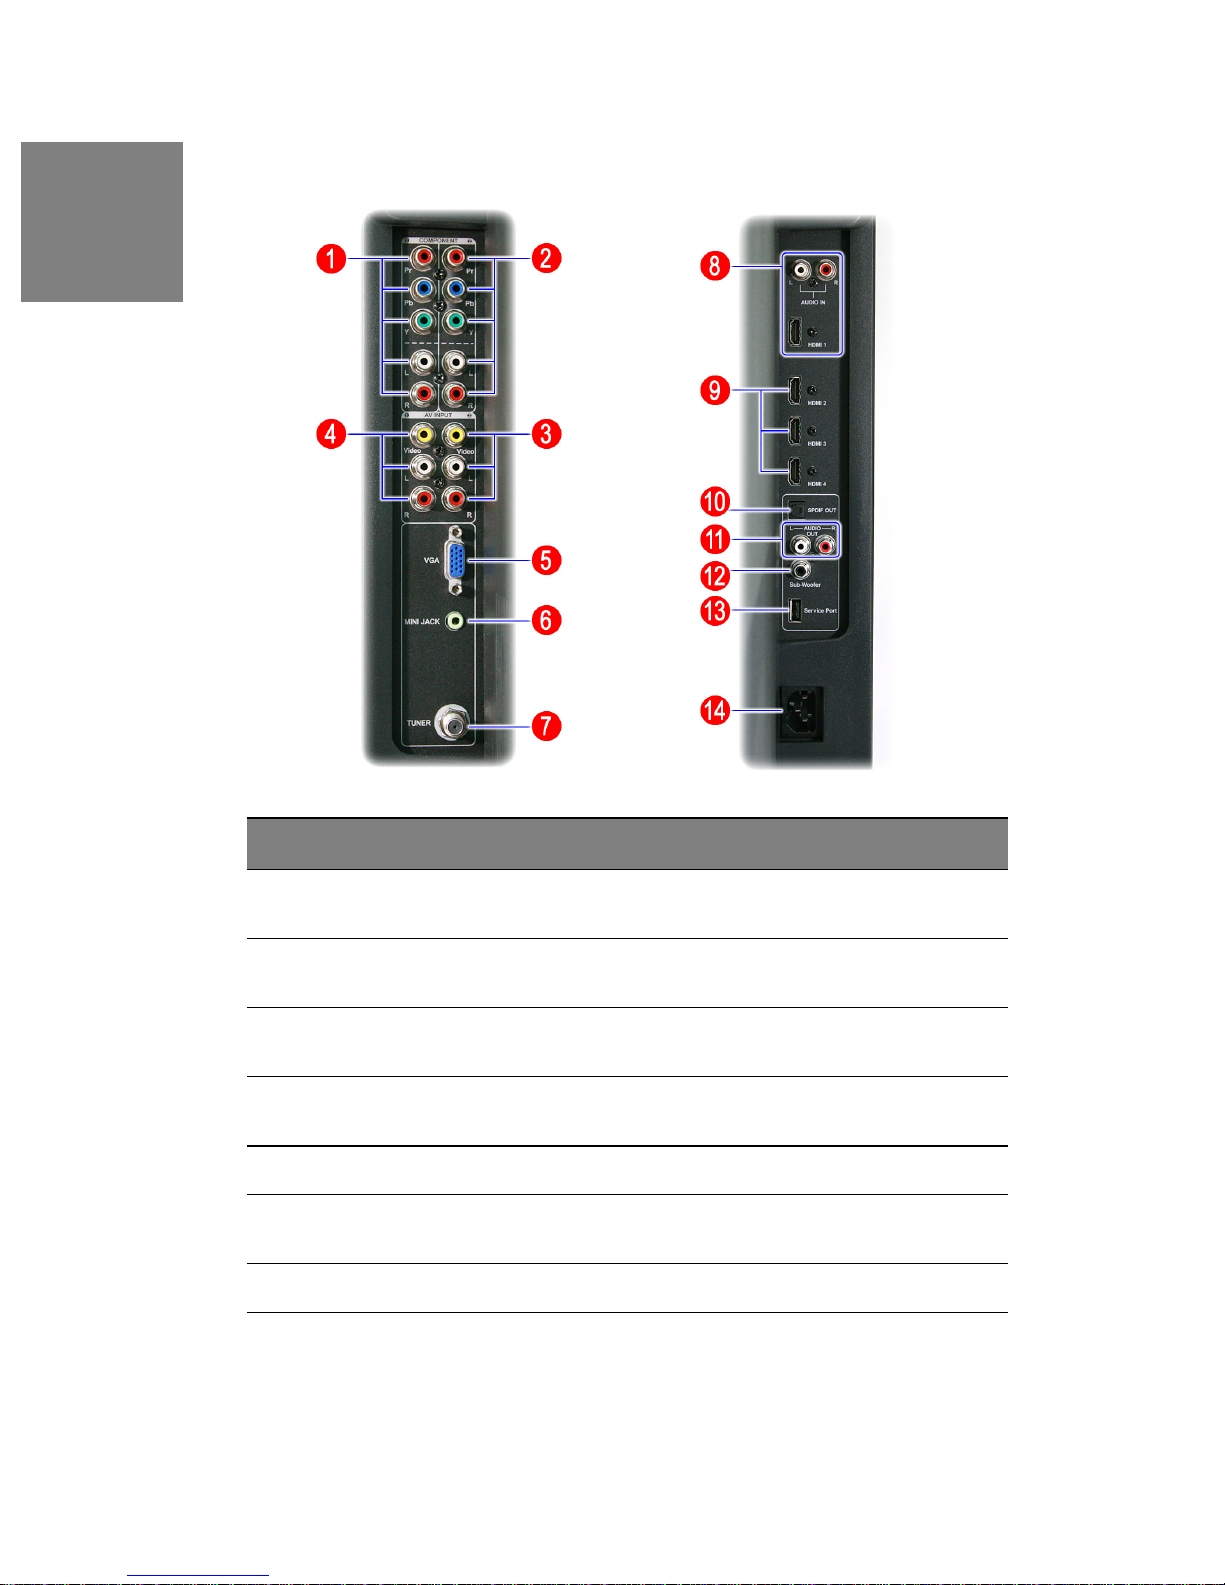
Side Connectors
# Item Description
1 YPbPr1/Audio 1 (Right/
Left)
2 YPbPr2/Audio 2 (Right/
Left)
3 A V1 Video/Audio (Right/
Left)
4 A V2 Video/Audio (Right/
Left)
5 VGA Connect personal computer using a 15-pin VGA cable
6 PC Audio Connect personal computer u sing a 3.5mm mini-jack
7 ANT (RF-input) Connect antenna or cable service
Connect external video device like DVD or game
system
Connect external video device like DVD or game
system
Connect an external video device like VCR (Audio
Right/Left supports S-Video or AV input)
Connect an external video device like VCR (Audio
Right/Left supports S-Video or AV input)
cable from PC's Audio Out
Page 16
14
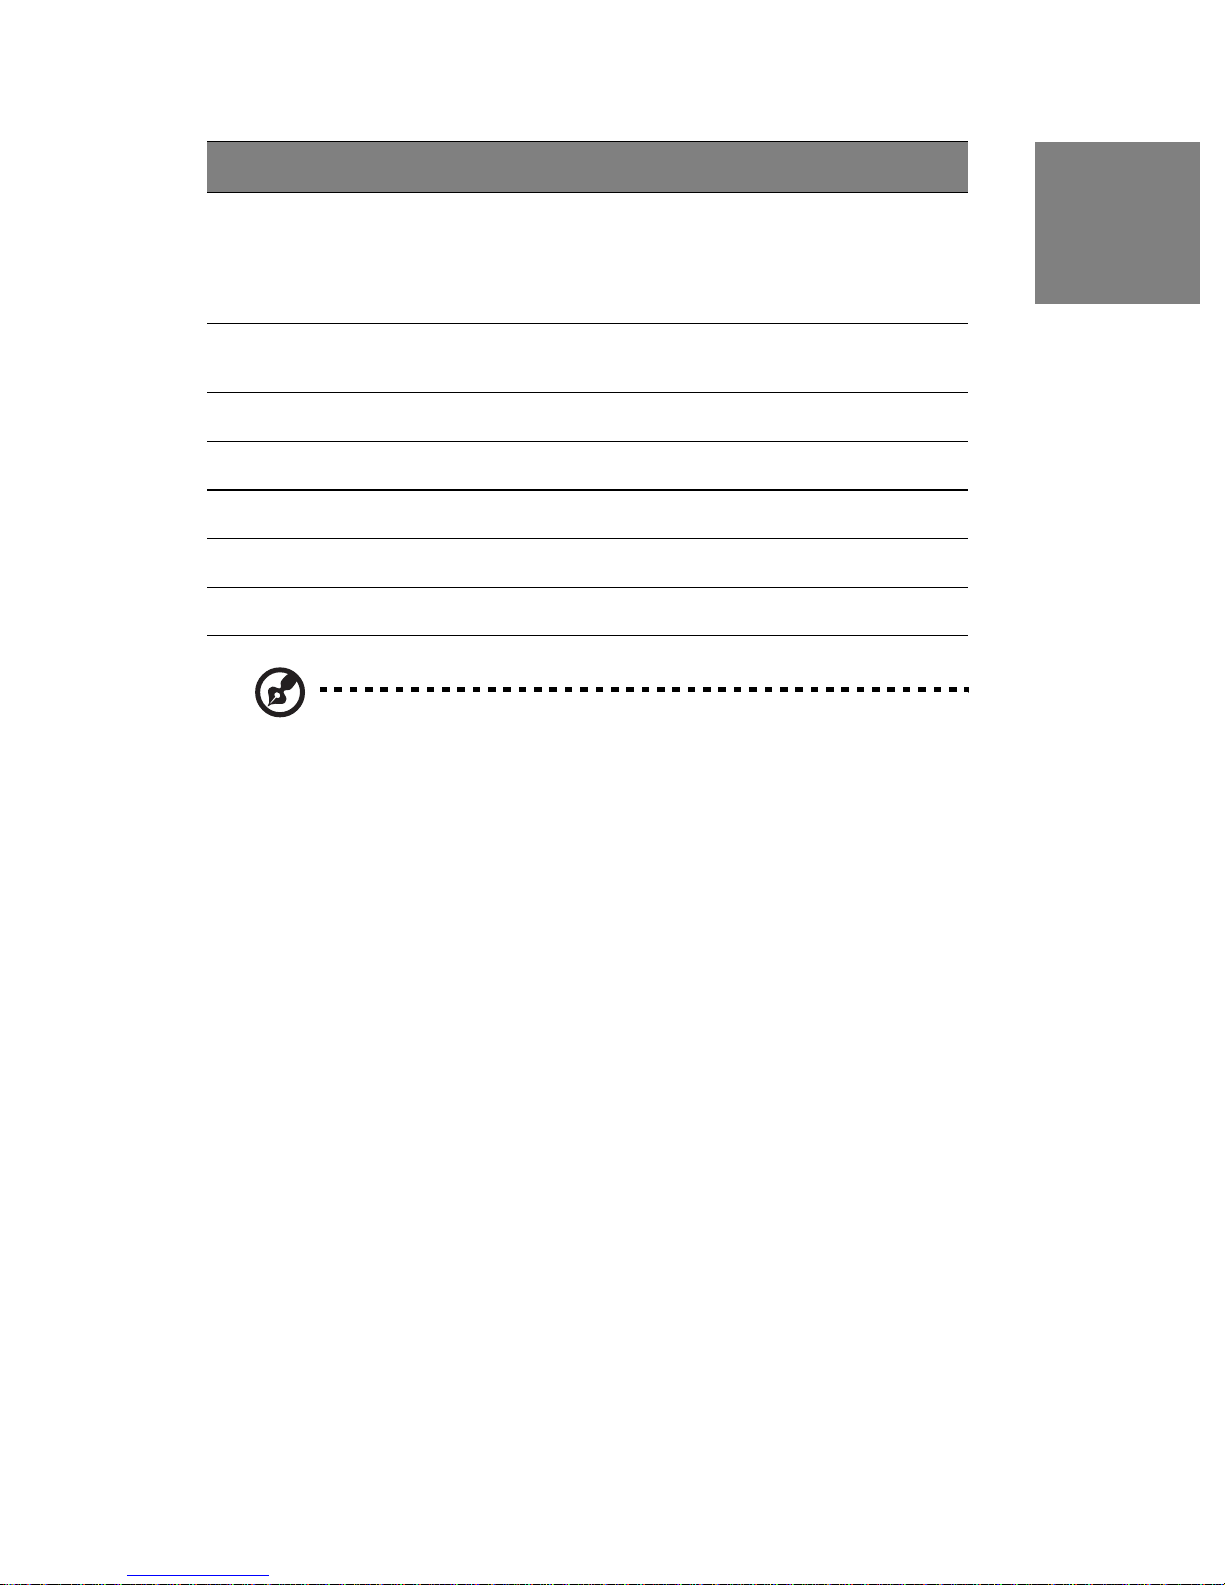
# Item Description
8 HDMI 1 /Audio1 (Right/
Left)
9 HDMI 2-3-4 Connect external HDMI device like a DVD, cable/
10 SPDIF Digital Audio out connection
11 Audio Out (Right/Left) Connect an external audio amplifier
12 Subwoofer Connect an external subwoofer
13 USB Service port for Firmware update and maintenance
14 AC-IN (Power) Connect to power source via supplied power cord
Connect external HDMI device like a DVD, cable/
satellite receiver or personal computer; for analog
Audio use, select Audio menu in On Screen Display
(OSD) and use remote's left/right arrows to change
HDMI to Analog
satellite receiver or personal computer
Note: See “Connecting Your HDTV” on page 20 for more information
about connecting cable/satellite receivers, game consoles, VCR and
DVD player/recorders, audio devices and your personal computer.
English
Page 17

15
English
Additional information:
Quick Reference: HDTV Connection
YPbPr
The "Y" stands for the luminance of the signal; Pb and Pr refer to the color difference
signals ("b" for blue, "r" for red). Provides improved color bandwidth over S-Video or
composite video connections.
DVI-HDCP (Digital Visual Interface/High-bandwidth Digital Content Protection)
Provides superior level of digital video quality, typically used in cable/satellite
receivers or DVD players. (Not Available)
HDMI (High Definition Multimedia Interface)
Provide superior level of digital video quality; includes DVD, cable/satellite receivers
or personal computers
S-Video Input (option)
The "S(uper)-Video" connection provides enhanced picture clarity for selected
accessory sources such as a digital broadcast satellite service, video games, DVD
and VHS. Accessory source must have S-Video output jack.
Page 18
16
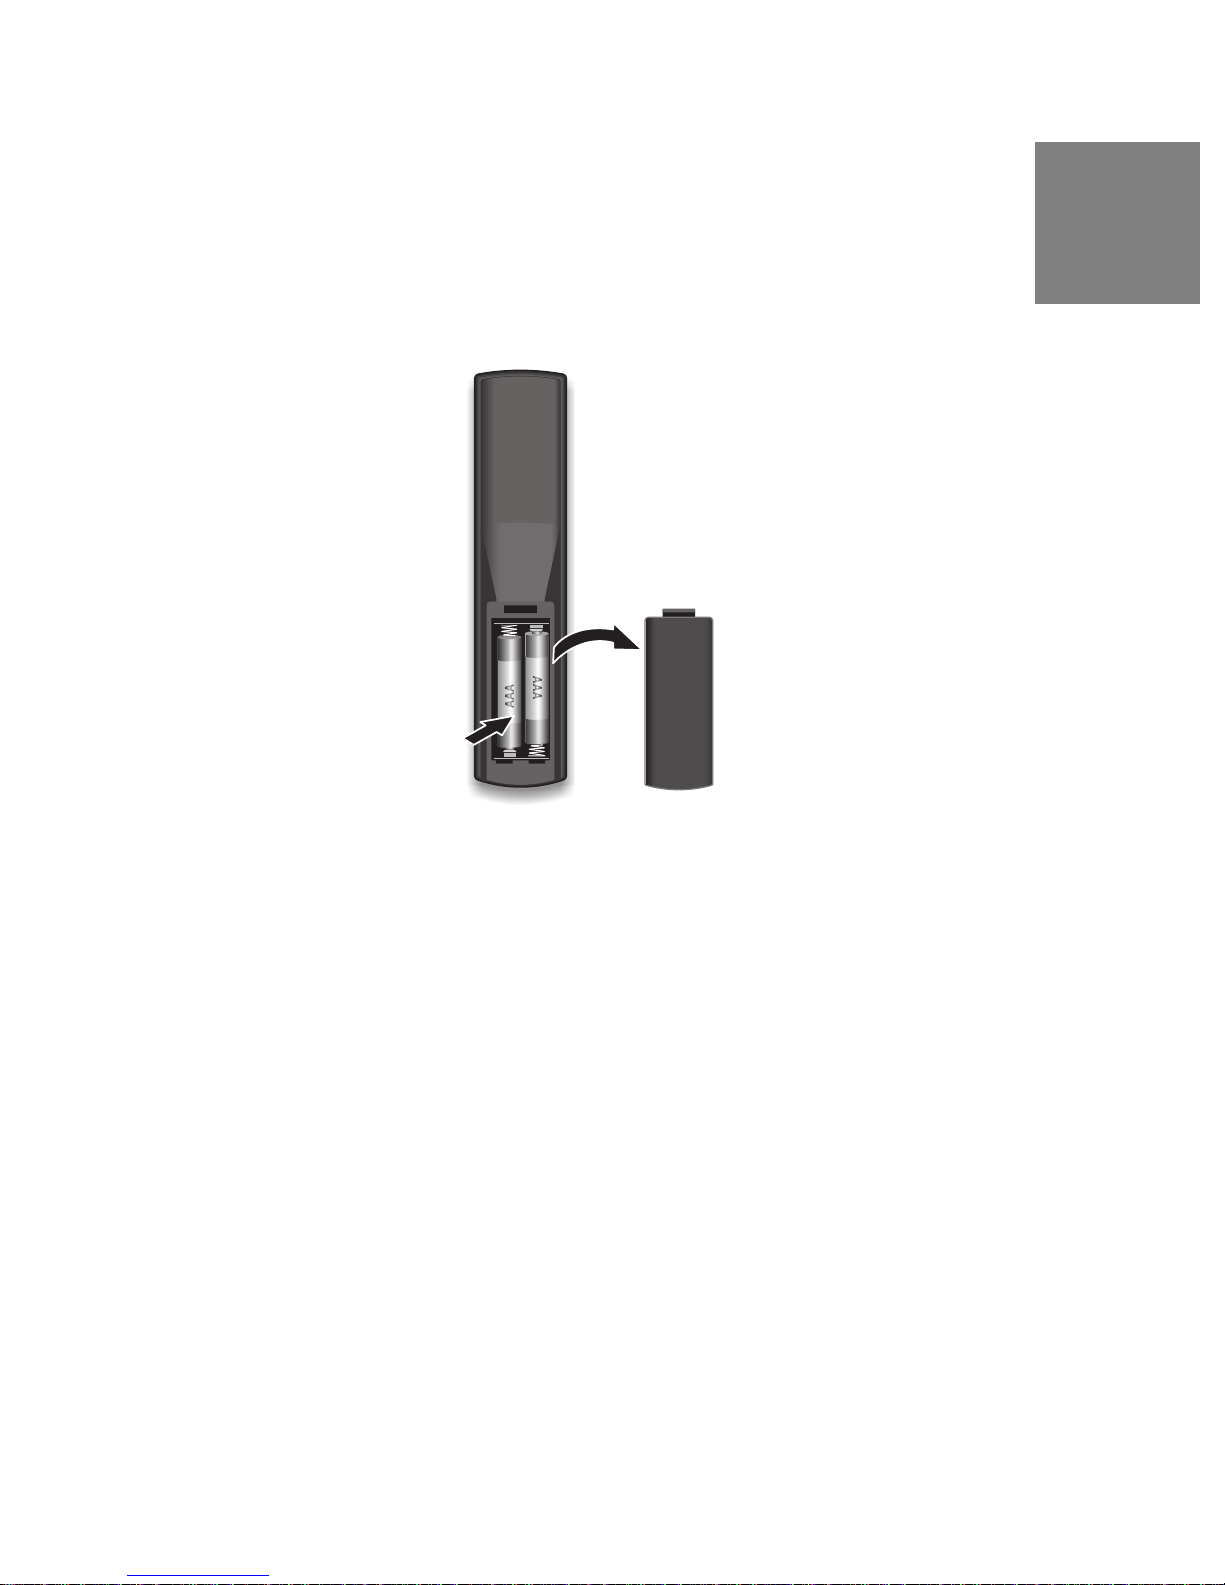
Inserting Remote Control Batteries
1 Remove the battery compartment cover
2 Insert the batteries corresponding to the (+) and (-) marks inside the
battery compartment
3 Reattach cover
English
Precaution
• Only use AAA batteries
• Don't mix new and old batteries, which can result in cracking or leakage and
may pose a risk for fire or personal injury
• Make sure you Insert batteries according to (+) and (-) markings; incorrect
battery installation can result in cracking or leakage and may pose a risk for fire
or personal injury
• Always dispose of used batteries in accordance with local laws and regulations
• Keep all batteries away from children and pets
• Remove batteries when the remote control will not be used for an extended
period of time
Page 19
17
English
Remote Control Features
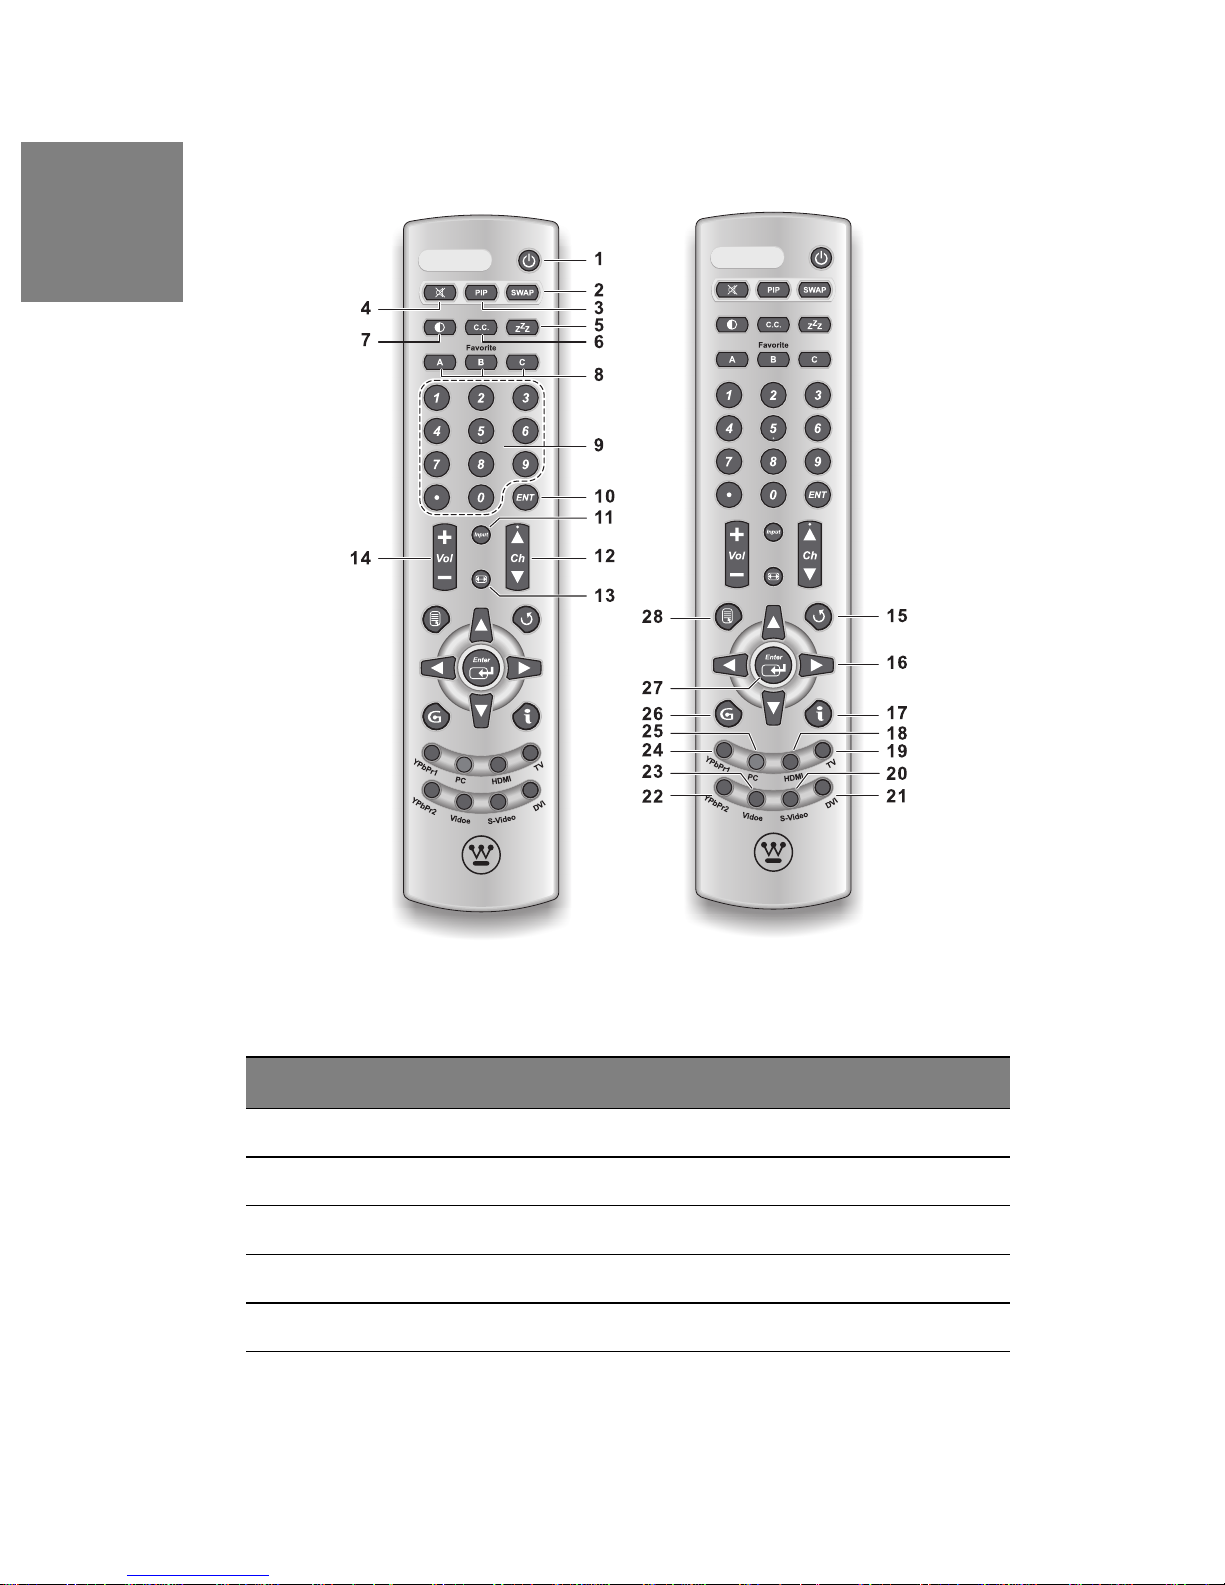
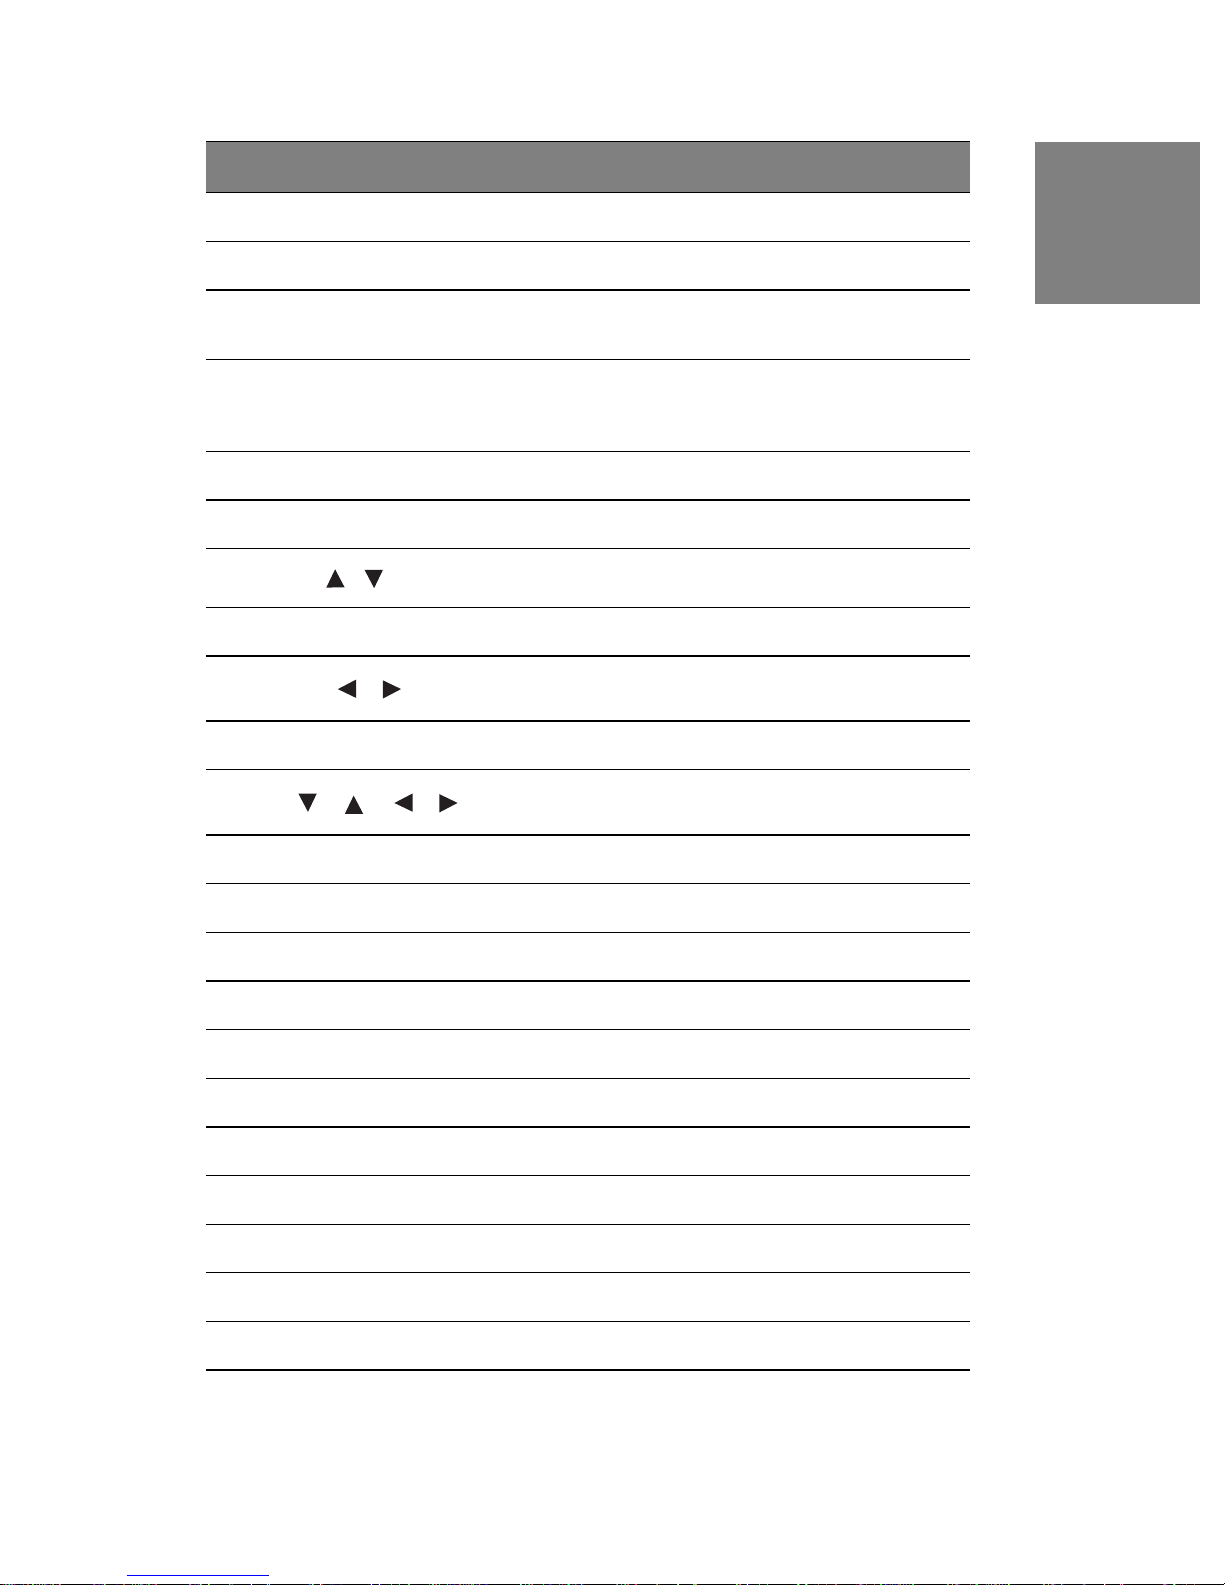
# Item Description
1 Power Switch the power On/Off
2 SWAP Switch between PIP and Main Picture (not available)
3 PIP Display sub picture On/Off (not available)
4 MUTE Turn the sound On/Off
5 SLEEP Set sleep timer
Page 20
18
# Item Description
6 CC Turn Closed Caption On/Off
7 BACKLIGHT Shortcut to adjust backlight adjustment
8 FA VORITE CHANNEL A / B
/ C
9 CHANNEL NUMBER KEYS Select specific channels
10 ENT Complete channel selection
11 INPUT Display MP input menu
12
13 SCALING Set video display format to “STANDARD” or “FILL”
14
CH /
VOL /
Jump to favorite channels (Hold button for 3 seconds
to program favorite channel and input source)
Note: The Dot is used to input dash when selecting
specific channels
TV Channel Up/Down adjustment
Volume Up/Down adjustment
English
15 LAST CHANNEL Switch to the previous channel
16
17 INFO Display the source and channel information
18 HDMI Switch to HDMI sources
19 TV Switch to TV source
20 S-VIDEO Switch to S-Video source (not available)
21 DVI Switch to DVI source (not available)
22 YPbPr2 Switch to YPbPr2 source
23 AV Switch to AV1 and AV2 sources
24 YPbPr1 Switch to YPbPr1 source
25 PC Switch to VGA source
26
/ / /
Navigate within OSD Menu
27 ENTER Make a selection
Page 21

19
English
# Item Description
28 Menu Turn OSD Menu On/Off
Page 22
20
3 HDTV/ACCESSORY SETUP
Now that you're familiar with the basics of digital television and the various controls
and connections for your HDTV, you're ready to enjoy its superb picture quality and
sound, along with the ultimate convenience of connecting your game consoles,
VCR, DVD, audio devices or personal computer.
Note: If you have already performed the steps in the Quick Setup
Guide, skip to the instructions specific to the accessory you want to
connect.
Connecting Your HDTV
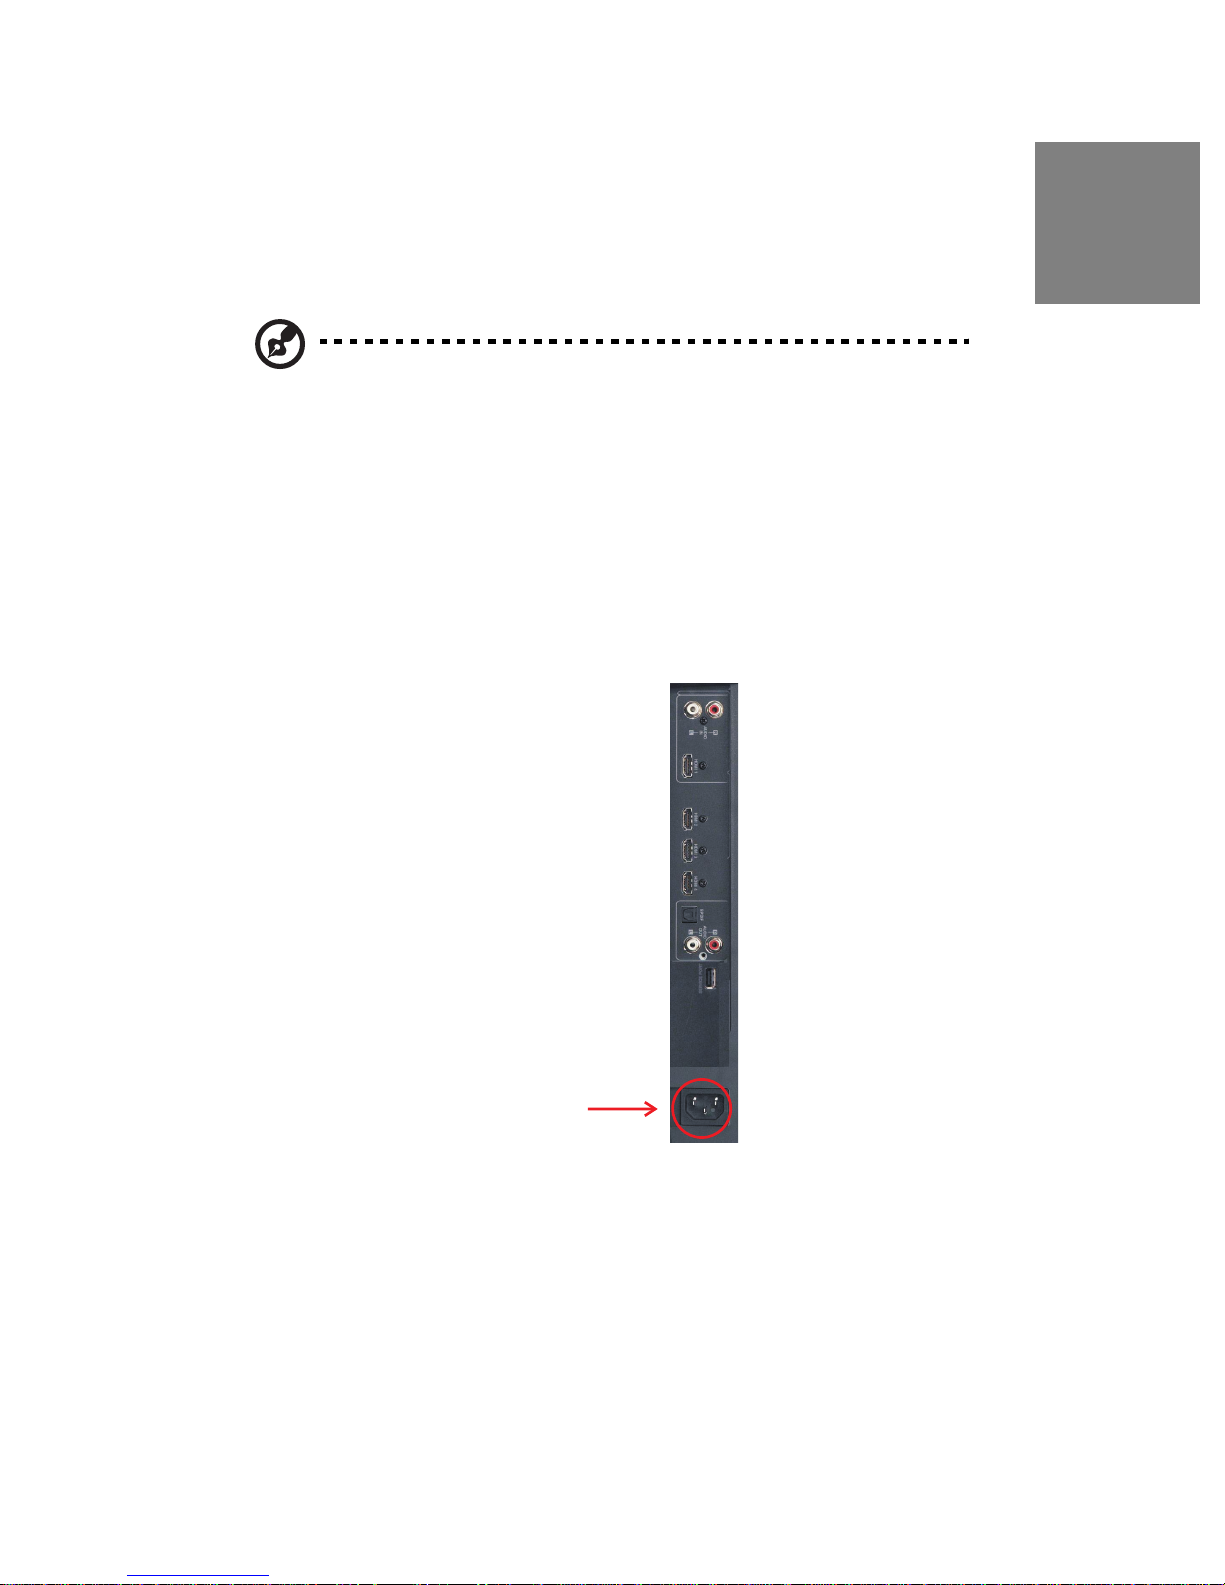
Power
1 Connect the supplied AC power cord to your HDTV's "AC In" jack and
to a properly grounded AC outlet.
English
2 If you're using an antenna or your cable service, connect the antenna
or cable (not supplied) to the "Antenna'" connector
3 If you're using a satellite receiver, connect to either the "HDMI"
connector (See “Side Connectors” on page 13 for connector
descriptions and locations)
Plug the power cord
Page 23
21
English
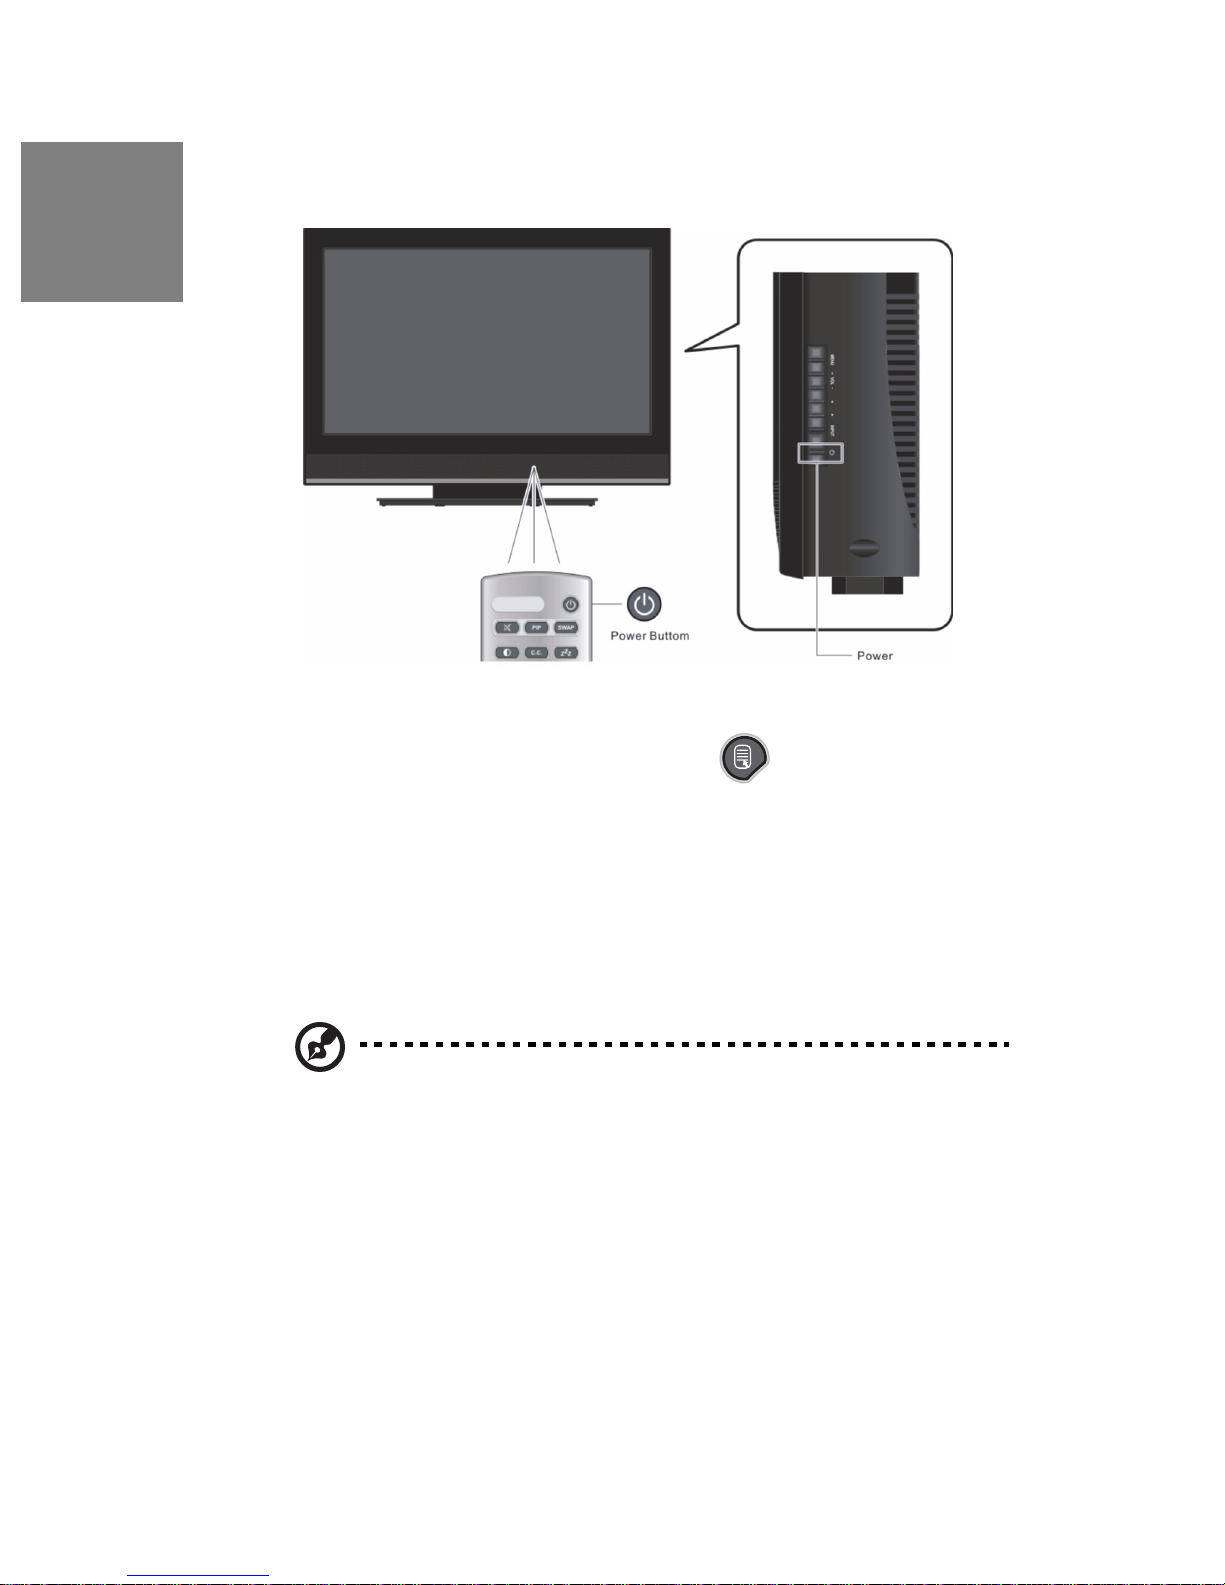
4 Press the Power button on either the remote control or the side-
mounted control panel to turn your HDTV on (it will take a few seconds
to power up)
Choose Your TV Source
1 Press the "Menu" button on your remote or the side panel to
access the On Screen Display (OSD)
2 Use the right/left arrow buttons to scroll across to the "TV" menu
3 Use the up/down arrow keys to select "Tuner Source"
4 Use the arrow keys to select your signal source "Air/Cable Auto"
• If you use a rooftop or indoor antenna, select "Air"
• If you use a cable service, select "Cable Auto", (depending on the frequency
used by your cable service)
Note: When using a DVI or HDMI connection, the cable box or
satellite receiver needs to be restarted to complete the HDCP
authentication.
Page 24
22
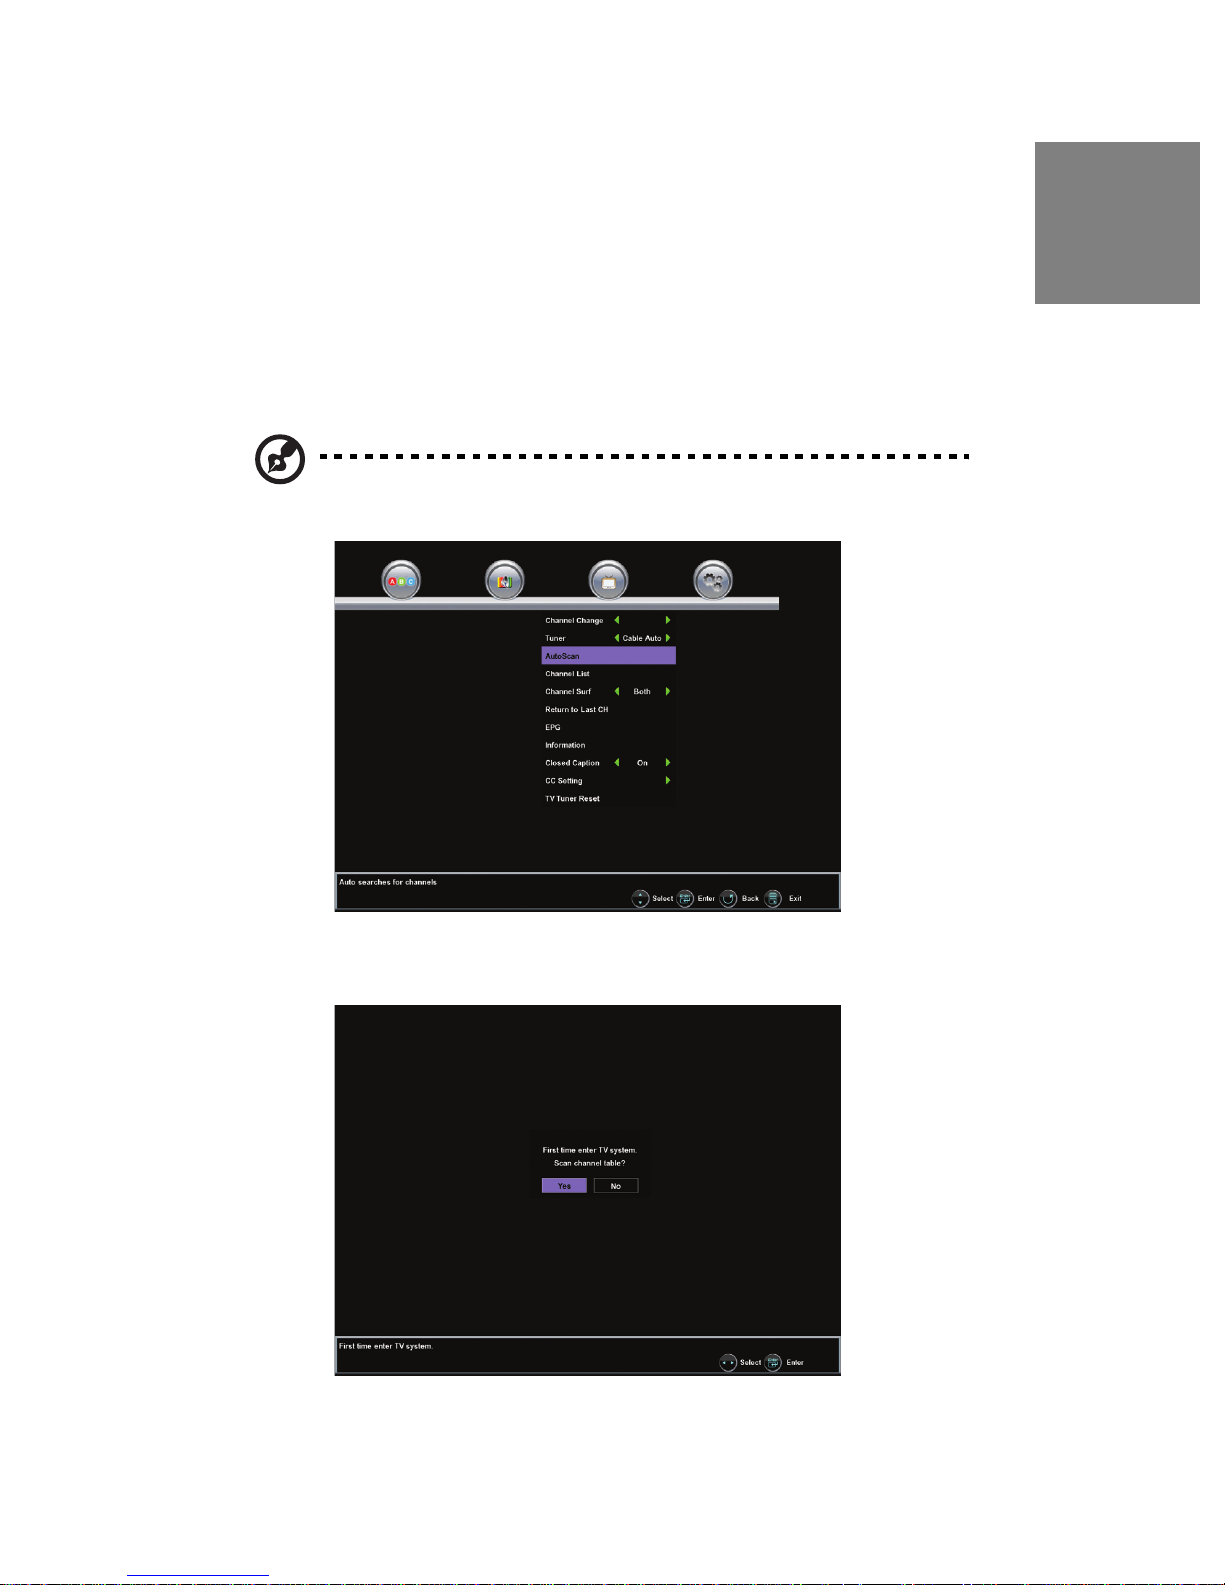
Determining Available Channels
1 When connected to an antenna, cable or other RF (radio frequency)
source, you'll need to run "Autoscan"-available in the "TV" menu of the
OSD in order for all available channels to be received
2 Before starting Autoscan select either Air (Antenna) or Cable for your
RF input. Use the up/down arrow keys to scroll below "Tuner" to "Auto
Scan"
3 Press "Enter" to start scanning for channels (identification of all analog
and digital channels may take several minutes)
Note: Depending on your area, some channels shown may not be
available for viewing.
English
• First Time connected to RF the system will automatically select the Autoscan
function.
Page 25
23
English
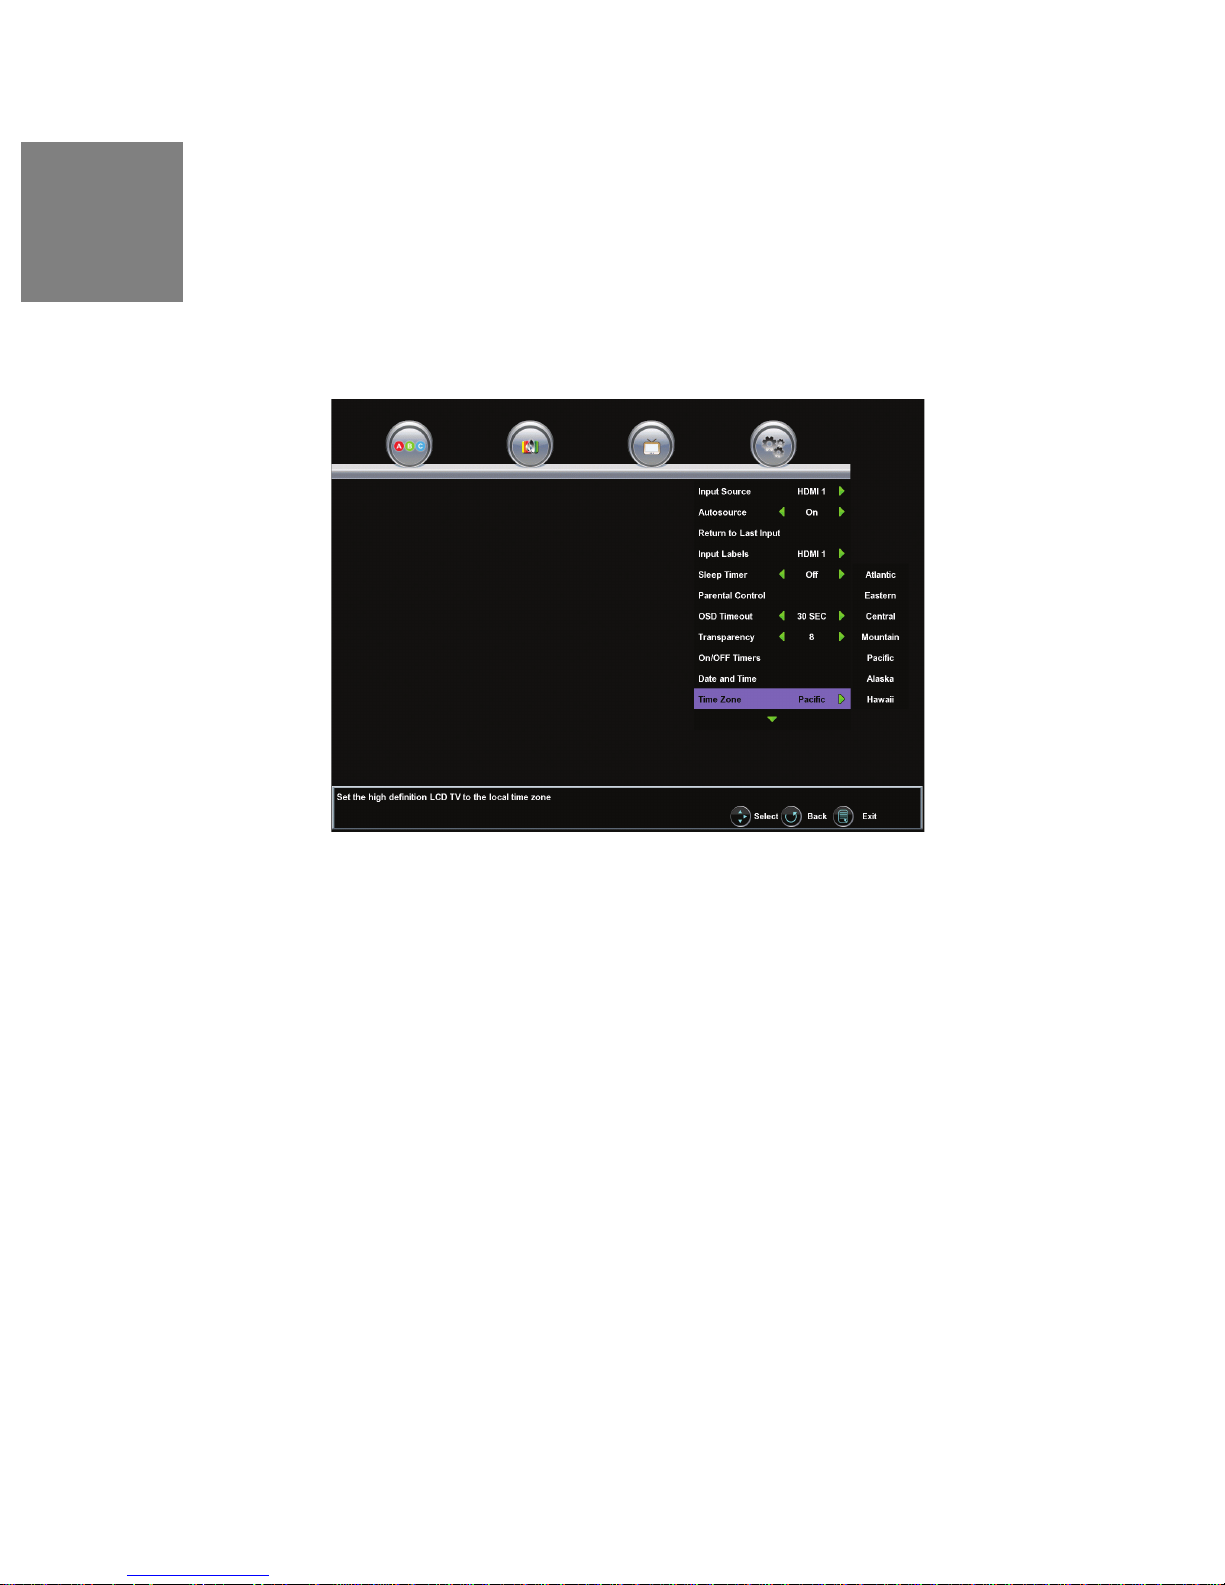
Set Your Time Zone
1 Scroll right to the "Settings" menu.
2 Use the up/down buttons to select "Time Zone".
3 Select your local time zone, which allows you to receive HDTV
programming information.
4 Exit the OSD.
Page 26
24
Connecting Your Personal Computer
Before making any connections, make sure all equipment is turned off.
Computer Settings
• For optimal picture quality, set your computer's timing mode to VESA (Video
Electronics Standards Association) 1920 x1080 at 60Hz
• Refer to your computer's graphic card User Guide for directions to set this
timing mode (many computers show 1024x768 as an alternative resolution)
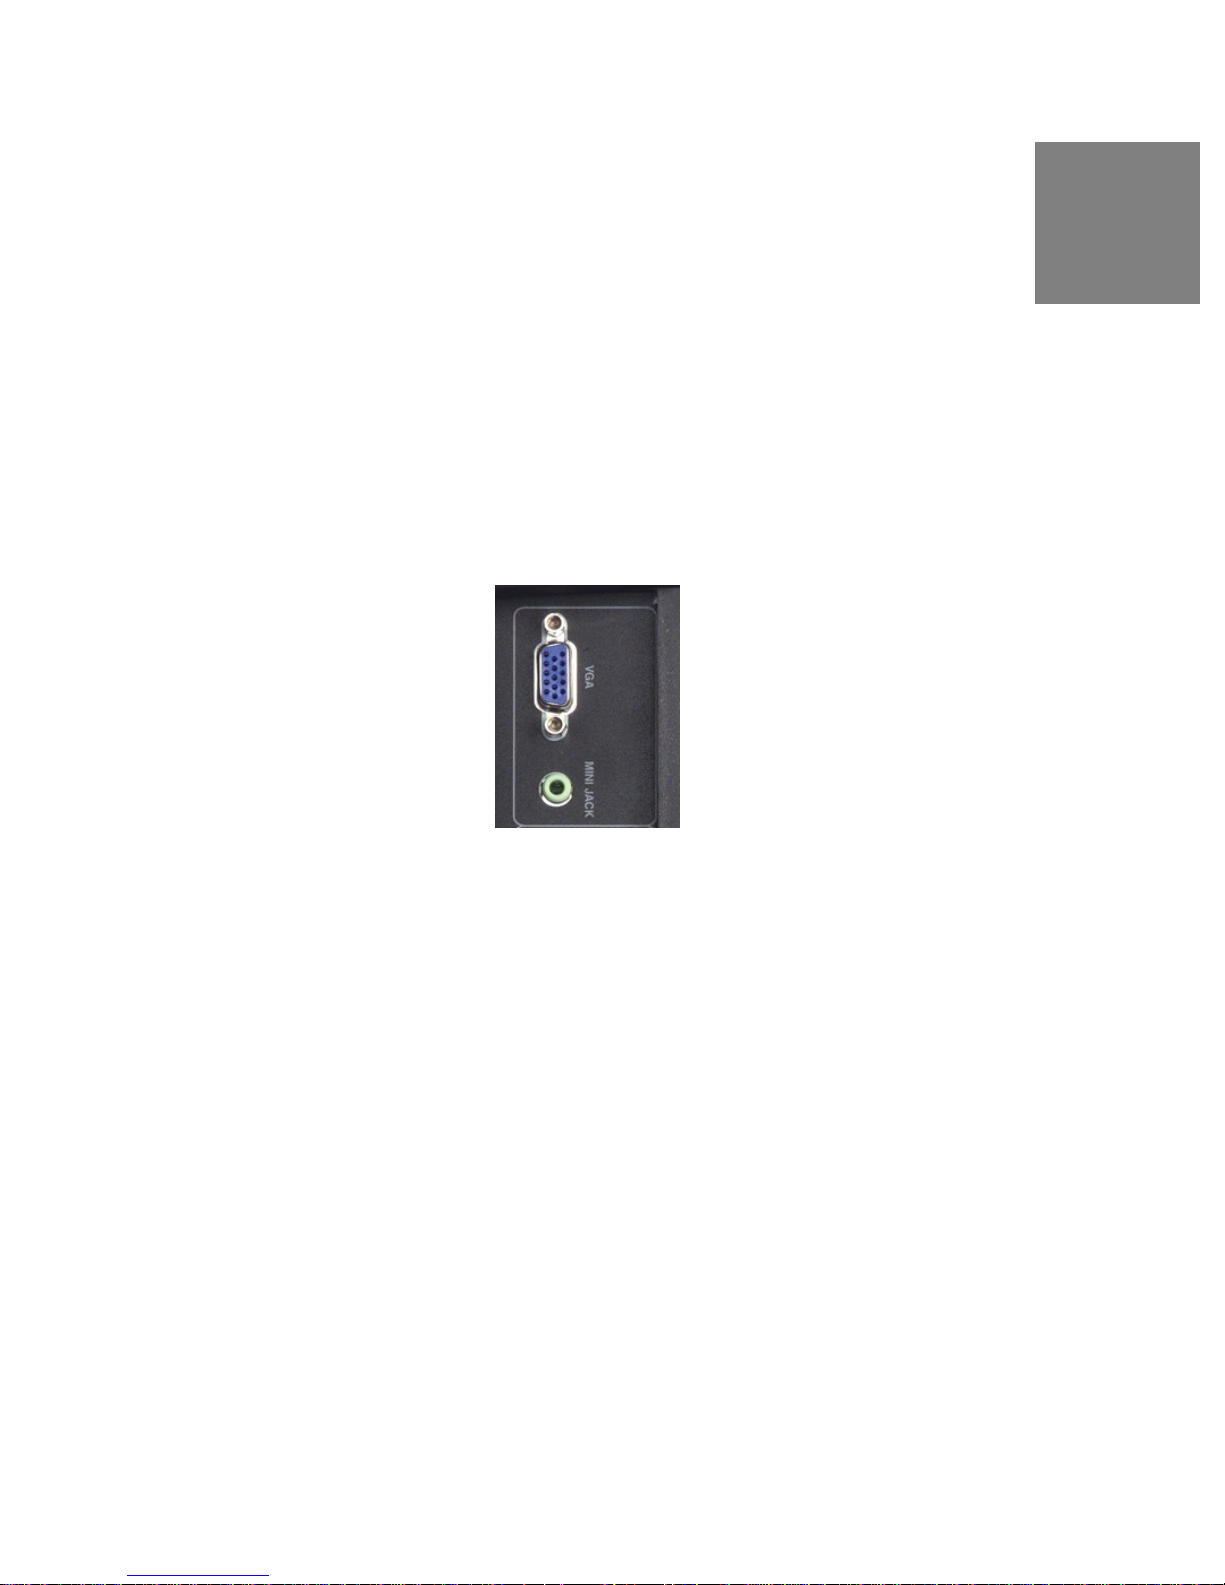
Connection Types
• VGA Connection
• Connect a 15-pin analog VGA cable (not supplied) from your
computer's "VGA OUT" port to the HDTV's "VGA IN" port
English
• Connect a stereo mini cable from your computer's "AUDIO OUT"
port to the HDTV's "AUDIO IN" port
Power
1 Turn on your HDTV (wait a few seconds for it to power up)
2 Turn on your computer
3 The HDTV will automatically adjust to the computer's resolution
Page 27
25
English
Connecting Other Accessories
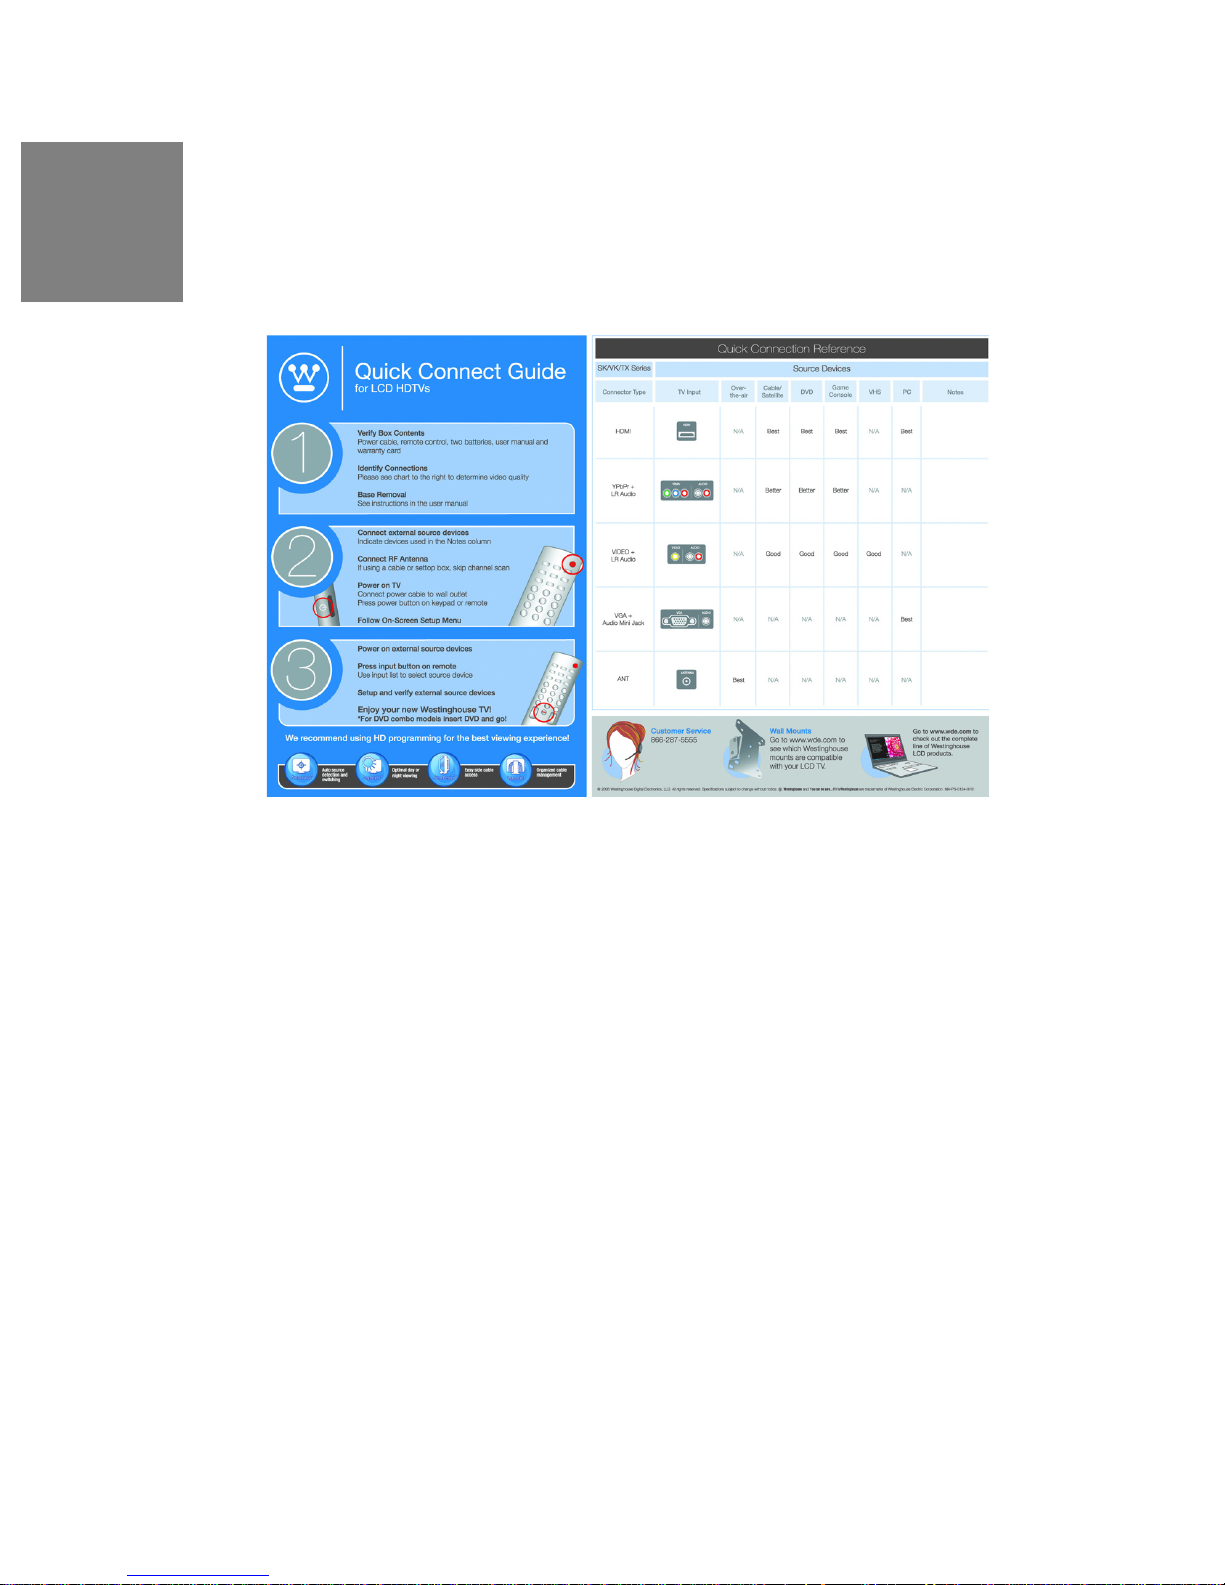
Following are the recommended connections to ensure optimal enjoyment of your
accessory equipment with your HDTV.
Before making any connections, make sure all equipment is turned off.
DVD or Game System
Connect your DVD player or gaming system using following input connectors:
• HDTV's HDMI ports HDMI1 to 4 (HDMI cable not supplied) and corresponding
Audio (Right/Left) connectors if you use the HDMI1 connector and analog
Audio
• For analog audio use with HDMI, open the On Screen Display (OSD), select
the "Audio" menu and use the left/right arrows to change "HDMI" to "Analog"
• For YPb/Pr1 and Audio1 (Right/Left) or YPb/Pr2 and Audio2 (Right/Left)
connectors on the HDTV to (cable not supplied)
Video Cassette Recorder (VCR)
Use the Video 1 and Audio 1 (Right/Left) or Video 2 and Audio 2 (Right/Left)
connector on your HDTV to connect your VCR (Cable not supplied).
Page 28

26
Cable or Satellite Receiver
Connect your cable or satellite receiver using HDTV's HDMI port (HDMI cable not
supplied) or YPb/Pr1 and Audio1 (Right/Left) or YPb/Pr2 and Audio2 (Right/Left)
connectors on the HDTV to (cable not supplied).
Audio Equipment
Use your HDTV's "Audio Out" port to connect to an external audio amplifier (cable
not supplied).
English
Page 29
27
English
4 HDTV OPERATION
About the On Screen Display (OSD)
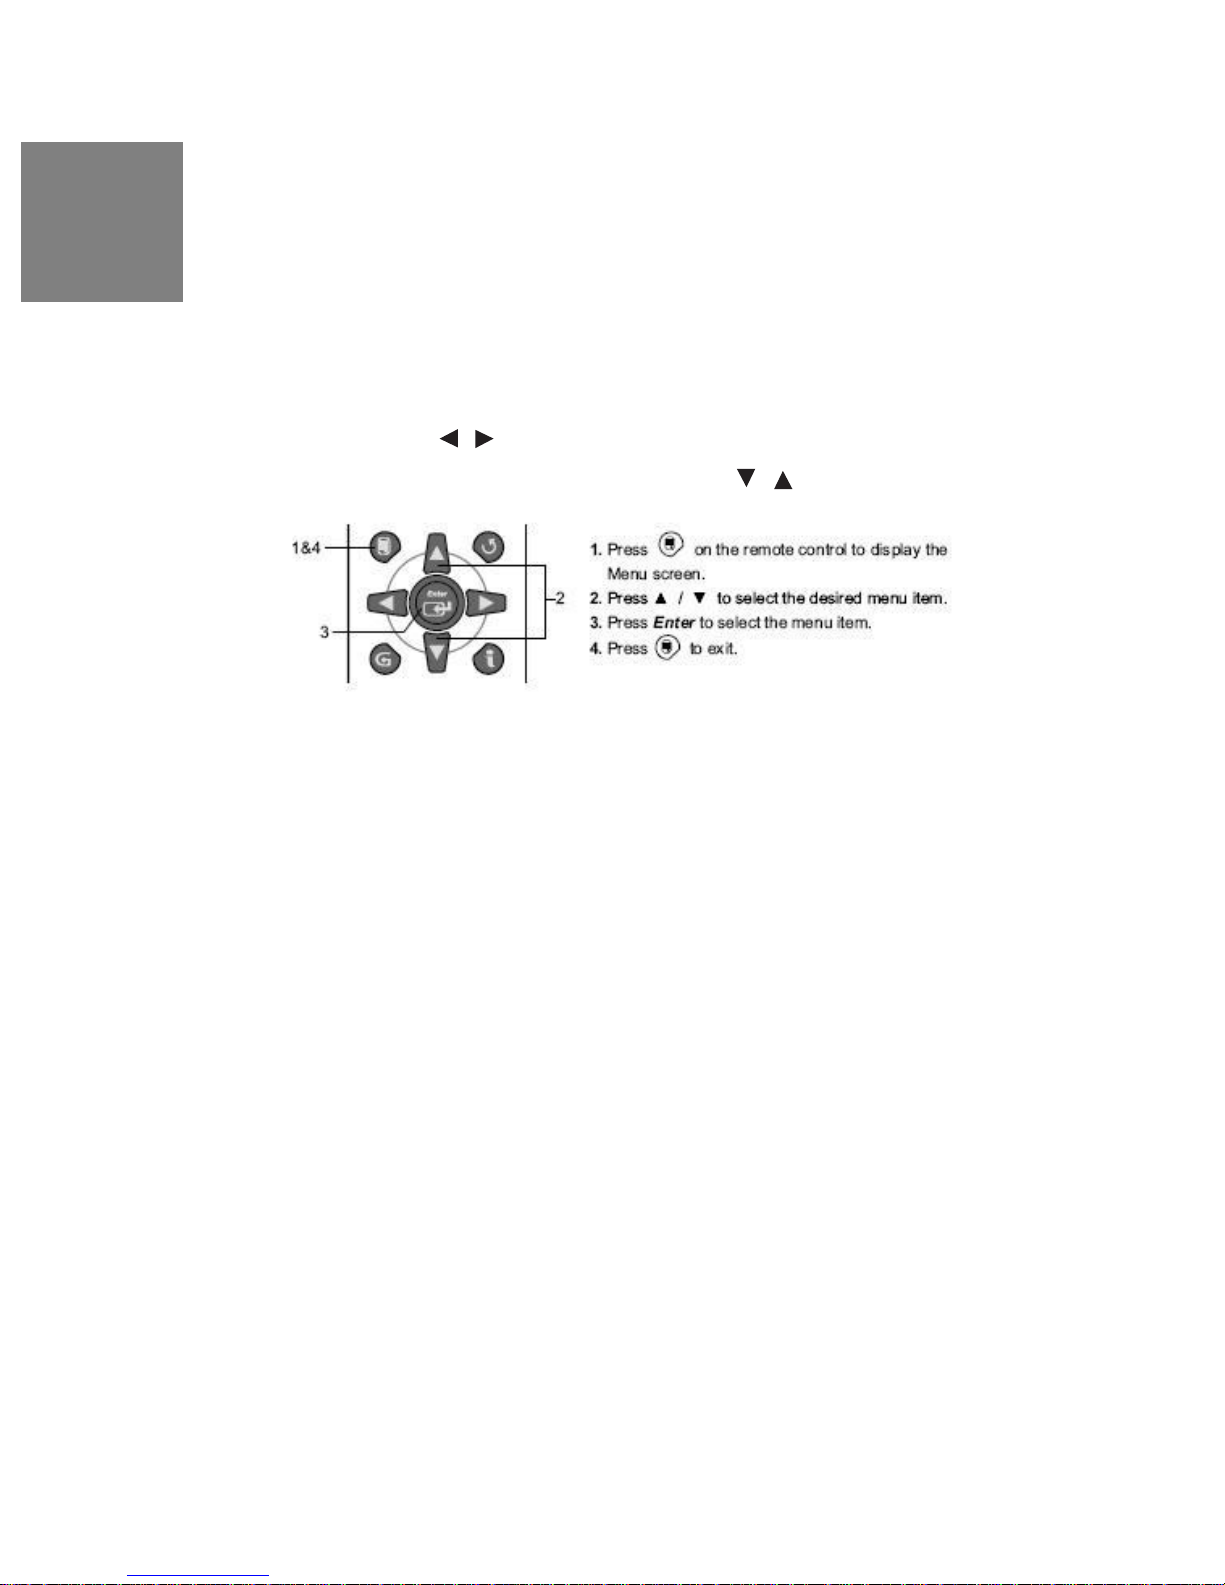
Your HDTV's On Screen Display (OSD) conveniently integrates all functions
required for setup and operation. There are two ways you can access the OSDeither by pressing the remote control's "Menu" button (located just below the volume
controls on the left side of the remote), or by pressing the "Menu" button on the
HDTV's right-side control panel. You can select amongst any of the four menus by
using your remote's / buttons. Similarly, each of the menus includes submenus, which can be selected by using the remote's / buttons.
Page 30
28
OSD Menus and Features
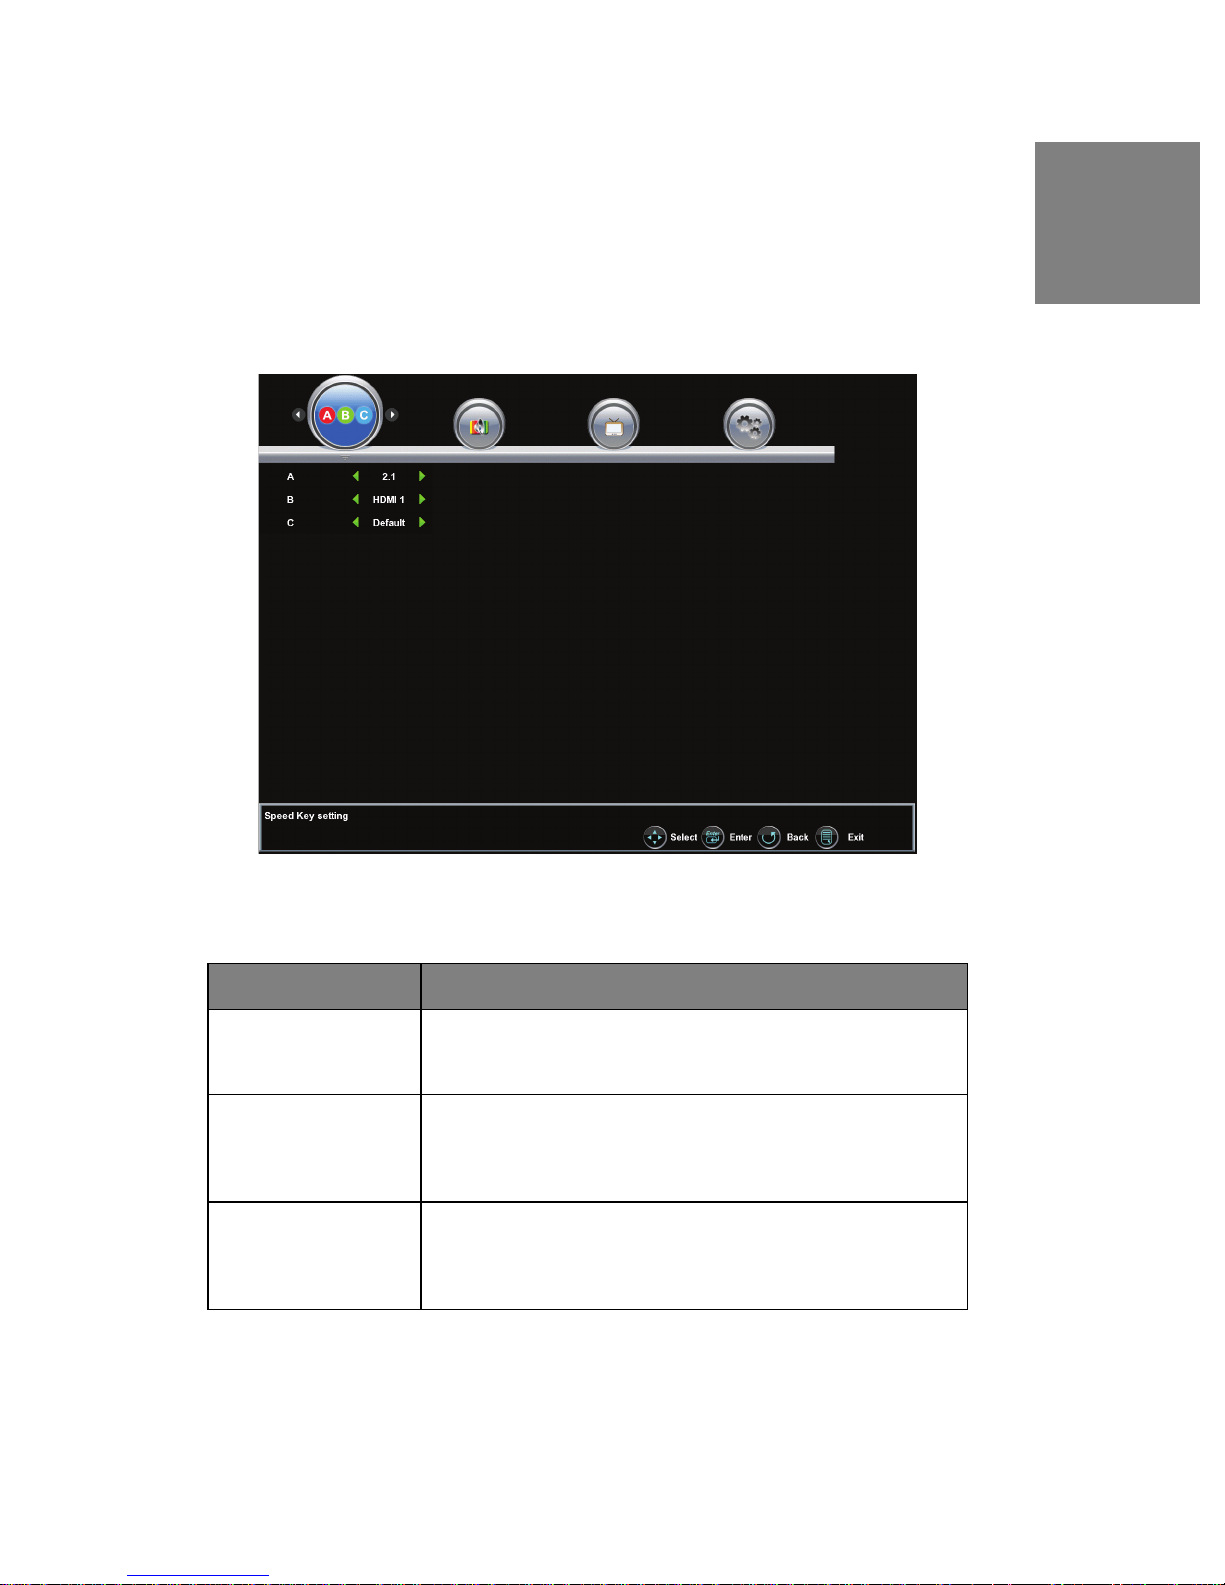
List of Speed Keys Menu
Initially, the “Favorite Keys” are set to “Speed Keys” with default settings. User can
overwrite the current define setting by choosing one of menu option and hold either
A, B, or C for about 5 second or longer. A list of available settings are displayed in
which you choose within the list and select by pushing the "Enter" Button.
English
Speed Key Menu Features Function Descriptions
A Press and Hold A button on remote control for 5 seconds to store
B Press and Hold B button on remote control for 5 seconds to store
C Press and Hold C button on remote control for 5 seconds to store
your favorite channel and input source. When ready you can
select your setting by pushing enter button
your favorite channel and input source. When ready you can
select your setting by pushing enter button
your favorite channel and input source. When ready you can
select your setting by pushing enter button
Page 31
29
English
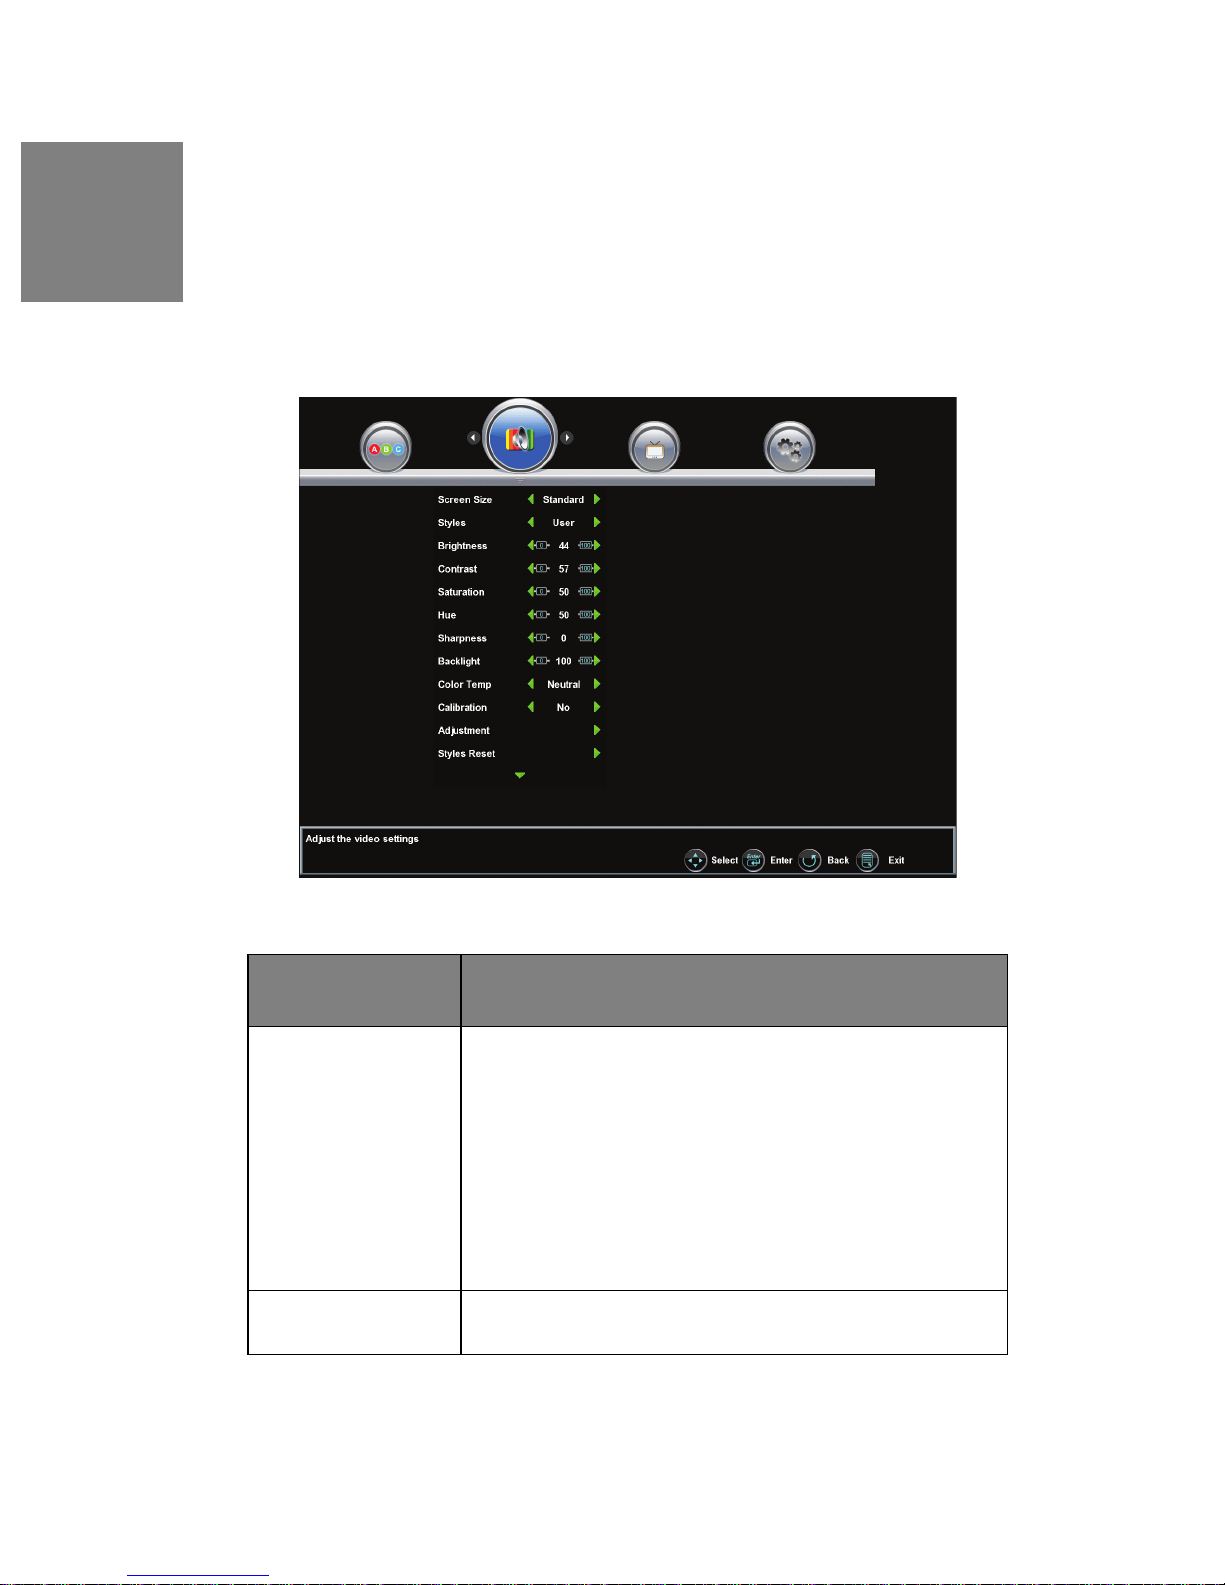
Video Menu
The "Video" menu allows you to adjust the properties of the image you see on the
screen by adjusting the display's brightness, contrast, color intensity and hue,
picture clarity and sharpness. You can also adjust the backlight's intensity and, if
necessary, restore the factory default video settings.
You have the option to select any of the 5 preset Video modes for individual
preferences.
Audio/Video Menu
Features
Screen Size Adjusts ratio between picture width picture height (16:9 pictures
will be displayed in original format):
• Standard-conventional format used for viewing 4:3
programs in their normal format
• Fill-format that horizontally stretches 4:3 pictures to
the edge of the screen (some programs will be
broadcasted with black or gray bars on the top and
bottom or sides of the picture)
• Overscan.
Style Select from 5 different Video modes, (User , Movie, S ports, Game,
Enhanced)
Adjustment/Descriptions
Page 32
30
Audio/Video Menu
Features
Brightness Black level adjustment
Contrast White level adjustment
Saturation Intensity of color
Hue Red/Green level adjustment
Sharpness Picture clarity
Backlight Intensity of HDTV lamp illumination
Color Temp Select from 3 different color temperature
Calibration Open up the Calibration Menu for advanced video adjustment
Style Reset Resets video settings to factory default
Adjustment/Descriptions
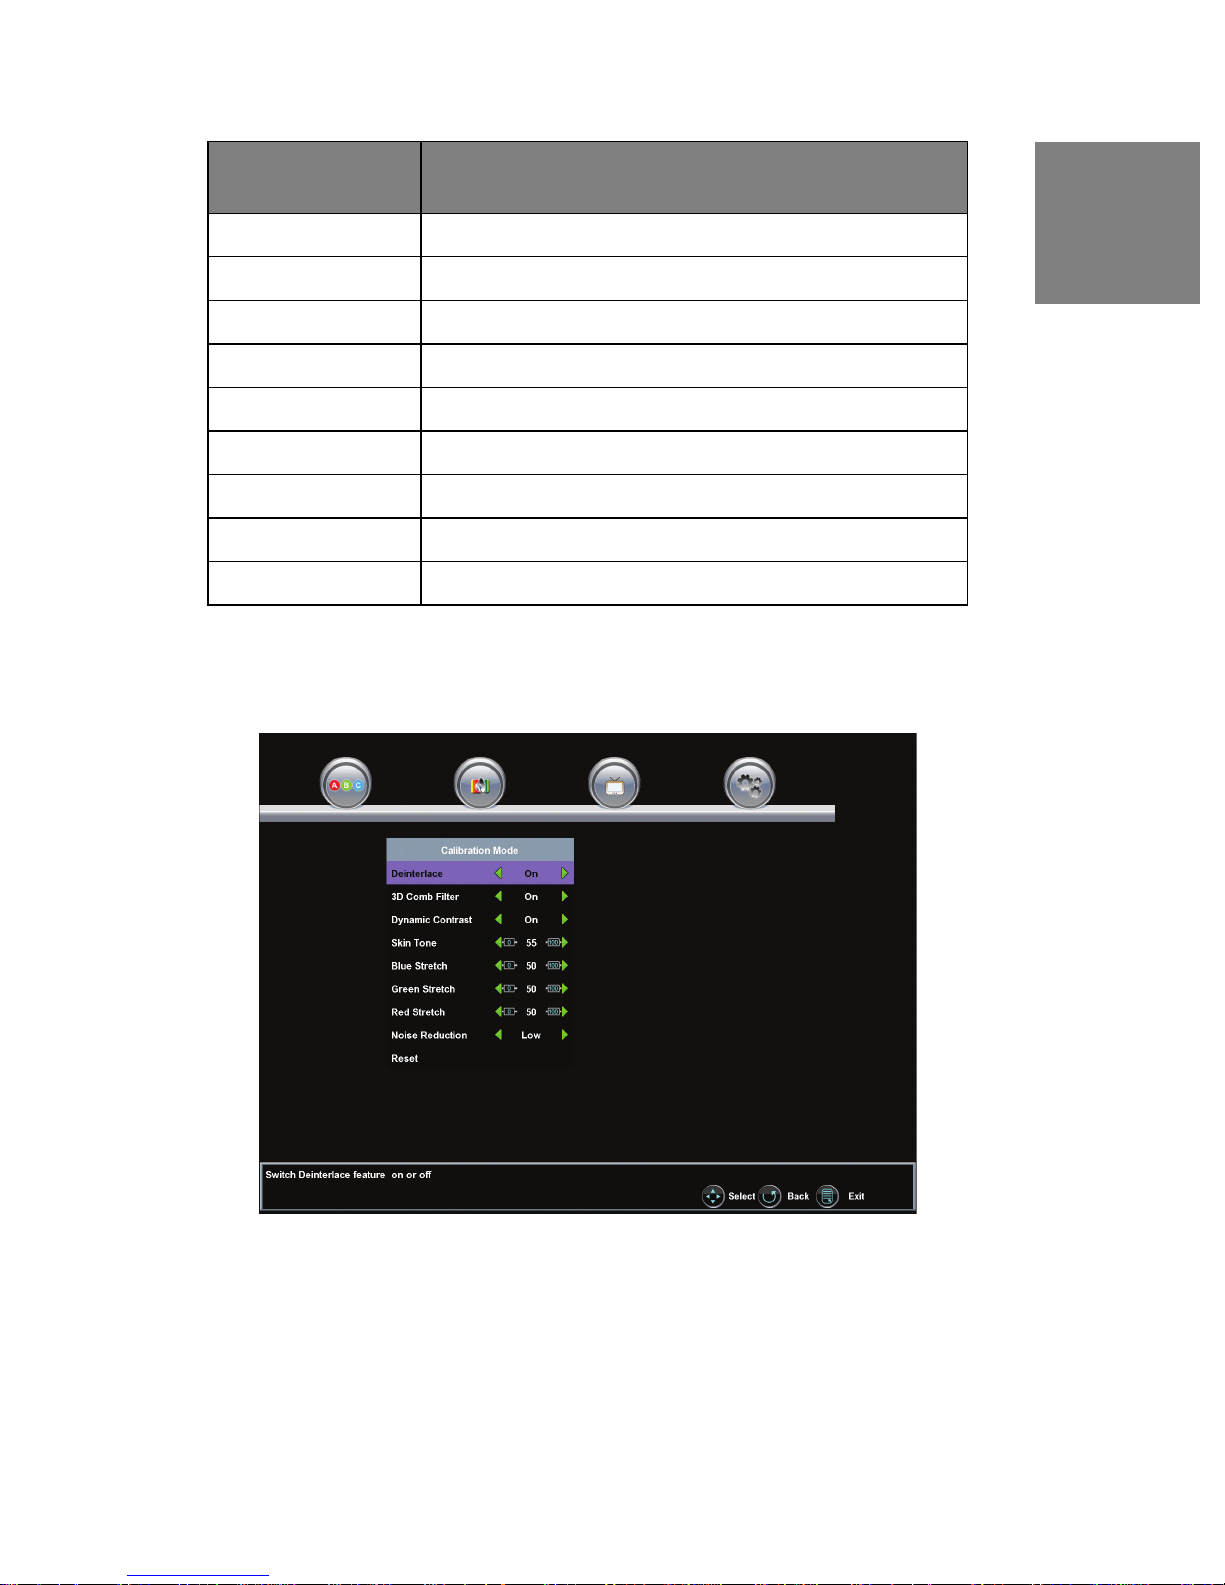
Calibration Menu
The "Calibration" menu integrates advanced choices that allow you to optimize your
HDTV experience, especially for Video setting and individual color adjustments.
English
Page 33
English
31
Calibration Menu
Features
Deinterlace Turns on/off Deinterlace
3D Comb Filter Turns on/off 3D Comb Filter. In on mode, the picture quality is
better
Dynamic Contrast Enhance dynamically the Black and White levels depending on
the displayed picture or video
Skin Tone Allow you to adjust the Skin tone
Blue Stretch Allow you to adjust the Blue level
Green Stretch Allow you to adjust the Green level
Red Stretch Allow you to adjust the Red level
Noise Reduction Select from 4 different mode for noise reduction (High, Medium,
Low and off)
Reset Resets video settings to factory default.
Function Descriptions
Page 34
32
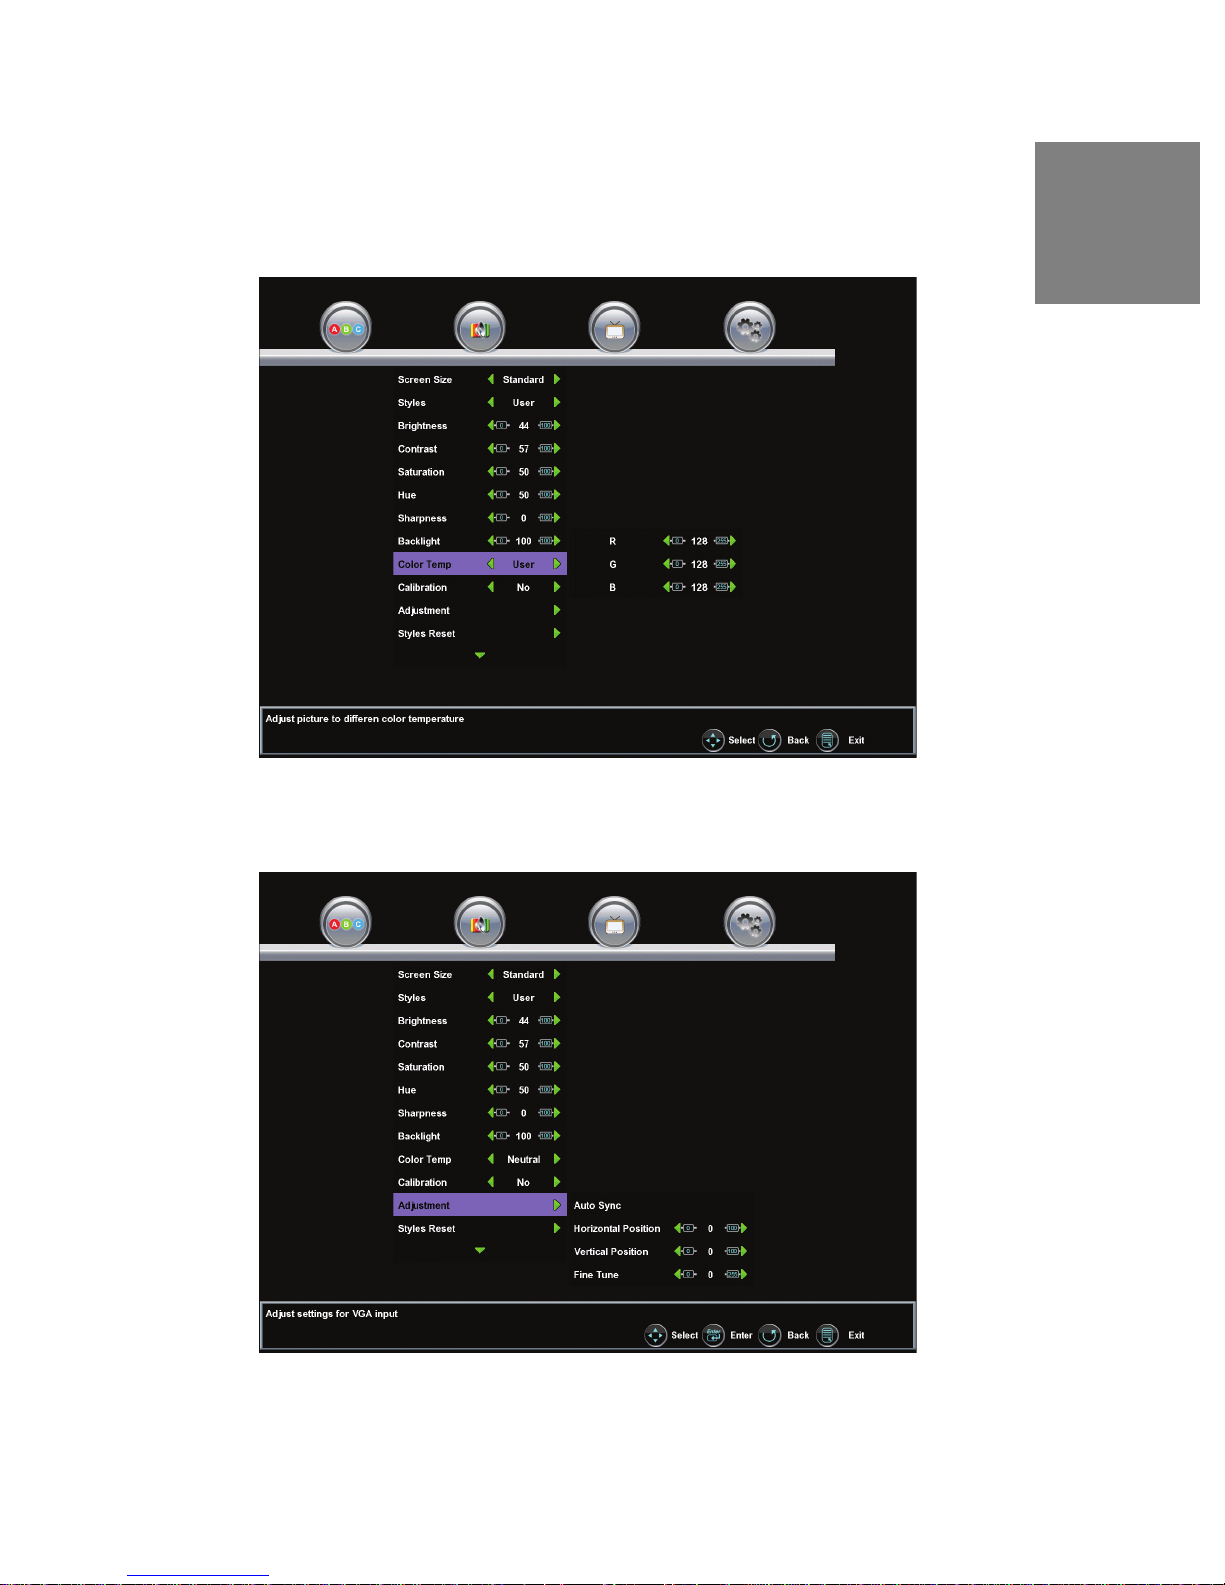
Color Temperature
The Color Temp menu allows you to adjust each color temperature (Warm, Neutral,
Cool) individually.
In case of misadjustment it can be Reset to factory default.
English
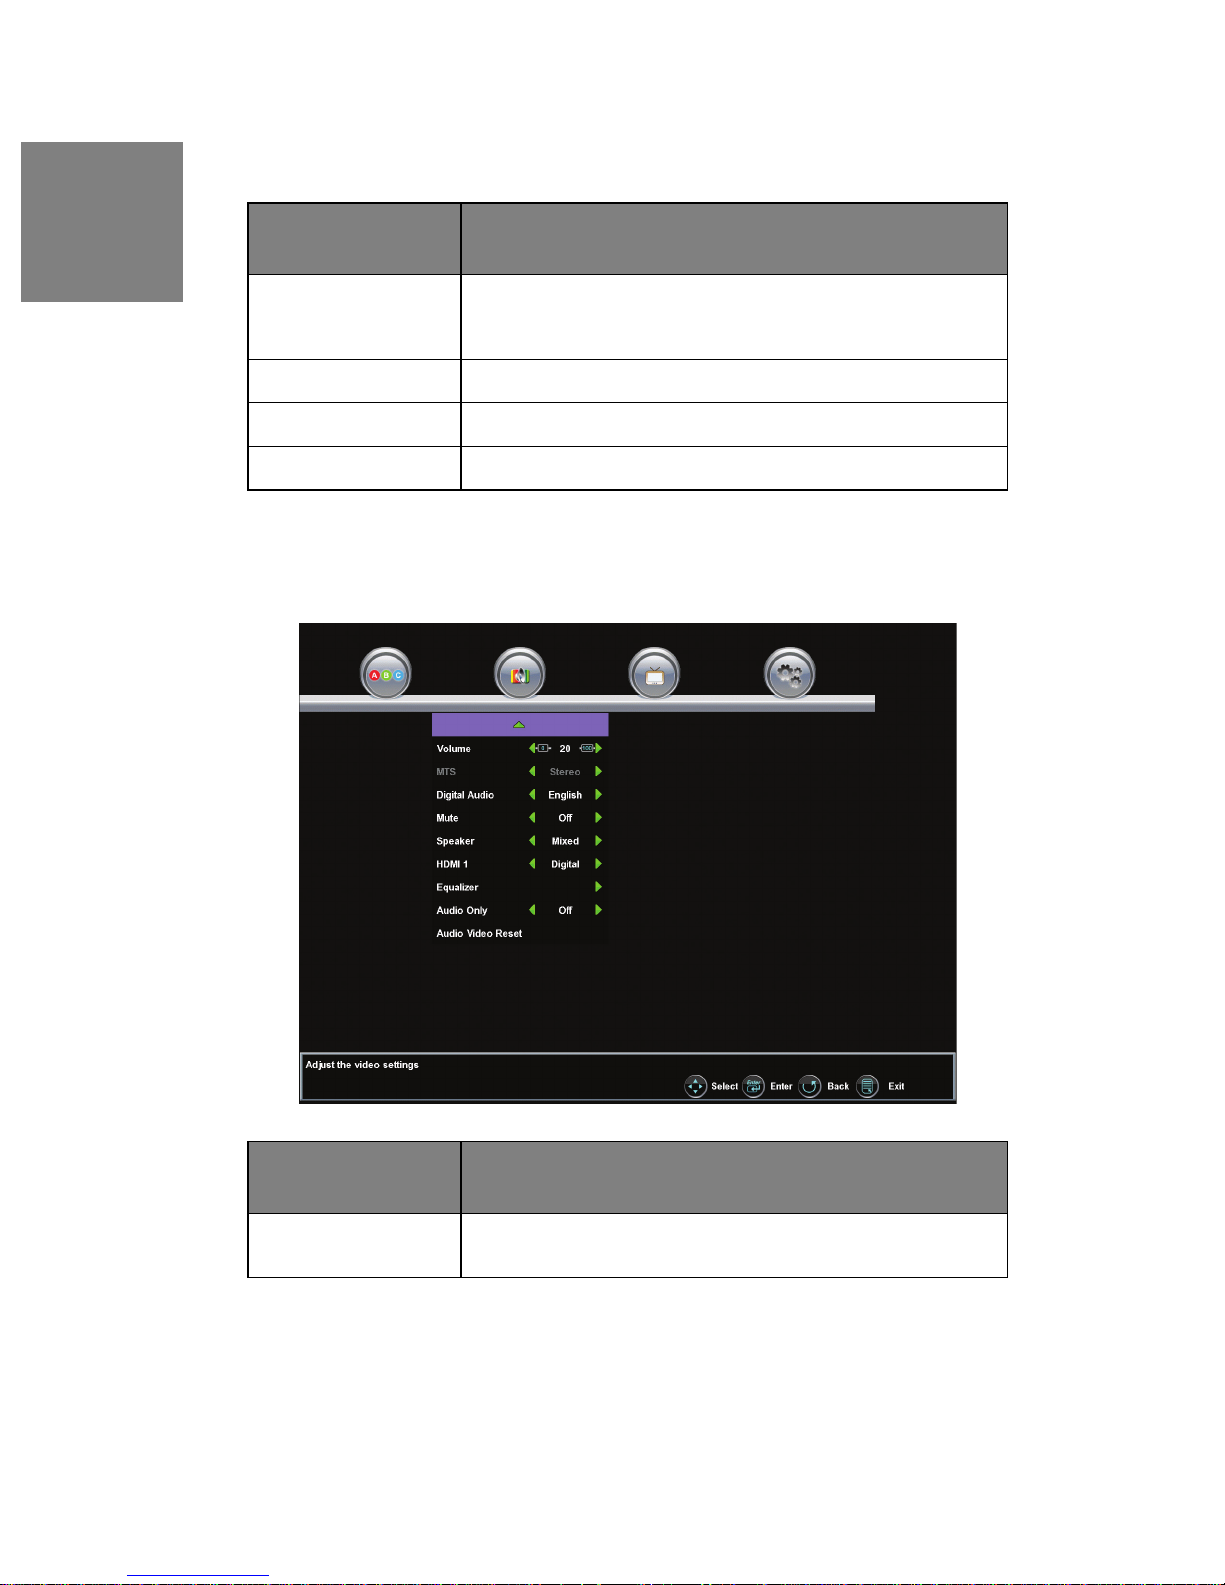
Adjustment Menu
Only available in "PC" (VGA) input mode. Lets you adjust image and phasing.
Page 35
English
33
Audio/Video Menu
Features
Auto Sync Automatically centers the image to the middle of the screen by
synchronizing both vertical and horizontal refresh rate and
resolution
Horizontal Position Manually adjust horizontal position of the screen image
Vertical Position Manually adjust vertical position of the screen image
Fine Tune Manually adjust the Phase control to eliminate Noise
Adjustment/Descriptions
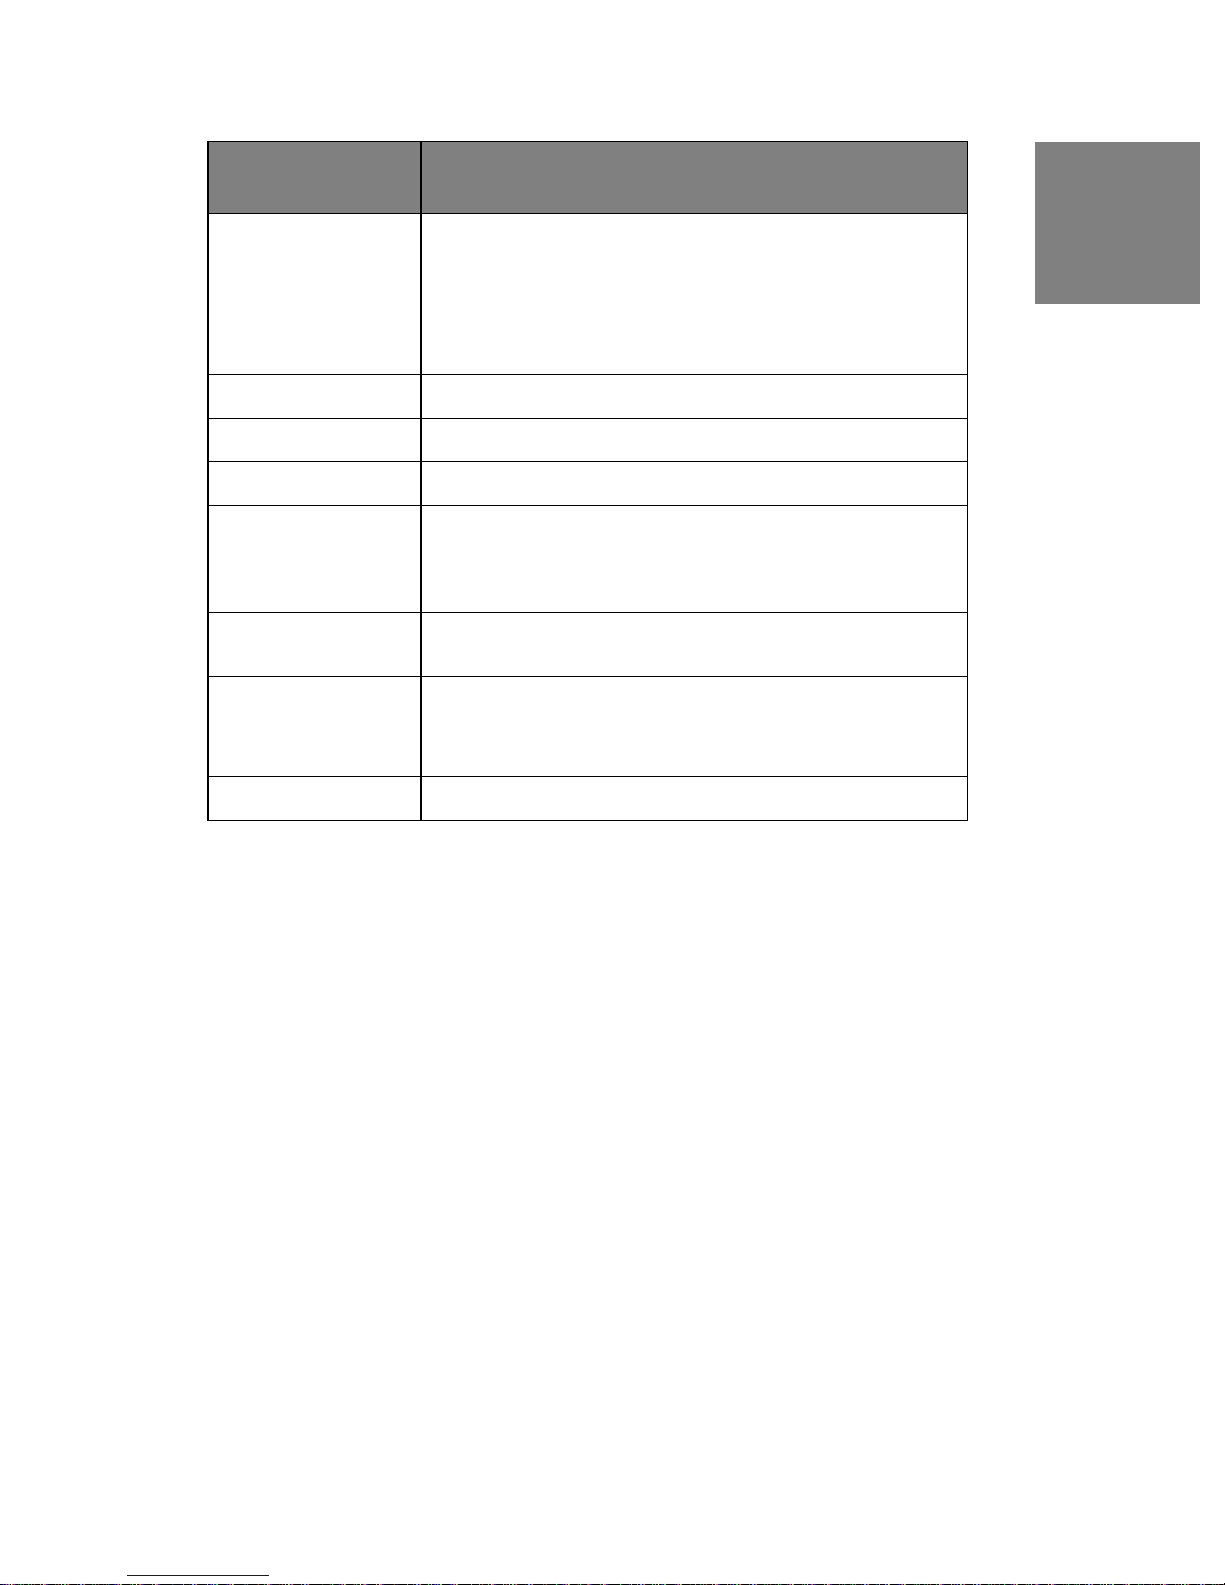
Audio Menu
The "Audio" menu let you precisely configure your audio preferences to optimize
your listening experience.
Audio/Video Menu
Features
Volume Adjust the volume by clicking left and right arrow keys on the
Adjustment/Descriptions
remote control
Page 36
34
Audio/Video Menu
Features
MTS Choose from three different MTS (Multi-Channel Television
Sound) settings:
Adjustment/Descriptions
• Mono
•Stereo
• SAP
Digital Audio Enables language selection for digital channels
Mute Turns audio on/off
Speaker Turns internal speakers on/off or have both on (Mixed)
HDMI 1 Switch the HDMI audio input source to either”
• Analog - RCA audio input
• Digital - HDMI cable integrated audio input
Audio Only Enables audio only, the picture (Backlight) will be turned off and
can be reactivated with any button of the Remote Control
Equalizer Choose from eight different audio settings:
• User, Speech, Jazz, Classic, Rock, Electronic,
Bass, Vocal
English
Audio Video Reset Reset Audio/Video mode to factory default settings
Page 37
35
English
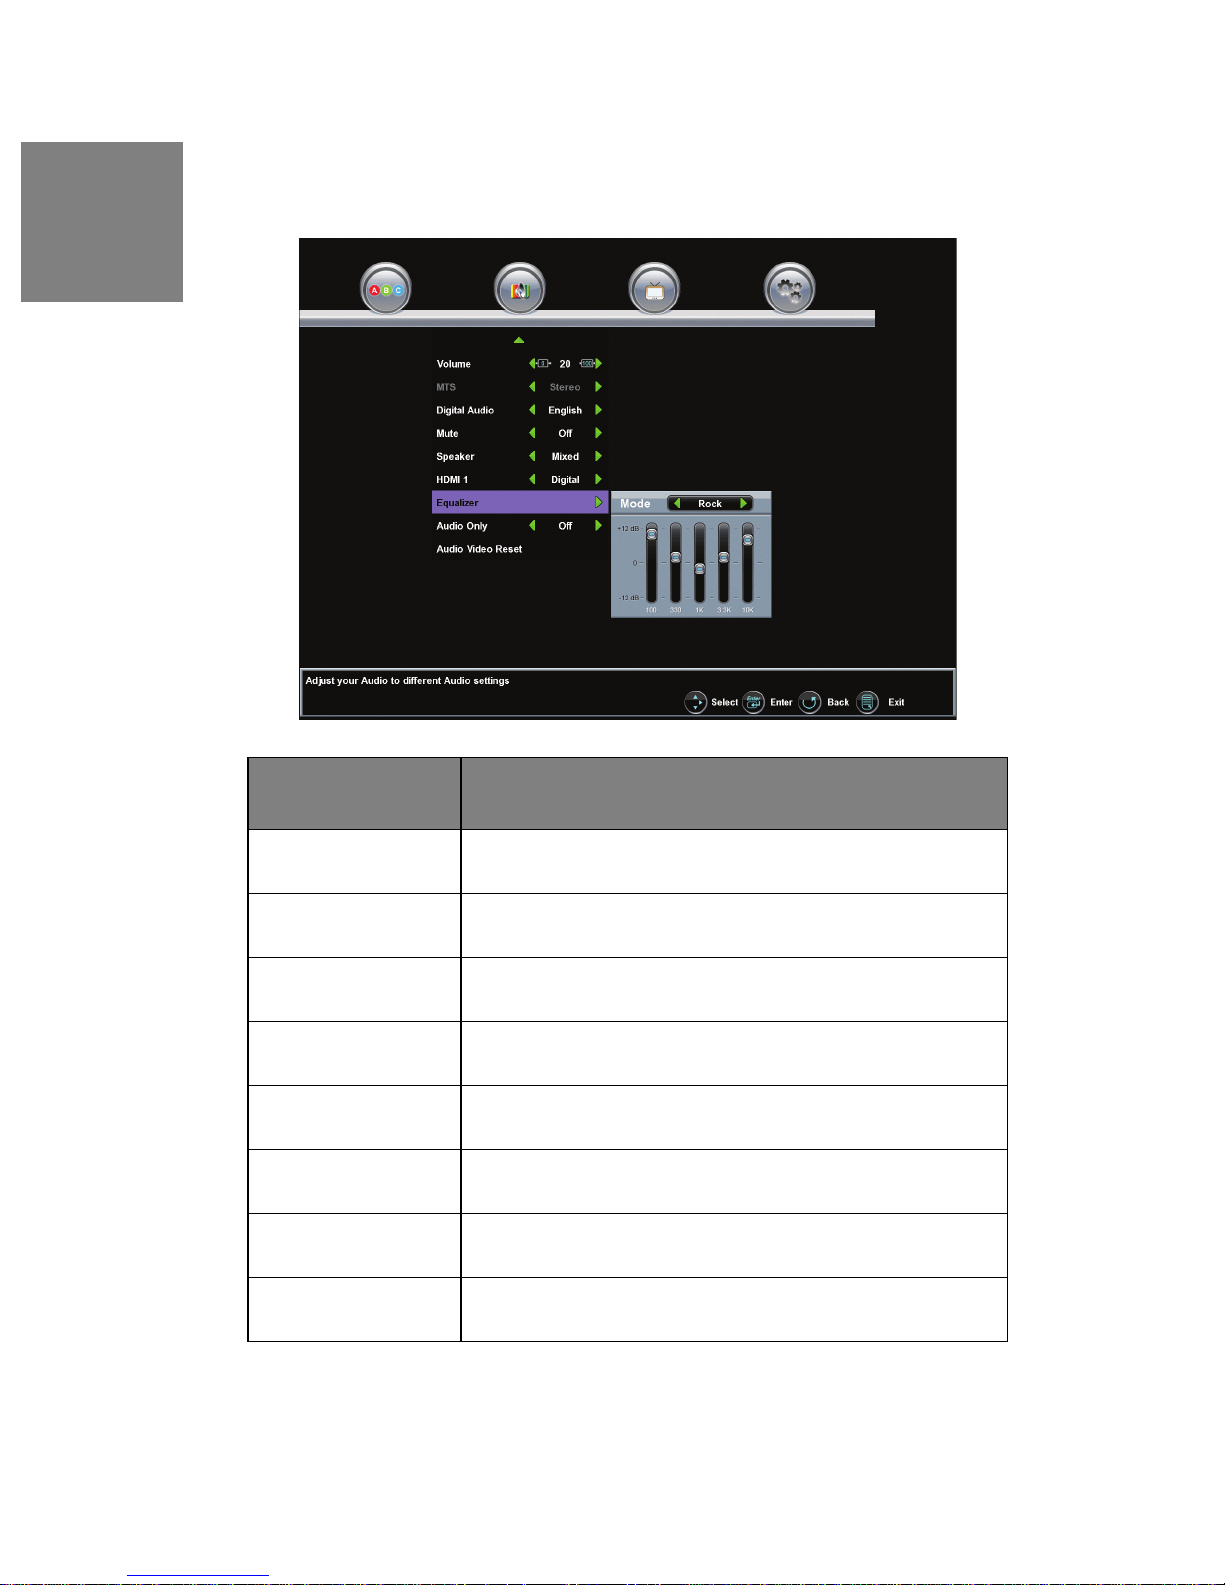
Equalizer Menu
The "Equalizer " menu let you individually configure your audio preferences to
optimize your listening experience.
Equalizer Menu
Features
User Allow you to adjust the preset mode according to your preference
and listening experience.
Rock Allow you to adjust the preset mode according to your preference
and listening experience.
Vocal Allow you to adjust the preset mode according to your preference
and listening experience.
Bass Allow you to adjust the preset mode according to your preference
and listening experience.
Speech Allow you to adjust the preset mode according to your preference
and listening experience.
Jazz Allow you to adjust the preset mode according to your preference
and listening experience.
Electronic Allow you to adjust the preset mode according to your preference
and listening experience.
Classic Allow you to adjust the preset mode according to your preference
and listening experience.
Adjustment/Descriptions
Page 38
36
TV Menu
The "TV" menu provides a broad array of functions you'll use during setup, as well
as customizing various features such as closed captioning, favorite channels.
English
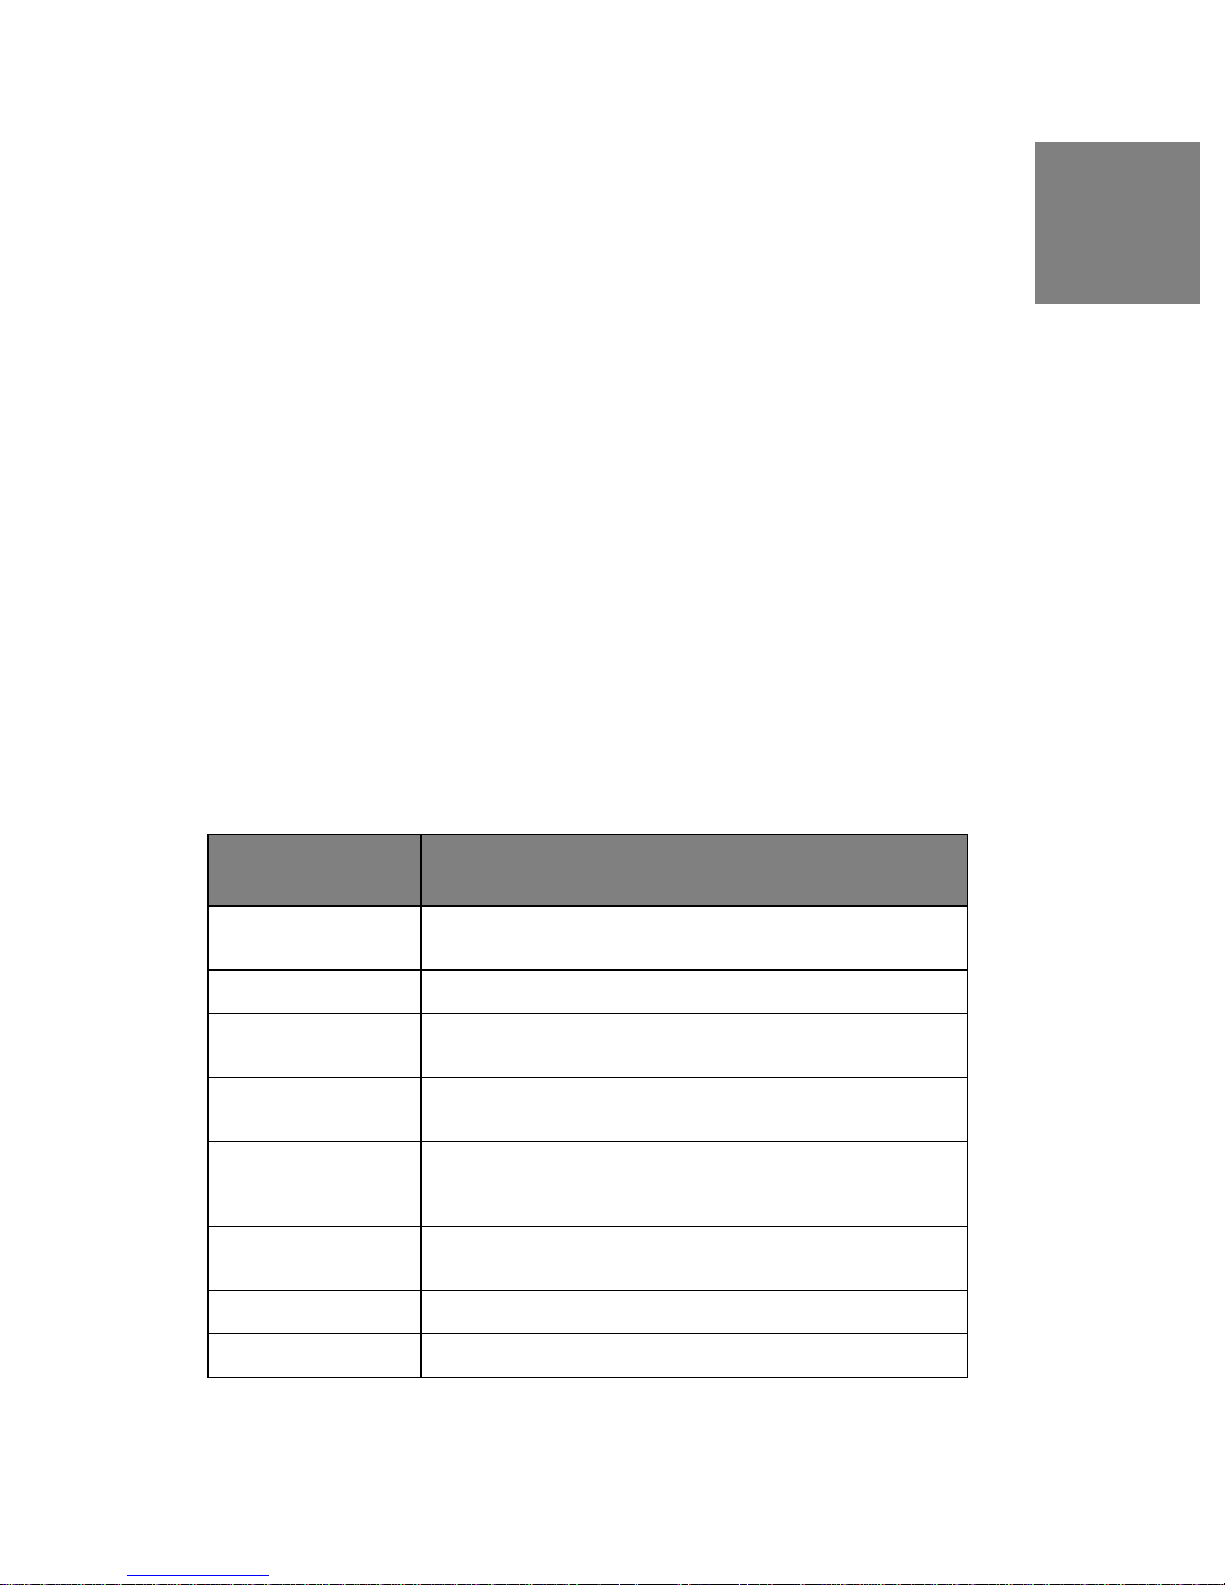
TV Menu Features
Channel Change Click the left and right arrow on the remote control to change the
channel.
Tuner Select your signal source: Air, Cable or Auto.
AutoScan Select for automatic scanning of the tuner's range of frequencies
for all viewable channels available.
Channel List Allow you to check the current list of viewable Analog, Digital or
Both TV channels available.
Channel Surf Starts automatic channel surf by switching every 5 second to
the next channel. The channel surf can be stopped by pressing
the Enter button at the remote control.
Return to Last
Channel
Information Displays information of channel, signal strength, date and time.
Returns to previously viewed channel.
Feature/Sub-Menu
Descriptions
Page 39
37
English
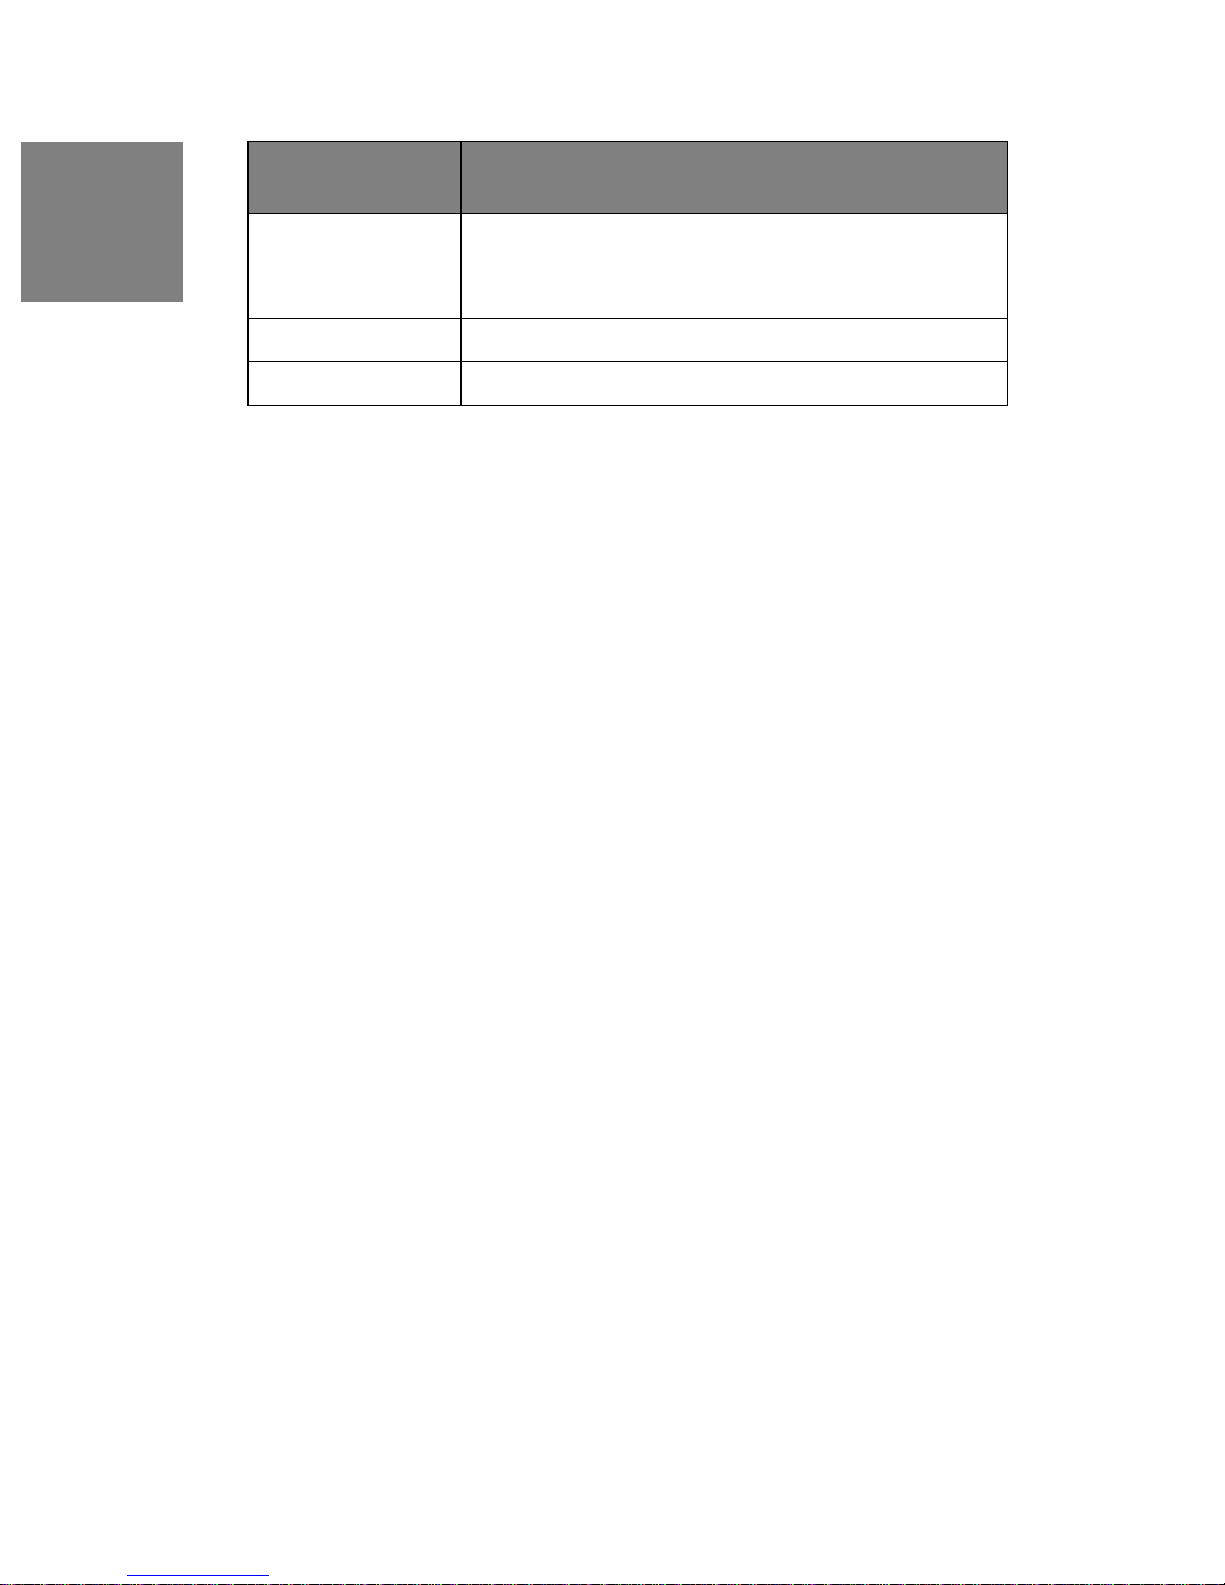
TV Menu Features
Closed Caption Allows you to turn closed captioning of audio on or off, select
analog or digital modes, or personalize the captioning style; userdefine style sub-menus provide choices for font, size, style, plus
text and background colors and opacity.
CC Setting Changes setting for closed captioning such as font, etc.
TV Tuner Reset Reset TV mode to factory default setting.
Feature/Sub-Menu
Descriptions
Page 40
38
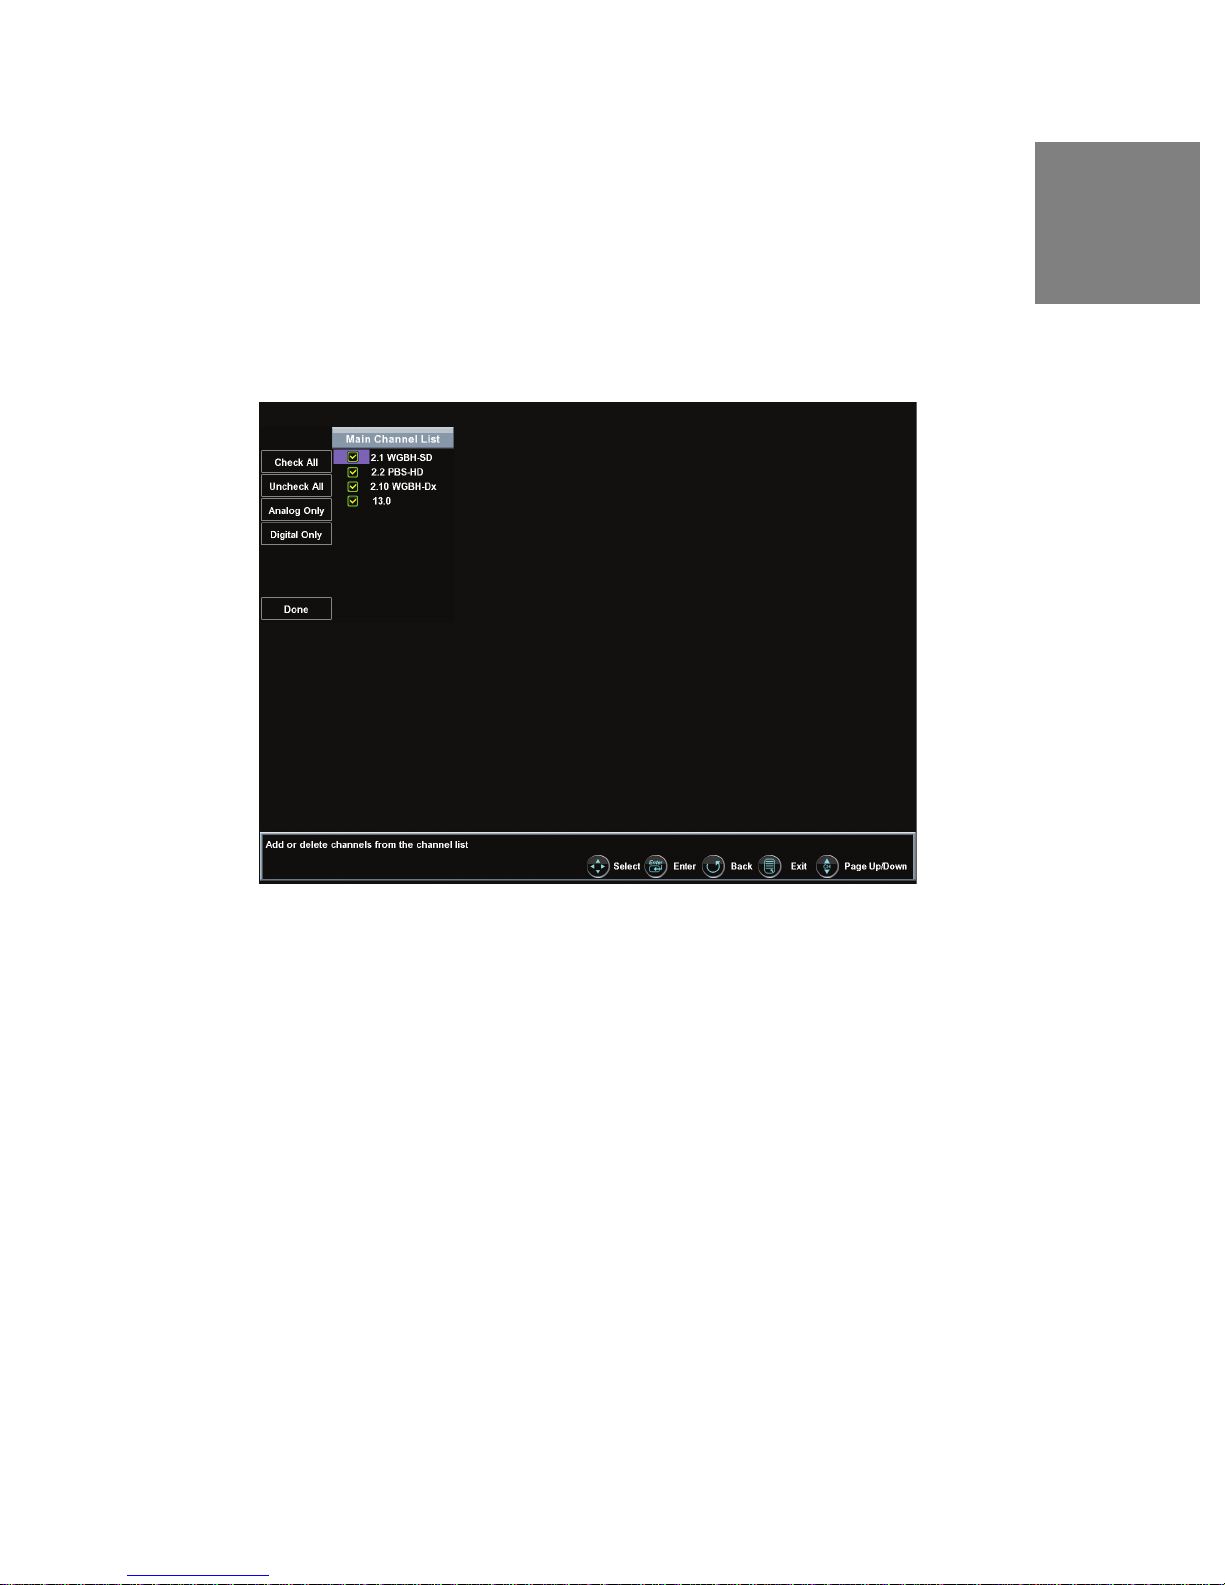
Add or delete additional TV channels
Use the OSD to access the TV Menu Feature
Select Add Channel
Add a channel by entering the physical channel number or a range.
Select Delete Channel
Delete a channel from the current list of viewable channels available.
English
Channel Number
Scroll to highlight a channel number from the list of available channels and press
Enter to delete the channel. The OSD Menu has to be fully exit in order to delete the
channel
Channel Skip
Highlight channel number and press Enter to switch to the selected Channel.
Page 41
39
English
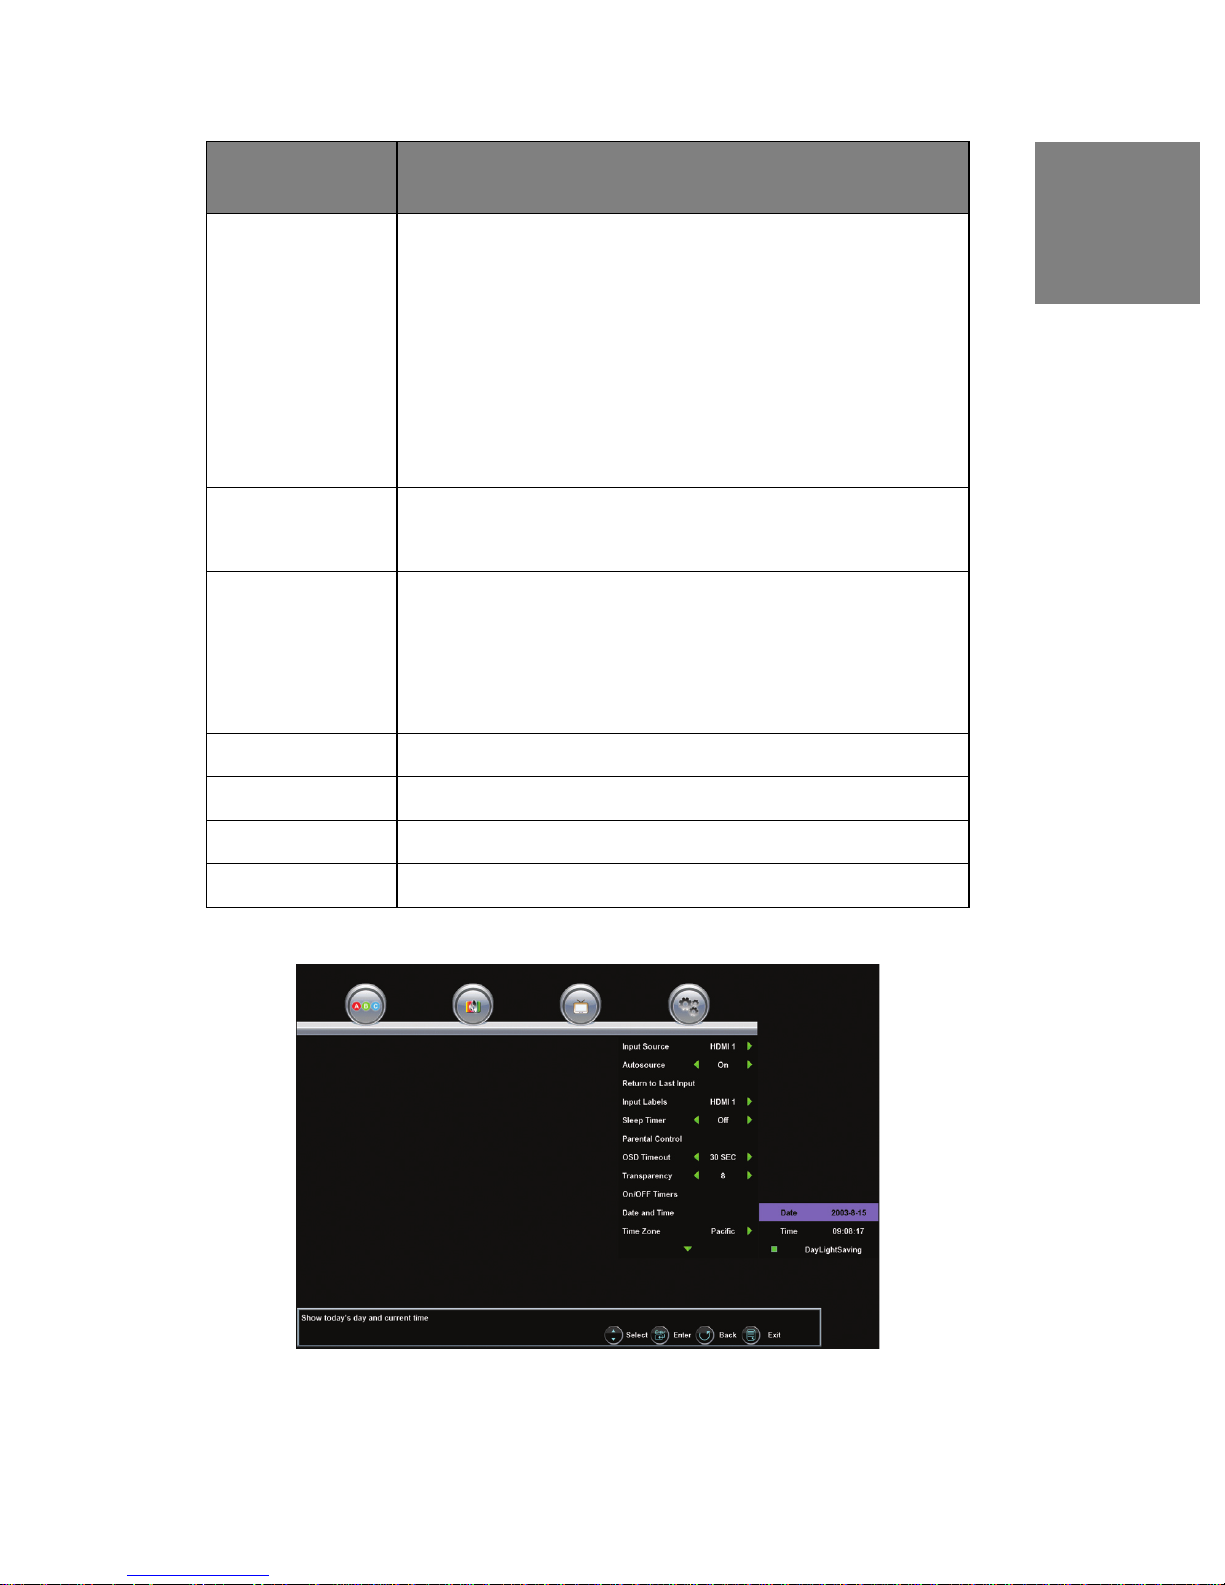
Settings Menu (Screen 1)
The "Setting" menu integrates still more choices that allow you control the
appearance of the image you see on the screen, based on the selected source input,
to manage various power-related functions to simplify your viewing experience and
save power, to optimize your HDTV experience, from language selection to pertinent
system and installation information.
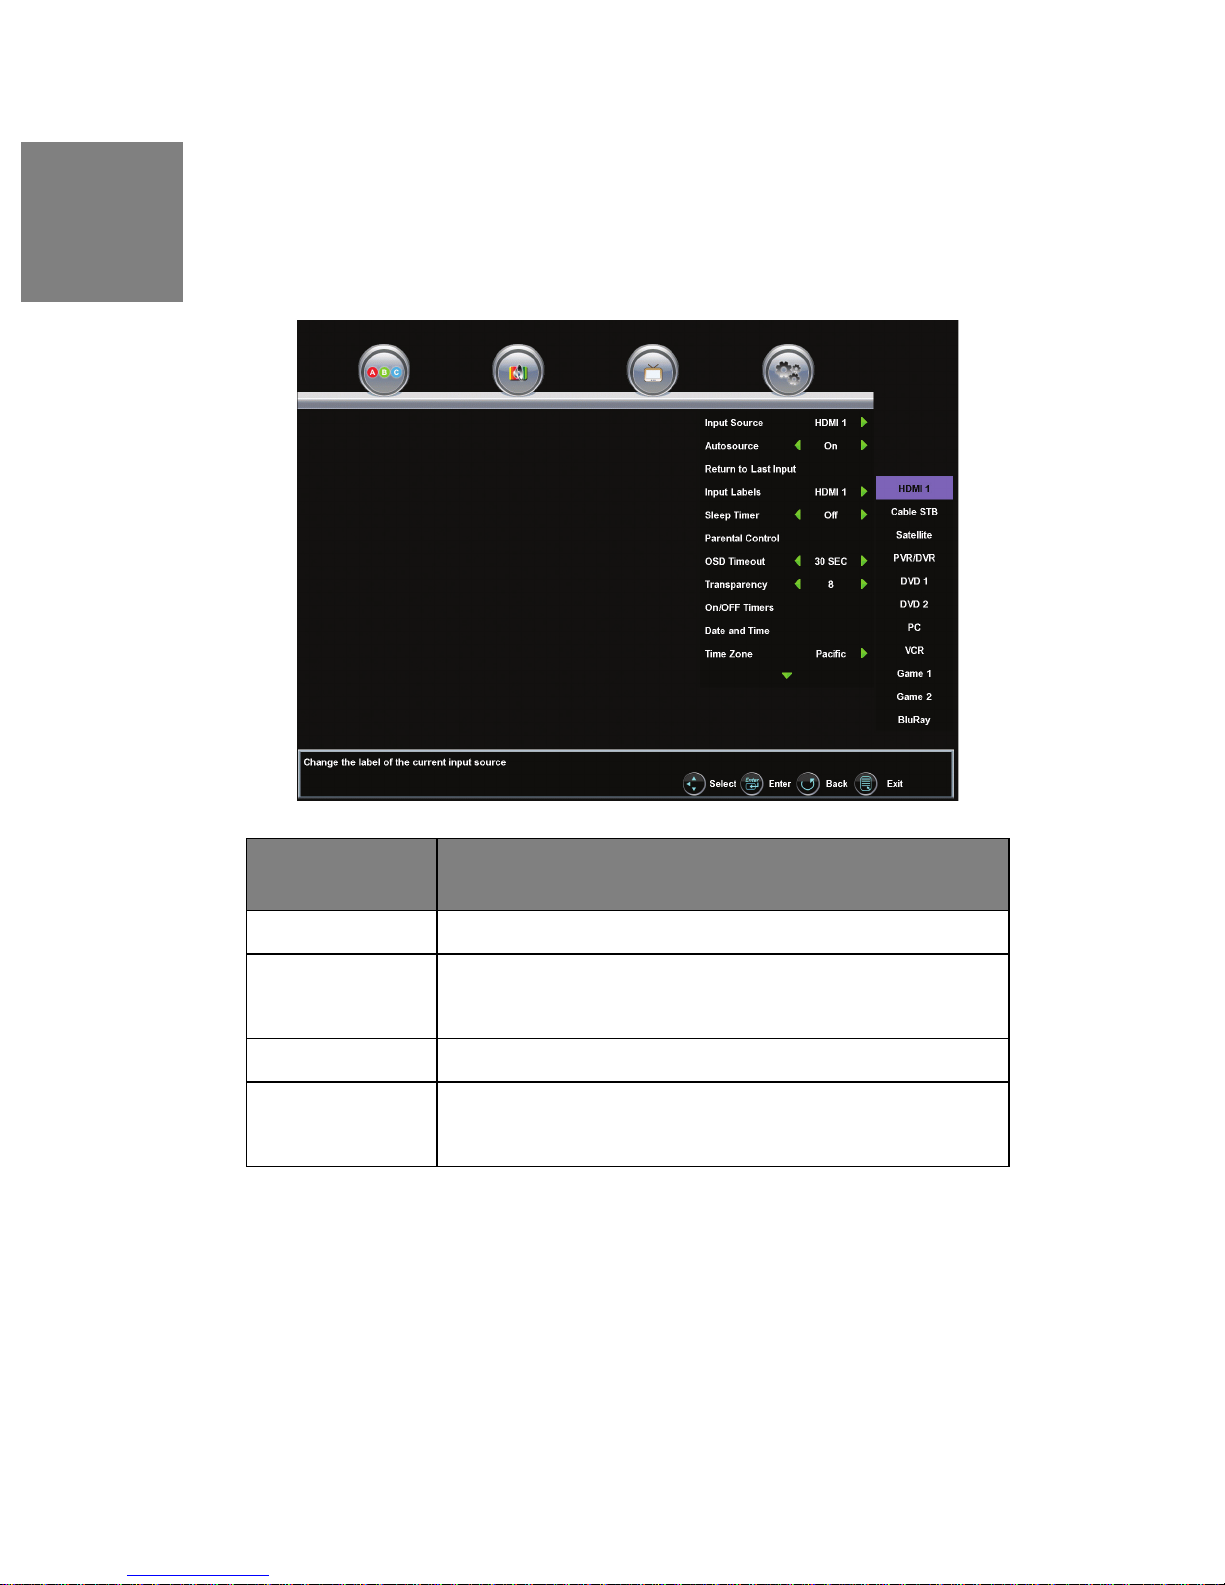
Setting Menu
Features
Input Source Let the user select the input source
Autosource™ Turns Autosource detection On/Off. In On mode Autosource can
detect a new source which is plugged in the TV and switch input
source setting of your HDTV to the source automatically.
Return to Last Input Select to return to previous input source
Input Label Allows current source input to changed to one of the labels in the
input label list; if the label is already used by another source, the
label will be reset to the default label
Function Descriptions
Page 42
40
Setting Menu
Features
Sleep Timer Sets the High Definition LCD TV to turn off after a specified amount
of time:
Function Descriptions
•Off
• 15 minutes
• 30 minutes
• 45 minutes
• 60 minutes
NOTE: The HDTV will take a few seconds to return from Sleep
mode.
Parental Controls Displays the parental control menu for password-controlled channels
and content; sub-menus include lock-outs according to ratings,
channels and content
OSD Timeout Select On/Off for the OSD to leave the screen; when set to "On", the
OSD will time out in one of three selected time frames:
• 5 seconds
• 10 seconds
• 30 seconds
English
Transparency Adjust the transparency level of the OSD
On/Off Timer Set the time for the LCD TV to power on or off
Date and Time Set the date and time of the LCD TV
Time Zone Set the High Definition LCD TV to your local time zone
Page 43
41
English
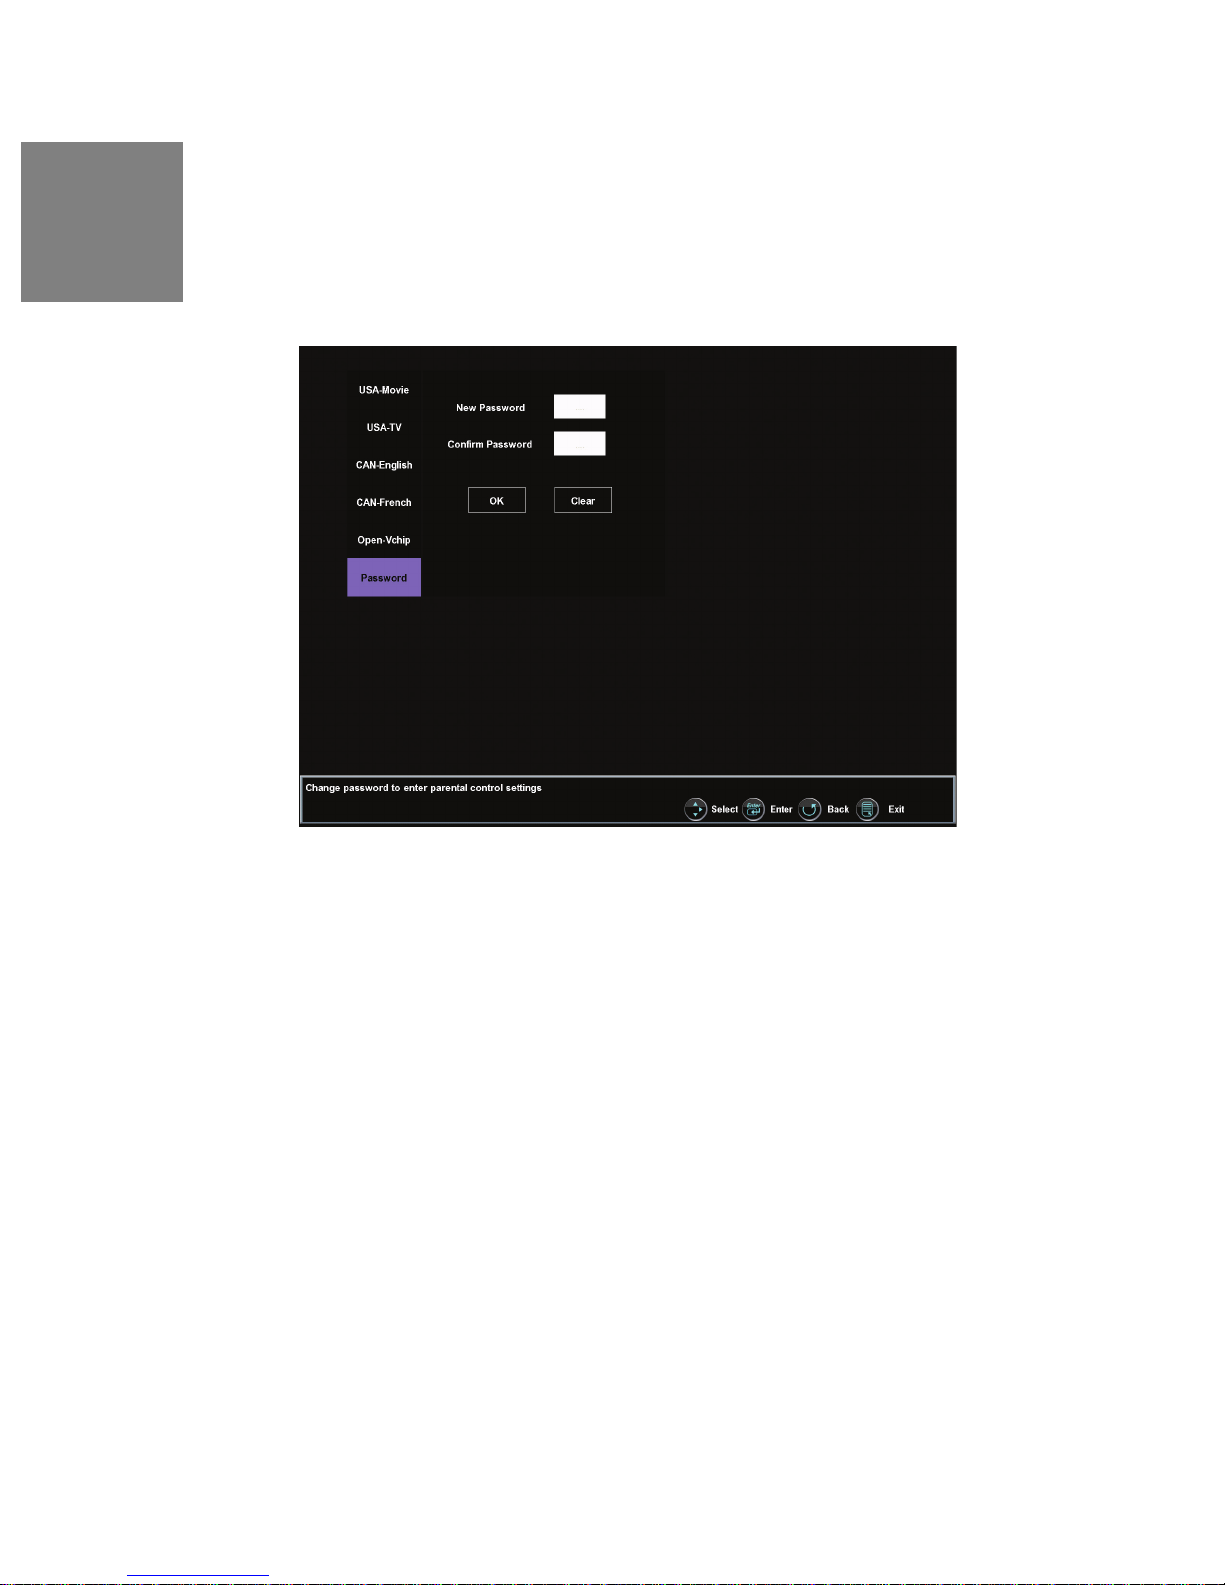
About Parental Controls
The Parental Controls feature allows you to block TV programs based on various
ratings systems, as well as to lock out the HDTV's right side-mounted controls. The
first time you enter the "Parental Control" menu, you will be taken to the password
sub-menu to set up your four-digit password, which is required for using this feature.
You will be prompted to enter your selected password any time you wish to lock or
unlock selected programming ratings or channels.
Page 44
42
Lock Channel
English
Parental Control Menu Features Descriptions and Definitions
Lock Channel Lock or unlock the HDTV’s right side-mounted
controls.
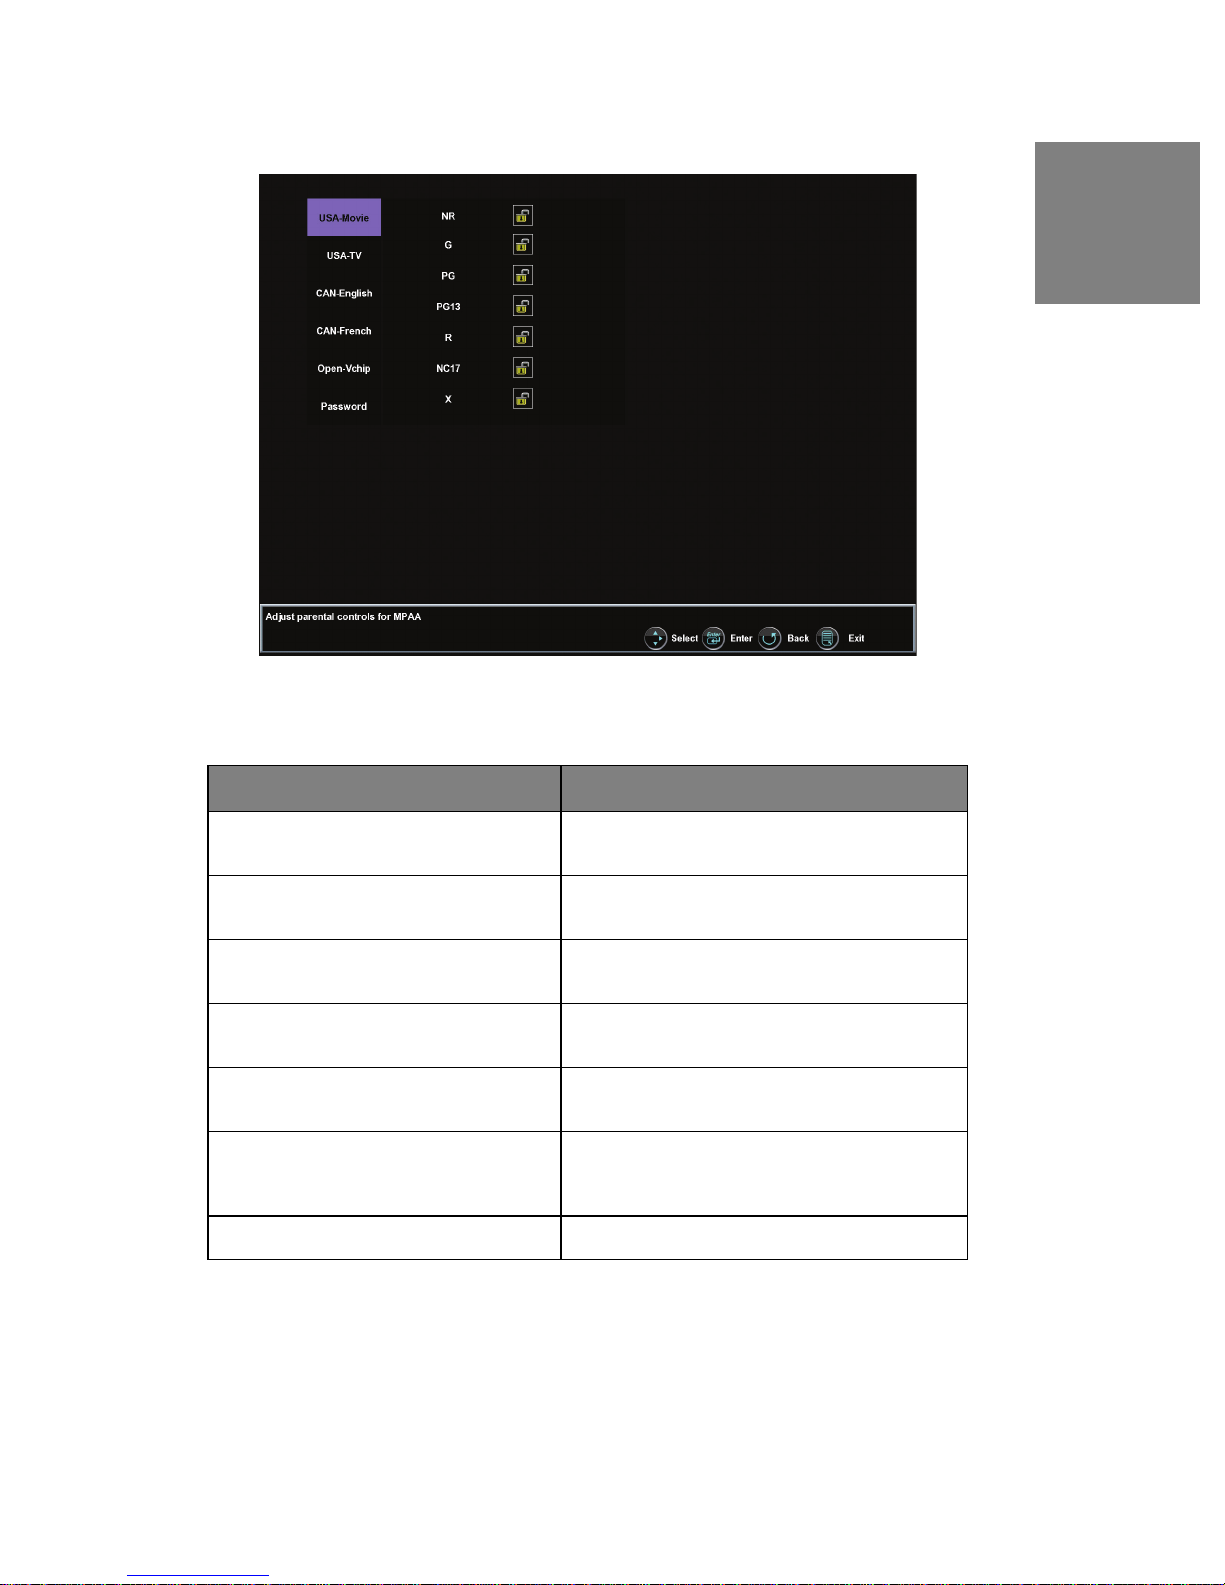
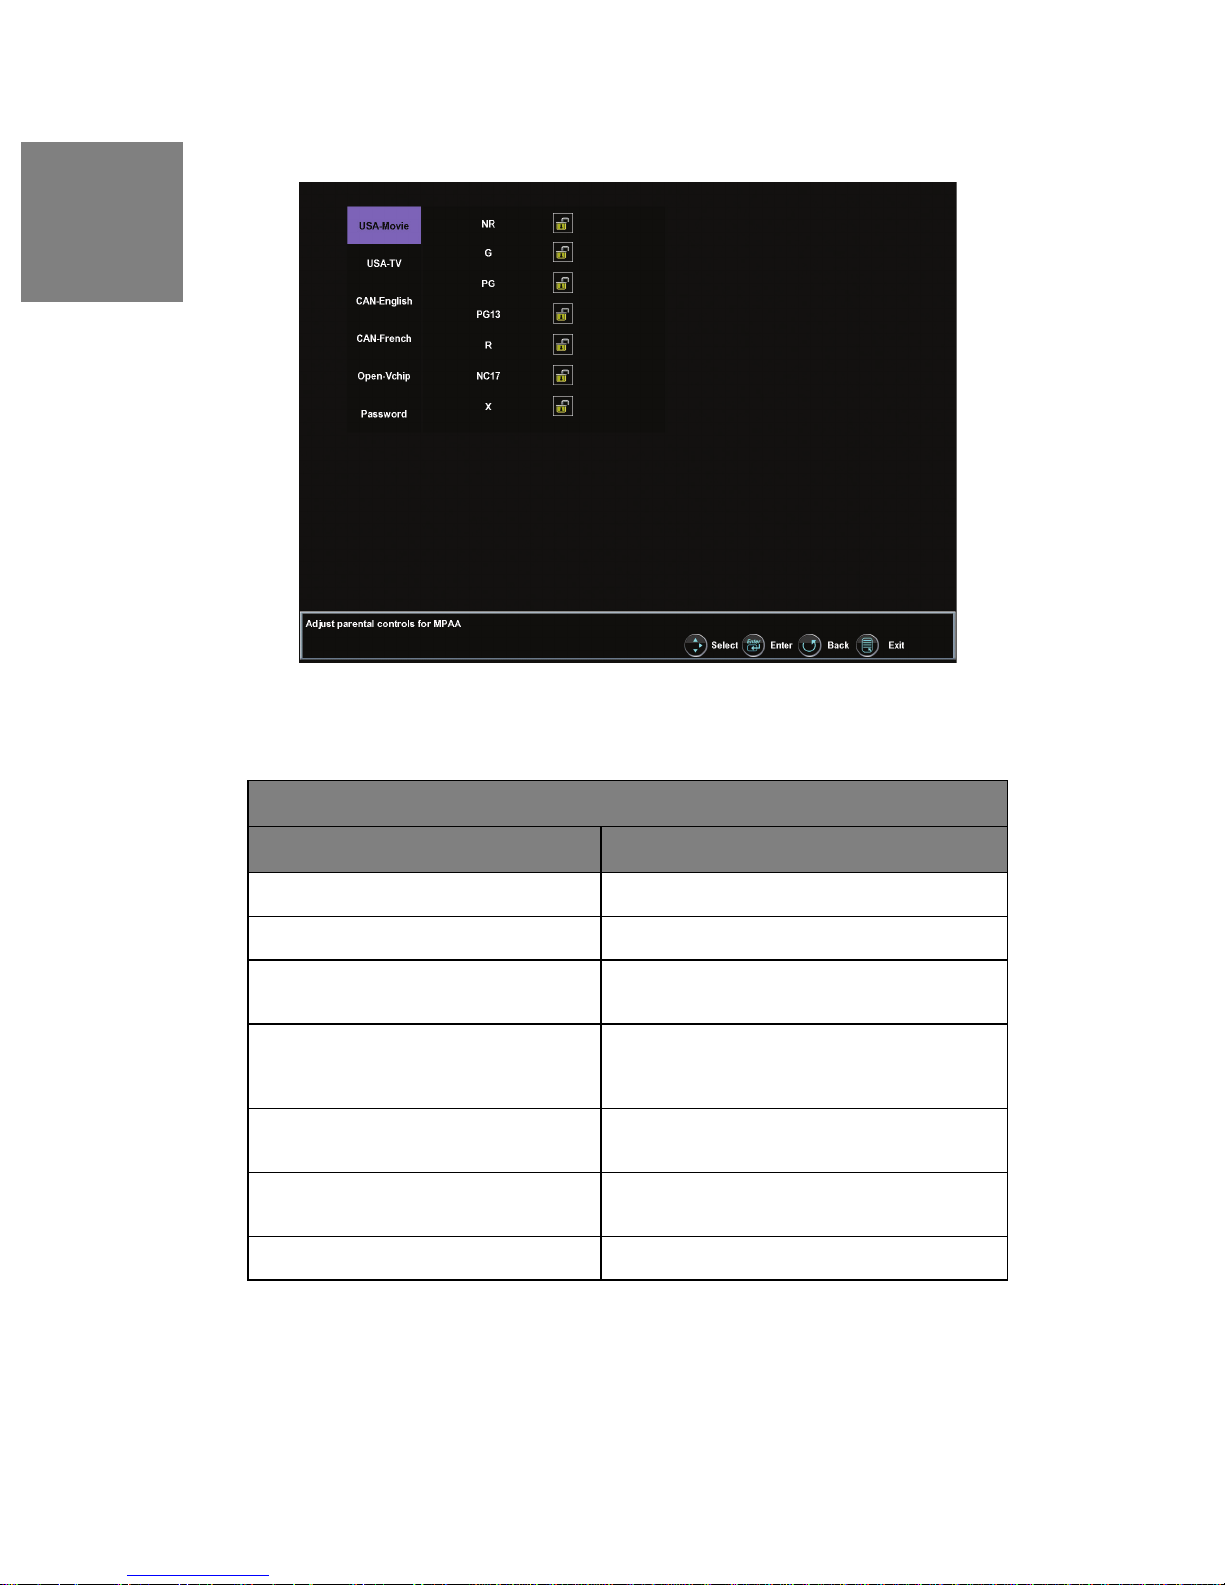
US MPAA Rating Lock or unlock programming according to
MPAA Ratings.
US TV Rating Lock or unlock programming according to TV
rating and/or content.
CA English Rating Lock or unlock programming according to
Canadian English Ratings.
CA French Rating Lock or unlock programming according to
Canadian French Ratings.
Open-Vchip Open V-chip technology is mandated by the
FCC which can be programmed to adapt to
changing standards.
Password Select a new parental control password.
Page 45
43
English
US MPAA Rating
US MPAA Ratings and Content Sub-Menu
Rating Definitions
NR Not Rated
G General audience - All ages admitted
PG Parental Guidance suggested - Some material
might be unsuitable for children
PG-13 Parental Strongly cautioned - Some material
might be inappropriate for children under 13
years of age
R Restricted - Viewers younger than 17 require
accompaniment of a parent or adult guardian
NC-17 No Children 17 - Children under 17 are not
Admitted
X Adult audience only
Page 46
44
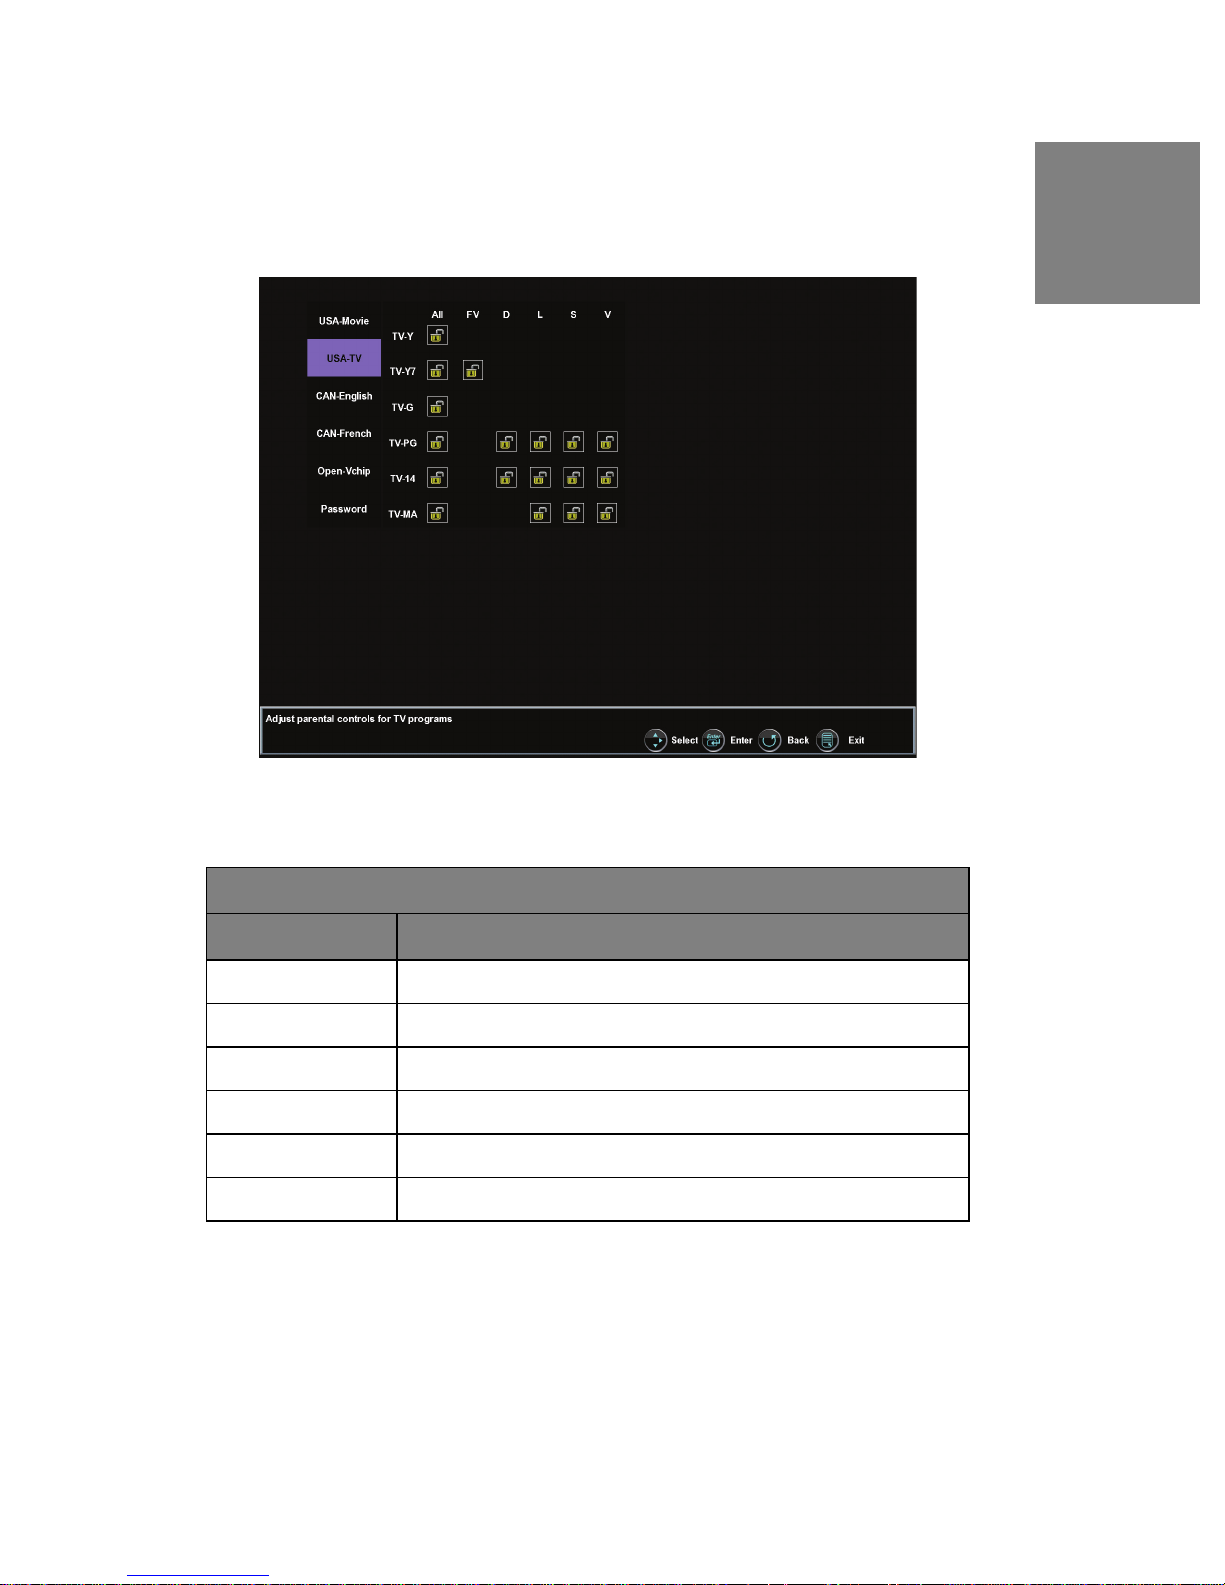
US TV Ratings and Content
This sub-menu allows you to block programming according to US TV Ratings as well
as content type.
English
US MPAA Ratings and Content Sub-Menu
Rating Definitions
TV Y All children
TV Y7 Directed to older children
TV G General audience
TV PG Parental guidance suggested
TV 14 Parents strongly cautioned
TV MA Mature audience only
Page 47
English
45
US MPAA Ratings and Content Sub-Menu
Content Definitions
All All Content
FV Fantasy Violence
D Sexually Suggestive Dialog
L Adult Language
S Sexual Situations
V Violence
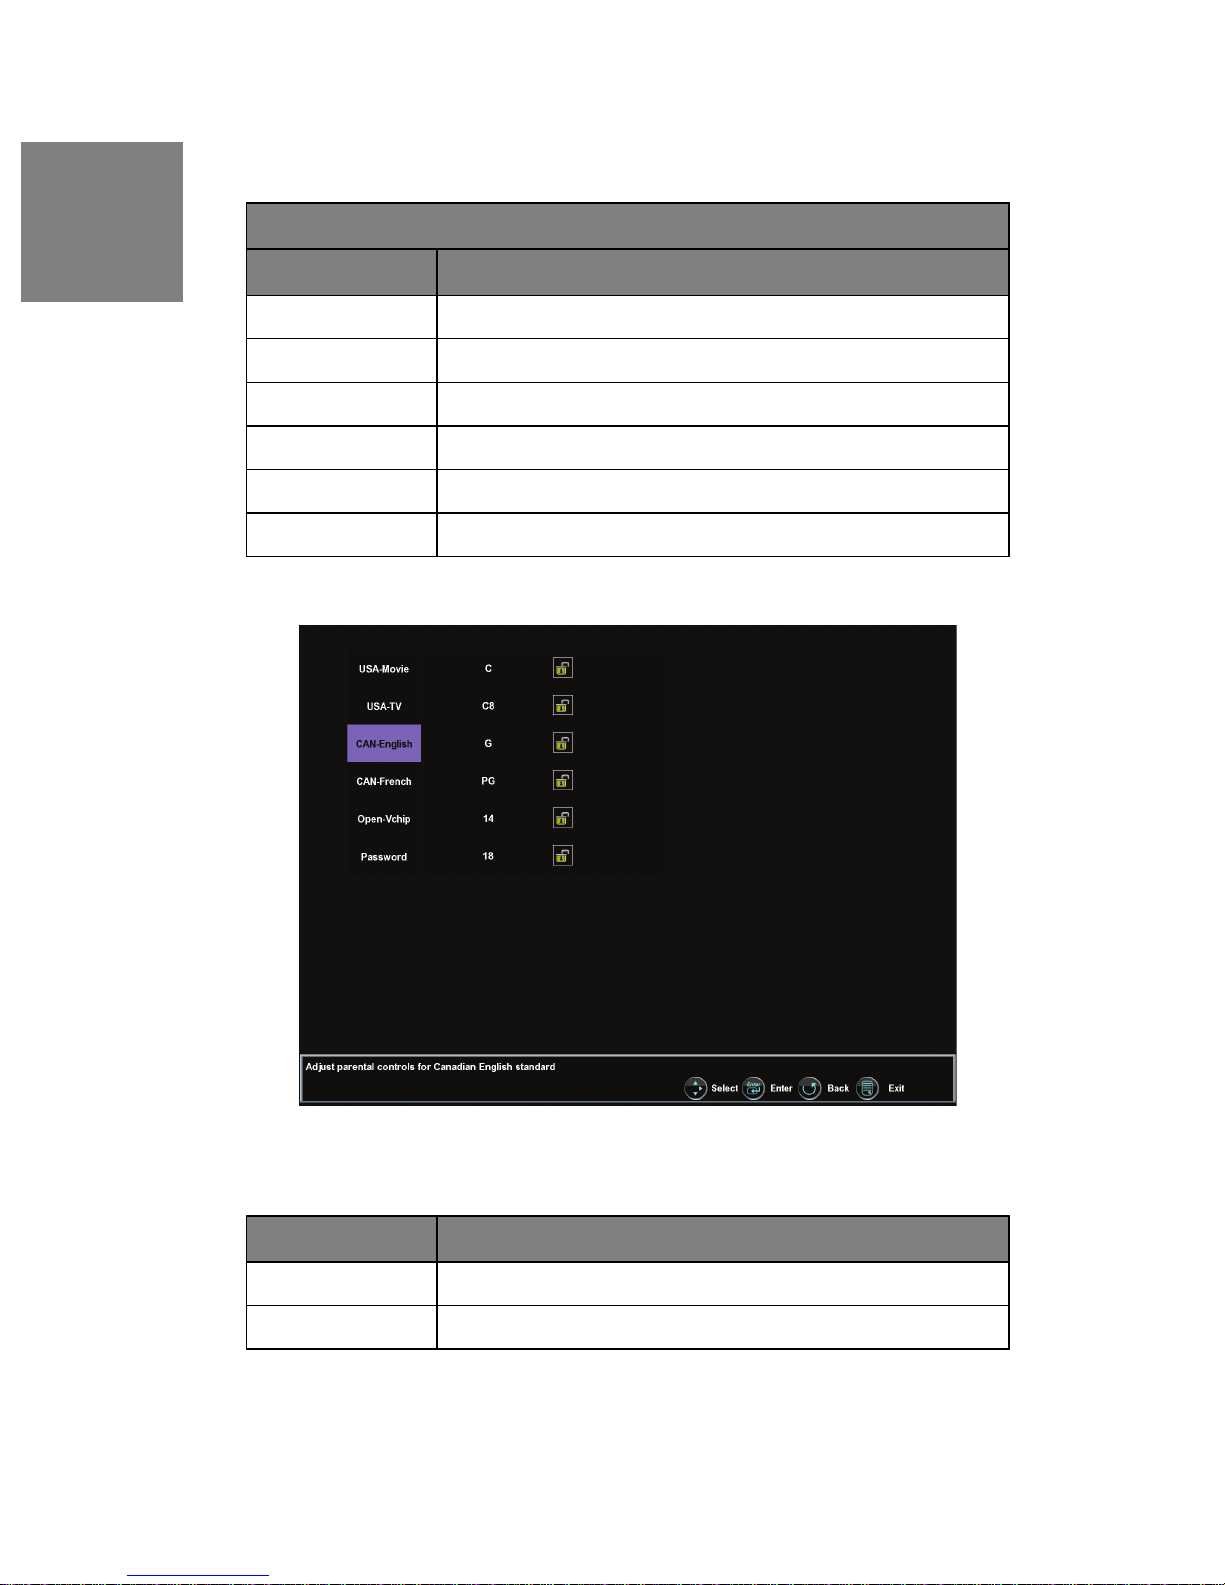
Canadian English Ratings
Rating Definitions
C Children
C8 Children over 8 years old
Page 48
46
Rating Definitions
G General
PG Parental Guidance
14 Over 14 years old
18 Adults
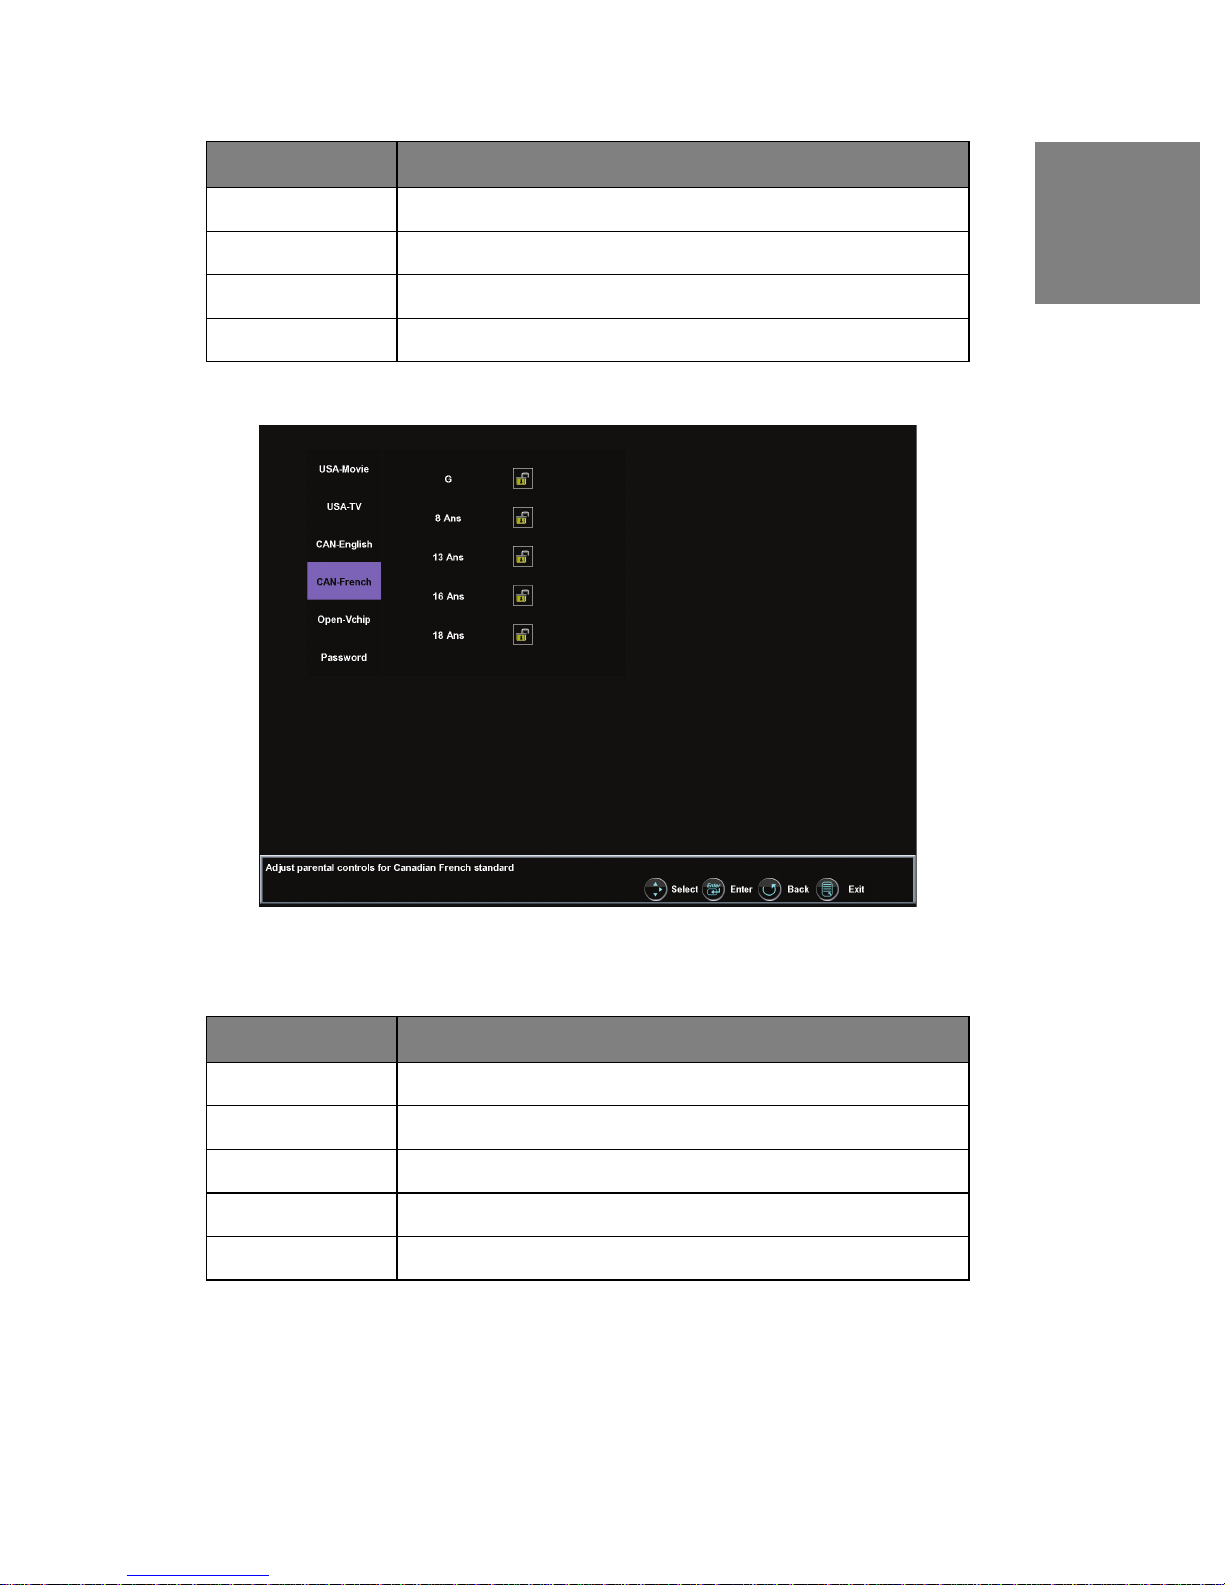
Canadian French Ratings
English
Rating Definitions
G General
8Ano General but inadvisable for young children
13Ano Over 13 years old
16Ano Over 16 years old
18Ano Over 18 years old
Page 49
47
English
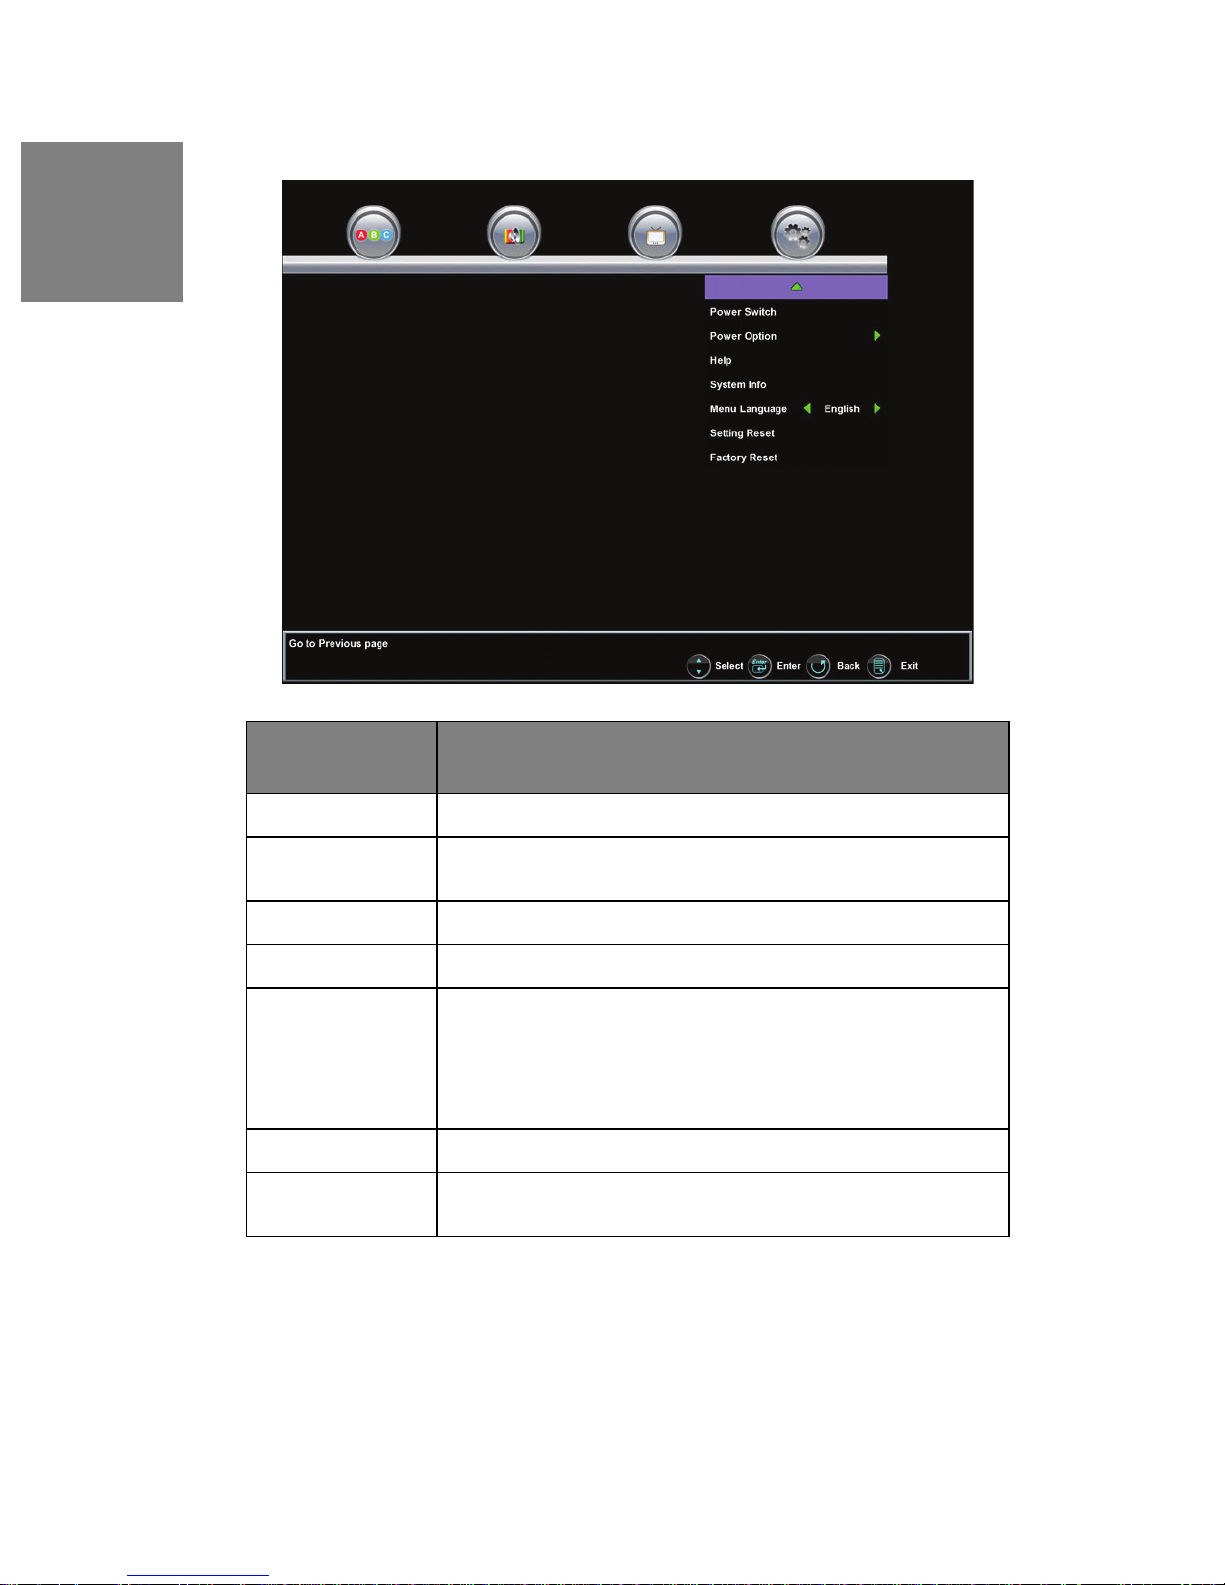
Settings Menu (Screen 2)
Setting Menu
Features
Power Switch Select to turn off TV
Power Option To manage various power-related functions to simplify your viewing
experience and save power
Help Display a Quick Install Matrix for referencing connections
System Info Access system information like Firmware version
Menu language Select the OSD language from the following:
Function Descriptions
• English
• Spanish
• French
Setting Reset Reset setting mode to factory default settings
Factory Reset Reset all of the HDTV’s OSD menu settings (except parental controls
and scanned TV channels) back to the factory default settings.
Page 50
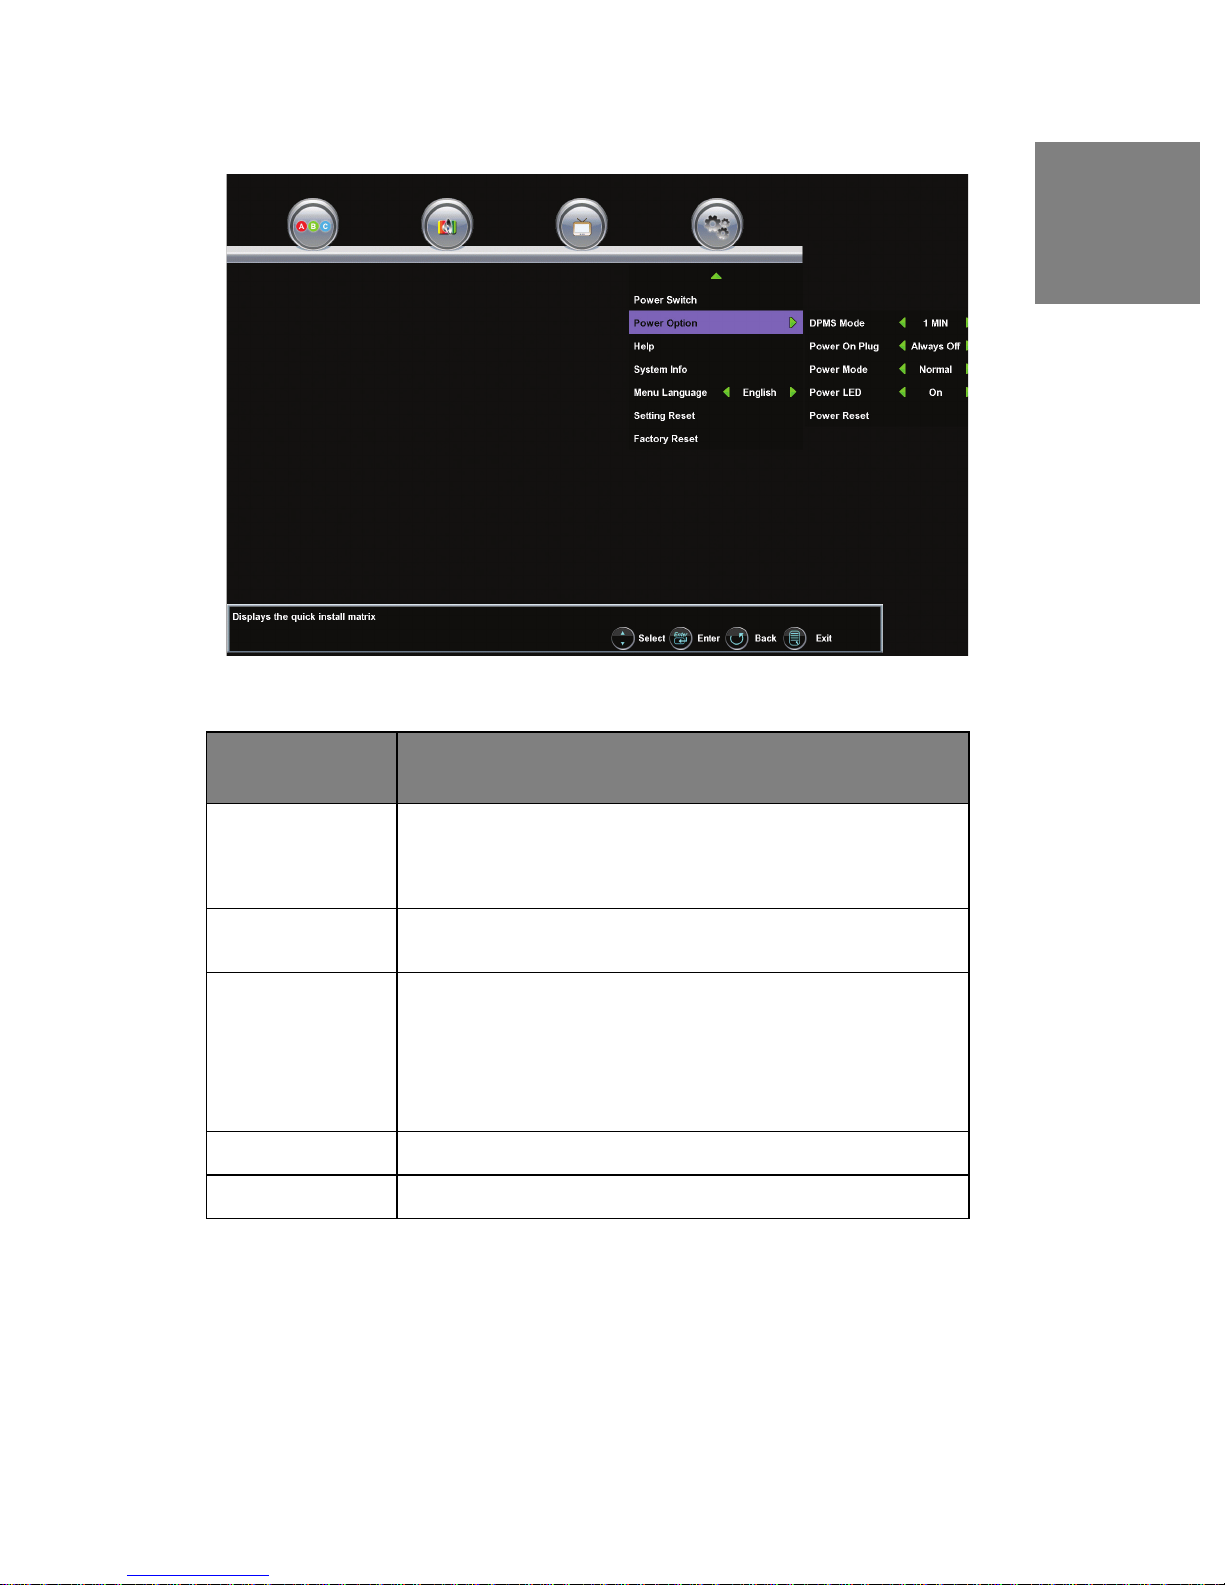
48
Power Option
English
Power Menu
Features
DPMS Mode Lets you turn the DPMS (Display Power Management Signaling) On/
Off; when “On”, the display goes into Standby mode If there is no
incoming signal from the selected input for off, 3-sec, 10-sec or 30sec interval.
Power On Plug Enables/disables feature that allows your HDTV to automatically turn
back on when power is restored.
Power Mode Set the power boot up mode:
Function Descriptions
• E. Saver - takes longer to come back from S tandby but
requires less power
• Normal - faster return from Standby but requires more
power.
LED Turns the HDTV’s LED on or off.
Power Reset Reset power mode to factory default settings.
Page 51
49
English
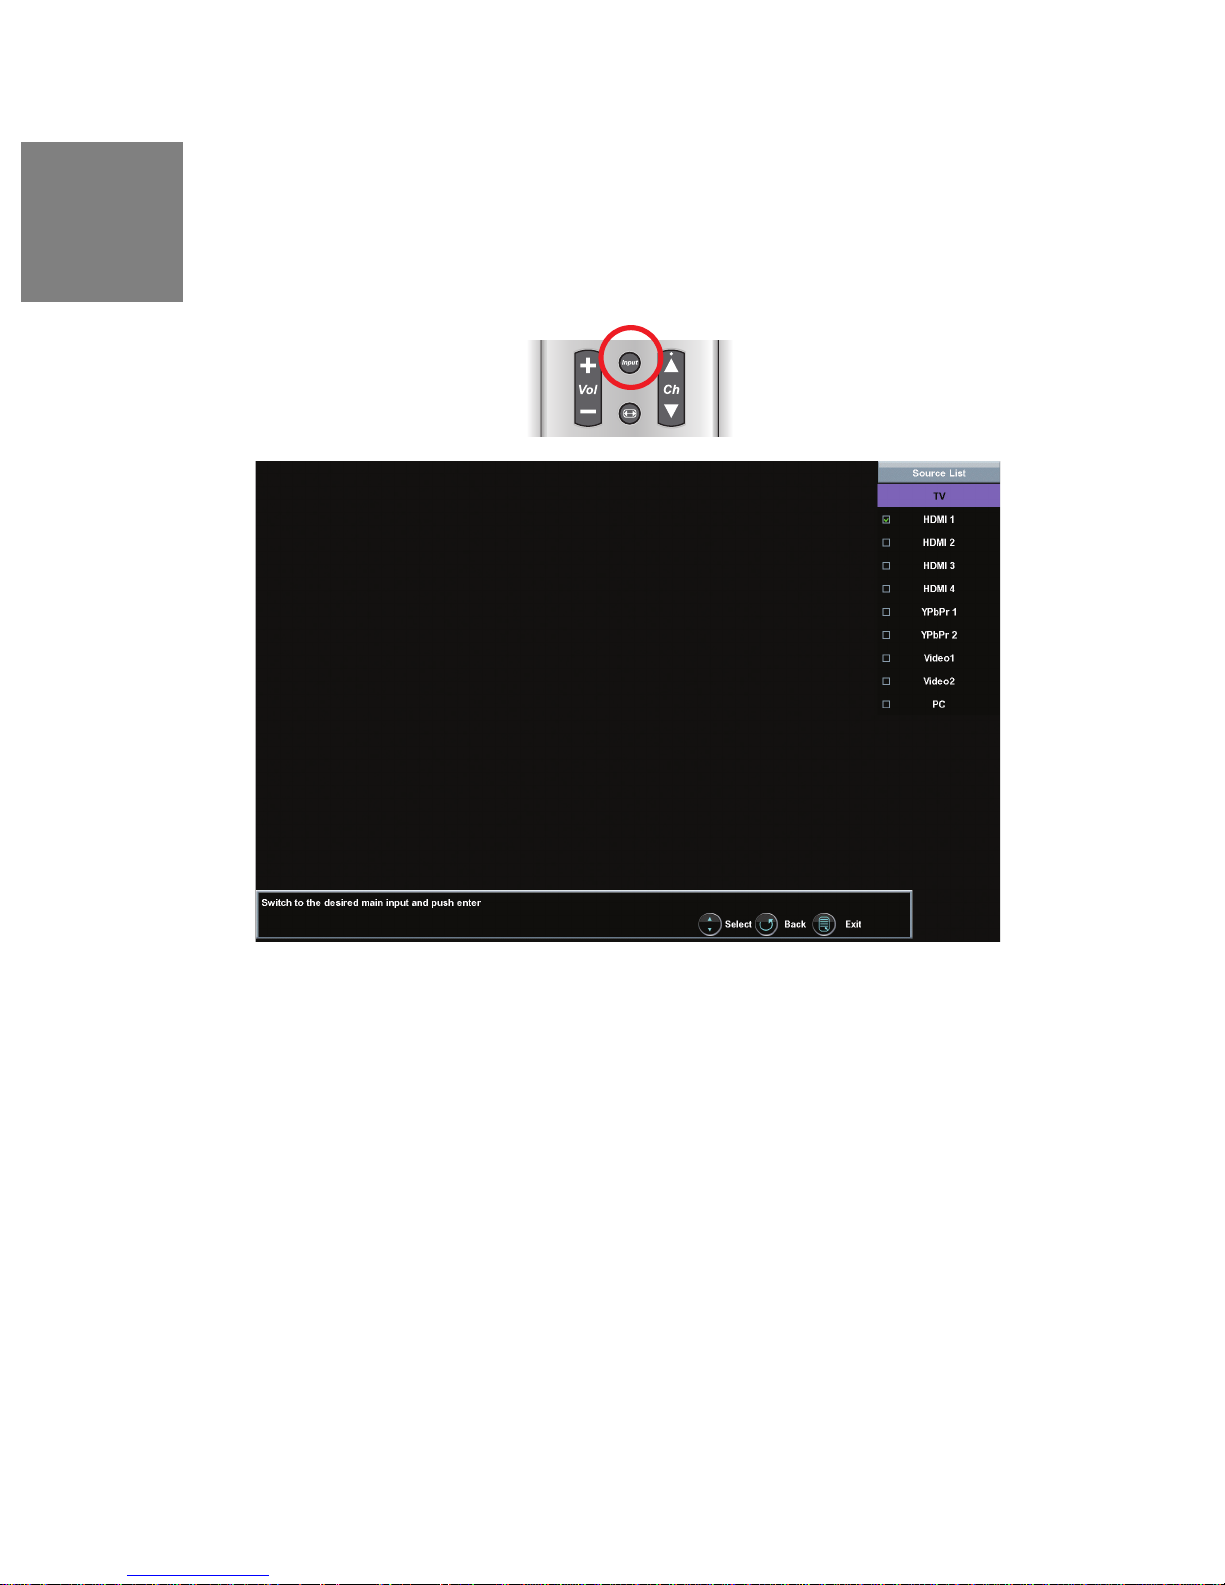
Input Menu
To change the Main Picture source, press the Input button on the remote to display
the Main Picture (MP) input menu. When the input menu is open, press the Input
button again to switch to the next input or use the up/down arrows to scroll through
the inputs and the press enter to switch to the highlighted input. The input menu will
timeout after 5 seconds and switch to the input that is currently highlighted.
Page 52
50
5 Appendix
42-inch High Definition LCD TV Specifications
Model Name TX-42F450S
Panel T ype 42” TFT (Thin Film Transistor), Active Matrix LCD,
1920 x 1080 vertical stripe; anti-glare coating
Color 16.7 million colors
Aspect Ratio 16:9
Viewing Angles 176° (H) / 176° (V)
Input Signal Video/Audio RGB Analog * 1 (75 ohms, 0.7 Vp-p)/Mini-Stereo
*1
• H/V separated (TTL) for PC
HDMI-HDCP * 4 / RCA (L/R) * 1
• fh: 30-80 kHz, fv: 50-75 Hz NTSC
TV system NTSC / HDTV * 1
Component Video * 2 / RCA (L/R) Stereo * 2
Composite * 2 / RCA (L/R) stereo * 2
English
Output Signal RCA (L/R)/SPDIF/SUBWOOFER OUT
HDTV Compatibility 480i, 480p, 720p, 1080i, 1080p
PC Compatible Recommended 1920 x1080@ 60Hz
Supported 1024 x 768 @ 75 Hz
800 x 600 @ 60, 75 Hz
1024 x 768 @ 60Hz
1280 x 800 @ 60Hz
640 x 480 @ 60, 75 Hz
Speaker Output 10W (x2 Channels)
Audio Support
Power Voltage 120VAC, 60HZ, 5.5A
Page 53

51
English
Temperature Operating 15 to + 35° C (Hum < 75%)
Storage 10 to + 50° C (Hum < 35%)
Humidity
(Relative)
Altitude Operating 0 to 2,000 m
Dimension Physical 42.1", 41.98" x 5.06" x29.10"(with Base)
Weight Gross/Net 29.4 kg / 24.6 kg
Regulations UL/C-UL, FCC-B
Power
Consumption
Mode
Operating 20 to 80% non-condensing
Storage 20 to 90% non-condensing
Storage 0 to 12,000 m
42.1", 41.98" x 5.06" x 26.93"(w/out Base)
64.83lbs. (with Base)
54.24 lbs. (w/out Base)
On <250W Typical (Blue LED)
Active Off
• <1W (Amber LED) in E-Mode
• <30W (Amber LED) Normal Mode
Warning: Do not set the graphics card in your computer to exceed these refresh rates; doing
so may result in permanent damage to the High Definition LCD TV.
Note: Product Specifications are subject to change without notice.
Page 54
52
47-inch High Definition LCD TV Specifications
Model Name TX-47F450S
Panel T ype 47” TFT (Thin Film Transistor), Active Matrix LCD,
1920 x 1080 vertical stripe; anti-glare coating
Color 16.7 million colors
Aspect Ratio 16:9
Viewing Angles 176° (H) / 176° (V)
Input Signal Video/Audio RGB Analog * 1 (75 ohms, 0.7 Vp-p)/Mini-Stereo
*1
• H/V separated (TTL) for PC
HDMI-HDCP * 4 / RCA (L/R) * 1
• fh: 30-80 kHz, fv: 50-75 Hz NTSC
TV system NTSC / HDTV * 1
Component Video * 2 / RCA (L/R) Stereo * 2
Composite * 2 / RCA (L/R) stereo * 2
Output Signal RCA (L/R)/SPDIF/SUBWOOFER OUT
English
HDTV Compatibility 480i, 480p, 720p, 1080i, 1080p
PC Compatible Recommended 1920 x1080@ 60Hz
Supported 1024 x 768 @ 75 Hz
800 x 600 @ 60, 75 Hz
1024 x 768 @ 60Hz
1280 x 800 @ 60Hz
640 x 480 @ 60, 75 Hz
Speaker Output 10W (x2 Channels)
Audio Support
Power Voltage 120VAC, 60HZ, 6.0A
Temperature Operating 15 to + 35° C (Hum < 75%)
Storage 10 to + 50° C (Hum < 35%)
Page 55

53
English
Humidity
(Relative)
Altitude Operating 0 to 2,000 m
Dimension Physical 47", 46.08" x 4.98"x31.37"(with Base)
Weight Gross/Net 34.6 kg / 29.35 kg
Regulations UL/C-UL, FCC-B
Power
Consumption
Mode
Operating 20 to 80% non-condensing
Storage 20 to 90% non-condensing
Storage 0 to 12,000 m
47", 46.08" x 4.98"x 29.23"(w/out Base)
76.29lbs. (with Base)
64.72lbs. (w/out Base)
On <300W Typical (Blue LED)
Active Off
• <1W (Amber LED) in E-Mode
• <35W (Amber LED) Normal Mode
Warning: Do not set the graphics card in your computer to exceed these refresh rates; doing
so may result in permanent damage to the High Definition LCD TV.
Note: Product Specifications are subject to change without notice.
Page 56

54
Troubleshooting
No Power
• Make sure power cord is securely connected to the "AC In" jack on the back of
the High Definition LCD TV.
• Make sure AC power cord is securely connected to the AC socket.
• Plug another electrical device (such as a radio) to the power outlet to verify that
the outlet is supplying the proper voltage.
• When set to E. Saver, the TV will take longer to turn on. Change the Power
menu setting to Normal to improve power on time.
Power is suddenly turned off
• Check if Sleep Timer is set. If so, turn it off.
• Check if Inactivity Off is set. If so, turn it off.
Remote Control Does Not Work
• Press only one button at a time.
• Make sure batteries are inserted correctly.
• Replace batteries with new ones if necessary.
English
Remote Control Code Not Found in a "Universal" Remote
• Purchase a separate "learning" remote control.
•Go to www.westinghousedigital.com
for a list of remote codes.
Image Quality Issues
• For the best TV image quality, "Standard Definition" TV content should be
viewed in 4:3 format.
No Picture
• Check the video connection.
• Make sure the video cable connected to the High Definition LCD TV is tightly
secured to the video output port on the back of the computer. If the other end of
the video cable is not attached permanently to the High Definition LCD TV,
secure it tightly.
• Adjust brightness and contrast.
• If you are using a Macintosh computer older than G3, you need a Macintosh
adapter.
• Make sure that the input source you are connected to corresponds to the
source on the High Definition LCD TV.
• Verify that the antenna is properly connected.
Page 57

55
English
No Picture when I connect VGA cable or "No Input Signal"
• Check VGA cable connection.
• Lower the video resolution on the computer and try again.
Picture is cut off/with sidebar screen.
• Use "Auto Adjust".
• Make sure the aspect ratio is set correctly.
Blocky images appear in TV mode.
• Check your antenna connection. If necessary , rotate the antenna and wait up to
10 seconds for signal.
• Reduce signal splitters and excessively long cables.
• Replace poor antenna cables and/or connectors to improve signal quality.
Wrong or Abnormal Colors
• If any colors (red, green or blue) are missing, check the video cable to make
sure it's securely connected. Loose or broken pins in the cable connector could
cause an improper connection.
• Connect the High Definition LCD TV to another computer.
Snow Appears on Screen
• Check your antenna connection. If necessary , rotate the antenna and wait up to
10 seconds for signal.
• Check the TV/CATV selection.
• Make sure the external device is HDCP compliant.
There's No Sound
• Check the audio connection.
• If MUTE appears on the screen, press the "MUTE" button on the remote control
to turn the function off.
• Check the audio settings to see if the HDTV audio is set to SAP or minimum.
• Press the Volume + (Up) key on the remote control.
Parental Control Password is "LOST"
• While rare, if this should happen, select "PASSWORD EDIT" and enter "0000"
to reset the password.
Where Can I Find More Help?
• Log on to: www.westinghousedigital.com
• Contact Westinghouse Customer Service at (866) 287-5555 or write us at
[email protected]
Page 58

56
Cleaning the High Definition LCD TV
• MAKE SURE THE HIGH DEFINITION LCD TV IS TURNED OFF
• NEVER SPRA Y OR POUR ANY LIQUID DIRECTLY ONTO THE SCREEN OR
CASE
To clean the screen:
1 Wipe the screen with a clean, soft lint-free cloth. This removes dust
and other particles.
2 If still not clean, apply a small amount of non-ammonia, non-alcohol
based glass cleaner onto a clean, soft lint-free cloth and wipe the
screen.
To clean the case:
1 Use a soft, dry cloth.
2 If still not clean, apply a small amount of non-ammonia, non-alcohol
based, mild non- abrasive detergent onto a clean, soft lint-free cloth,
then wipe the surface.
Disclaimer
English
Westinghouse Digital does not recommend the use of any ammonia or alcoholbased cleaners on the High Definition LCD TV screen or case. Some chemical
cleaners have been reported to damage the screen and or High Definition LCD TV
case. Westinghouse Digital will not be liable for damage resulting from use of any
ammonia or alcohol-based cleaners.
Page 59
57
English
Wall mount and Base removal for the 42"/47"
HD LCD TV
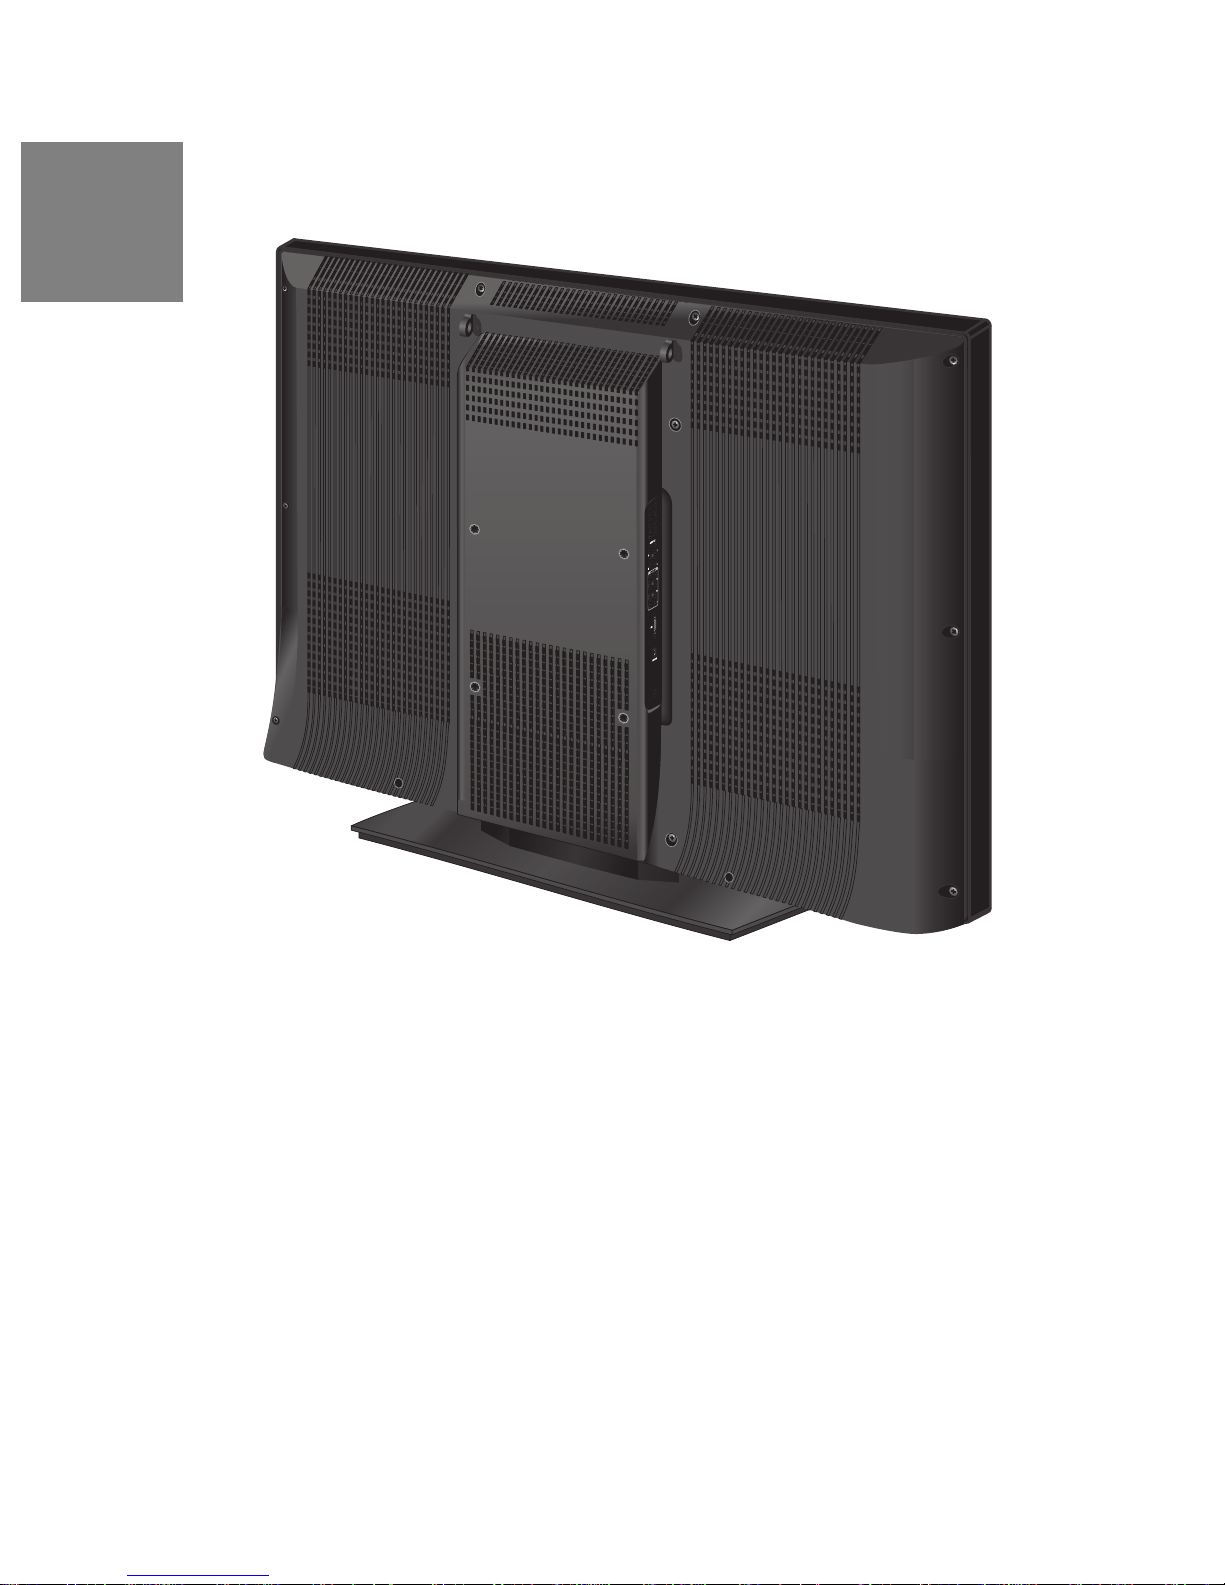
The TV has been fitted with one set of VESA mounting holes. The holes are spaced
200 mm equally apart for the 42"/47" product. These mounting location are provided
strictly as an option to the user for wall mounting.
It is the responsibility of the user to use a UL Listed Wall Mount Unit rated to support
the weight of this TV. Please consult authorized service personnel for the
installation of this Unit. Incomplete or inadequate mounting of the unit to the wall
may cause it to fall down, resulting in potentially serious injury.
Page 60
58
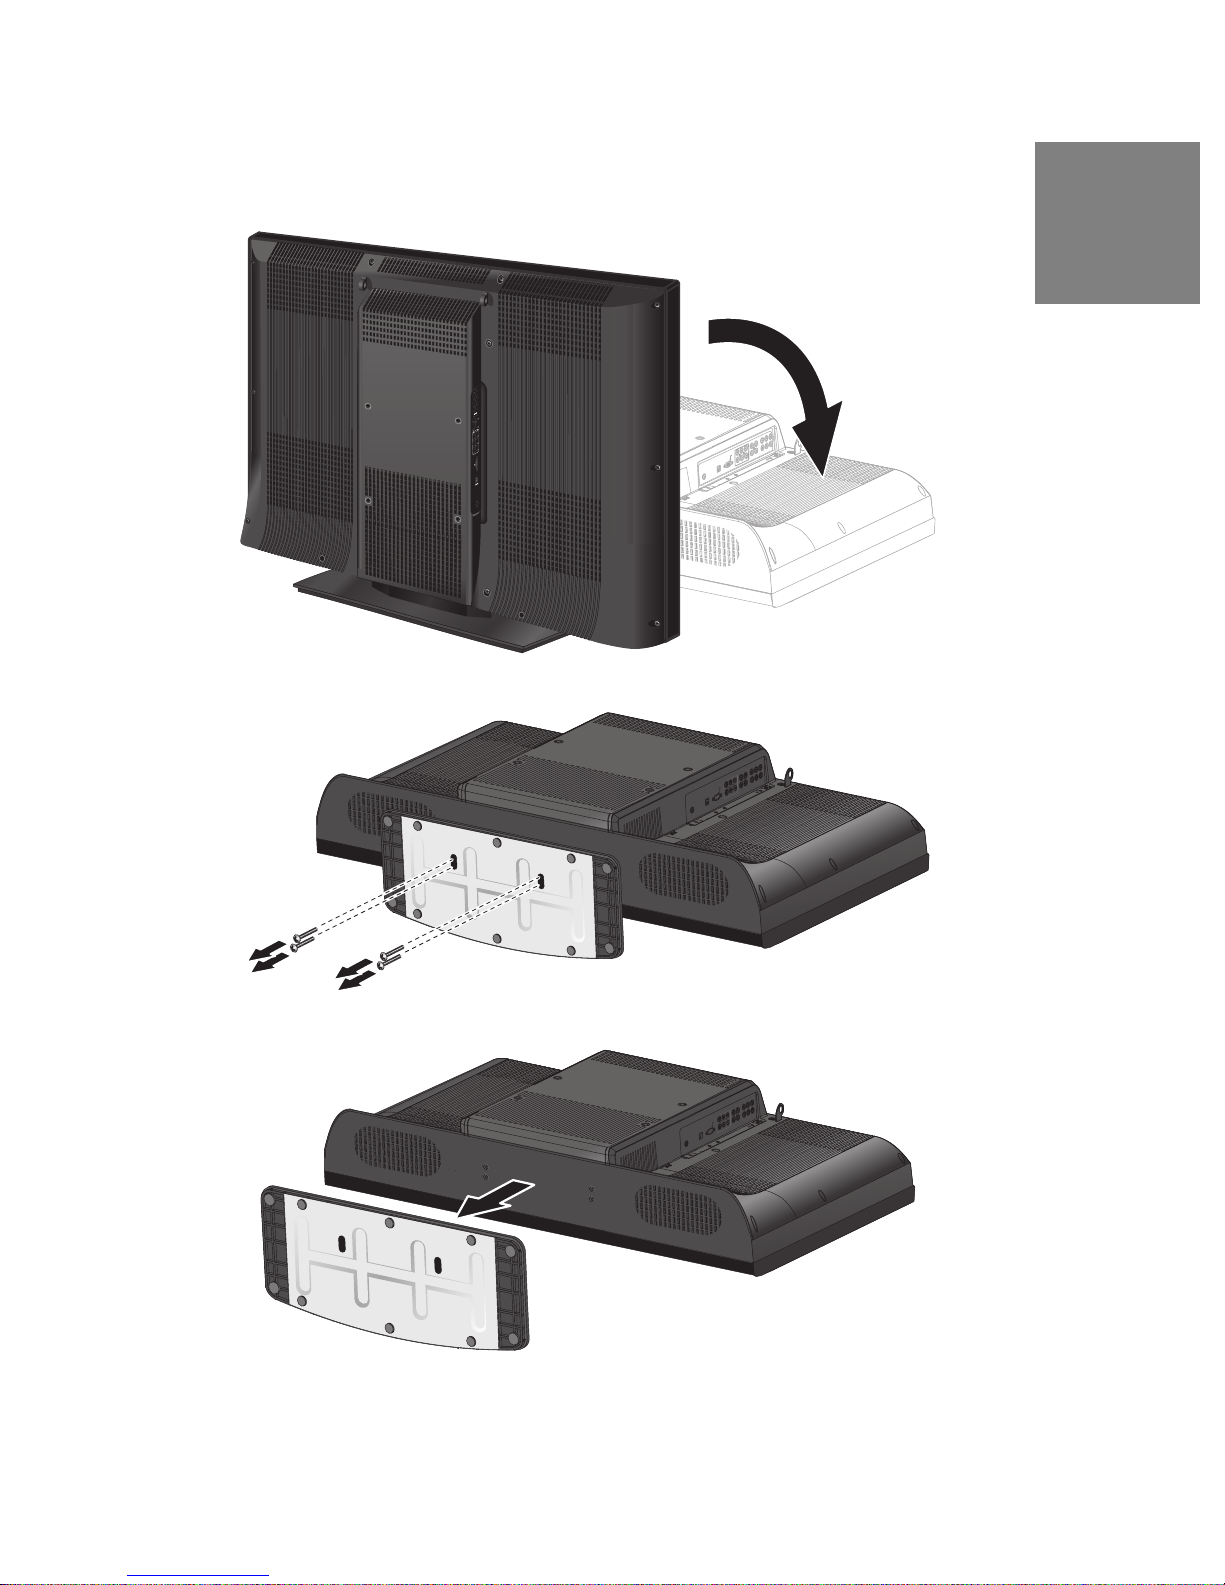
1 Lay the LCDTV with front bezel down on a soft and clear area. Please
make sure that there is no any foreign objects on the surface to avoid
any scratch or damage of the LCD panel.
2 Remove the four screws as shown.
English
3 Slowly remove the base from the LCD TV.
Page 61
59
English
Safety bracket Options
Brackets
Anti-tip over option:
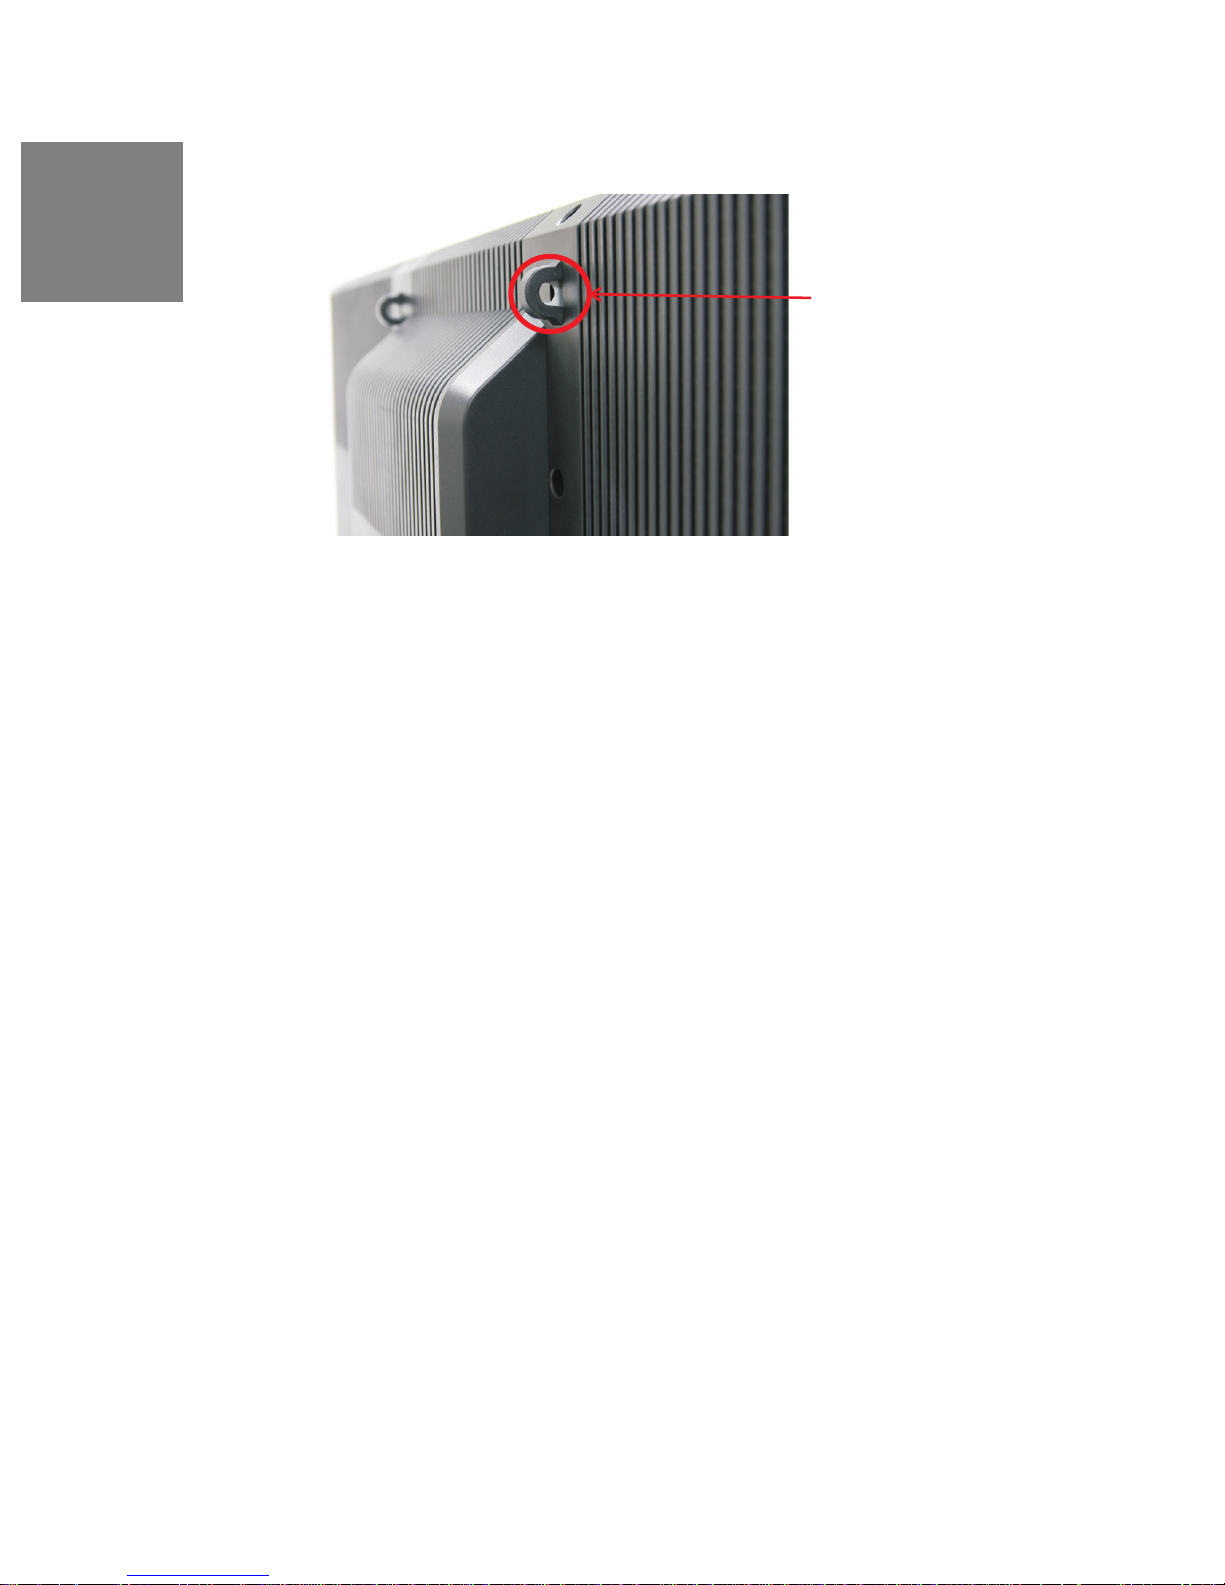
This TV has two small metal brackets on the back side of the TV. These two
brackets have a circular cut out in the center. The brackets are to serve as an "antitipover" option and/or theft deterrent.
If used as an "anti-tip over" aid, it is the responsibility of the user to securely anchor
the brackets to a surface that can support the weight of the TV.
(Note: at no time do we advocate using these brackets to support the entire weight
of the TV.) These brackets must be used in conjunction with TV's provided base.
The brackets are to be used as an additional safety precaution option.
Theft deterrent option:
If used as a theft deterrent, much like the "anti-tipover" application, the brackets can
aid in anchoring the TV.
 Loading...