

Page 1
2-Outlet 7-Day Outdoor Timer
Professional Grade Outdoor Digital Timer with Dual Battery Backup
ITEM #28480
T26462
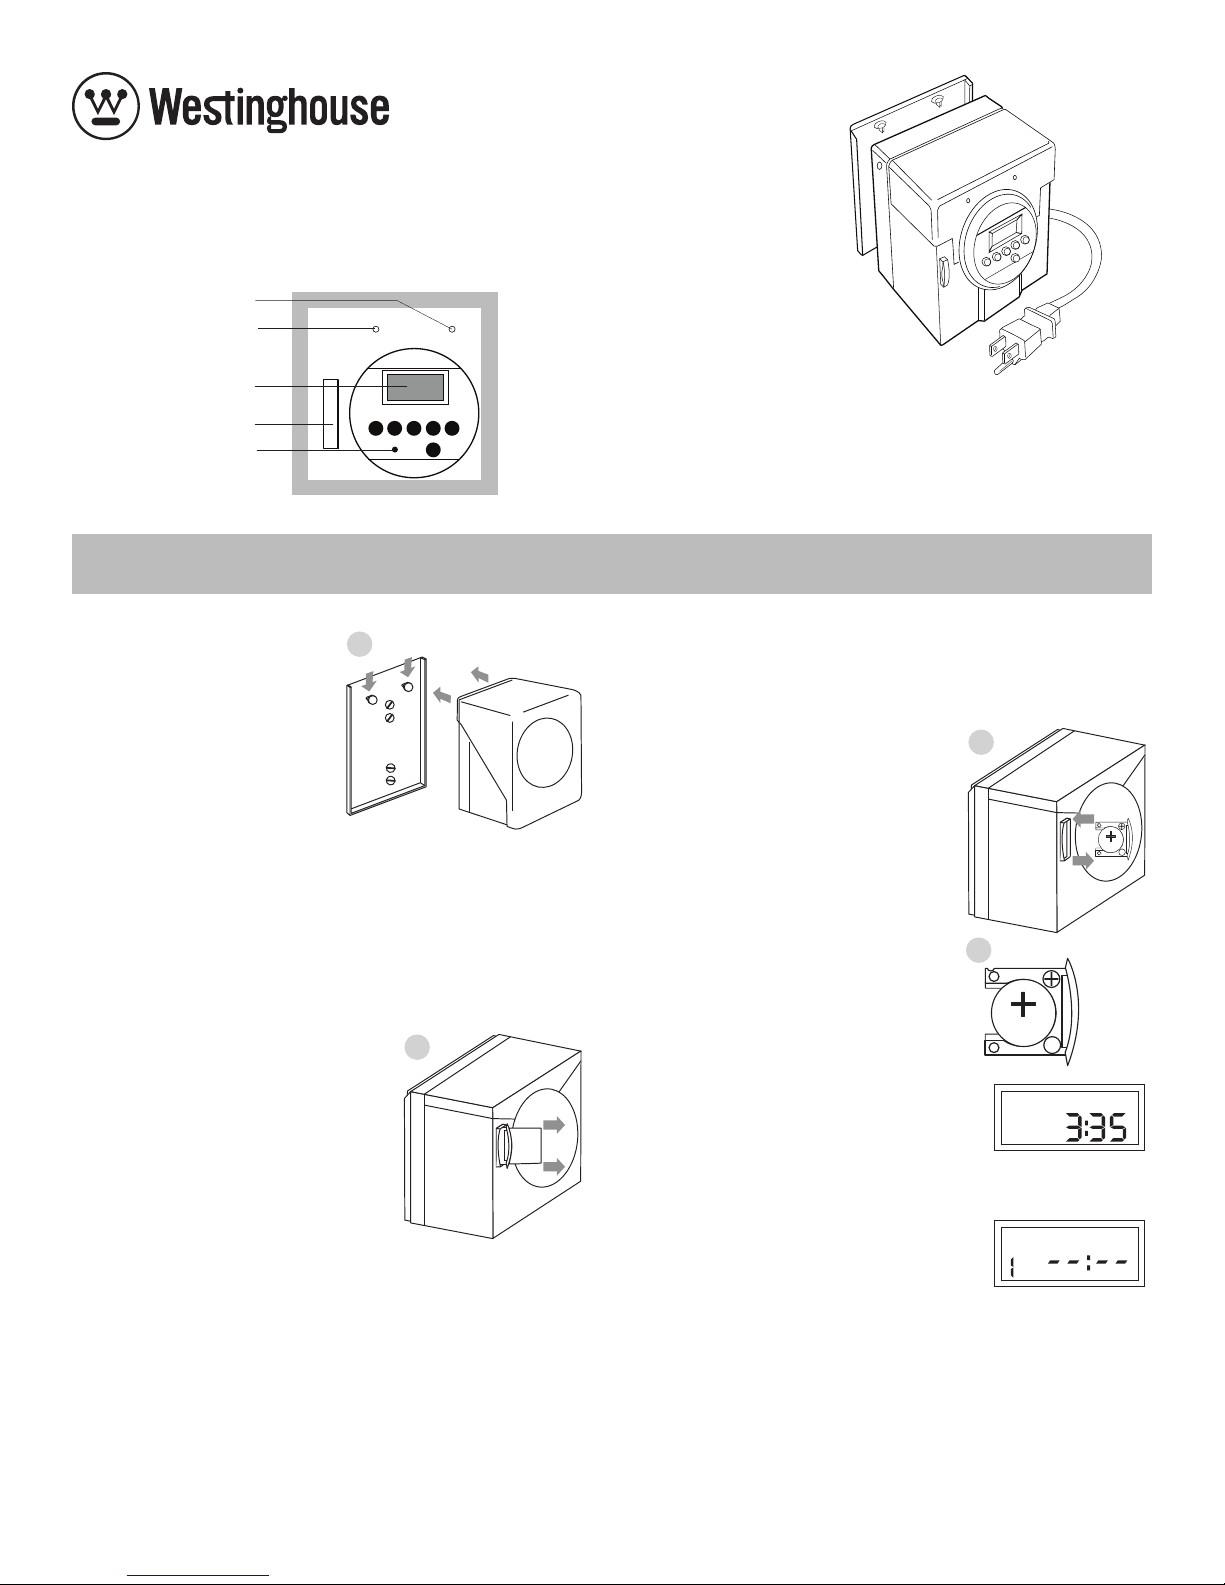
Green LED
Red LED
Liquid Cr ystal Display (LCD)
Backup Lithium Ion Battery
Reset Button
Overload Power
Time Timer Day h+ m+
Reset Override
The maximum load of this timer is:
125VAC/60Hz/15A/1875 Watts
Tungsten & Resistive
OPERATING INSTRUCTIONS
WALL MOUNTING
This unit comes with a wall mounting
plate. The plate will make it easy to mount
the timer onto an interior or exterior wall.
Simply insert 2-4 screws through the
holes on the mounting plate and into your
wall as shown in illustration A, making
sure to position the plate so that the 2
plastic but tons are towards the top. Then,
align the 2 holes on the back of the timer
to the 2 buttons on the wall plate, and
push down to secure the timer. There are
4 holes on the mounting bracket, which gives you many mounting options.
A
READ INSTRUCTIONS CAREFULLY IN ORDER TO SET UP YOUR OUTDOOR TIMER PROPERLY
INSTALLATION CAUTION
The timer is designed to be operated only when in a vertical position (mounted
vertically with outlets facing the ground.) Failure to hang the timer vertically may
cause water penetration through the outlet and will void manufacturer’s warranty.
Plug the timer into a 3-prong grounded electrical outlet. If used outdoors, the timer
must be plugged into a GFCI approved outlet.
BEFORE FIRST USE
• Charge the batteries by plugging into a regular
household outlet for ten minutes.
• Remove the protective bat tery barrier plastic
insert as shown in illustration B.
• Using a paper clip or pencil, insert into the hole
marked RESET and push in.
• You are now ready to proceed to Timer
Programming.
B
REMOVE
BEFORE
USE
BACK-UP BATTERIES
There are two back-up batteries in this timer. The primary battery is a Lithium Ion
3 volt replaceable button cell batter y. This Li-Ion battery will work in a temperature
range of -13°F to +122°F (-25°C to +50°C). This batter y will last about 5 months from
first use. Shelf life of the Li-Ion battery before first use is approximately 3 years.
The secondary back-up is an internal, rechargeable Ni-MH (Nickel Metal Hydride)
battery which will work in a temperature range of -25°C to +55°C (-13°F to +131°F).
To fully charge the Ni-MH batter y would take approximately 5 hours. A full charge of
the Ni-MH battery should last about 2 months.
Before programming the timer remove the TAB marked (Remove Before Use) as
shown in Illustration B. When removing this tab, the primary battery will provide
the necessary power for immediate programming. This batter y will enable
programming and memor y retention for up to 5 months without plugging the timer
into an A /C outlet.
(Incandescent & Application)
The secondary batter y will kick-in if the primary Li-Ion button cell battery is
removed from the compartment, or if the Li-Ion battery becomes drained. The A/C
power from a wall outlet will supersede both batteries when the unit is plugged in.
MAK E SURE TO REPLACE THE LI-ION BATTERY EACH SEASON
LI-ION BATTERY REPLACEMENT
• To remove drained battery, use straight head
screw driver and pry out the battery holder
from timer housing (illustration C). Remove
battery from batter y holder.
• Insert fresh replacement batter y into batter y
holder. Make sure to correctly position the +
positive side of the battery into the holder, by
matching up the + plus sign on the bat ter y to
the + plus sign in a small circle on the battery
holder (illustration D).
• Push-in the batter y holder (with battery)
into the slot on the timer housing as shown
in illustration B. Make sure that the + plus
positive sign on the battery is facing towards
the outer wall of the timer.
C
3 VOLTS
D
3 VO LTS
TIMER PROGRAMMING
1. To SET CURRENT DAY AND TIME the Time button
must be pressed and held, throughout this step.
Press the Day button until the present day of the
week appears. Do the same with the h+ and m+
buttons to set the time. To fast for ward, hold the
buttons down. Note that either A or P appears in the bottom right of display
window to indicate AM or PM.
2. To SET THE TIMER press the “Timer” button once
and the display will appear as shown here. Next,
set the time [with the “h+” and “m+” buttons, as
above] and day(s) you want your appliance/light
“ON” [refer to the Day button section on the bottom
LEFT of this page for a list of 11 different day(s)
options]. Press the “Timer” button a second time
[note that OFF appears in the display] and set the
time and day(s) you want your appliance/light “OFF.”
For more detail, see examples on other side. This step can be repeated five times,
for a total of 6 “ON/OFF” programs.
3. Press the “Time” button to return to current day and time display.
4. Finally, plug your appliance/light into the timer. Be sure that the item plugged into
the timer is switched “ON”.
MO TU WE TH FR SA SU
TIMER
The number on t he right
(“1”) repr esents which
program (of 6) is being
viewed
OFF
ON
TH
P
Page 2
HINTS AND TIPS
• The rechargeable bat tery in the timer should be charged rst by plugging it into a regular household outlet
(125V) for ten minutes.
• Ensure the “ON/OFF” switch on your appliance or light is in the “ON” position when connected to the timer.
• Do not expose the timer to extremely high or low temperatures. Do not place in direct sunlight.
• This Outdoor Digital Timer is weatherproof .
• Display is clearer when viewed from above.
• To fast forward, press and hold the “h+”, “m+” or “Day” button.
• Check your programmed times by pressing the “Timer” button (up to 12 commands available).
• Ensure the hour has been set correctly to AM or PM, indicated either by A or P.
• For any given day and time, if one program is set to ON, and another program OFF, Outdoor Digital Timer will
turn your appliance/light OFF.
• Return to the clock function by pressing the “Time” but ton.
BUTTON FUNCTIONS
Time–Set and display present day and time.
Timer–Set/view 6 “ON /OFF”programs .
Day–Set day(s). See eleven dif ferent settings
below [Hold for fast forward].
h+– Set hours. [Hold for fast for ward]
m+– Set minutes. [Hold for fast forward]
Override–Manual “ON/OFF”. When this button
is pressed it will change the current state from
“OFF” to “ON” or vice versa. When the next
programmed time is reached the timer will revert
to the program’s control.
Also in case of overload, this button is used to
re-activate the timer.
Reset–Clear all settings.
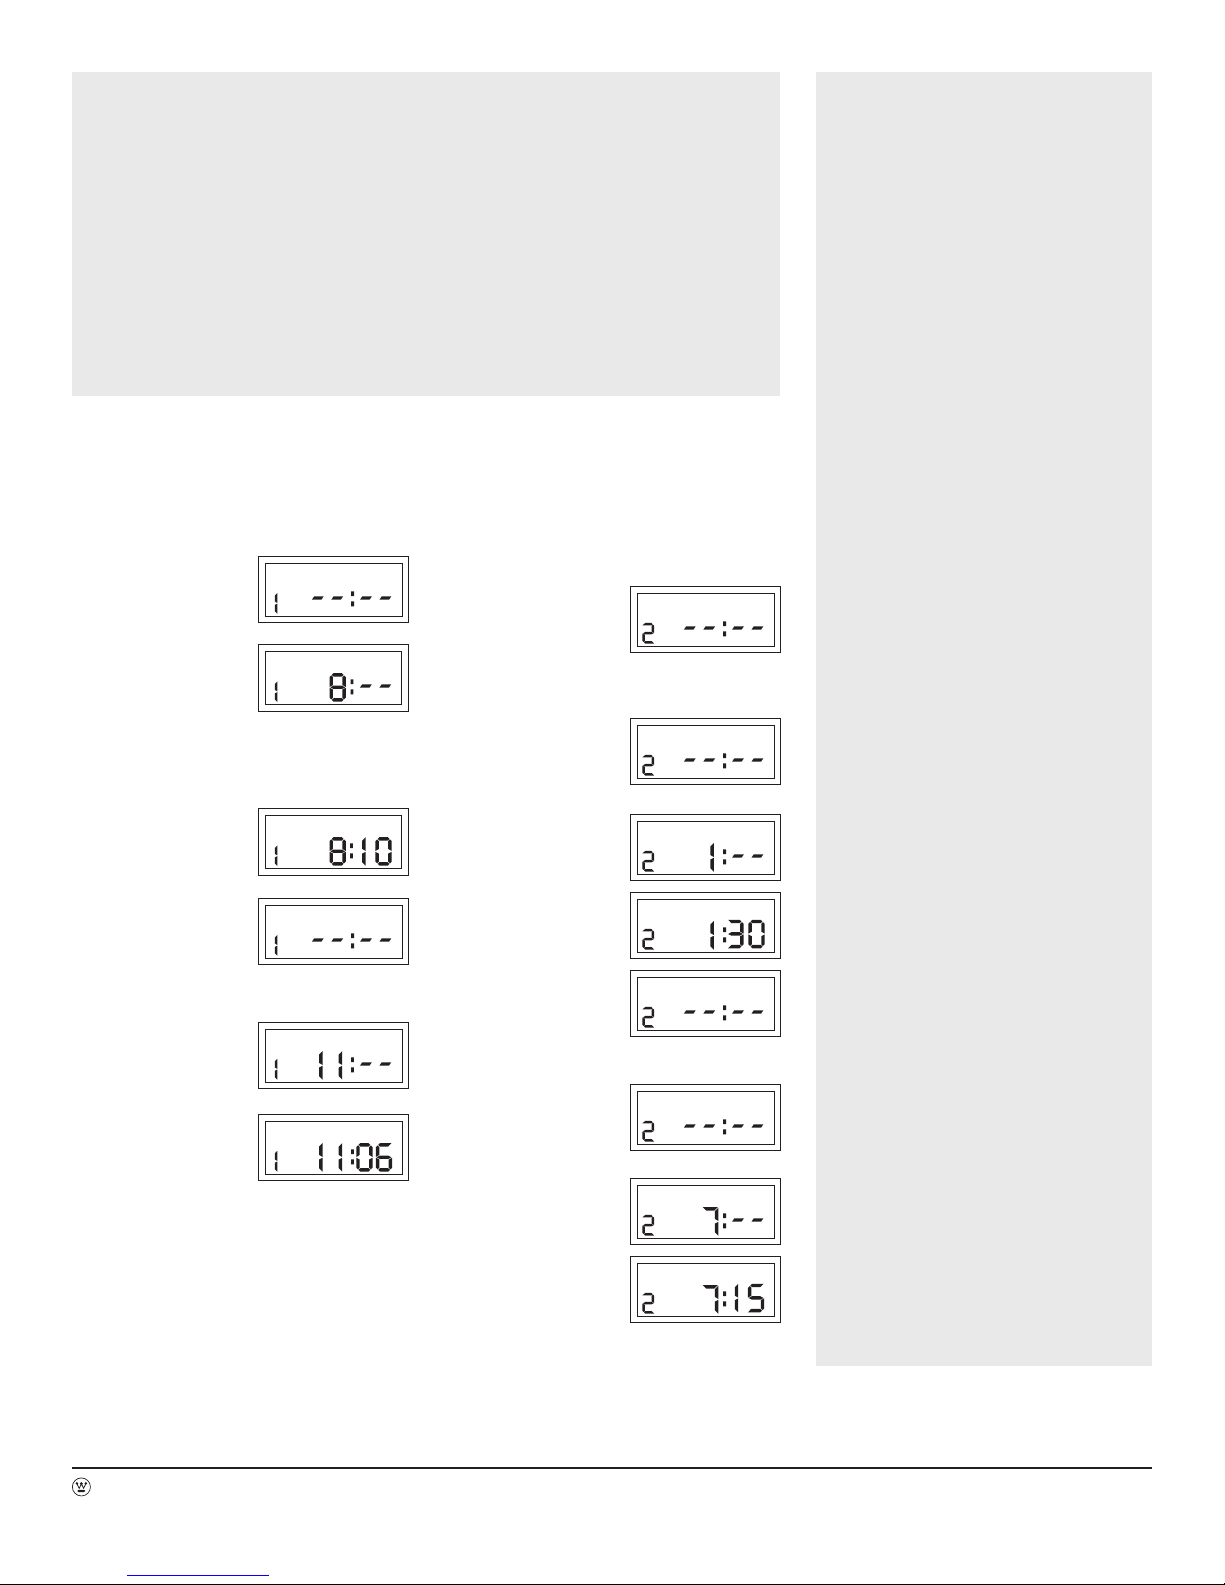
Here below, are step-by-step instructions for setting your timer in two different examples:
EXAMPLE A
To switch an appliance or light ON every day of the
week at 8:10 pm and OFF at 11:06 pm, follow the steps
below:
1. Press the Timer button
once to show:
2. Press the h+ button
until 8:-- pm appears.
Note that the small P
at the bottom right of
display window shows
PM.
3. Press the m+ button
until 8:10 pm appears.
4. Press the Timer button
again to set the OFF
time, the display will
now show:
5. Press the h+ button
until 11:00 pm appears:
6. Press the m+ button
until 11:06 pm appears:
Your timer is now set to go ON every day of the week
at 8:10 pm and OFF at 11: 06 p m.
MO TU WE TH FR SA SU
TIMER
ON
MO TU WE TH FR SA SU
TIMER
ON
MO TU WE TH FR SA SU
TIMER
ON
MO TU WE TH FR SA SU
TIMER
OFF
MO TU WE TH FR SA SU
TIMER
OFF
MO TU WE TH FR SA SU
TIMER
OFF
EXAMPLE B
To switch an appliance or light ON at 1:30 pm Saturday
and OFF at 7:15 am Monday, follow the steps below.
(Let’s assume you have already set Timer Program 1,
and now want to set another).
1. Press the Timer
button until program
2 appears. This is
the nex t available ON
program:
P
2. Repeatedly press the
Day button until only
SA (Saturday) appears
3. Press the h+ button
until 1:-- pm appears.
P
4. Press the m+ button
until 1:30 pm appears:
5. Press the Timer button
again to set the OFF
time; the display will
now show:
P
6. Repeatedly press the
Day button until only
MO (Monday) appears:
P
7. Press the h+ button
until 7:-- am appears:
8. Press m+ button until
7:15 am appears:
MO TU WE TH FR SA SU
TIMER
ON
TIMER
ON
TIMER
ON
TIMER
ON
MO TU WE TH FR SA SU
TIMER
OFF
MO
TIMER
OFF
MO
TIMER
OFF
MO
TIMER
OFF
TIMER BUTTON
The first press of the Timer button displays the
ON settings for the 1st program, the second
press– its OFF settings. The third press displays
the ON settings for the 2nd program, and so on
to the twelfth press of the Timer button, which
displays the OFF settings for the 6th program.
You don’t need to use all six ON/OFF programs.
DAY BUTTON SETTINGS
FOR TIMER MODE
1. MO TU WE TH FR SA SU –
Daily ON/OFF settings will repeat every day.
2. MO will only operate Monday.
SA
3. TU will only operate Tuesday.
4. WE will only operate Wednesday.
5. TH will only operate Thursday.
6. FR will only operate Friday.
SA
7. S A will only operate Saturday.
8. SU will only operate Sunday.
P
9. MO TU WE TH FR –
Weekday will operate Monday to Friday.
SA
P
10. SA SU –
Weekend will operate Saturday and Sunday.
11. MO TU WE TH FR SA –
6 Day will operate Monday to Saturday.
RESETTING OVERLOADED TIMER
If the Power LED is OFF and the Overload LED
is ON, an overload has occurred. The timer
automatically shuts power down to the pluggedin components in order to prevent damage and/
or other dangerous events such as explosion
or fire. (Current time and program(s) set tings
will not be affected by the overload shutdown of
plugged-in devices.)
In order to re-activate the overloaded timer:
A
A
1. You must remove the excess plugged-in
components; otherwise, the overload and
power shut-down will repeat.
2. After allowing the timer’s temperature to cool
down (~15 min.), press the Override button.
SAVE THESE INSTRUCTIONS!
Customer Service Assistance: Toll Free 1-855-350-6868
Hours of Operation – 10AM to 6PM, EST, Monday - Friday
and WESTINGHOUSE are trademarks of Westinghouse Electric Corporation. Used under license. All rights reserved.
Manufactured and distributed by: The NCC, Brooklyn, NY 11220 • www.thencc.com • © 2014 The NCC Made in China
Your timer is now set to go ON at 1:30 pm Saturday
and OFF at 7:15 am Monday.
 Loading...