

Page 1
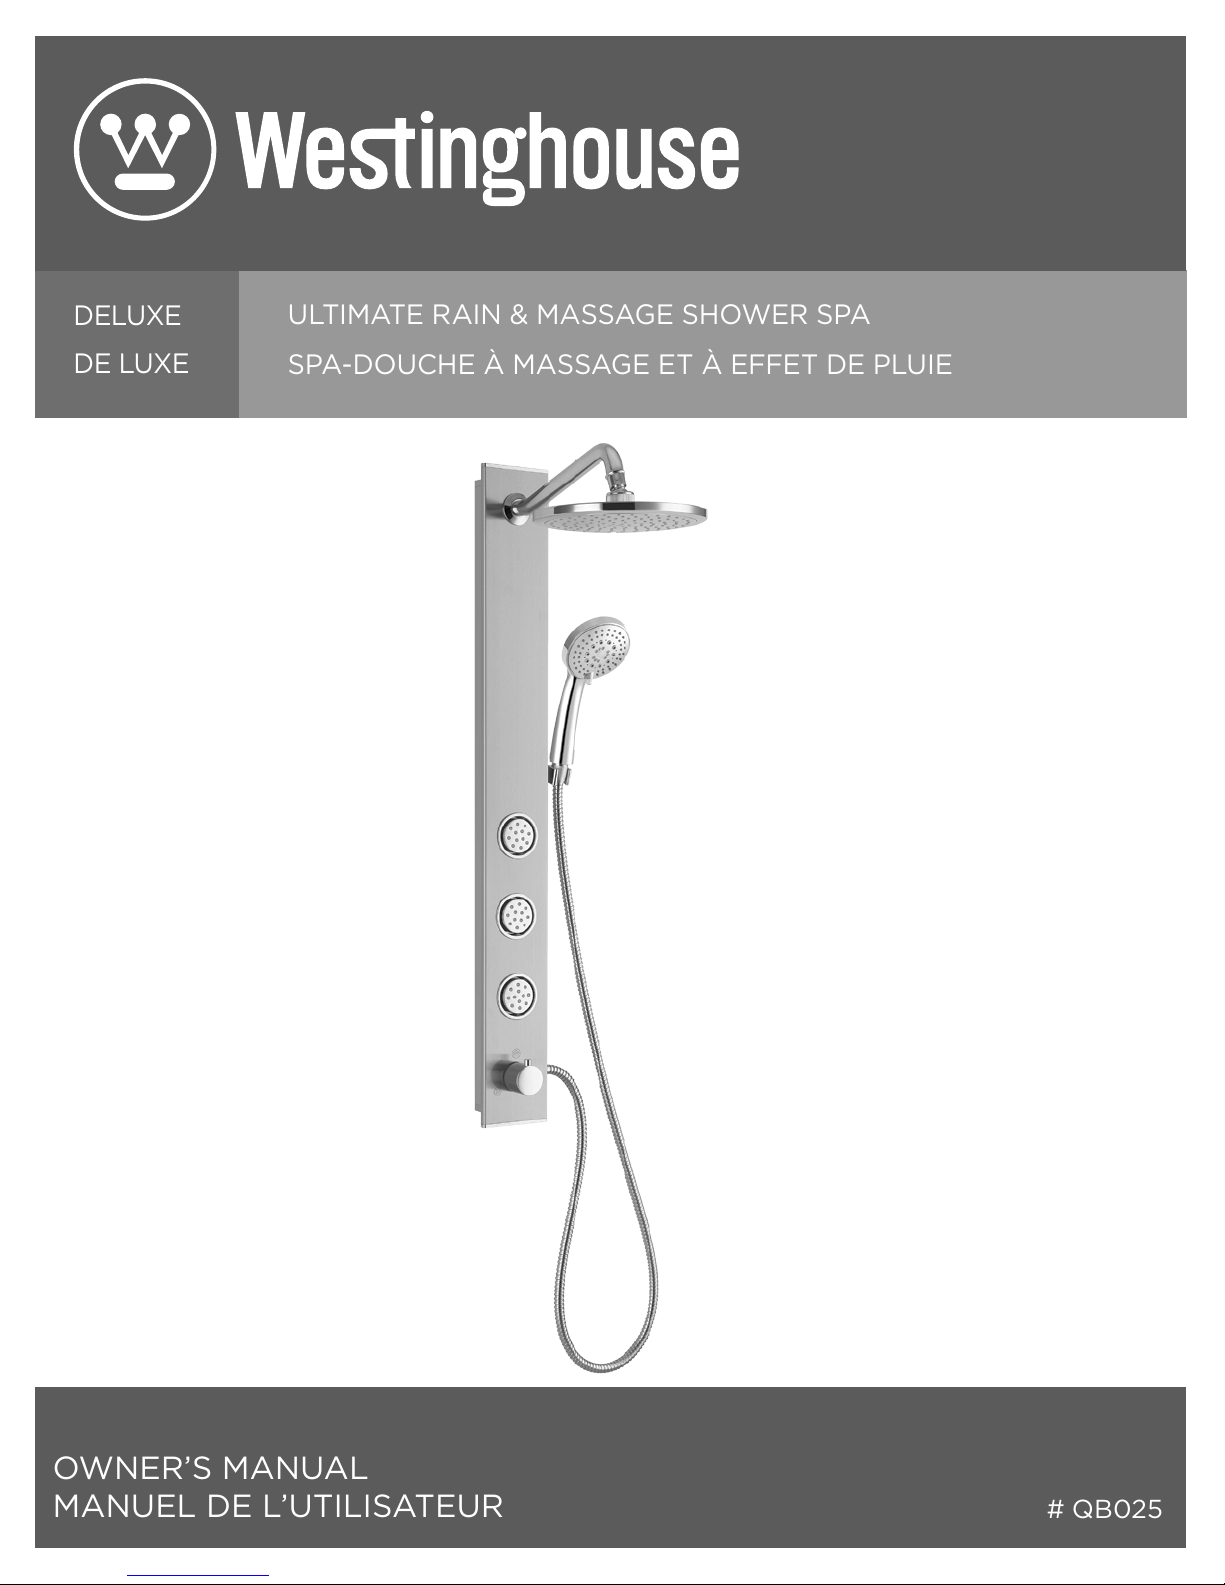
DELUXE
ULTIMATE RAIN & MASSAGE SHOWER SPA
DE LUXE
SPA-DOUCHE À MASSAGE ET À EFFET DE PLUIE
OWNER’S MANUAL
MANUEL DE L’UTILISATEUR
# QB025
Page 2
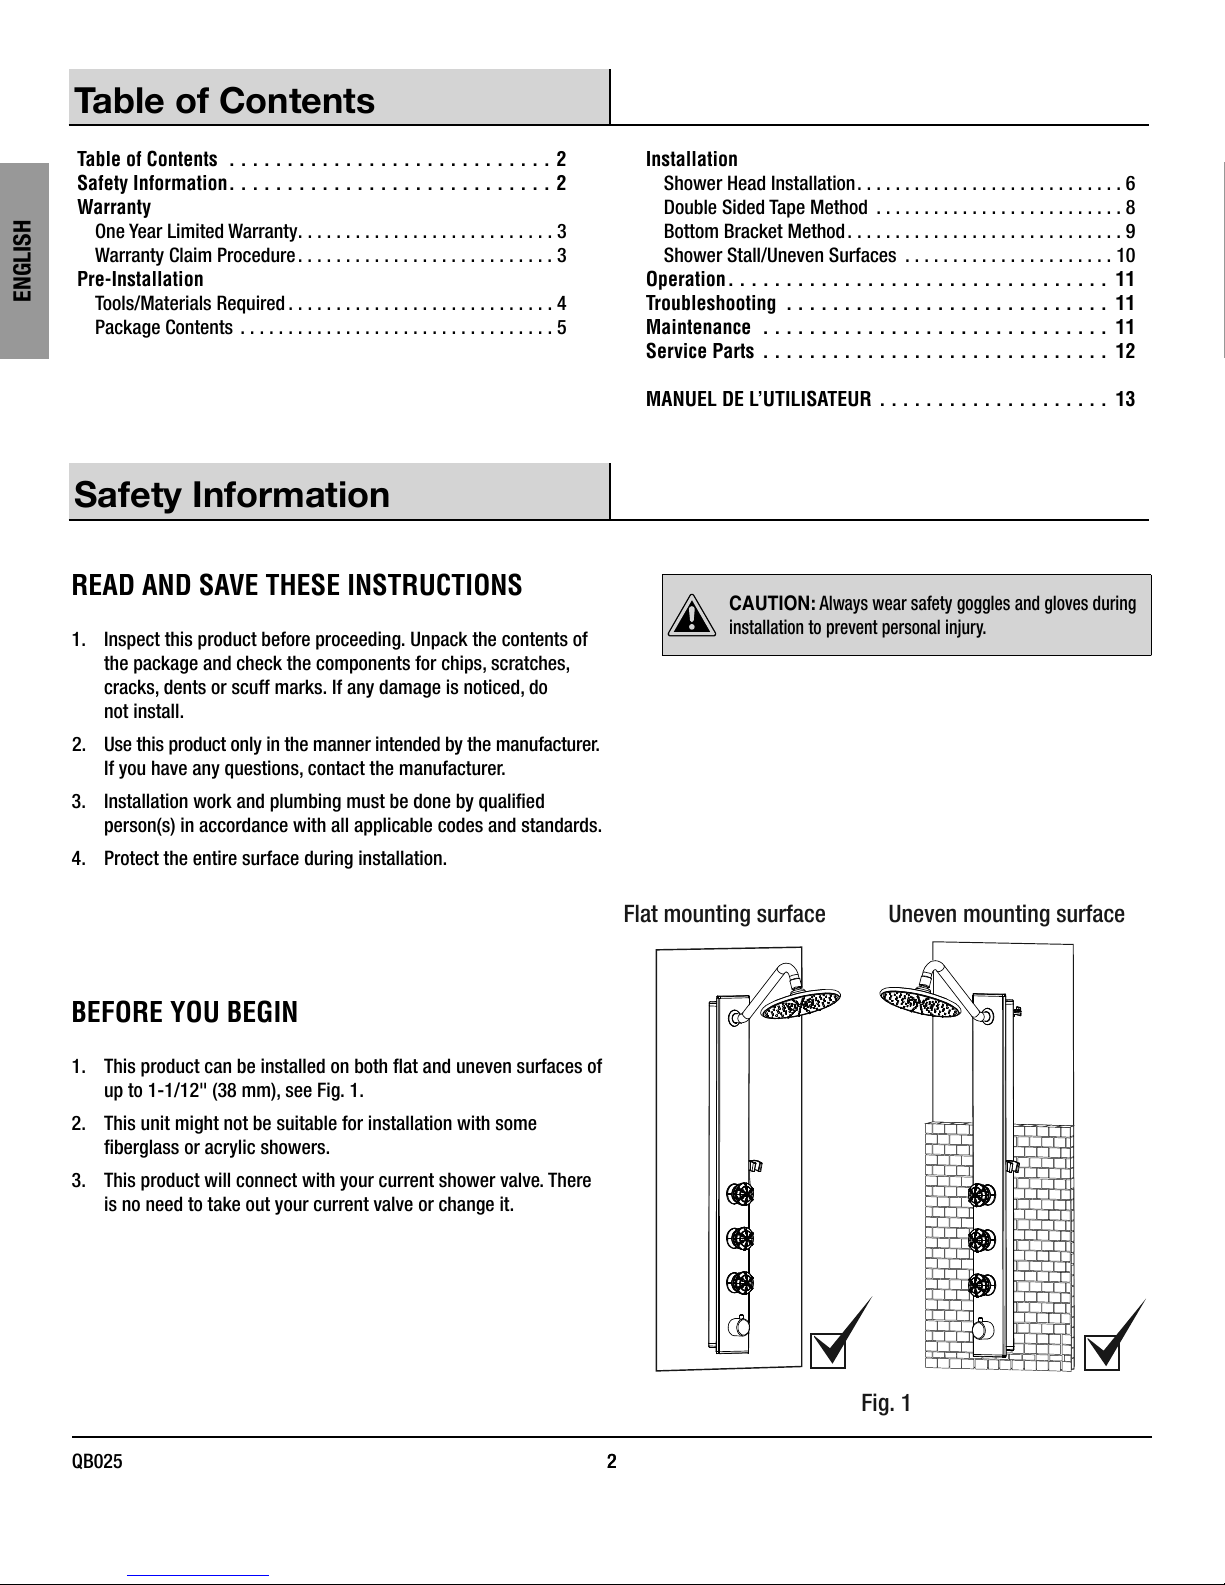
Table of Contents
Flat mounting surface
Table of Contents ............................2
Safety Information ............................ 2
Warranty
One Year Limited Warranty ...........................3
Warranty Claim Procedure ...........................3
Pre-Installation
ENGLISH
Tools/Materials Required ............................4
Package Contents .................................5
Safety Information
READ AND SAVE THESE INSTRUCTIONS
1. Inspect this product before proceeding. Unpack the contents of
the package and check the components for chips, scratches,
cracks, dents or scuff marks. If any damage is noticed, do
not install.
2. Use this product only in the manner intended by the manufacturer.
If you have any questions, contact the manufacturer.
3. Installation work and plumbing must be done by qualied
person(s) in accordance with all applicable codes and standards.
4. Protect the entire surface during installation.
Installation
Shower Head Installation ............................6
Double Sided Tape Method ..........................8
Bottom Bracket Method .............................9
Shower Stall/Uneven Surfaces ......................10
Operation ................................. 11
Troubleshooting ............................ 11
Maintenance .............................. 11
Service Parts .............................. 12
MANUEL DE L’UTILISATEUR ....................13
CAUTION: Always wear safety goggles and gloves during
installation to prevent personal injury.
BEFORE YOU BEGIN
1. This product can be installed on both at and uneven surfaces of
up to 1-1/12" (38 mm), see Fig. 1.
2. This unit might not be suitable for installation with some
berglass or acrylic showers.
3. This product will connect with your current shower valve. There
is no need to take out your current valve or change it.
2
QB025 2
Uneven mounting surface
Fig. 1
Page 3
Warranty
ONE YEAR LIMITED WARRANTY
A thorough inspection must be made before installation and any damage must be promptly reported. We will not be liable for failures or damage
that could have been discovered or avoided by proper inspection and testing prior to installation.
Conglom Kitchen & Bath warrants this product to be free from defects in materials or workmanship for one (1) year from the date of purchase.
Proof of purchase (original sales receipt) from the original consumer purchaser must be made available to Conglom Kitchen & Bath for all
warranty claims.
This warranty is non-transferable and shall be voided if the unit is removed from its initial installation or if it is not installed following the
manufacturer’s instructions. It does not apply in the event of product damage due to the use of other than genuine Conglom Kitchen & Bath
replacement parts, (Replacement parts may be obtained by e-mail at cs@conglomkb.com or by calling 1-877-333-0098 between 8:30 am -
5:00 pm EST) installation error, abuse, misuse or improper care and maintenance (whether performed by a plumber, contractor, service provider
or member of the purchaser’s household). The warranty excludes damage due to aggressive air or water conditions, harsh or abrasive cleaners
and/or materials.
Under no circumstance shall we be held liable for personal injury or property damage resulting from improper installation or use of this product.
We will not be held liable for inconvenience caused by loss of use of this product, costs incurred for labour or materials, removal and installation
of replacement units, or any other incidental or consequential damages. Costs relating to obtaining access for repair or replacement are the
responsibility of the user.
Our obligation shall be limited to the repair or replacement of a unit (at our discretion) that may prove, by our sole examination, to be defective
under normal use and service during the warranty period.
ENGLISH
Any failure of this product that is not traceable to a defect in material or workmanship is not covered by this warranty. These non-warrantable
items include, but are not limited to:
- Improper installation not in accordance with manufacturer’s instructions.
- Dents and/or scratches incurred during shipping, handling, or installation.
- Change in colour or nish due to chemical usage.
- Damage caused by failure to follow care and cleaning guidelines, including damage caused by the use of abrasive cleaners.
- Alterations made to the unit by the purchaser or installer.
- Damage caused by accidental impact, re, ood, freezing, and normal wear.
- Bends and warping caused by forced connections, over-tightened ttings, and inadequate support during installation.
- Damage caused by use of chlorine-based cleaners.
This warranty does not extend to commercial and institutional installation or use.
WARRANTY CLAIM PROCEDURE
If a claimable defect occurs or replacement parts are needed,
1-877-333-0098 (Service available in English and French, Monday - Friday from 8:30 am - 5:00 pm EST).
Before you make your call, please ensure that you have:
- Model number or description.
- Proof of sale.
- Details regarding the defect and/or part number.
- Name(s) and address(es) of the owner and/or installer.
please contact our customer service team at cs@conglomkb.com or
3 CONGLOMKB.COM
Please contact cs@conglomkb.com or 1-877-333-0098 for further assistance.
Page 4
Pre-Installation
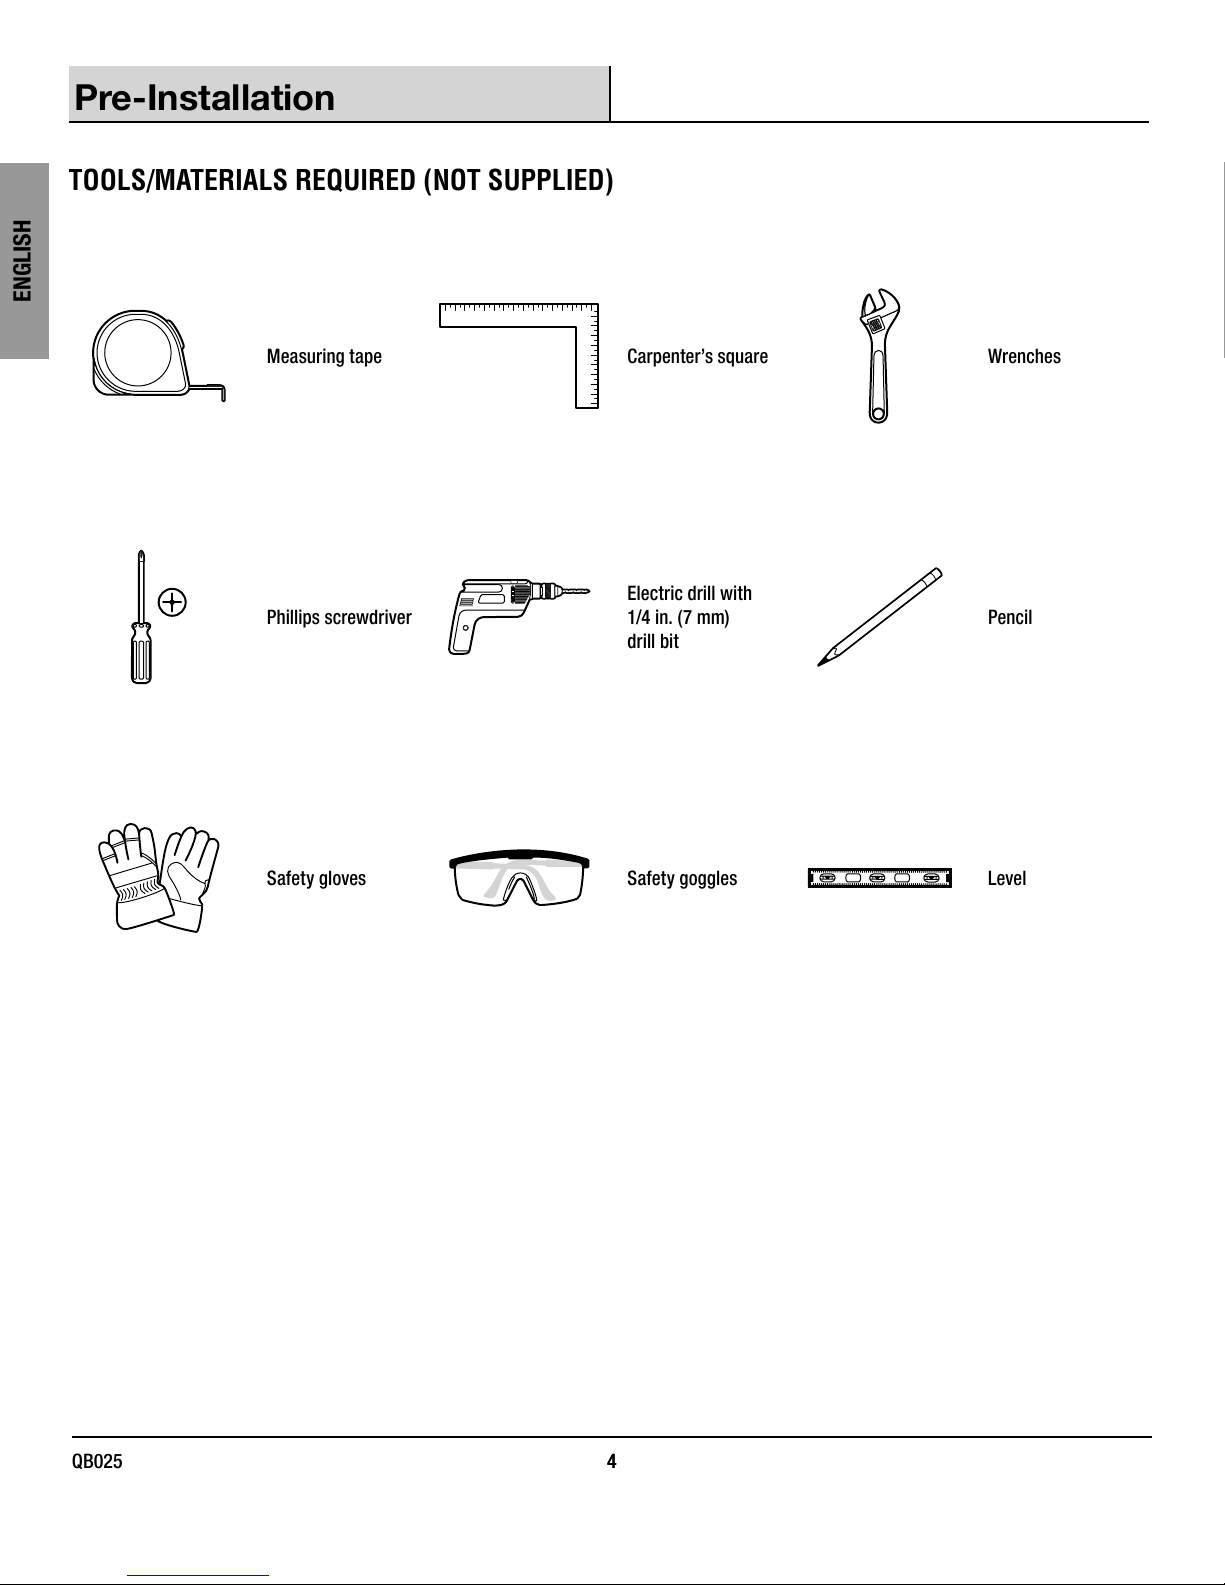
TOOLS/MATERIALS REQUIRED (NOT SUPPLIED)
ENGLISH
Measuring tape Carpenter’s square Wrenches
Phillips screwdriver
Electric drill with
1/4 in. (7 mm)
drill bit
Pencil
Safety gloves Safety goggles Level
4
QB025 4
Page 5
Pre-Installation (continued)
N
S
R
L
M
N
Q
P
T
U
V
W
X
C
Y
1
Z
2
DD
AA BB CC
H
K
B
C N
G
D
A
E F
J
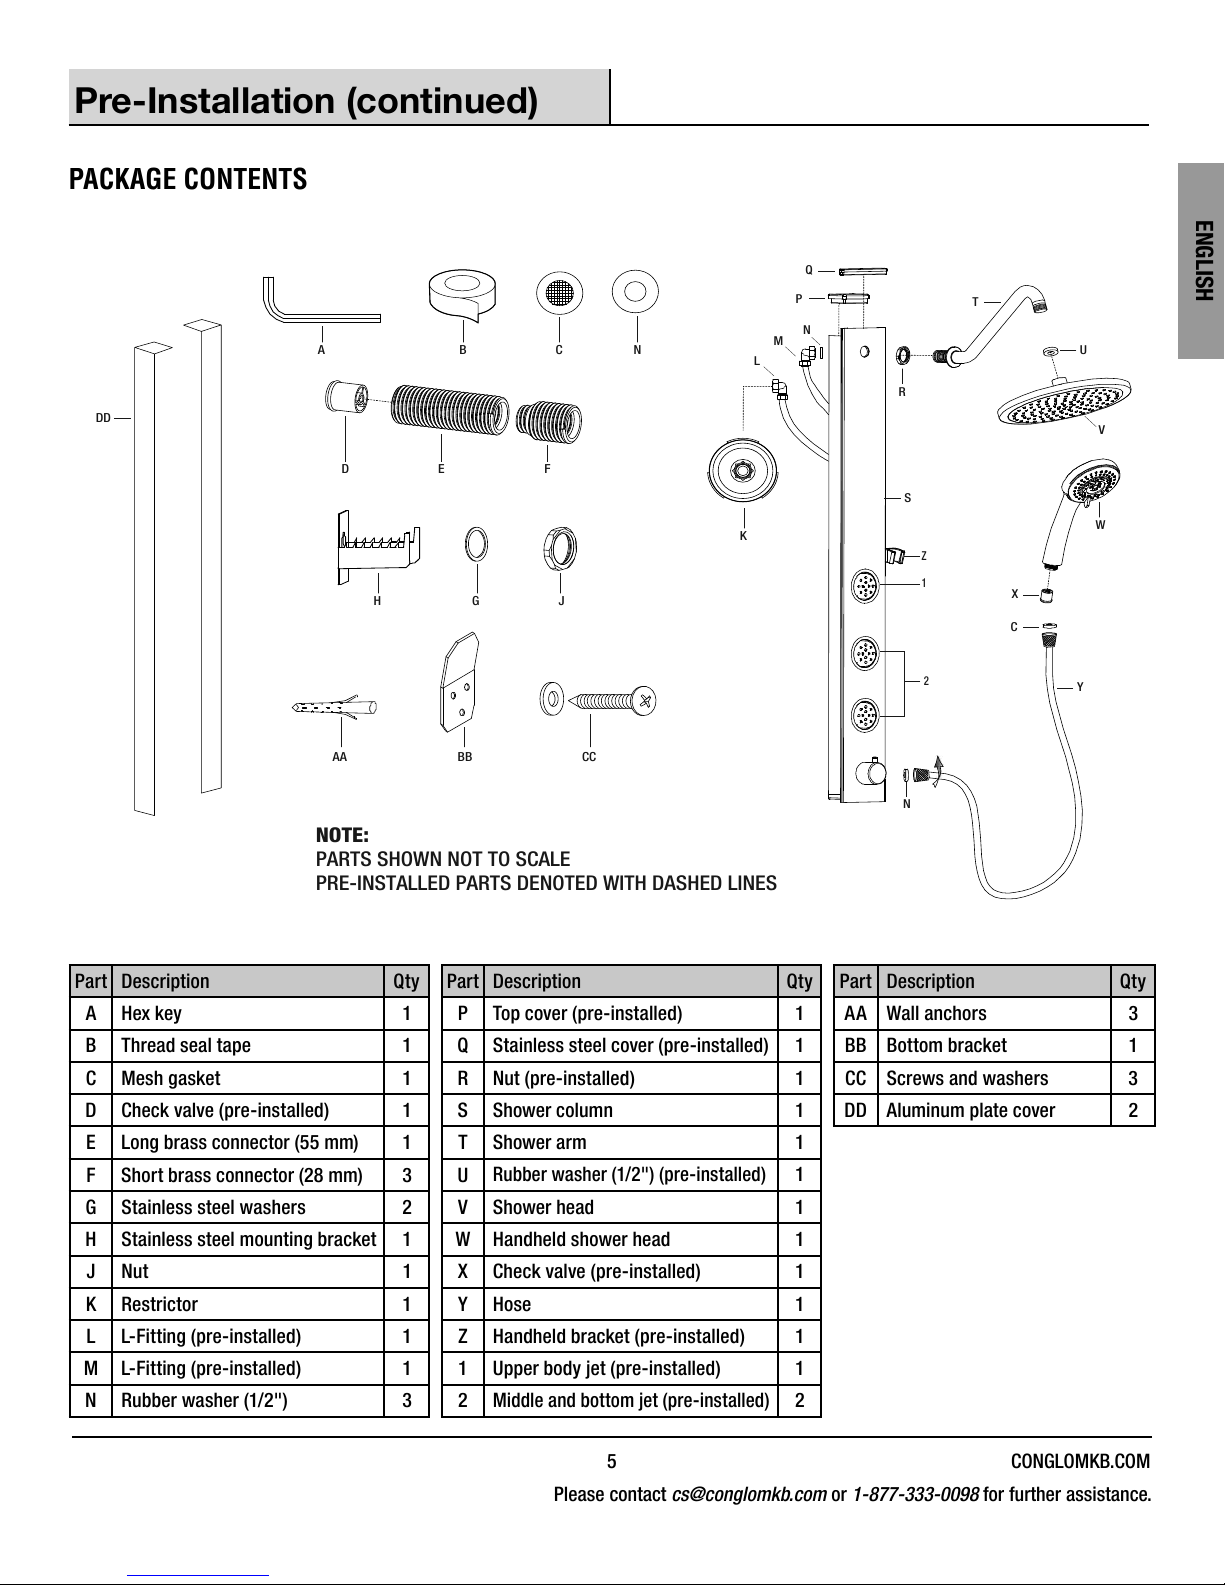
NOTE:
PARTS SHOWN NOT TO SCALE
PRE-INSTALLED PARTS DENOTED WITH DASHED LINES
PACKAGE CONTENTS
ENGLISH
Part Description Qty Part Description Qty Part Description Qty
A Hex key 1 P Top cover (pre-installed) 1 AA Wall anchors 3
B Thread seal tape 1 Q Stainless steel cover (pre-installed) 1 BB Bottom bracket 1
C Mesh gasket 1 R Nut (pre-installed) 1 CC Screws and washers 3
D Check valve (pre-installed) 1 S Shower column 1 DD Aluminum plate cover 2
E Long brass connector (55 mm) 1 T Shower arm 1
F Short brass connector (28 mm) 3 U
G Stainless steel washers 2 V Shower head 1
H Stainless steel mounting bracket 1 W Handheld shower head 1
J Nut 1 X Check valve (pre-installed) 1
K Restrictor 1 Y Hose 1
L L-Fitting (pre-installed) 1 Z Handheld bracket (pre-installed) 1
M L-Fitting (pre-installed) 1 1 Upper body jet (pre-installed) 1
N Rubber washer (1/2") 3 2
5 CONGLOMKB.COM
Rubber washer (1/2") (pre-installed)
Middle and bottom jet (pre-installed)
Please contact cs@conglomkb.com or 1-877-333-0098 for further assistance.
1
2
Page 6
Installation
S
T
R
T
M
N
V
T
U
T
R
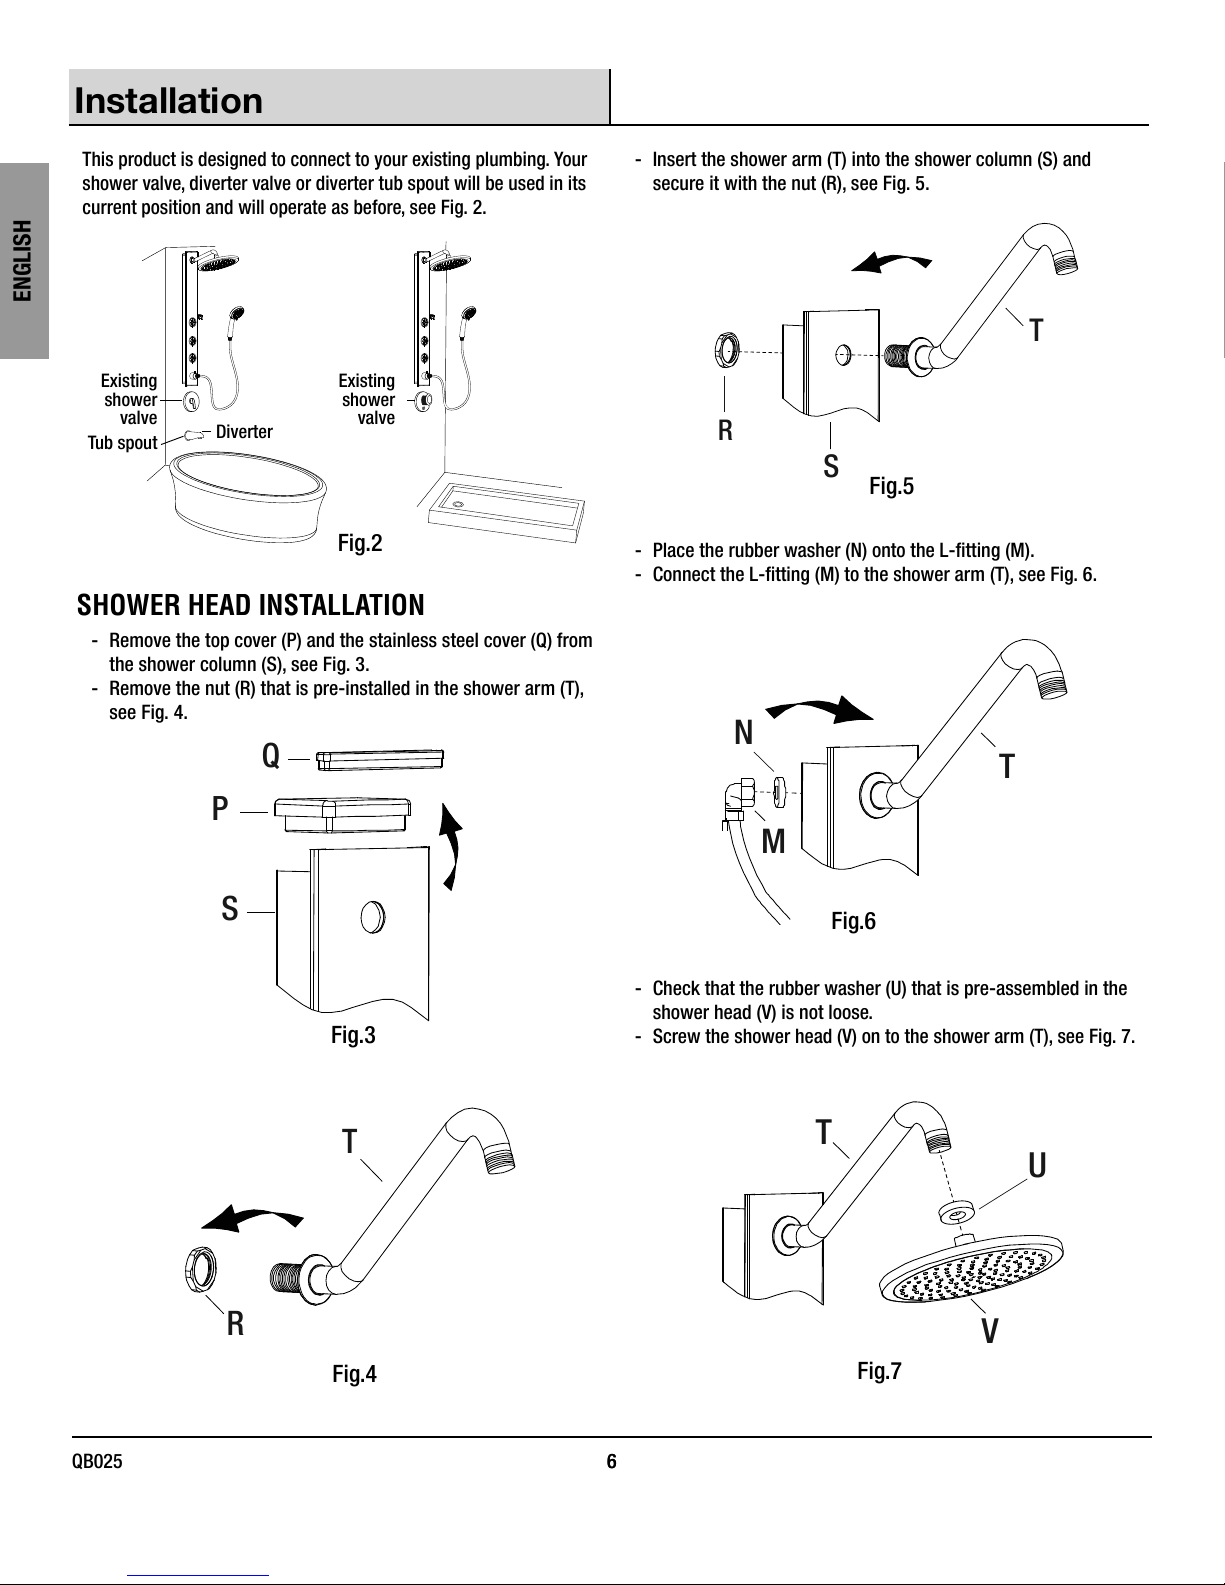
This product is designed to connect to your existing plumbing. Your
shower valve, diverter valve or diverter tub spout will be used in its
current position and will operate as before, see Fig. 2
ENGLISH
Existing
shower
valve
Tub spout
Diverter
Existing
shower
valve
Fig.2
SHOWER HEAD INSTALLATION
- Remove the top cover (P) and the stainless steel cover (Q) from
the shower column (S), see Fig. 3.
- Remove the nut (R) that is pre-installed in the shower arm (T),
see Fig. 4.
- Insert the shower arm (T) into the shower column (S) and
secure it with the nut (R), see Fig. 5.
.
Fig.5
- Place the rubber washer (N) onto the L-tting (M).
- Connect the L-tting (M) to the shower arm (T), see Fig. 6.
P
S
Q
Fig.3
Fig.6
- Check that the rubber washer (U) that is pre-assembled in the
shower head (V) is not loose.
- Screw the shower head (V) on to the shower arm (T), see Fig. 7.
6
QB025 6
Fig.4
Fig.7
Page 7
Installation (continued)
1
3
2
Mark shower
arm here
3
3
Thread seal tape on this end
2 3/16" (55.6 mm)
D E
B
Pre-installed in E
E
Mark on shower arm
Thread
Seal End
Align
here
MINIMUM: 5/8"
MAXIMUM: 1 1/8"
E
Mark on shower arm
MINIMUM: 5/8"
MAXIMUM: 1-1/8"
F
A
Shower
Outlet
Brass
Connector
Assembly
NOTE:
Make sure that your shower valve is closed at all times from now until the
testing is required.
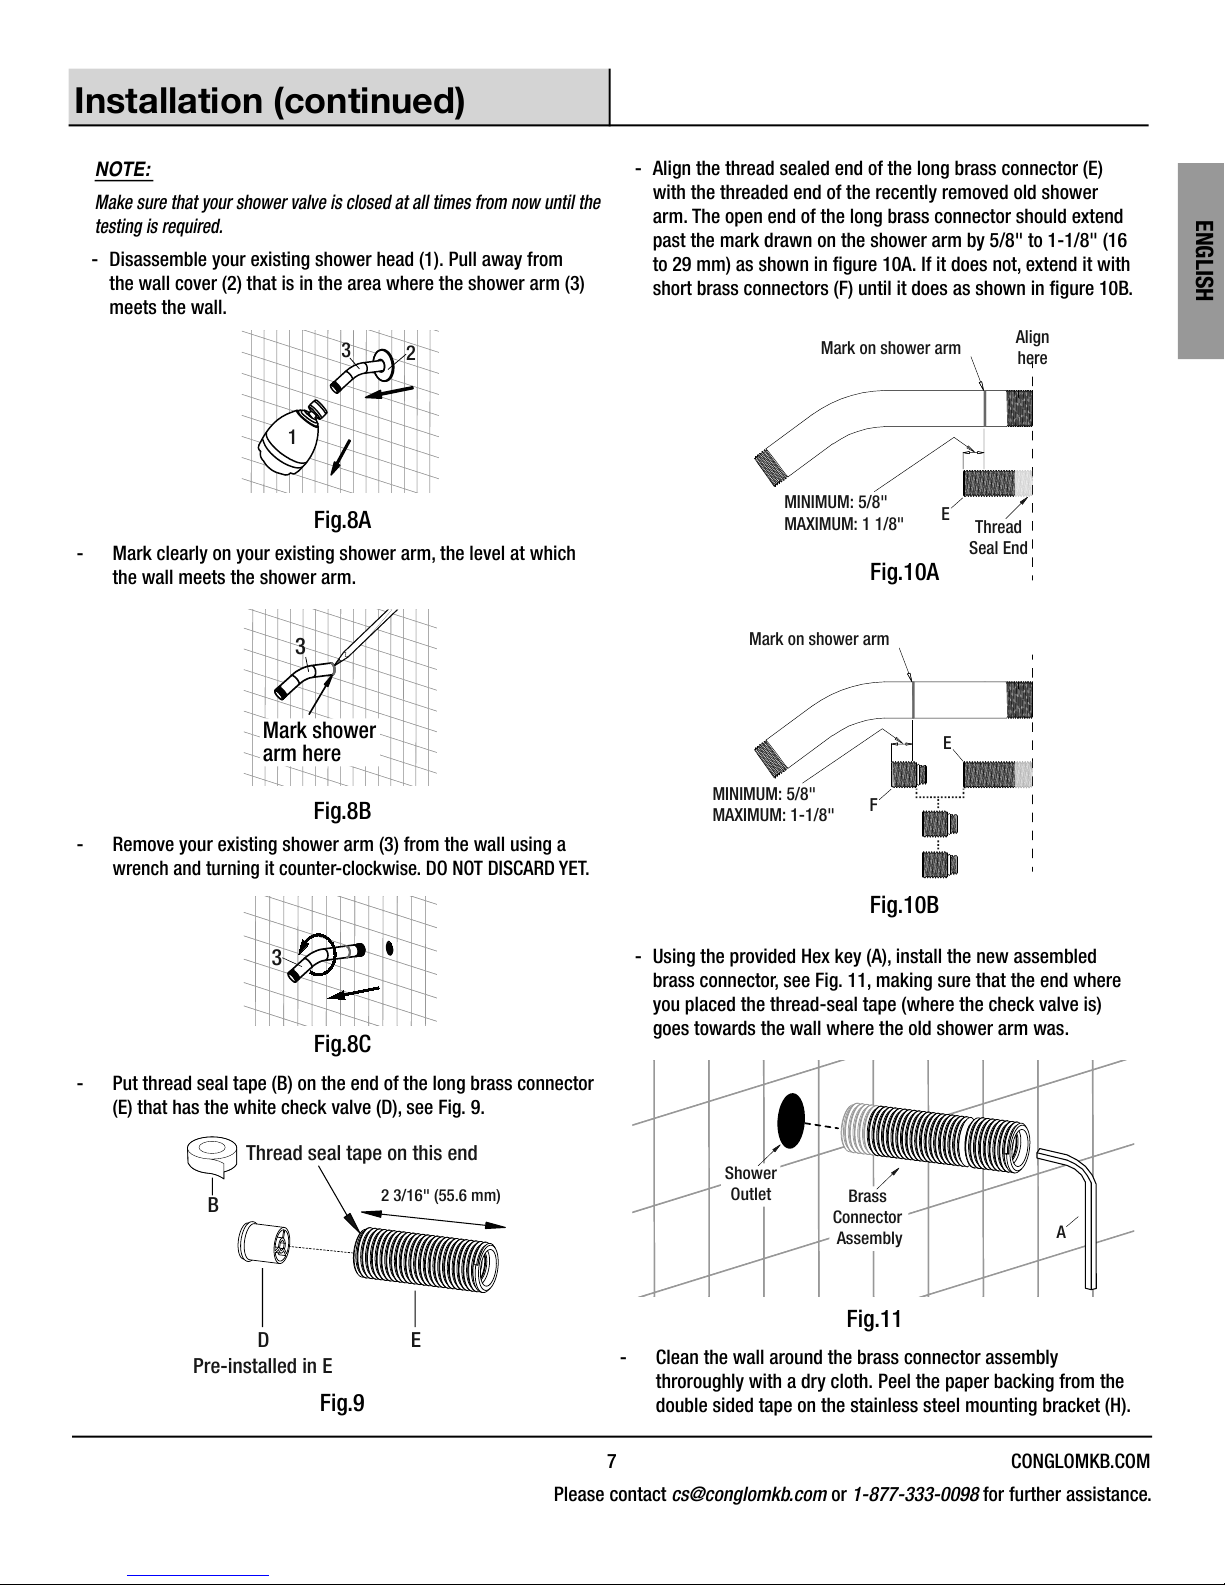
- Disassemble your existing shower head (1). Pull away from
the wall cover (2) that is in the area where the shower arm (3)
meets the wall.
Fig.8A
Mark clearly on your existing shower arm, the level at which
-
the wall meets the shower arm.
- Align the thread sealed end of the long brass connector (E)
with the threaded end of the recently removed old shower
arm. The open end of the long brass connector should extend
past the mark drawn on the shower arm by 5/8" to 1-1/8" (16
to 29 mm) as shown in gure 10A. If it does not, extend it with
short brass connectors (F) until it does as shown in gure 10B.
Fig.10A
ENGLISH
Fig.8B
Remove your existing shower arm (3) from the wall using a
-
wrench and turning it counter-clockwise. DO NOT DISCARD YET.
Fig.8C
Fig.9
- Put thread seal tape (B) on the end of the long brass connector
(E) that has the white check valve (D), see Fig. 9.
7 CONGLOMKB.COM
Fig.10B
- Using the provided Hex key (A), install the new assembled
brass connector, see Fig. 11, making sure that the end where
you placed the thread-seal tape (where the check valve is)
goes towards the wall where the old shower arm was.
Fig.11
-
Clean the wall around the brass connector assembly
throroughly with a dry cloth. Peel the paper backing from the
double sided tape on the stainless steel mounting bracket (H).
Please contact cs@conglomkb.com or 1-877-333-0098 for further assistance.
Page 8
Installation (continued)
Shower
Outlet
Brass
Connector
Assembly
GH J
Shower Outlet
22 1/2" (572 mm)
Clean Bracket
Mounting Area
BB
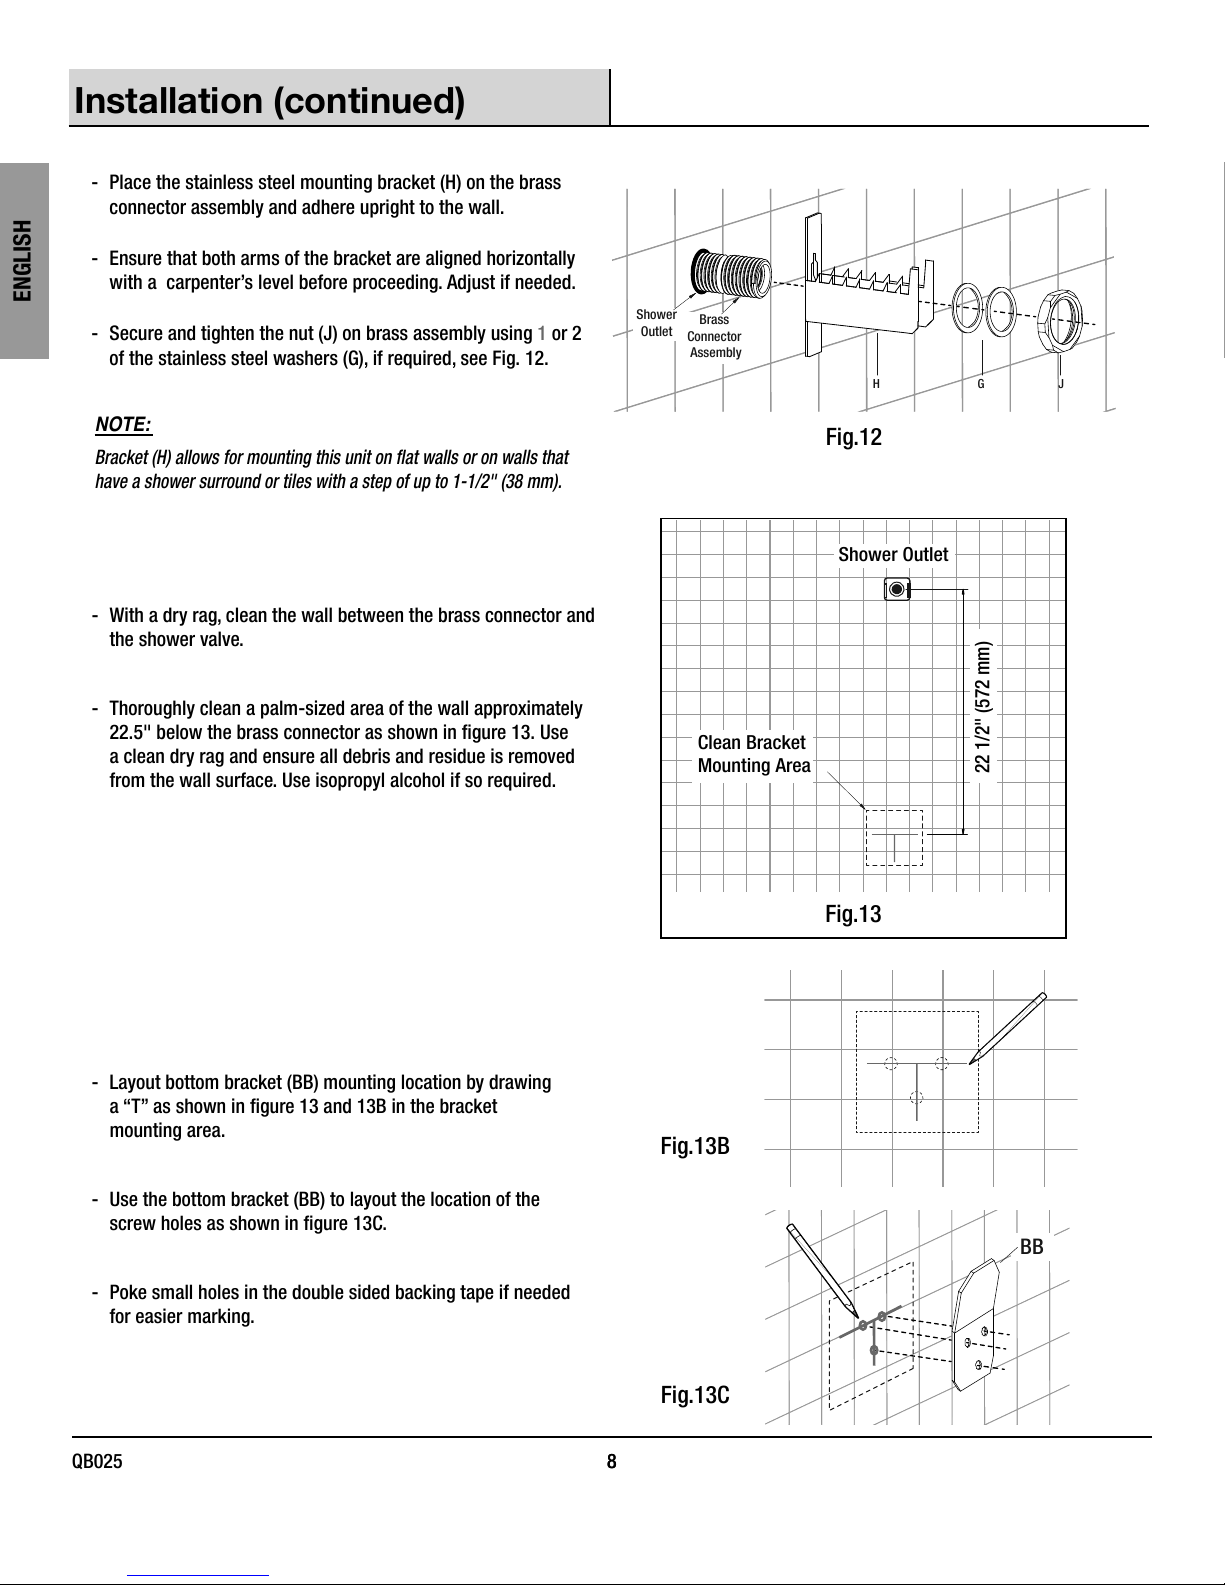
- Place the stainless steel mounting bracket (H) on the brass
connector assembly and adhere upright to the wall.
- Ensure that both arms of the bracket are aligned horizontally
ENGLISH
with a carpenter’s level before proceeding. Adjust if needed.
- Secure and tighten the nut (J) on brass assembly using 1 or 2
of the stainless steel washers (G), if required, see Fig. 12.
NOTE:
Bracket (H) allows for mounting this unit on at walls or on walls that
have a shower surround or tiles with a step of up to 1-1/2" (38 mm).
- With a dry rag, clean the wall between the brass connector and
the shower valve.
- Thoroughly clean a palm-sized area of the wall approximately
22.5" below the brass connector as shown in gure 13. Use
a clean dry rag and ensure all debris and residue is removed
from the wall surface. Use isopropyl alcohol if so required.
Fig.12
Fig.13
- Layout bottom bracket (BB) mounting location by drawing
a “T” as shown in gure 13 and 13B in the bracket
mounting area.
- Use the bottom bracket (BB) to layout the location of the
screw holes as shown in gure 13C.
- Poke small holes in the double sided backing tape if needed
for easier marking.
8
QB025 8
Fig.13B
Fig.13C
Page 9
Installation (continued)
Wall Screws Optional
AA BB CC
BB
Press
Firmly
K
H
S
L
S
H
BB
1
2
NOTE:
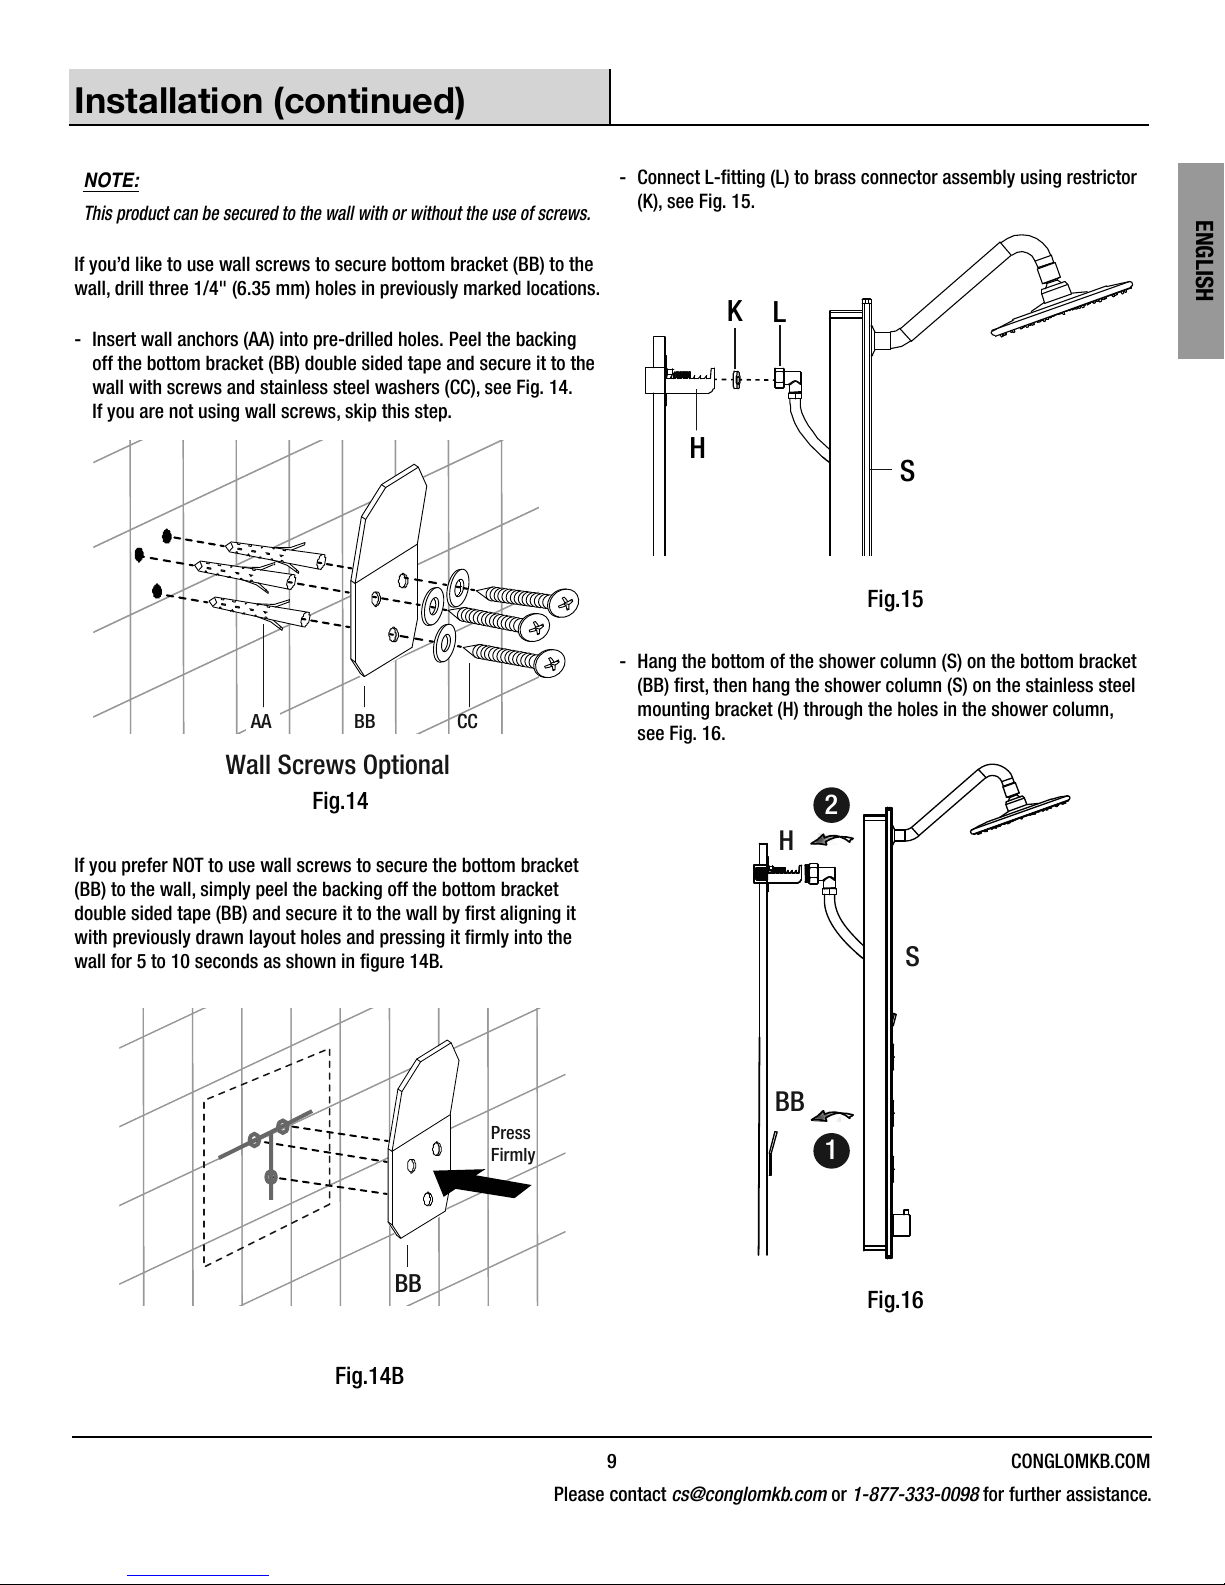
This product can be secured to the wall with or without the use of screws.
If you’d like to use wall screws to secure bottom bracket (BB) to the
wall, drill three 1/4" (6.35 mm) holes in previously marked locations.
- Insert wall anchors (AA) into pre-drilled holes. Peel the backing
off the bottom bracket (BB) double sided tape and secure it to the
wall with screws and stainless steel washers (CC), see Fig. 14.
If you are not using wall screws, skip this step.
- Connect L-tting (L) to brass connector assembly using restrictor
(K), see Fig. 15.
Fig.15
- Hang the bottom of the shower column (S) on the bottom bracket
(BB) rst, then hang the shower column (S) on the stainless steel
mounting bracket (H) through the holes in the shower column,
see Fig. 16.
ENGLISH
Fig.14
If you prefer NOT to use wall screws to secure the bottom bracket
(BB) to the wall, simply peel the backing off the bottom bracket
double sided tape (BB) and secure it to the wall by rst aligning it
with previously drawn layout holes and pressing it rmly into the
wall for 5 to 10 seconds as shown in gure 14B.
Fig.16
Fig.14B
9 CONGLOMKB.COM
Please contact cs@conglomkb.com or 1-877-333-0098 for further assistance.
Page 10
Installation (continued)
DD
Distance
DD
DD
Distance
FINAL INSTALLATION
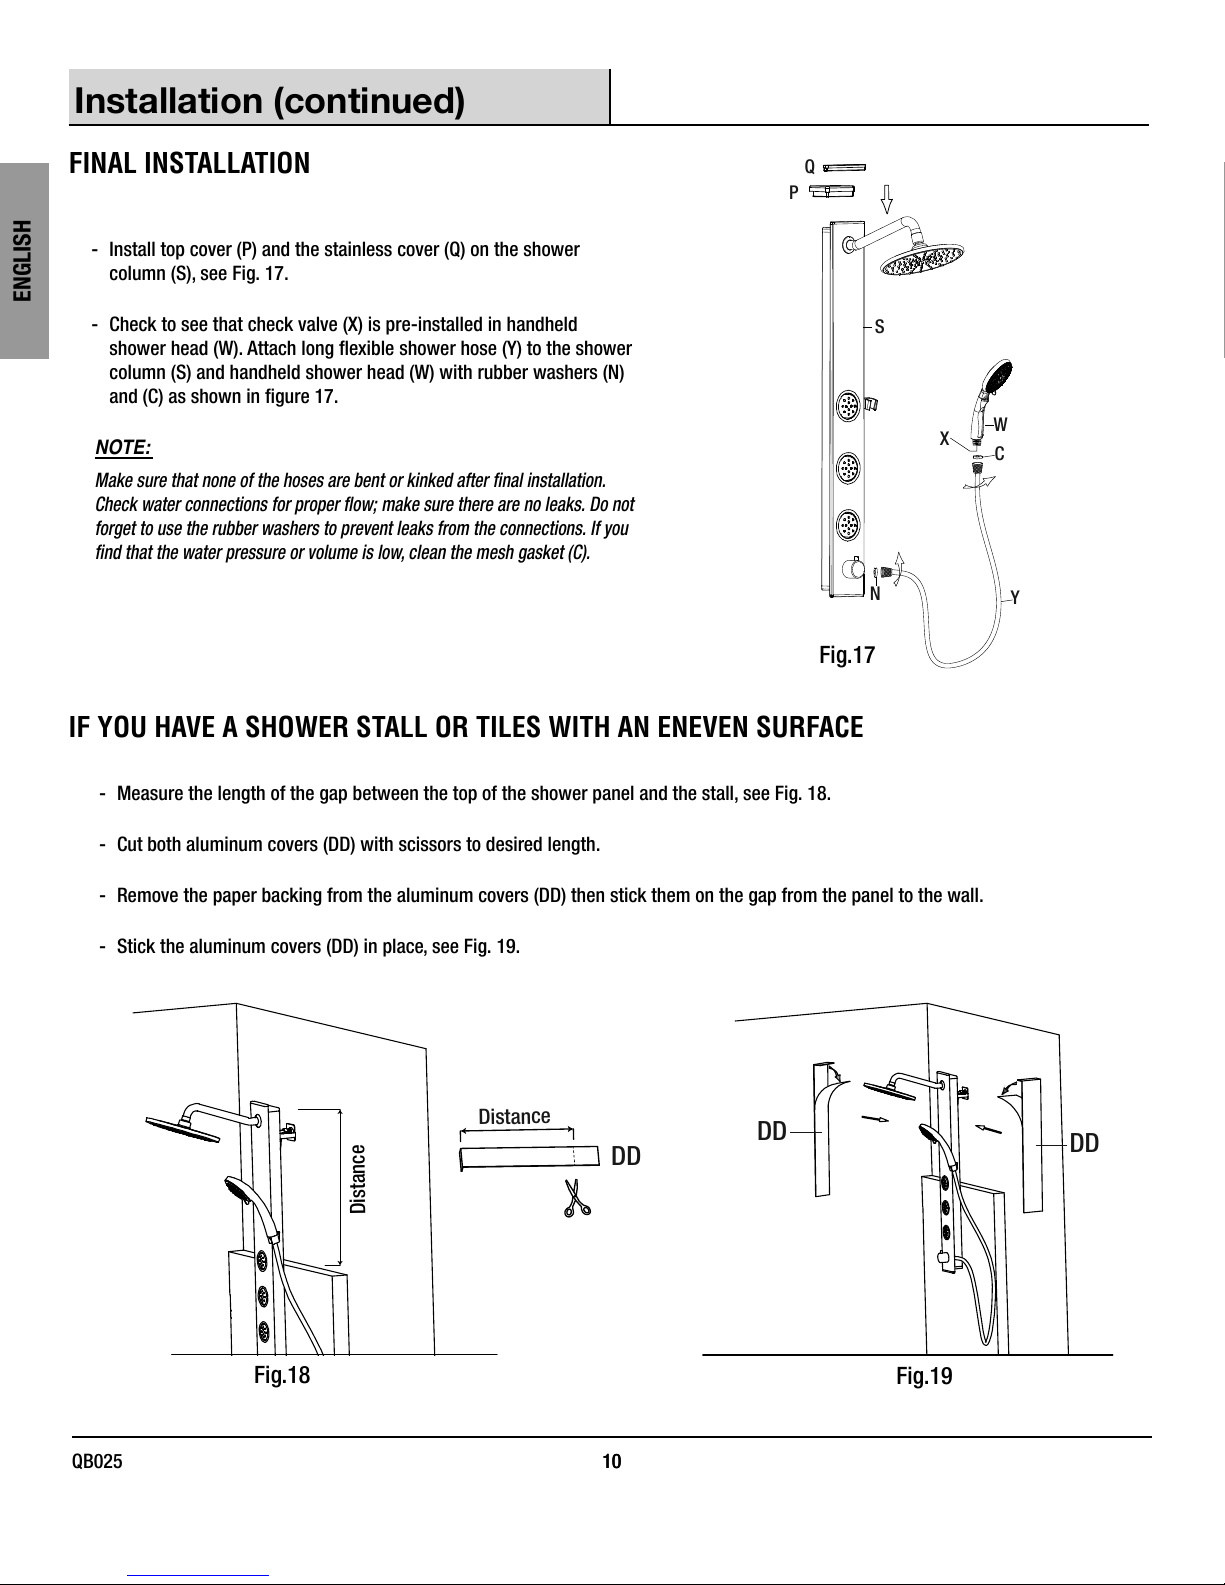
- Install top cover (P) and the stainless cover (Q) on the shower
column (S), see Fig. 17.
ENGLISH
- Check to see that check valve (X) is pre-installed in handheld
shower head (W). Attach long exible shower hose (Y) to the shower
column (S) and handheld shower head (W) with rubber washers (N)
and (C) as shown in gure 17.
NOTE:
Make sure that none of the hoses are bent or kinked after nal installation.
Check water connections for proper ow; make sure there are no leaks. Do not
forget to use the rubber washers to prevent leaks from the connections. If you
nd that the water pressure or volume is low, clean the mesh gasket (C).
IF YOU HAVE A SHOWER STALL OR TILES WITH AN ENEVEN SURFACE
P
Q
Fig.17
S
W
X
C
N
Y
- Measure the length of the gap between the top of the shower panel and the stall, see Fig. 18.
- Cut both aluminum covers (DD) with scissors to desired length.
- Remove the paper backing from the aluminum covers (DD) then stick them on the gap from the panel to the wall.
- Stick the aluminum covers (DD) in place, see Fig. 19.
Fig.18
Fig.19
10
QB025 10
Page 11
Operation
Selector
switch
1
Selector
switch
2
Selector
switch
5
Selector
switch
6
Selector
switch
4
Selector
switch
3
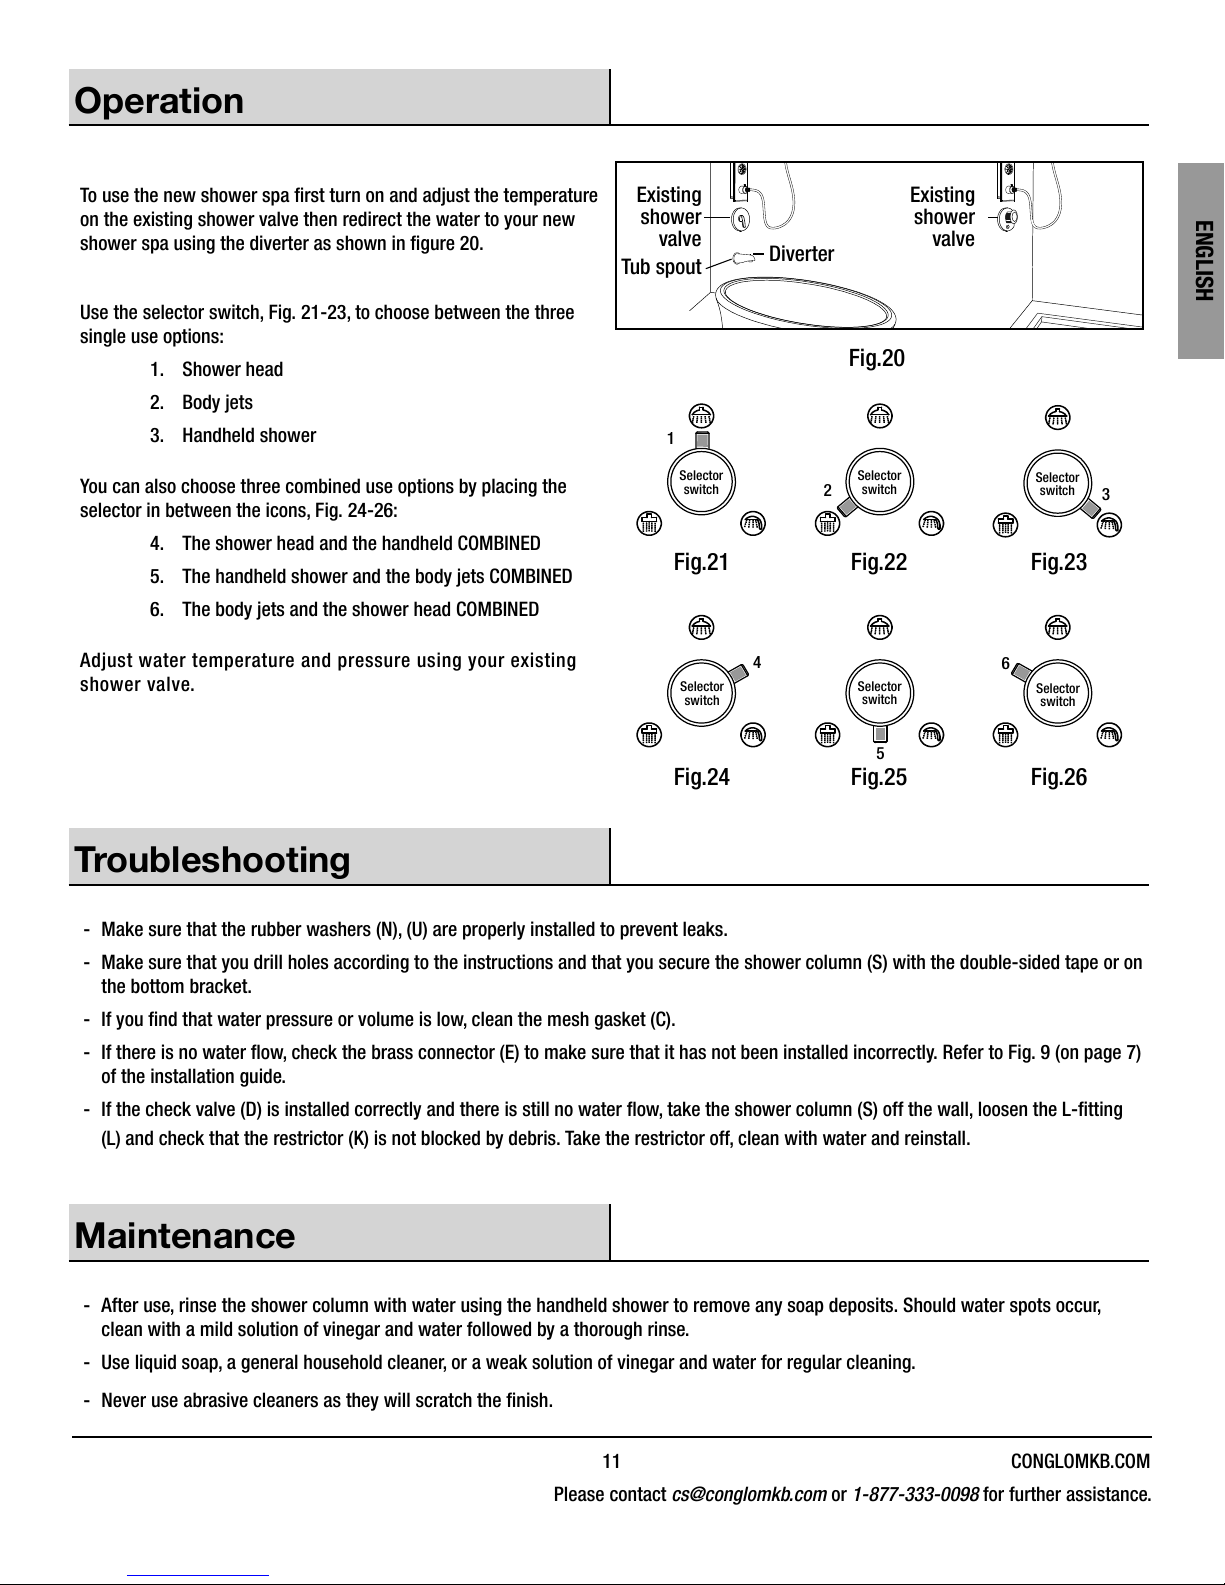
To use the new shower spa rst turn on and adjust the temperature
on the existing shower valve then redirect the water to your new
shower spa using the diverter as shown in gure 20.
Use the selector switch, Fig. 21-23, to choose between the three
single use options:
1. Shower head
2. Body jets
3. Handheld shower
You can also choose three combined use options by placing the
selector in between the icons, Fig. 24-26:
4. The shower head and the handheld COMBINED
5. The handheld shower and the body jets COMBINED
6. The body jets and the shower head COMBINED
Adjust water temperature and pressure using your existing
shower valve.
Existing
shower
valve
Tub spout
Diverter
Existing
shower
valve
Fig.20
Fig.21 Fig.22 Fig.23
ENGLISH
Fig.24 Fig.25 Fig.26
Troubleshooting
- Make sure that the rubber washers (N), (U) are properly installed to prevent leaks.
- Make sure that you drill holes according to the instructions and that you secure the shower column (S) with the double-sided tape or on
the bottom bracket.
- If you nd that water pressure or volume is low, clean the mesh gasket (C).
- If there is no water ow, check the brass connector (E) to make sure that it has not been installed incorrectly. Refer to Fig. 9 (on page 7)
of the installation guide.
- If the check valve (D) is installed correctly and there is still no water ow, take the shower column (S) off the wall, loosen the L-tting
(L) and check that the restrictor (K) is not blocked by debris. Take the restrictor off, clean with water and reinstall.
Maintenance
- After use, rinse the shower column with water using the handheld shower to remove any soap deposits. Should water spots occur,
clean with a mild solution of vinegar and water followed by a thorough rinse.
- Use liquid soap, a general household cleaner, or a weak solution of vinegar and water for regular cleaning.
- Never use abrasive cleaners as they will scratch the nish.
11 CONGLOMKB.COM
Please contact cs@conglomkb.com or 1-877-333-0098 for further assistance.
Page 12
Replacement Parts
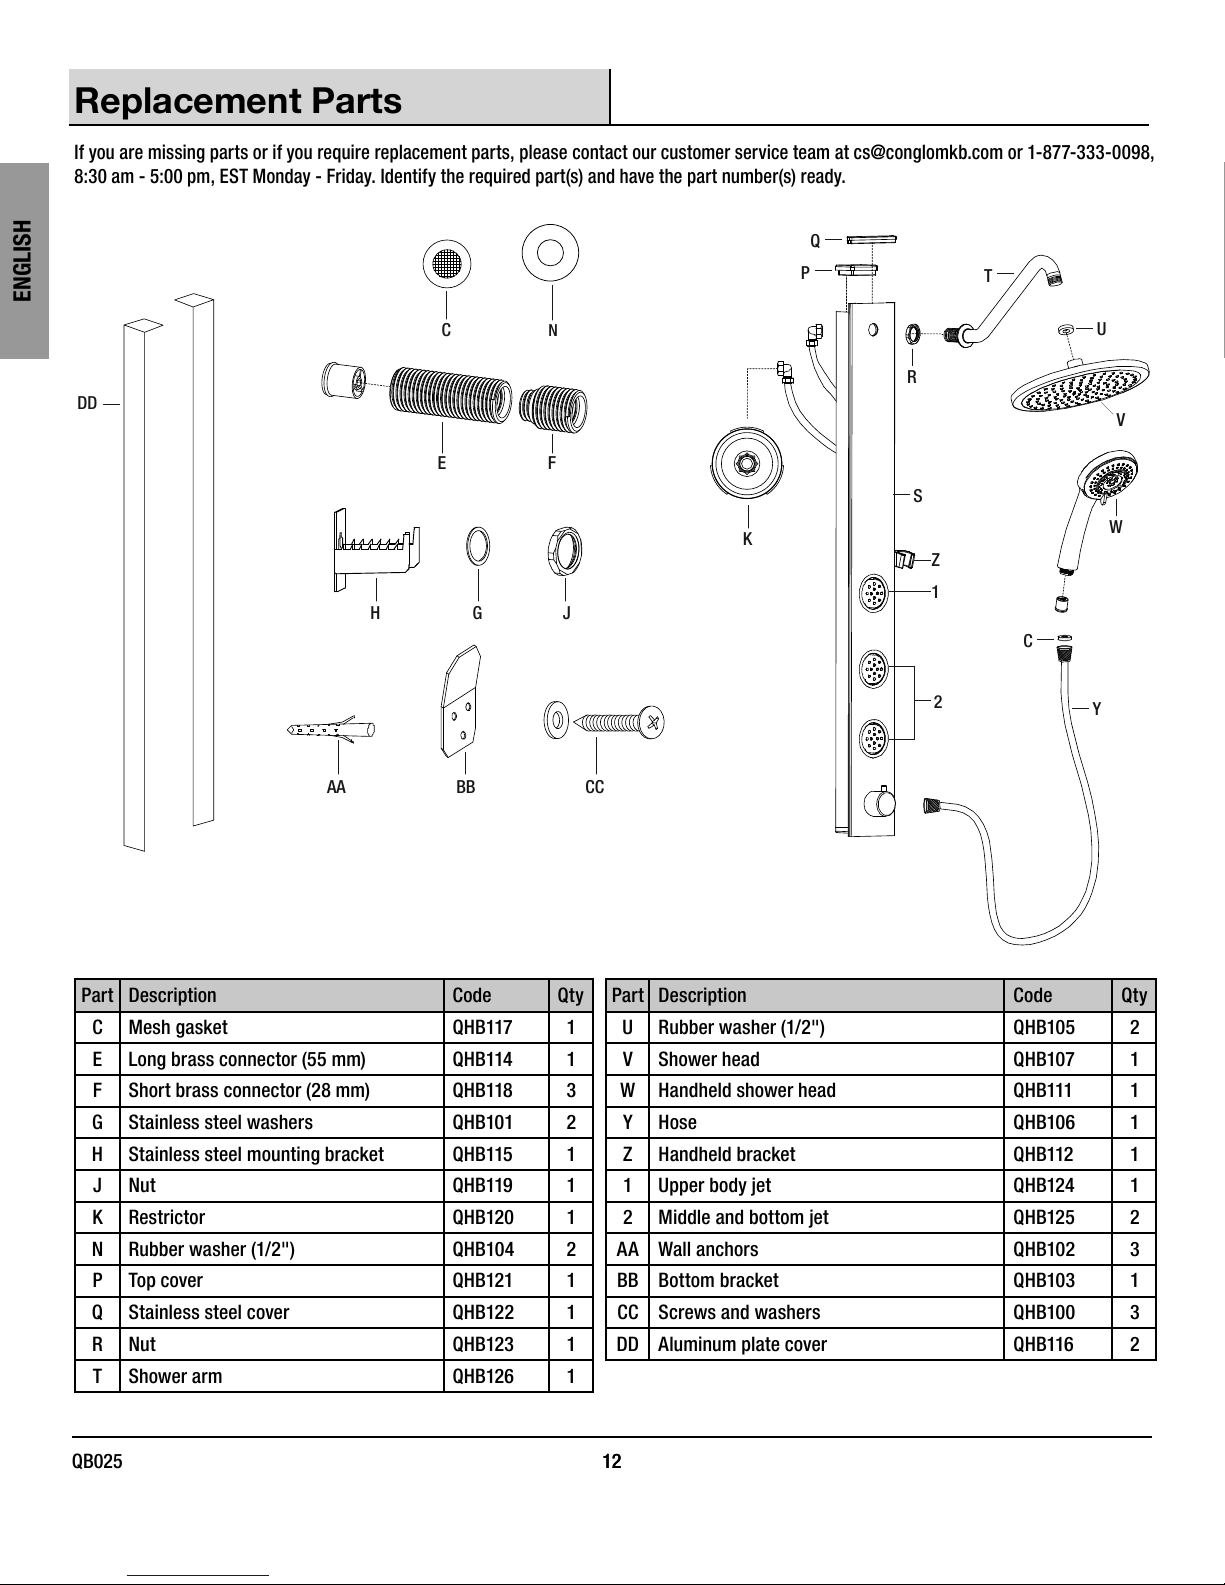
If you are missing parts or if you require replacement parts, please contact our customer service team at cs@conglomkb.com or 1-877-333-0098,
8:30 am - 5:00 pm, EST Monday - Friday. Identify the required part(s) and have the part number(s) ready.
Q
ENGLISH
DD
P
C
E F
H
G
N
R
S
K
J
T
Z
1
C
U
V
W
2
AA BB CC
Y
Part Description Code Qty Part Description Code Qty
C Mesh gasket QHB117 1 U Rubber washer (1/2") QHB105 2
E Long brass connector (55 mm) QHB114 1 V Shower head QHB107 1
F Short brass connector (28 mm) QHB118 3 W Handheld shower head QHB111 1
G Stainless steel washers QHB101 2 Y Hose QHB106 1
H Stainless steel mounting bracket QHB115 1 Z Handheld bracket QHB112 1
J Nut QHB119 1 1 Upper body jet QHB124 1
K Restrictor QHB120 1 2 Middle and bottom jet QHB125 2
N Rubber washer (1/2") QHB104 2 AA Wall anchors QHB102 3
P Top cover QHB121 1 BB Bottom bracket QHB103 1
Q Stainless steel cover QHB122 1 CC Screws and washers QHB100 3
R Nut QHB123 1 DD Aluminum plate cover QHB116 2
T Shower arm QHB126 1
12
QB025 12
Page 13
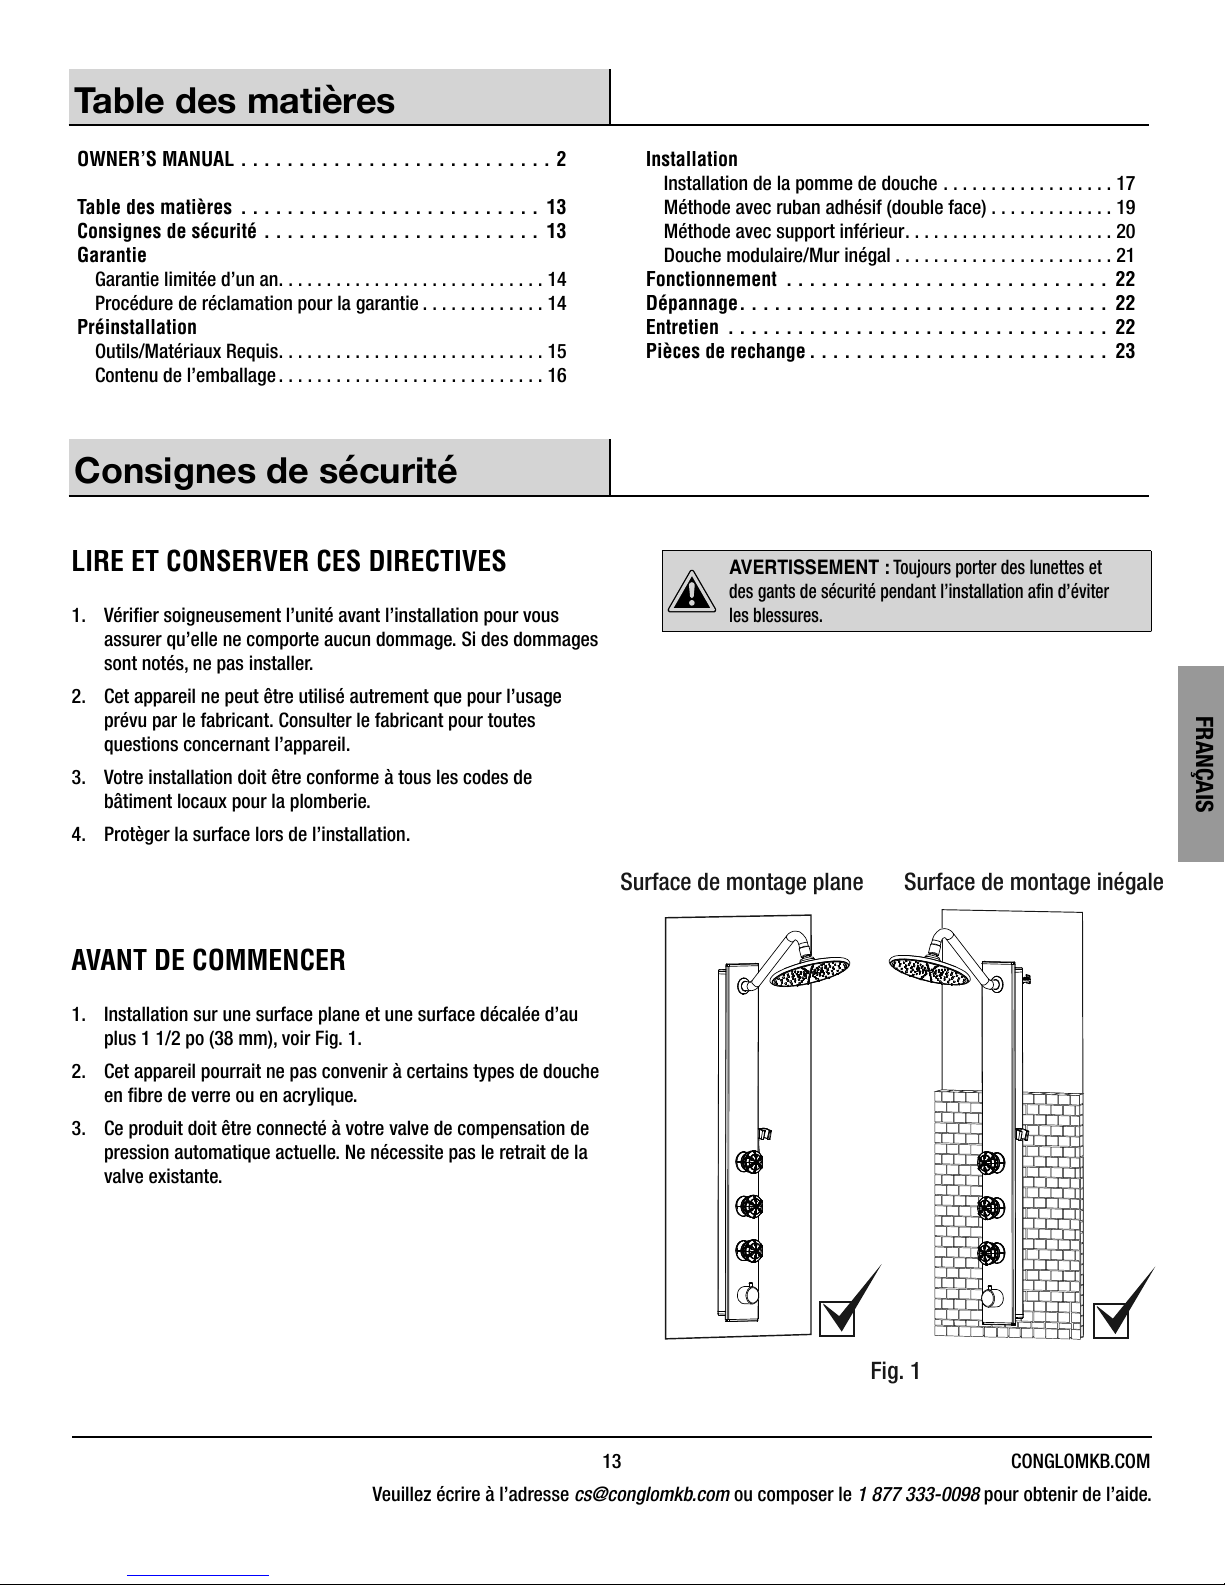
Table des matières
OWNER’S MANUAL ...........................2
Table des matières ..........................13
Consignes de sécurité ........................13
Garantie
Garantie limitée d’un an ............................14
Procédure de réclamation pour la garantie .............14
Préinstallation
Outils/Matériaux Requis ............................15
Contenu de l’emballage ............................16
Consignes de sécurité
LIRE ET CONSERVER CES DIRECTIVES
1. Vérier soigneusement l’unité avant l’installation pour vous
assurer qu’elle ne comporte aucun dommage. Si des dommages
sont notés, ne pas installer.
2. Cet appareil ne peut être utilisé autrement que pour l’usage
prévu par le fabricant. Consulter le fabricant pour toutes
questions concernant l’appareil.
3. Votre installation doit être conforme à tous les codes de
bâtiment locaux pour la plomberie.
4. Protèger la surface lors de l’installation.
Installation
Installation de la pomme de douche ..................17
Méthode avec ruban adhésif (double face) .............19
Méthode avec support inférieur ......................20
Douche modulaire/Mur inégal .......................21
Fonctionnement ............................ 22
Dépannage ................................ 22
Entretien ................................. 22
Pièces de rechange .......................... 23
AVERTISSEMENT : Toujours porter des lunettes et
des gants de sécurité pendant l’installation an d’éviter
les blessures.
FRANÇAIS
Surface de montage plane Surface de montage inégale
AVANT DE COMMENCER
1. Installation sur une surface plane et une surface décalée d’au
plus 1 1/2 po (38 mm), voir Fig. 1.
2. Cet appareil pourrait ne pas convenir à certains types de douche
en bre de verre ou en acrylique.
3. Ce produit doit être connecté à votre valve de compensation de
pression automatique actuelle. Ne nécessite pas le retrait de la
valve existante.
Fig. 1
13 CONGLOMKB.COM
Veuillez écrire à l’adresse cs@conglomkb.com ou composer le 1877333-0098 pour obtenir de l’aide.
Page 14
Garantie
GARANTIE LIMITÉE D’UN AN
Inspecter minutieusement le produit avant l’installation et signaler tout dommage sans délai. Nous ne serons pas responsables des défaillances
ou des dommages qui auraient dû être découverts ou évités par une inspection adéquate et des essais avant l’installation.
Conglom Kitchen and Bath garantit ce produit contre tout défaut dans les matériaux ou la fabrication, pour une période d’un (1) an à compter
de la d’achat. Une preuve d’achat (facture d’achat originale) du consommateur/acheteur original devra accompagner toute réclamation faite à
Conglom Kitchen & Bath.
Cette garantie est non transférable et sera nulle si l’unité est enlevée de son installation initiale ou si elle n’est pas installée suivant les
spécications du fabricant. Elle ne s’applique pas dans l’éventualité de dommages causés au produit suite à l’utilisation de pièce(s) de
rechange autre que les pièces originales Conglom Kitchen and Bath, (les pièces de rechange peuvent être obtenues en nous écrivant un
courriel à cs@conglomkb.com ou en appellant au 1-877-333-0098 entre 8h30 et 17h00, H.N.E.) d’une erreur d’installation, l’abus, l’utilisation,
l’entretien ou le service incorrect (qu’il soit effectué par un plombier, un entrepreneur, une entreprise de service ou un membre de la famille
de l’acheteur). La garantie exclut les dommages causés par des conditions agressives d’air ou d’eau, des nettoyants ou des matériaux rudes
et/ou abrasifs.
Nous ne pouvons en aucun cas être tenus responsables pour toute blessure corporelle ou tout dommage matériel résultant d’une mauvaise
installation ou utilisation de ce produit. Nous ne serons pas tenus responsables de l’incapacité d’utiliser cette unité, des inconvénients, des
coûts encourus pour la main d’oeuvre, des matériaux, de l’enlèvement et de l’installation des unités de remplacement ou d’aucun autre
dommage causé par un incident ou accessoire. Les coûts encourus pour obtenir l’accès pour la réparation ou le remplacement sont à la
responsabilité de l’utilisateur.
Nos obligations se limitent à la réparation ou au remplacement de l’unité (selon notre discrétion) qui peut s’avérer, selon notre examen unique,
être défectueuse sous l’utilisation et le service normal pendant la période de garantie. Nous pouvons émettre un crédit au montant de la valeur
de la facture du produit défectueux (ou d’un pourcentage de ce montant selon l’usure) tenant lieu de la réparation ou du remplacement.
Toute défectuosité de l’unité qui ne peut être liée à un défaut de matériel ou de fabrication n’est pas couverte par cette garantie. Ces conditions
non garanties incluent, mais ne se limitent pas aux suivantes :
FRANÇAIS
- Une mauvaise installation non conforme aux instructions du fabricant;
- Les bosselures, bosses et rayures causées pendant l’expédition, la manutention ou l’installation;
- Le changement de la couleur ou du ni en raison de l’usage d’un produit chimique;
- Les dommages causés par le non-respect des directives de soin et de nettoyage, y compris les dommages causés par l’utilisation de
produits nettoyants abrasifs;
- Toute modication apportée à l’unité par l’acheteur ou l’installateur;
- Les dommages en raison d’un impact accidentel, du feu, d’une inondation, du gel et de l’usure normale;
- Les courbures et les déformations provoquées par des raccordements forcés, des xations trop serrées et un support inadéquat
pendant l’installation.
PROCÉDURE DE RÉCLAMATION POUR LA GARANTIE
Si un défaut couvert par la garantie se produit ou que vous avez besoin des pièces de rechange, contactez notre service à la clientèle au
cs@conglomkb.com ou au 1-877-333-0098 (service disponible en anglais et français du lundi au vendredi de 8h30 à 17h, H.N.E.).
Avant d’appeler, veuillez-vous assurer d’avoir en main :
- Le numéro de modèle ou une description;
- La preuve d’achat;
- Les détails concernant le défaut et/ou le numéro de la pièce de rechange;
- Le nom et l’adresse du propriétaire et/ou de l’installateur.
14
QB025 14
Page 15
Préinstallation
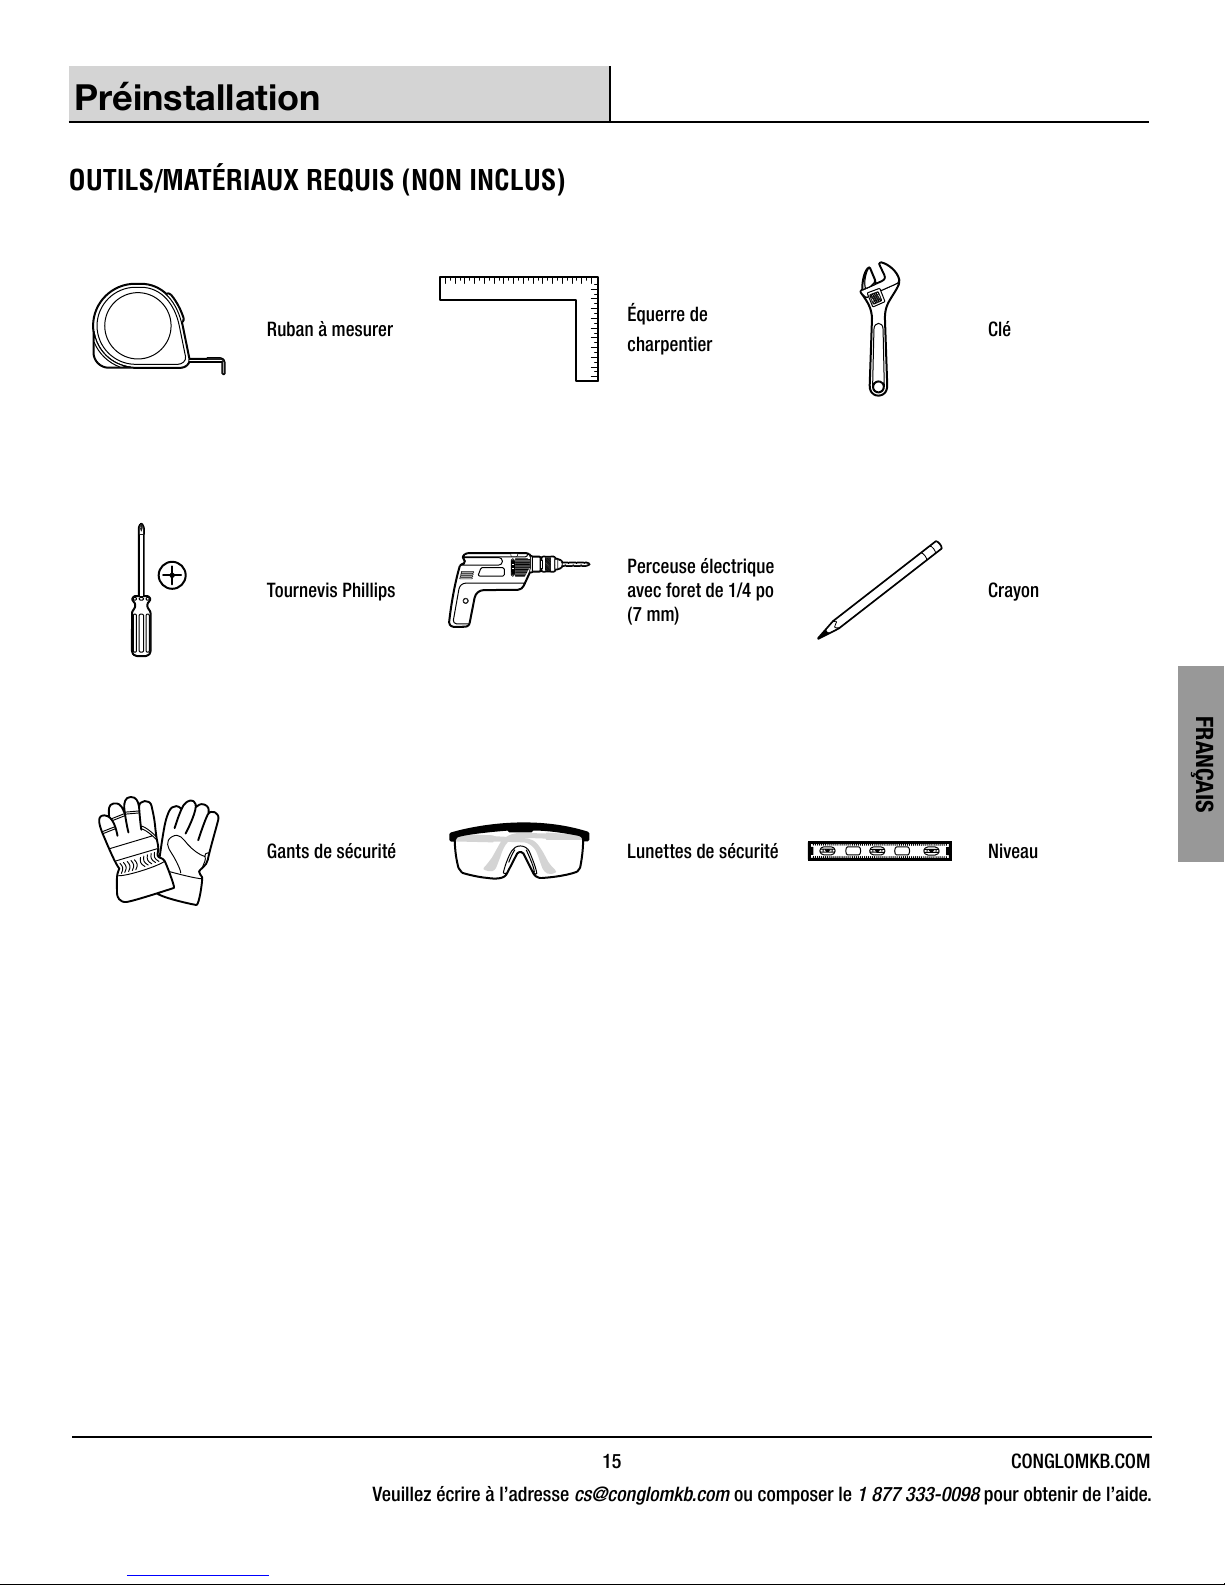
OUTILS/MATÉRIAUX REQUIS (NON INCLUS)
Ruban à mesurer
Tournevis Phillips
Gants de sécurité Lunettes de sécurité Niveau
Équerre de
charpentier
Perceuse électrique
avec foret de 1/4 po
(7 mm)
Clé
Crayon
FRANÇAIS
15 CONGLOMKB.COM
Veuillez écrire à l’adresse cs@conglomkb.com ou composer le 1877333-0098 pour obtenir de l’aide.
Page 16
Préinstallation (suite)
N
S
R
L
M
N
Q
P
T
U
V
W
X
C
Y
1
Z
2
DD
AA BB CC
H
K
B
C N
G
D
A
E F
J
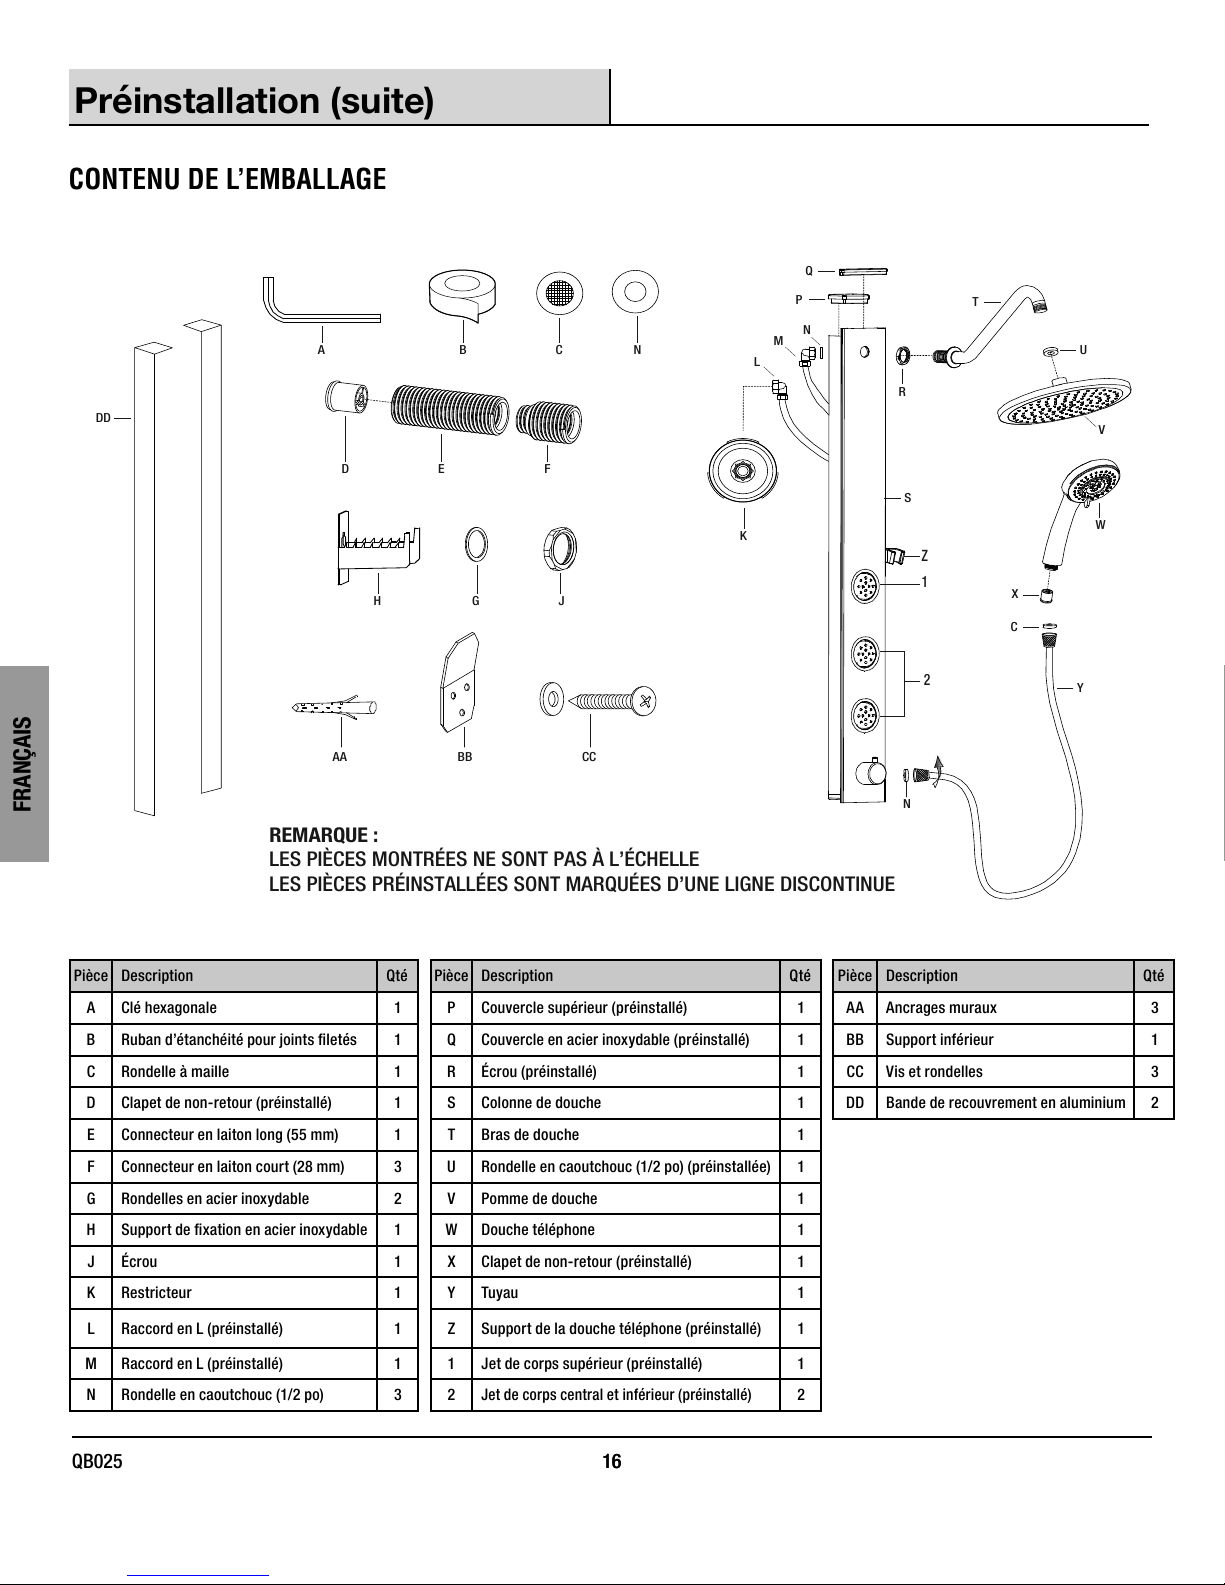
REMARQUE:
LES PIÈCES MONTRÉES NE SONT PAS À L’ÉCHELLE
LES PIÈCES PRÉINSTALLÉES SONT MARQUÉES D’UNE LIGNE DISCONTINUE
CONTENU DE L’EMBALLAGE
FRANÇAIS
Pièce Description Qté Pièce Description Qté Pièce Description Qté
A Clé hexagonale 1 P Couvercle supérieur (préinstallé) 1 AA Ancrages muraux 3
B Ruban d’étanchéité pour joints letés 1 Q Couvercle en acier inoxydable (préinstallé) 1 BB Support inférieur 1
C Rondelle à maille 1 R Écrou (préinstallé) 1 CC Vis et rondelles 3
D Clapet de non-retour (préinstallé) 1 S Colonne de douche 1 DD Bande de recouvrement en aluminium 2
E Connecteur en laiton long (55mm) 1 T Bras de douche 1
F Connecteur en laiton court (28mm) 3 U Rondelle en caoutchouc (1/2po) (préinstallée) 1
G Rondelles en acier inoxydable 2 V Pomme de douche 1
H Support de xation en acier inoxydable 1 W Douche téléphone 1
J Écrou 1 X Clapet de non-retour (préinstallé) 1
K Restricteur 1 Y Tuy au 1
L Raccord en L (préinstallé) 1 Z Support de la douche téléphone (préinstallé) 1
M Raccord en L (préinstallé) 1 1 Jet de corps supérieur (préinstallé) 1
N Rondelle en caoutchouc (1/2po) 3 2
Jet de corps central et inférieur (préinstallé)
2
16
QB025 16
Page 17
Installation
S
T
R
T
M
N
V
T
U
T
R
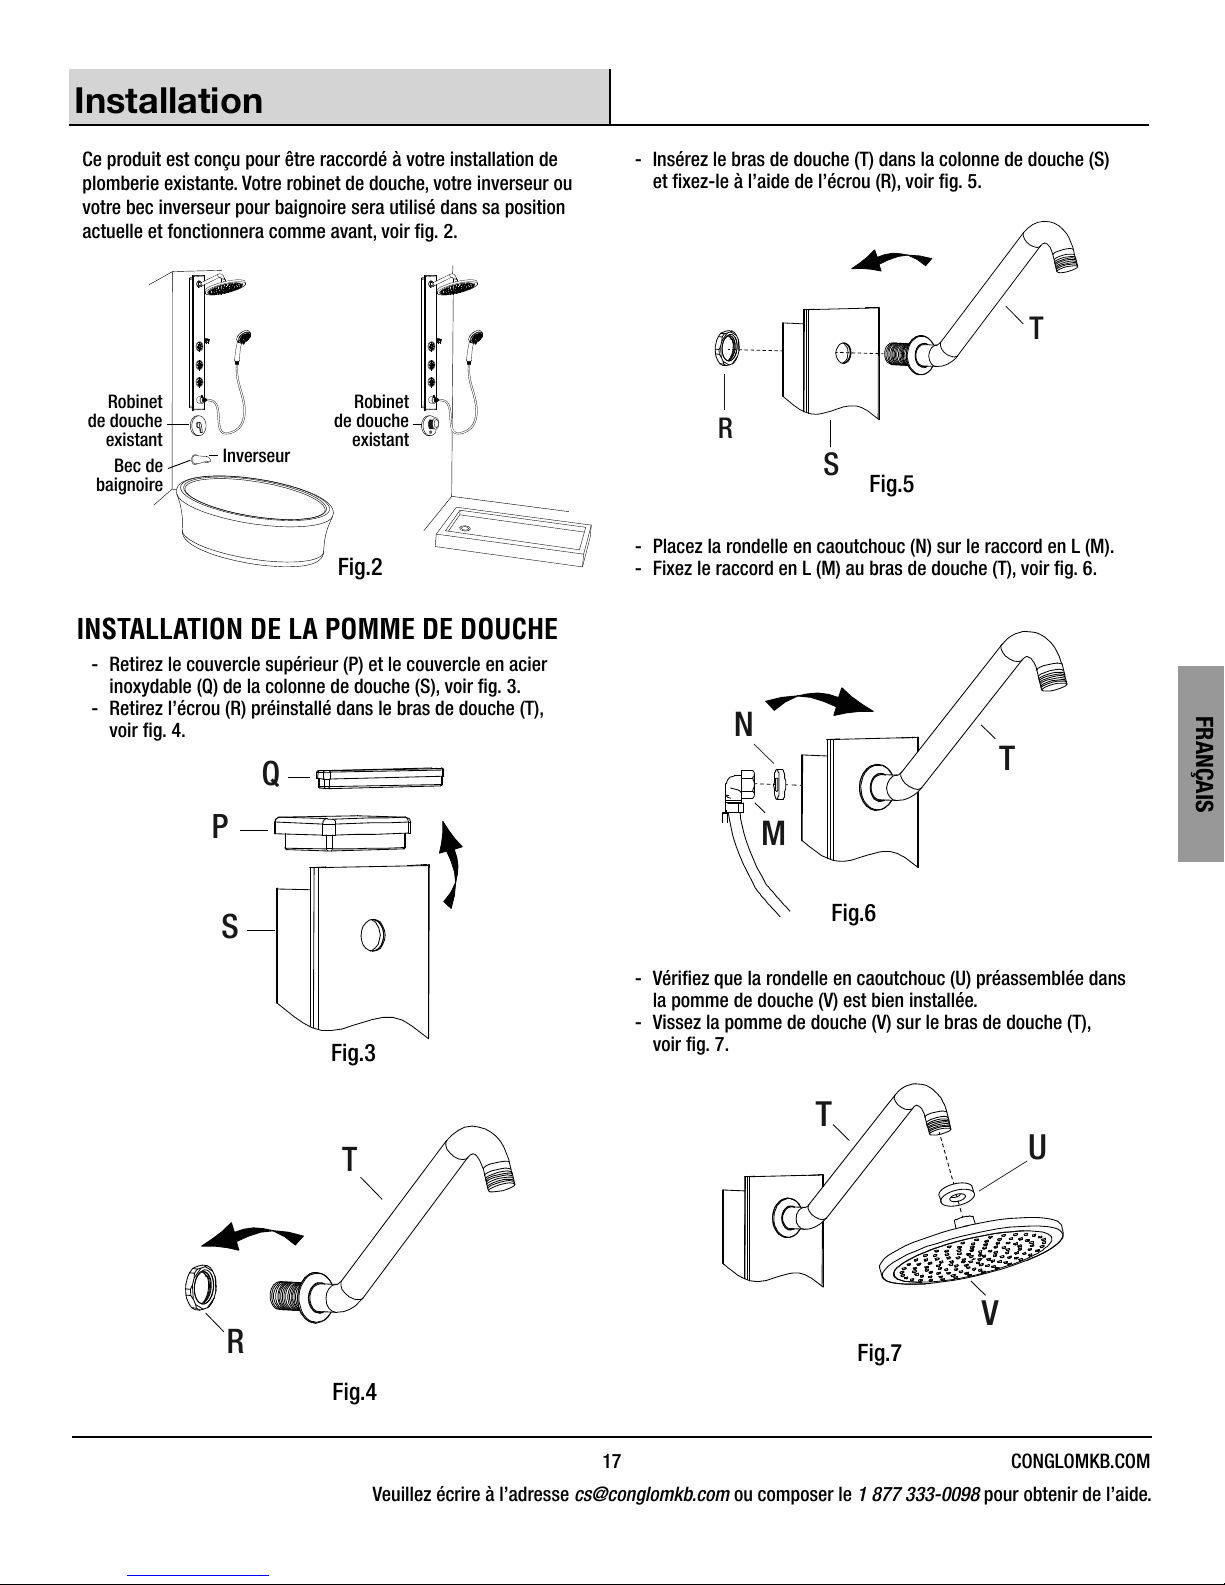
Ce produit est conçu pour être raccordé à votre installation de
plomberie existante. Votre robinet de douche, votre inverseur ou
votre bec inverseur pour baignoire sera utilisé dans sa position
actuelle et fonctionnera comme avant, voir g.2.
Robinet
de douche
existant
Bec de
baignoire
Inverseur
Robinet
de douche
existant
Fig.2
INSTALLATION DE LA POMME DE DOUCHE
- Retirez le couvercle supérieur (P) et le couvercle en acier
inoxydable (Q) de la colonne de douche (S), voir g.3.
- Retirez l’écrou (R) préinstallé dans le bras de douche (T),
voir g.4.
- Insérez le bras de douche (T) dans la colonne de douche (S)
et xez-le à l’aide de l’écrou (R), voir g.5.
Fig.5
- Placez la rondelle en caoutchouc (N) sur le raccord en L (M).
- Fixez le raccord en L (M) au bras de douche (T), voir g.6.
FRANÇAIS
Q
P
S
Fig.6
- Vériez que la rondelle en caoutchouc (U) préassemblée dans
la pomme de douche (V) est bien installée.
- Vissez la pomme de douche (V) sur le bras de douche (T),
Fig.3
Fig.4
voir g.7.
Fig.7
17 CONGLOMKB.COM
Veuillez écrire à l’adresse cs@conglomkb.com ou composer le 1877333-0098 pour obtenir de l’aide.
Page 18
Installation (suite)
1
3
2
Marquez le bras
de douche ici
3
Appliquez le ruban d’étanchéité à cette extrémité
23/16po (55,6mm)
D E
B
Préinstallé dans la pièceE
E
Marque sur le bras de douche
Marque sur le bras de douche
Extrémité
avec ruban
d’étanchéité
Alignez
ici
MINIMUM: 5/8po
MAXIMUM: 1-1/8po
MINIMUM: 5/8po
MAXIMUM: 1-1/8po
E
F
A
Alimentation
douche
Connecteur
en laiton
3
REMARQUE :
Assurez-vous que votre robinet de douche est fermé en tout
temps jusqu’à l’étape du test.
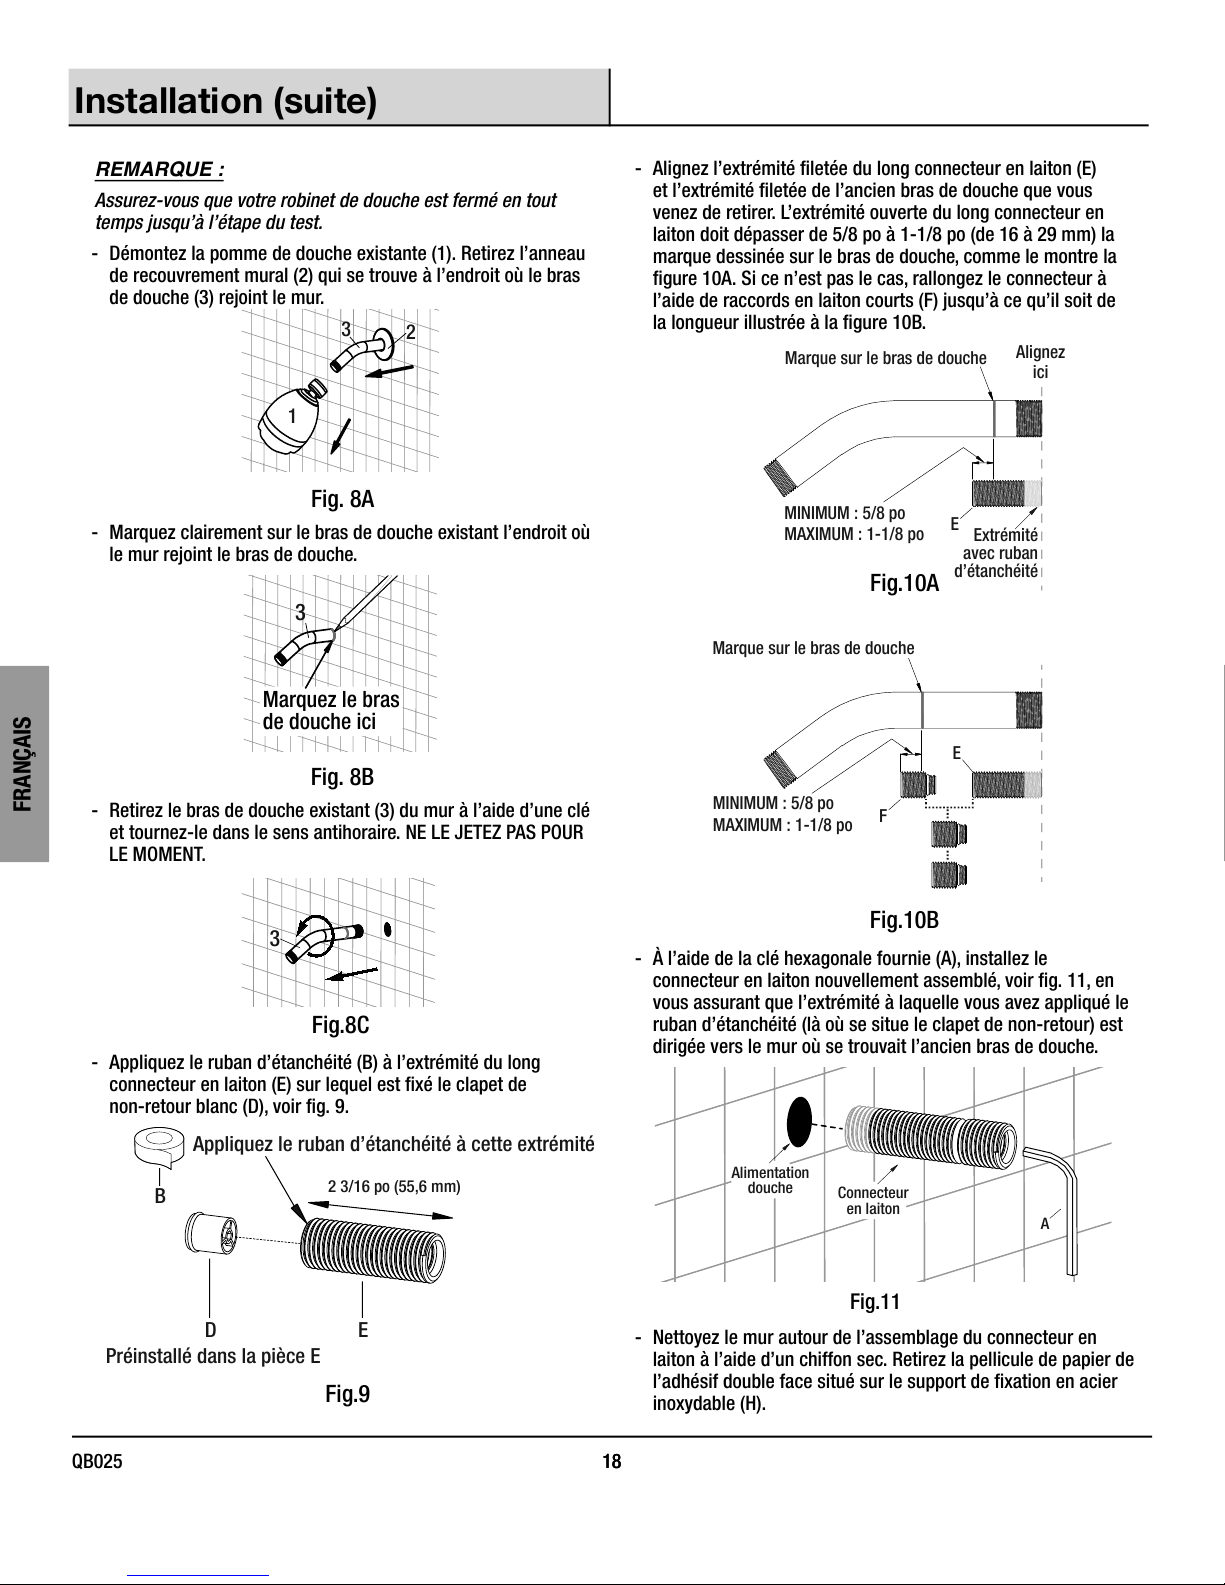
- Démontez la pomme de douche existante (1). Retirez l’anneau
de recouvrement mural (2) qui se trouve à l’endroit où le bras
de douche (3) rejoint le mur.
Fig.8A
Marquez clairement sur le bras de douche existant l’endroit où
-
le mur rejoint le bras de douche.
- Alignez l’extrémité letée du long connecteur en laiton (E)
et l’extrémité letée de l’ancien bras de douche que vous
venez de retirer. L’extrémité ouverte du long connecteur en
laiton doit dépasser de 5/8po à 1-1/8po (de 16 à 29mm) la
marque dessinée sur le bras de douche, comme le montre la
gure10A. Si ce n’est pas le cas, rallongez le connecteur à
l’aide de raccords en laiton courts (F) jusqu’à ce qu’il soit de
la longueur illustrée à la gure10B.
Fig.10A
Fig.8B
FRANÇAIS
Retirez le bras de douche existant (3) du mur à l’aide d’une clé
-
et tournez-le dans le sens antihoraire. NE LE JETEZ PAS POUR
LE MOMENT.
Fig.8C
- Appliquez le ruban d’étanchéité (B) à l’extrémité du long
connecteur en laiton (E) sur lequel est xé le clapet de
non-retour blanc (D), voir g.9.
18
QB025 18
Fig.9
Fig.10B
- À l’aide de la clé hexagonale fournie (A), installez le
connecteur en laiton nouvellement assemblé, voir g.11, en
vous assurant que l’extrémité à laquelle vous avez appliqué le
ruban d’étanchéité (là où se situe le clapet de non-retour) est
dirigée vers le mur où se trouvait l’ancien bras de douche.
Fig.11
-
Nettoyez le mur autour de l’assemblage du connecteur en
laiton à l’aide d’un chiffon sec. Retirez la pellicule de papier de
l’adhésif double face situé sur le support de xation en acier
inoxydable (H).
Page 19
Installation (suite)
GH J
Alimentation
douche
Connecteur
en laiton
BB
221/2po (572mm)
Zone de xation
du support nettoyée
Alimentation douche
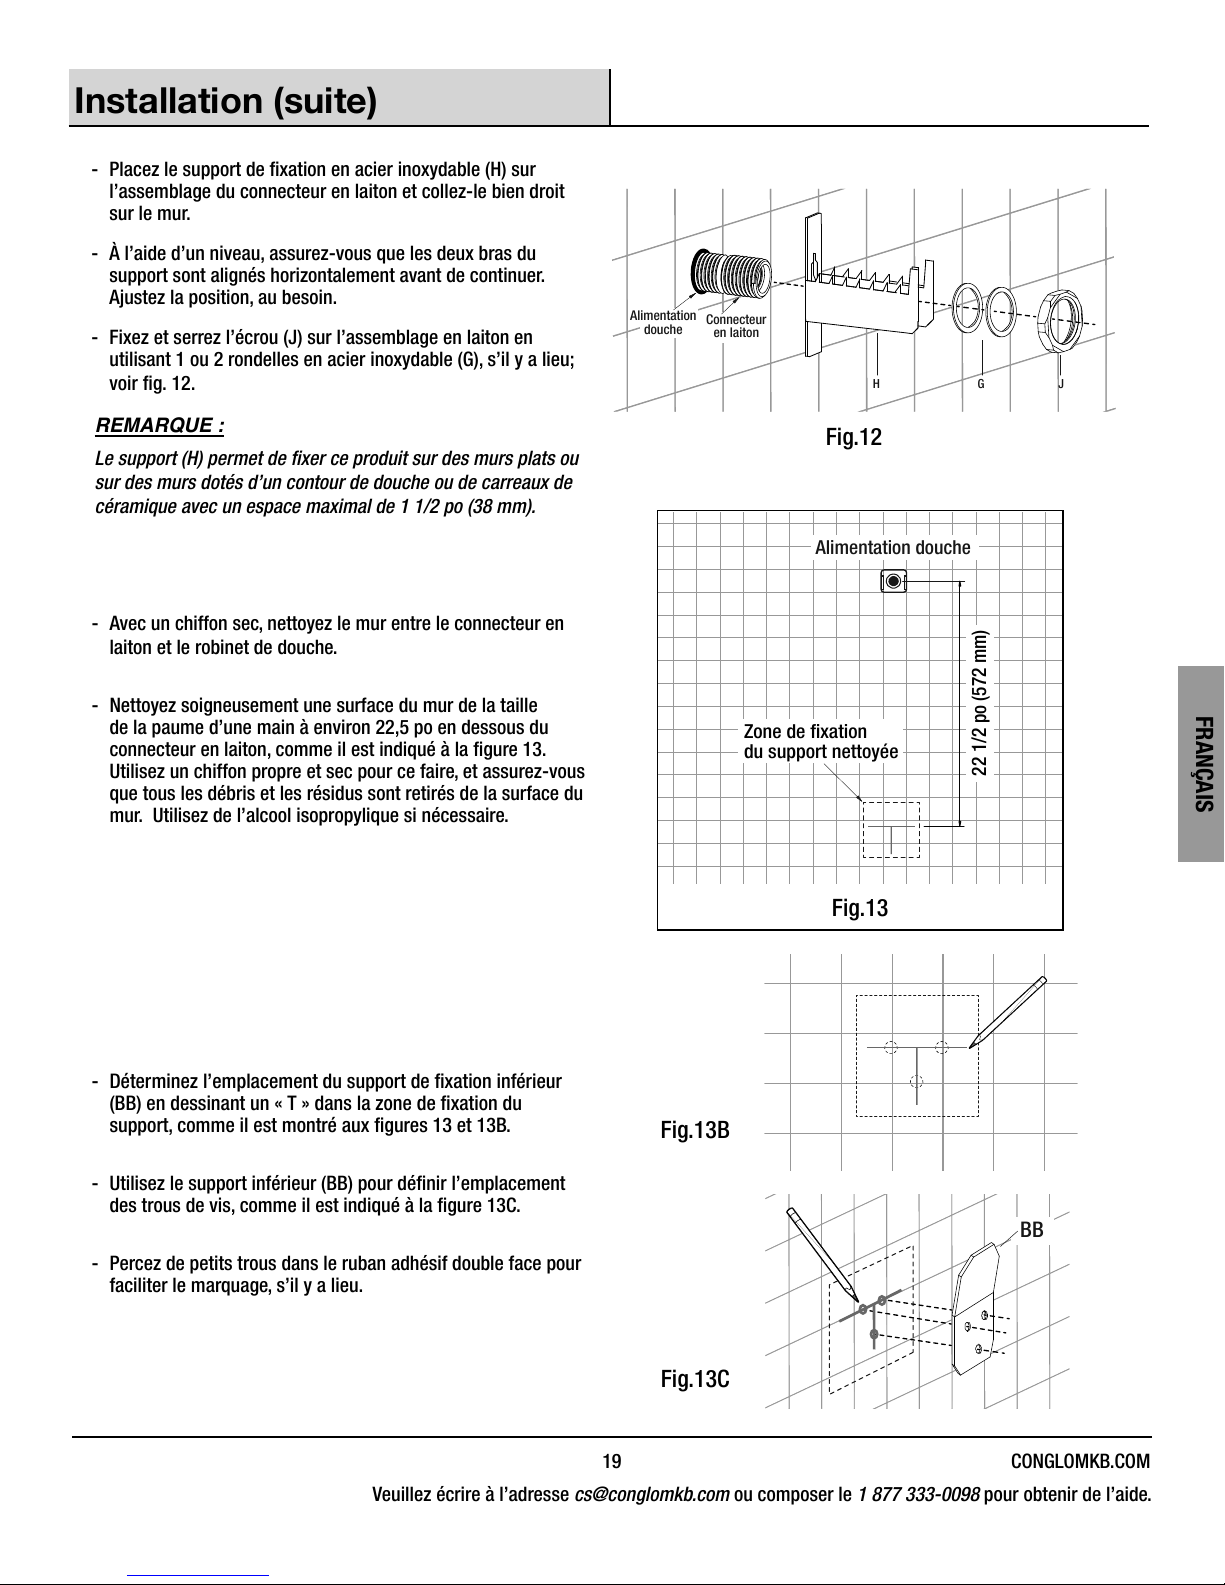
- Placez le support de xation en acier inoxydable (H) sur
l’assemblage du connecteur en laiton et collez-le bien droit
sur le mur.
- À l’aide d’un niveau, assurez-vous que les deux bras du
support sont alignés horizontalement avant de continuer.
Ajustez la position, au besoin.
- Fixez et serrez l’écrou (J) sur l’assemblage en laiton en
utilisant
voir g.12.
1 ou 2 rondelles en acier inoxydable (G), s’il y a lieu;
REMARQUE :
Le support (H) permet de xer ce produit sur des murs plats ou
sur des murs dotés d’un contour de douche ou de carreaux de
céramique avec un espace maximal de 11/2po (38mm).
- Avec un chiffon sec, nettoyez le mur entre le connecteur en
laiton et le robinet de douche.
- Nettoyez soigneusement une surface du mur de la taille
de la paume d’une main à environ 22,5po en dessous du
connecteur en laiton, comme il est indiqué à la gure13.
Utilisez un chiffon propre et sec pour ce faire, et assurez-vous
que tous les débris et les résidus sont retirés de la surface du
mur. Utilisez de l’alcool isopropylique si nécessaire.
Fig.12
FRANÇAIS
Fig.13
- Déterminez l’emplacement du support de xation inférieur
(BB) en dessinant un «T» dans la zone de xation du
support, comme il est montré aux gures 13 et 13B.
- Utilisez le support inférieur (BB) pour dénir l’emplacement
des trous de vis, comme il est indiqué à la gure13C.
- Percez de petits trous dans le ruban adhésif double face pour
faciliter le marquage, s’il y a lieu.
19 CONGLOMKB.COM
Veuillez écrire à l’adresse cs@conglomkb.com ou composer le 1877333-0098 pour obtenir de l’aide.
Fig.13B
Fig.13C
Page 20
Installation (suite)
Vis murales facultatives
AA BB CC
BB
Pressez
fermement
K
H
S
L
S
H
BB
1
2
REMARQUE :
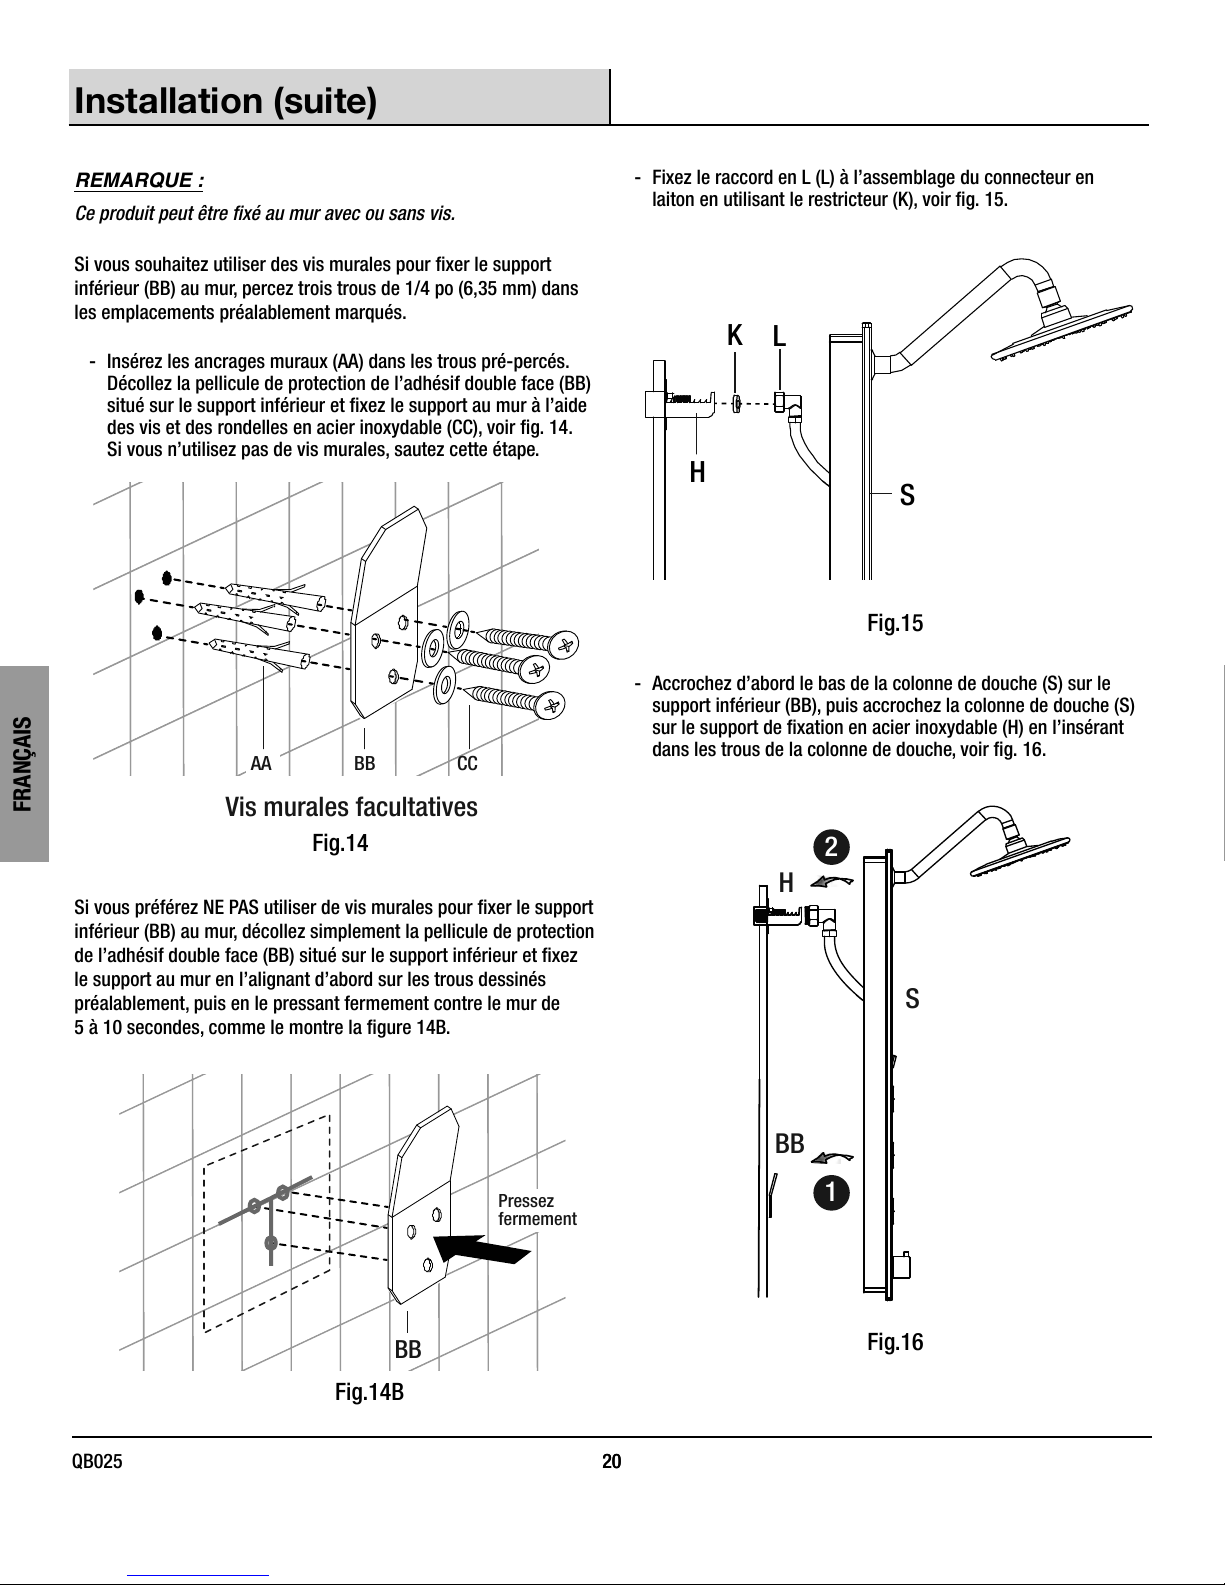
Ce produit peut être fixé au mur avec ou sans vis.
Si vous souhaitez utiliser des vis murales pour xer le support
inférieur (BB) au mur, percez trois trous de 1/4po (6,35mm) dans
les emplacements préalablement marqués.
- Insérez les ancrages muraux (AA) dans les trous pré-percés.
Décollez la pellicule de protection de l’adhésif double face (BB)
situé sur le support inférieur et xez le support au mur à l’aide
des vis et des rondelles en acier inoxydable (CC), voir g.14.
Si vous n’utilisez pas de vis murales, sautez cette étape.
FRANÇAIS
- Fixez le raccord en L (L) à l’assemblage du connecteur en
laiton en utilisant le restricteur (K), voir g.15.
Fig.15
- Accrochez d’abord le bas de la colonne de douche (S) sur le
support inférieur (BB), puis accrochez la colonne de douche (S)
sur le support de xation en acier inoxydable (H) en l’insérant
dans les trous de la colonne de douche, voir g.16.
Fig.14
Si vous préférez NE PAS utiliser de vis murales pour xer le support
inférieur (BB) au mur, décollez simplement la pellicule de protection
de l’adhésif double face (BB) situé sur le support inférieur et xez
le support au mur en l’alignant d’abord sur les trous dessinés
préalablement, puis en le pressant fermement contre le mur de
5 à 10secondes, comme le montre la gure14B.
Fig.14B
20
QB025 20
Fig.16
Page 21
Installation (suite)
DD
Distance
DD
DD
Distance
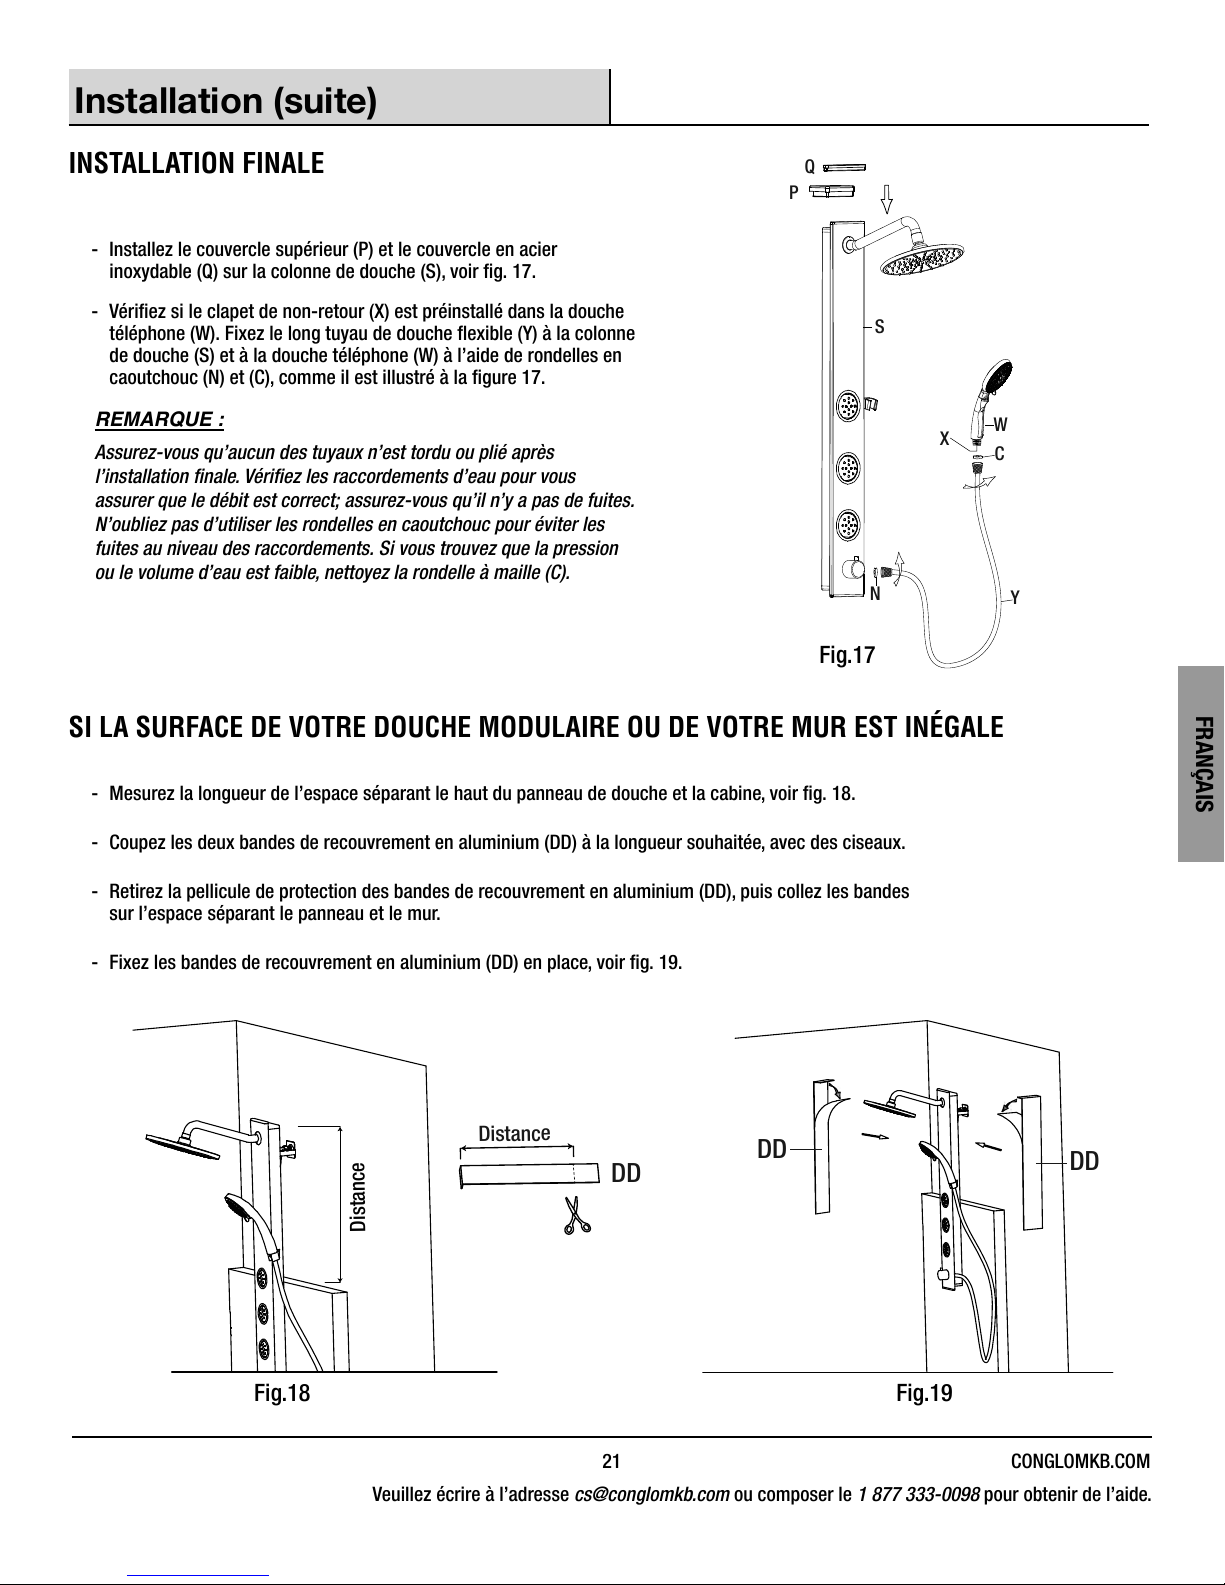
INSTALLATION FINALE
- Installez le couvercle supérieur (P) et le couvercle en acier
inoxydable (Q) sur la colonne de douche (S), voir g.17.
- Vériez si le clapet de non-retour (X) est préinstallé dans la douche
téléphone (W). Fixez le long tuyau de douche exible (Y) à la colonne
de douche (S) et à la douche téléphone (W) à l’aide de rondelles en
caoutchouc (N) et (C), comme il est illustré à la gure17.
REMARQUE :
Assurez-vous qu’aucun des tuyaux n’est tordu ou plié après
l’installation nale. Vériez les raccordements d’eau pour vous
assurer que le débit est correct; assurez-vous qu’il n’y a pas de fuites.
N’oubliez pas d’utiliser les rondelles en caoutchouc pour éviter les
fuites au niveau des raccordements. Si vous trouvez que la pression
ou le volume d’eau est faible, nettoyez la rondelle à maille (C).
Q
P
S
X
N
Fig.17
SI LA SURFACE DE VOTRE DOUCHE MODULAIRE OU DE VOTRE MUR EST INÉGALE
W
C
Y
FRANÇAIS
- Mesurez la longueur de l’espace séparant le haut du panneau de douche et la cabine, voir g.18.
- Coupez les deux bandes de recouvrement en aluminium (DD) à la longueur souhaitée, avec des ciseaux.
- Retirez la pellicule de protection des bandes de recouvrement en aluminium (DD), puis collez les bandes
sur l’espace séparant le panneau et le mur.
- Fixez les bandes de recouvrement en aluminium (DD) en place, voir g.19.
Fig.18
Fig.19
21 CONGLOMKB.COM
Veuillez écrire à l’adresse cs@conglomkb.com ou composer le 1877333-0098 pour obtenir de l’aide.
Page 22
Fonctionnement
Sélecteur Sélecteur Sélecteur
Sélecteur Sélecteur Sélecteur
1
2
5
6
4
3
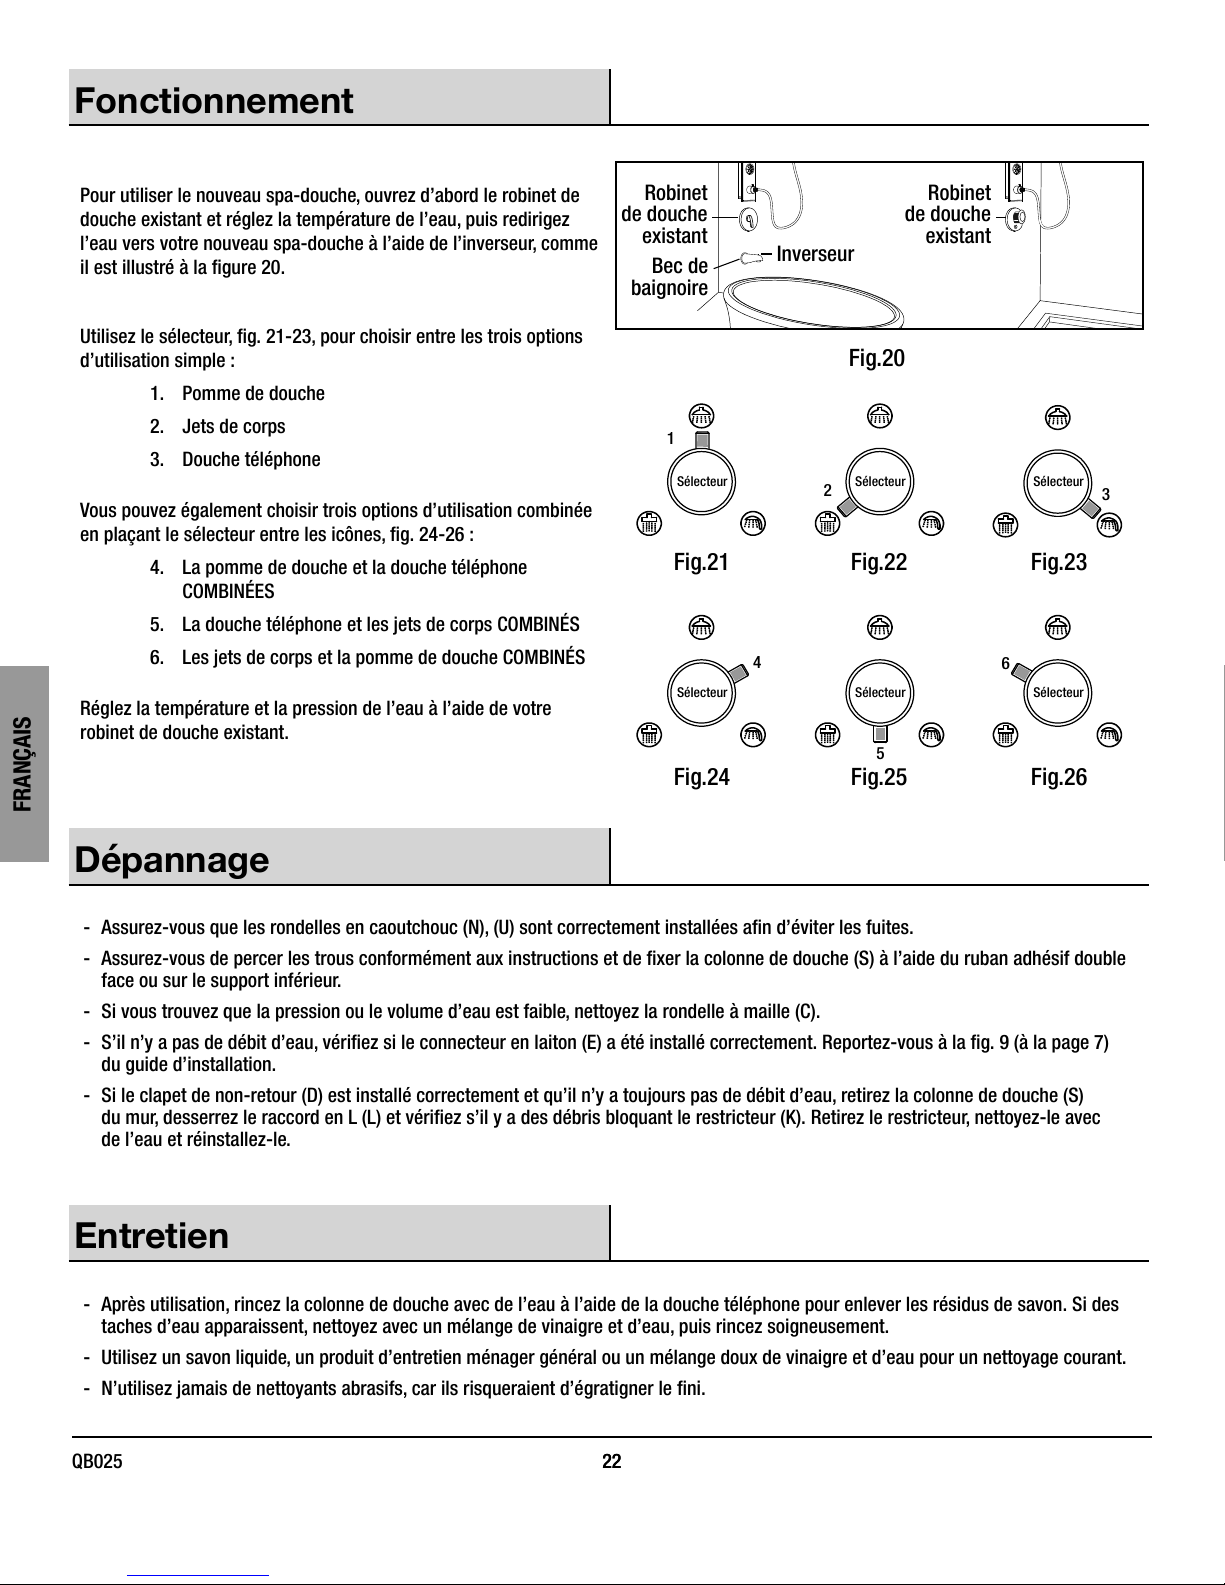
Pour utiliser le nouveau spa-douche, ouvrez d’abord le robinet de
douche existant et réglez la température de l’eau, puis redirigez
l’eau vers votre nouveau spa-douche à l’aide de l’inverseur, comme
il est illustré à la gure20.
Utilisez le sélecteur, g. 21-23, pour choisir entre les trois options
d’utilisation simple:
1. Pomme de douche
2. Jets de corps
3. Douche téléphone
Vous pouvez également choisir trois options d’utilisation combinée
en plaçant le sélecteur entre les icônes, g.24-26:
4. La pomme de douche et la douche téléphone
COMBINÉES
5. La douche téléphone et les jets de corps COMBINÉS
6. Les jets de corps et la pomme de douche COMBINÉS
Réglez la température et la pression de l’eau à l’aide de votre
robinet de douche existant.
Robinet
de douche
existant
Bec de
Inverseur
Robinet
de douche
existant
baignoire
Fig.20
Fig.21 Fig.22 Fig.23
FRANÇAIS
Dépannage
- Assurez-vous que les rondelles en caoutchouc (N), (U) sont correctement installées an d’éviter les fuites.
- Assurez-vous de percer les trous conformément aux instructions et de xer la colonne de douche (S) à l’aide du ruban adhésif double
face ou sur le support inférieur.
- Si vous trouvez que la pression ou le volume d’eau est faible, nettoyez la rondelle à maille (C).
- S’il n’y a pas de débit d’eau, vériez si le connecteur en laiton (E) a été installé correctement. Reportez-vous à la g.9 (à la page7)
du guide d’installation.
- Si le clapet de non-retour (D) est installé correctement et qu’il n’y a toujours pas de débit d’eau, retirez la colonne de douche (S)
du mur, desserrez le raccord en L (L) et vériez s’il y a des débris bloquant le restricteur (K). Retirez le restricteur, nettoyez-le avec
de l’eau et réinstallez-le.
Entretien
- Après utilisation, rincez la colonne de douche avec de l’eau à l’aide de la douche téléphone pour enlever les résidus de savon. Si des
taches d’eau apparaissent, nettoyez avec un mélange de vinaigre et d’eau, puis rincez soigneusement.
- Utilisez un savon liquide, un produit d’entretien ménager général ou un mélange doux de vinaigre et d’eau pour un nettoyage courant.
- N’utilisez jamais de nettoyants abrasifs, car ils risqueraient d’égratigner le ni.
Fig.24 Fig.25 Fig.26
22
QB025 22
Page 23
Pièces de rechange
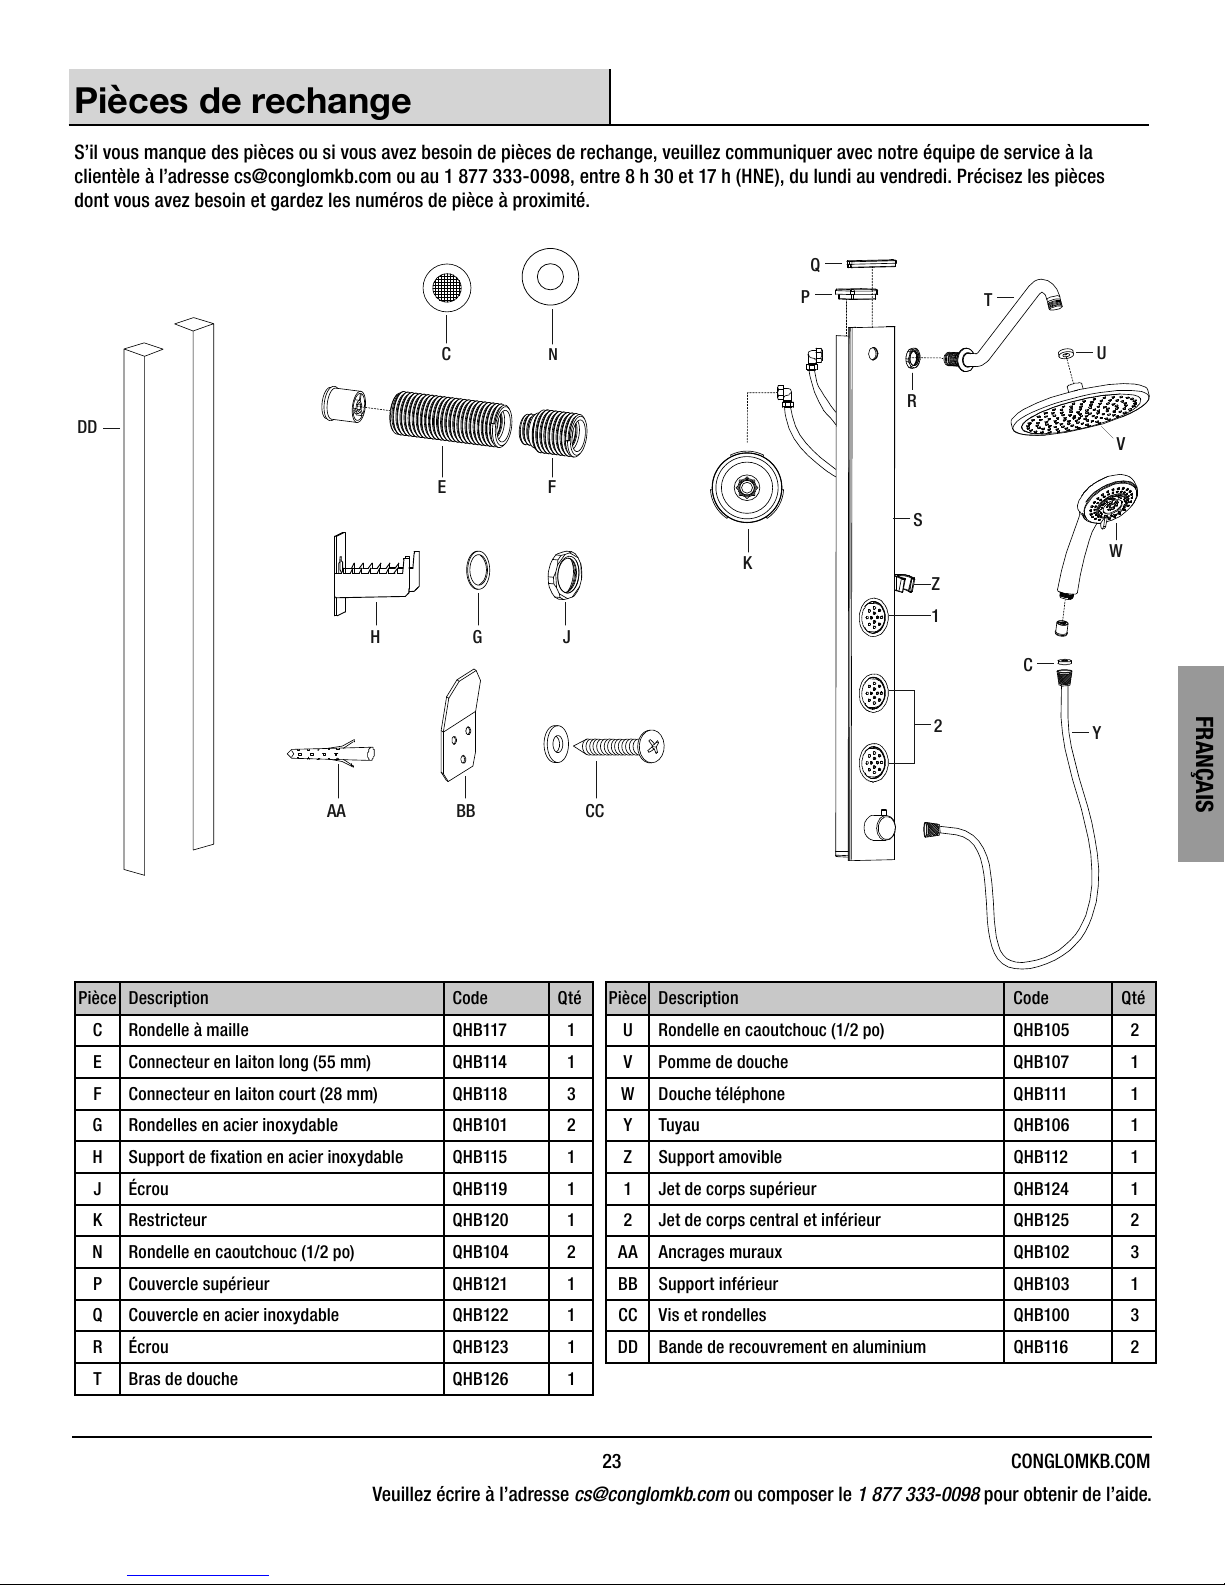
S’il vous manque des pièces ou si vous avez besoin de pièces de rechange, veuillez communiquer avec notre équipe de service à la
clientèle à l’adresse cs@conglomkb.com ou au 1877333-0098, entre 8h30 et 17h (HNE), du lundi au vendredi. Précisez les pièces
dont vous avez besoin et gardez les numéros de pièce à proximité.
Q
P
T
DD
C
E F
H
AA BB CC
G
N
J
U
R
V
S
K
Z
1
C
2
W
FRANÇAIS
Y
Pièce Description Code Qté Pièce Description Code Qté
C Rondelle à maille QH B117 1 U Rondelle en caoutchouc (1/2po) QHB105 2
E Connecteur en laiton long (55mm) QHB114 1 V Pomme de douche QHB107 1
F Connecteur en laiton court (28mm) Q HB118 3 W Douche téléphone QH B111 1
G Rondelles en acier inoxydable QHB101 2 Y Tuyau QHB106 1
H Support de xation en acier inoxydable Q HB115 1 Z Support amovible QHB112 1
J Écrou QH B119 1 1 Jet de corps supérieur QHB124 1
K Restricteur QHB120 1 2 Jet de corps central et inférieur QHB125 2
N Rondelle en caoutchouc (1/2po) QHB104 2 AA Ancrages muraux QHB102 3
P Couvercle supérieur QHB121 1 BB Support inférieur QHB103 1
Q Couvercle en acier inoxydable QHB122 1 CC Vis et rondelles QHB100 3
R Écrou QHB123 1 DD Bande de recouvrement en aluminium QH B116 2
T Bras de douche QHB126 1
23 CONGLOMKB.COM
Veuillez écrire à l’adresse cs@conglomkb.com ou composer le 1877333-0098 pour obtenir de l’aide.
Page 24
Imported by / Importé par :
St-Laurent, Québec, H4S 2C3
1-877-333-0098 | [email protected]
(service available in English and French, Monday - Friday from 8:30 am - 5:00 pm EST)
(service disponible en anglais et français, du lundi au vendredi, 8h30 à 17h, H.N.E.)
www.conglomkb.com
Made in China / Fabriqué en Chine
Retain this manual for future use.
 Loading...